Blackie
-
Posts
102 -
Joined
-
Last visited
Content Type
Profiles
Forums
Gallery
Events
Everything posted by Blackie
-
 A pleasure Lou. I have been off the air for about a week due to a failed modem. I also am working on the bow sprit and foremast rigging. I have served some stays and have just completed a few connections for the bob stays and bowsprit shrouds so let's stay in touch. Blackie
 -
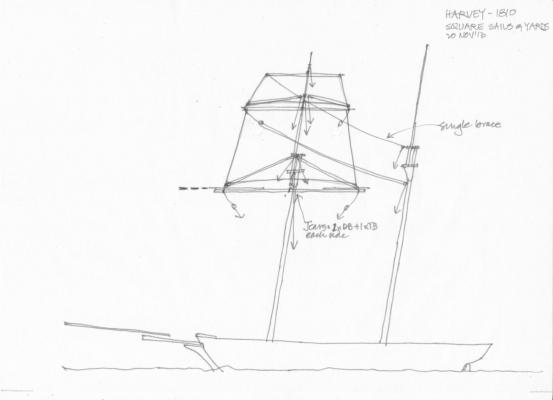
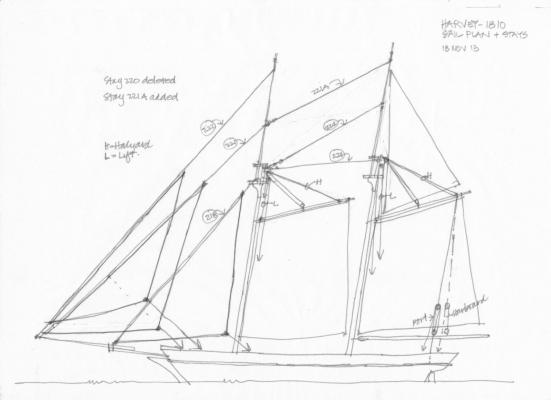
Yes Floyd and I have now done a drawing for the square sails. I also had a rethink on the fore and aft sails and the stay #224. It interfered with hoisting the main gaff topsail using sail hoops rather than another gaff set vet high on the main mast. I have added another sketch.

- 88 replies
-
- 2
-

-
- harvey
- artesania latina
- (and 1 more)
-
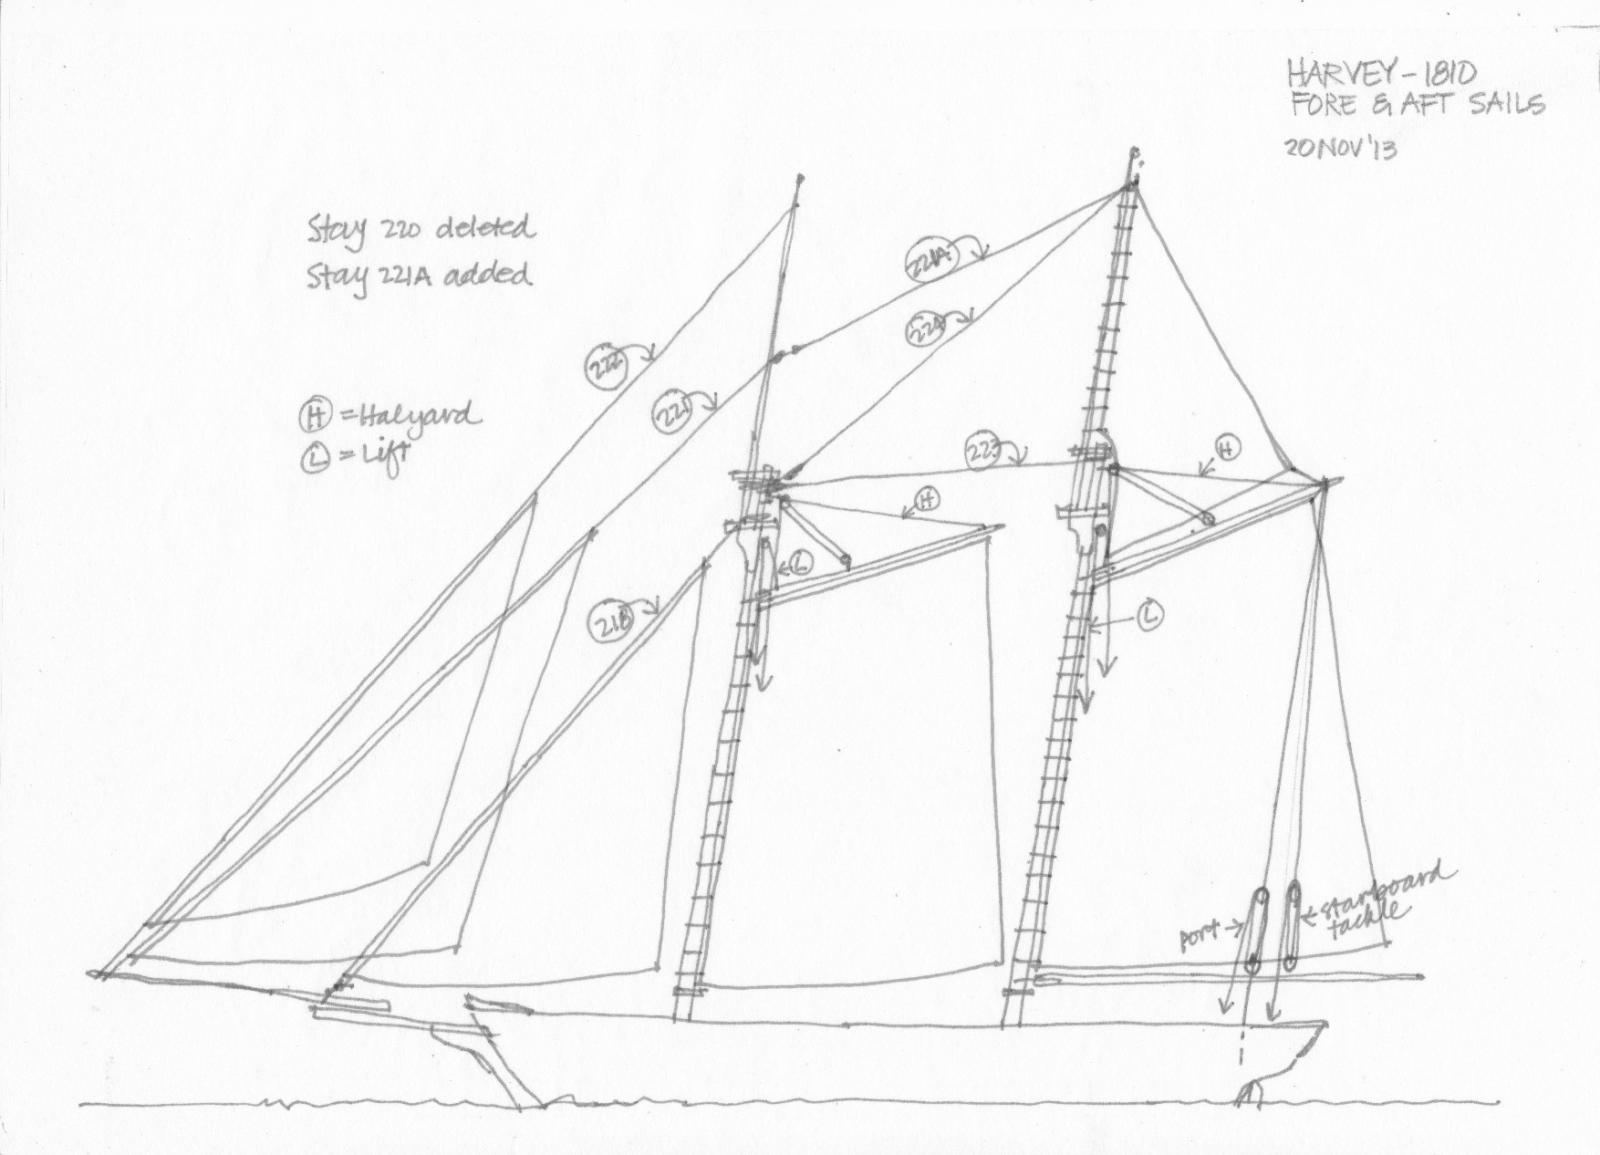
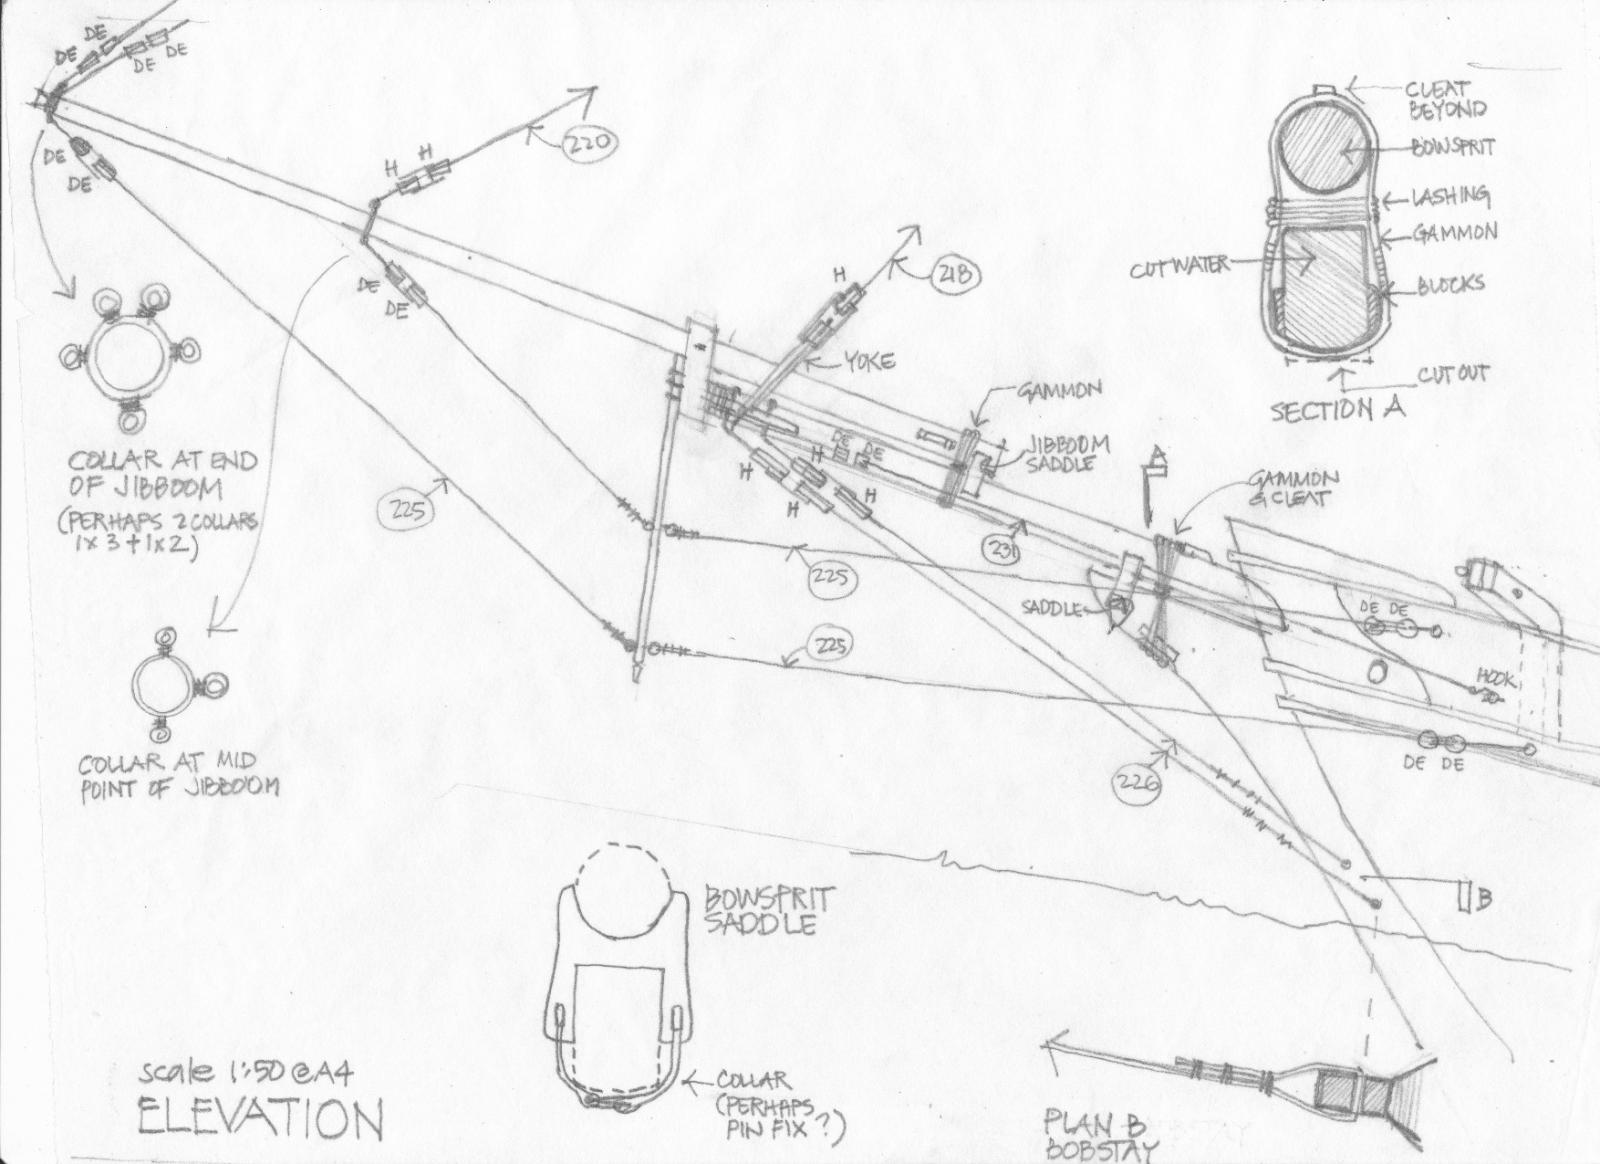
I have decided on the fore and aft sail plan as below and the relevant stays. Three head sails and the stays which I believe to be about the correct year of 1810. The POB rigs are a little different and I can't see their like in my sketches of old schooners. Kit stay # 220 from the centre of the jibboom has been deleted and the martingales adjusted to suit. I have also settle on the fixings at the foremast head which will be eyebolts passing through the mast for strength and simplicity. The latter objective seems to me to be something that the BC builders would have aimed for when you look at when and where they were built - metal straps and brackets were all more material and more working of metal that they would have found difficult.
- 88 replies
-
- 1
-
-
- harvey
- artesania latina
- (and 1 more)
-
I am working out the sail plan and a while ago I had decided to go with 3 headsails rather than the 4 shown in the kit drawings. I remain of that opinion and have again read the comments in my POB book which says that the BC had only 3 large headsails to not impede the driving power of the sails in that area. So far so good. However, I went back to my sketch of the bowsprit rigging (uploaded above) and now think that the stay shown as #220 (fore preventer stay) should be deleted. The POB book does not refer to it and the sail plans for the POB I and POB II have no sail on it. Further, in my source books this stay is only shown when the jibboom is very long, say twice the length of the bowsprit. In my Harvey the jibboom length beyond the bowsprit cap is about the same length as the bowsprit projecting beyond the bow. I think that I will delete this stay and move the martingale connected at that point out to the end of the jibboom. Any help/comments will be appreciated.
-
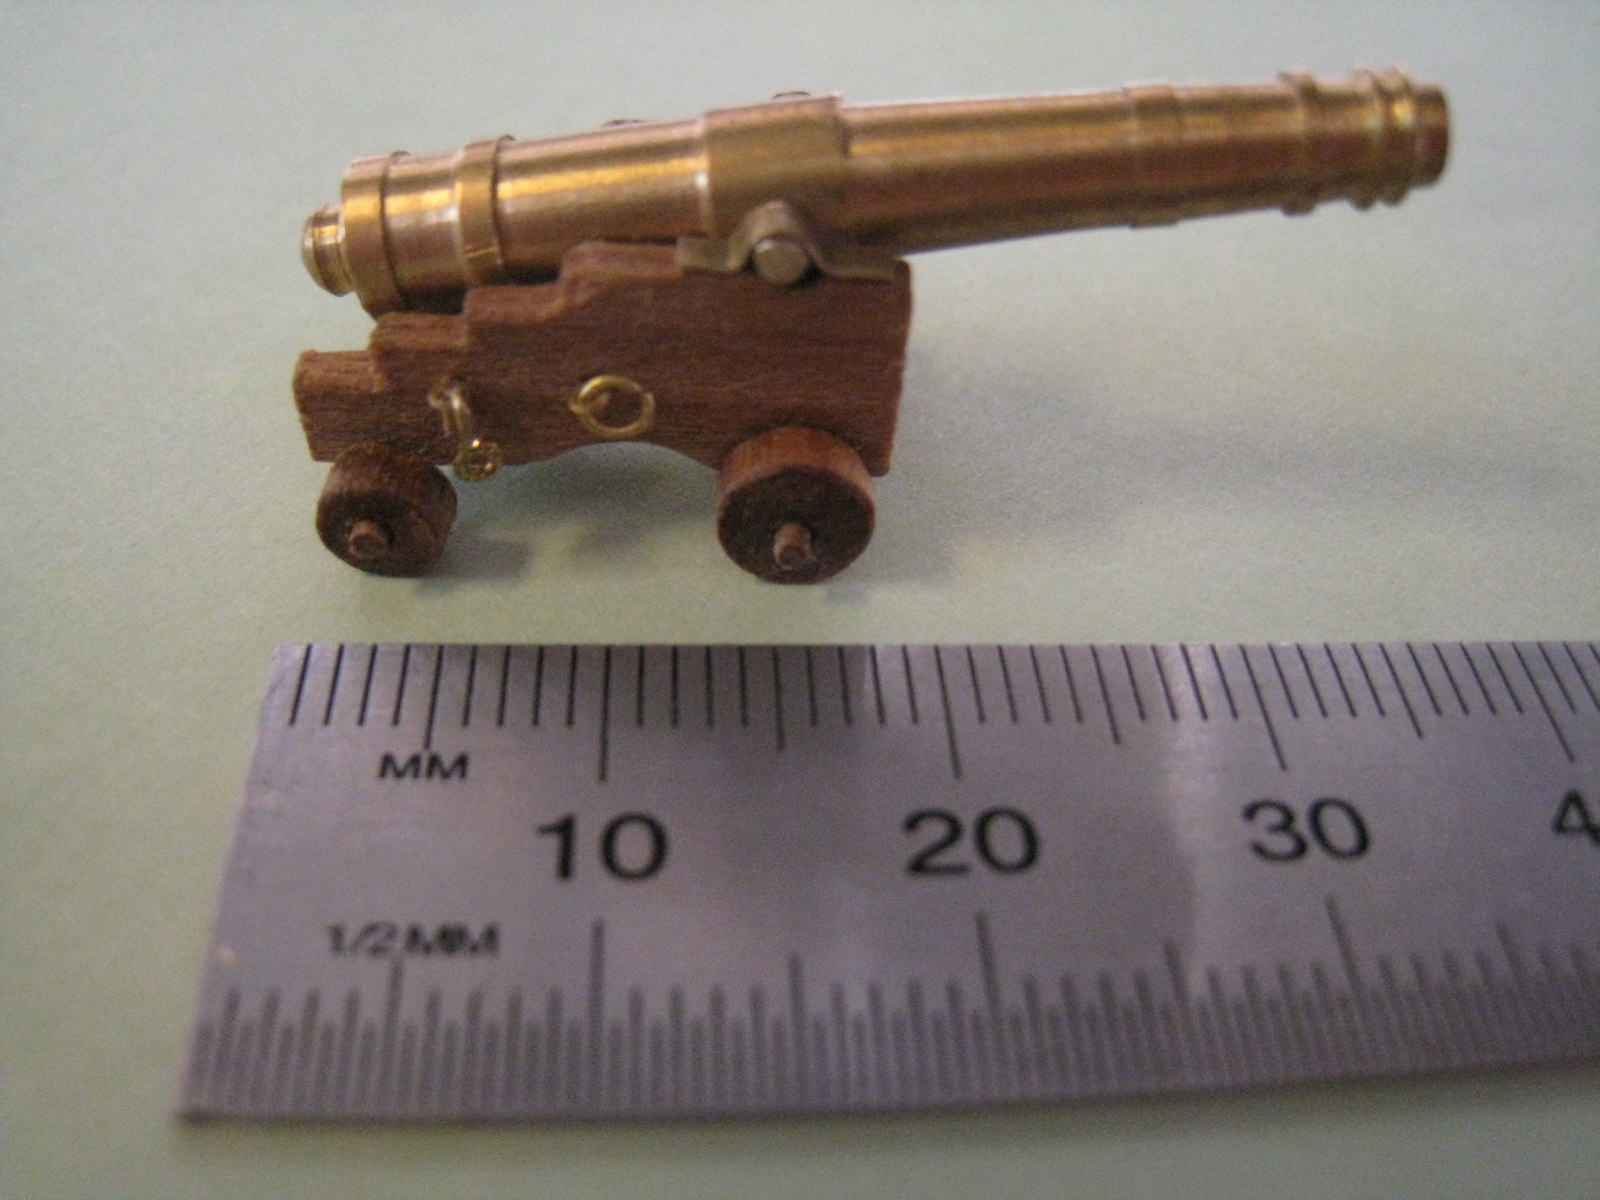
In between other jobs I have been making my own cannon carriages but have reused the kit cannons. I have assembled two so far and am going crazy making the hooks for the tackles. One of them is in the attached file.

- 88 replies
-
- 2
-
-
- harvey
- artesania latina
- (and 1 more)
-
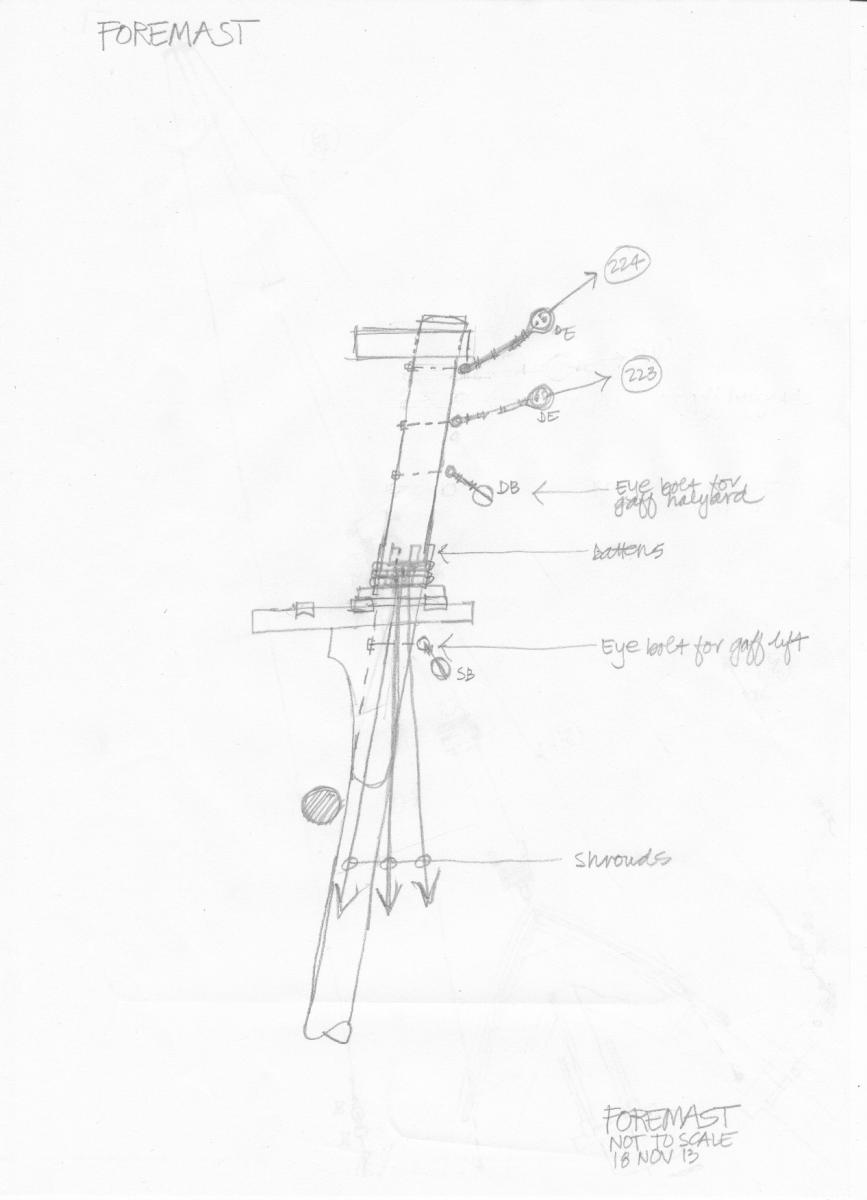
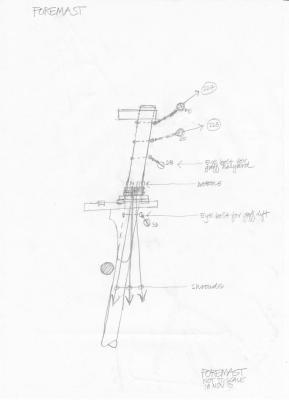
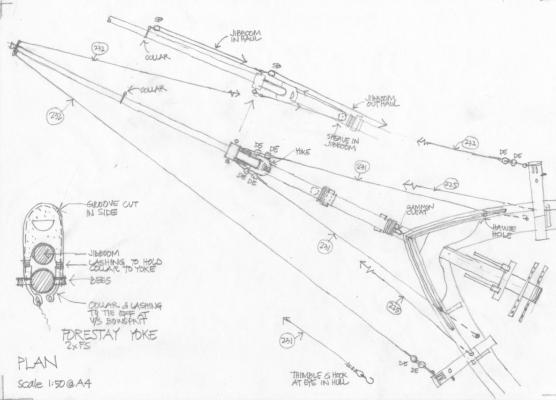
Lou I can't see why we would not share our thoughts and research in this hobby - I need all the help that I can get. I have modified my earlier bow drawing to include a sketch of my yoke and the collar that will sit in the groove and the thimbles are lashed together below the bowsprit to hold it firm against the bees. Like most of my kit after the hull, I didn't like the kit yoke and made my own from a walnut plank and added the groove to take the collar. My foremast now and the yet-to be made mainmast have trestle trees and cross trees and definitely no fighting top according to the books and sketches that I am looking at. I have been drawing all over the earlier mast drawing and have worked out some sketches of what I want to do for working stay tackles. halyards and various collars, etc. The mast drawing is a mess and too large to scan but I could perhaps draw bits of it onto A4 size and show the changes - I probably need to do that just for me anyway. I'll post it when I do it. A lot of my rigging and fittings come out of a few books including The Global Schooner by Karl Heinz Marquardt. He has done a few AOS books as well as the one on schooners. I also use a few Charles Davis books and of course the POB boats as examples if I think the item is true to 1810 - the year I am trying to stick to. No plans to draw ships - too many curves! Do you have a connection to the Ardent class? I am interested in the 74 gun HMS Revenge which fought at Trafalgar. One of my ggg grandfathers (William Robinson aka Jack Nastyface) served on board for 6 years including Trafalgar before he deserted. I will send the spreadsheet and some other sketches to your email address. Blackie
-
Lou You are welcome to anything. Attached are some revised sketches of what I am doing (thinking?) They are updates of the earlier versions and are more accurate re length of spars and where I think the rigging is going. Note the saddle between the bowsprit and cutwater to allow the gammon lashing to get through the gap. It is important to tighten the gammon as it takes so much strain and the saddle will also support the bowsprit, especially side to side. I also have a spreadsheet of rigging sizes plus hearts, blocks and dead eye sizes that I am using if you are interested.

-
Lou I had not realised that anyone much was interested in the drawings except perhaps Floyd. Since I first uploaded them I have been modifying them a bit so as you asked I will add the revised images to my log for you. Obviously as I will upload them you are most welcome to use them in any way you wish. Since I first did them I have retired and no longer have easy access to a really big scanner. I need to redraw a couple to eliminate the scribbles and then scan to A4. I should be able to do it in a day or two. I asked about the bowsprit gammon as I couldn't see how I could do the final lashing to tighten the gammon as there is no gap between cutwater and bowsprit in my model. However, I have now decided to add a spacer between the cutwater and bowsprit just like I have between the bowsprit and jibboom and this will solve two problems for me. The gap created will allow the lashing to be wrapped around the gammon and the extra steeve of the bowsprit will make it a little easier for me to get the bowsprit shrouds to angle down rather than up or inline with the bowsprit. I will do a drawing of what I mean and add it to my log. Blackie
-
Hi Lou Thanks for your comments on my log. Your build is looking really good. I too have abandoned my kit and really do like your windlass. I have been tossing up for a while whether or not to redo mine. What are you doing for the bowsprit gammoning which is one of the next things for me to do as I start on the rigging? I am unsure how it would wrap/tie around the stem and be tied off. I have done some drawings of the rigging and will get going as soon as some materials arrive. Blackie
-
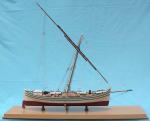
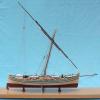
I am just adding an image of some of the fittings that I have been working on. The rigging will be the bobstays and they were made by twisting copper wire to form a strand of the required diameter and then serving the strand with cotton thread. The yard is the lower foremast yard. All comments are welcome.
- 88 replies
-
- 2
-
-
- harvey
- artesania latina
- (and 1 more)
-
Thanks Floyd I will wait to see your comments. Meanwhile on my Harvey I have moved onto the spars and rigging and I have developed an Excel spreadsheet to enter and calculate rigging sizes from real ship to model sizes. It also shows locations, numbers and sizes of hearts, dead eyes and blocks. It is still a work-in-progress but I would appreciate any comments, so can I send it to you? Blackie
-
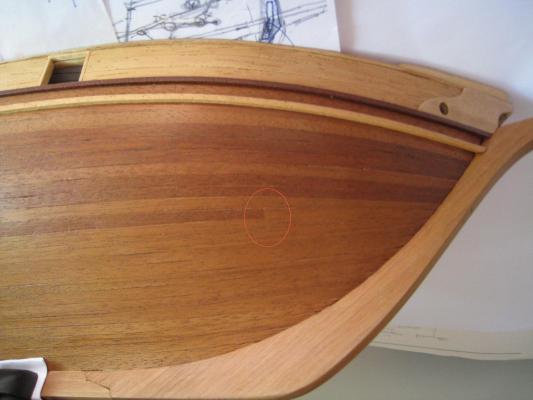
Your run of bottom planks to the stern looks OK but it does look as though the unplanked gap at the stern is a little less than at say frames 7 & 8 so you might need to taper – it could just be the angle of the shot. I have looked closely at my Harvey and see that right at the stem the second plank is tapered by half, as is the next one down. I also remember that I had to apply a little “force” to get them to follow the curve and to sit neatly against its neighbour and flat on the hull. I was getting the same problem that you have outlined – planks rising up the hull. Can I ask you to define “spile”? Not a word with which I am familiar but assume you mean taper.
-
Floyd This is what I did when I planked my Harvey: I fitted the garboard strake then the first plank down from the wales, which is a full width plank. I divided the rest of the hull into two (some do three) by fitting a batten at about the halfway line. The batten is fitted with planking screws so that it can be easily removed. This batten is located where it fits best as the run of the plank takes it but still be about halfway over the length of the hull. The two sections to be planked are treated much the same as follows: At each frame I measure the length of the hull between the batten and the top or garboard strake. I used a flexible dressmaker’s tape to do this. My planks were 5.5mm wide so I divided the hull lengths by 5.5 to get the base number of planks in each section. No plank can be less that half its full width when it reaches the stem and this could have a bearing on the number of planks. Every plank was supposed to run from stern to stem so I used proportional dividers over each length to determine the plank width at each frame. I transferred the calculated plank dimension to the plank at each frame mark and cut it to create a tapered plank. After each plank was fitted I remeasured the length at each frame and used the dividers (adjusted to the new total number) to find the plank widths for the next plank. They fitted reasonably well but the walnut planks have a strong grain that can have a mind of its own and I needed to be careful to not allow the grain to determine the cut line. The widest length on the Harvey is at the stern but otherwise it is about 1/3 from the stem. This can give you a plank that widens then narrows slightly before widening out to its full length at the stern. Of course the best laid plans and all that went astray – as the gaps narrowed I realised that I could not fit in all of the planks without reducing past the no-go “half width” point. I must have been cutting the planks at the stem a little wider that they have should been. I was going to have to drop out a plank or two. So to finally answer your question, there is no exact point at which to stop the plank. From memory I chose a point near the stem where 3 tapered planks would be about equal in width to 2 full planks (perhaps a little less, say 1¾) and still allow 2 of the 3 planks to run to the stem and finish about half width to look about right with the others already there. In my case this point is a little over half way from the keel to the wale and about 55-60mm from the stem at that line.
-
It is so long ago since I laid the first plank layer that I forget exactly what I did. However, from memory I know that I did not cut any rabbet but did have the stem projecting past the first layer of planks to fit the second layer into. I guess I had a sort of ready-made rabbet. On my Harvey I am slowly working on the foremast yards. I have decided to add studdingsail booms to the lower yard and am now making some boom irons - fiddly work! Hopefully I can soon start to assemble the catheads, bowsprit, jibbom and foremast plus the relevant rigging.
-
Floyd I have attached a few shots of my Harvey plus the drawing to illustrate what I did. I have 22 planks at about the centre from bow to stern and these run from bow to stern, except where 3 planks change to 2 as shown in one of the photos (Harvey Bow). That means I have 21 planks at the bow. The main thing is to not taper the plank more that half its width. At the stern I have 25 planks. This should not have happened. I probably could have done it with 23-24 but I must have over-tapered and 3 stealers were inserted. I tried to do the system in chapter 3 of Donald Dressel's book Planking Techniques for Model Ship Builders but lost my way a bit. Still, I'm pretty pleased with the result. The drawing I have attached is from Historic Ship Models by Wolfram Zu Mondfeld.

-
Hi Floyd I know how you feel about the planking - it is a really tough time!! I took months of real time to get the second layer onto my Harvey and I won't bore you with the process now as you are well into it. However, I might say that you perhaps will need to start tapering the lower planks at the bow a few planks sooner. In my case I pretty much tapered every plank at the bow except for the garboard plank and first plank below the wale. That said, I hear you about removing planks, so to avoid that again you could try to fit stealers by stopping some planks short of the stem and cut the next one into and over it. Depending on the "distance" between the fitted planks at say frame 2 and frame 7 you could figure out the necessary taper and perhaps only one plank needs to stop short and still not taper more that half of the other plank widths. I had to add in a few stealers at the stern of my Harvey which you can probably see in my log photos. I could send you a sketch if all of that does not make sense. How about a photo of your repaired knee?
-
I am back home and slowly getting back to the model. I still have lots to do and am jumping around a bit but one of the things I am looking at is the fixing for the sheet for the mainmast gaff sail. I do not like the model option of a ring bolt in the transom rail - it seems too flimsy to take the force. Drawings and a replica built in Tasmania for a 19th C schooner use a horse. I my case this would be about 800mm above the deck and say 1000mm wide to clear over the tiller. Does anyone know what else could be used? I can think of say fixing a timber across the transom frames to take the load of a central ring bolt. The Pride of Baltimore 1 had a ring bolt fitted to two transom frames on both sides of the boat but in the Harvey this would mean the sheet rubs on the bulwark. Should I put this on another forum? Blackie
-
Thanks Daniel for the comments. Do you mean the fid? A square or rectangular section of timber that passes through the mast to rest on the trestletrees. If so it is in the photos. If that is not it, can you explain further what you mean. Since taking the photos I have also fitted a sheave to take the lift of the lower yard. I can't add any pictures just now as I am travelling but will try to remember when I return home in October and have started on the yards. Blackie
-
Hi Floyd Thanks for the comments. Every source that I have show these vessels with tillers rather than wheels. The tillers appear to be about 7 to 9 feet long. Pride of Baltimore I had a tiller. However, I take your point and I believe that only the smaller vessels would have been steered by hand. So I will be adding steering tackle from the tiller to blocks on the deck or bulwarks which would add purchase to the operation of the tiller. I also intend to add two rudder pendants when the rudder is fitted permanently. I am unsure what you mean by "blacken the eyes". Mostly this model will be clear finished timber and unpainted brass for the metalwork. I am now thinking of removing the metal band around the mast cap and adding eyebolts to take the various blocks, etc.
-
Bob The attached image shows the "cradle" that I made to overcome the slight list that the model developed. The cradle, made from some scrap timber, sits away from the model and allows a good view of the hull but supports it also. Perhaps I should have accentuated the list as the model has some "sails" but I didn't. Good luck

-
I also needed a cradle for one of my models when the pedestals failed to keep it completely vertical. However, as Bob said it is an opportunity to be creative and produce something in keeping with the model form, which in my case I think I achieved. Depending on the type of ship, another form of support is to set the model as if it is in a dry dock sitting up on the support blocks. This creates a very stable support and can be an interesting option.
-
I am now working on the masts. The bowsprit, jib boom, foremast and fore topmast are advanced with assorted bits for support all fitted with blu-tack so far as shown in the images. I am a little puzzled by the way to attach blocks and stays to the mast cap. I have made a strap to fit around the mast cap with tabs to which the fittings will be attached. However, I am unsure if this is correct. Perhaps a few eyebolts is what should be fitted. Any comments? I also made a rudder and tiller rather than use the kit versions - images are attached.


- 88 replies
-
- 4
-
-
- harvey
- artesania latina
- (and 1 more)
-
I am building a Harvey by AL, am doing my own thing and I am now up to the masts. I started with the bowsprit, jib boom and the foremast having looked at a reasonable number of references. I think I have the mast head correct but am open to comments please. However, I am a bit puzzled by what to do for the mast cap and the fixing of blocks for the yard and stays. Perhaps I should just add a few eyebolts but I have seen some drawings that show a metal strap around the mast cap with tabs to which the blocks etc are fixed. I have attached a few images of my progress to date and would appreciate any comments. So far cross trees and trestle trees are glued but not the top mast or mast cap.


-
Floyd, nice looking knee bracket as a replacement part. I'm not sure about the clamping. Assuming that the bracket is strong enough to take the initial load, perhaps some pegs/spring clamps to hold the bulwarks to the bracket and some rubber bands/masking tape wrapped around the bow to hold everything until the glue dries? Another option might be some form of timber jig that is shaped to slip onto the outside/across the top of the bulwarks. As it is slipped on it will press the two sides in and hold it all together from the outside. Good luck, Blackie
-
Floyd Sorry to hear about your troubles with the second layer of planking. However, it appears to be behind you. Are you going to taper your planks or just add stealers as required? As for the split bow - wow! Luckily for me I have had no such issue on my Harvey even after I had abandoned it for many years. I am at a loss as to what could have caused it but perhaps as Bob said, it was the gunwale rails. The knees do appear to be an option to hold it all together. I modified the kit-supplied knee (same one as you have) to change its shape a little and I built up the underside to make it appear thicker. This would only add a little to its strength but I still have some small distance below it clear of the bow sprit so it looks likely that you should be able to get the new knee in and still clear the bowsprit. In my case I have only fitted recently the gunwale rails and I did not use the kit-supplied walnut. I have never had any luck bending walnut sideways no matter how much I soaked it. I always use "bendy beech" for gunwale rails as it is a dream to bend any which way. Blackie