Blackie
-
Posts
102 -
Joined
-
Last visited
Content Type
Profiles
Forums
Gallery
Events
Everything posted by Blackie
-
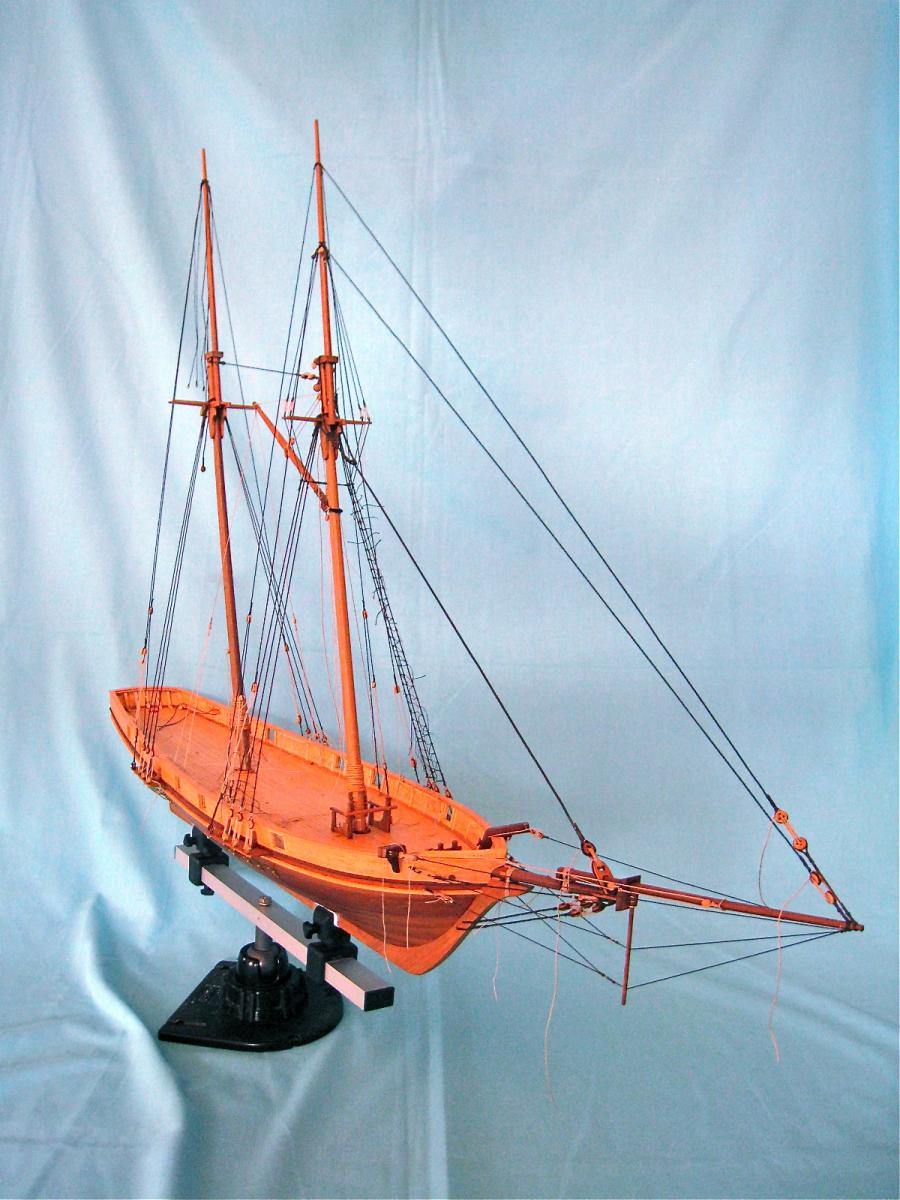
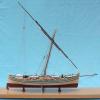 It's been some time since I posted something but I have moved on a little with the main mast and most of its rigging now fitted.
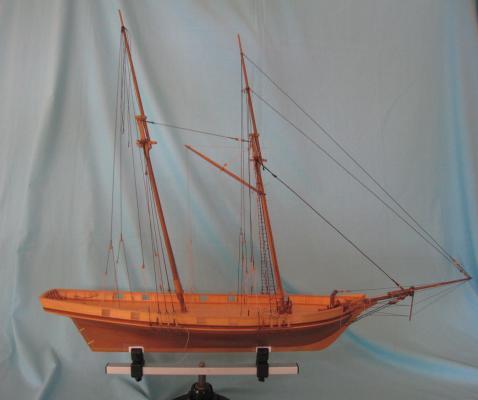

- 88 replies
-
- 5
-

-
- harvey
- artesania latina
- (and 1 more)
-
Hi Floyd I would be careful putting any epoxy on particular areas on the outside as it will give you an area much harder than the other material and could make sanding tricky. It will probably give you a lumpy finish. I like Michael's suggestion as you can cut a hole in the deck assuming that you have not yet fixed the decking in place. If you don't like that, how about shaving the filler off the flexing planks, apply some CA to stiffen the exposed planks and reapply filler. Blackie
- 80 replies
-
- 1
-
-
- Americas Cup
- Endeavour
- (and 1 more)
-
Per I agree with you about the heads not being on the BC. That said I did find that some immigrant vessels to Australia did have them. The James Craig is a restored/rebuilt 3 masted barque here in Sydney and it has a very small "box" up forward similar to the Harvey kit. I can't find an image of it but you might find one on the web just for interest. On the JC today it is used for tools/equipment. Blackie
-
Per My Harvey kit must be older than yours and the bulwarks came in 2 pieces each side. I admit that it was a while ago but I can't remember any problems and they are now lined and as strong as I could ever wish for. I do remember that I cut the gun ports into the bulwarks first, then trimmed them and finally added the lining cut to the port trimmers. I should think that your card bulwarks will also be very stiff once you line them. Another thing to check is the final thickness of the lined bulwarks against the width of the bulwark rail material. In my case, I added some vertical frames which I should not have done and found that the original rail strip was then just a whisker too narrow. I used a black marker pen for the caulking in the deck boards. Blackie
-
Wow Floyd, where will you keep it? That's such a beautiful looking hull shape. I'm looking forward to seeing it rigged. Keep at it (then back to your Harvey). Blackie
- 80 replies
-
- 2
-
-
- Americas Cup
- Endeavour
- (and 1 more)
-
Hi Paul Glad to see your log today. I also am working on the Harvey in Sydney. I have been at it for years on and off and feel that I am close to finishing. I have a log at "Harvey by Blackie" which might help you though I started the log after I had finished the hull. If you have queries about planking, ask and someone will give you good advice. I did try very hard to get the first plank layer in lime wood as well-fitted as possible as a practice for the second layer. It also helped me get the second layer to fit fairly easily - ha ha! I did abandon the kit for the deck layout as I felt that the kit was so far away from a Baltimore schooner and have mostly scratch-built everything from the deck up. I'm not sure if you are interested in the history of your models but the Harvey as such never existed and the heyday of the Baltimore clipper boats was very early 1800s. However, you can produce a model that could have reasonable references to the Baltimore clipper boats if you wish. You will find a number of logs in MSW that will help you with the Harvey kit. I'll follow yours with interest. Happy modelling Blackie
-
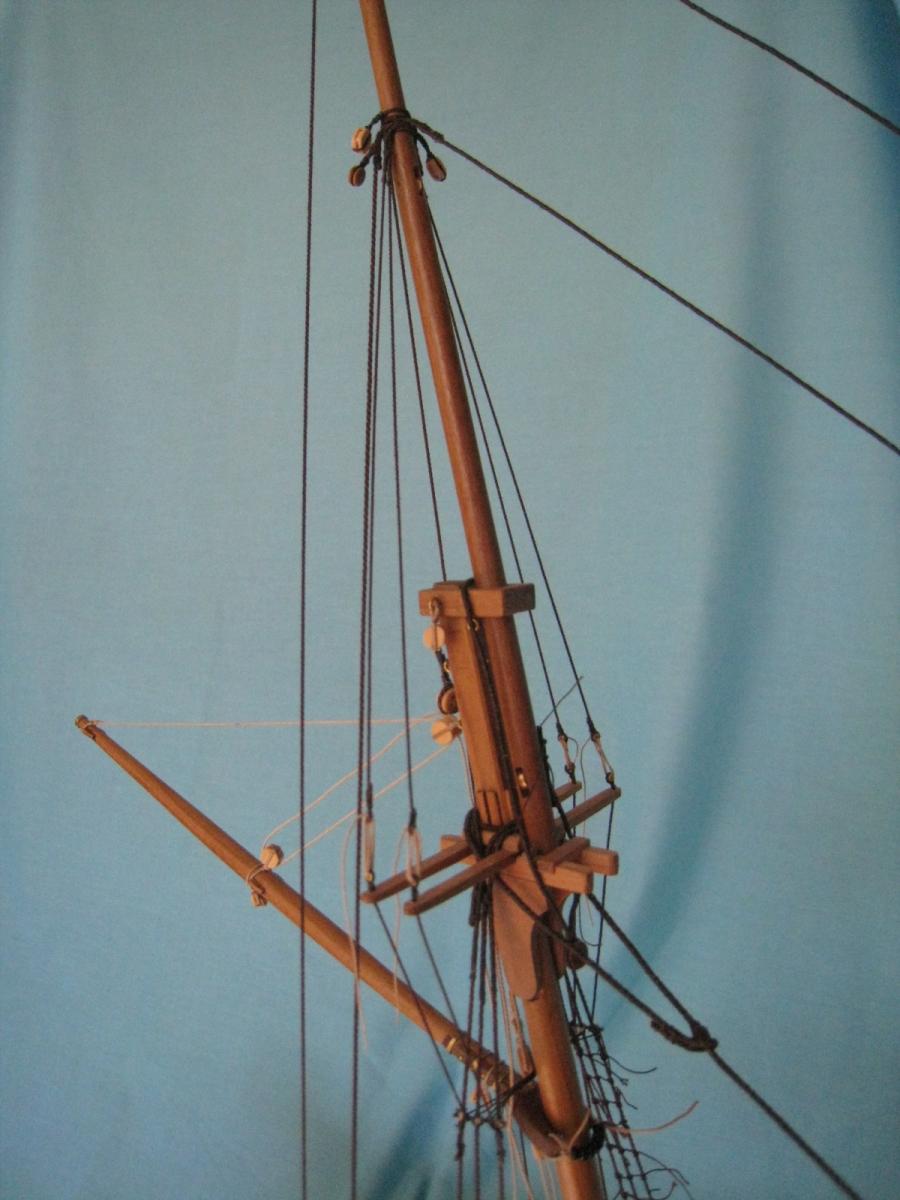
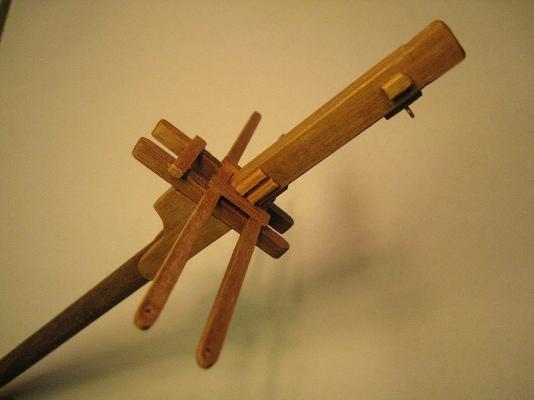
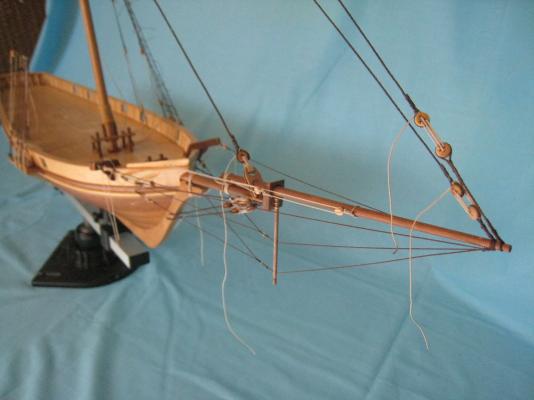
I'm off onto the road for a few weeks so before I go, I thought I would post some shots of the main mast and its spars. I will finish coating the mast, top mast, boom and gaff before I go and then fit them when I return. When researching the mast dimensions and shape I found two versions of the shape at the mast head. I went with what is shown but now believe that I should have done it the other way. That was to extend the square section down to the base of the cheeks - I think that would look better and it certainly would have been easier to make.
- 88 replies
-
- 4
-
-
- harvey
- artesania latina
- (and 1 more)
-
I seem to have some trouble uploading drawing files using PM so here they are. These sketches are what's shown on my log or will be used for the rigging. I should say that when I rigged the bowsprit and jib boom, I changed the stays, etc slightly from the layouts shown in my sketches included in the early log. This was to allow the anchor stock to swing clear - 3D reality always trumps 2D planning. Foremast Dims.pdf Top Foremast Dims.pdf Foremast Head.pdf Foremast Yard.pdf Lower Topsail Yard.pdf Lower Topsail Yard Halyard.pdf
- 88 replies
-
- 2
-
-
- harvey
- artesania latina
- (and 1 more)
-
Hi Floyd, if it will help you I can send you my diagrams of the lengths and diameters for my spars. I searched some books I have and settled on these as the best fit that I could find for a schooner of the BC size. The spars are mot straight tapers from end to end as shown in the kit drawings/instructions.
- 88 replies
-
- 1
-
-
- harvey
- artesania latina
- (and 1 more)
-
I don't know where the time goes though some travelling has slowed me down a bit. Progress shots are attached and I have now almost finished the main mast, main topmast, boom and gaff. I have also made the yards for the foremast but will not fit them until I have finished the ratlines. The rigging is not tightened until I rig the main mast as I have seen changes in rigging already set when I add other lines.The deck houses etc are completed but will be fitted after the masts and rigging.


- 88 replies
-
- 8
-
-
- harvey
- artesania latina
- (and 1 more)
-
Hi gregs1234, Thanks for your comment. I have gone with 10 degrees for the fore mast angle and will probably add 1-2 degrees to the main mast depending on what it looks like when I get there. There is one thing that I have found in rigging the fore mast that needs thinking about and planning for. It is that the greater the rake of the mast, the location of the back stay(s) will become critical. I have found that a fixed back stay rigged to the channel close to the last shroud is too close to the cross tree. It ended up touching the cross tree when I rigged the fore stays so I am now moving it sternwards on the channel and replacing the deadeyes with blocks to allow it to be eased when the gaff is eased. I will also adjust the location of the fixing eyebolts for the working back stay.
-
Floyd I know what you mean about the walnut planks. I used them for my ship's boat because I wanted the same colour as the schooner hull. I cut the 6mm wide planks to 4mm which gave me a 3mm exposed plank width. I abandoned the whole of the kit model and built mine from scratch over a balsa wood mould. However, the walnut planks were sometimes a bit fiddly even after I tapered them and were often difficult to glue to each other, especially as I had no frames. The boat was built as a real boat would be built with the frames added after the planking work. That said, the attached image shows some timber that came with my kit which I used to plank the bulwarks. The kit says it is mukali and it is quite blonde, in fact yellow. The strip is 4mm wide and as you can see, very bendy. The internet says that the colour of mukali can vary from yellowish white to pale pink-brown so perhaps you would need to see exactly what you are getting. Anyway, it is very flexible and mine looks good. Another option could be flexible beech except that it might be a bit pricey.

-
Well done Floyd. At this rate you will catch me as I have been a bit slow while enjoying the outdoors in this Australian summer.
-
Floyd, just back from a few days off. My J class boat model is 1:80 scale so much smaller than yours. Also she is a solid hull so no planking - simpler and easier. I must admit that I had completely forgotten about it - just need to practice my spray painting techniques.
-
Floyd, no worries. Your comment about Endeavour roused me to search my shelf and there I found an old kit for Shamrock V, the first British J class boat. I must have bought it about 20 years ago and have never started it. Maybe it's about time! Merry Christmas and great modelling in the New Year.
-
Good luck Floyd - nearly there! I see in your signature that you have on the shelf the Endeavour which I assume is Cook's Endeavour. If so, when you start it remember that I work very, very near the replica and could get some photos for you anytime you want. Just ask. The attached image is of the Endeavour's bow and when I saw it I thought of our discussion about tapering planks and stealers. It is very instructive even if the hull is a very different shape from the schooner. The image is in an article in the local museum's magazine written by the shipwright who built the replica. The museum now owns the replica.

-
Thanks Lou, I'm sure that you will get there before me so I'll keep an eye on your log. I see what you mean about the pull against the peak halyard. I had a thought of eliminating the guy pendants which would also free up some space. I wondered if the continuous main sheet could act instead. It'll be a while before I get there. Blackie
-
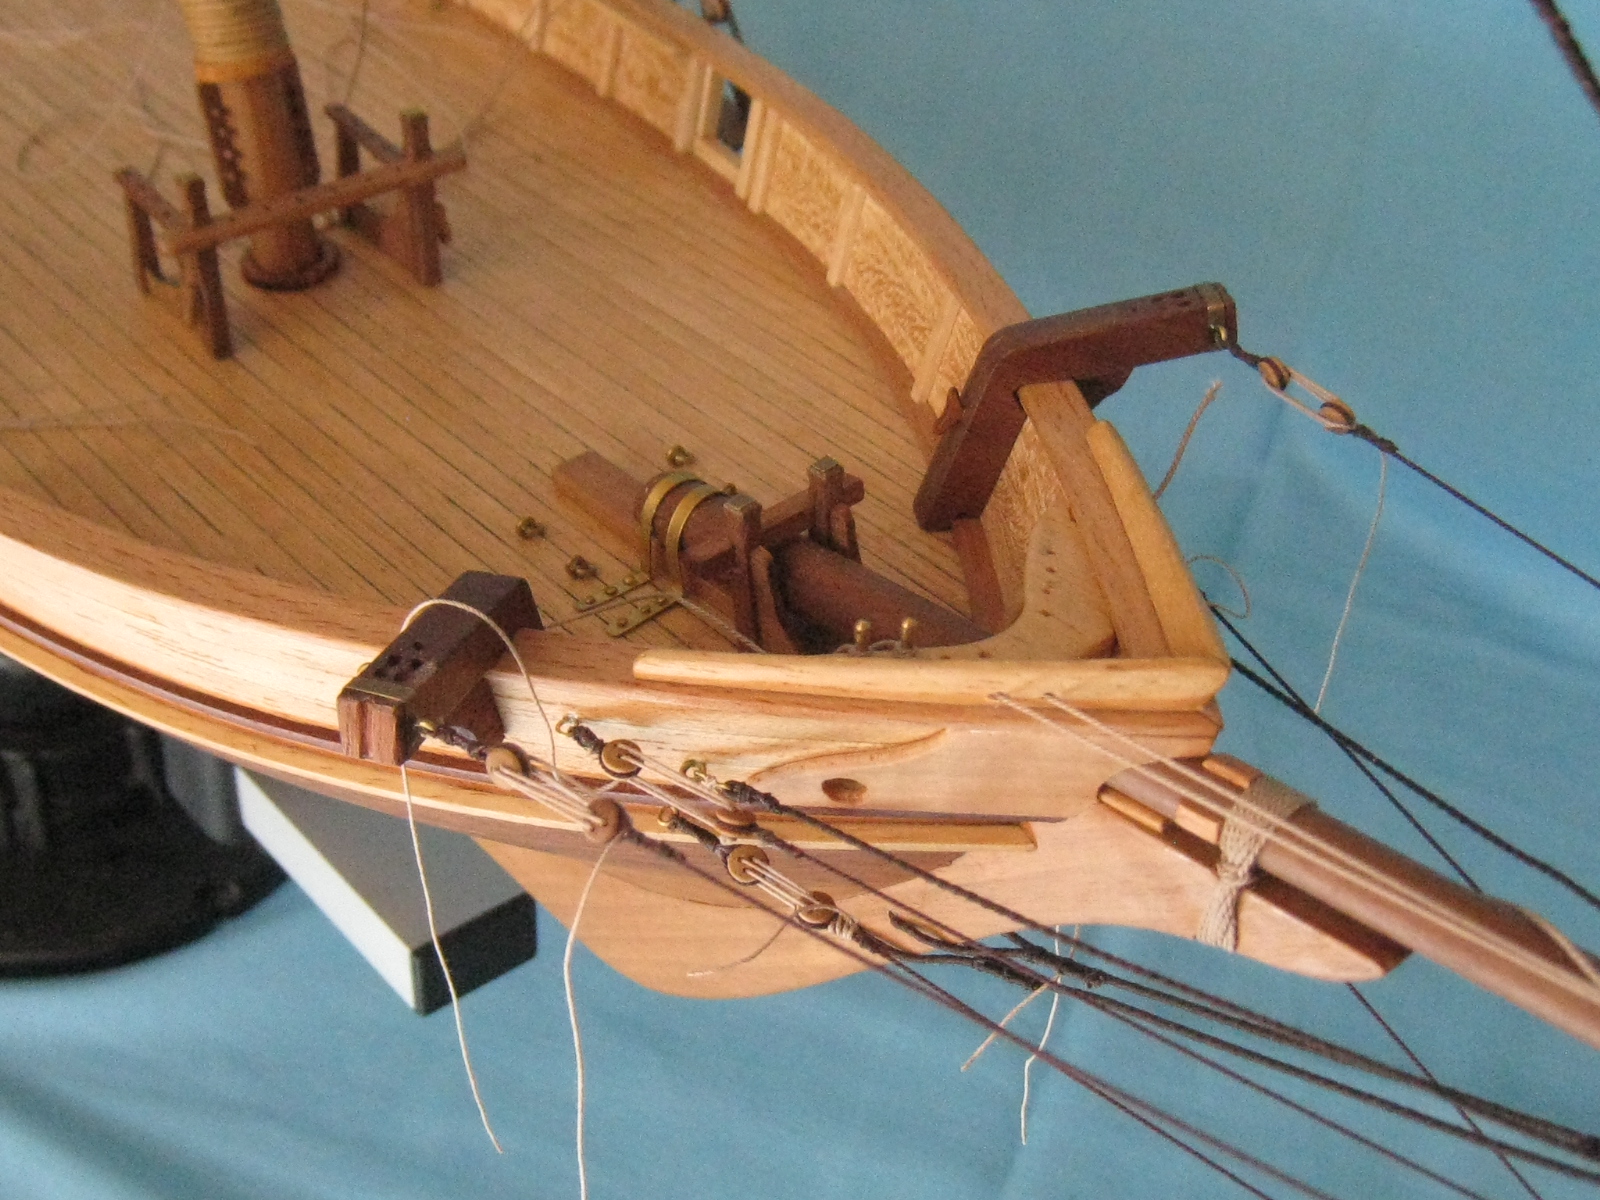
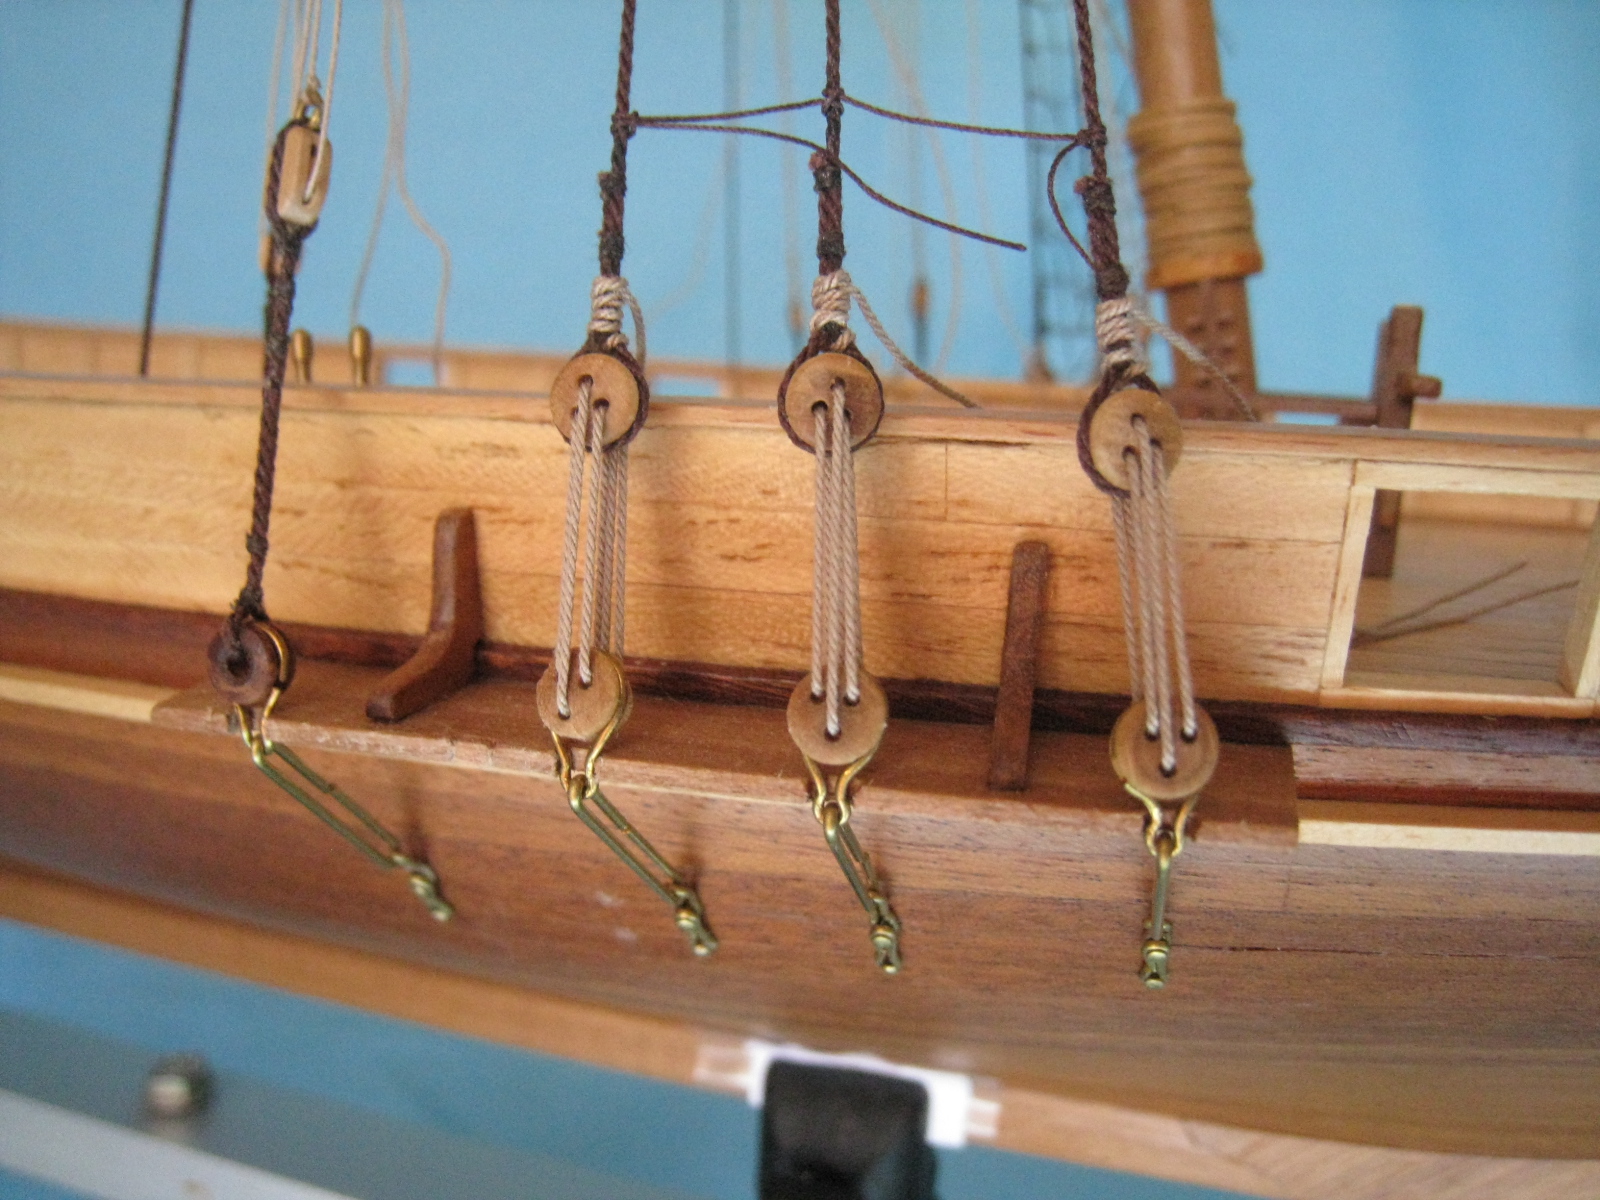
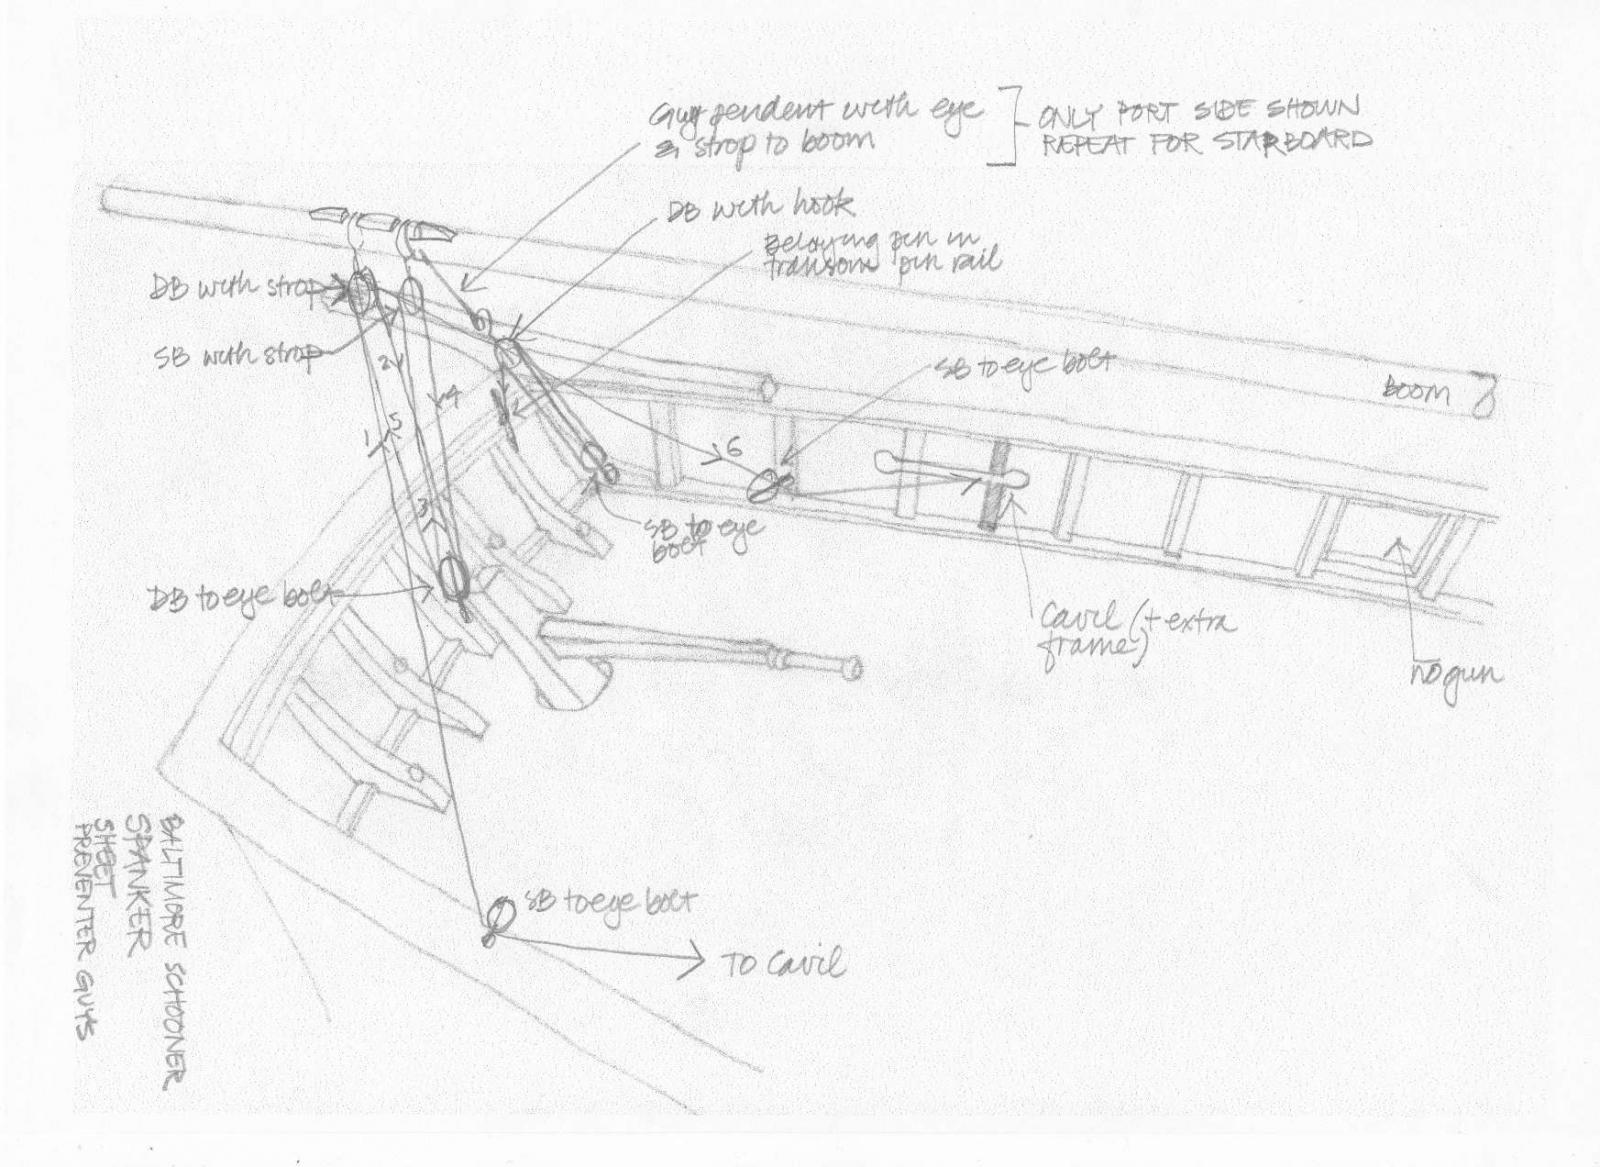
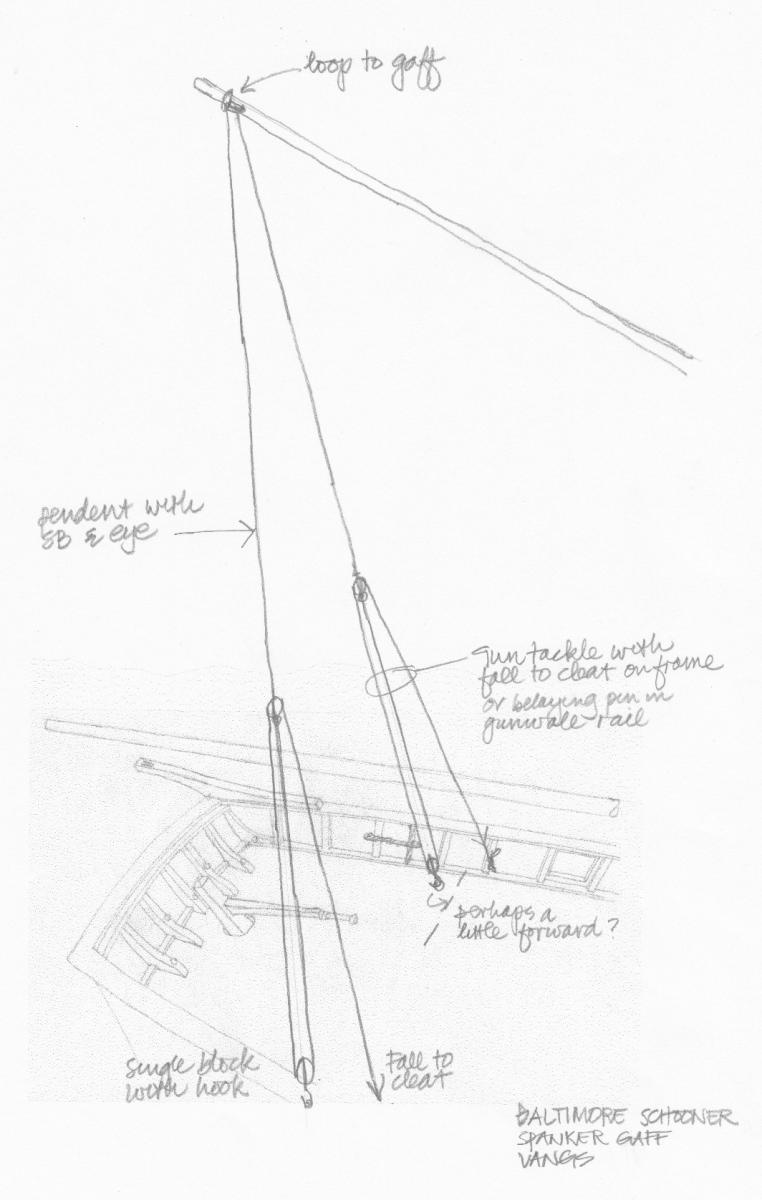
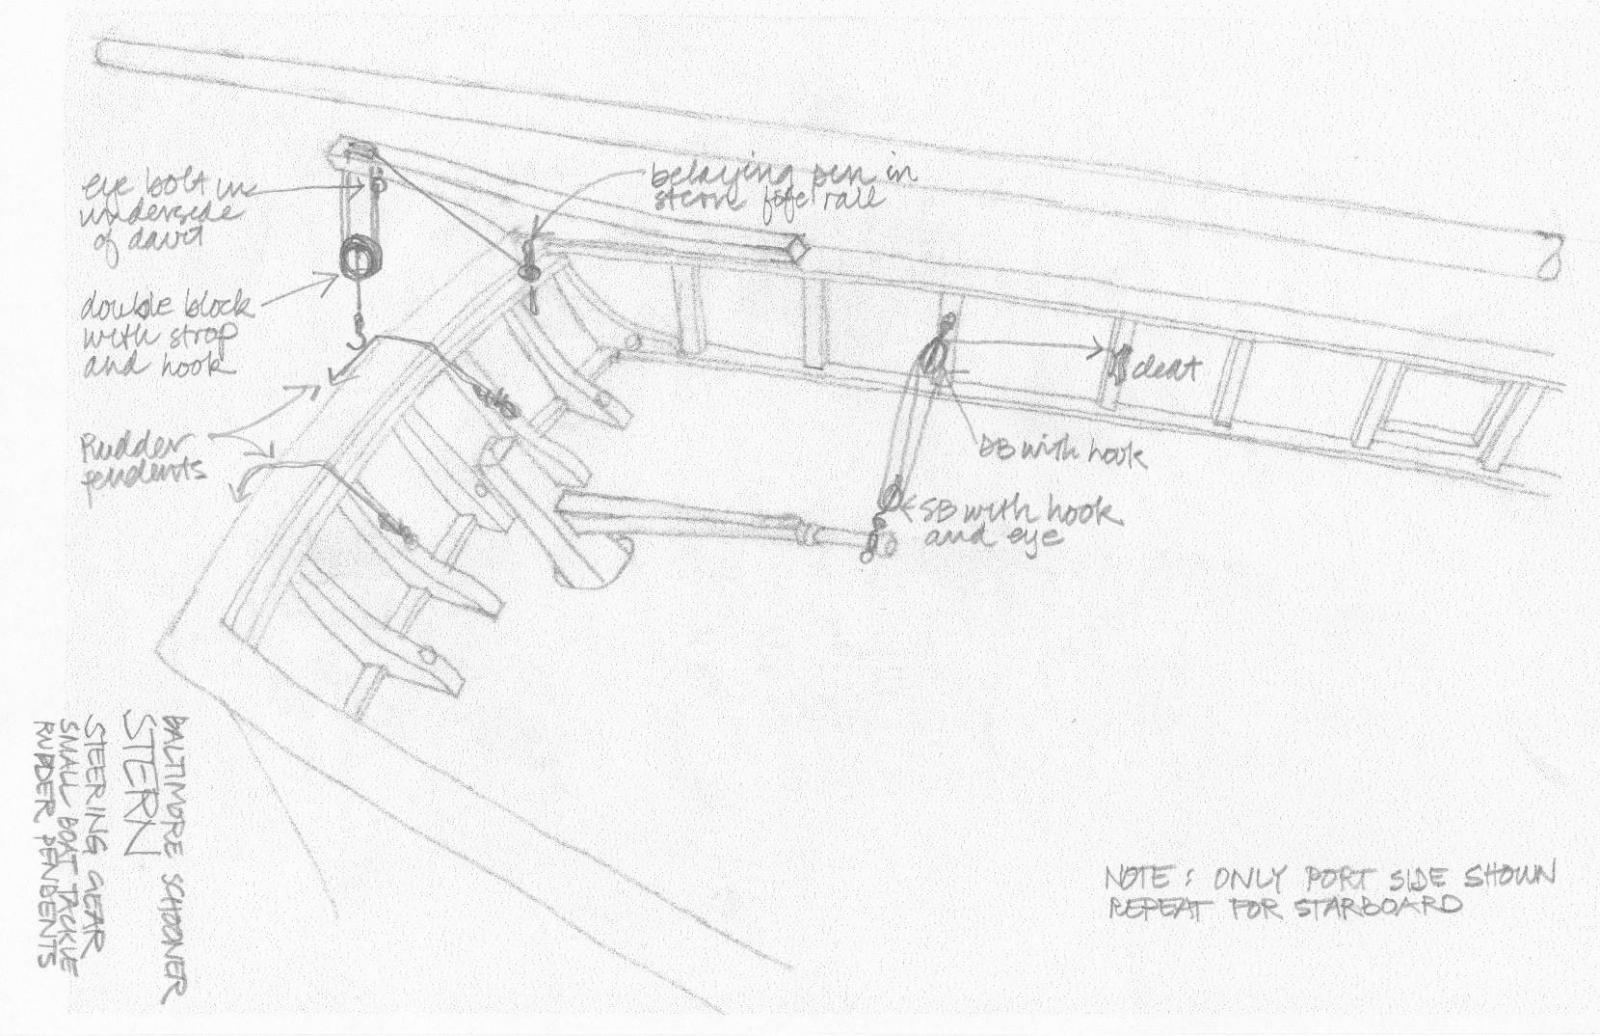
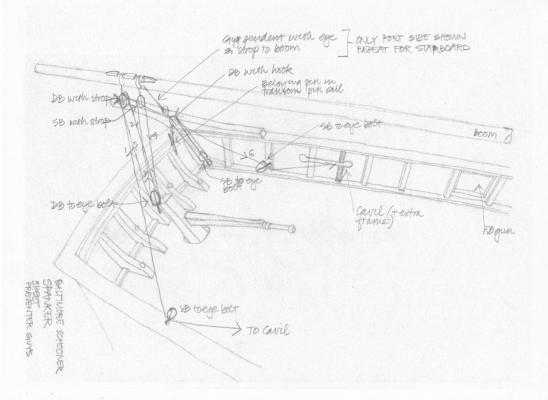
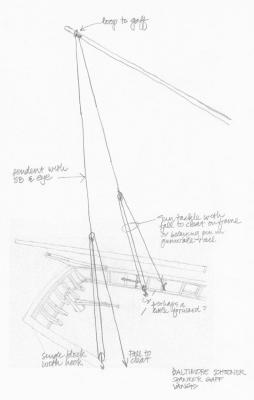
I need some advice please. I have made a few drawings of the boat davits and running rigging for the spanker boom and gaff and they are attached. Can you see any problems? I think that they will all cleat each other when assembled on the model and should give enough space for the crew to work the lines. Perhaps the steering tackle will foul the main sheet? Yes it will!!!! Do I need the gaff vangs? I can find lots of images which have none including POB and La Recouvrance. To delete these would free up some space in what has become a quite busy area. Thanks Blackie

- 88 replies
-
- 1
-
-
- harvey
- artesania latina
- (and 1 more)
-
Lou You really are charging along and its looking great. I am waiting for some more materials so I am doing some more thinking and drawings for the rigging of my Harvey. On yours, are you adding sails? Are you rigging the foremast lower yard (crossjack yard) as a spread yard (no sail below) or as a square sail (with course)? Therefore, are you fitting it with a sling or a halyard? I have reread some sources and I am not putting on sails and am rigging the crossjack yard as a spread yard. The sources say that I should have a fixed sling - after all it does not need to move up and down. Are you fitting a main stay? My source books show with and without in drawings and paintings. Blackie
-
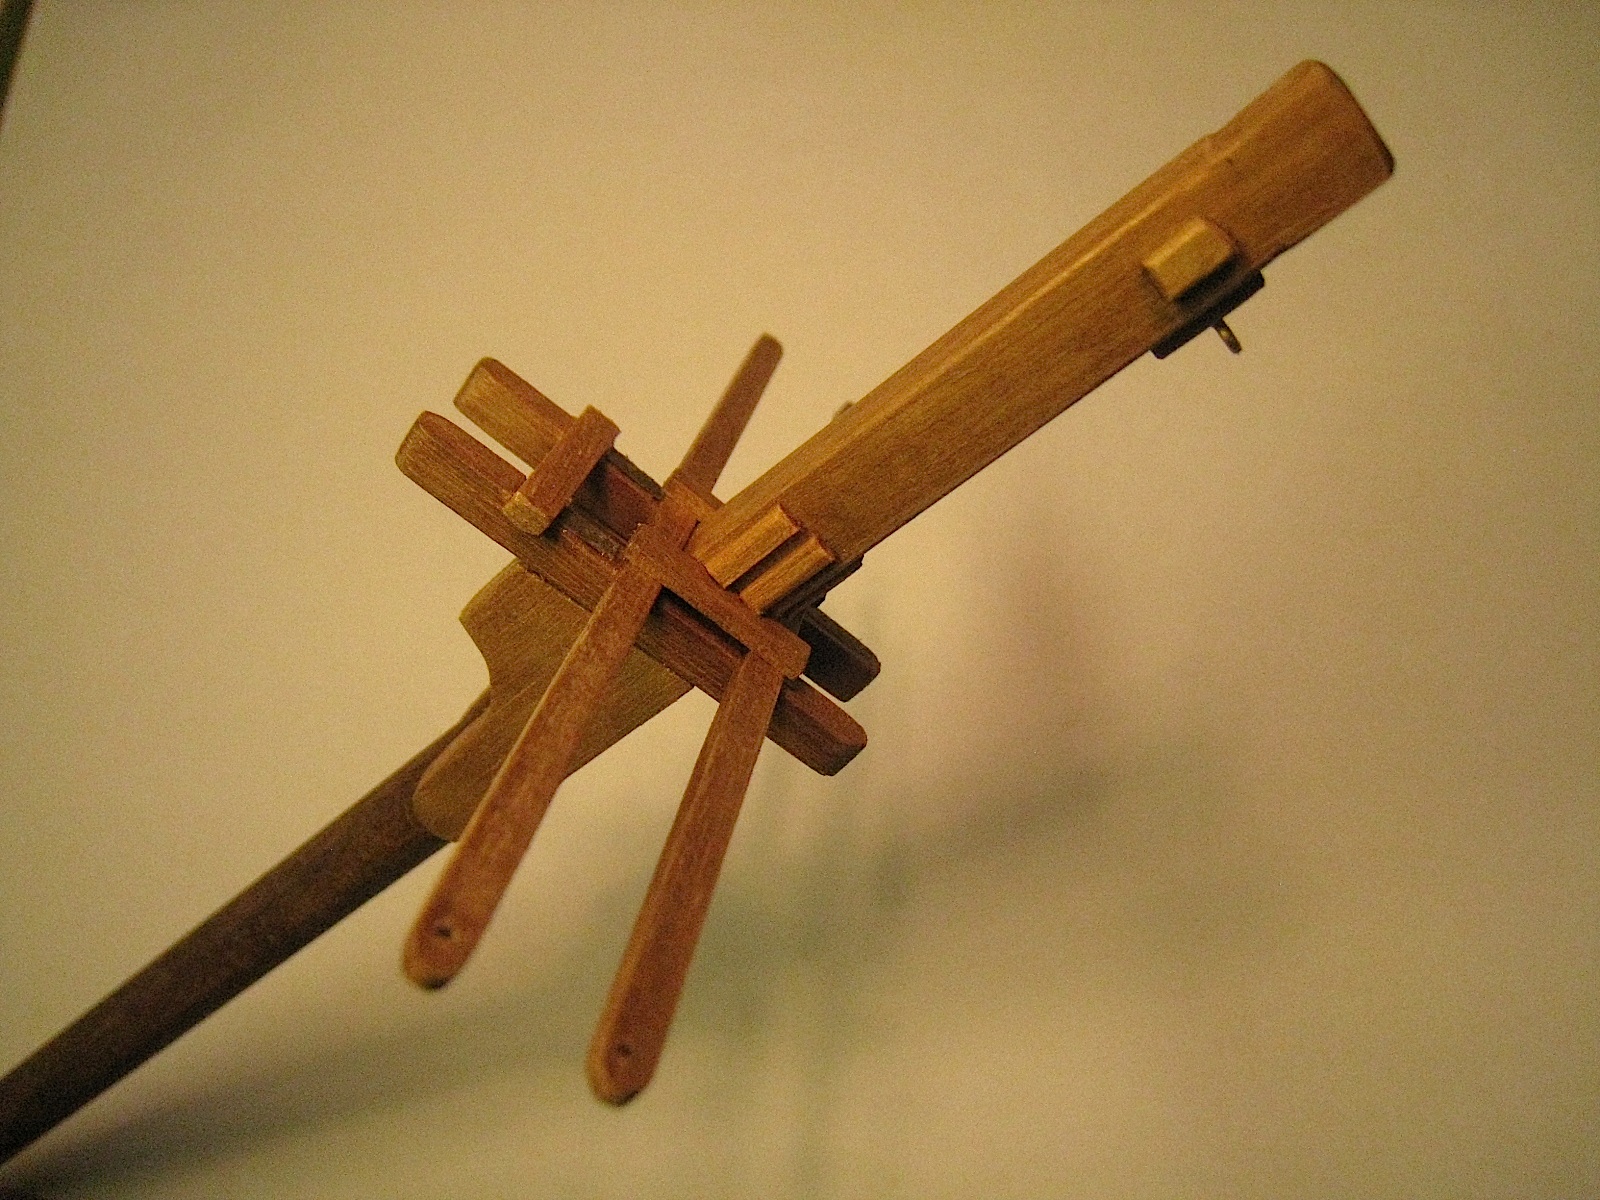
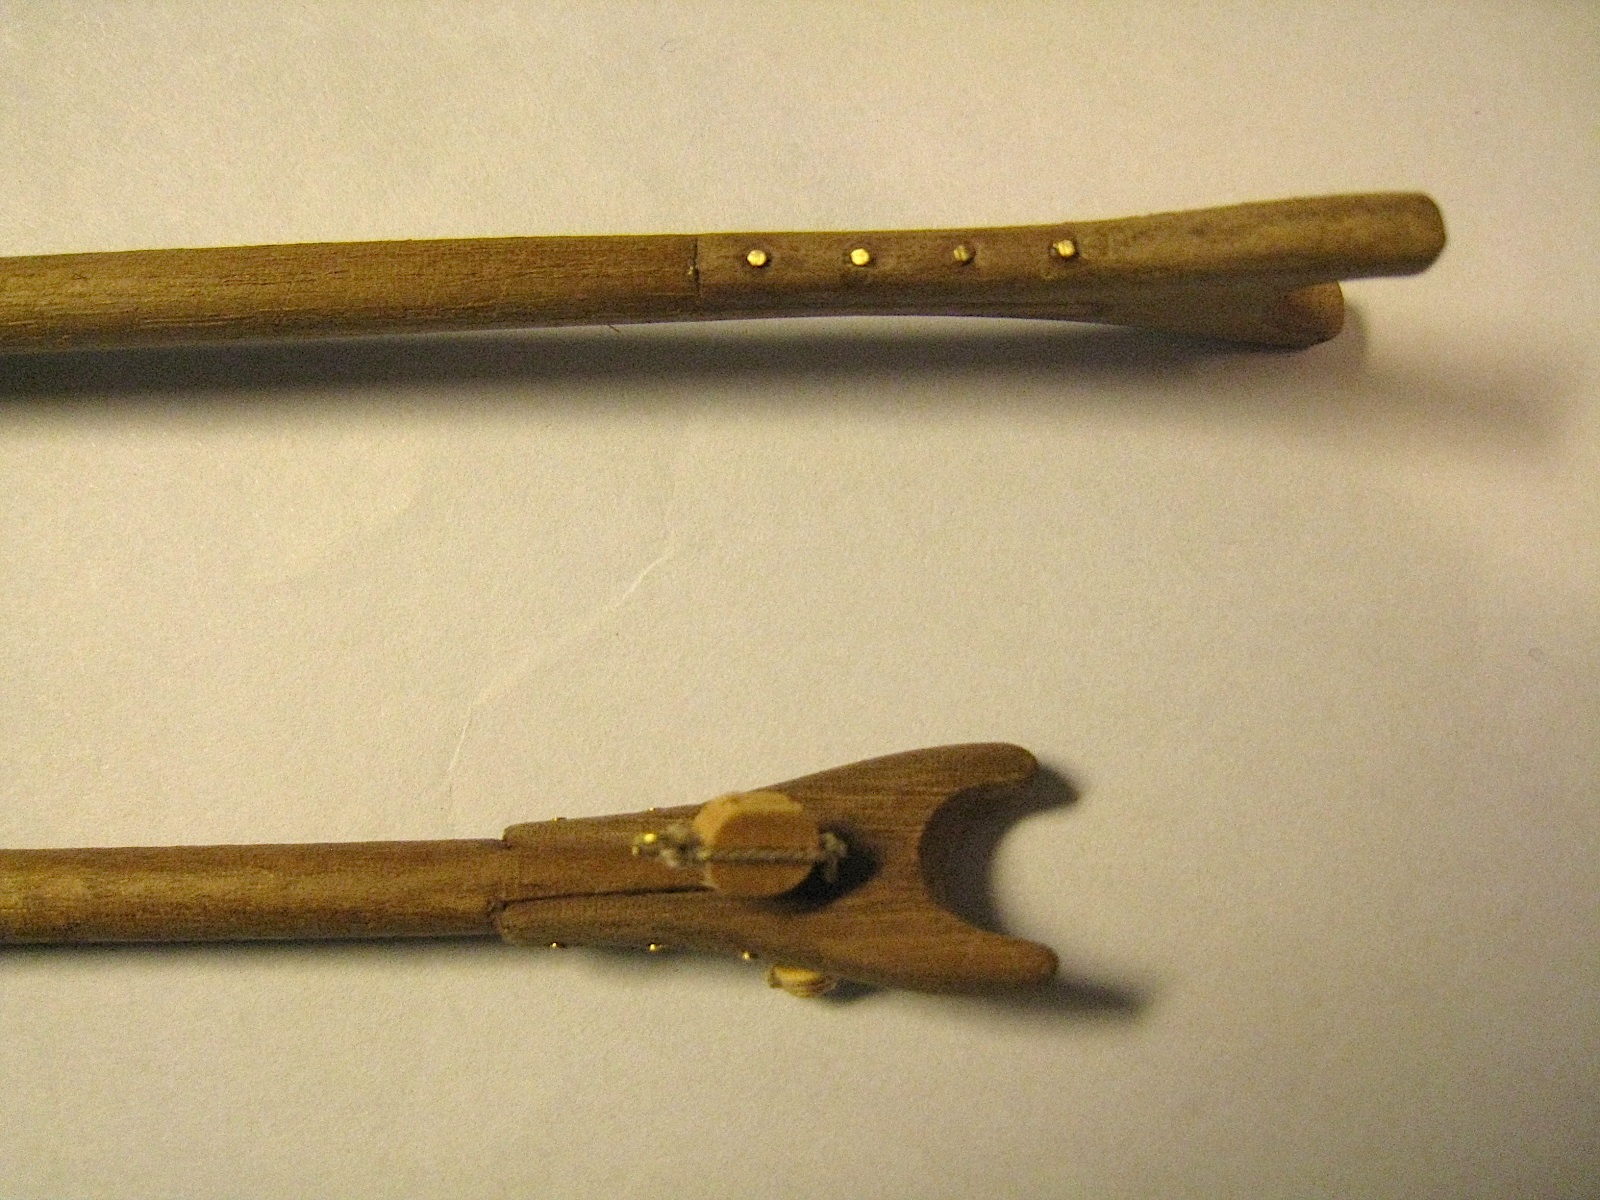
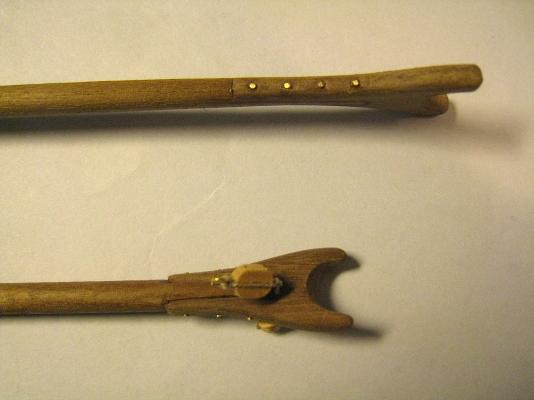
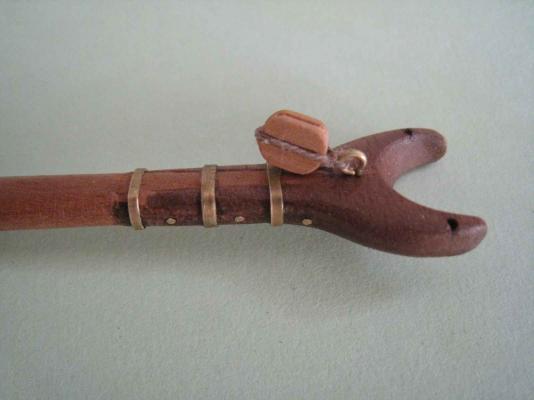
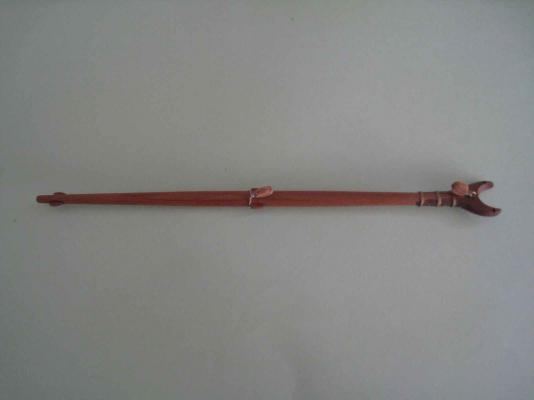
Moving slowly but have finished the gaff for the foremast as per the attached.

- 88 replies
-
- 4
-
-
- harvey
- artesania latina
- (and 1 more)
-
It's looking really, really good Lou. You have certainly jumped ahead and going great. Sorry to keep asking questions, but further to your chainplates, are they pre-cut strips that you used? If not, how did you cut the 0.26 sheet? Blackie
-
Hi Lou I must admit that I am thinking of changing the rake on my masts. Perhaps 12o on the fore mast and 15 on the main. Still not as much as POB vessels but a bit more like my source books say. We are all building variations into our models which is what I think happened with the original Baltimore schooners. Re your chainplates, can you tell me what diameter brass wire and sheet thickness did you used. I think that what I have is a bit thin. Blackie
-
Elia, I am in awe of your workmanship and attention to detail - fabulous. Thank you Blackie
-
Thanks Lou. They do look good. My source books show something that I think is way too tricky for me to replicate so I'll try your idea. Thanks again.
-
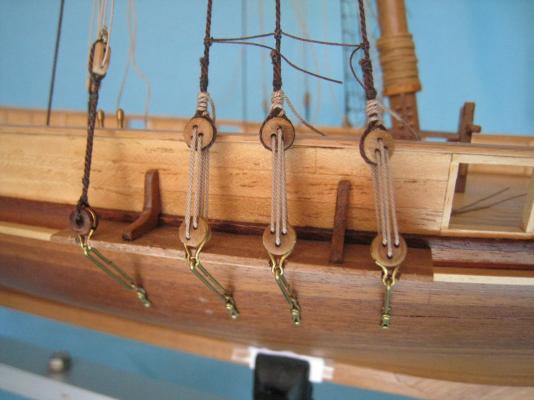
Hi Lou You have ben busy and it looks good. I also am not looking forward to doing the ratlines and I'm also working on the fore gaff and the upper yards and will post some pictures soon on my log. What did you use for the chain plates at the shrouds? My kit only has twisted wire which I don't want to do? Blackie