HOLIDAY DONATION DRIVE - SUPPORT MSW - DO YOUR PART TO KEEP THIS GREAT FORUM GOING! (Only 27 donations so far out of 49,000 members - C'mon guys!)
×

Haze Gray
-
Posts
223 -
Joined
-
Last visited
Content Type
Profiles
Forums
Gallery
Events
Everything posted by Haze Gray
-
 I'll definitely be following this build - the French incremental design advances starting with Gloire up through the Amiral Baudin class class are fascinating to me. At 1/72 scale the Magenta will be almost a yard long and should be quite a striking (and rare?) model!
 -
Hi Egilman , since I have a new buildpate on the way I've sanded down the one I have on hand - it's right around 0.115mm (the note I got from the "engineer" said anything less than 0.15mm would not impact a print - which might be true so I'll give it a go and see how things turn out. Part of me thinks it would be nice to have two build plates as I'd like to build a wash tank that I can drop the build plate onto without removing the parts - so when I am removing them there's less of a chance of dripping or unwashed parts attempting to launch into orbit during the separation process. On another note, my tiny little Photon S is down, I got a tiny leak in the FEP and and the resin cured between the LCD and the underside of the FEP... the LCD ripped out when I pulled out the vat with almost force required - so I have a new LCD on the way but I also bought what is essentially a screen protector for both machines in case that happens again - the film covers the entire LCD screen and a bit beyond it....so those should at least mitigate some risk there.
-
Hey Egilman, I recently picked up the monoX and checked the flatness of the build plate (it was 0.203mm deeper in the center vs the sides) so I got the seller to send me a new one - any issue with the build plate on yours?
-
Hi Alan, how many cans of primer did you end up using?
- 460 replies
-
- 5
-

-
- Finished
- Flower-class
- (and 1 more)
-
Egilman - what version of solidworks are you using?
-
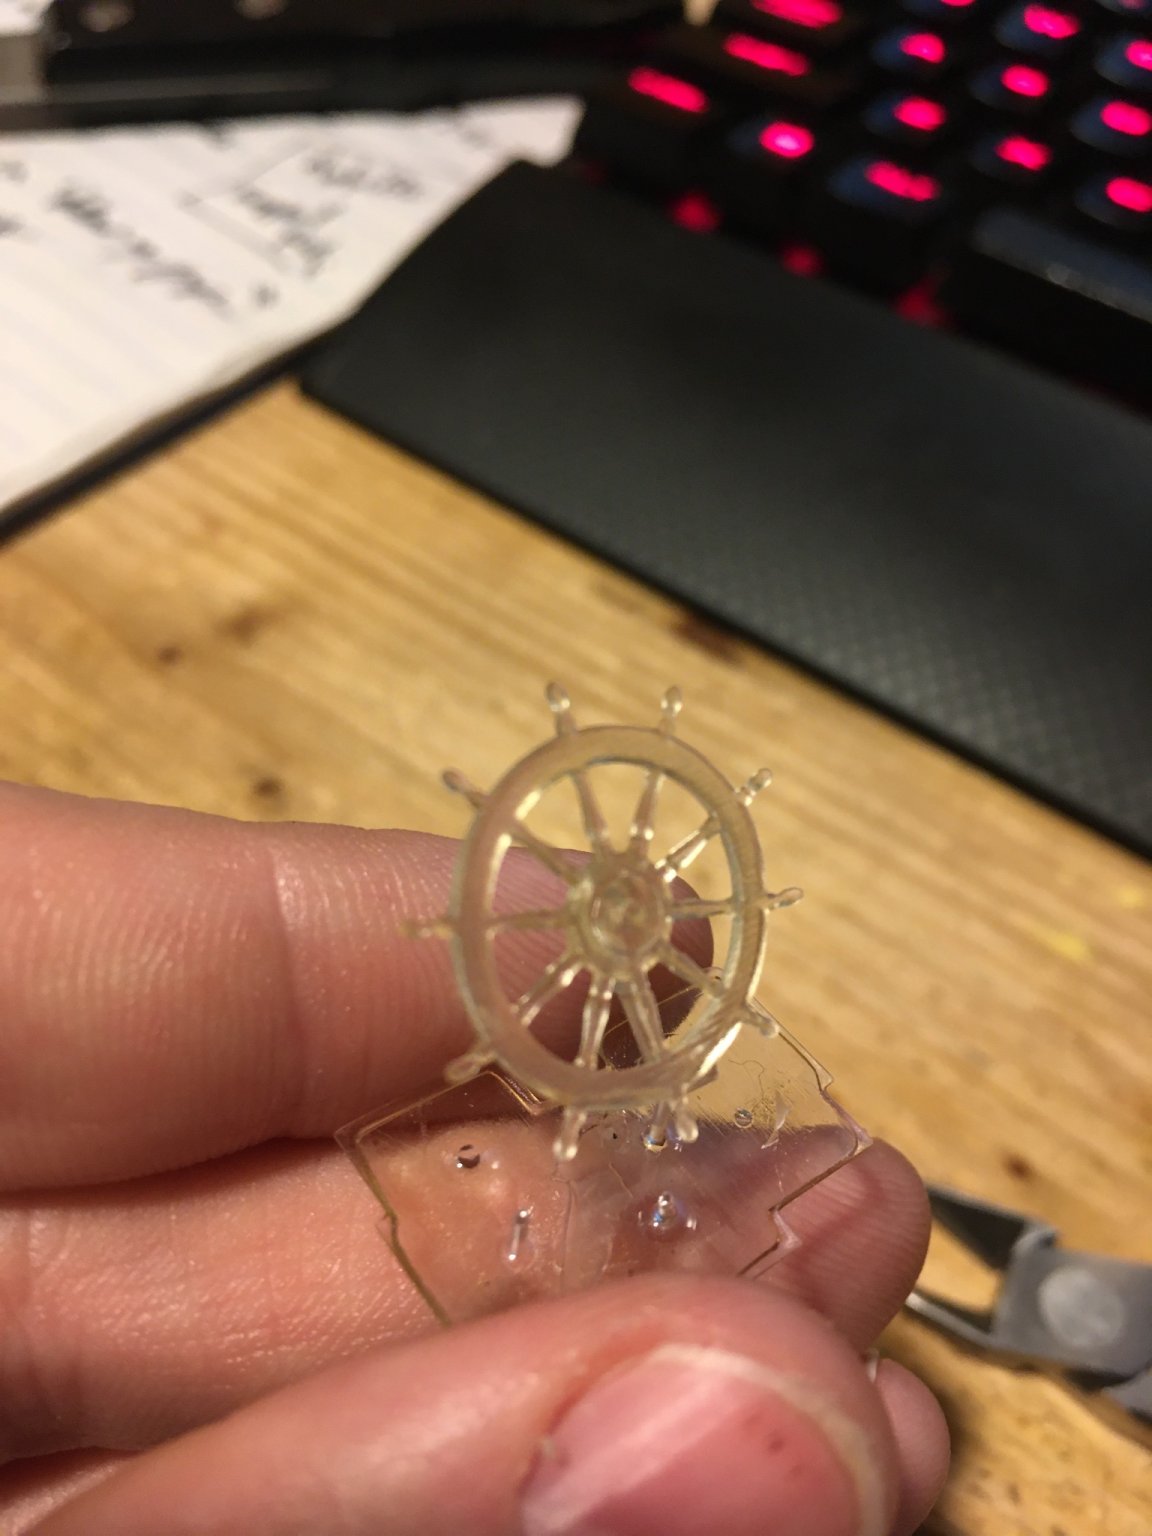
My first attempt at the helm…. Not quite there but closing in on it… Egilman, that monoX is a very tempting machine - probably big enough to do a ship in 1/350th scale ! The DLP machines we’ll see in the next year or two will be a step change for sure but likely not as large as the mono X

-
Hi Alan, what kind of filament are you using? Also, does the print cooling fan turn on when you're laying down the first layer or does it wait until you have .2 - .3 mm laid down? It looks like maybe the the bed might not be fully level as the corner brims on the left side are incomplete but the one on the right side is.
- 460 replies
-
- 5
-
-
- Finished
- Flower-class
- (and 1 more)
-
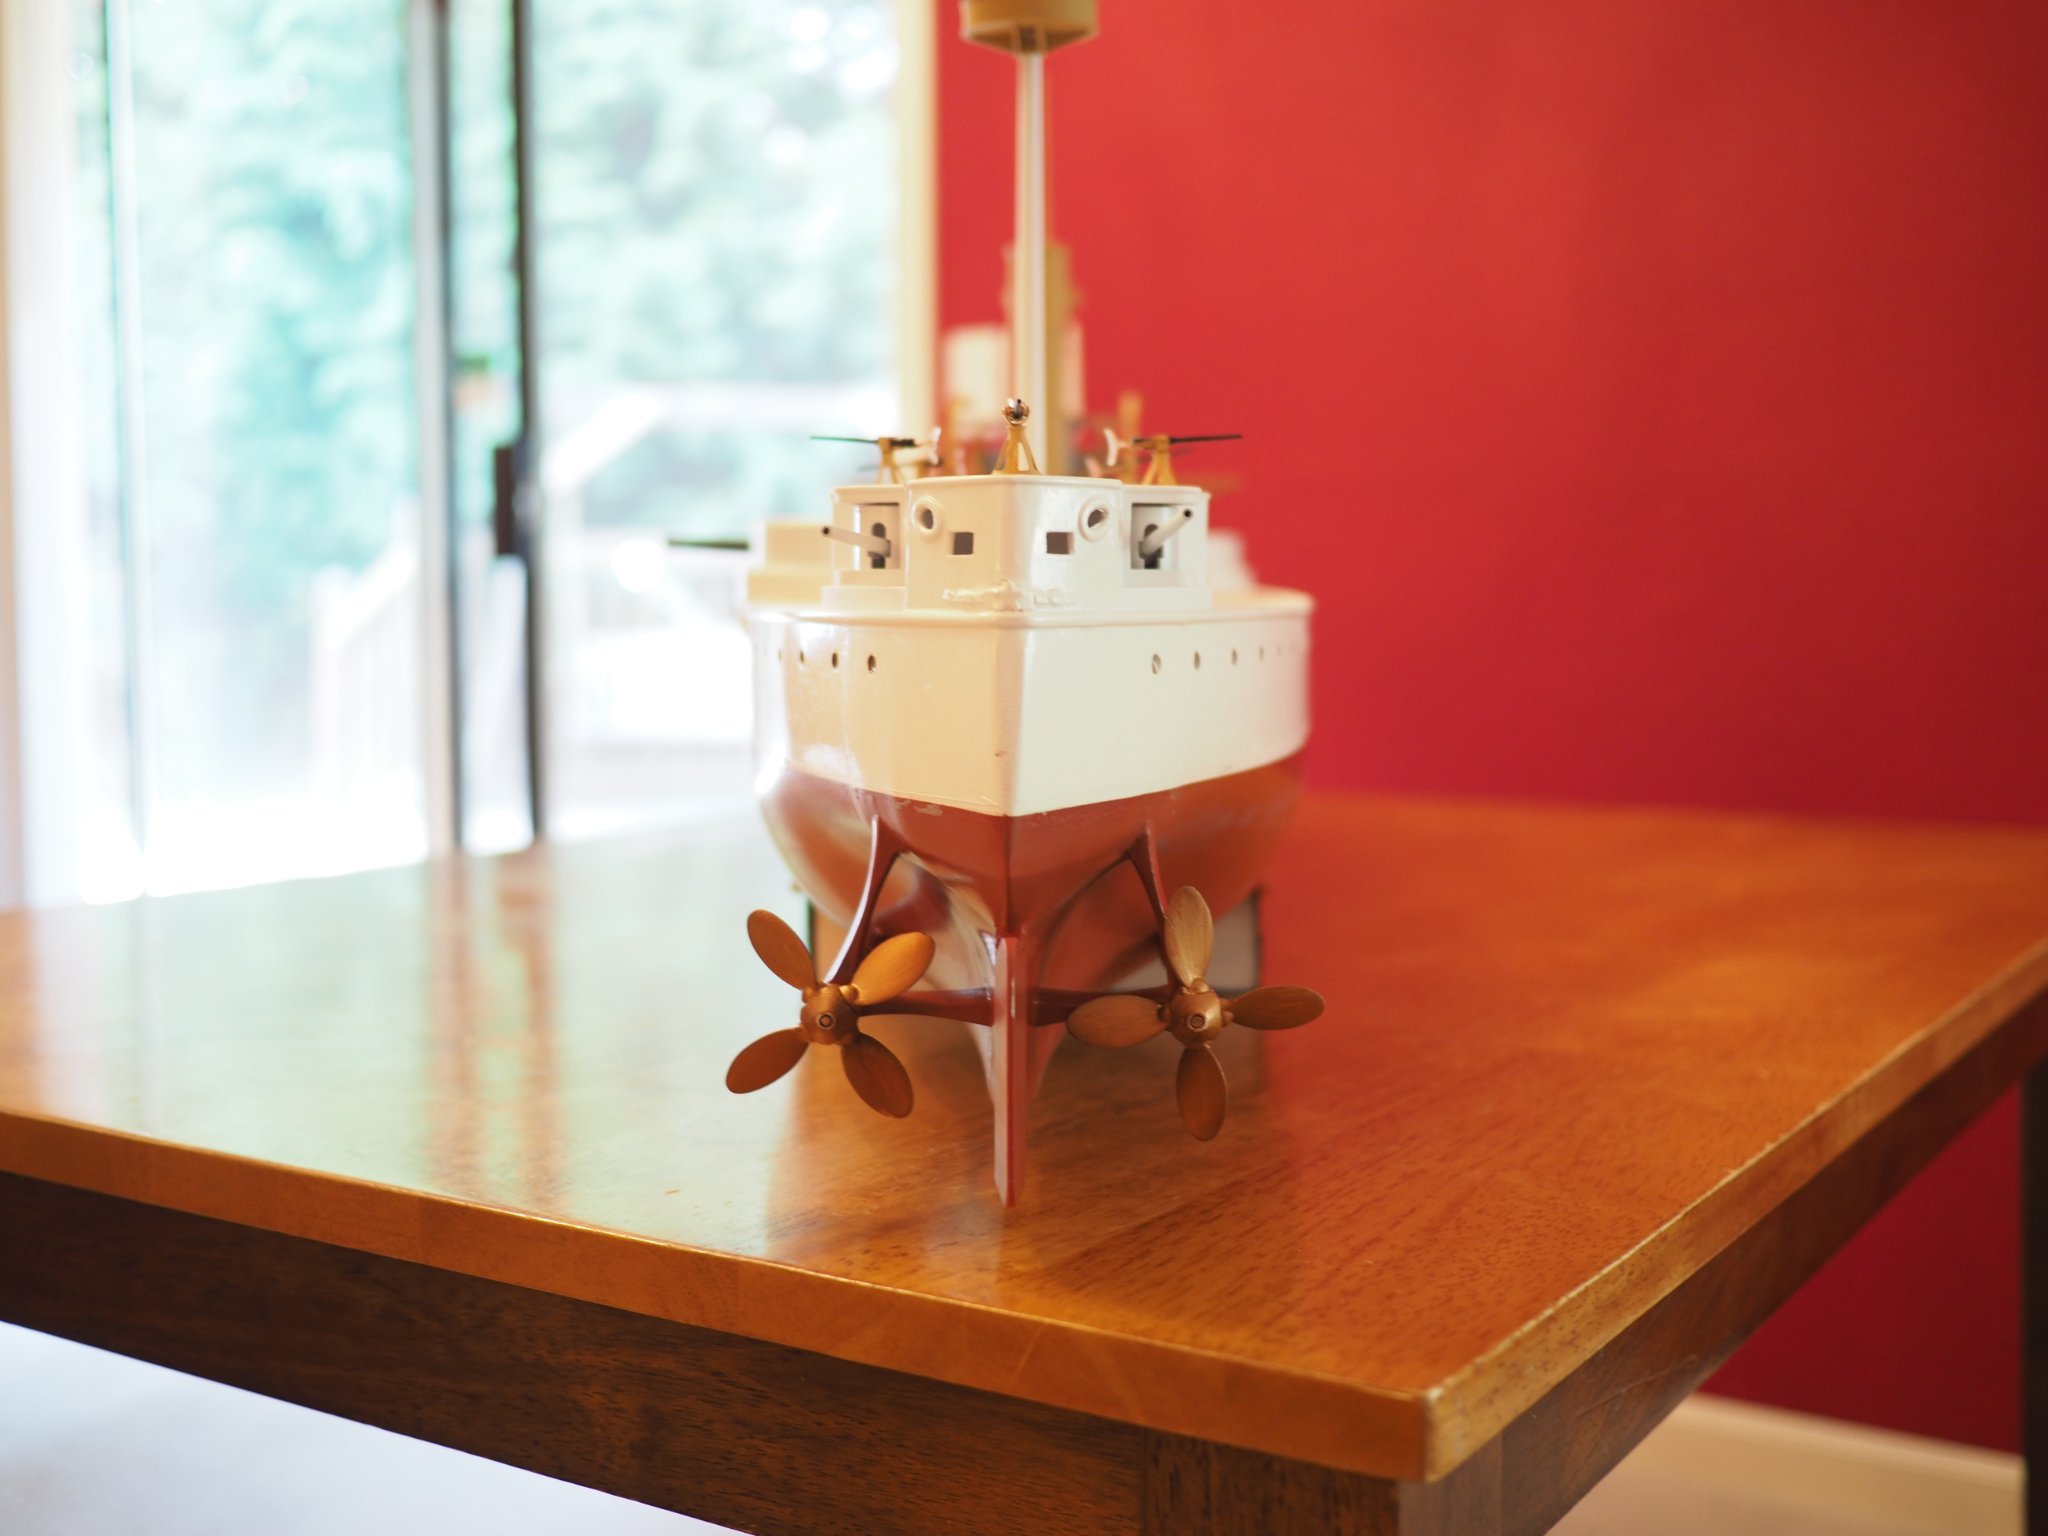
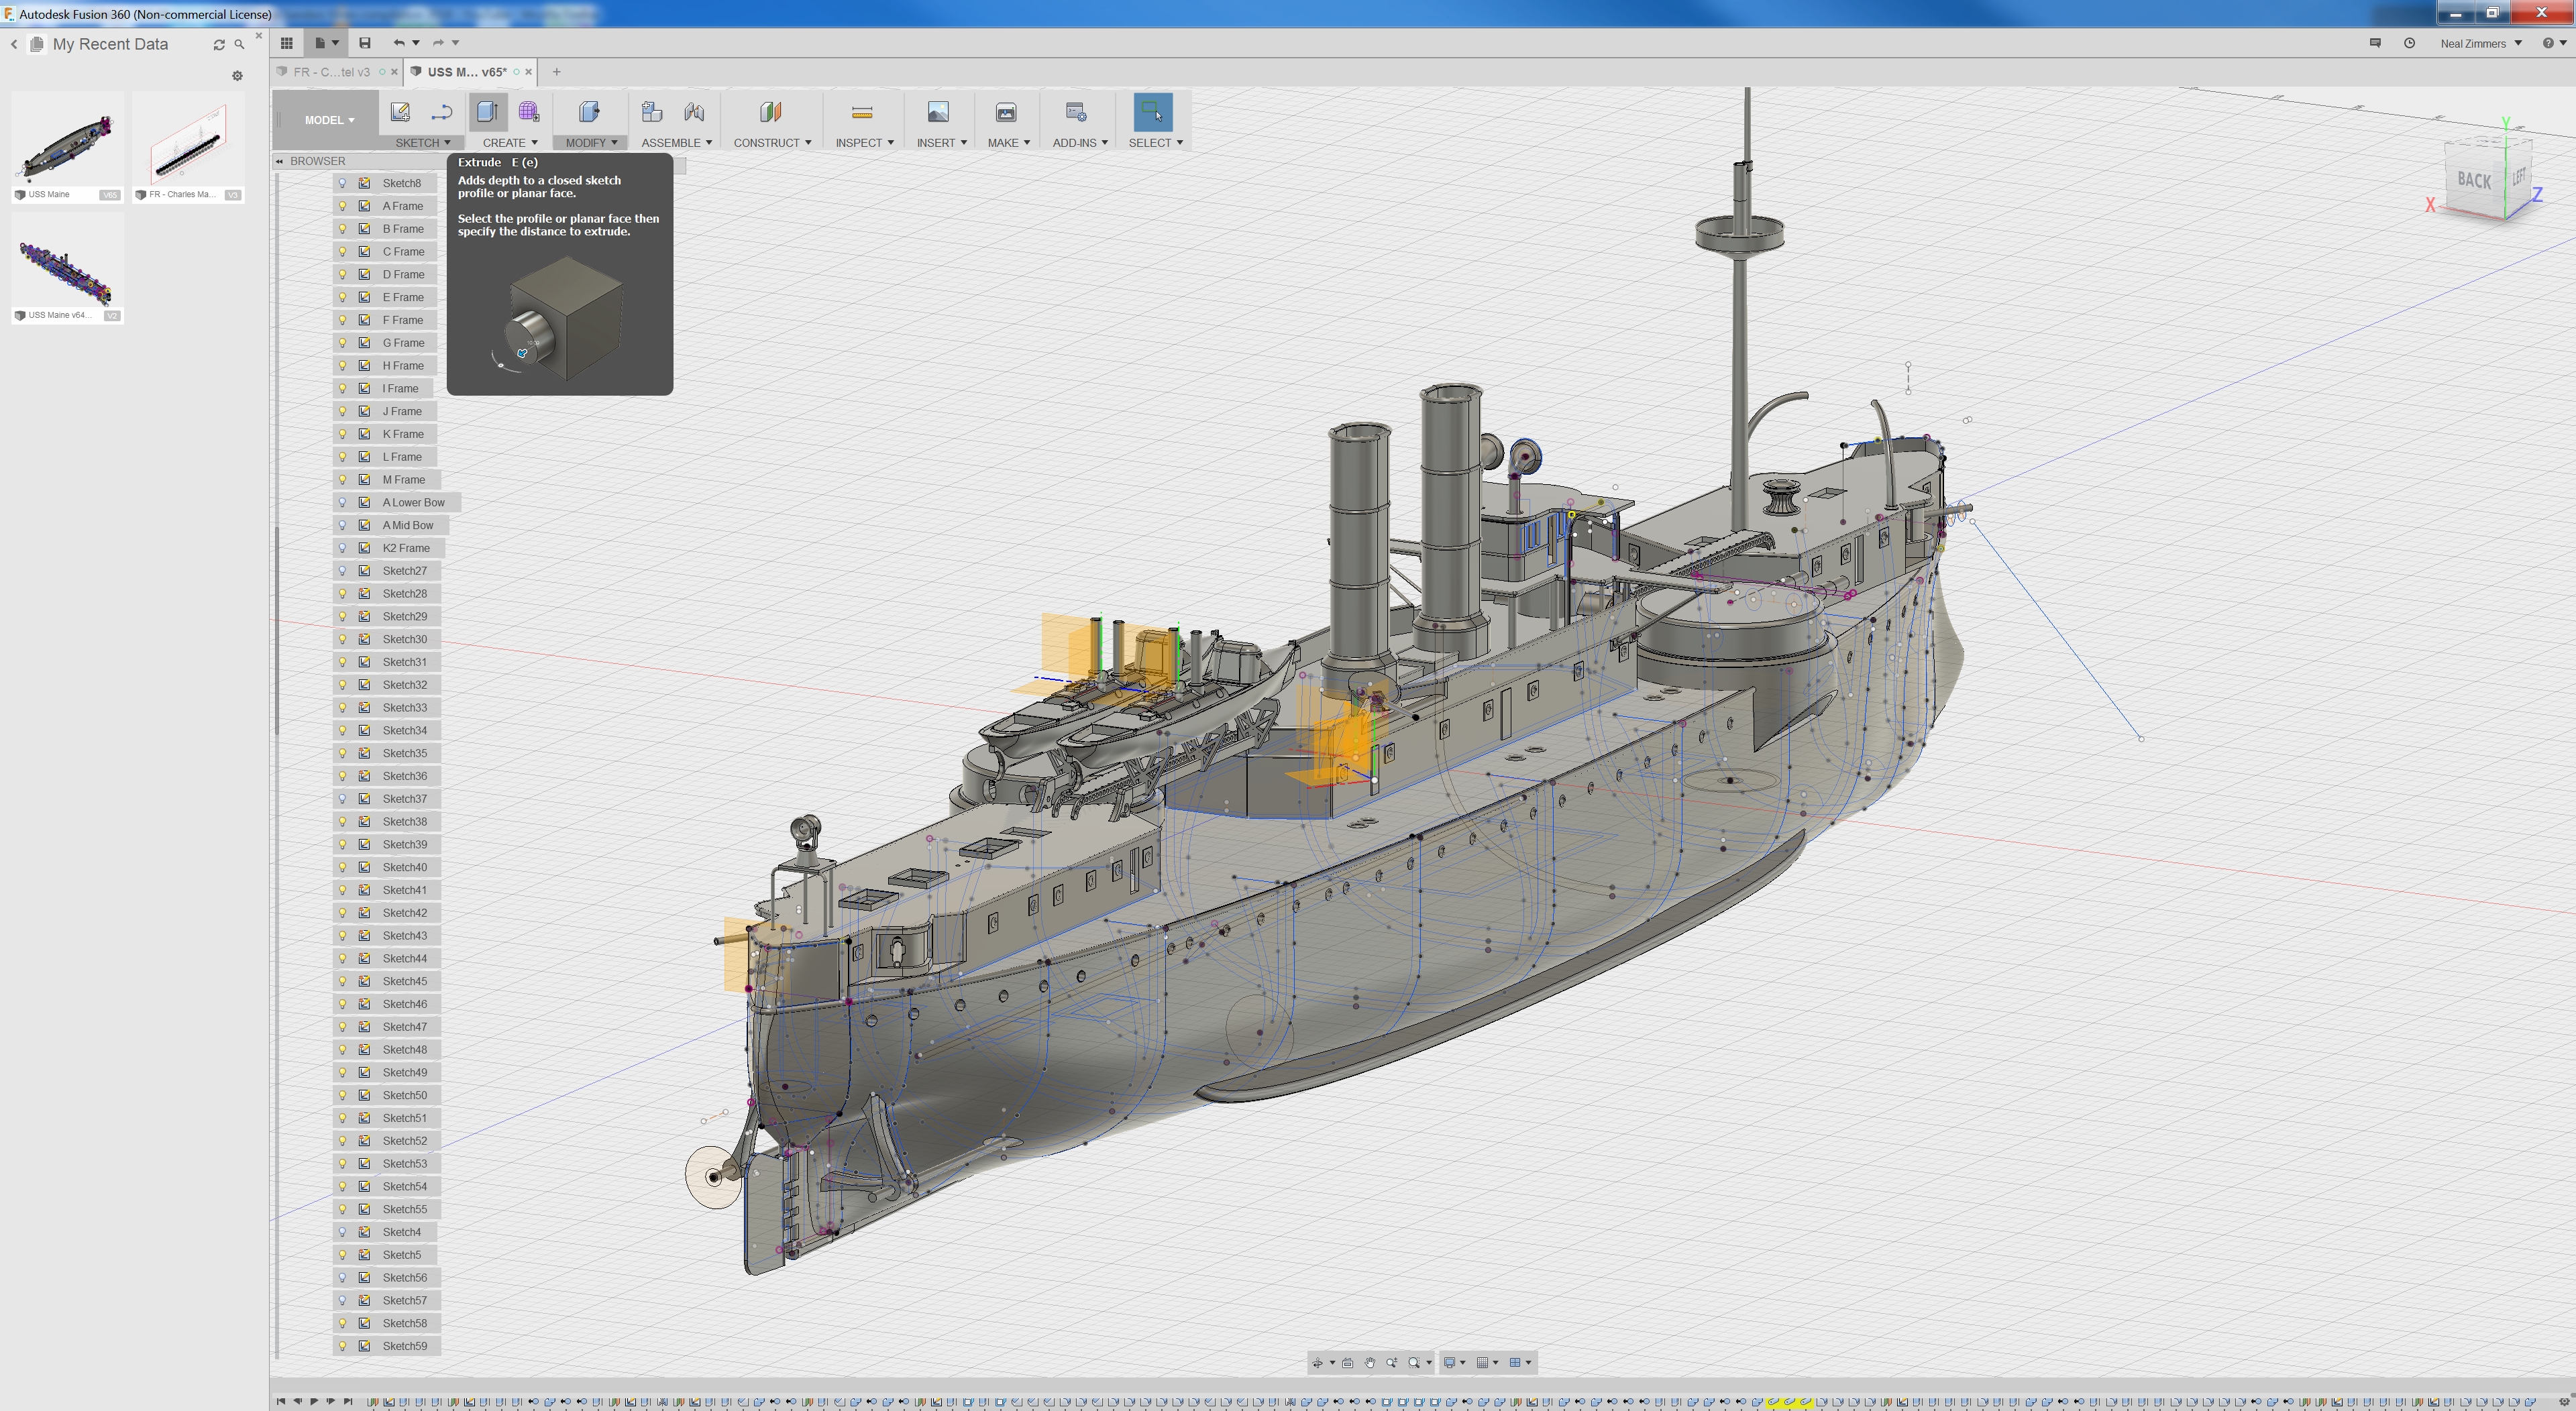
I agree with Lou. I believe there wouldn't be much reason to print a ship that could be reasonably modeled in the material of the original, especially wooden ships where the detailed construction is so much part of the beauty and fascination - unless it was for some kind of board game. I'm having a lot of fun printing and assembling an RC version of the Maine, I always enjoyed plastic model kits and so I'm kind of getting to relive my childhood passion.
-
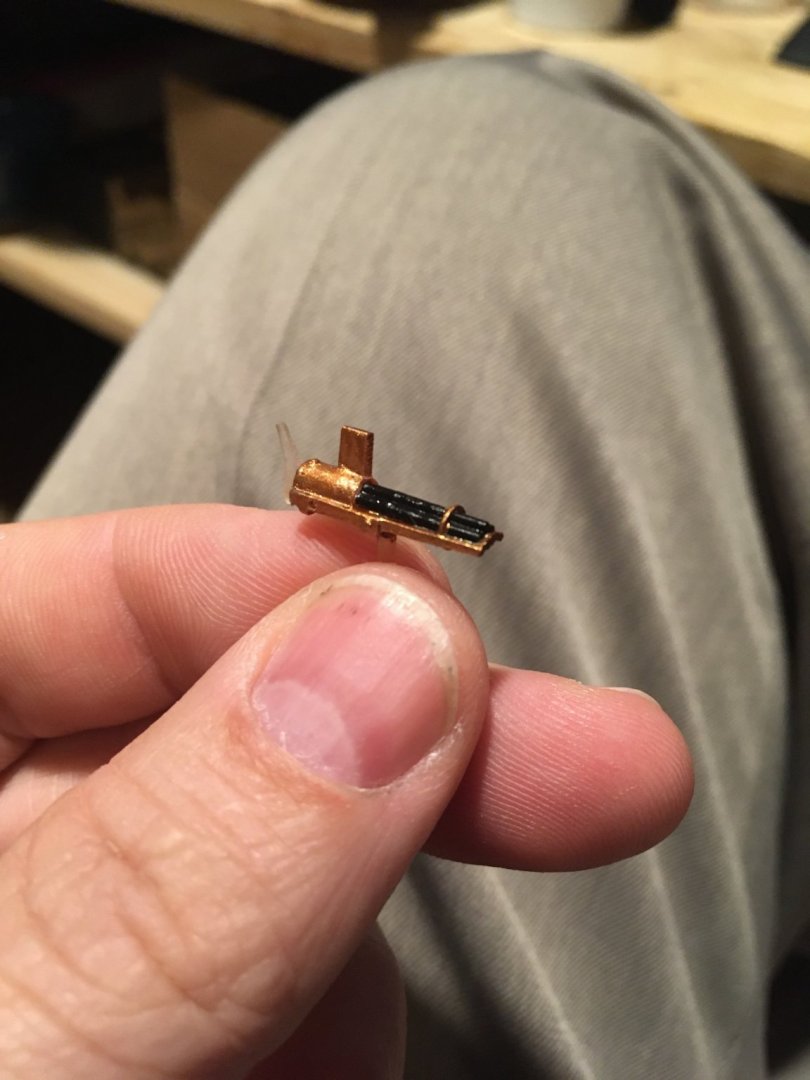
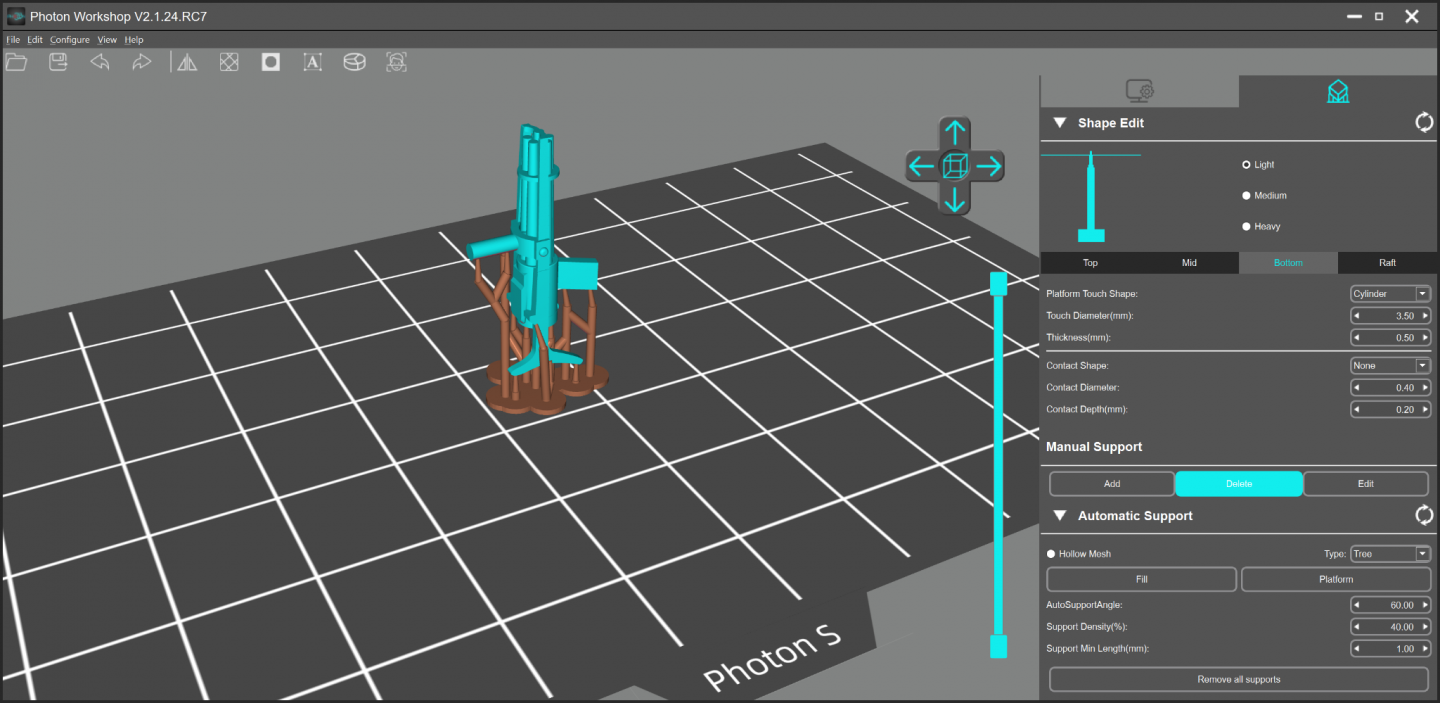
It was a bit of a challenge but not any more than learning how to use a regular filament printer. Similar to a typical filament deposition 3D printer, resin printers use .STL files that are sliced through a specific program - for resin printers they are converted to a format for 'stereo lithography' printing. I got the resin printer because I knew I would need it for some parts on the USS Maine that my regular filament printer would be challenged to successfully print. With a smaller nozzle (0.3mm) you can print small parts with decent detail but the resin printer takes it to the next level. you do have to learn a bit about how to position the parts for the resin printer and then there's the whole issue of having resin and a wash station and curing box (or use the sun). I go through 2 pairs of rubber gloves every time I use the resin printer for something. One big advantage with the resin printer is is that you can print multiples of the same part in the same time it takes to print just one. So when I printed that last Hotchkiss revolving cannon I didn't do just one, I did 12 since I knew I have other ships in work that will need them.
-
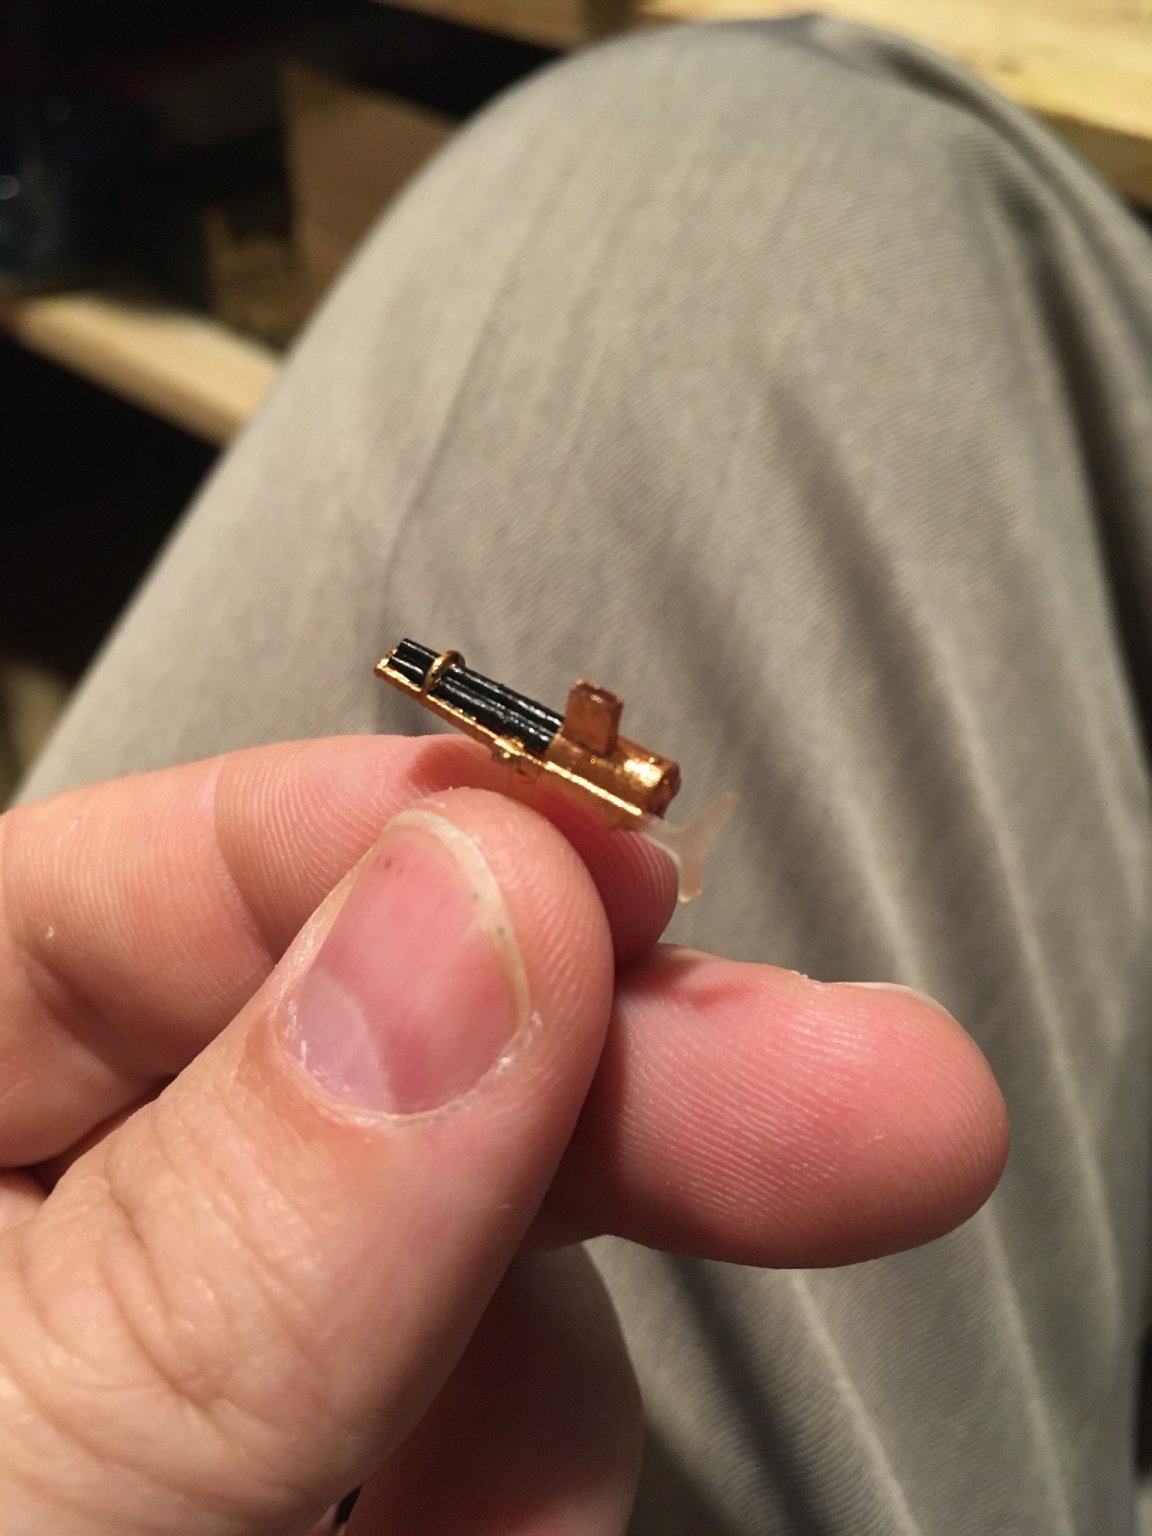
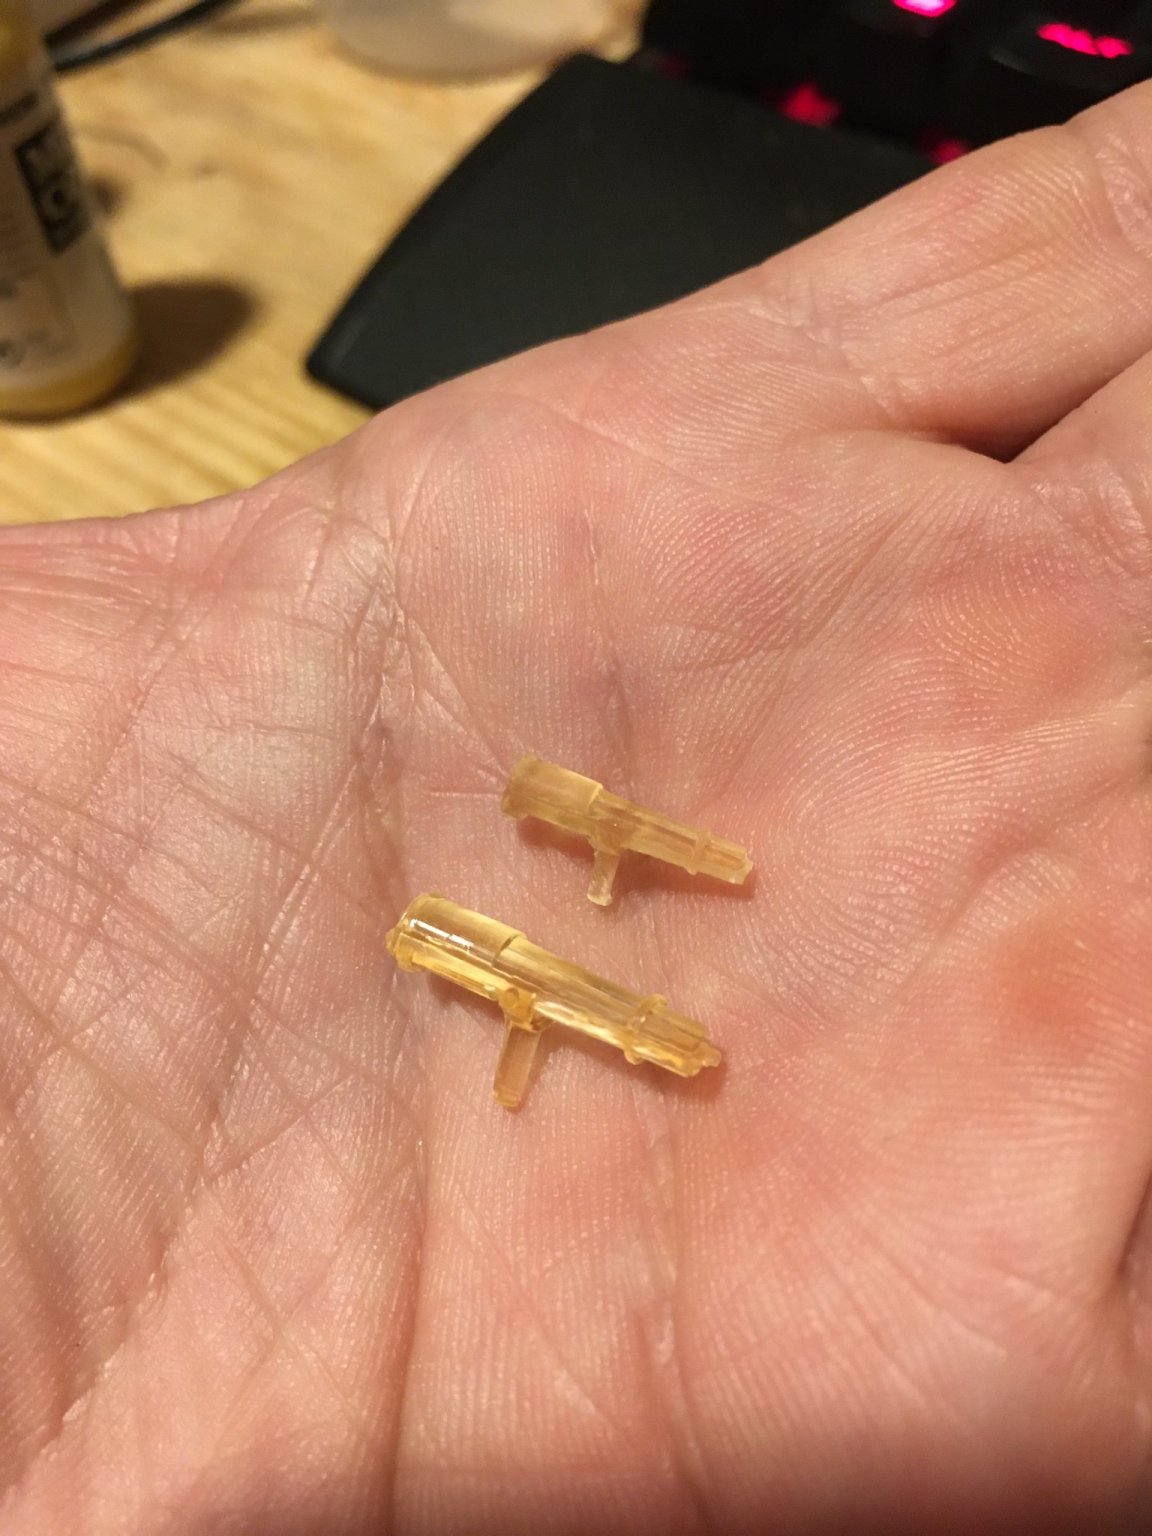
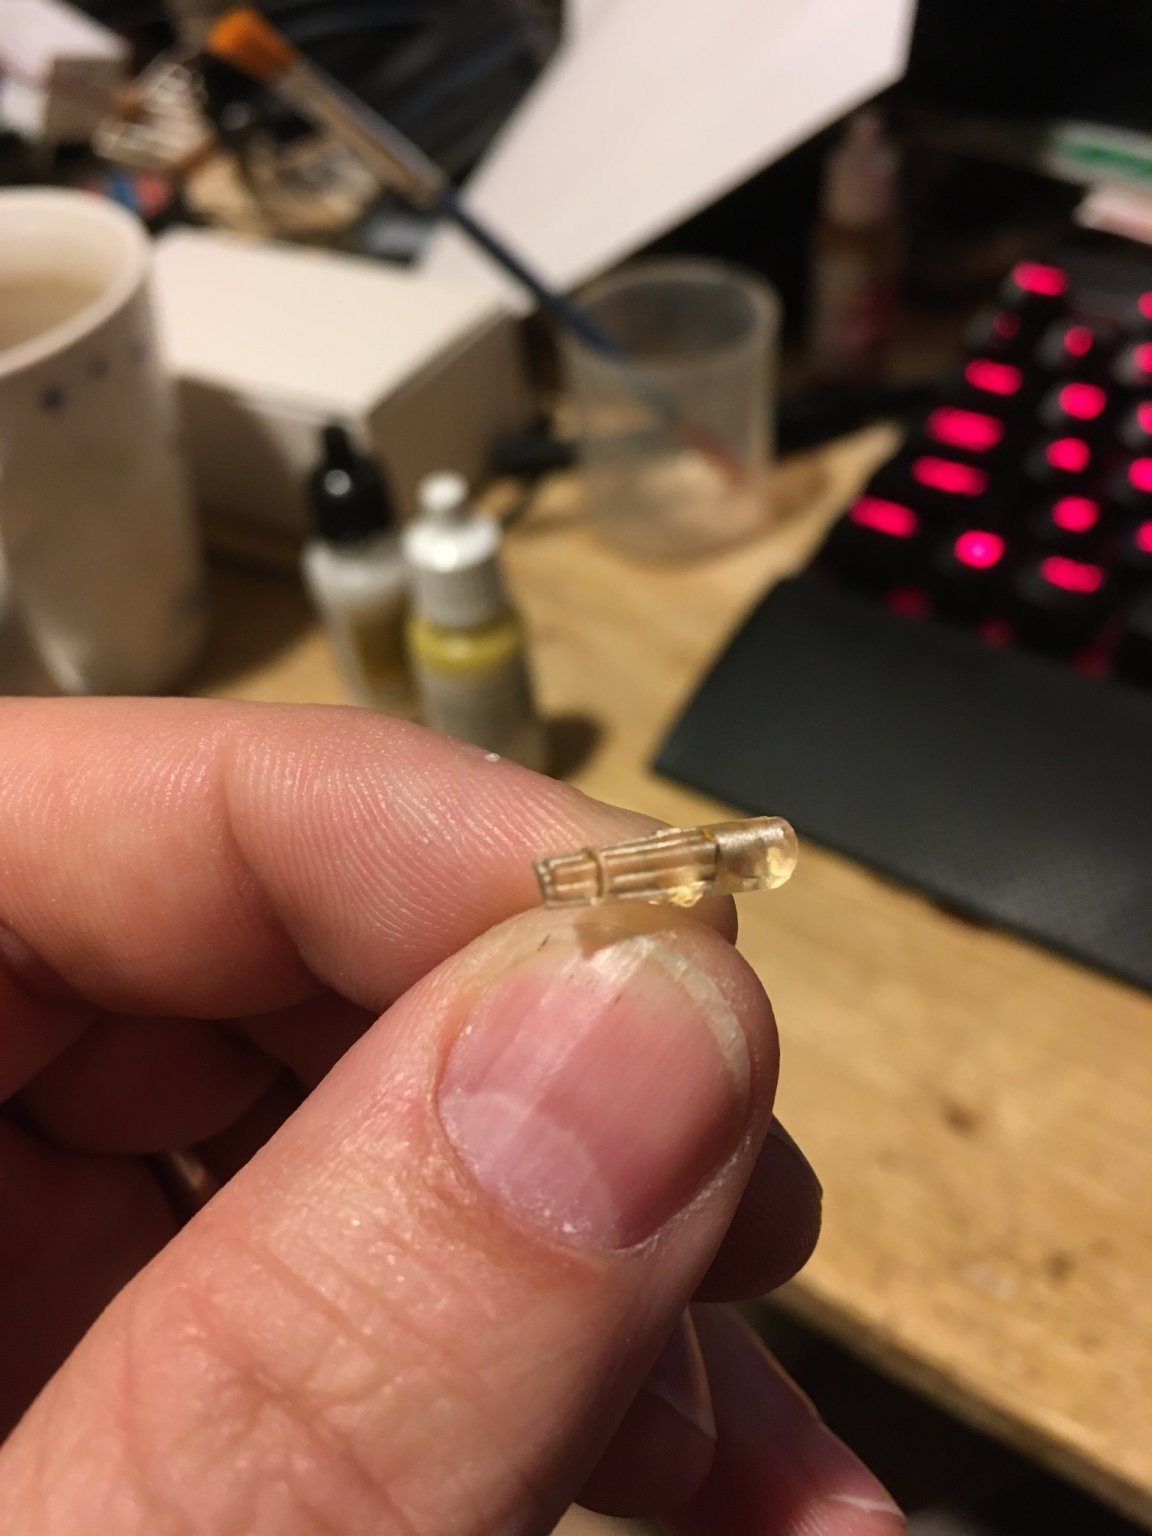
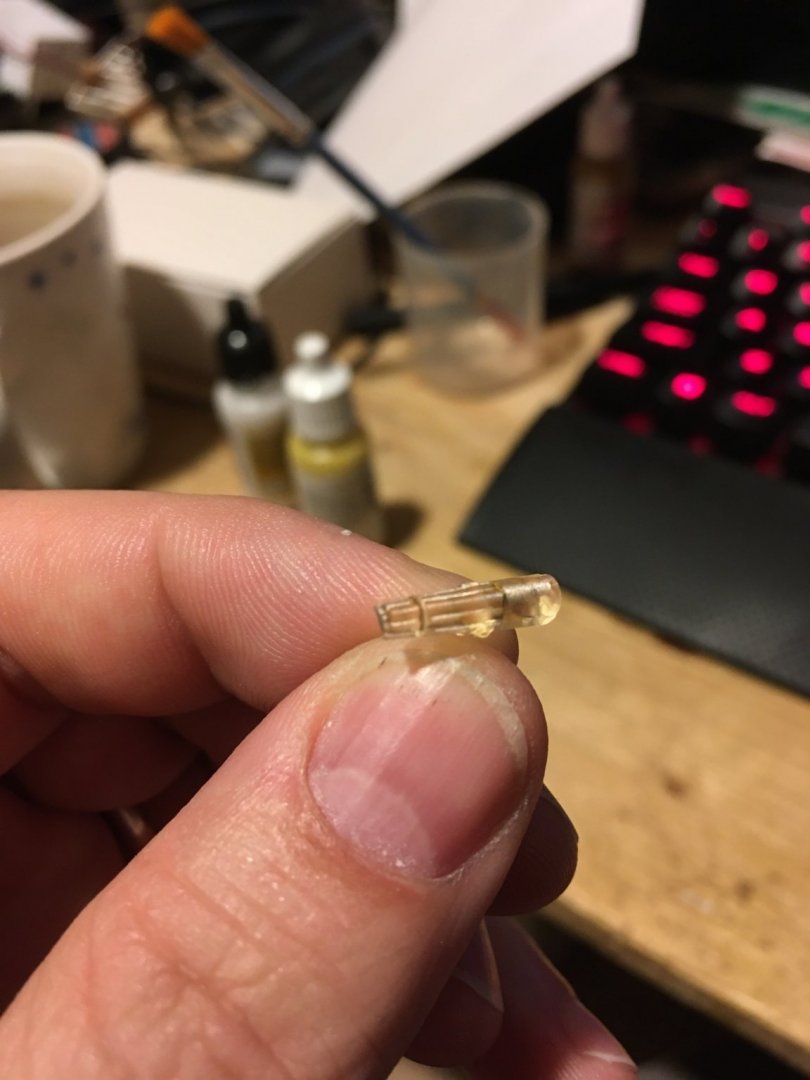
Hotchkiss cannon turned out well, sure are small, had to use a loupe to be able to paint!


-
Usually going hotter would reduce the stress - so you're probably fine there unless you're seeing problems with the first layers spreading out like an 'elephants foot'.
- 460 replies
-
- 5
-
-
- Finished
- Flower-class
- (and 1 more)
-
Alan, I've been there done that myself! bit surprised the epoxy gave way but the mating surface area for the hull joins on the corvette aren't super big - One question I have looking at the sections on the work table - when you join them are you somehow clamping the sections to the internal shape? 3d printed parts in a U shape will tend to have more tension on the outside and want to splay open a bit so I assume that's probably something that you have a method to deal with.
- 460 replies
-
- 6
-
-
- Finished
- Flower-class
- (and 1 more)
-
I use an Anycubic Photon S
-
Hi CDW, yes it’s from a resin printer
-
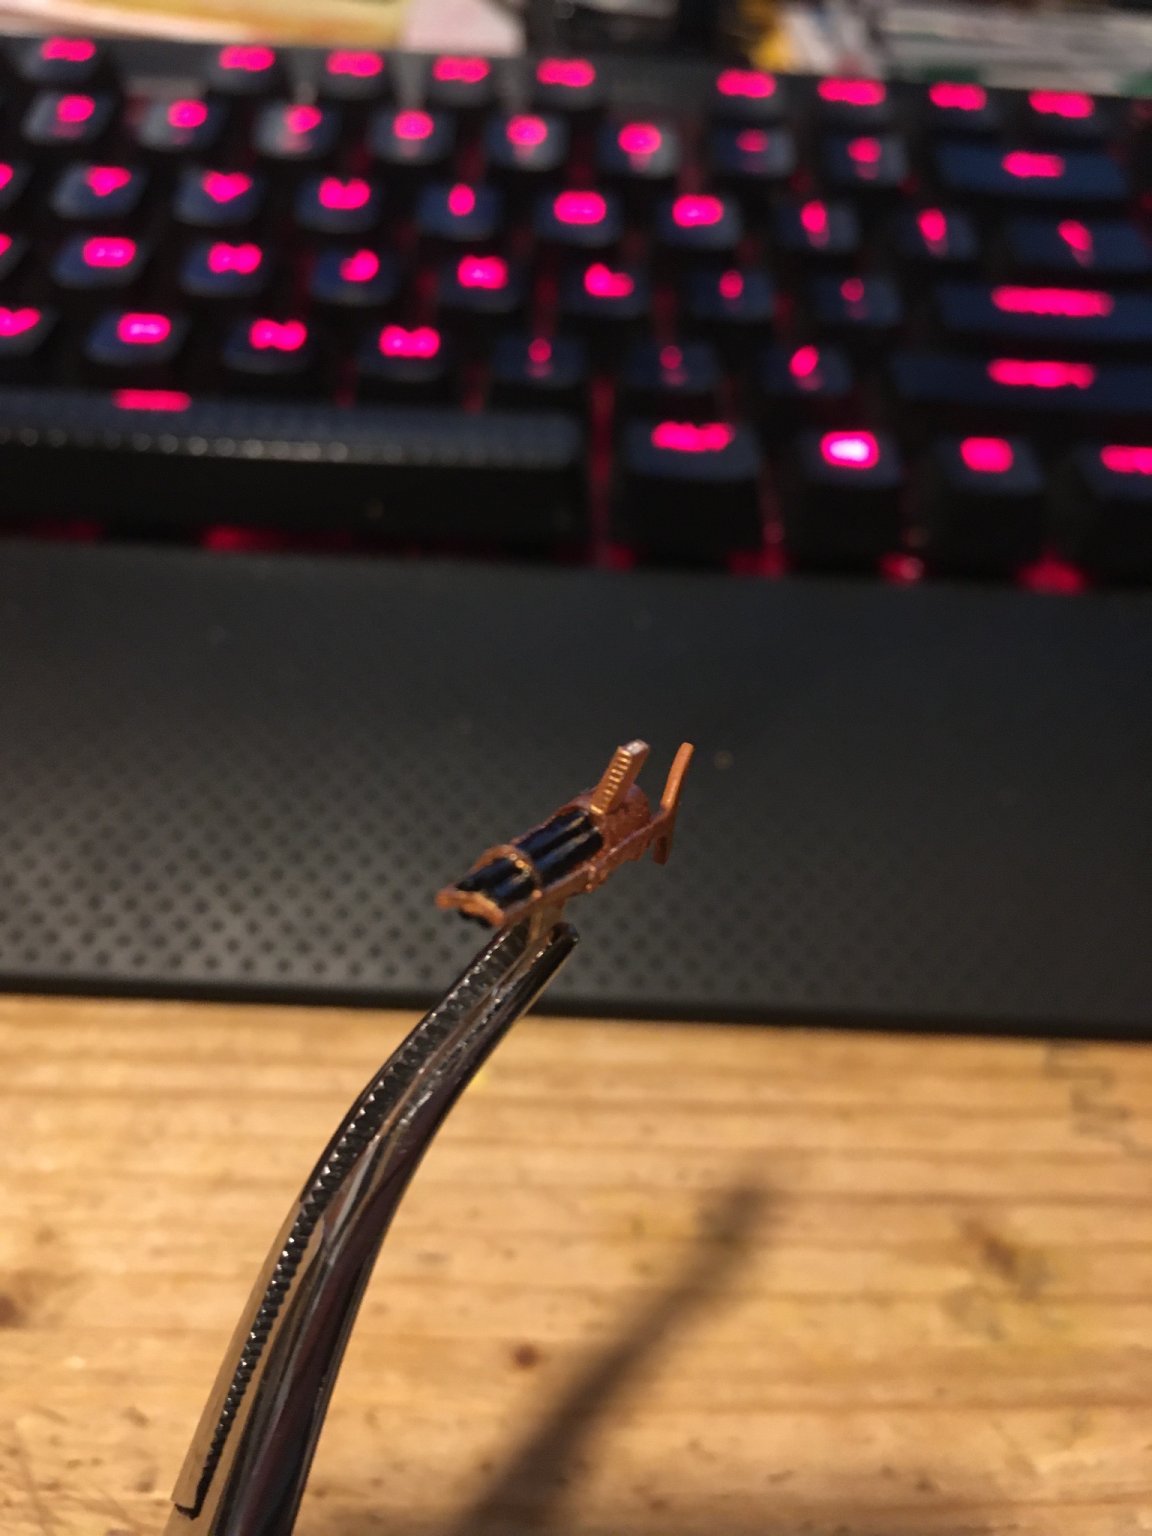
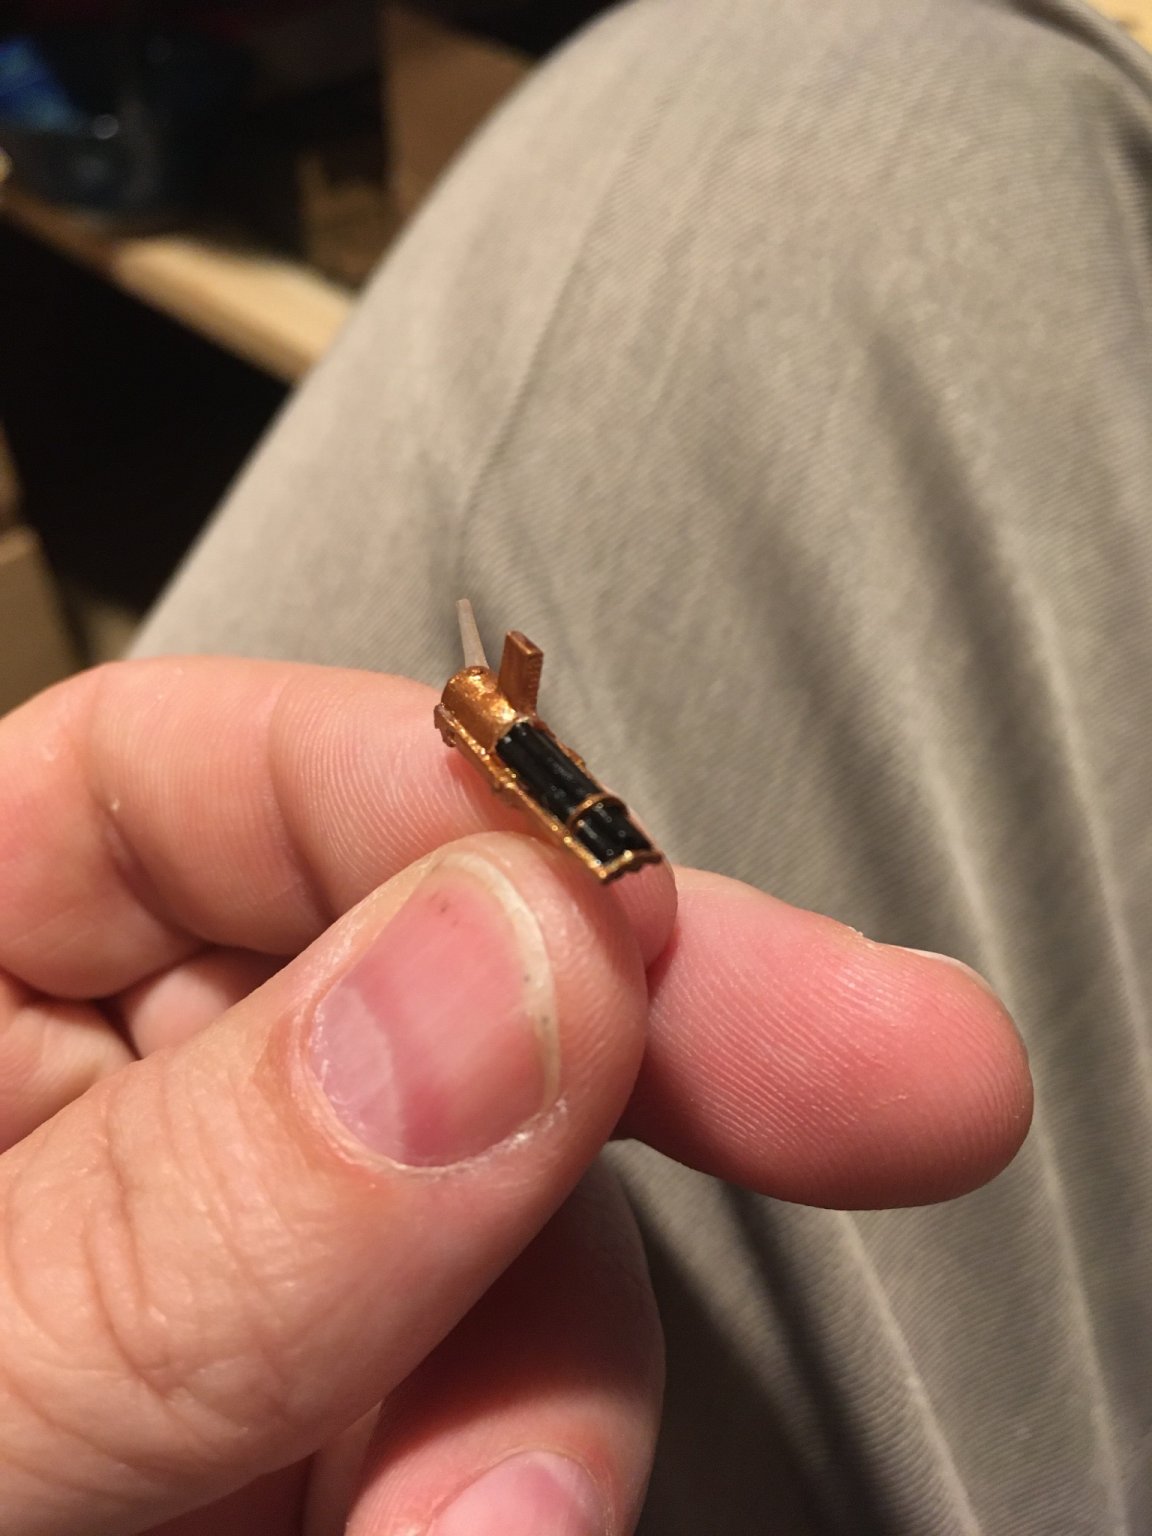
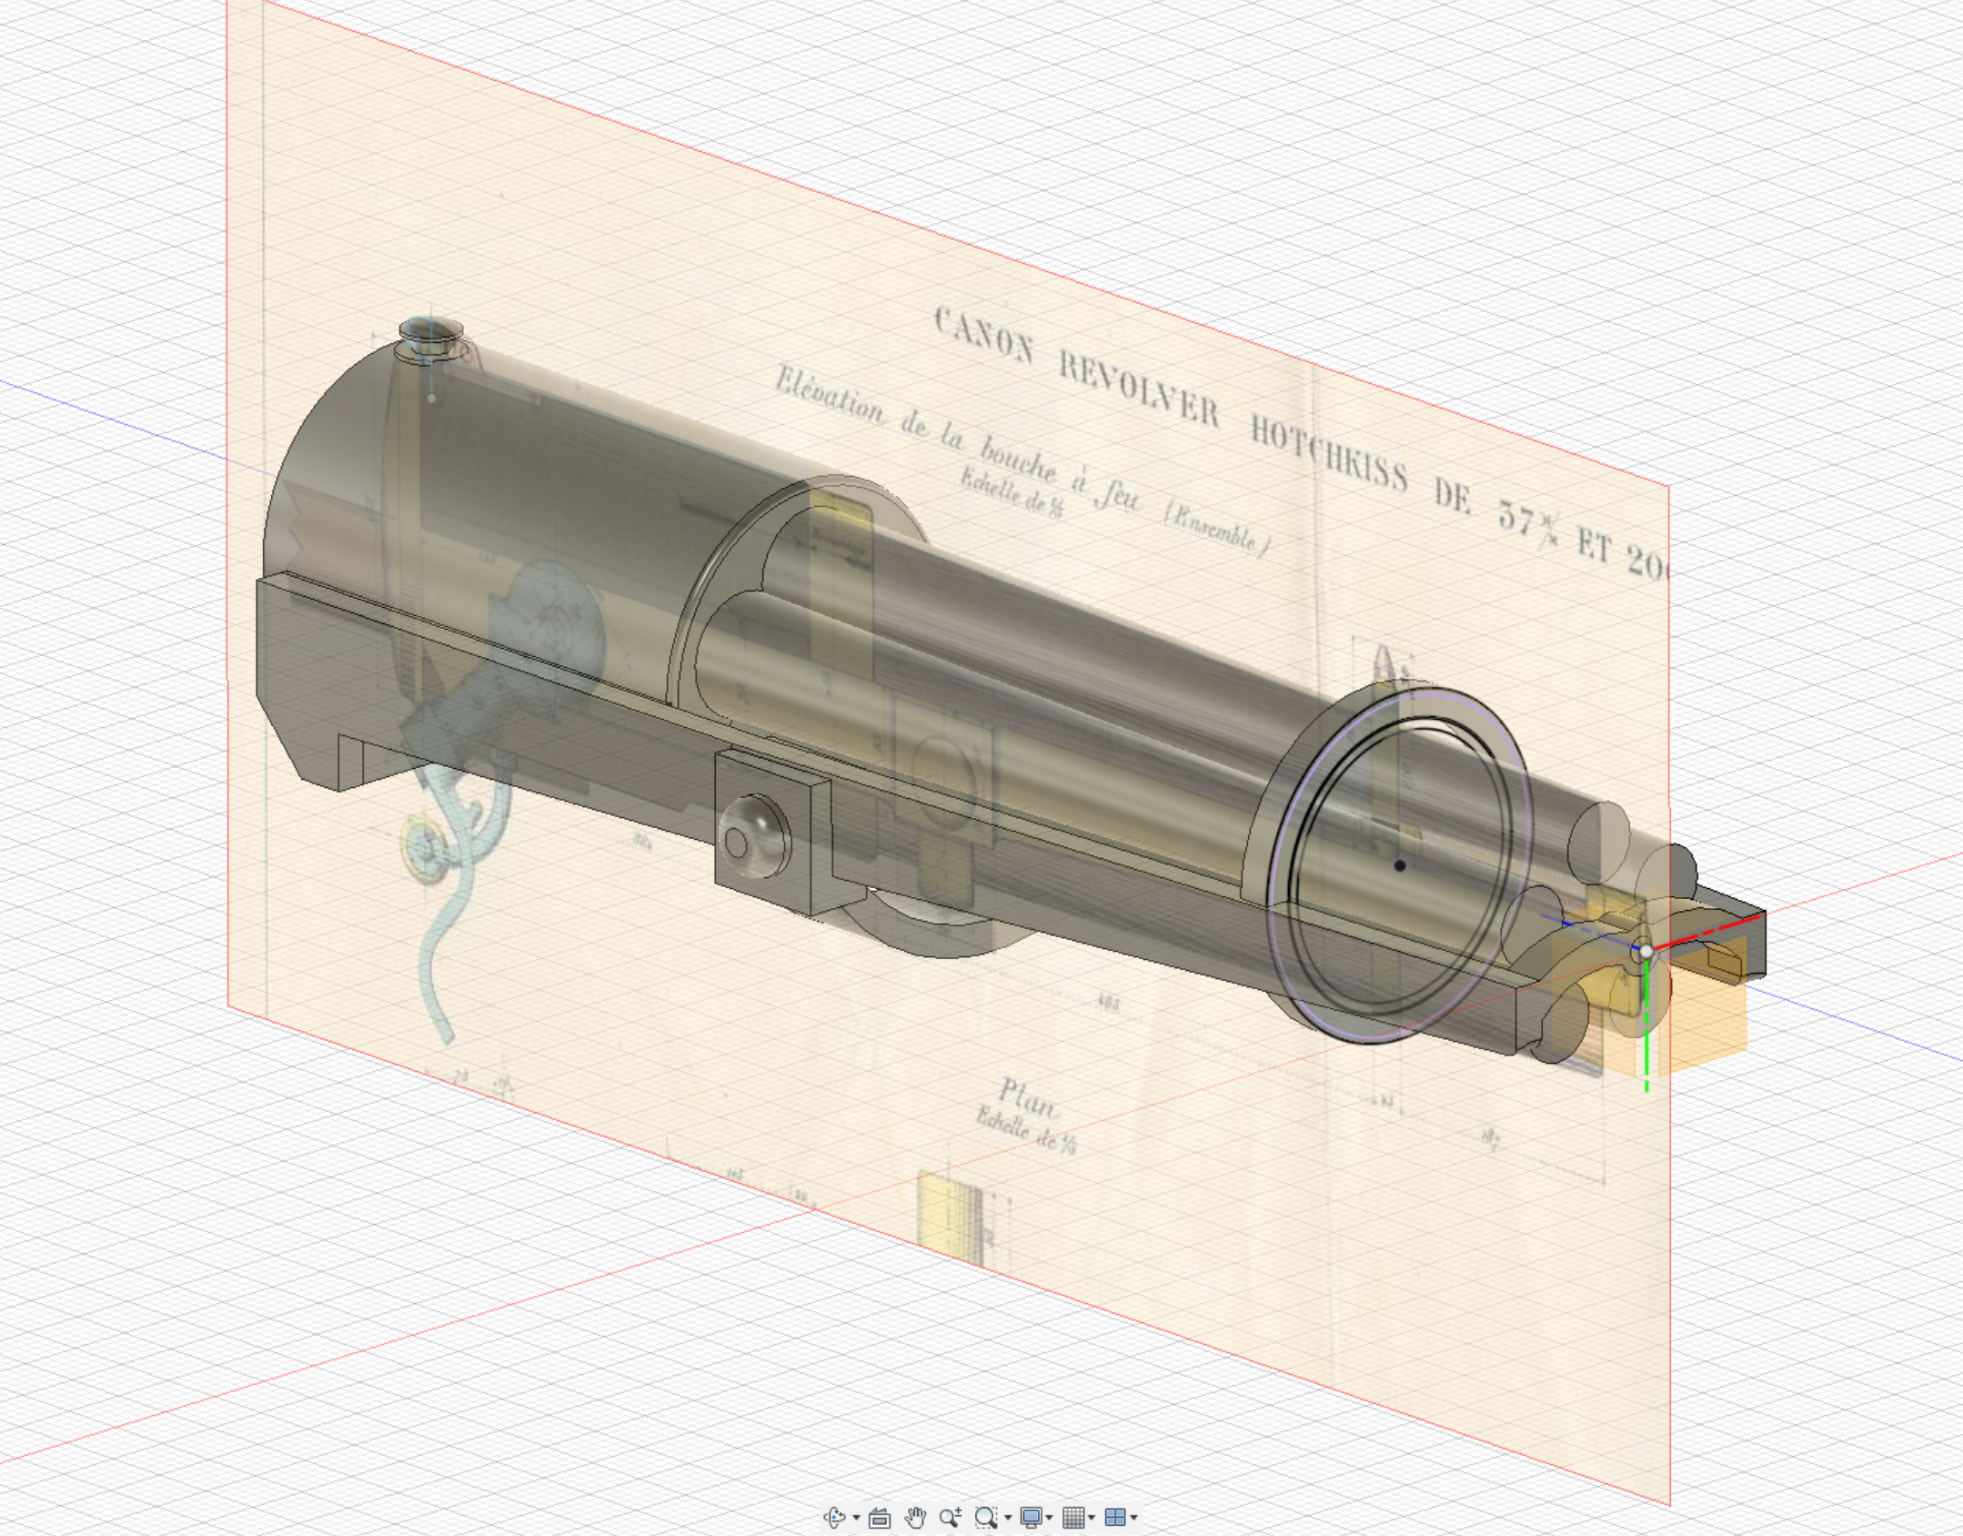
So on the topic of can a 37mm Hotchkiss cannon be printed at 1/72 scale - the answer is yes - I think.... small one is actually too small (at 12mm) for 1/72, and the large one is too large (19mm) - so I've adjusted to the proportions (though it's still about 1mm longer than it technically would be at scale but) and added the shoulder brace and magazine and printing another one and hope it turns out!

-
Alan, what temperature do you set the bed to when printing? If your getting lifting during the print you can up the bed temp to around 60c ….. currently I set my bed at 50c but I keep the bed on after the print is done.
- 460 replies
-
- 5
-
-
- Finished
- Flower-class
- (and 1 more)
-
I've also had some good experiences with automotive primer - not sure if I would give up Gesso for it on hulls but I use primer almost exclusively on small parts (with some light sanding prior to spraying) and there it works well for me -
- 460 replies
-
- 7
-
-
- Finished
- Flower-class
- (and 1 more)
-
Hi Dan yes have that or a version of it - one think I might try is printing without the barrels and then use small pipe or rod for the barrels - but I'm going to try to print one later today.

-
I've heard about gesso in a spray can but it's cut with significantly more water is my understanding - so many more coats required but maybe that's not an issue.
- 460 replies
-
- 6
-
-
- Finished
- Flower-class
- (and 1 more)
-
King, I want to add that you need to resist any urge to lay on the Gesso in a thick layer - especially if you don't cut it by 20-25% water. first time I used Gesso I laid three thick layers down and thought "this is amazing - I can make all those lines disappear"...but, once dry, it took me a really, really long time just to get to the point the left over brush marks were not so visible. Gesso can be quite a durable coating, especially if it's not fully cured and if you lay it on thick it's going it could take a long time to cure. As mentioned before, test out what you want to do on a separate piece and see how it goes.
- 460 replies
-
- 5
-
-
- Finished
- Flower-class
- (and 1 more)
-
Considering how the weld lines stand proud and separate the surface of the hull into multiple sections sanding the plastic directly would be somewhat torturous (and rotary tool would remove weld lines in the blink of an eye no matter how careful you are). A very thin layer of 75% gesso/ 25%water mix could help fill in the lines somewhat and then follow up with multiple layers of primer and then sanding could be a good way to go - but I recommend you print one additional of the hull sections to test whichever method you want to pursue since you will learn a lot about what works and what doesn't.
- 460 replies
-
- 6
-
-
- Finished
- Flower-class
- (and 1 more)
-
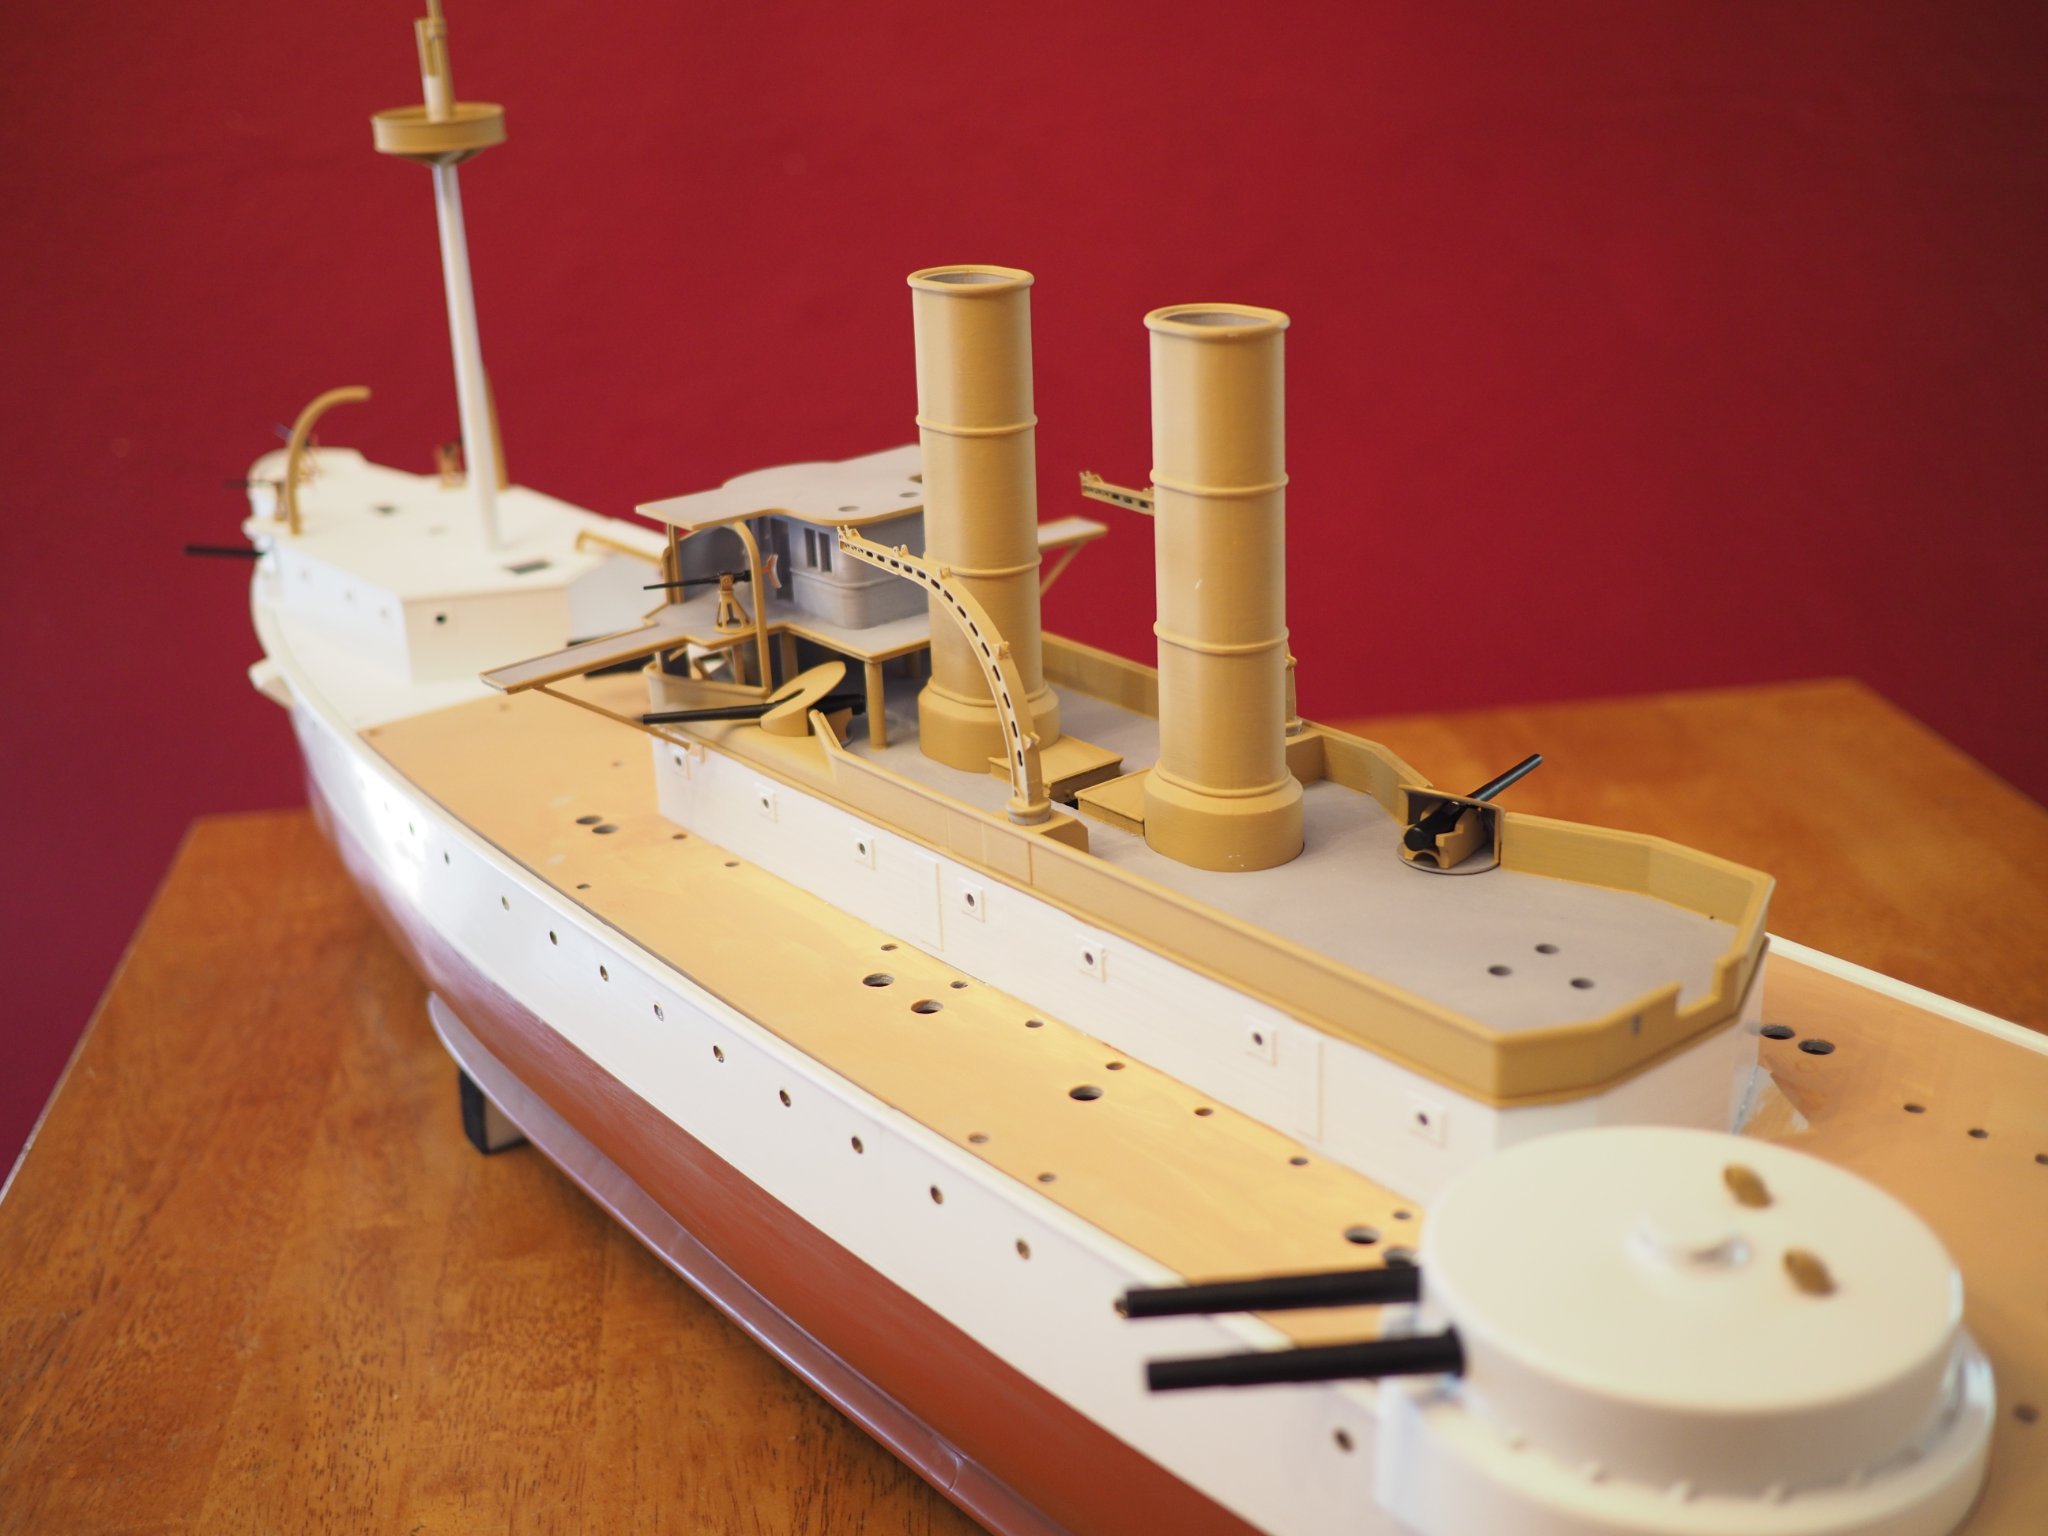
yeah those are not going to be easy - there were 37mm Hotchkiss revolving cannons (very similar to this) and then there's the .45cal Gatling guns (which I don't think were actually mounted on the ship but on limber but can't be sure). I do have photos that show both 1lbr QF guns and the 37mm Hotchkiss revolving cannons mounted on the 4 points of the center island - and one of the drawings in the national archive calls out "gatling gun or 1lbr" in those 4 locations. "gatling gun" is is sometimes a generic term used for revolving multi-barreled guns - but I'm going to go with what I have photographic evidence of. I'm going to attempt to make the 37mm Hotchkiss revolving cannons but they are probably at the limit of what I can print so I might fall back on mounting 1lbr QF guns.....
-
So I looked closer at the video the way the bow breaks the water results in an extreme upward travel and a curl much further back - this really isn’t unusual for this bow shape (it’s similar to ploughing a field) if you look very closely at the bow you’ll see the waterline at the bow is actually above surface of the water but is quickly forced upwards and outwards.
-
Yves, You're correct - but it might be more accurate to say the ship was too light in the stern, the tips of the props were not always in the water and I probably needed about 3/4" more draft!
-
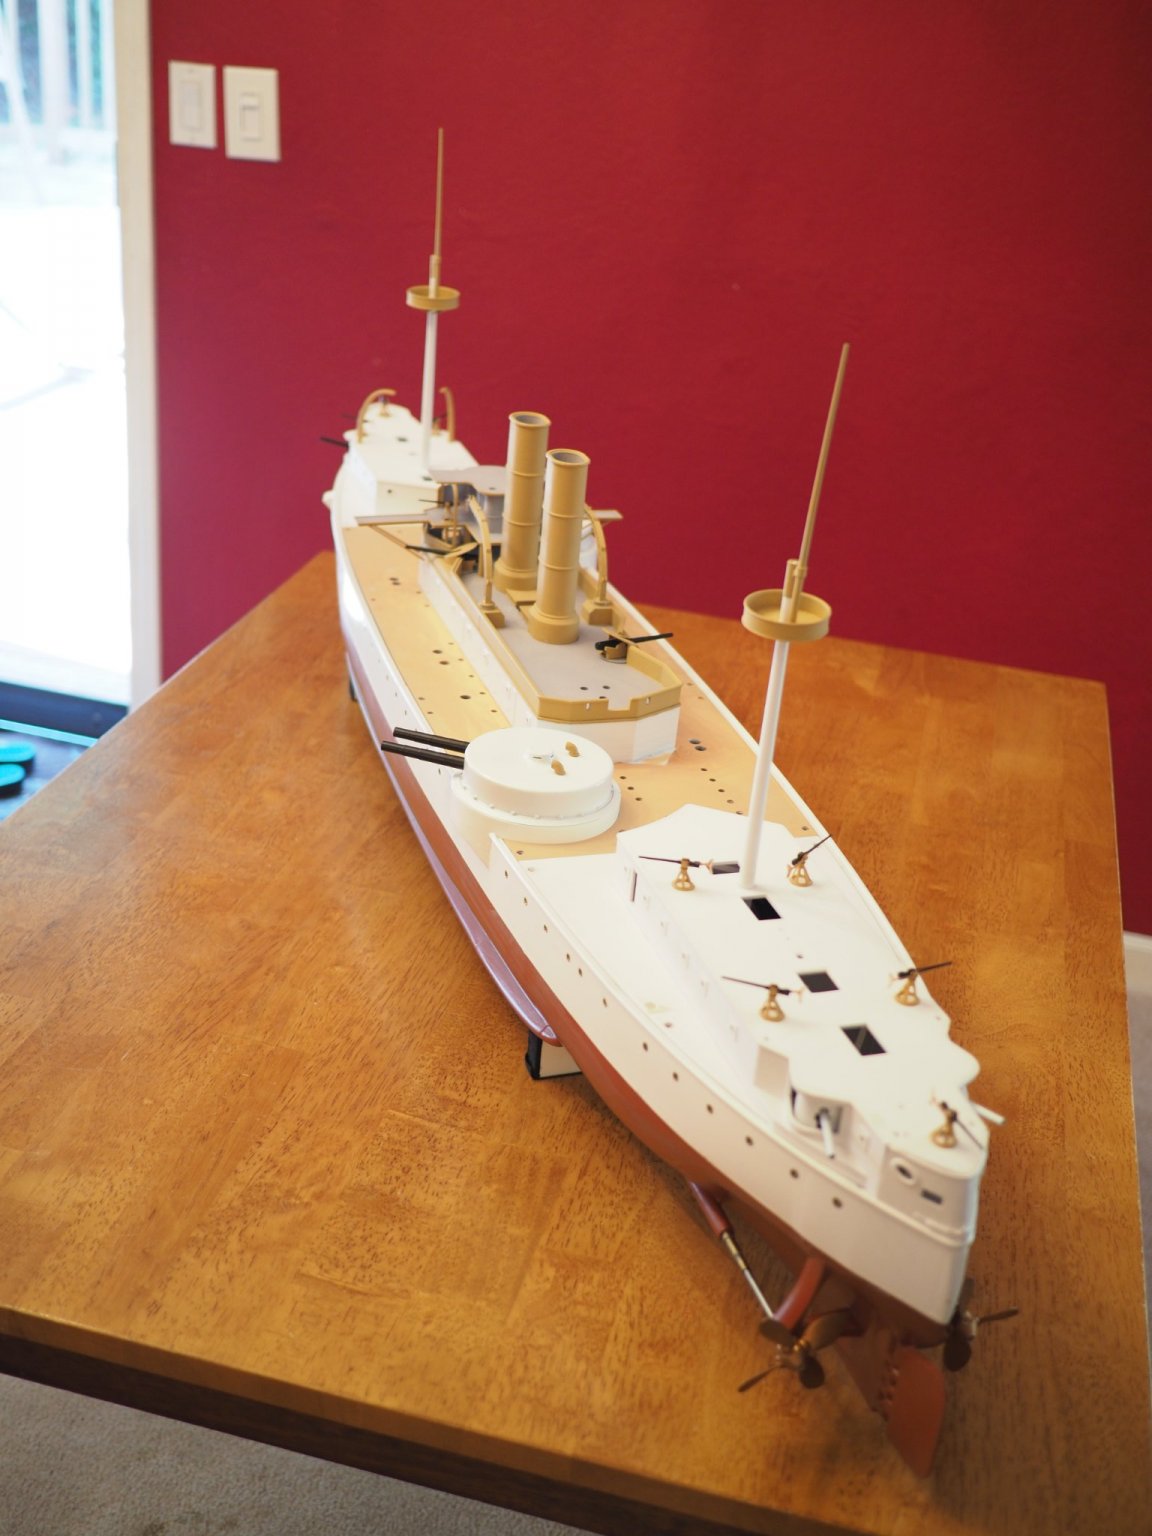
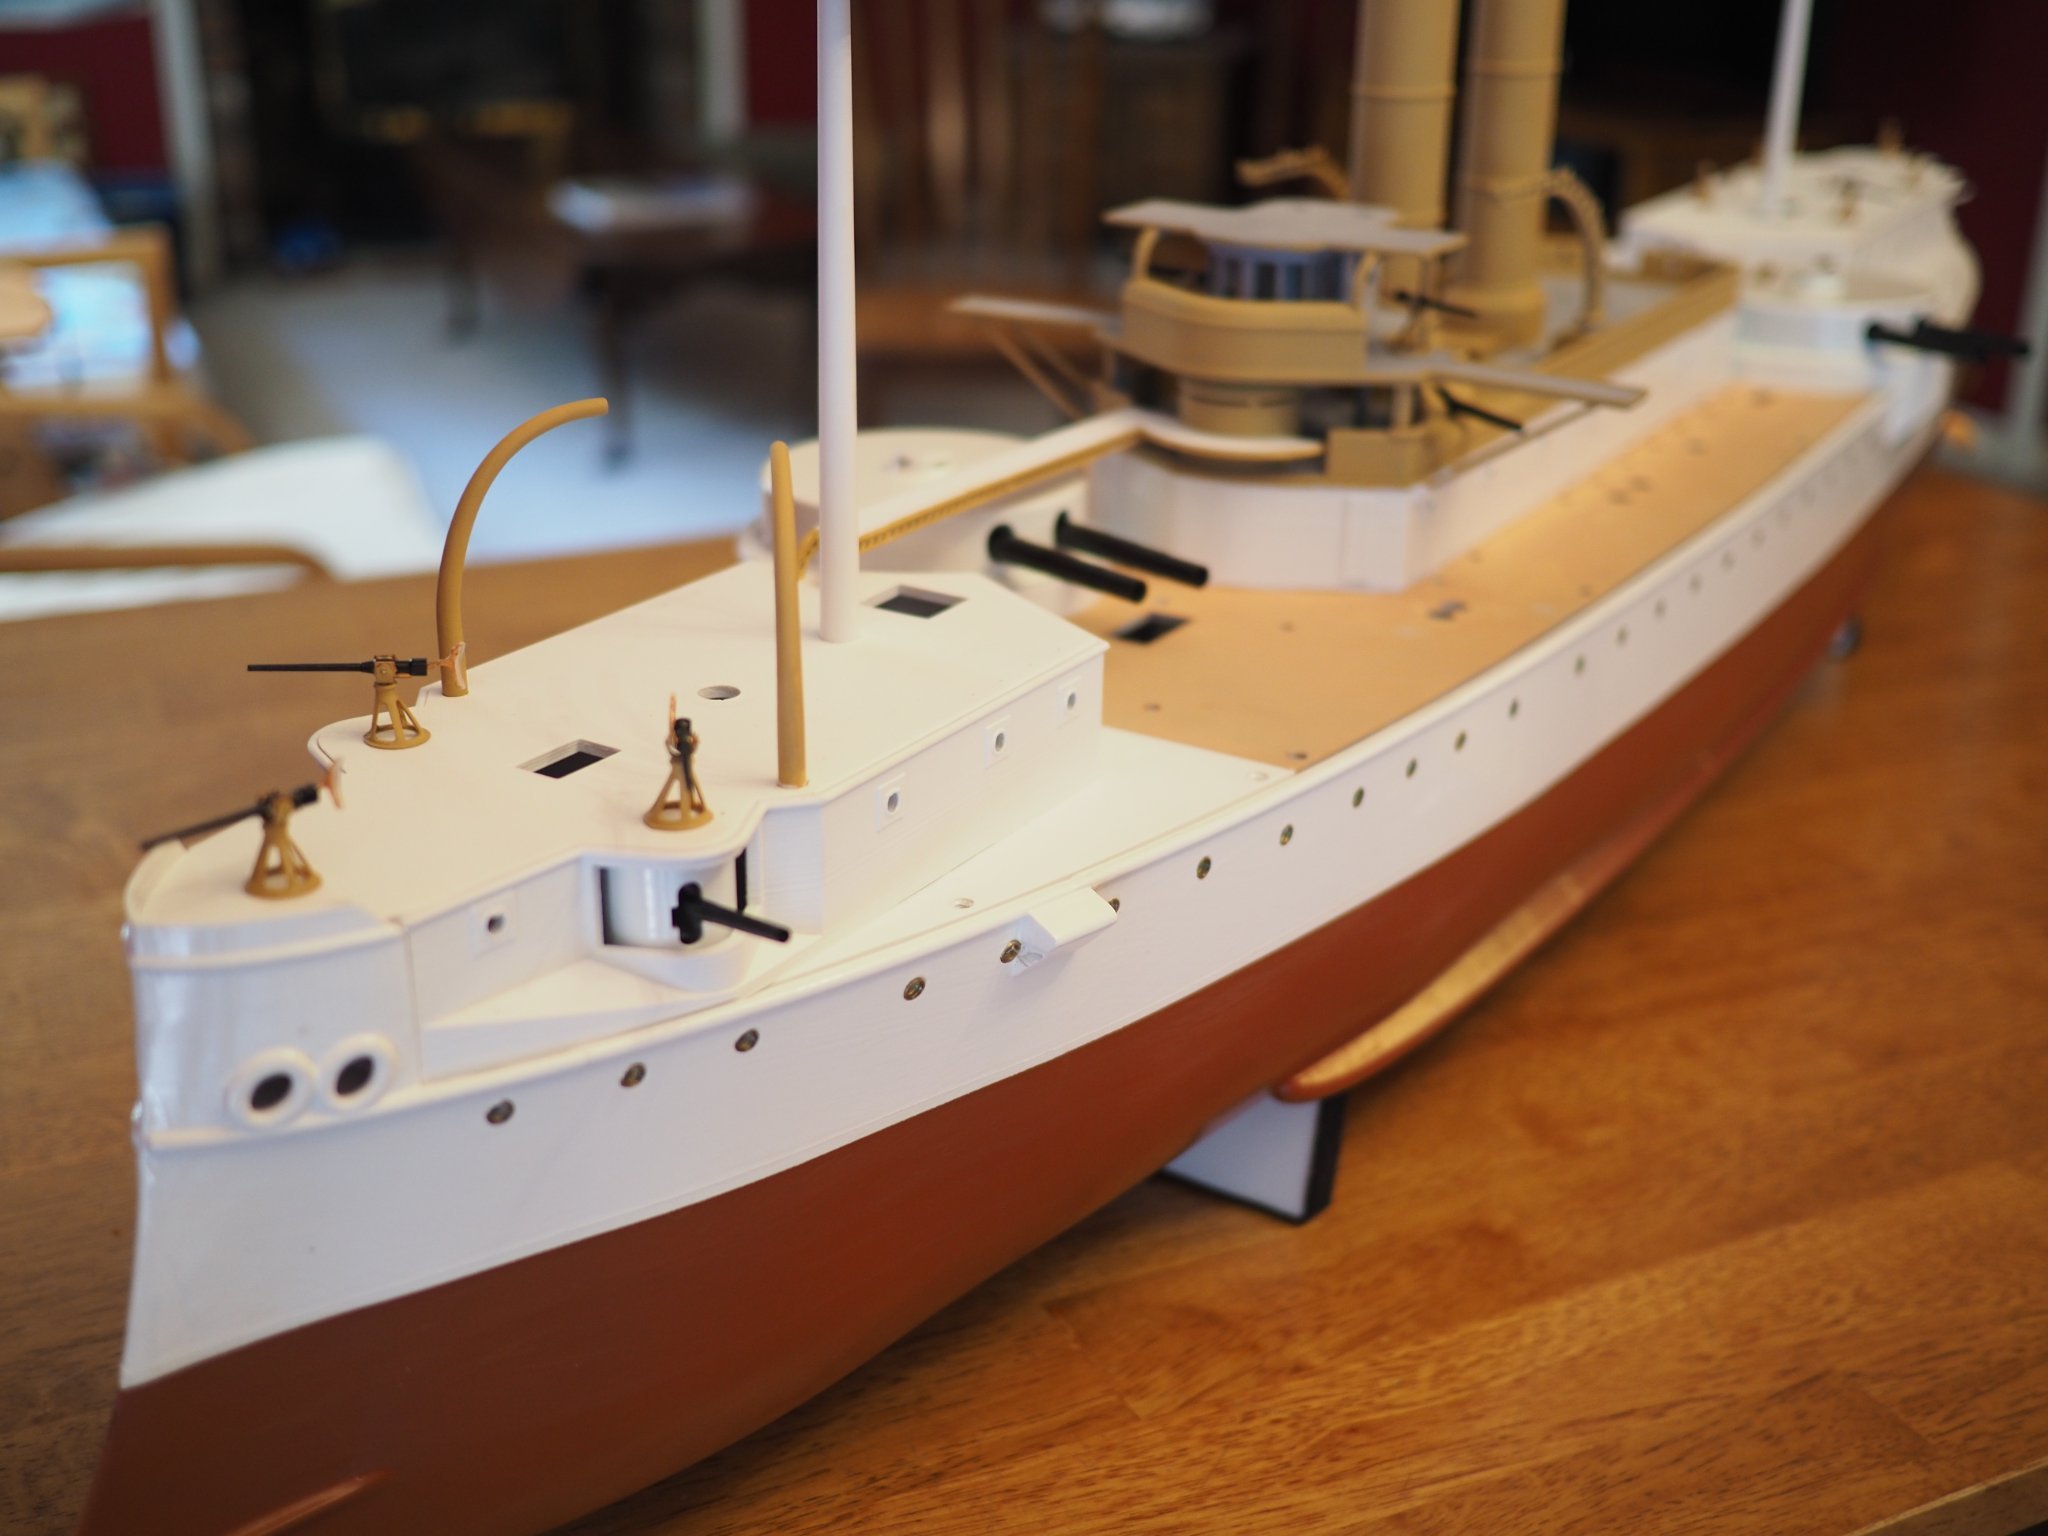
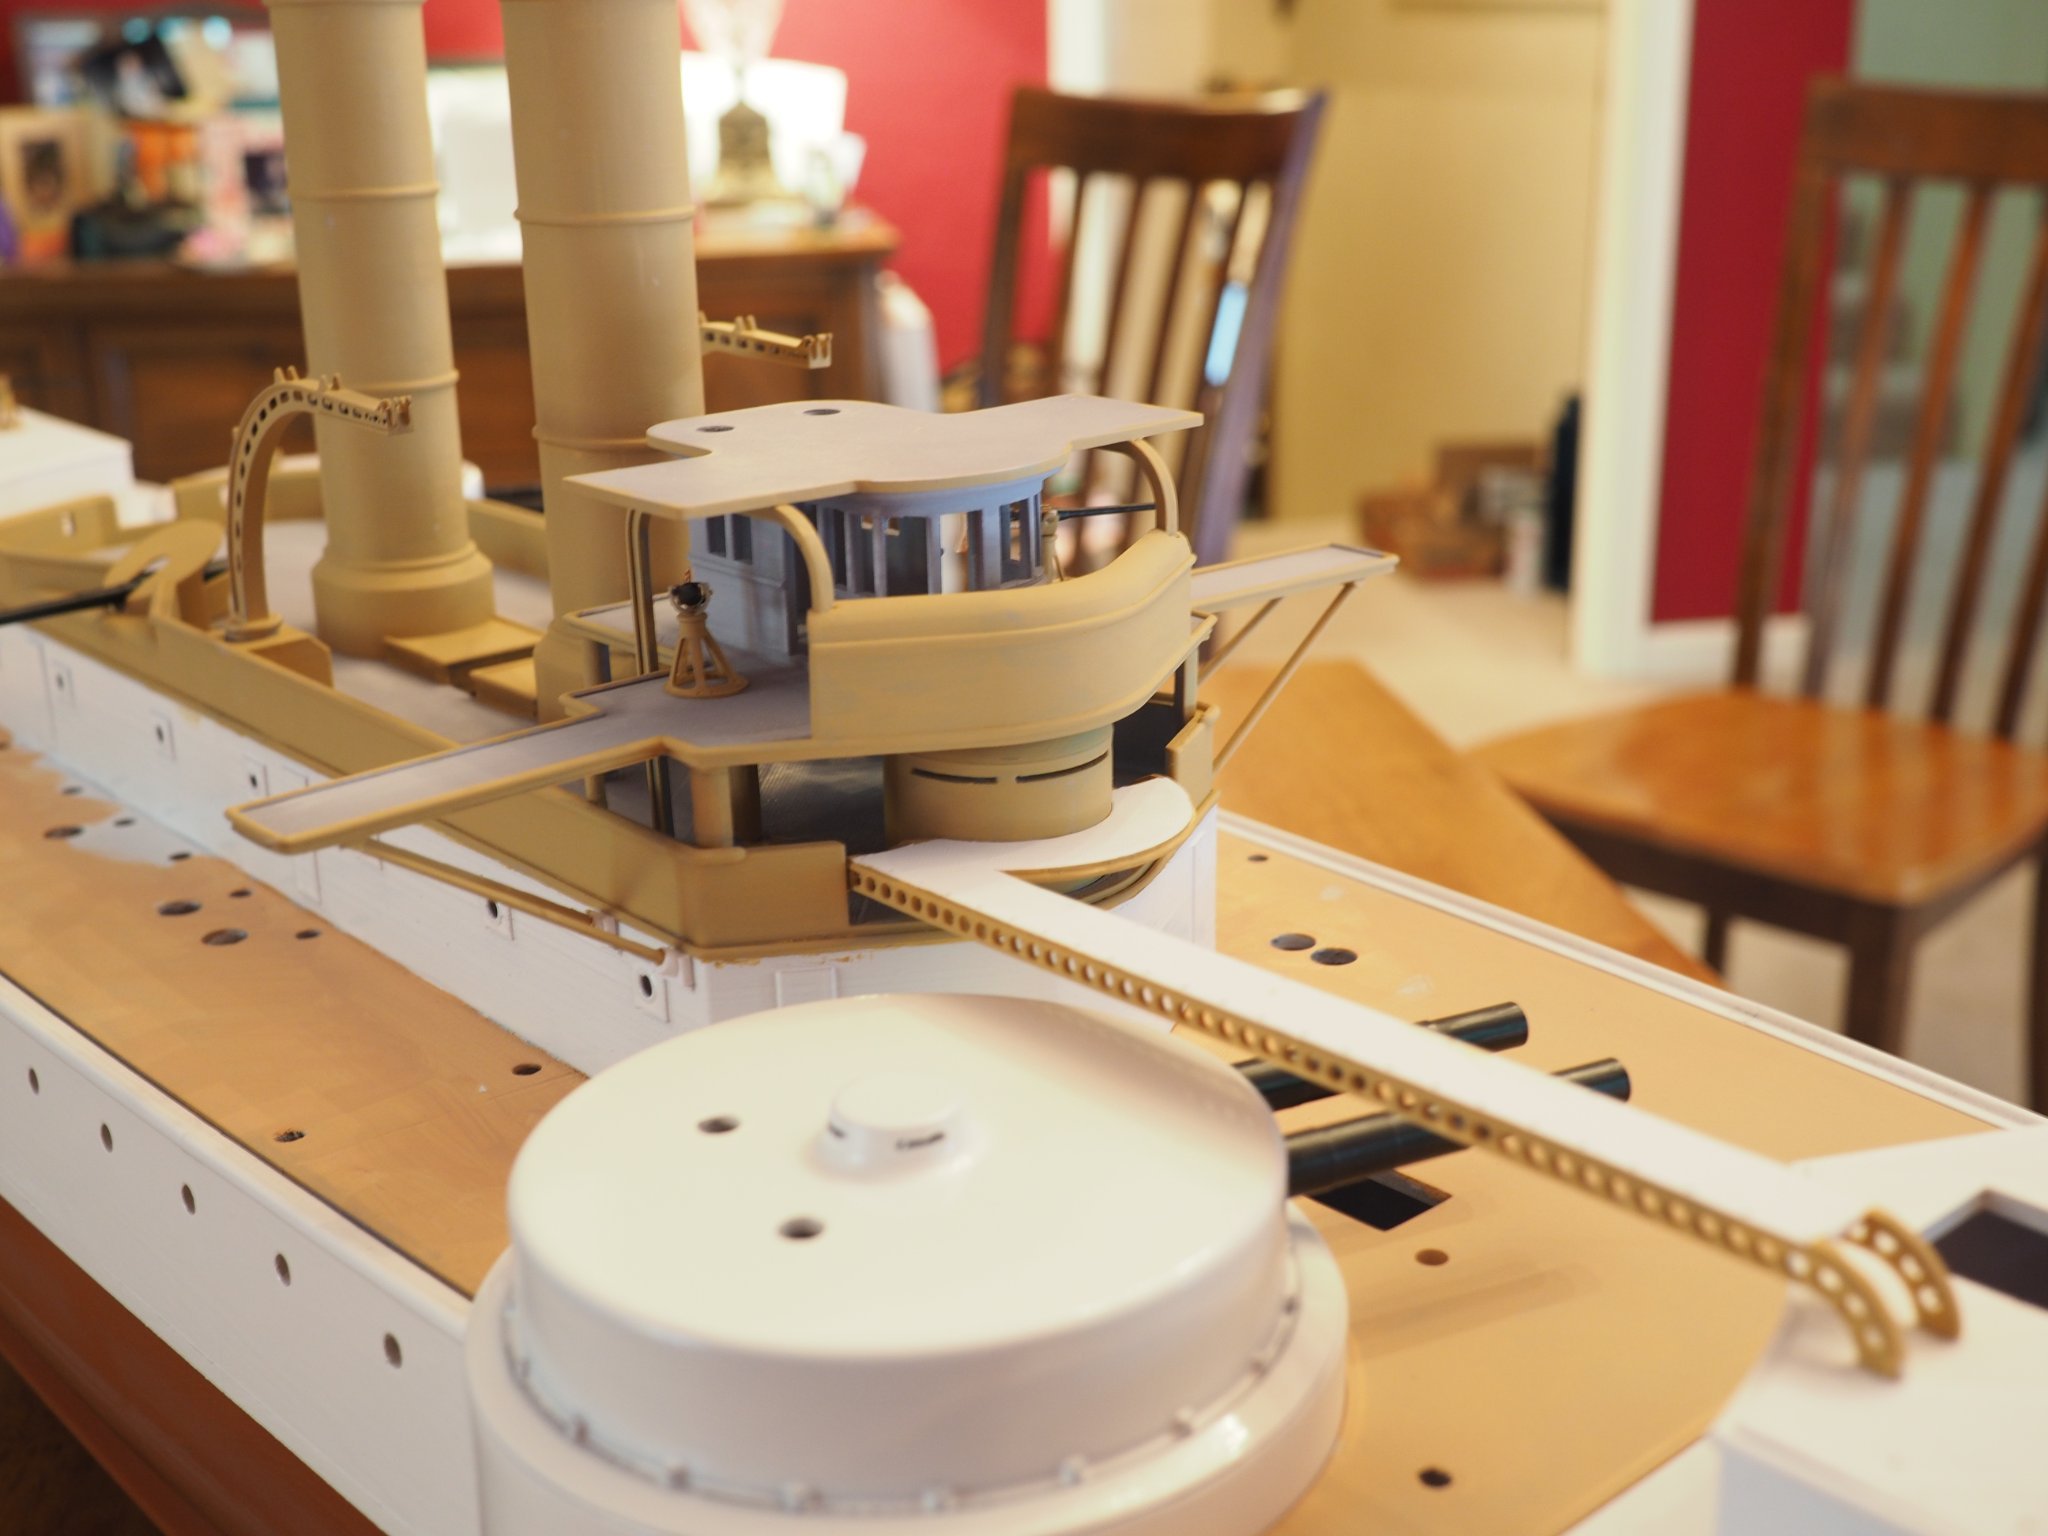
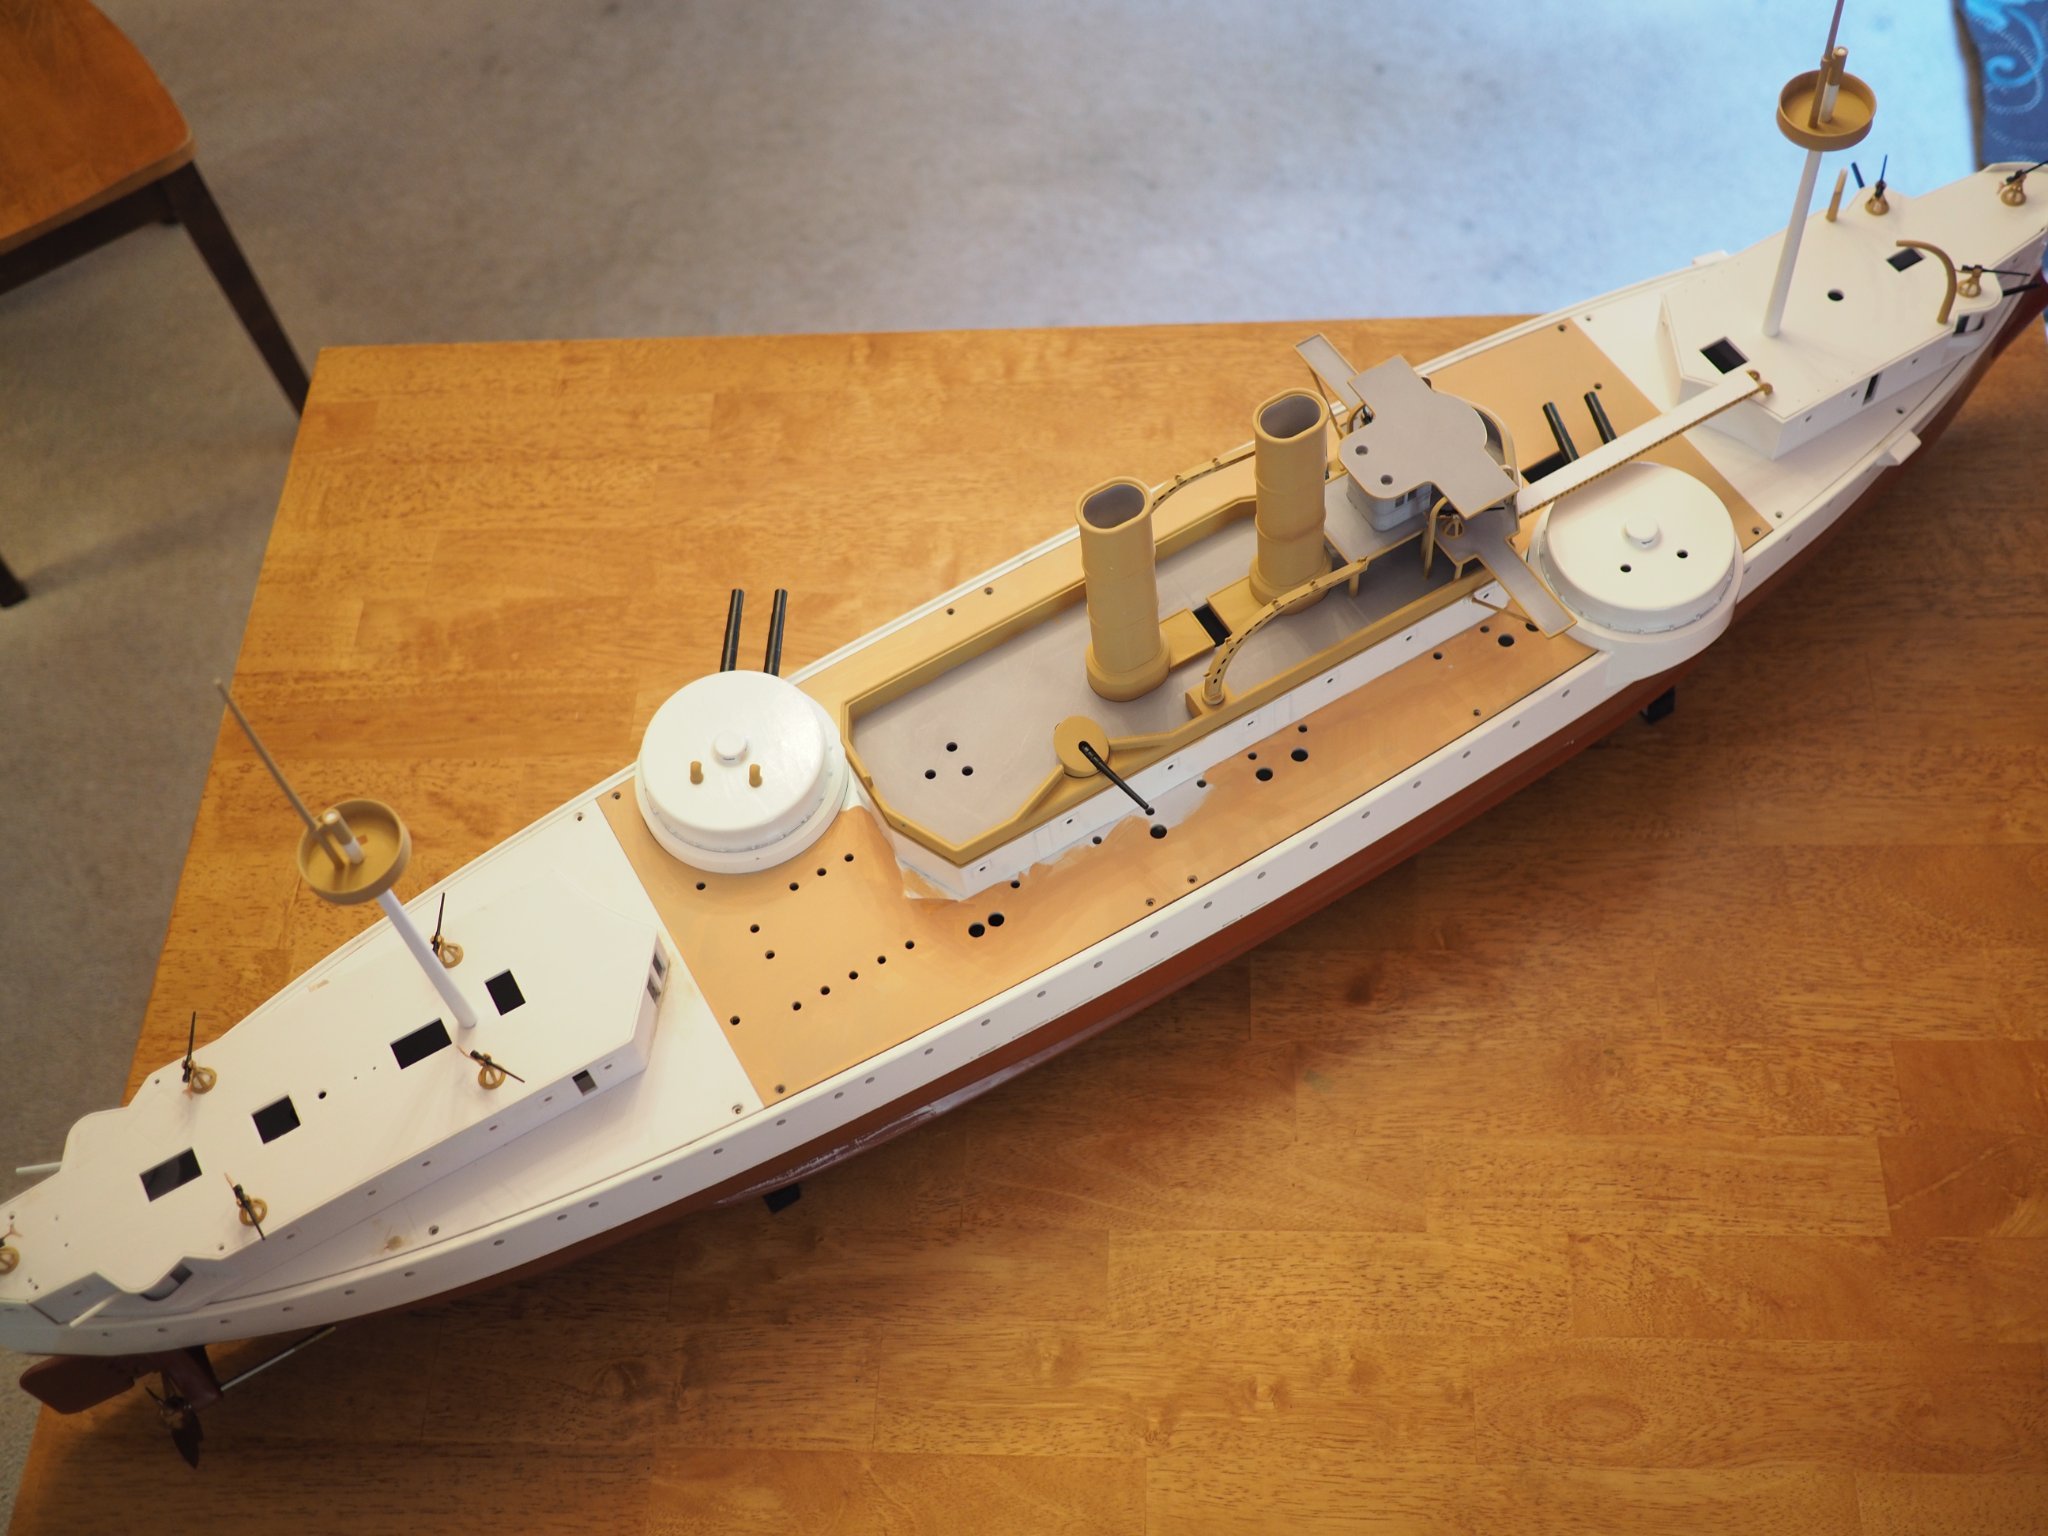
Pics as requested - note though that I am still a long way away from finishing - I started painting the deck and don't like the color so waiting for more appropriate paint to arrive + there's lots and lots of detail that needs to be added.