
MORE HANDBOOKS ARE ON THEIR WAY! We will let you know when they get here.
×
Glenns_TX
-
Posts
84 -
Joined
-
Last visited
Content Type
Profiles
Forums
Gallery
Events
Everything posted by Glenns_TX
-
 OK, I found where I read about using contact or airplane cement. It was the instructions for the Sultana and applying it's deck sheeting. So I guess that means regular wood strips can be glued with white or wood glue.
 -
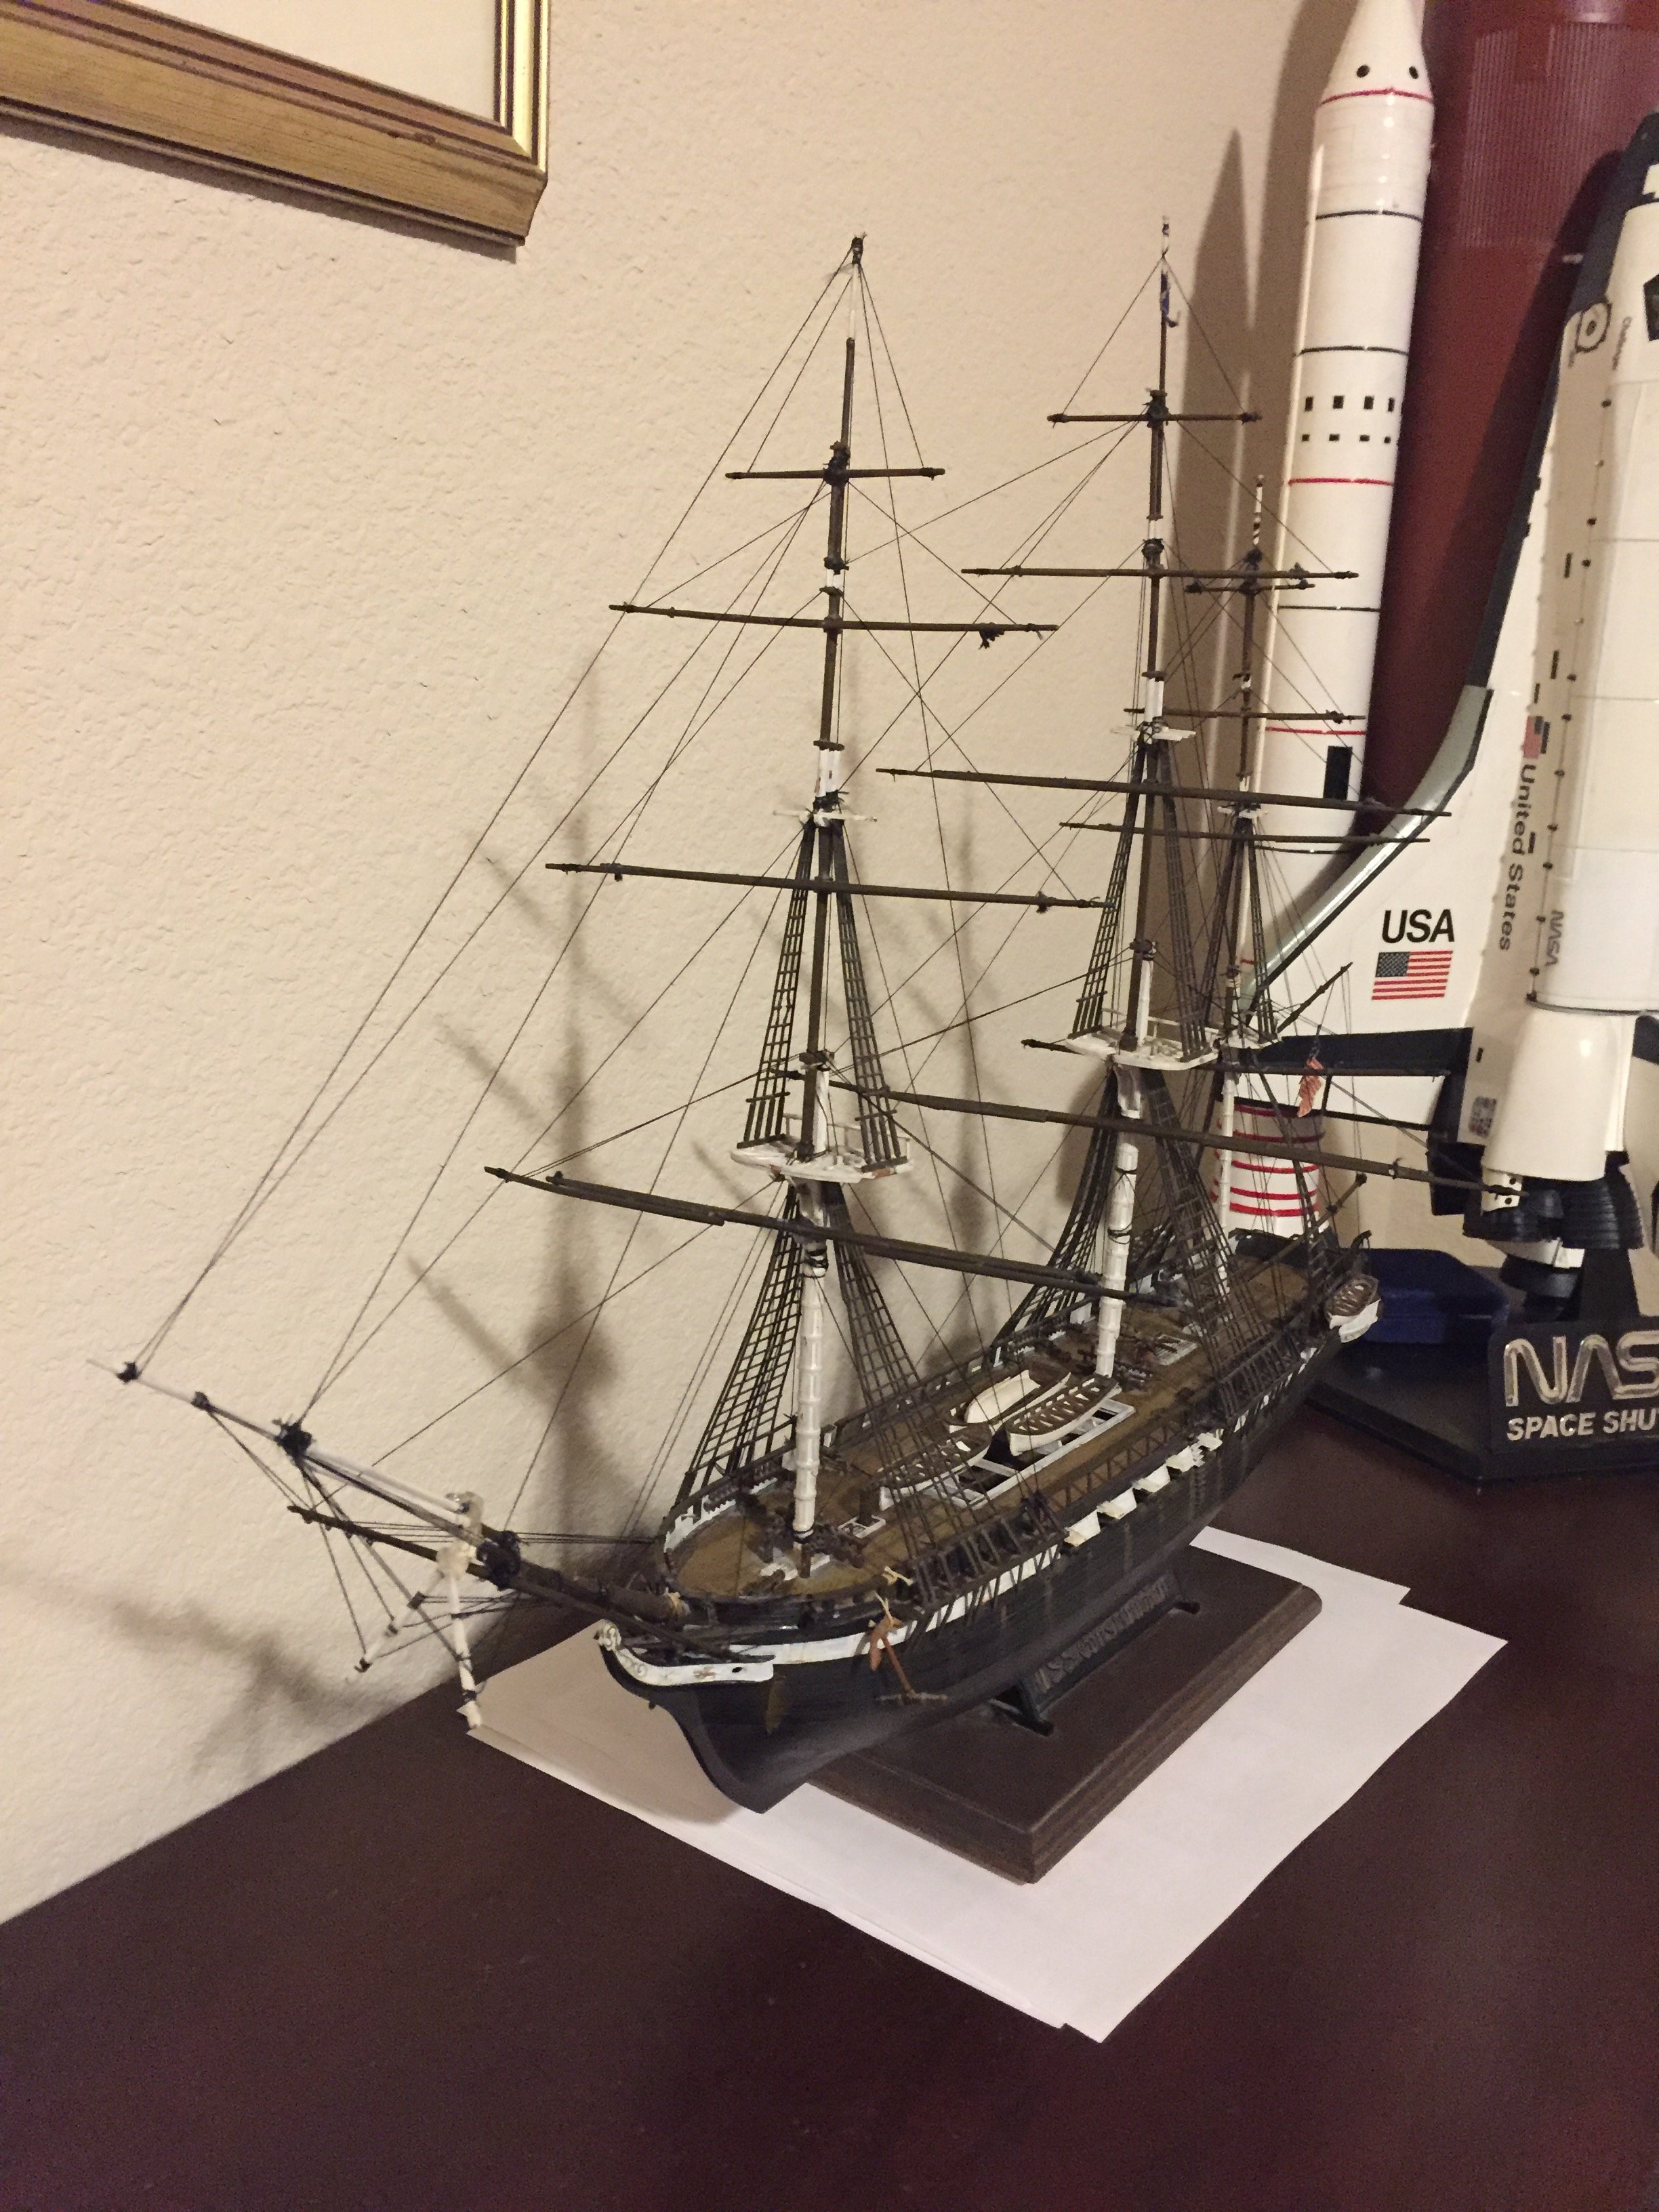
These things should come with a warning label. Because if I wasn’t crazy before, I will be by the time I finish. If the ship doesn’t finish me first. Managed to drop it tonight. Sustained minor damage to the stern laser cut keel piece. Surprisingly, the bow section and cut water appear unscathed. Cut 3 strips of Tanganyika into 4cm strips per the instructions. Here are a few columns and rows laid out. Hope gets easier once you glue a few first.
-
So Gents, I read somewhere not to use white or wood glue for the decking. Something about it dampening the wall. It said airplane cement. Do they mean the testers tube of plastic cement? This kit kit’s decking is 0.6 x 3 mm Tanganyika strips. Now if I would only remember what I did with my rulers.
-
Well they’re not ready for the deck. But here they are. I’m sure you know the boxes on the matt are 1” square.
- 12 replies
-
- 2
-

-
- enterprise
- revell
- (and 1 more)
-
Sprayed everything with primer tonight. Anyone know what Enterprise’s hanger deck colors were? CV-6 was easy. The Star Trek Kits gave me more fits. The Klingon ship has chrome pieces which needed to be masked. The Enterprise’s pylons and one engine still refuse to give up their seams.
- 12 replies
-
- 2
-
-
- enterprise
- revell
- (and 1 more)
-
Thanks Lou. I wasn’t even sure if her birds would be loaded while in port. I still have the upper wings. So I can make it work if I change my mind. Just cut and CA tooth picks. Paint. Add the upper wings. Not much work on her today. I bought the beeswax for the rigging. And I applied a clear coat to make the decals go on easier. I’ll spray a Matt clear after.
-
I wonder if they make bottles large enough to hold this little ship?
- 12 replies
-
- 3
-
-
- enterprise
- revell
- (and 1 more)
-
Lou, please let me know what your new book on the Arizona says about her planes. I still have the wing sections. But with those bottom pegs gone, it would be a pain to attach them. All the sea plane research I did online said the Gulls were no longer in service by 1941. It said the Navy replaced the Gulls with another plane before the Kingfishers in the 30's.
-
I will be planking the deck with the Tanganyika strips before I add the bulwarks. The bow section will require significant bending. The instructions say I can use a manual or electric plank bender, or soak in hot water and alcohol. Given how easily the bottom keel snapped, do I chance bending the bow bulwarks with by manual plank bender? I mean, the keel snapped easier than a toothpick. And for the gap in the keel sections, do I fill with the same wood putty. Or a blend stick?
-
Cleaned the parts last night. This morning removed hull sections. Cleaned up any flash. Glued hanger deck to bottom hull. Filled and sanded where needed. Will prime later. Working on some Polar Lights Original Series Star Trek Kits to. And those needed more filling. Prefer to prime all three kits together.
- 12 replies
-
- 4
-
-
- enterprise
- revell
- (and 1 more)
-
Sanded the last of the filler off the hull. Cut out the laser cut keel sections. Scraped the burn marks off with my Exacto knife. And glued them to the hull. But, the bottom section broke in two. This Walnut is plywood is very fragile. Don’t know how I will handle the thinner and more detailed sections yet.
-
Added some wood fliller to those dents. May need more after sanding. So moving slowly ahead with this build.
-
This kit was purchased from Hobby Lobby several years ago. Since that time like the rest of my kits, it has resided in a closet. Today I decided I need something “easier” to do while I work on the Bounty. And it just happened my 1/700 Hornet by Trumpeter arrived. So like the Arizona, I’ll gain some experience with this $6 kit. So far the main difficulty was finding Navy Blue 5-N. No one had it here. So unless I find some, I plan to mix a 3:1 ratio of Model Air insignia blue with black. The blue is FS35044 while 5-N is 35045. It’s a waterline kit. Another first. Guess I’m making an ocean too.
- 12 replies
-
- 7
-
-
- enterprise
- revell
- (and 1 more)
-
Well the screws are attached. The kit stands painted with grey primer and glued and screwed to the wood stand. Mike Holmes would be proud. The Arizona is tacked to the stands with a few drops of super glue. Thanks to Imagna for pointing out that Revell’s instructions have the turret plane mounted backwards on the catapult. I flipped it around. But need to decal, rig and clear coat. Forgot to get beeswax. So I’ll continue working on this tomorrow.
-
No. I didn’t look very much. But I couldn’t find any in this scale. So I figured the Gulls are so tiny, just cut the wing pegs. Then sand and paint. Try to pass them off as Kingfishers.
-
My memory was correct. There are no templates to shape the hull. Looks like it needs only filling and minor sanding. I read ahead. Tav1 calls for glueing the laser cut bulkwark pieces before planking the deck. That’s in Tav2. But this site’s FAQ, http://www.shipmodeling.ca/aa918.html , says plank decks before hull. And that order makes sense. Planking the deck would be easier without the bulwarks in place. What do you guys think?
-
During my free evenings, when I haven't been working on my USS Arizona build, I've been reading Mr. Mastini's book. As well as looking at build logs for solid hull ships. Looking at instructions and practicums on Model-ExpoOnline. But the only ones I've found cover model shipways kits. Those solid hull ships appear to be more roughly carved. And require extra carving and sanding with provided templates to achieve the proper shape of the hull. I'll have to double check when I get home. But I don't think my Corel kit has templates. And the hull appears to be completely shaped. So I guess I just need to fill and sand. But from what I've learned, I should read all the instructions again. Because many manufacturers instructions are inadequate. The closest Bounty build I could find was a 12 part series on Gary Brinker's Youtube series. I believe he built Constructo's HMS Bounty kit. His comments have me fearing my upcoming build of their Enterprise kit. But since mine is over 25 years old, maybe their quality standards higher then.
-
Best $37 I’ve spent in awhile. So much easier for those small airbrush jobs than siphon fead.
-
The airbrush was $28 with their 40% coupon. Harbor Freight has a hose for $8. Funny you mentioned Testors. I inherited my father’s Testors airbrushes and Testors mini compressor. But I’ve been using it for my Badger 200.
-
Not much progress tonight. I painted a second coat for the water line with the paint marker. I eyeballed the location and width of the waterline. Hope it is close enough for government work. The masts are on for dry fitting. Wanted to paint the masts with my new Iwata Neo gravity fed airbrush. Should have known there is no standard airhose lines for airbrushes. So didn’t get the masts painted yet. Bought some decorative wood from hobby lobby to mount her on. Sanded and stained that.
-
Should I paint the top of the stack? If so, Matt black or just black wash to grime it up. Same question for the chains.
-
Last night I masked off the hull for to paint the waterline with a black paint pen. Should have put another coat within 3 hours but didn’t. So that will wait till tomorrow night. Tonight, I continued construction. Inserted the decks into the hull. Added the boats, cranes, catipult, stack and bridge.
-
So Tav.1 says finish the hull with sandpaper paying attention to steps and grooves. Which I take to mean to not over sand them. I have 60, 150 and 220 grit wood sandpaper. Another post I read here seemed to suggest 60 could quicky strip away too much. So I began with 150. Focusing on smoothing the hull. But there are areas where it has carving marks or endentations. Do I sand until they’re gone? And the deck has a finger nail thick raised section. Do I sand that until it’s level? Thanks.
-
Some luck. They have a page of all the instructions text in English.