DONATION DRIVE - SUPPORT MSW - DO YOUR PART TO KEEP THIS GREAT FORUM GOING!
×


Tom in NC
-
Posts
44 -
Joined
-
Last visited
Content Type
Profiles
Forums
Gallery
Events
Everything posted by Tom in NC
-
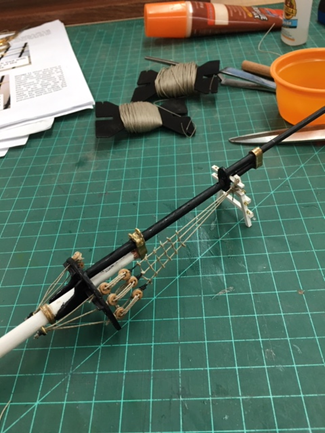
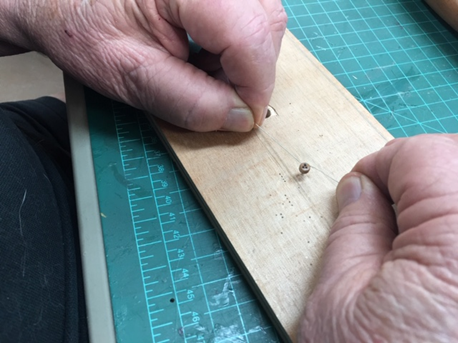
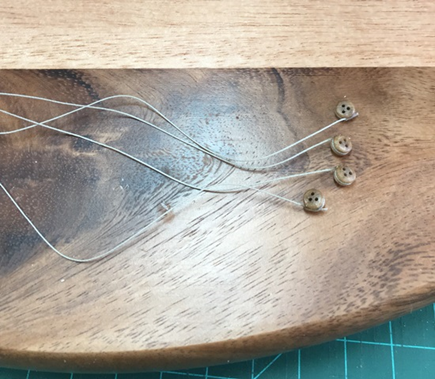
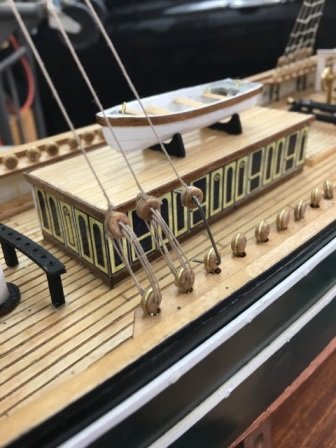
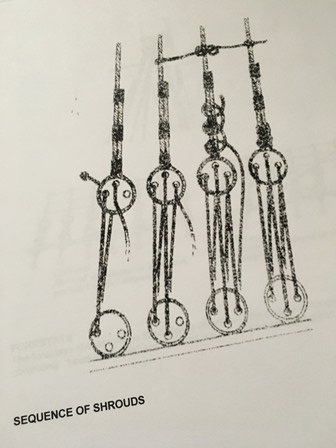
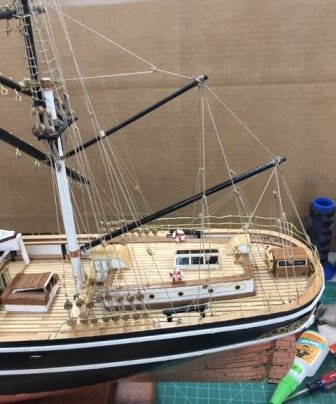
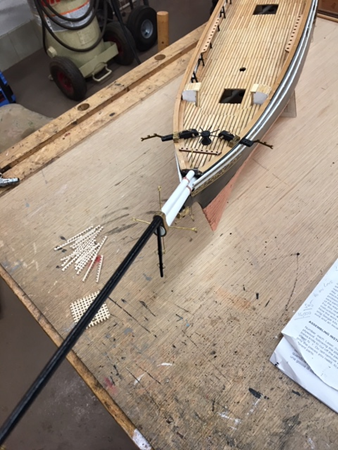
 BUILD LOG -- CUTTY SARK -- Phase 2 At the end of my last post (way back in Nov 2018) I was almost done with assembling the masts and yards, and I was not very happy with the way they were coming out. I went back and did a re-do on much of that work. One of my bugaboos was drilling many centered holes in the round dowels that made up the yardarms. These were there to hold a variety of eyelet pins that contain the sailors rope foot supports on each yard. Thanks to Keelhauled for suggesting that I use an awl to create indentations in the dowels that would keep the drill bit from wandering off line. Duh. How did I not think of that? The picture below shows the high quality drill press fixture for rotary tools that I used to drill a number of well-centered holes in the yards, and if you look closely enough you can see some of the eyelets installed. Next step was installing all of the lower dead-eyes that would eventually connect with the lower ratlines and shrouds. Below is a shot of one of the reworked masts that I think shows my much improved technique on dead-eye connections and ratlines. Below is a picture showing my own process for attaching shroud lines to dead-eyes. I insert a steel pin (the same size as the pre-drilled holes on the dead-eyes) into my makeshift assembly board. I slip a dead-eye over that then form a simple half hitch loop at the end of the shroud and slowly close it around the dead-eye. When it's tight I secure it with a small drop of super glue. After it's dry I trim off the excess line before installation. I find it more productive to make up a whole set of shrouds w/dead-eyes so that once I start attaching and spacing them I can get into a rhythm and work right through a sequence without stopping. Connecting the prepared shroud lines to the lower dead-eyes was a complete mystery to me when I got to that point. I was dreading the chore, but thanks to a trick I picked up somewhere on the MSW website I felt ready to proceed. I realize that my skill at this is still pretty crude, but I'm getting better as I go along. First I had to finally glue the masts in place -- and the fear that I'd screw that up was great. There's no going back and redoing that. Establishing the right spacing between upper and lower dead-eyes was accomplished by inserting a small wire guide into holes on each dead-eye then slowly starting the "weaving" process. I don't have any idea what the correct term for that is, but "weaving" seems to make as much sense as anything else. In the pictures below you can see the initial hook-up with the wire guide, then the beginning of the "weaving". When two strands of "weaving" are in place you can put tension on the top of the shroud line to hold the right spacing and finish the process off by running the line through the remaining holes and tying the line off at the top of the upper dead-eye. Another valuable tip I found on MSW is this Sequence of Shrouds illustration. If you do not follow it your shroud attachments will look awful. Once you've connected the first dead-eyes in a row you can dispense with the wire spacer and just adjust the size of the next connection to match. Be sure to put the spacer in a safe place. You'll need it again. Here's a peek at my next part of the project -- the many shrouds that are part of the standing rigging on the rear deck. I'll just post one picture here because this report is getting waaaay too long. One observation here is that the makers directions had me installing the brass railings around the rear deck way back when. That was really stupid because boy do they get in the way when installing the shrouds and ratlines here. Thanks for following along. having figured out several puzzles re rigging I'm having more fun with the Cutty and perhaps I get too long-winded. Sailing ships. Long-winded. Get it? TOM
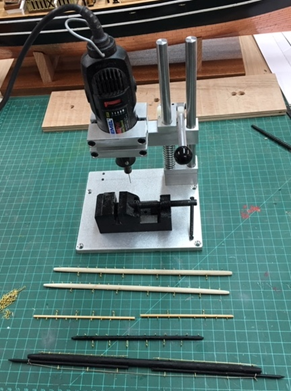
- 14 replies
-
- 4
-

-
- cutty sark
- mantua
- (and 3 more)
-
Many thanks to Mr Bluejacket for his response re the Charles W. Morgan, and for the "likes" from Grandpa Phil and Bob Cleek.
-
Thanks to MrBlueJacket and Steve for your kind comments. Steve: I'm already deep into a new project, the Cutty Sark, and I'm overdue to add to the build log I've posted on that. Much more difficult than the Portland, MrBlueJacket: if you know, can you give me any hints about BlueJacket coming out with a new model of the Charles W. Morgan? I've heard rumors and that ship is on my bucket list. Many of my ancestors were involved in the whaling industry, and some were ship captains. I built a model of the Charles W. Morgan when I was in my 20s and I'd like to build it again before I get too much older. TOM
-
Popeye: I'm impressed that you can take on more than one of these projects at a time. The Cutty is plenty for me, and it's been going slowly of late as we're trying to sell our home and move to smaller quarters (quite a distraction). I've gotten a number of good tips and encouragements since signing up as an MSW member and I really appreciate it. Re the Cutty; I'm almost done with the pre-work on the masts and will soon be installing them, Then the rigging process will really begin. As a comment on learning, the first mast mast I did (rat lines, spars, etc.) took me about a week. The second (main mast) took even longer, but after discovering that the ratline process could be made much easier using small homemade wire guides to ensure that the deadeyes were properly aligned (a tip from an MSW blog) the foremast took me only 1-1/2 days and looks great. I may have to go back and redo the other two masts as a result. Two steps forward and one step back. Just like life. I hope someday I can talk about the large variety of projects I've undertaken, but right now The Portland (by Bluejacket) and the Cutty are my two big efforts at relearning boat-building skills. Thanks again for your encouragement. TOM
- 14 replies
-
- 1
-
-
- cutty sark
- mantua
- (and 3 more)
-
Thanks for the encouragement Popeye. Coming from an experienced "old hand" like you it's very much appreciated.
- 14 replies
-
- 2
-
-
- cutty sark
- mantua
- (and 3 more)
-
Hof: This has been a difficult build for someone starting over, as it were. But the whole package from Mantua Sergal is quite nice, I think. High quality bits & pieces indeed. Some things get lost in translation, but with perseverance I'm making good headway. The large diagram sheets are excellent, and the written instructions (about four pages worth) can be puzzled out. When I finish (not if) I think I'll be very proud of this model. Thanks for your interest. TOM
- 14 replies
-
- 3
-
-
- cutty sark
- mantua
- (and 3 more)
-
Marc: Thanks for your comments. Your tips about drilling centered holes through round dowels were great. I'll employ those. The Holidays slowed me down, but I'm getting back to the Cutty now. The Foremast is almost ready to be glued in place, and the Main Mast is getting close too. In the past week I've been tying the middle and upper ratlines, and getting past the monotony that involves is a struggle. I counted 154 tiny knots on the Main Mast lines, and I probably missed some. I've been contemplating how to create the lowest (and largest) ratlines to the deadeye shrouds -- getting all of the deadeyes to be spaced evenly and tied off is a mystery so far, but I've been collecting "how-to" ideas and will get it done somehow. Thanks for your interest, It's motivating. TOM
- 14 replies
-
- 2
-
-
- cutty sark
- mantua
- (and 3 more)
-
Tung Oil "Experiment"
Tom in NC replied to knightyo's topic in Painting, finishing and weathering products and techniques
For years I used "tung oil" on the furniture I made. I got very good results by applying it full strength, waiting about 30 minutes and then wiping it off thoroughly. The next day I'd buff the whole piece with 0000 steel wool and slather on another coat. Wait, wipe off and let dry. The next day, same thing. After three applications the finish was terrific and that was it. Rags went into an outdoor trash can and were carted off weekly by our local trash picker-uppers. Ultimately I stopped using "tung oil" because (a) it took so long to apply, (b) it was not very water resistant and (c) I discovered the beauties of Sherwin-Williams water resistant spraying lacquer. I could spray three coats, buffing between each coat with the 0000 steel wool, and have a fine (and durable) semi-gloss finish by day's end. Spraying lacquer on ship models ain't so easy, so I use Deft brushing lacquer or a water-based polyurethane and rub it to a nice semi-gloss final finish with the aforementioned 0000 steel wool. Good ventilation required in all cases. -
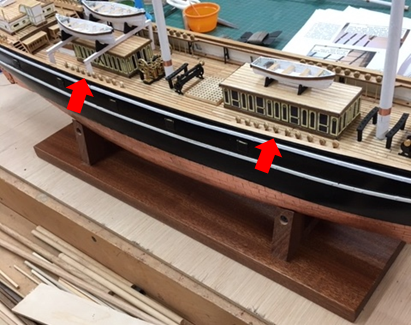
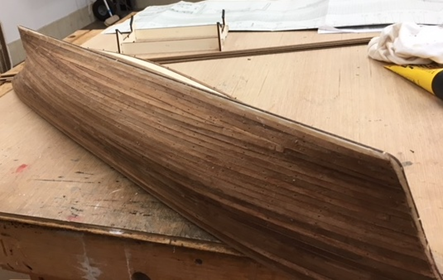
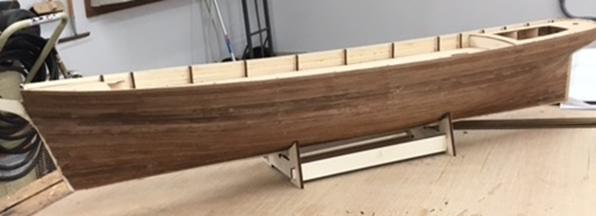
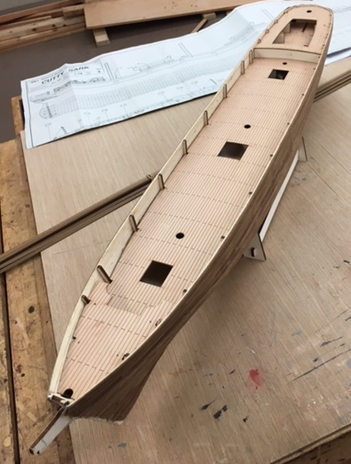
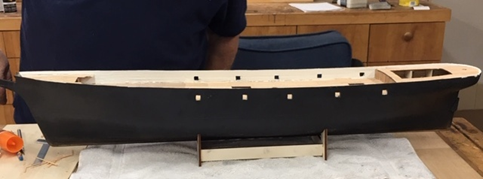
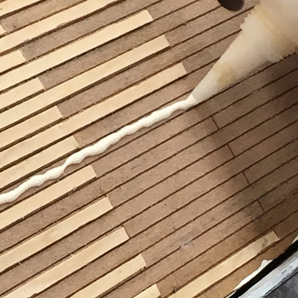
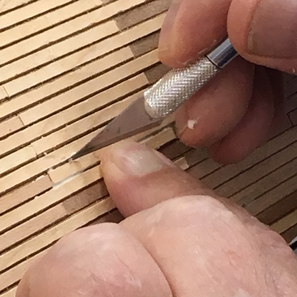
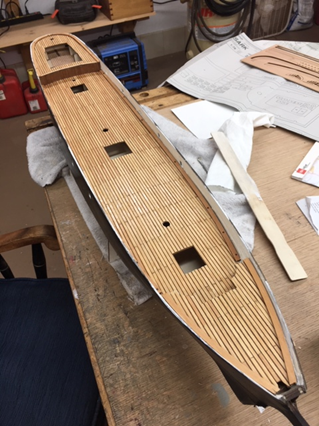
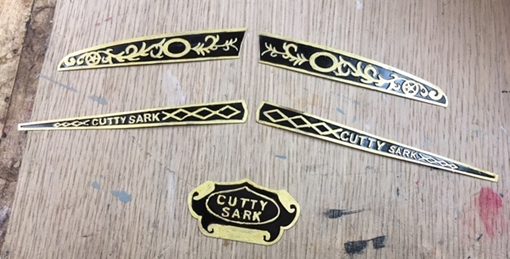
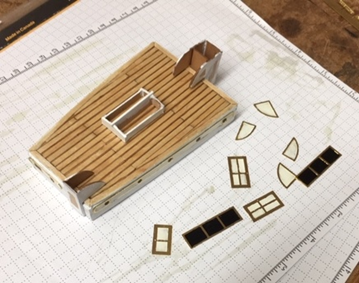
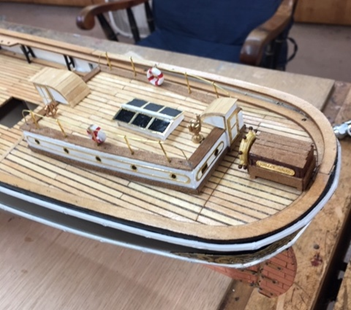
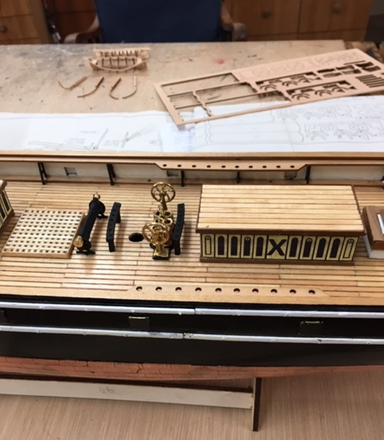
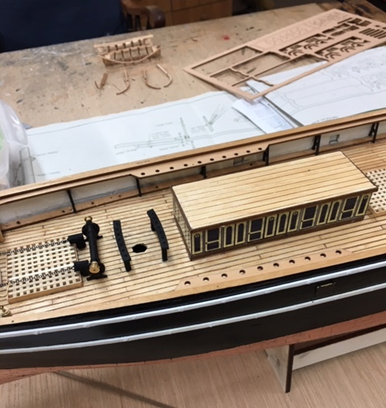
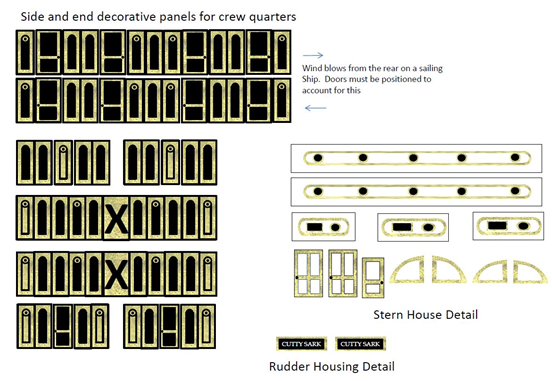
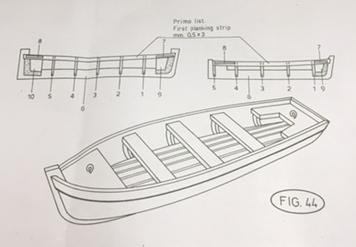
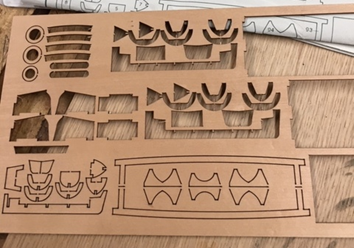
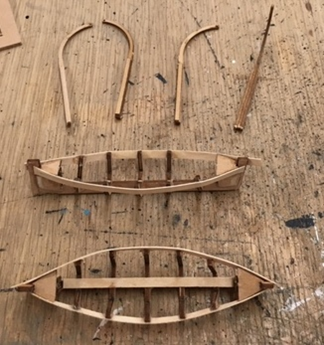
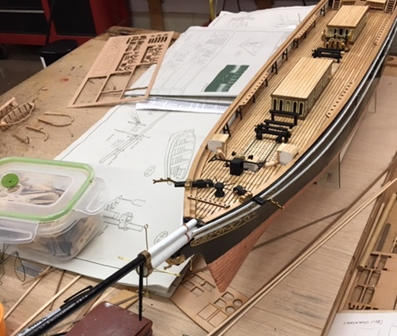
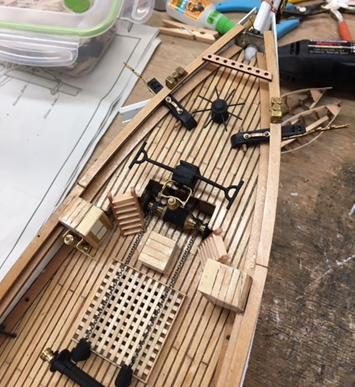
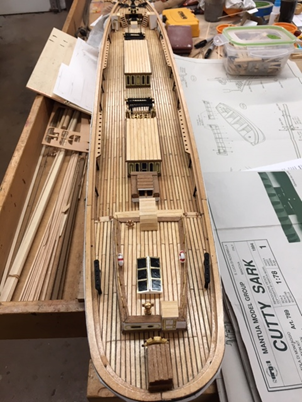
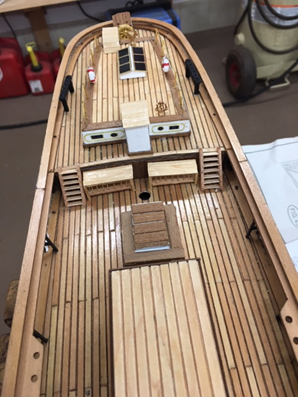
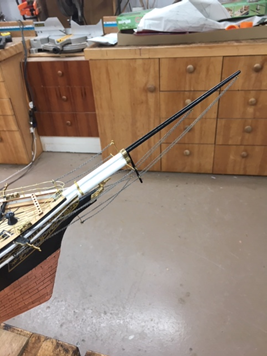
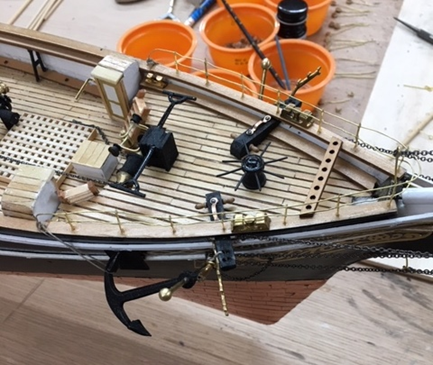
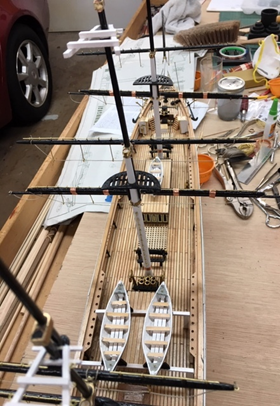
This will be my second build log since joining as a member in November 2018. I started building the Cutty Sark by Mantua Sergal on September 1st. Now, in late November, I have pretty much wrapped up all of the hull and deck work and am starting to work on the masts and (gasp) the daunting rigging. I’ll try to do better with my pictures. I read the build log by keelhauled, posted back in March 2013, and his overview of the Mantua Sergal Cutty Sark kit is so perfect that I’m going to borrow (plagiarize) a good bit of it and include it here. I hope keelhauled won’t be offended. His work was too masterful to ignore. KIT OVERVIEW Manufacturer: Mantua (Sergal), Italy Model: MA 789 (Art 789) Dimensions: Length 45” (1150mm) Height 26” Scale: 1:78 Purchased: 2018 Price: $549 USD (2018) Construction: Double Plank on Bulkhead: Limewood inner, Walnut outer Fittings: Brass, copper, bronze, copper plates, walnut dead eyes and blocks, copper sheet with ornamentation and deck siding, bronze figurehead, grey cotton rigging line in various sizes, silk flag. Instructions: Booklet with translations into English, Italian, French, and German. In my opinion the translations are similar to what Japanese instructions in the 1950s used to look like. Not very clear and only marginally useful. Plans: Four very large two sided sheets – Eight plans total . 1:1 sheets for the deck, side, standing, and running rigging. Other sheets detail building steps. The parts are generally high quality but in at least three instances I felt I could improve on the stuff they included. I’ll detail my deviations from what Sergal Provided as I go along. As for reference materials I haven’t yet checked out the books and sources that keelhauled included in his build log, but can certainly recommend a book which has become sort of a bible for me re the building of rigged ships in general. Mastini, Frank. Ship Modeling Simplified: Tips and Techniques for Model Construction from Kits . McGraw-Hill Education. (I have the Kindle edition which allows me to check things on the fly while out in the shop). KEEL & HULL CONSTRUCTION I’ve read a lot about various methods for checking the alignment of keel and bulkhead and deck components – and certainly about all of the after-market products that supposedly make this a breeze -- but the laser cut parts in this kit slipped together so easily and precisely that I didn’t waste a lot of time agonizing over that. Instead of an after-market vise to clamp the keel I used the large end vise on my workbench to keep things stable while I assembled the parts. Many years ago I built a plank-on-bulkhead version of the Vasa (a Billings model), and even though it didn’t turn out very well I learned about soaking & bending planks, and using small pins/nails to hold them in place while the glue was drying. That was a single layer planking job, and I think that the double planking of the Cutty Sark is much better for obtaining a smooth finish on the hull. It was during the application of the second layer of planks that I began taking pictures of my work. I got pretty cocky at that point, figuring that if I could do a nice planking job like this that this build was going to be a lot easier than I expected. So, after lots of sanding and filling and smoothing I proceeded to spray paint the hull with matte black paint as directed. This what the hull looked like when I finished -- but not until I had stripped, sanded and repainted the dang thing 2-3 times. I tend to work too fast on almost everything, and this was a really good message that I needed to slow waaay down. DECKING Applying the main decking material (which may or may not have been maple) was tedious but ultimately very satisfying. The directions suggested painting the decks with a nice varnish when they were done, and I used a satin finish spar urethane. I smoothed the work with 0000 steel wool between coats and after the final coat. The directions actually suggested that I start applying the gazillion copper plates to the lower hull before doing the deck work above, but I was a bit discomforted at the way the black matte paint I had applied to the hull was prone to showing fingerprints, so I decided to put that chore off. My disappointment with some of the model’s instructions started at that point. Ultimately, once I got the hull finish smooth I painted over the matte black with spar urethane, then restored the matte finish by carefully rubbing it out with 0000 steel wool. The final result looks great, but it required a lot of fussiness to get there. COPPER PLATING I found this chore to be a nightmare. If each little plate wasn’t perfectly aligned with the waterline or the surrounding plates it looked really crappy. Avoiding getting glue on the plates was very difficult too, and even when a line of plates was firmly glued on there was a tendency for some of the plates to bow out a bit, and some even popped off while I was working. Worst of all, when it came to tapering the plates I had no clue re how to do that. Tapering or trimming stiff little 1:78 scale copper plates with scissors or a small grinder just was an untenable answer. I suspect that anyone who has installed copper plating to a model of this scale will probably be nodding with understanding. In desperation I went hunting for advice online, and that's how I discovered Model Ship World and its fantastic group of members who can provide great advice on any phase of model ship building. I found the answer for my copper plating problems with a fellow that had ditched the little plates in favor of copper electrical tape. Sheer genius. I got some of that tape, stripped the lower hull of copper plates (for the second time) and applied it. Using an Xacto knife I carefully added slits to emulate the plates, and it worked great. I had to forego the rivets on the copper plates that were provided, but on a 1:78 scale ship it was no great loss. After I had the tape applied I finished up the lower hull with two coats of satin finish spar urethane for protection and enhanced bonding. I didn’t take specific pictures to document all of the above, but the one below should give you a rough idea about the results. DECK WORK Now let’s get on to another gripe I have with this model. Beautiful brass hull decorations are provided, as well as a whole sheet of doors and decorations for the deck crew quarters and hatches. The directions tell you to spray paint these bits with either black or white paint and then, when dry, to lightly rub the raised surfaces with a 600 grade emery cloth to (theoretically) rub away the paint on the raised surfaces and leave a decoration or component with a bright brass accent surrounding the colors. As it turns out, rubbing the paint, even very gently, results in you removing the very thin brass plating and exposing the copper underlayment. It just ruins the piece. I was beside myself, because there was so much of this work to be done. I had to finish the hull decorations with a very fine brush and some gold flake model paint. Looks OK, but they would be better with a real brass finish. The initial work on the deck housings and other deck components started with the stern deck house. Here is a picture showing a partially completed deck house, along with the various decorative brass pieces that are to be attached. I didn’t even think of spray painting and rubbing – I once again wielded the smallest brush I could find and filled in the sunken areas by hand. Yeah, I know they look OK in this picture, but I was not happy with them. Here is a picture showing the stern deck house completed and installed. The brass stanchions and railings came out nicely. Note also the rudder control housing and the ship’s wheel. BOWSPRIT Before tackling the other deck accouterments I went to work on the preliminary assembly and installation of the bowsprit and the hawse supports. Also note the two small lavatories (er, outhouses) on the main deck and the bits on the bench that ultimately became the two cargo hatches. Work on the rest of the deck structures went pretty well, and I think the various components look very nice. Shown below: one of the main hatches, a windlass, belaying pin holders and a very nice bilge pump assembly. The decorative panels and doors on the crew quarters shown in these photos require some better explanation – because I think I managed to solve the hand-painting of brass pieces problem in a rather unique and satisfying (to me) fashion. After carefully measuring the surfaces to be covered by the brass panels, I turned to an old friend – PowerPoint – and designed similar decoration panels for the crew quarters. It’s easy to size things in PowerPoint, and it also has the capability for dragging in colors from photographs. I took a picture of one of the brass pieces and used it to make the designed panels really look authentic. Here’s the brass picture and the designs I worked up to replace all of the brass work on the whole deck. I printed the page above on glossy photo paper on my ink jet printer, trimmed everything with scissors and glued them each in place with Goop rubber cement. Authentic? Maybe not, but a satisfying solution for me that I think looks way better than the glue-on brass pieces provided. Note the comments about properly orienting the crew cabin doors to account for wind direction. I got that tip from Mancini’s great book. It seems counter-intuitive, but the wind comes from behind on a sailing vessel, and doors that open the wrong way can be ripped right out of a seaman’s hands. LIFE BOATS So, I went on feeling my way through the rest of the deck details, and that finally included building and mounting the lifeboats. They are also plank on-bulkhead construction, and were fun to make. Laser-cut wooden parts are a huge improvement in model boats since the last ones I built years ago. Here are some other pictures of deck construction ... … and on to adding support chains to the bowsprit and installing the anchors. Yeah, I know the figurehead is supposed to be white, but I like the bronze color better. MASTS & YARDS For the past two weeks I’ve been working on the masts. Here is a shot of what I’ve done so far. See if you can detect the problems I’ve had that are going to lead me to start all over again next week. Note the completed and installed life boats that came out quite nicely. The masts themselves are pretty much OK. But the yards are a disaster in my eyes. Shaping them and gluing them together was not bad, but the attachments of the lower yards to each of the masts is “amateur hour”, and the rope supports that sailors stand on to work on the sails are all grossly out of scale. Also, I used the spar urethane on the masts and yards, which are supposed to be matte black, and it just came out way too shiny. No good. Last but not least, when trying to drill holes in the yards it is almost impossible to keep one’s drill bit from wandering off-center. Bad, bad, bad. DRILL PRESS FOR ROTARY TOOLS To solve the hole drilling problem I’ve ordered a drill press assembly for the Dremel, along with a machinist’s vise to hold even the skinniest of dowels firmly while I drill. I found all kinds of cheapo attachments like that ($30-$40), but somewhere I ran across a link to a review of a small company in CA that produces what appear to be real high-end accessory attachments for rotary tools. https://www.evilmadscientist.com/2013/drillpressplus/ If you’re interested in accuracy, and you aren’t totally constrained by costs, you might want to take a look at this guy’s work. Some really neat ideas for the small home machine shop, all powered by rotary tools. http://vanda-layindustries.com/html/drill_press_plus.html I am looking forward to taking delivery of my new drill press station next week. I’ll let you know if it’s as good as it looks. "He who dies with the most tools wins." So ends my rather lengthy narrative re stage one of my Cutty Sark build. From this point on I’ll try to do a much better job with photos and update my progress as I go -- and maybe not be so wordy. I’ve already gotten several responses to my previous posts from model shipmakers around the world. Really neat. I hope to continue tapping into this fine group -- not for approval of my work, but for suggestions re how I can do everything better. Phase 2 coming soon. Tom in NC November, 2018


- 14 replies
-
- 6
-
-
- cutty sark
- mantua
- (and 3 more)
-
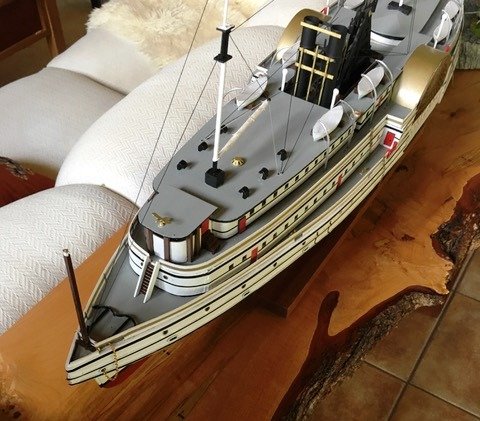
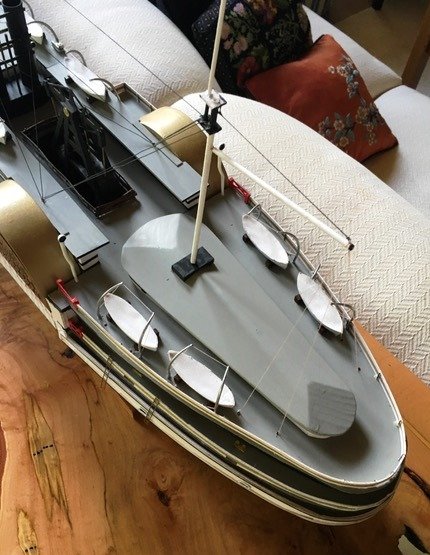
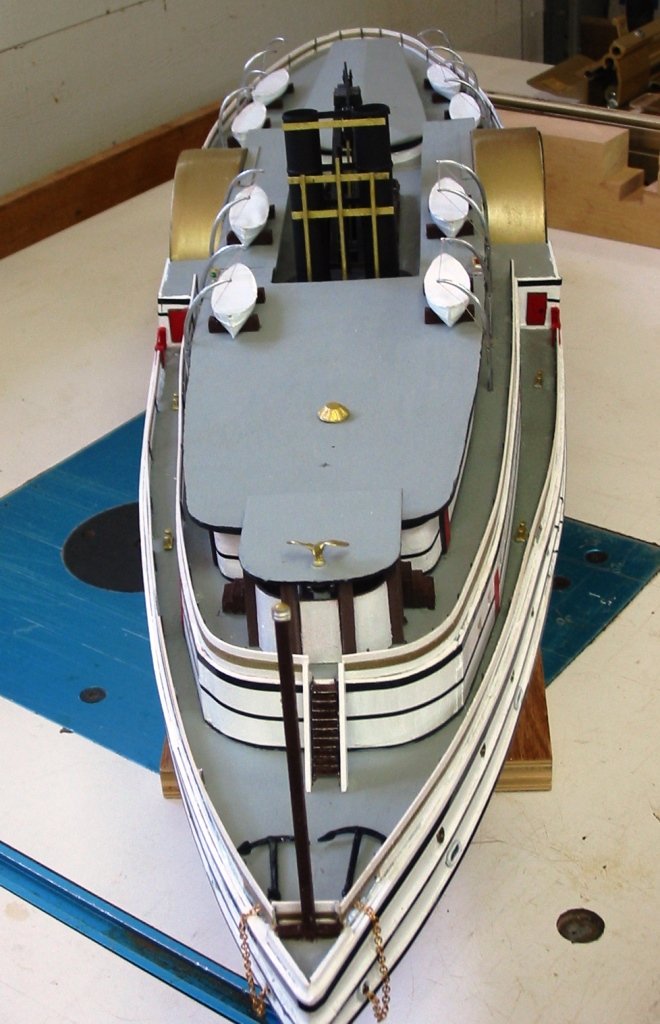
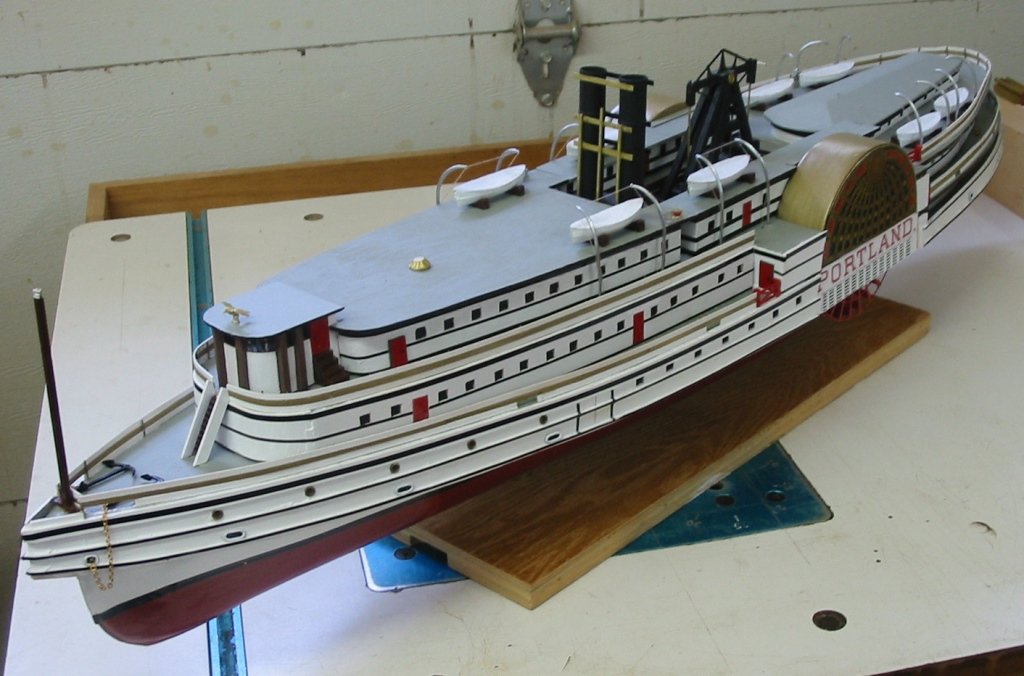
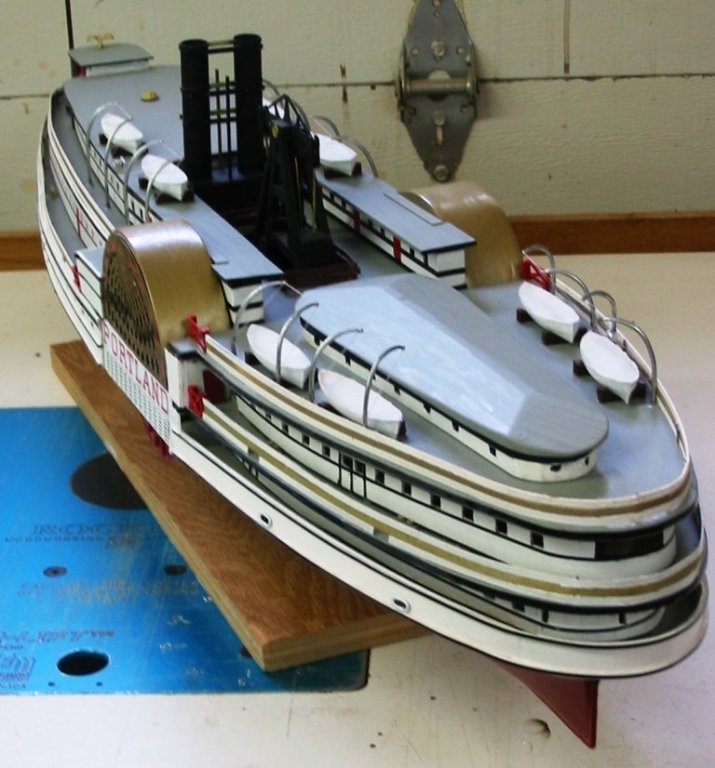
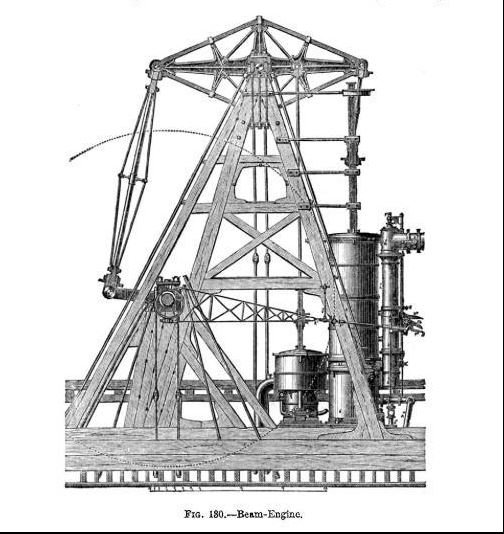
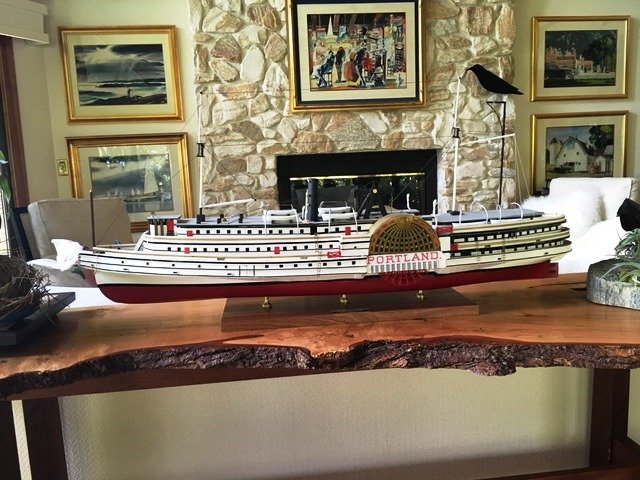
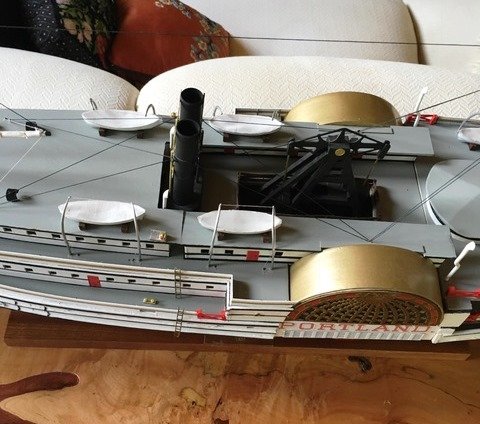
After an absence of about 45 years I got back into ship modeling in March 2018. The Portland was a Bluejacket model that my wife gave me as a gift about 30 years ago. My workload then kept me away from starting on it and we've been lugging it around in a big box ever since. I formally retired in 1999, and somehow got tangled up in designing and building custom furniture. Then, early this year and 15 years later, I decided I'd done that long enough and started cleaning my shop in preparation for selling off my tools. It was at that point I re-discovered the Portland, languishing on a tall shelf and pretty well covered with sawdust. I almost tossed it, but couldn't resist giving modeling another try. Now I'm firmly hooked. What follows is a brief report and some of the things I learned during this build. I know that a build log is supposed to follow the build process as you go along, but last March I didn't have any of that in mind, didn't take many pictures, and had never heard of this fine organization that i'm now a member of. So consider this as a brief description of the build process relating to a 30-year old version of the Portland, the things I learned as I did it, and the results when I finished it. My next build log, relating to the Cutty Sark by Mantua Sergal will be started shortly and I'll catch you up with what I've done so far and have you follow me along as I tackle the heaviest lift - the rigging. Now for the Portland ... The Portland was a paddle wheel steamer that mostly served a route between Boston and Portland, ME. It looks to me like it was a pretty high-class ride. As is the case with many well-known ships The Portland sank in a violent storm shortly after departing Boston. There were no survivors. This is a solid hull wooden model, and the version I had to work with was not presented with laser-cut parts, etc. The pictures were not very clear, the directions assumed that I was an Admiral class constructor (I'm not) and I found the whole thing very difficult. Today's version of the Portland by Bluejacket looks to be vastly improved in quality & content. Check it out. As mentioned earlier, I didn't know I'd be submitting a build log, the pictures that follow are not as good as those found in many other build logs. After shaping the hull I started on the decks. They had to be laid out on provided plywood and cut out with a scroll saw. Thanks to my unfamiliarity with this work I had to make adjustments along the way (even going out and buying more plywood to replace the sheets that I ruined. It took me several weeks to reach this point. The directions re how to build the paddle wheels were so sketchy as to be useless. The spoked "wheels" were brass, but how to hold three brass wheels together and glue tiny individual paddle onto them was a real head-scratcher. Ultimately, knowing that the hub section of the wheels would be hidden, I simply glued rounded blocks of wood between all of them to hold them in position while I glued tiny paddle elements to them. And something else that the directions didn't cover well was the creation and shaping of the sponsons fore and aft of each paddle wheel. Bear in mind that I didn't have very many ship building tools. More experience with shaping wood elements (and a wood bender) would have been a big help. After this picture was taken I smoothed them out quite a bit and repainted that section. In this shot the decks had just been stacked so I could visualize next steps. Before gluing any of the decks in place I created the paddle wheel covers (had bought a wood bender by then), the small wheel house and the walking beam engine. The engine was a real puzzle to me and I had to Google "walking beam engines" to get a real clue re what I was doing. The Bluejacket plans weren't especially helpful. I did the engine at this point because it had to be in place to ensure that the decks surrounded it correctly. In this picture the boat is pretty close to completion, and I had grown comfortable with the concept of "making things up" at that point. For instance, the guardrails surrounding most of the decks were supposed to include brass wire stanchions, covered by a thin gauzy fabric (my wife tells me it's called tulle). The kit had some of that in it (as well as clear plastic for windows) but 30-years of storage, sometimes in attics, had ruined all of that stuff. So I installed wire stanchions and glued thin wood strips to them (white & gold painted). Not as classy as what Bluejacket intended, but I haven't lost any passengers yet. Here's a better angle showing the smoke stacks, their bracing and the life boats. The "Portland" decals on the sides were also destroyed by the years of storage, so I recreated them on PowerPoint and printed them out on glossy photo paper. I think they look better than the decals. The little red gates were not in the plans, but I thought the crew would appreciate easier access to things so I installed them. Also note that all of the decks and roofs were ultimately repainted with a nautical grey color instead of sea green I originally used. When I was done the ship was quite different than the real thing, or even what the model designers had intended. But it was darned good experience for getting back into the game, and my kids and other visitors think I'm a genius. Please don't rat me out.


- 10 replies
-
- 12
-
-
Chris: This summer I built a 30-year old model of the Portland, a paddle wheel steamer. We have toted that thing around for all these years and I finally got into the mood to build model ships again. I'm going to report on that build, then I'll start reporting on my new project, the Mantua Sergal model of the Cutty Sark. TOM
-
Jack: I interpreted that button as adding to the commentary below. Then, after getting your answer, I scrolled down and found the build logs of others. I thank you for pointing me in the right direction and, as expected, I feel like a goof. At the age of 75 I'm getting used to that though. All best, Tom in NC
-
I'm having brain fade this afternoon. I've read all of the comments and directions re what to title the log, specific things that should appear in the title, etc. -- but danged if I can find a simple button that says "Start Your Build Log". Typical question from a newbie I suppose, but it is rather well hidden if such a button exists. Thanks -- Tom in NC
-
Carl: I'm new to Model Ship World and have been rummaging around through all of the build logs. I stopped to review yours, not because I'm interested in this sort of ship, but because I live about 1-1/2 miles from Zebulon Vance's birthplace just outside of Weaverville, NC. It's nicely maintained by the state, and Zebulon's claim to fame was that he was the first governor of this state. Your descriptions and photos of your work are great, and I'll soon be starting my own re my build of the Cutty Sark. You've given me some good ideas re how to do that. All best, Tom in NC
- 446 replies
-
- 2
-
-
- zebulon b vance
- deans marine
- (and 3 more)
-
Getting Back Into The Hobby After 45+ Years
Tom in NC replied to Tom in NC's topic in New member Introductions
Thanks to all for your warm welcome to the "community". A couple of responses and some added information... - I live in Weaverville, NC, just north of Asheville - One of you asked if we had any relatives in common who were involved in whaling or sailing out of New England and I know of at least 4 Hoxies (my last name) who were whaling ship captains. The Hoxie House in Mystic Seaport was a very popular hotel (since renamed) and the phone book there was full of Hoxies. The oldest house on Cape Cod is also called the Hoxie House and is now a museum in Sandwich. - One of the primary reasons for my visiting Mystic Seaport several years ago was to see the Charles W. Morgan, one of the last if not the last sail-powered whaling ships. I built a model of it back in my 30s. Now it's rumored that Bluejacket is planning a new high-end model of that and it's going to be #1 on my shopping list if & when it becomes available. I'll do a much better job on it this time around. - And of lesser note, there was a clipper ship named the Harriet Hoxie. Google it. - One of you was also a woodworker and warned me that if I ever graduated to scratch-built ships I'd miss the tools I sold. I hope I get good enough to get that far in the hobby, and I can always buy newer tools. - Lastly, the pictures I attached of The Portland paddle-wheel steamer show it displayed on one of the many tables I built during my furniture making years. See y'all later when I start posting photos and details of my current Cutty Sark build. Tom in NC Tom Hoxie -
Hi all. I'm a new guy here. I was getting pretty good at wooden ship models back in my late 20s and early 30s, but the demands of my career intervened and I had to give it up for lack of spare time. I'll bet there are a number of you out there with a similar profile. In my mid-40s my new wife presented me with a fine Bluejacket model of The Portland paddle wheel steamer. I loved the model, but if anything I was even busier then so I tucked the thing away for some future opportunity. I retired in 1998 and after a move to a warmer location (NC vs MI) I somehow got sidetracked into woodworking in 2003 (a completely new field for me) and over the next 15 years got pretty good at designing and building custom furniture. I didn't get rich, but had a lot of fun and paid for some very nice power tools several times over. Early last year (2017), at the age of 74, I decided I'd had enough of furniture making. Material costs were through the roof, and so were machine prices and upkeep costs. I just let the shop languish. One day in March of this year I made some rudimentary efforts to clean it up (it's depressing how much sawdust can collect in every nook and cranny in15 years) and while doing that I ran across a dusty old box on a high shelf and -- SHAZAM -- The Portland came back into my life. It was begging me to try modeling again, and summoning up some of my long-forgotten skills from earlier days I managed to finish the thing after 6 months. It looks pretty nice, but a really good ship builder would probably laugh at my efforts. I can do much better. and I will. I was lucky enough to find a guy who wanted to buy a complete woodworking shop, and now half of my garage is referred to as "The Shipyard". On September 1st I began work on the Mantua Sergal model of the Cutty Sark, and am firmly hooked on the hobby once again. I plan to start posting build progress reports in the forum area soon. My main interests are clipper ships and whaling ships. Several of my old New England forefathers captained whaling ships. I really enjoy reading through the posts from others, even the really old ones. I'll enjoy hearing from you and sharing your stories for however many years I've been allocated.


- 18 replies
-
- 13
-