Tom in NC
-
Posts
44 -
Joined
-
Last visited
1 Follower

Recent Profile Visitors


-
 GrandpaPhil reacted to a post in a topic:
Artesania's brand new kits in 2020
GrandpaPhil reacted to a post in a topic:
Artesania's brand new kits in 2020
-
mtaylor reacted to a post in a topic:
Artesania's brand new kits in 2020
-

Artesania's brand new kits in 2020
Tom in NC replied to modeller_masa's topic in Wood ship model kits
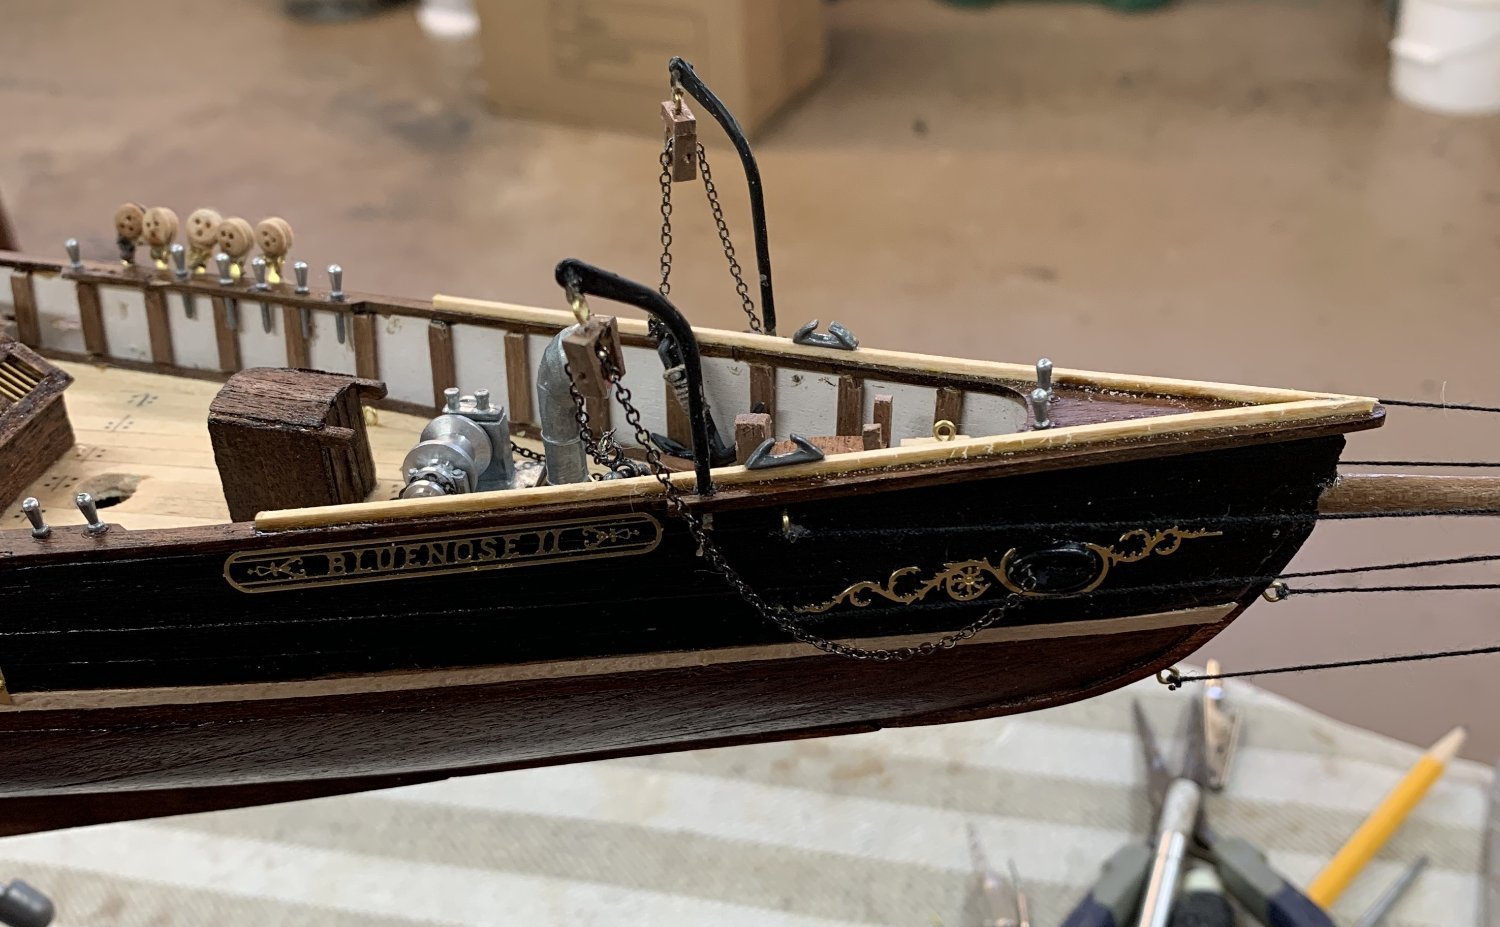
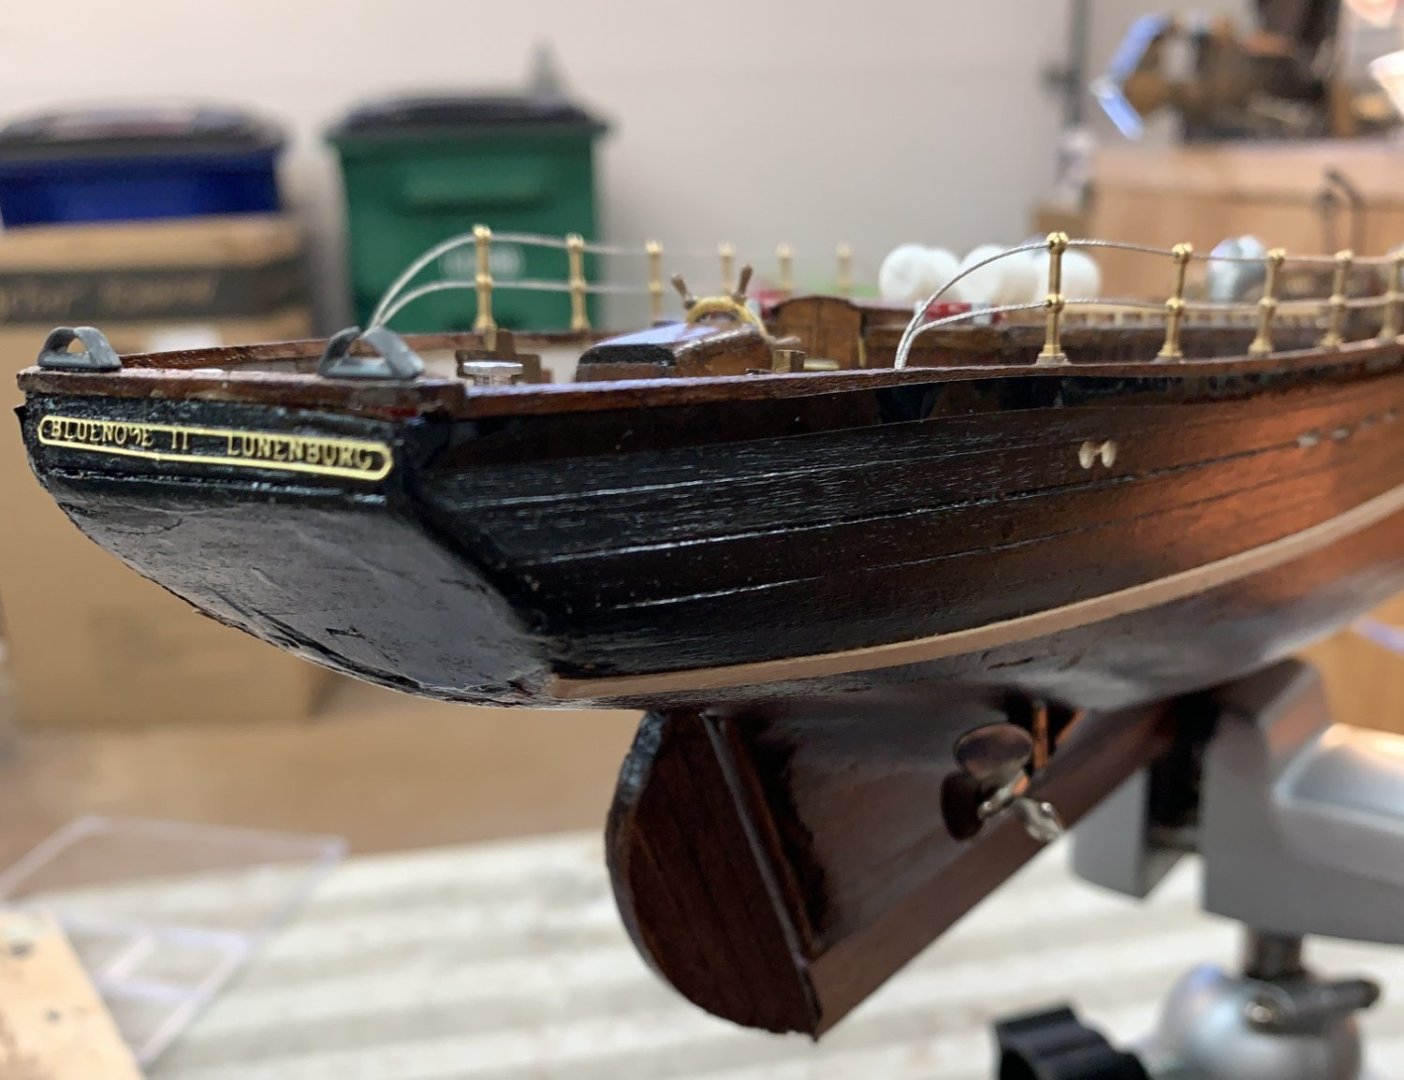
I'm currently building the Artesania Latina Bluenose ll. It's a newly produced kit, not an old one purchased on eBay. I'm very impressed with some elements of the kit, but very disappointed with others. This kit comes with a CD (and luckily I still have a PC with a CD slot), and the .pdf and video files on it are very nice - as far as they go. To save some time & space I'll summarize my experience - good & bad - with this model below. * Components are all high-quality. Nice woods, fibers and metal. A few minor parts missing, but the rigging threads (while nice) are inadequate. Not enough of the heavier black fiber to complete all of the shrouds. * That's assuming that I'm using the right weight thread for that purpose. If there was a parts list with component descriptions included with the kit I'd know. * I was able to make my way through the hull and deck directions, and the results look great, but things get very fuzzy after that. I could get the masts assembled just by looking at the provided pictures, but then as the pace quickens the pictures (which include numbers next to each component) leave you to guess what to do. What the heck does a part number in a picture mean when there's no parts list to refer to? There are literally no written instructions after you get to mast construction. I'll get through this. I've built a number of models and feel pretty competent. But I'll have to refer to pictures on the box cover, the pictures with indecipherable numbers, etc. Good try Artesania Latina, but the little details count and you need to do a lot better with instructions.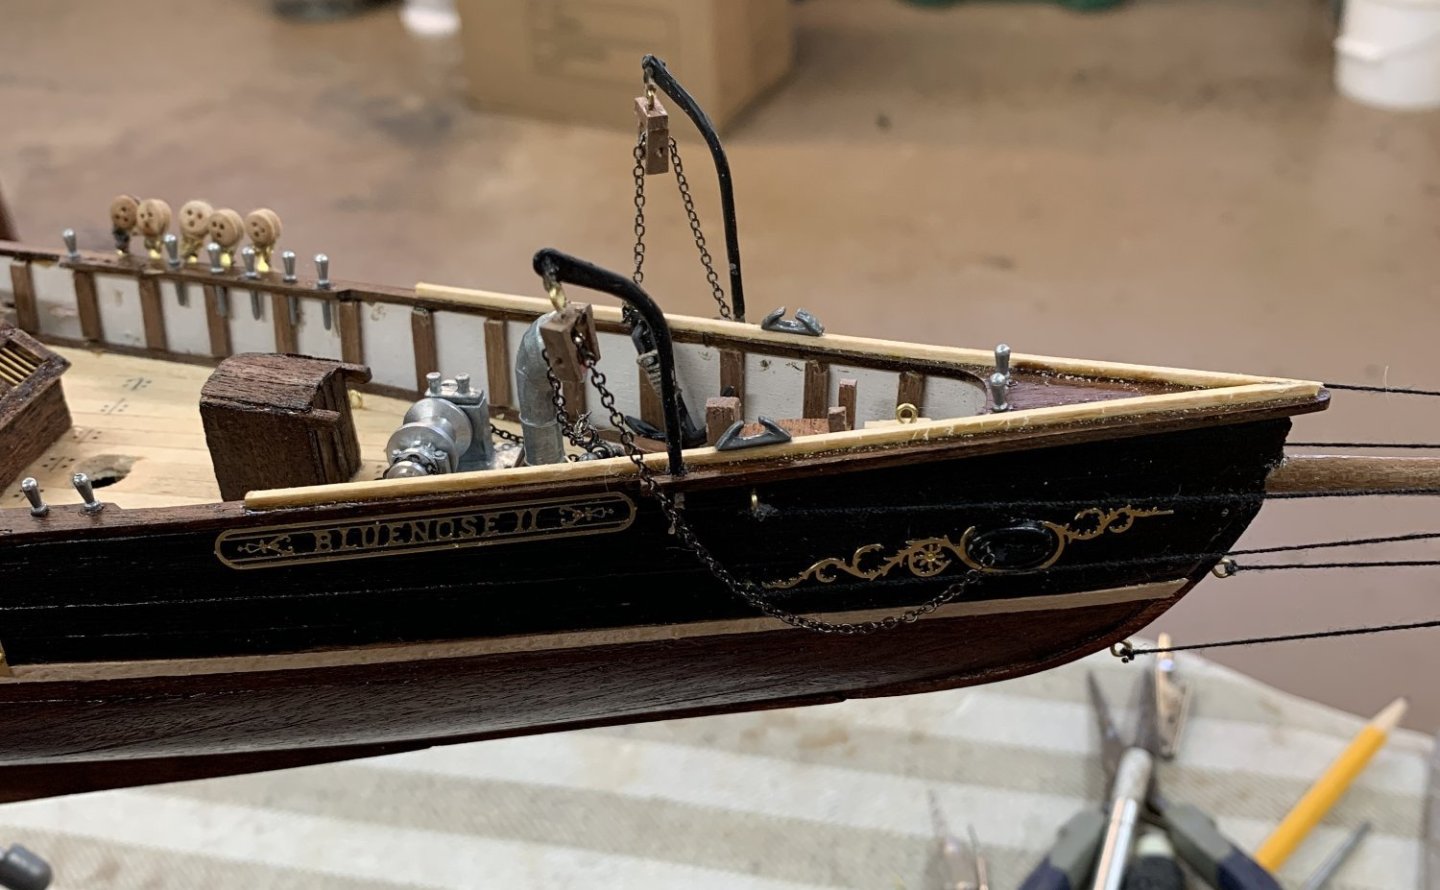


-
Haliburton reacted to a post in a topic:
Endurance by Galliumsphinx - OcCre - 1:70 - first build
-
I see by the date on your first response, and the fact that you haven't posted any more progress reports, you may have given up or have other time commitments. Whatever the case I'd just like to add that I'm working on the Dutchman now and last year built the Endurance and the Ulises tug boat -- all from Occre. Prior to those builds I took on various models from Model Expo (C.W. Morgan, Chaperon) and Mantua (Cutty Sark, HMS Victory), and a few others earlier on. You can find build logs on each (except the C.W. Morgan) here on Model Ship World. On the Morgan I got so hung up on precise detail (after following at least three build logs from superb modelmakers) that I never posted my build, finding my skills to be a bit removed from those other guys. I also haven't posted build logs on the Endurance and Ulises -- frankly because it's just too much trouble. I found myself taking way too much time staging photos and trying to write clear descriptions of my work. Nevertheless, I still support Model Ship World because of the wonderful logs so many others take the time to post. I guess my point is that building a ship model means different things to different people. I love it, but found myself getting tied up in knots worrying about the precise authenticity of my work. Now I've learned to appreciate that a ship model (or any other type of model) is a representation, not a dead-nuts accurate depiction. There are other guys and gals on this forum who agonize every detail of their builds, and damn are they good at that, but my own joy comes from simply doing a good yeoman's job and enjoying myself. My results have been pretty good, but I haven't built a model yet that took more than nine months to complete. I have the luxury of spending my free time on this, and I have lots of free time, being retired for many years. Please don't get discouraged. Take whatever time you have and try to build competent models, not necessarily museum quality pieces. I have models displayed all over the house, and I love looking at them. Friends, family and visitors all appreciate them (for 2-3 minutes) and uniformly remark on my "patience". Ho-hum. I build them for my own pleasure. I must also comment that the last three models I've built have all been from Occre, and I find them to be much more fun than my previous efforts, not because of their high level of detail, but because the quality of their materials is top drawer, their instructions are quite good (pictures, YouTube build videos, etc.) and they wind up looking (to the casual observer) damned nice. And when you look at the current pricing of other models it's very easy to decide what to buy. Hope you continue model building. It's very satisfying when you worry more about pleasing yourself than anyone else. Tom in NC
-
Tom:
I am in Guilford, CT. I passed through Asheville 50+ years ago, it must have changed a great deal since. I remember that area was beautiful.
I could use some guidance and advice. I just scored a 25+ year-old Bluejacket Portland model kit on Ebay at a deep discount. I am returning to model building after a 60-year hiatus. I never thought I would build this model due to its cost. The new kit is $590! I have not started my build yet, I just received the kit. Everything in it, including decals and fabrics are in excellent condition.
Before I start building, what advice can you share? What are the pitfalls? What tools are most valuable? You mentioned a wood bender, and I have already considered buying one. I plan to spend a long time on this kit. I want it to approach museum quality and be as accurate as I can make it. I have wanted a model of the Portland since 1961, when I first read about it. I am willing to spend the time; hopefully I will live long enough, as I am 74.
Thank you for sharing your photos. They will be helpful once I begin. I have never seen photos of the Portland up close, real or model. I will be glad to share my experience, issues, and photos in the future.
I hope we can stay in touch. I have to complete my work area, before I begin my build.
Thank you in advance,
Ed Pospesil
-
 Keith Black reacted to a post in a topic:
ENDURANCE by OcCre - 1/70 scale
Keith Black reacted to a post in a topic:
ENDURANCE by OcCre - 1/70 scale
-
kit review ENDURANCE by OcCre - 1/70 scale
Tom in NC replied to ccoyle's topic in REVIEWS: Model kits
Keith: Nice job on the stanchions (and the rest of your work). I just started my Endurance build last week and I must say I have had a really good experience thus far. No damages, no missing parts and the keel in my kit was still in its frame. My kit must be a newer version (from Model Expo). I am very impressed with the instructions. Each step is covered by really well-done color photos and the one-page written instructions are pretty self-explanatory. The review by ccoyle was excellent and I imagine that it's been read quite a bit now that the ship is in the news. His points about the less desirable aspect of the kit (stamped brass stanchions in particular) are well taken and I'll be upgrading those - if I can find any. Haven't located any turned brass versions yet but will keep searching. I'll need 12mm versions in 1 and 2-hole configurations. Any tips re finding these things would be appreciated. I'm sure that there will be other upgrades as I go long and I'll handle them as they come up. There are some really nice design features that I'm impressed by. For instance, the difficulty in establishing mast angles is easily solved by the below deck locaters that are glued into the keel and line up perfectly with the mast holes in the deck. I'm sure I'll run across similar examples of what is looking like really thoughtful design. Manufacturers of other more expensive and detailed kits should take a look at things like this. Getting the mast angles right on my recently completed Charles W Morgan was quite difficult (and the Morgan's instructions leave a lot to be desired too). Happy building to all. I'm really happy with my Endurance kit. Tom in NC -
WestPort reacted to a post in a topic:
HMS Ontario by David Lester - MarisStella - 1:48 - Terminated
-
mtaylor reacted to a post in a topic:
L'Orenoque by Mamoli
-
Mark Thanks for your response. I'll try to contact Daniel to get further information. Just not familiar with Mamoli models and what they are like today. Call it due diligence. Hopefully the L'Orenoque is a newly produced kit and not something from the old Mamoli inventory. Have a great New Year. Tom
-
mtaylor reacted to a post in a topic:
L'Orenoque by Mamoli
-
Does anyone have experience with the Mamoli L'Orenoque kit that's being advertised in Model Expo's latest catalogue. I'm curious to know if this is a "new" kit with "new" quality componentry and well-written instructions. In some forums I've read that prior to the Mamoli Company burning down several years ago, and before a fellow named Dusek bought the rights and started to rebuild the company and its product line, that Mamoli models were not so hot. Most criticisms seem to center around vague and poorly translated instructions. My best experiences have been with Mantua and Model Shipways products, and I hope someone can advise me that Mamoli's current models are on a par with those builders. Any comments will be appreciated. Tom in NC
-
David Don’t know if you ever saw my question above but it finally occurred to me to look at the parts list and all the answers are right there. I feel pretty stupid. Now headed for Syren and Bluejacket. All best, Tom in NC
-
David I know you’ve moved well beyond the CWM, but your terrific build log lingers on. I’ve been using it as my primary guide in building the same kit … and I have some questions if you’d be inclined to help me out. One in particular. You detailed the size and origins of the blocks you ordered from Syren and Bluejacket, but your list didn’t indicate whether they were single or double blocks, nor how many of each were needed. I’ve tried to discern that from the plans but am stumped. I know it’s asking a lot, but if you could dredge that info up out of memory it would sure be appreciated. I’ve been working on this project since March (6-8 hours a day) and am fast approaching the dreaded rigging stage. As you observed, the number of fittings that have to be installed on the masts and yards is formidable. I have especially appreciated your notes and pictures re how you did things along the way. This model requires a level of inventiveness beyond any I’ve done so far and your explanations re how you came up with workarounds have been extremely helpful in that regard. Your superb work, along with that of Gerald Spargo has inspired me to create results far beyond my previous efforts. Once again, I love your build log and your photos. You are a super star when it comes to ship modeling. I can only hope my own results will be 1/2 as good as yours. Tom in NC Tom Hoxie tomhoxie@aol.com
-
GrandpaPhil reacted to a post in a topic:
HMS Victory by Tom in NC – FINISHED - Mantua – 1:78 scale
-
Thanks to all of you. These comments are very helpful. I'm off to the "shipyard" (as my wife calls it). I need to start posting some of my progress and eventually you'll see how these ideas helped me. MSW is great!!!
-
I’m currently working on the Model Shipways 1:64 Charles W Morgan and there are a number of places where iron rod is needed to fashion fittings. In particular the plans call for chain plates to be fashioned from 0.016” iron rod — and I have no clue re where to get any of that. Or any other small diameter wire/iron rod suitable for shaping fittings. In some cases I’m going to have to solder the parts I need to create and I’m just learning how to do that. If you have some resources for this kind of thing it would sure help me. Many thanks. Tom in NC tomhoxie@aol.com
-
David: Sorry about your throwing in the towel on this model. I've never done that (yet) but I can imagine making such a decision. I have done one project during this modeling lifetime (I returned to ship building a few years ago after a 45 year sabbatical -- called making a living) that I went ahead and finished even though I was not happy with the work that I'd done. My son loved the thing so I gave it to him and he brags about my work. I can live with that. The real reason I'm writing is to tell you that I'm starting on the Model Shipways Charles W. Morgan next week (my birthday present to myself) , and I am planning to use your fantastic CWM build log as a guide. I don't know if I can match your work, but I'm gonna try like hell. Best of luck on whatever your next project turns out to be. Tom In NC Tom Hoxie
-
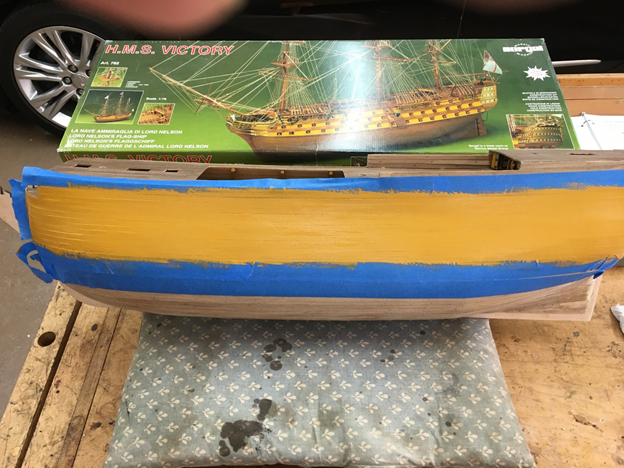
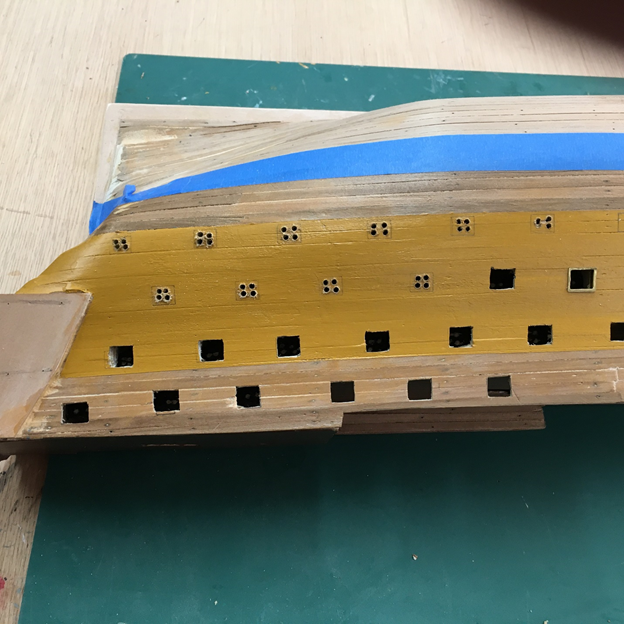
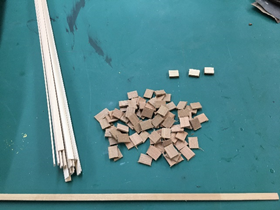
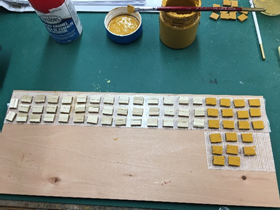
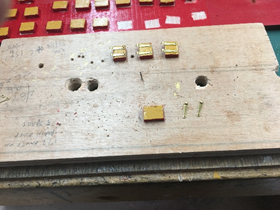
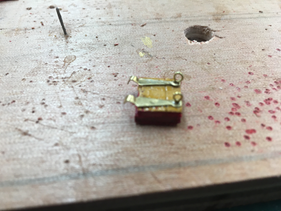
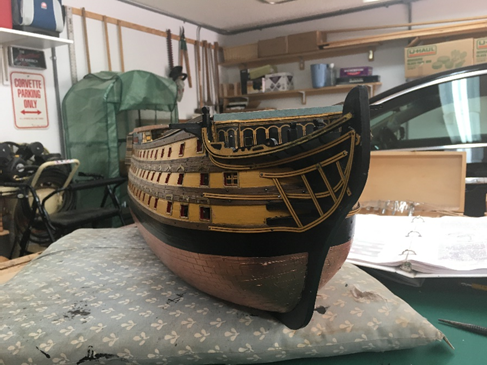
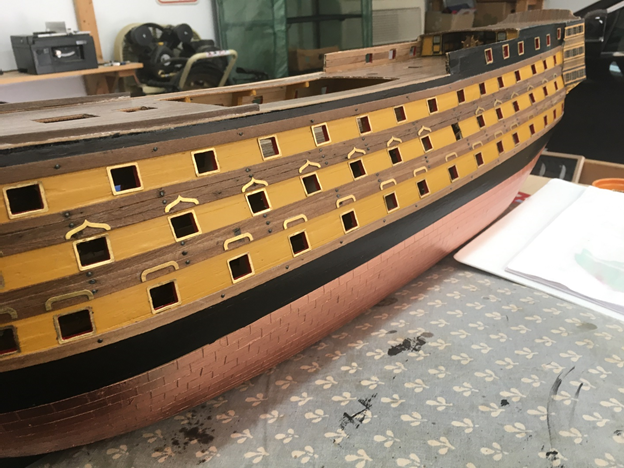
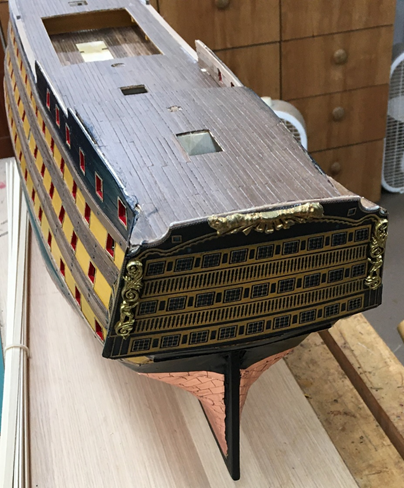
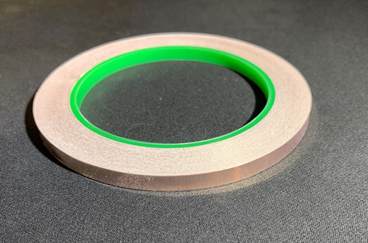
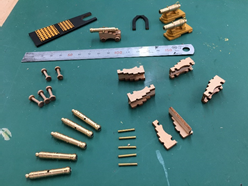
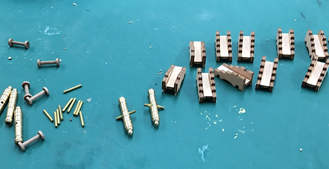
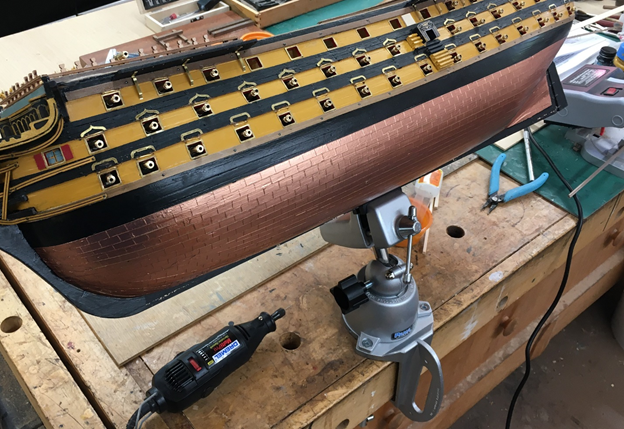
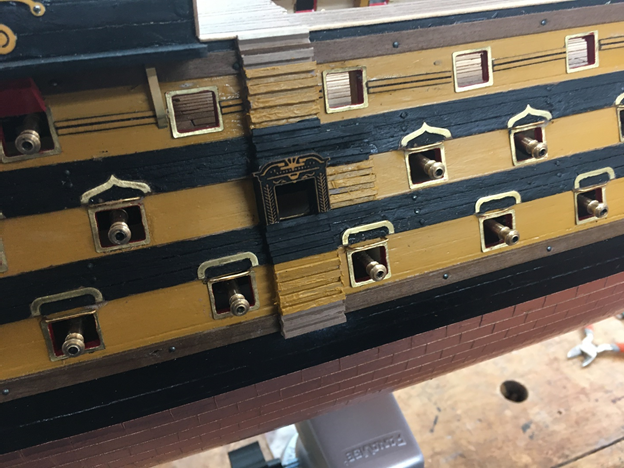
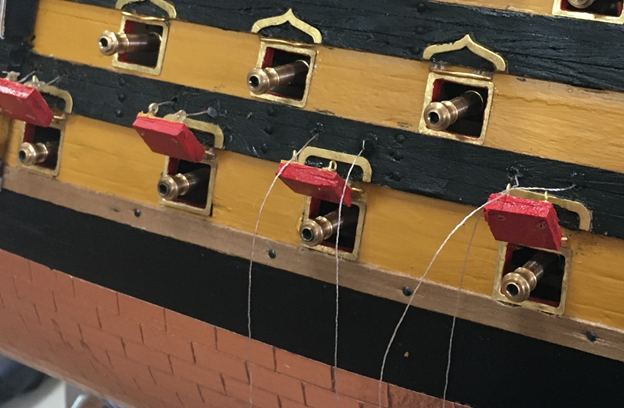
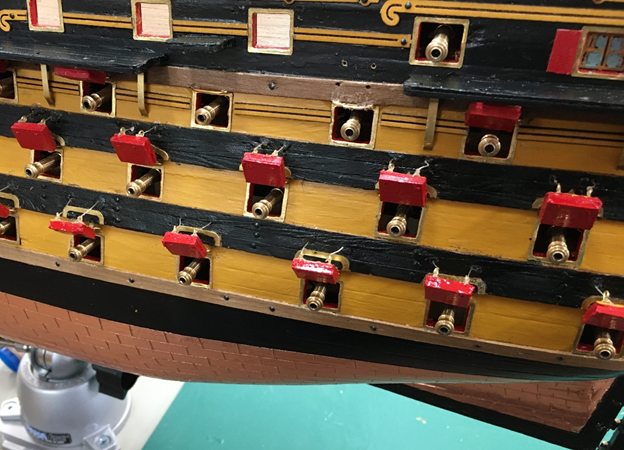
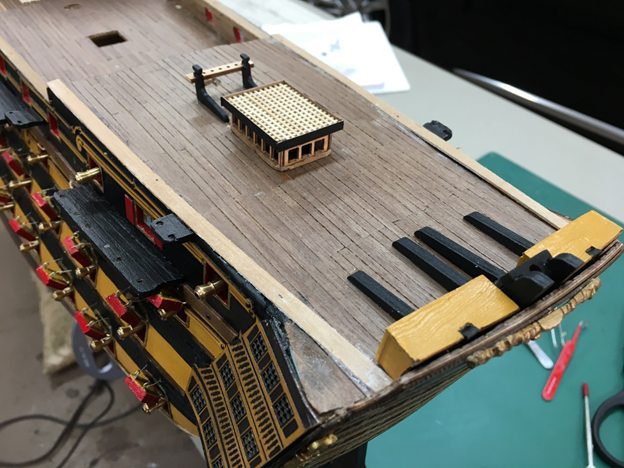
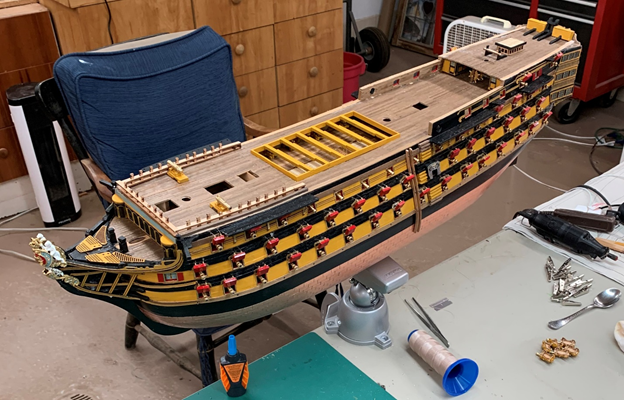
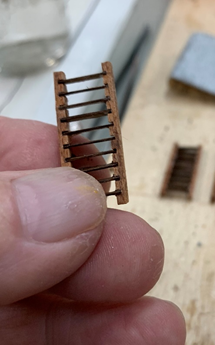
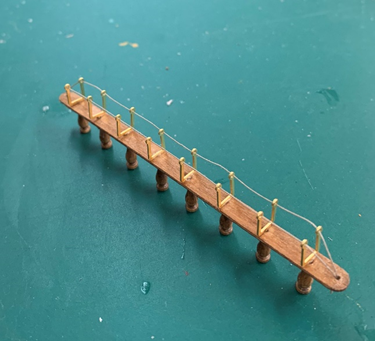
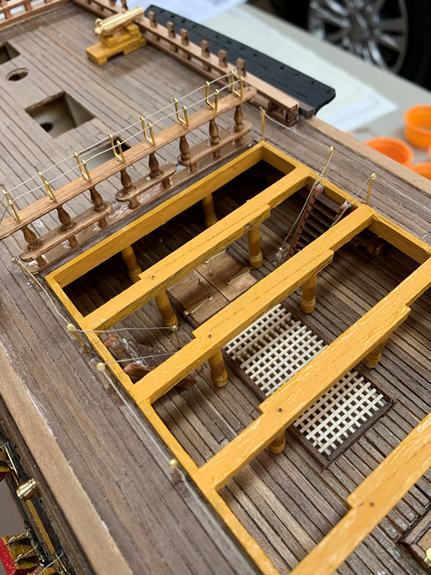
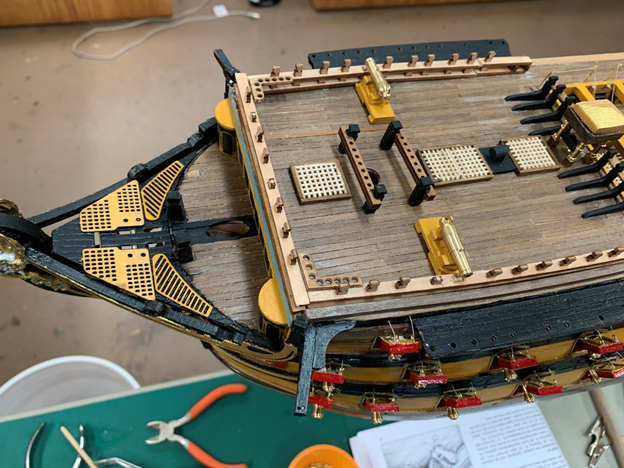
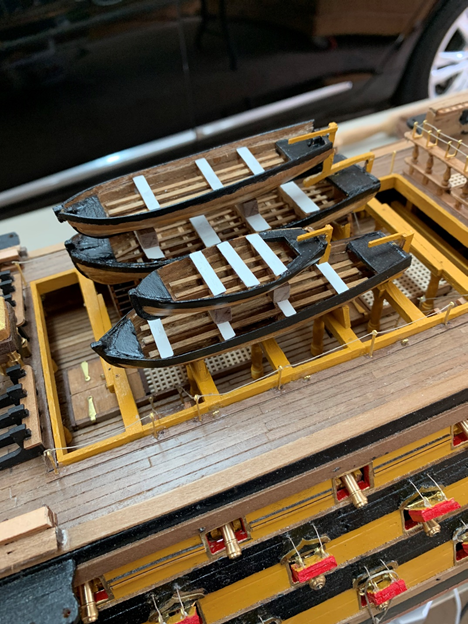
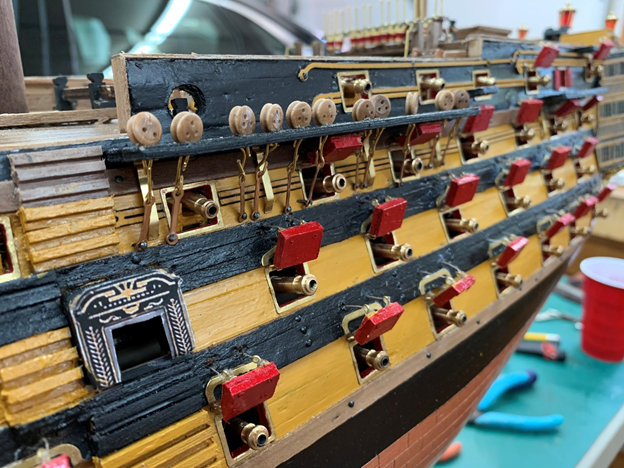
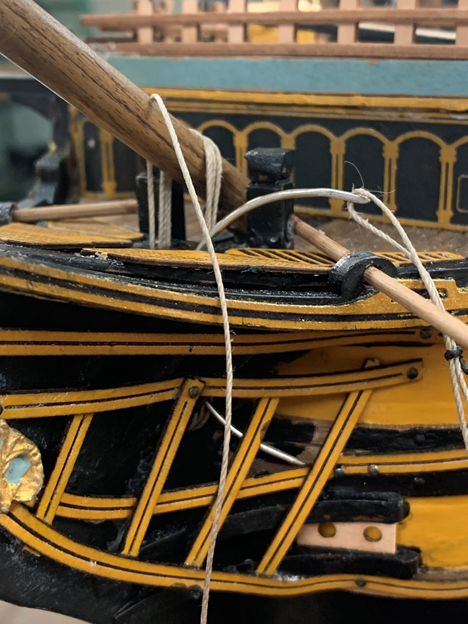
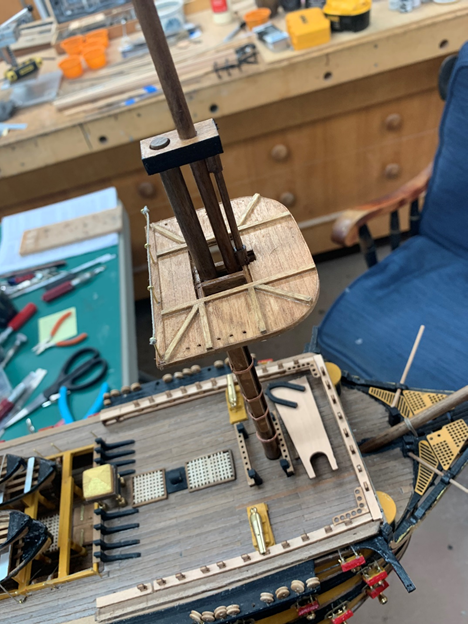
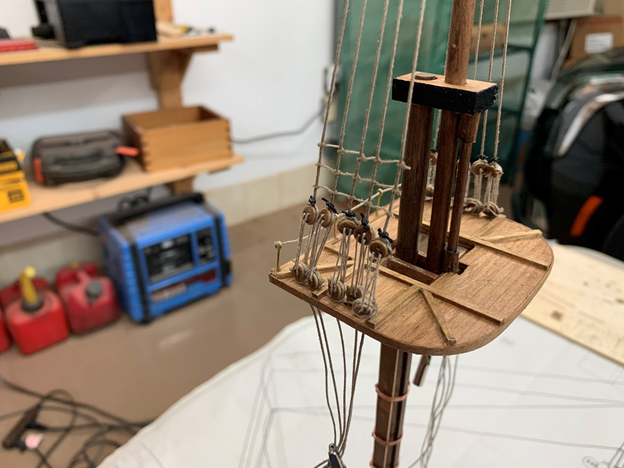
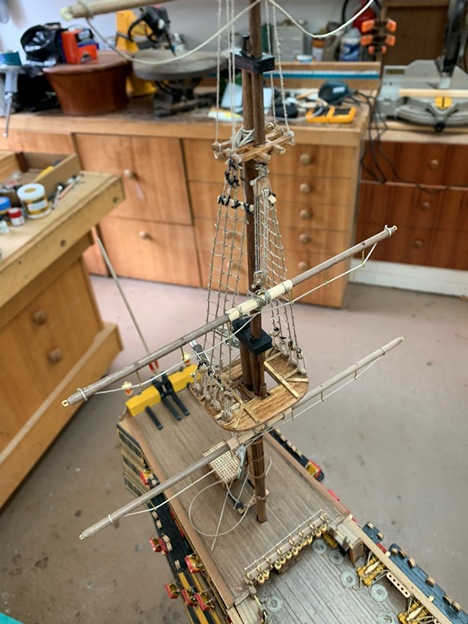
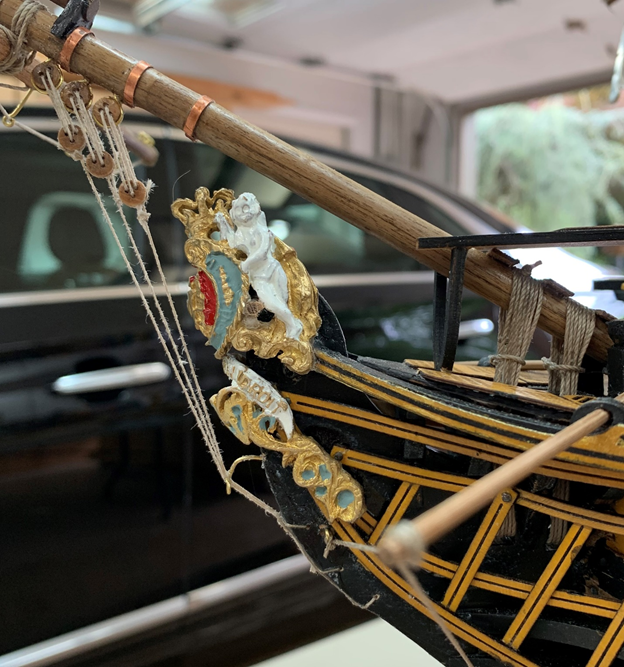
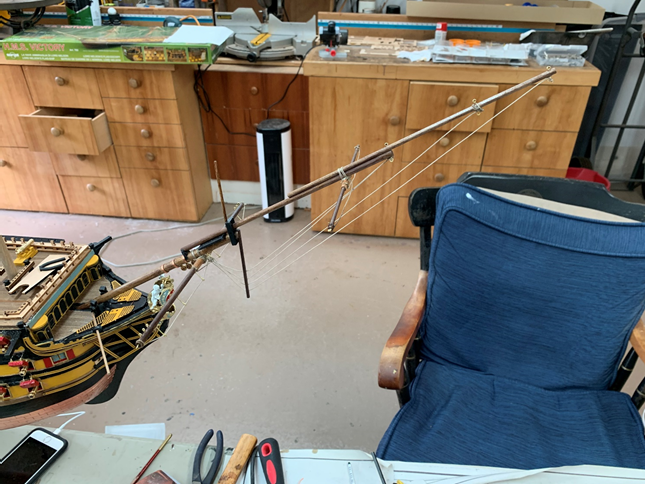
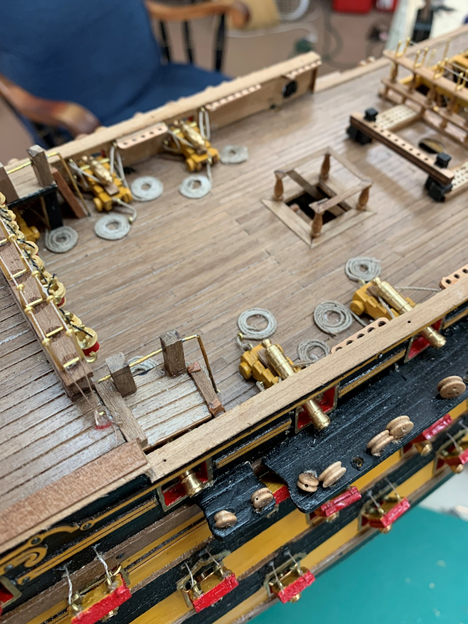
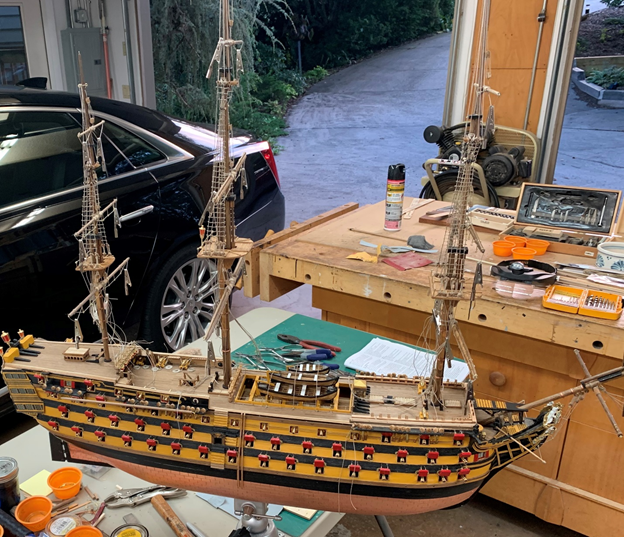
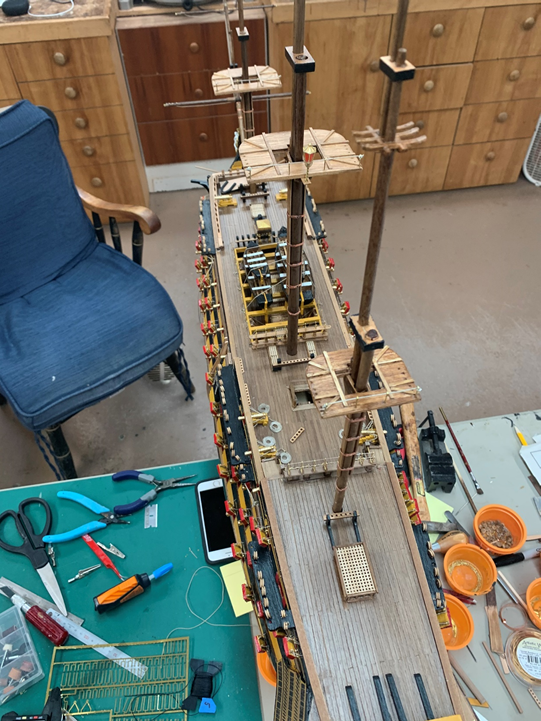
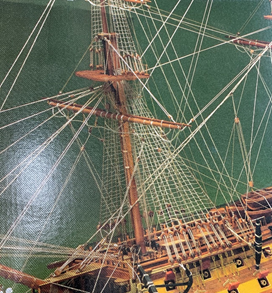
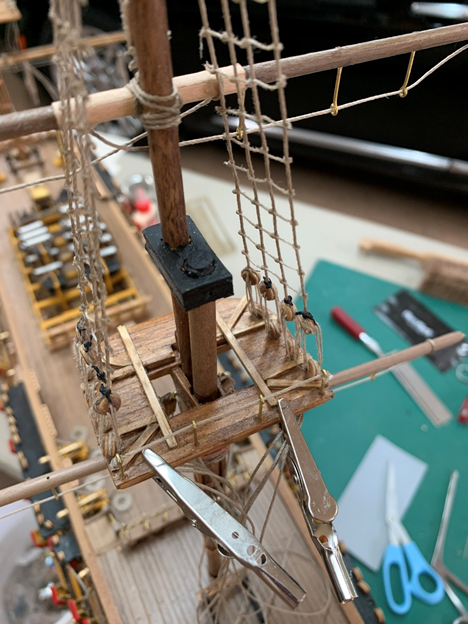
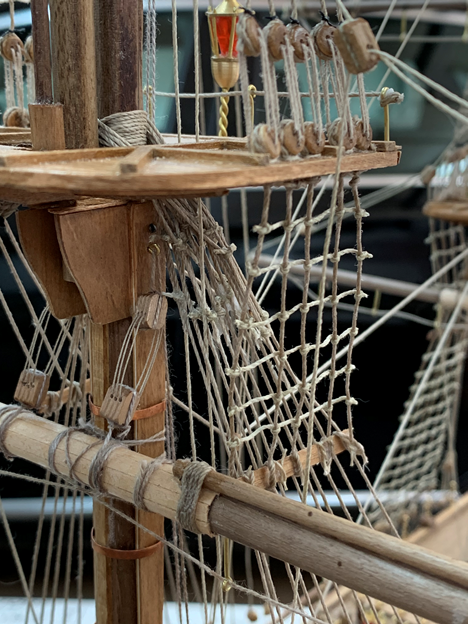
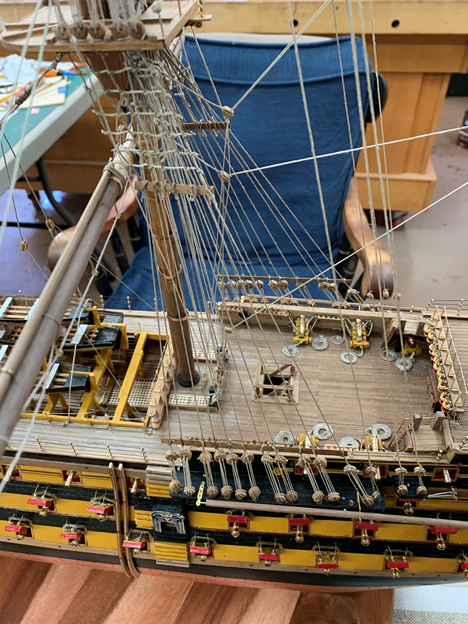
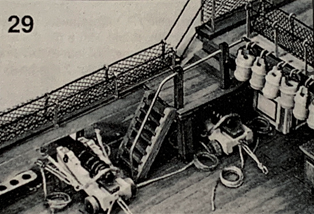
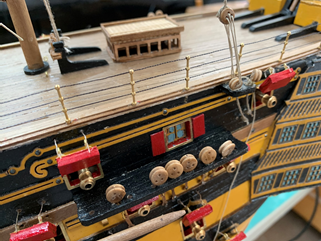
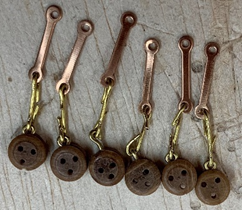
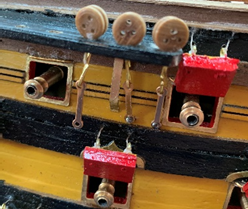
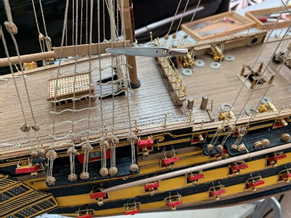
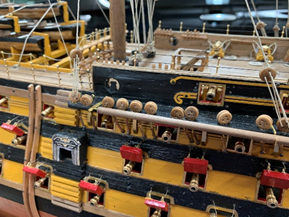
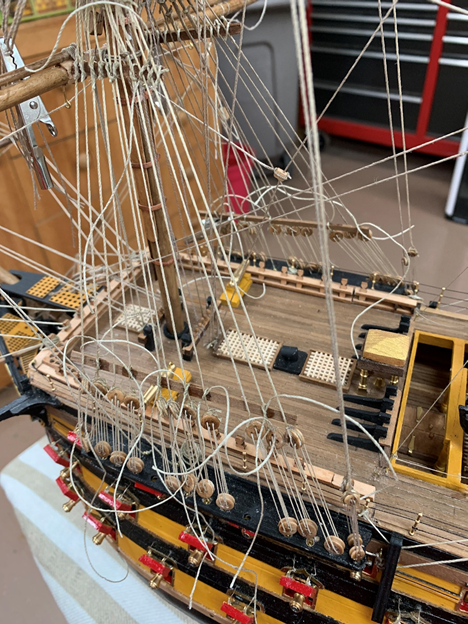
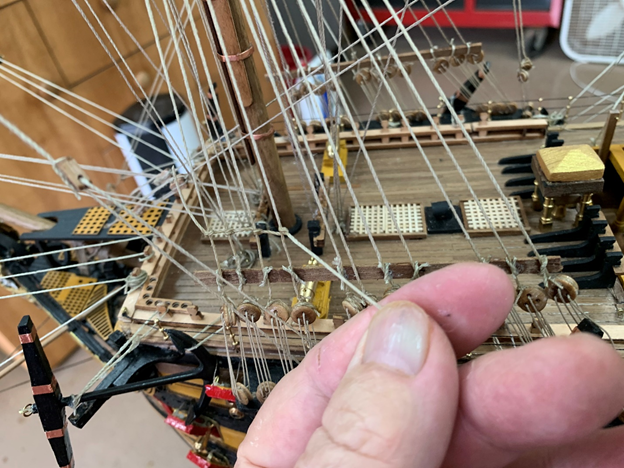
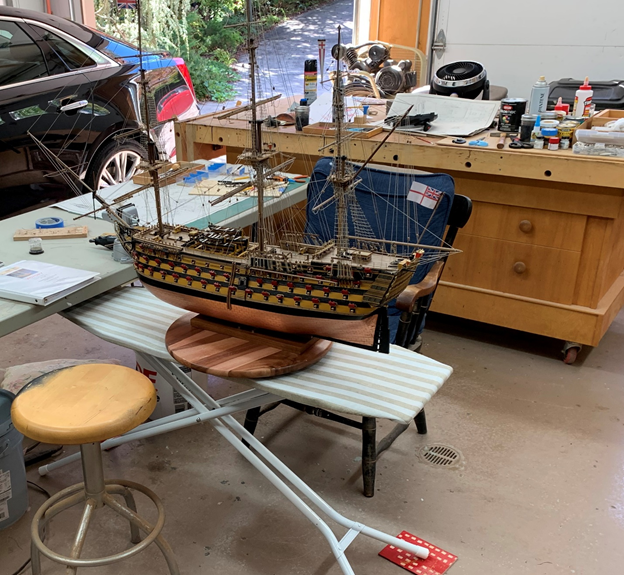
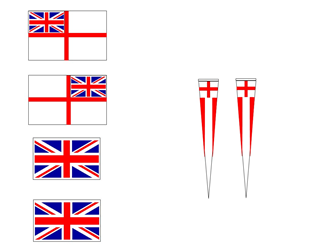
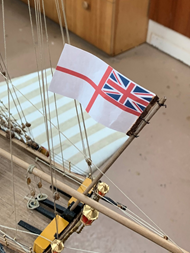
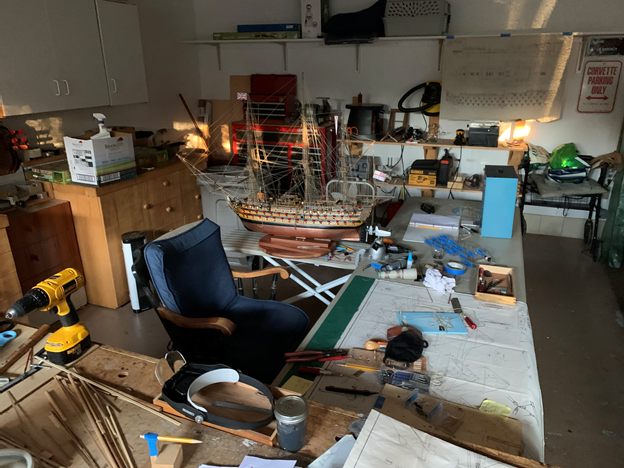
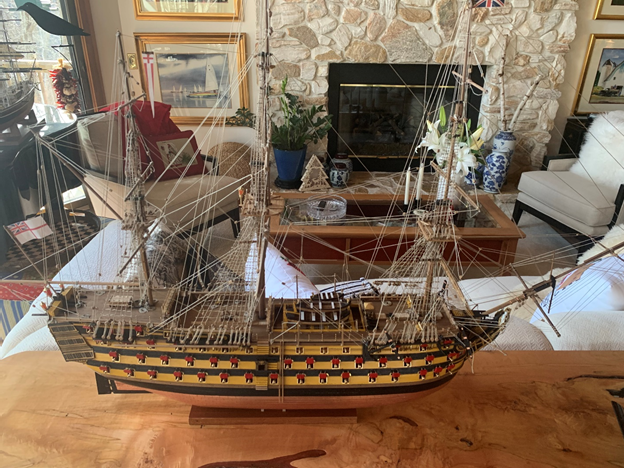
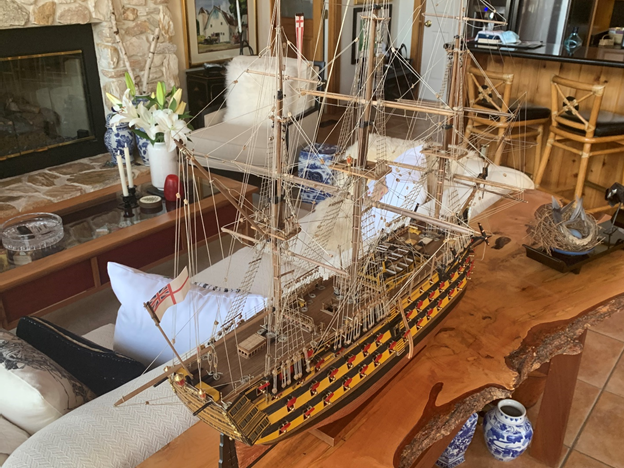
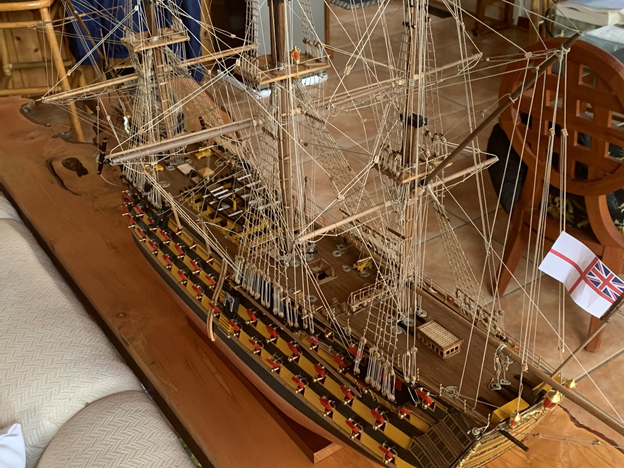
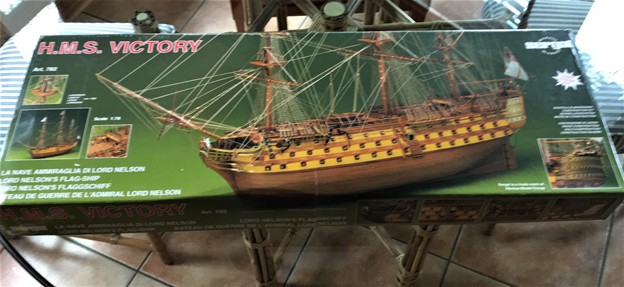
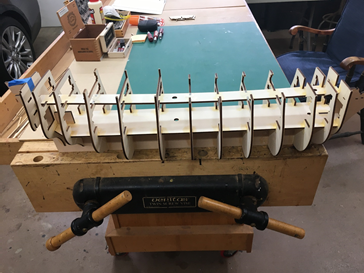
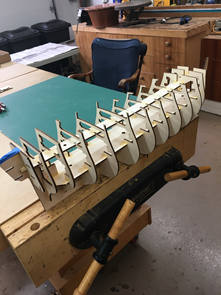
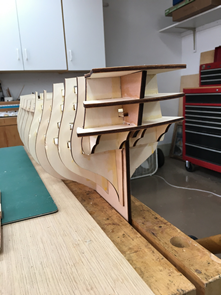
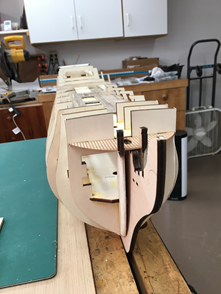
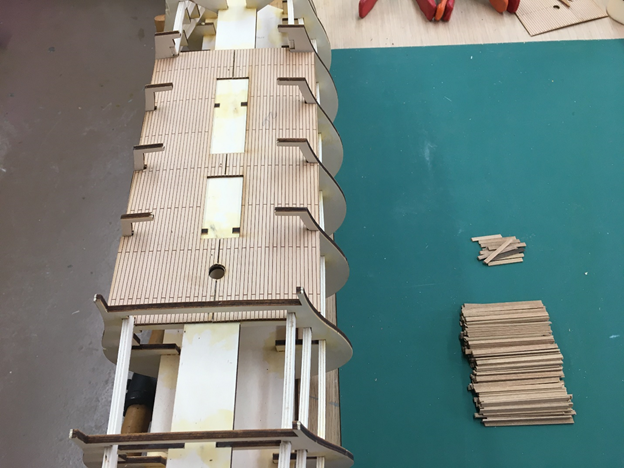
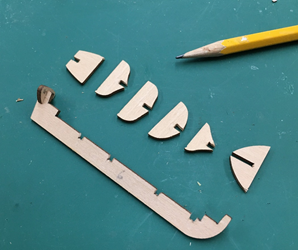
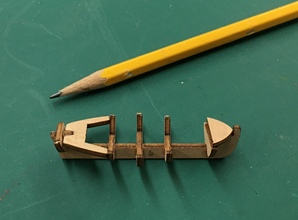
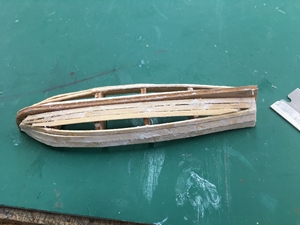
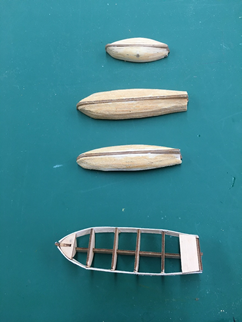
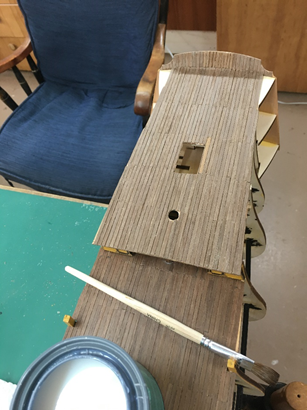
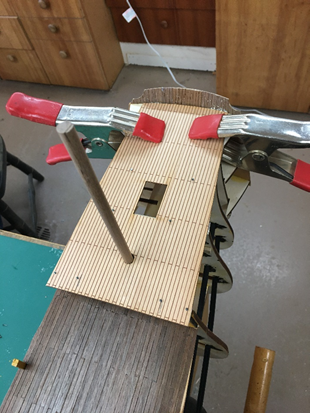
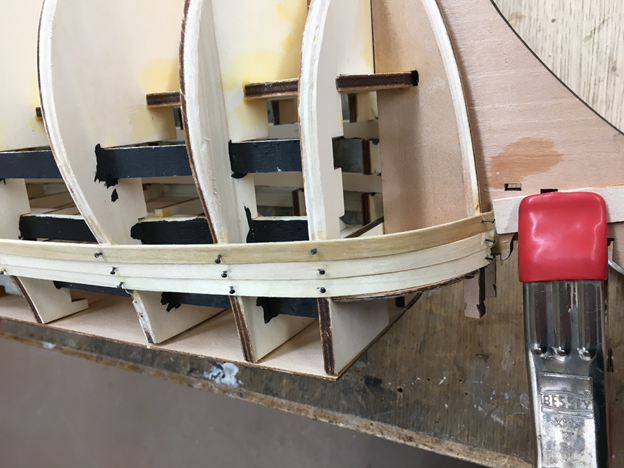
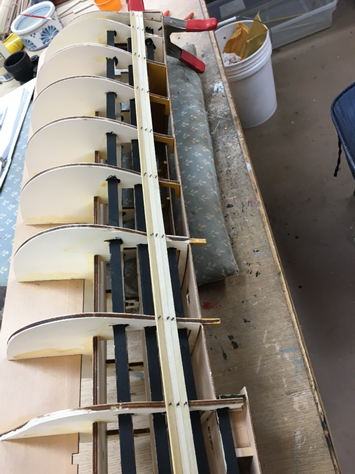
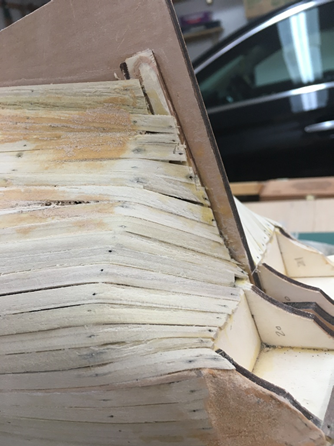
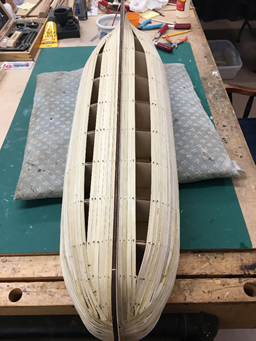
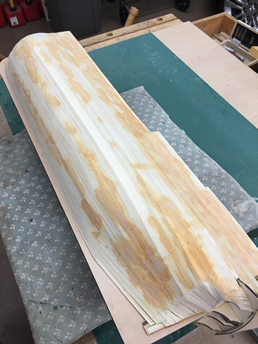
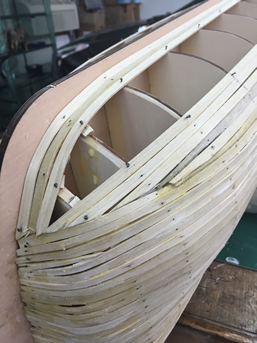
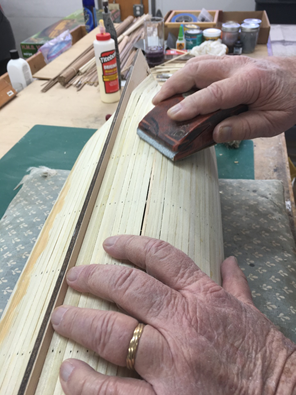
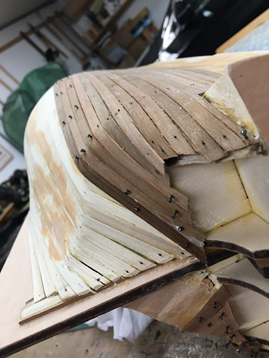
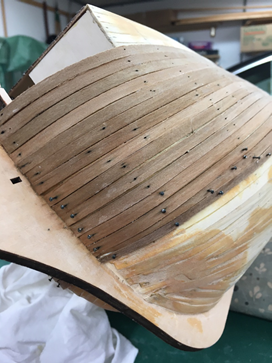
HMS Victory Build Log -- Part 2 -- 2/18/21 After the final sanding of the hull I determined the position of the waterline, masked it off and proceeded to apply an ochre yellow color the middle part of the Victory’s hull was painted with. I was able to find a very satisfactory artist acrylic paint online that is thick enough to fill smaller voids so that you wind up with a very nice, smooth result. To use with a finer brush in hard-to-reach spaces you can thin this acrylic paint with water to make things easier. It was available in a much bigger bottle than the little paints you find in hobby stores – and you’ll need that extra amount of paint on this ship. After the paint was dry I used the aforementioned template to locate the gunports, taking care to move a few to positions where the ports could be cut without hitting one of the underlying bulkheads. Once I had the port shapes scribed onto the surface I first drilled holes within those borders then use a sharp Xacto blade to cut away excess and bring the openings to their final size. The kit provides nice brass “frames” for the gunports and I used those to insure that I had the holes square and of the right size. Before cutting the two lower rows of gunports I installed the gunwales to ensure that the ports were properly positioned between them. At some point you have to assemble the gunport covers, and it’s a step-by-step process of cutting the cover, planking it with two small planks, painting them yellow on one side and red on the other, then installing the associated hardware. If I had it to do over again I’d skip doing the extra planking – it just makes the cover thicker than it needs to be and adds nothing of any value. Once I had the gunport covers all cut out & painted I set them aside and assembled the bow components. As mentioned earlier, brass frames are provided for all the gunports. They must have the inside edges painted red. Then brass drip moldings are glued on over the gunports on the two lower decks – and they are differently shaped for some reason. Note the lower hull copper cladding. More about that in a minute. The next picture shows the aft crew and captain’s cabin sides fully installed. As I mentioned much earlier there were several pieces in this kit that were formed from thin plywood and stamped with a faux gold color. I didn’t like them much but managed to make them work by (a) painting all of the windows a light blue, and (b) coating all of the cabin pieces with Minwax semi-gloss water-based arylic. It all came out much better than I had hoped. Note that these parts got a semi-gloss finish as opposed to the decks that got a matte finish. The copper cladding bits were not included in this version of the ship, which is just as well since I had hated trying to install those things on the Mantua Cutty Sark that I completed a couple of years ago. I instead used 1/8” copper foil electrical tape for my cladding (manufactured by PEMOtech). It goes on very smoothly, and once it’s in place you can add vertical slits to emulate the plates. Teensy rivets for authenticity? Nahhh. To add durability I coated it all, along with the rest of the hull, with the Minwax matte finish acrylic. It looks great and I strongly suggest you consider it if you plan to copper clad a ship model. It comes in a variety of different sizes too. The next picture is meant to show what carelessness can look like. It all cleaned up OK, but yuuuck! Each cannon on the upper deck and the lower gundeck had to be assembled. The cannons on the lower decks are simply glued into holes drilled into gun support rails inside the gunports. By the way, if you’ve ever tried to assemble a model like this you know how difficult it is to handle the thing and hold it in any particular position while you make additions. Paint smudges, bits break, etc. Ugh. So when I discovered the PANA Vise I was ecstatic. I was able to twist and turn the hull in almost any direction and fix it in place to add bits & pieces on the sides and deck. I used this device throughout the hull assembly process and it's a lot more versatile than a simple keel clamp. I highly recommend it. From this point I'll just add pictures of various additions to the hull and deck construction with brief comments... Sea gangways & cannons installed. According to the plans the cannons should be flat black. I like them better with their unpainted brass finish. Cannon port covers. Tedious job, not well-explained in the plans. The gunport covers have to be attached to the hull but there is no description re how to do that. I finally created wire loops just above the gunports and hung the hinges on them, adding a drop or two of super glue to hold them at the right angle. Then I inserted thread into holes I drilled in the hull, with a drop of glue to hold those in place. Lastly I connected the thread to the eyelets on the covers and trimmed off the excess. Only had to repeat this process 80 or 90 times. Gaaaack. Captain's cabin skylight added, along with flag lockers at the stern. This was, after all, a flagship :):):) Additional details added to the bow construction. Several other deck components installed. Ladders Banisters Lower gun deck details (hatches, entryways); lifeboat supports frame the hole in the deck. Foredeck details (bitts, cannonball racks, hatches, belfry, etc.) Lifeboats completed and installed. Never did figure out why there are four different sizes. Basic rigging attachments installed (channels, chain plates & deadeyes). The bowsprit is lashed into place at two points on the bow. No clue in the plans re how to accomplish this. I used a nice big curved upholstery needle to guide the cordage into place. Foremast assembled and slipped into place. Main mast and mizzen masts added. Note cannons installed on the deck and coiled ropes. Beginning installation of upper ratlines/shrouds on one of the masts. Mizzen mast w/upper ratlines completed w/assembled yards added. Figurehead painted and installed. Note heavy ropes holding bowsprit in place and other rigging details. Four decorative lanterns (three on the stern and one on the main mast) must be constructed using nice brass & plastic components provided. Bowsprit standing rigging details (note comfy chair and messy workspace). I’m obviously not a neat freak. Or an especially good photographer. Closer view of main deck cannons and restraining rope attachment schemes. Also note companionway to lower gun deck as well as stairs/railings coming down from the forecastle deck. All three masts & bowsprit in place; ready to start serious rigging. Will continue in a few days ... HMS Victory Build Log -- Part 3 -- 3/1/21 Here's the rest of my HMS Victory story.. The railings provided with this model were basically u-shaped brass loops into which you were supposed to neatly insert a folded black nylon mesh. They call it “hammock netting”. They look fantastic on the finished model in the plans and the box illustrations (see picture below), but when I was challenged to perform that scheme I completely failed. Probably the fussiest thing you are expected to do on the whole model. Sooo, I ordered some appropriately-sized 3-hole stanchions from Ages of Sail and constructed the ship railings with them. Again, probably something only an expert model maker would notice, but it sure looks better than what I was doing. Chain plate construction & attachment First chore in the transition from hull building to rigging was assembling the three masts. As I mentioned in the beginning, I didn’t do a very good job of memorializing every step of this build. Here is a picture showing the three masts after preliminary assembly and fitted to the hull. No good photography to show how it was done. Some of the best clues re the rigging on this model are contained in the excellent photos on the box – even though the paint scheme in those pictures is nothing like the one described in the instructions … The picture below shows the foremast with the upper ratlines pretty much done. I’ve seen in some other build logs that I’m not alone in being confused when it comes to the attachment of yards to masts. In this case I chose to drill a hole thru the yard and the mast, insert a piece of brass wire, slip the yard on to that and then lash the whole thing into position. I’m sure there are better ways to do it, and hope I’ll learn what the trick is before starting my next ship. For the record, I don’t think anyone but another model ship builder will notice what I did. And now here are various shots of rigging in progress... Doesn't this look like fun? One work trick I learned was getting the ship in a position where it could be turned around and be at an appropriate level to work on from a chair. I salvaged an old ironing board that my wife wanted sent off to the dump, and added a cheap 12” wooden Lazy Susan. Made the rigging challenges a lot easier. The flags that came with the model were unacceptable. Printed on some sort of thin linen but only on one side. Soooo, I scanned the kit flags, dragged the scans into PowerPoint and downloaded matching British flag designs from the Internet. I flipped and duplicated each image then printed the whole page out on matte finish photo paper. Trimmed each image and “glued” them together, back to back, with rubber cement. They were easy to bend and furl, and they turned out great. And so, the sun sets on my HMS victory build. It’s been a lot of fun and I’ve learned many new tricks and techniques – mostly from the build logs of other model makers who are a lot more skilled than I. MSW is a fantastic source for people who are still just learning. Thanks to all. Finished Project I moved my Victory into the house where it now occupies a place of honor in the middle of our great room. Love it, love it love it. Tom In NC (Tom Hoxie) Weaverville, NC


-
Chris: Yep. I'm 77 years old, been retired for 20+ years, got over golf & woodworking after 15 years, and now really enjoy model ship building. Oh, and I haven't been able to get a COVID vaccination yet. When I was building my Cutty Sark a couple of years ago (which I finished in about the same amount of time as the Victory) I was flummoxed by communications with a fellow modeler who had been working on his Cutty for NINE years !!! I just can't imagine taking that long to do anything. Putting in just 3-4 hours a day can get a lot of stuff done while leaving me plenty of time for several other enjoyable pursuits. Tom Hoxie
-
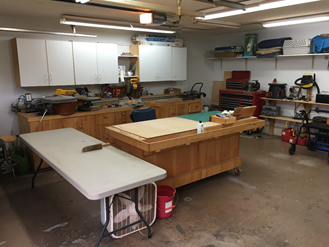
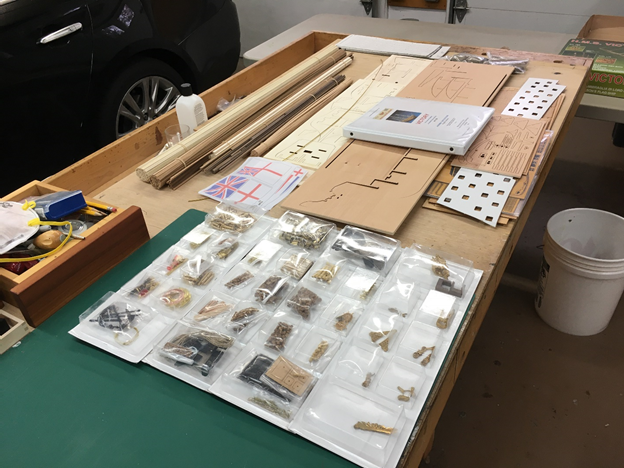
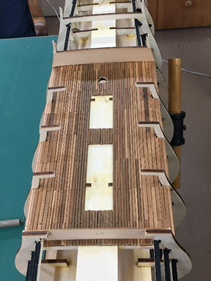
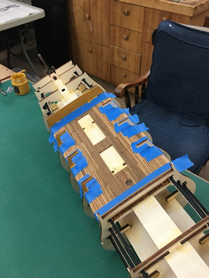
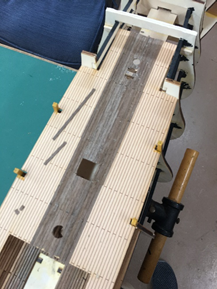
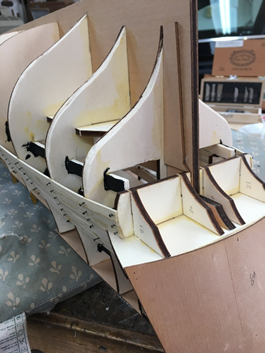
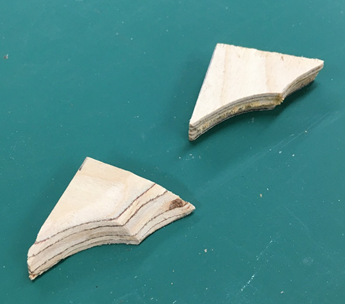
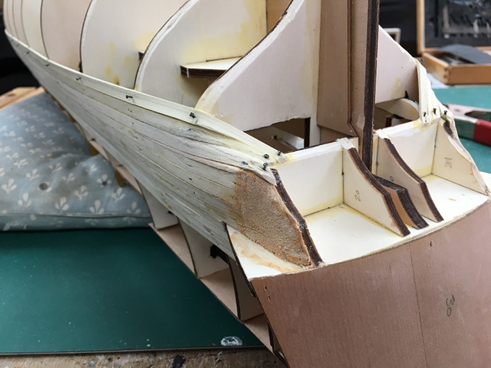
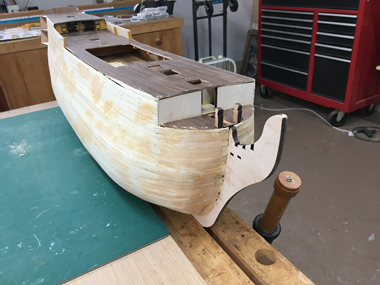
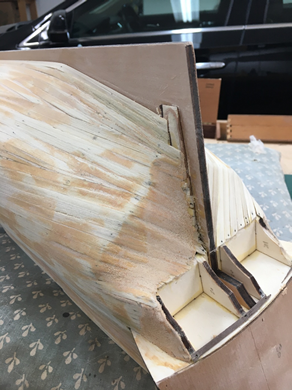
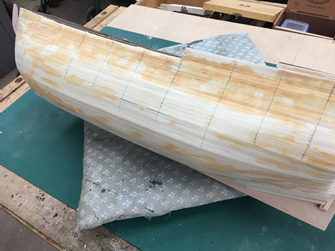
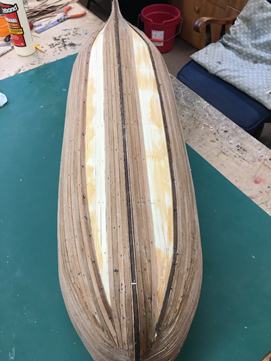
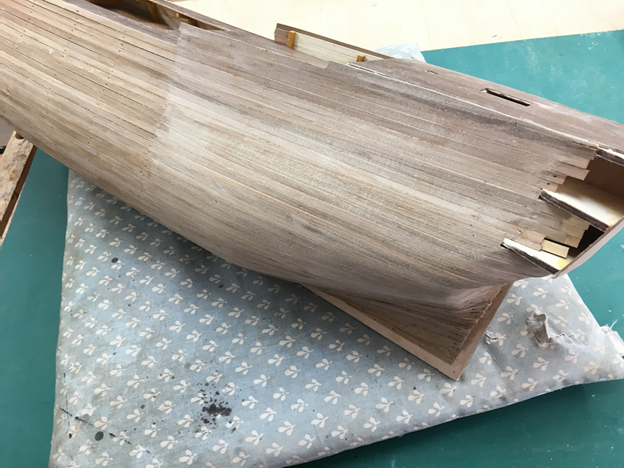
Previous Build Logs Portland Paddle Wheel Steamer https://modelshipworld.com/topic/19493-portland-by-tom-in-nc-finished-bluejacket-shipcrafters-scale-18-my-re-entry-into-the-model-ship-world-after-a-45-year-absence/ Cutty Sark by Mantua https://modelshipworld.com/topic/19525-cutty-sark-by-tom-in-nc-mantua-sergal-scale-178-after-a-45-year-hiatus-i-thought-id-come-back-and-do-something-easy/ Chaperon Steamship Re-imagtined https://modelshipworld.com/topic/21519-chaperon-by-tom-in-nc-–-model-shipways-148-scale-–-renamed-“jezebel”-and-given-a-new-reimagined-history/ Caveat This build log is being submitted after-the-fact. I started this project in March 2020 – just as the COVID pandemic was hitting full stride -- and was so immersed in it for the next nine months (finished the build in late November 2020) that I was quite lax about my photography and writing out my procedures. I’ll submit this anyway as I’m sure there will be many builders who will take this challenge on themselves, but I apologize for the brevity of the thing. This model is certainly not for beginners. If you have some experience and know what you're doing the final result will be very satisfying. Purchase and Start-up When shopping for this model in early 2020 I found there were very few to be found. European sellers were not parting with it for whatever reasons (taxes, trade barriers, ???). But I happened upon a kit that was available right away at Model Expo in Florida. On their web site at the time there were some interesting comments from the founder of Model Expo that tell of his years-long relationship (since 1971) with the designer of this kit, Sergio Fabrizi -- who has since sold the rights to this kit and others to Sergal. I’m not sure, but I suspect that the model I got was previously owned and repurchased from the original buyer who stashed it on a shelf somewhere. It was in great shape, and I don’t feel I was cheated, but read on to see why this matters. The instructions that come with it are printed in a variety of languages, and I don’t mind saying, the translations leave a lot to be desired if you are an English-speaker. But there’s a helpful solution. Supplemental English instructions for the Mantua 1:78 scale HMS Victory (version ART 738) are available as downloadable .pdf files (gasp) for free … my kit is an earlier version (ART 782) but the differences are not great. https://www.mantuamodel.co.uk/downloads/2-uncategorised/37-english-translations Scroll down the page and you will find 4 downloadable files – English translations for the ART 738 version of the HMS Victory. These instructions were great. There is also a file re planking at the top of the list, and I found it immensely helpful. I’ve planked two ship models before, but I’m far enough from being an expert that every little bit of guidance helps. The kit seemed to be in good shape -- even though it showed some signs of being on a shelf somewhere for quite a while. At first glance all the bits and pieces seemed to be included. Later on, I discovered some shortages. My garage work area was ready … I mentioned that the English instructions I downloaded for ART 738 were a little different than for my ART 782 kit. One of the differences between the two kits is that some parts included in the later kit are made from brass, while in my kit they are mostly made from thin, printed plywood. They are OK, simply different than what I expected. How I dealt with them will be covered later. The laser-cut bulkhead and keel elements were well made, and I had little problem with alignment and assembly. Note that I used the Veritas twin-screw vice at the end of my homebuilt workbench to hold things in place while assembling the keel. Next step was installing and planking the lower gun deck. As you can see, I took the time to cut a good many deck boards in advance. Problem with that was that I cut these elements from some 0.5 x 4 mm boards provided. I should have used the 0.5 x 3 mm boards the instructions called for. Grrrr. Luckily, I caught this mistake before gluing any in place. It’s hard to measure the difference between widths of 3 and 4 mm. I switched to the 0.5 x 3 mm boards, and after getting about ½ the lower gun deck done I realized that I didn’t have anywhere near enough of them to finish the lower gun deck, let alone all the main deck elements that would come later. Grrrr again. I fired off an email to Model Expo, admitting my mistake with the 4 mm planks and describing the missing 3 mm pieces. While waiting for what I hoped would be a satisfactory resolution I elected to start assembling the lifeboats. There are 4 different lifeboats. They are also plank-on-bulkhead challenges, but much smaller. I used Gorilla Glue gel on the lifeboats because it does not drip like many glues, and it grips wet boards quickly. Since I would be painting these little devils later the white residue that the gel leaves won’t be bothersome, but you need to be very careful using gel where a white residue cannot be disguised. After waiting for a week, and not hearing back from Model Expo I just assumed that they had to close shop because of the Covid-19 virus. So, I proceeded to hunt for the planking I needed online. Another of my favorite model-making supply shops came through in spades. Ages of Sail https://www.agesofsail.com/ shipped me a supply of 0.5 x 3 and 0.5 x 4 walnut strips within a week. Great quality too. While I waited (I am obviously not very good at waiting) I finished the lower gun deck with some of the 0.5 x 4 mm planks I had pre-cut knowing that they wouldn’t show very much when all was said and done. I also painted the lower deck bulkheads with the ochre yellow paint called for. Found some artist acrylic stuff on Amazon that worked great. Have enough left over to do 2-3 more ships With the lower gun deck “complete”, and with the new supply of walnut deck planking, I put away the partially completed lifeboats and moved on to installing and planking the main deck. When the deck planking was complete I coated each deck with Minwax water- based, matte finish, polyurethane. Great stuff. Planking the Hull Note that you need to bevel the edges of several bulkheads so that the planking can wrap around them properly and provide a good gluing surface. The black boards you see inside the bulkhead structure are where you will mount the cannons eventually. By the way, one HMS Victory build log I have read included some comments about the wood being so brittle that it cracks when bending it. That will almost always be the case unless you soak the wood. I found an appropriately sized plastic tray at Lowe’s that allowed me soak my hull wood for quite a while before attempting to bend it. It’s really quite flexible when thoroughly wet. I use small nails to hold the planks in place while the glue dries. I use pin insertion pliers designed for that purpose (https://www.micromark.com/ ) and the nails go in easily through wet boards. When I got to the point of tapering the planks into the stern I realized that other than some pictures there were no instructions to help me decide how to do that. See how the planks end awkwardly in the picture below. So I fashioned some “filler” pieces from scrap plywood that allowed me to wrap the planks around to a better position. Appearance didn’t matter much in this first layer of hull planking, so I “sculpted” the area with wood filler. The final planking layer would later cover that. Pretty ugly, but effective. The rest of the initial planking at the rear was again something to figure out from pictures – little or no instructions. The way I look at it, the initial planking is where you establish the right curvature and shape of the hull. The fact that it’s ugly doesn’t really matter. Wood filler rules !!! Once the first course of planks is laid you can start filling, sanding and smoothing. The metamorphosis is very satisfying. You start out thinking “this is not going to work”, but somehow it does. Somewhere along the way I decided that it might be a good idea to try on the template that determines where the cannon ports will eventually go. The directions didn’t recommend this – but I had a premonition. I first marked the position of the bulkheads, then positioned the template. Sure enough, some of the the cannon ports lay right where a bulkhead lurked beneath (see the lines showing up below). I still don’t know why that happened, but forewarned is forearmed, and I knew that when it came time to cut the ports I’d have to make adjustments. So. on to the second layer of planking, and this time appearance counts a lot more. The planking instructions I suggested that you download from the Mantua site were quite helpful. They aren’t specific to this model, but they give you step-by-step advice re tapering boards and filling the curved spaces efficiently. The final sanding and shaping is very important. I'll try to file the next installment of this build log in a few days.


-
Yves ... thanks for your comments. No, I don't plan to add any people even though the Statute of Limitations has probably run its course.