HOLIDAY DONATION DRIVE - SUPPORT MSW - DO YOUR PART TO KEEP THIS GREAT FORUM GOING! (Only 51 donations so far out of 49,000 members - C'mon guys!)
×


FingerSticker
-
Posts
46 -
Joined
-
Last visited
Content Type
Profiles
Forums
Gallery
Events
Everything posted by FingerSticker
-
 Sorry if I am thick, Chris but how exactly are you failing to complete the assemblies? What is gong wrong, and even better, what is going right? Adrie.
 -
Hey ShipWrong! Welcome to the wonderful and crazy world of Ship Modellers Anonymous! You know, 'the plank' would be the worst punishment for me. Not only do I have a decent fear of water, I also have vertigo. So standing on a wobbly plank with below me only water …. Shudders. As for card, I mean the cardboard variety, i.e. cereal boxes and such. I'm now working on a galleon from the 16th Century, then someone else (amateur) is doing a world War 2 cruiser and one of the moderators (Dan Vadas) is building a WW2 tank at the moment. There are some similarities with building with wood, in that the start of the construction is the same, with building a false keel, add some frames then add the planks/ship sides etcetera but it requires a different set of skills. I have the cardbuilding skills, myself, not the woodbuilding skills. Hence I do 'card'. Have a look on this forum and search for CARD. You'll be amazed with what's been done in card. Adrie.
-
Evening, all! First off, thanks to all those who have thumbed me. Much appreciated!!!! I thought it best to do a quick overview of where I am. My guestimate of doing two carriages per day has been rather accurate. After two and a half nights, I have completed 5 carriages so far. (Plus most of the sixth cut out). With 17 more to go I reckon it will be another nine days (barring any time required for chores and house repairs, etcetera). It doesn't really help that my better part is currently in her sickbed nursing a rather persistent cold and someone needs to look after her. It also doesn't help that when cutting parts out of the cardboard the cardboard delaminates. Not a biggie, because they can be recombined with a drop of PVA but it does slow you down a bit. Oh, and my apologies but I was planning on presenting a red carriage. Unfortunately when I opened the tin of red paint, it contained a rather dark red brownish paint. I must have used the half empty tin to mix up some paint for the below the waterline hull of a WW 2 cruiser. The cruiser didn't make it over here but apparently the paint did! 🙄 So we'll be waiting for a new tin of paint to arrive. Well, that's about it, really. Have a good evening, all! Laterzzzz! Adrie.
-
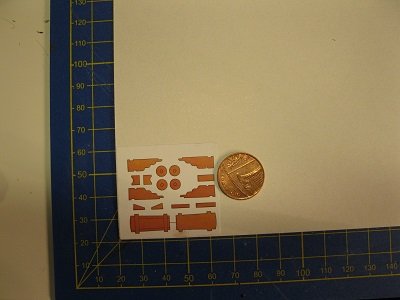
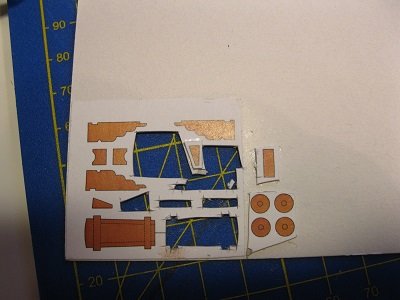
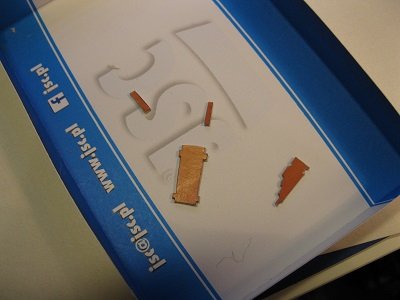
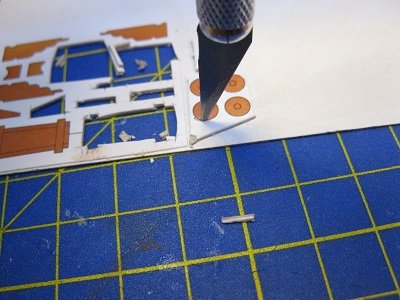
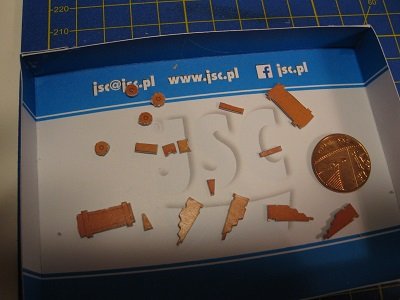
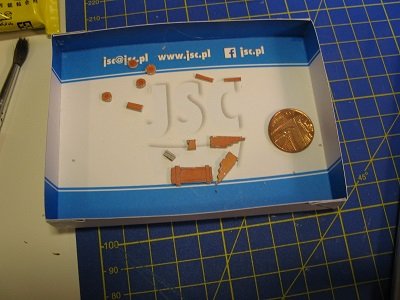
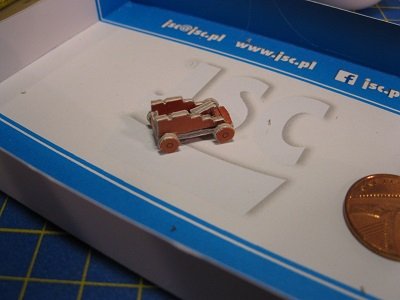
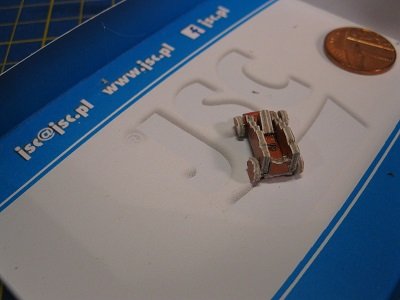
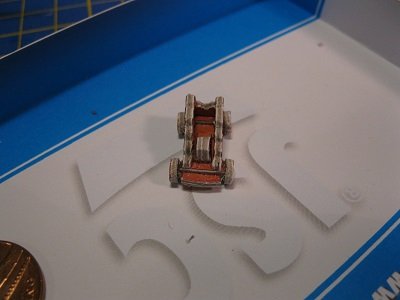
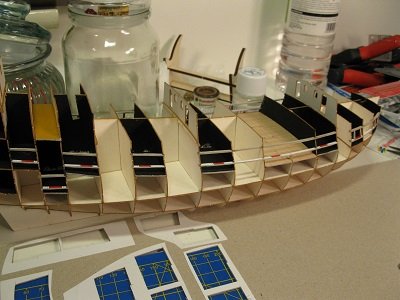
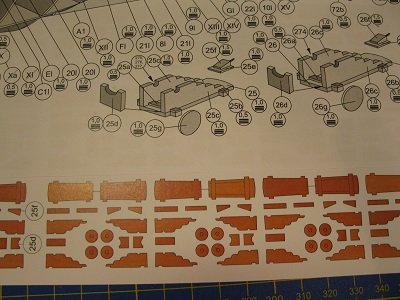
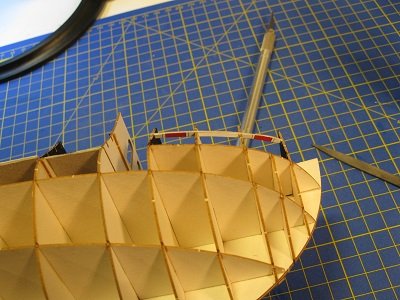
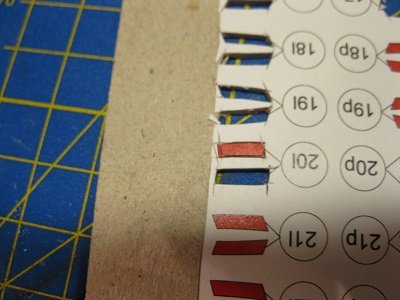
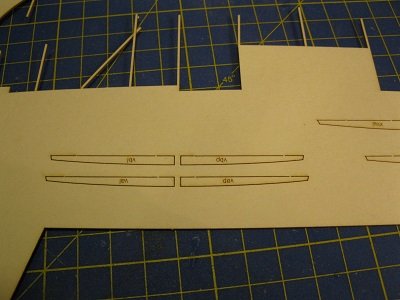
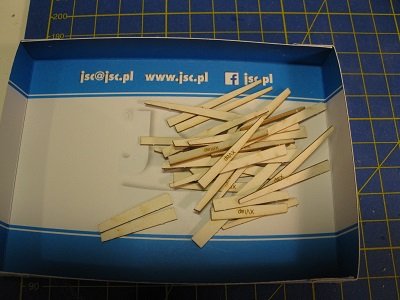
Good evening all! A quick update on what has been done today. A lot, and not a lot, strangely enough. But more about that later. As mentioned, today would be the start of the construction of the gun carriages, specifically the carriages that are to be placed onto the gun deck before the weatherdecks are put in place. The middle sized one was trialled first to see if laminating the pieces onto 0.5 mm card would be workable. So one set was cut out and laminated to a 0.5 mm sheet. Then the parts were cut out with a no 11 blade and deposited into the collection tray. Other pieces, that needed additional laminating, were cut out and glued back onto the card. For the wheels I used a stab-technique. I found that to work quite well and better than the more traditional cutting technique. To stab you keep the knife vertical and only with the tip you make small stabs around the circular object going along the edge of the circle. As long as you keep the knife perfectly vertical, you'll get quite a good finish. It doesn't help, though, that the card is 1 mm thick which will require multiple stabs at the same position, going round one way, then go round again the other way and then finally go round again the first way. All this cutting in nearly the same position can make part of the wheel go 'flat'. The bottom two circles I did first and are cut roughest because I haven't done the stab for ages. But slowly I got back in the groove and the last wheel was almost perfect. If there is a problem with this construction then it would be that the design is ludicrously complicated. As you can see above, you need 17 separate parts to make one gun carriage. And since you are going to need 18 middle sized carriages and 4 large carriages, each made up of 17 parts ...... it's gonna take a while. It took me the better part of the day to do the trial one, which once you get settled will speed up a bit but still we are talking one or two carriages a night. Oh yeah, as you can imagine, the stabbing puts a lot of stress onto the tip of the blade. So much so, that you can expect plenty of tips to break off. I am going to trail a different shape of blade, purely for the stabbing and see if that holds up better against the strain. But once all cutting was done, it was time to start glueing the parts together, like top and bottom plate, two pieces of sides each side and the wedge block for the breech of the barrel. After drying these were cleaned up with the tip of a knife and then combined to create the carriage. Not too shabby! But as you can see, the part still needs a final painting coat. I'm still not clear about whether to go with brown as overall colour or red. I'm leaning more towards the red, to be honest, because I saw an article online about the ship internals, which stated: "Red was the predominant color in the interior coloring. Red lead, an oxide, was suspended in varnish to achieve the color of this paint. It was thinned with turpentine. The blacks w'ere lampblack, Stockholm tars, pitch, or a mixture of unknown colorings of heavy metals suspended in an evaporating vehicle, usually varnish based. The interior gunwales of warships were painted red in the mistaken idea that it would not show the color of the blood of the crew shed in battle. The idea of such color camouflage was extended even to the gun carriage. This idea pxevailed in warship coloring until well into the mid-1800s." I still think the whole concept is ludicrous so I would welcome it if one of our members can tell us why it should OR should not be red. Until then, I am going to laminate the remaining 17 sets to the card and make a start on the cutting. Have a lovely evening and see you all latezzzz! Adrie.
-
To be honest, I don't think I would have done so either. But be assured of my continued support! As for HMV laser cut, I have never used them myself. But I didn't really have any issues with the de Ruyter laser cut set. Apart from it being difficult to add midway through the build, like I did. But you can't really blame the laser cut set for that, really. Never the less, keep going, Jan! I'll be rooting for you! Adrie.
-
Blast! I'll have a look through my collected parts paperwork and see if I have anything left from my build of the De Ruyter that will help you. The chances are slim, though, since I recently moved town for a new position and the house we moved into was a bit smaller so we had to throw a lot of stuff away, which might very well have included old build plans. When I did the build report for the Modelspace site, I do remember that I used to take a shot of the parts on card before cutting, which showed the part numbers and then the parts cut out and assembled. It's not ideal, but you could look through that build log to find out what part so-and-so is with the newer kit. But since the newer kit had been extensively redesigned you might probably find that the fit is not that great on the older version anyway. 😥 Sorry that I couldn't be more helpful. I take it you don't want to ask Sint for a copy of the newer version and start again? Adrie.
-
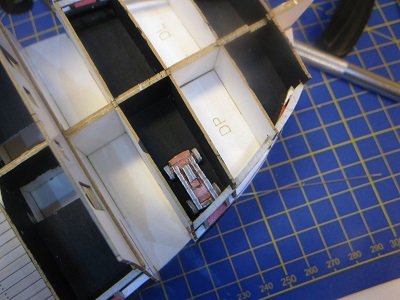
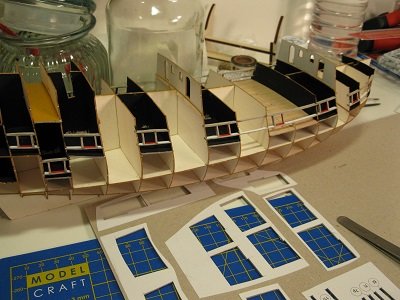
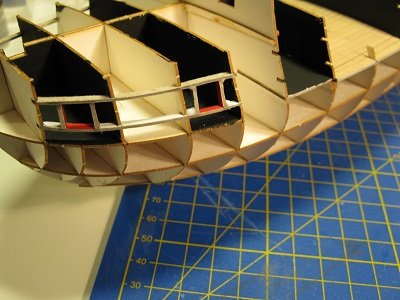
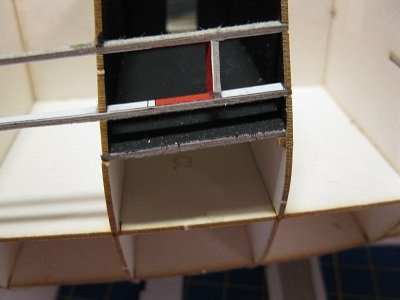
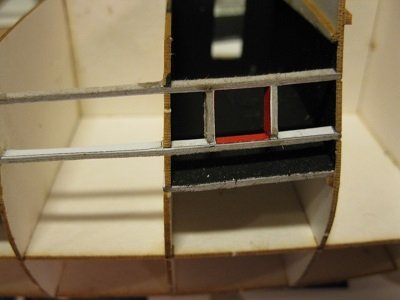
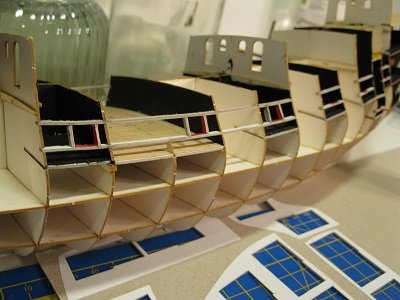
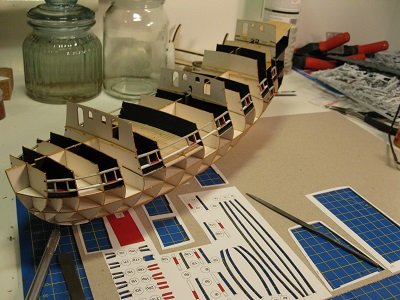
Good evening all!!! A little update is due and a question for for you as well. First the update. I continued the gun frames on the right hand side. The horizontals went in without a glitch, Then a few deep breaths and time for the vertical posts. One by one, cut, check in place, cut, check in place, take out, check in place and glue. Sets one and two just a little trimming required. The third one, undersize again! Put on glue, put back in place and cut a lot bigger. The fit was then ok, not brilliant but definitely better than yesterday. So step by step I went along the ship. Definitely looking better but good enough? Possibly, possibly not. The only way to know if to line them up with the first planking layer and see if they really fit with that. They might not, because: On the left hand side, perfectly in line with the cover piece, the card that is to show the red inside when looking through the deck above. But about 1 mm too low on the right hand side. The problem may be with the cover piece or a combination of them both, of course, but i can start to see why Jan didn't want to use the rails and attached the gun position frames directly to the back of the upper planking cards. It might turn out to still be passable, though, or so I hope. But we will find that out later. For now we have finished all the pieces that I laminated. Next stop, dem gunzzz! (Actually dem gun carriagezzzzzz)! I have already decided that I will laminate the gun carriage pieces onto 0.5 mm card, which will double up to 1 mm when I glue top and bottom together. Well, that is the plan that I am going to try out with the first set of parts. There are 18 gun carriages no 25 and 4 no 26 to do and since you will see a gun barrel at most, even if it goes horrible wrong with one set, I should still be able to use it just to attach a barrel to. But here is the question that I want to ask you. I noticed that the parts as printed are brown-ish rather than red. And I saw Jan paint his carriages mid brown as well. But what about the stories that on Elizabethan ships both internal sides, bulwarks and gun carriages were all painted red? Is that a myth? Or did that depend on something else? I heard a lot of stories doing the rounds about the red colour. One story said that it was to reduce the psychological impact on the gun crew if their partner got blown to smithereens on the grounds that their blood wouldn't show up on the sides and guns. (Hmmmmmm). Another story goes that the red colour below decks was an invention by Hollywood producers because it would make scenes with the ships guns look more threatening. (Again, hmmmmmmmm). So what's the real story? And do I need to touch up with brown or repaint in red? Please, please, please, please, who has a proper answer to share? Adrie.
-
Keep going, Jan. You're on the right track! I don't recall having all the issues that you described. But I tackled the camouflage version and I believe that they were a special print from JSC for Scaldis and that Scaldis gave JSC a lot of feedback about the model. Perhaps they made some changes to the newer version but didn't touch the grey version? I remember reading somewhere that they used a better quality card for printing. The only other thing I can recommend is to do the railings as soon as you can. Once the sections are glued to the deck they can be a royal pain to position correctly. And do not give up hope! You are definitely showing her who's the boss! Adrie. P.S. I remember buying the Zwarte Zee in 1/200 scale. Way, way, way too small for me!!!! So good luck with your purchases! And perhaps consider the purchase of a pair of bionic eyes!!!! 😉
-
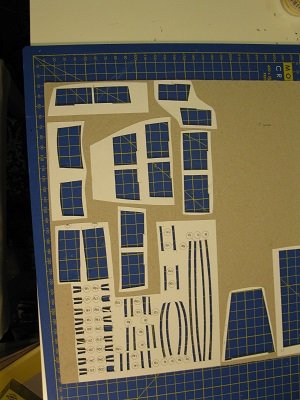
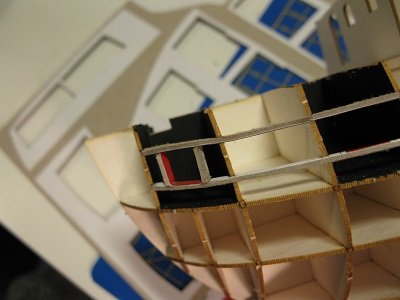
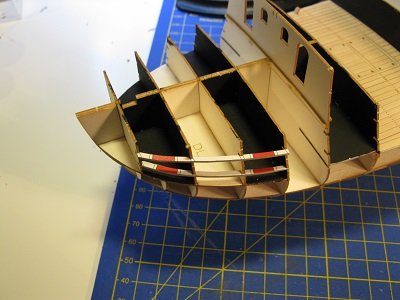
Good afternoon, all! Thanks, Richmond, for your continued stream of useful information my way! If you refer to Jan's model, then yes, I did see that and am still amazed by the apparent ease with which he creates those great looking models. But to be honest I have never been big on viewing other people's model building if they are the same model as mine. The reason for that is quite selfish, I guess. I just LOVE how a model can throw you a curve-ball, so that you have to do some serious thinking on how to solve that particular problem. I can tell you, it feels great when you are stumped then work out yourself how to solve it. So far (knock on wood, oh blast, my model is card, not wood. OK, I'll knock my head then) I have almost always found a way out of a self inflicted or model created issue. As I did so far on this luffly lady. Of course, there is always a risk that there is an issue that would have been easier to solve if I had known about it first and had taken some precautions. But then it wouldn't be my model anymore, just a copy of someone else's. And of course there is an equal chance that the model that you are building simply just will not work, no matter what you do. But at least it will be because I couldn't get it to work and I will 'calmly' nod my head and admit that I have been beaten. BUT (BIG BUT COMING!) BUT from what I have seen so far that will not happen with this luffly lady! I am mightily impressed with the accuracy and looks of this model. I think it was Chris who mentioned that Shipyard had a good name with regards to the quality of their kits? It would be well deserved, as I can tell from the drawings, cardboard quality and notes from them. There are mistakes, I will admit. In fact I found several so far, but most of them are quite minor, with only one leading me to a "F....., what do I do now!!!!!????" But if that is the worst mistake Shipyard can throw at me then I can truly declare that I have never had a more peaceful and relaxing build than this luffly lady! I hope you will all be able to attest to that, following this build log! Oh, yeah, painting. I have never got good use out of colour markers nor do I use acrylics for touch ups or edge painting. Humbrol has a quite wide of range of enamel paints and so far I have always found one that was close enough to be used, provided that the damage area is small enough. It is amazing with how much colour difference you can get away with if the area is minor and as long as the difference between original and touch up paint is not too big. Free tip, don't EVER use black to edge paint a white surface!!! 😆😂😋. Dan, I humbly bow deeply to the amazing bloke who has found a little spot where my luffly lady can rest her luffly little bottom, secure in the knowledge that peeping Toms from all over the world can, uhhhhh, peep in? Oh yeah, mistakes, right? Remember the last picture from yesterday? What was wrong? The top one is an exact copy of the bottom one, where you would really need a mirror imaged part. So in fact they got the l and p (left and right) mixed up. Here is the offending top left part transferred to the right hand side. Perfect! So, easily solved. Instead of cutting out the l part for the top rails, just cut out the p part of the same number to replace it. So having solved this little conundrum I continued happily with cutting out the gun port posts to fit on the glued in horizontals. When ...... The uprights were a smidgen too large, pushing the horizontals away from each other! I tried the second set of posts and they seemed to fit reasonably at first but once glued in gave the same issue, if slightly less! Oh, b...... . What about the third set then? Way too short and the angle was all wrong, leaving a big triangular opening at the bottom! This was the Oh f..... moment. What to do next???? Since I had already cut out the second pot (stupid, I know), what could I think off that I could do with a post that was way too short and the wrong shape? Well, for one, put it back seemed to be a good idea so I put a little drop of glue on the bottom edge of the post and put it back in the sheet. Once the glue had dried, I guestimated how much extra material the post should have and cut the extra at the bottom of the part. Then taking it out again I offered it up to the model. Better, even though the guestimate was still off. But good enough to continue, I reckon. Especially since the outside cladding (skin) will cover a multitude of sins. So I'll leave that for the moment and review it once the first planking layer is on. It did mean though that from that moment on, I had to cut out each post, offer it up and see if I needed to glue it back and add some more material or take off a smidgen more. All doable but a lot more work. I then did the rest of the horizontals on the left hand side and started the arduous task of individual post-fixing. That's what I would class as a proper curve-ball. But I think I whacked it out of the park, never the less! Hah! Oh yeah, where was that hole again? I LUV it when a plan comes together! And here's the latest state of play. Tomorrow I'll start on doing the gun ports on the right hand side. We'll see how long that it going to take. Toodlepips! Adrie.

-
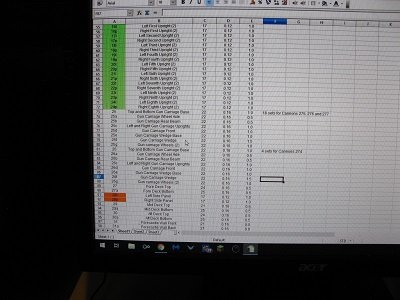
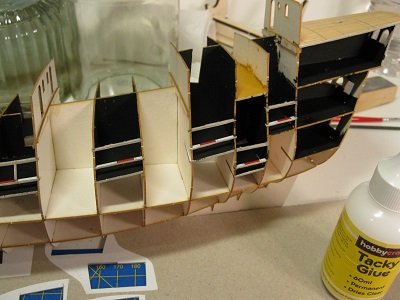
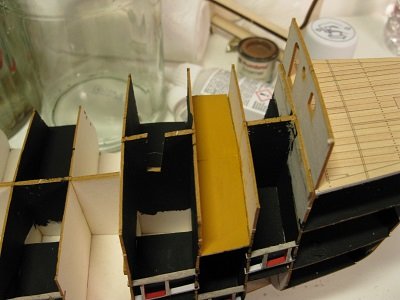
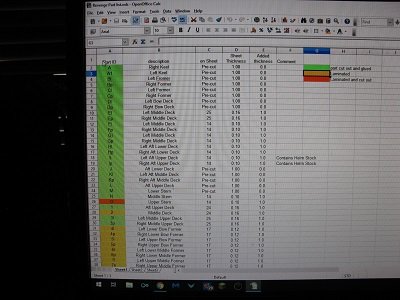
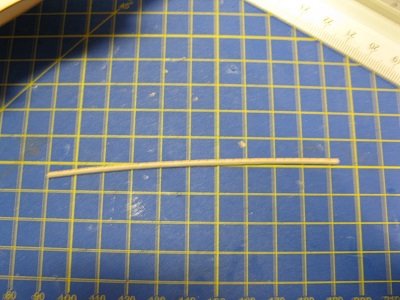
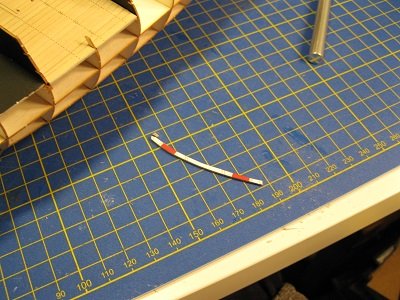
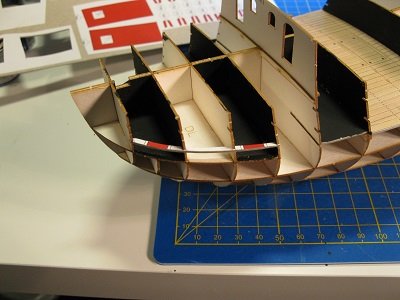
Hi Richmond and all! many thanks for your kind words. I hope I can continue the trend. And apologies about the misunderstanding! Things are definitely heating up, building wise. But first off, I mast apologise to you all. I hope not too many spotted my mistake. Having just explained to all what the colour codes meant, and showing the spreadsheet, eagle-eyed viewers might have picked up on part O, that I described as not having glued on until I had more contact point and what colour is it in the spreadsheet? Yep, green, i.e. glued down. Here is the updated version of the spreadsheet. A minor mistake, perhaps, but small mistakes can lead to big problems! Anyway, it looks like a lot is done, right? Uhhhh, no. This is the second sheet and I only added parts up to number 40 so far with the last number on the sheets 309!! So I'm afraid we'll be here for a while. So onwards then! No rest for the wicked and so on. Uhhhh, or perhaps not. Well, not yet. Because I suddenly had this question popping into my head. Why, oh why..... Why, oh why, is part 2, the wooden deck coloured and part 3, the deck to the front of it, isn't??? And then it hit me. It's coloured because it will be visible after construction! And deck 3 won't! I quickly confirmed it with the deck that was going on top of that section and indeed! There were gratings placed on the deck that would be open and thus what was underneath would be visible. Deck 3 wouldn't be under the gratings section so wouldn't be visible. But if that was the case, what about the frames immediately before and behind deck 2? Real ships don't have frames so they shouldn't be visible on the model either. And what about those gundeck sections that I glued in previously? In real ships gundecks ran all along the ship, not just a section placed here and there. I did a few searches on ship card building project on MSW and looked at the first few age-of-sailing ships and they all had blackened internals. Which makes sense. if the light isn't great and you're looking inside a blackened room, your not going to see anything. Ok, you're not going to see anything that should be there but you're also not seeing things that are there and shouldn't be there. So, I guess that would be the best thing. Not perfect, but then again I do NOT want to build a perfect model. As soon as I build the prefect model, I might never enjoy building another model again because it might not be as perfect as the perfect model. So a little bit 'wonky' is ok by my standards as long as the next model will be a little bit less 'wonky'. That works for me. I hope it does for you too! So all sections that have gunports ... black! I also included the section under the Captain's Cabin deck since that has window holes and I will install those windows opened up with a bit of acetate behind it. Once the black paint was drying I worked on the deck, scoring the slats as before and pre-curving it on the jar as before. I had to trim a little bit off the deck to make it fit snugly and then, with a little bit of glue, in it went! The one section that I didn't turn black what the place where the helm-stock was going to be placed which I painted as close to the deck brown as I could. When I did so, I noticed that there was quite a bit of a gap between the two deck halves. I filed that down and filled the hole with PVA. Since that shrinks whilst drying, I will probably have to add some more PVA in a couple of goes but once it is filled, I will retouch it with paint and show you the difference. In the meantime I continued with the next part number, which was 4, or 4l to be precise. (4l for 4 lewa, which is left in Polish, the other side is p, for prawa / right). 4l is the front left side bottom gun port part. The next part was 5l, which is the front left side top gun port part. Can anyone spot the problem? And on this cliffhanger I will leave you for the night, because it is getting late, my eyes are getting tired and my mizzus wants me to go to bed. So toodlepips to you all. Till laterzzzzz! Adrie.
-
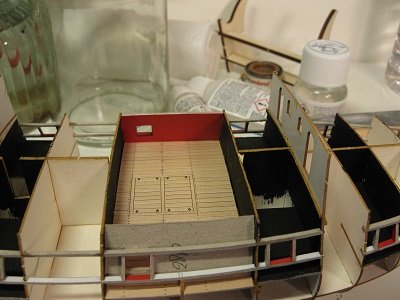
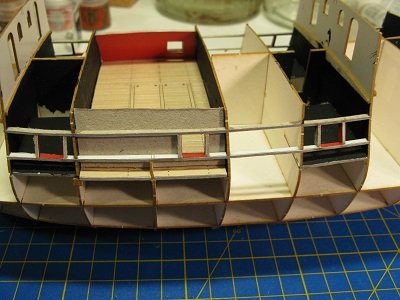
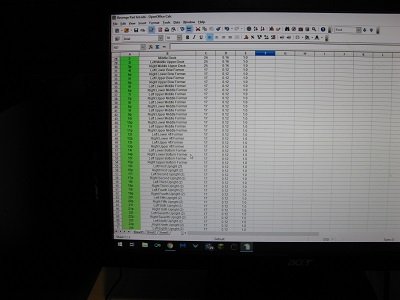
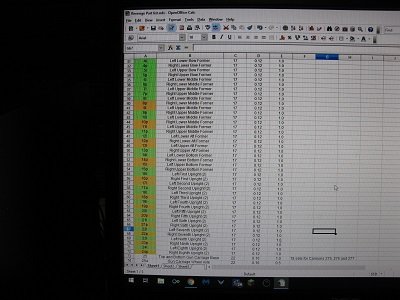
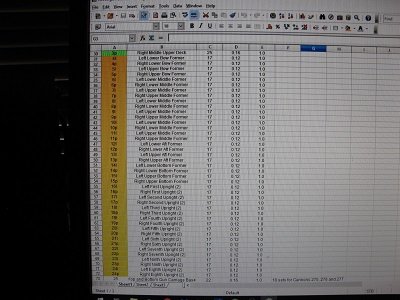
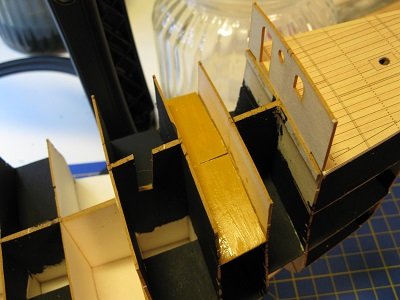
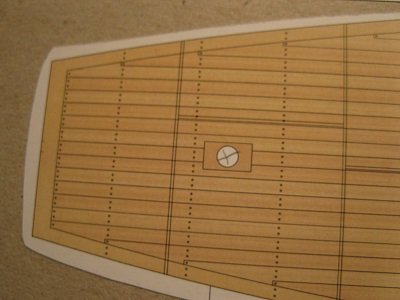
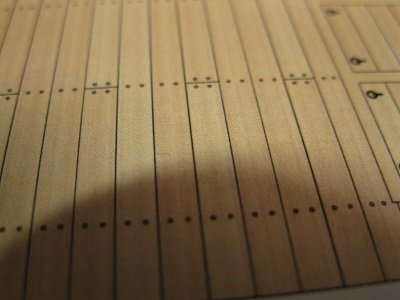
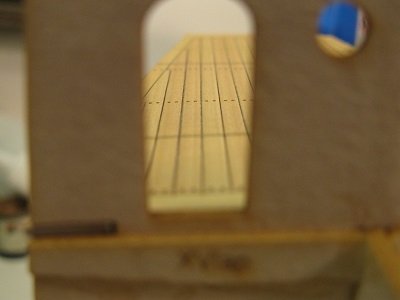
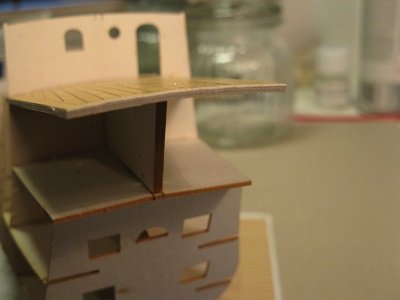
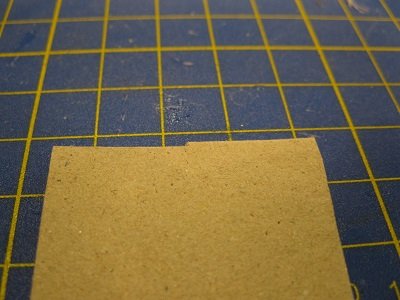
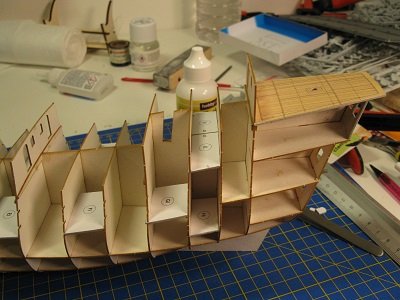
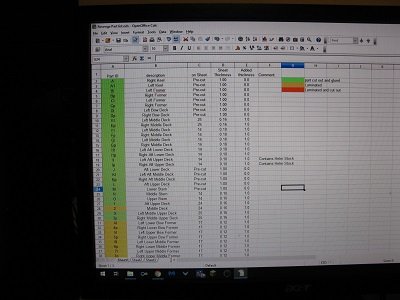
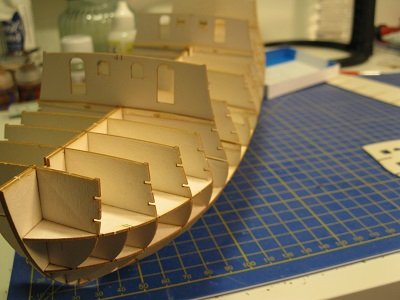
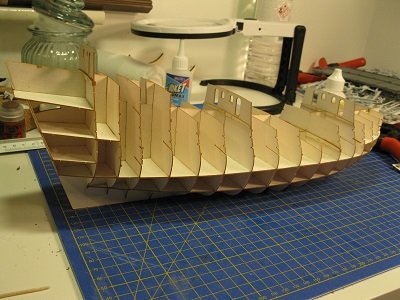
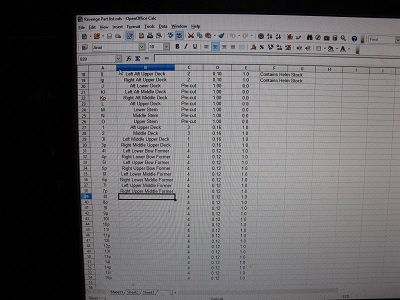
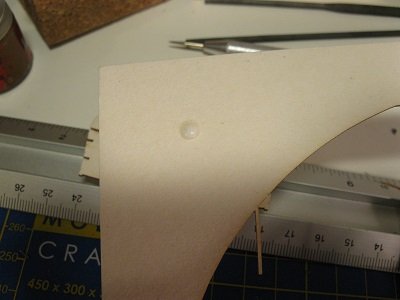
Good evening, all. I thought it was time for a bit of colour! Having glued all the pre-cut parts, and boy, have they made life easy, I started laminating the next parts to be added. Shipyards wants us to work in numerical order, so start with part 1, then part 2, etc. But before that there are the structural parts mentioned with letters. Some of them were already done as they came as pre-cuts so I used my spreadsheet to locate all lettered parts and cut them out. I also started on cutting out the first of the numbered parts, since they would all go onto 1 mm card and I had sufficient parts laminated to last me a while. Since there was still a question about whether laminating would give the right thicknesses, especially considering the fact that some of the parts were on paper and others on thin card, I decided to forego the correct sequence and try out a part that was originally on card of 0.16 mm thickness. Part No 1, the Captain's Cabin Floor was chosen. Shipyard also recommended to cut along the wood slats on pieces with wood on them to give a better effect, i.e. make them more 3D. Since I didn't like to sound of cutting, which could easily go too deep, I took my awl and decided to score the card with the awl, twice along the black lines with the awl held at about 30 degrees to make a nice round depression and then once with the awl at about 60 degrees, to get a score in the middle of the depression. It worked! It worked quite nicely in fact. I can see a clear demarcation now between the 'slats'. Unfortunately photographing it is a completely different matter. It didn't take me more than a couple of minutes to do the deck so I'll do this on all other wood as well. I am sorry that it isn't really visible for you, but you'll have to trust me on this. I also looked at where the deck was going and noticed that all decks are curved. That created a little bit of bother when I tried to insert the tabs on the deck into the slots of the former. I could get the front end curved by basically forcing the deck into the slots but the back end was still flat. So I used the biggest diameter that I could find to pre-curve the deck on. And the result? Luffly! Treated this way, I could quite easily slot the deck into the frame. And since this was the thickest a part could be, it confirmed that if you laminate the part onto the prescribed thickness, the end part will fit perfectly! Well, thickness-wise anyway. Success! I took the deck out again and started on the small gun-decks that are scattered around the ship. I cut them out, letter by letter, curved them as I did the deck and then tried to slide them into the corresponding positions. Which didn't go too well. A size issue? When I investigated the piece, I noticed that the part had a ridge at the underside where the card had been cut. Two small strokes with a file on the bottom of the tab removed the offending ridge and gave it a minute bevel, which slid into the corresponding frame slots without a glitch. Bit of glue on the tab and the edges of the deck and in they went! I did this with all the gun decks and added frame N (stern part with 4 windows) before I glued down Deck 1, my first COLOURED piece! I also cut out frame O which will go on top of the cabin deck but I will not glue that until I have some more contact points there. For now, the scores are: Yes, I added a colour code to my spreadsheet to show the different states of parts. White means they are still on the sheet, yellow means they have been laminated onto card, red means they have been cut out and green means that they have been glued on. That should keep track of everything, I would think. But that's all for now. Have a luffly evening, all! Adrie.

-
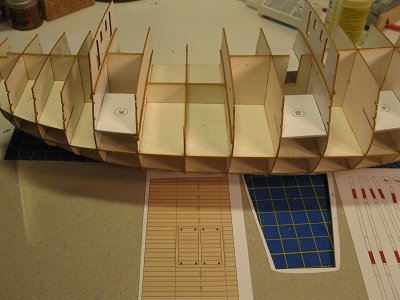
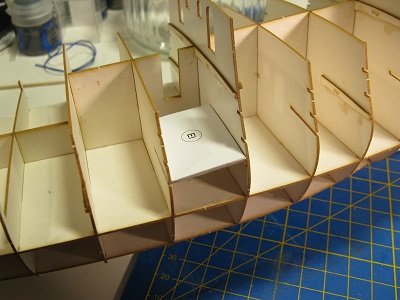
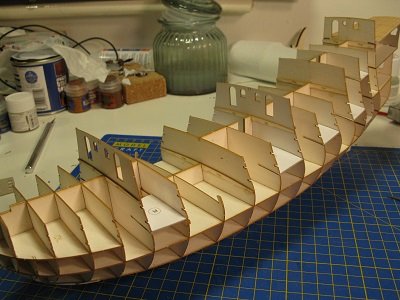
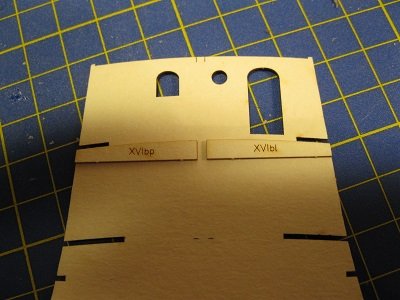
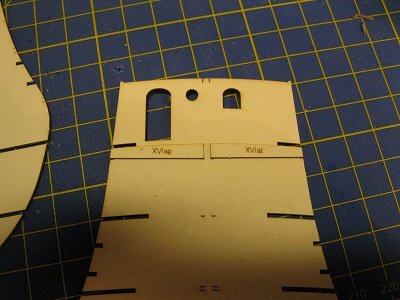
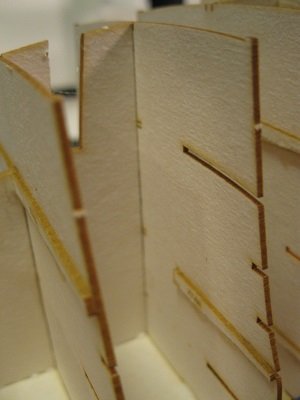
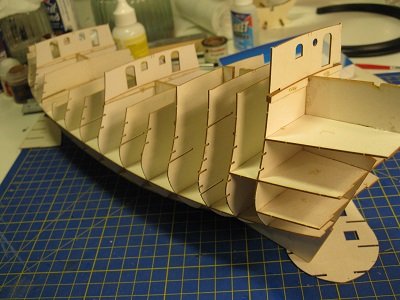
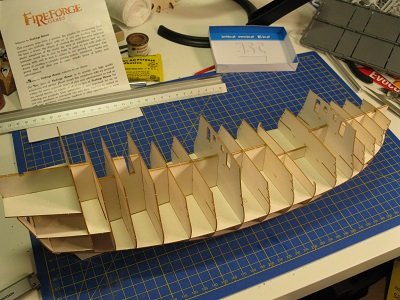
Many thanks for the confirmation, Nick. Means I'm still on the right track! Thank you for the info about rubber glue, Druxey. Especially about the latter part. I'll be reviewing the use of rubber cement. Mind you, as it tends to go on large surfaces, i.e. the structure so most would be away from prying eyes, but it wouldn't be good if my model came apart after a couple of years. I think I'll stick with the fingers, though. I don't think a name of CrepeRubberSticker works as well as mine.🤣 I know from own experience that dealing with Polish companies can be a pain, especially when asking questions or complaining. Not all can read and write English and translations from English to Polish and v.v. can be problematic. That shouldn't apply to Cornwall Boats, though. But it may well be that those laser cut parts come from Poland as well. I still hope it gets sorted soon, though. As for rubber glue, there are a number on the market and one I checked sells in Australia too. That is UHU (can I mention company names on here?), All Purpose Adhesive, which comes in a yellow tube. But other brands are no doubt available. I know that in the Netherlands and Belgium all purpose glue is sold under the name Velpon All Glue, so I expect other brands will be available in other countries as well. It can be used as contact glue, as Druxey said, but I tend to use it like that to repair a cracked piece of chine, for instance. For thin porous materials like paper, I just use it as it is, i.e. put some glue on a part, press it where it needs to go and wait for the glue to set. I did notice a mistake with the kit though, although I would call it minor. I noticed that a couple of frames were in mirror image! For instance, frame 14 (which would be XIV), was lasered as VIX! Below is a picture of another frame, X. It was a bit confusing but once I sussed out what was wrong, I continued. Unfortunately Richmond's warning about the loosening deck supports came too late. I had finished the build log and then returned to do some more glueing, which was in fact the glueing of the said supports to the frames ... ... and then some of the frames to the keel. I had done 4, then let those dry with the side former partly in place to keep the frames perpendicular, then took off the former and glued four more, put back the former and let the glue dry. At that time I chanced a glance at the computer and saw your warning. Oops! I decided to continue the adding of the frames and then afterwards use a toothpick to deposit some relative thick superglue to the undersides of the supports, where they lay against the frames. I hope that will be enough to hold them in place. Well, there's only one way to find out if that was enough, and that is by continuing! Once all frames were in place and dried, I glued in side formers B and C on the left side first. I applied some PVA to the flat edges of the formers and then along the 'paths' where the sides would fit in the slots on the frames. This was made a LOT easier by Shipyard displaying where the formers and frames should end up. I must admit, I quite like their thinking! Anyway, all pre-cut formers were glued in place, first on the left side, and then the right side. I'll let it dry like that until tomorrow, as I ran out of parts to glue. That will give me time to work on the hopefully ultimate way to ensure that all parts 'easily found', are glued in the right order and are on the right thickness of card, namely a spreadsheet. This will show at a glance on which sheet each part can be found, what it is, what the laminating and total thicknesses are and any comments i can come up with. It's probably gonna change but for now I have plenty of entries to add! Till laterzzzzz! Adrie. P.S. Richmond, this is my little helper to see things straight. You're not the only one needing it!!!


-
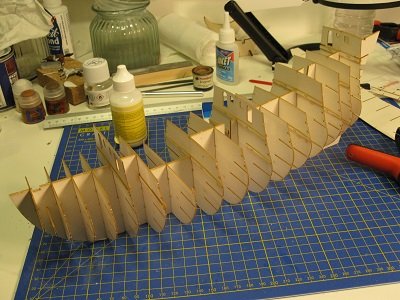
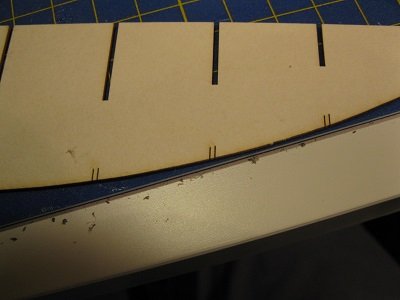
Thanks, Chris. So far it's been all good. I hope it stays that way. And Richmond, I have seen your log. Thanks for the link even though your post seems to have disappeared now (??). I hope that Shipyard and Cornwall Model Boats come to your rescue soon. For me, as said, it's all been good. I've removed all frames and keels from the 4 sheets of pre-cut parts and dry-assembled them. The fit was good, which I tested by running my finger along the edge of the decks and checking for alignment with the frames. It all fitted quite snugly! However, I did notice that there were still a number of slots left on frames 4, 5, 6, 9 11 and 13, however. Wondering if I had received all the pre-cut parts, I checked the framework assembly drawing. It seems that there is more decking to assemble, but they are supplied on thin paper, which is 0.10 mm thick. The drawing also states that they have to be laminated to 1 mm card and the horizontal slots in the frames are about 1.08 mm wide, so the missing parts have been found! Unfortunately it means I have to wait for the cardboard that is on order to arrive, which will be Monday or Tuesday, together with the card mount that is to arrive around the same time. Also you can see my 'system' for making sure I know what to do with each part. I cross the number of with pencil once I cut out the part, and will cross the number out with a marker once the parts are glued in place. That should allow me to work out which parts are still to be added as well as check what thickness they are to be. I did have a scratch-the-head moment, though, when I noticed that the assembly drawing also wants me to laminate the frames with 1 mm card! I decided to disregard that requirement as the pre-cut parts are already 1 mm thick and the slots in the frames and keel are about the same size. Since it is quite normal to laminate the structural parts with 1 mm card in other kits, I assume that these requirements are linked to a time when the company did not supply pre-cut pieces and supplied the builder with 0.1 mm paper thick drawings to laminate. Of course, time will tell whether I did the right thing, but it makes sense to me. Especially since I had two beers yesterday to celebrate the Dutch national football team beating the French team 2-0 and beers does tend to ...uhhh... lubricate my thoughts. Just like the false keels, frames 5 and 10 have been supplied as doubles. I can understand that you want the keel to be quite strong so you would like a 2 mm thick keel, but frames 5 and 10 came from a sheet that was only 0.5 mm thick, so combined they won't be different from the other frames so not really sure why they did that. Did you spot the wormy grey strings on the photo on the right? That's another reason why I like rubber glue. If some of it is pressed out during the combining, you simply rub it off with your fingers to create these strings. Then a little tap of the card on the table and hey presto, the strings are gone and the glue is removed! Anyway, all that was left on the pre-cut sheets were some formers, which look like they are to support the decks and the frame-ends. So, what's next? Glueing of course! And a rethink of how I am going to track my progress because I just worked out the crossing out with pencil and marker is not going to be enough since the diagram only shows the left hand of the model and there is nothing to note down what has been done and what needs to be done on the other side. I'll come up with something, I'm sure. I tested the remainders of the pre-cut card for resistance against PVA glue by placing a big drop of glue on it and letting it dry. I am pleased to see that the card underneath the drop hasn't changed at all so PVA will be good to use on the skeleton. Why PVA glue? because it takes less time to dry and it shrinks during drying. The problem with rubber cement is that as soon as it comes out of the tube, the solvents start to evaporate making the glue stringy and less effective as a glue. As long as you don't wait too long, like half an hour or so, that won't happen with PVA. So I'll be using PVA for the structure. But that will be for another day! See you all laterzzzz and happy modelling! Adrie
-
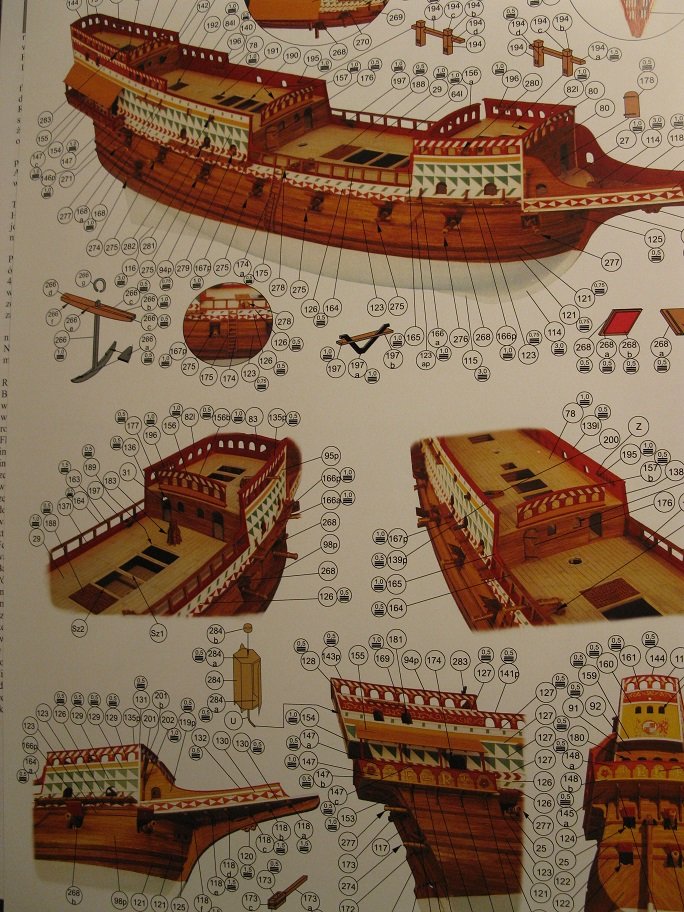
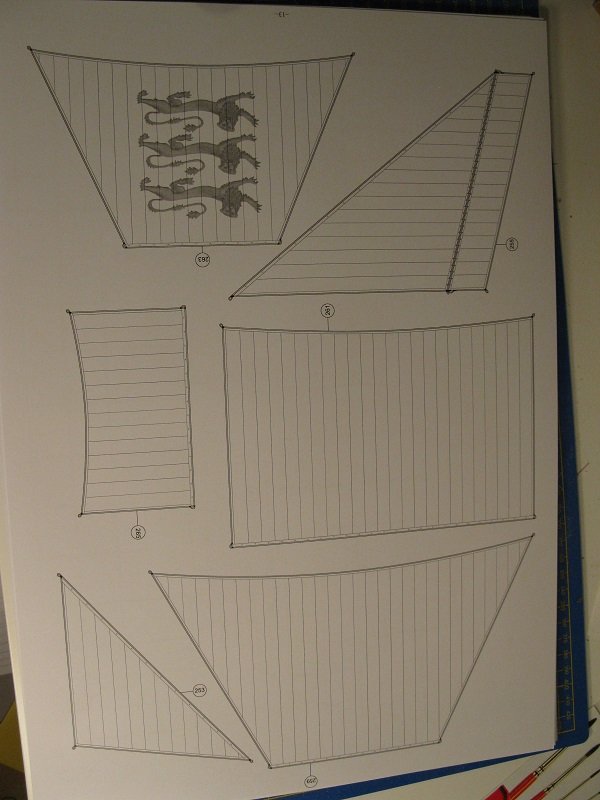
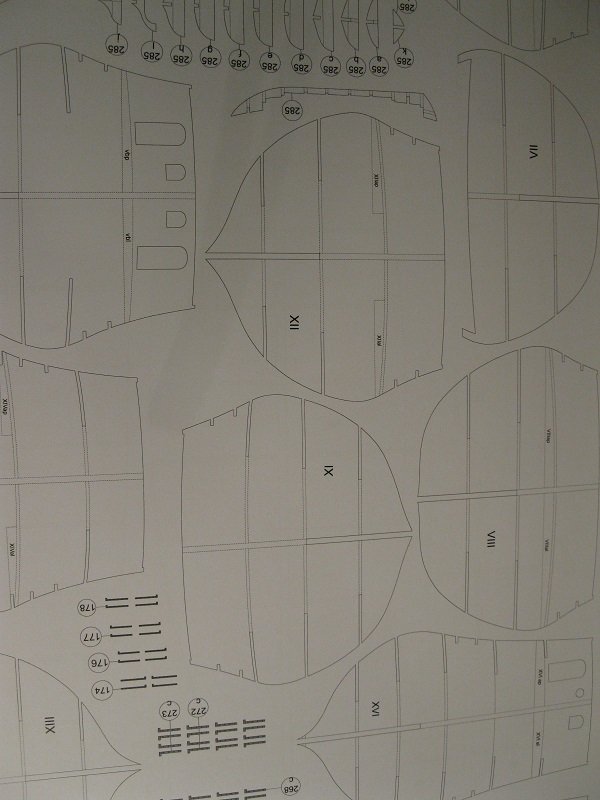
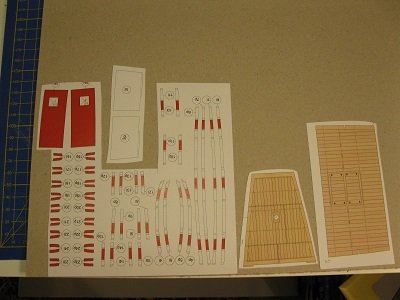
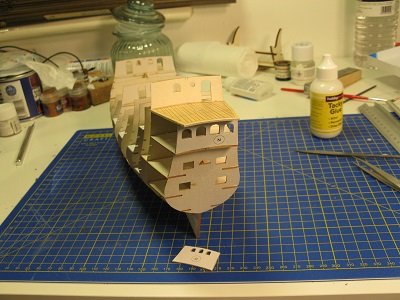
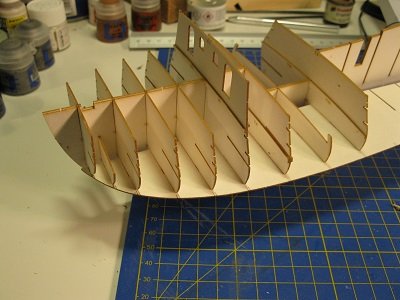
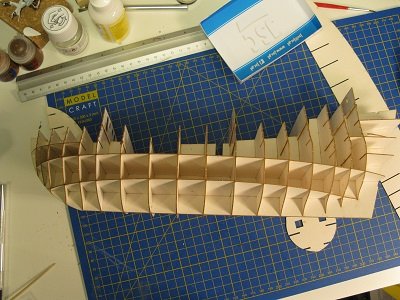
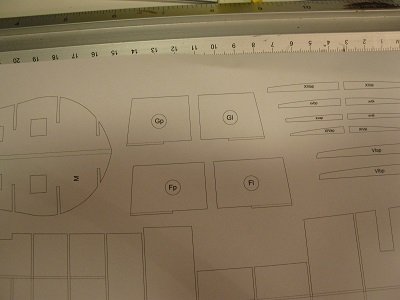
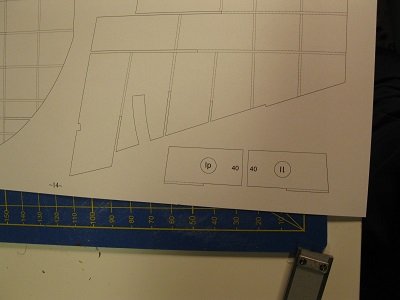
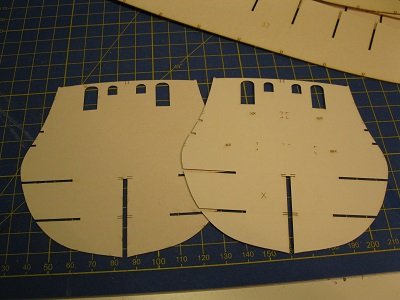
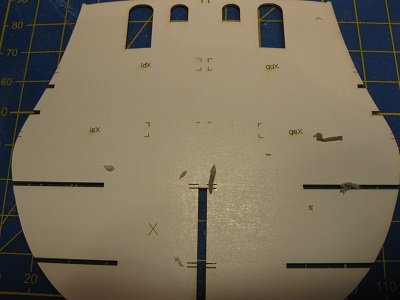
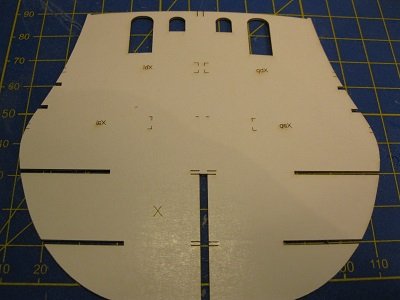
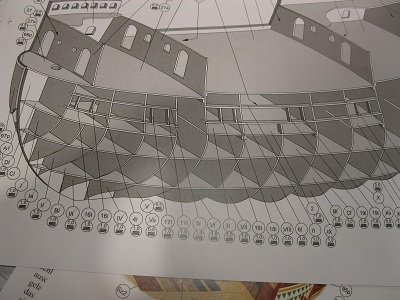
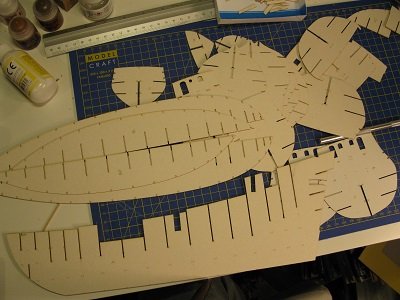
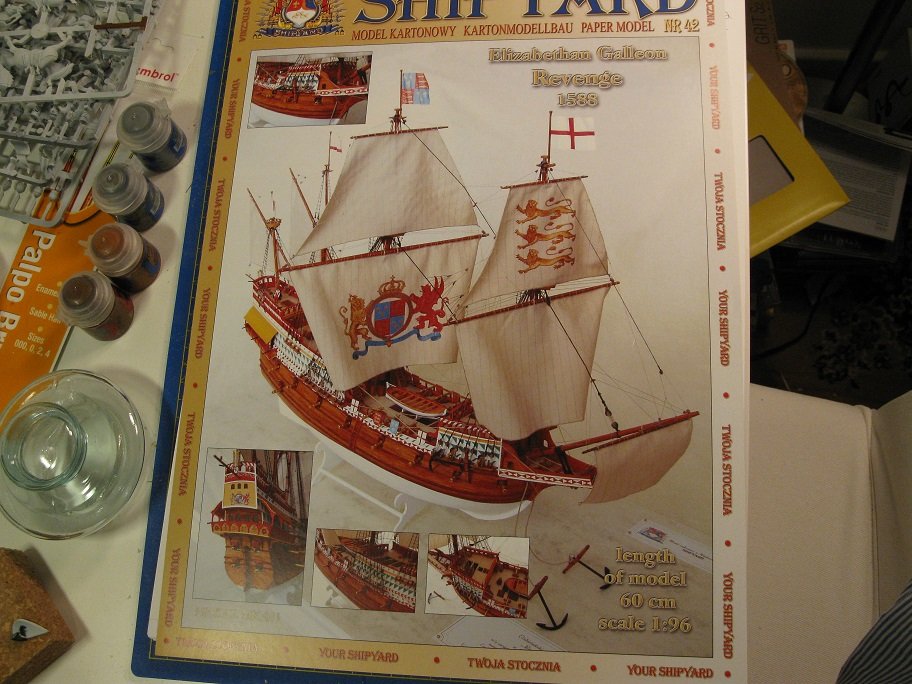
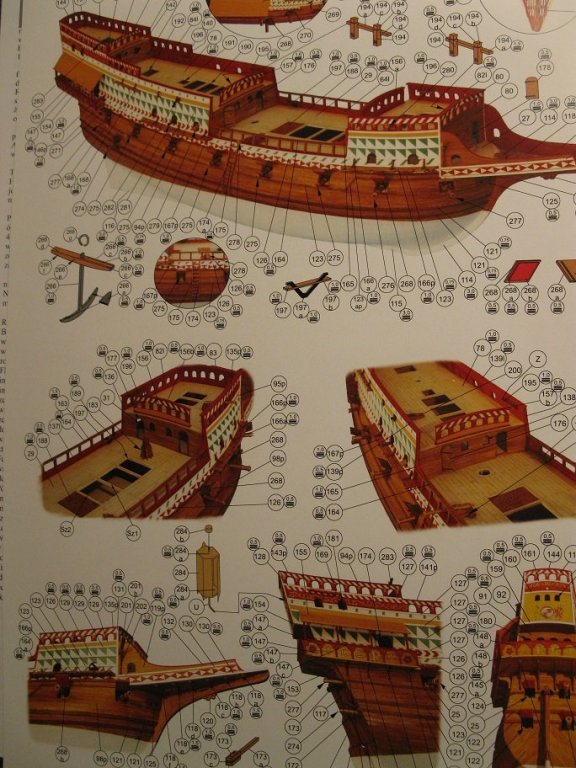
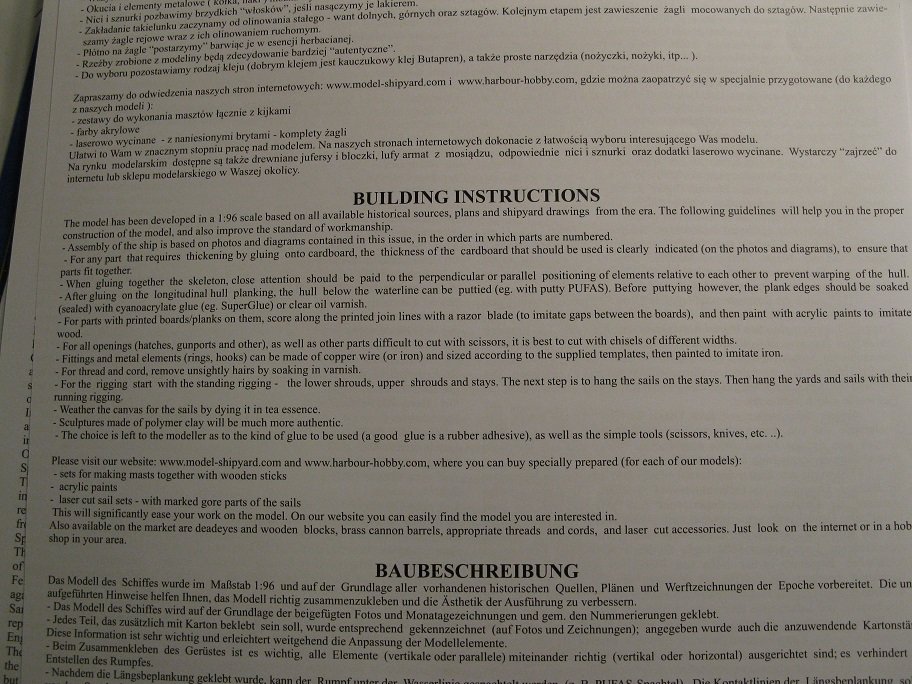
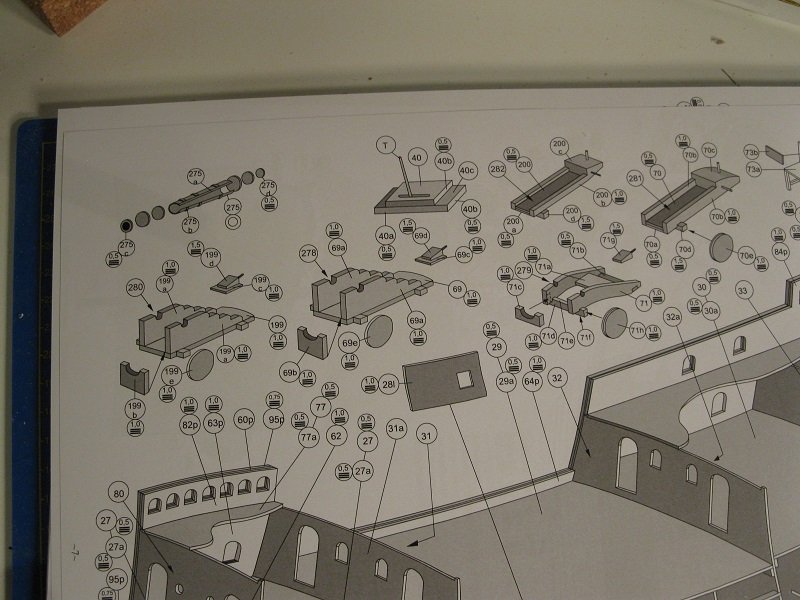
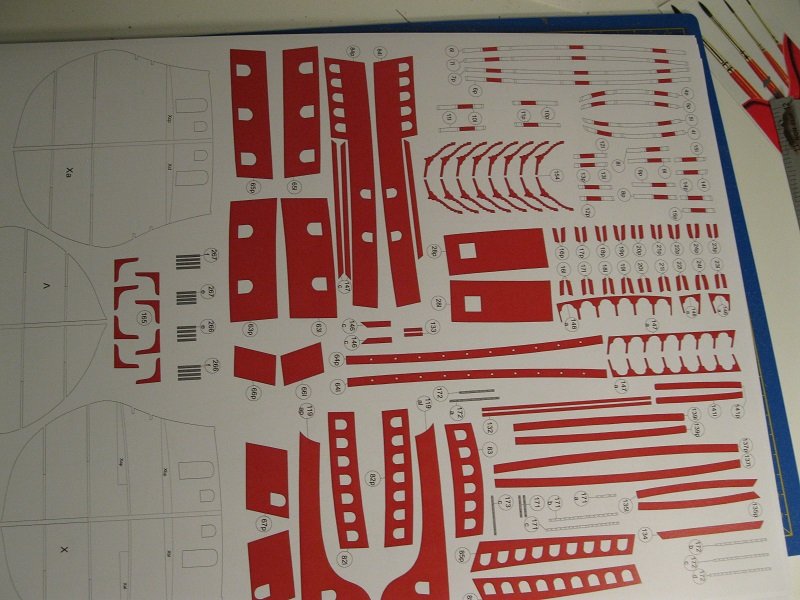
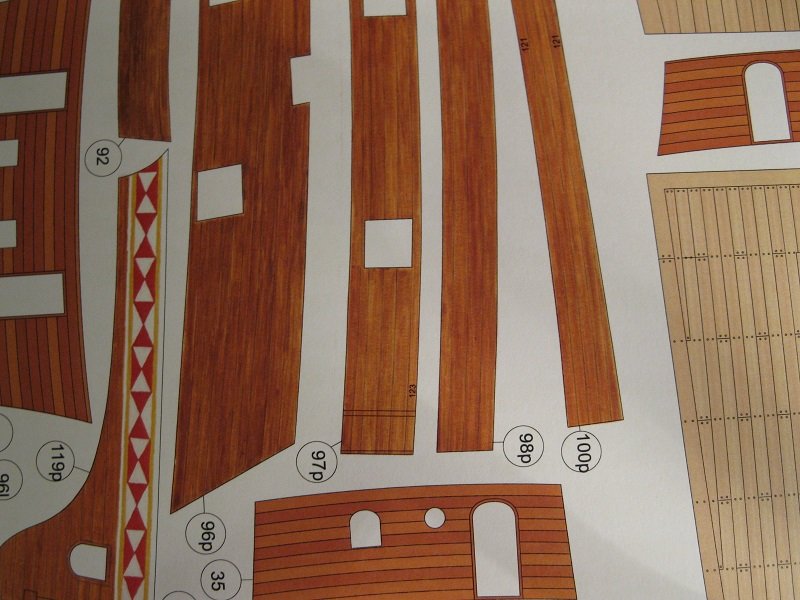
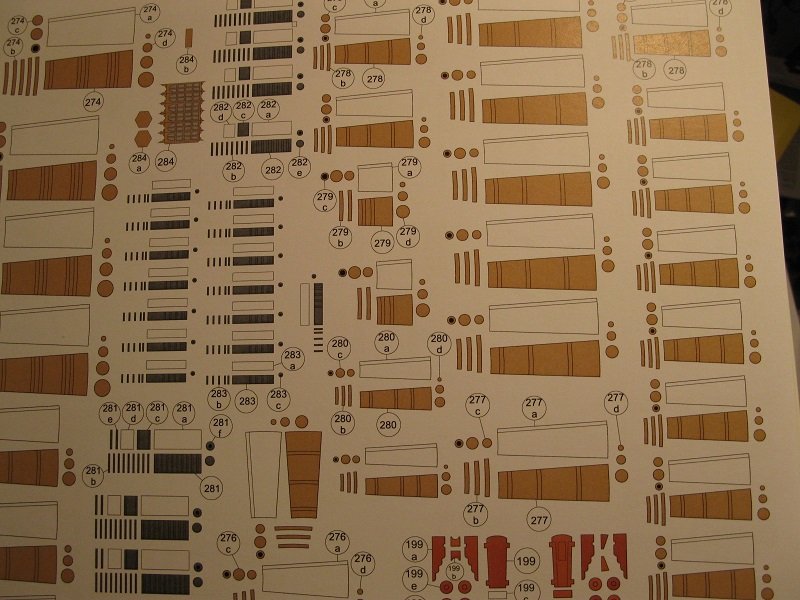
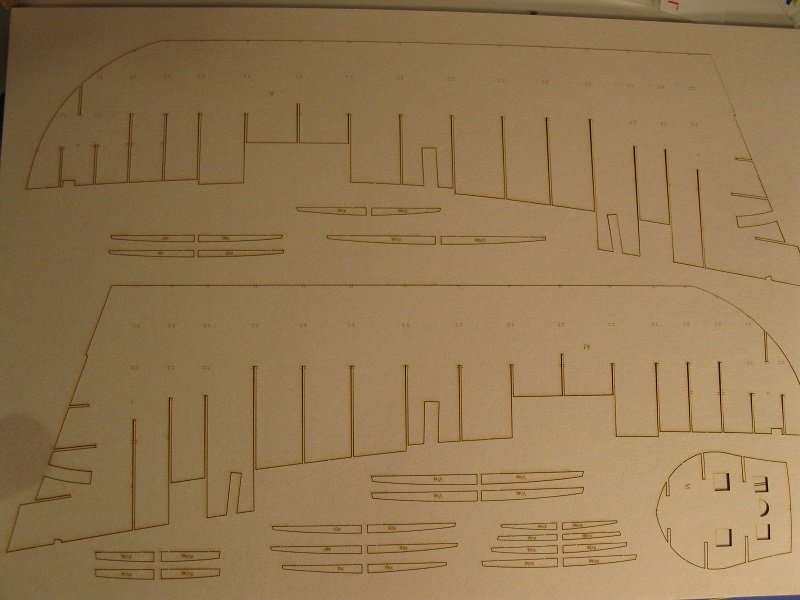
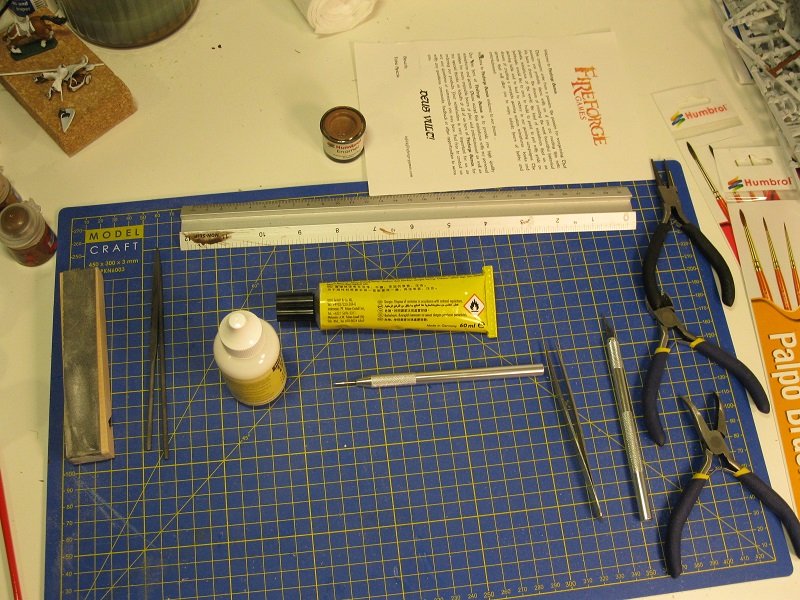
Good afternoon, all. Today I will be presenting my latest build project, The Revenge, a cardmodel from Shipyard, a Polish publisher of card ship model kits. I chose this ship because I like it, having built it as an Airfix plastic model many moons ago, it's looking great and I never built a Shipyard model before. BUT most importantly, because I think it will be great fun building it. Fun always comes first for me. For those who aren't familiar with the Revenge and her history, I will first give a short introduction to the ship. The Revenge was built by Master Shipbuilder Mathew Baker as race-built galleon. Race-building has little to do with speed as the name might suggest. Race-building was an English 'translation' of razee and linked to the terms: razing to the ground and razor. A razeed ship had a number of decks removed, normally from the fore- and after-castle to make the ship handle better and be more manoeuvrable. The Revenge was relatively small at 43 m length and 440 tons burthen, especially when compared with the then built Spanish galleons who were built big for extra cargo capacity, but still carried four masts and up to 46 guns, 20 on the gundecks and 26 on the weatherdecks. Having been built in 1577, the Revenge participated in many actions, like the raid on Cadiz in 1587, the battle of Gravelines (1588), the Frobisher Expedition (1590) and in the battle of Flores (1591), where the ship was captured by a Spanish fleet of 53 vessels, after 15 hours of constant action and repulsing numerous boarding attempts. Her Master, Richard Grenville, died of battle wounds two days after the capture onboard the Spanish flagship. The Spanish didn't get to use her much because on route back to Spain, the already heavily damaged ship was caught in a storm off the Azores, and sank, together with a number of victorious Spanish ships. I guess it's not the best ending for a proud vessel, but at least Lord Tennyson wrote a poem about her and her last battle. So she'll be remembered. The model is supplied in A3 format, and has twelve pages of printed parts, 7 pages of drawings and templates and a laser cut set of frames and keel. Oh, and a rather short set of building instructions. I guess a picture paints a thousand words. Below I'll add some photo's from the part pages. I must admit, I am mightily impressed (and utterly terrified) by the large number of parts and sub-parts that will have to be cut out, stuck to thicker board, edge-painted and stuck together. Yep, I definitely have my work cut out for me. Luckily the start will be easy, on account that the frames and keel have been pre-cut (4 sheets in total). So it's gonna be a quick start, and then a grind. And a grind. And a grind. But first let me introduce you to my set of tools. A crafty knife, an unruly ruler, some nippers and tuckers, some files and sanding equipment, some paint (enamel), an awl, to score the parts with and four types of glue (only showing two), namely rubber cement for large sections because it allows for some movement after sticking and will not distort card, a small bottle of PVA for the small detail parts (which are most of them anyway) which will dry up almost invisibly, a can of spray mount, for sticking the card sheets onto thicker cardboard and a bottle of superglue for card stiffening and other uses. Both superglue and spray mount are on order, as are three thicknesses of card, 0.5, 0.75 and 1.0 mm thick. I will try to keep this build 'pure', i.e. use only card or paper, unless I have to use something else, like threads for the rigging. So no metal barrels, no wooden dowels for masts, nothing like that. Just paper, card and glue. And me. Interested? I know I am! I'll start by 'releasing' the frames and keels and start the construction with them But more about that later. Heffulovelievenin! Till laterzzz! Adrie.


-
Hi Dave. Welcome! I hope you'll have a great time here! Adrie.
-
Welcome, Bill. Hope you're going to have a great time here! Adrie
-
Welcome, Guilly. Hope you're going to have a good time here! Adrie
-
Hoi Jan, yep, that's me, well, was me ...... in a previous incarnation. I'm in a much better place now. 😉 Ohh, that's nice of you to say, Chris. I hope I can do them (da skillzz) and the model justice. Oh, and David? Plasters and bandaids are always around in my household. Just par for the course. You know why? When the last one has been used, you can be CERTAIN you will cut yourself. 😉 Adrie
-
Hoi Jan, it was posted on the Model Space website. If you Google Model Space and De Ruyter, it should take you straight there. Adrie (Not sure what the rules are here about posting links on this forum so you'll have to do a bit of typing yourself.)
-
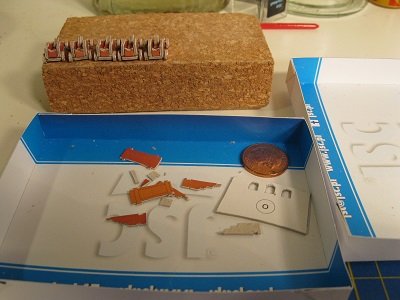
Good morning Jeff, David, Chris, Mark, Art, Mark(Oz) and Geoff and goedenmorgen to Patrick and Jan. Thank you for the kind welcomes. What's in the build stack? Apart from some Teutonic Knights from Fireforge, which are a 'by-the-by' kinda project, I am planning on starting with a first for me, namely a Man-O-War, the Revenge from Shipyard (1/96). Also expected to appear in the near future are two cruisers from JSC, the HMS Exeter and HMS Ajax/Achilles (both 1/400) to start a 'Battle of River Plate' scenario, for which I really am looking for a 1/400 card model of the Graf Spee. But that will be a while from now, as doing a build log of a project adds significantly to the building time of a model, as I have noticed when doing a 1/250 card model of the de Ruyter cruiser from the Netherlands for a different website. A project that, almost complete, then met with disaster when a heavy bout of hayfever and a neighbour's cat caused delays and ultimate utter destruction. The cat is still alive and I moved home since then, by the way. So that's not gonna stop me again! Well, famous last words and such. Adrie.
-
The slightly balding man gets up from his chair and looks around at the group surrounding him. "Uhhhh, hello. My name is Adrie." He stares at his hands then clears his throat. "I am Adrie," he says again, this time a bit louder. " I am Adrie and I can't do wood." Uhh, oops, seems to have gotten my desktop buttons mixed up. Thought I was linked to the ModelShipBuilders Anonymous. But it's true. I can't do wood. After yet another failure I felt it was time for a change. Out with the wood, in with the card. Card I can do. Card I can do quite well. So it's card for me from now on. And a little bit of plastic on the side. We all like to play dirty, once in a while, no? So .... here's me, I'm Adrie and I'll be doing card in here. That is ..... once my card kits arrive, that is. And the glue, and the knives, and the awls, and .... oh yeah, and the SD card. Very important, that. No card, no snapshots to show and we all like our snapshots, don't we? Nudge-nudge, wink, wink. Pleased to meet you all! Adrie.
- 19 replies
-
- 13
-