
HOLIDAY DONATION DRIVE - SUPPORT MSW - DO YOUR PART TO KEEP THIS GREAT FORUM GOING! (Only 20 donations so far - C'mon guys!)
×

DarkAngel
-
Posts
243 -
Joined
-
Last visited
Content Type
Profiles
Forums
Gallery
Events
Everything posted by DarkAngel
-
 Thats a smart way to do the port liners. Are you going to square the frame around the hatches ? I'm learning alot from your buil EJ
 -
Vane: Thanks for the pic looks like you have a few other ships in your dry dock too. Enlarging Port Hatches I haven't seen a good closeup of the Corel HMS Victory cannon hatches. Your pic is just what I was looking for. The hatches seem a lot smaller than the real thing, that is the opening around the cannon is quite restrictive. I think I'm going to go for a walk on the 'Dark Side' and redo the hatches a bit bigger. This affects where I am now because I am planning on adding port liner frames to the hull before I start the hull planking. Just found some nice wood (maple) kicking around in storage, so I'll use that. I can try out my new razor saw and split the wood up into 5mm x 5mm custom lengths to fit in between the bulkheads. Also I am curious of the height of the waterline, going by eye at this stage and using a mini laser level. Does anyone have any suggestions for working out how high on the hull the waterline should be? Rear Cabin Well it's already started. I have begun to reassess the rear cabin area and had a go at carving the piece supplied in the kit with my new modeling knives. I also have excess material from trimming down the deck planks to about 3mm, these thin offcuts I shall use on the rear cabin end for adding extra framing to the decorations on the outside. They seem to be the perfect size, just need to layer them up 2 or 3 thick in places as they are only 0.4 mm thick. Carving layers into the plywood rear end cabin template provided to give more depth like the original Cutting corners into the window spaces as they are quite rounded, filing edges Considering putting a slight curve to the cabins instead of being dead flat Adding two more thin layers internally to build up windows and framing inside Thinking about using clear perspex or plastic for window panes and adding an internal led light for nighttime illumination. However would also need to consider the ships external lamps at the back I'll update a pic of the rear cabin section raw carving when it's finished a bit later on when the layering, carving part is complete. July 29th : Sat, here's an update of a work in progress. Base paint layer down, needs overpainting with yellow ochre on decorations and window framing. Still building up layers of wood trim, Window panes to go behind this facade. Also thinking about repositioning sections #22, #23 and #24 to allow framing behind to fit out of sight of open windows.
-
hi Vane Thanks for your input, feel free to add a pic of your painted HMS Victory if you wish. It would be good to see another Corel model completed.
-
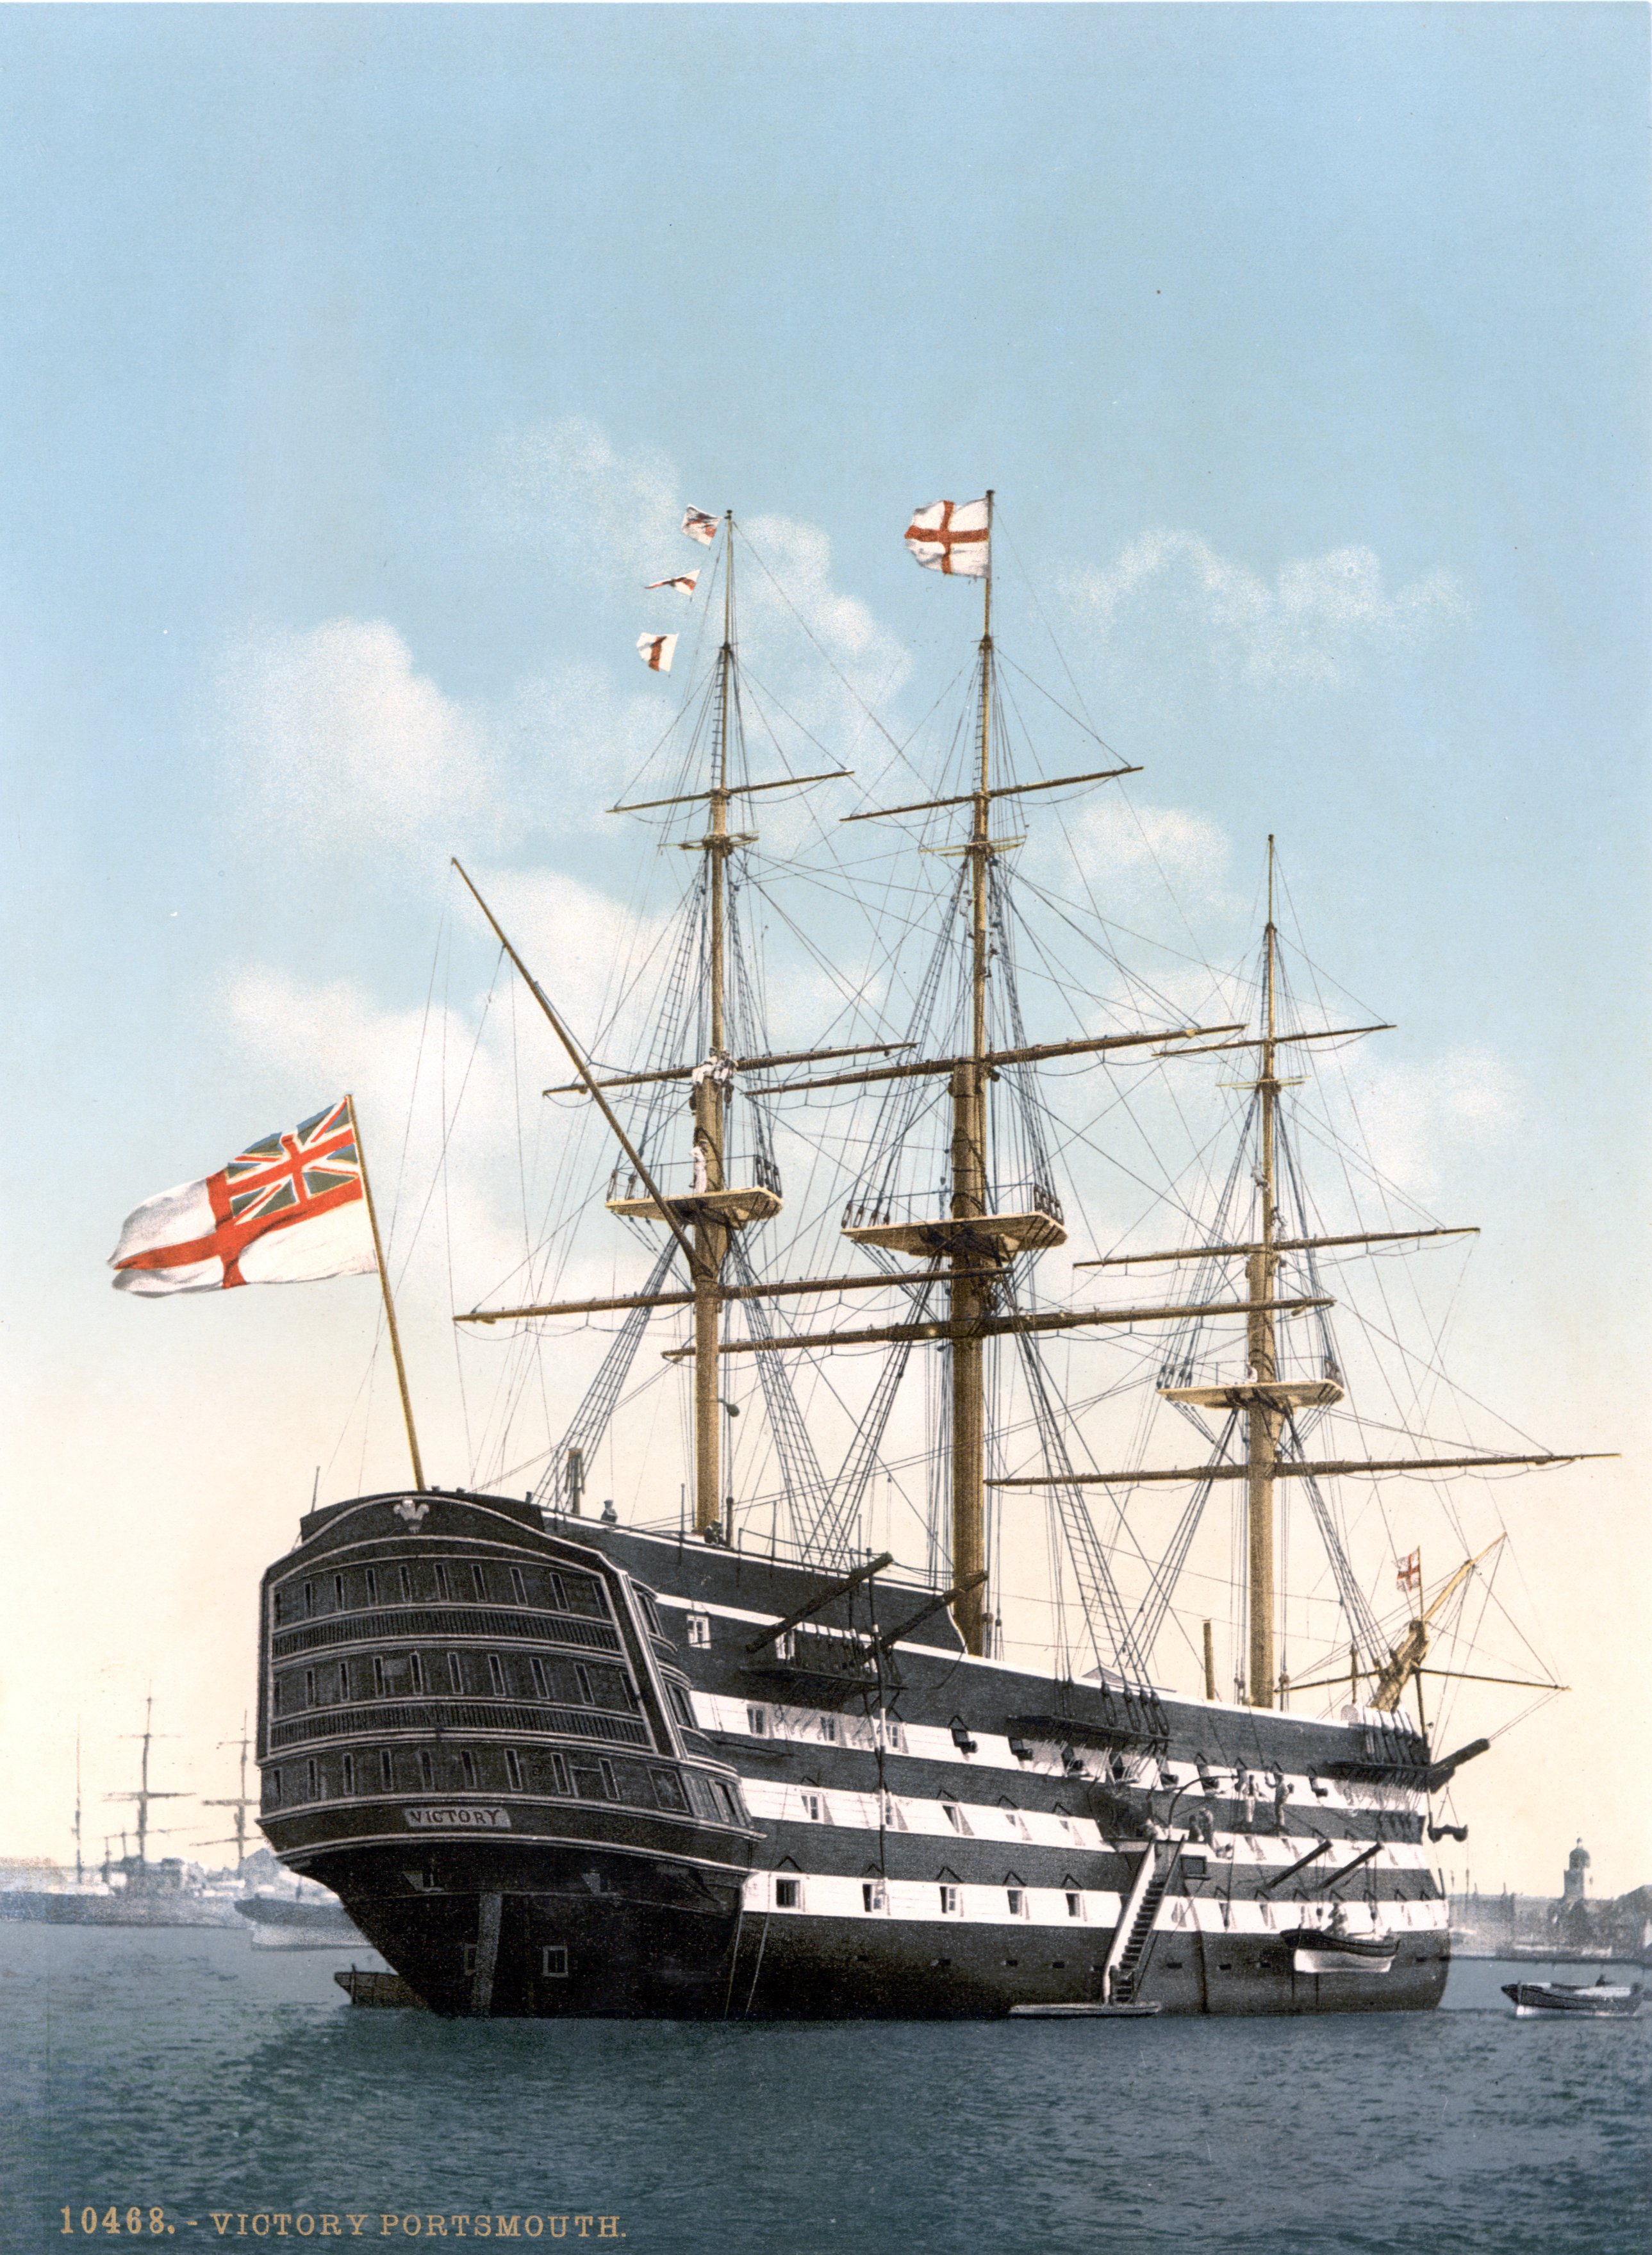
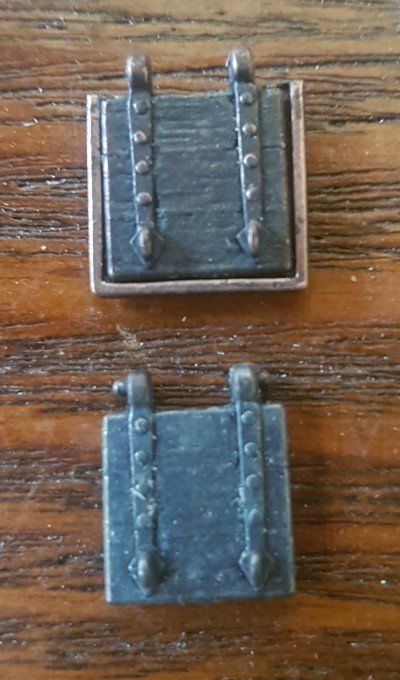
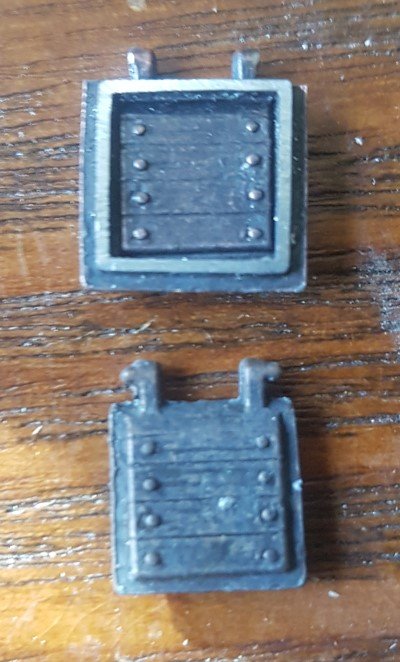
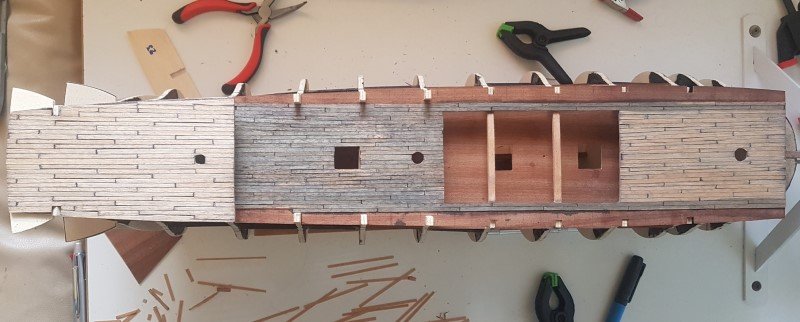
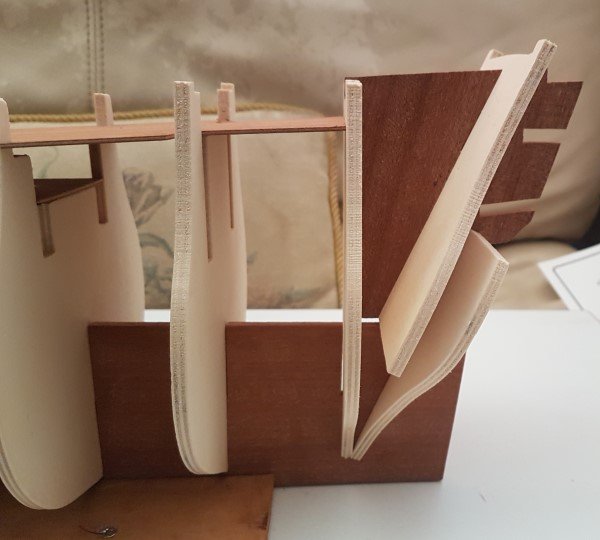
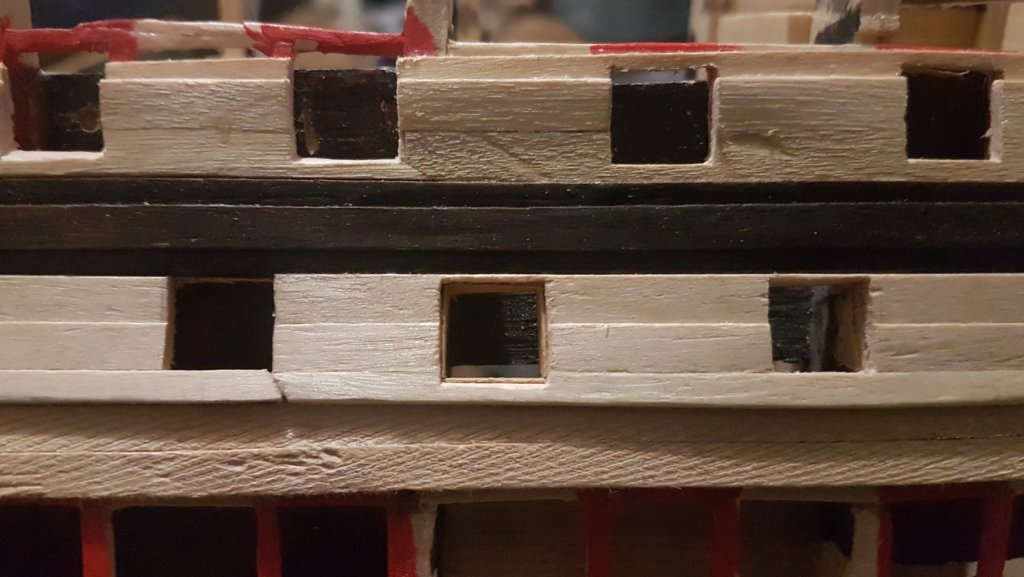
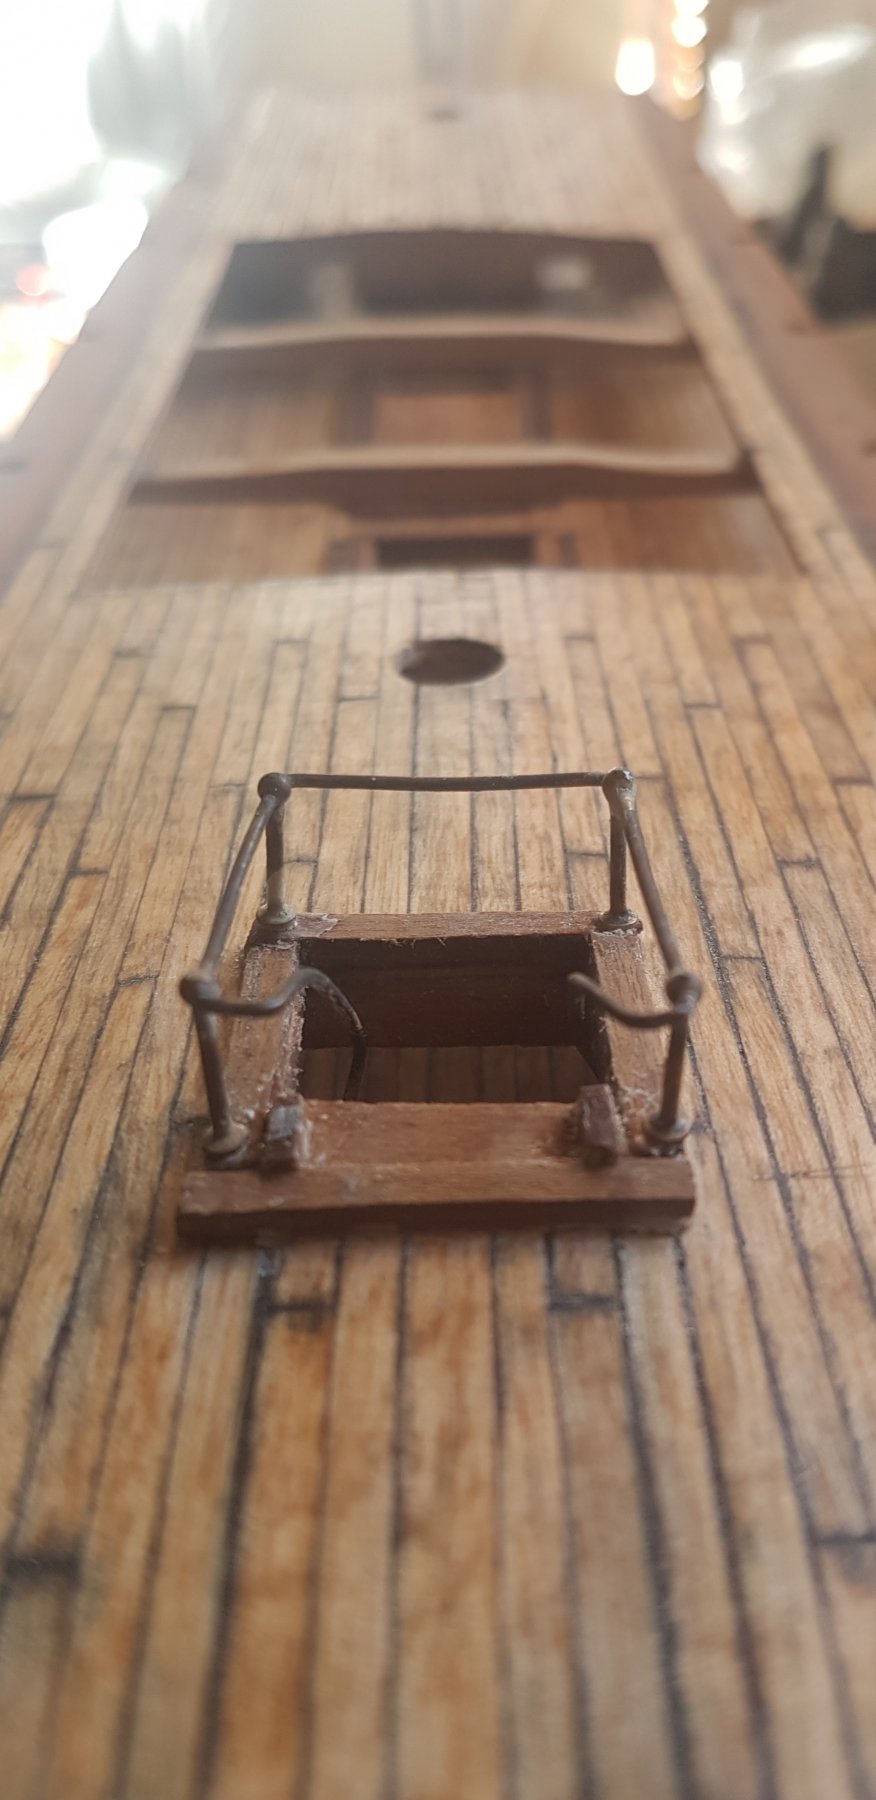
Gun Port Hatches The Corel kit comes with cast metal gun port hatches, these are set to sit on the outside of the hull. However the HMS Victory's gun port hatches are flush with the hull. So I am thinking of using the hatch and frame together as an open hatch and having a larger square hole in the hull to accommodate the larger sized hatch. I think this is closer to the original and gives a more heavy duty effect to the hatch thickness. Any thoughts from the peanut gallery pic's below (above) Front view, (below) Back view edit. Now I am looking at these images, I'm thinking the hatch without the surround would look more like the original ship.
-
Wow that planking looks flawless Looks like you have added framing to the deck wall and I like the subtle port lining you can see beyond the hatches.
-
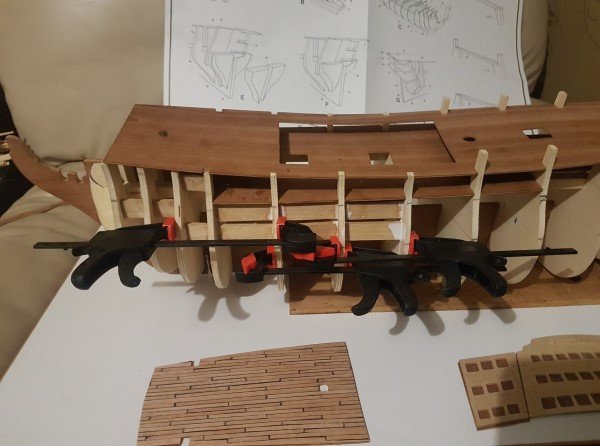
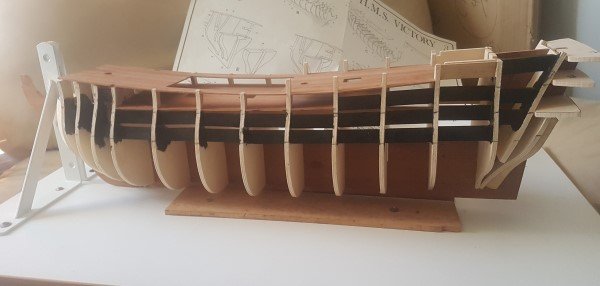
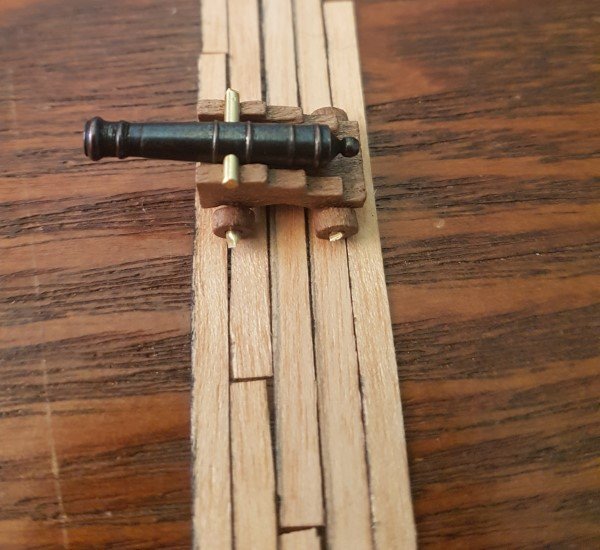
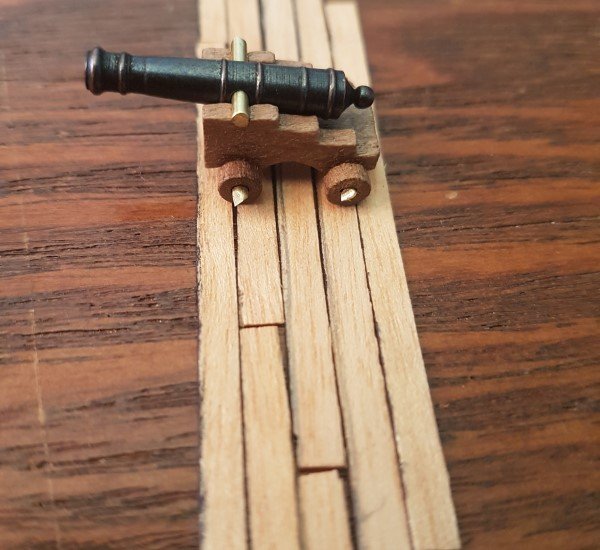
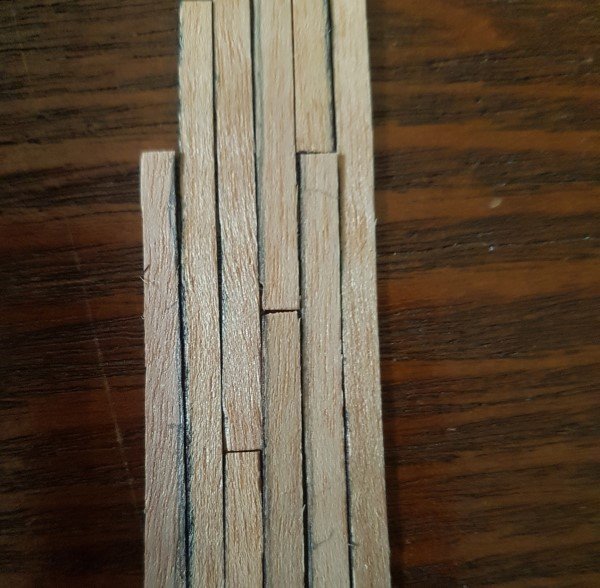
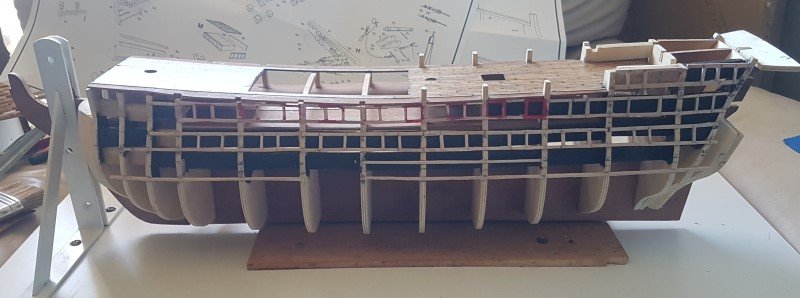
Thanks EJ for the heads up I am now a follower of your latest build. Hull update Here a few picture's which indicate my progress on the hull thus far... June 29th : Saturday, finished cannon backing and painted black to add shadow within cannon hatches for later.

-
Aha ! That's a really interesting insight I would not have anticipated for my HMS Victory build. Plus I like the idea of excess wood to use for framing port liners on my cannon hatches prior to planking. Thanks for the pics, as having a visual reference really makes the point What's the thickness of the deck wall you have settled with ?... on your scale ?
-
What a fantastic ship ! I shall be following your progress with interest. I love the woodworking details and the choice of wood colors. Maybe a museum would be in order instead of 2 garages
-
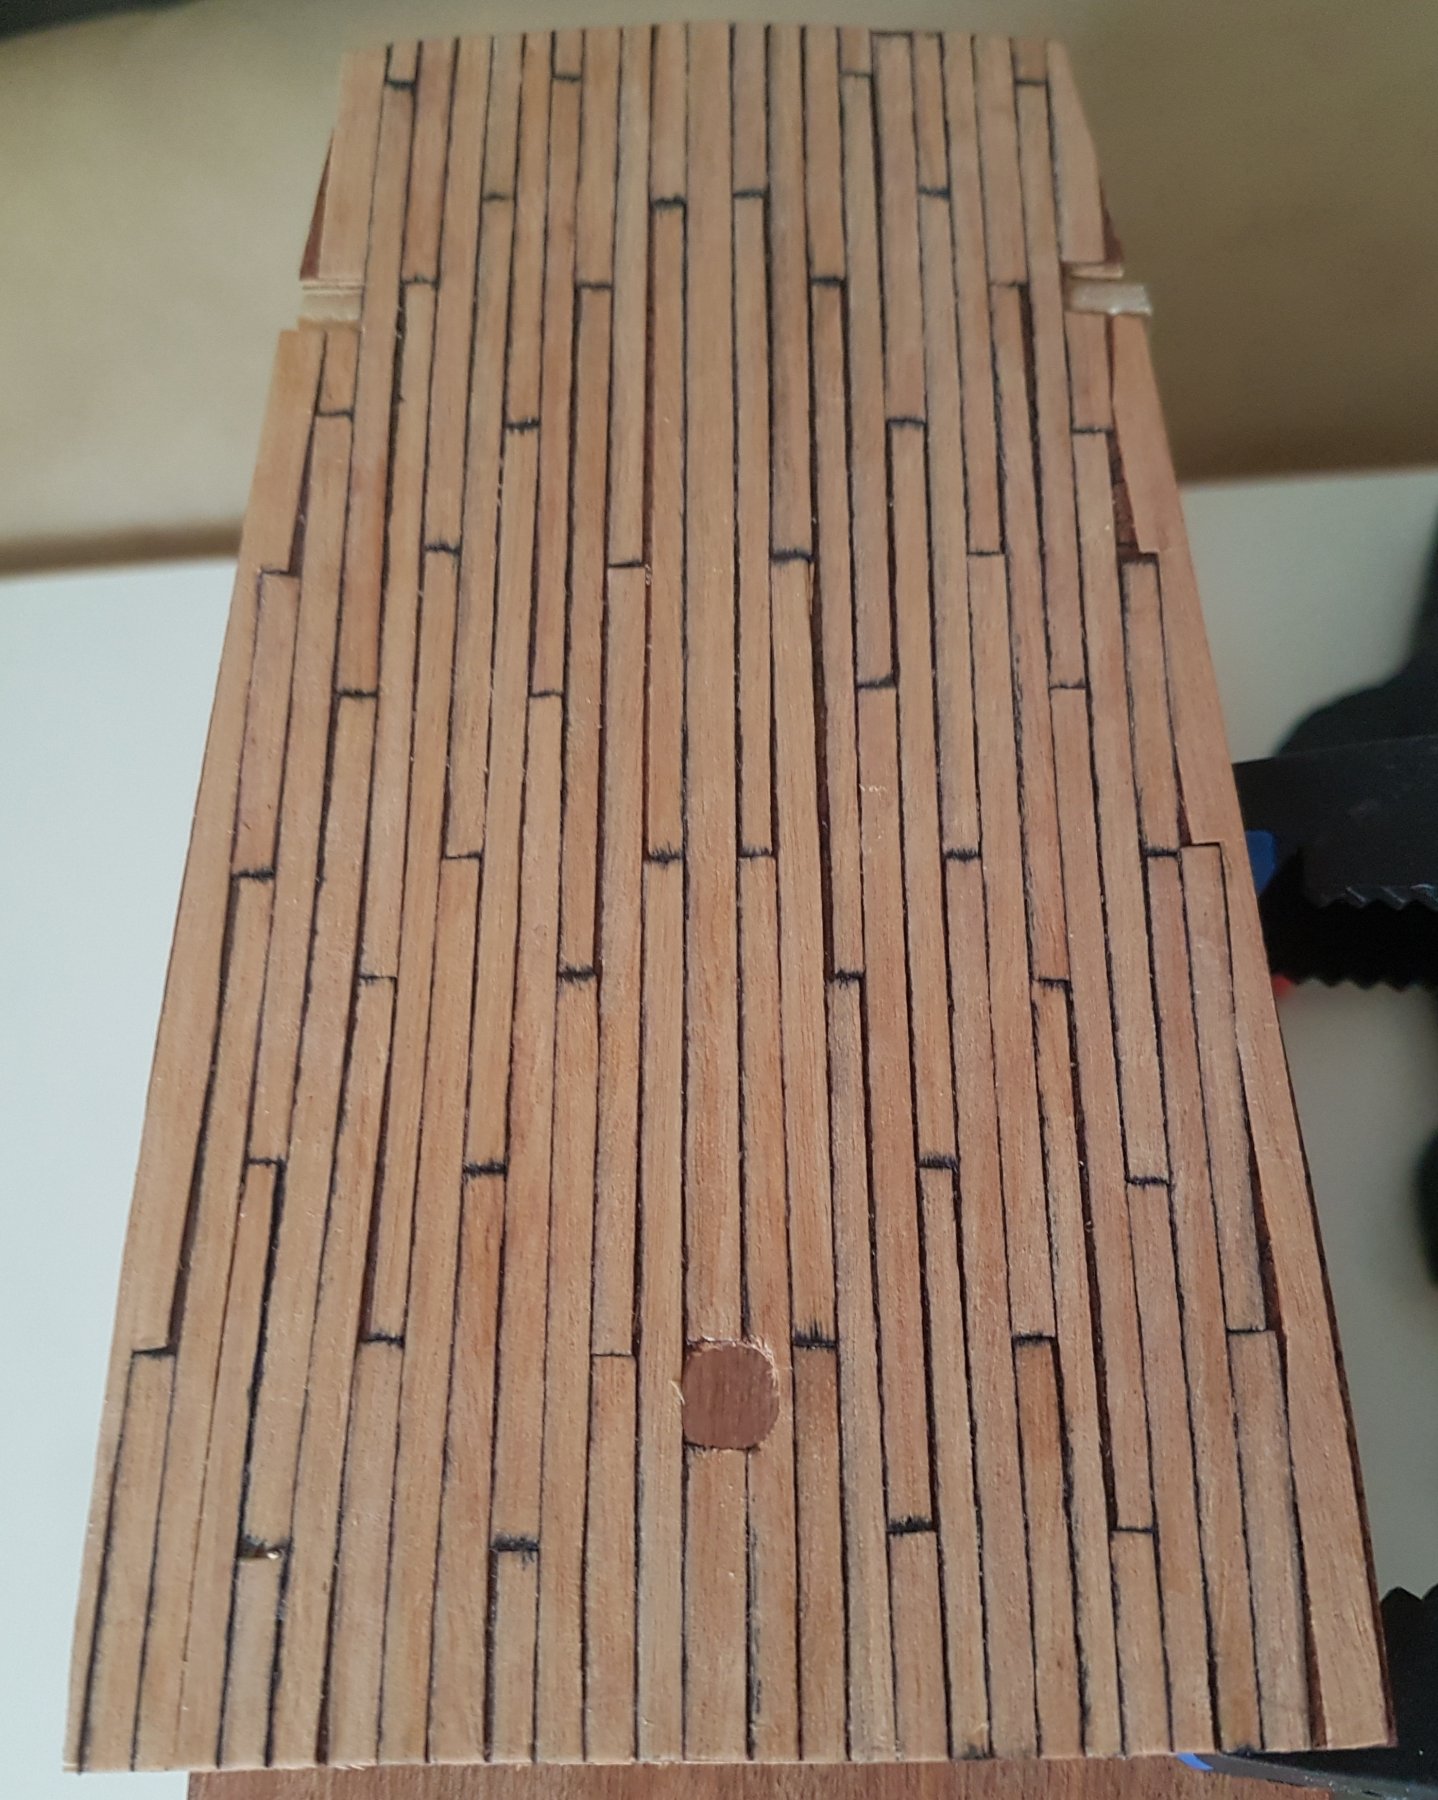
Top Deck planking While I am working on the hull, I have taken a break to have a go at planking the top deck using the 4 plank system and historical planking notes others have used for the HMS Victory build. Plank size for the 1:98 Scale HMS Victory. length 70mm, width (max) 3mm, thickness 0.5mm approx. Steps taken I drew horizontal line measurements of 14mm across the top deck false floor to calculate the positioning of decking Found the center vertical line of the deck and marked the position of a center plank 4mm width and running the entire length of the top deck separated only by the mast hole. Used a marker to add a caulking line along one long edge and the ends of the planks. Glued them onto the top deck false floor one row at a time wiping off excess PVA as I went, ensuring all the planks lined edge was on the same side. This is my first attempt... a couple of planks could be replaced to tidy up the appearance where there are gaps

-
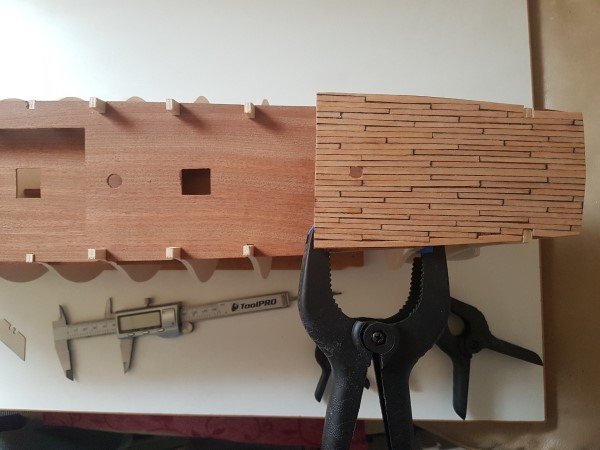
You're welcome Yacht1255. Tag along indeed Mark, and feel free to comment or provide advice Deck planking notes: from taking a look at photo's of the HMS Victoria top deck I have calculated there are about 21 planks either side of the middle plank. The deck plank strips I have are 4mm wide and the top deck is 113mm at the widest point. Therefore to be accurate to the correct number of planks across the top deck I have trimmed the strips to about 2.7mm and cut to 60mm lengths which is roughly the size of the 6-7m deck plank lengths of the original HMS Victory. Here's a mock up of the new deck sizing with a top deck cannon in the Corel 1:98 scale kit. Also tried the sharpie pen for the caulking method. I also like the way the dark background also highlights the gaps in between the planks. These planks are just sitting in place, with a little bit of stick I am sure to get them more precise with less gaps as they move after being touched with other planks in these pics. Other considerations include aging the wood. Going to consider a graying effect perhaps like the original and probably finish the surface with a quick scrape of a sharp flat of the razor blade.
-
Shipwrights Journal Build Plan Calendar June 20th The Build Begins ! - Assemble Bulkheads for test fit with deck levels noted - Fit cannon brackets between bulkheads, calculate deck level 3 floor line - Cannon test fit assembly for height of port liners on deck levels 1 & 2 - Build jig to hold keel level for build
-
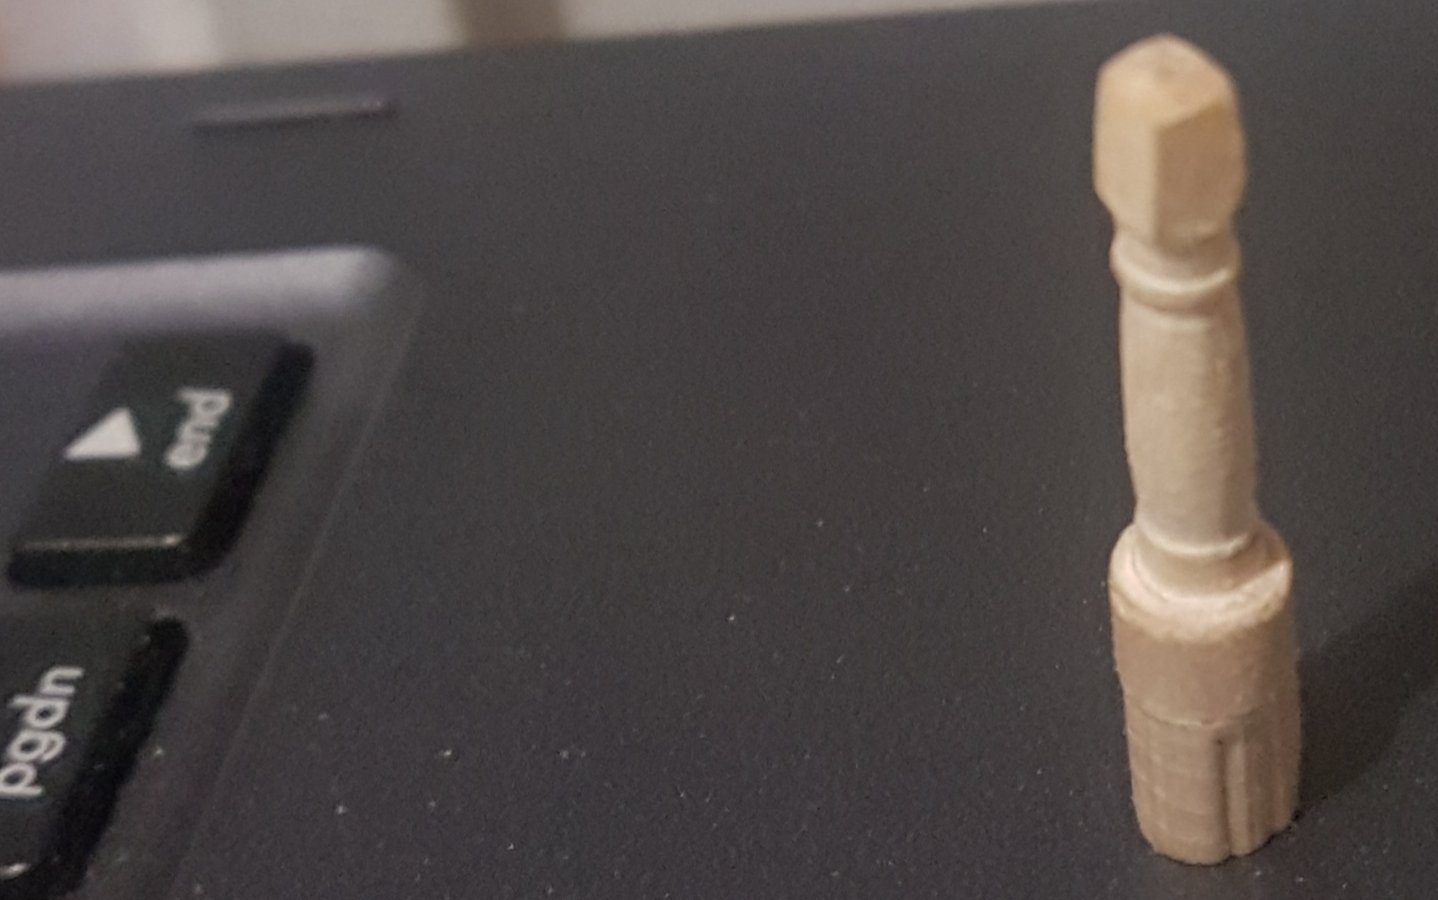
Tips BY NO MEANS CAN I TAKE ANY CREDIT FOR THESE WONDERFUL IDEA'S Gluing and Prefabrication Diluted PVA mix with water : I read in a blog somewhere here that thinning down PVA glue to a weaker consistency helps later when structural sections need taking apart and redoing. Mixing sawdust with PVA is great for filling any unsightly gaps in the wood. Gorilla Glue works well with wet wood bonding. Especially useful for when bending and then gluing wet wood onto the hull. Building a solid strong level hull Setting the keel straight and true is important to getting everything right and level right off the bat. Use a jig to hold the front and end of the ship in place level and true at 90 deg while assembling the bulkhead framing, screwing down brackets onto the baseboard is good to keep the model level. measure and remeasure the levels to make sure everything is level often after attaching or reattaching new sections. Excess wood can be trimmed later once the framing is complete to save mistakes being permanent in the early stages of the build. Aged Wood method mix vinegar and torn fine steel wool overnight, brew some strong tea and paint tea on the decking or wood to be aged After tea has dried, paint on vinegar and steel wool solution wait until it dries repeat as necessary lightly scrape wood to finish Sourcing wood for crafting Wooden coffee stirrers are about 2mm thick and 5-6mm wide, useful for splitting into smaller parts Bamboo round disposable chopsticks are good for using in a drill lathe to shape Bamboo tooth picks or long skewers are good for crafting belaying pins, and long skewers good for oars too. Adding aged patina to brass and iron 'Liver of Sulphur' concentrate is the solution to break down the surface adding a patina in brown to black. You should investigate this method carefully as it is a dangerous substance Requires rubber gloves and safety goggles as it is harmful. Also have water available to neutralise solution that may be on tweezers or other items in contact with it I use a water 'bath' in a separate container to dip items in to stop the patina process (mainly for cannon balls) Adding a patina to brass seems to take days with the items soaking in the concentrated solution, whereas a quick dip and leaving to air dry works a treat after a few hours of chemical reaction with the brass. Power Drill Wonder tool May be used as a small portable handy lathe for small wooden dowl turning Can be used as a power motor for sitting in a rope twining jig to make your own ships rope.


-
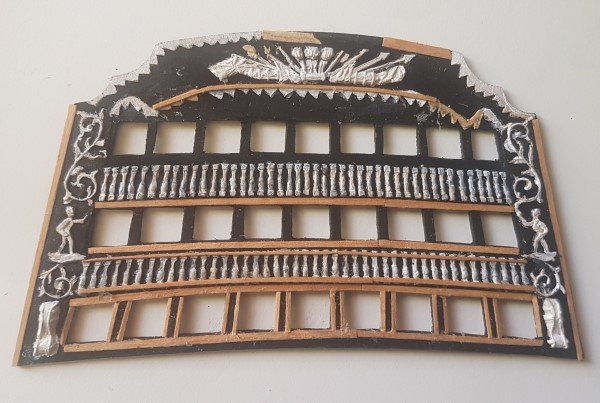
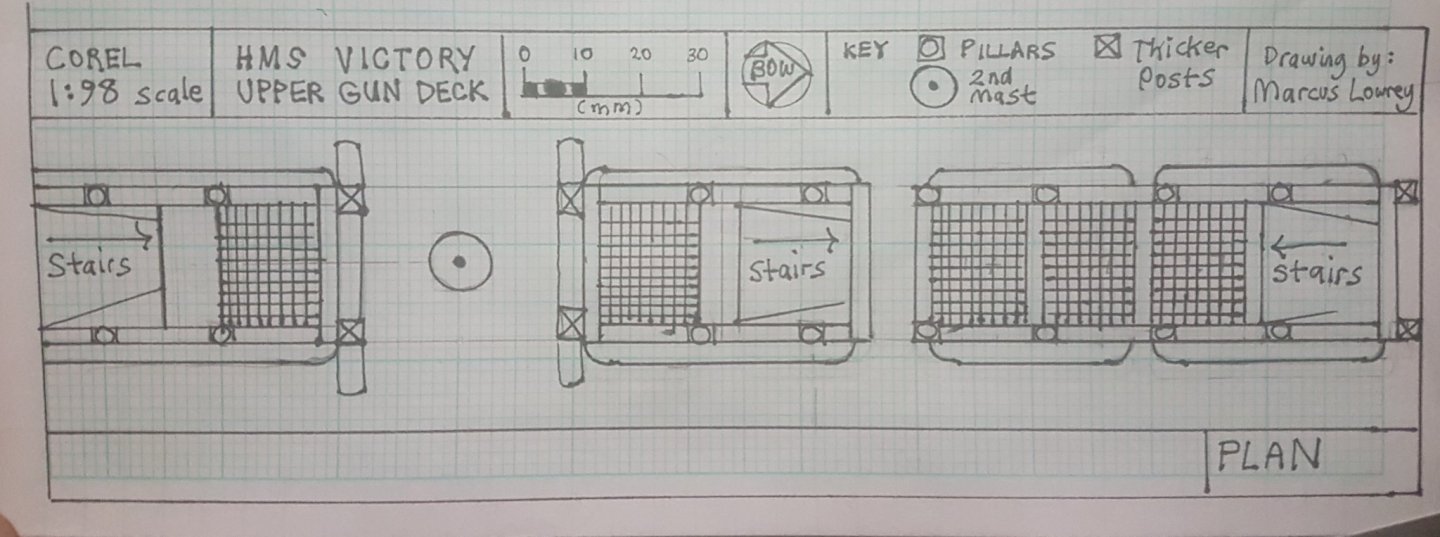
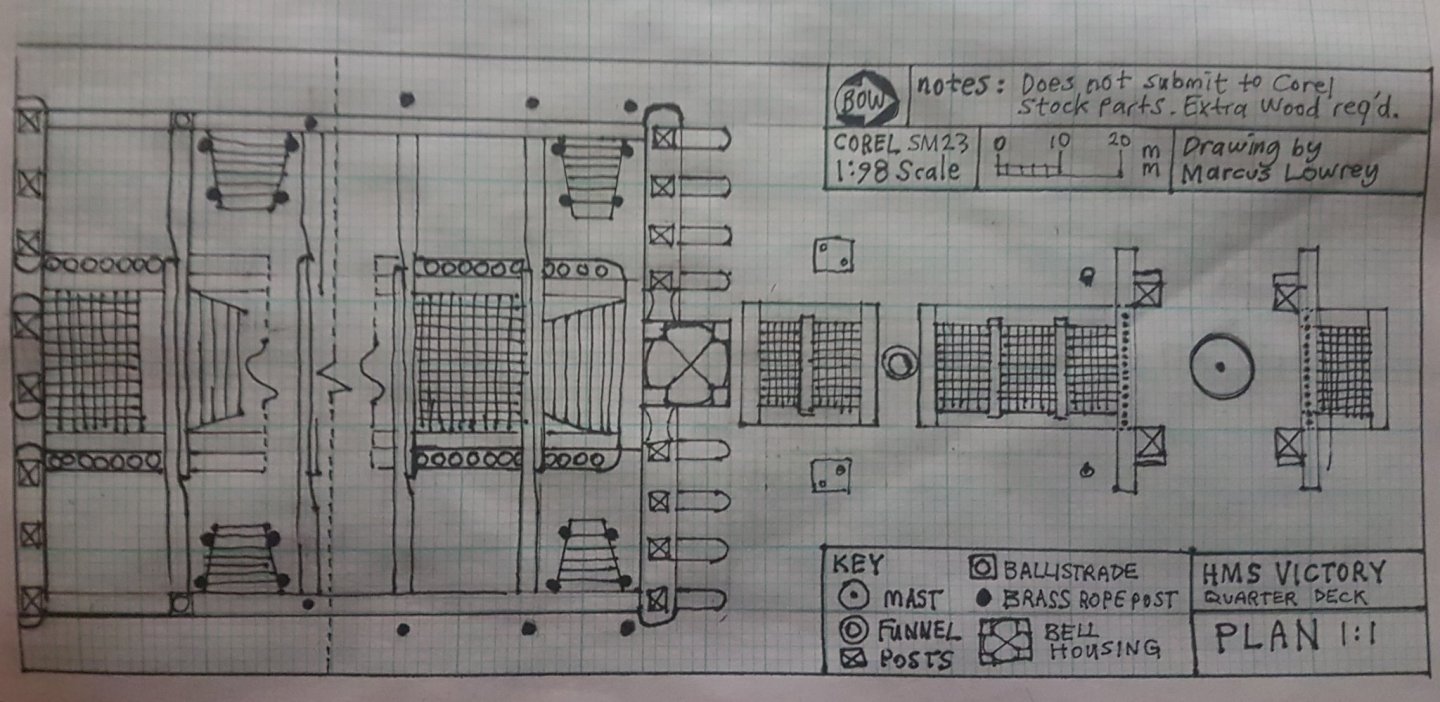
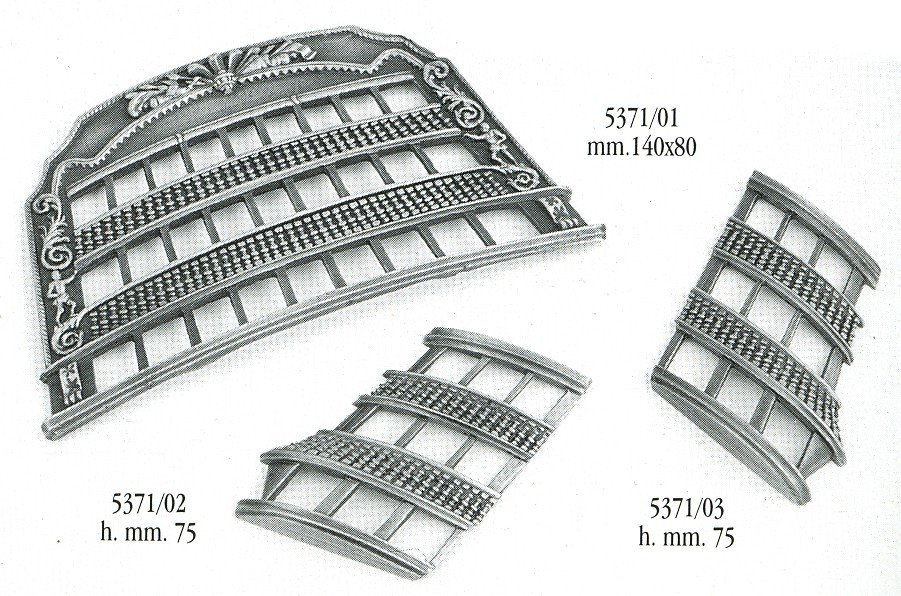
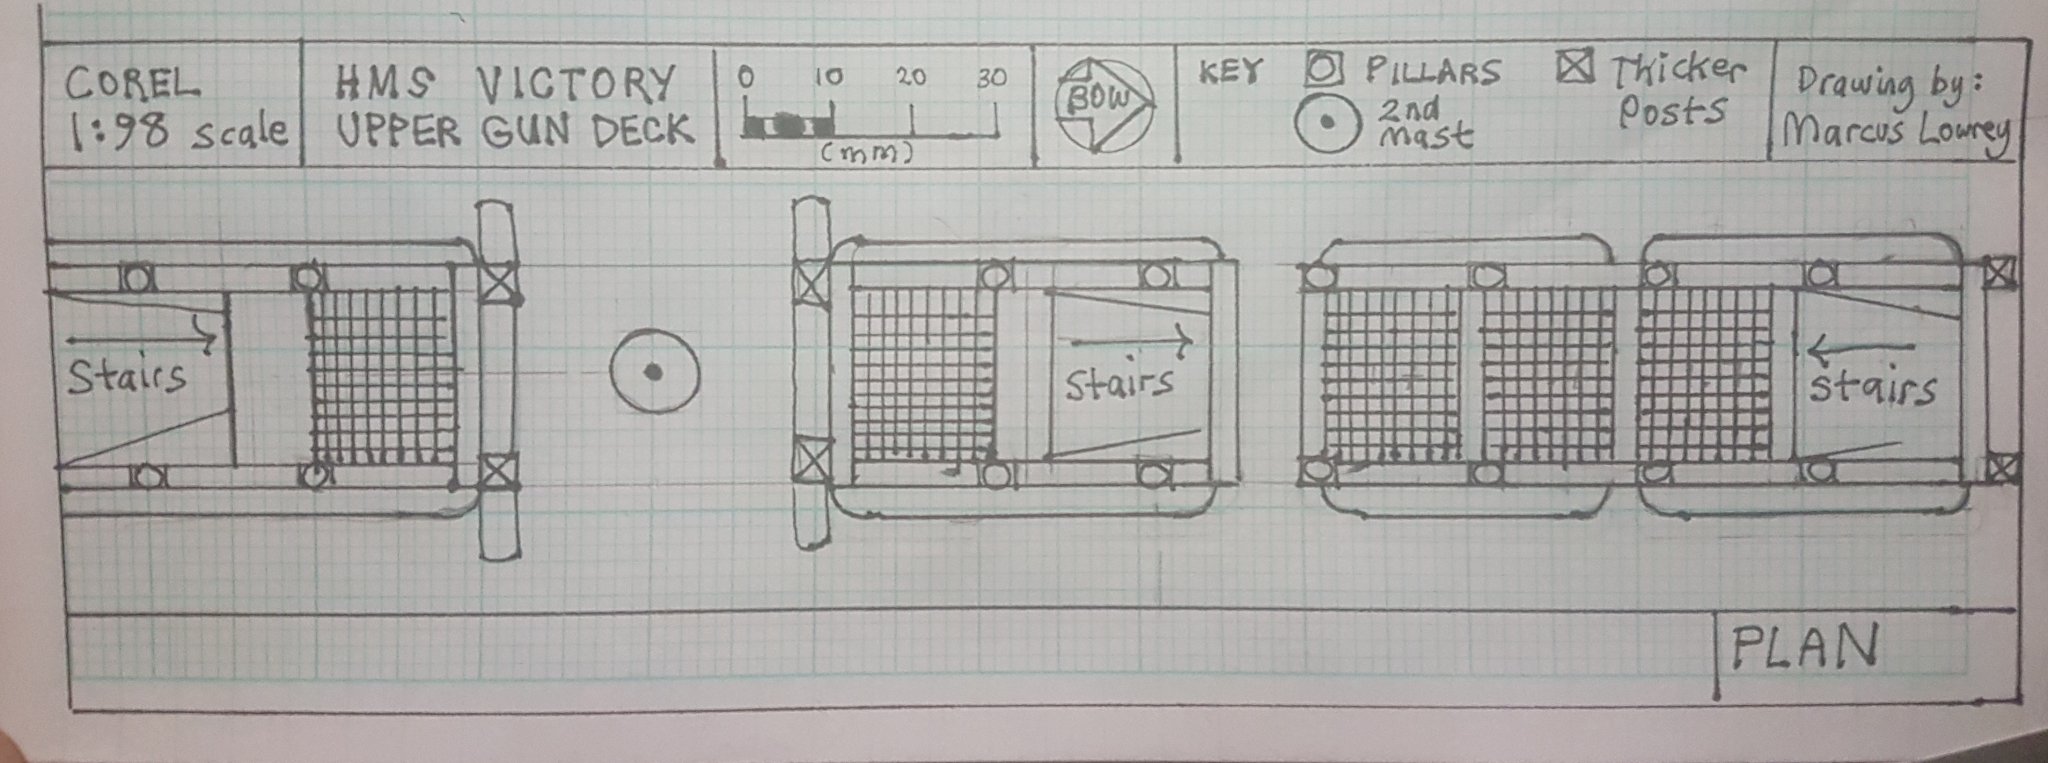
Build Modifications Rear Cabin Look at rebuilding this part entirely to be more accurate with the original HMS Victory in dimensions, details and may have a go at wood carving the decorations at some point solution: Obtained the Amati HMS Victory cast metal stern parts. Cannon framing and Port Liners Prefabricating framing directly into the bulkheads to allow accurate placement of cannon hatches, whales and wood choice for hull planking. That's the theory anyway. Cannon's I have obtained the following Cannon's in addition to the one's supplied in the kit, as the barrel lengths are incorrect for the long 12 lb'ers' Corel 30mm Cannon's from Cornwall Models UK Billings 18mm x 4mm brass half cannon's for the Quarterdeck long 12 lb'ers Reforming Parts In the assembly of the hull - Bulkhead #12 needs the slot re-cut a quite a bit to enable the deck to sit over it. edit does fit as original, after refitting a second time, it fits better and the height difference is for the quarterdeck above. Bulkhead #13 below you can see rising above the rest of the wood needed a bit of the slot lengthened to fit flush. This is needed to allow the top deck to set level. Bulkhead #12 (see above) can be trimmed under the Quarterdeck by about 5mm to allow for the Ship's Wheel to fit underneath the Poop Deck Hull 2nd planking to use white pine 2mm x 5mm coffee stirrers to arrange flush with walnut 2mm x 5mm whales. New plans of attack I have decided to redo the floor plan of sections of the Upper Gun Deck and the Quarterdeck. Feel free to use these drawing plans as a scaled guide in your personal build Quarterdeck notes: The forward grates could be a bit wider upon further reflection as the outer frames extend a little past the belaying pin posts. Also the stock grates can be replaced with the wooden grates in the kit or the Artesania 33mm grates. I've gone for the Artesania 33mm grates as they appear a smaller grid than the stock Corel wooden grates. Upper Gun Deck notes: The forward posts on the bow side should be pillars, the same as the others in the series, not thicker posts. Also the placement of the posts around the 2nd (Main) Mast are accurate to the real HMS Victory, however they are further away from the mast that the other belaying pin racks on the Quarterdeck. So if you wanted all 3 masts to have the same distance from the belaying pin racks, then you may need to reconsider my plan below.
-
Model limitations Scale There are many sections I have noticed that don't seem to match the original pics of the HMS Endeavour as taken in Portsmouth and I'd like to change the visual aesthetic to be in line with the original as much as possible. Rear Cabin The size of this and the build looks all out of whack, this is important as it sets the placement of the rows of cannons on the hull and needs to be completely reworked in my opinion to make the hull more in line with the original HMS Victory. Solution: Acquired the Amati 1:96 - 1:100 metal casted 140mm x 80 mm rear cabin and sides and rebuilding Stern framing will be required. Deck levels and Cannon hatch framing My initial thoughts are that these will need to be adjusted to accommodate the correct placement of the third row of cannons near the waterline. I'm going to consider this when assembling the bulkheads and adding a frame to position the cannon hatches on the various rows of cannons before planking the hull. Cannon's There are only carriages for the short 12 lb'ers in the kit, and no allowances for the longer barreled 12 lb'ers. Also the half cannon's with the wider barrels are not found on the Upper Gun Deck, but the Middle Gun Deck being the 24 lber cannons. Also the Lower Gun Deck has bigger cannons again !... 48 lber's I think with even bigger barrels no doubt. notes: I used the stock cannon hatches with the framing trimmed and attached to the hatch to make them a little bigger. Cannon dummy's are the 24 lber's and not present on the Quarterdeck, so I obtained the Billings 18mm x 4mm brass half Cannon's as they are more accurate to go with the other 12 lber's
-
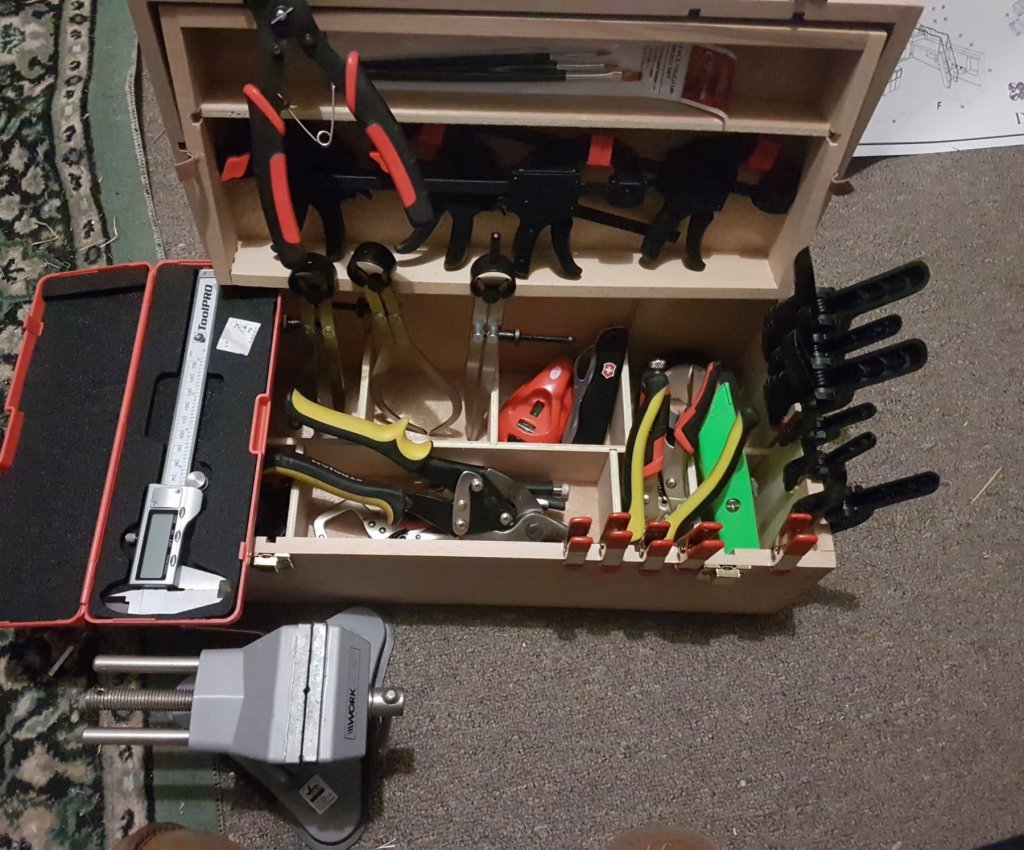
Tool Kit Wooden Pine Artists Box Pull out long tray to keep wood strips flat Small medication bottles - for keeping small parts in a sealed plastic container - labelled by part # and name Syringes - for PVA glue storage and application Razor saw and blades - for sharp wood cutting modelling knife - extra chisel end blades Push pins - for planking Tooth picks - applying PVA to small parts Dusting brush - cleaning dust and debris Clips - Clamps - for holding stuff together overnight Circlip Pliers - internal, external adjustable Wire cutters - heavy duty Scissors - misc Cutting mat - self healing mat to save your bench tops Tweezers - hook nose mini files - smoothing wood and castings Leatherman 'surge' - multi tool. mini hand drill - for tiny drill bits like 0.5 mm, 1.0 mm Permanent marker: Faber Castell PITT Artist pen for caulking lines on deck planks Power tools mini lathe cordless drill - (lathe) remanufacturing belaying pins etc. (rope maker) spin motor for making own rope Dremel, rotary mutli tool. for cutting, grinding, sanding and engraving in precision scale, also has work station aka drill press and a flexi extender shaft for precision work. Steam cleaner - great for plank bending. Misc PVA glue - good to dilute for easy removal later on placements of structural parts. Strong bond in a few hours. Gorilla glue - good to use on wet wood for strong bonding. Has 12 hour cure time. Vice grips - just because I have lots of small vice grips Bench Vice - suction mount, good for making precise adjustments to small material's. Magnifying glass with light mini laser level - AAA battery for quick easy levelling Digital Calipers - checking width's and thickness accurately (unfortunately they jump 5cm often) I'd go with non digital next time. Guillotine - trimming deck planks Plank cutter - for nice square ends to cuts
-
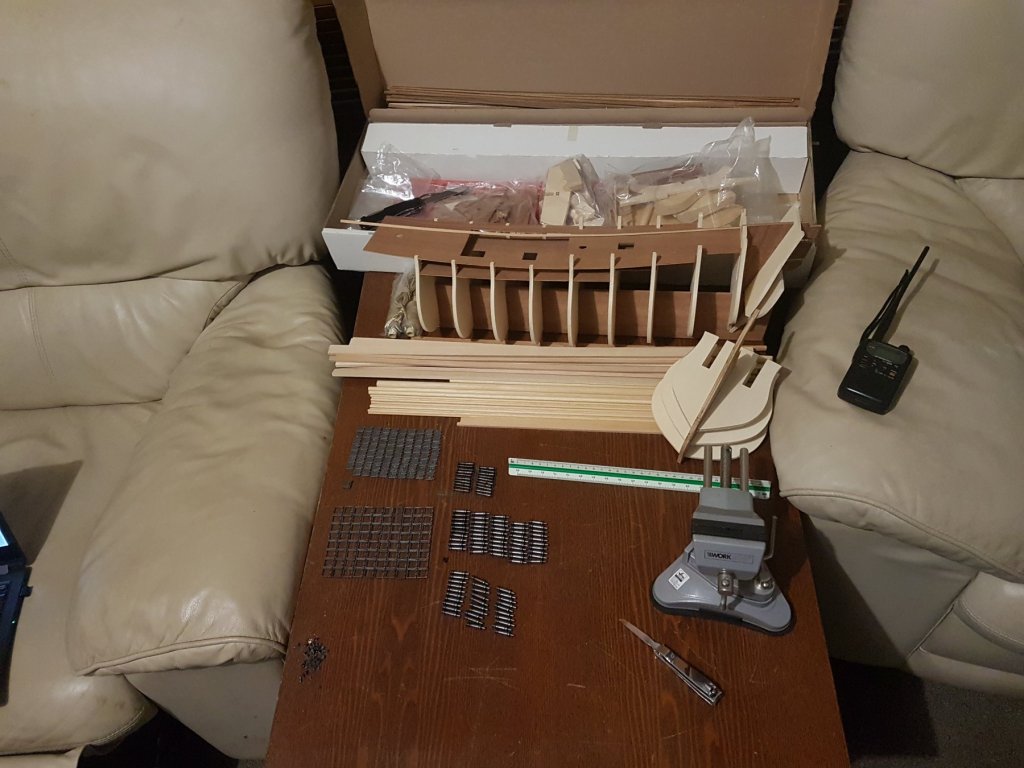
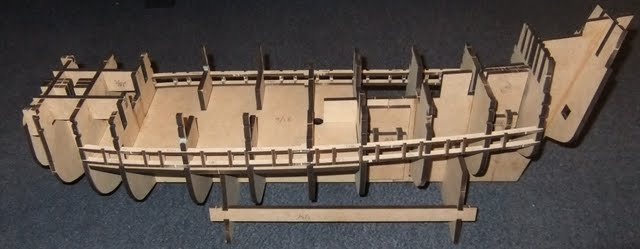
Out of the Box Opened the box and took a basic inventory, there are lots of brass ad wooden fittings. Everything looks good qua;ity, thread is woven like rope, cannons are metal with a burnished look to them and crafted tiny fittings are quite impressive. I couldn't just let the bulkheads sit in the plastic for any longer... so I liberated them and assembled the skeleton of the ship to get a feel for the size and how things fit together. Found some nail clippers with a file on them to file down edges of bulkheads and did a test it of the decks. Looking good and I think I have a handle on how things go together. Still waiting for tools to arrive so this time will be used on trying to work out the model and the best plan of attack for the hull planking and placement of hatches. I'm going to go through all the wood strips and sort everything out. Also checking the inventory parts by number and ticking them off as I go along making sure I have the right parts for the build. One thing I noticed is that the Corel model only has one type of cannon hatch.... Counted 102 cannons.
-
HMS Victory 1805 A R R I V E D :: V I A :: P O S T Today I received the post packed HMS Victory 1805 SM23 wooden kit by Corel. I opened the box with trepidation however was pleasantly suprised to see nothing broken at first check, everything in is the original packaging and unopened. The maps and disgrams are crisp and new, in short it's a like new kit I purchased for about 1/3 of the normal price with free postage !. My plan is to redesign my living room to accommodate a modelling and display area. I have tools still arriving via post and a lot of preparation to undertake as yet before I will begin this epic project. My next few posts will include various topics for quick easy reference which I shall add to as I go along. Out of the Box Pics of the bits and pieces straight out of the box. Tool kit Tools acquired throughout the build Model limitations Notes built up from research on limitations, scale errors and other stock issues with this particular build Build Modifications Planned changes to make model more to scale, or true to the original in design or visual appearance Tips Tips found to be most useful in the build will be referenced here Ship Wrights Journal A diary type of account of my progress complete with pics to highlight the journey.
-
Sure did Danny, and kudos to you my friend. That build is impressive and has given me an idea about what kind of tools to add to my wish list. The files for instance are interesting. Thanks for the heads up.
-
Hi Dan, good to see an Aussie nearby has built the HMS Victory 1805 by Corel Do you think adding something like this to the bulkhead's would help line up the cannon rows with the waterline when planking the hull ?
-
Wow thanks everyone, I feel like throwing a BBQ and having you all over for a steak Nice to see folks from all over posting here.
-
Hi Jan, thanks for the info, I really like the le Soleil Royal, it's probably the Tintin ship for me I read the info on Wikipedia about the 1776 HMS Unicorn that was captured by the French and rebranded the La Licorne until it was recaptured back by the english and returned to HMS Unicorn. However I haven't really researched the subject further. Maybe we could start a new thread about the HMS Unicorn 1776 or La Licorne and discuss it further
-
During the Renaissance, the Italians would paint over a base layer or fresco layer in paintings... not sure about ships though
-
I wonder if anyone will flog the scientists for getting it wrong, or whomever decided to go ahead with that 'pink' colour scheme Nelson would be turning over in his grave I can imagine to see that mistake immortalized and encouraged with ship modelers for years to come.
-
Morgan, your write up is very informative and interesting As an artist myself to get a pure yellow color it is common practice to put a base coat of white with a layer of yellow over the top. I'm wondering if this was done to freshen up the Victory instead of just painting a mixed yellow and white over the top. If the base material is not a uniform color / shade then that can create the effects of color variance of colors painted over it. On a large surface this would be more apparent, so it makes me think that a baselayer of white may have been used and then yellow over the top... meaning the final color would be pure yellow. This color may have been what Nelson had an issue with, and as there was yellow and white paint available I'm sure that some mixing would inevitable to experiment with different yellow paint options as you have mentioned, If more new coats were applied more often then perhaps the need to paint a white base coat was not needed as the color was still quite 'clean' underneath. This means that if the navy supplied paint had yellow and white available in the quantities mentioned then the mixing of those paints would be quite likely. Pure yellow aged in the sun would indeed pale over time and to match this when repainting, a yellow / white mix may attempted to match the aged yellow color. A new yellow color would be quite alot brighter and if there were many ships in a fleet painted at different times then I can see Nelson's issue and request for a pale yellow color to be used as standard. Of course this is just my 2 cents as an artist who works with oils in large pure abstract type colors. (ie large blocks of pure colors)
-
Thanks EJ You know another ship I'd like to build is the HMS Unicorn from TinTin... The HMS Unicorn by Corel looks nothing like this... it only has 1 row of cannons and a smaller hull. If I purchased the HMS Unicorn by Corel, I think I'd use the bulkheads off the HMS Victory to modify the hull and add to the build for the cabins at the bow of the ship. I like Tintin, and I would probably display the ship with Tintin imagery.
.thumb.jpg.ea8fe899a7417e4c72d6df94b7d638ba.jpg)


.jpg.bdd78453108d563273a166d14059dd00.jpg)