


rhephner
-
Posts
72 -
Joined
-
Last visited
Content Type
Profiles
Forums
Gallery
Events
Everything posted by rhephner
-

Where is the deck?
rhephner replied to rhephner's topic in CAD and 3D Modelling/Drafting Plans with Software
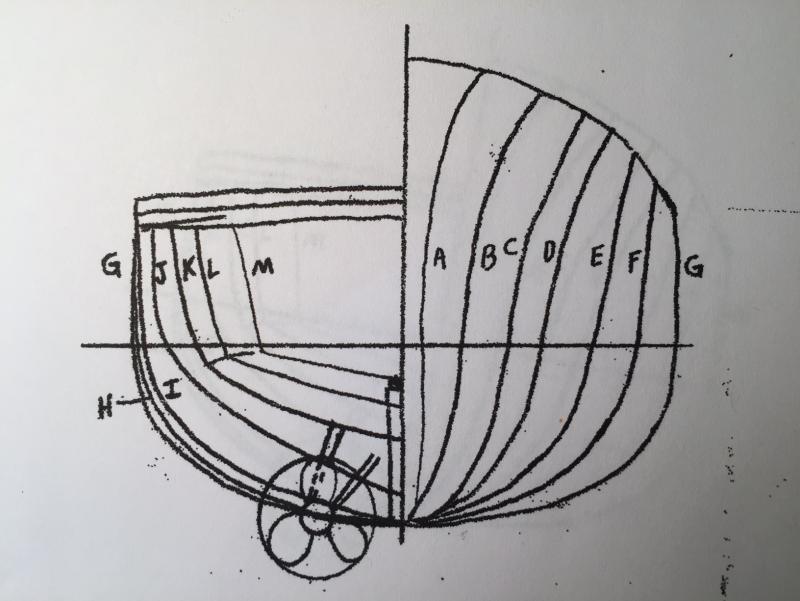
Wow. Thank you so much for the pictures. That must have been quite an experience to serve onboard a Fletcher. From the pictures it's clear what you mean about it be a flush deck. It also appears that there is very little camber to the deck. Certainly not as much as indicated. As Jbshan has indicated it would appear there are some lines missing. I thinks what I'll do is match the height of the frames up to the sheer plan and go from there. Thanks! -
Hi, I'm starting to work on a scratch build of a Fletcher class destroyer. The attached plan from Strike Models is what I'm working from. I'm having a little trouble interpreting the the build plan. Mainly the difference in the deck line between the left and right. If I cut each frame according to this diagram, won't the deck be really steep in the front? For example, frame G on the right has a much higher deck than frame G on left. Is this really the deck? Thanks. Rich
-
Those are some fantastic chains. Did you solder them to stay closed, or was the bend itself enough to hold them tight? Did you use a jig? Nice work! I wish mine looked half as good. Rich
-
I just got it last week, so it took approximately 3 months. Hearing that they're moving now put all the pieces in place for me. I called them several times and sent a couple of emails. I was probably a little over anxious to get my cannon. Each time they told me, "probably next week," or "probably in a couple of weeks." The reason given was related to the lack of availability of equipment. I wish they had just told me up front that it could be a while. Honestly though, great quality product and even the best outfits have supply and customer service hiccups every once in a while. I'd buy from them again . . . just maybe not backorder. : )
-
Anybody know what the average time is that it takes Model Expo to fill a backorder? Their site says 15 to 30 days, but I'm past that and no package yet. This reminds me of order things with box tops when I was a kid and checking the mailbox every day to see if it came. While I'm enjoying the anticipation, I'm really itching to get started. Thanks. Rich
-
Dang it. I was afraid of that. Thanks.
-
Anyone know when/if Shipwright 2014 and 2015 will be out?
-
To follow up, I went back and looked at the Amazon reviews for the iron I bought. There were several that complained it would not heat up after being used for a short period of time. It's also a 25W iron. I think I'll buy a 60W iron and try that. Thanks for the help.
-
I did replace the tips, but no luck. It may very well be the iron, but I hate to think so since it's fairly new. That's what I get for going cheap though. Any recommendations on a good iron?
-
I'm a major rookie at soldering and am running into trouble. I'm soldering wire into chains for dead eyes. I'm using rosin core solder and a ten dollar soldering iron. The first few chains went as expected, but now I'm having trouble. The solder won't melt as expected. I heat the wire with the iron, hold the iron to the wire and touch the solder to the iron. It takes several minutes before the solder melts. I thought the tip needed cleaning, but I did that and the results were about the same. I even bought new tips and still couldn't get it to melt. I get that the feeling I'm missing something fundamental. Can anyone help? Rich
-
Cutting/Sanding Brass?
rhephner replied to esion's topic in Metal Work, Soldering and Metal Fittings
Wow. Thanks All. This gives me some great leads. I have a jeweler's saw, so I'll start there and see where it takes me. I appreciate the comments. This is an attempt to kick my modeling up to the next level by making my own metal parts. It's all a prelude to where I hope to be in a few years, scratch building warships. Rich -
Cutting/Sanding Brass?
rhephner replied to esion's topic in Metal Work, Soldering and Metal Fittings
Forgive me for resurrecting this topic, but esion and I seem like we're working on the same project at the same level. I started playing with brass last night to make rudder hinges and gunport hinges and had a heck of a time cutting the brass in thin stips about 1mm wide. I eventually was able to do it running a #11 exacto blade over and over the .25mm brass sheet and then bending, but the result came out a little banged up. I also tried wire cutters, but it's difficult to tell where I'm cutting with something that small. Is there a better way? Am I missing something, or is this one of those things you just have to use brute force for? Rich -
It's no so much that I'm unhappy with it, as I'd like to preserve it. It gets dirty pretty easy and I'm worried that without some kind of protection, the paint will fade, crack and just generally look "unfinished" if that makes any sense. Thanks for the suggestions. I a flat or satin wipeon poly seems like a good idea. Rich
-
I'm working on the model shipways Rattlesnake and am starting to second guess my painting choices. I used acrylic paint purchased from Model Expo and have not applied any finish. The more I look at it (and the dirtier it gets) the more it looks like it's lacking something. The question is, should I apply a finish of some kind? I'm reluctant to do that for fear of making it look too shiny. What do most folks do? Semi-gloss? Thanks. Rich
-
Scott, I've been working on this kit for about 4 years now. No, it isn't that beautiful, I am just that slow. I couple of lessons learned I can share. 1. I did bend the transom, but replaced the britannia metal decorcations with modeling clay. Basically, I used the metal decoration to create a mold out of Sculpey, baked the mold to get it really hard and then filled it in with more Sculpey, baked that and separated the two pieces. This allowed me to get a much better fit on the transom. See http://www.shipmodelsocietyofnewjersey.org/resources/Downloads_page/sculpeydoc.pdf. There's another article that was in Ships in Scale and posted on this site, but I can't find it right now. In fact I used Sculpey all over it for added pizzaz. The plans show this kind of detail, but it's missing from the instructions. Chuck Pessaro totally inspired me. 2. I would save the little inset pieces for the bulkheads and make knees out of them to hold up deck beams that are part of the bulkhead piece. I didn't do this and probably had to glue each beam a half a dozen times. I think in the end, I just gave up and created new deck beams. If I had to do it over, I'd support them better from the get go. Good luck. You'll probably be done before I am. : ) Rich
- 264 replies
-
- 1
-

-
- rattlesnake
- model shipways
- (and 1 more)
-
Thanks for the tip on boxwood. I'll look into it and maybe give another go at the Triton cross section. Meanwhile, I'll continue to follow your build log for inspiration. Rich
-
Beautiful work. I wish I could get mine to look like that. In that vein, I have a couple of questions for you. I still consider myself to be pretty much a rookie at ship building and have not yet had much experience with scratch building. A couple of years ago I did cut a couple of frames from this Triton cross-section though. Mine did not look nearly so clean and did not come out quite so accurate and I ended up giving up. How much of a difference do you think using boxwood over a cheaper more readily available wood like basswood makes? From your log, it looks like you cut out each frame piece and then assembled them using the plans as a guide. Is that correct? I've seen other builds where the frames were assembled with "rough" blocks of wood and then cut to shape as a whole rather than in pieces. This is the method I tried, but mine were off by as much as 1/4" when complete. Was it easier to correct for errors when cutting each piece and then assembling? Just curious. You make it look easy. Thanks. Rich
