HOLIDAY DONATION DRIVE - SUPPORT MSW - DO YOUR PART TO KEEP THIS GREAT FORUM GOING! (Only 20 donations so far - C'mon guys!)
×

LucienL
-
Posts
122 -
Joined
-
Last visited
Content Type
Profiles
Forums
Gallery
Events
Everything posted by LucienL
-
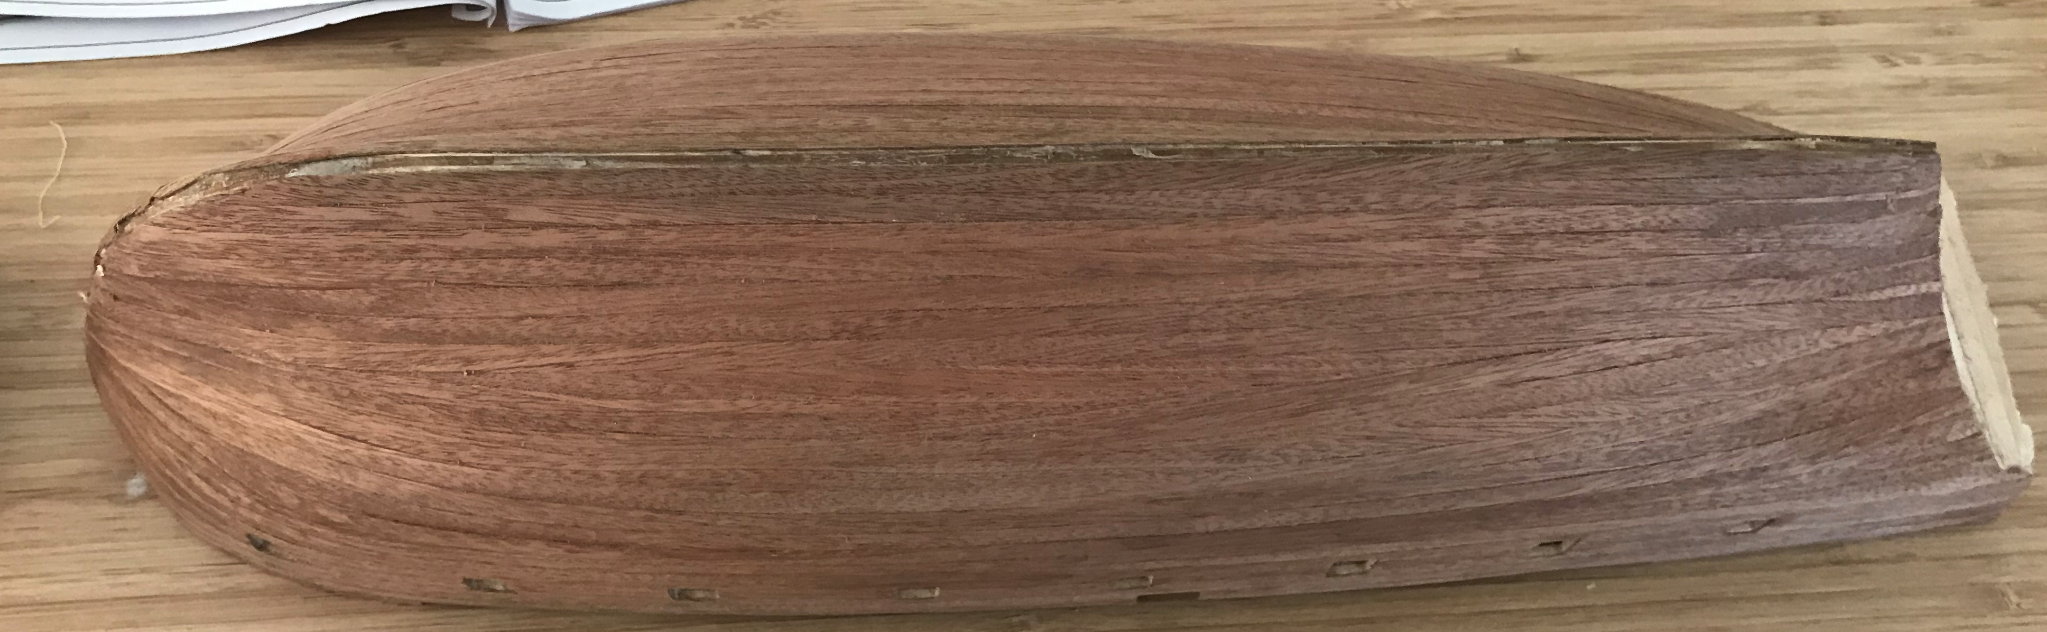
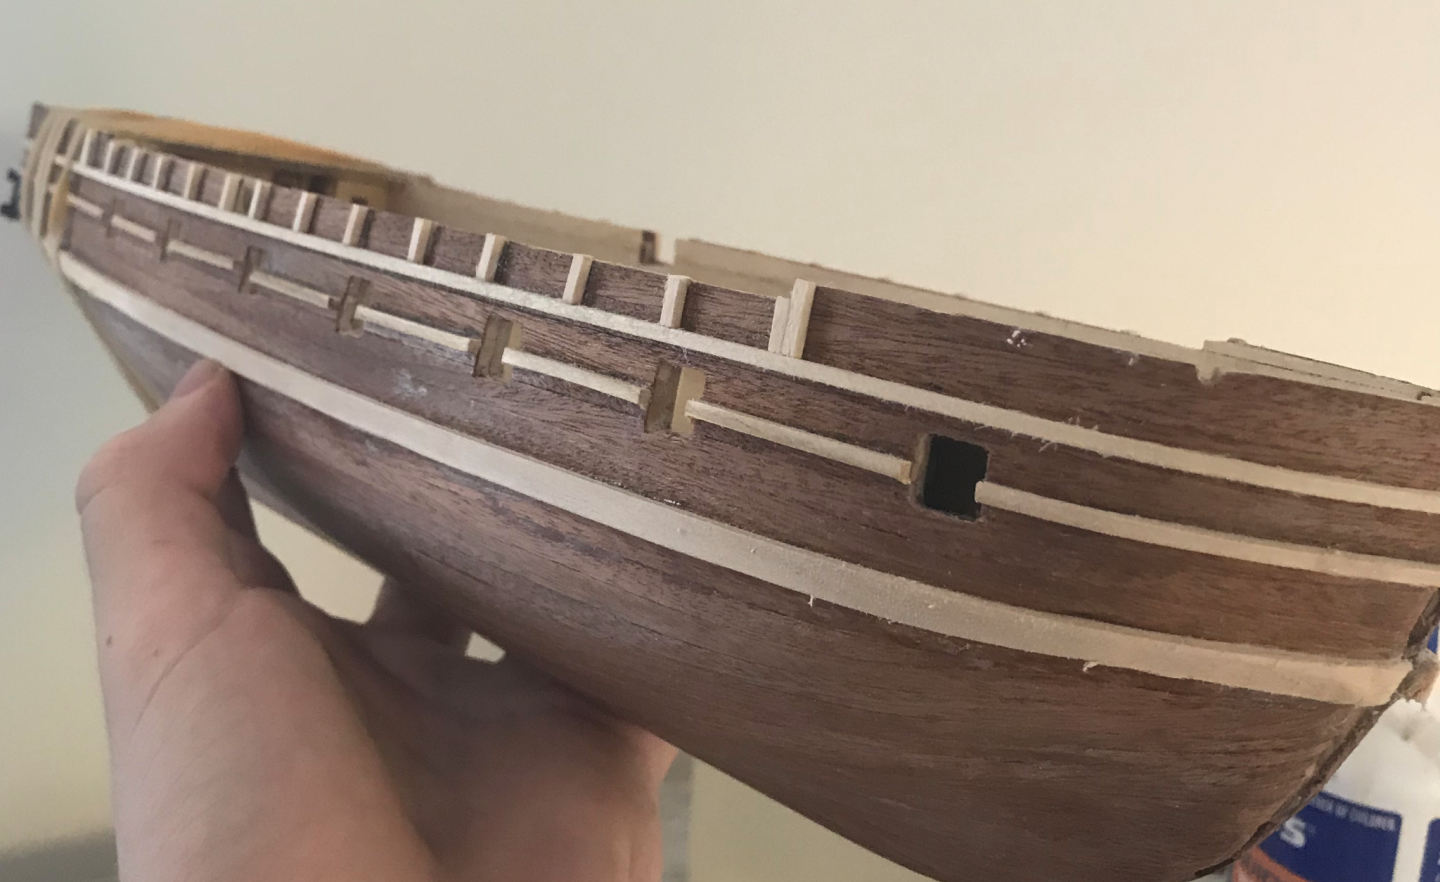
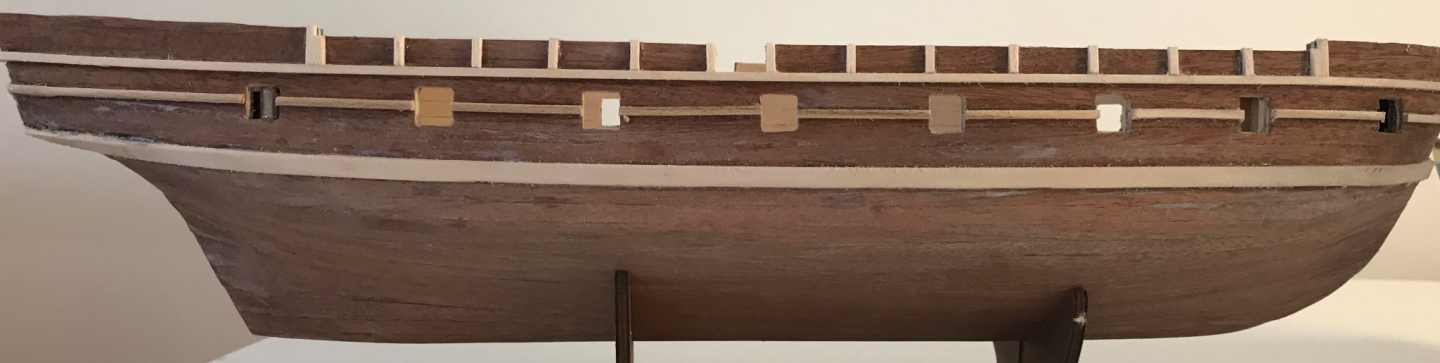
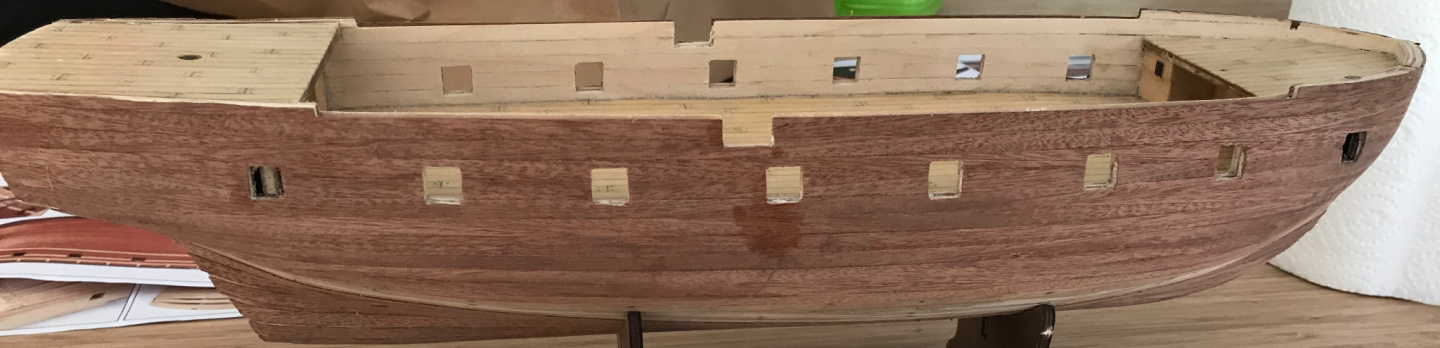
 The rubbing strakes went on with no dramas, but there is a small issue with the kit here. There shouldn’t be a third rubbing strake at the water line. According to the anatomy of the ship and most other sources I can find, there should be a thicker wale around here. I had some trouble getting the scale right, but a 7mm plank looks about right. At first, I tried to do 2 5mm planks to do the wales, but this was way too thick and looked wrong and one of them had to be removed. I used CA glue, which I regret now, and it was a bit messy. Some of the planking came up but could be glued back down. I remember being very frustrated at the time but it would all be painted and the actual damage was very minor. The hammock rail reinforcements were fun though, just a bit of work to get them to line up and be spaced properly. After looking at this for a while, I came to the realisation that the wales were too thin and the spacing between the bottom of the gunports and the wales was too wide. I then added a 2 mm strip just above it and that looked pretty much bang on Also, I did the anchor wales, which was tricky to get the same on each side. What I ended up doing is shaping the pieces off the boat and then lining them up to get them to look right. Then I just used one side as a template for the other to get them to look exactly the same.
-
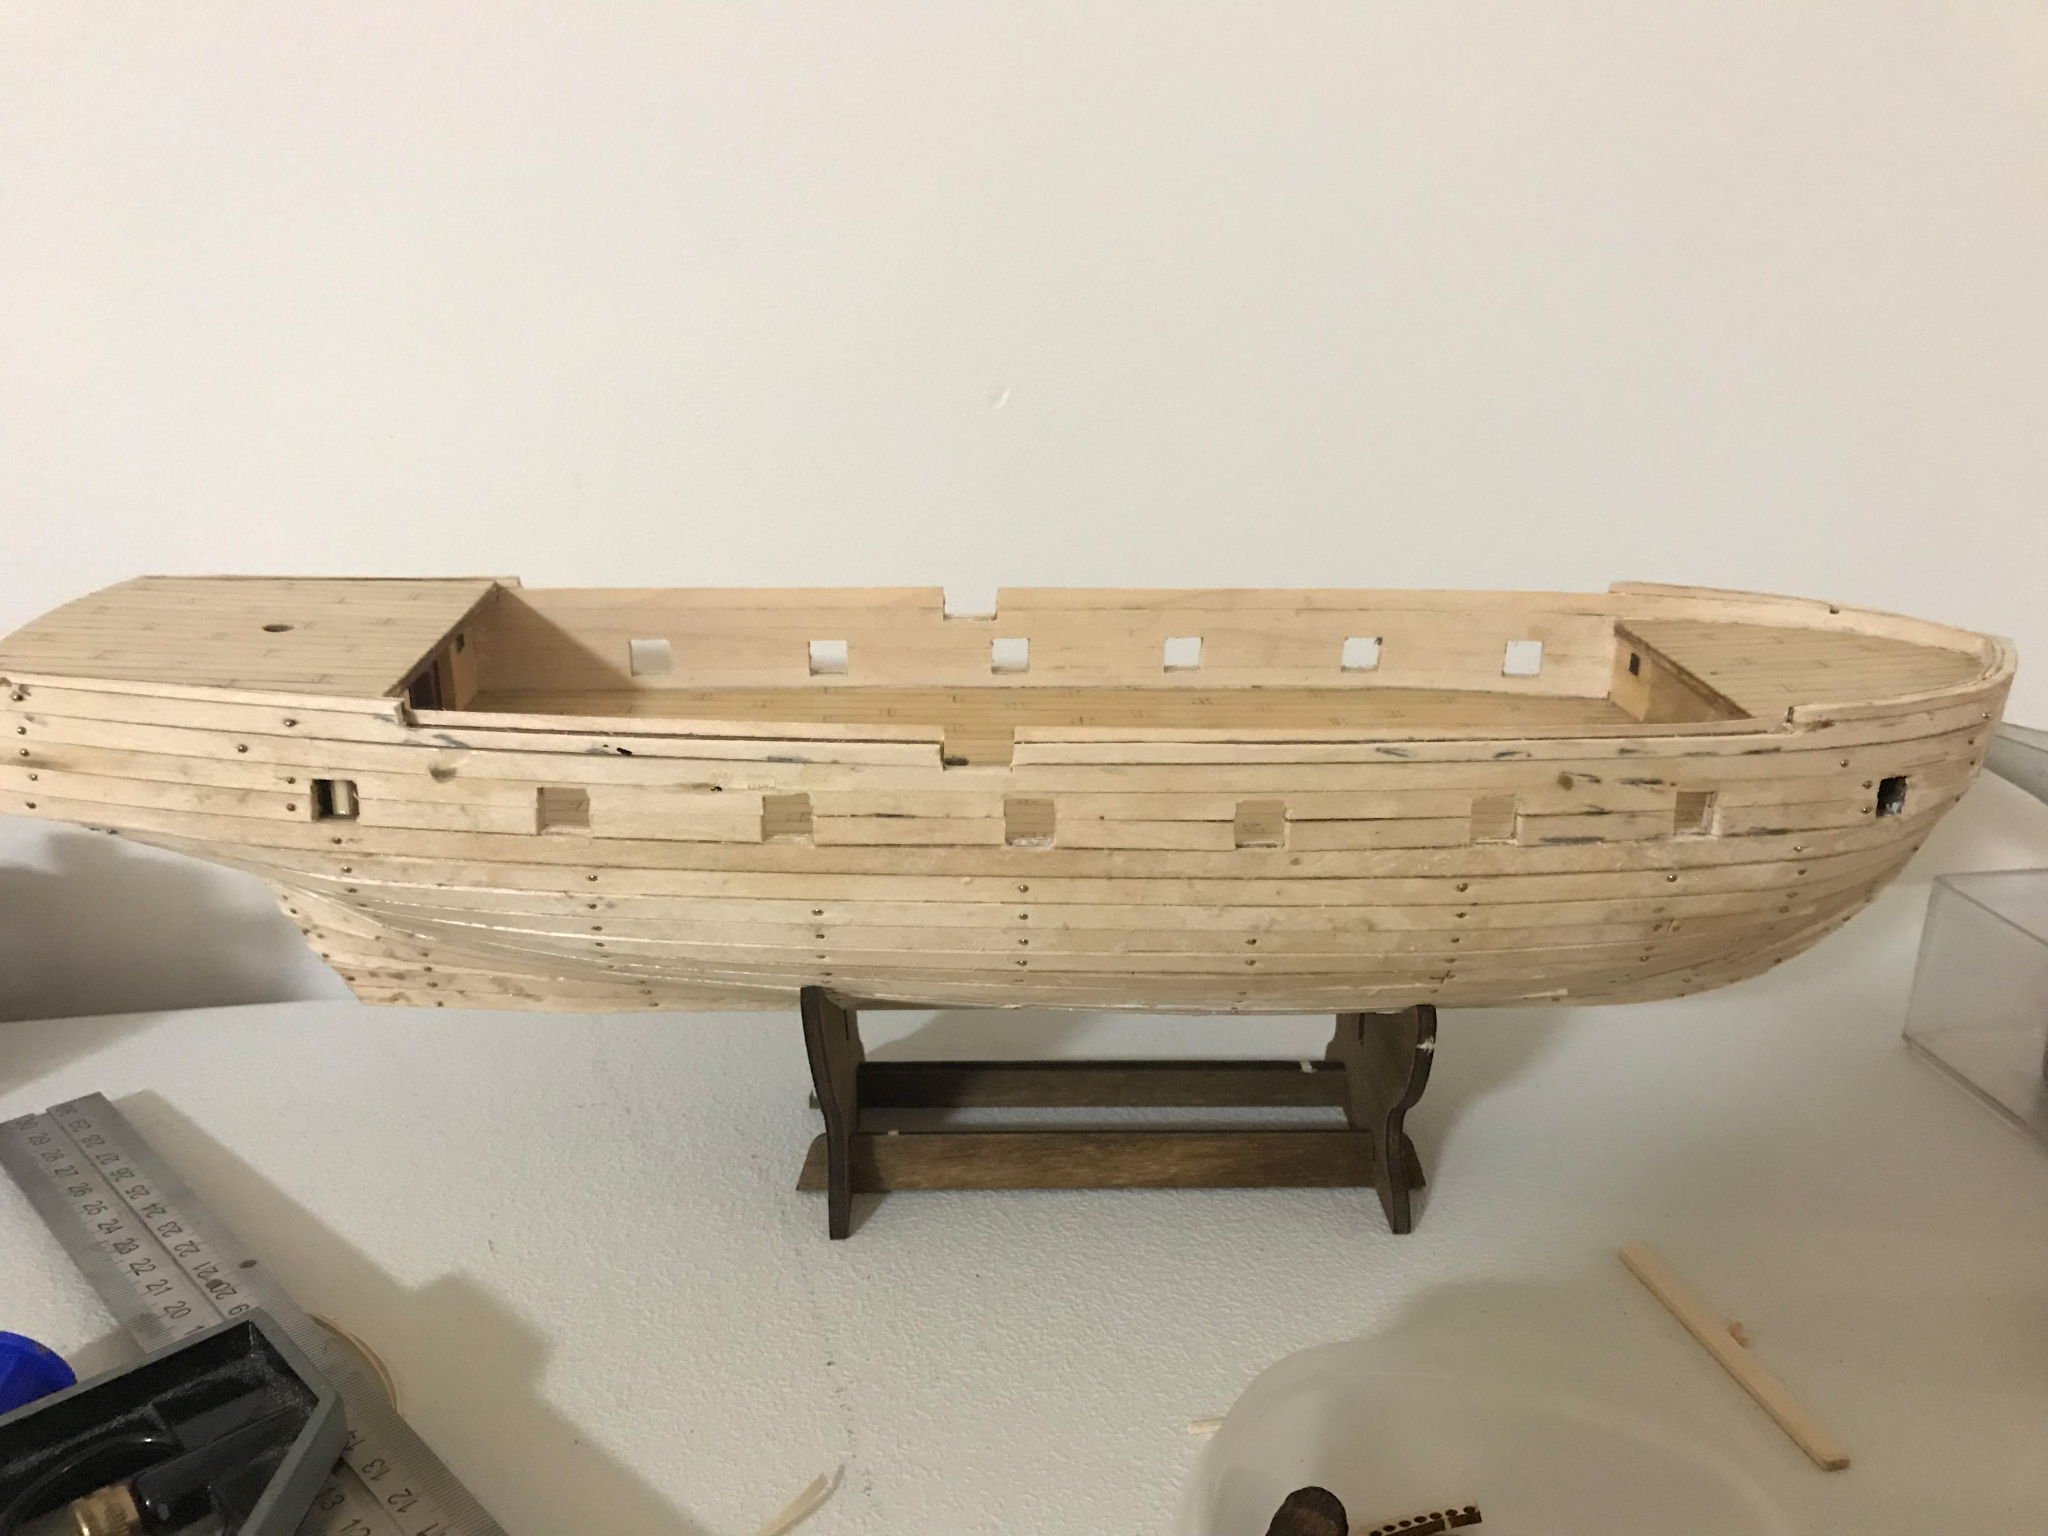
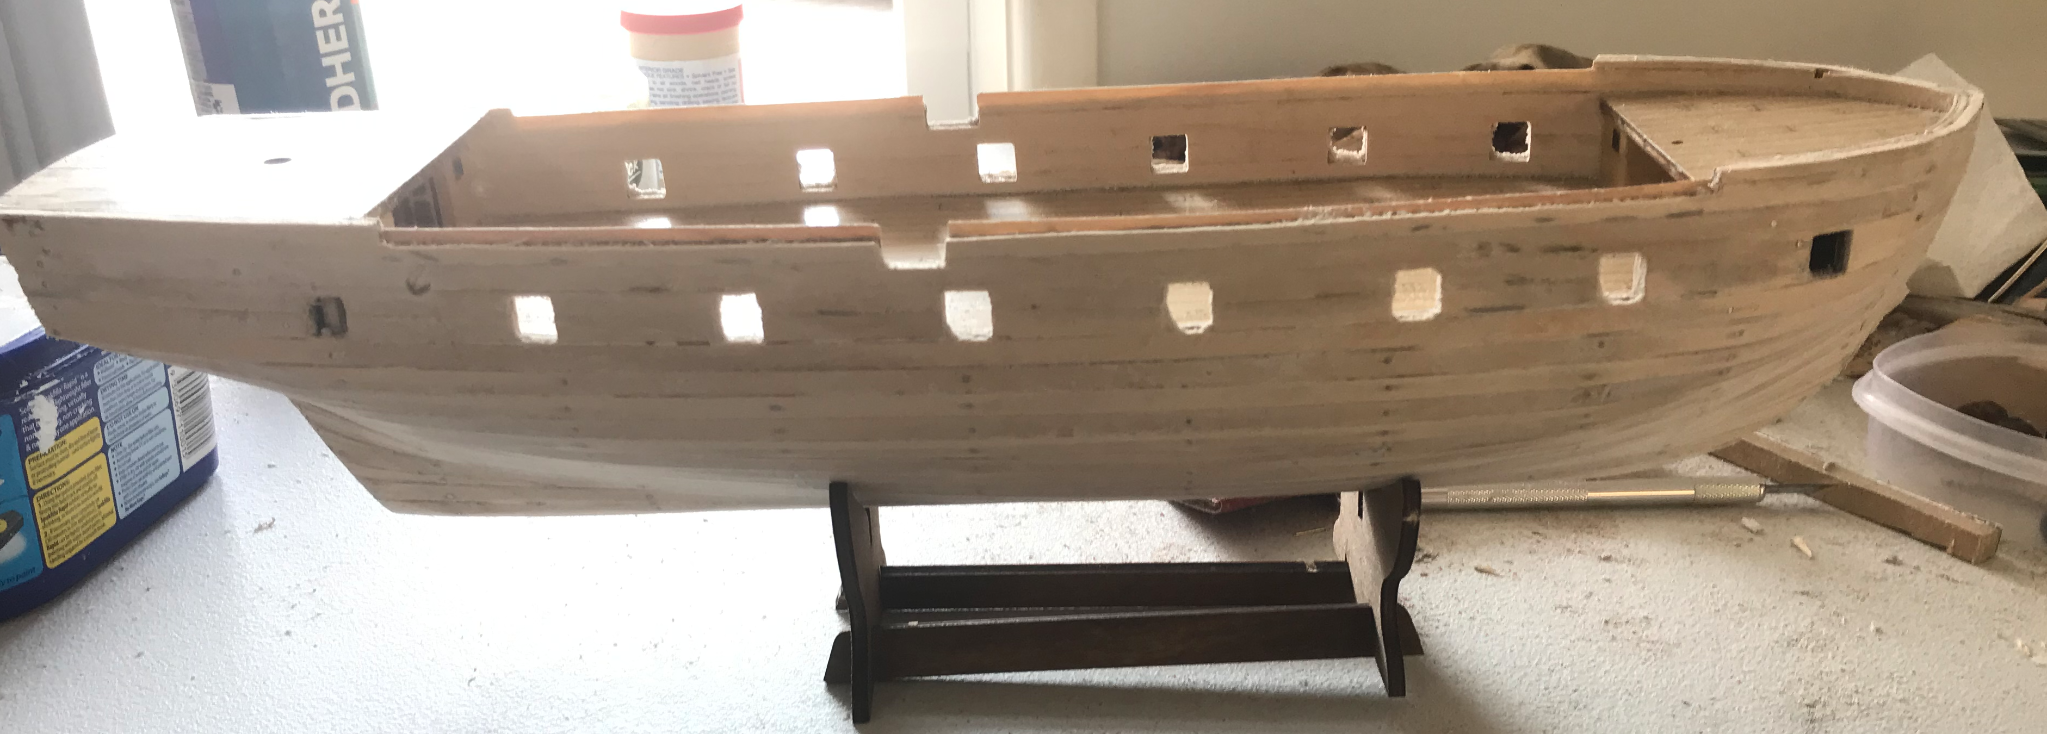
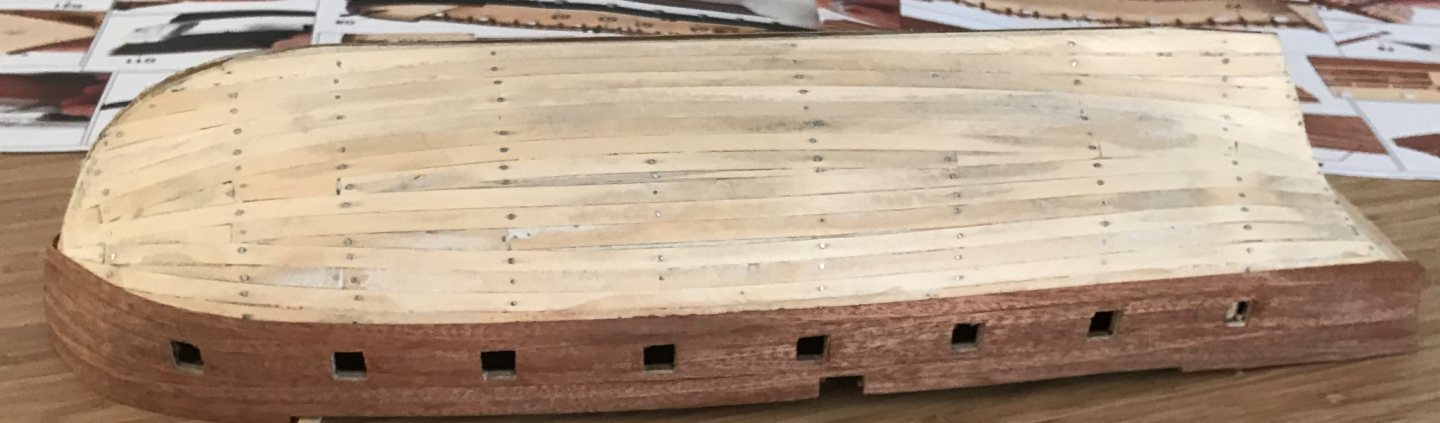
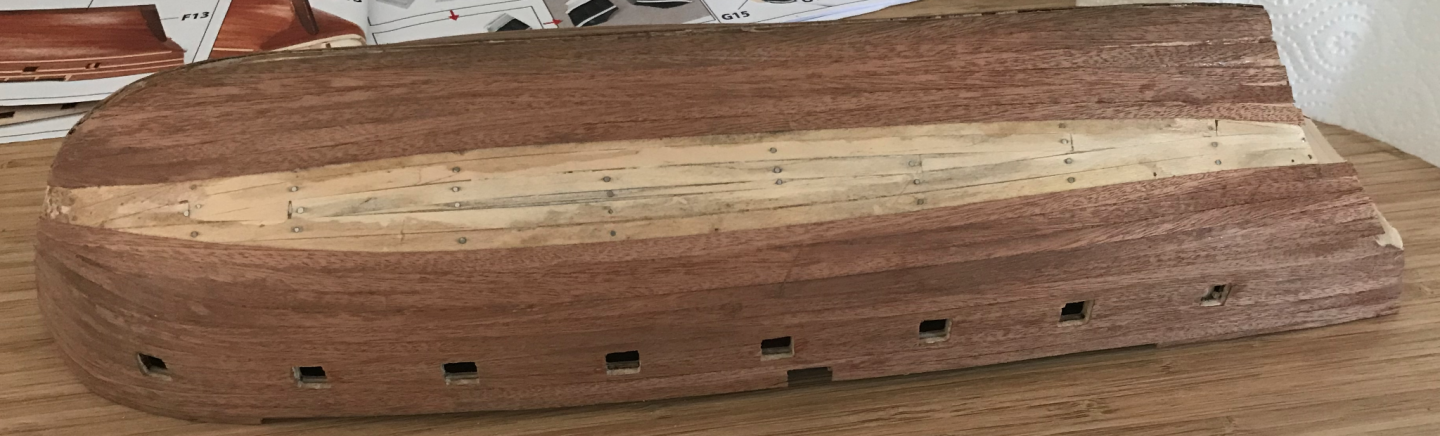
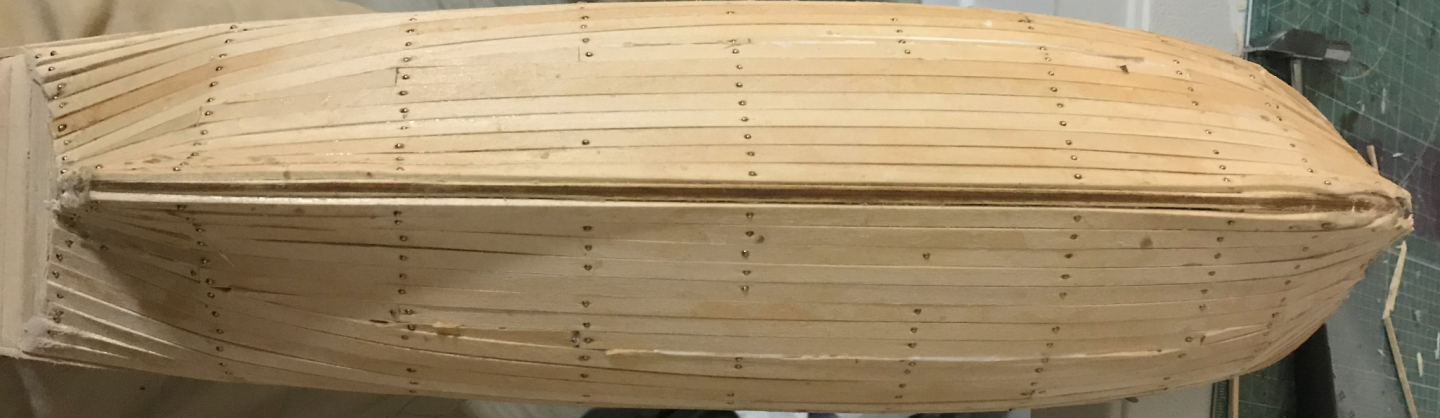
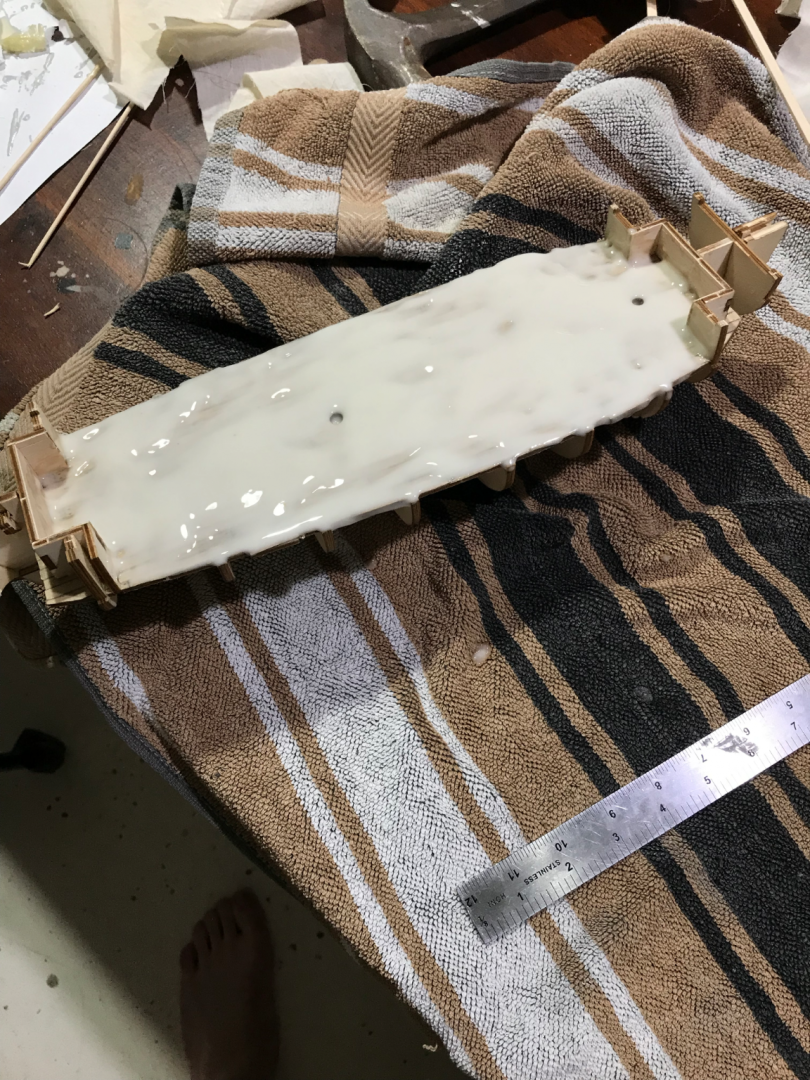
The planking in this kit is a little out of scale. This is also a problem with the deck, but I can live with this. As the entire hull of the ship will be either painted or coppered, there was a little less stress with the planking this time around. I’m really happy with how it turned out, but it is a shame that none of it will be visible in the final boat. I used contact glue and just took it slow with a healthy amount of sanding. It's also really good to have a screwdriver with a plastic handle or something similar to run over the planks. That will really get them to lie flat and fit snugly. The raised hammock rails were a little delicate being made up of only a thin strip of wood, so I had to be careful with that. I have a lot of photos from the planking, so I think I’ll just post those and let them tell the story now. Also, just an important note; if you are going to do coppering, the hull has to be extremely smooth, any bumps or raised planks will show through on the copper.


-
Hi Eric, I've actually come across your photos of the beagle replica before. Thank you, they have been a huge help, it gives a pretty good idea of the colours and shape of the boat, even if there are a few potential inaccuracies. You'd be surprised, it doesn't take much to do the coppering. I did mine with thin copper tape from an electronics store (Jaycar in Australia) and a sharp knife. Ageing it was a little more tricky, but still doesn't require much. It is a lot more work though and I was really conflicted on it. I do like the natural wood, so I completely get that.
-
Hey Maliba, there's a lot more to building a real ship. I'm really enjoying being able to go into the history of this little boat. The beagle is definitely a very relaxing and satisfying build!
-
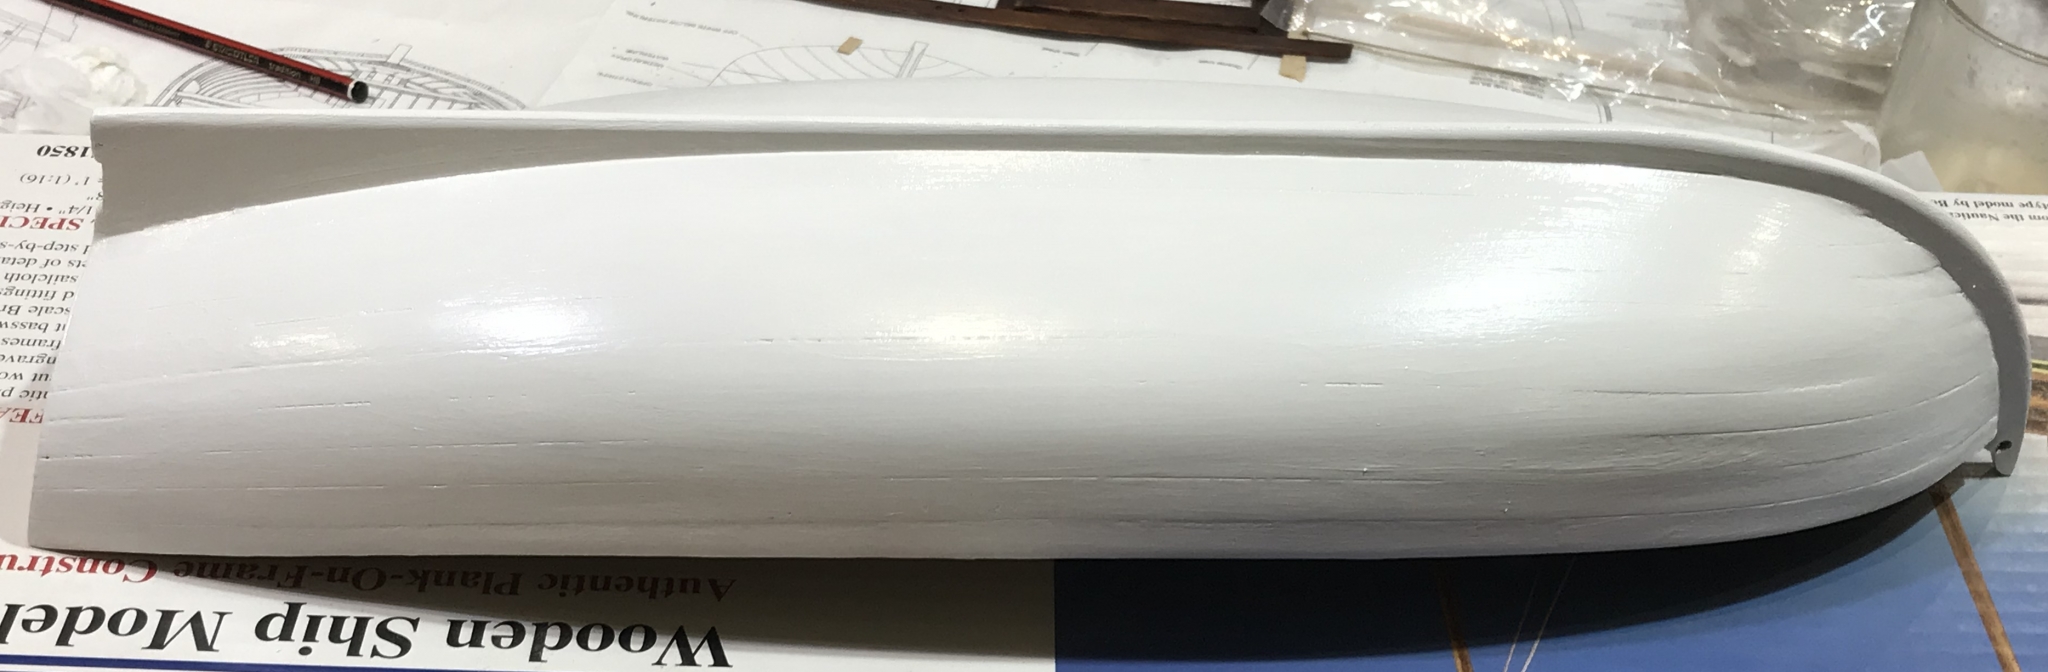
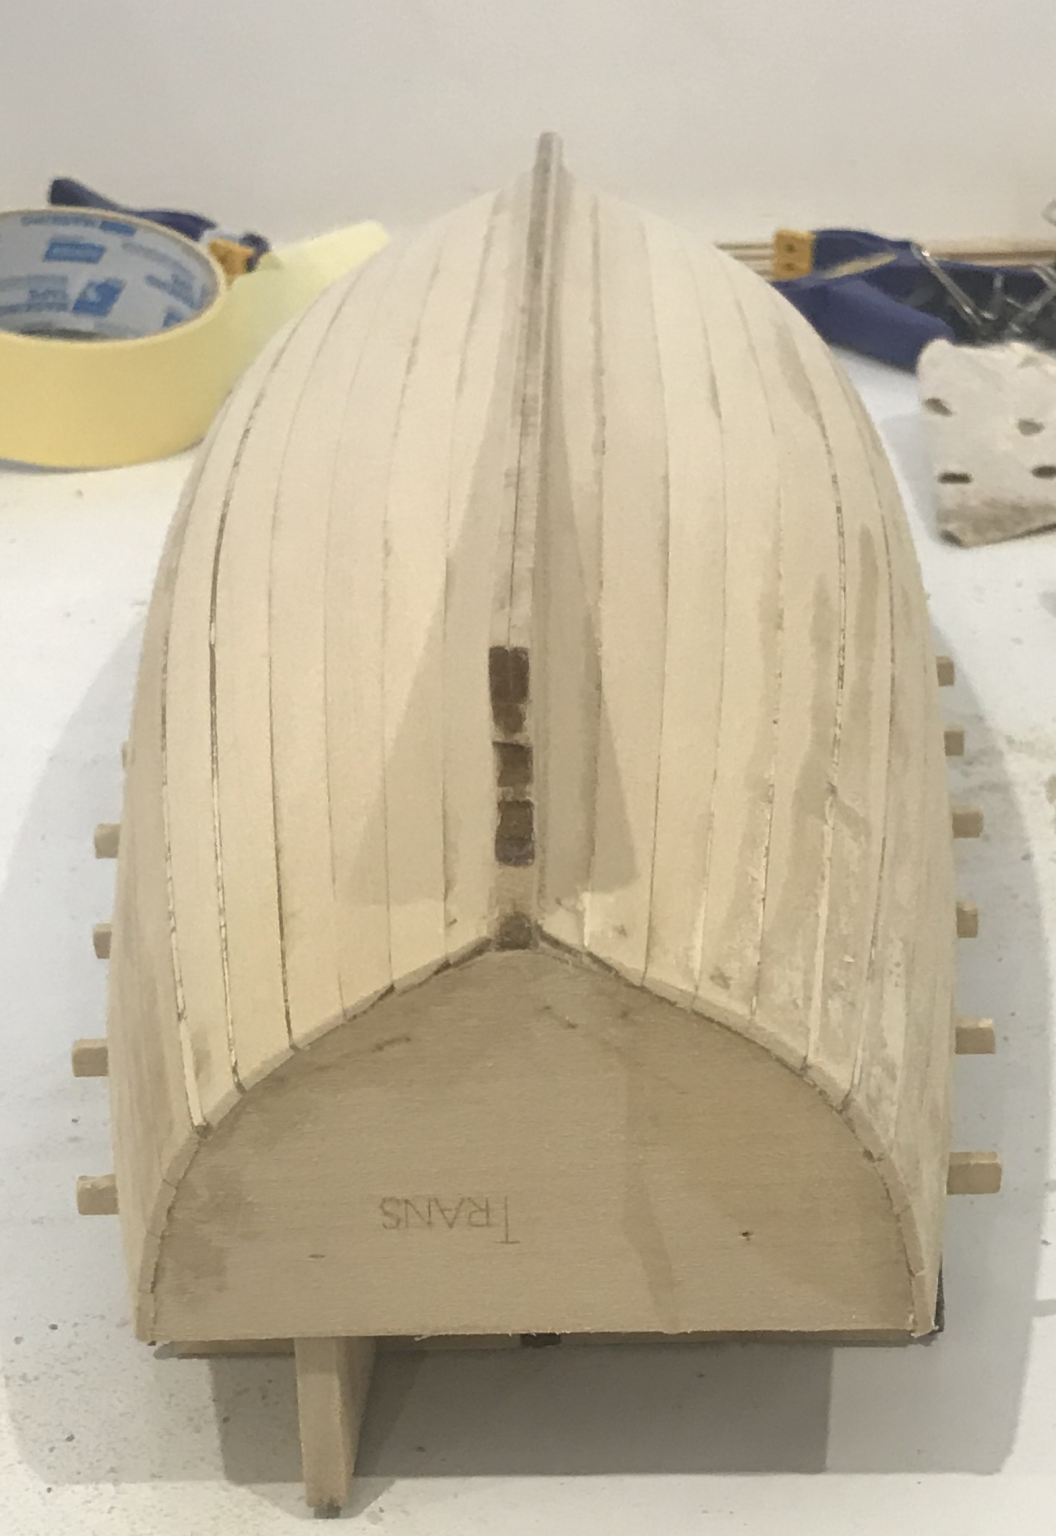
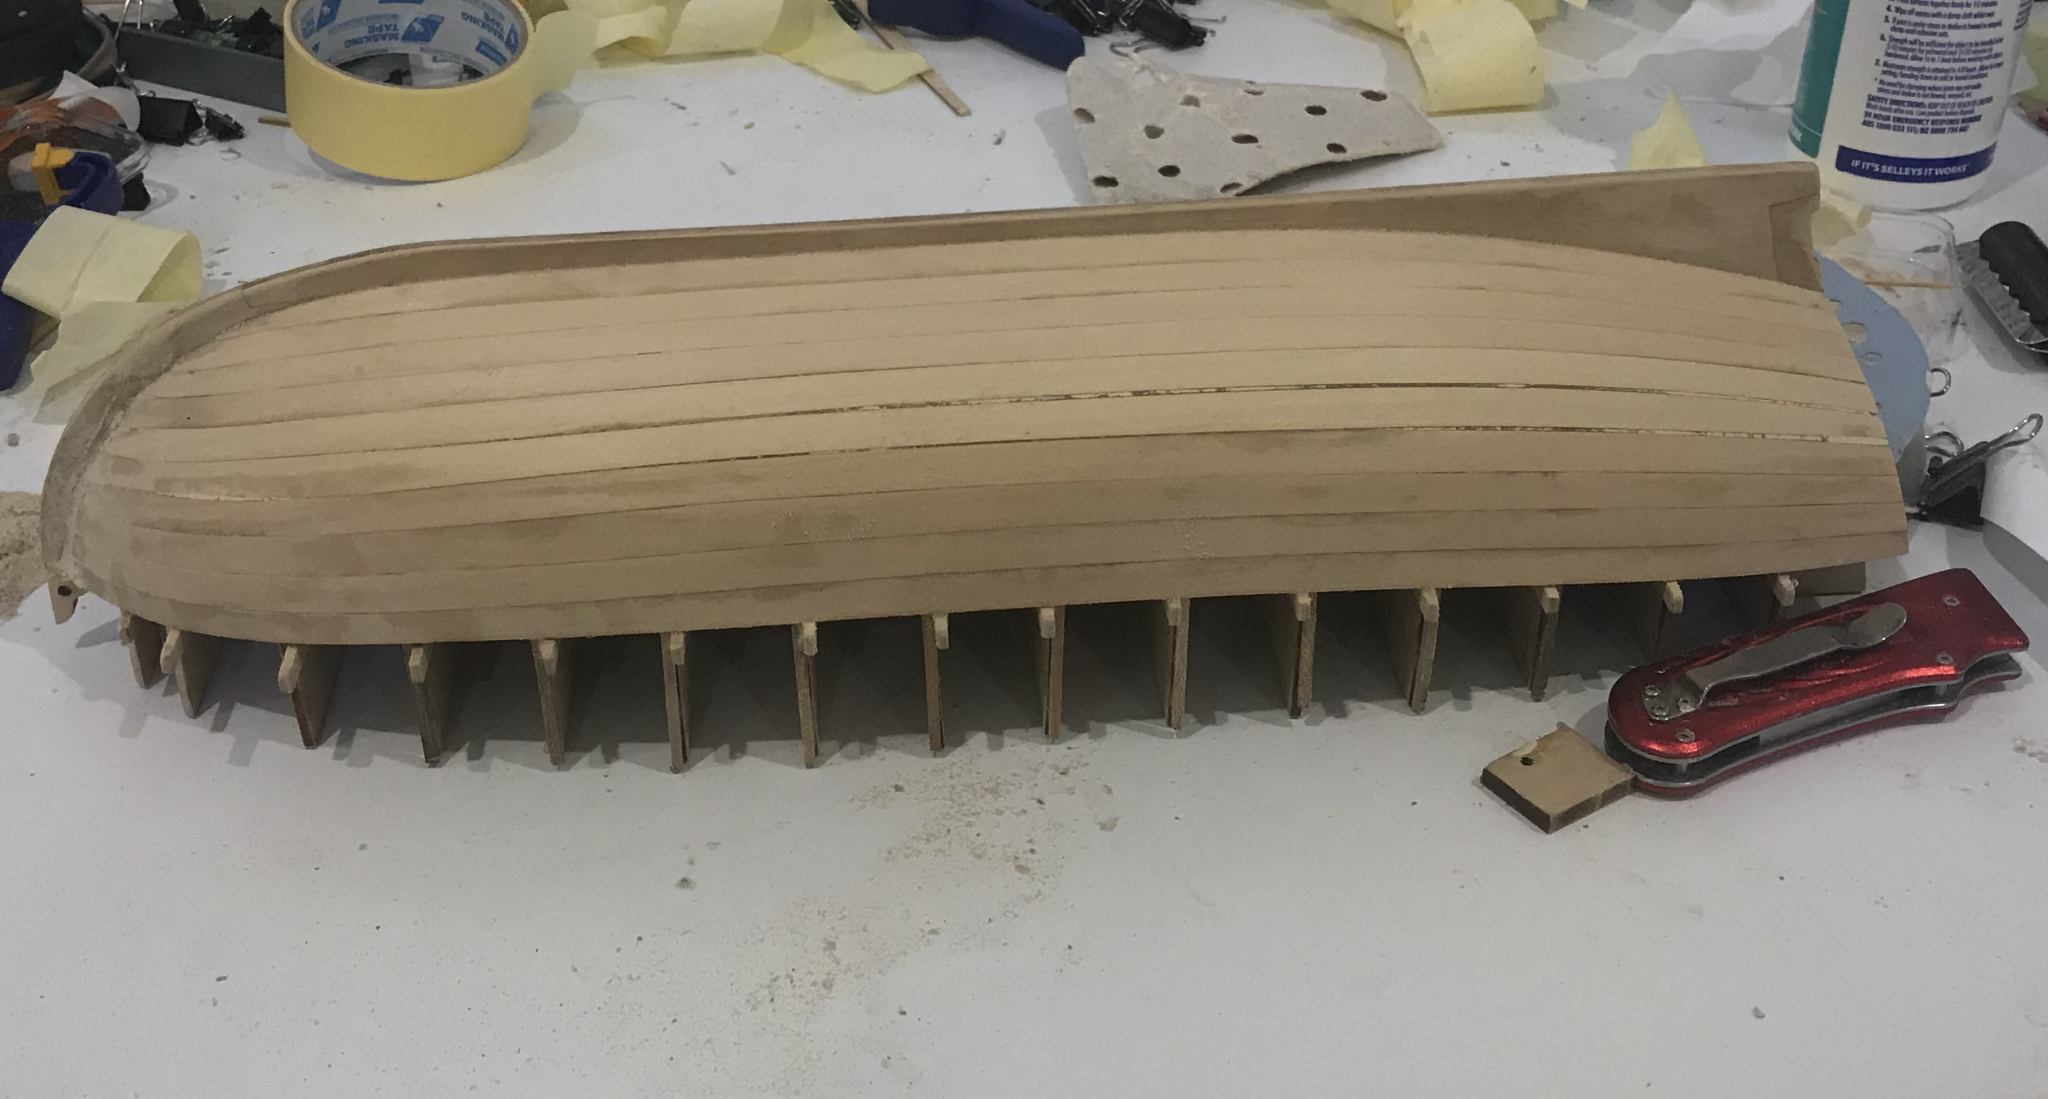
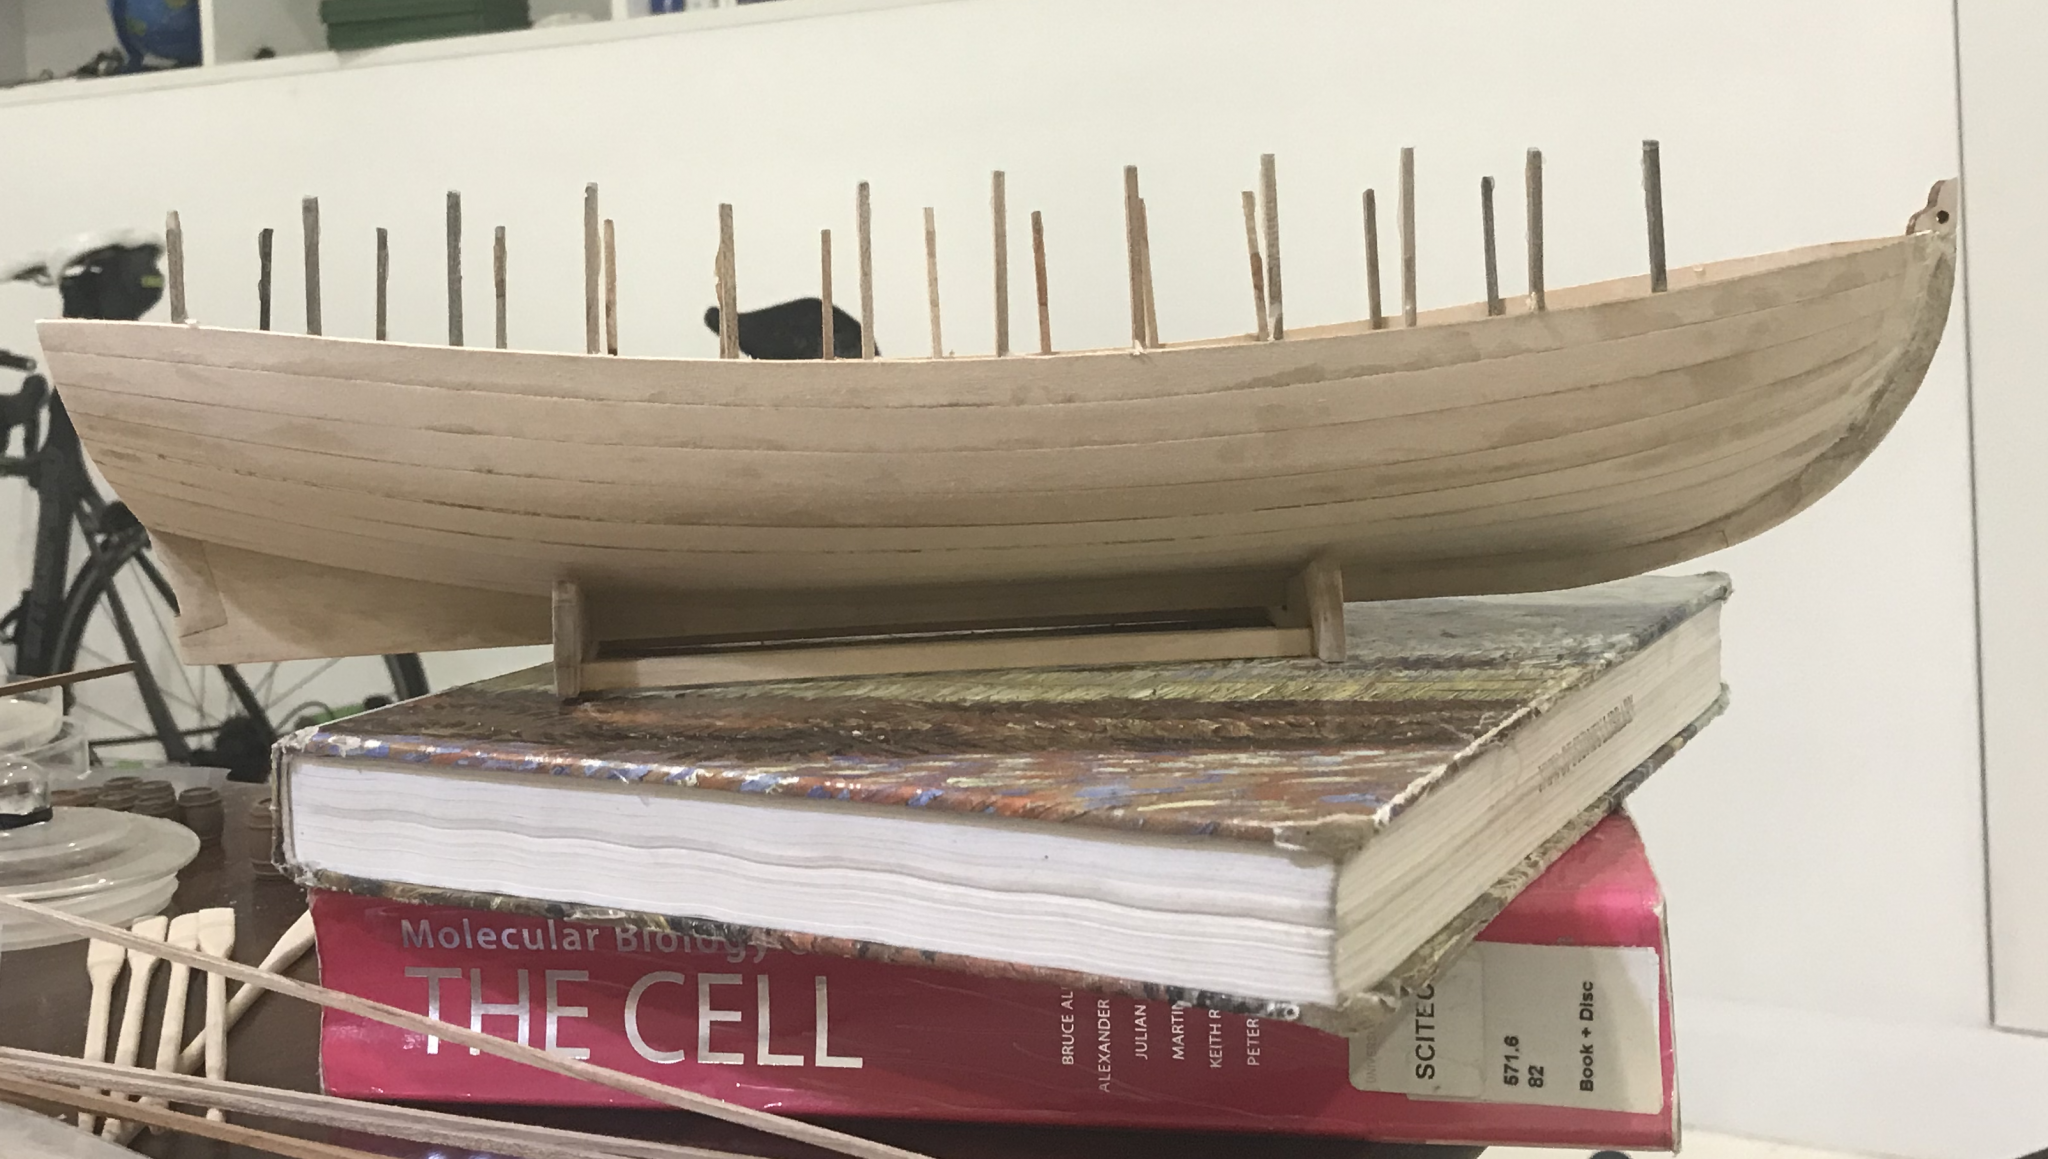
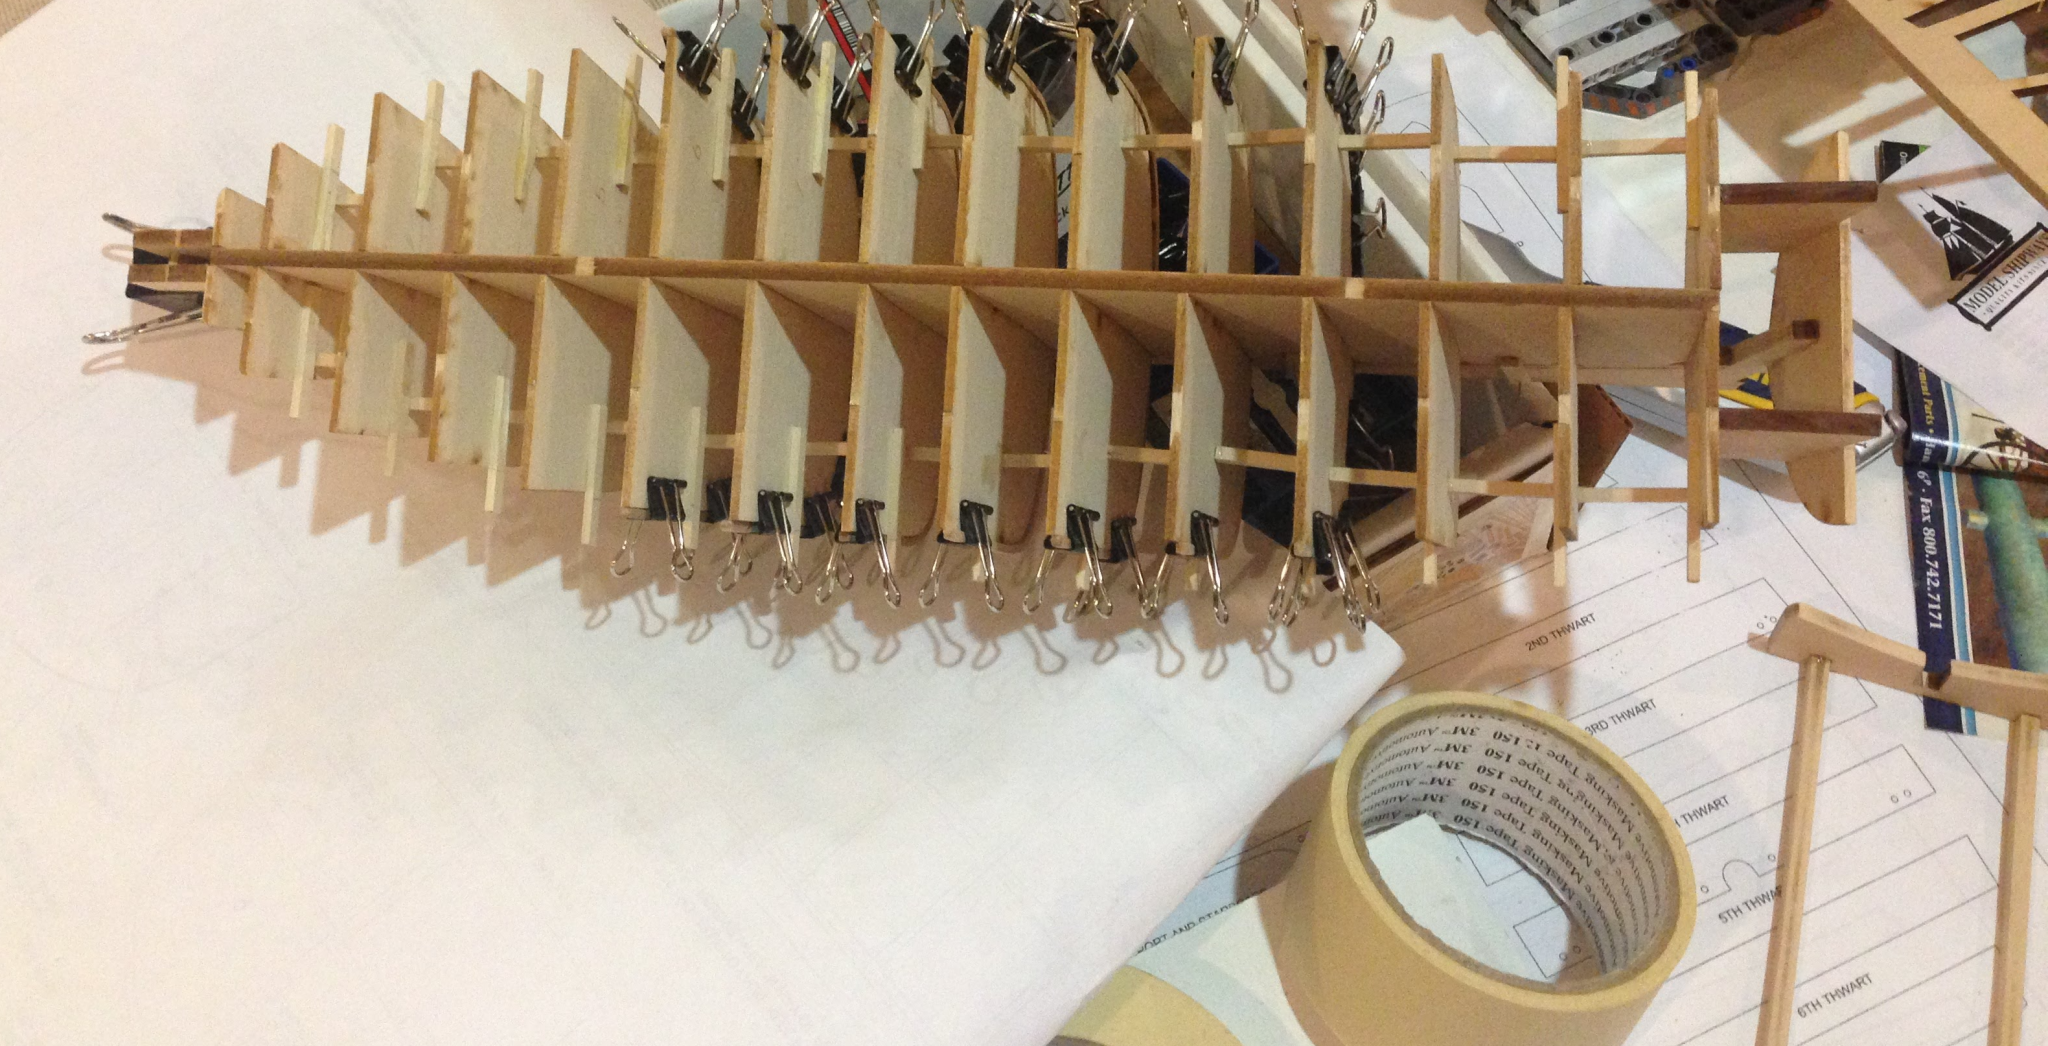
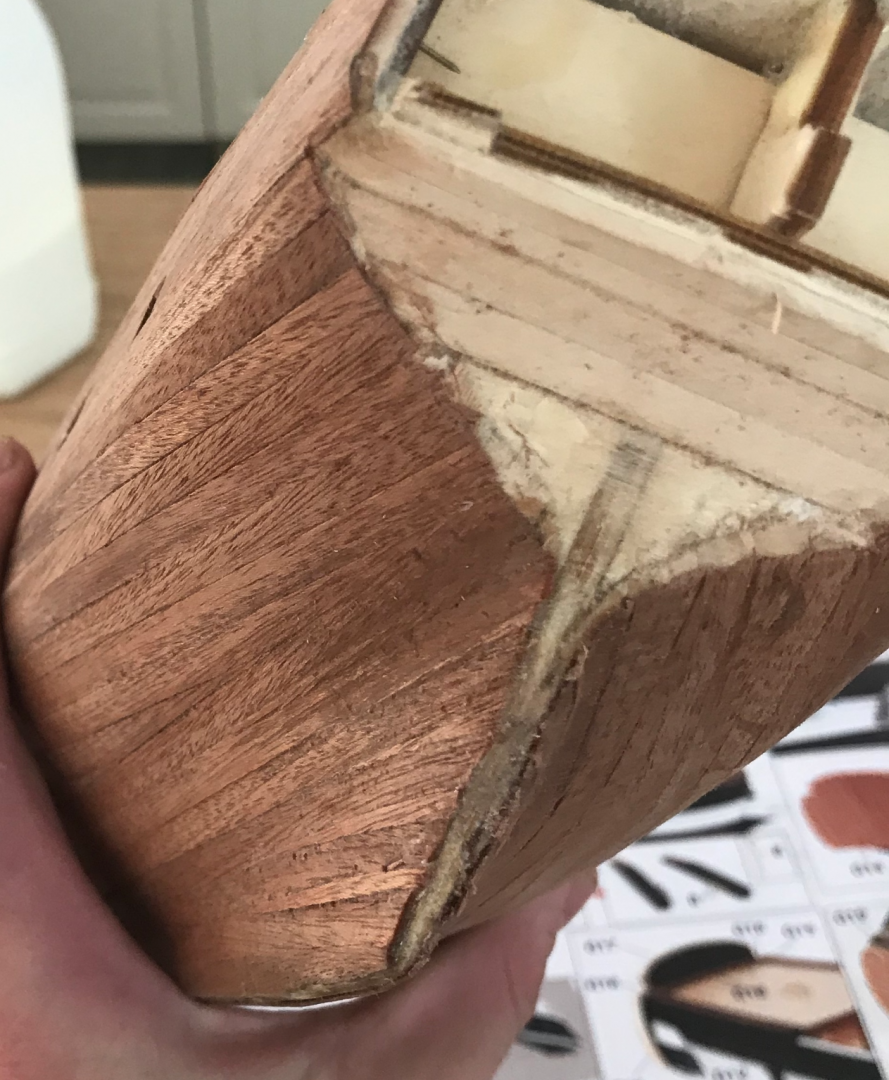
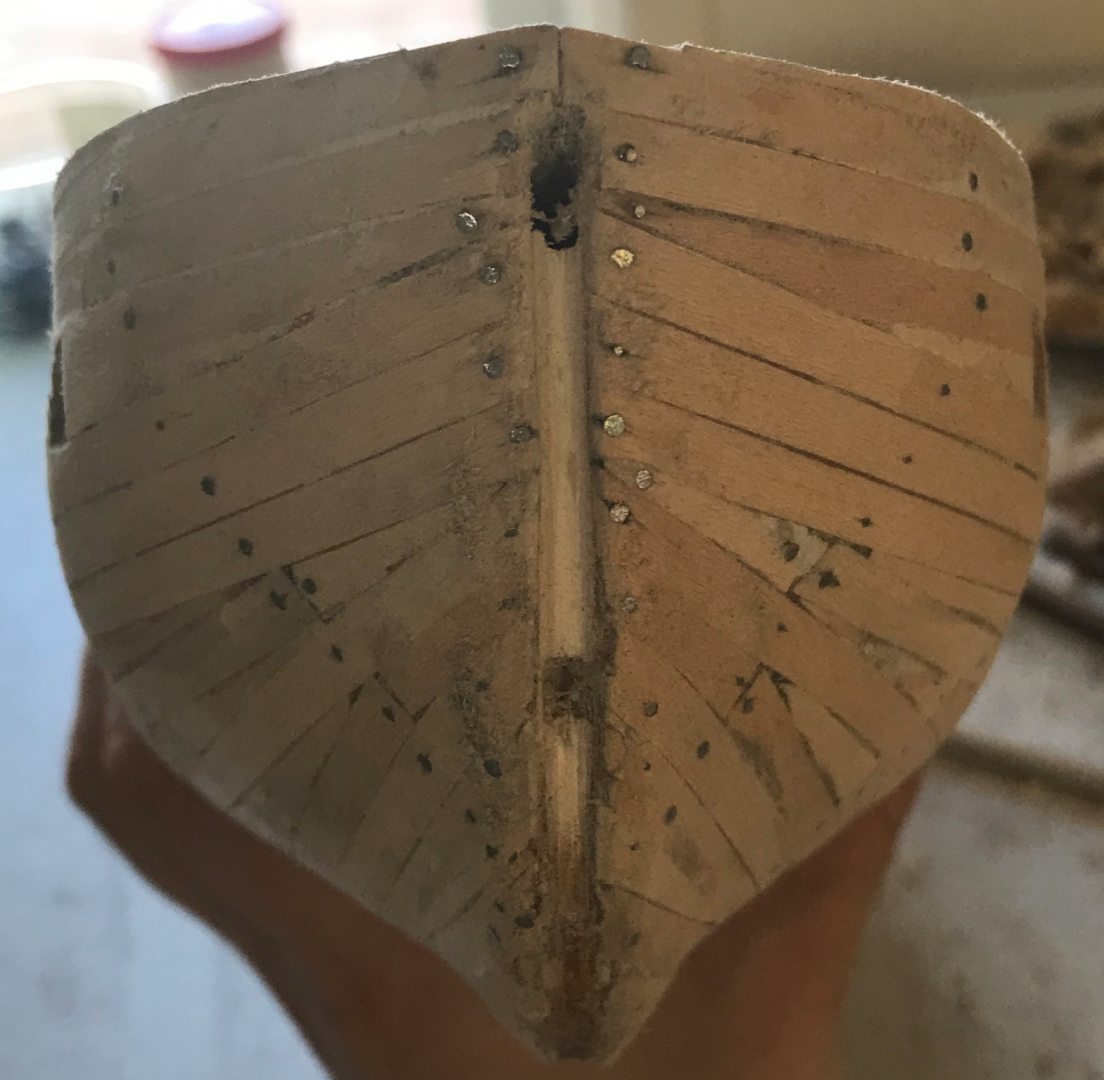
On the Albatros I was determined to do proper tapering of planks and use whole planks to cover the full length of the hull for the first planking. This was contrary to the OcCre instructions, which suggest a different method. The OcCre method involves cutting all the planks square and using them to cover as much space as you can. Then small triangles are cut to fill the gaps. On the Beagle, I used the OcCre method. Let me tell you, the OcCre method is definitely the right way to go about it. Tapering the planks and steam bending them took several days of on and off work on the Albatros. On the Beagle, I was able to get the whole thing done in a day (I was on break so had some time to spend on the boat). For a first planking it really does not matter how pretty the individual planks are on the hull, the shape just has to be there, and it needs to be sanded smooth. To get this right, I had to spend a lot of time on the fairing (but also not too much). This is the ship after the first planking was finished, it’s rough but that is okay. After extensive sanding and filing Then filling, followed by more sanding


-
Hey Dean, your build looks great! I think the Beagle would be a difficult first kit but you’ve done an excellent job
-
Hey Tom, thanks for your reply. I have some tips for the coppering now, there's a lot of trial and error that I can hopefully help people to avoid. I'm happy with it now, but it was a bit of a bumpy ride.
-
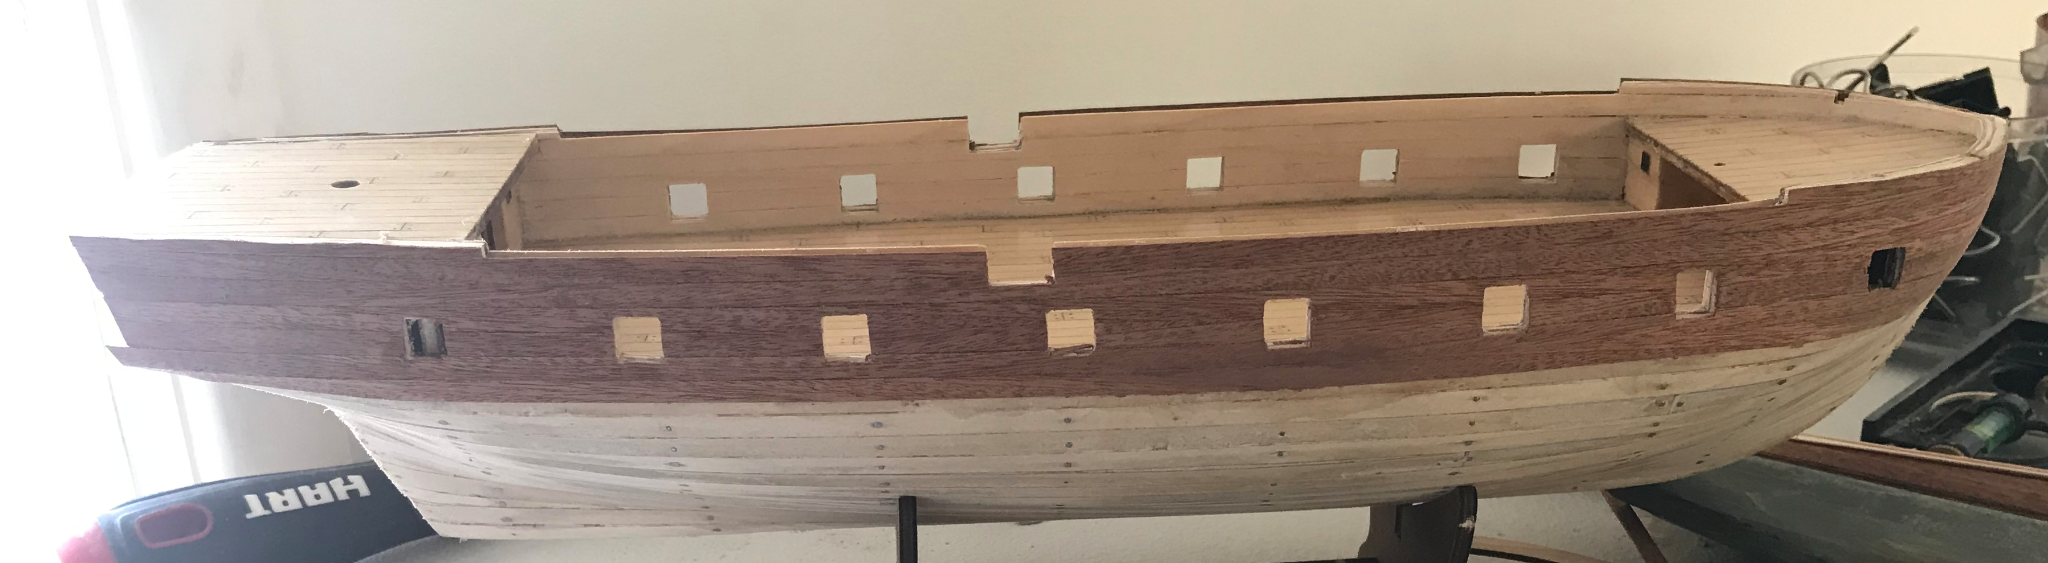
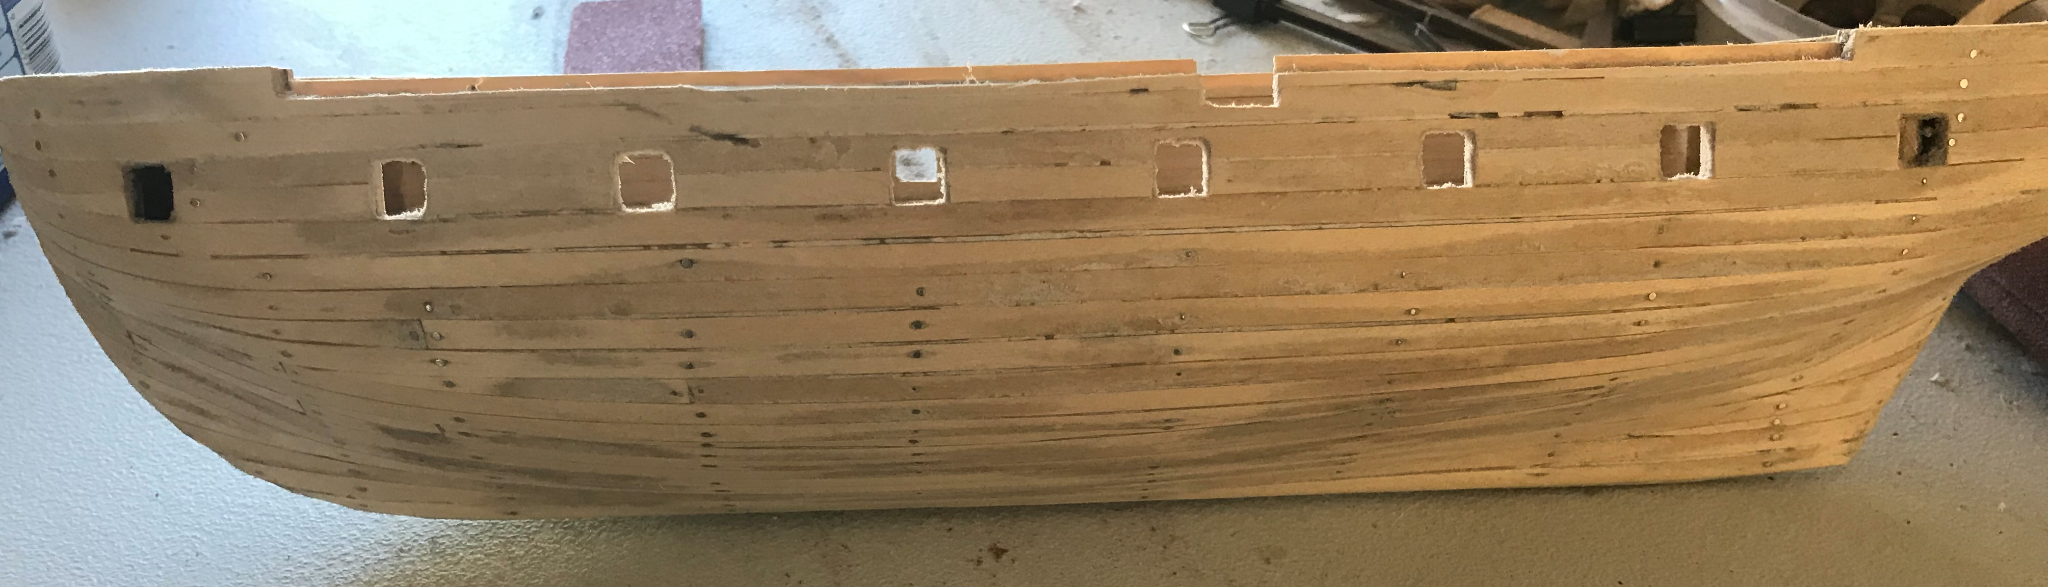
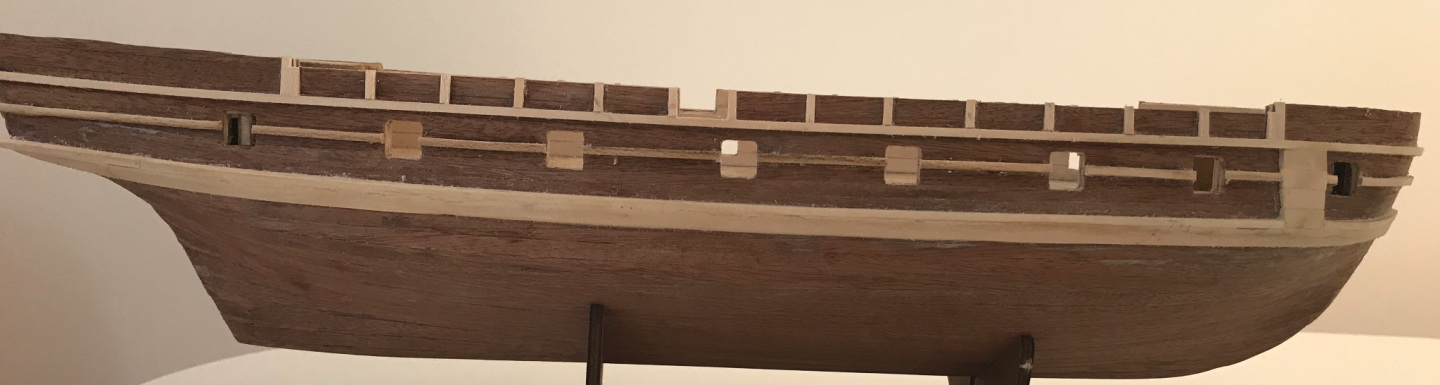
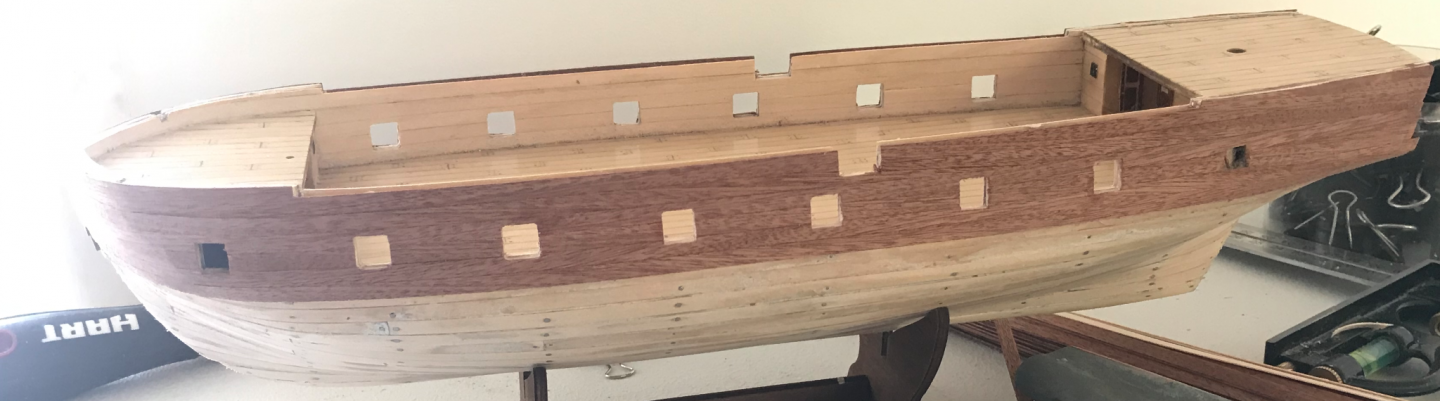
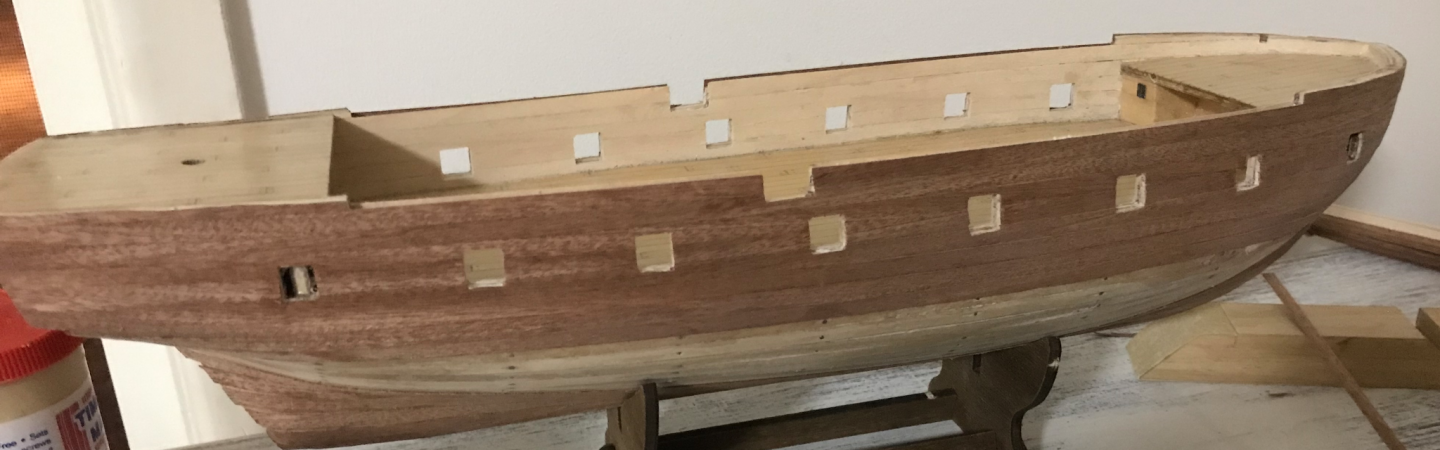
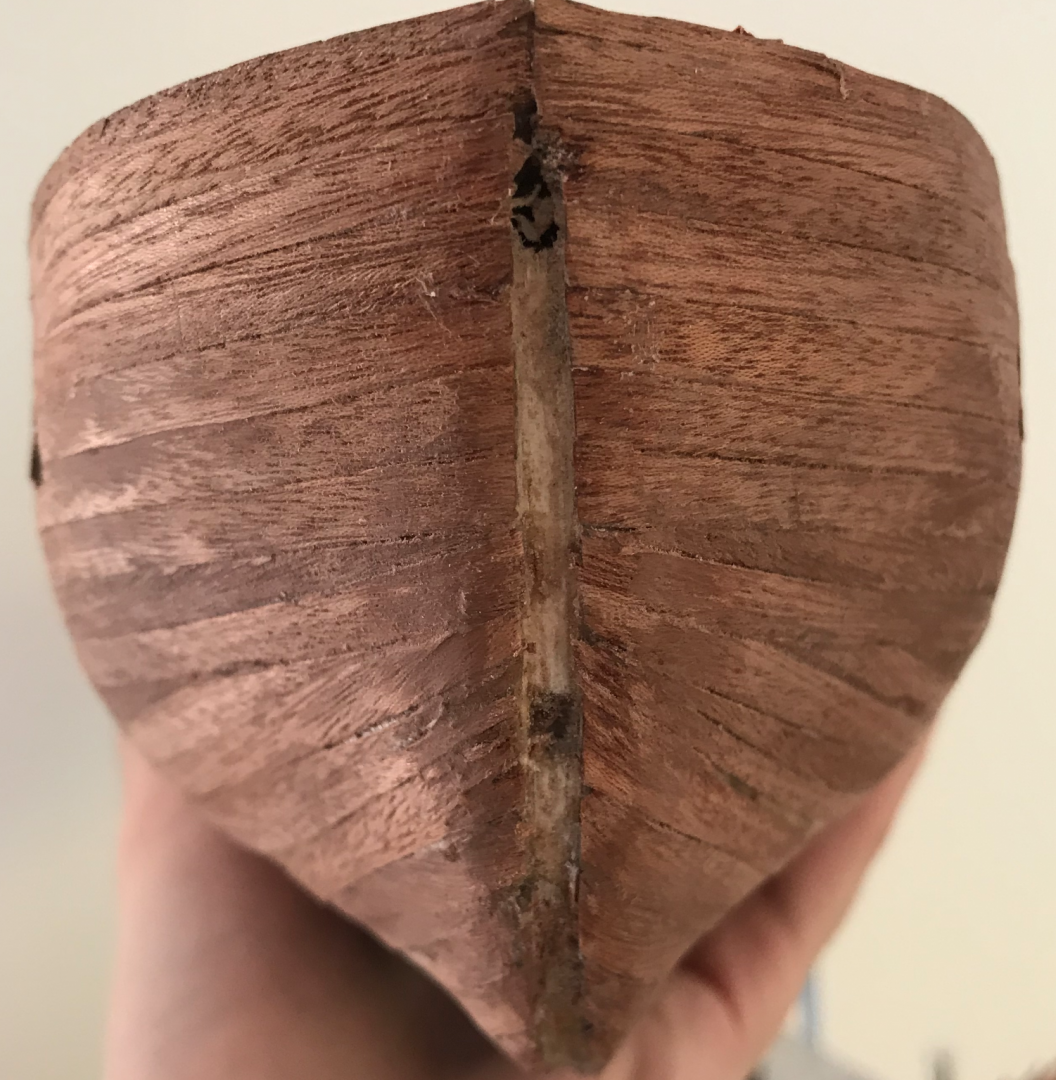
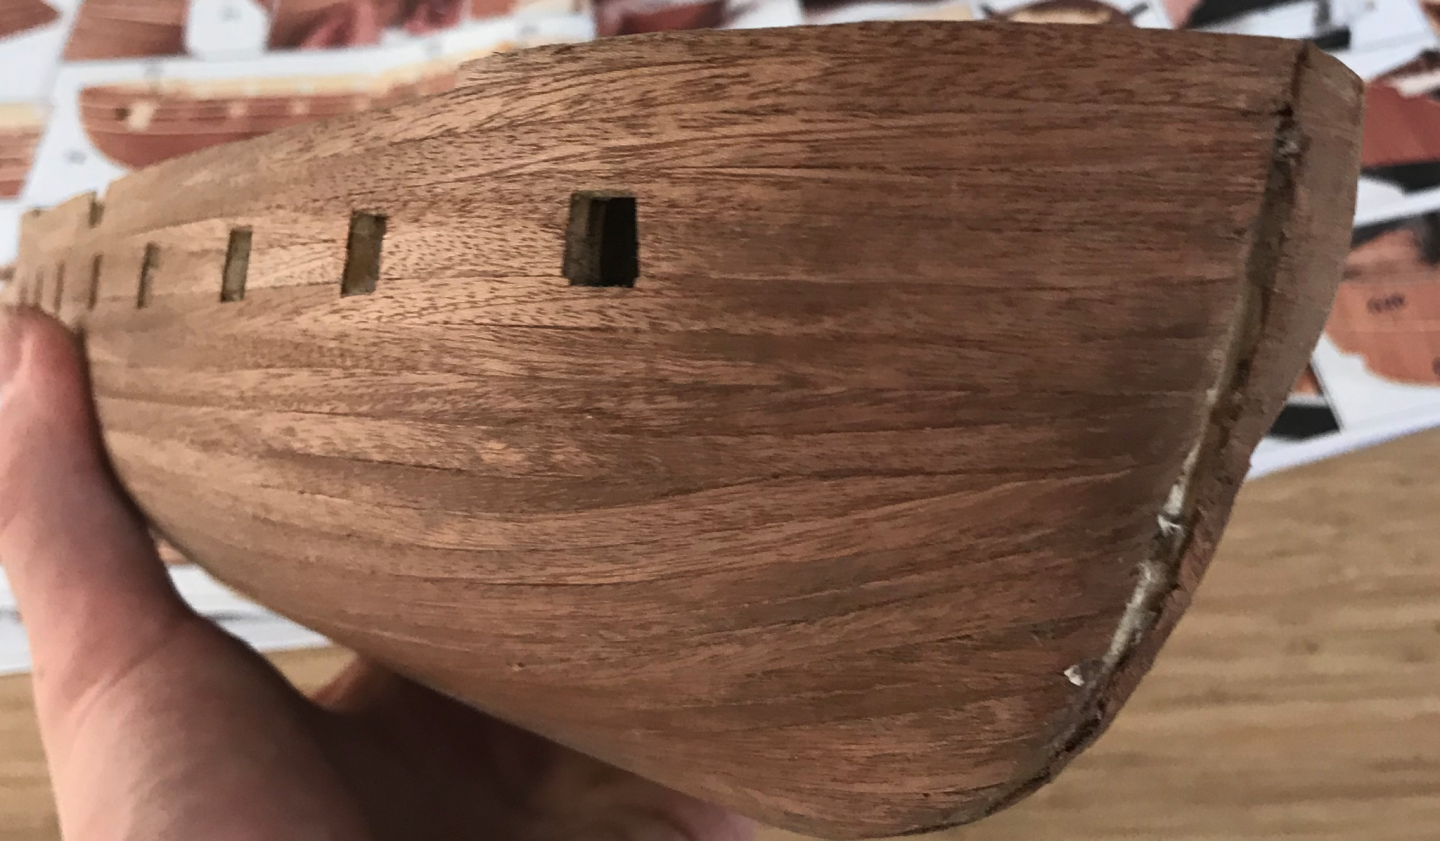
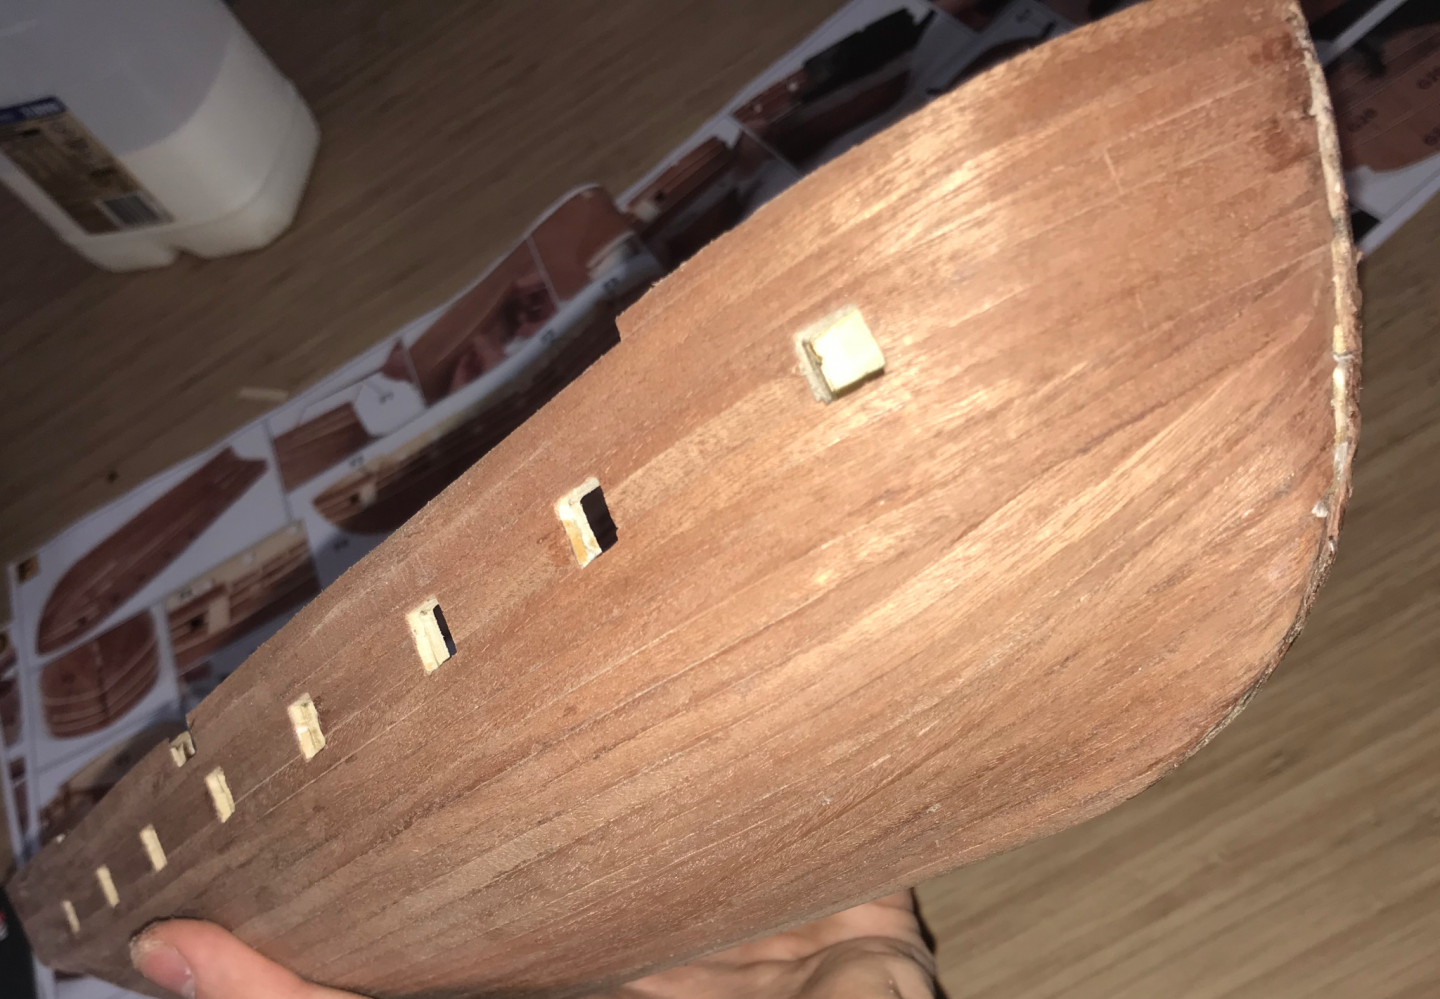
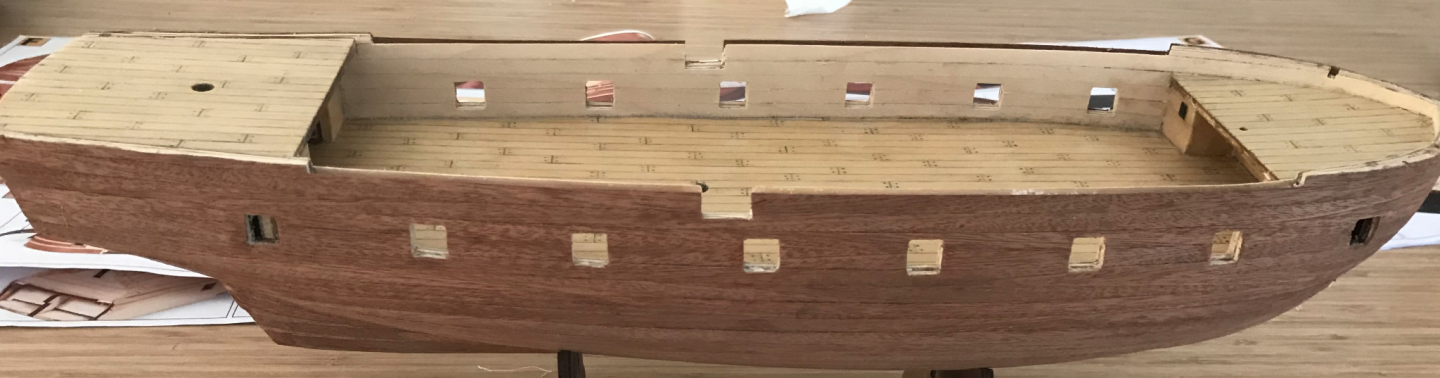
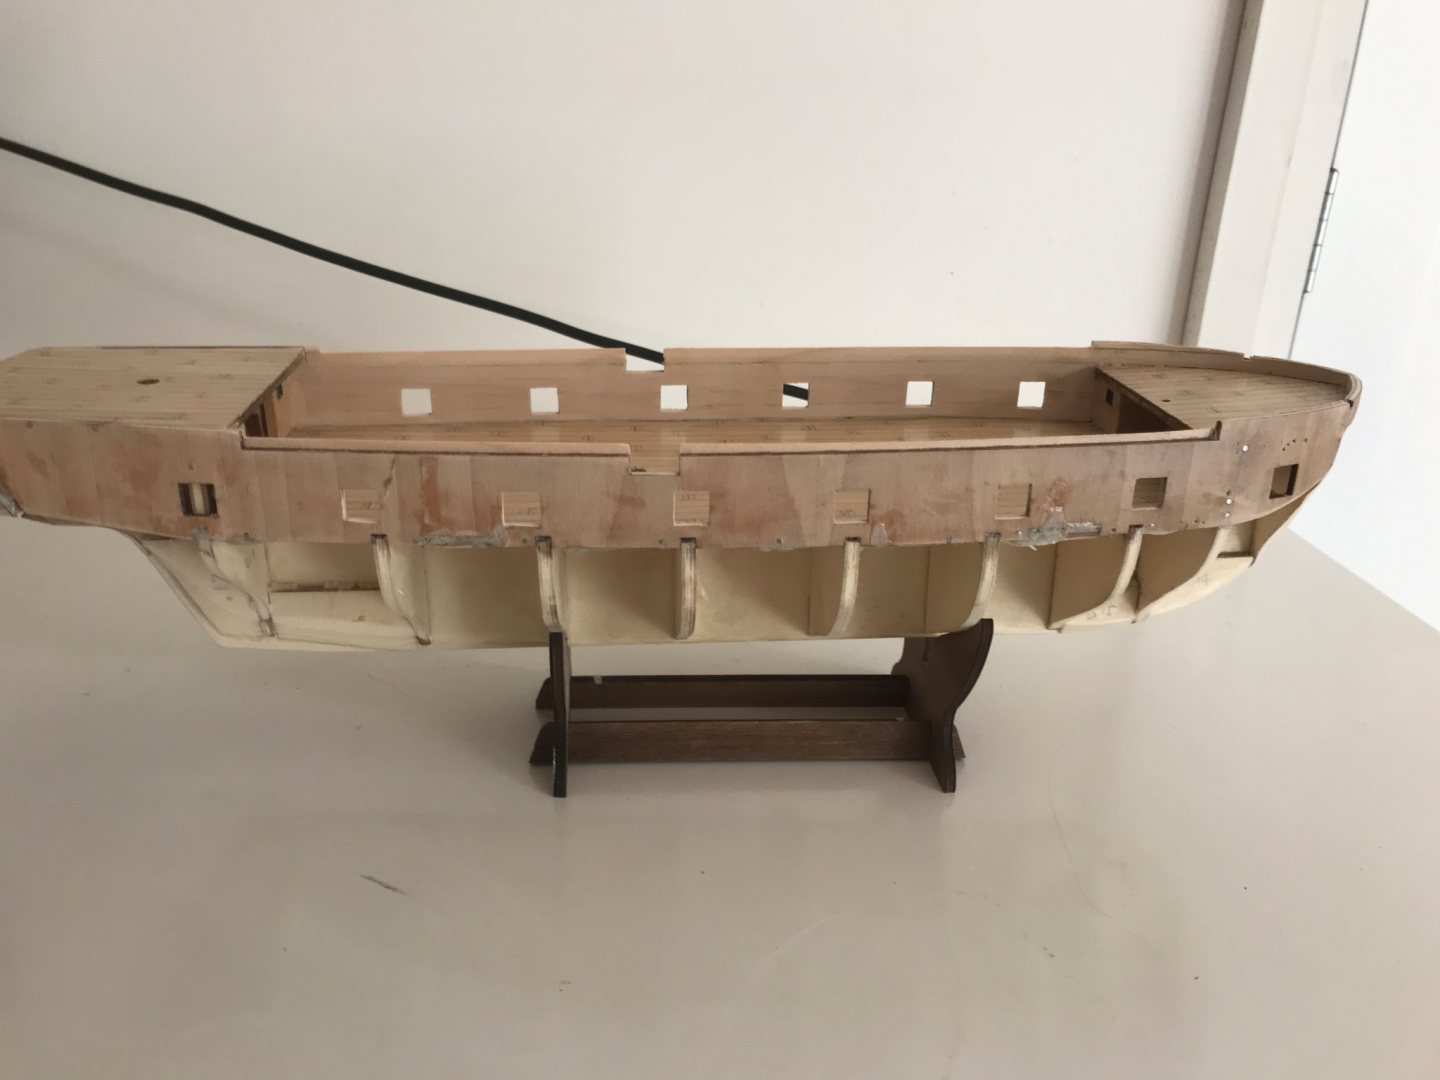
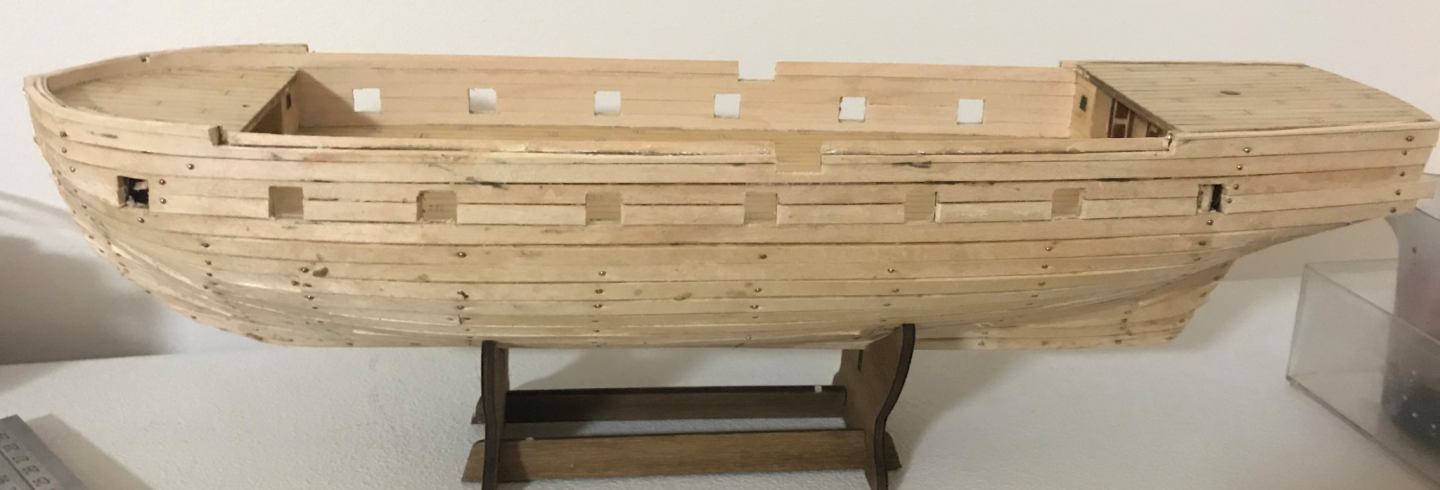
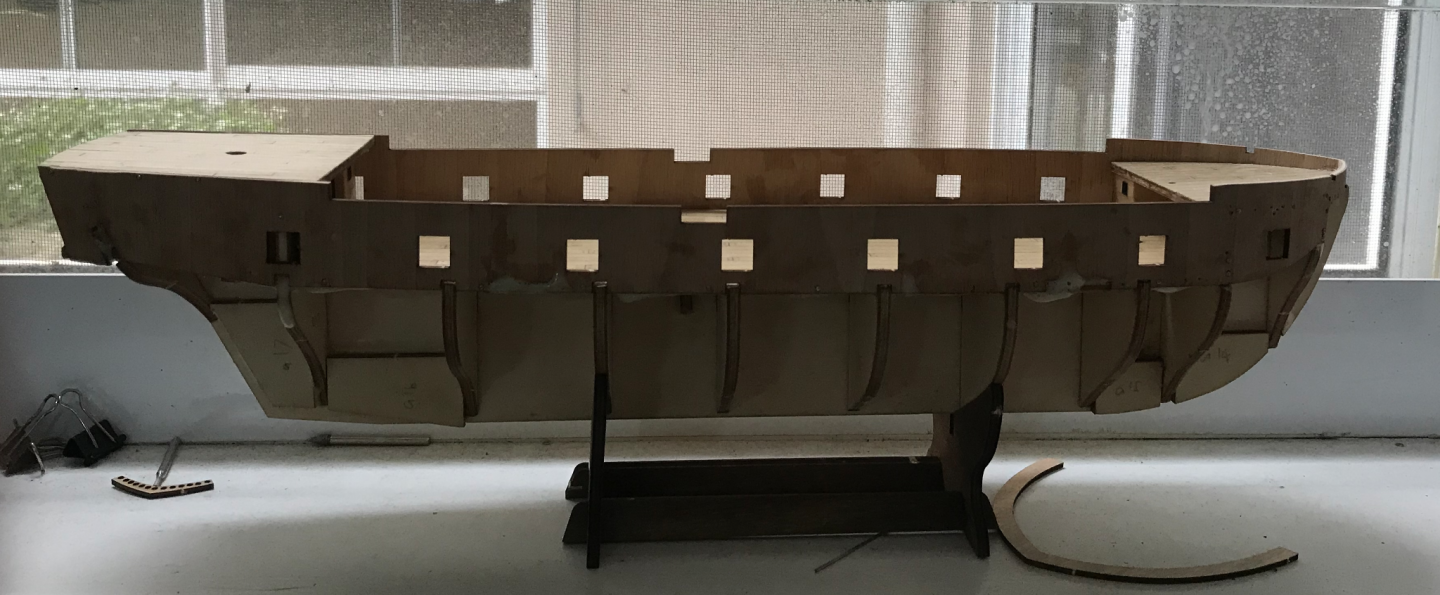
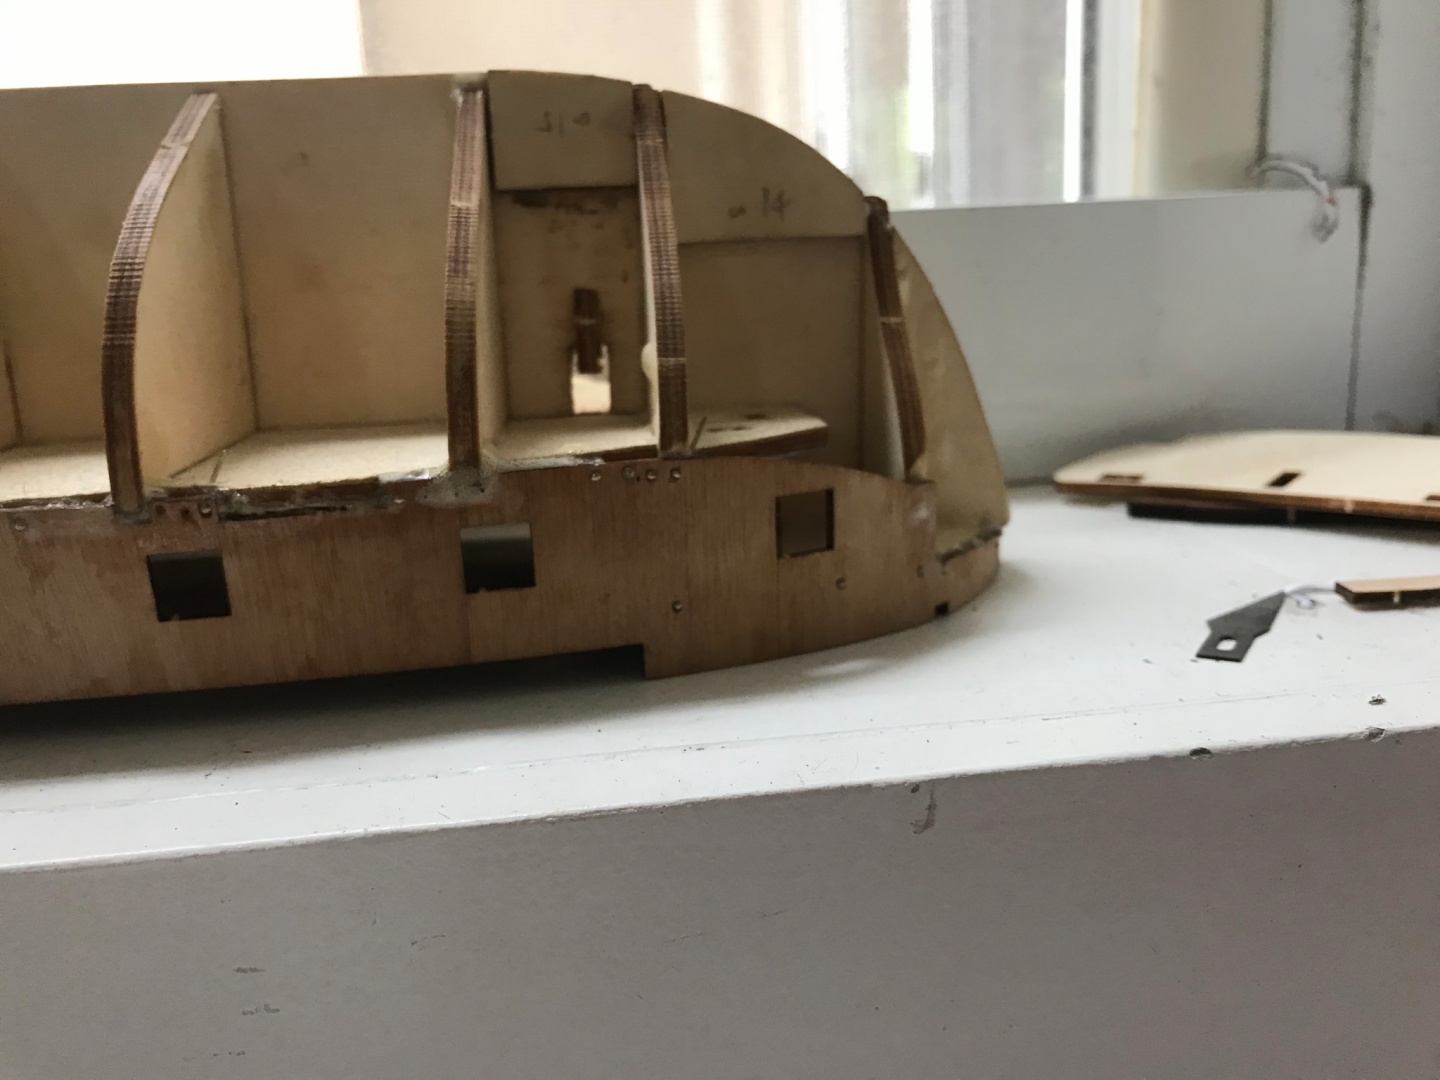
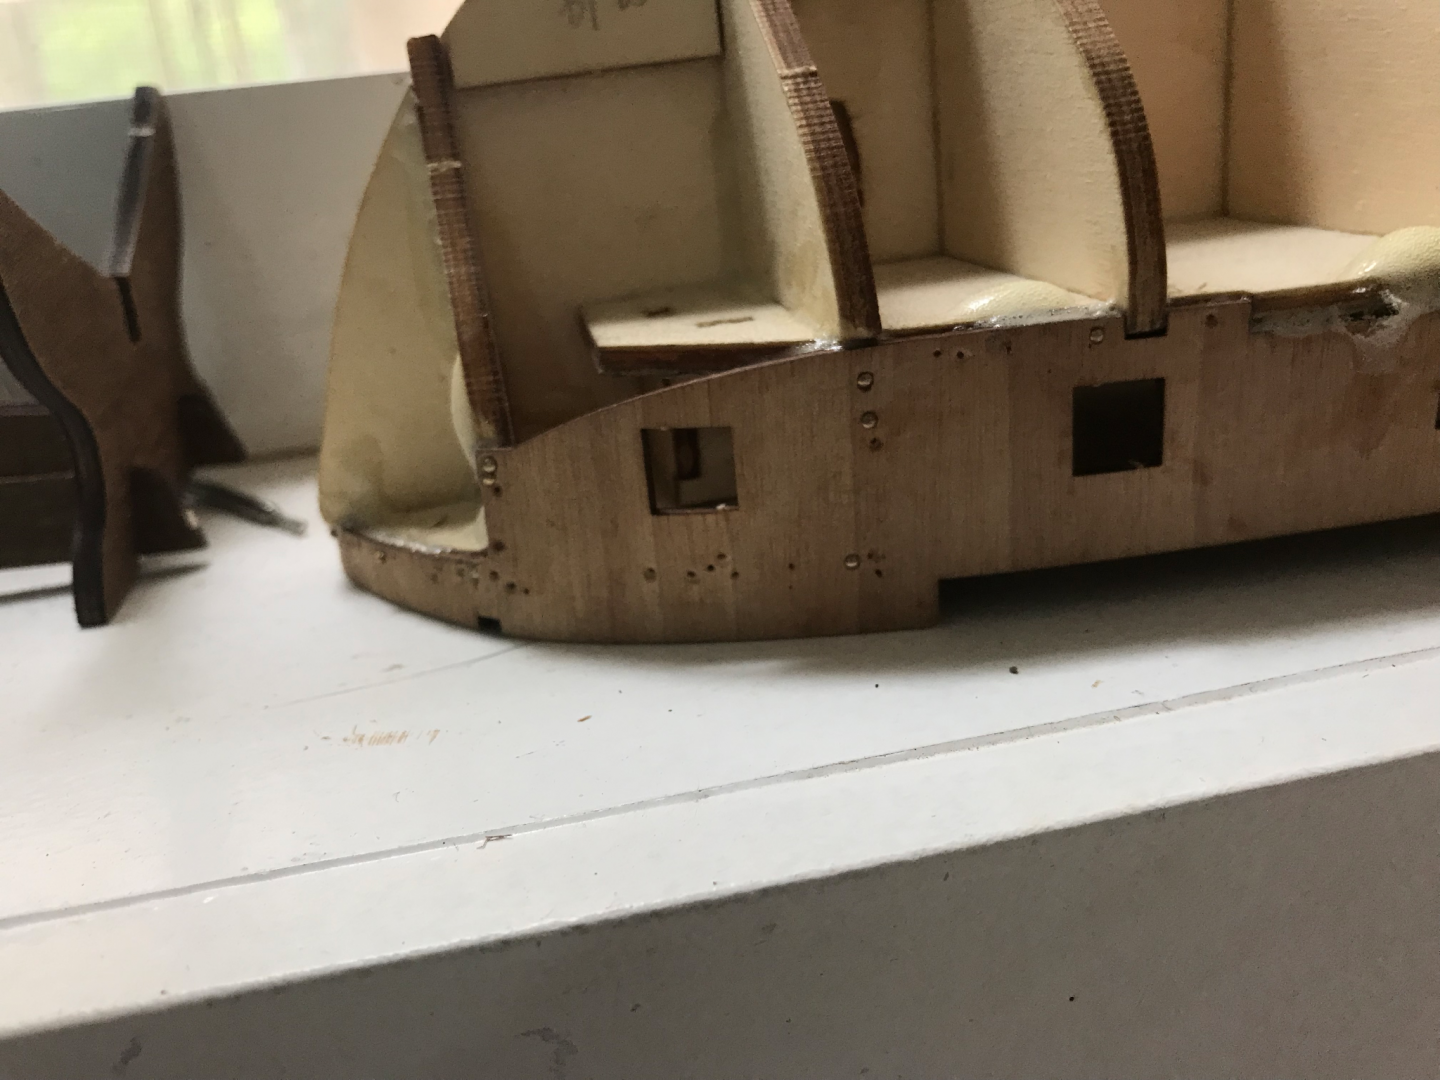
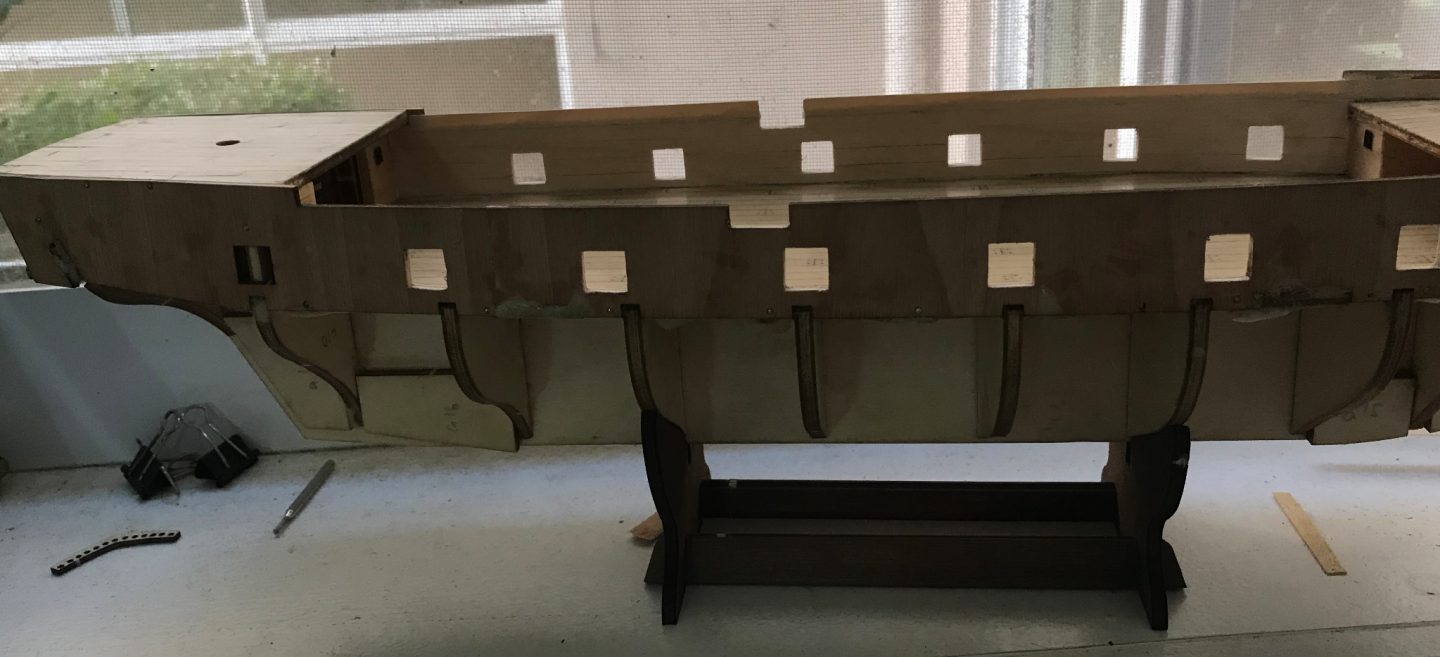
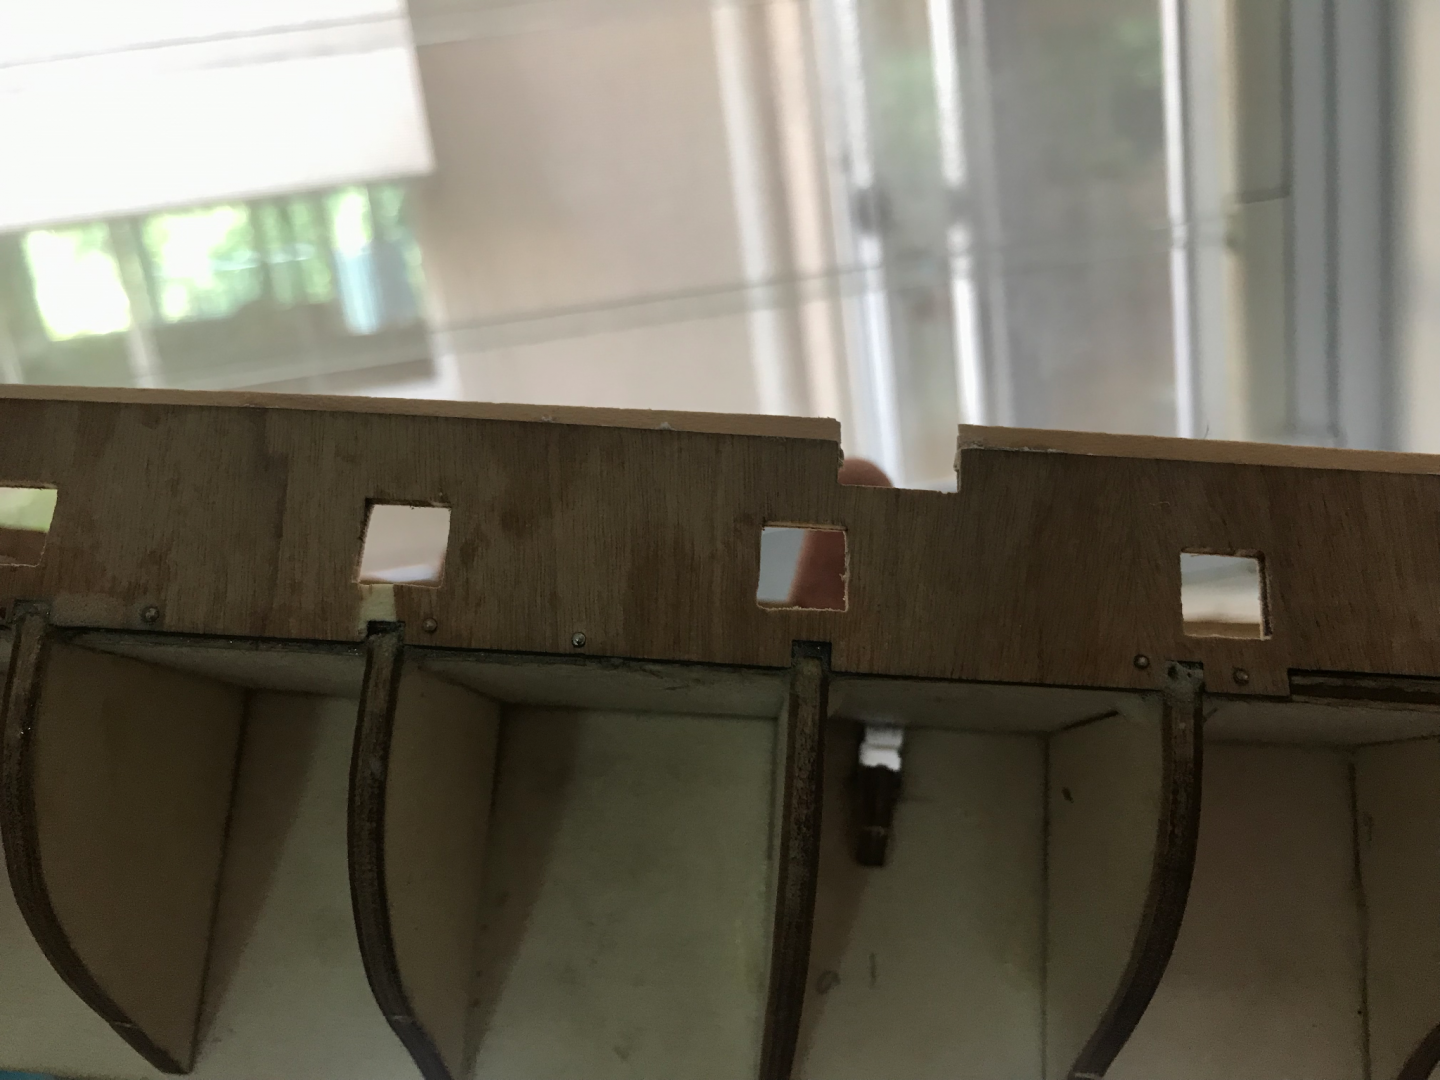
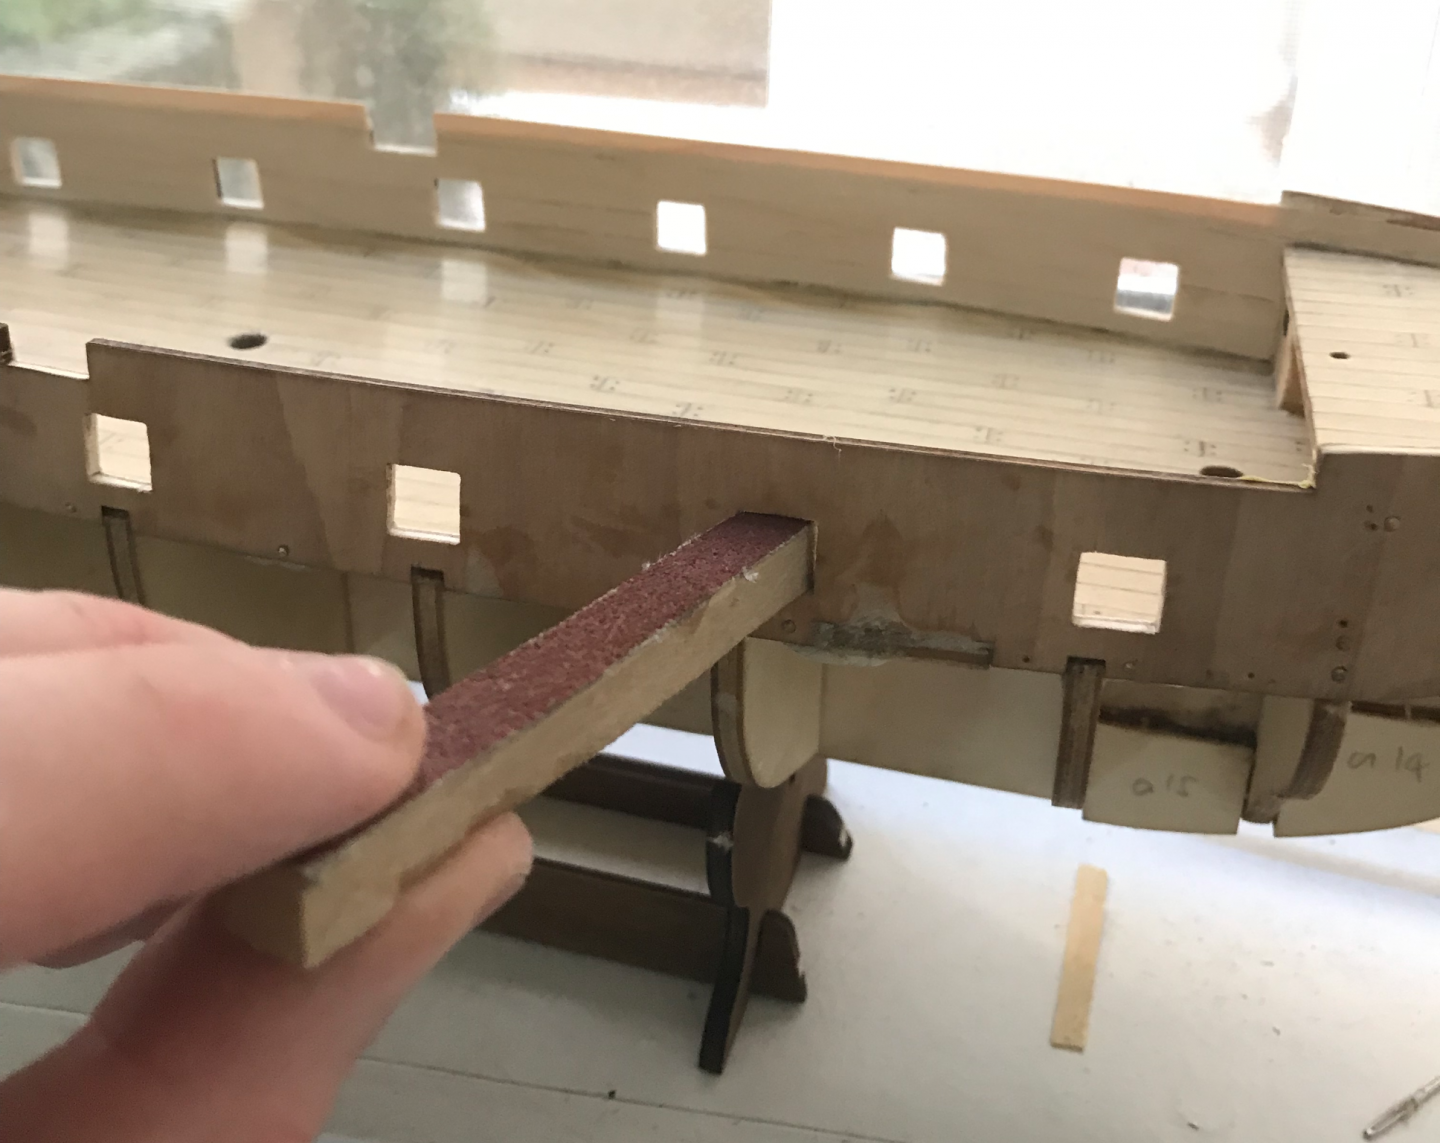
The bulwarks were the first key deviation from the kit instructions. From the anatomy of the ship, it seems like the bulwarks would have been higher from the forecastle to the poop deck than the kit allows. Also, raising the hammock rails will allow for a larger space to insert folded hammock, which is also good. The YouTube videos recommend starting from the middle of the ship and working towards the ends when nailing the bulwarks. I highly recommend doing this. On one side I didn’t follow the instructions and it was much more difficult than the other side. My gluing is a bit messy, but no one will see that when it’s finished, I’m using a high strength wood glue that takes a while to dry. I found that it was a bit of a challenge to get the bulwarks even at the forecastle, I’m not sure why, it may have been because I didn’t start nailing one of the bulwarks from the middle out, but it took a bit of sanding and re-nailing to get it right. Then, when lining the bulwarks internally, I didn’t trim down the top strip. This gave a height that I was pretty happy with and looks similar to the plans. The next challenge was the gunports. I initially started out by filing and trimming with a blade, but I now wish I hadn’t. I think I did make the gunports a little too big. What I would recommend doing is making up a little sanding stick of the appropriate side and using this to very lightly sand the lining back (after some trimming). This will give a nice straight line that will make tidy gunports. And yeah, so that was it. Then it was exam season and the boat took a back seat for a while. Planking was a big job and I wanted to do that in one big chunk so I waited until uni finished for the semester before getting to that.
-
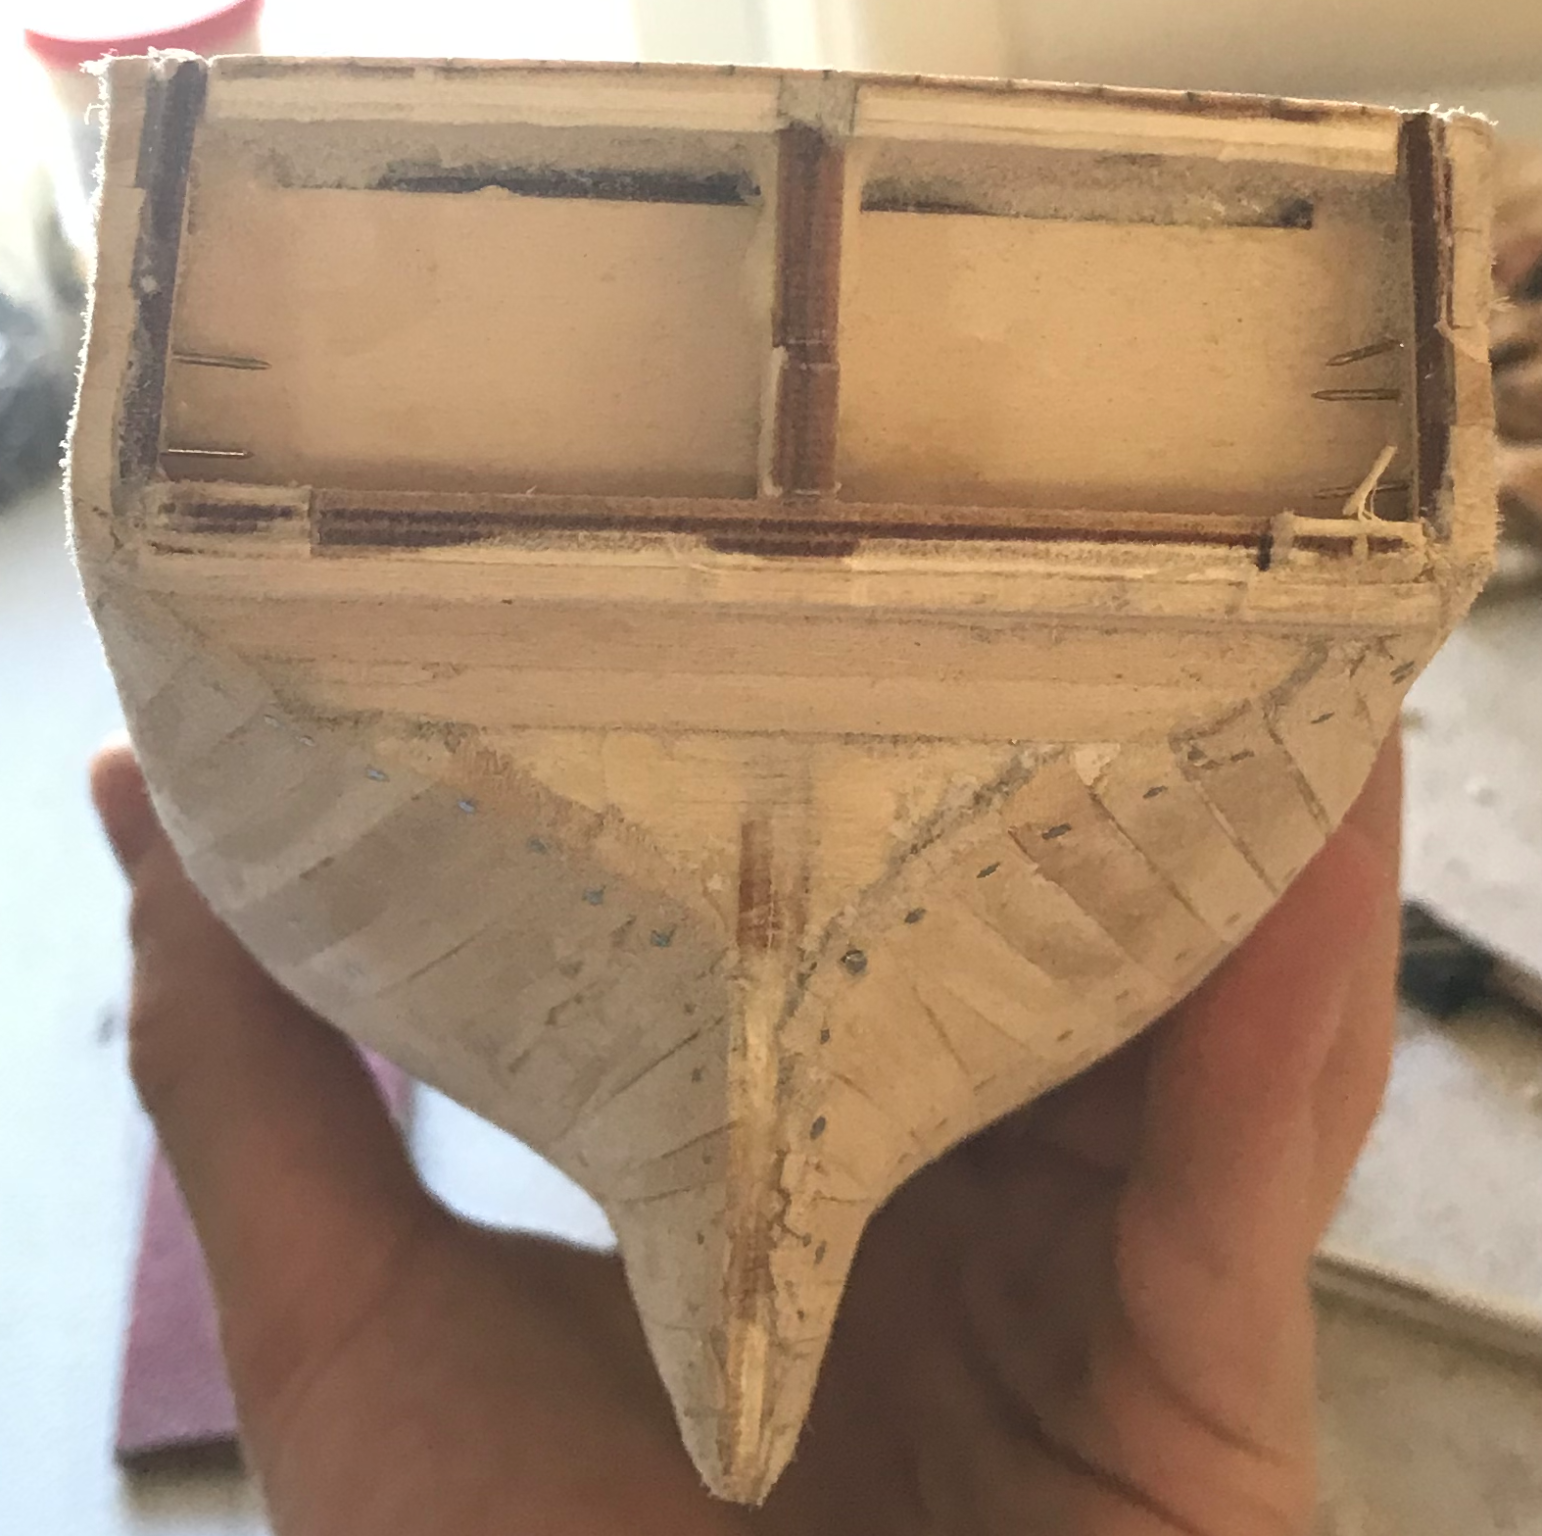
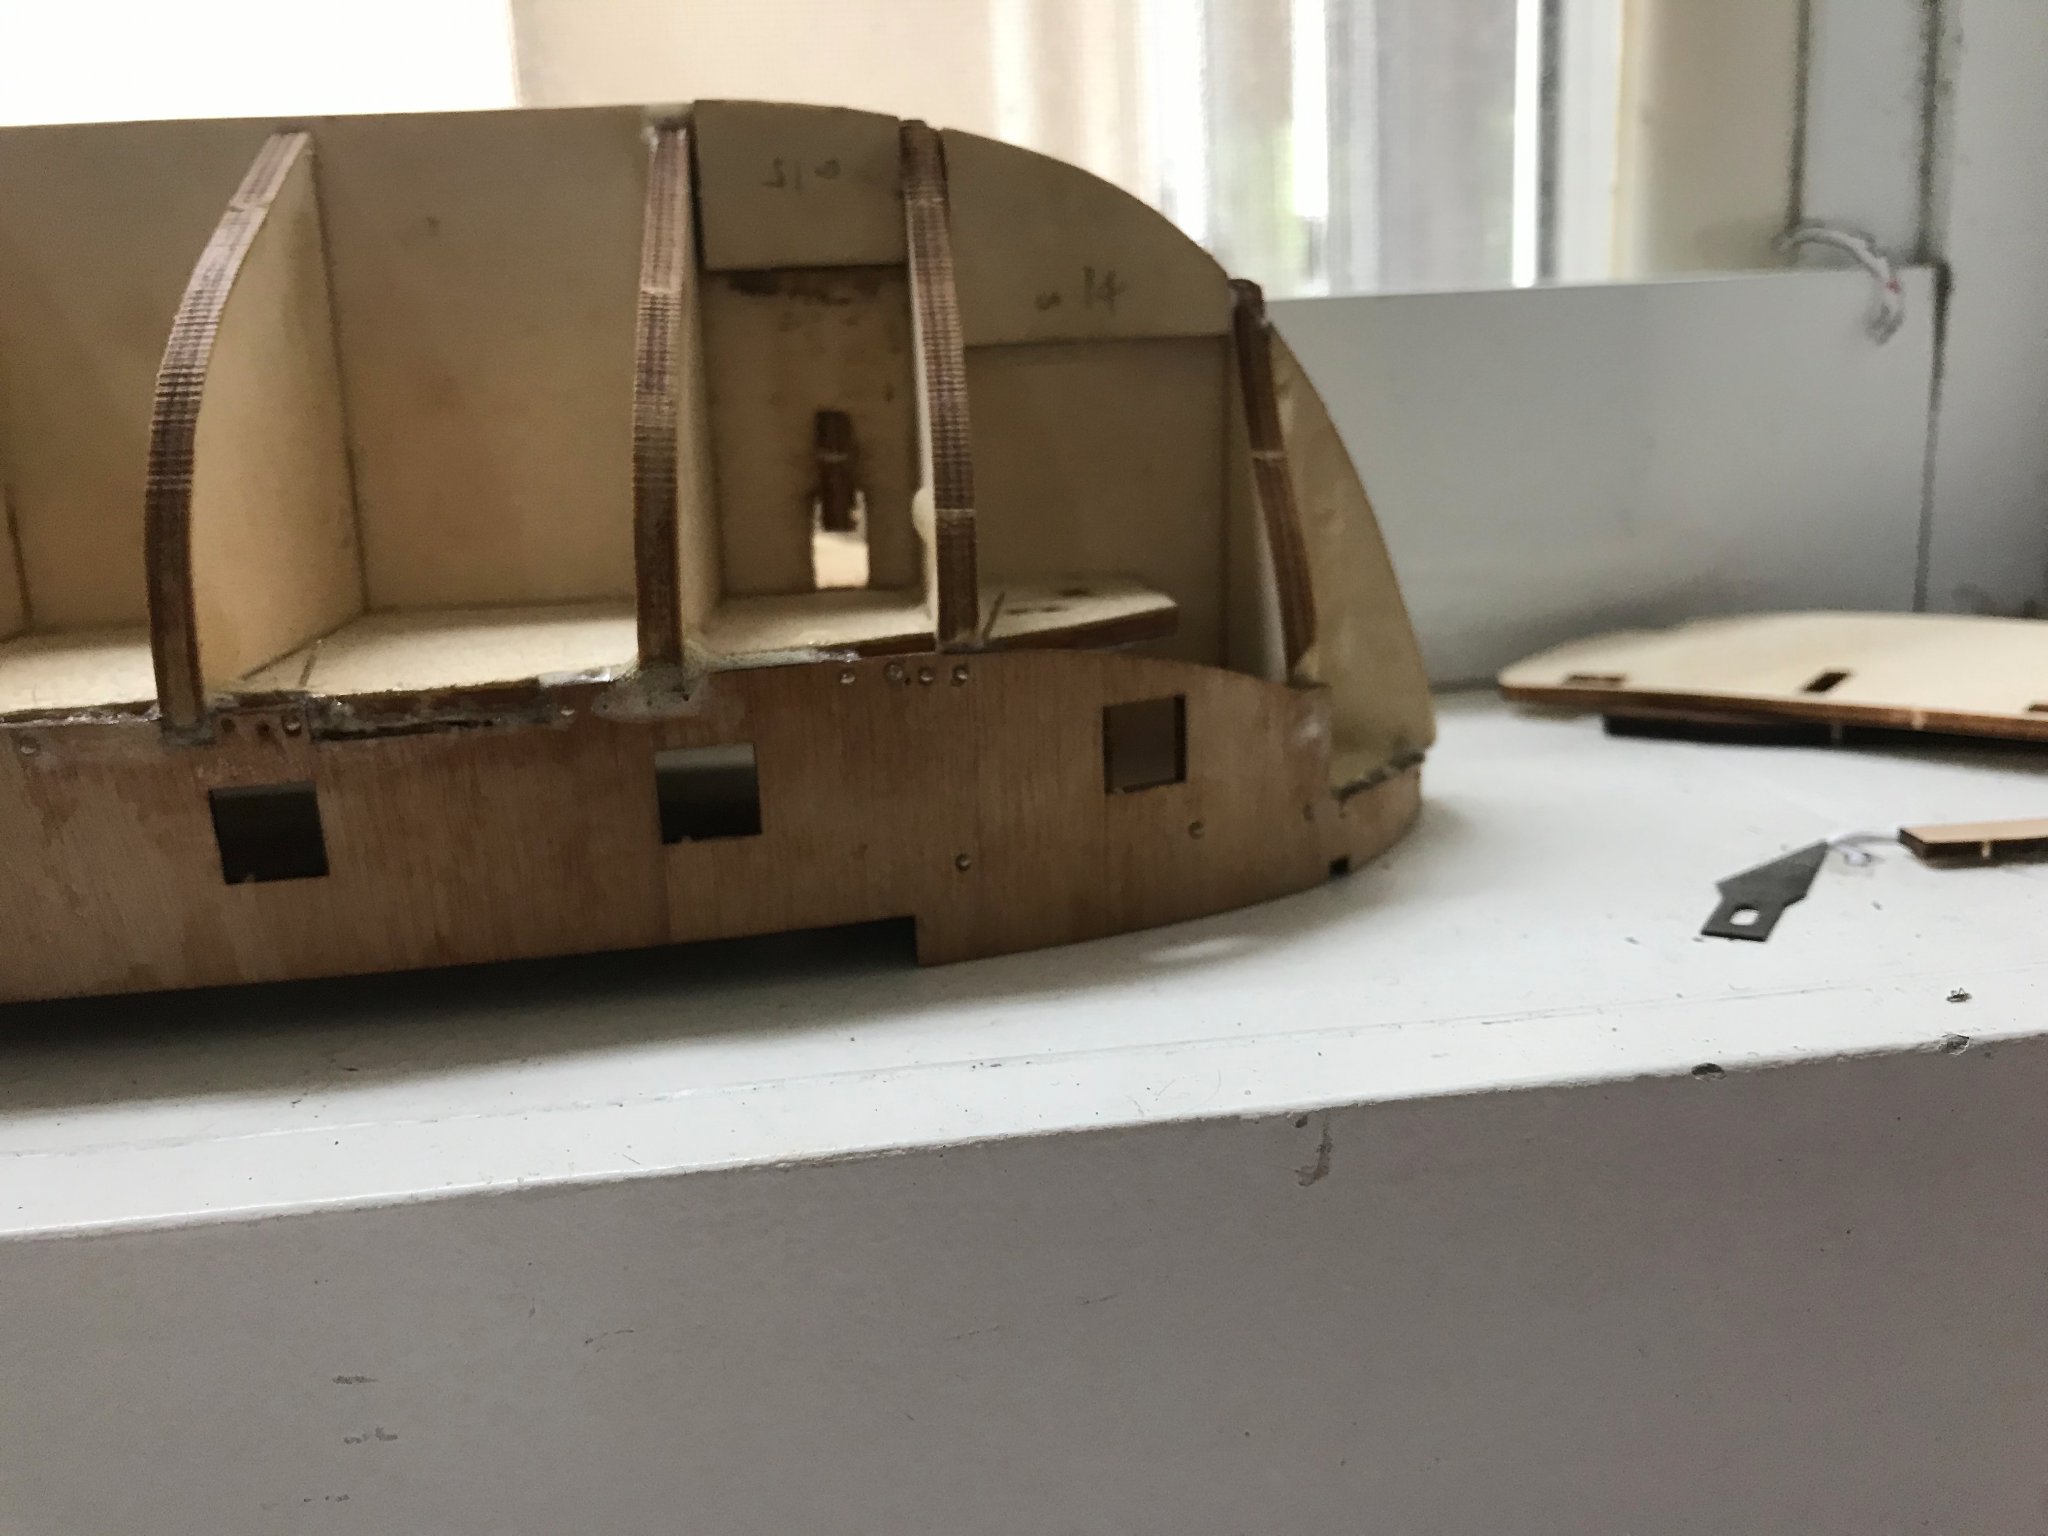
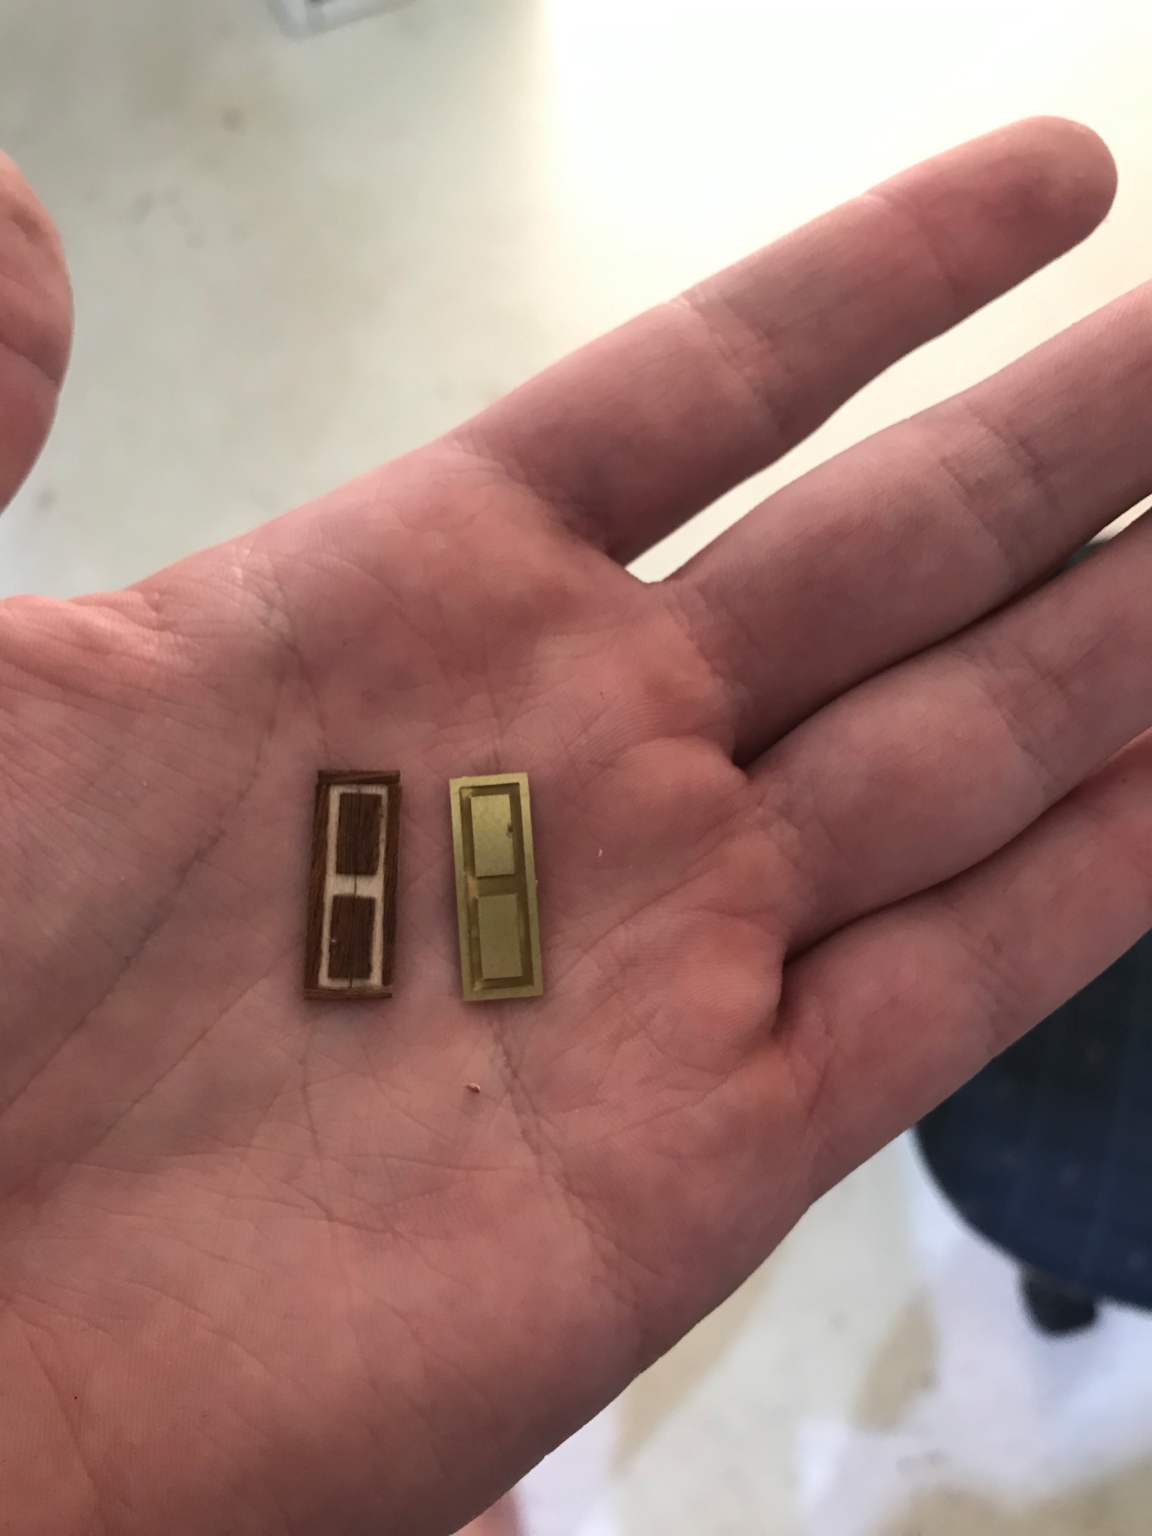
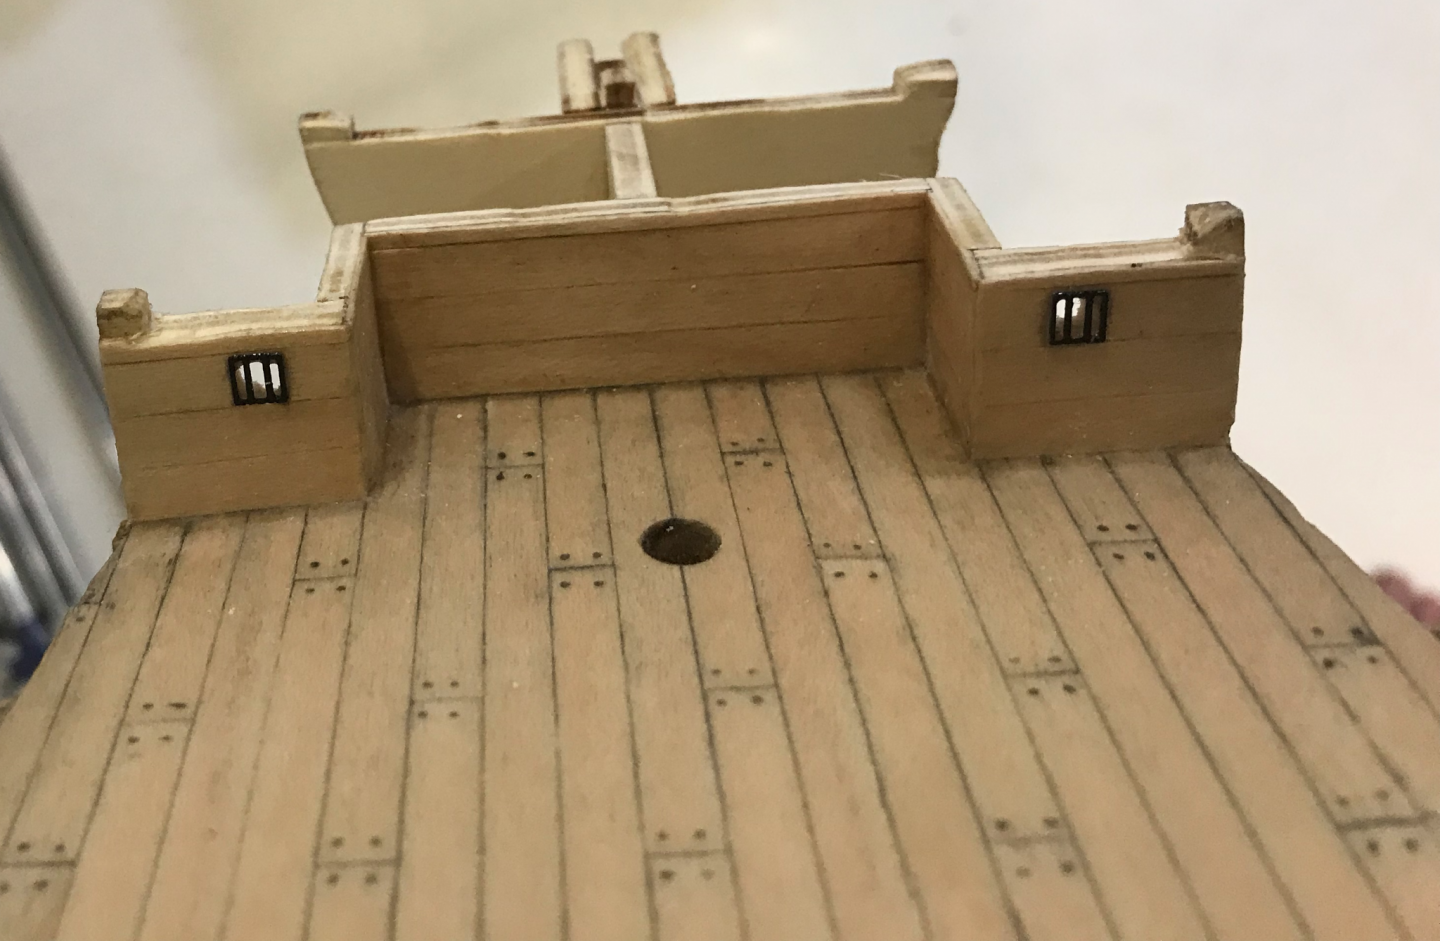
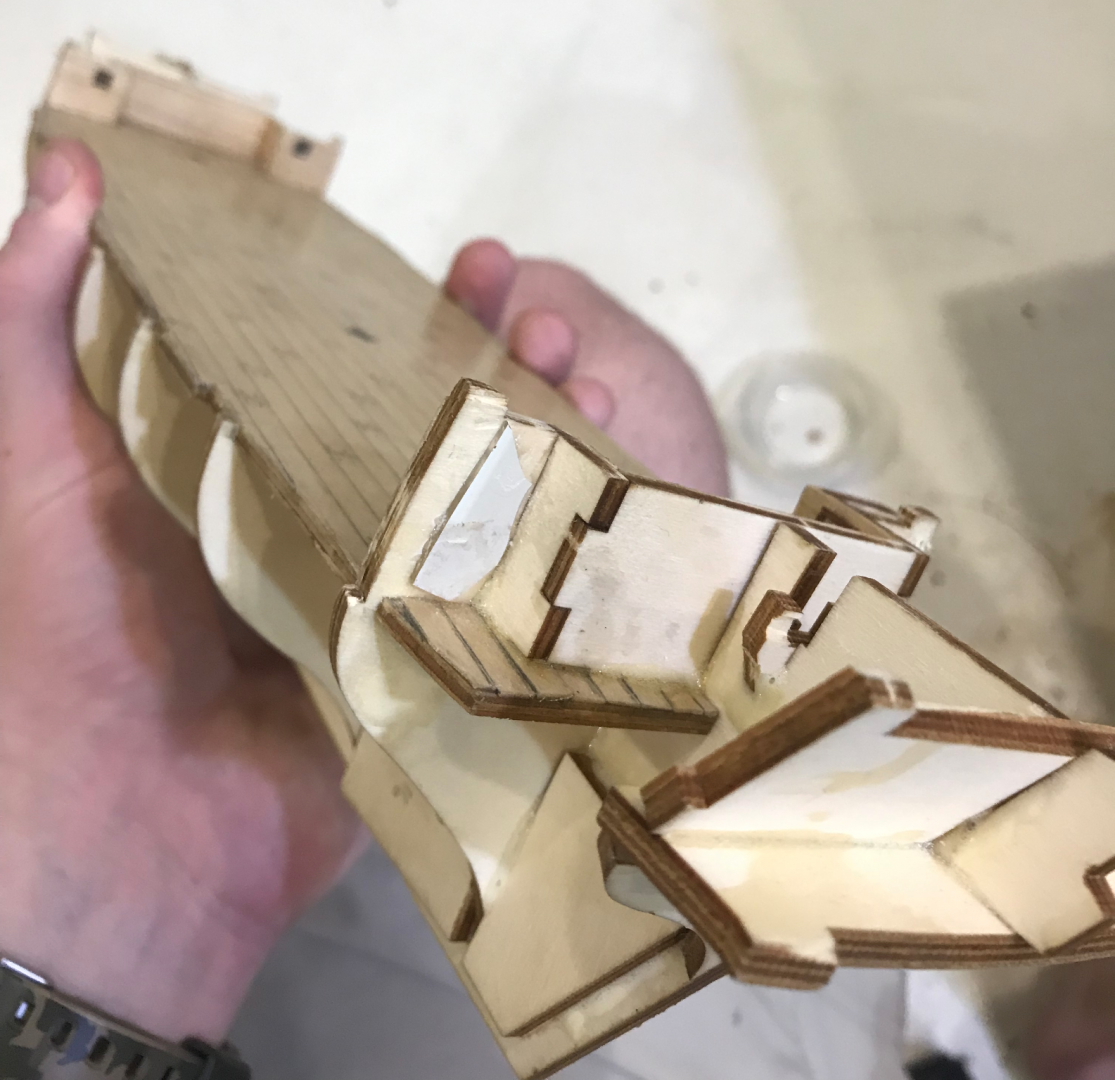
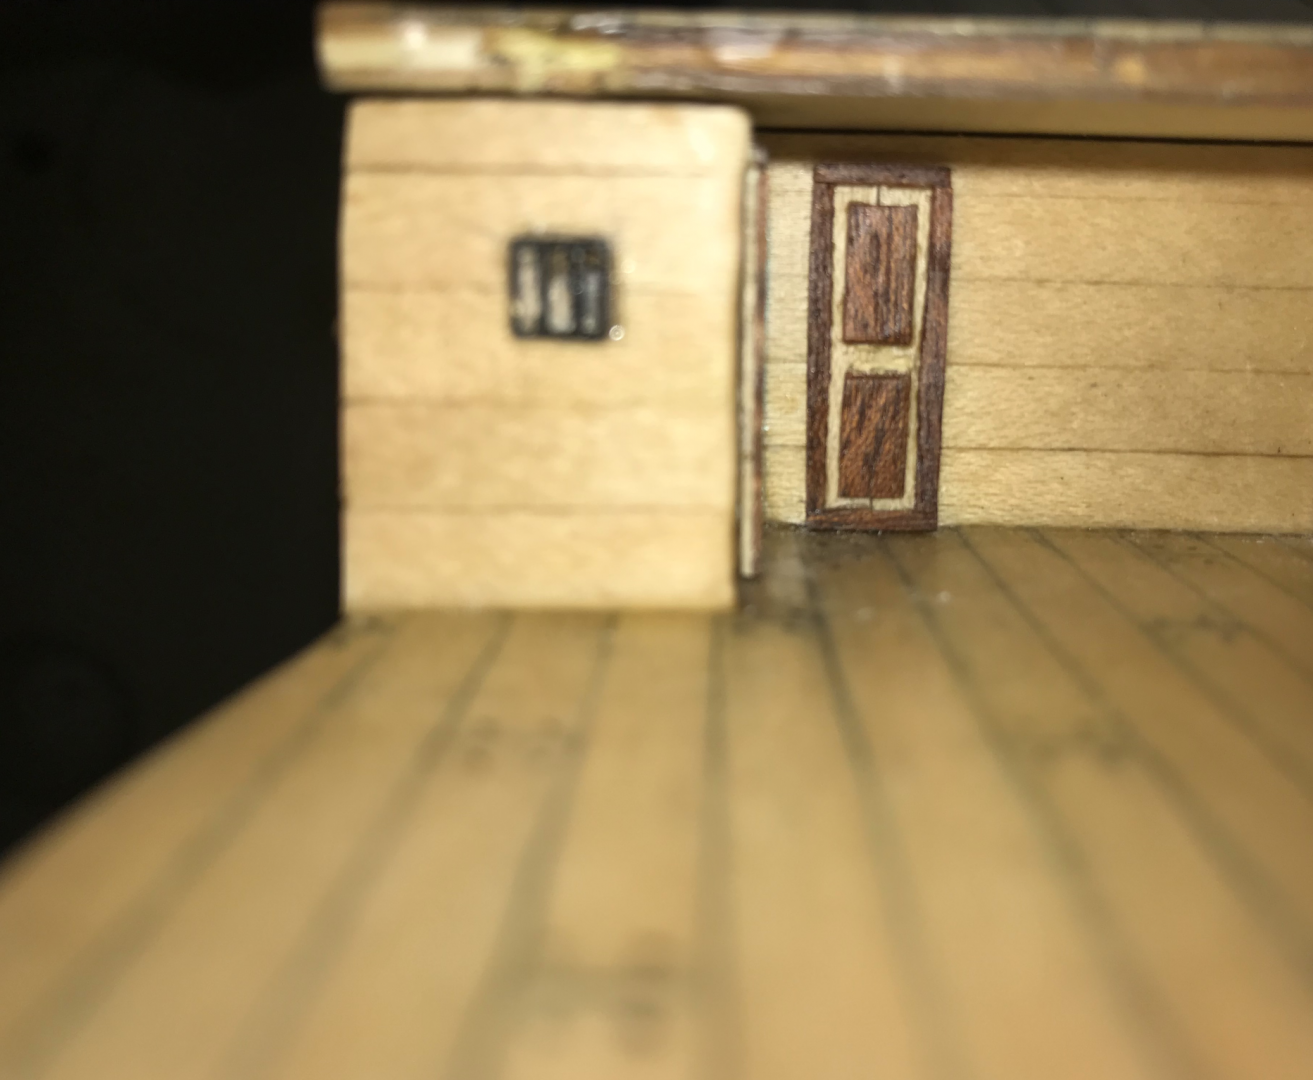
The kit instructions show most of the brass pieces being added without further alteration. I have some problems with this. First of all, this is implying that these pieces would have been made of raw brass instead of iron as they more likely would have been made of. Second, this is also implying that the ship makers would not have done anything to the brass to protect it from corrosion. So instead, I will be either painting or blackening all the brass pieces to add to the ship (I also think it looks better) The worst offender are the brass doors, which I feel look very wrong. I made my own wooden doors using some sapele strips stained with light oak and some sycamore strips. I don’t remember the exact measurements, but they were pretty similar to the brass doors, so if you wanted to make your own you could copy the measurements from the kit. I did end up replacing these doors to better match the developing colour scheme later on (and also to re-build them a bit better). The next step was the windows, which were painted black. After some thinking, I decided to cut out a hole in the wall behind them to make it look a little more realistic. Then to give the illusion of their being an open space behind the windows, I glued some mirror shards behind them This gave a really nice effect that is a bit tricky to capture in a photo. I’m really happy with it and will be doing a similar thing with the cabins and sky lights. If I had just left a hole, it would have been quite difficult to tell that anything had been done behind the windows. With the mirrors it reflects the light and adds a bit of life to the cabins. The poop and forecastle decks also went on with no dramas.


-
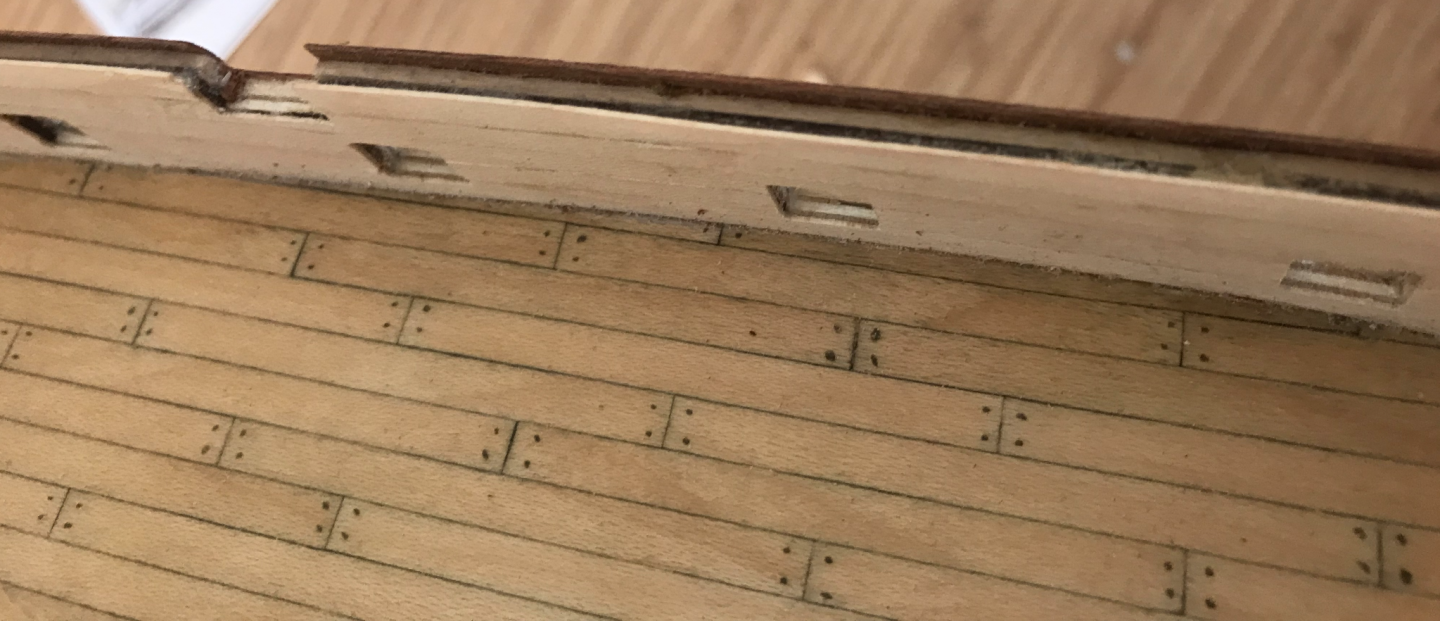
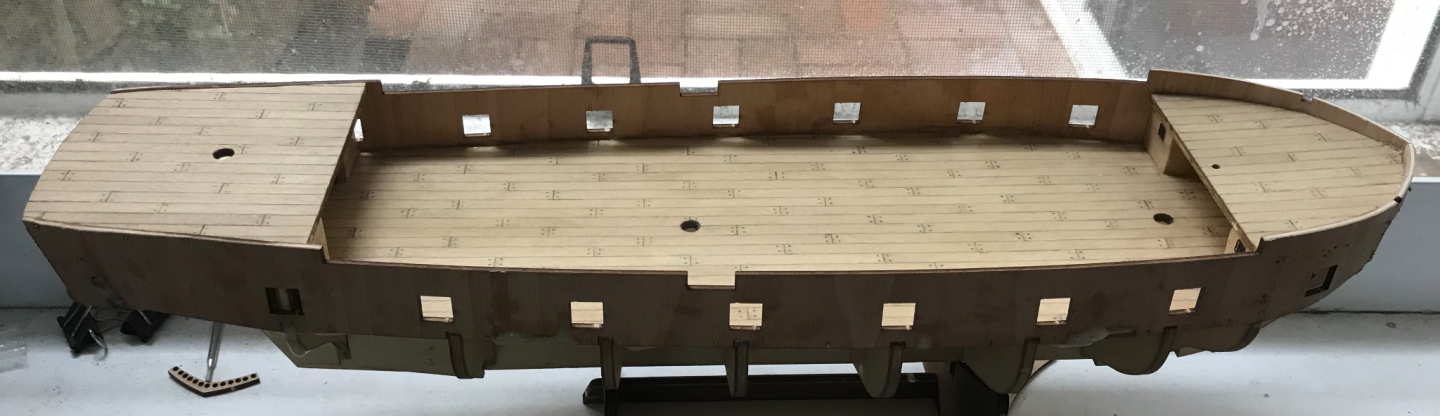
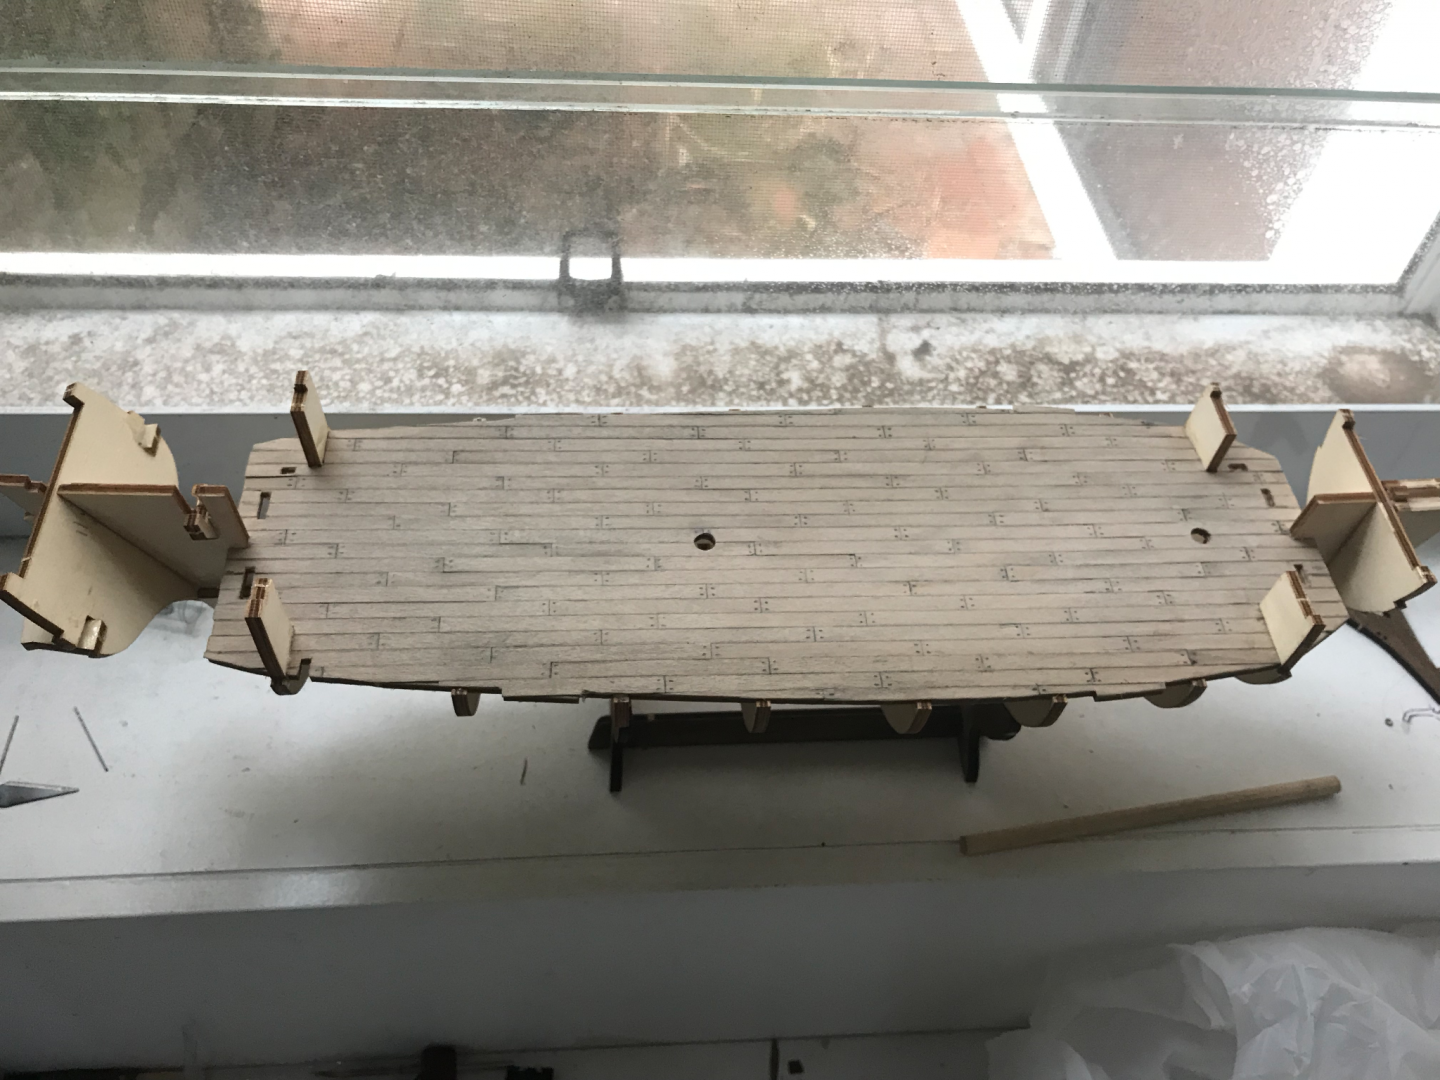
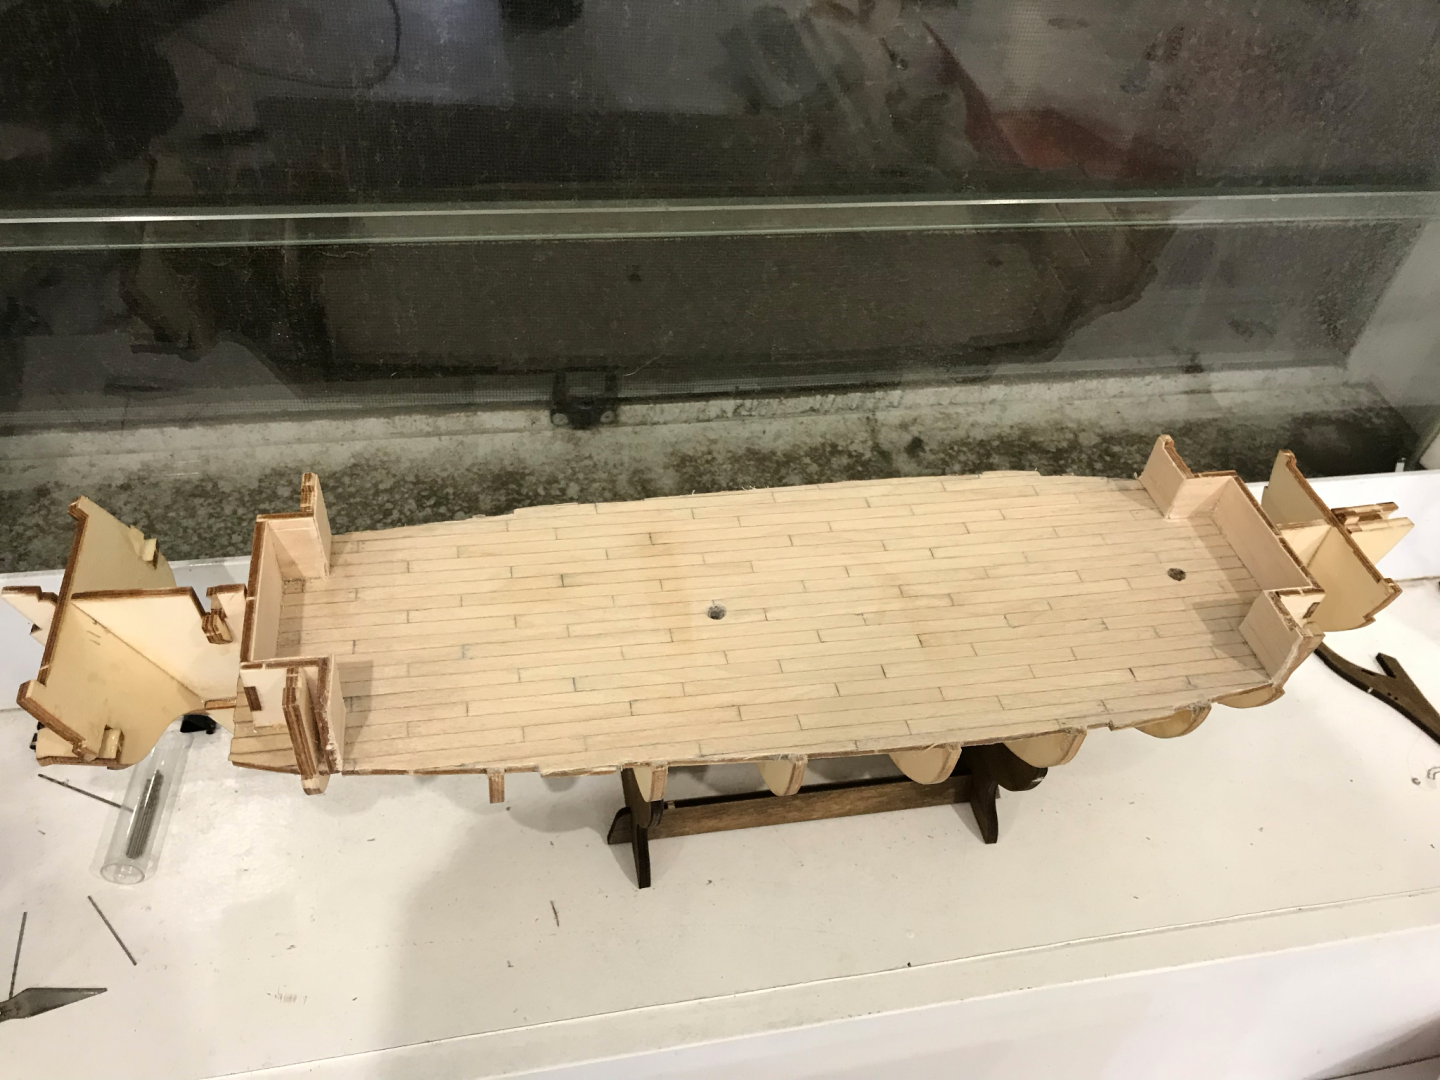
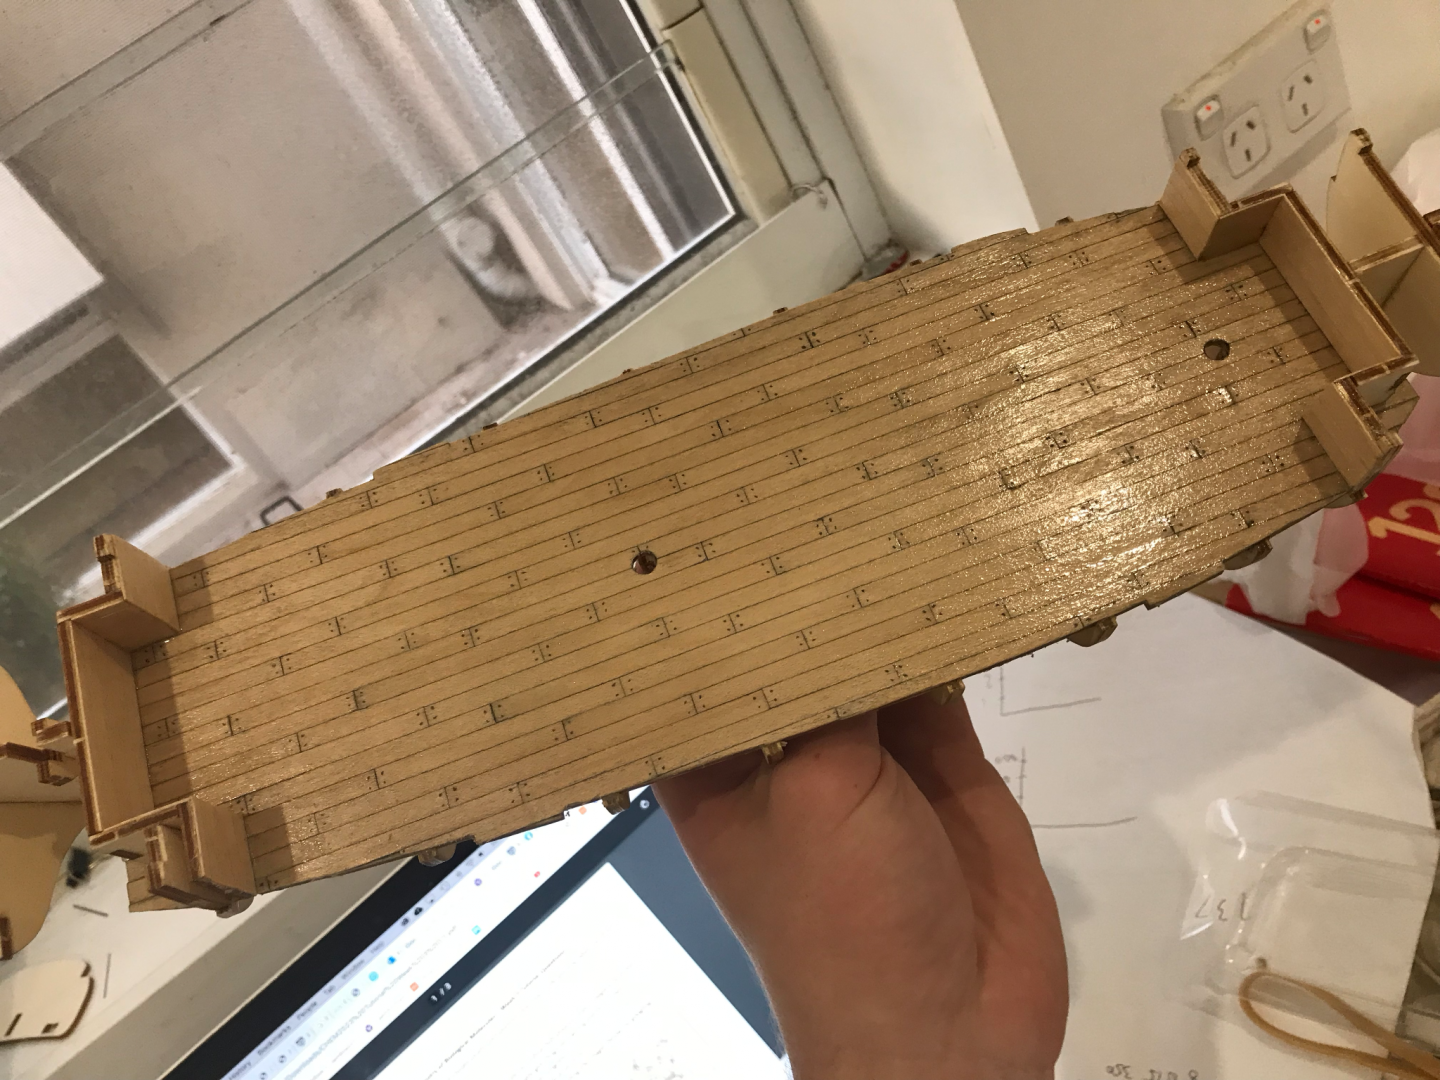
Okay, so it was a week into the build, and I hit the first major challenge, the deck. On my Albatros I did not attempt to simulate caulking and somewhat regretted that, so I decided to give it a go on this ship. I cut individual planks because I like it that way, even if it takes more time. I will be using a matte varnish on this build as I think it looks better and more realistic. Caulking was achieved by shading the edge of the planks with a 6B pencil and I was able to lay the planks mostly without drama. Although, a few notes, I laid the planks building from the aft to the fore, which meant that it became increasingly difficult to fit the planks in as I reached the end. Maybe next time I would lay a line of planks down the middle and build outwards. The Beagle had a three butt planking pattern according to the anatomy of the ship. Also, I did initially go with the pencilled in nails as recommended by the OcCre instructions. I have since significantly changed my stance, I think the pencil nails are out of scale and don’t look realistic. If I were to do it, I would also simulate the nails on the mid planks. I have since stripped the deck and removed the pencil nails, but we’ll get to that. In this photo, the deck doesn’t look so bad, it is probably a little too dirty though. Unfortunately, as I continued to sand the deck and redo some of the caulking, the pencil marks made the deck dirtier and dirtier I varnished the deck, while still hoping it wouldn’t look too bad and also not realising how dirty the deck had become After some back and forth, I decided I was not happy with deck and decided to strip the varnish and clean it The varnish could then be easily scraped off, giving a clean deck after a few planks were glued back down. Cleaning was done by scraping a sharp piece of glass over the deck several times. This is the best was I could find and works really well, giving a very tidy deck without destroying the grain. The nails were re-drawn (grr) and the deck was varnished again (still wet here)


-
Whoops, miscalculated in the last post, have been building for four months. Deck write up coming soon, watch this space.
-
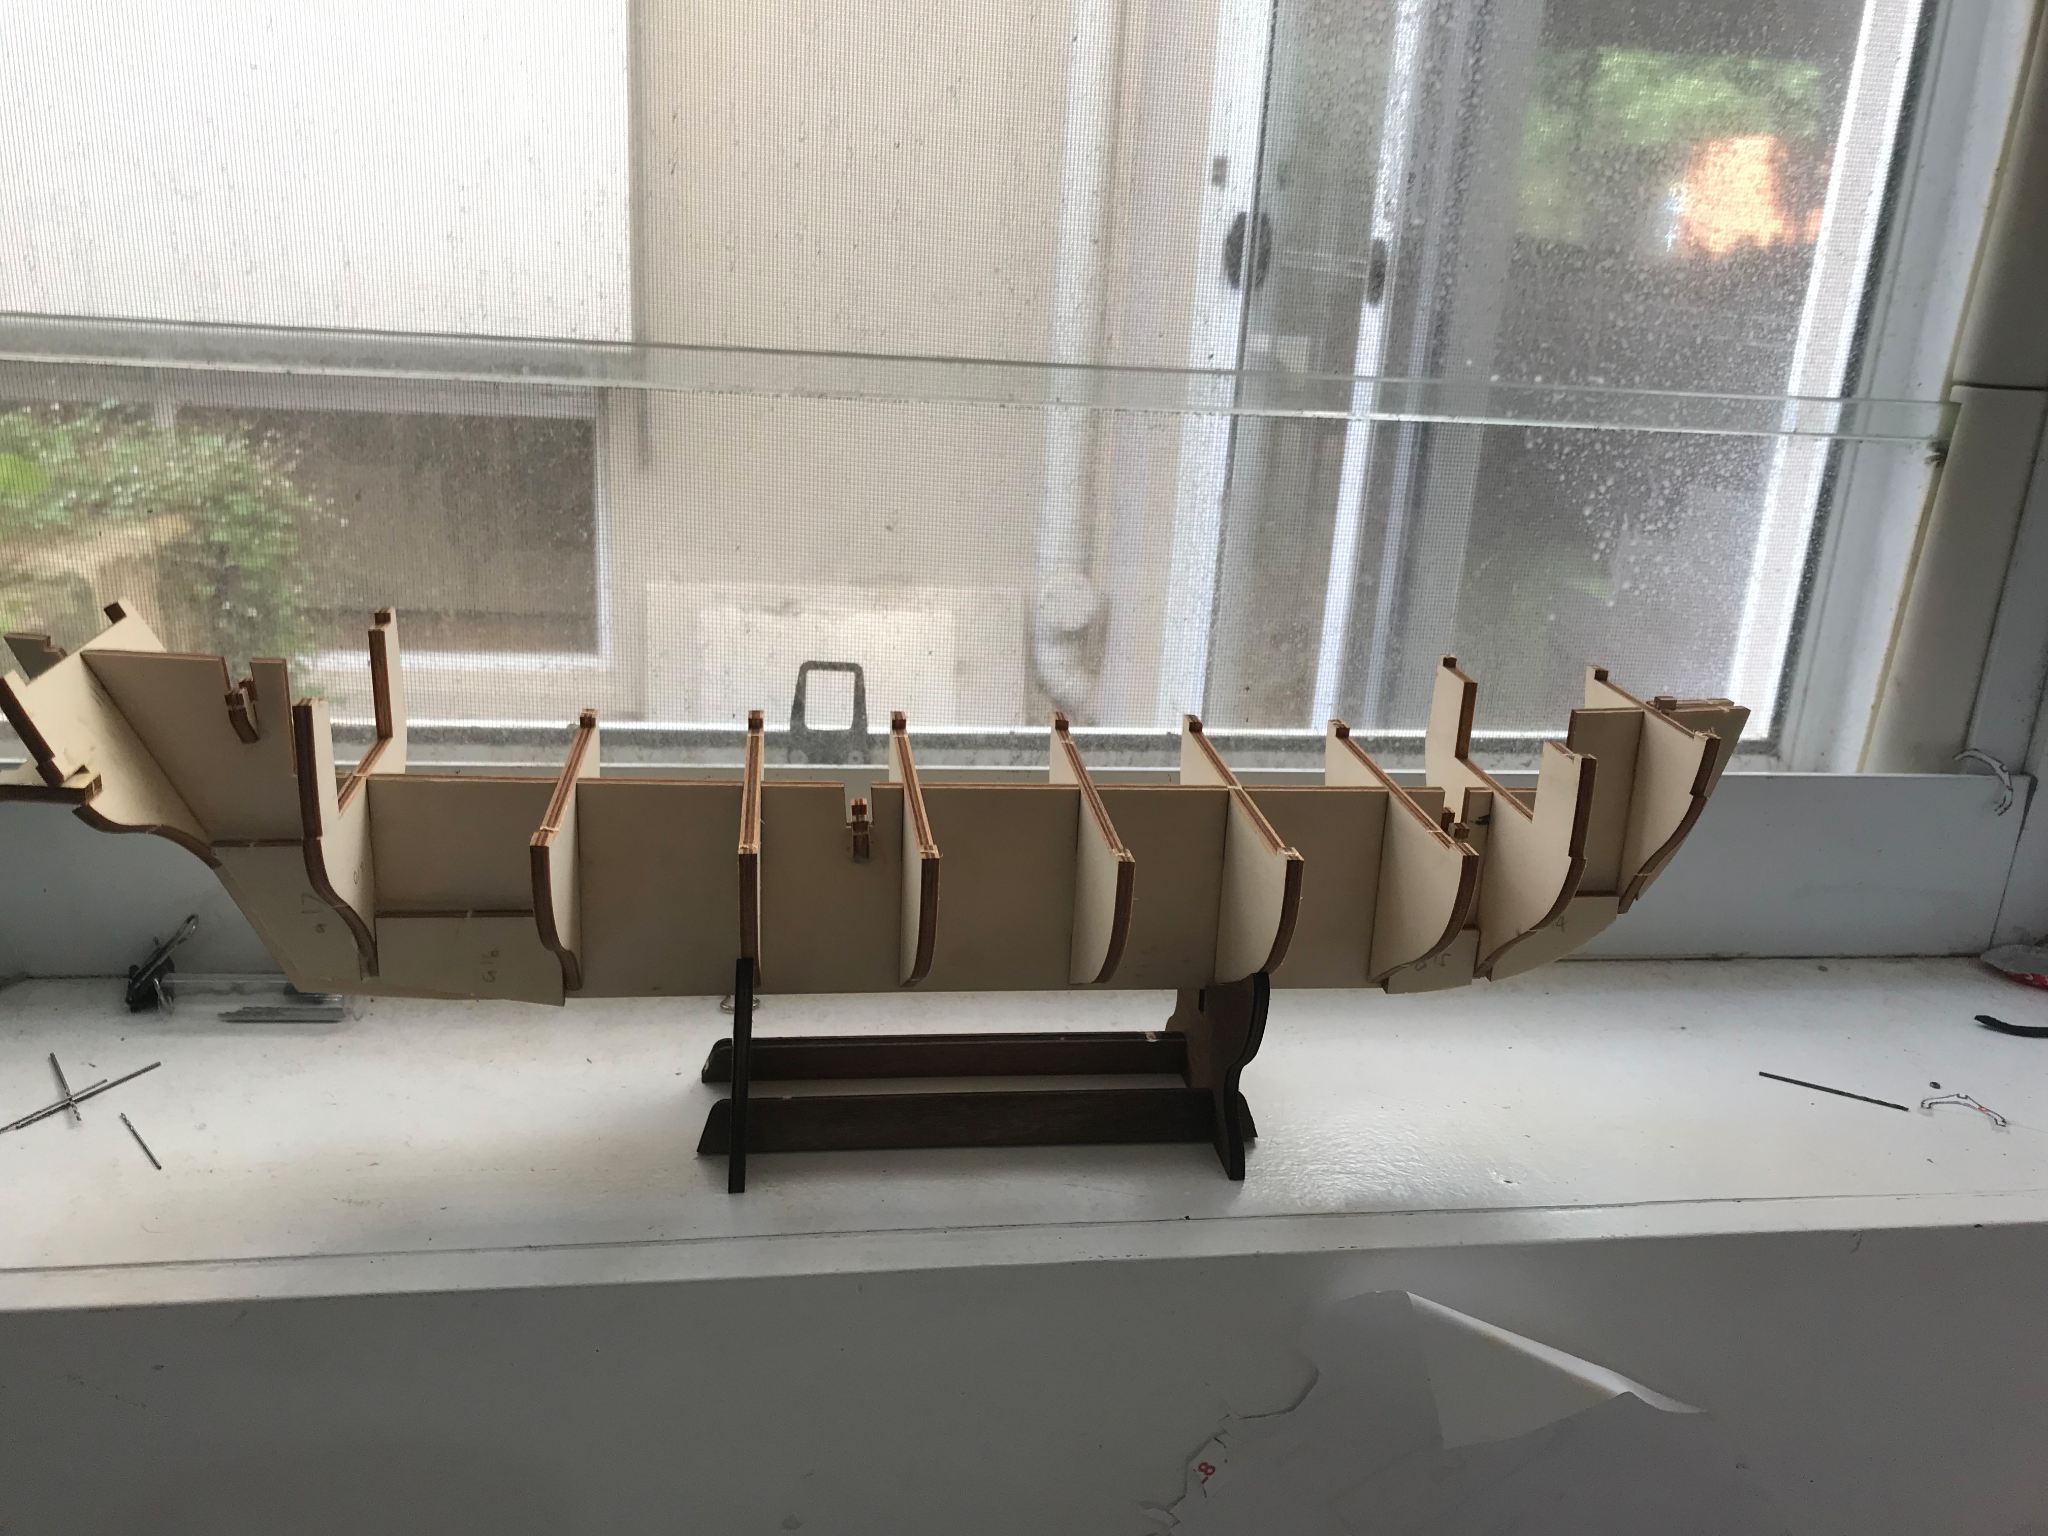
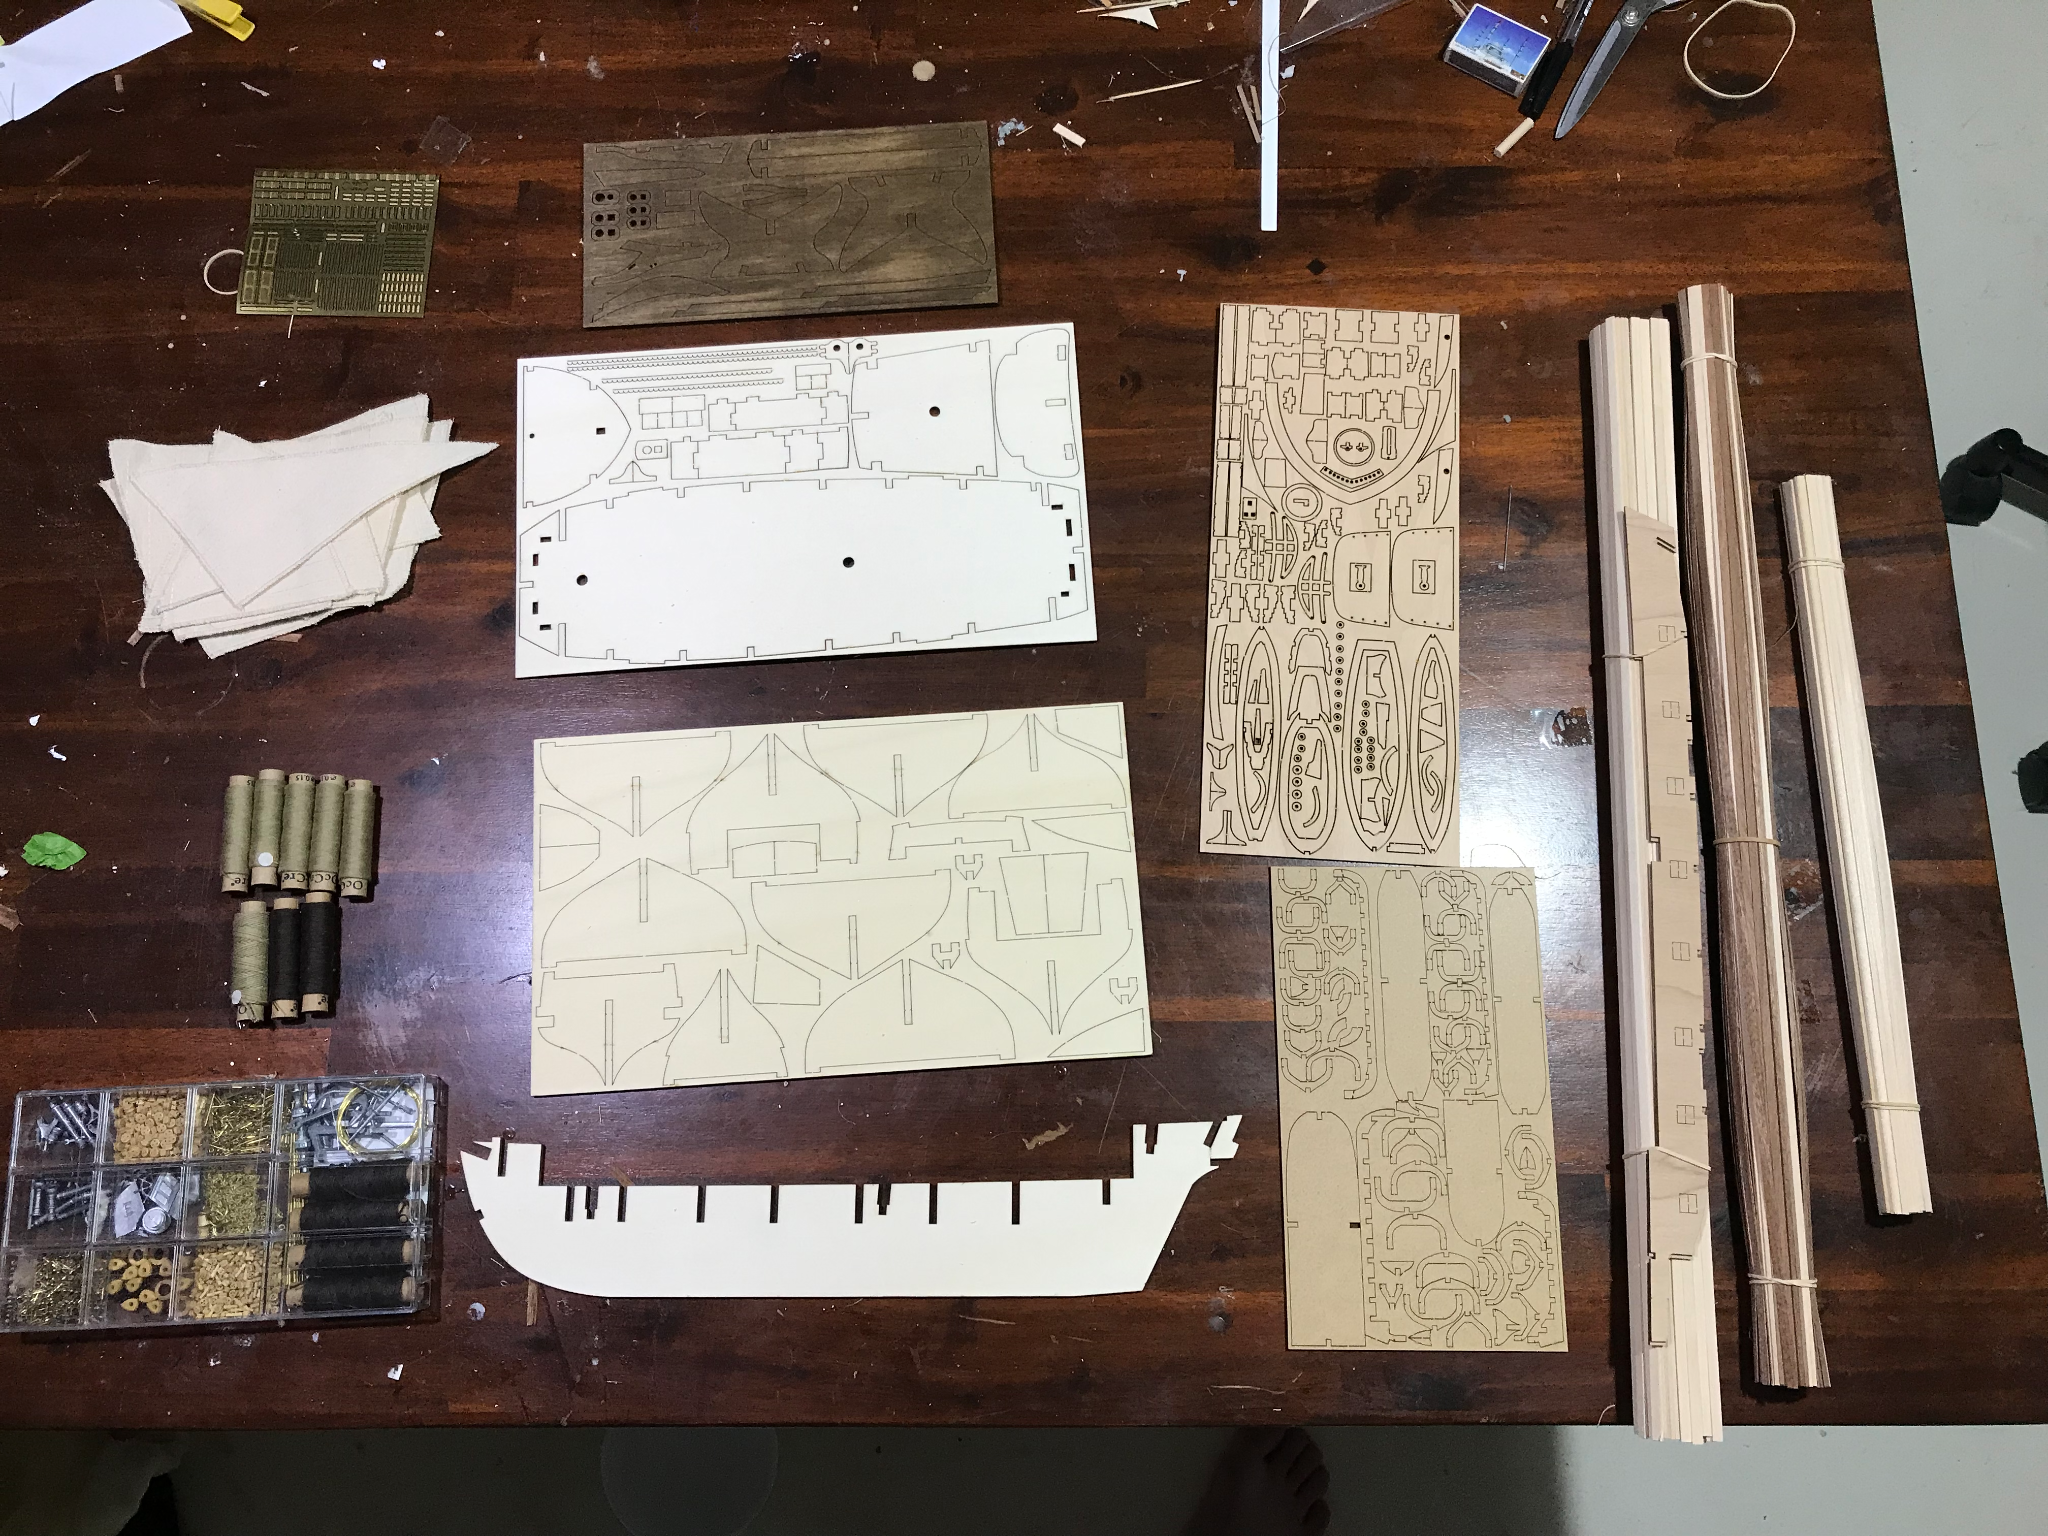
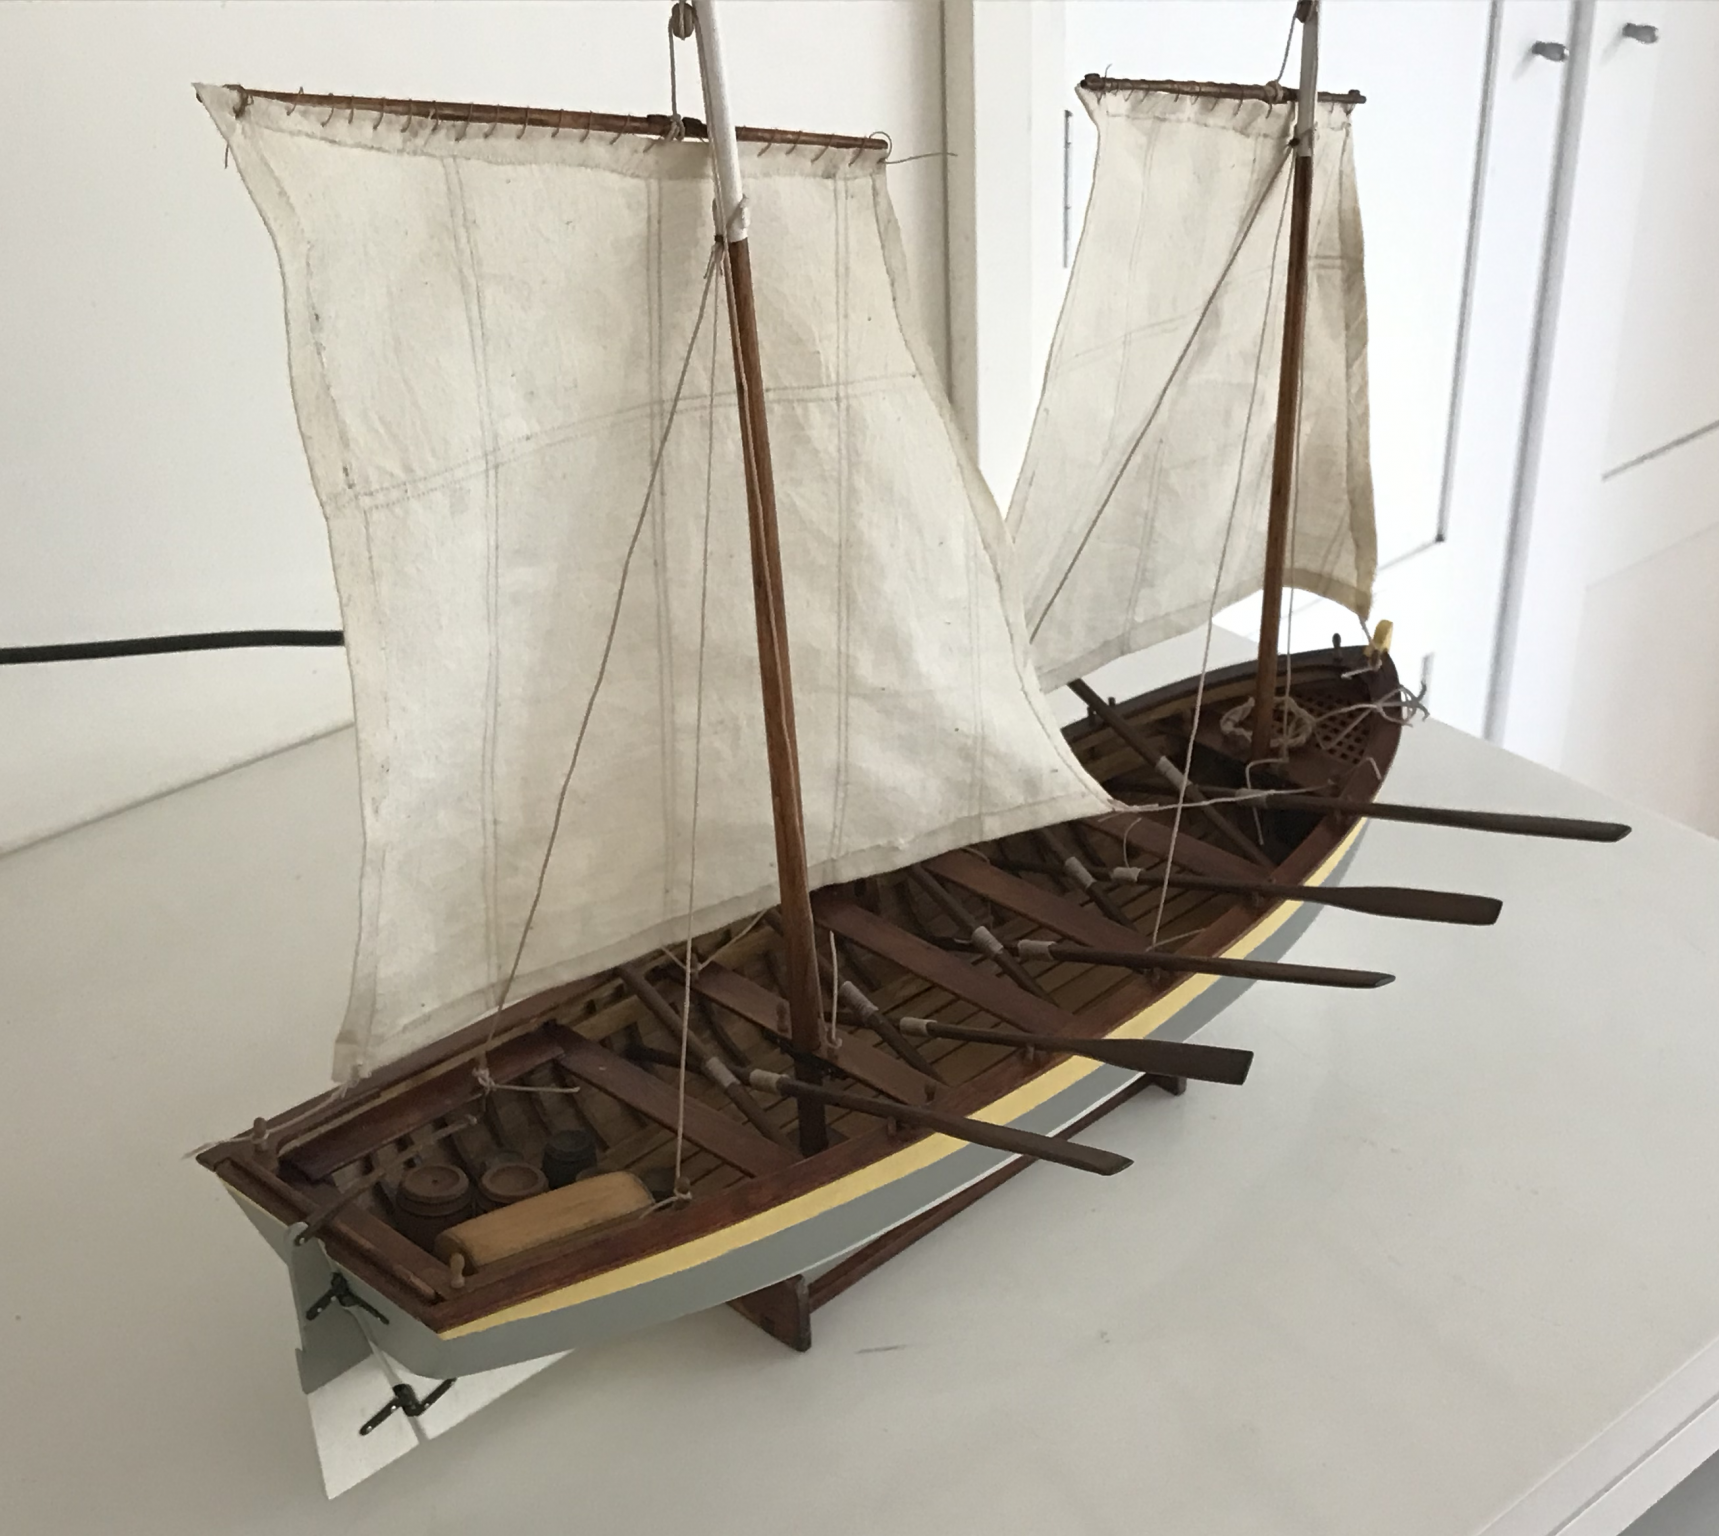
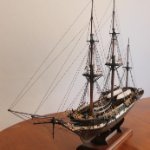
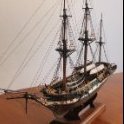
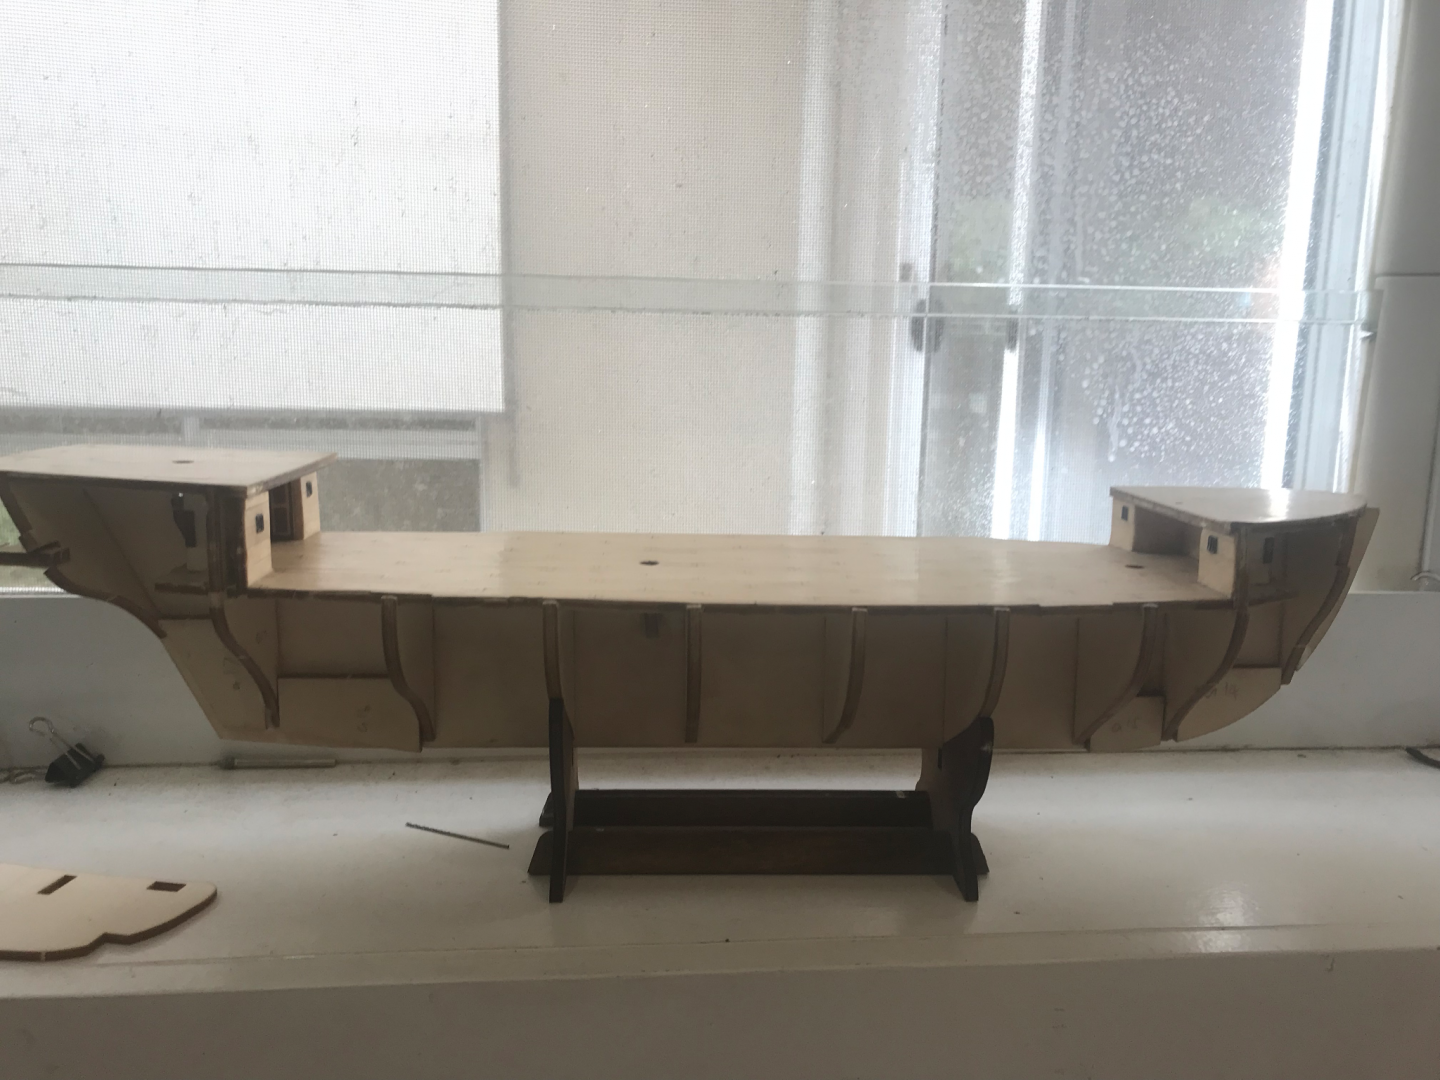
Hey everyone, so it seems like there are several HMS Beagle build logs all of a sudden. I had planned on writing up my own once the hull was completed and we are pretty close now (been building for 5 months, just need to finish up the deadeyes), so I thought I'd start to write up some of the earlier stages as well as outline what I'm going for with this build. So, I am currently a third year uni student studying Biochemistry and Biology and as a result, Charles Darwin and the HMS Beagle are very close to my heart and is partly what got me into this hobby. I've done a build log on my first ship, HMS Bounty's Launch, which I started with my Dad in around 2011 before leaving it on a shelf for 9 years. I've also built the USS Albatros to try and familiarise myself with OcCre kits and develop my skills for the big one (the Beagle). I'm going to try to build the ship as accurately as I can with a few exceptions. I have managed to obtain a copy of the Anatomy of the Ship book for the Beagle and will be making some modifications to the model accordingly. Some parts are out of scale (deck planks and a few others), but I'll just have to live with that. The biggest modifications I will be making include coppering the hull, folding actual fabric hammocks and scratch building 3 additional small boats (A yawl and two 28 ft whaleboats) to better reflect the real ship. Also I'll try to make my own sails when I get there, but I have a feeling that is still a little way off. For the colour scheme, I have been inspired by this particular build on youtube: https://www.youtube.com/watch?v=dYRfDE8_1vM&t=526s I really like the darker colours on the wooden parts even if it may not be accurate. There is also the replica in Chile and a virtual tour on youtube as well https://www.youtube.com/watch?v=OTo1X9EzFDQ. It seems like the internal bulwarks would have been painted white. I will not be doing this purely for aesthetic reasons. So far I've been enjoying the build even if it has been quite challenging. The hardest part by far was the coppering, I'll go into more detail later, but I've given it a patina and it took some trial and error to get that right. It was also a bit tricky to lay all the tiles without disturbing the patina too much. There have been a few major instances where I've had to redo things, but I feel that it has always been for the better. So anyway, here goes, these are the first couple of pictures I have. I've been taking lots of photos (597 is the current count) and should be able to outline the process pretty well, even if it was a while ago now.


-
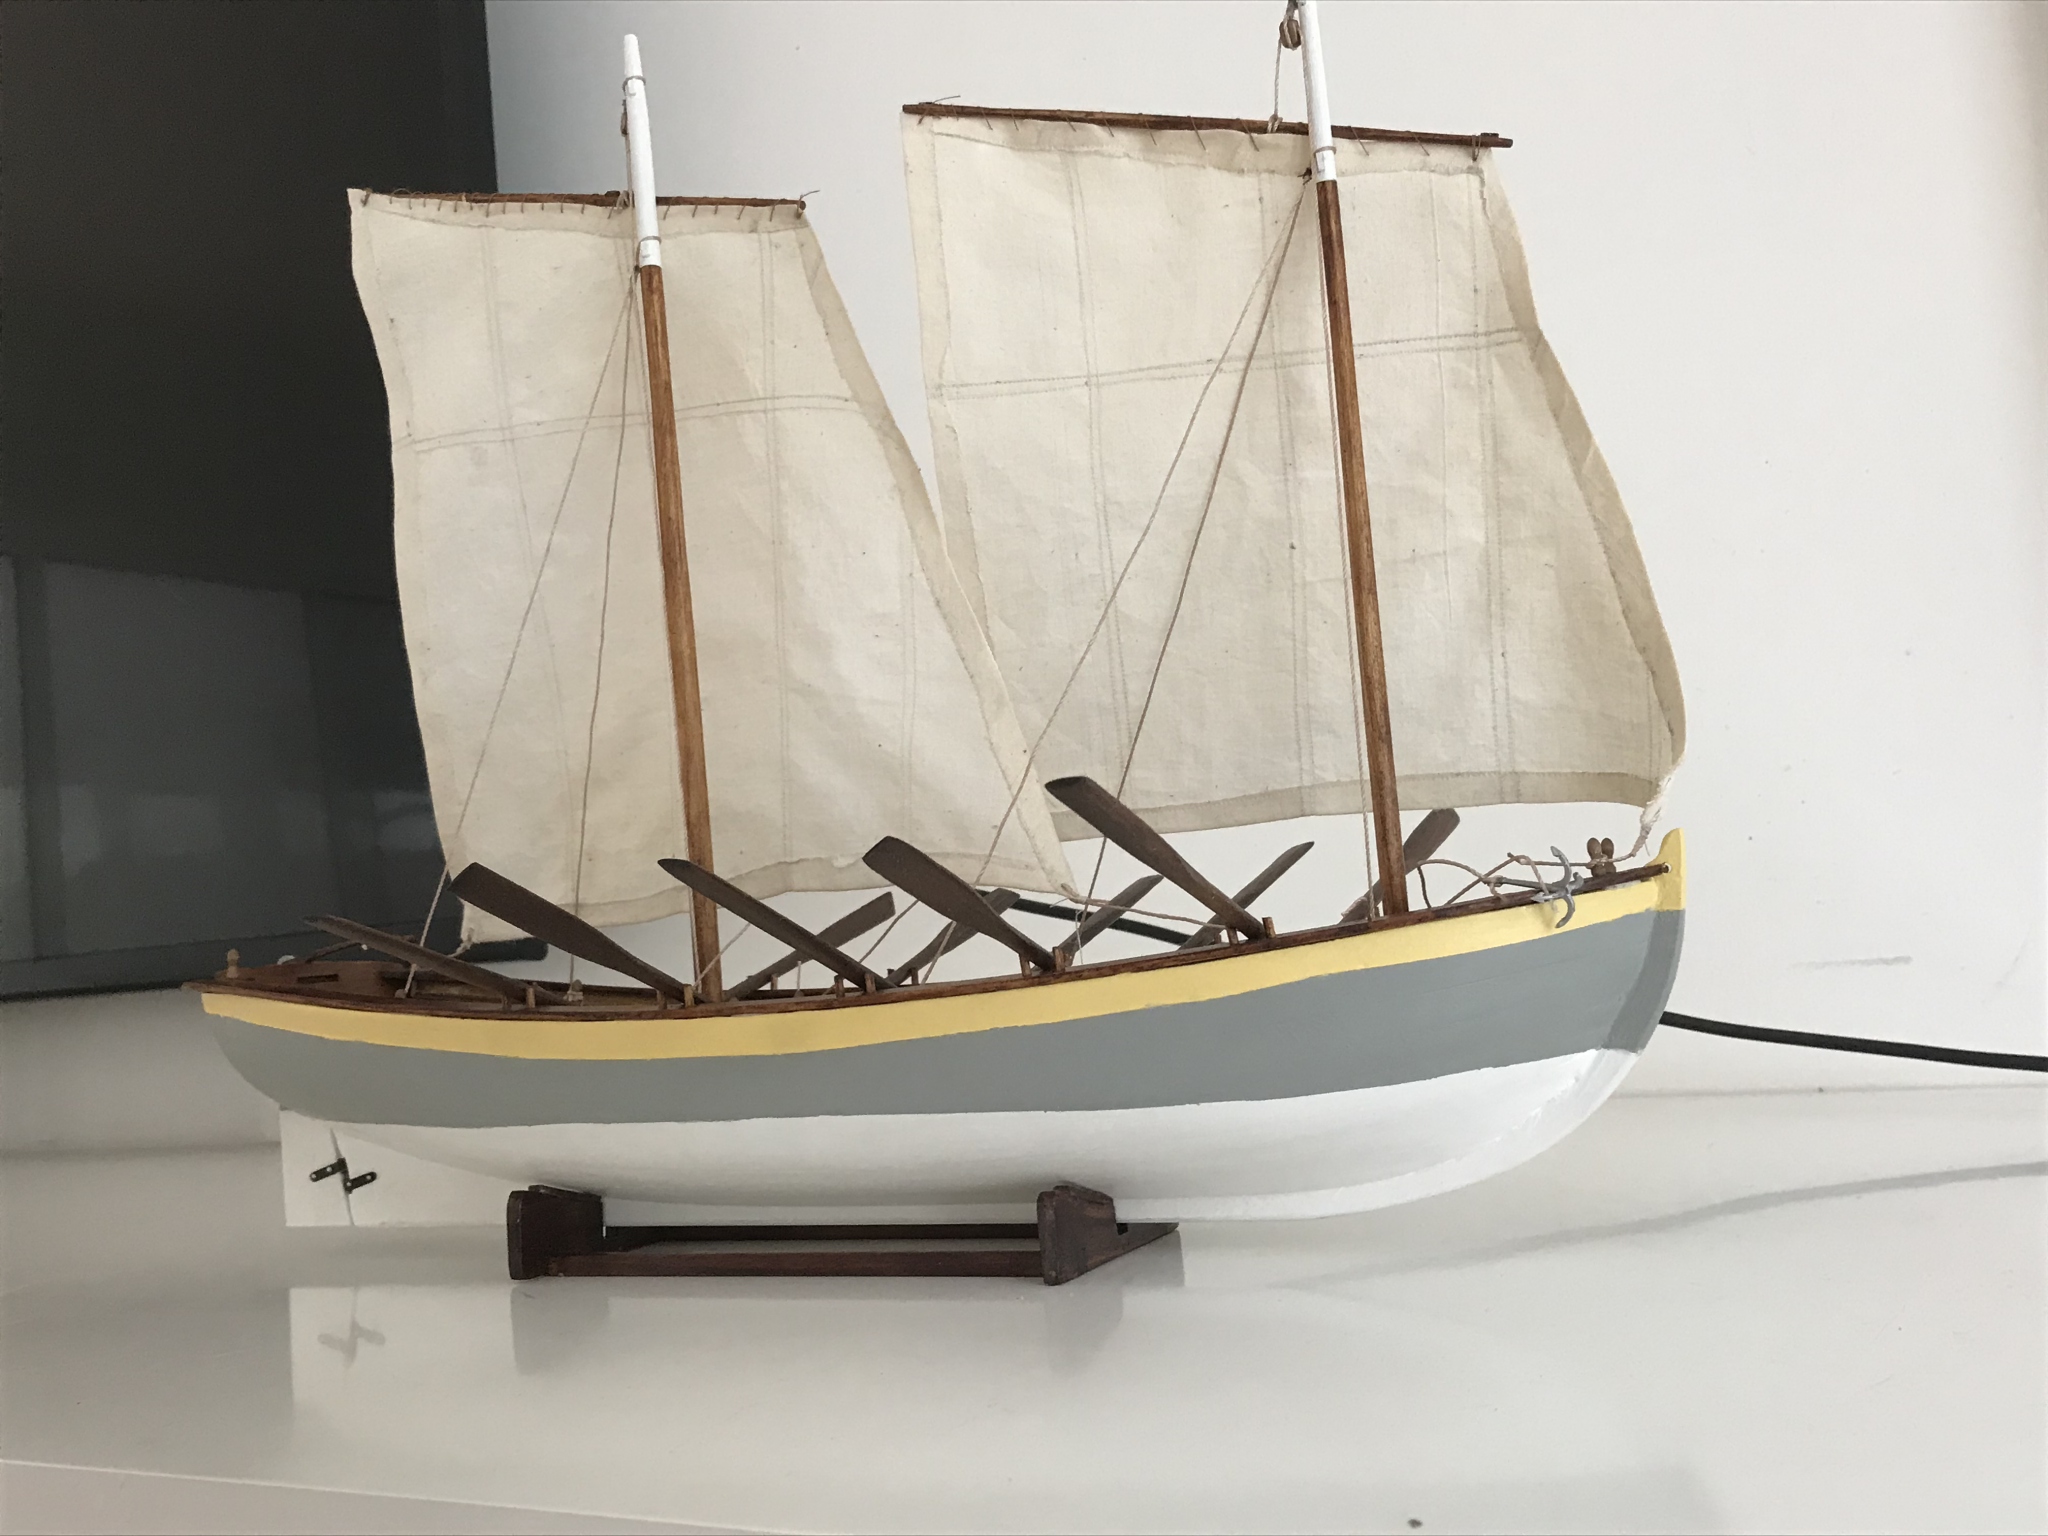
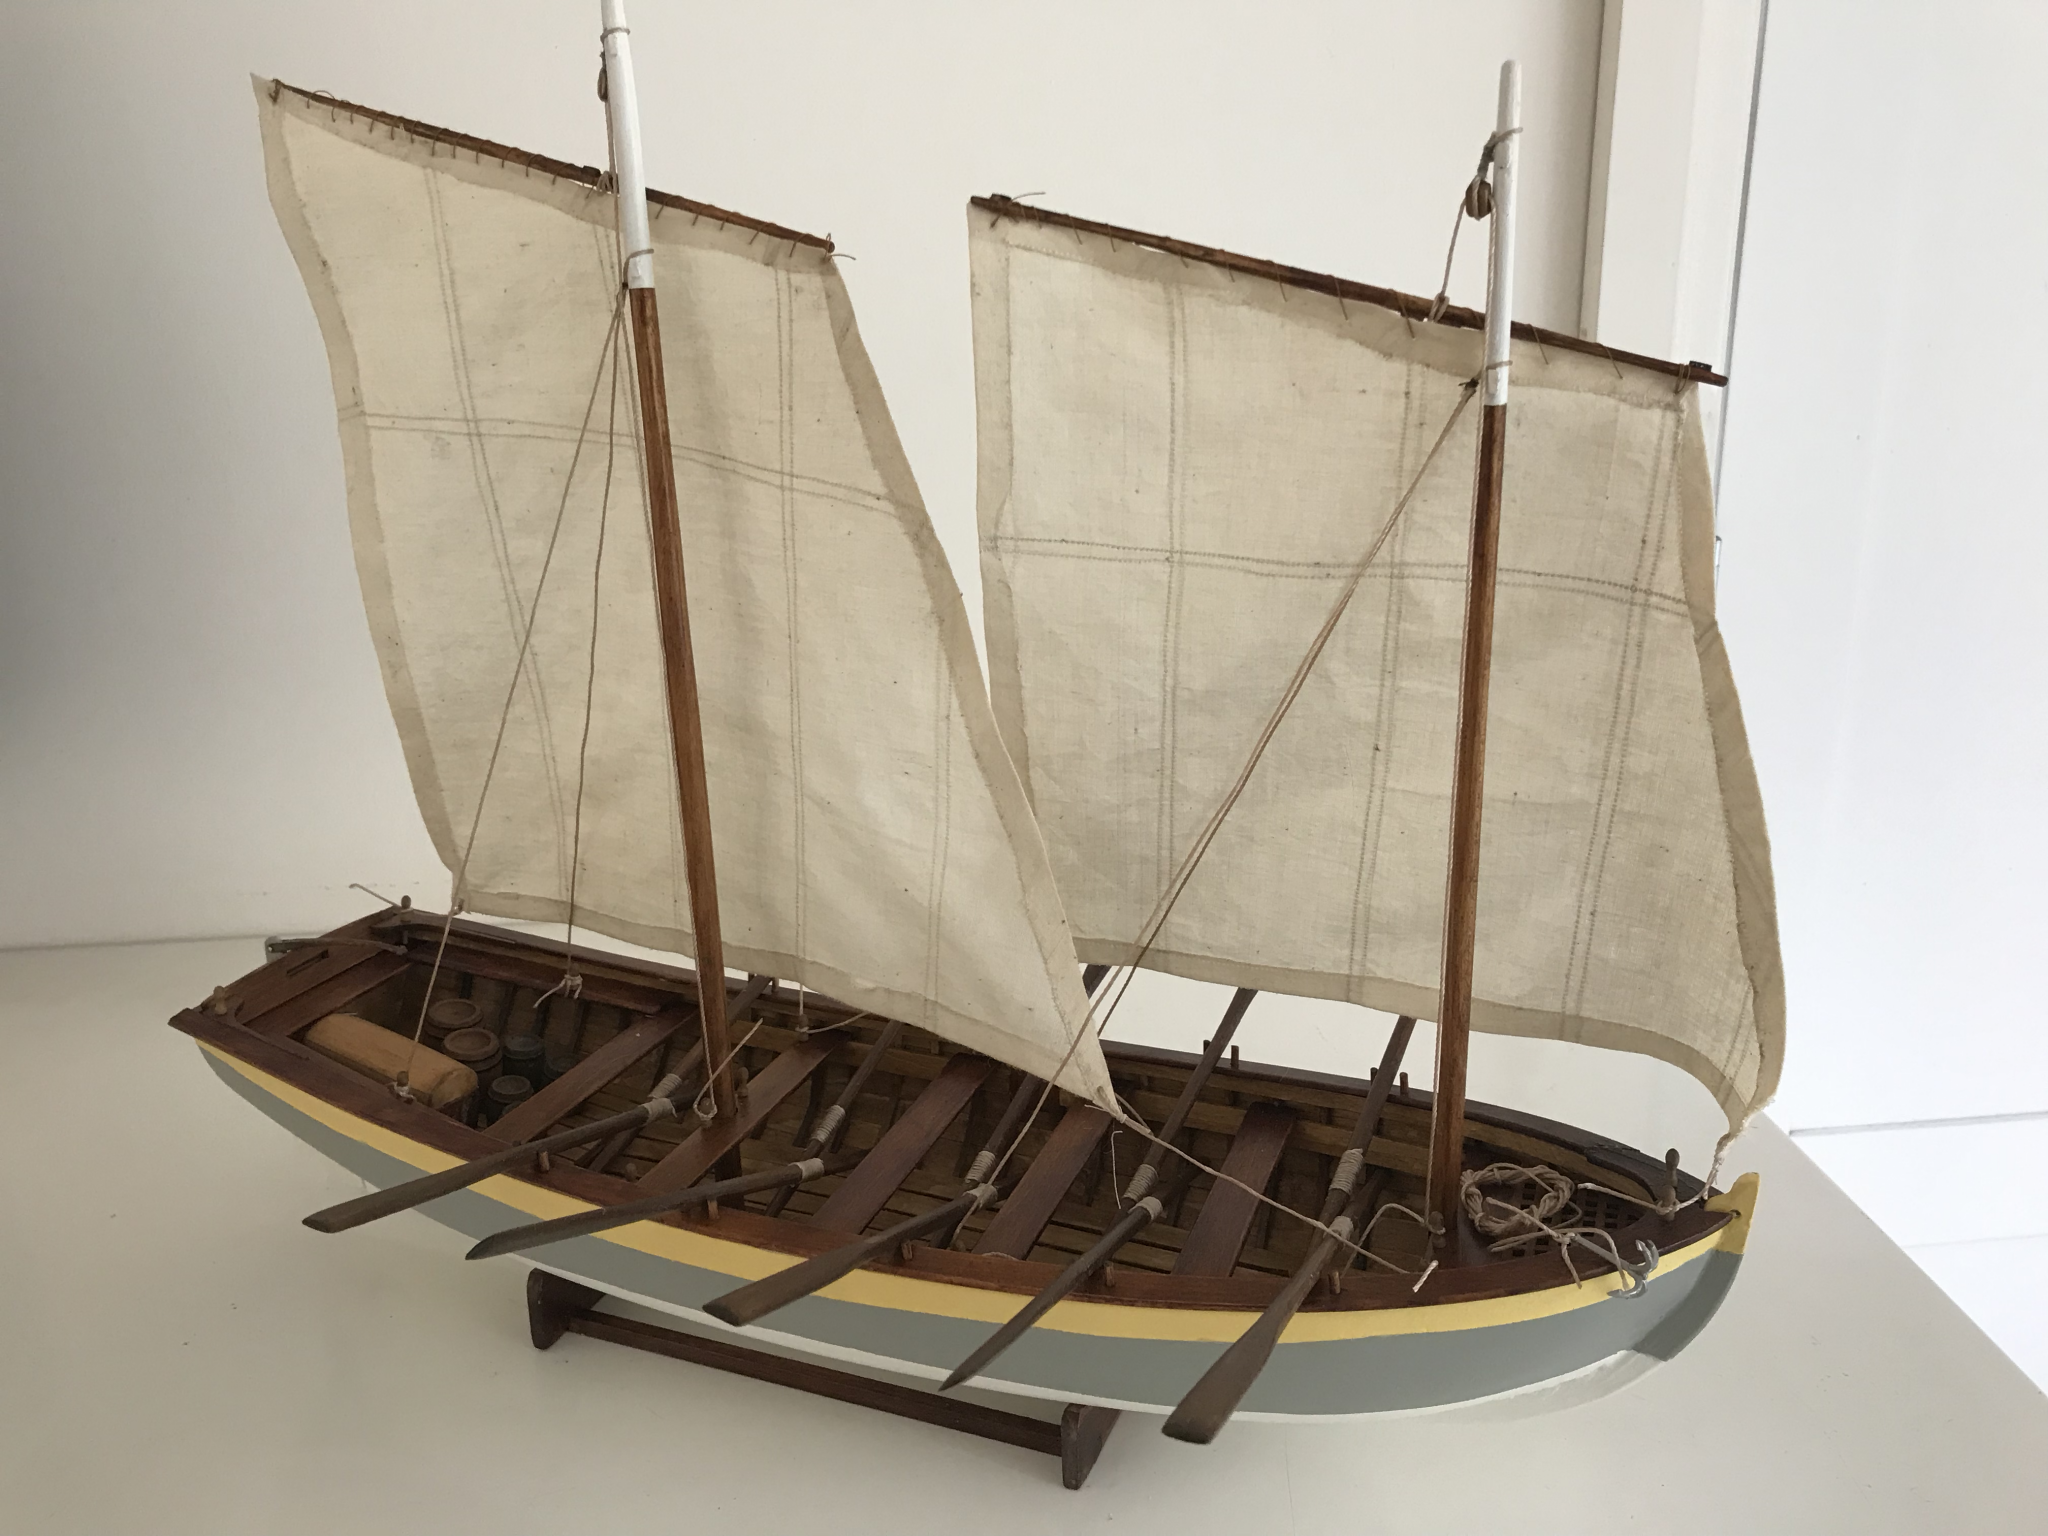
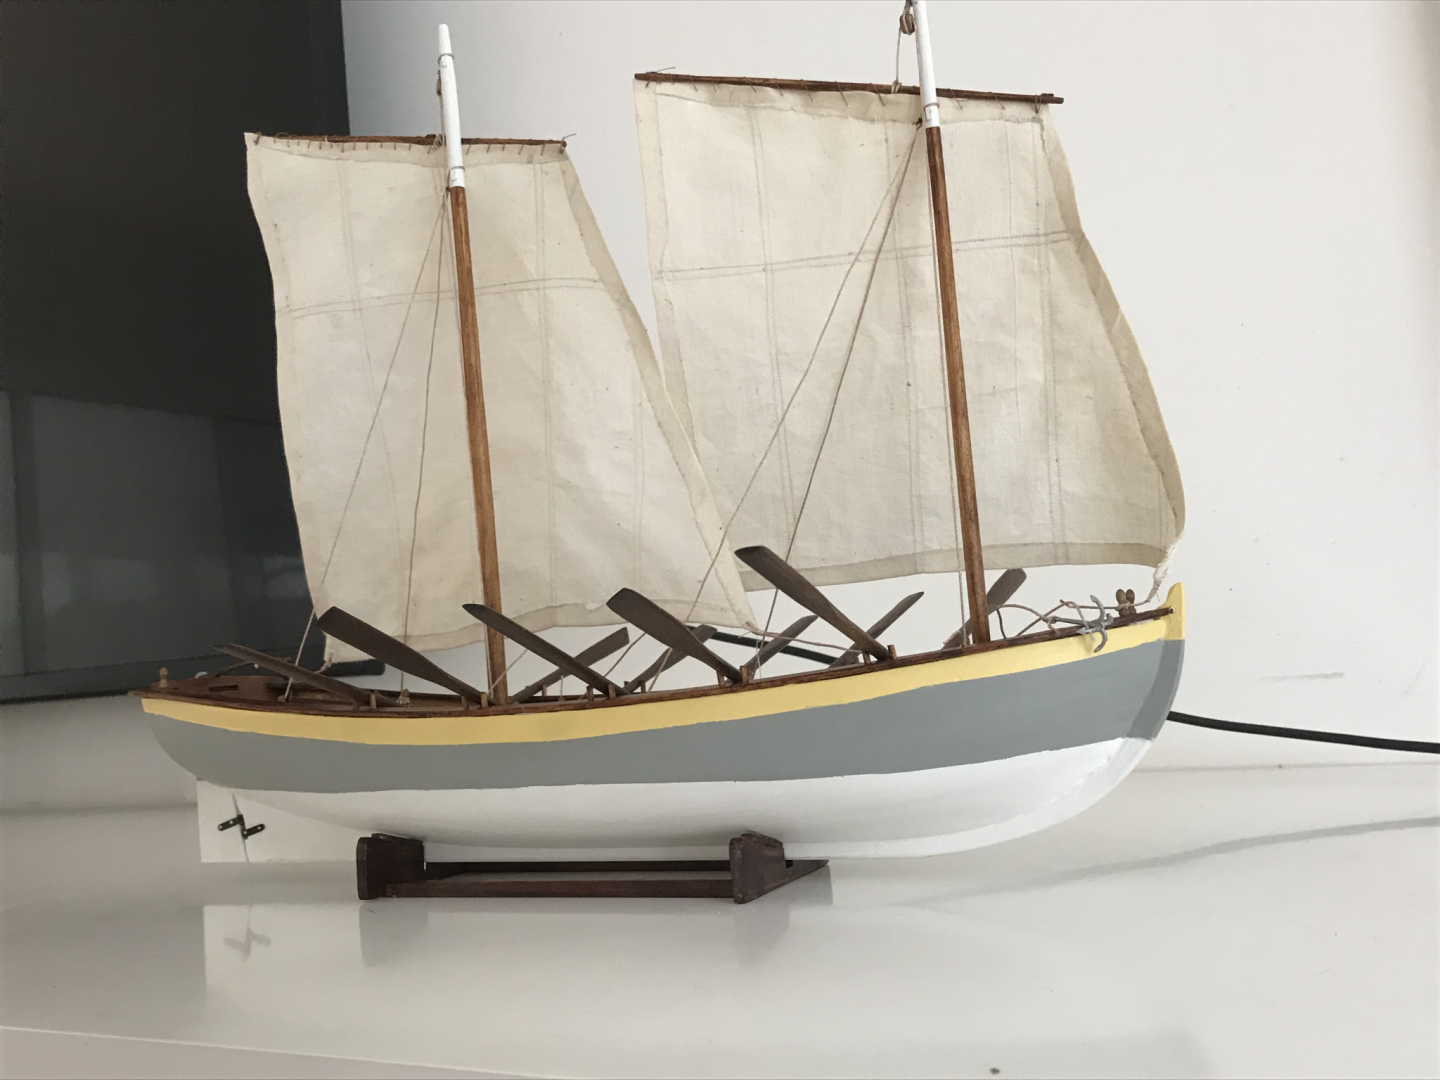
After a few lessons from my Mum about how to use the sewing machine, I was ready to give sail-making a go. My stitching was not very neat but good enough for the level of quality I was going for. I stitched the sails to the spars and spent an evening rigging the ship and it was finally complete. My philosophy while building this boat was to throw myself into a new skill without trying too hard to achieve something perfect. I think I do have a stubborn perfectionist streak, but I figured that for my first boat, I would have to let a few things go in favour of learning a new skill and hopefully make something better next time. With that said, I am still quite pleased with how this boat turned out and I have really enjoyed the entire process. Hopefully some other newbies might come across this log and find something useful here. A lot of the other logs I've seen for this kit have been from quite experienced modellers (the main ones I looked at were from 'Captain Steve' and 'usedtosail'), but I think this is probably a great kit for a beginner.


- 14 replies
-
- 3
-

-
- bountys launch
- model shipways
- (and 1 more)
-
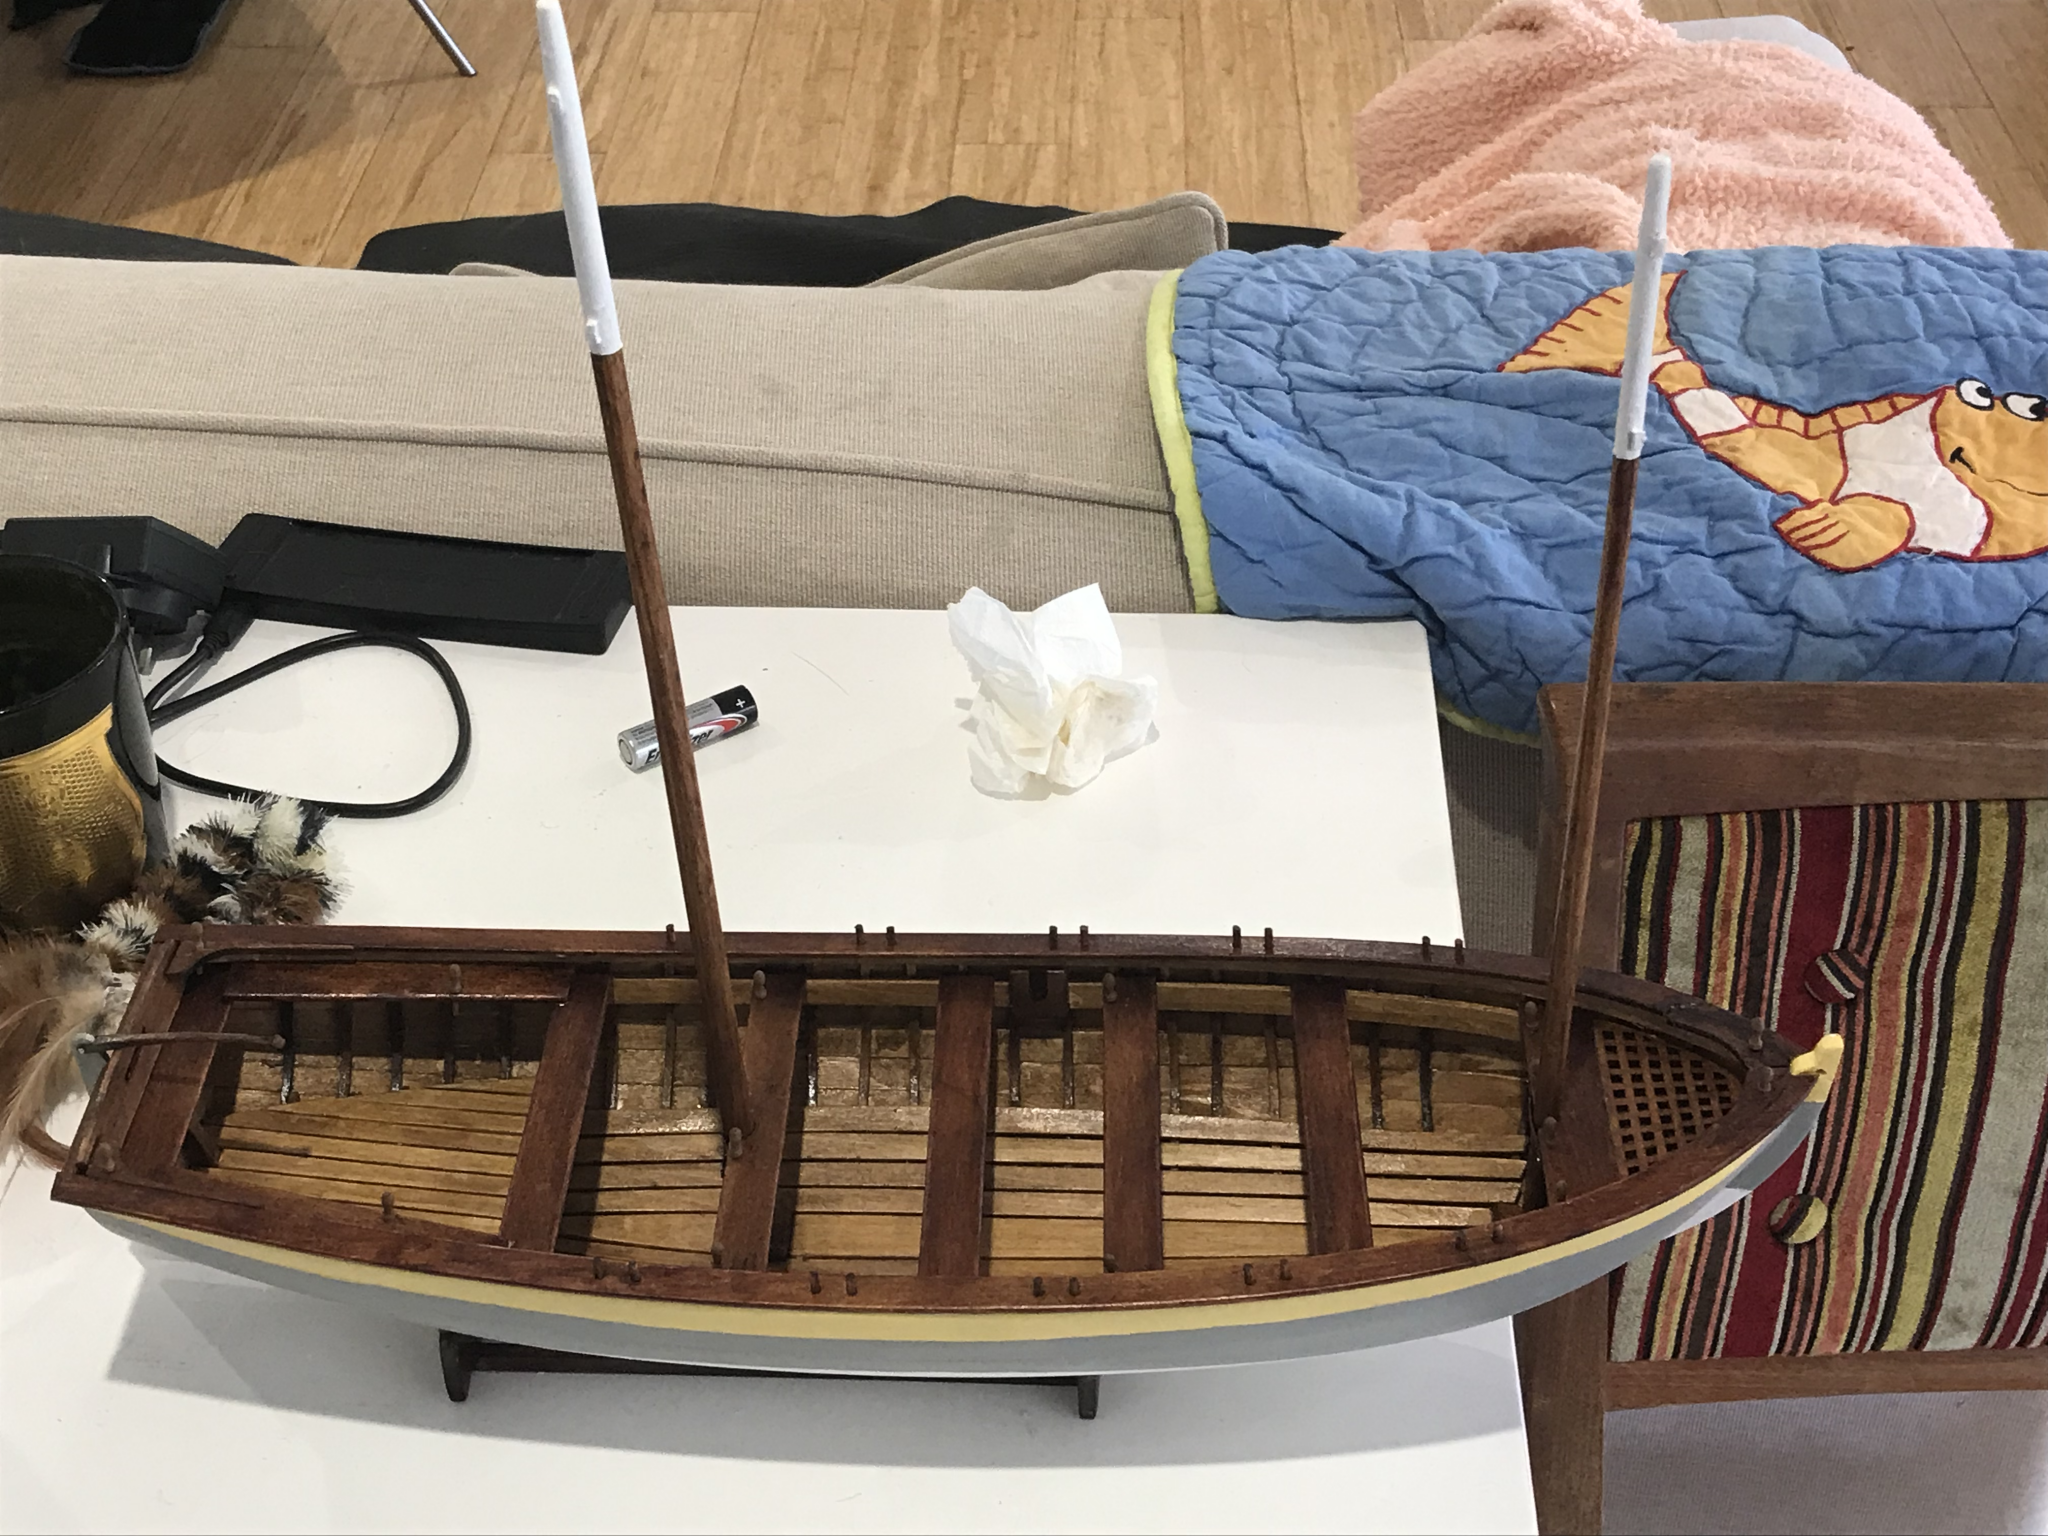
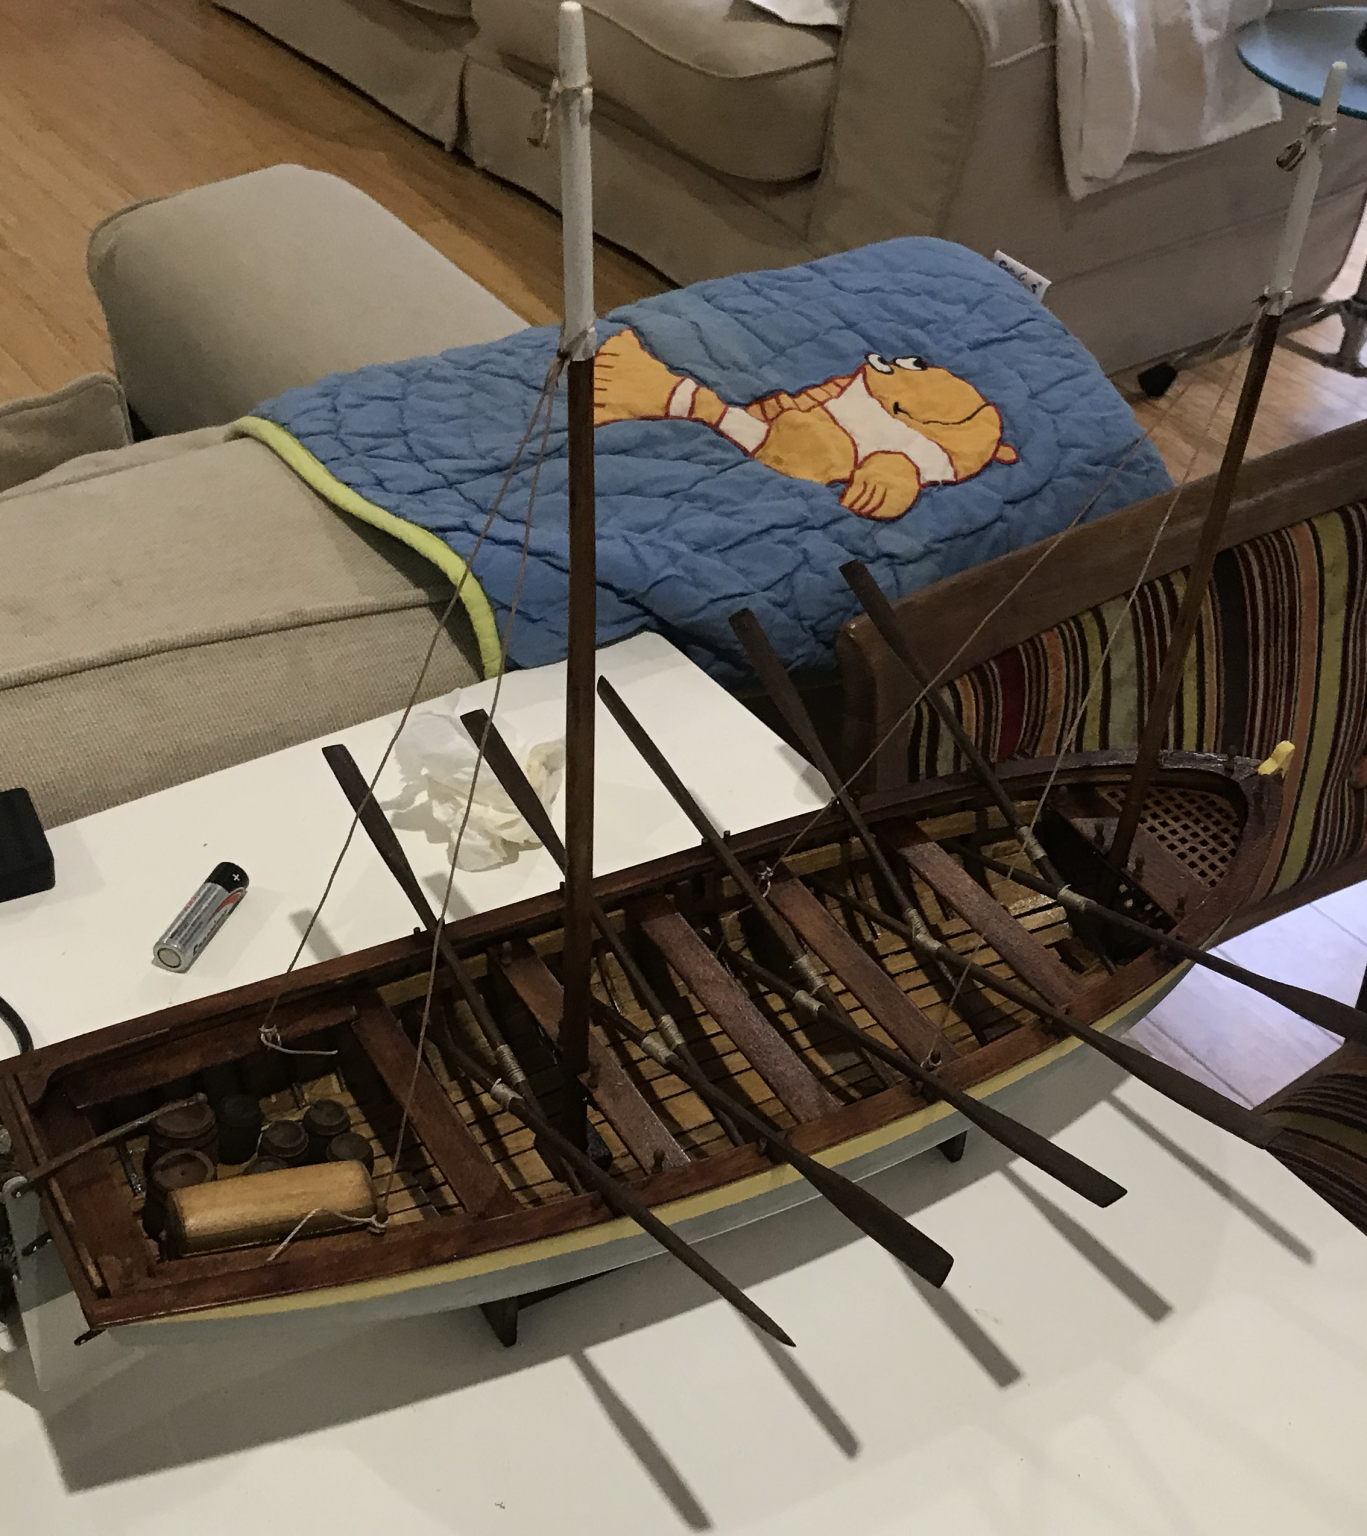
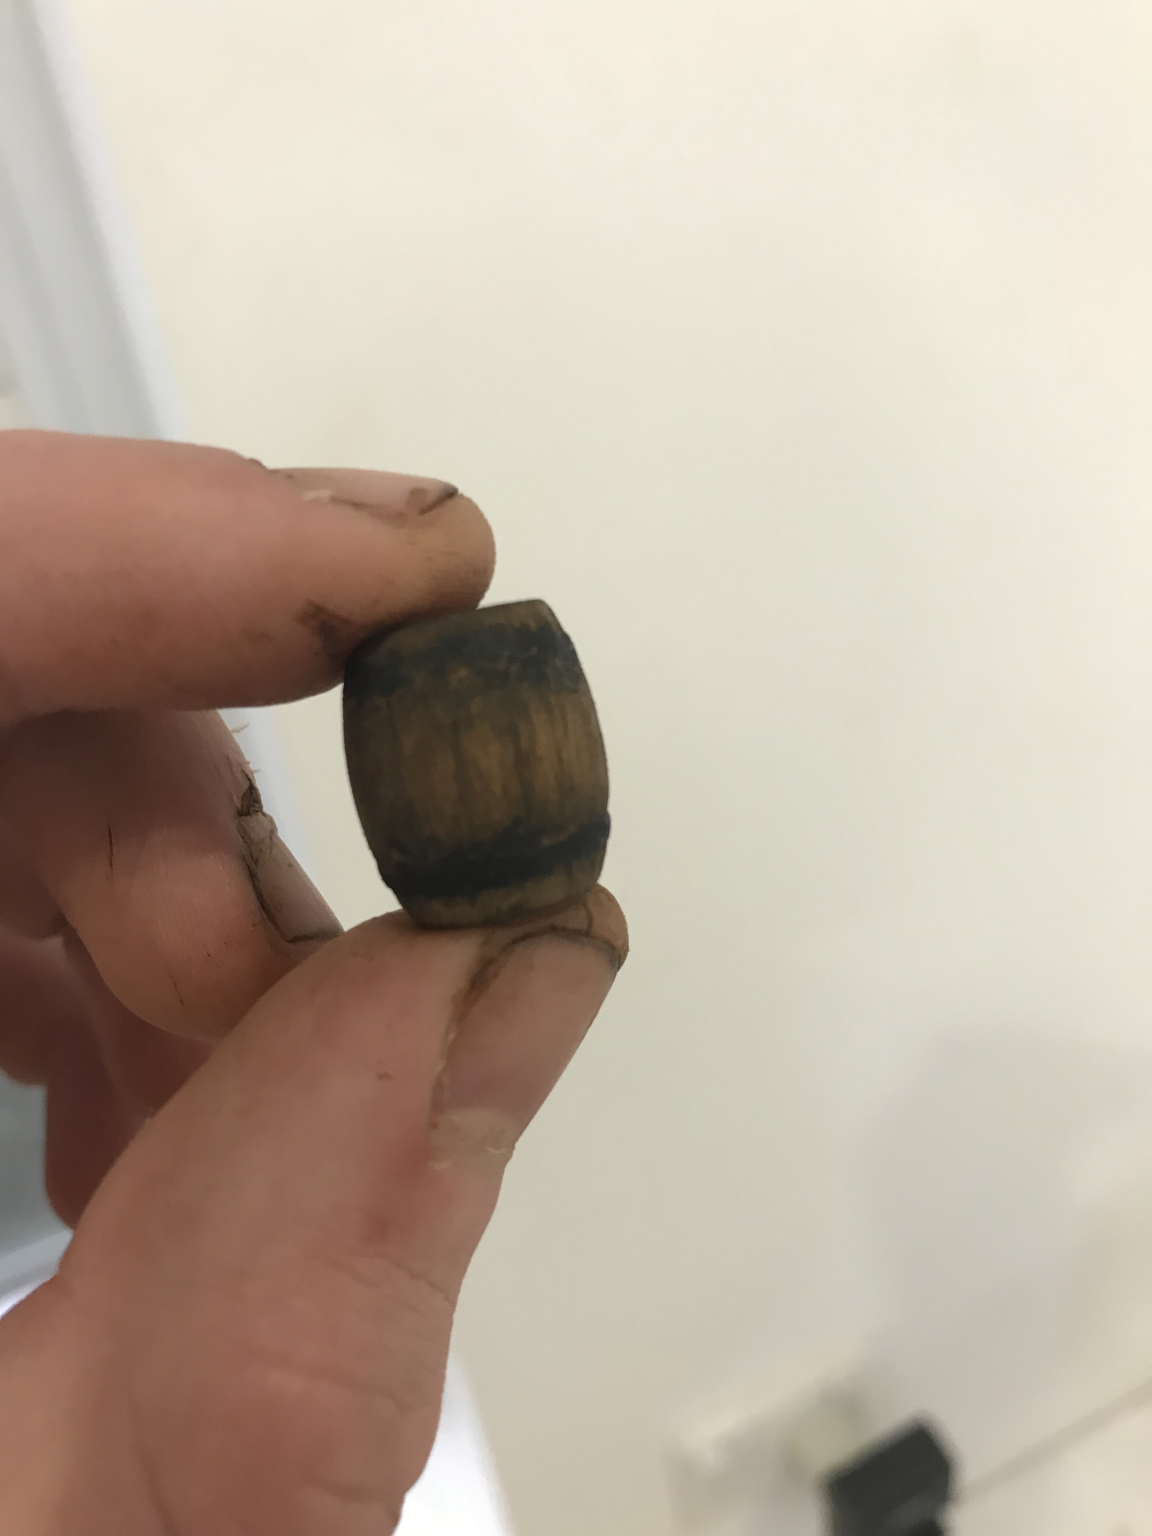
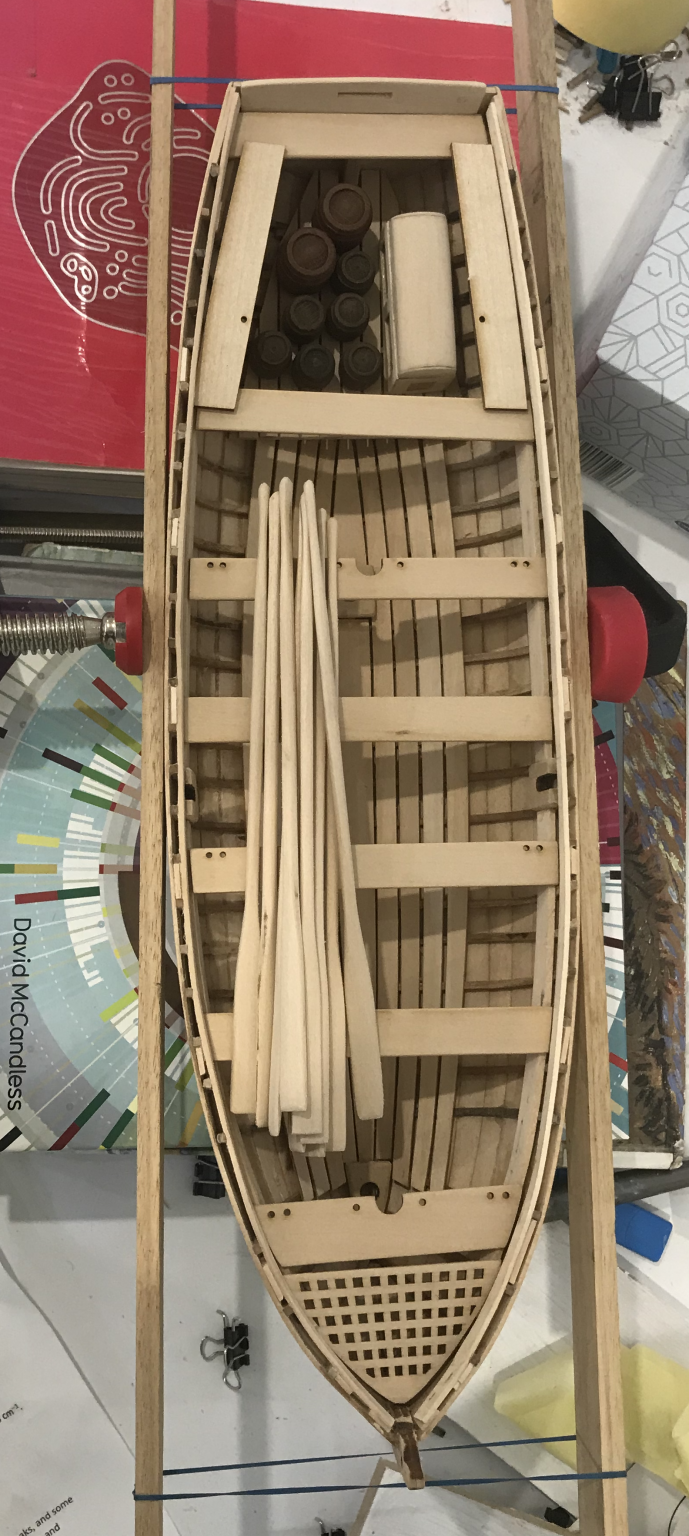
Okay, I managed to finish the masts, sails and rigging over the past week and I think I am ready to declare this ship finished. I do have to say, of all the tasks involved in this project, the sails and rigging collectively were some of the most difficult. I think I did get the hang of it eventually, but I do prefer the wood work. The masts were fairly simple just some tapering and sanding, adding the cleats was a bit fiddly but not too difficult. The stain I used was an oak, followed by a baltic with a very light walnut stain on top. The dowels were not very receptive to the stain and the spars came out a little uneven, but were okay. Then it was time for some of the initial rigging including the shrouds and the blocks. The knots for the shrouds were a bit tricky at first and I kept getting too much slack. I think I even re-did them after taking this photo to get them right. These blocks were also re-done as they were too tight. To form the rope for the blocks I held the line in a loop and melted the two pieces together with a lighter. There is probably a prettier way to achieve this, but it worked fine. I then used some sewing thread for the seizing with a bit of fray-lock to hold it in place. I also spent some time fiddling with barrels. The plans outline a much more detailed barrel than what is provided in the kit and I did attempt to replicate this. After cutting the plank grooves the raw wood was revealed and didn't look all that great, so I stained the barrel with some walnut stain. I was not happy with this stain so I sanded it back. I tried again with various mixtures of baltic, oak and walnut stains but couldn't really find something I was happy with. By the time I reached an acceptable colour, I had sanded the barrel so much that the barrel hoops were gone. I didn't really like this look either so I sacrificed this barrel and left all the others mostly untouched, my boat only has 5 small barrels now, oh well...


-
Hi Craig, glad you found the blackening solution helpful. Gee you can really see how small the boat was when it's full scale. Crazy to think they managed to fit 19 people in there
-
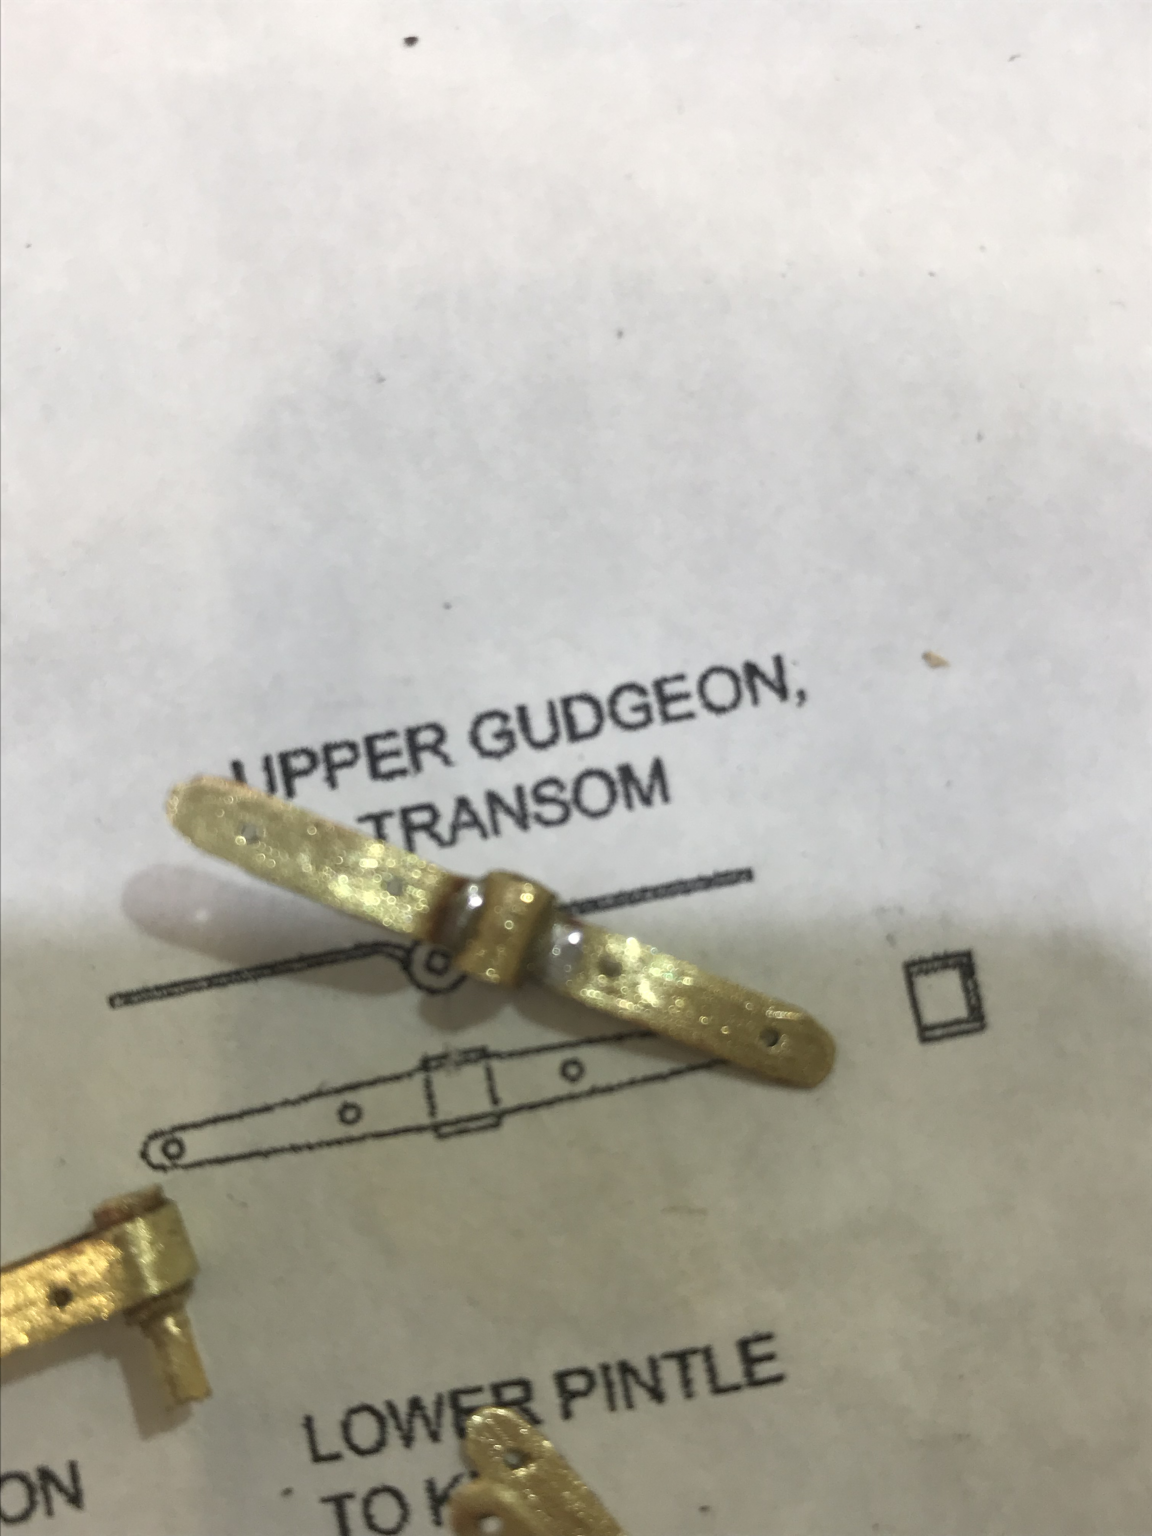
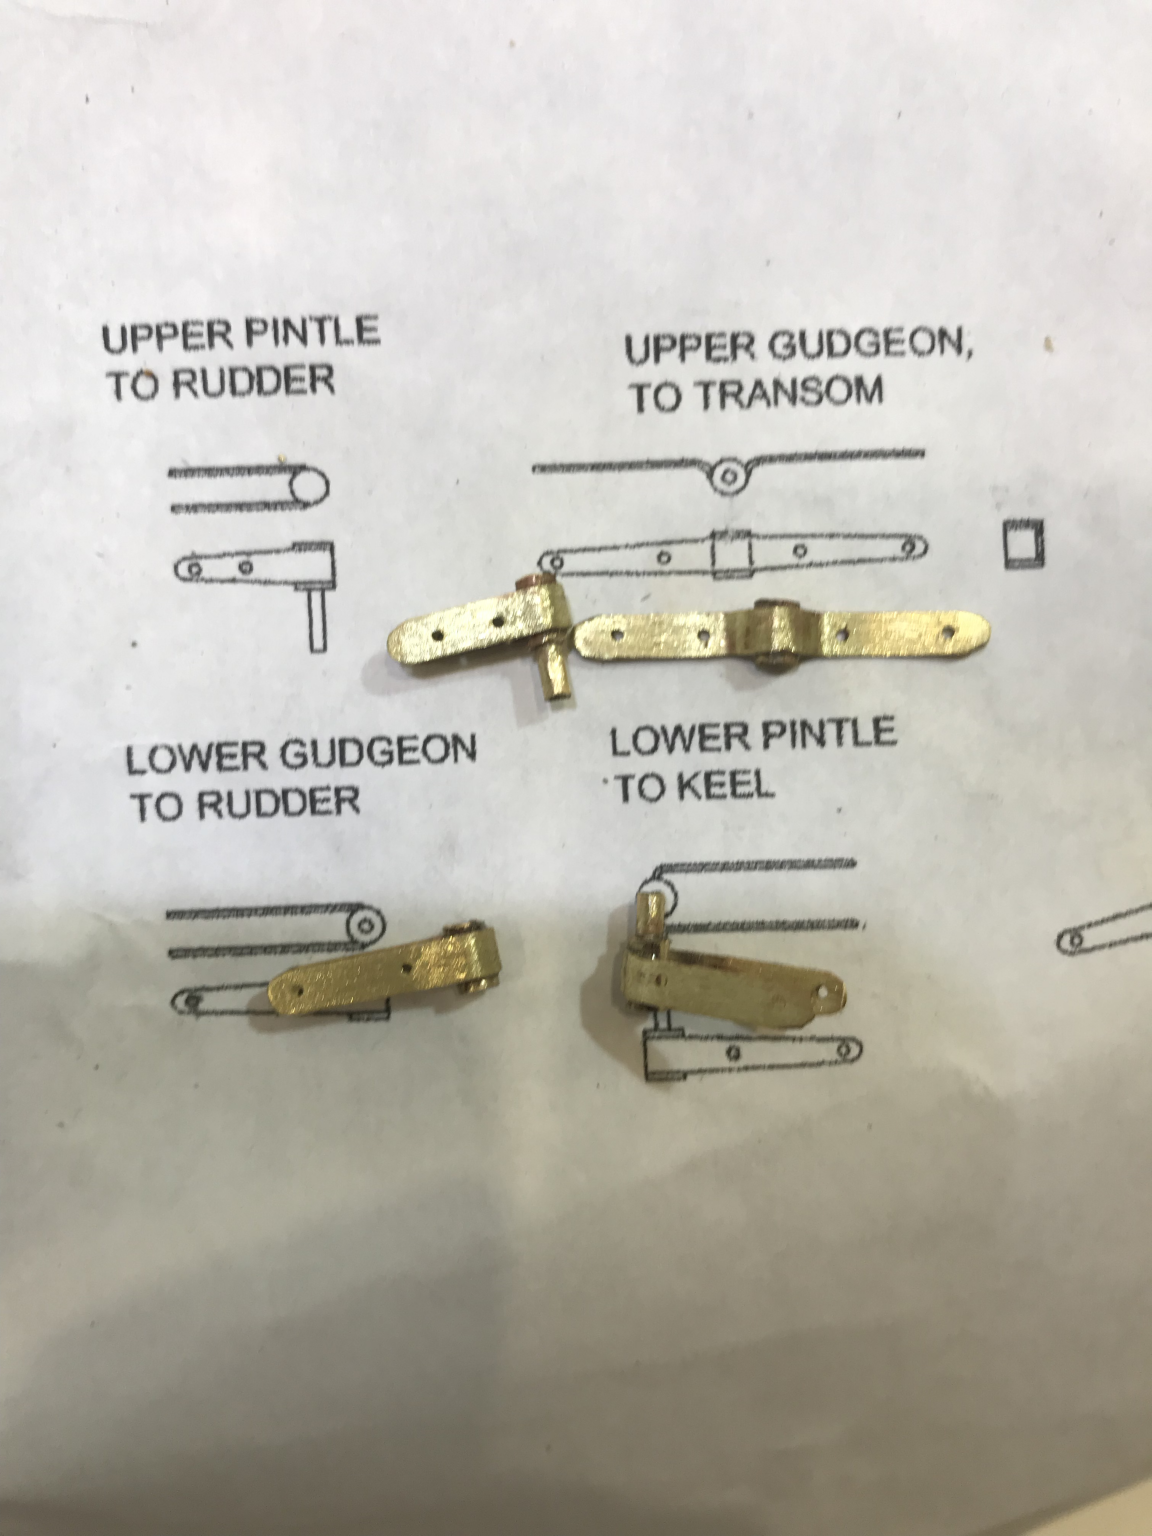
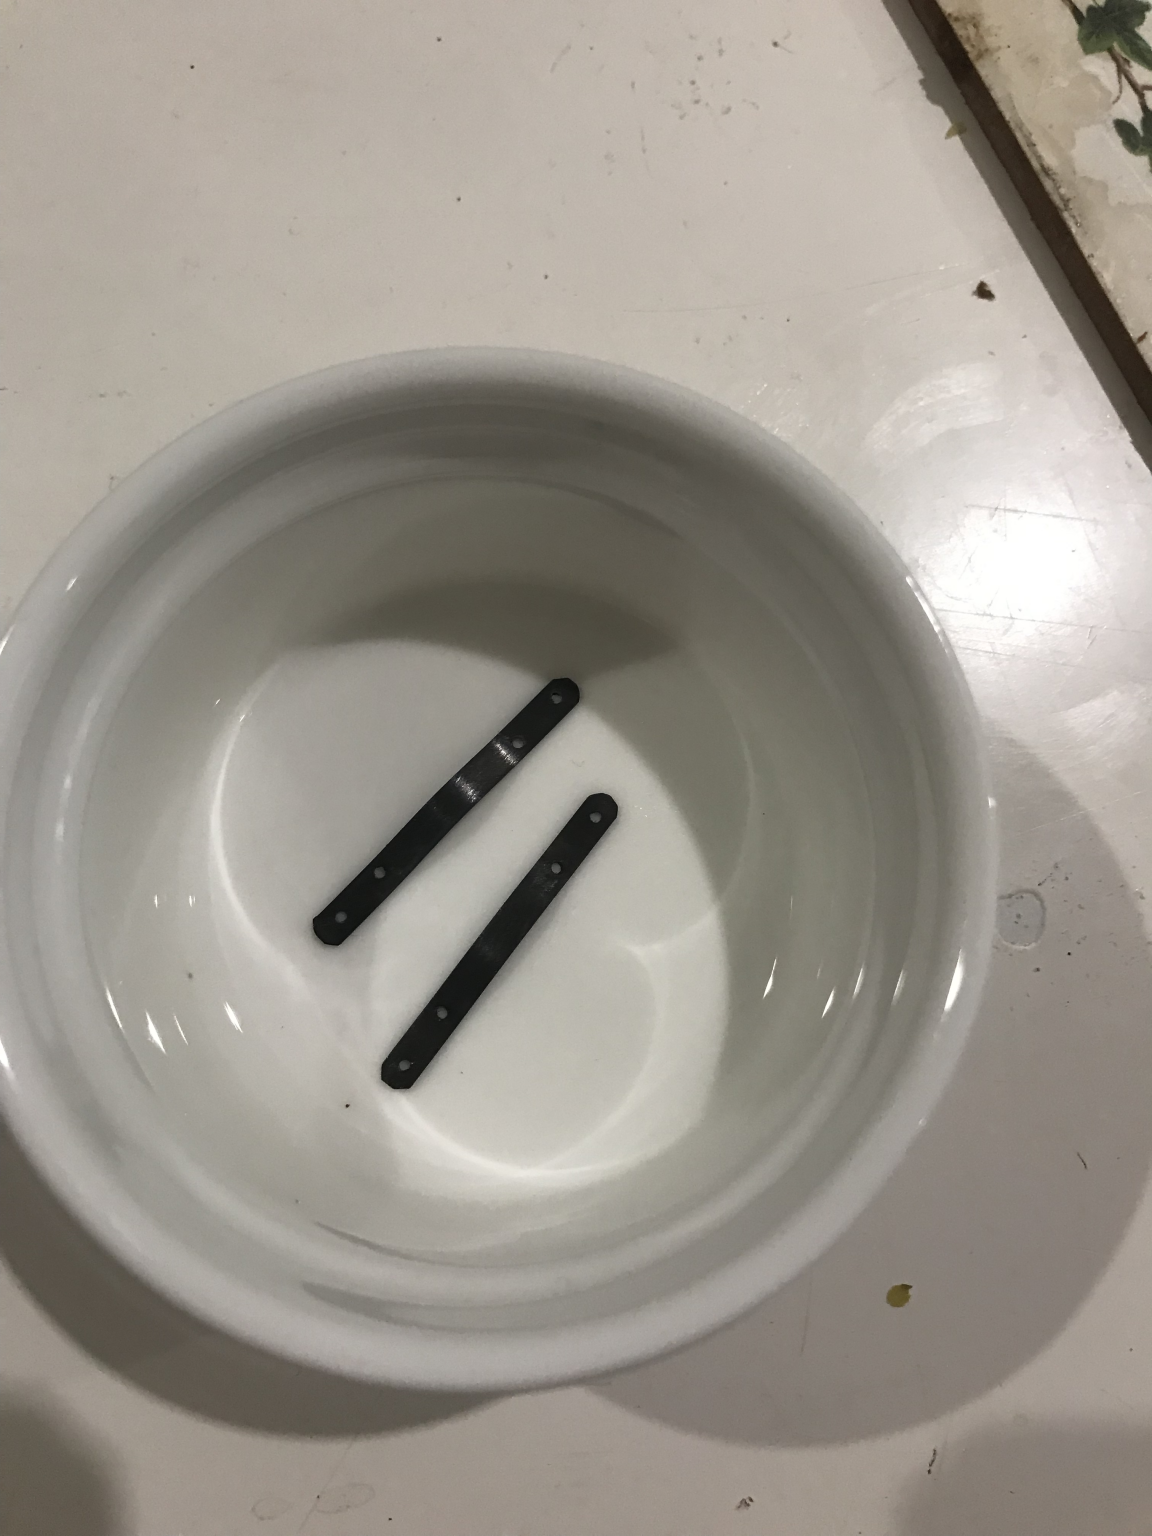
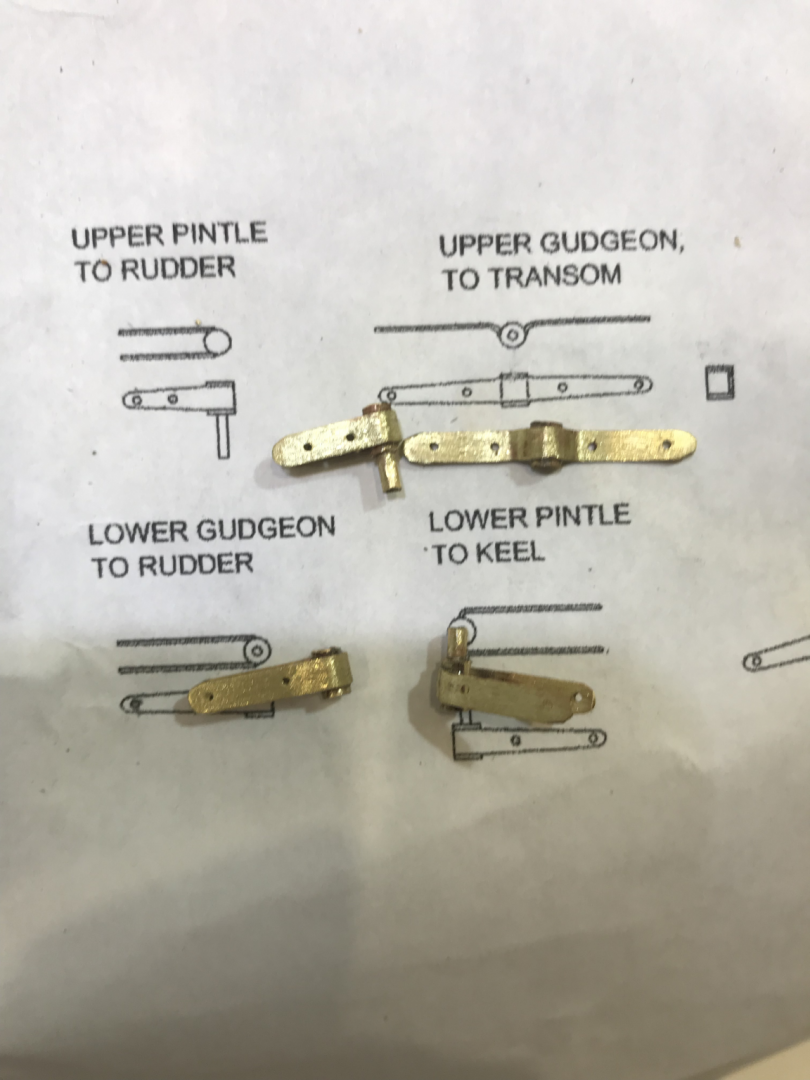
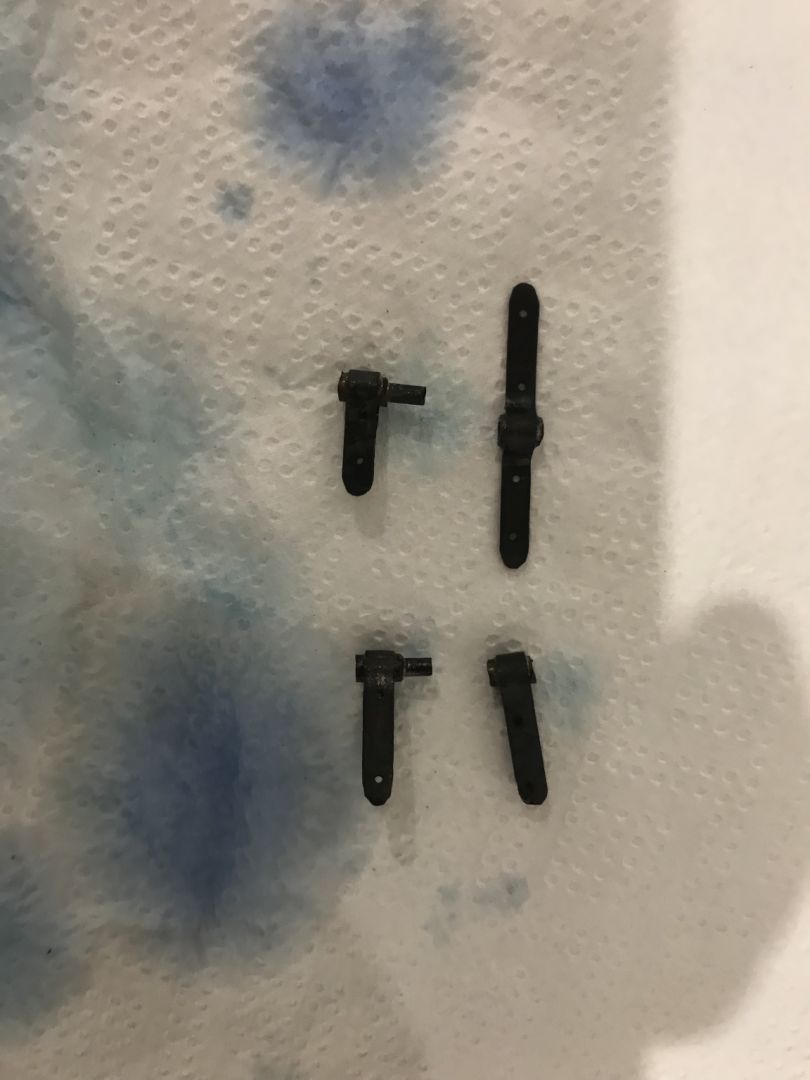
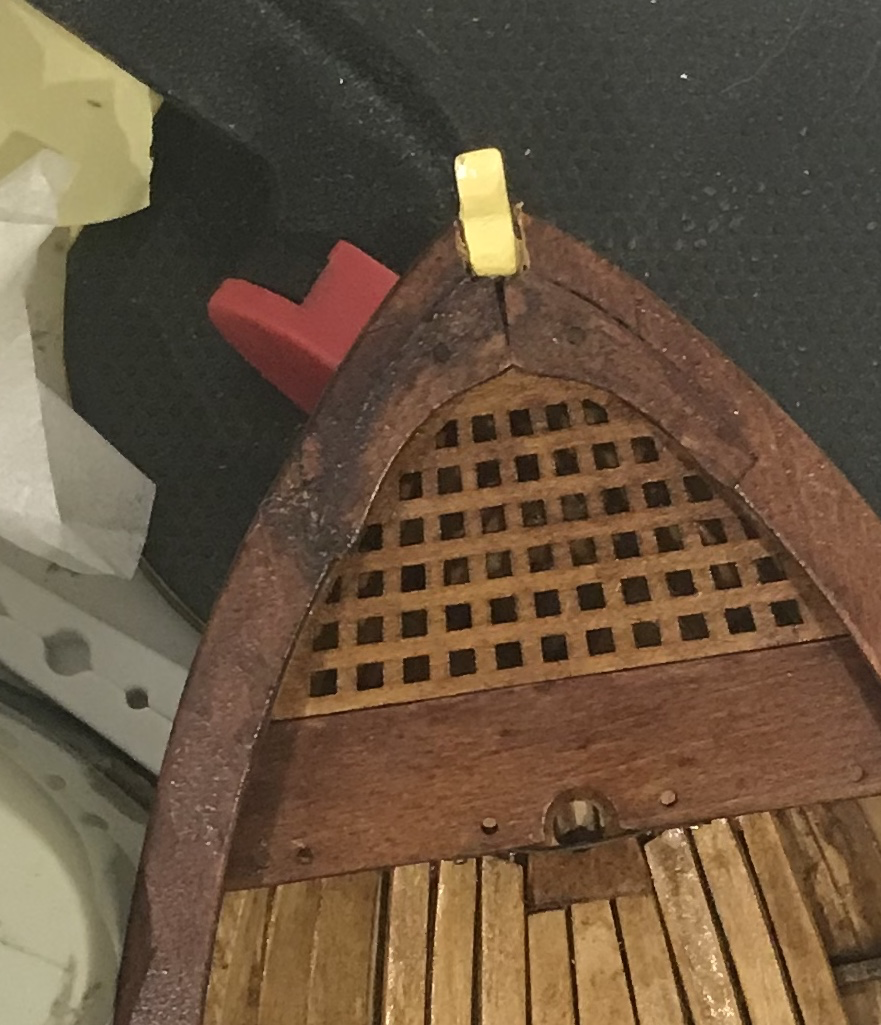
This part was tricky and required material not supplied in the kit. I had to buy some tiny brass tubes (3 mm diameter and 2 mm diameter) to form the hinges of the pintles and gudgeons. After shaping these pieces from the brass provided in the kit, I used some flux on the joints and held the tubes in place with some pliers. I dropped a bit of solder on the joints and heated the thing with a soldering torch. The solder moved pretty neatly into the joints and formed a pretty strong bond. After sanding and soaking in vinegar, the pieces were ready to be blackened. I could have done this part a little better, the hinges don't quite align, so there is a bit of resistance when the rudder is turned. It shouldn't really be fiddled with too much so I didn't try to fix it. I pushed the pins through the rudder/keel and nipped the nail off at the other end. I then bent the ends of the nails to hold them in place. And that's the hull done now, hopefully some more updates coming...


- 14 replies
-
- 1
-
-
- bountys launch
- model shipways
- (and 1 more)
-
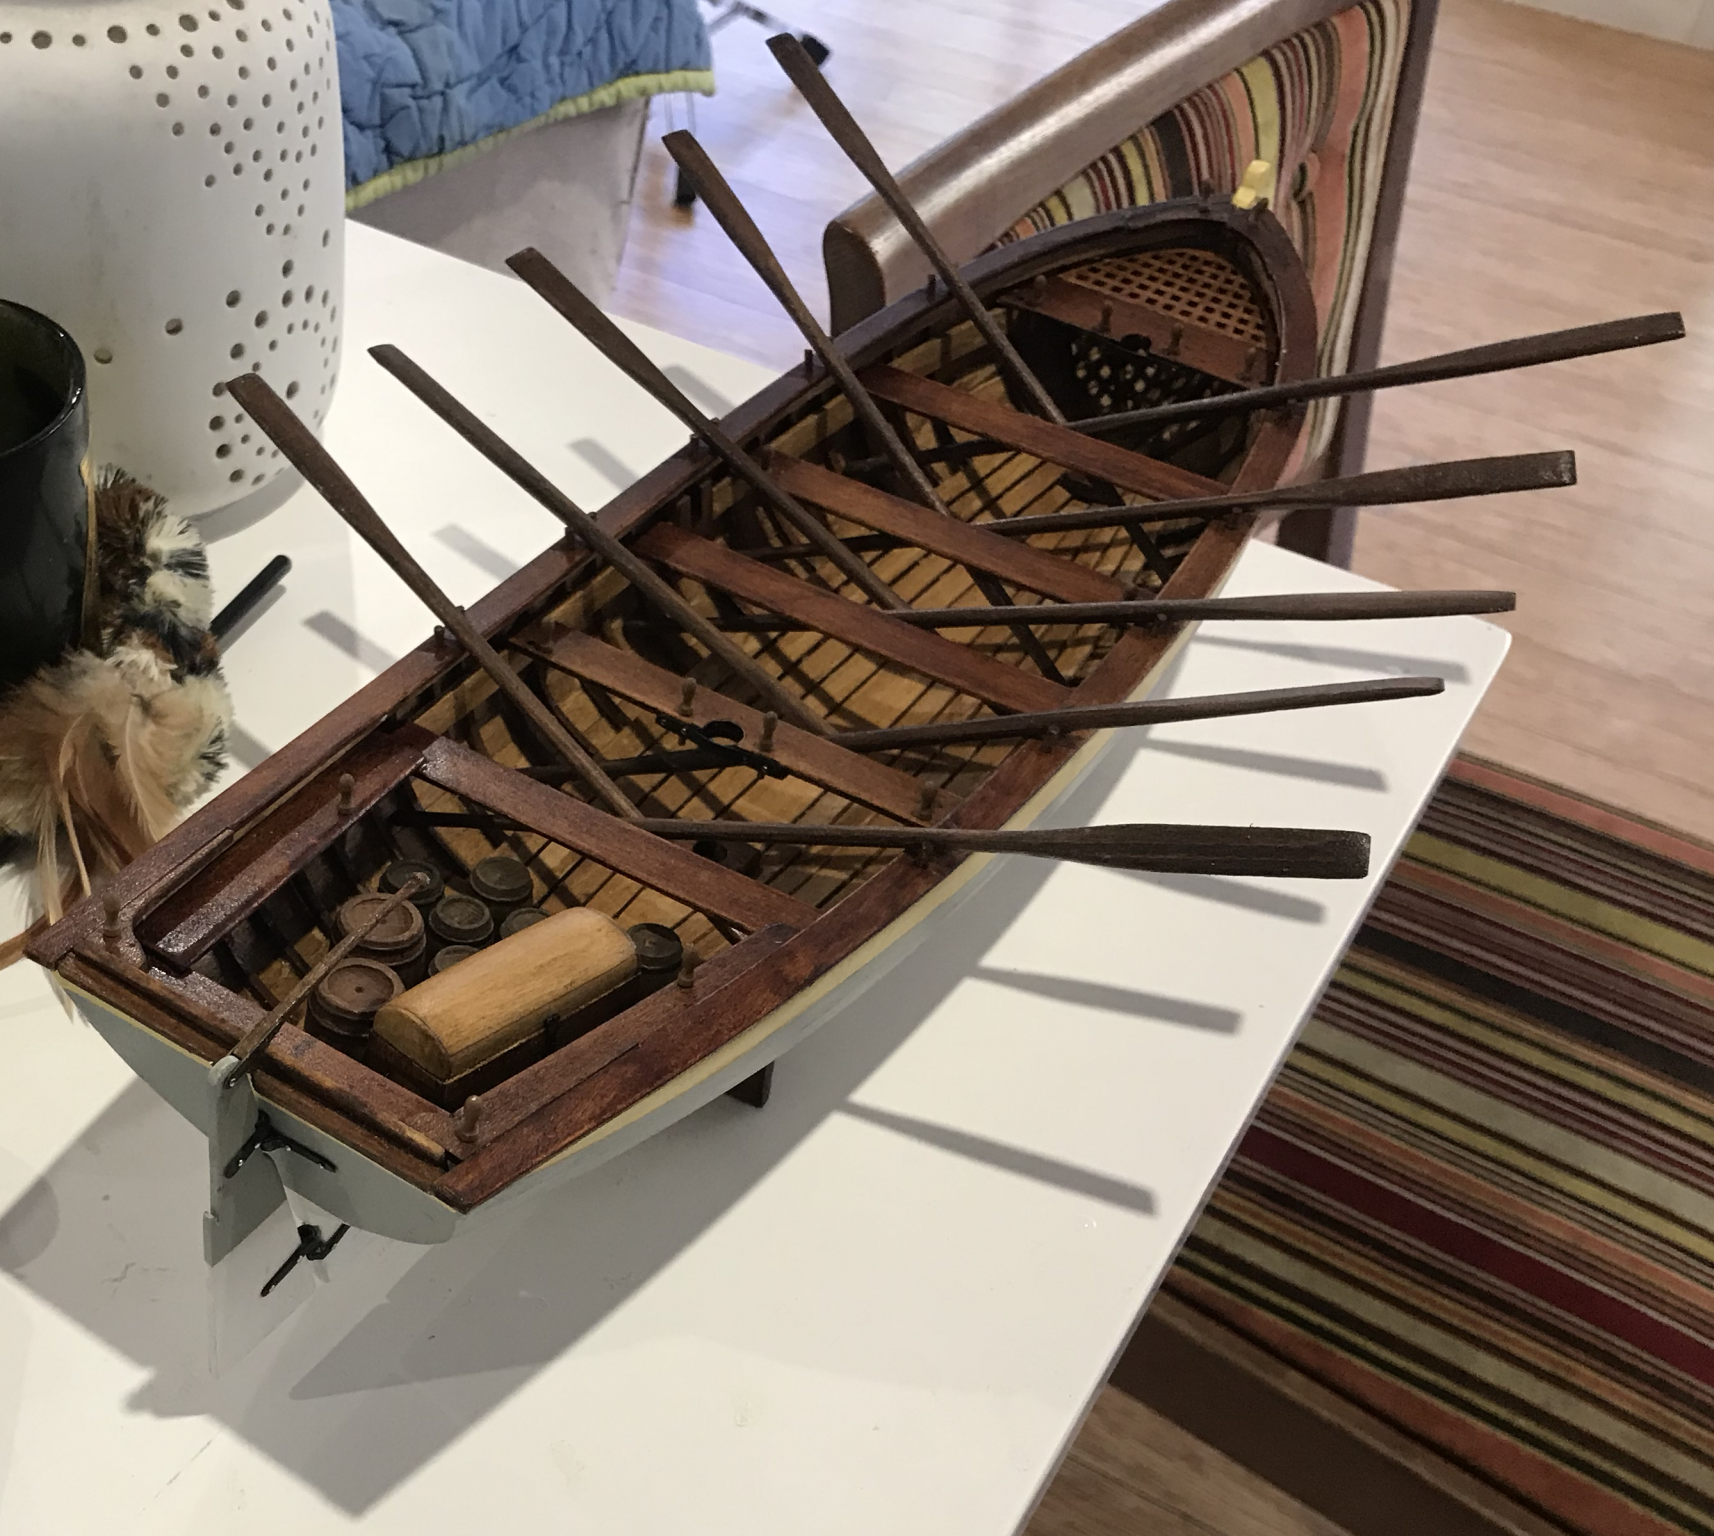
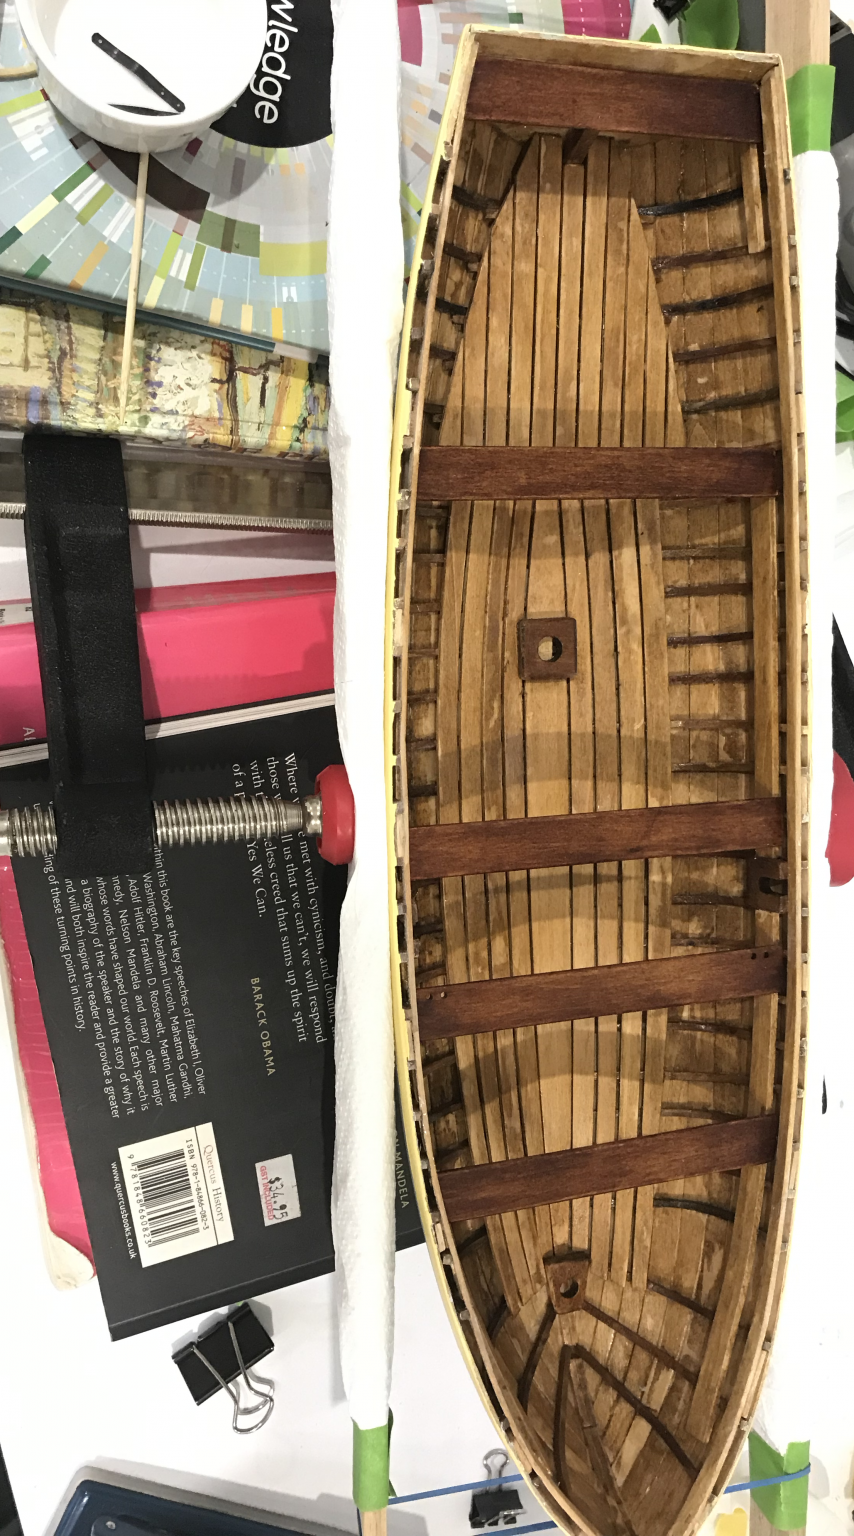
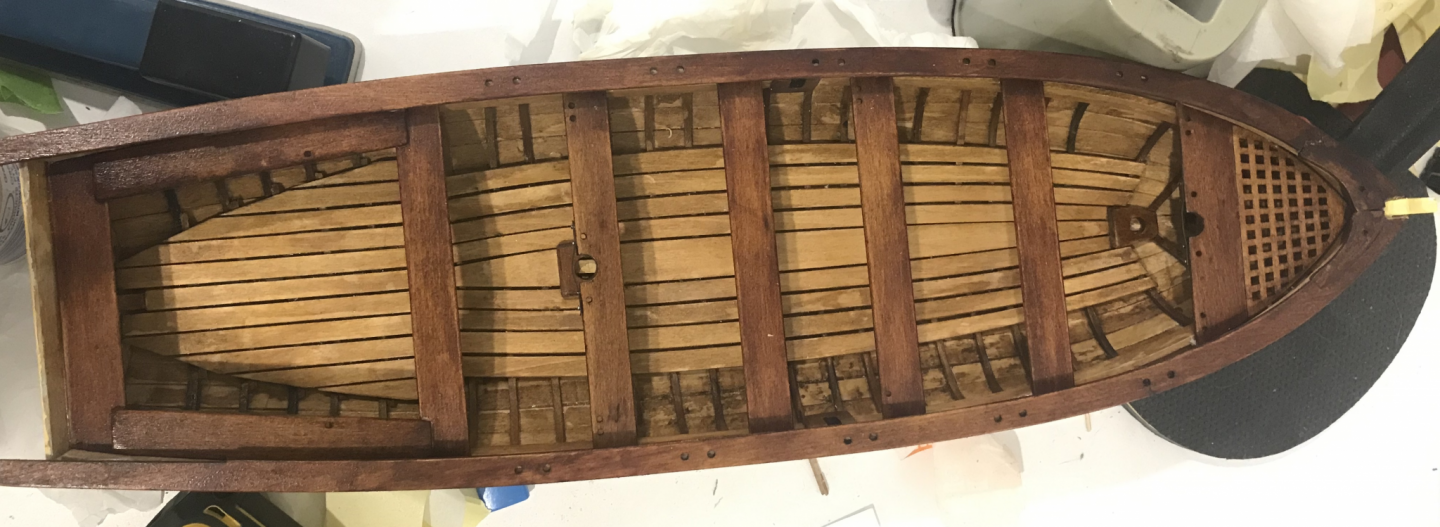
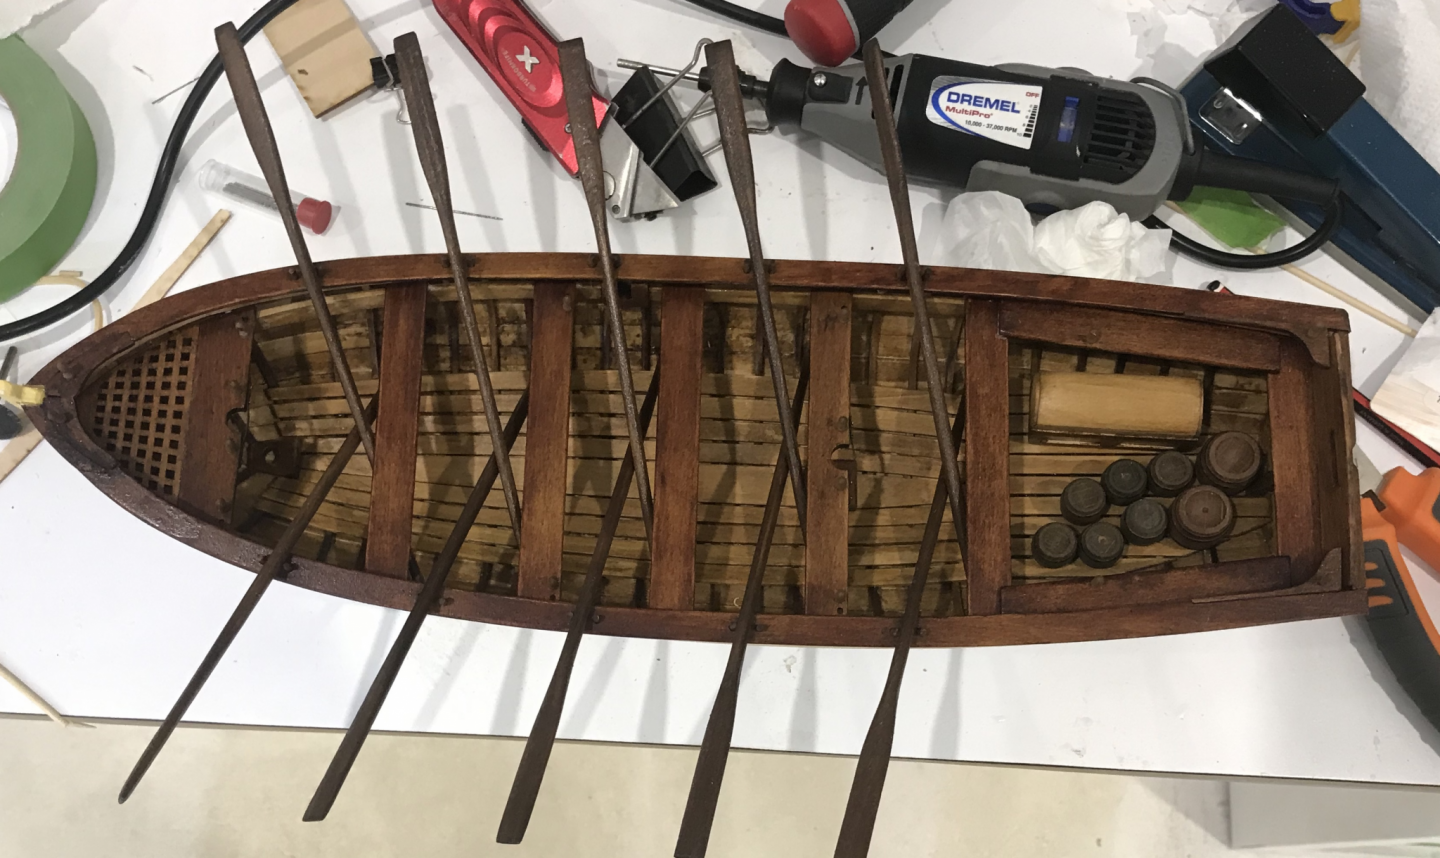
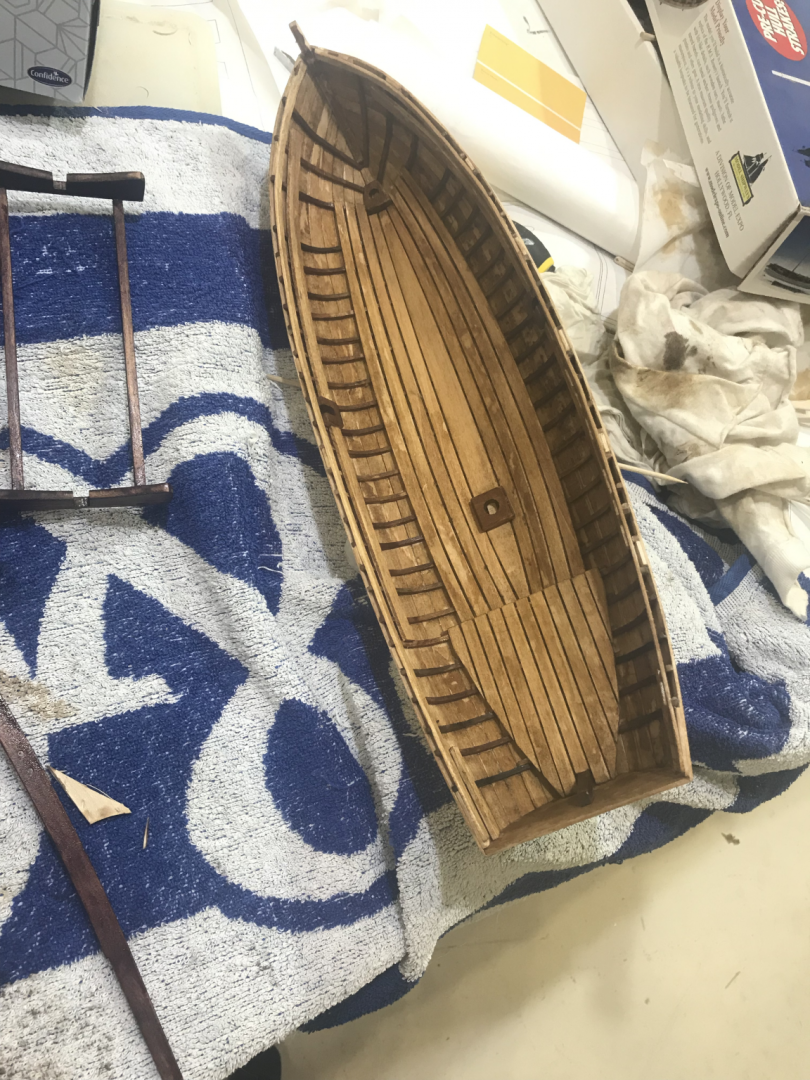
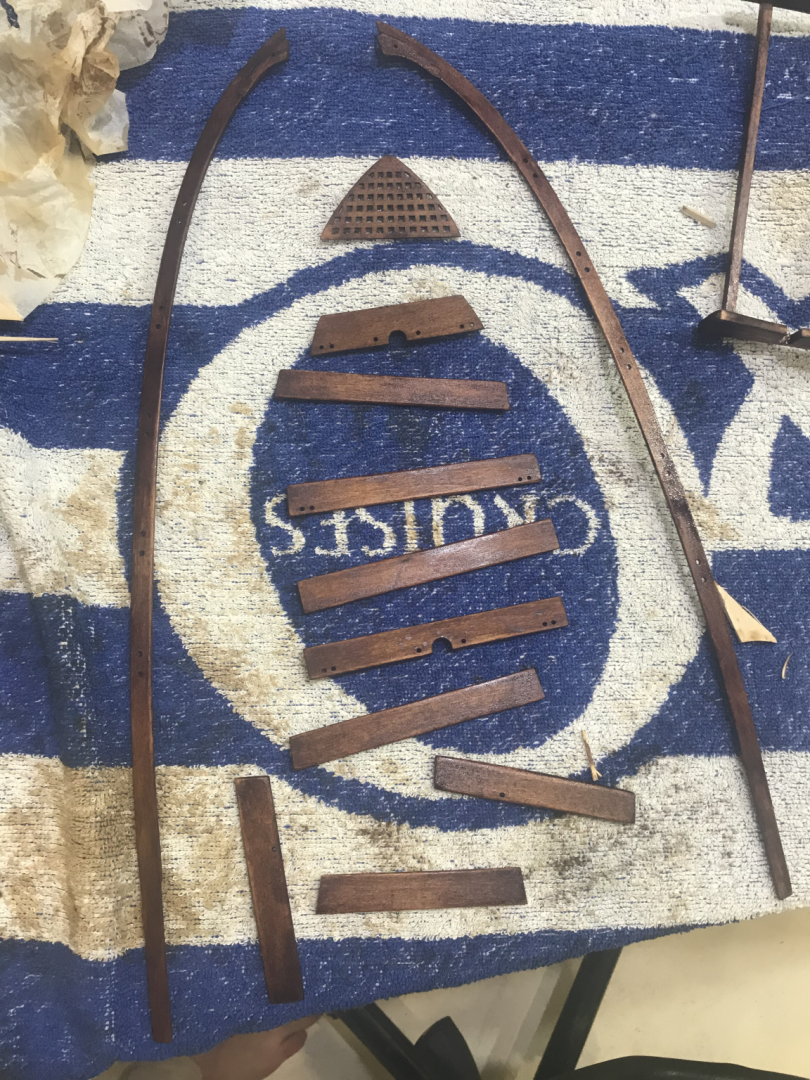
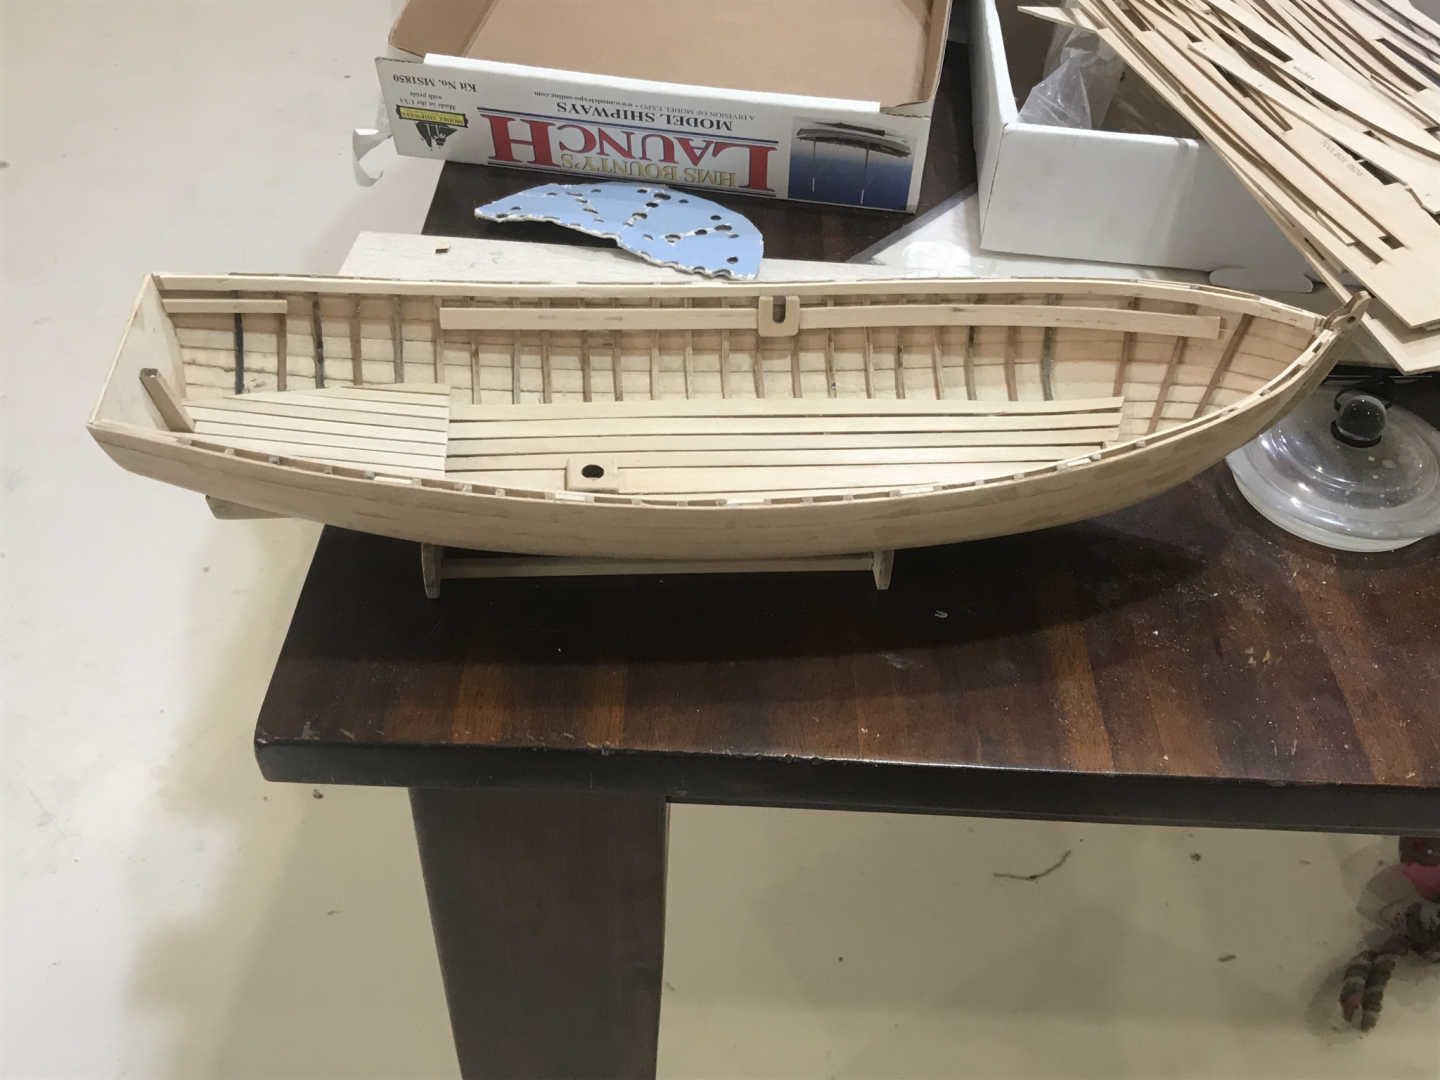
Once the thwarts containing mast helpers and the bow grate were glued in, the hull felt very stable and I removed it from the clamping setup to add the gunwales. This step caused the most frustration as one of the gunwales snapped at the tip while being held down preventing a neat joint at the bow. I think I probably weakened the piece when I glued on the breast hook and fiddled with it a bit. I then probably didn't cut enough material from the gunwales to fit the keel through the two pieces. I guess this is just something I have to live with, but it is a bit frustrating. I also probably didn't sand the frames and filler blocks enough so a few gaps were left between the planks and the gunwale, particularly at the bow. To hold the gunwales down a used bamboo skewers across the top with an elastic band running underneath the hull at the ends of the skewer to pull the gunwale to the hull. I added the remaining parts of the hull (backrest, quarter knees, stern gunwale, belaying pins and thole pins), and also stained the oars (straight walnut stain this time), which I am pretty happy with, although they are not perfect. I'll use leftover string from rigging to give them some handles. Then it was on to the pintles and gudgeons... Yikes!
-
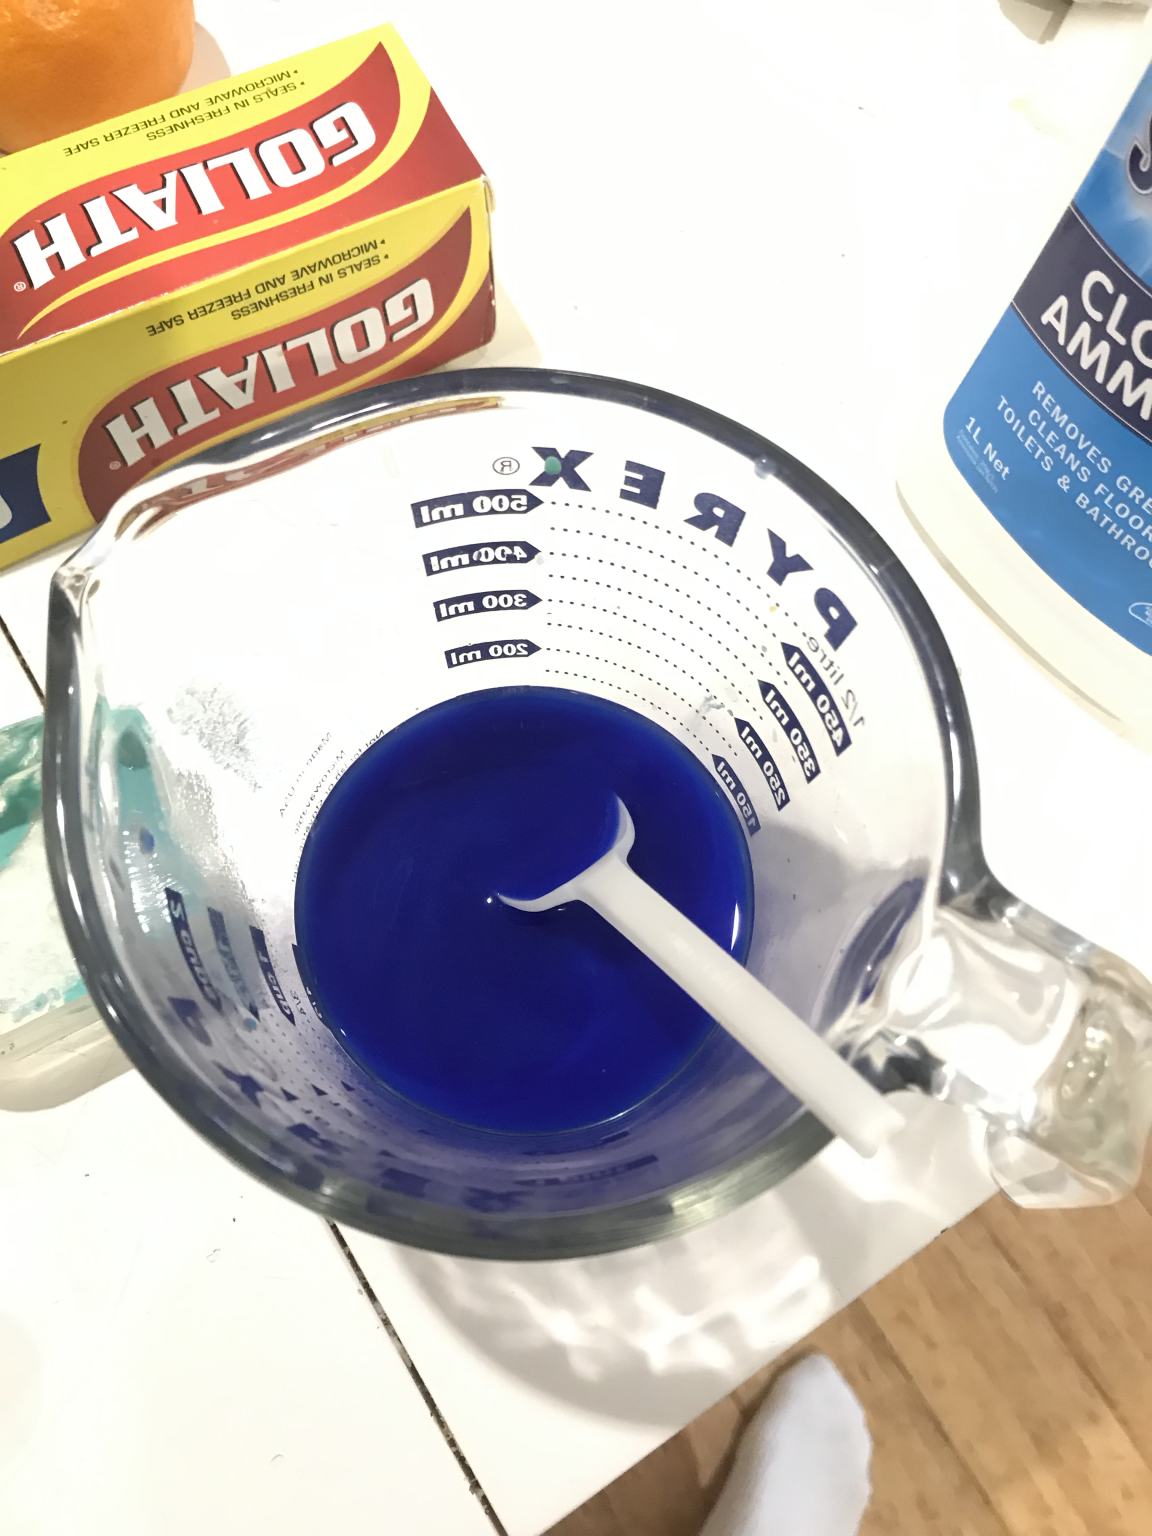
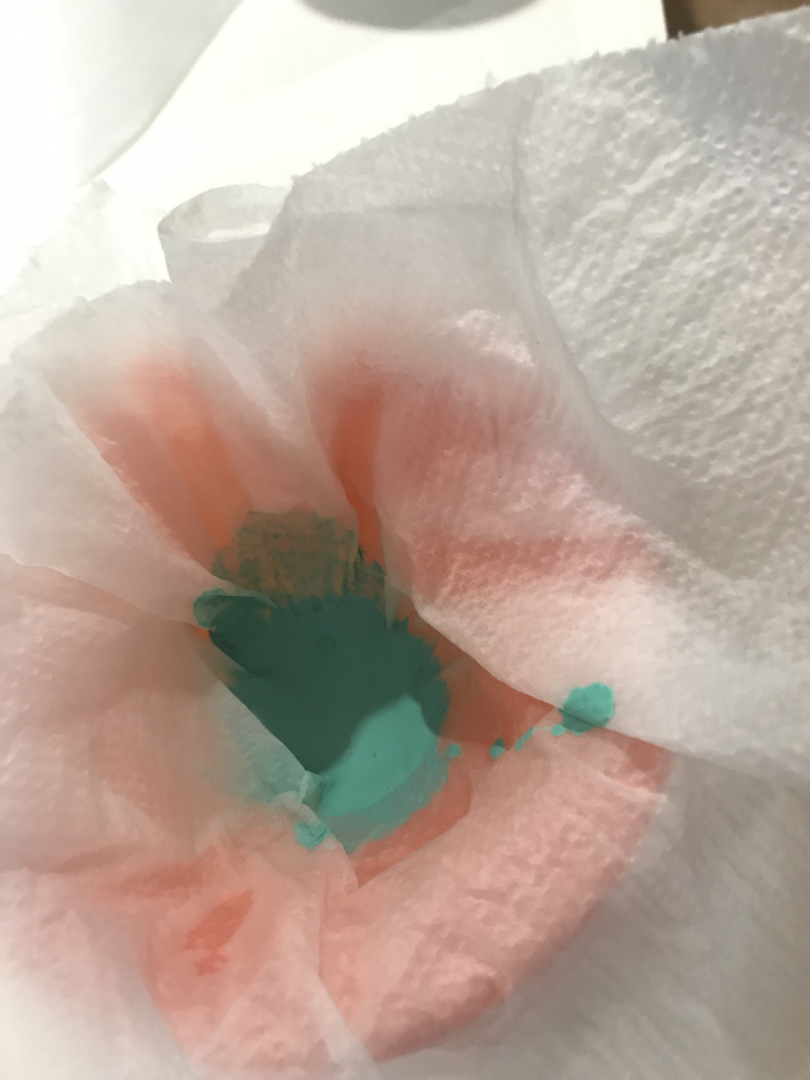
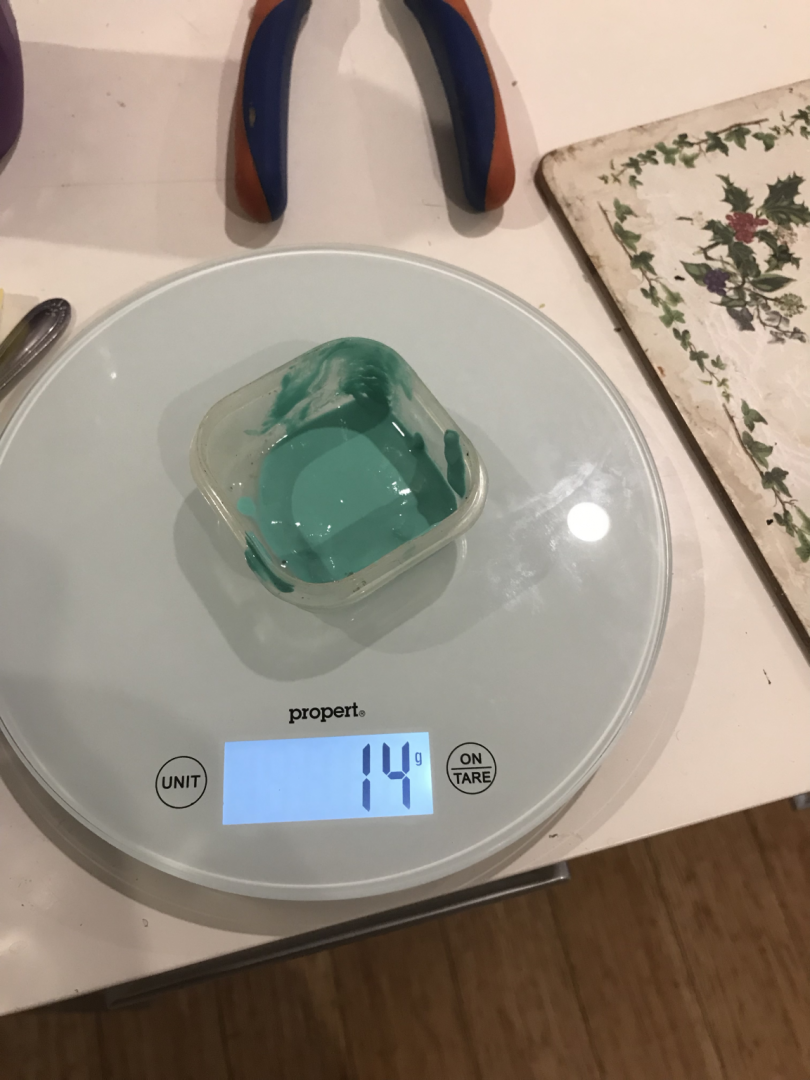
Holding the boat in shape overnight using my clamping setup really helped. The boat was much more willing to be held in place after that. After holding down most of the thwarts and using a strong slow-drying polyurethane glue, I felt that the hull had much more rigidity to it. I left the boat in the setup while I worked on the mast helpers. Apparently, over in the states, you guys can get brass blackening solution at gun shops. As an Australian, it is not so easy. I'm not sure if I wasn't looking hard enough, but I could not find a place to buy a brass blackening solution. Online, I found a recipe that consisted of copper carbonate and household ammonia. Ammonia is easy, but copper carbonate isn't really sold anywhere. However, I figured that as a chemistry minor I should be able to put something together. The copper carbonate was made by mixing copper sulfate (used as a plant supplement and is commercially available at gardening stores) and bicarb soda (which is sodium hydrogen carbonate). The precipitate formed is copper carbonate which can easily be filtered out using a paper towel and a funnel setup. Scoop out the copper carbonate using a spoon and you're good to go (6 g yield, and some left over for future projects) I used a ratio of 1 g of wet copper carbonate to 20 mL of household ammonia to give the blue blackening solution below. After that, I made sure the brass was clean by sanding with a fine grit paper and soaking in vinegar. I left the brass in for a relatively short amount of time (around 10 mins) to give the colour seen below. I found in some later pieces (cheek plates) that leaving them in for longer (1 hour plus) results in a browner colour rather than the black seen below.


- 14 replies
-
- 2
-
-
- bountys launch
- model shipways
- (and 1 more)
-
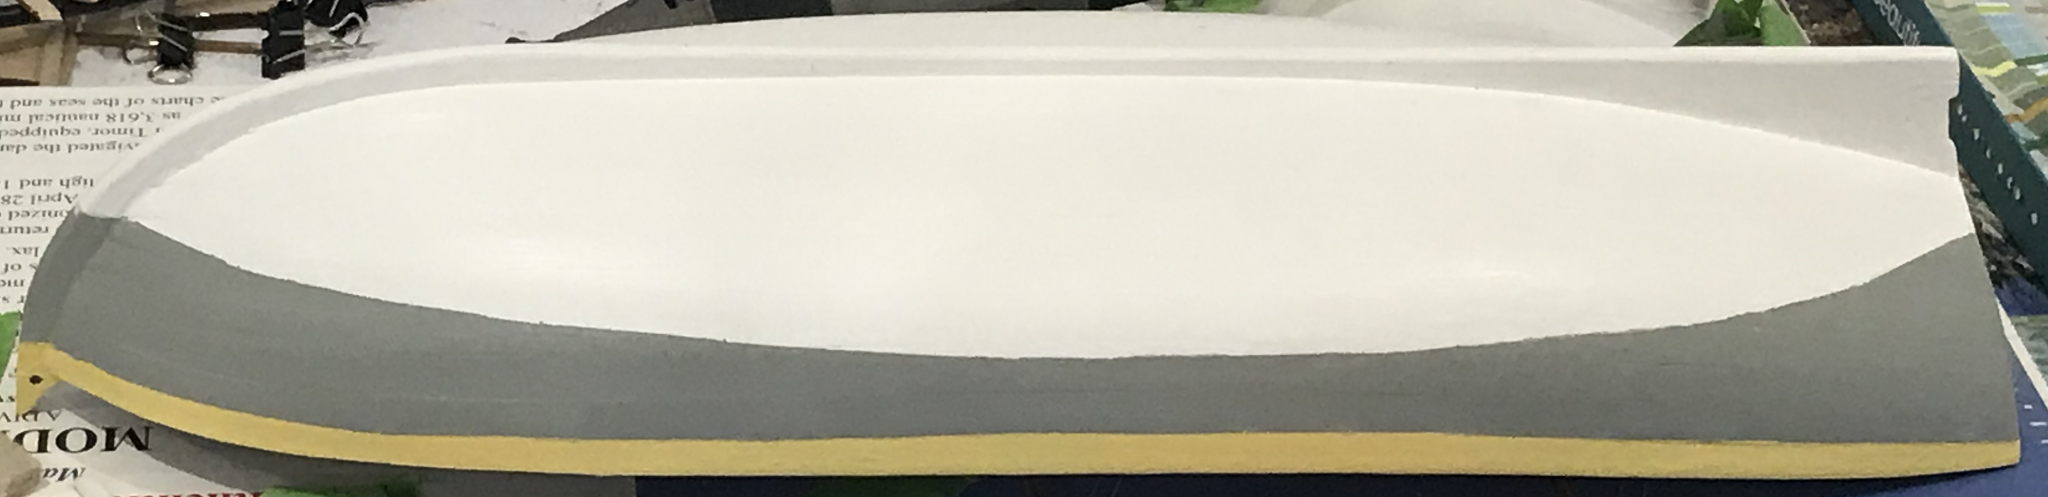
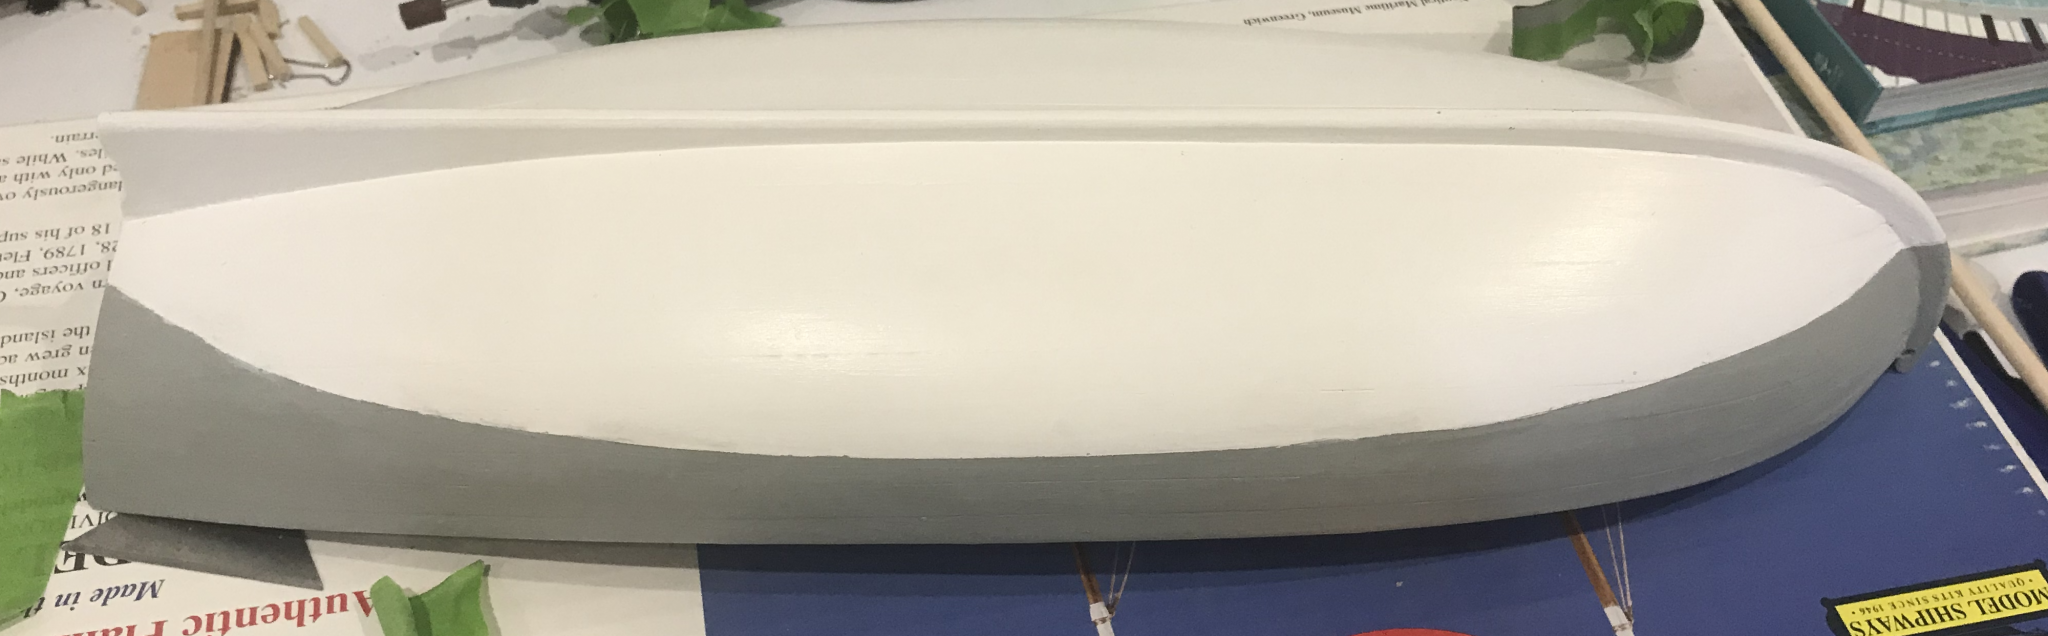
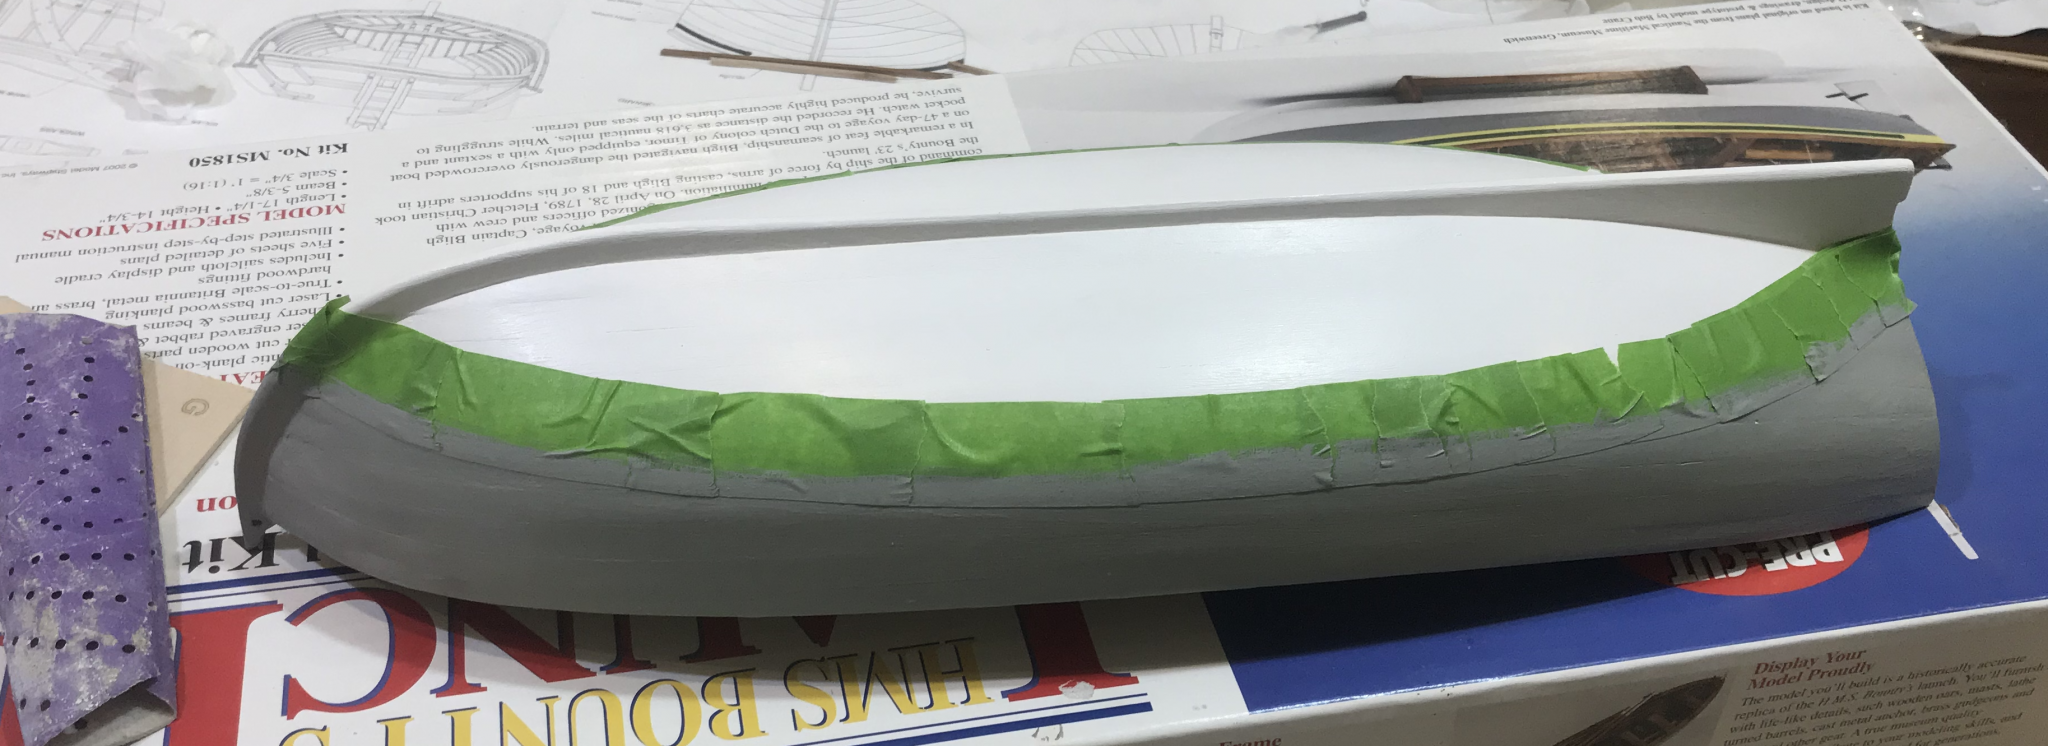
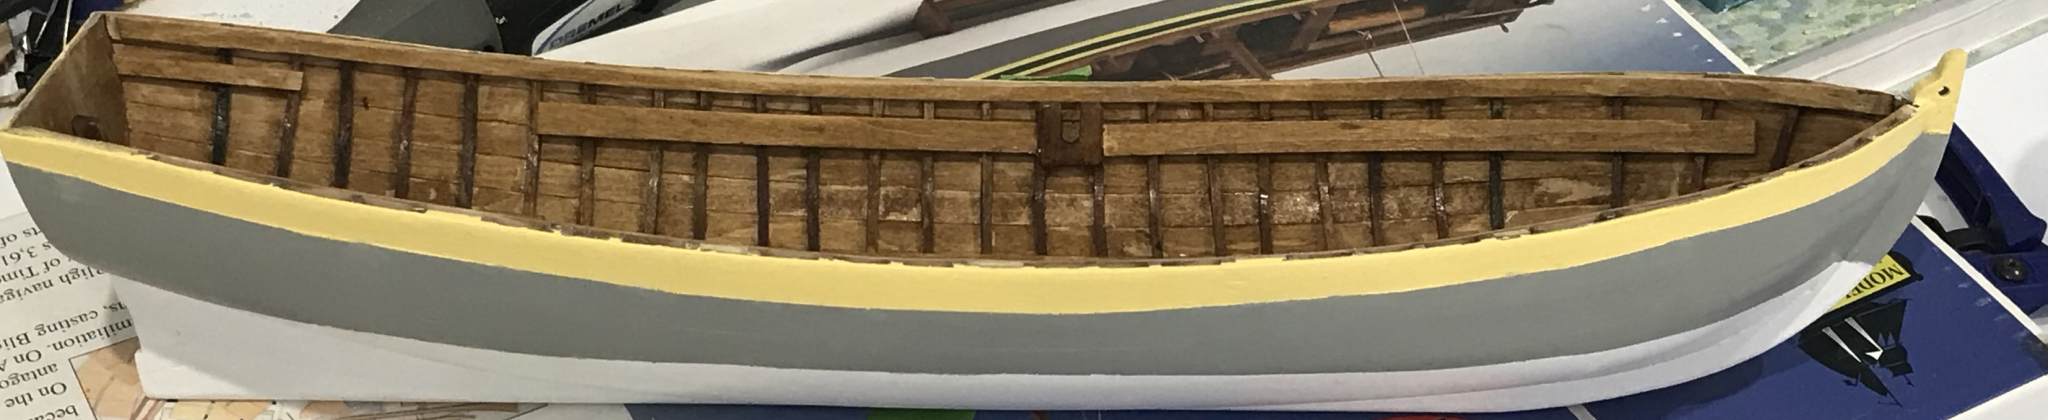
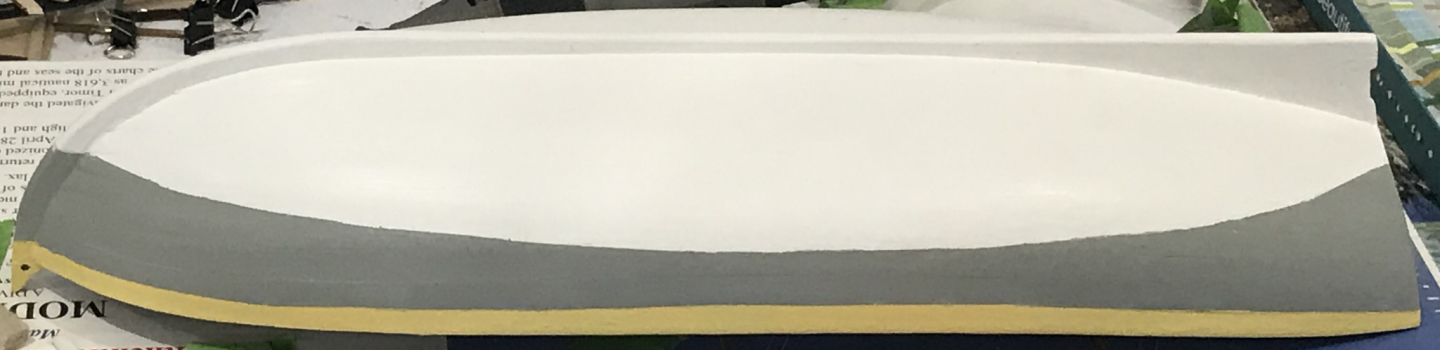
For staining, I used an oak stain on the inside and a walnut stain for the thwarts on an oak stained base. The instructions suggest a cherry stain, but finding that in Australia is somewhat difficult. The parts were finished using a clear wood varnish. Painting was done using a zinsser stainblocking primer (metho based) and a paint scheme consisting of the colours Natural white, Dragonstone (Taubmans) and Yukon Gold (Taubmans). See if you can spot the mutilated plank in the final photo. To draw the waterline, I stuck a pencil through a piece of polystyrene packaging material and ran that around the boat


-
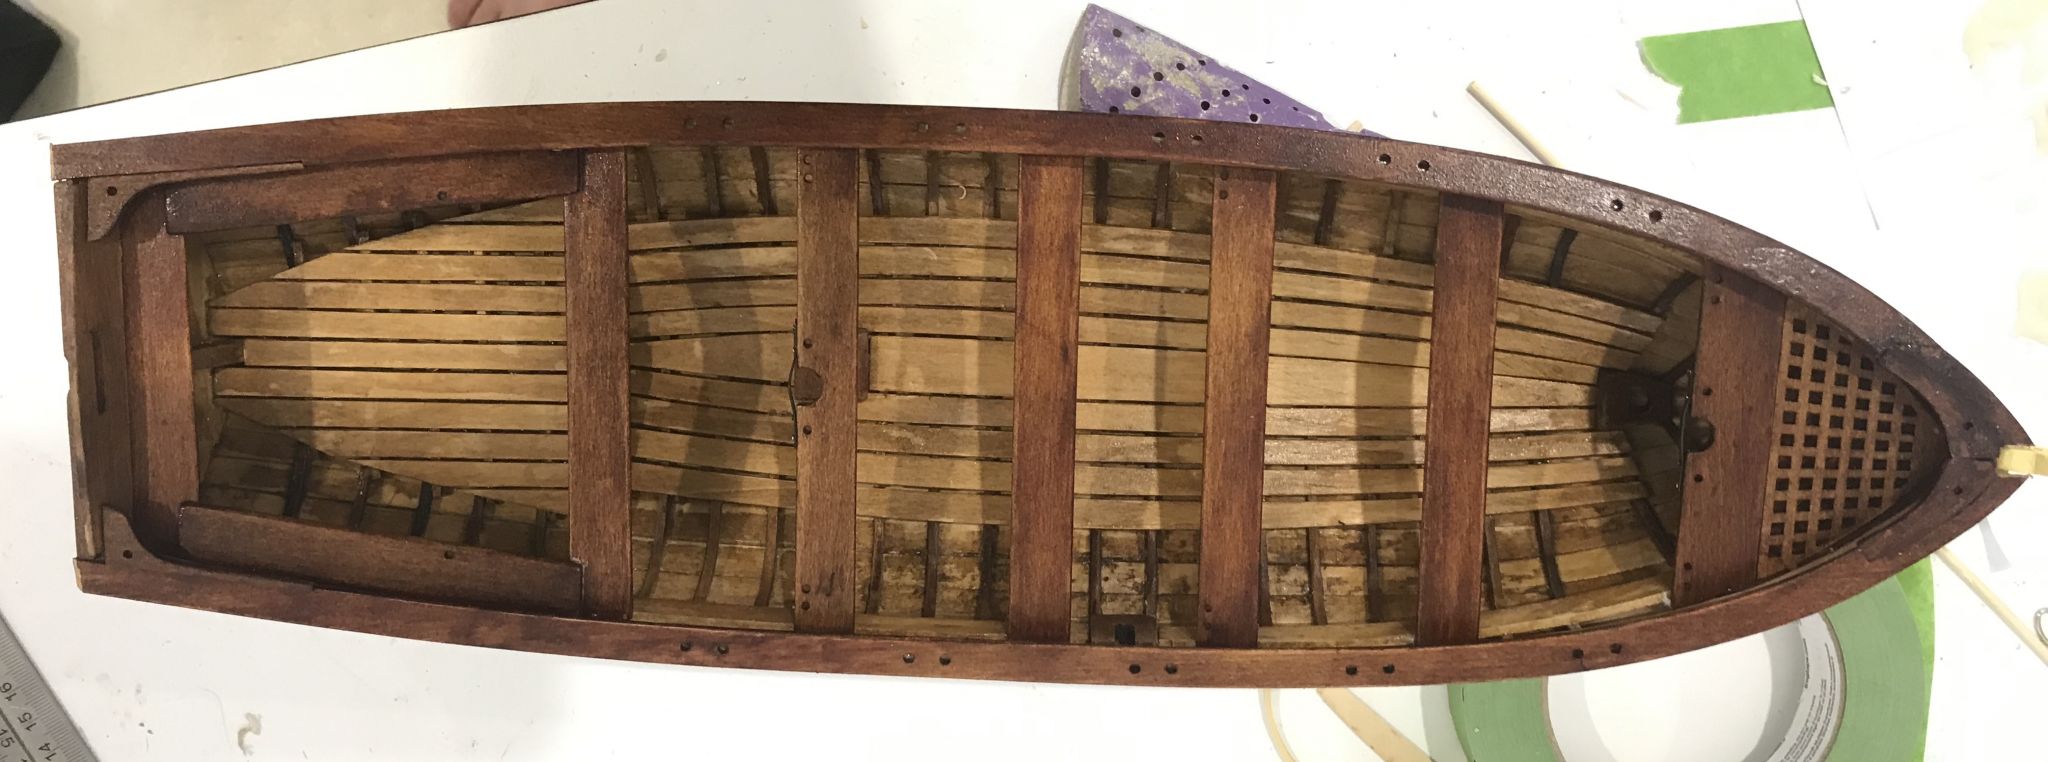
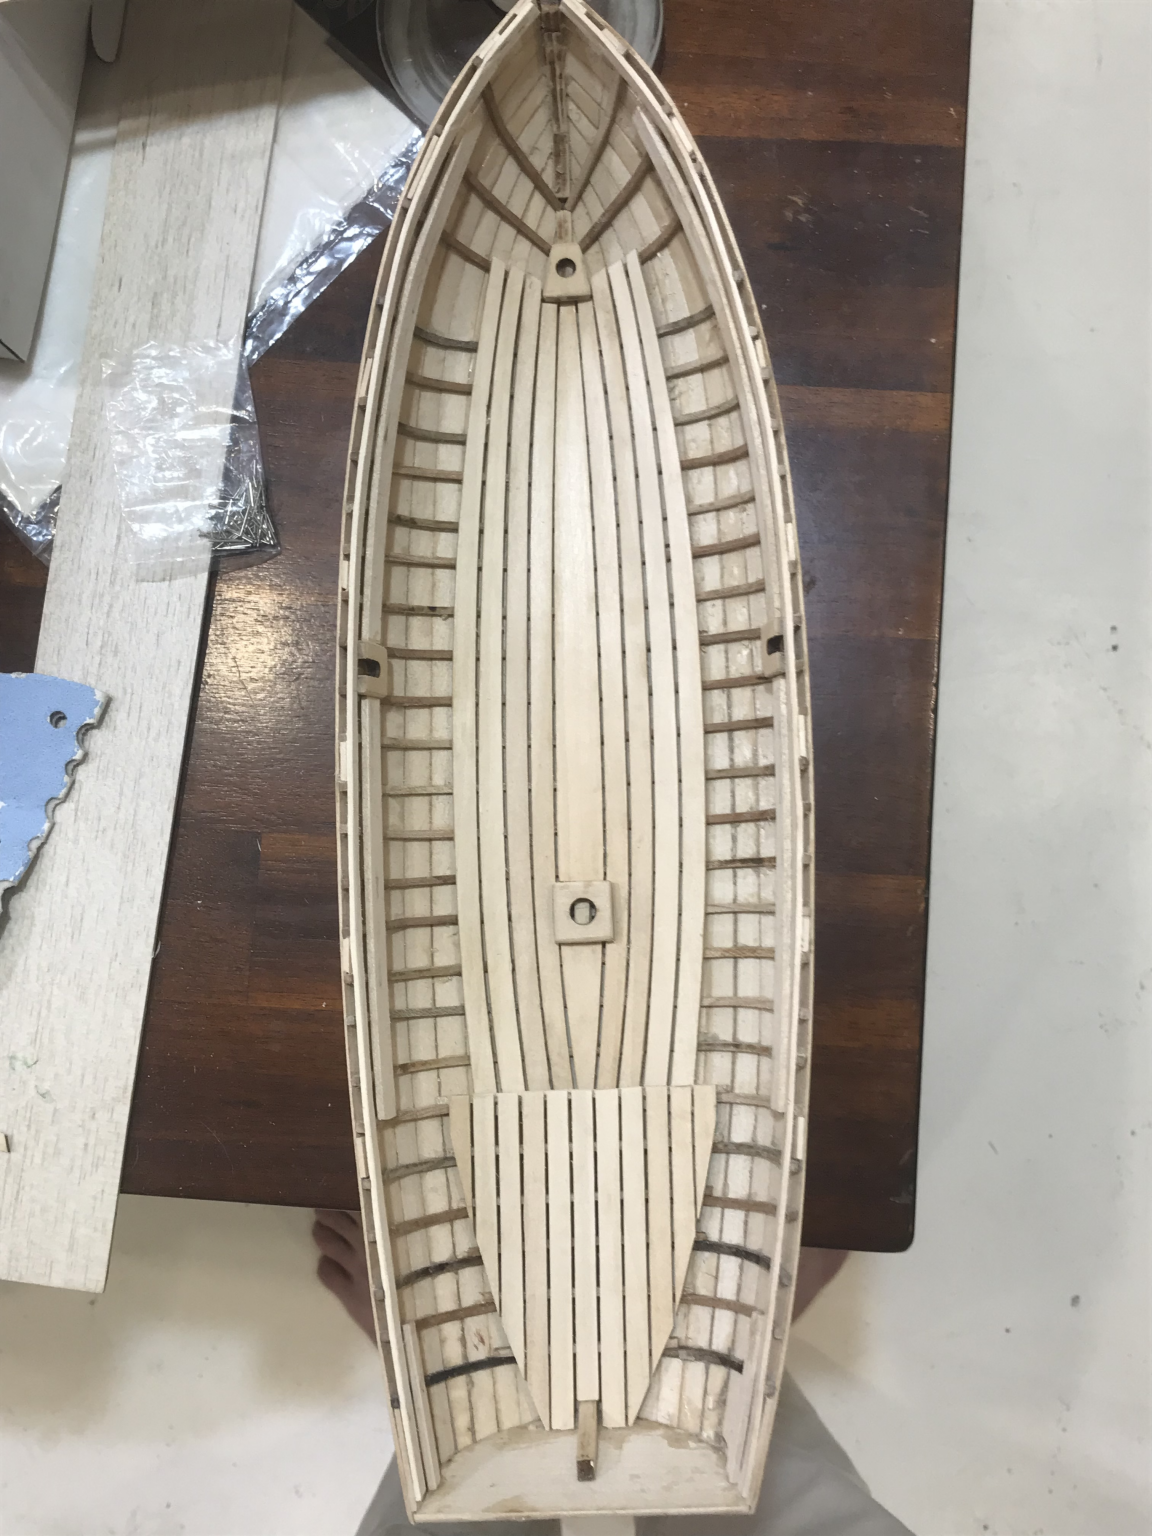
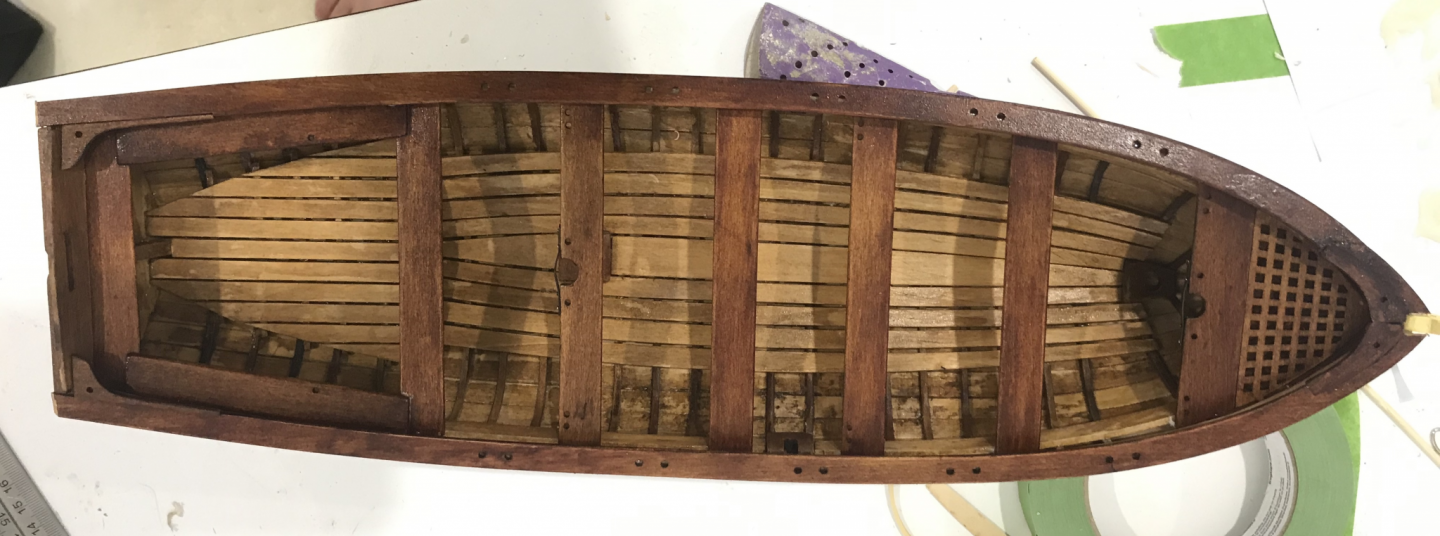
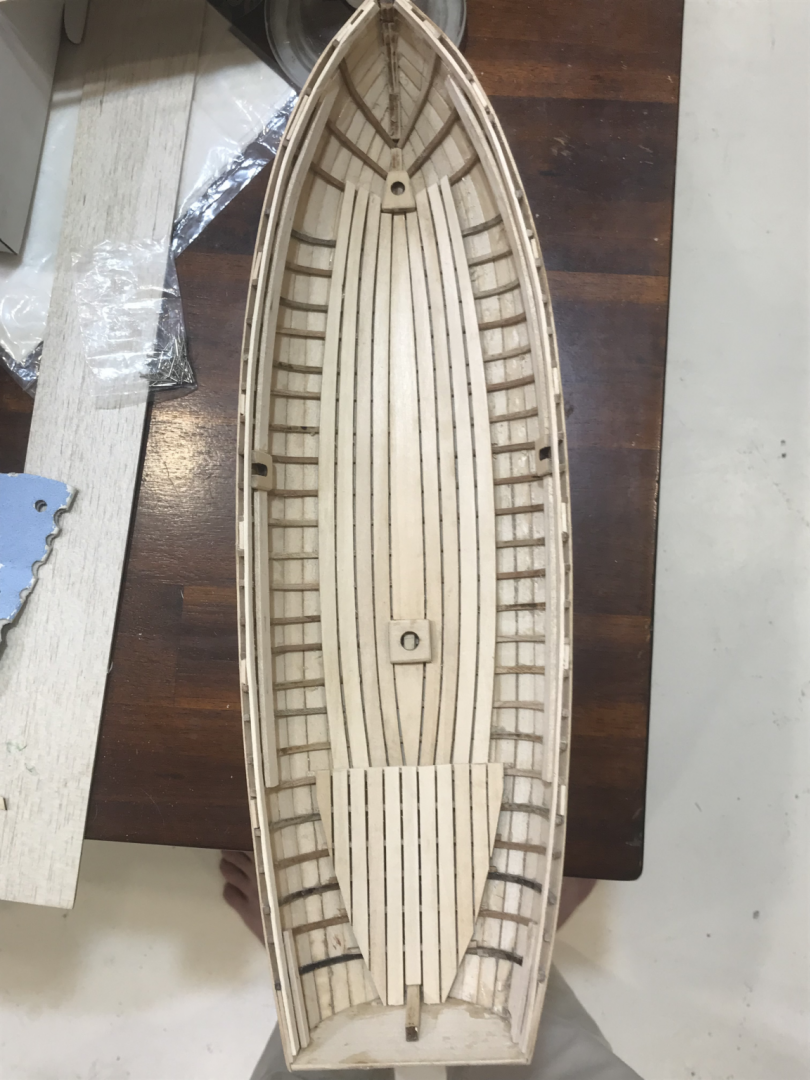
To bend the tween frames, I salvaged the broken parts from the jig and bent them to shape using those. This was moderately successful, but some frames weren't evenly spaced. This is a point where I probably should have redone a couple of the frames, but I figured that it would be barely visible and I was honestly sick of steam bending frames. Next step was floorboards, which went pretty well. I used the same method for the internal boards as I did for the external planks and soaked them in boiling water for a minute before holding them place with some fairly elaborate techniques (I don't have any photos, but I just used random things from around the house to hold them down). The quarter deck also went pretty well. I assembled the deck while the frames were already in the boat. I see in some other logs that this could have been assembled separately and the glued in, but I did not have enough faith in my own abilities to get that right. It was at this point that I realised that the staining should really have been done before the internal planking. Whoops, but that is the order the steps were listed in the instructions. I also shaped the thwarts and dry fitted them. Like many of the other logs for this model, I found that the planking had spilled out too much and the hull was now too wide for the thwarts. I could have cut new ones, but this would cause issues for the gunwales. I did not have enough material to cut new gunwales and it was only a small amount of compression that was needed to hold the thing in place. I figured that if I used a strong enough glue the thwarts and gunwales would be able to hold the hull in place. Pictured below is my attempt at a clamping system to achieve this.

-
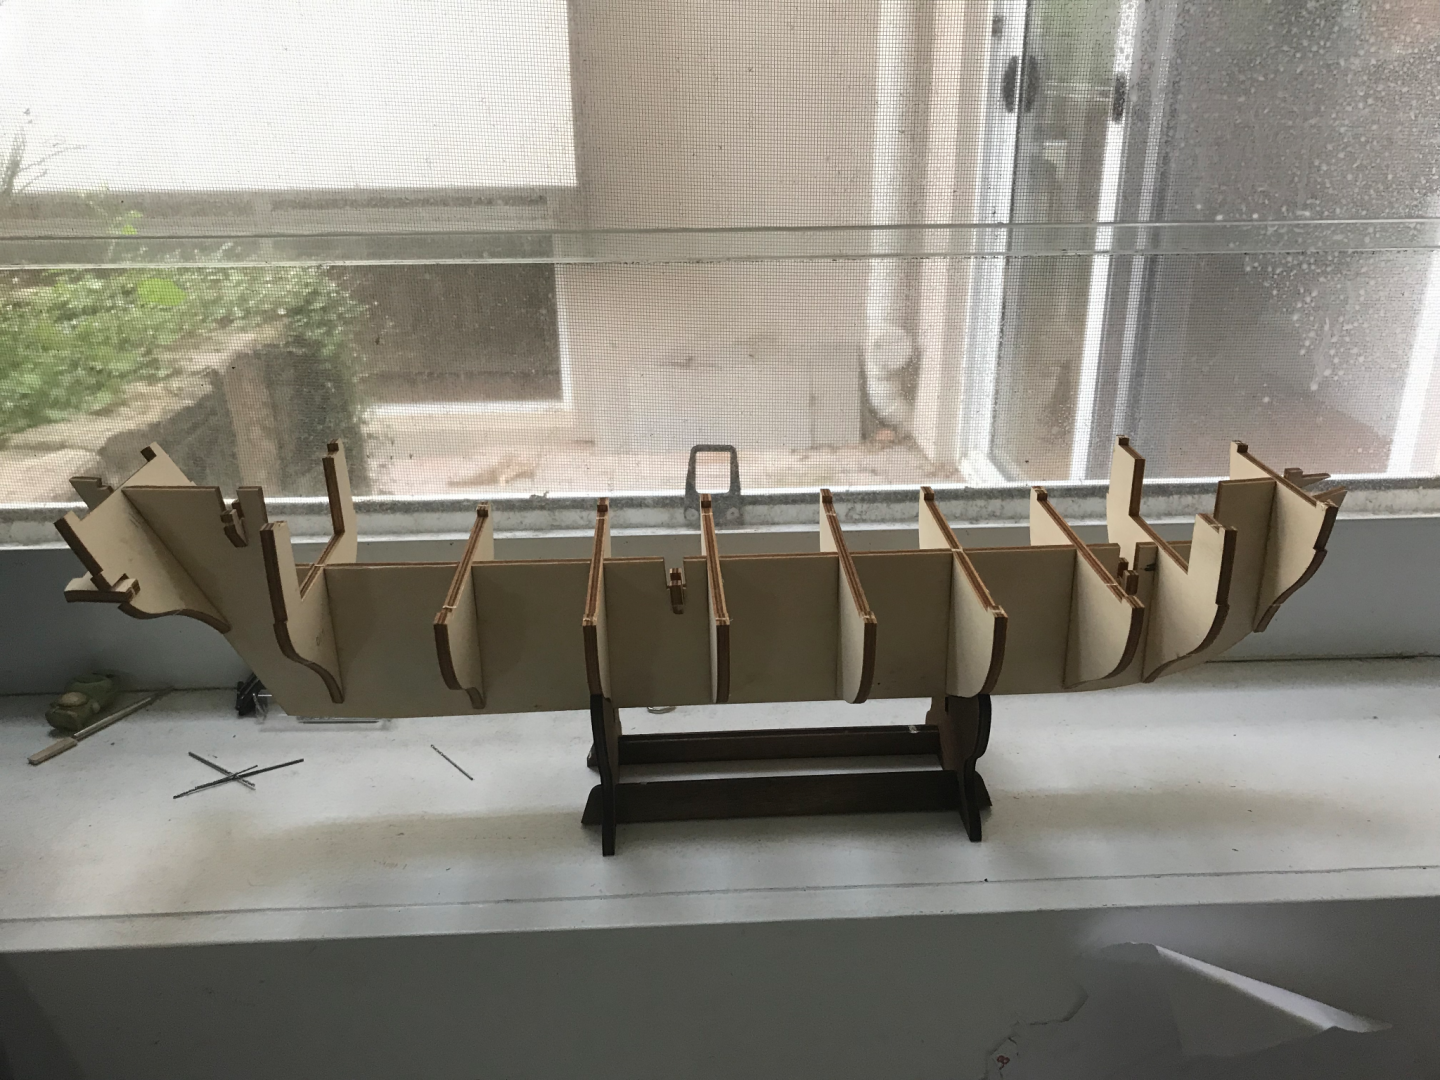
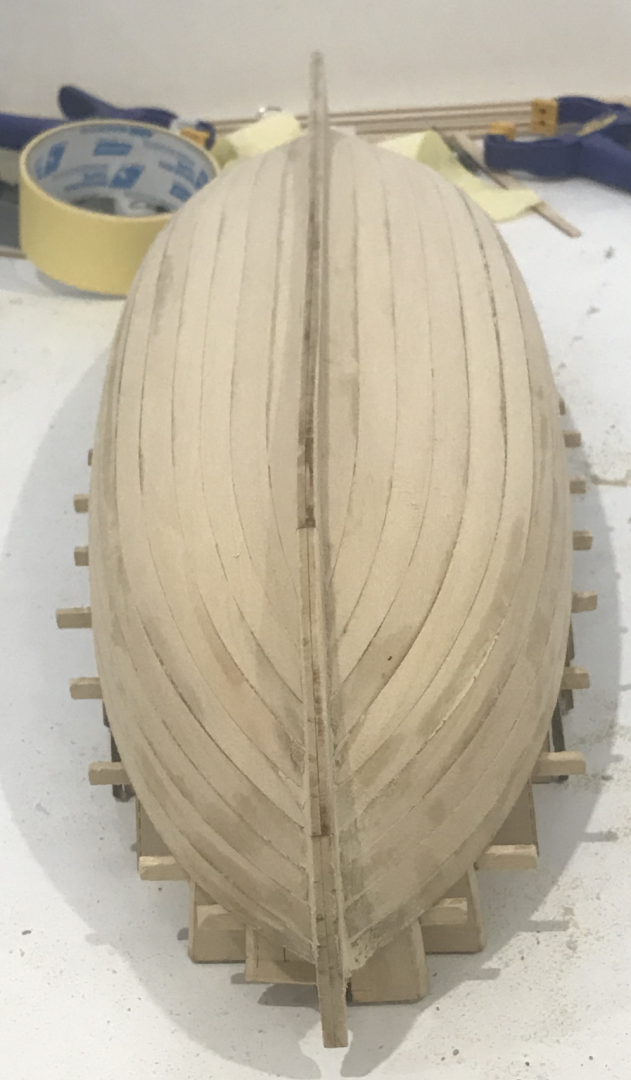
The planking went relatively smoothly. I soaked each plank entirely in boiling water for around a minute before bending to shape on the frames using the modified bulldog clamps suggested by the instructions. I had some problems with the shutter plank (as it seems like most other build logs for this model did). It was somewhat overstated by the instructions how much wider the shutter plank had been laser cut and as a result it left some nasty gaps in the middle. Some posts on this forum suggested using sawdust mixed with wood glue to fill the gaps. I tried that and it worked pretty well, but some glue globs came through the other side, so I'd have to be more careful in future. I also used some wood filler on the outside to make a smoother surface for painting and fill some of the gaps a bit better. For one of the shutter planks, I wasn't confident that it would hold to its neighbouring planks (due to the gap) so a brushed the whole inside with glue to ensure that it stuck to the frames. It was only after the glue had dried that I realised my mistake. It'll be clear in the photos of the staining that this caused some problems and I damaged the inside of the plank with my knife trying to scrape the glue off. Oh well... The hull did NOT come smoothly of the jig. I pretty much had to break the whole thing inside in an attempt to free my hull. The instructions suggested using some beeswax to prevent glue from running onto the jig. I think we did do this... nine years ago, so I doubt that helped very much. I think to avoid this, I should have used a smaller brush for the glue and used smaller amounts I also shaped some oars as seen in the above photo. This was done by hand and took a long time. It was shortly after this that I rediscovered the Dremel tool that was originally bought for this model.


-
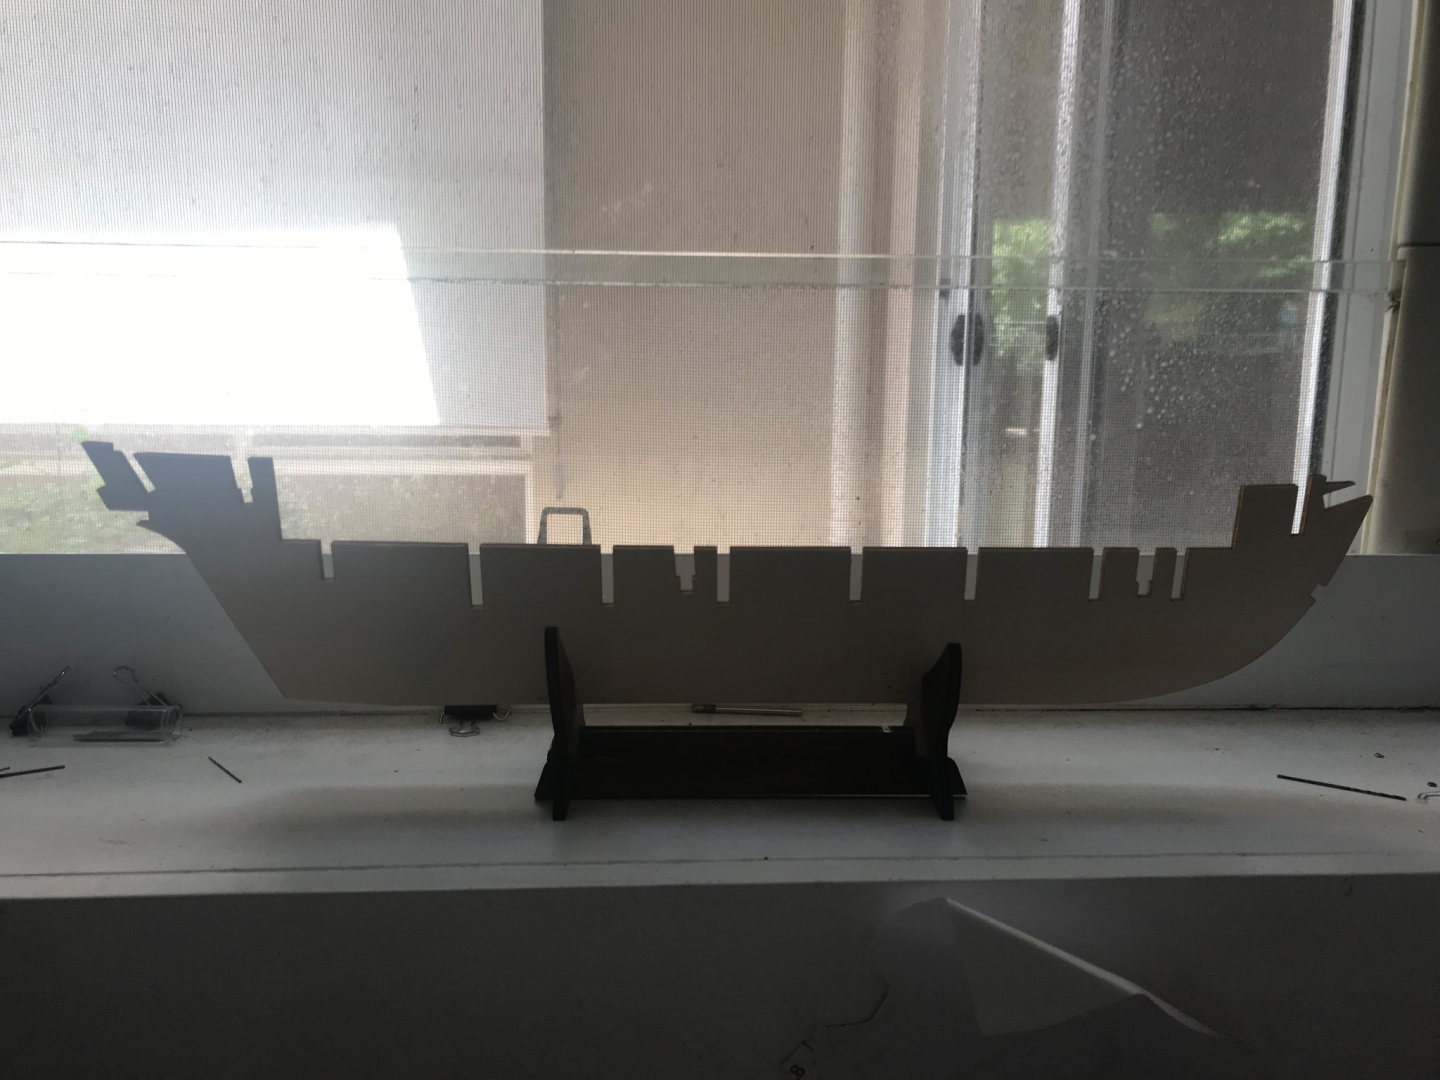
Hi there everyone, complete novice here but thought I'd post a log for this model kit. Back in probably 2011, my Dad and I were interested in building scale models, so we figured we'd start with a simple ship and work our way towards more difficult models. I was still in primary school at the time so when I say we, I really mean my Dad, while I watched and helped with simpler tasks. We made some decent progress with the Bounty's launch, but got as far as frames before my Dad's patience with the hobby ran out and the model sat on a shelf for the next 9 years. Pictured below is close to how the model was left. However, due to a COVID extended university holiday, I finally decided to give the thing another go and make some progress. The model is close to complete now (just masts sails and rigging to go) and I think I've made almost every mistake that you could possibly make. I'm still reasonably happy with the outcome. I'll try and outline the process with as many photos I have available.