HOLIDAY DONATION DRIVE - SUPPORT MSW - DO YOUR PART TO KEEP THIS GREAT FORUM GOING! (Only 51 donations so far out of 49,000 members - C'mon guys!)
×


Jeff preisler
-
Posts
92 -
Joined
-
Last visited
Content Type
Profiles
Forums
Gallery
Events
Everything posted by Jeff preisler
-
Very nice workmanship!! I also have this kit in my collection and when I decide to construct it, your detailed build thread will be a wealth of information for me. Thank you.
-
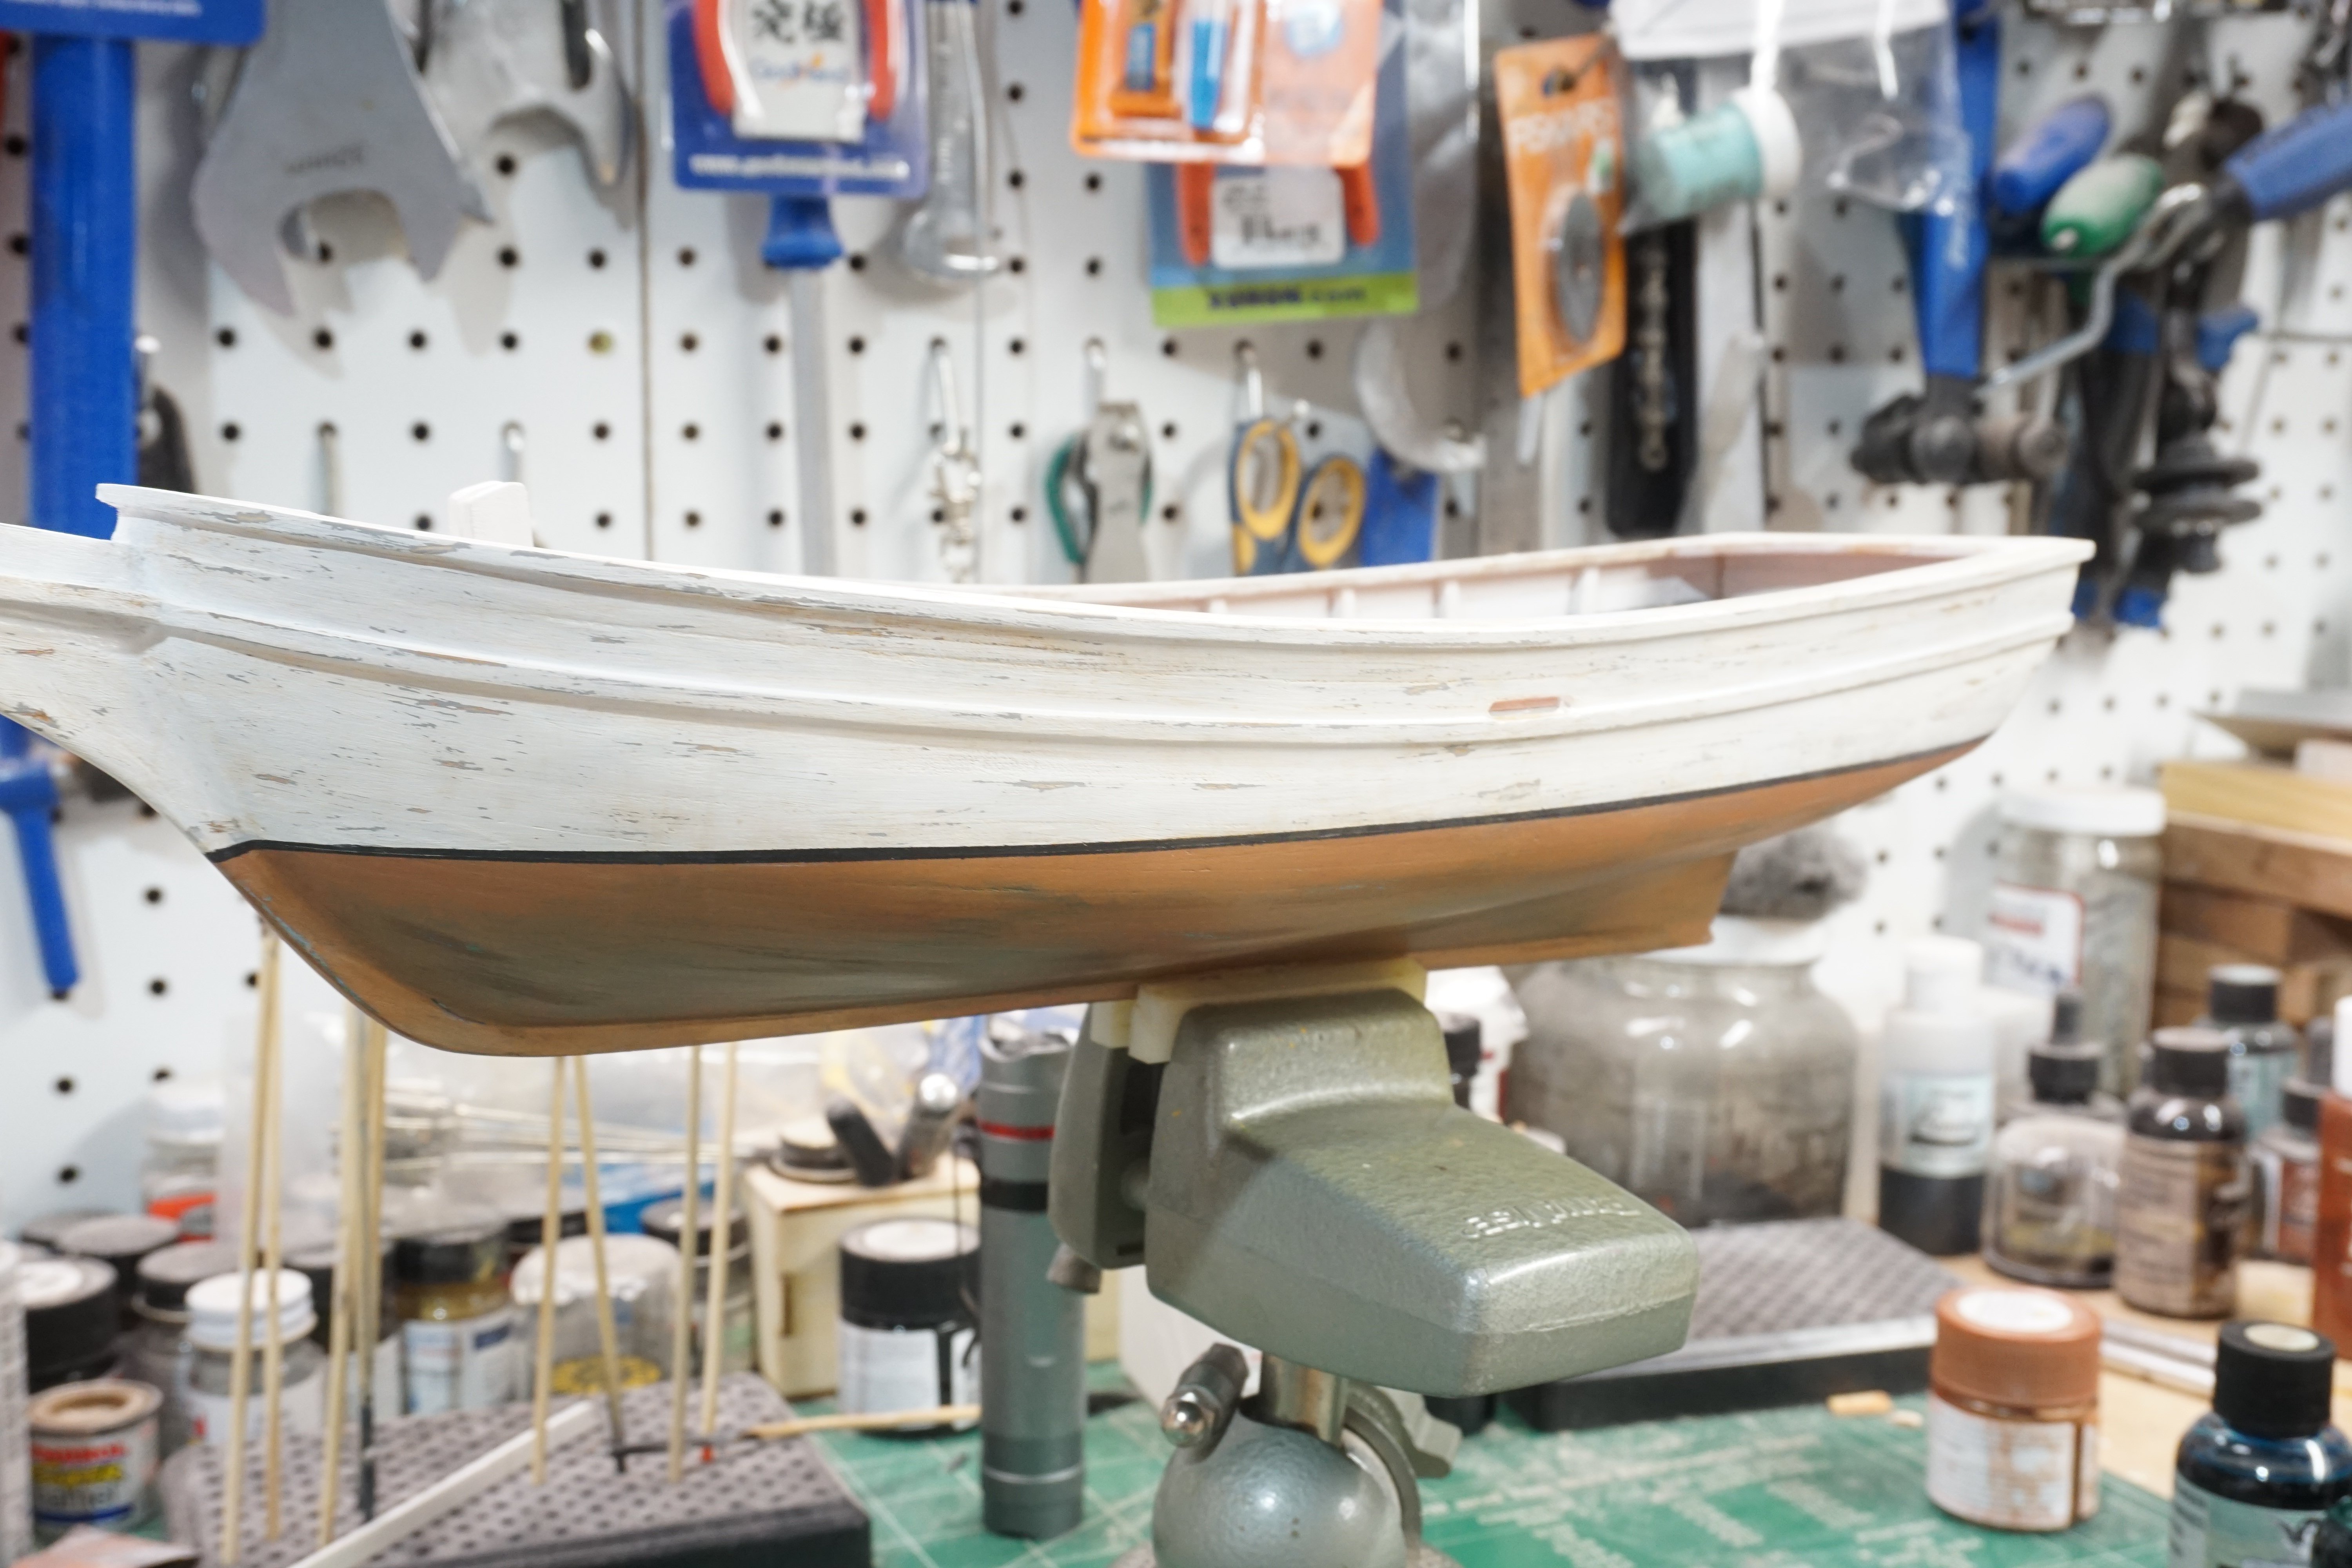
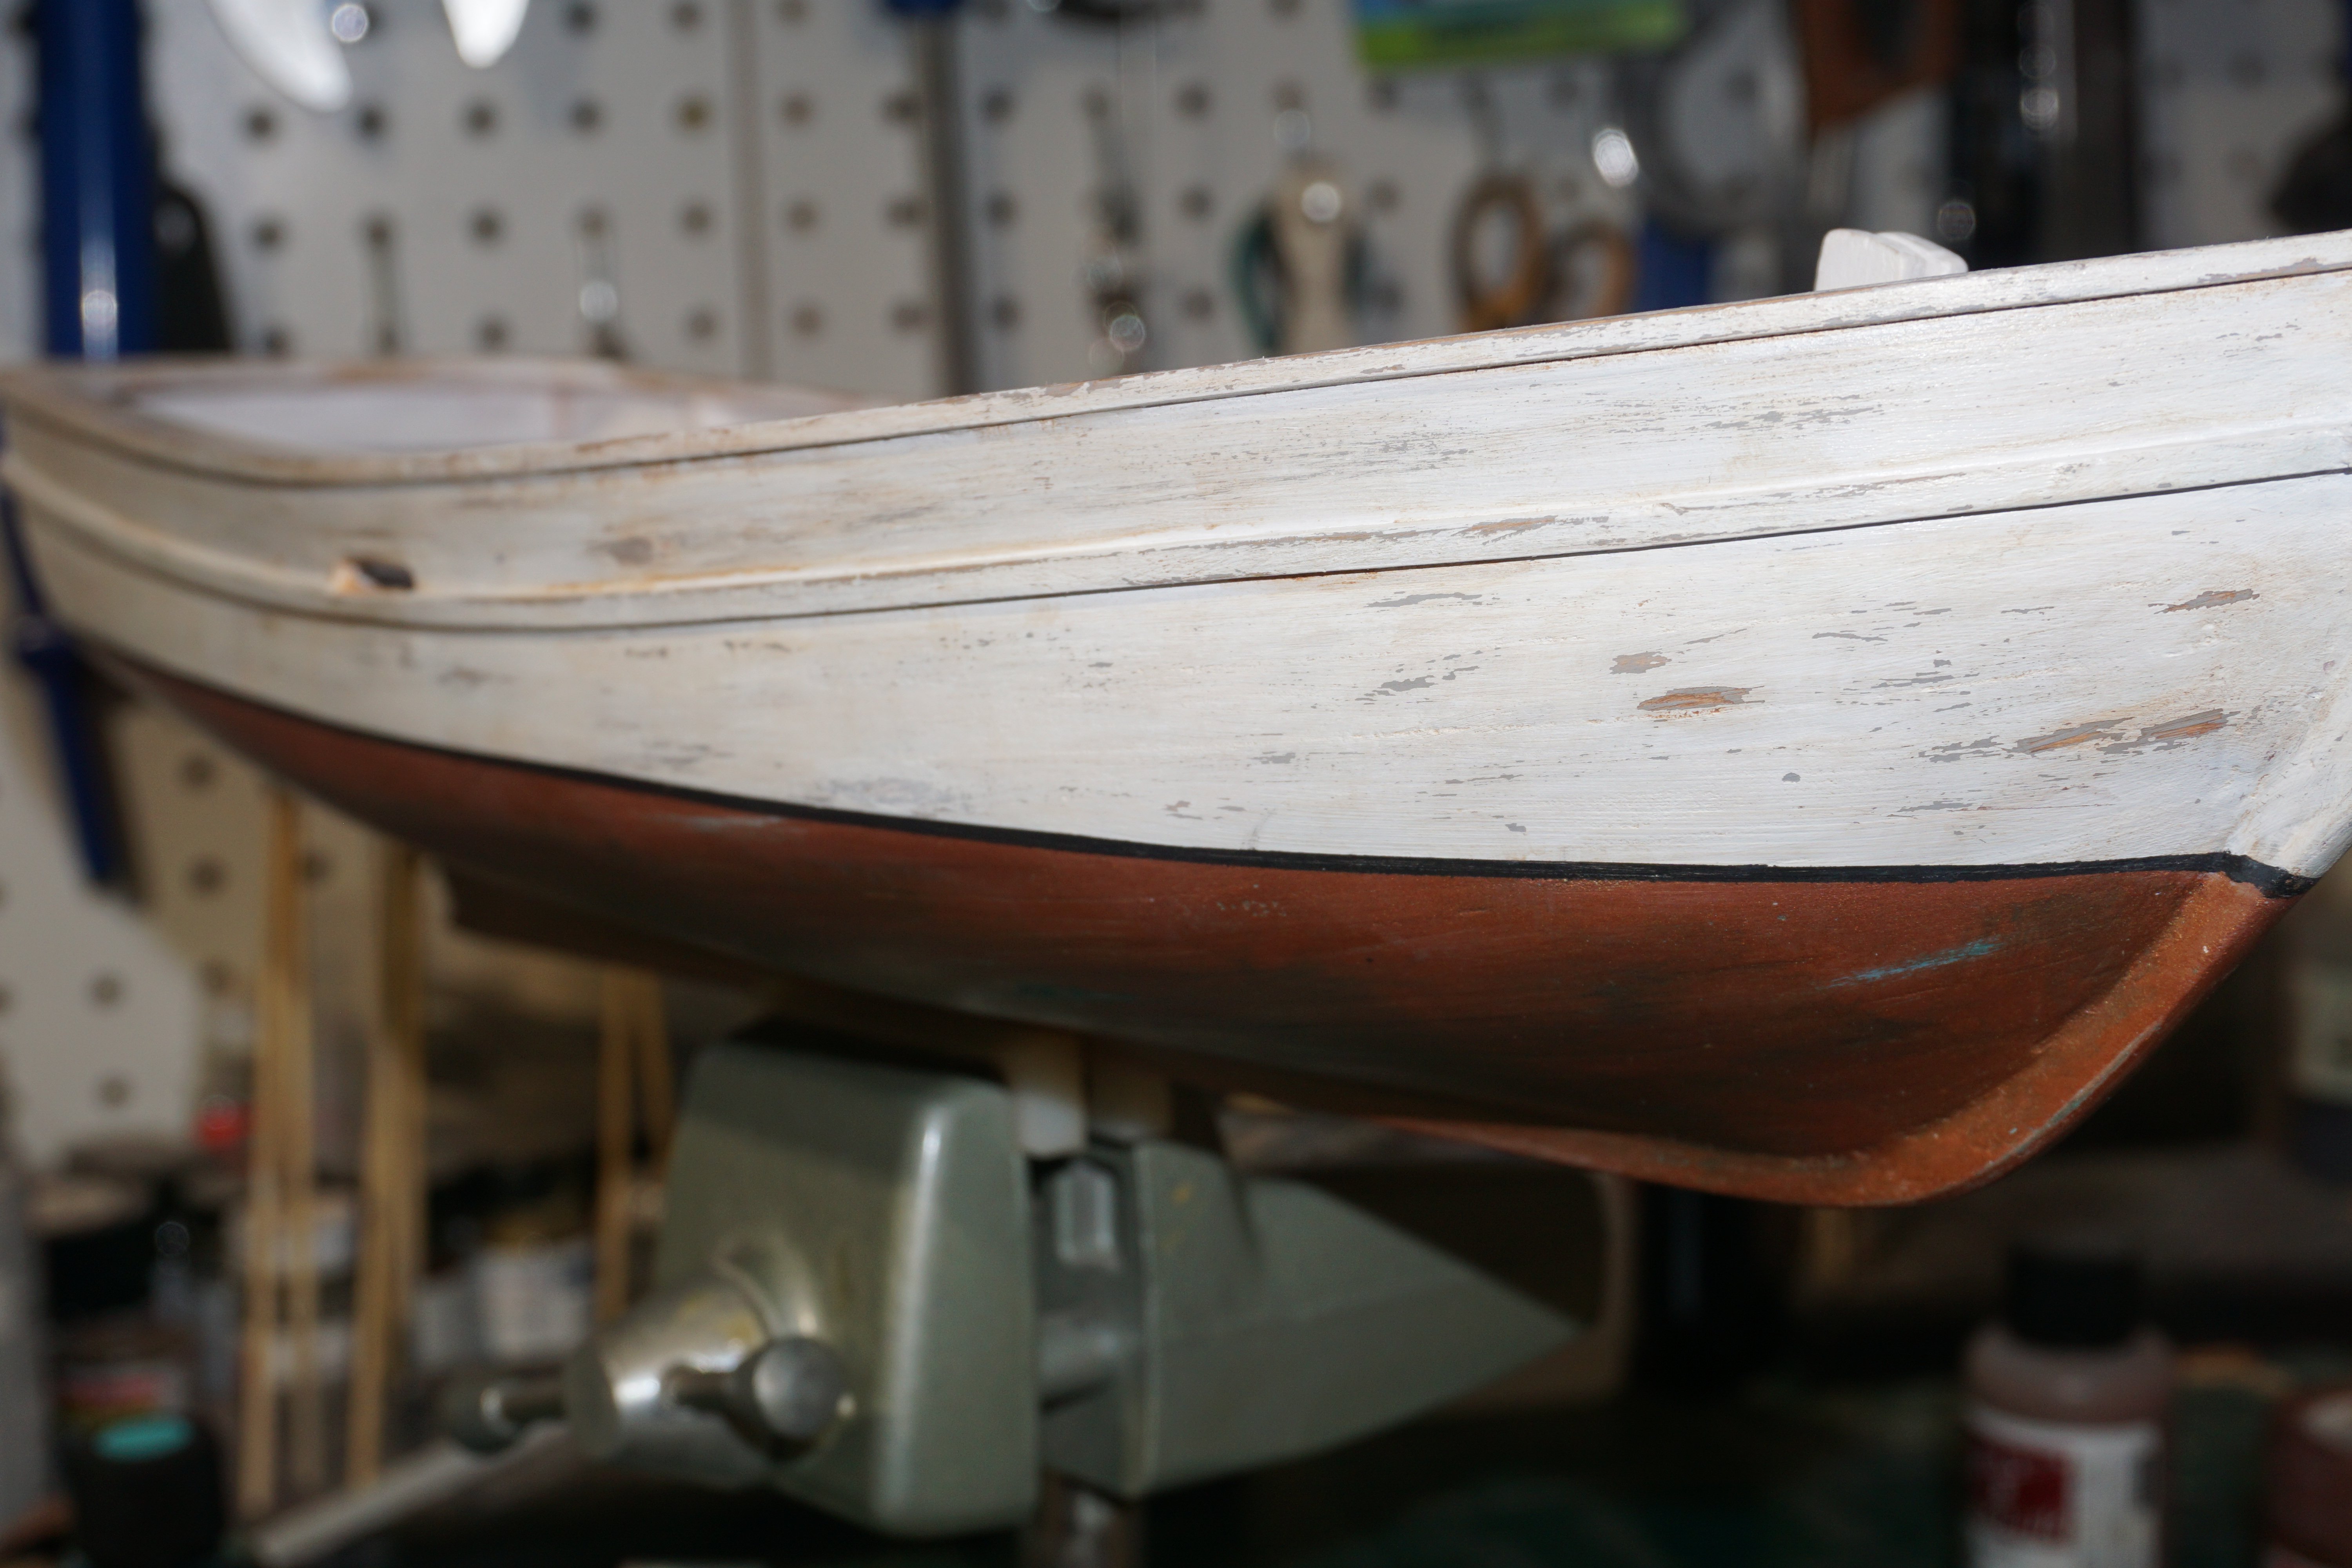
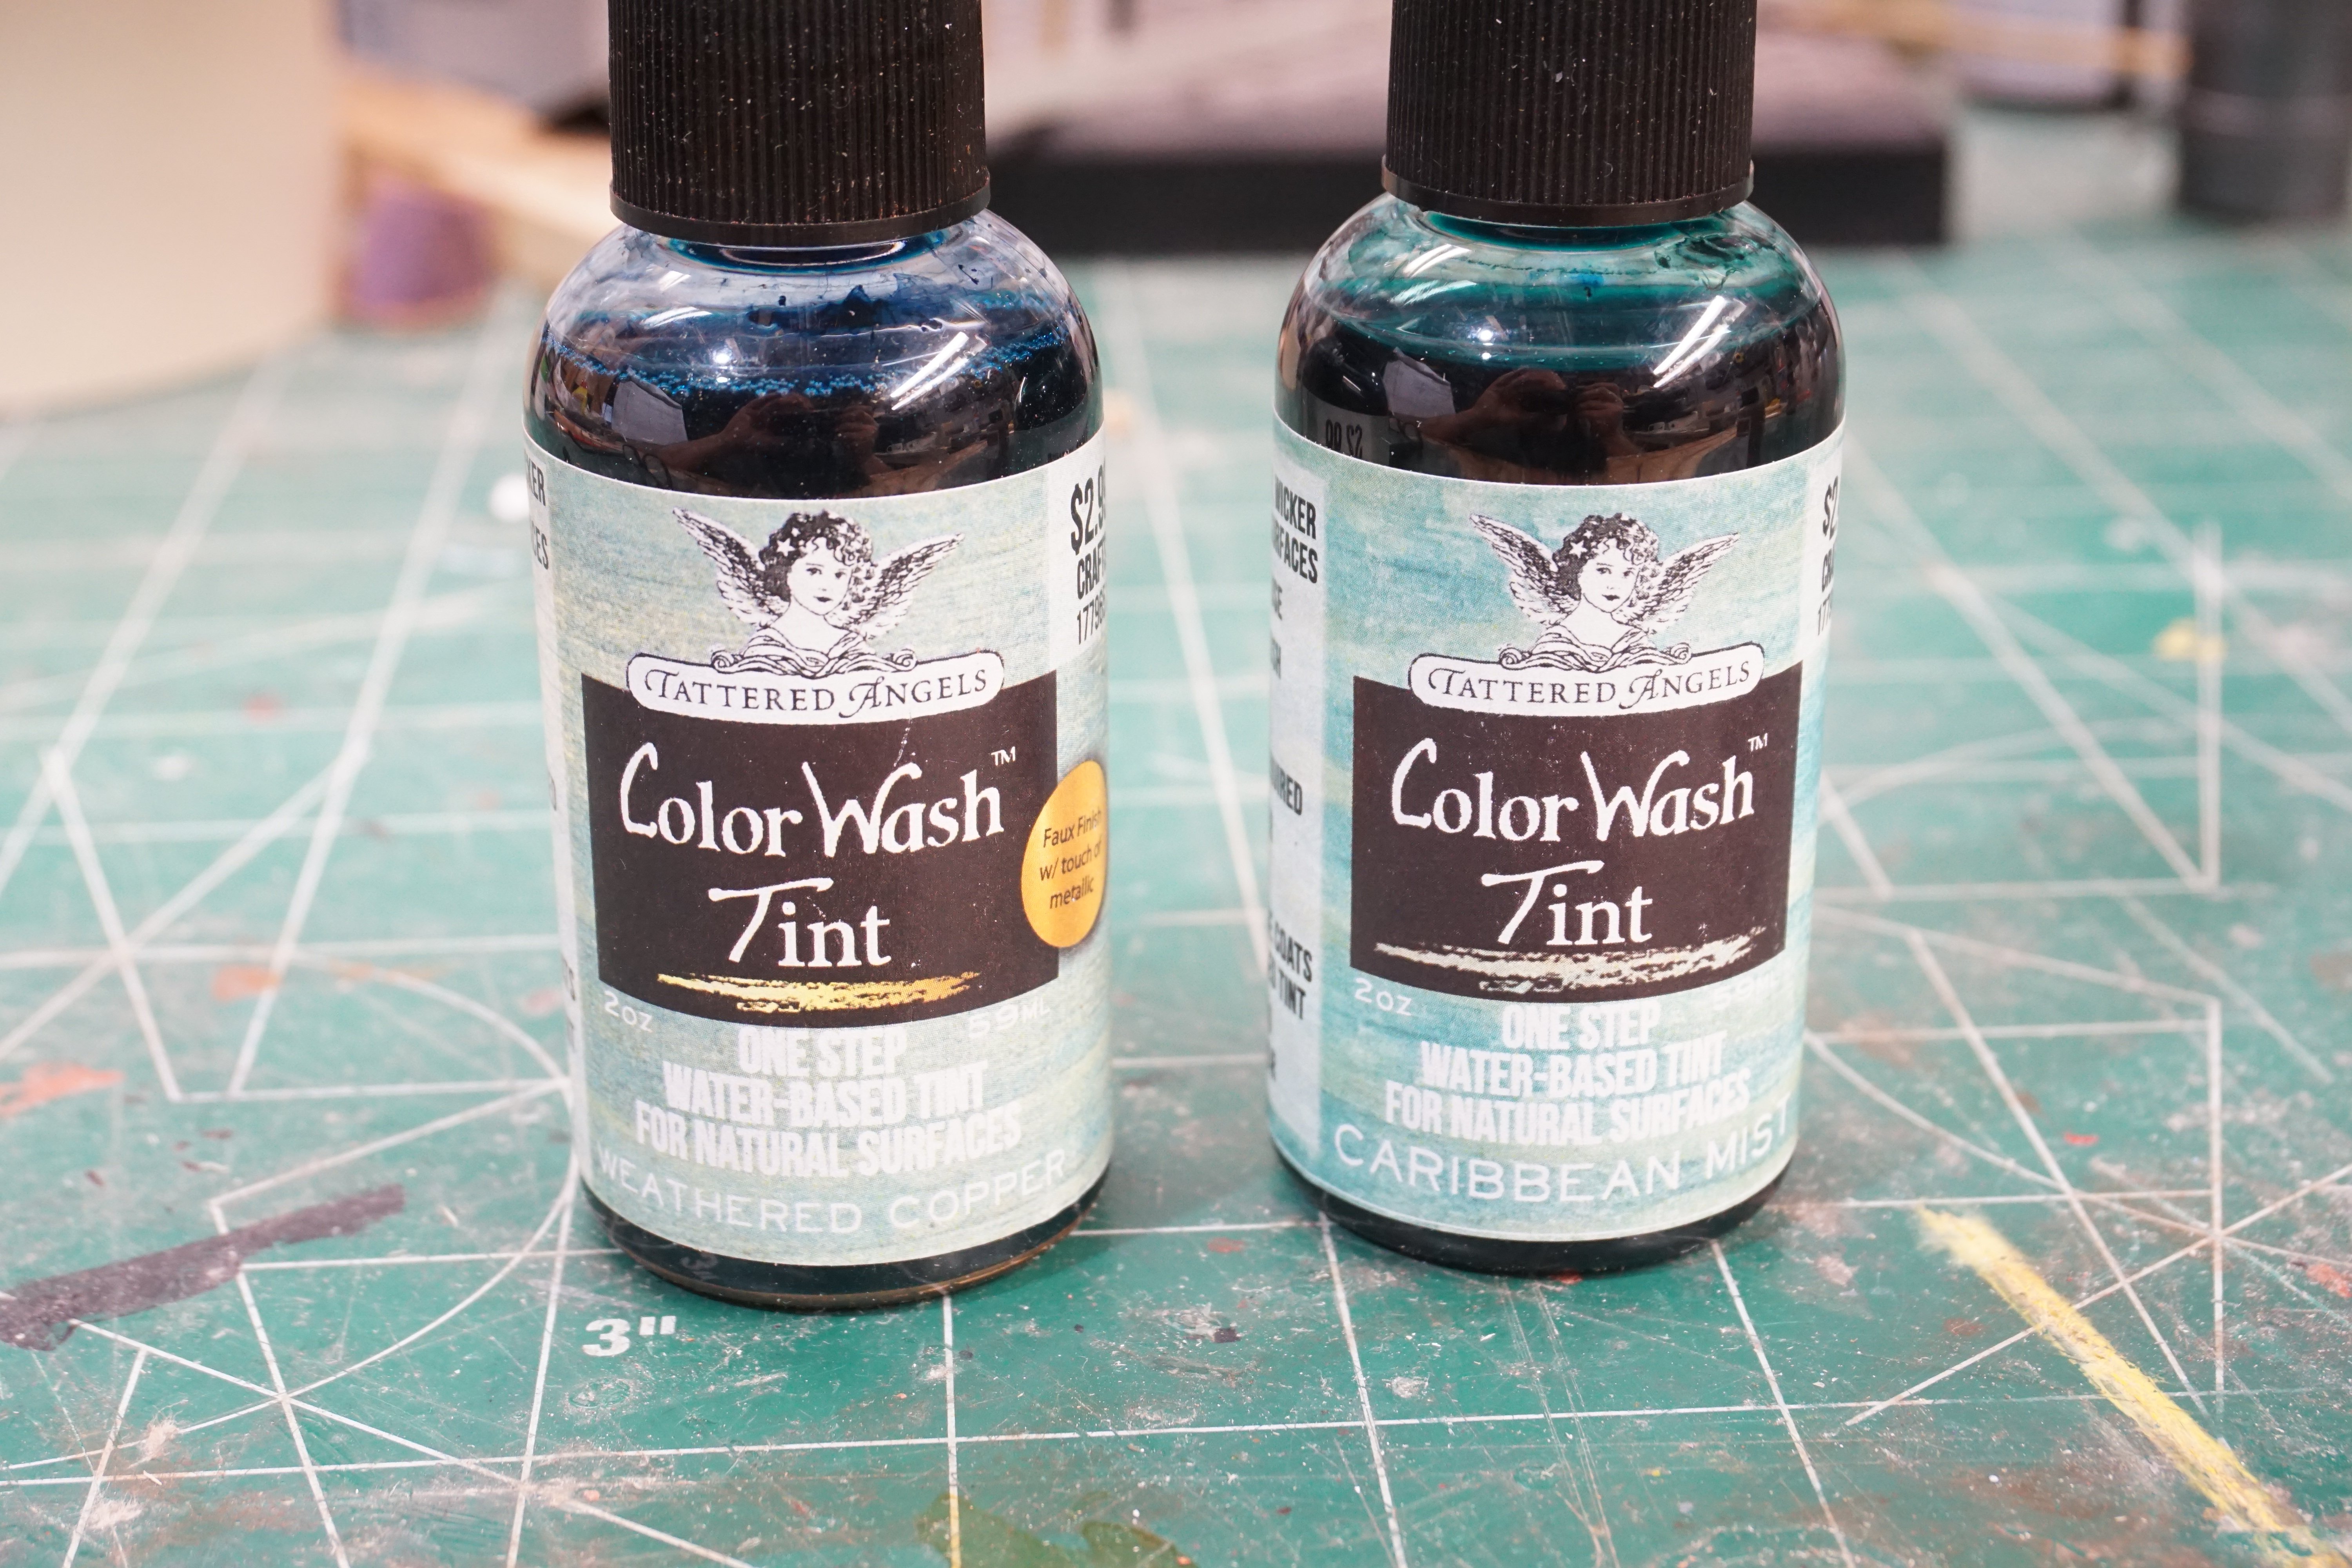
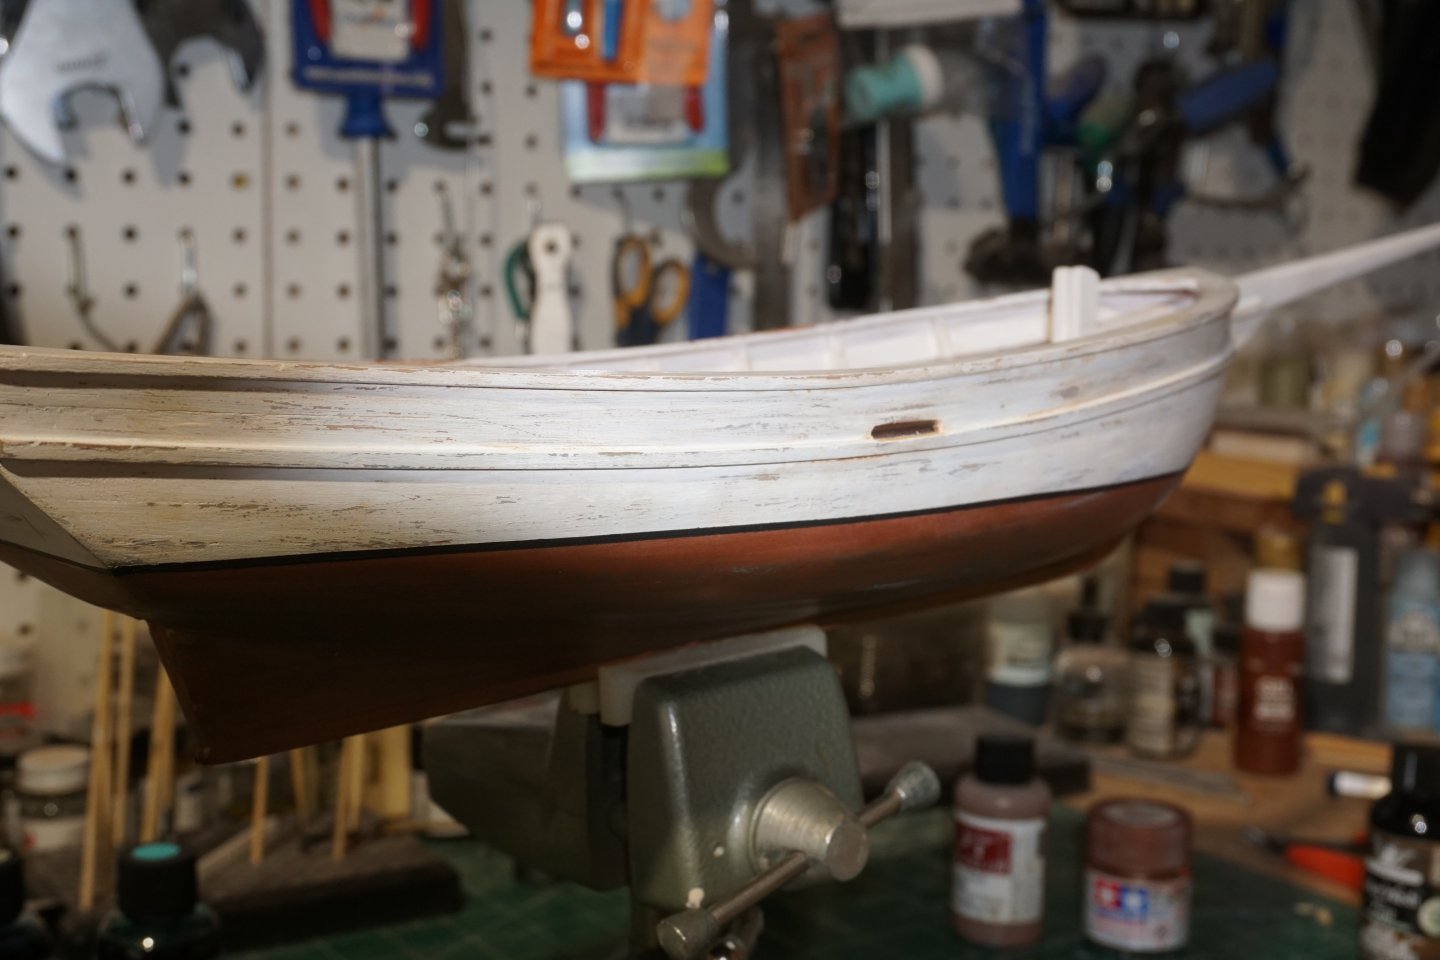
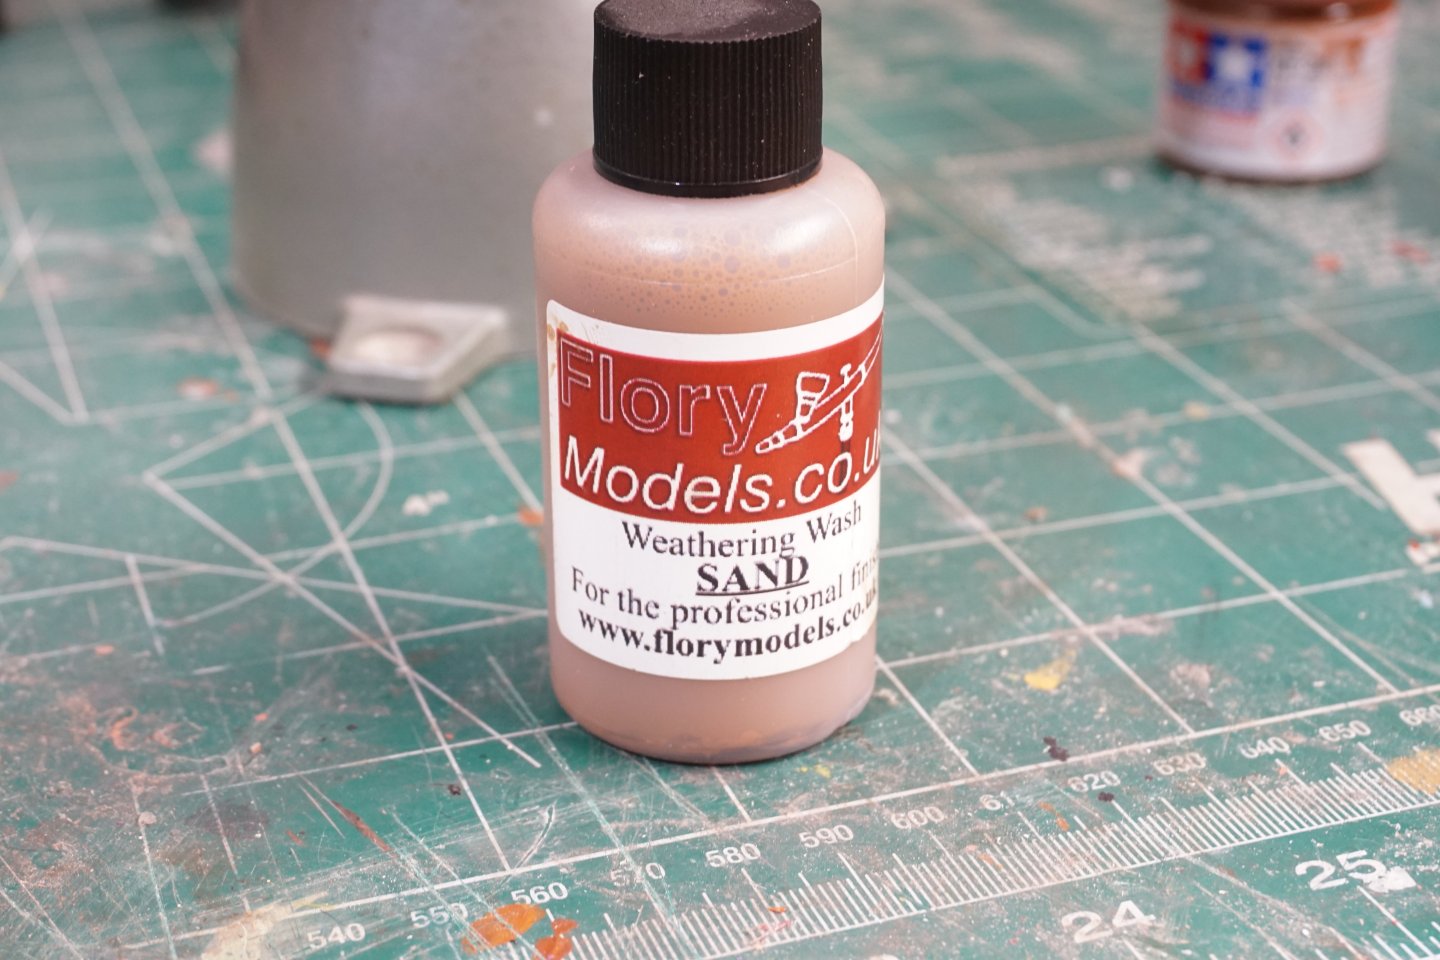
After priming the hull with Dupli-Color scratch filler primer and final sanding, I marked out the waterline. Using Liquitex acrylic white mixed with some matt medium I brush painted the hull above the waterline, then below the waterline I brush painted with Tamiya dark copper. I wanted to give the paint the look of being faded and weather battered from the long voyage at sea. I first roughed up areas of the hull with some sanding sticks to give the appearance of worn faded paint then using my x-acto knife, I scraped in some various scratches. For the lower hull applied a wash of weathered copper and Caribbean mist, (product I found at hobby lobby). Lastly, for the upper hull I applied a sand color clay-based wash from Florymodels.co.uk: what is nice about this clay wash from Flory is that even after it dries you can rub it off if it's not to your liking.


-
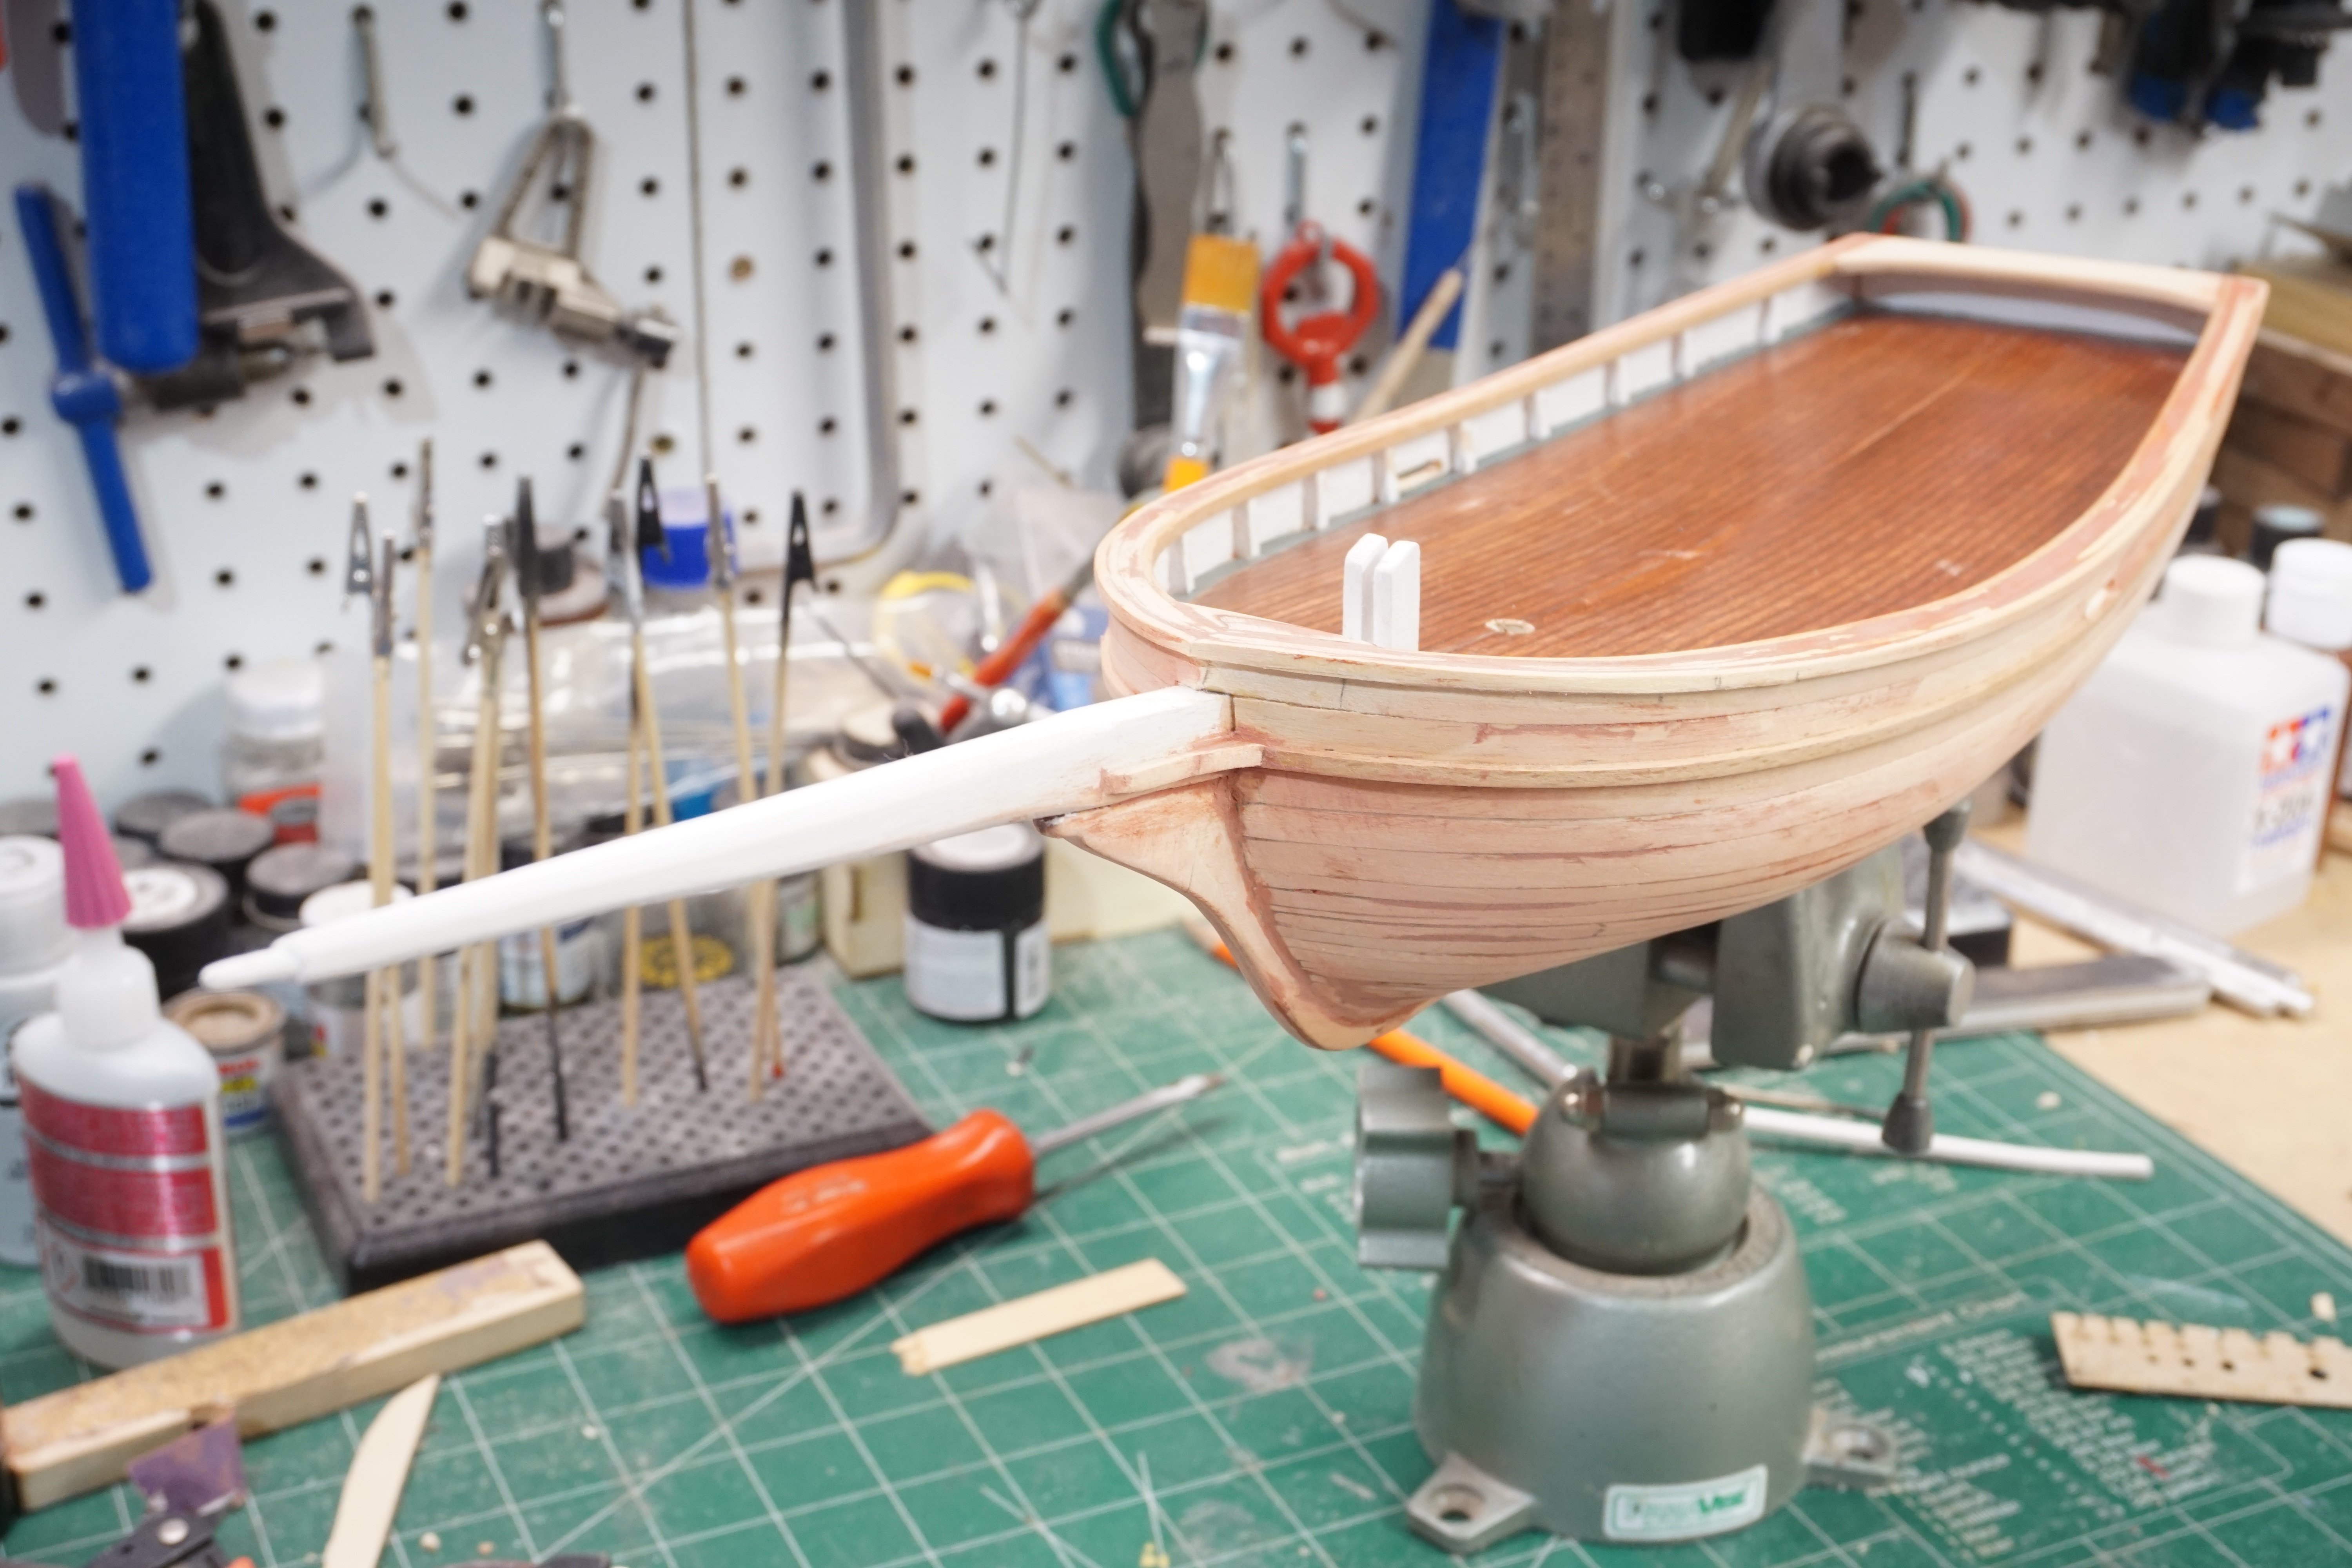
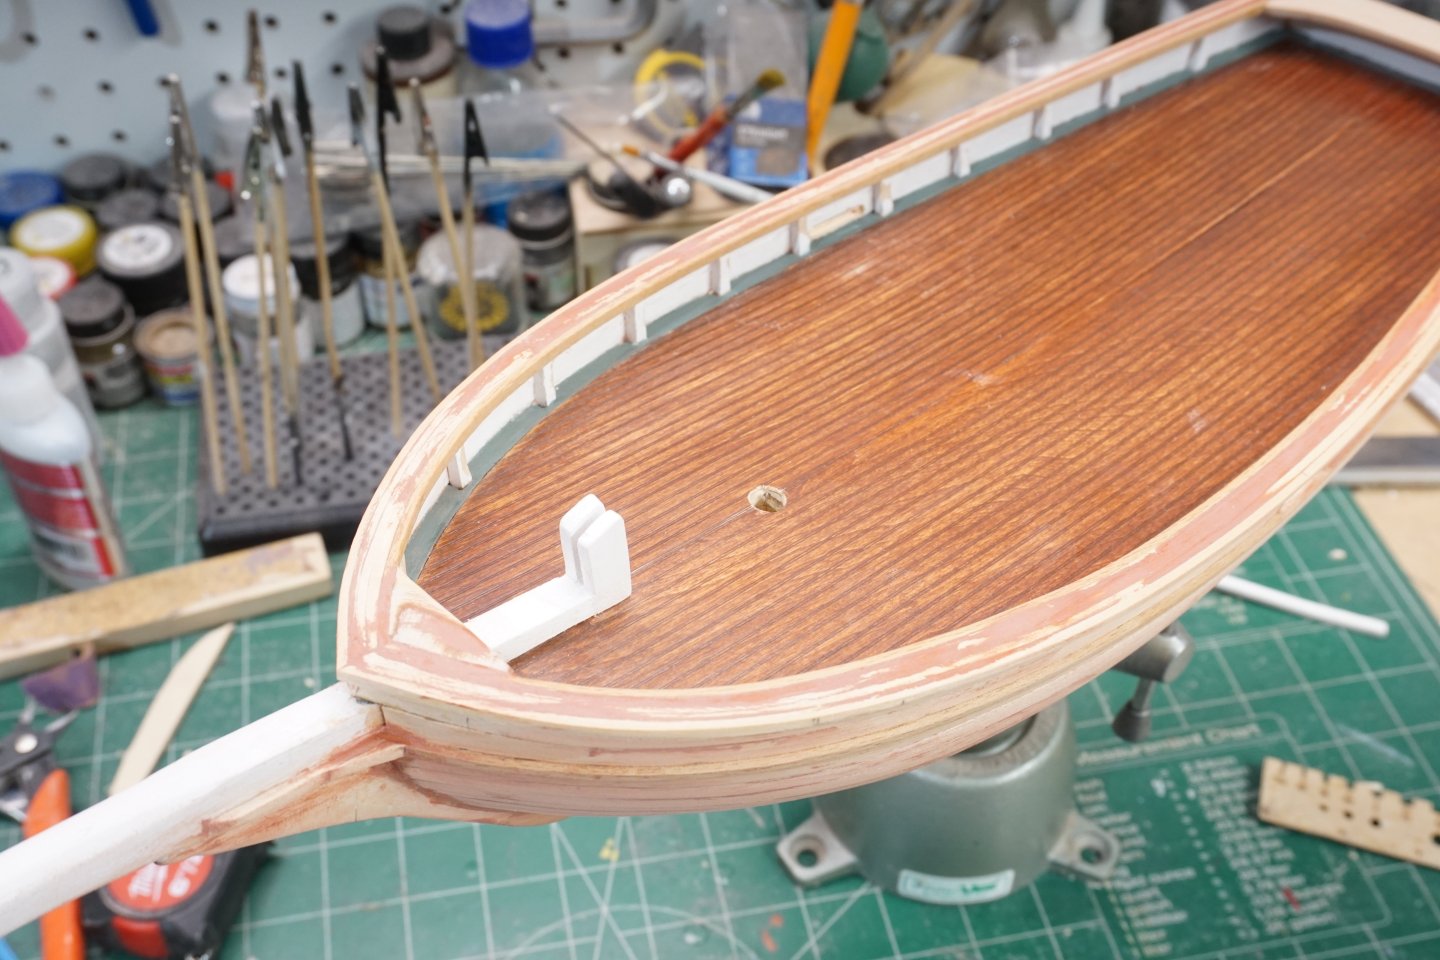
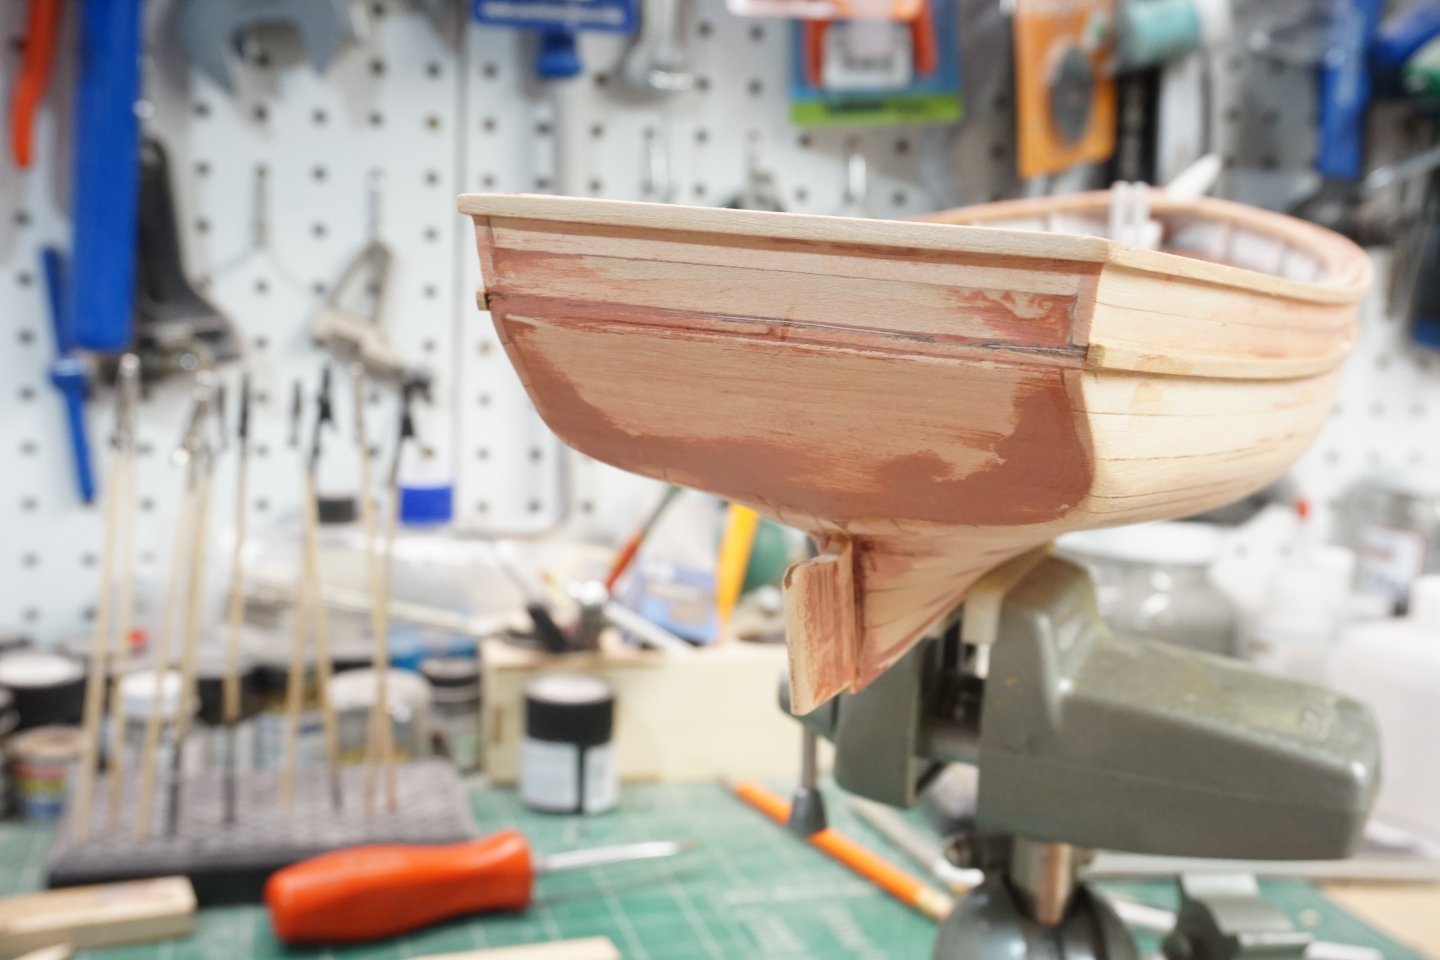
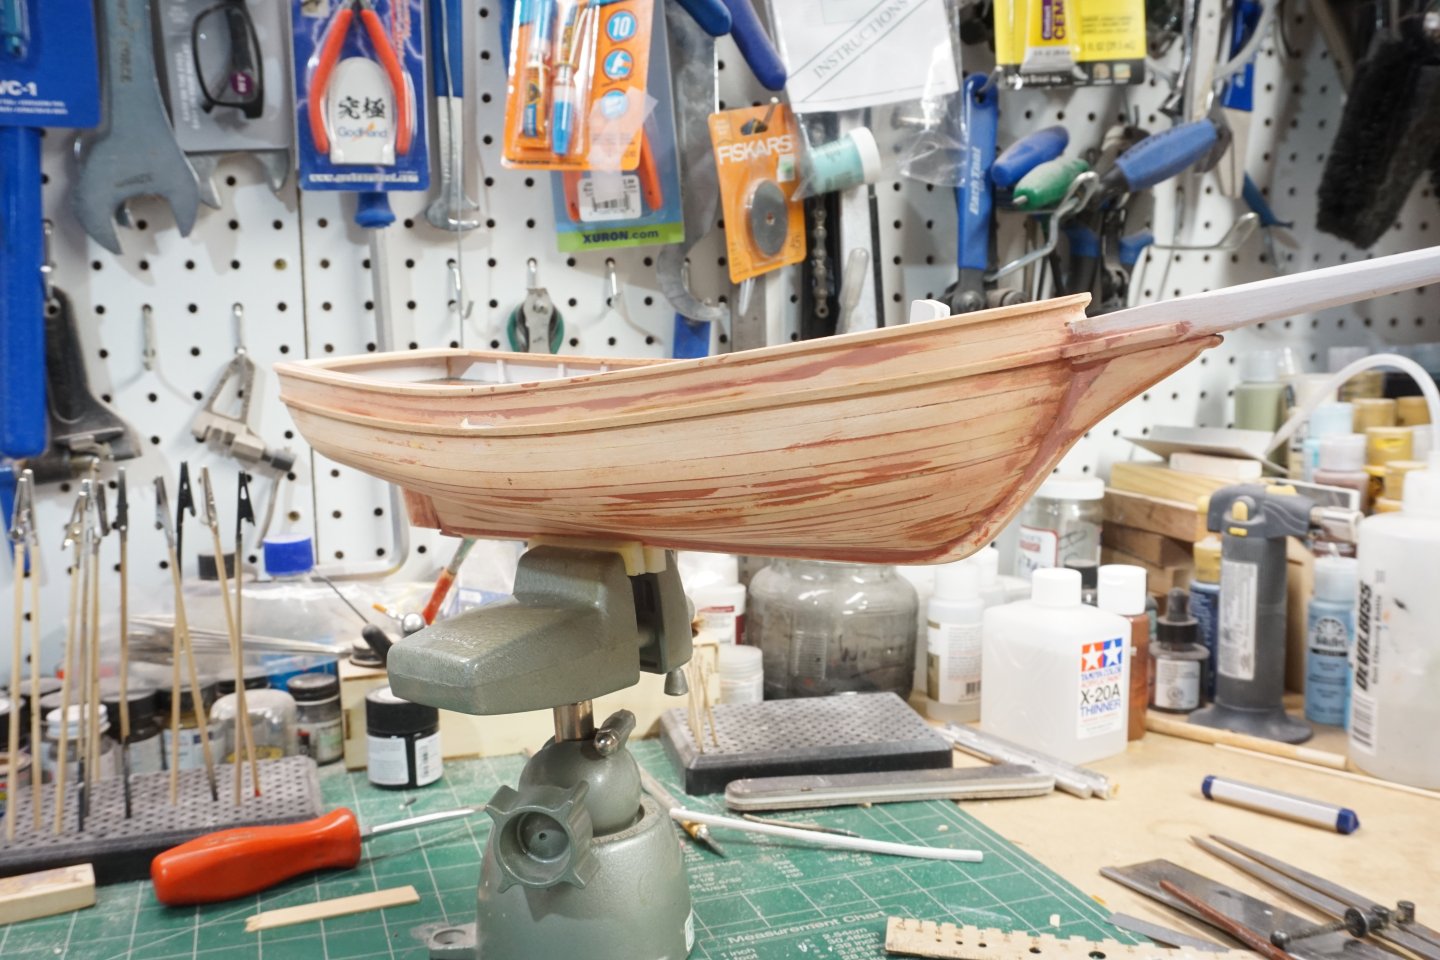
More progress on the hull including carving out and shaping and installation of the bowsprit from 3/8" basswood stock and cutting out the knightheads and attaching them to the base of the bowsprit. Shaped the 1/8" square rail stanchions and glued them into position while leaving them little long until the bulwarks planking was added, then I cut them flush and finally installed the cap rails. Then my next step was to fabricate the rudder assembly per kit instruction. Lastly, shaped and attached the bow block and taffrail deck (above the transom) and installed the rub rails and cut out the scuppers. So far everything is coming together pretty good without much trouble.

-
Very nice work!! I always wanted to try a card model myself. I will be following your build with great interest, thank you for your detailed photos and instruction.
- 37 replies
-
- 1
-

-
- Baltimore
- heinkel models
- (and 2 more)
-
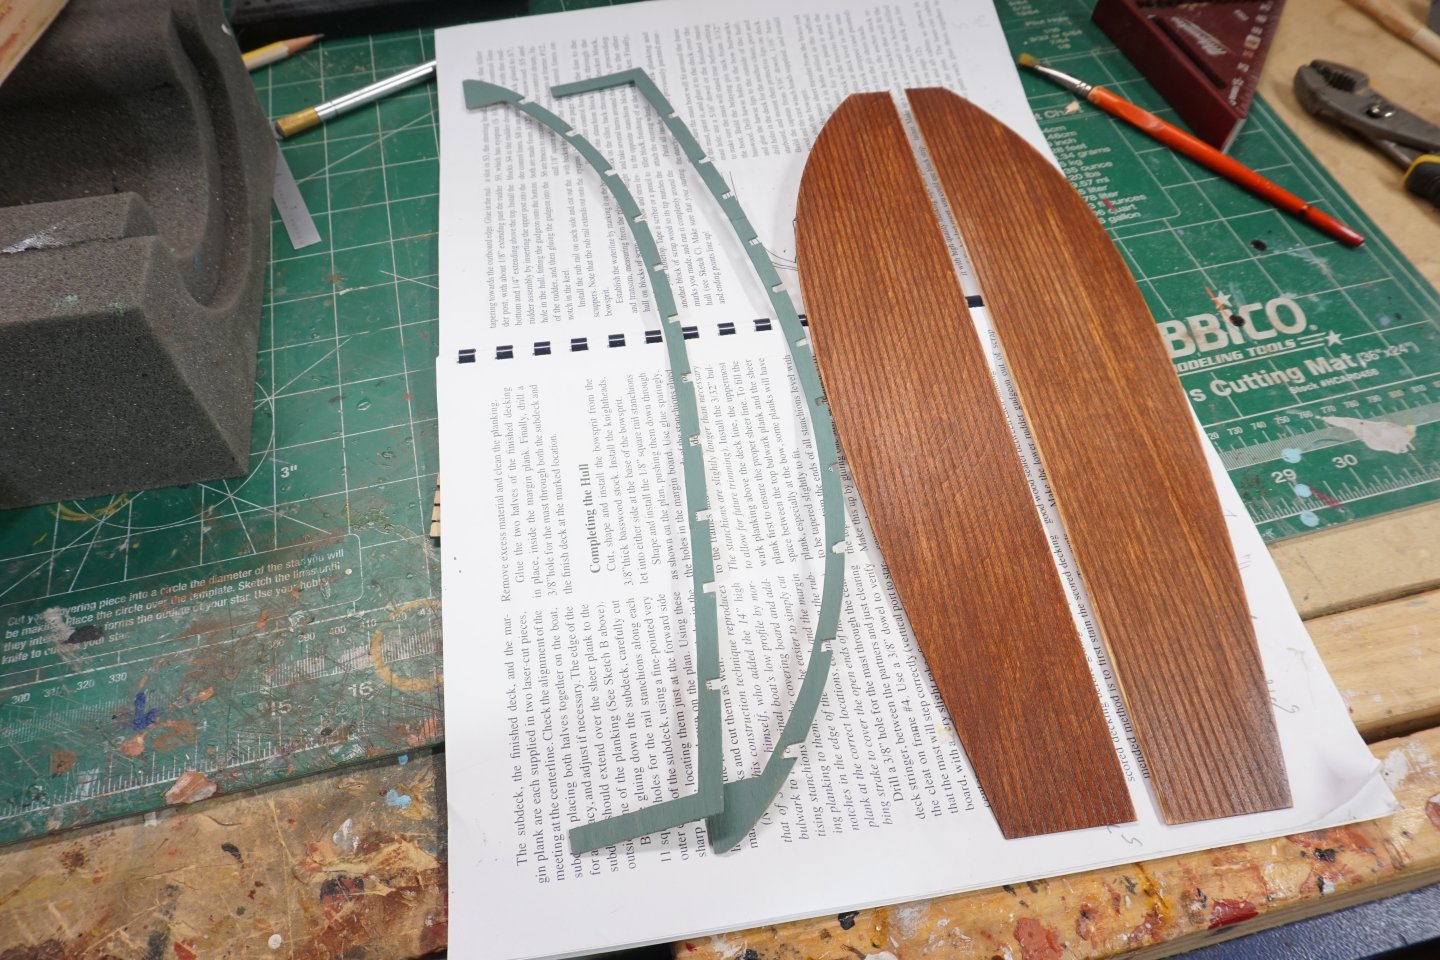
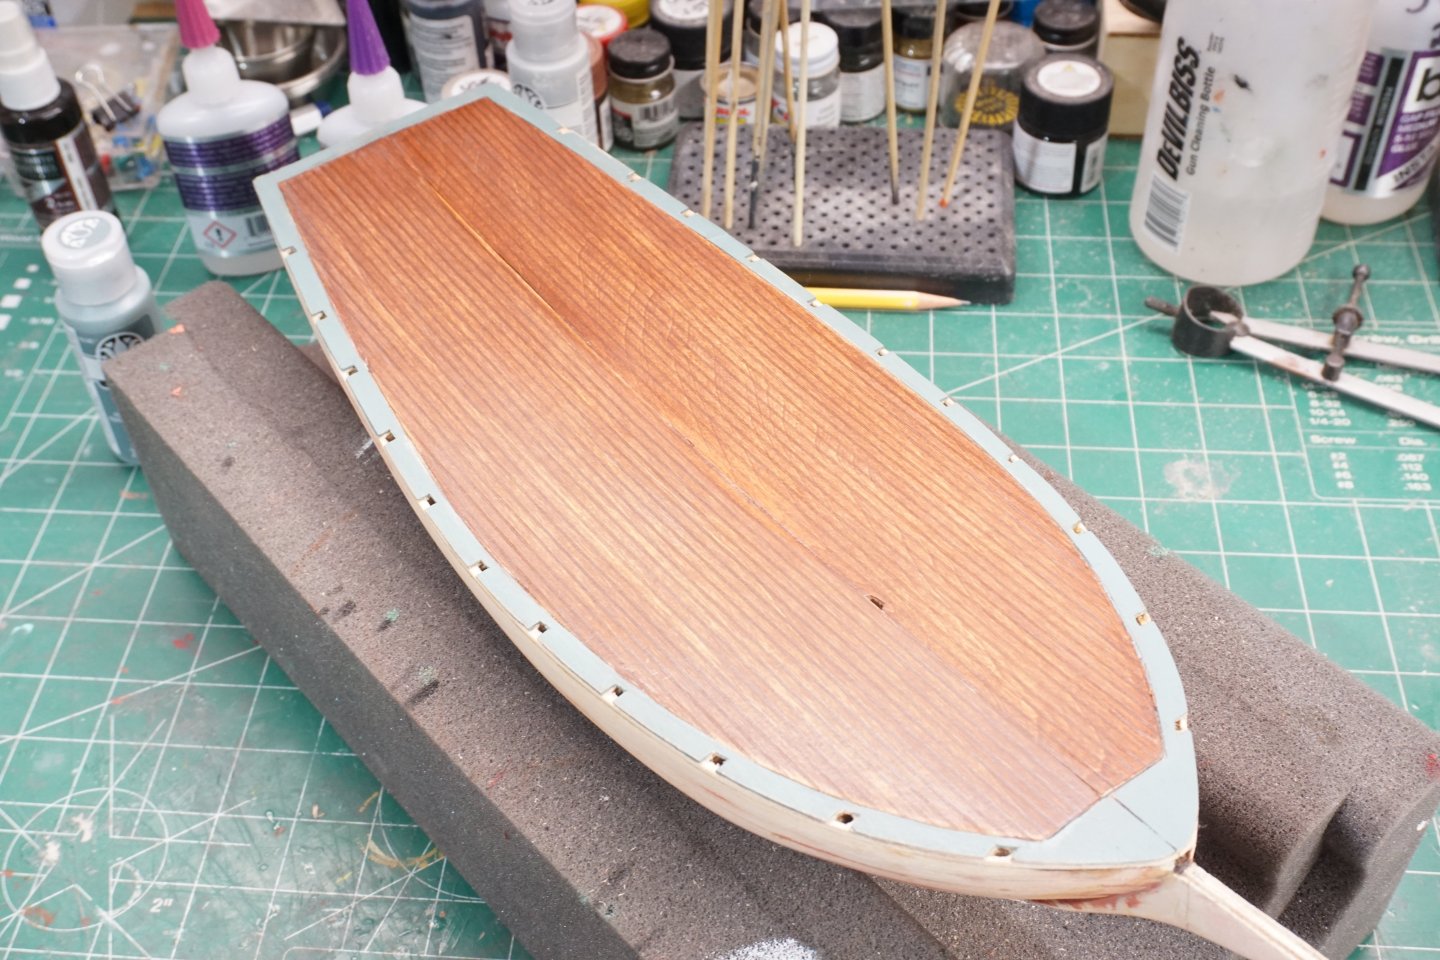
After applying automotive filler and sanding of the hull, I marked out and cut the square holes on the sub deck for the rail stanchions. Glued the sub deck down then carefully cut out the stanchion notches on the margin plank. Next, I stained the main decking, and brush painted the margin plank with a greenish grey color. After some trimming/sanding and I was sure everything was going to line up, I glued it altogether.

-
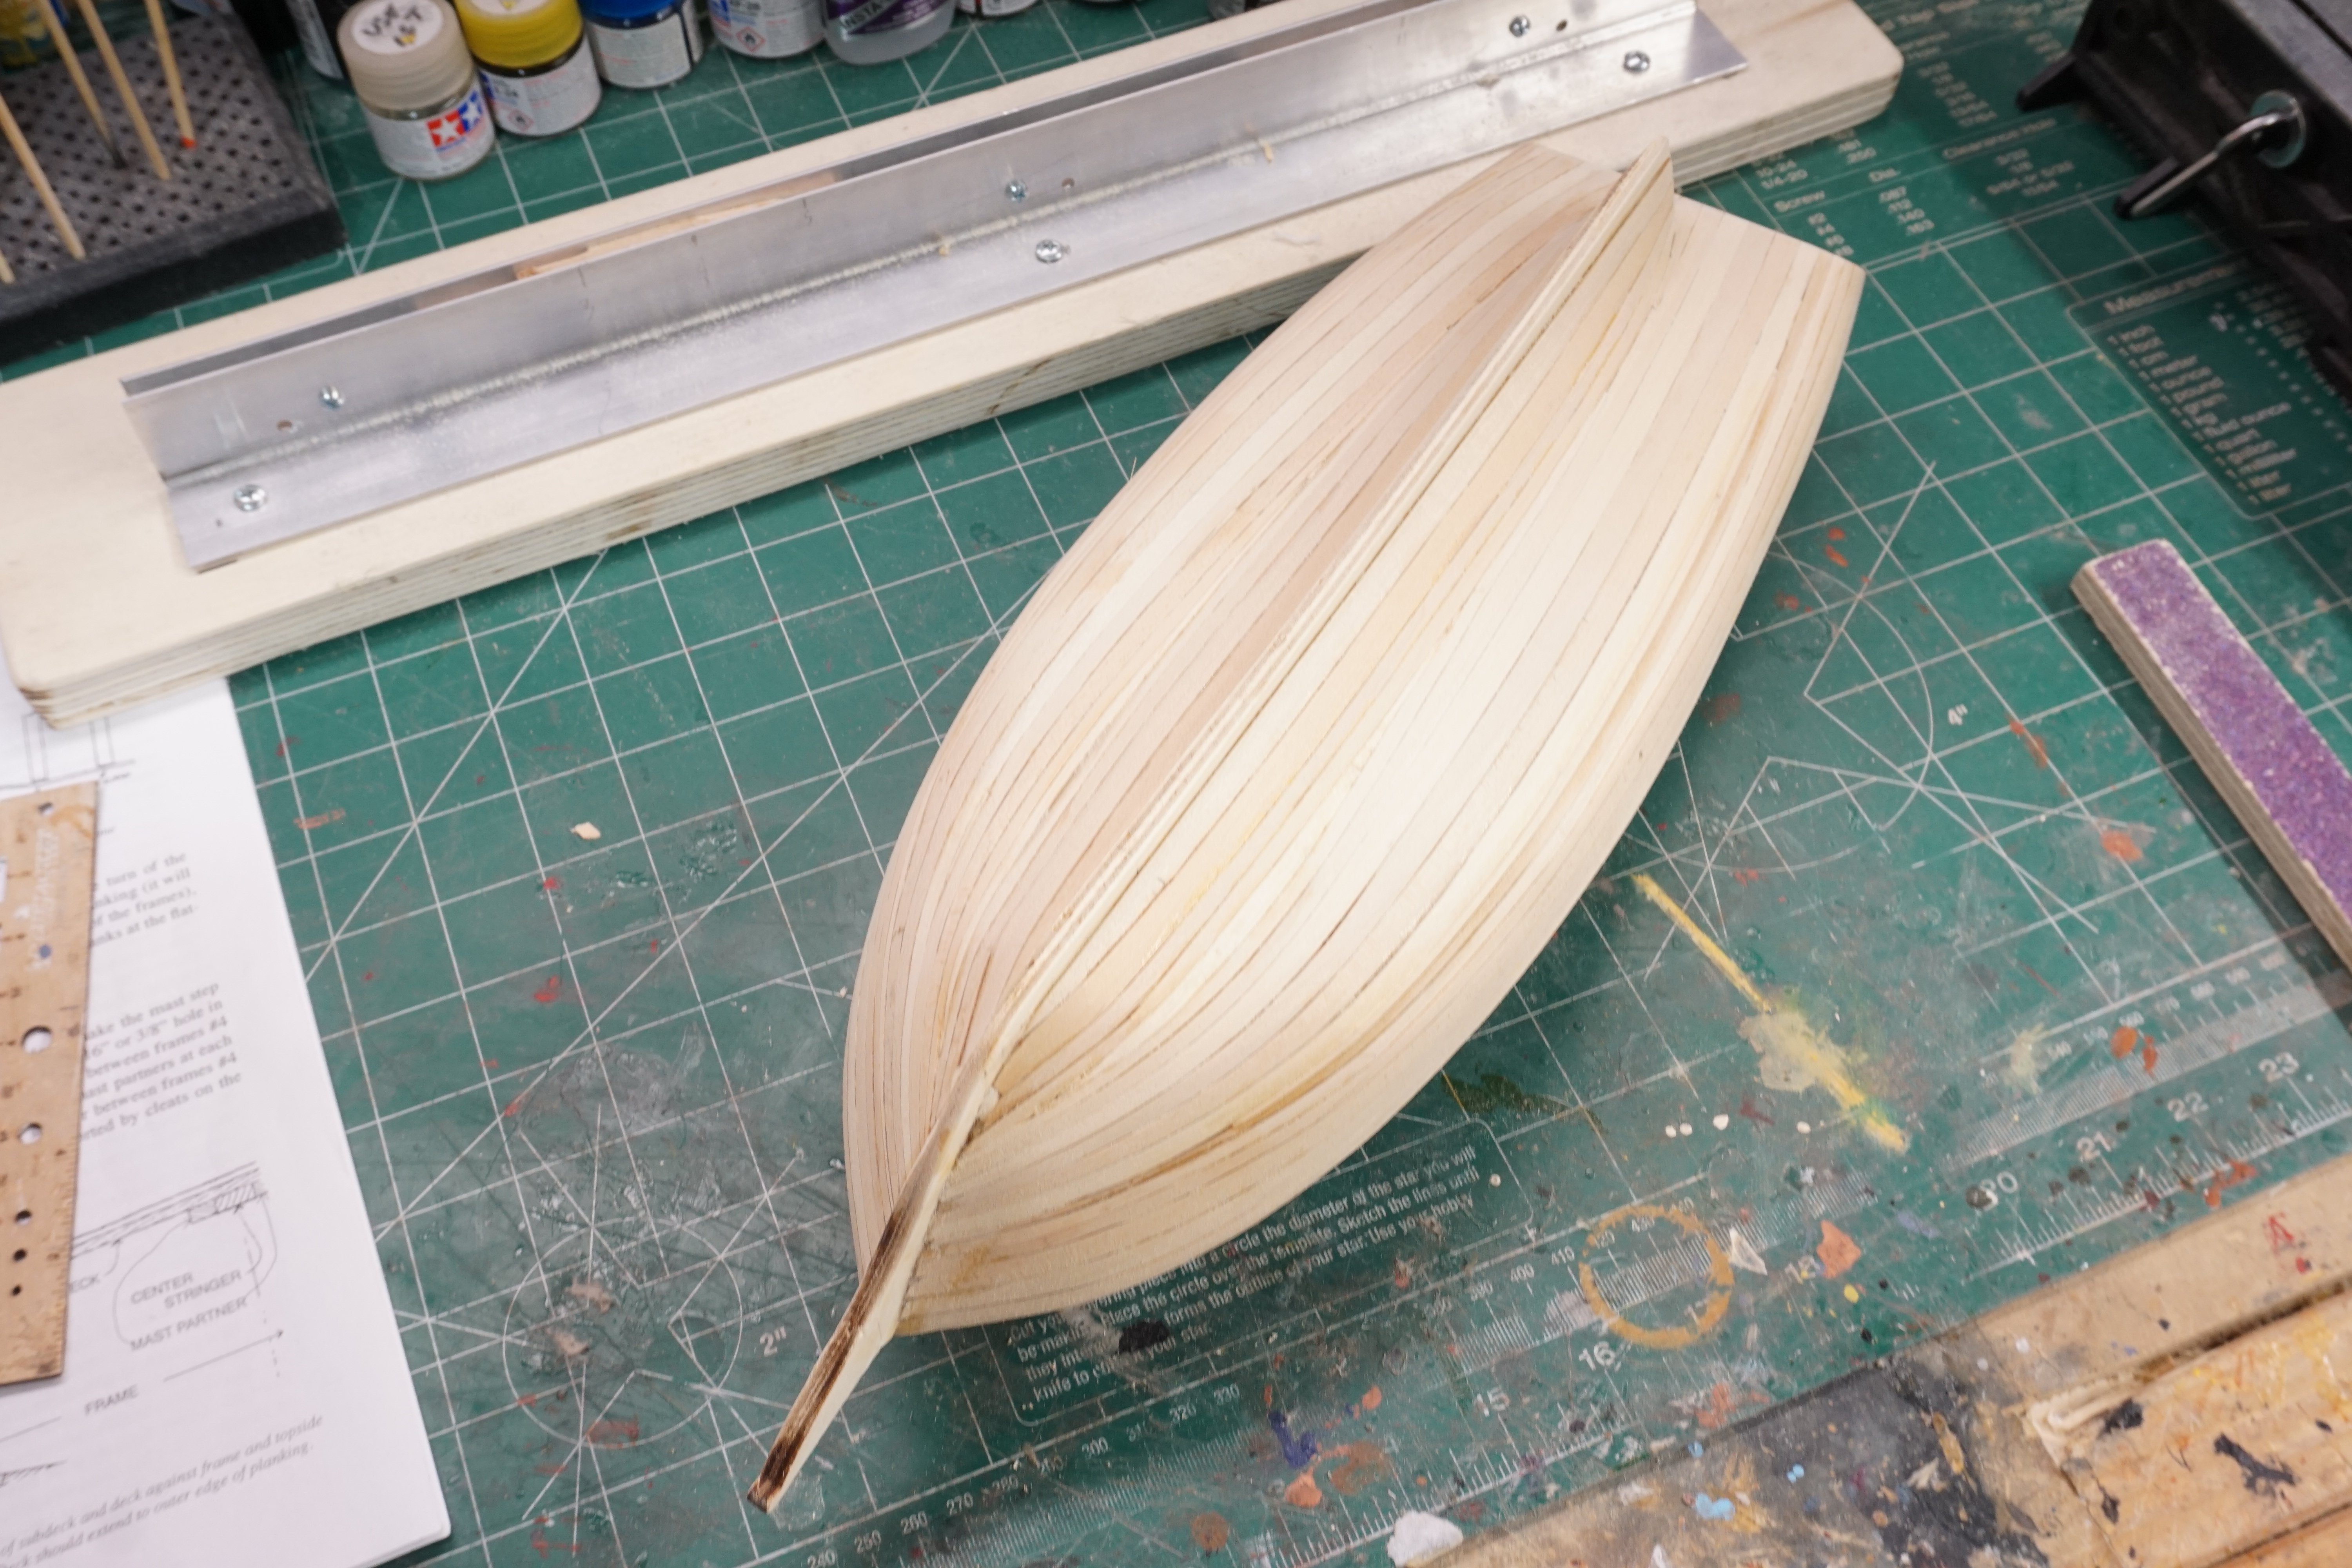
Finished up the planking this evening. Per kit instructions, I used the narrower 1/8-inch planks at the turn of the bilge as it was easier to go around the sharper curves. I tapered the planks at the bow, and also had to add 4 cheater planks, (2 per side). Just have to do some more sanding and filling, then I can move on to working on the deck.

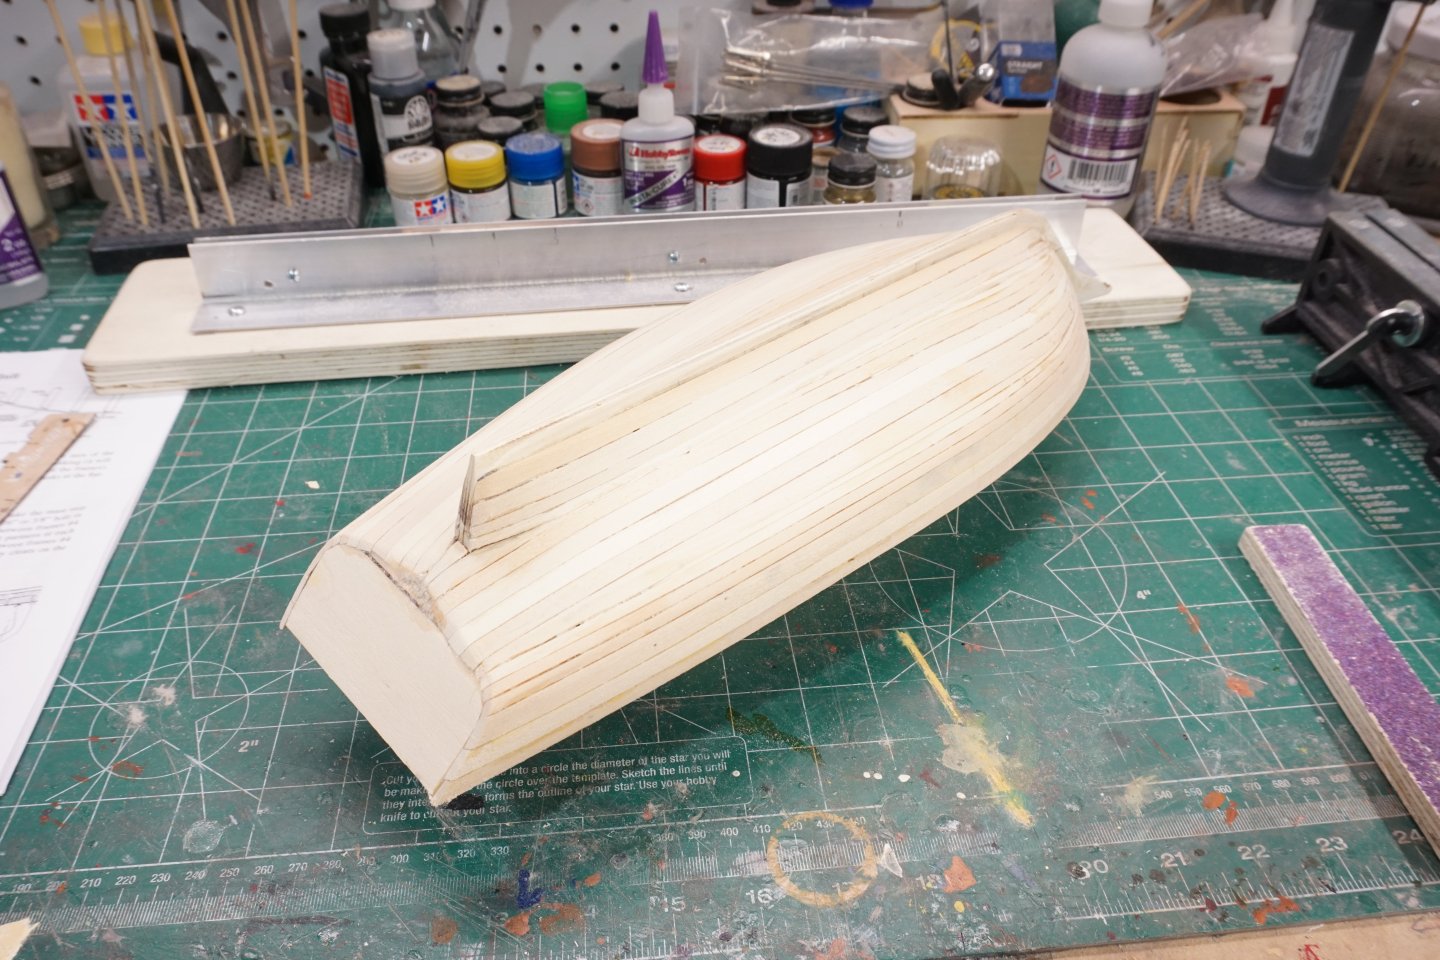
-
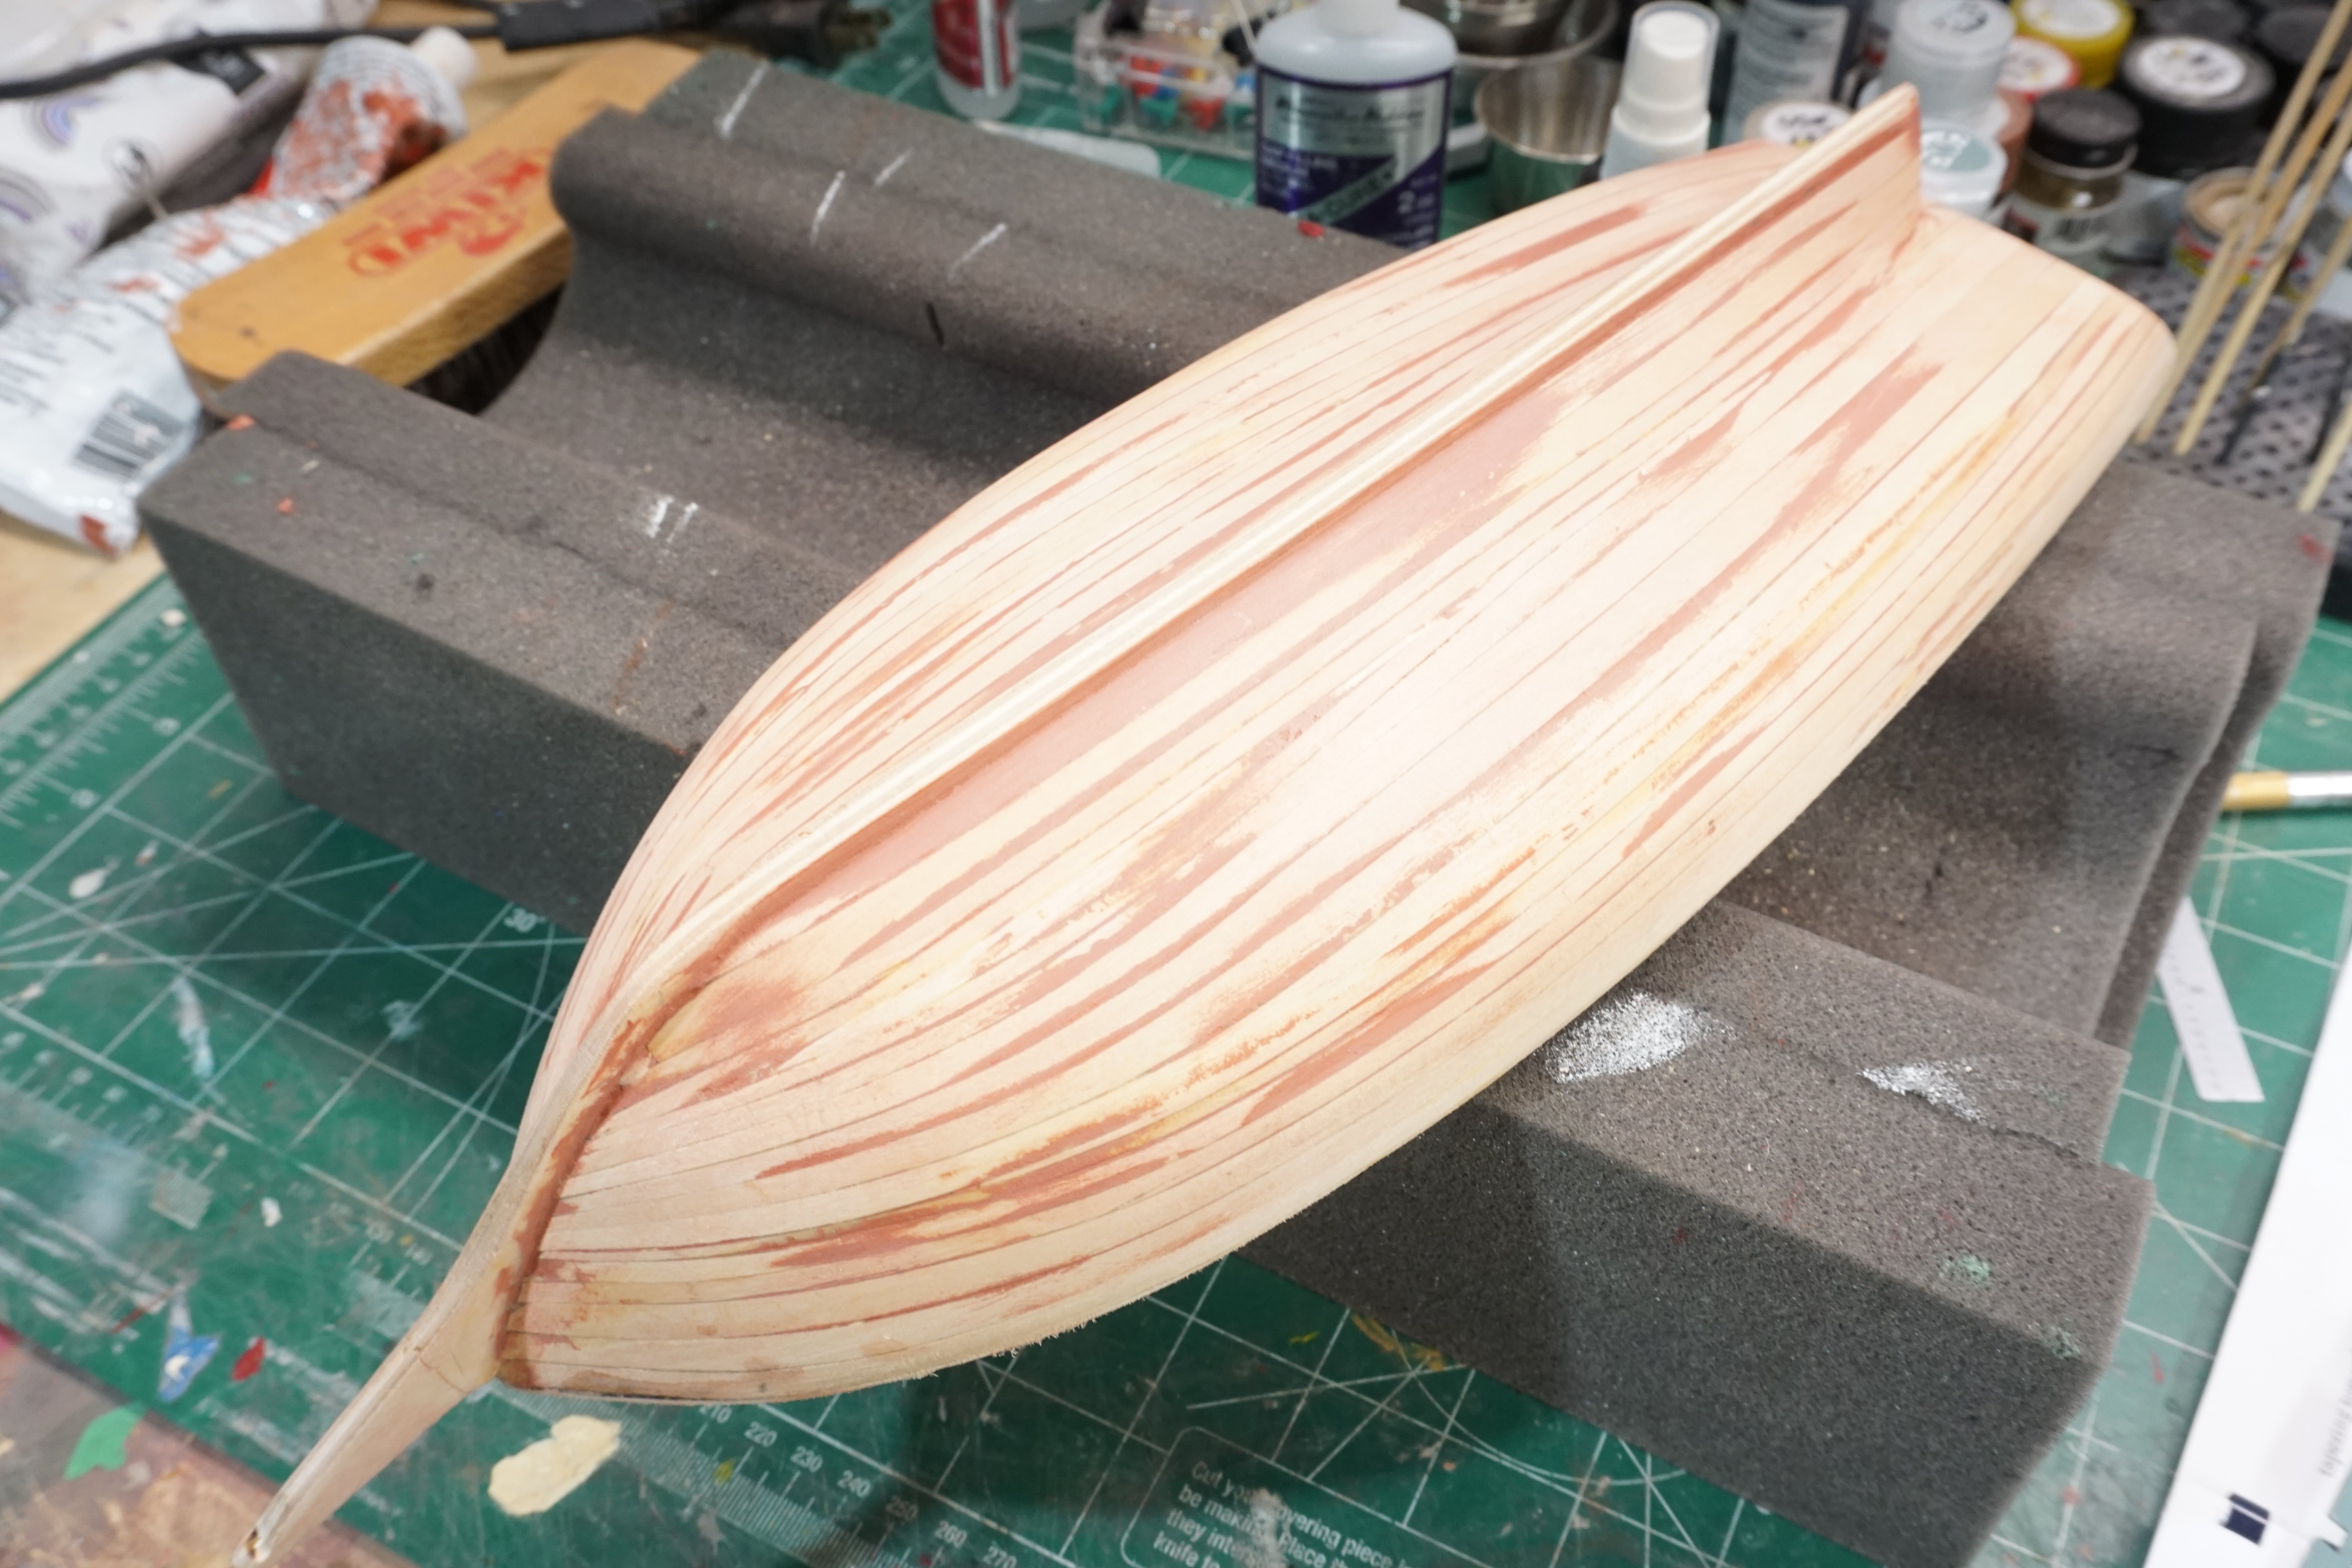
Over the holidays, I was able to get a good start on the planking. After soaking the planks in water and using my hot iron bending tool I was able to get the curve close enough to my liking. I use a combination of medium CA and Tite-bond 2 wood glue for adhering planks.


-
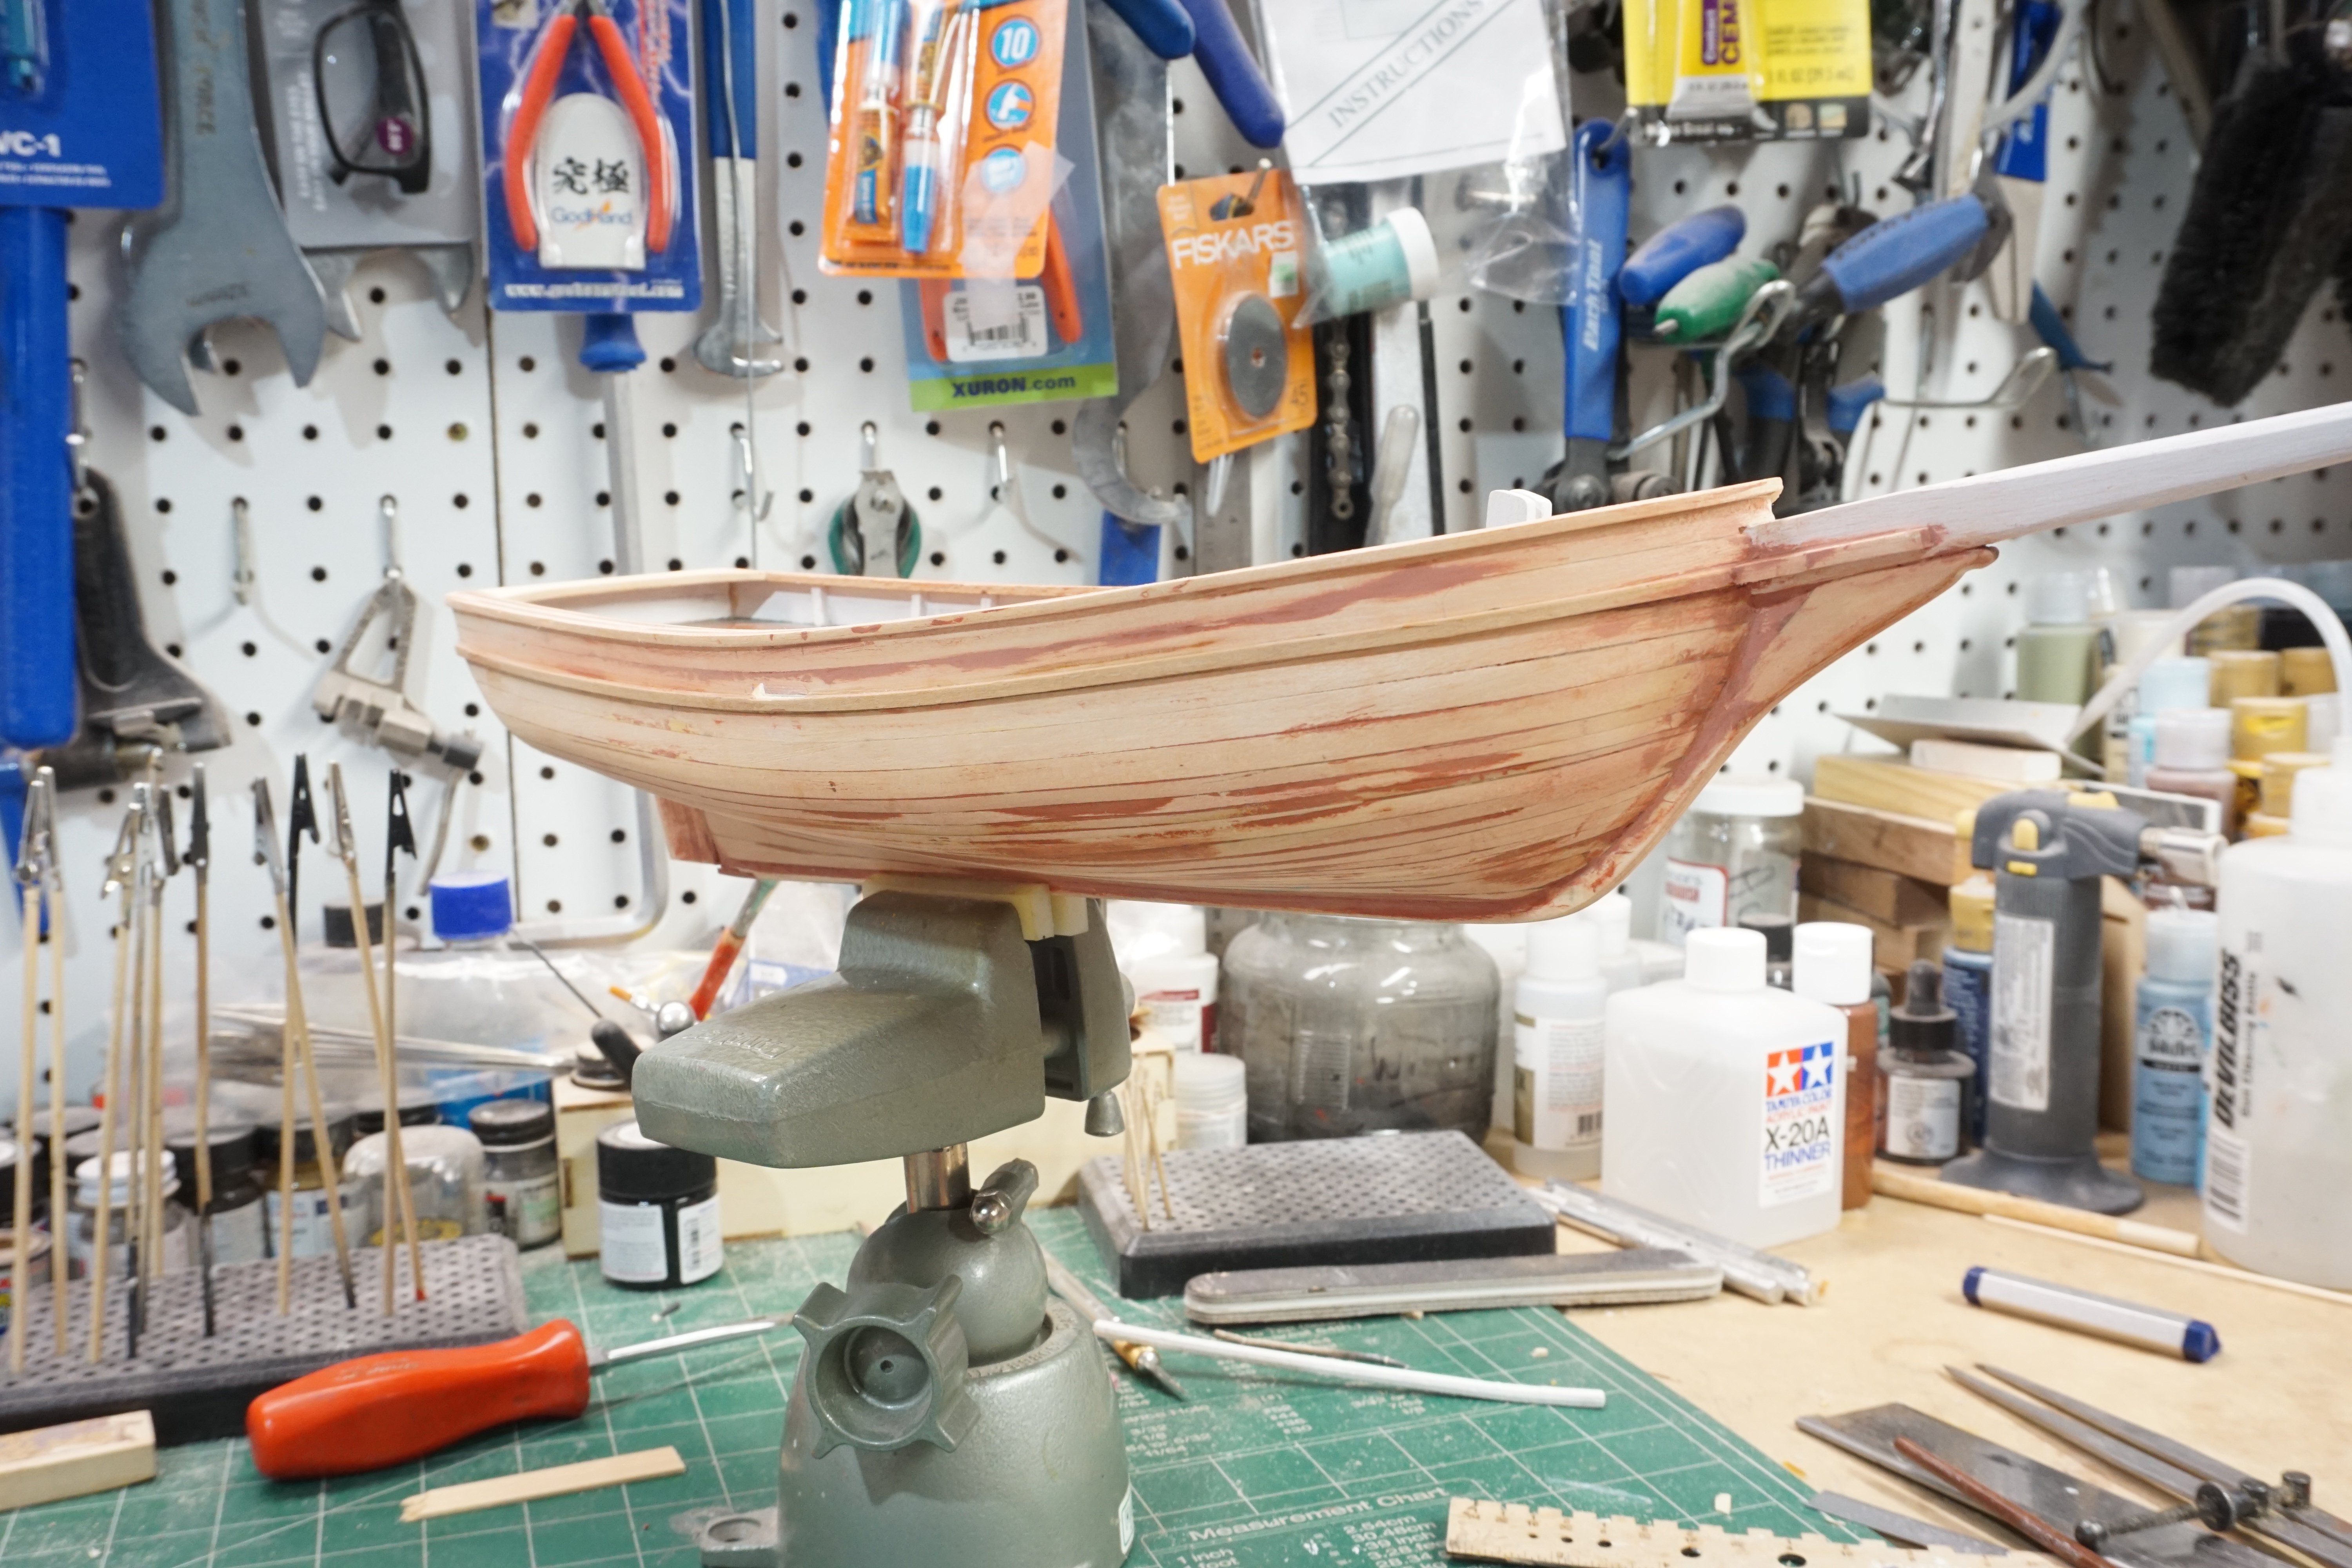
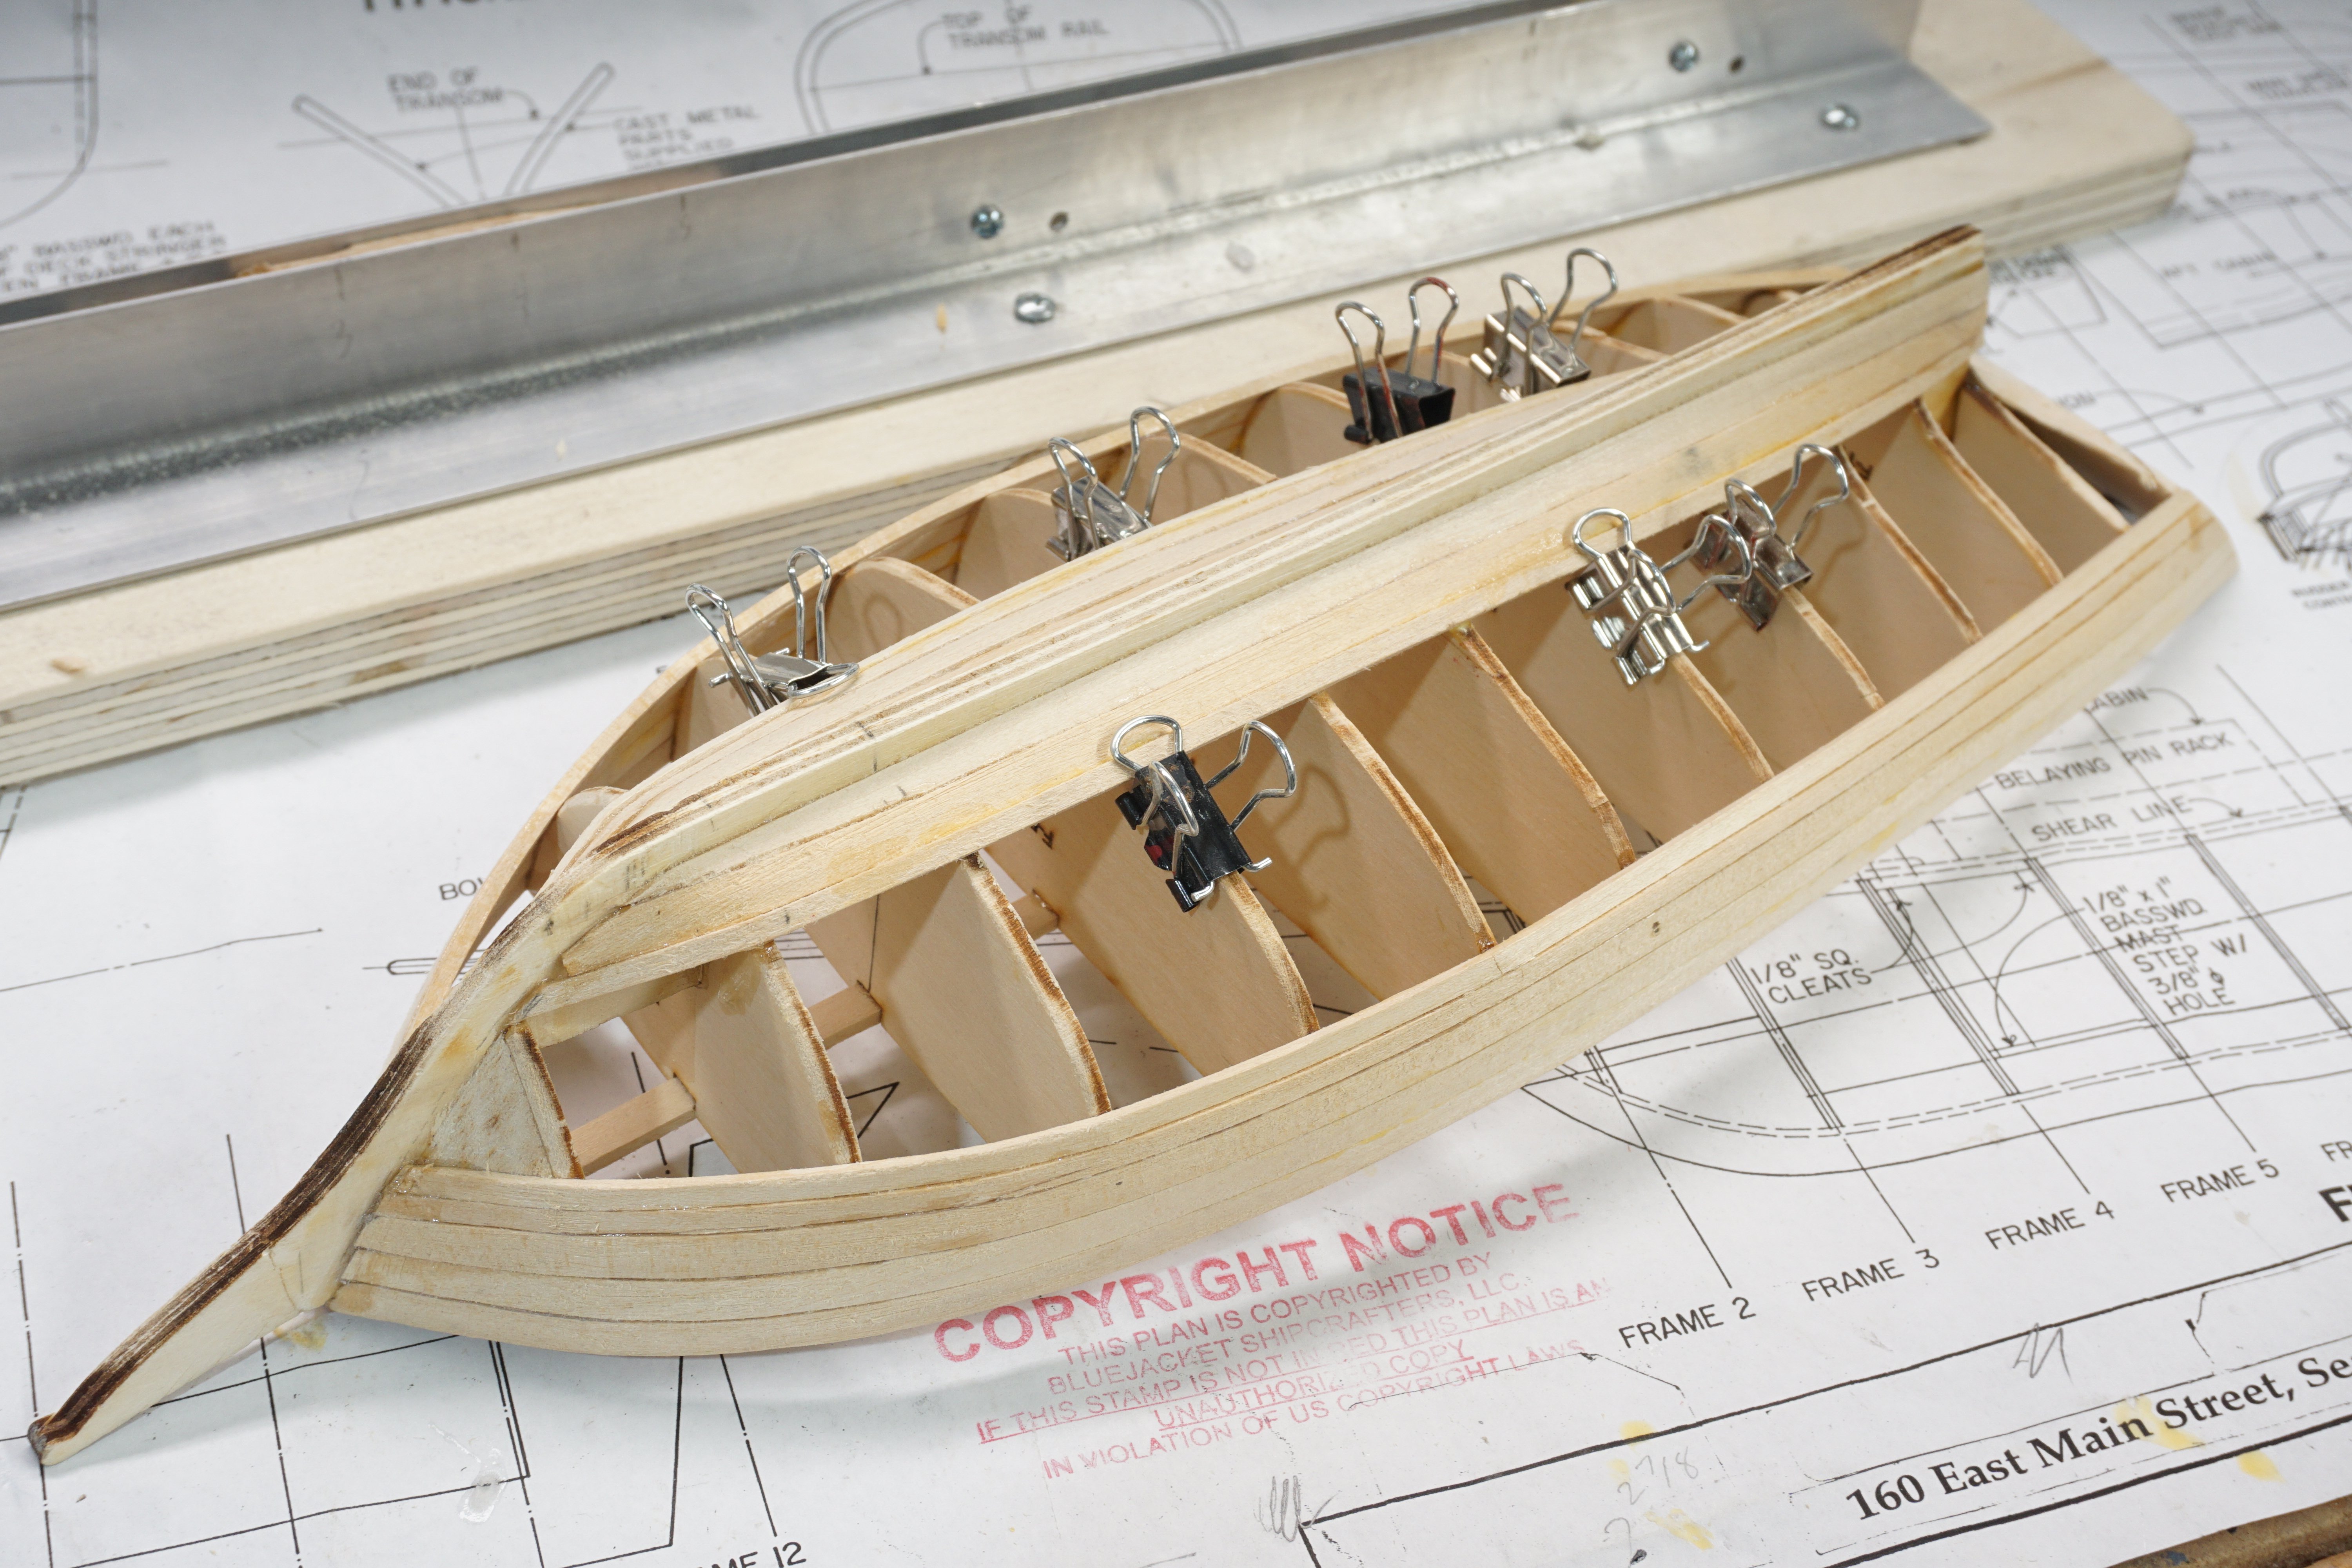
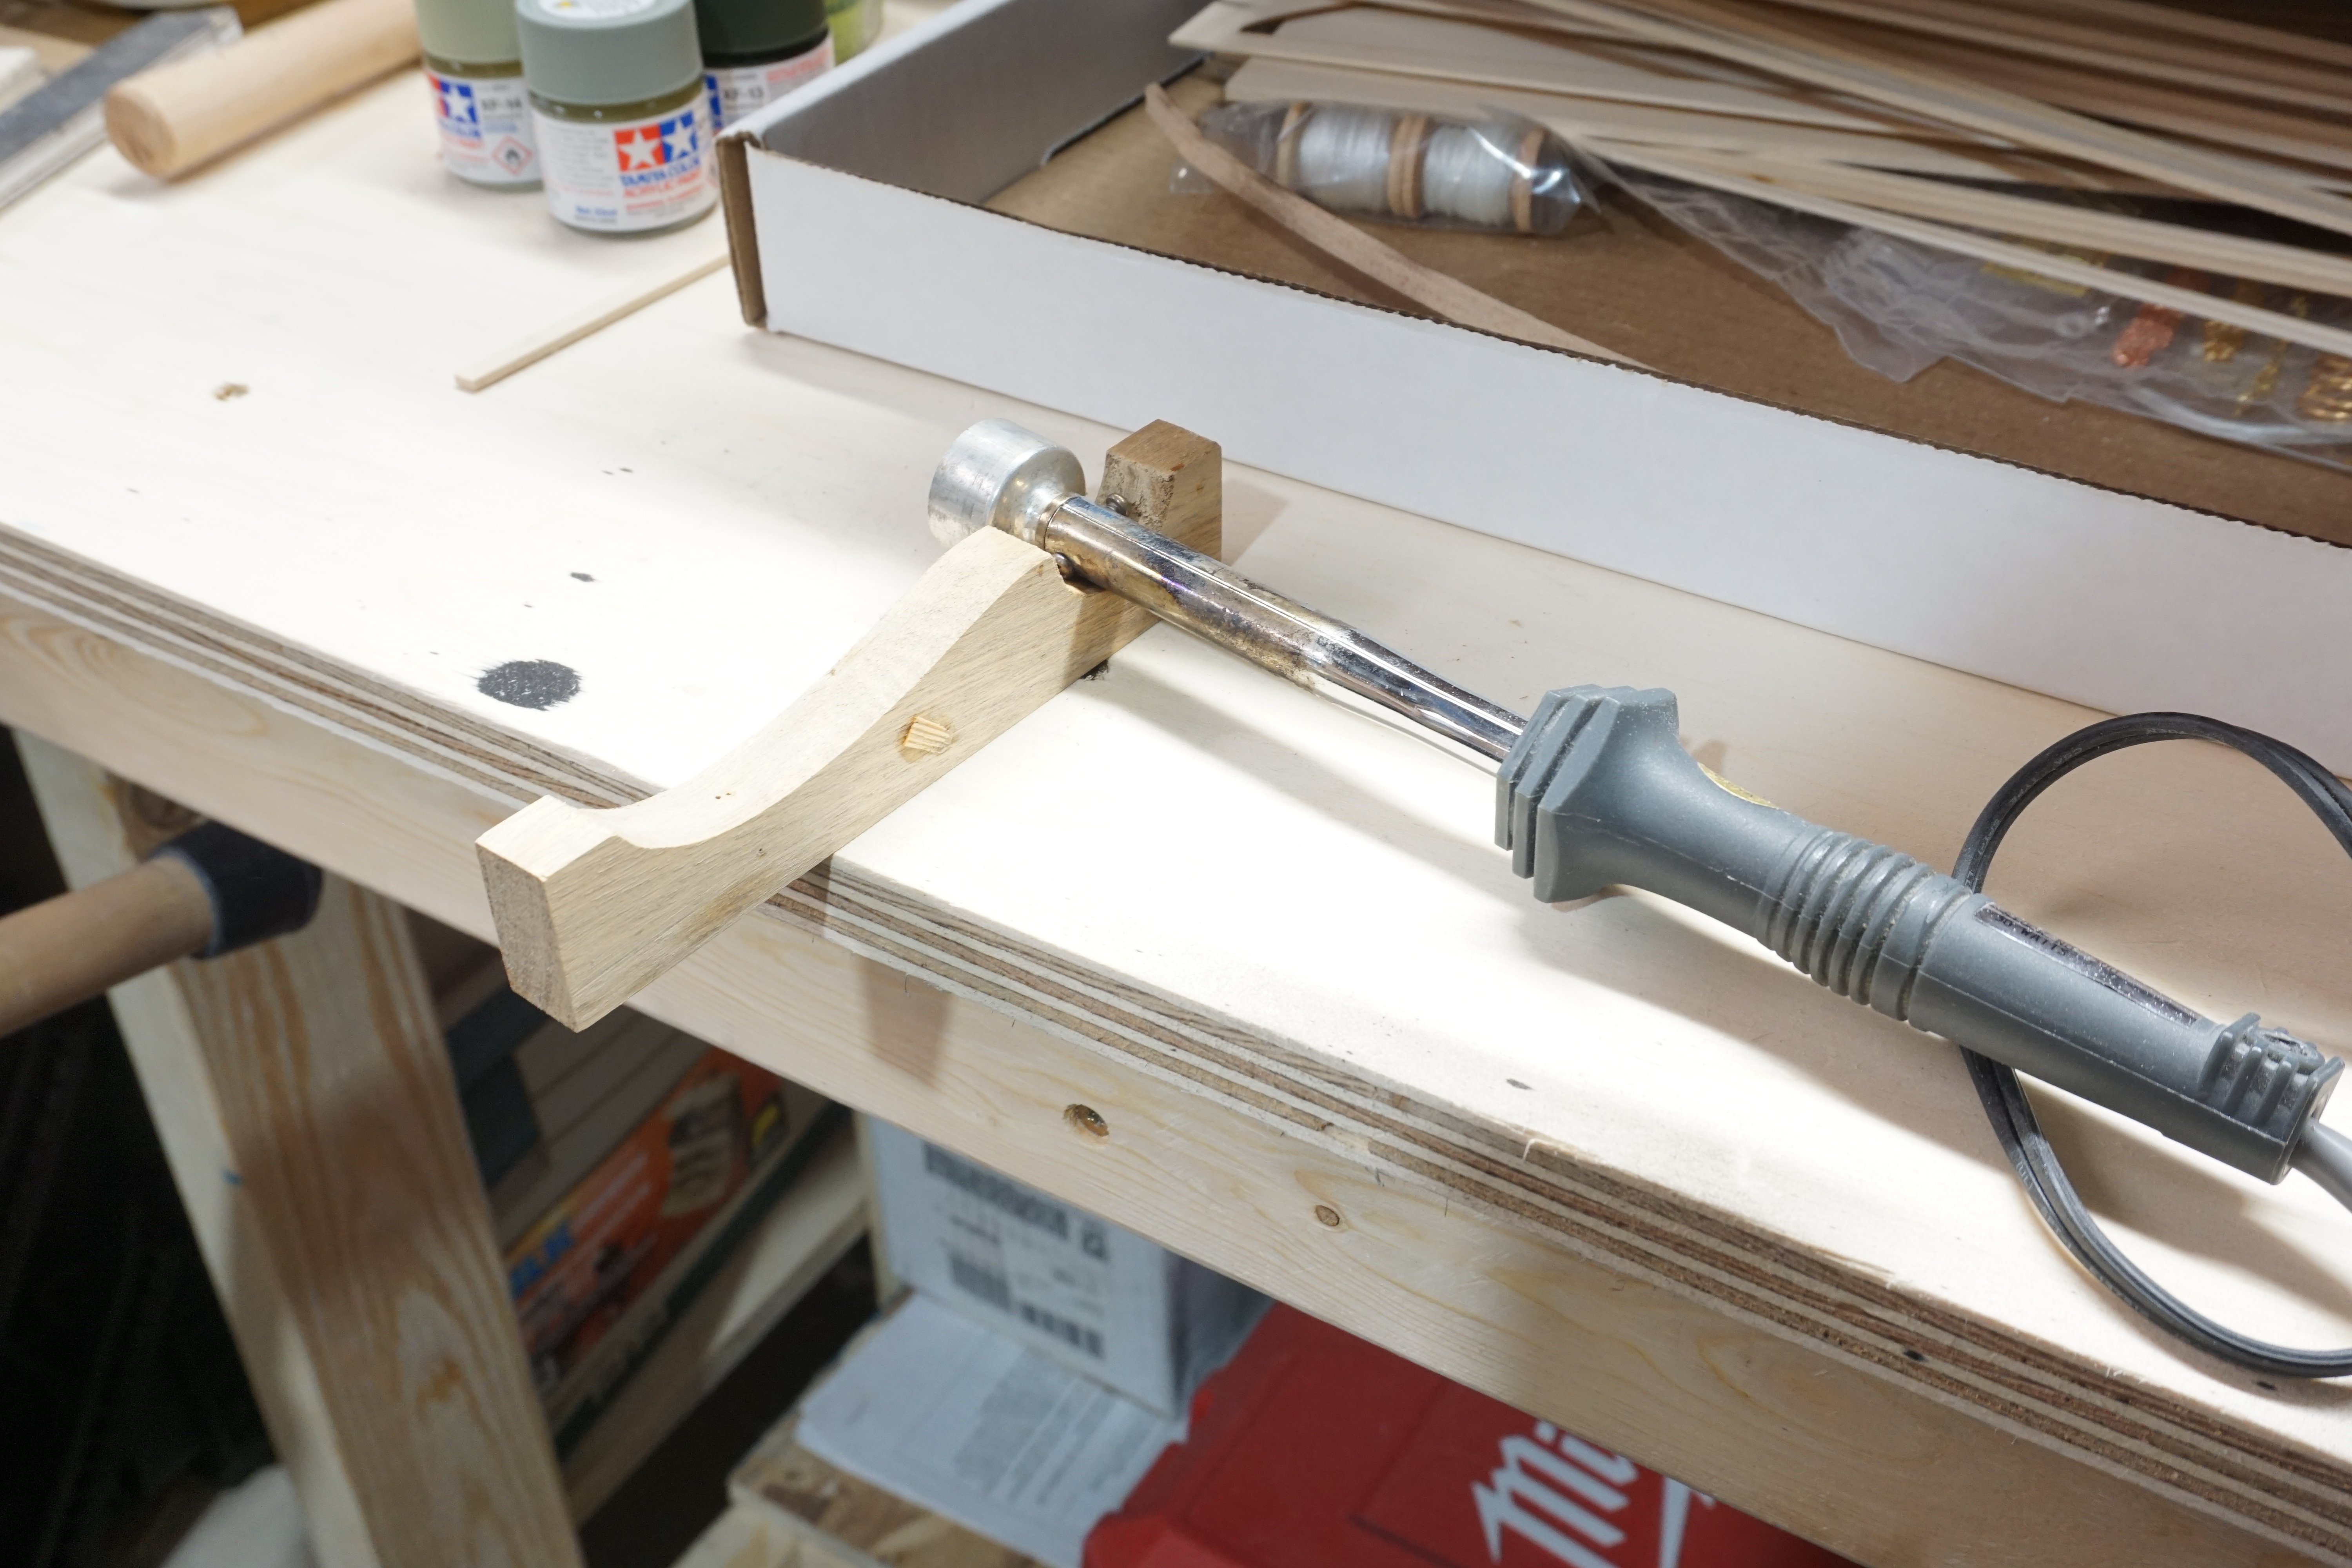
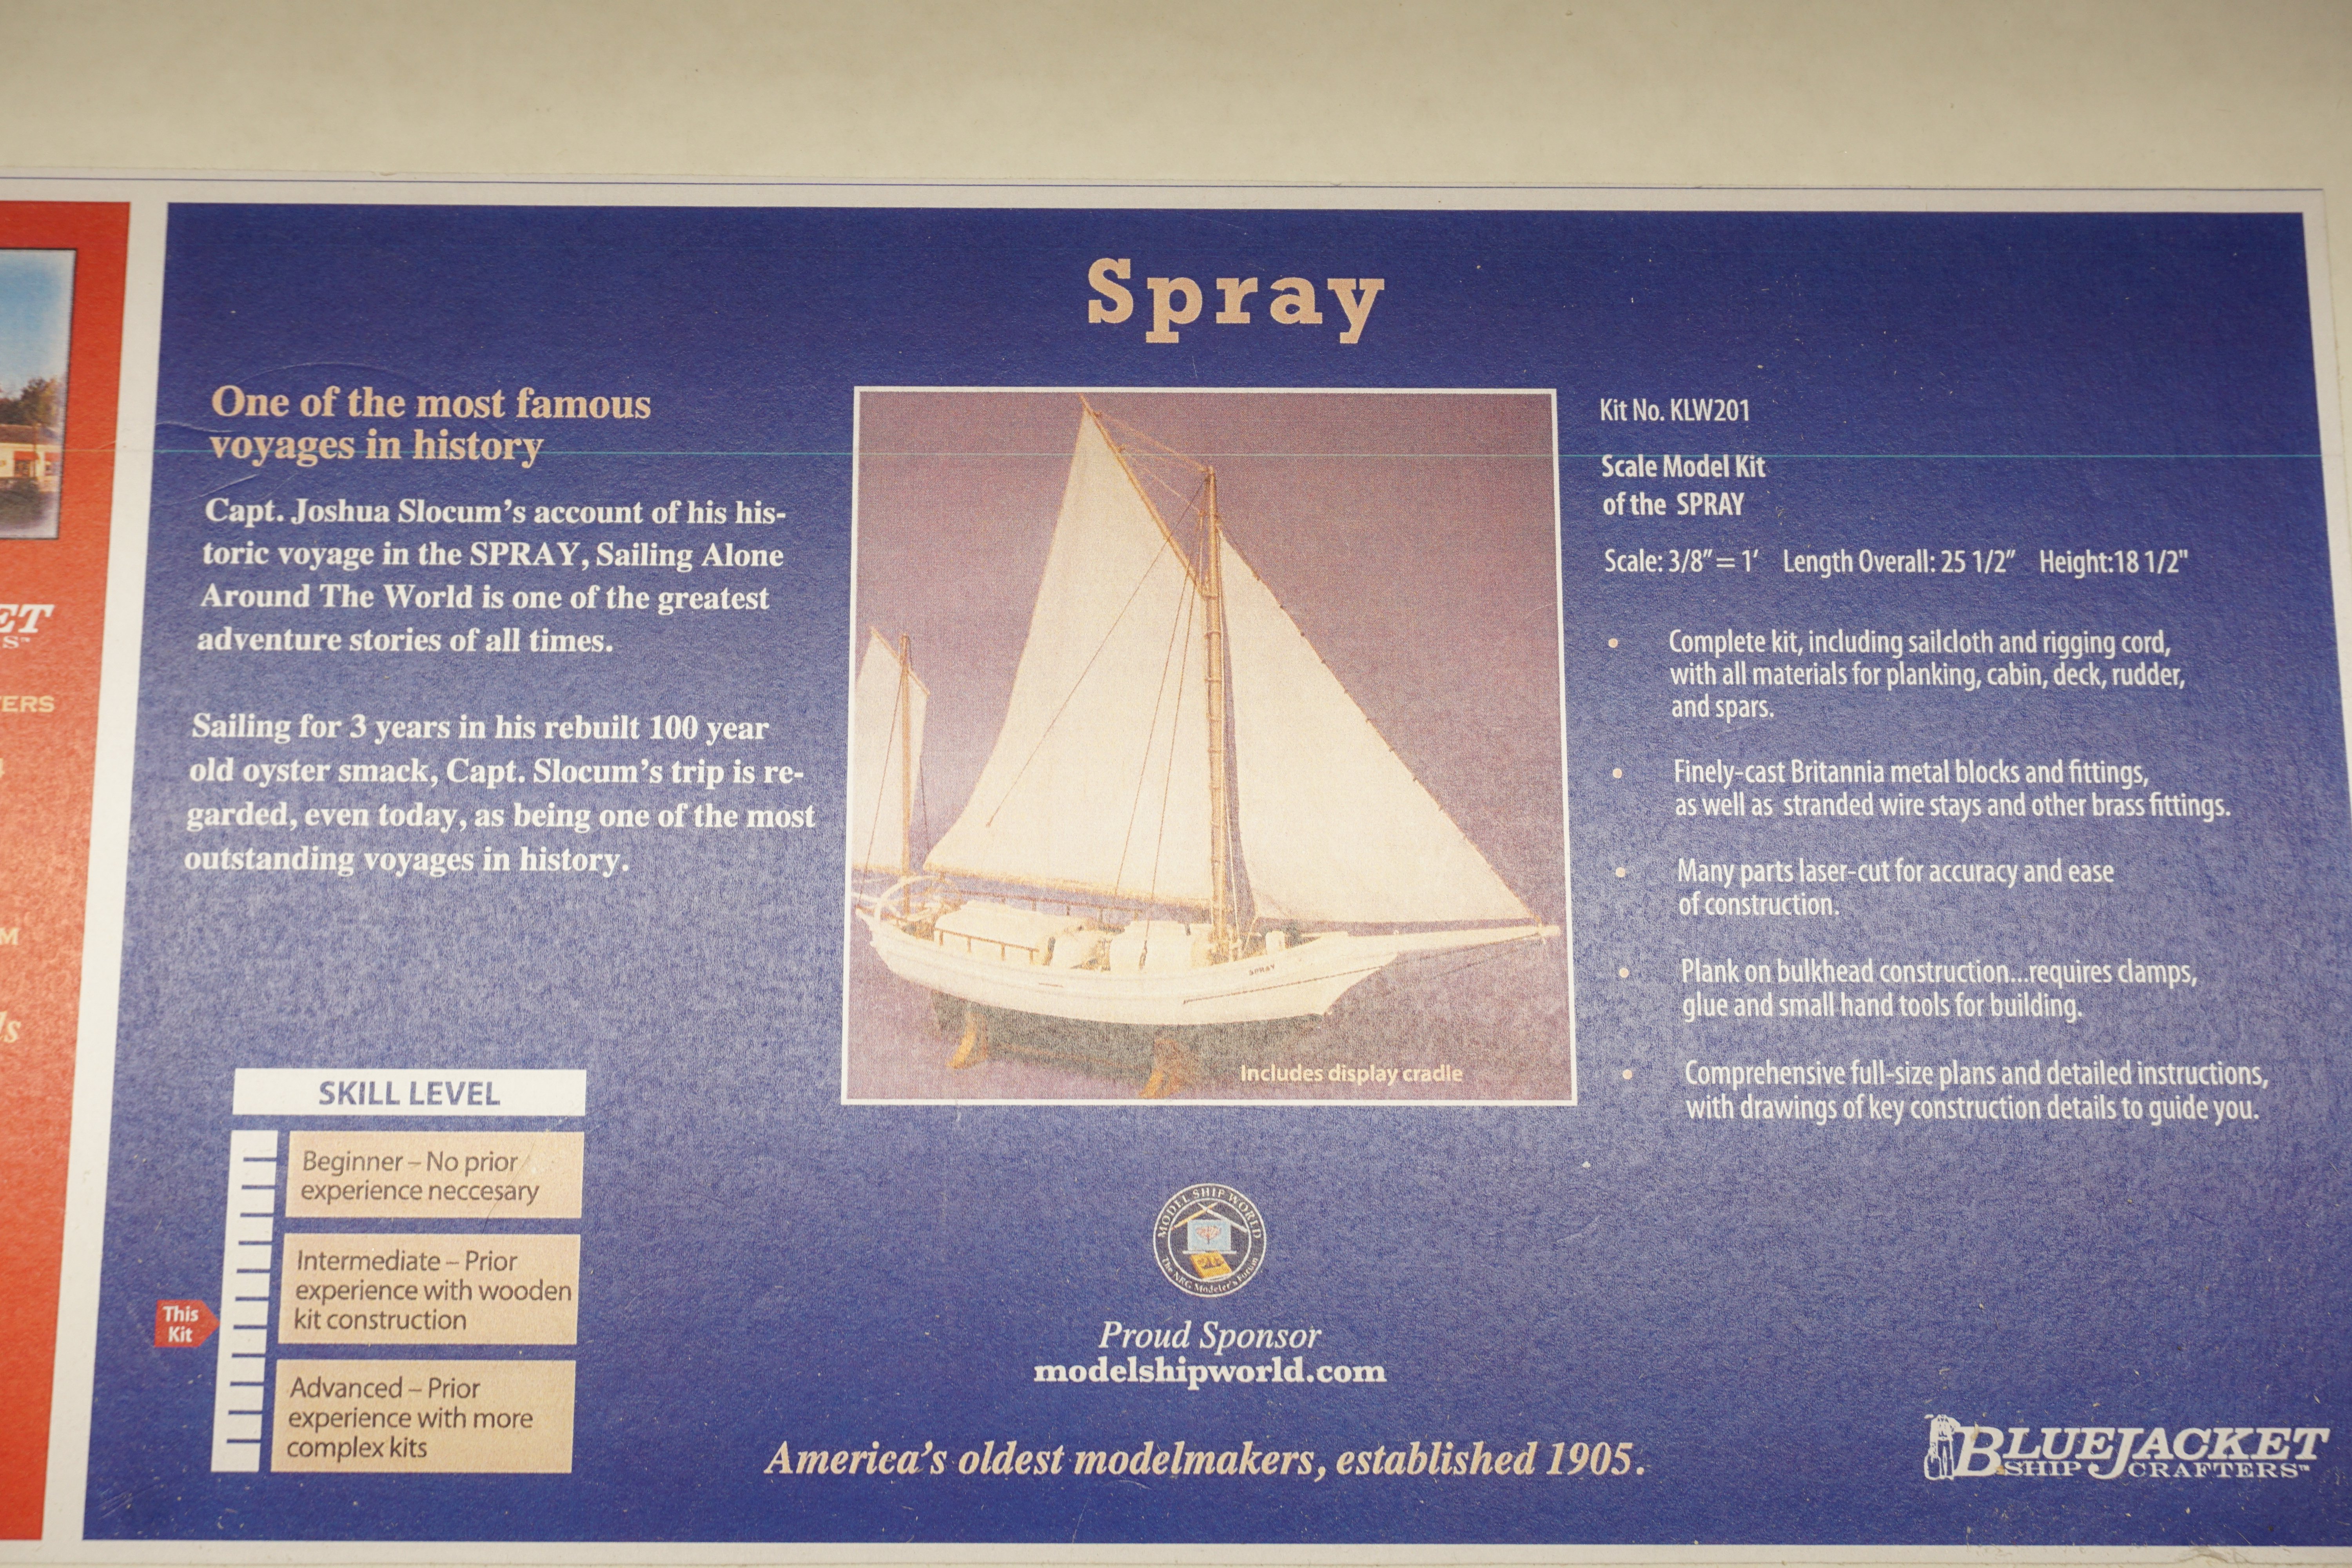
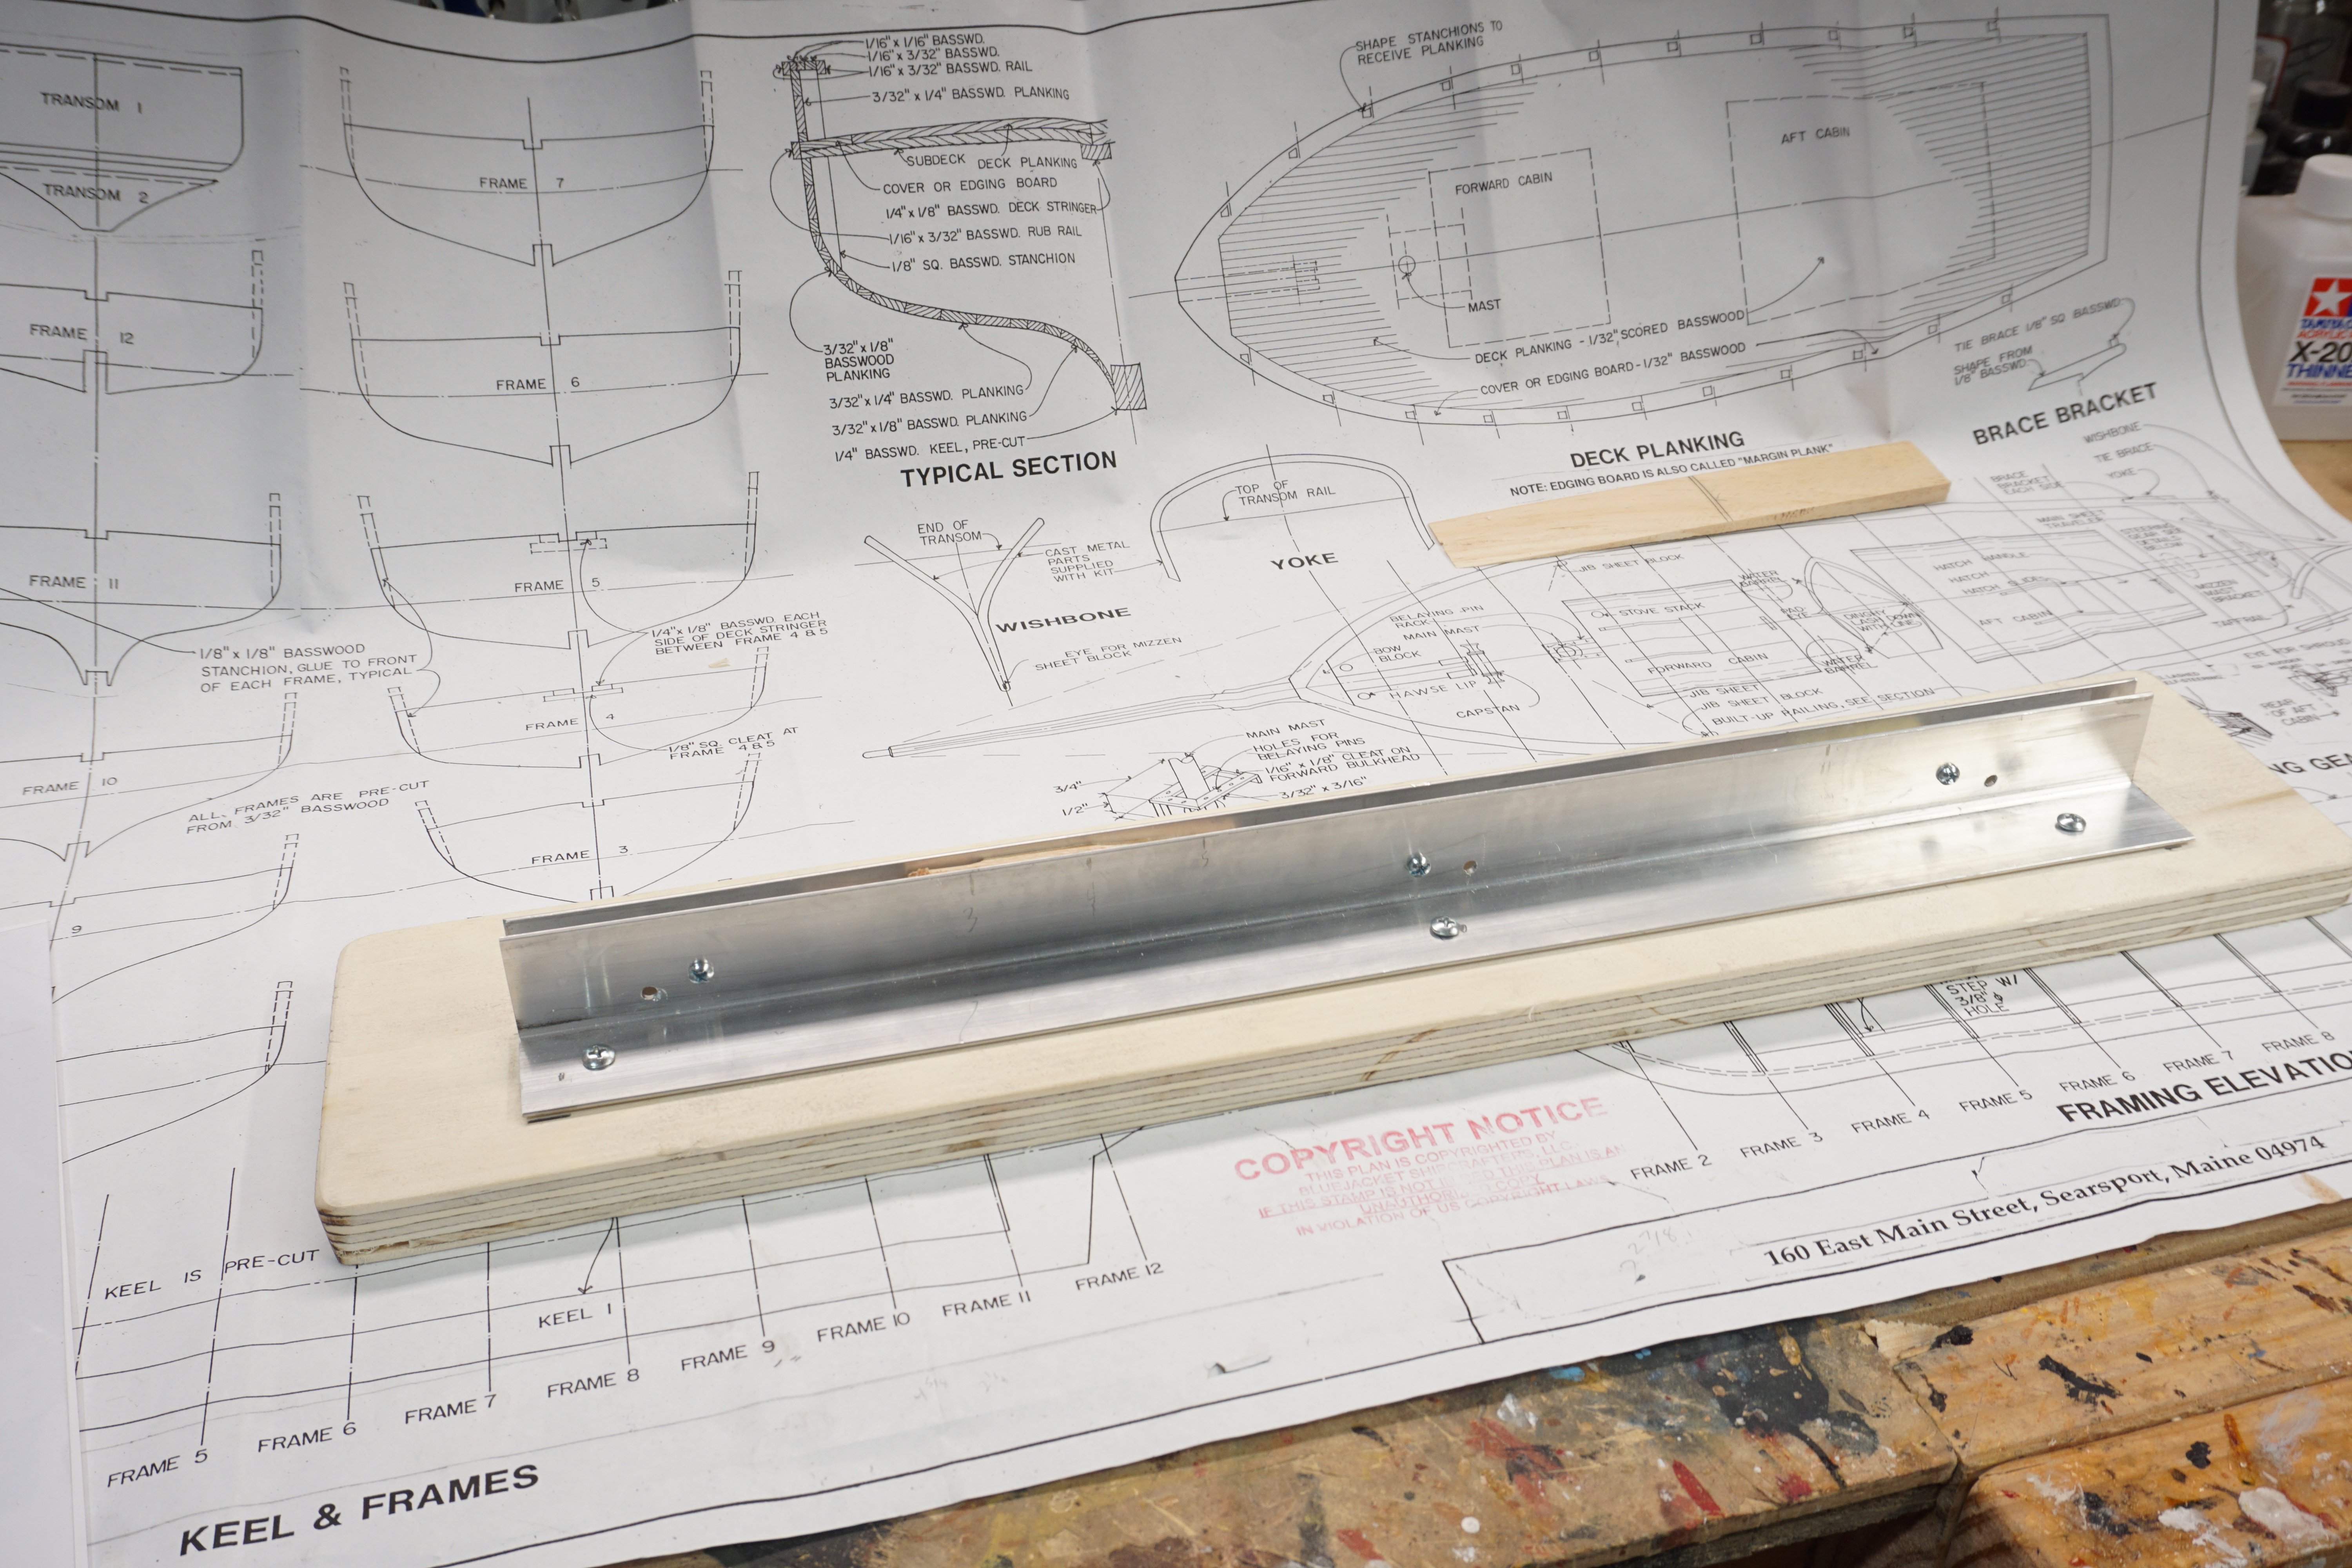
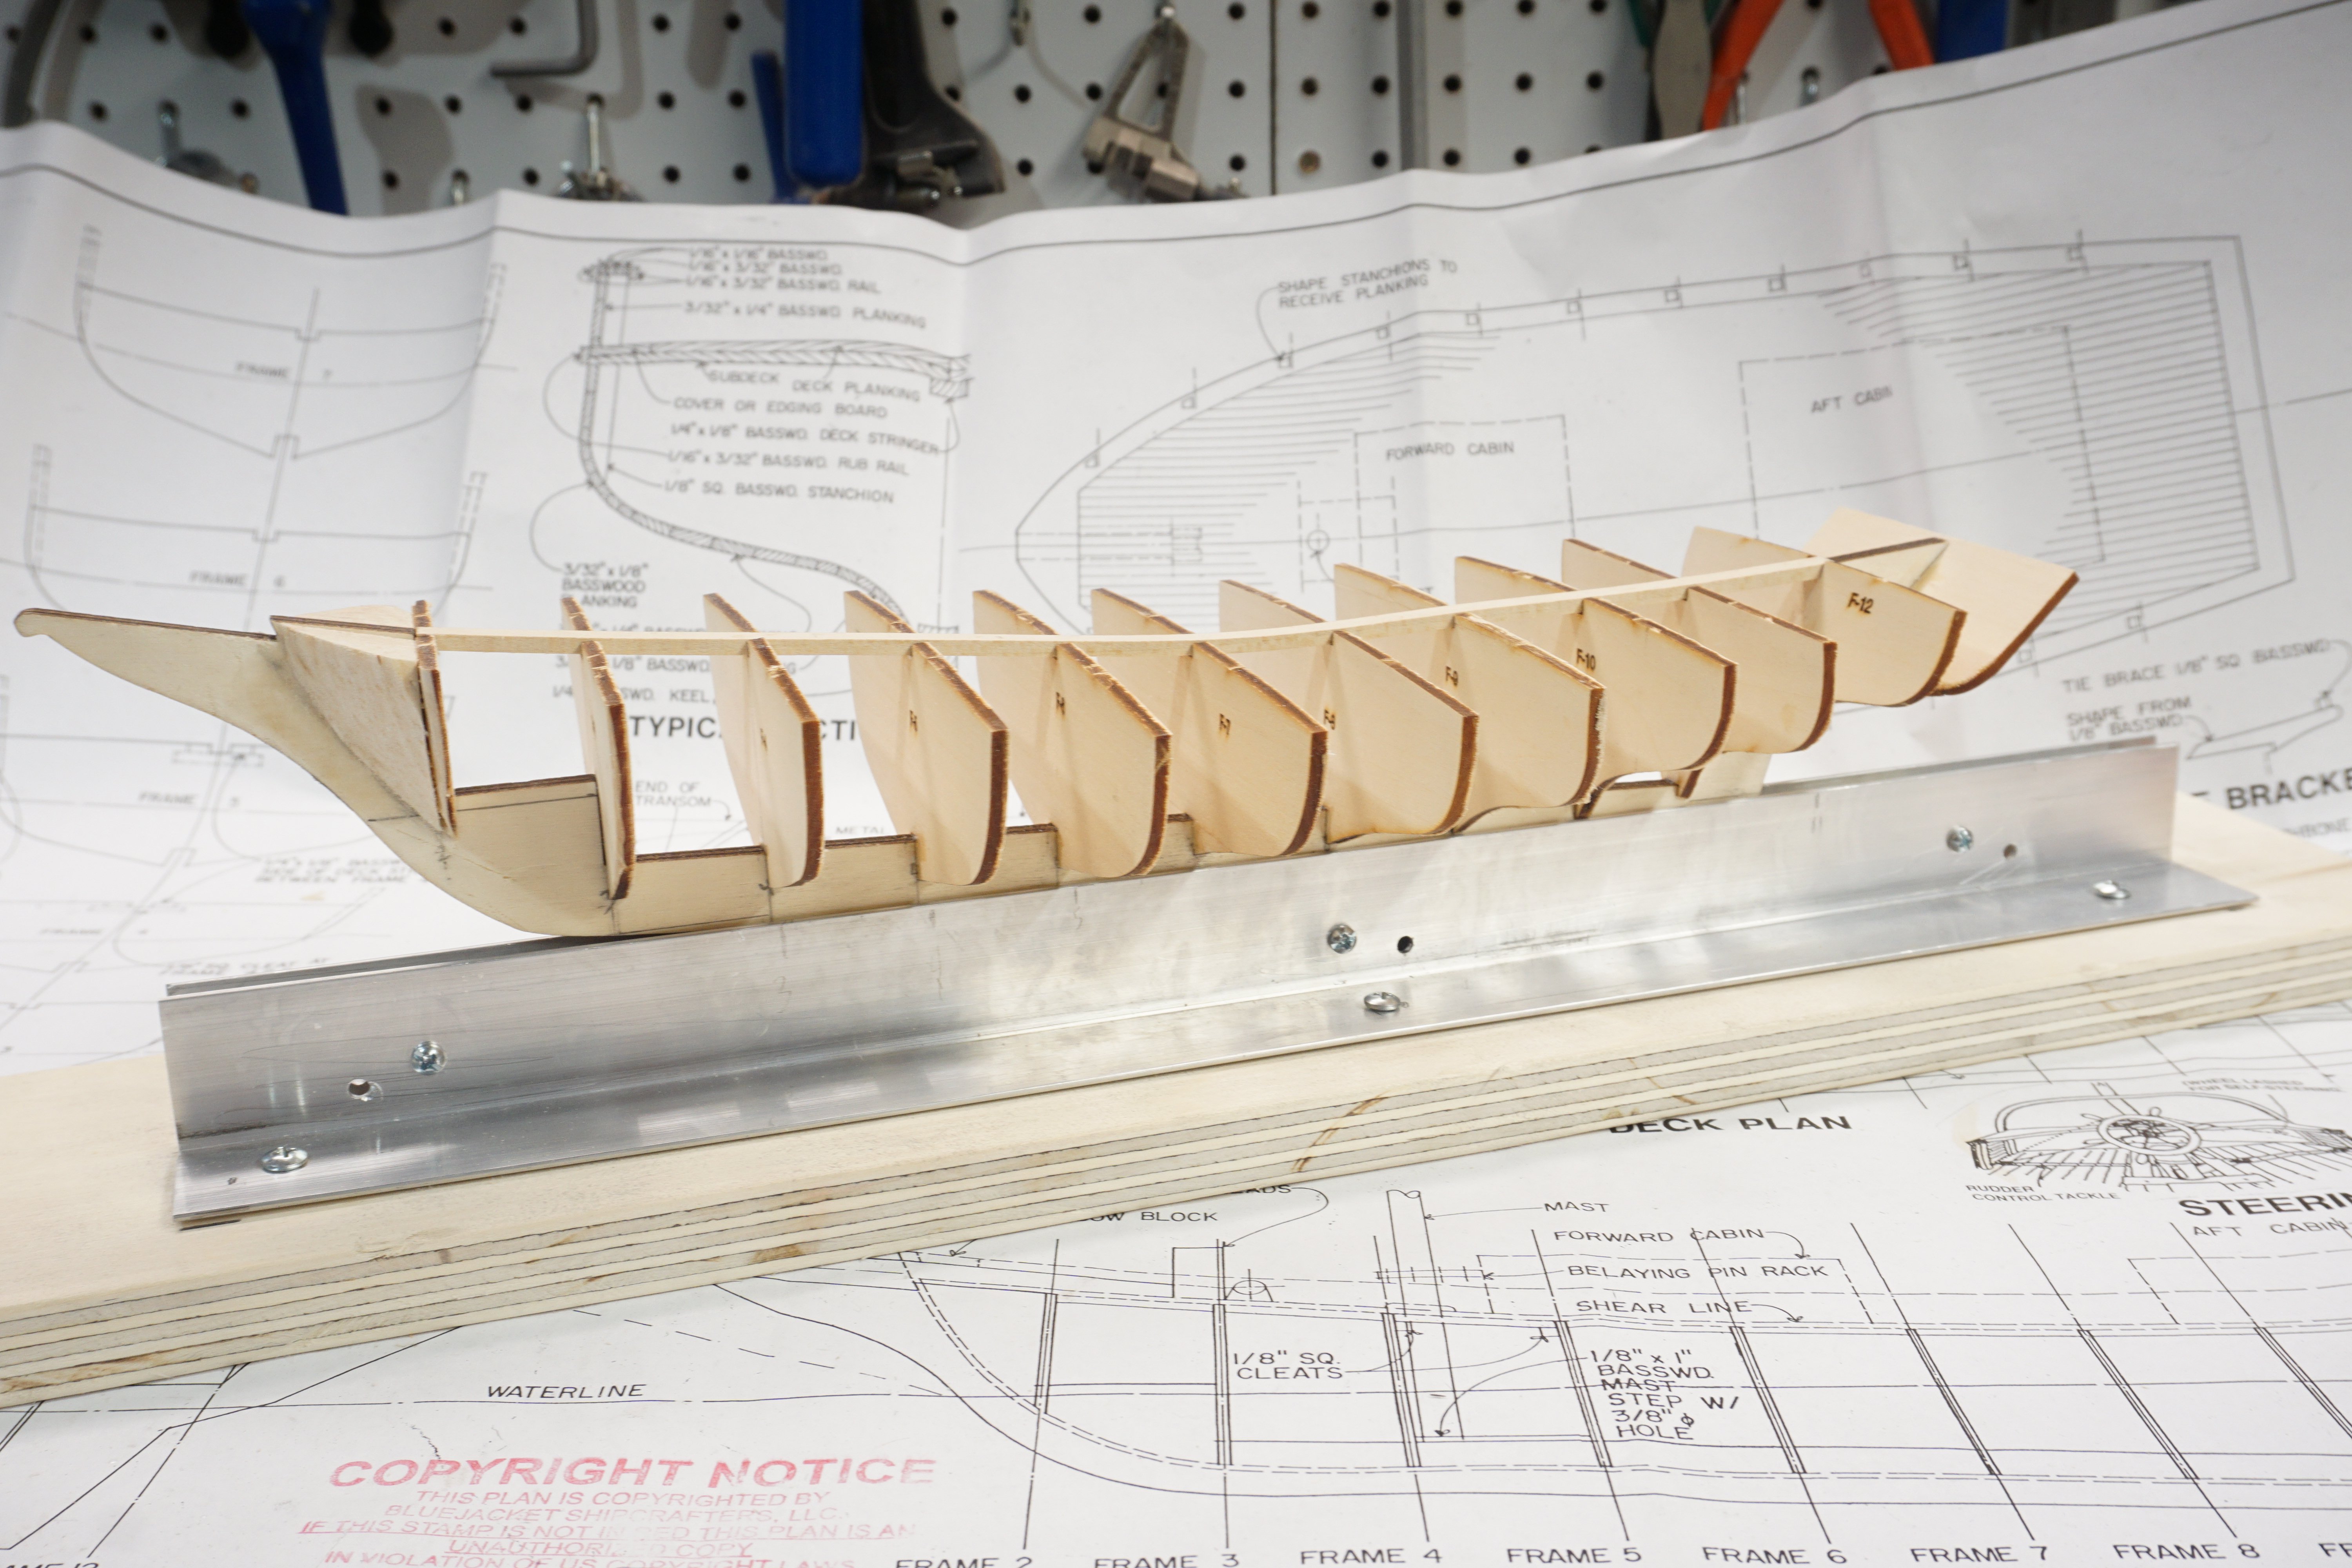
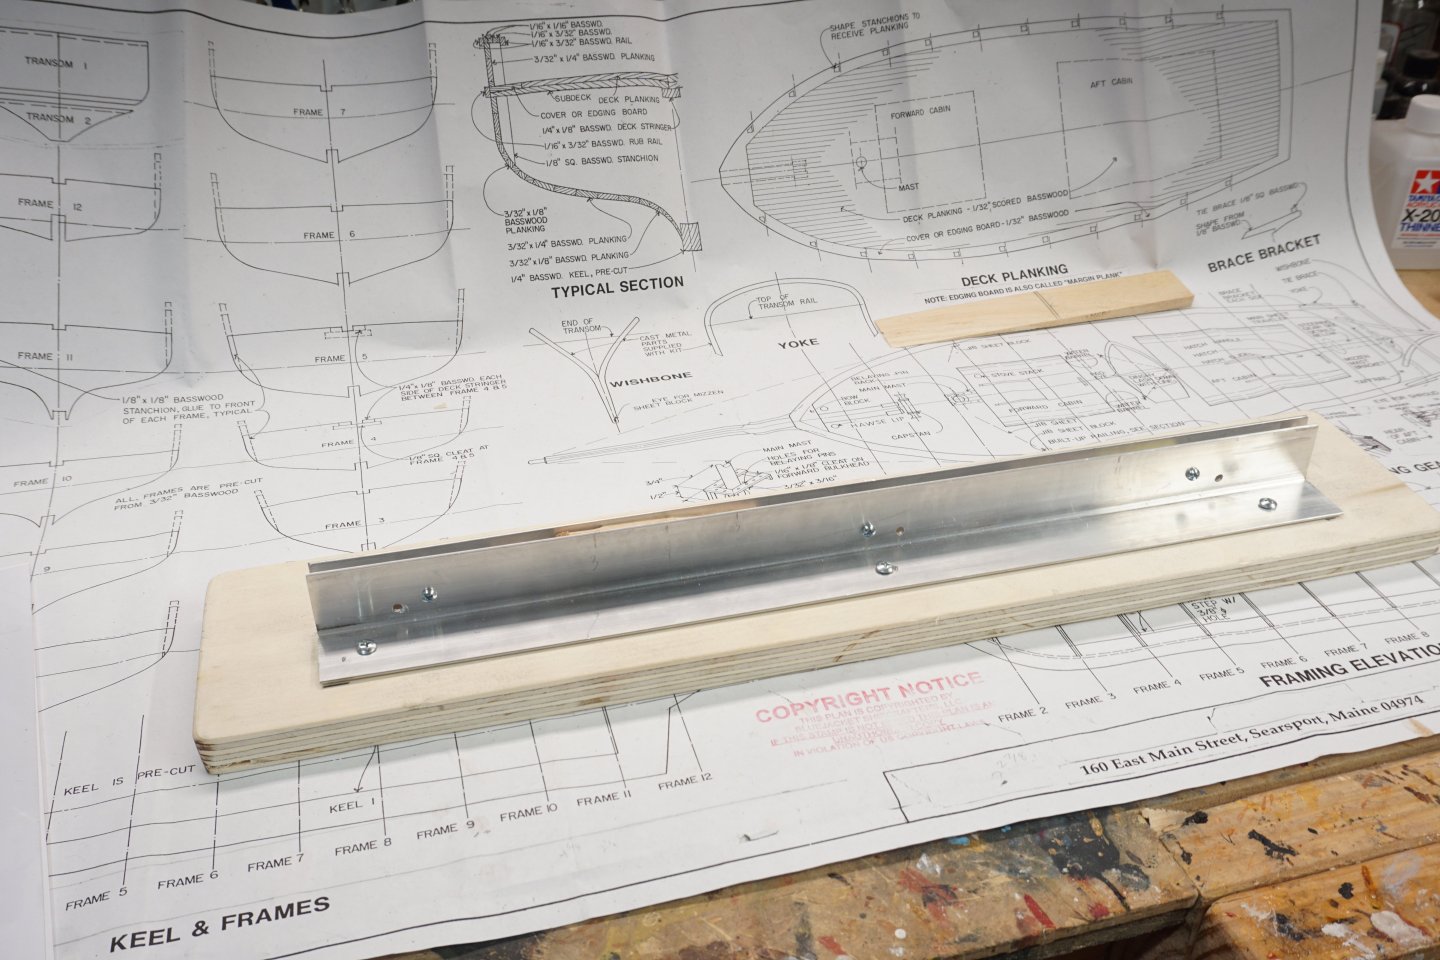
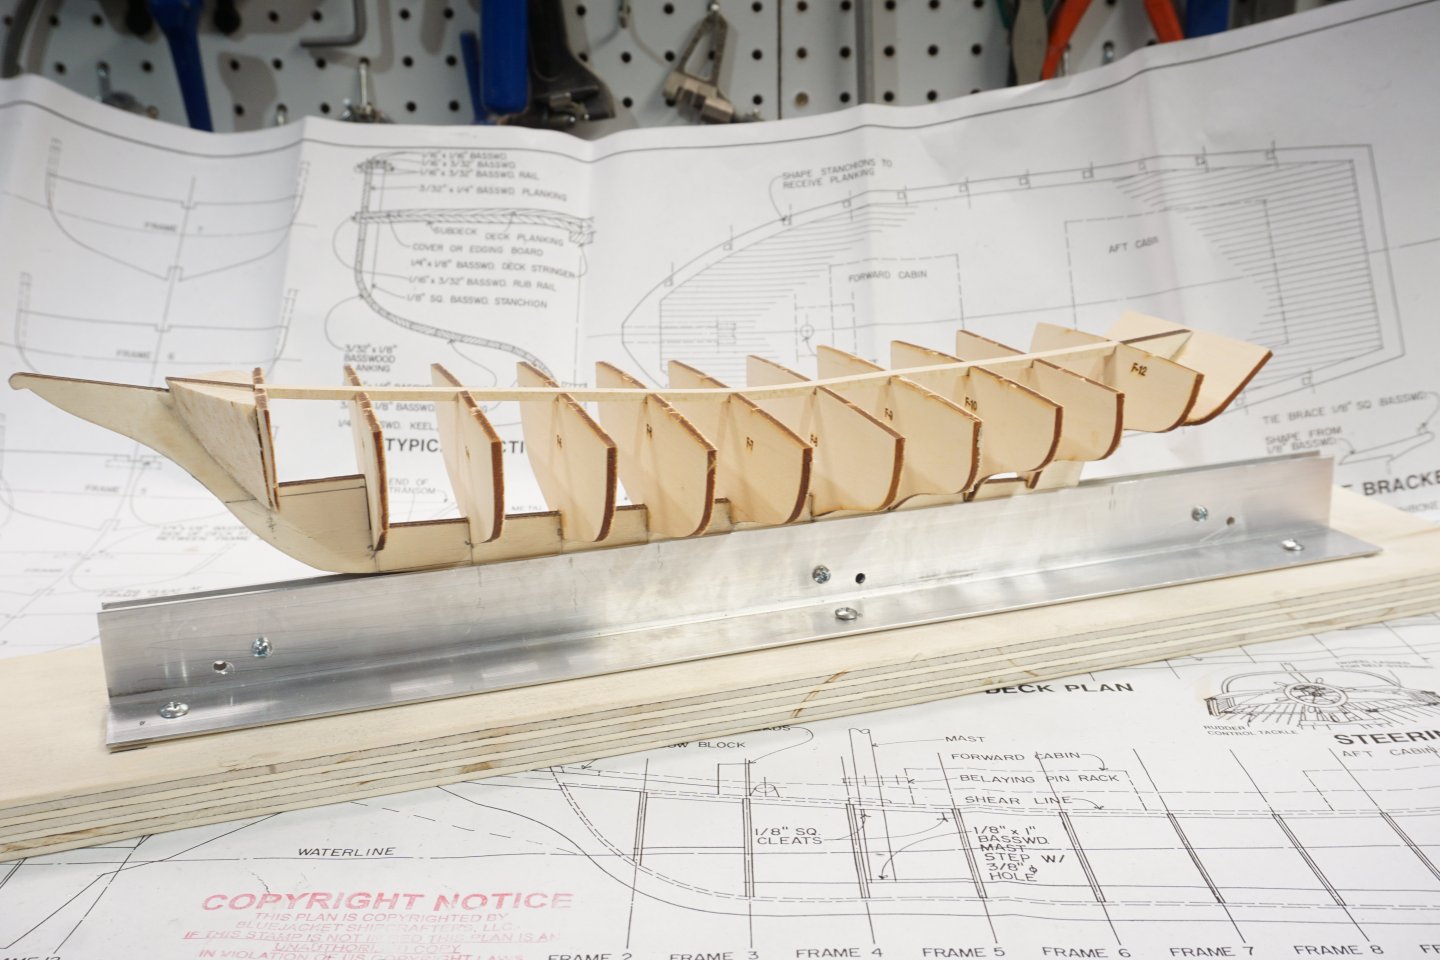
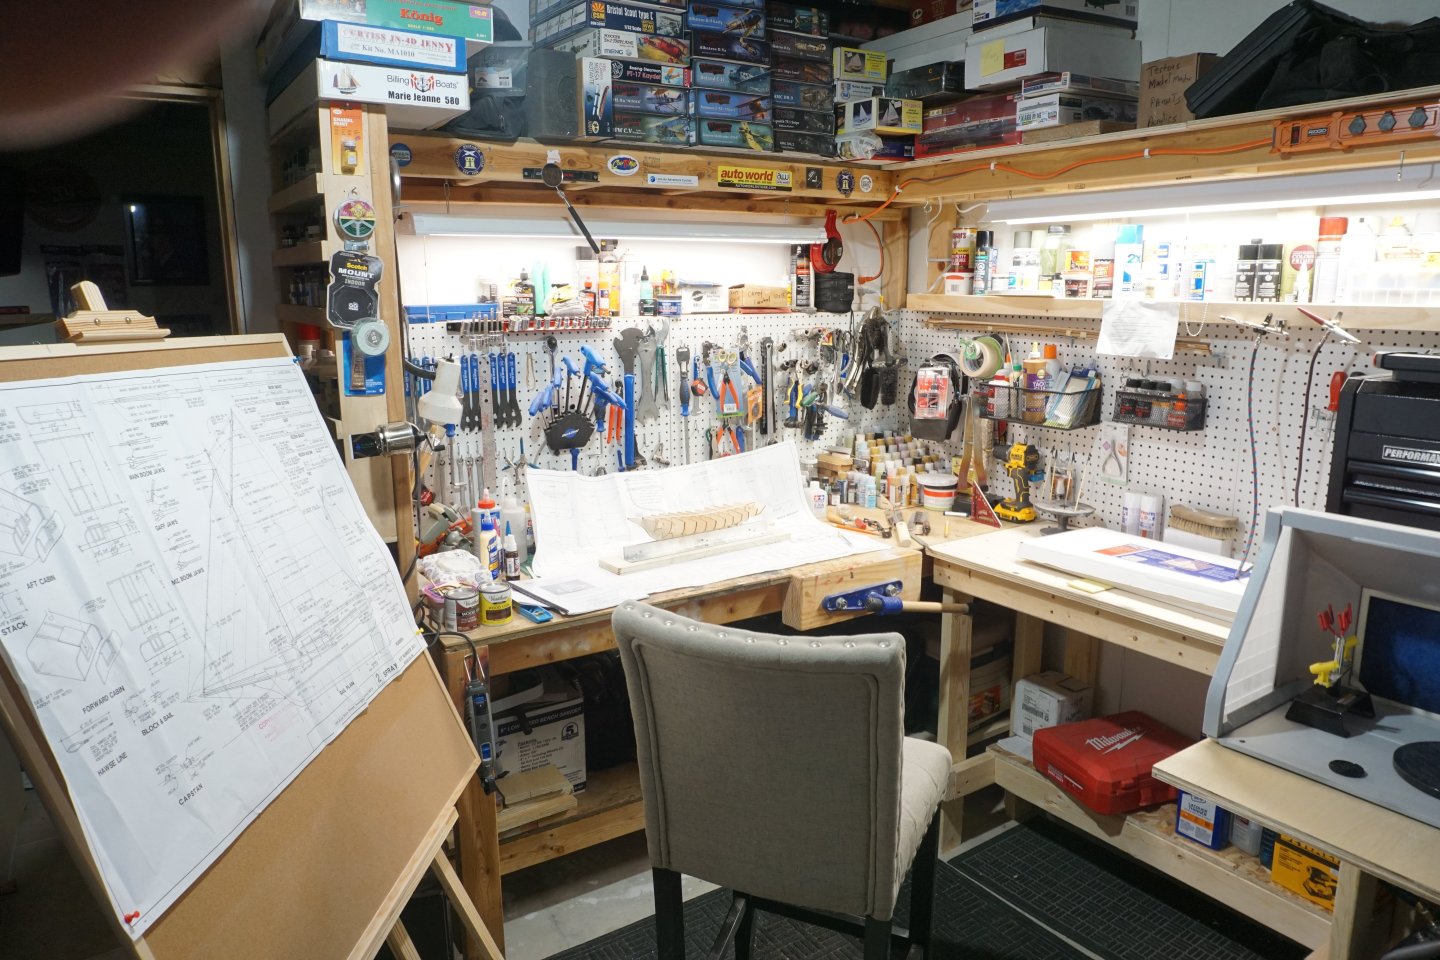
For my next project I decided on Joshua Slocum's Spray from BlueJacket Shipcrafters. After reading over build manual and viewing some of the build logs my 1st thing was to make that ship building cradle that others have made. This cradle was not expensive and easy to construct, I should have made this a while ago as it's adjustable and will work with my future builds. I assembled the Keel and bulk heads, then I added some filler blocks at the bow to give the planks more gluing area. I recently built an addition on to my workbench as it was way to cluttered before.

-
Thank you for the nice compliment. I'm happy my photos are helpful.
- 32 replies
-
- 1
-
-
- Lackawanna
- BlueJacket Shipcrafters
- (and 1 more)
-
Thank you. I didn't log actual build hours, but I spent approximately 3 months from start to finish. This kit was a challenge for me, but the only issues I had was the Pilot house railing due to its tight curves and the stair rails. The kit supplies brass wire to go in between the stanchions and due to the tight curves, I thought it would be easier to use thread. At Hobby lobby. I found some goldish colored thread that looked like cable approx. the same thickness as the brass wire the kit supplies. After getting it installed, I painted the thread with some brass-colored paint. Lastly, the pilot house stair rails didn't look good when gluing together so I soldered the joints instead (my soldering experience is minimal). Sorry it took me so long to reply as I haven't been on MSW for a few months. good luck with your build and I hope it's going smoothly. any more questions feel free to ask and I will try to answer.
- 32 replies
-
- 1
-
-
- Lackawanna
- BlueJacket Shipcrafters
- (and 1 more)
-
Thank you. In my opinion, Bluejacket kits are excellent, and the instructions and plans are very good as well. I did search for pictures of other modelers Lackawanna builds, and actual photos of the real ship for some close-up details and help with the rigging. Also, Nick and Al at Bluejacket are very helpful with any questions you may have about their kits if you run into issues with something. If you get this kit, I hope you do a build thread and feel free to ask me any questions. Sorry it took me so long to reply as I haven't been on Model ship world for a few months.
- 32 replies
-
- 3
-
-
- Lackawanna
- BlueJacket Shipcrafters
- (and 1 more)
-
Thank you for your nice compliment and interest in my build.
- 29 replies
-
- 1
-
-
- Nantucket Lightship
- BlueJacket Shipcrafters
- (and 1 more)
-
Thanks, Nic for your nice compliment and the 10% discount.
- 29 replies
-
- 2
-
-
- Nantucket Lightship
- BlueJacket Shipcrafters
- (and 1 more)
-
Thank you for your interest in my build and the nice compliment! I'm by no means a photographer, but it was the evening, and I took the photos with the dining room lights off using just my camera flash.
- 29 replies
-
- 2
-
-
- Nantucket Lightship
- BlueJacket Shipcrafters
- (and 1 more)
-
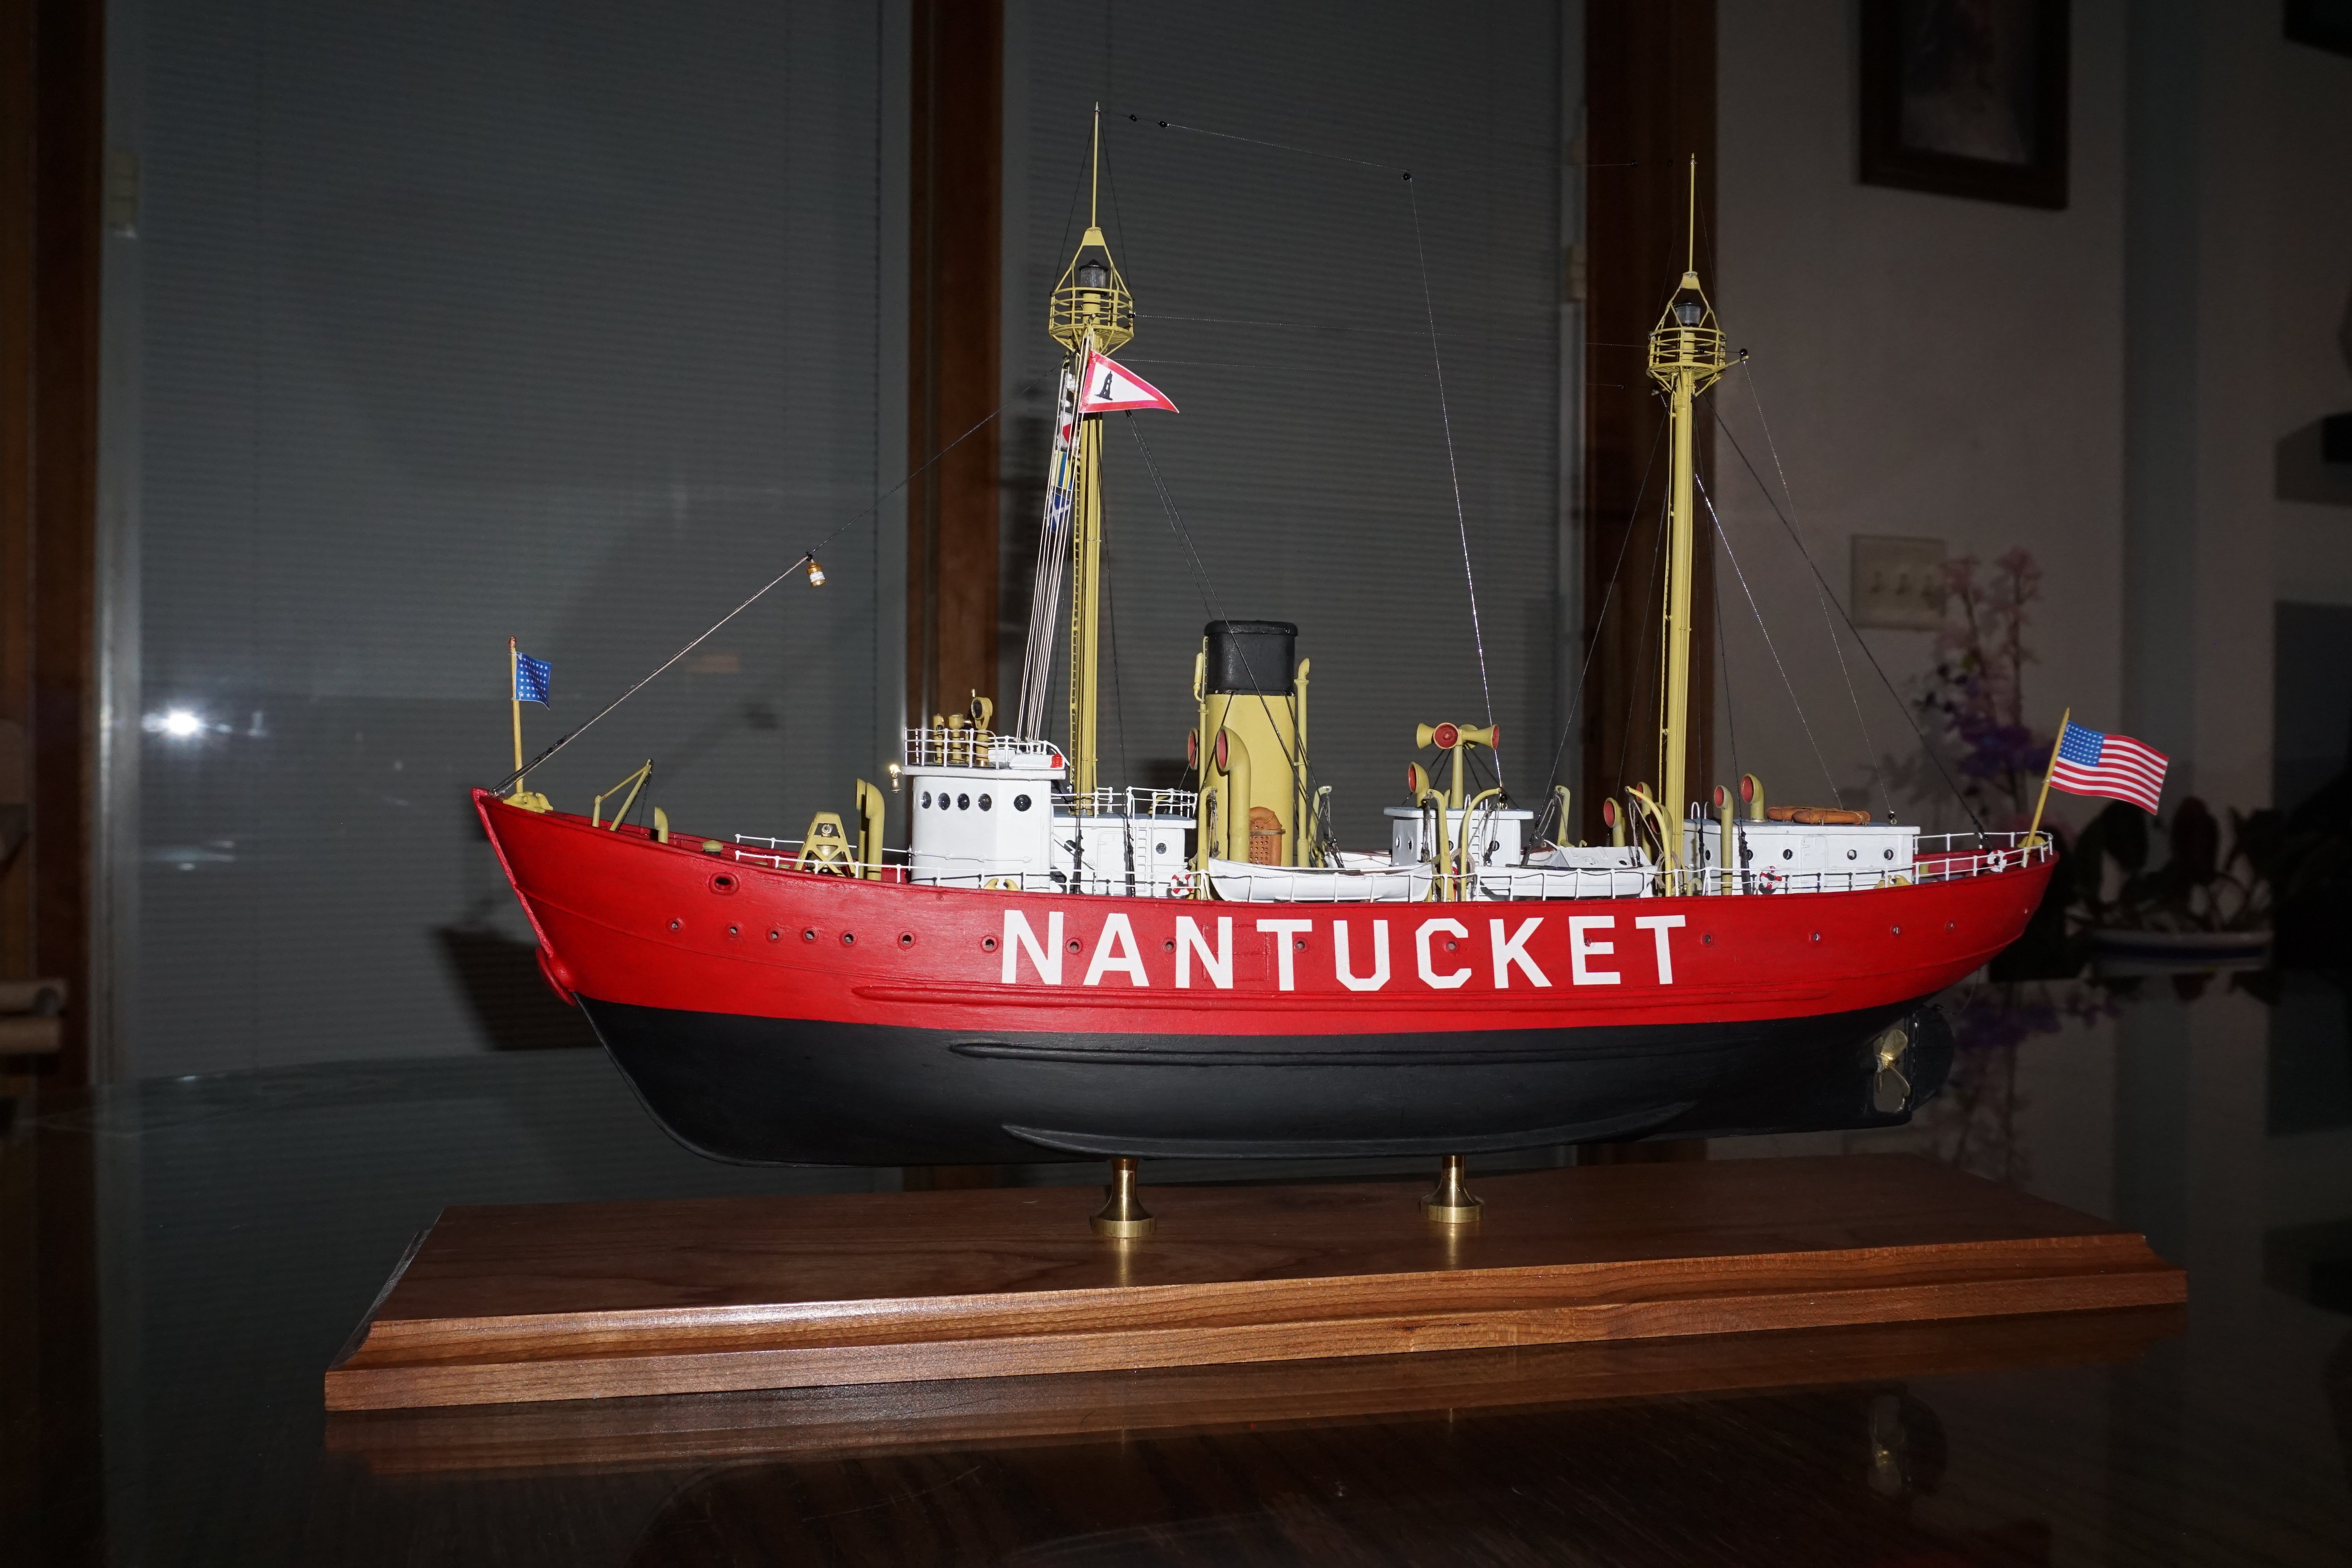
The kit is supplied with adhesive backed lettering. Very easy to work with and after applying pressure around any raised or recessed detail it will conform nicely. Thank you for the nice compliment on my build and glad you like.
- 29 replies
-
- 2
-
-
- Nantucket Lightship
- BlueJacket Shipcrafters
- (and 1 more)
-
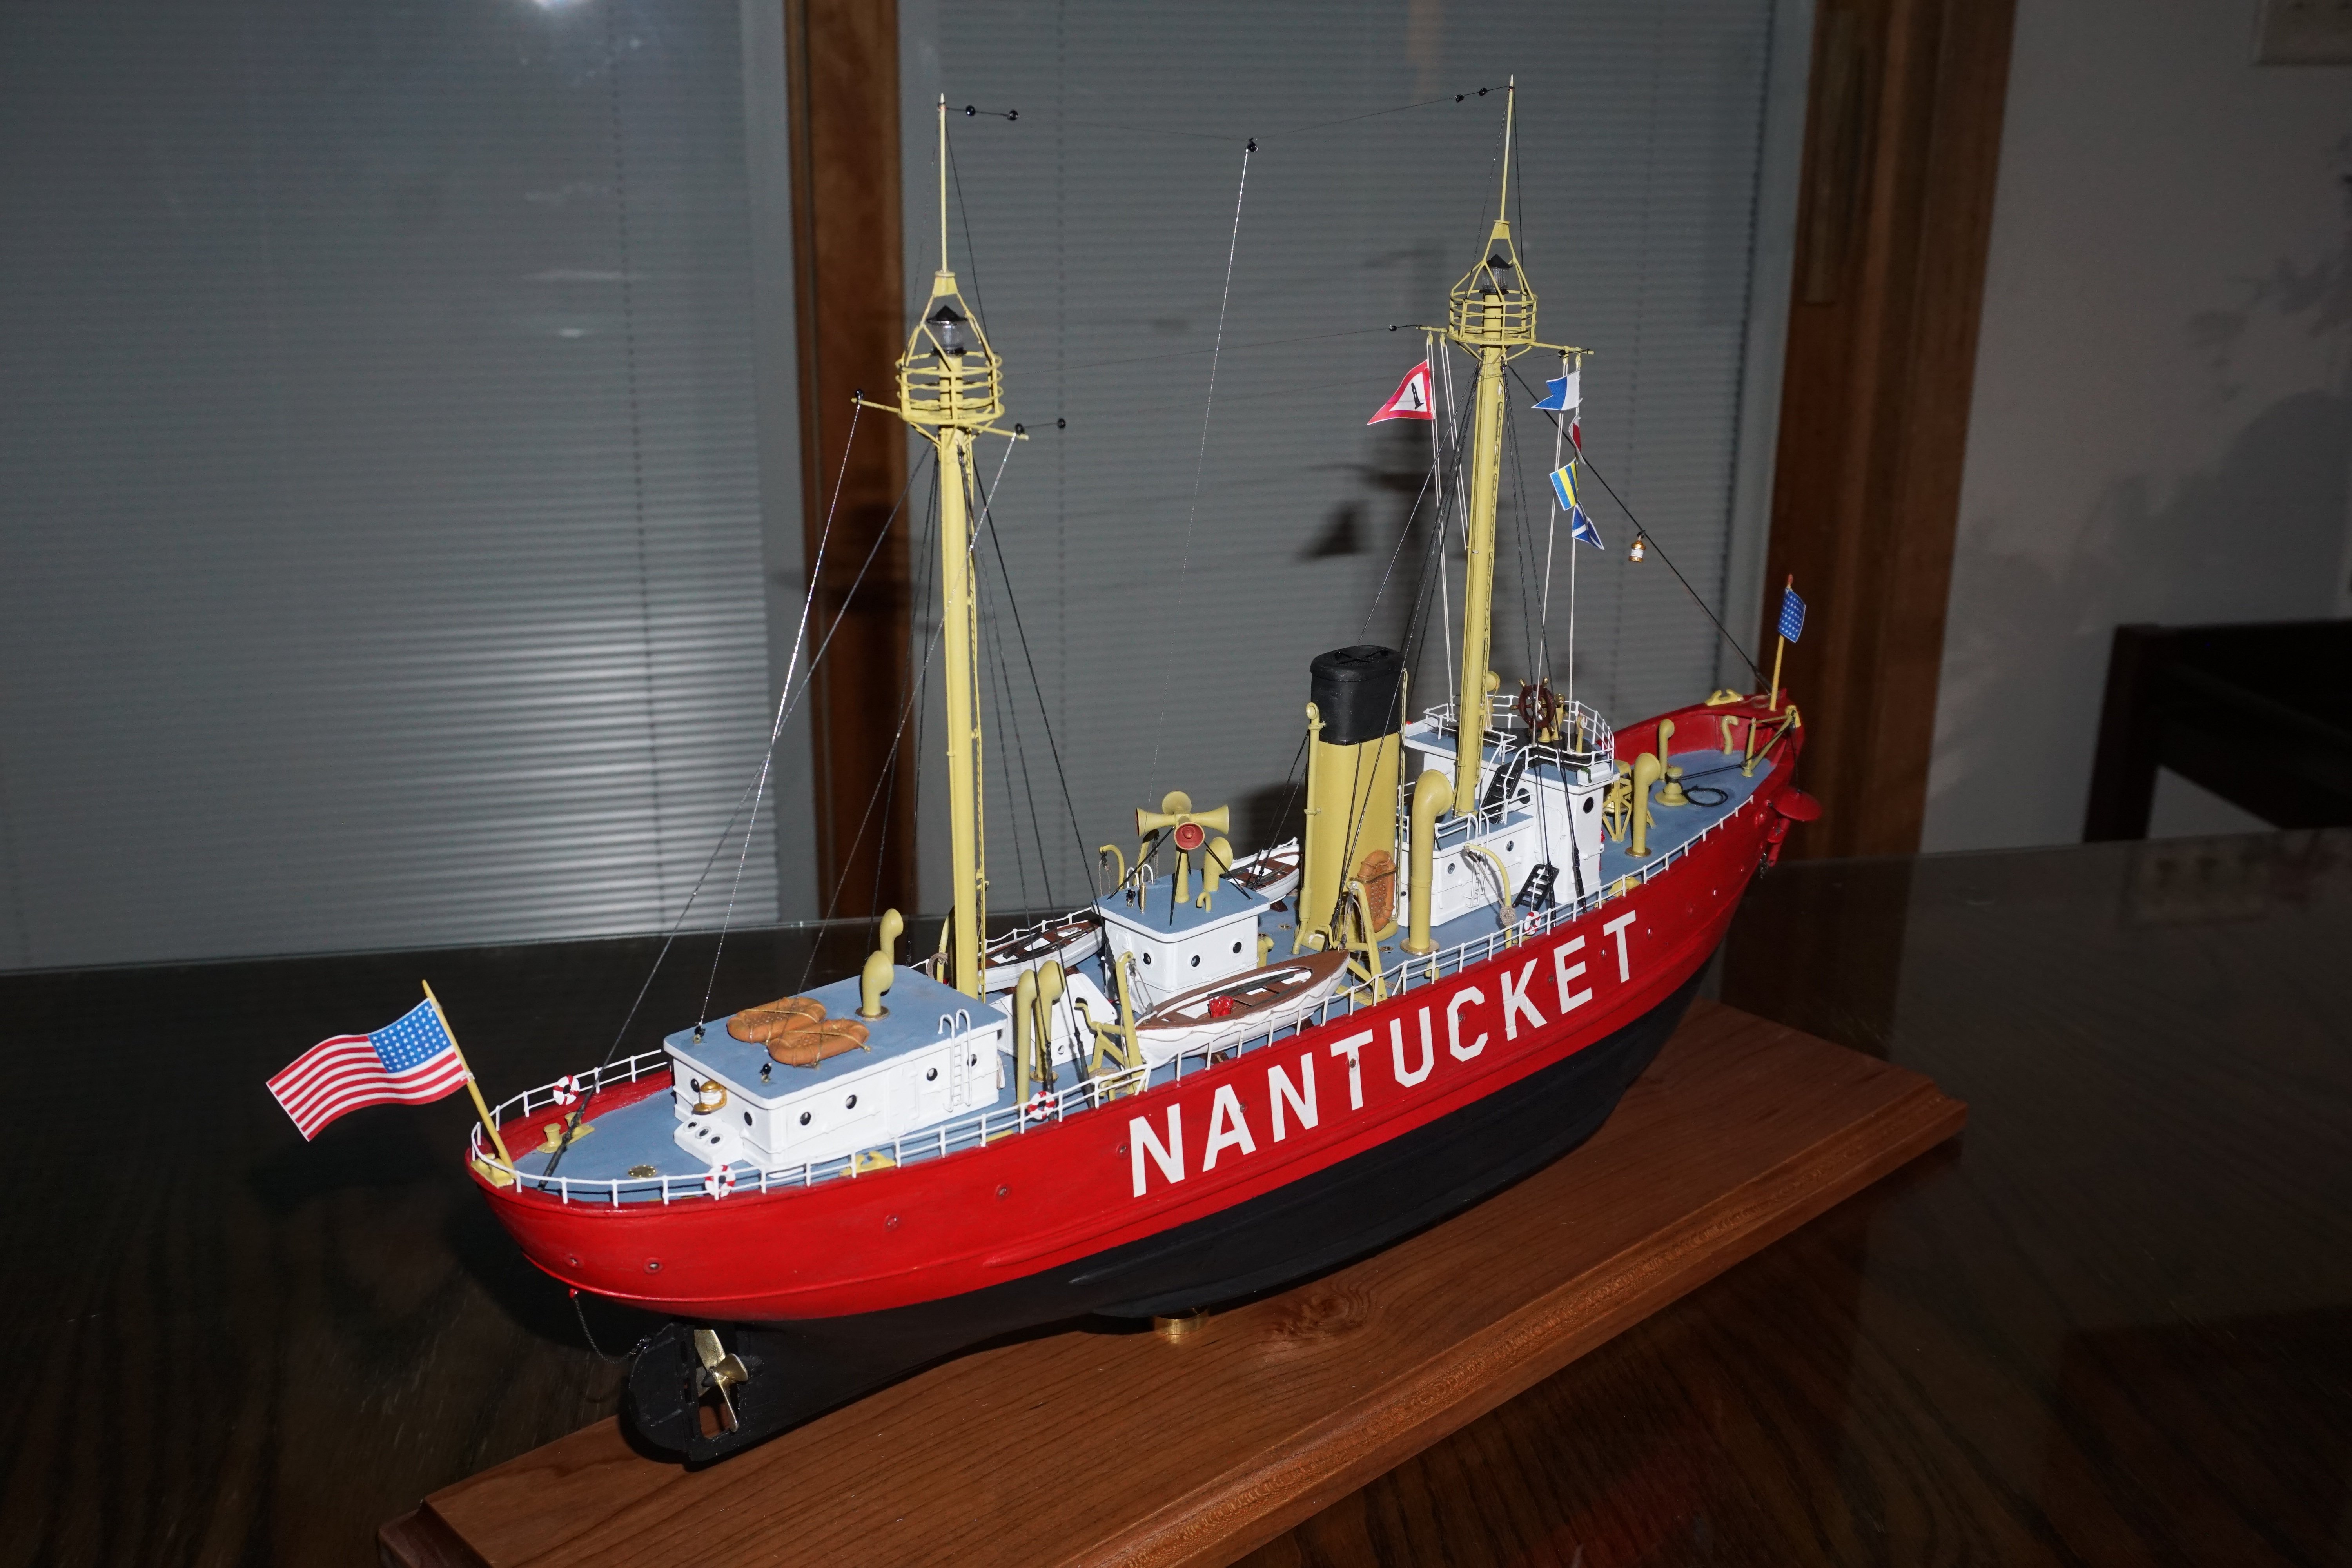
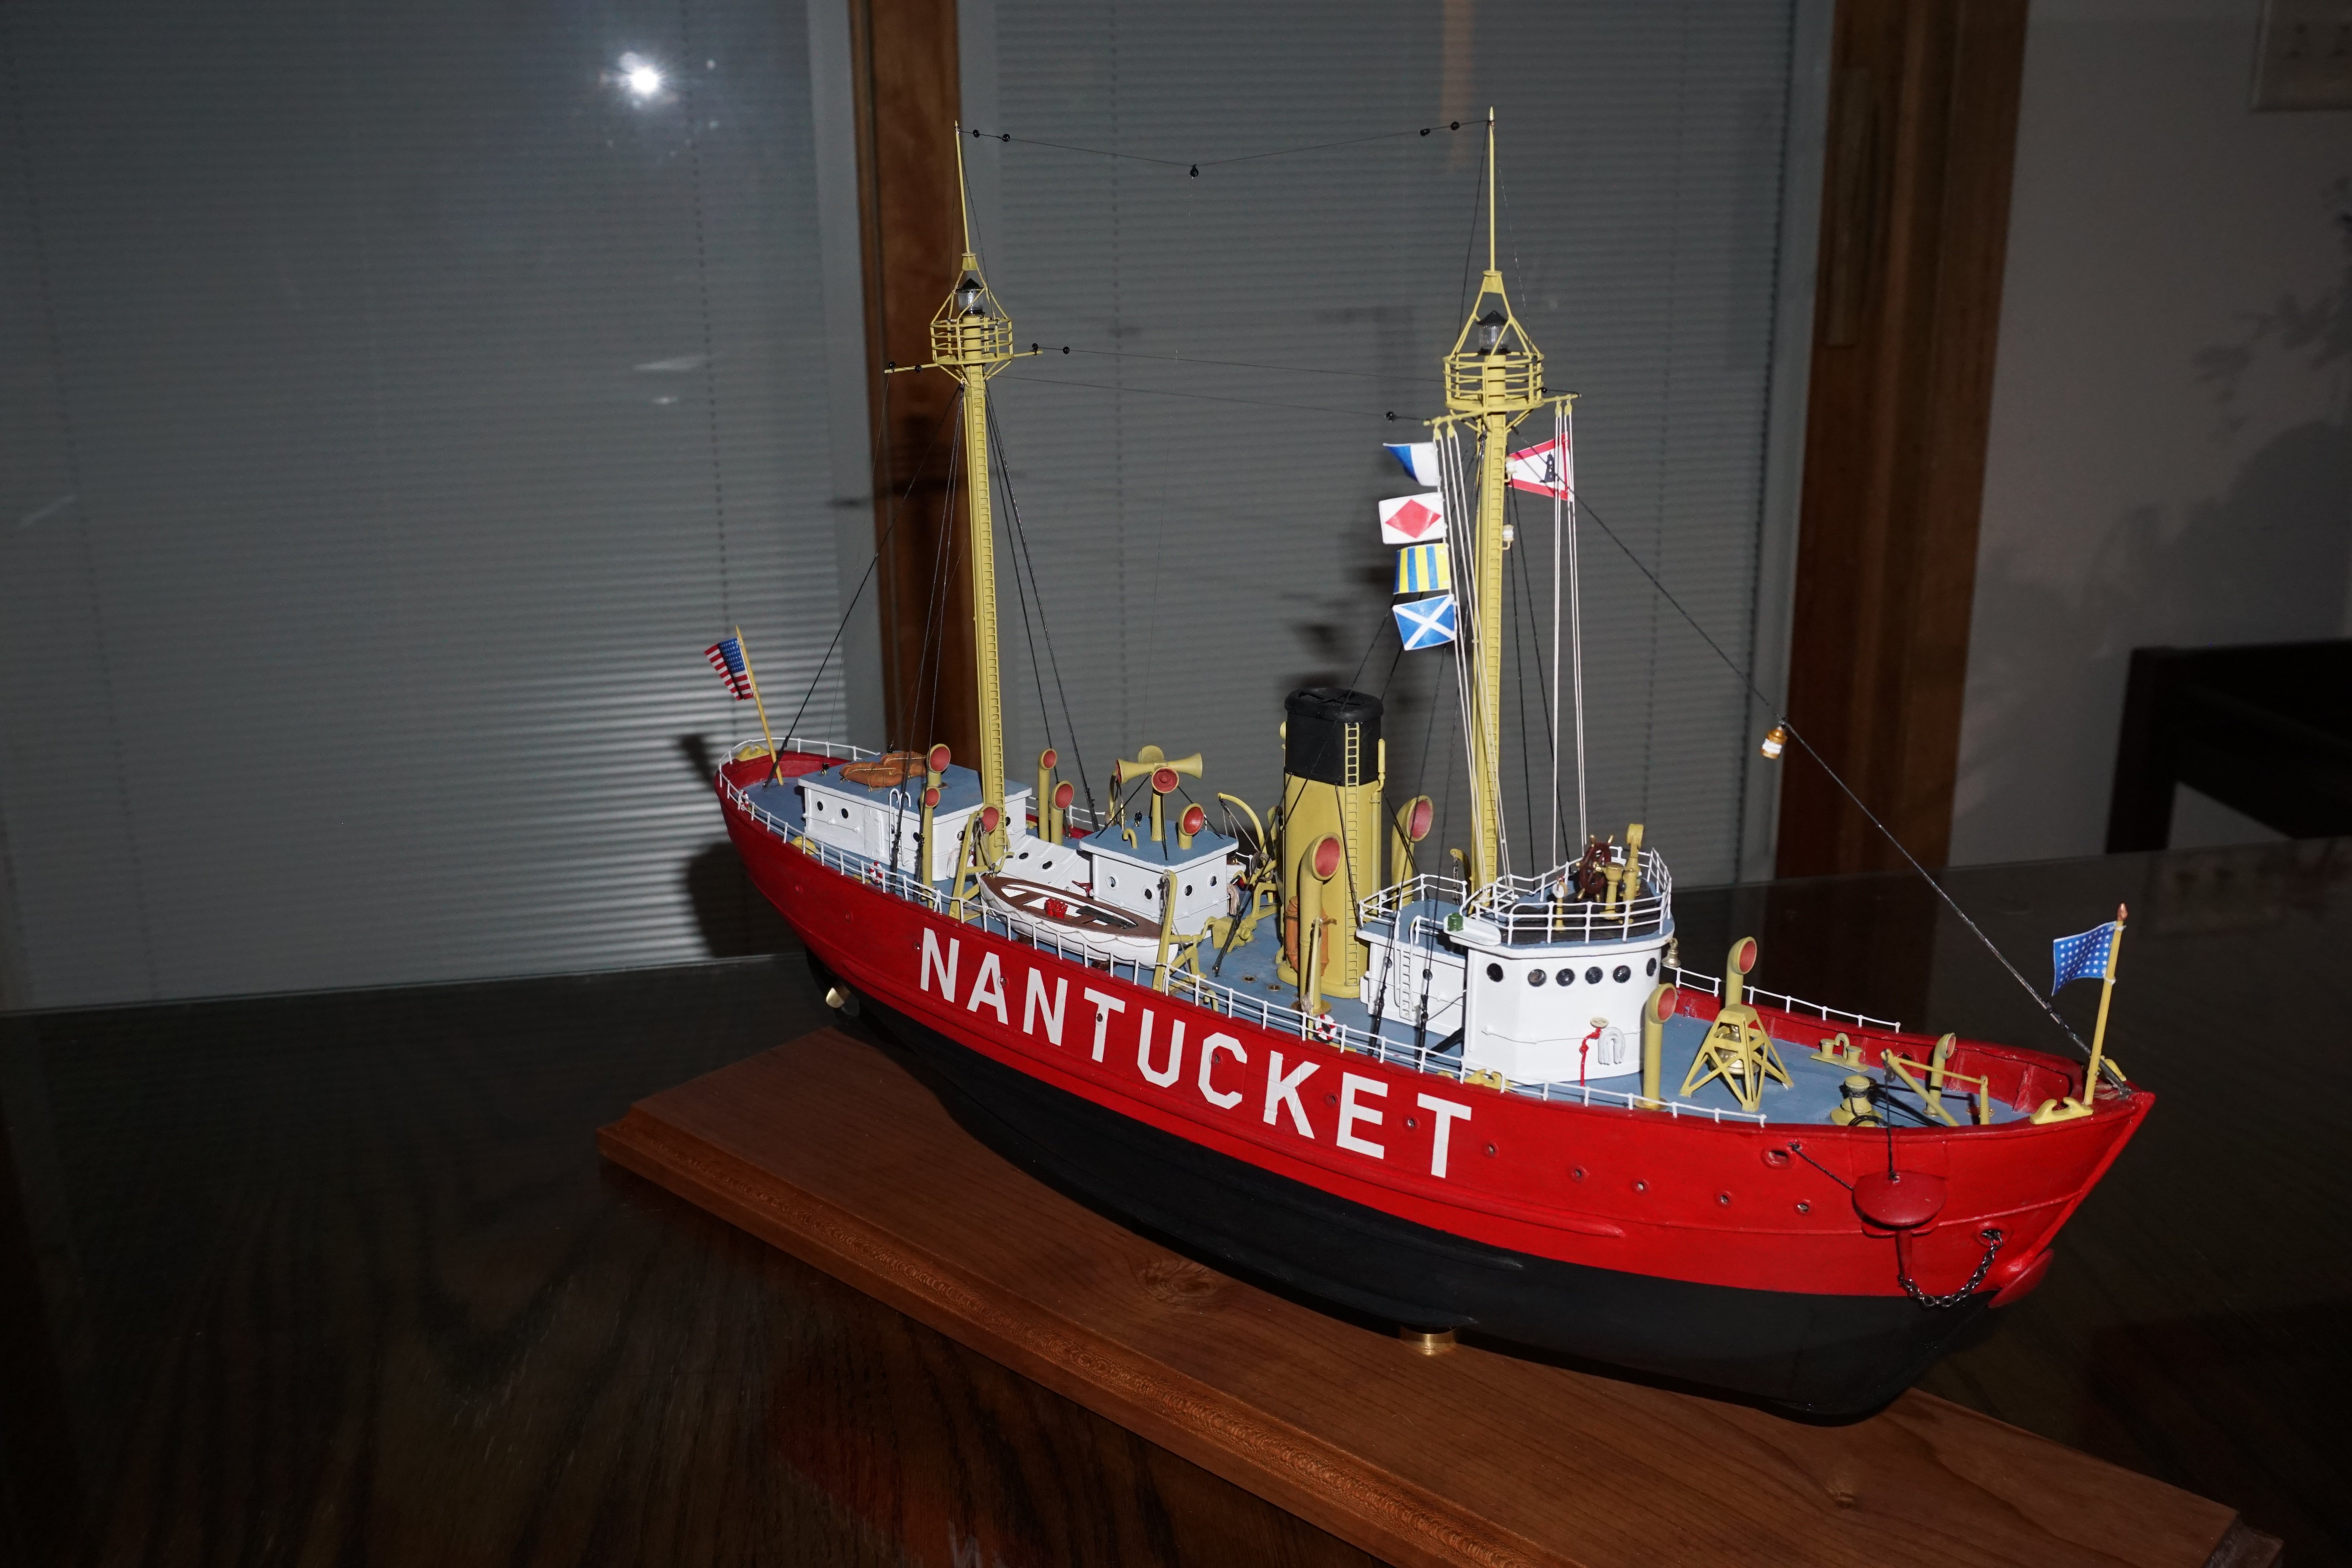
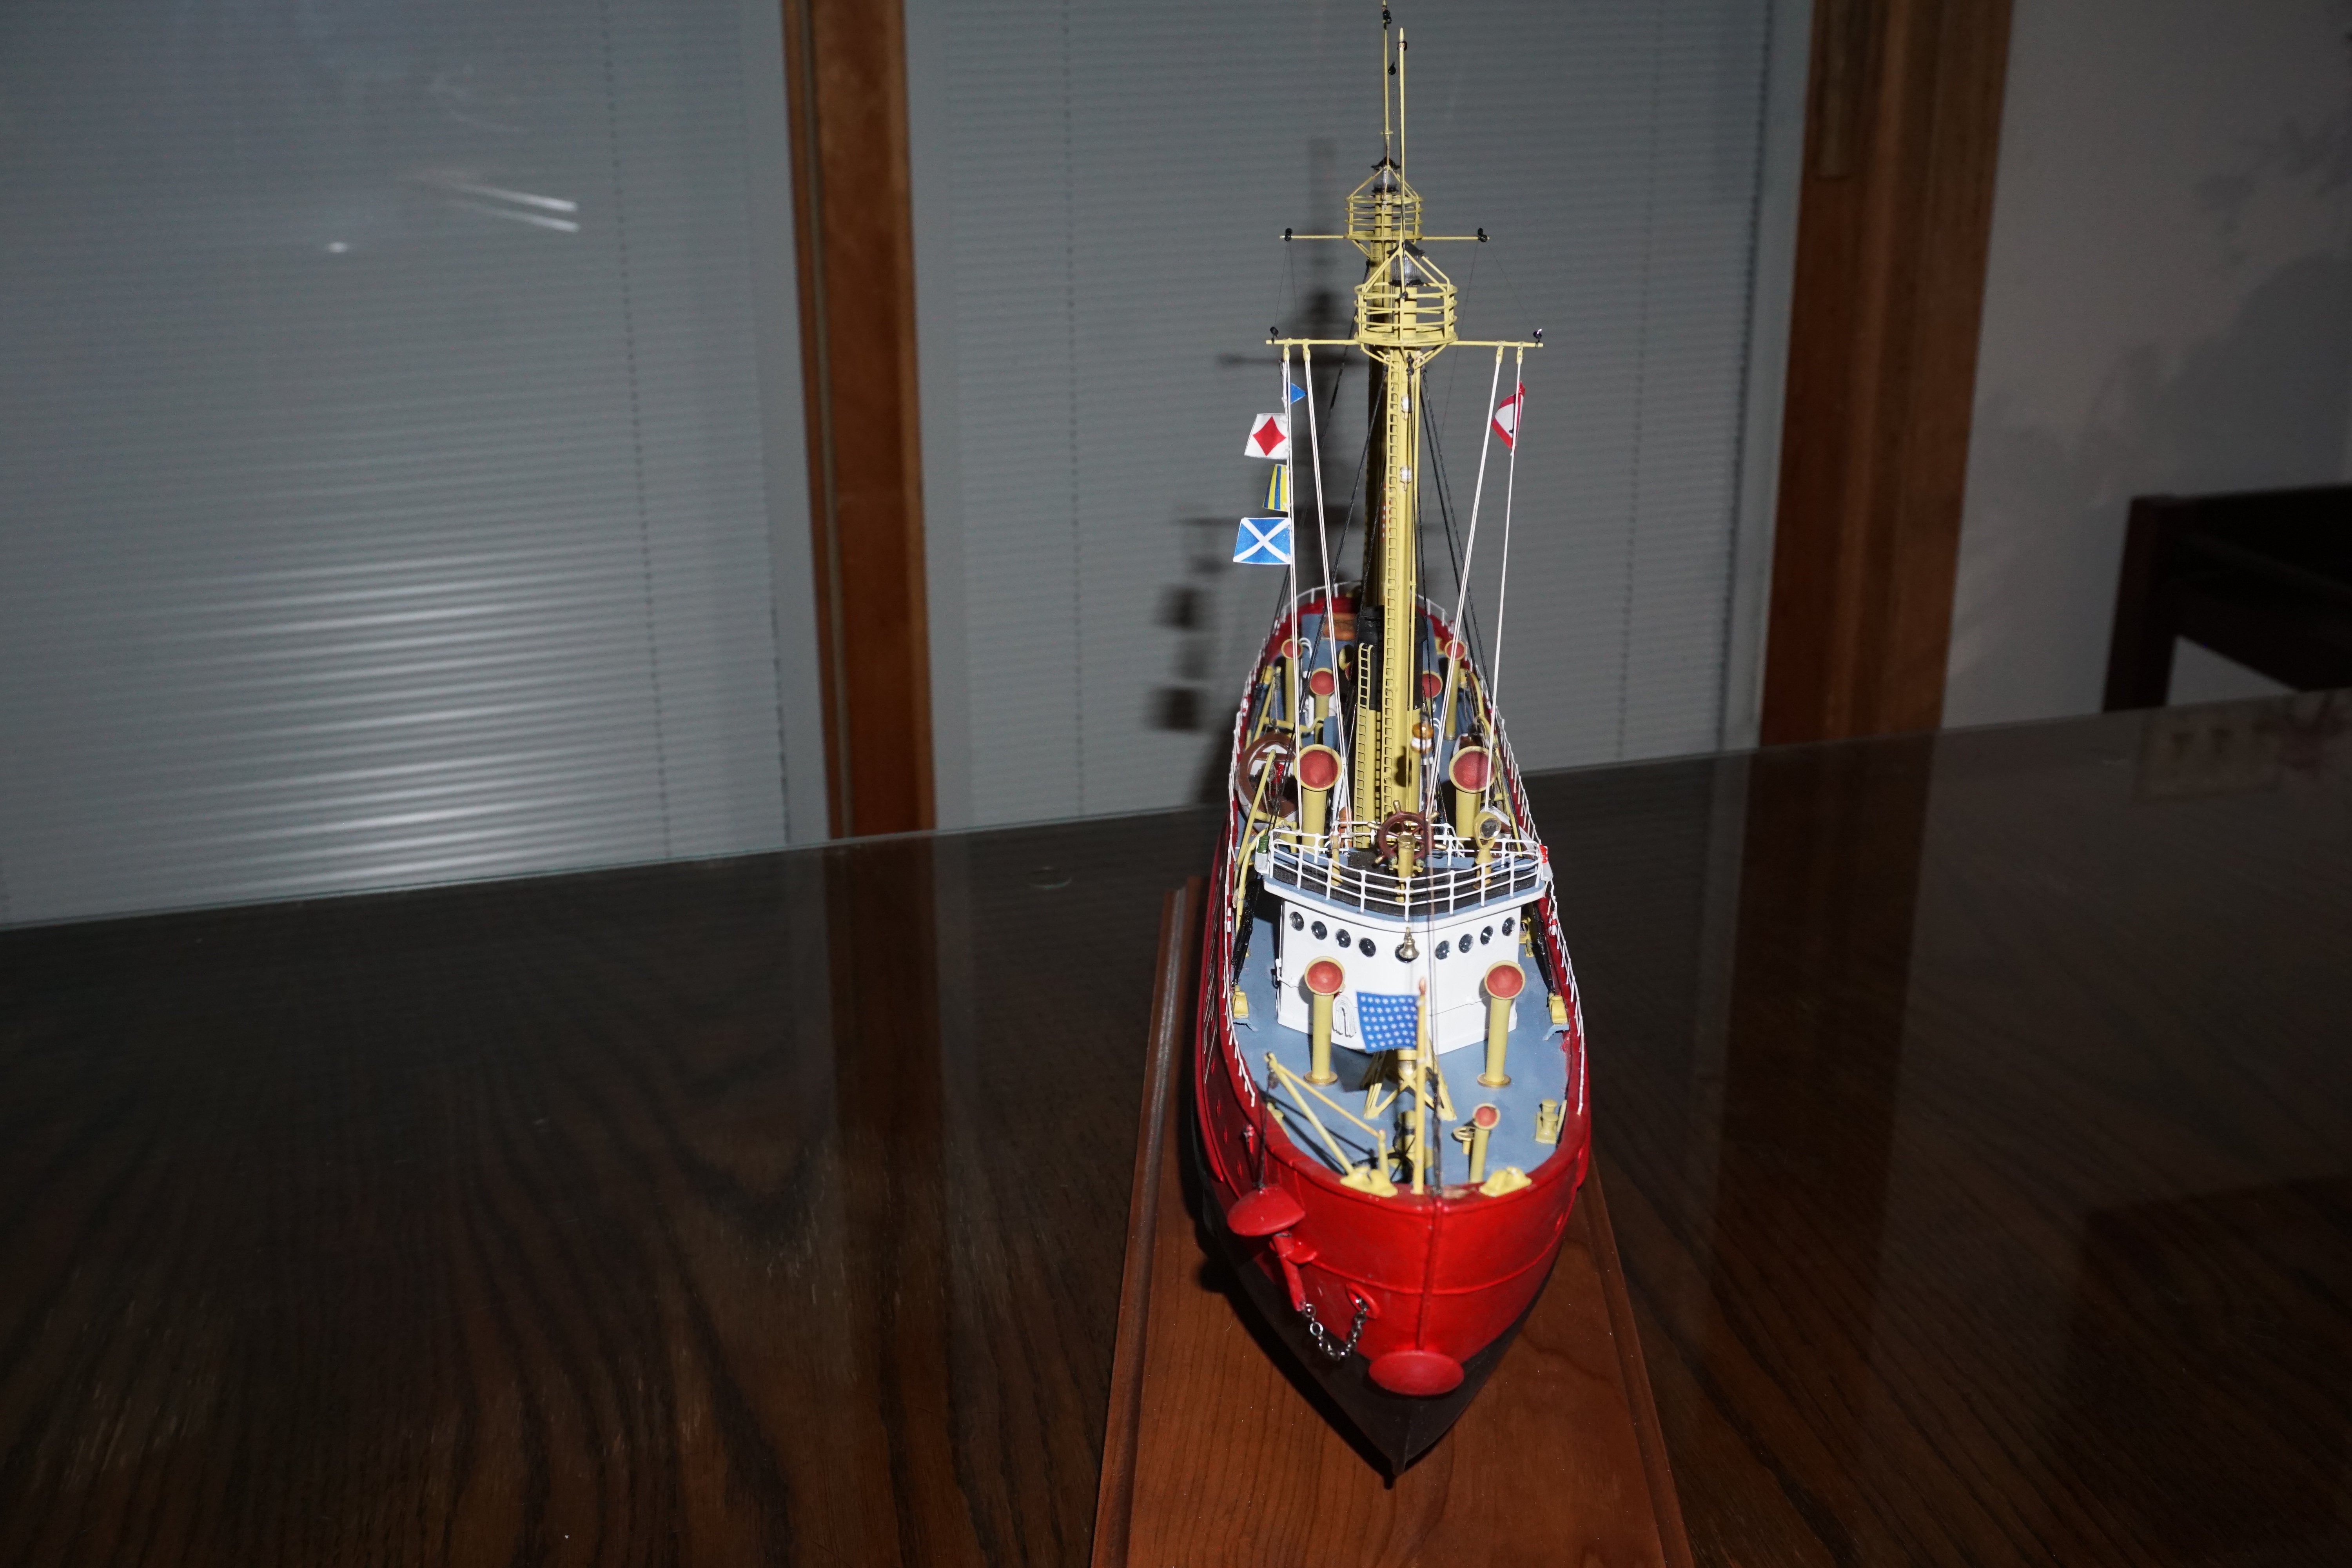
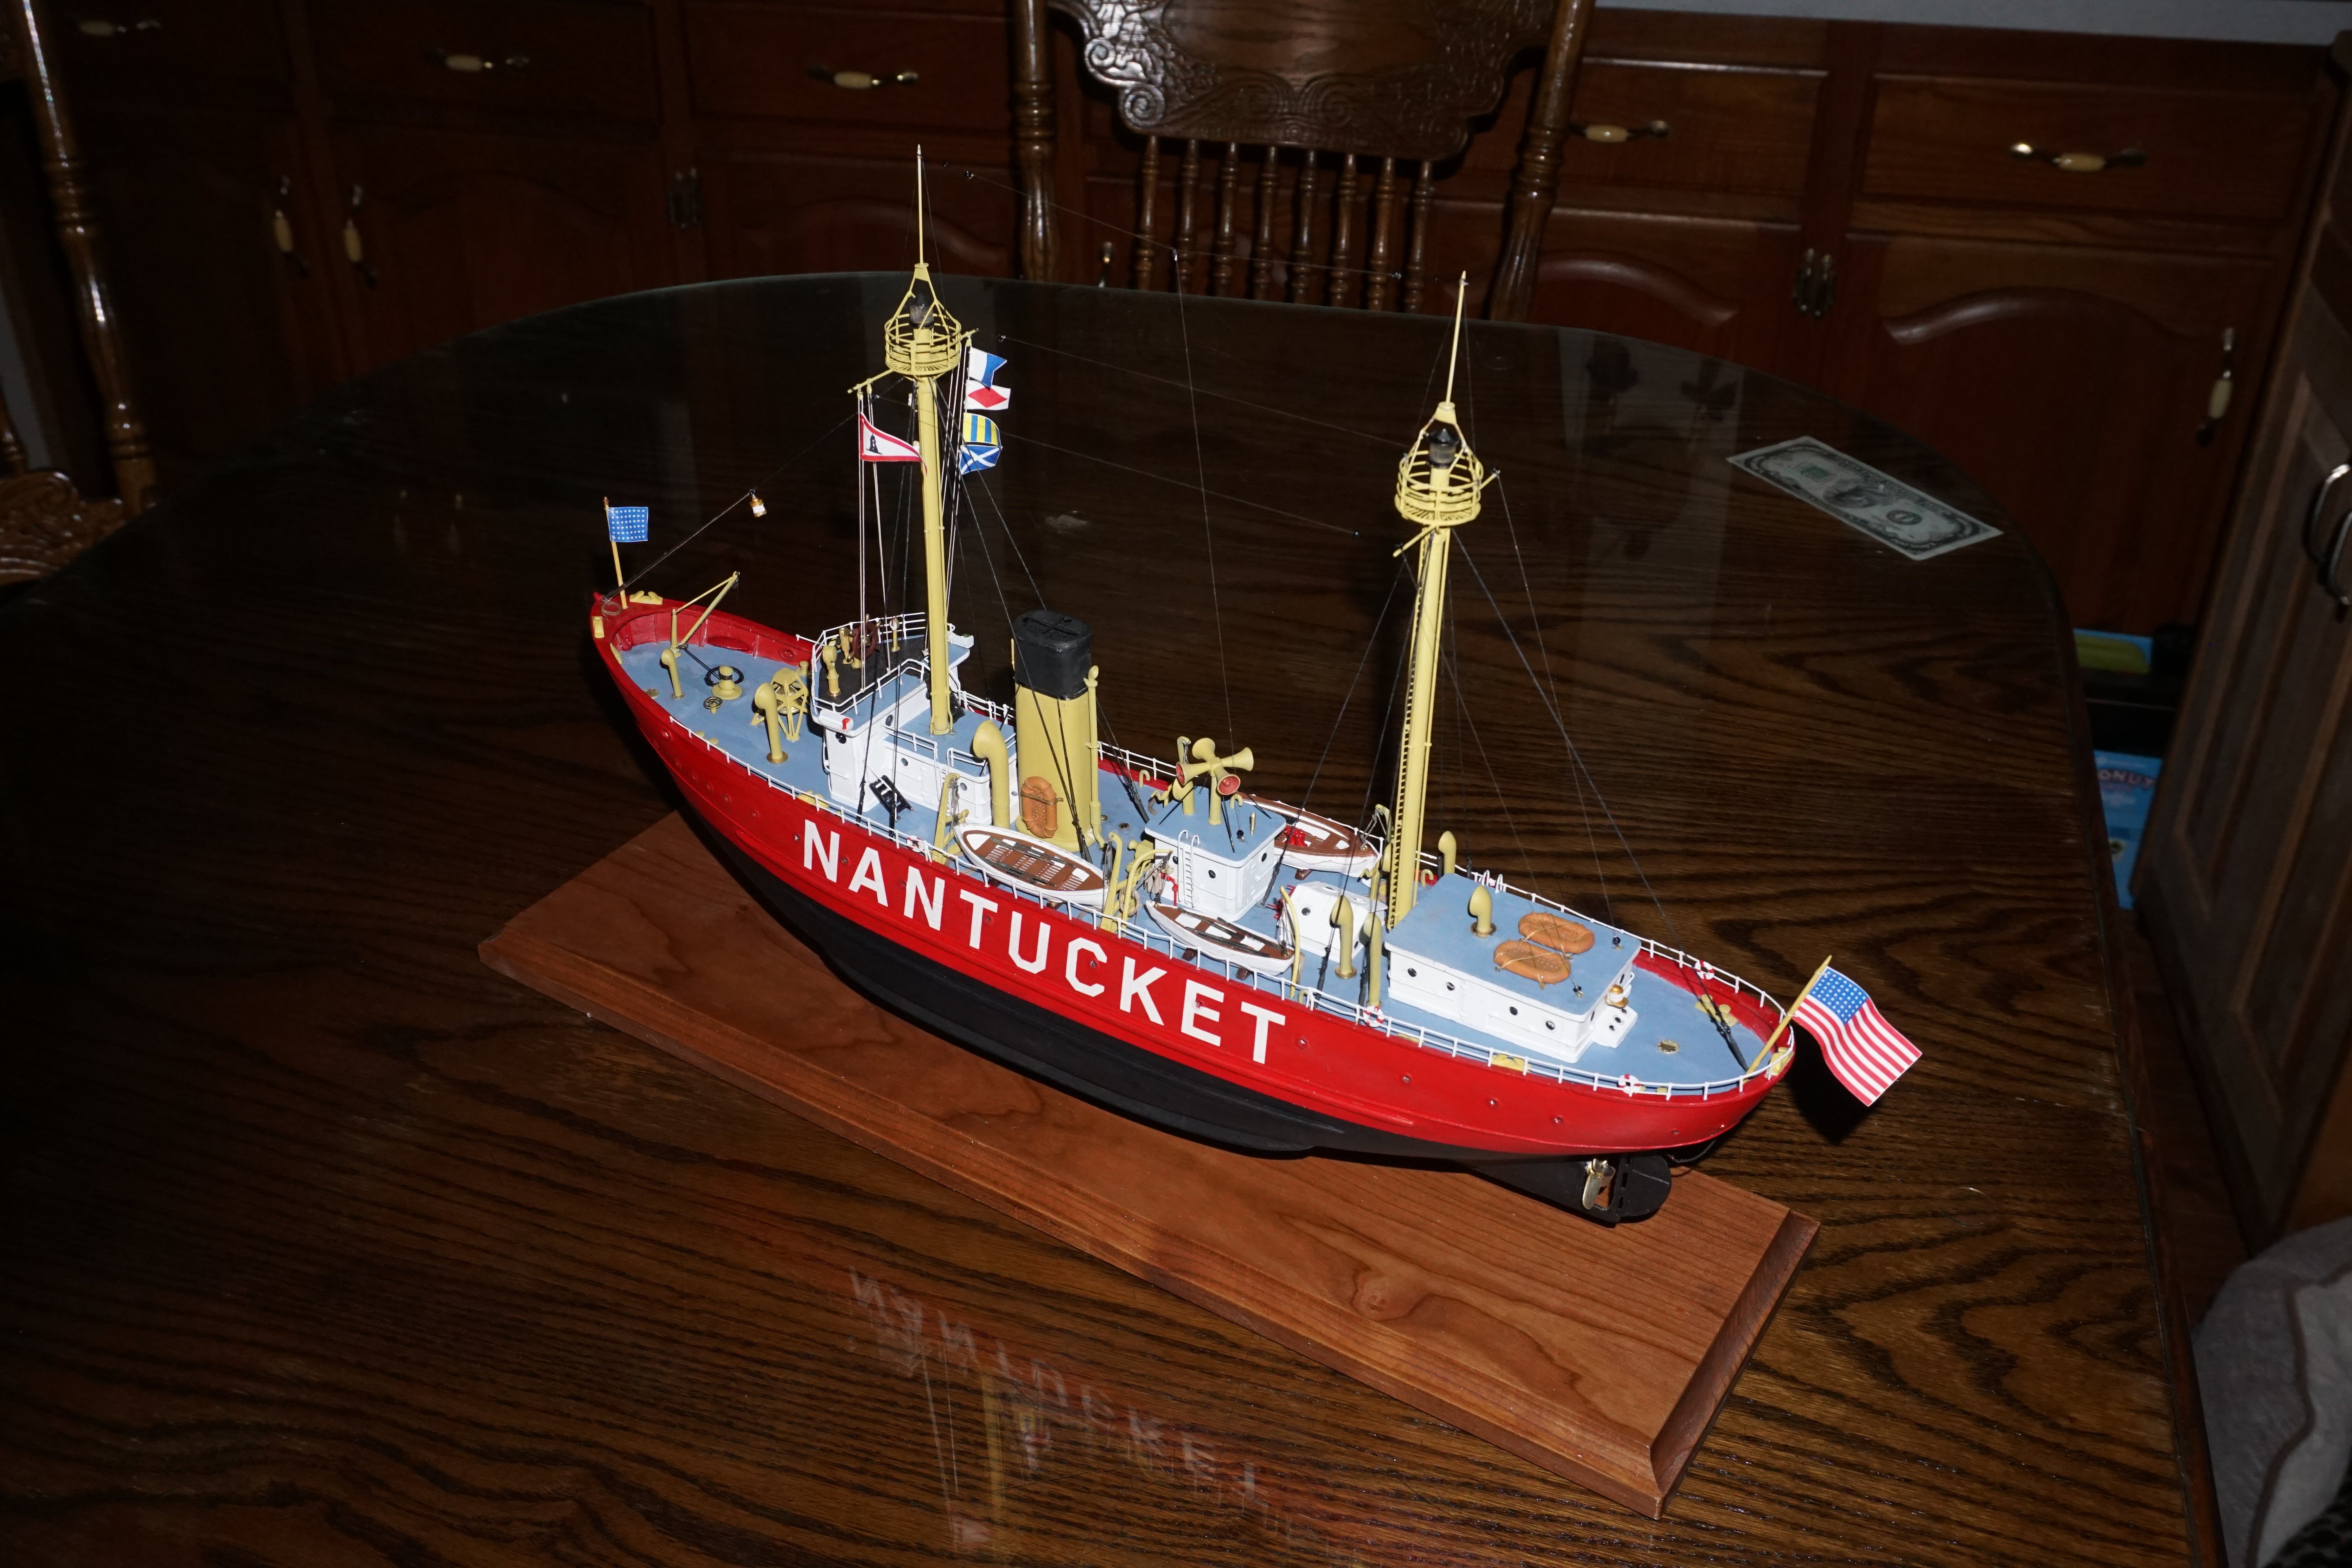
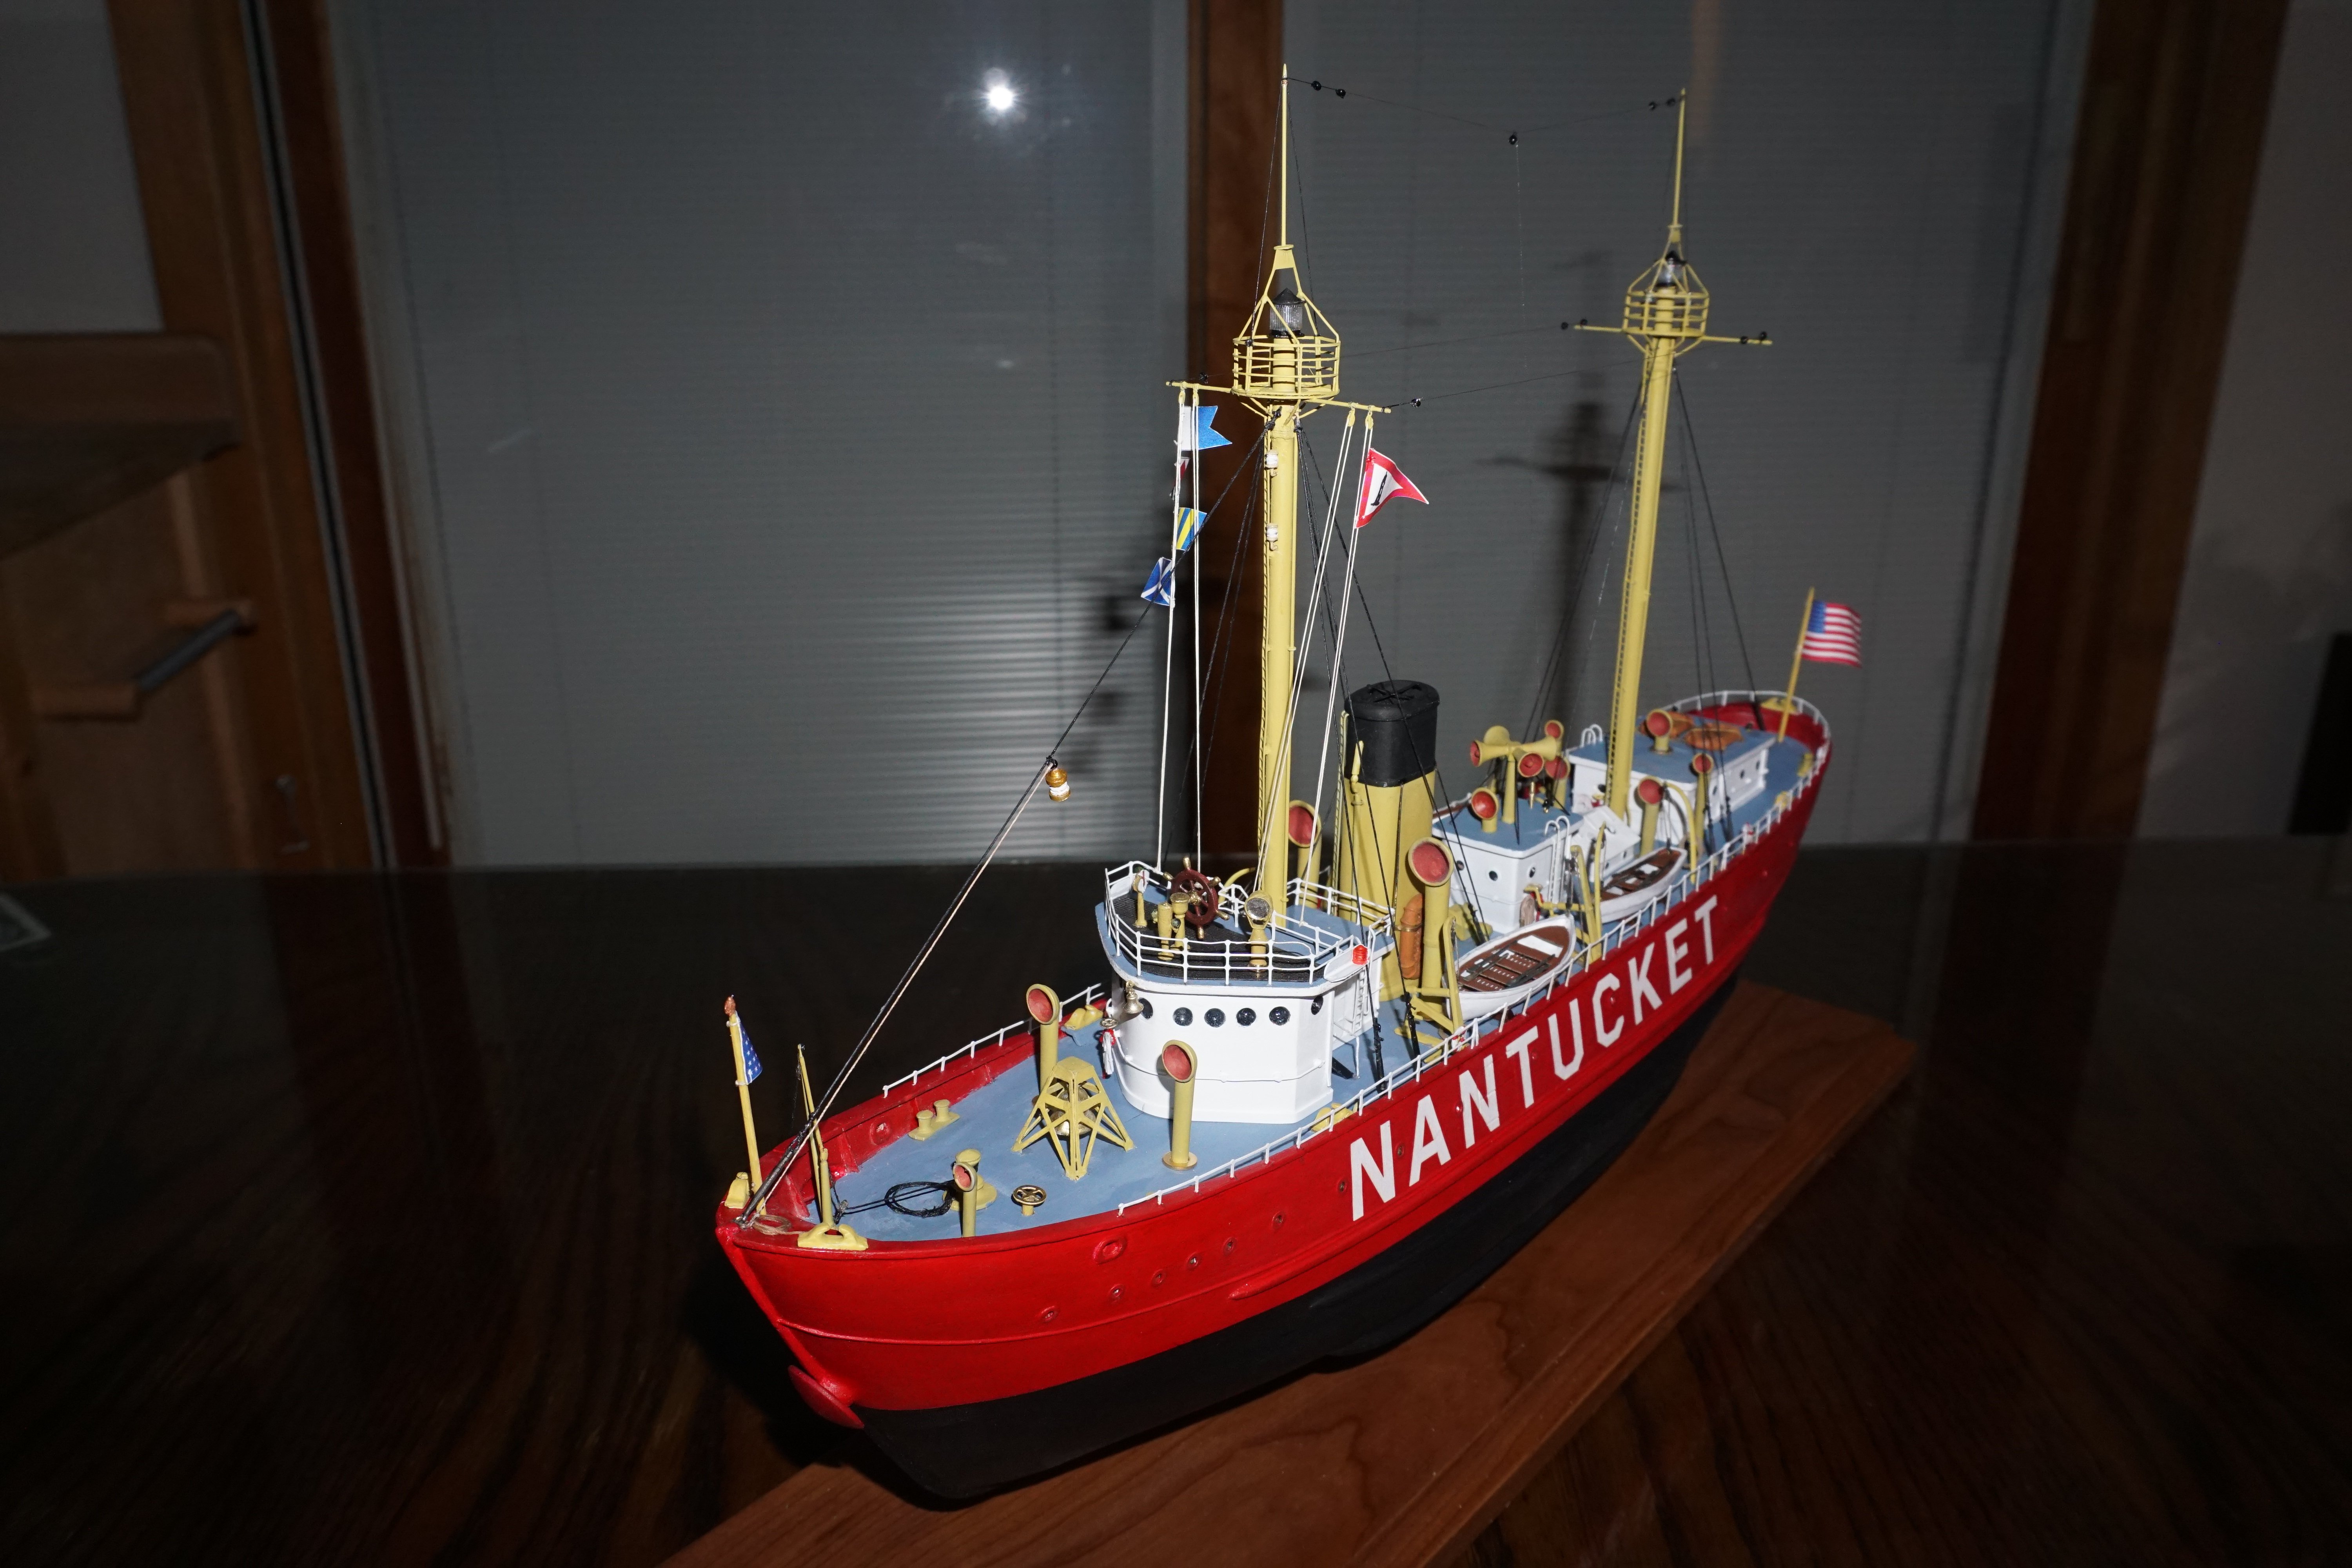
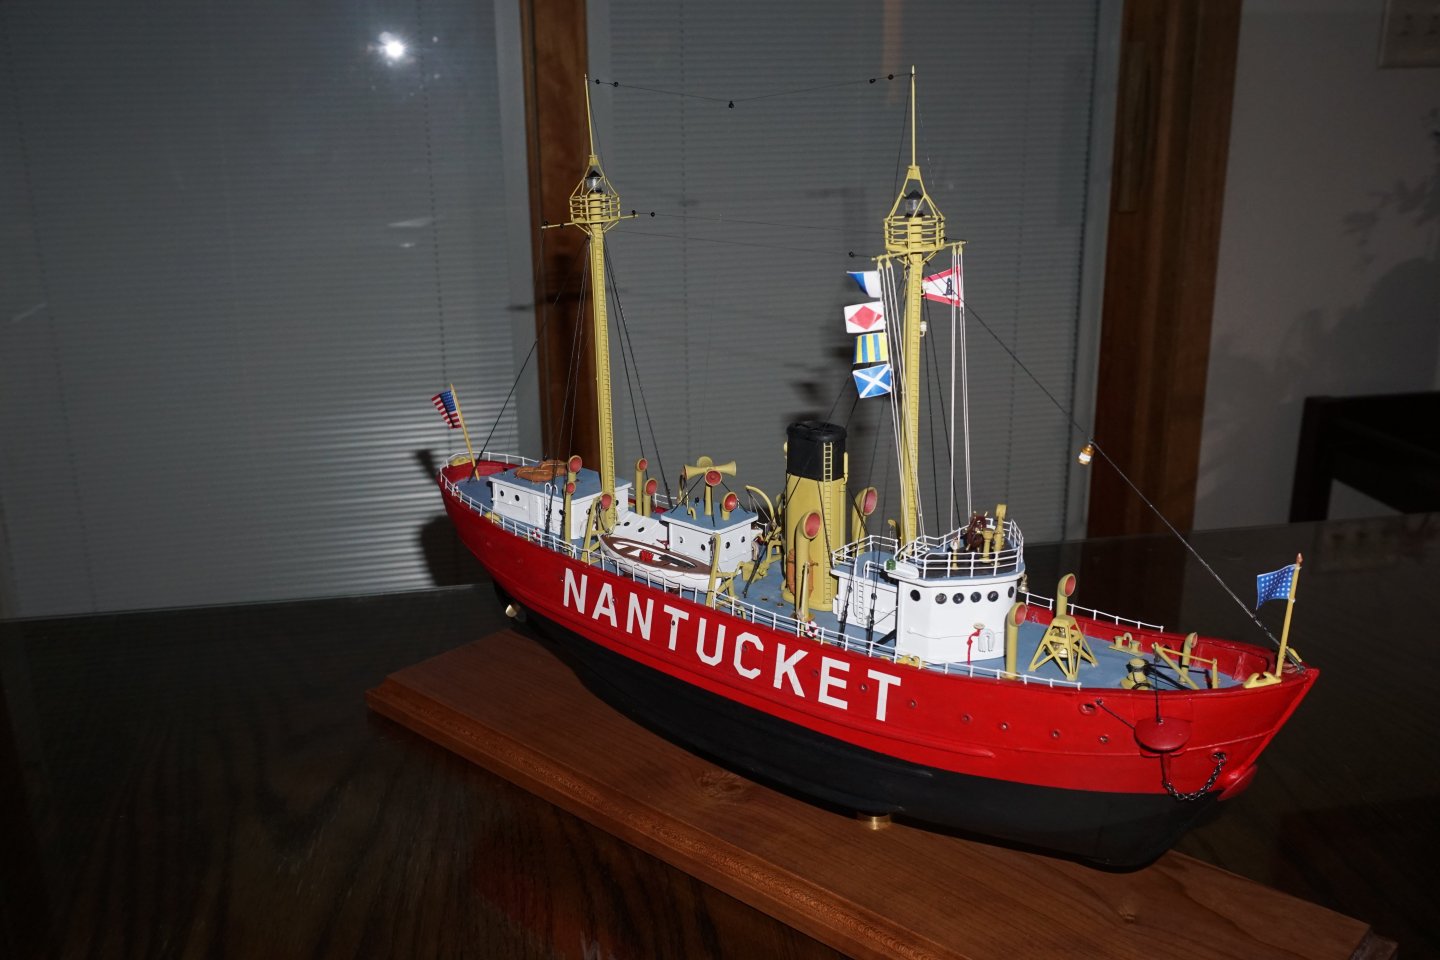
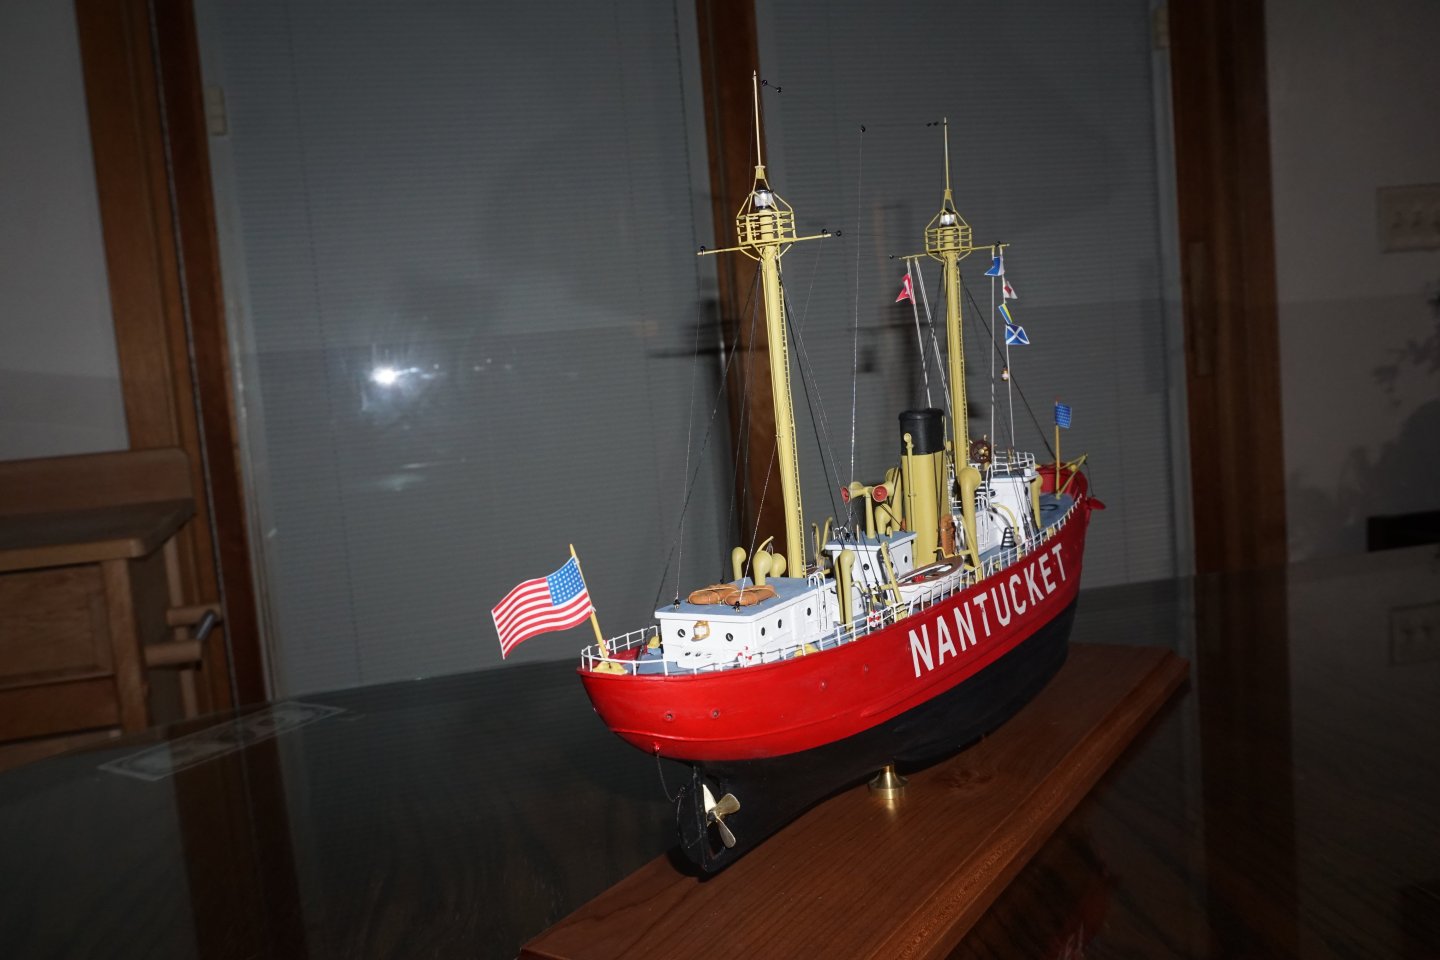
Ok. here is my completed Lightship. It took me nearly 4 months to get this done and I'm very satisfied with the end result. Not much more to say about this build except that it was a pure joy and kept me entertained for most of the winter.


- 29 replies
-
- 9
-
-

-
- Nantucket Lightship
- BlueJacket Shipcrafters
- (and 1 more)
-
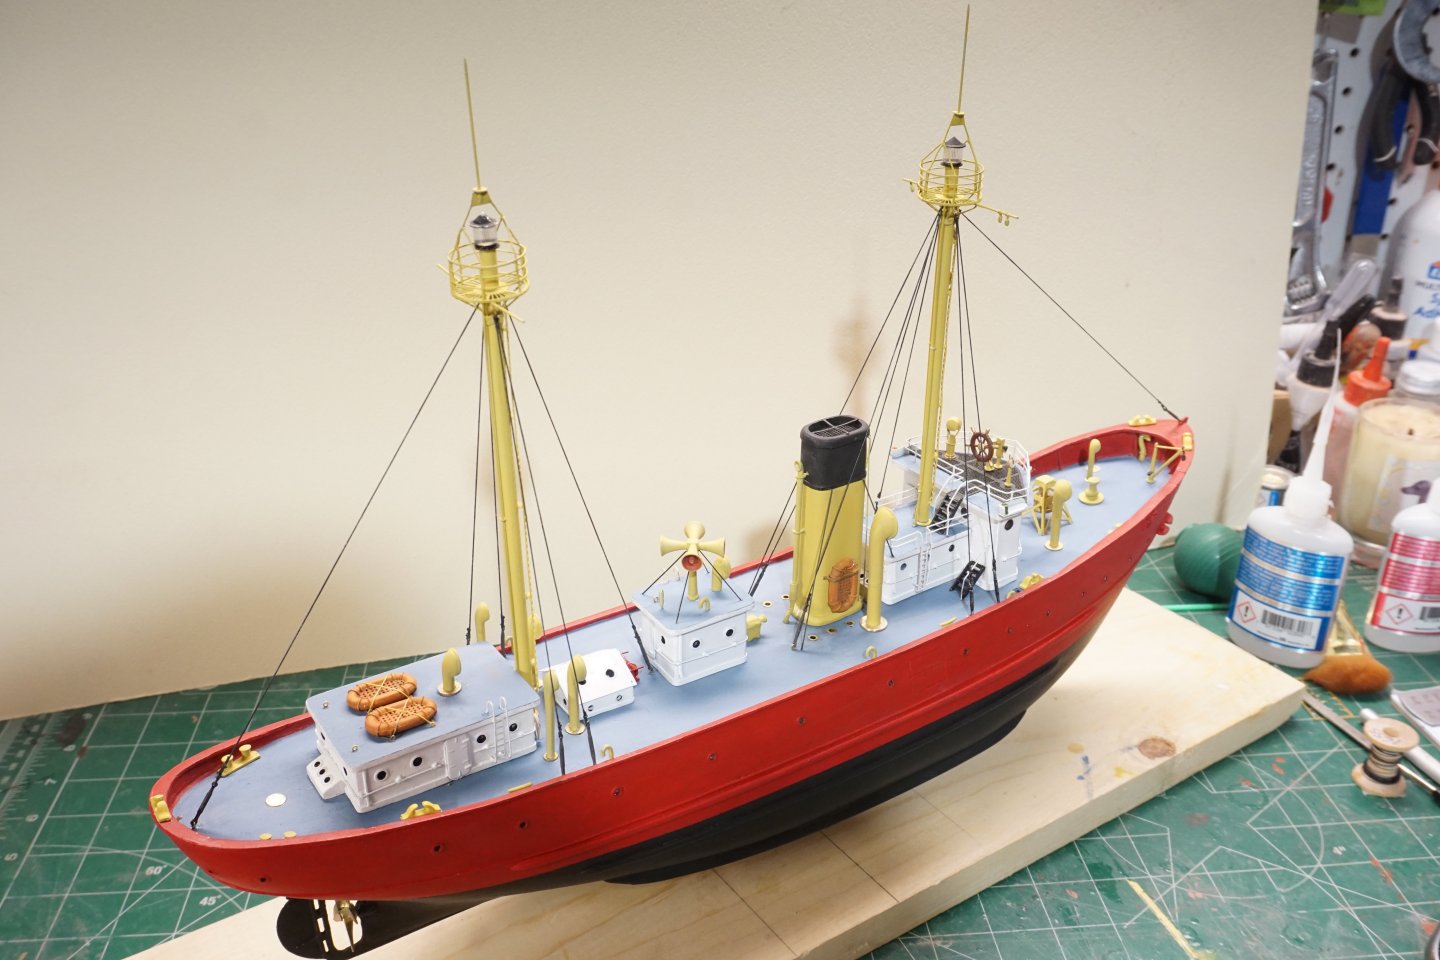
The mast construction went fairly smooth, for added strength, I decided to solder the photo etch lantern frames and baskets together. Humbrol enamel matt 81 (pale yellow) was the color I used for airbrushing the masts, stack, vent funnels and davits. At this point everything is glued down and I got a good start on the rigging, completing the stays and shrouds. I should have this completed in the next few days.
- 29 replies
-
- 8
-
-
- Nantucket Lightship
- BlueJacket Shipcrafters
- (and 1 more)
-
Thank you for your information. I will have to look into it, I saw a product called flow medium (Masters Touch) at my local Hobby Lobby which is supposed to thin but give I glossy finish per label. I actually used Liquitex matte medium to lower viscosity, but it wasn't like using paint thinner, so I did not experiment and after brushing on some scrap wood I decided to brush paint as my impatience with trying something new got the best of me. After reading your reply and doing some research, I found Liquitex does make an actual airbrushing thinner which my local hobby lobby did not have, I will order some and try it out. Thank you so much for your input and I will definitely try experimenting with my airbrush in the future.
- 29 replies
-
- 1
-
-
- Nantucket Lightship
- BlueJacket Shipcrafters
- (and 1 more)
-
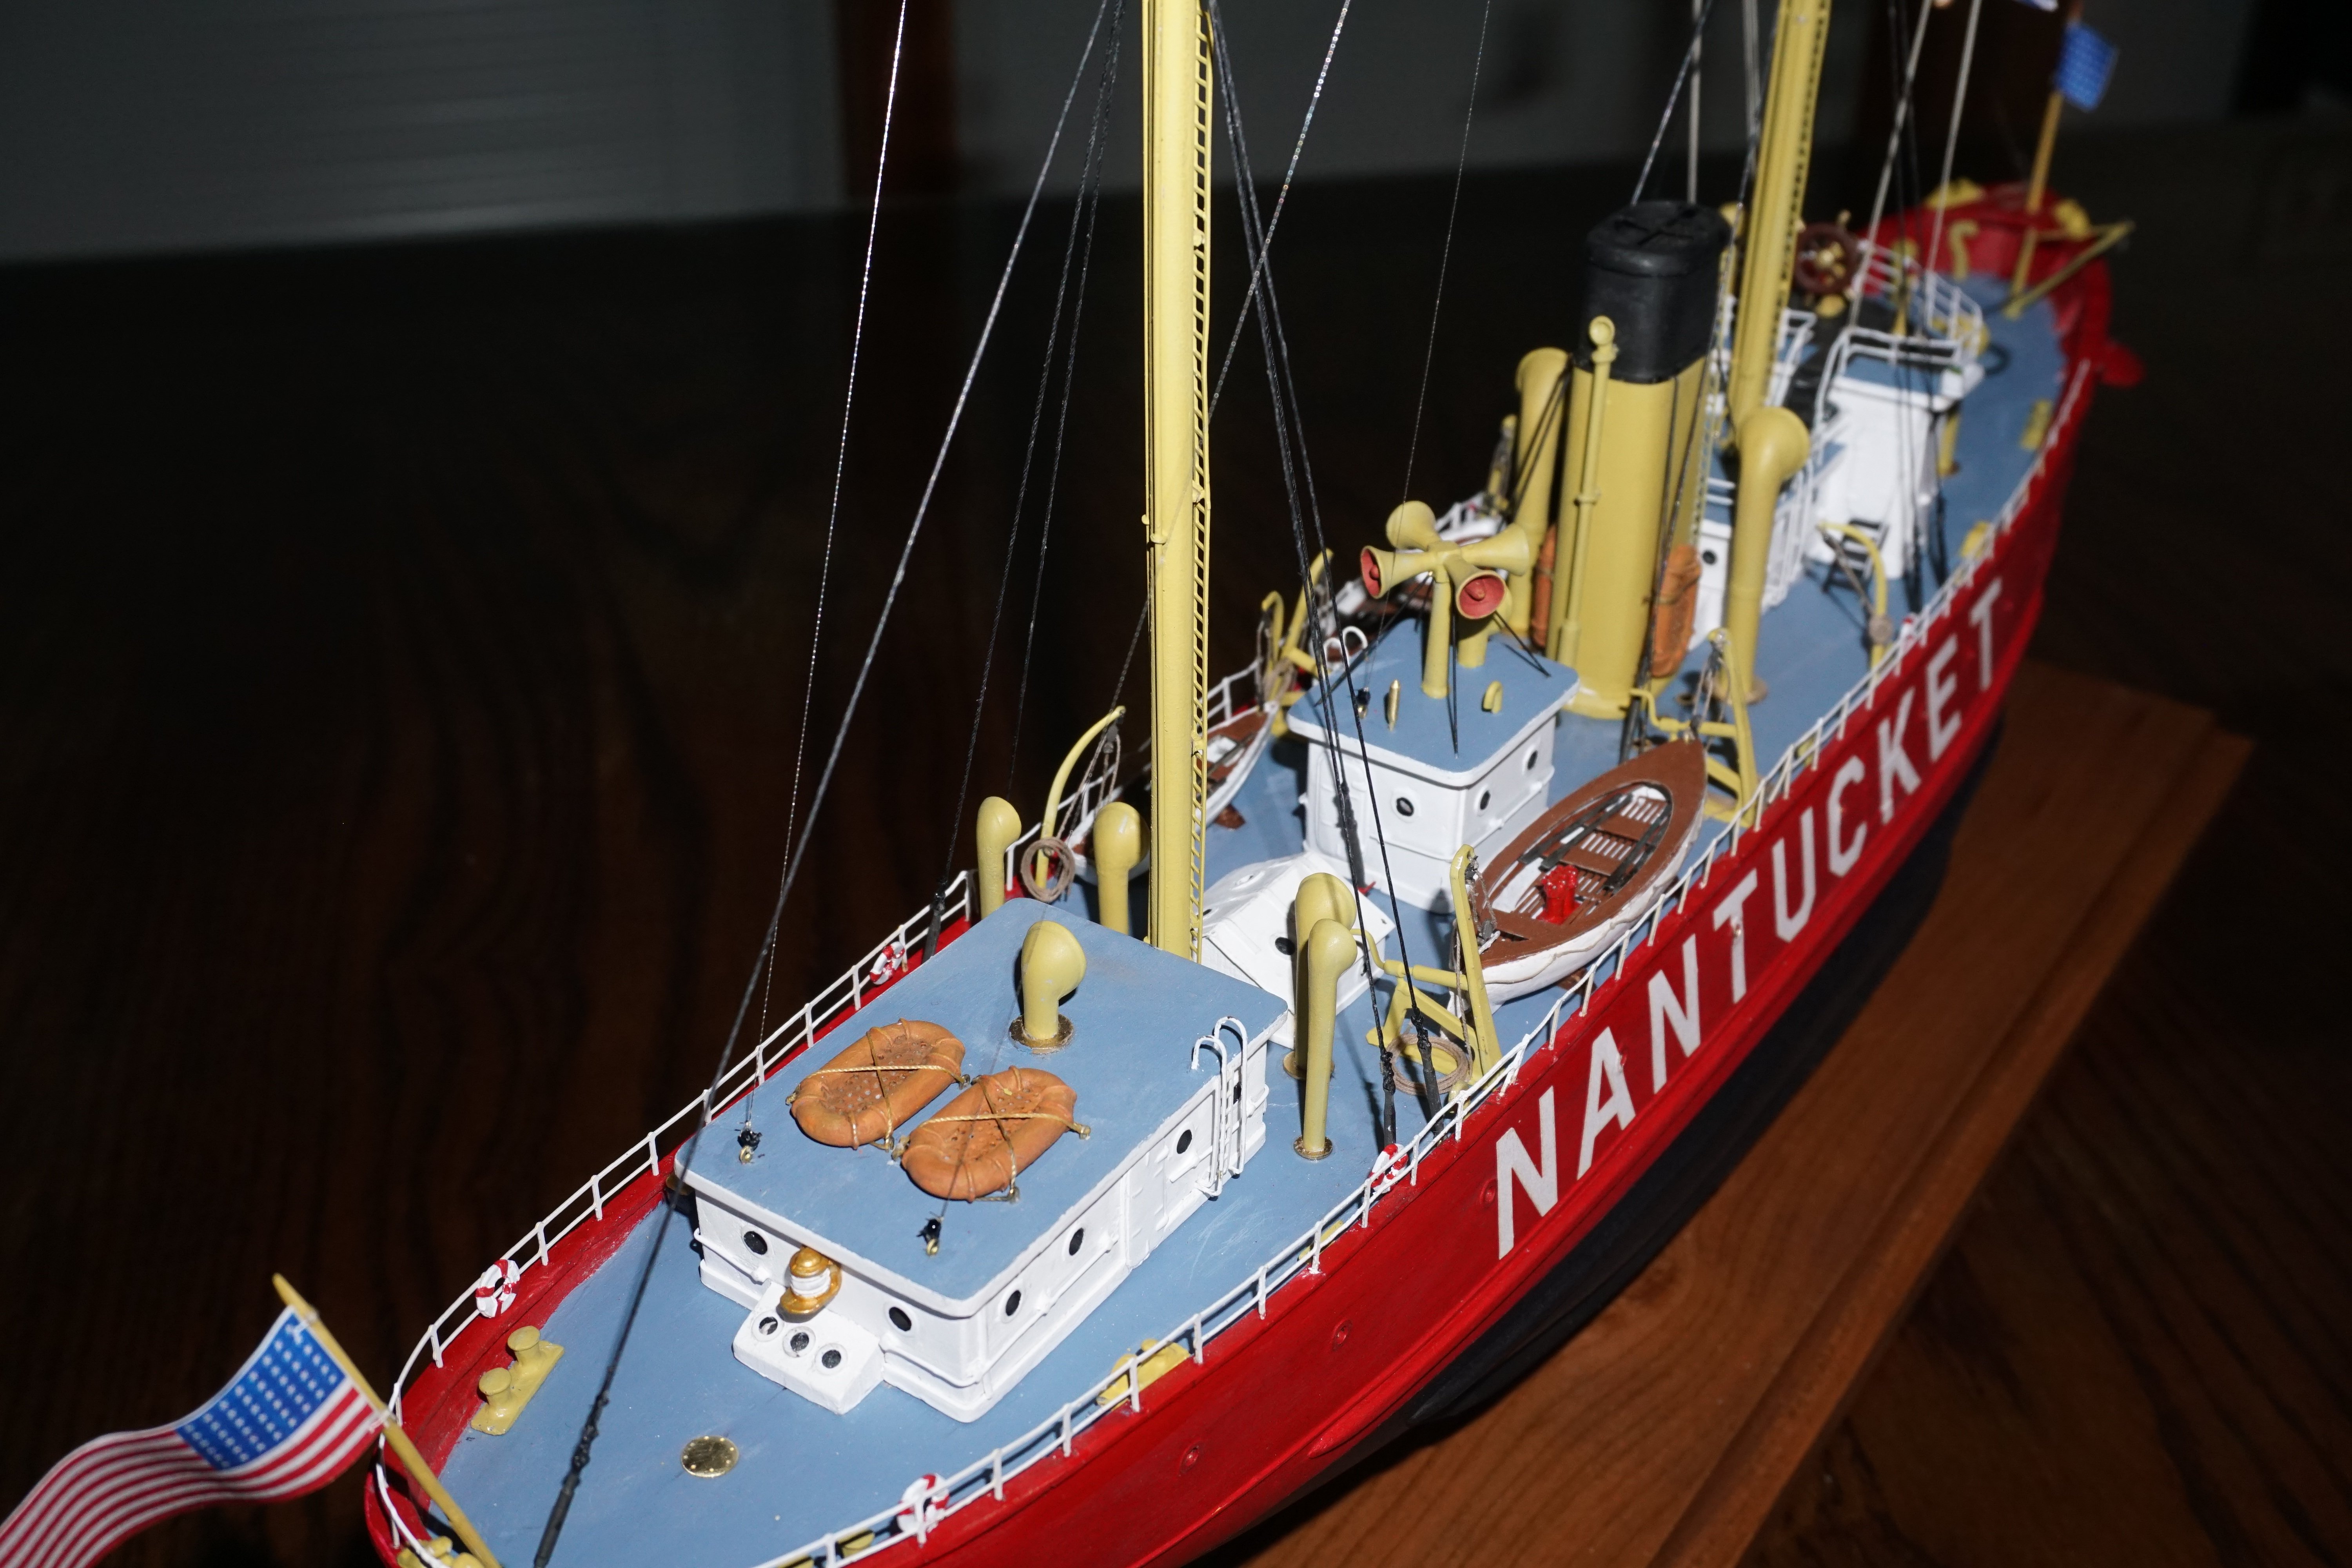
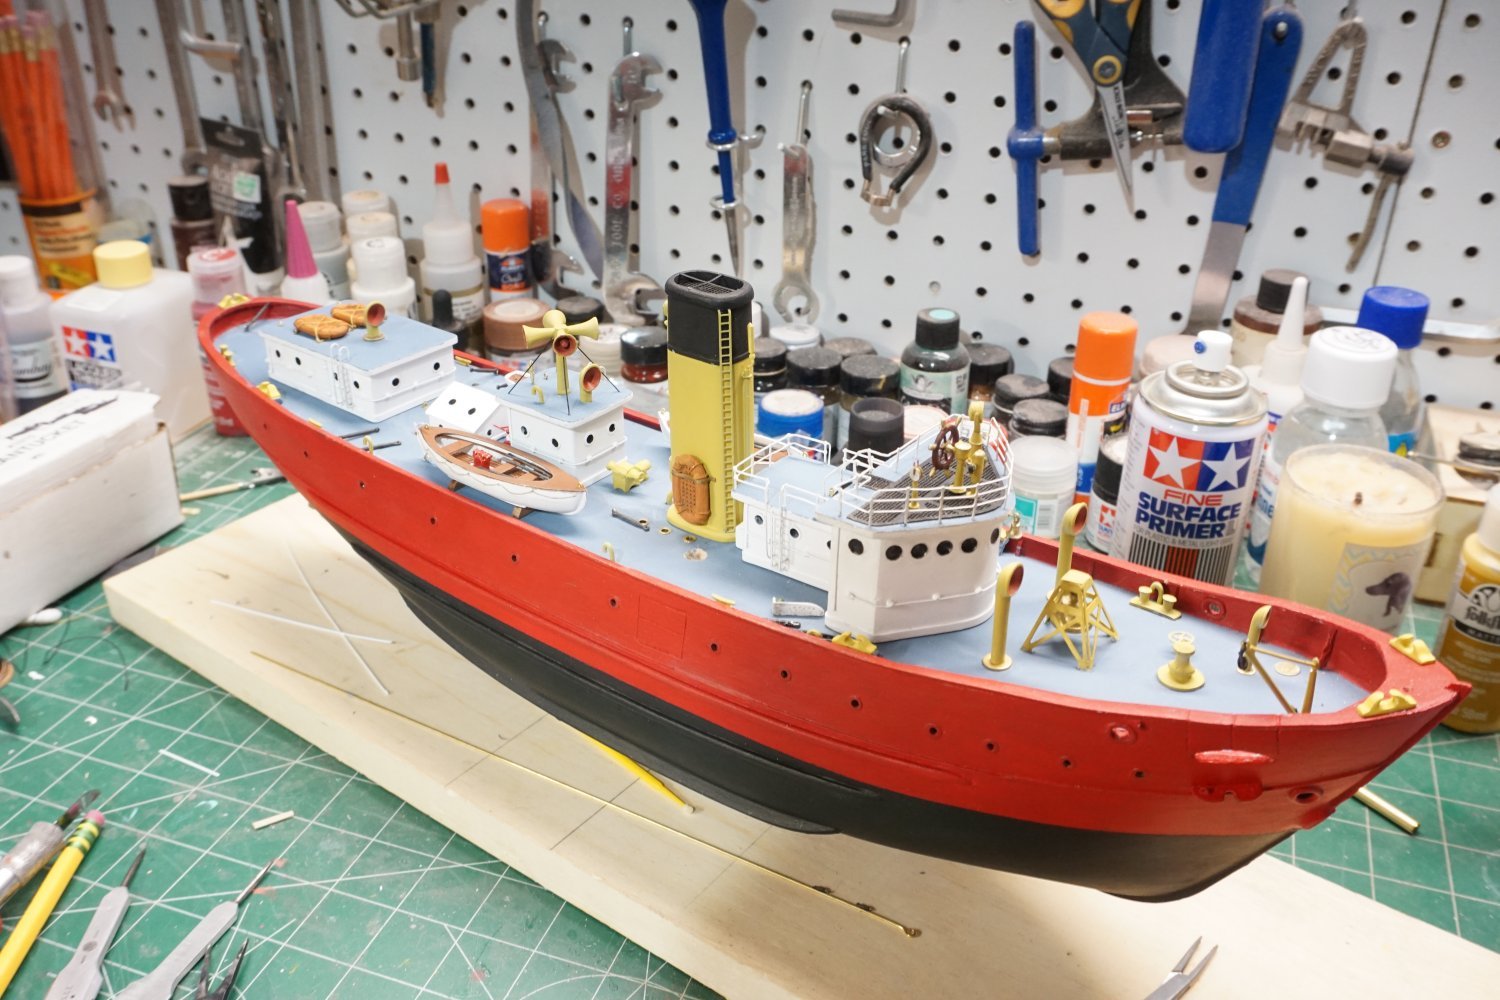
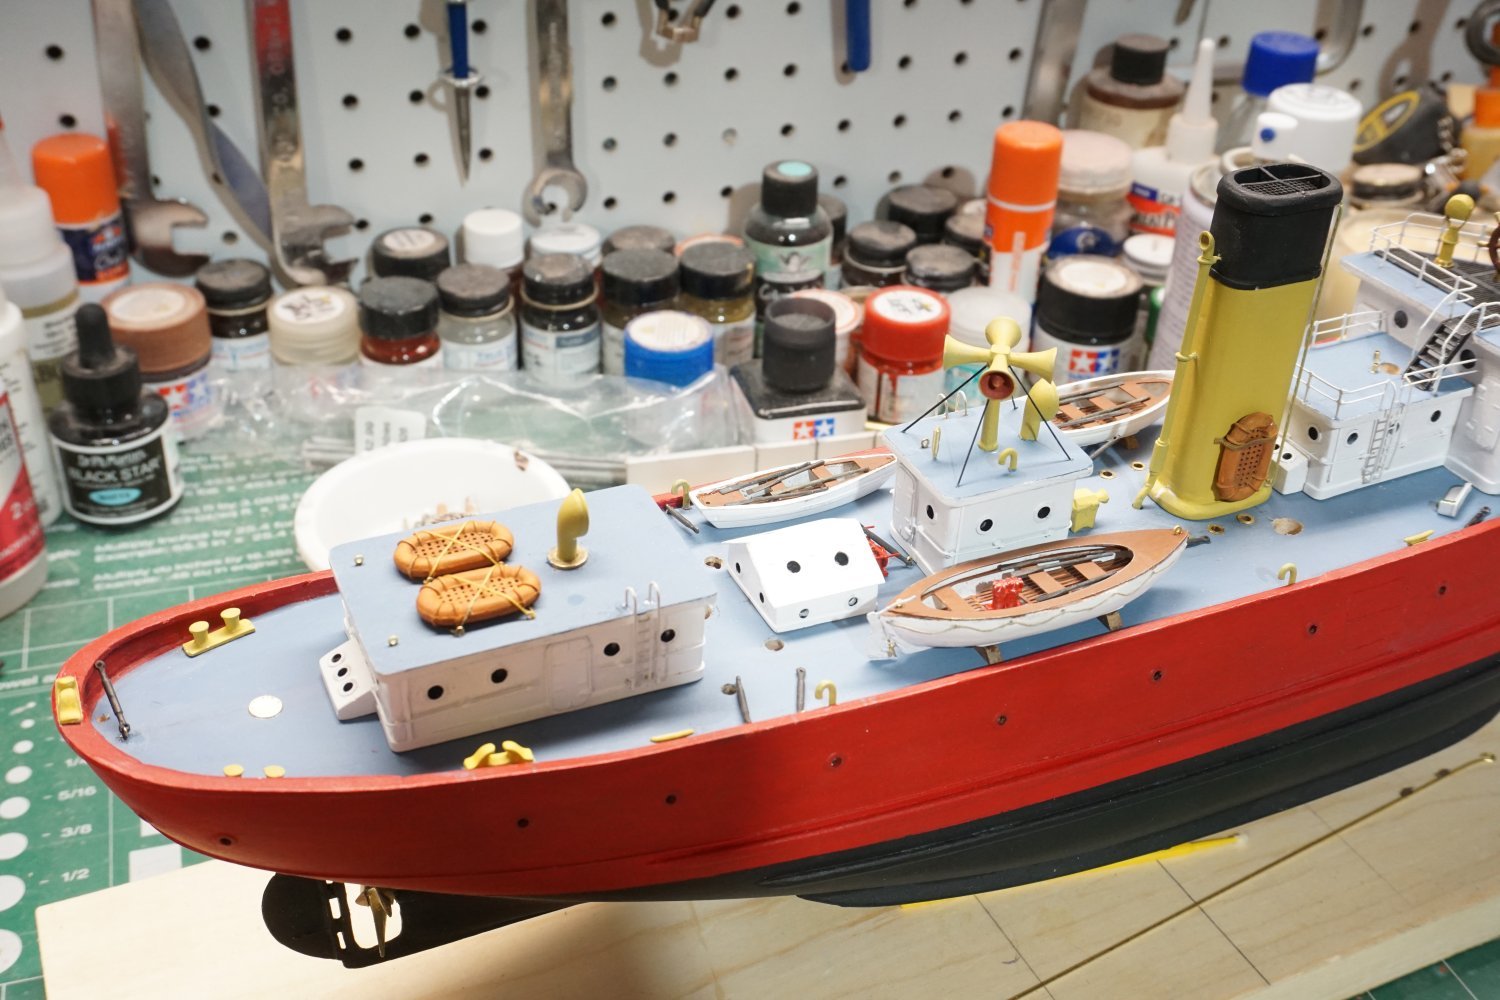
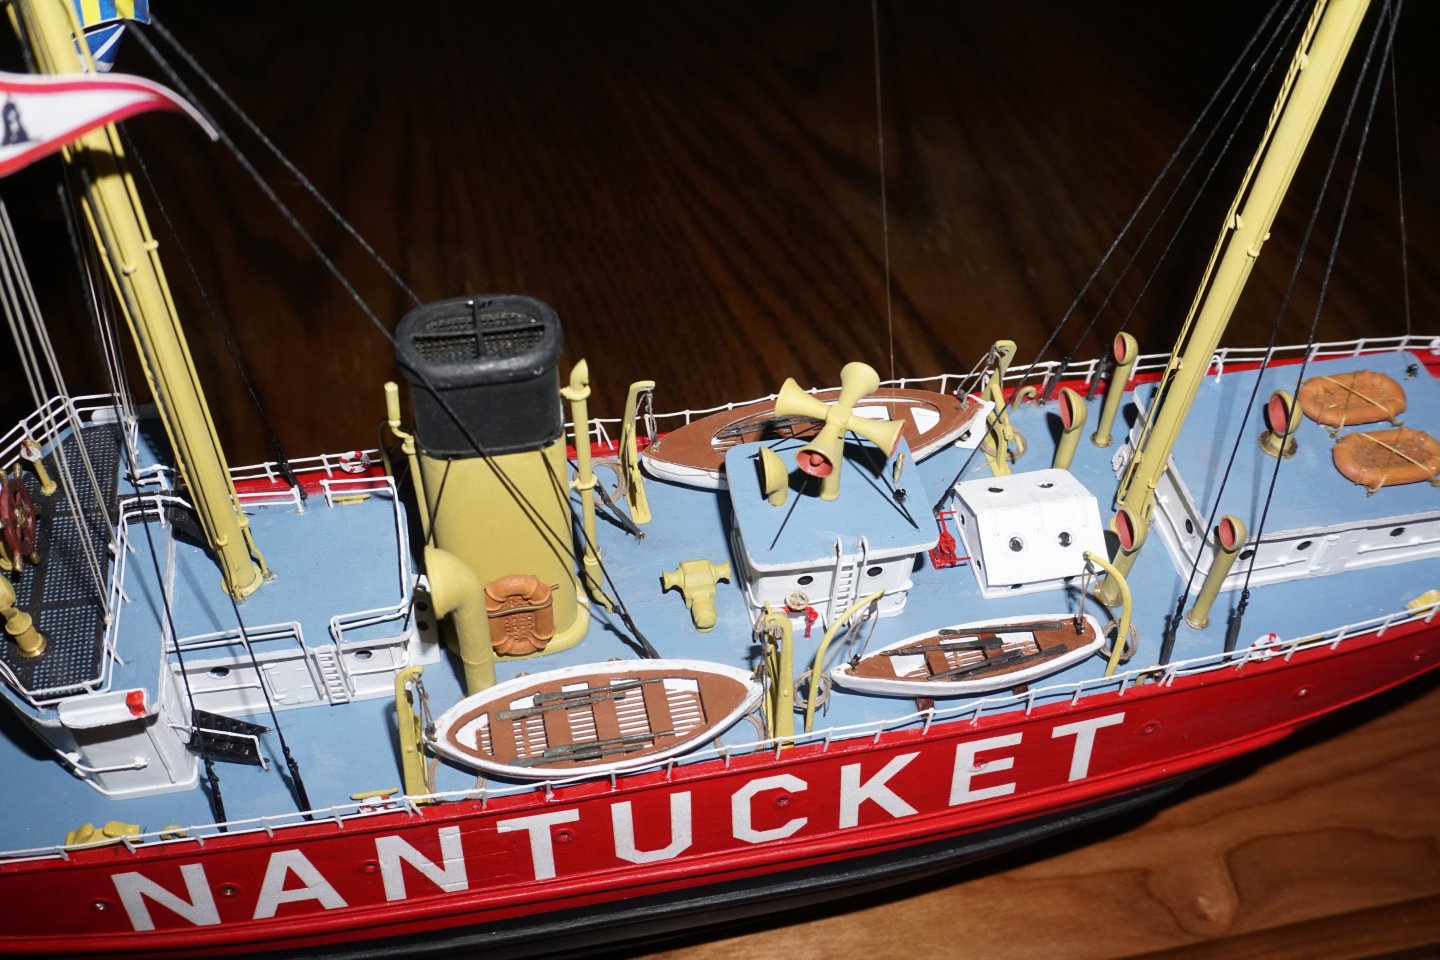
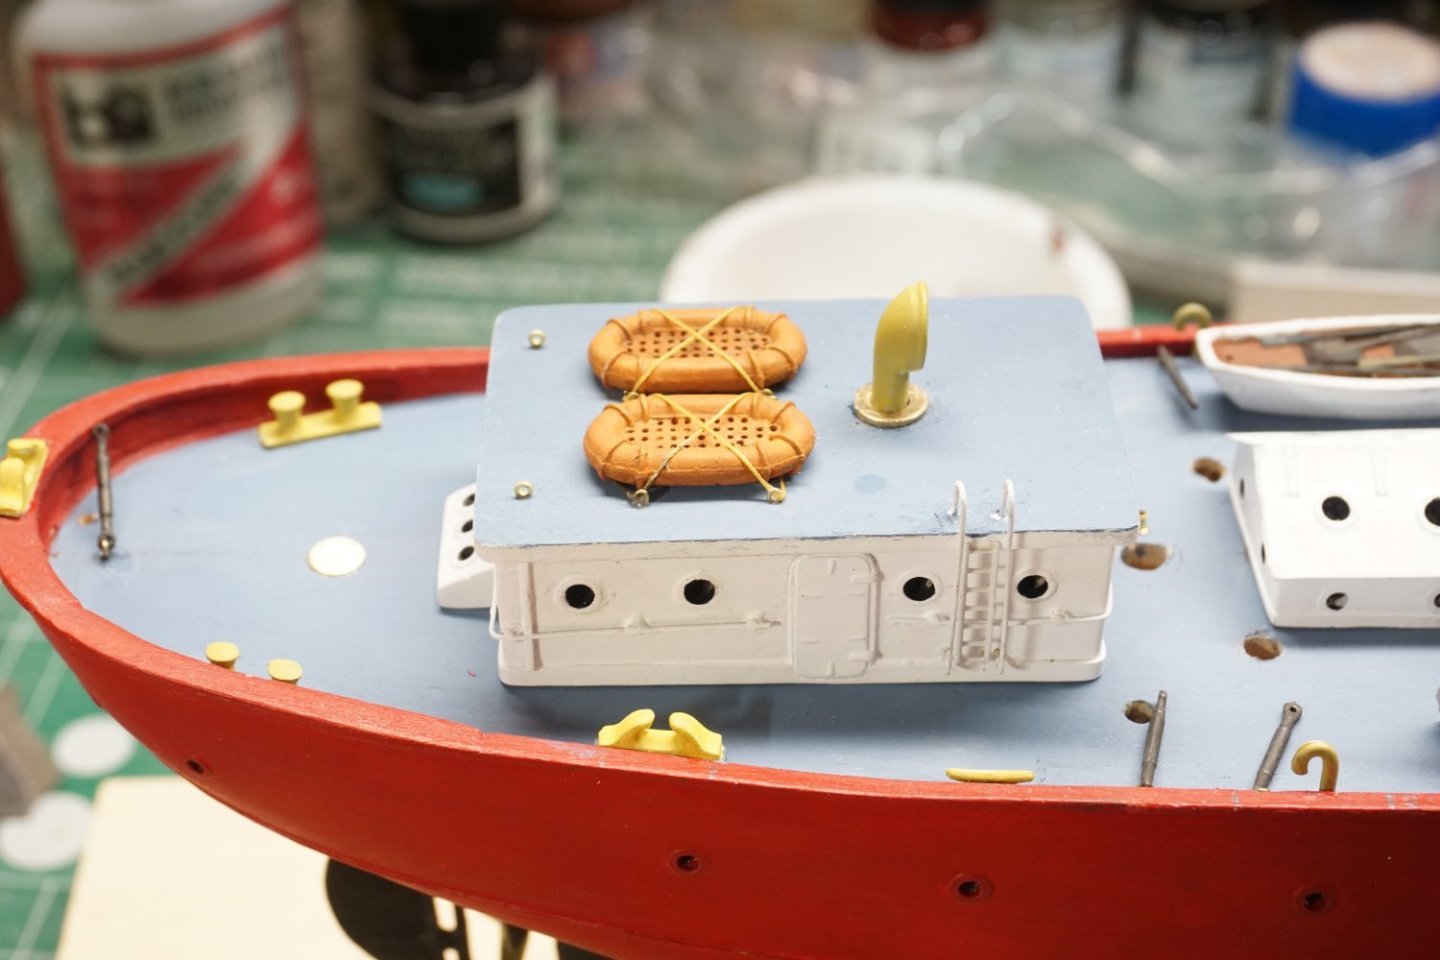
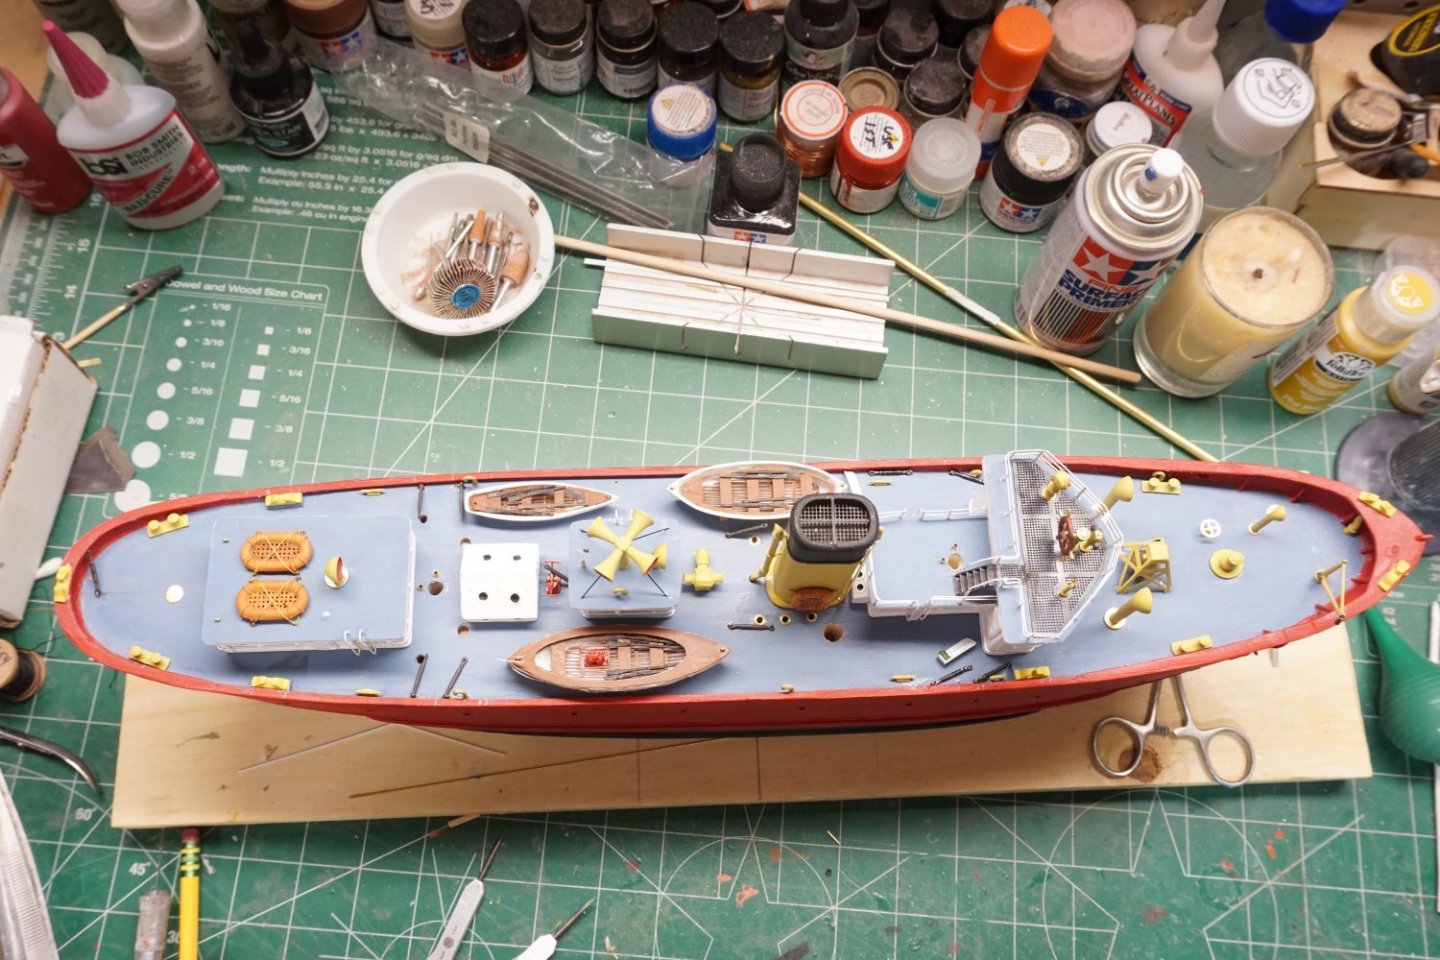
More progress on the Nantucket. Completed all deck structures. Instead of just glueing the life rafts to the radio house roof, I decided to add tie downs for more detail. I also did the extra work and made a propeller and shaft out of scrap brass for the large whale boat, made some mounting cradles out of hardwood as well. I'm probably wrong on my color choice for the boats flooring and benches as it was supposed to be the deck grey, but I went with red brown instead as I like the look. At this point in my build the only deck structure that is glued down is the small engine room skylight, everything else is just positioned in its location. Currently working on the boats davits then it will be on to the masts and rigging. I'm really enjoying this build but looking forward to the finished product.


- 29 replies
-
- 9
-
-
- Nantucket Lightship
- BlueJacket Shipcrafters
- (and 1 more)
-
Very Nice!! Congratulations!!
-
Thank you and glad you like it so far. The kit that I have is supplied with .020' x .020" styrene plastic for the drainpipe and .020" x .10" styrene plastic for the baseboards.
- 29 replies
-
- 2
-
-
- Nantucket Lightship
- BlueJacket Shipcrafters
- (and 1 more)
-
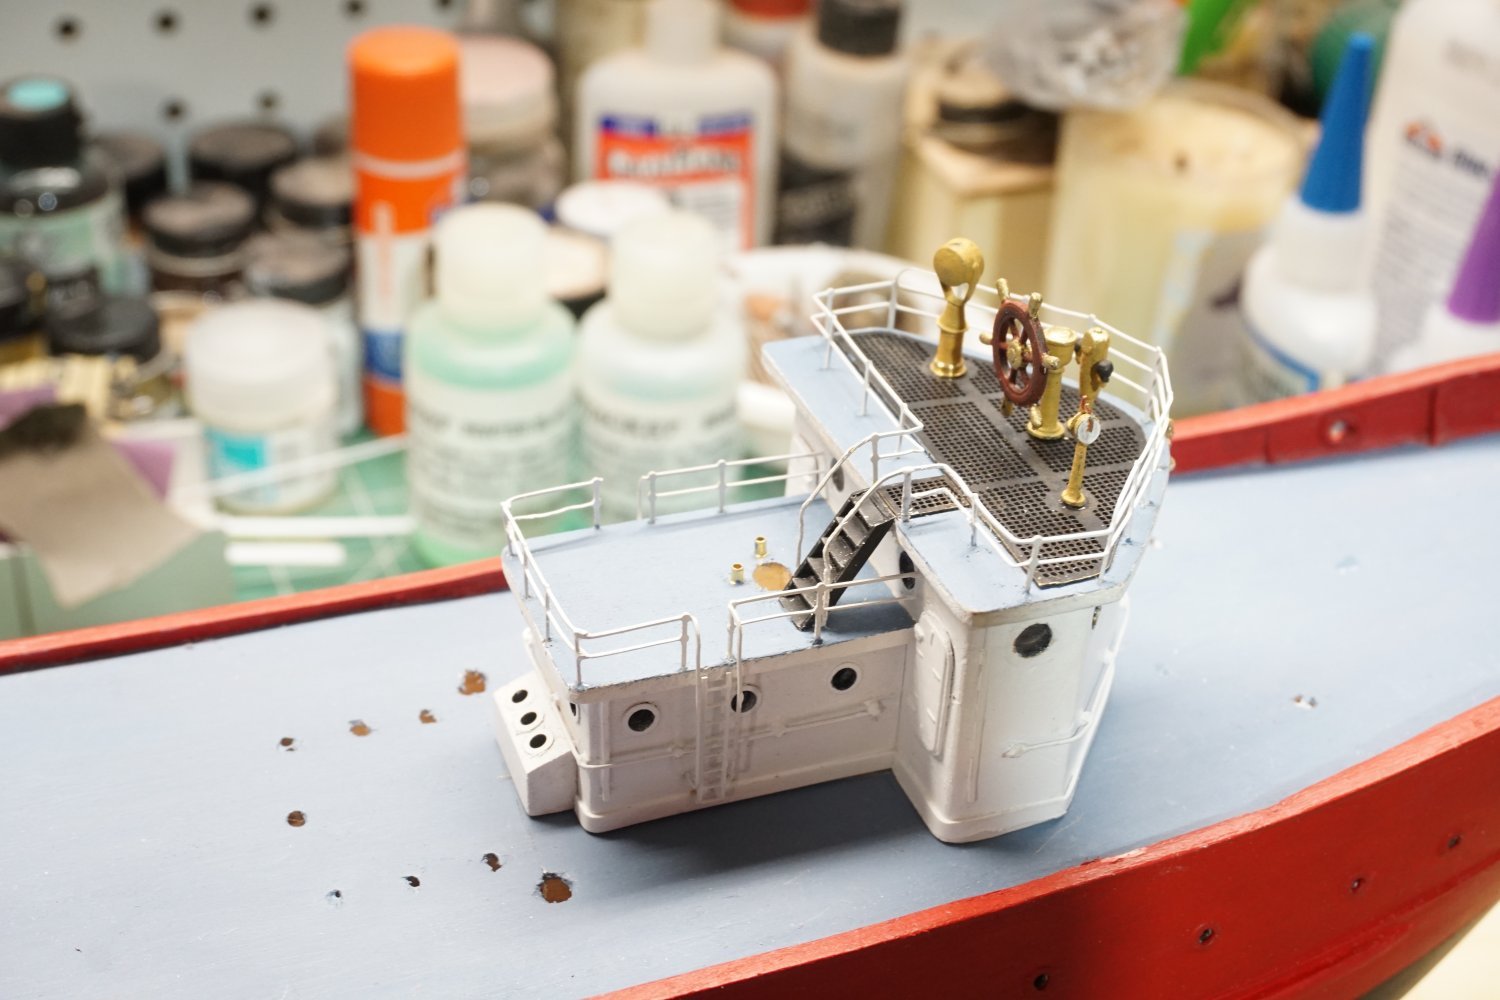
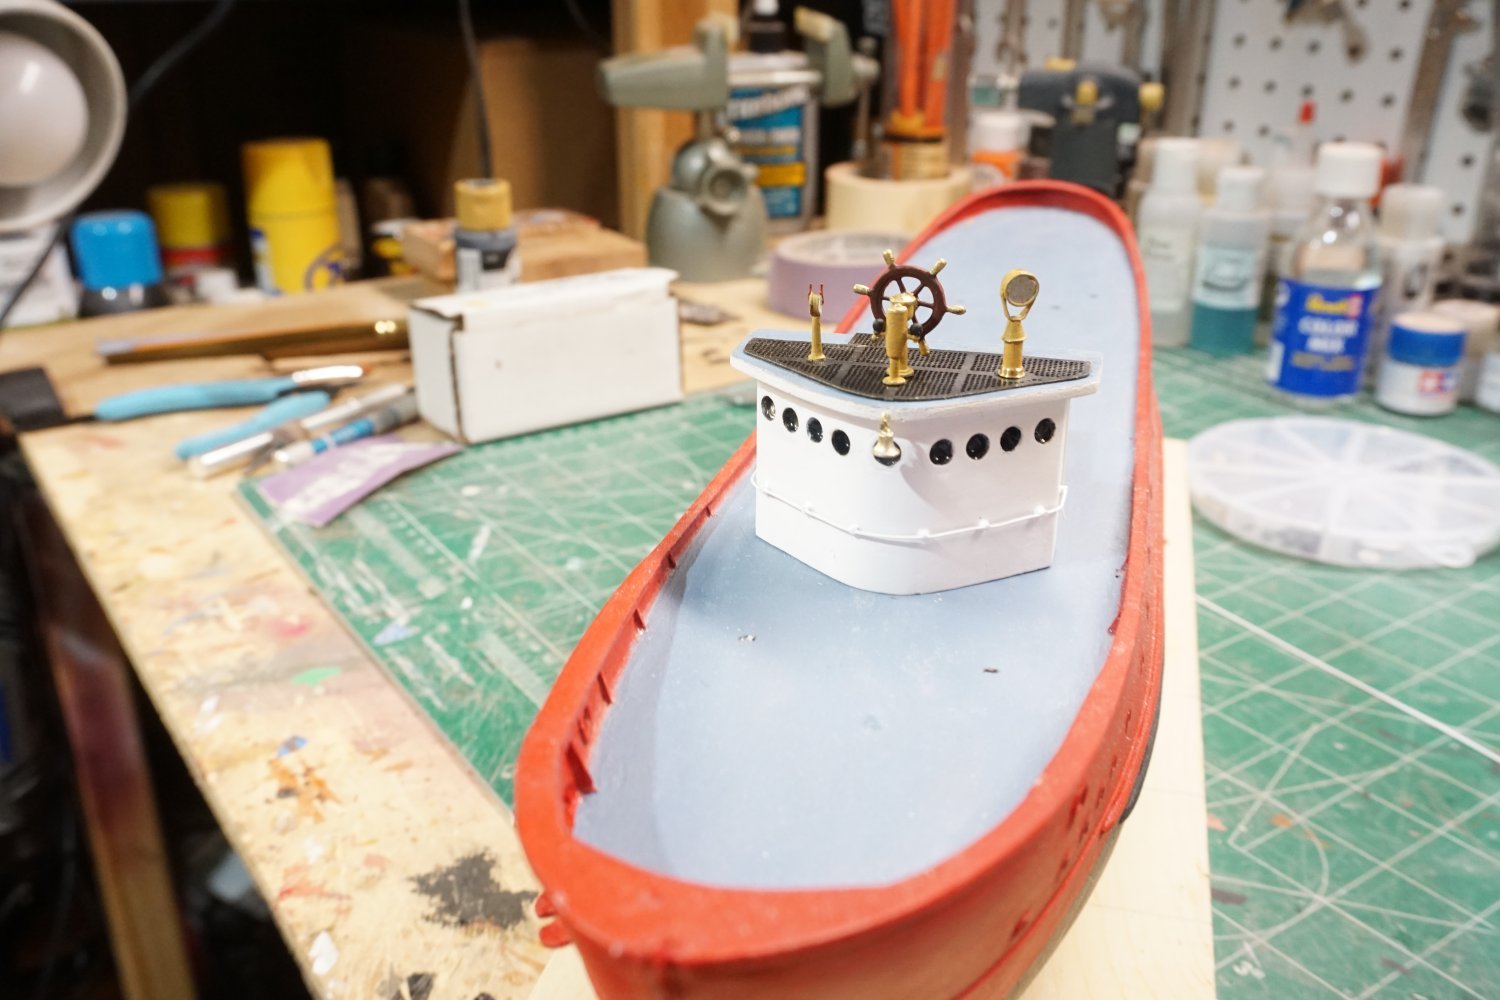
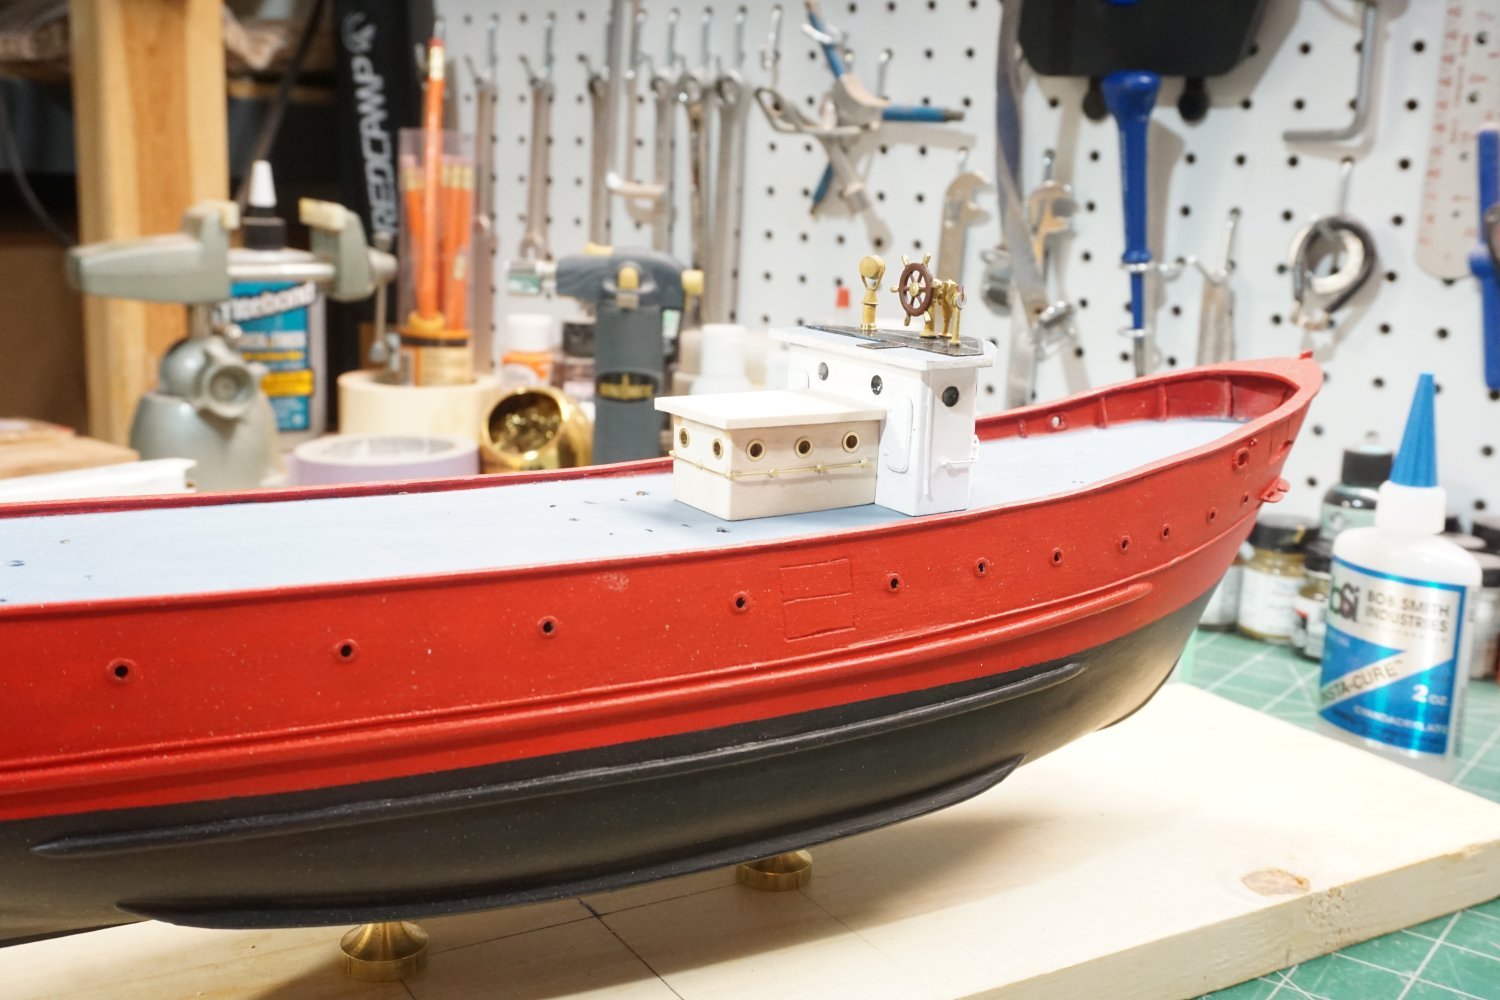
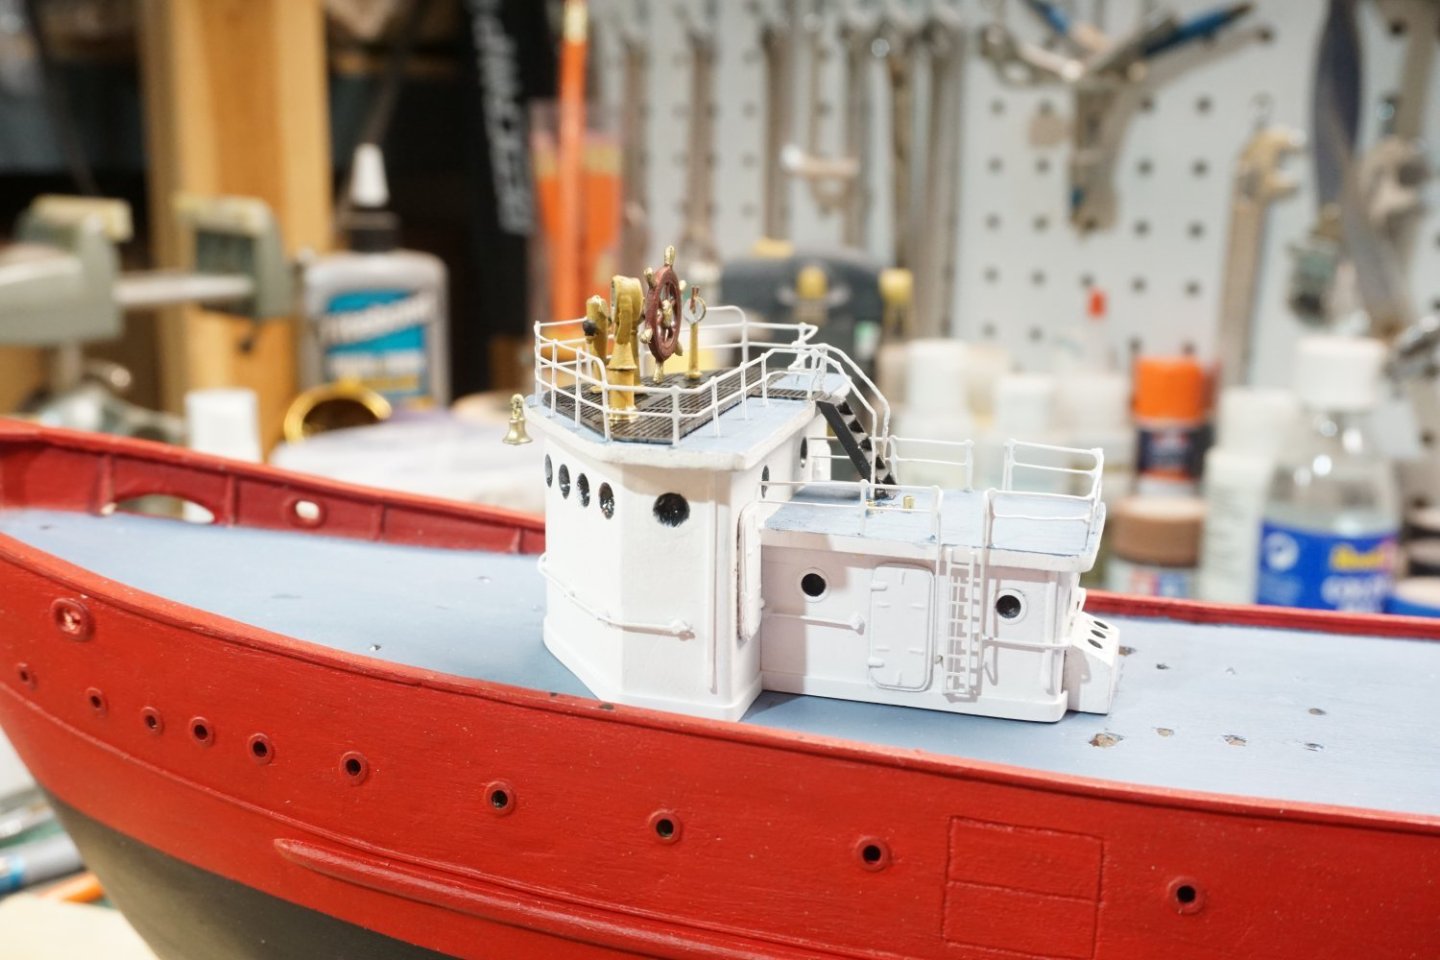
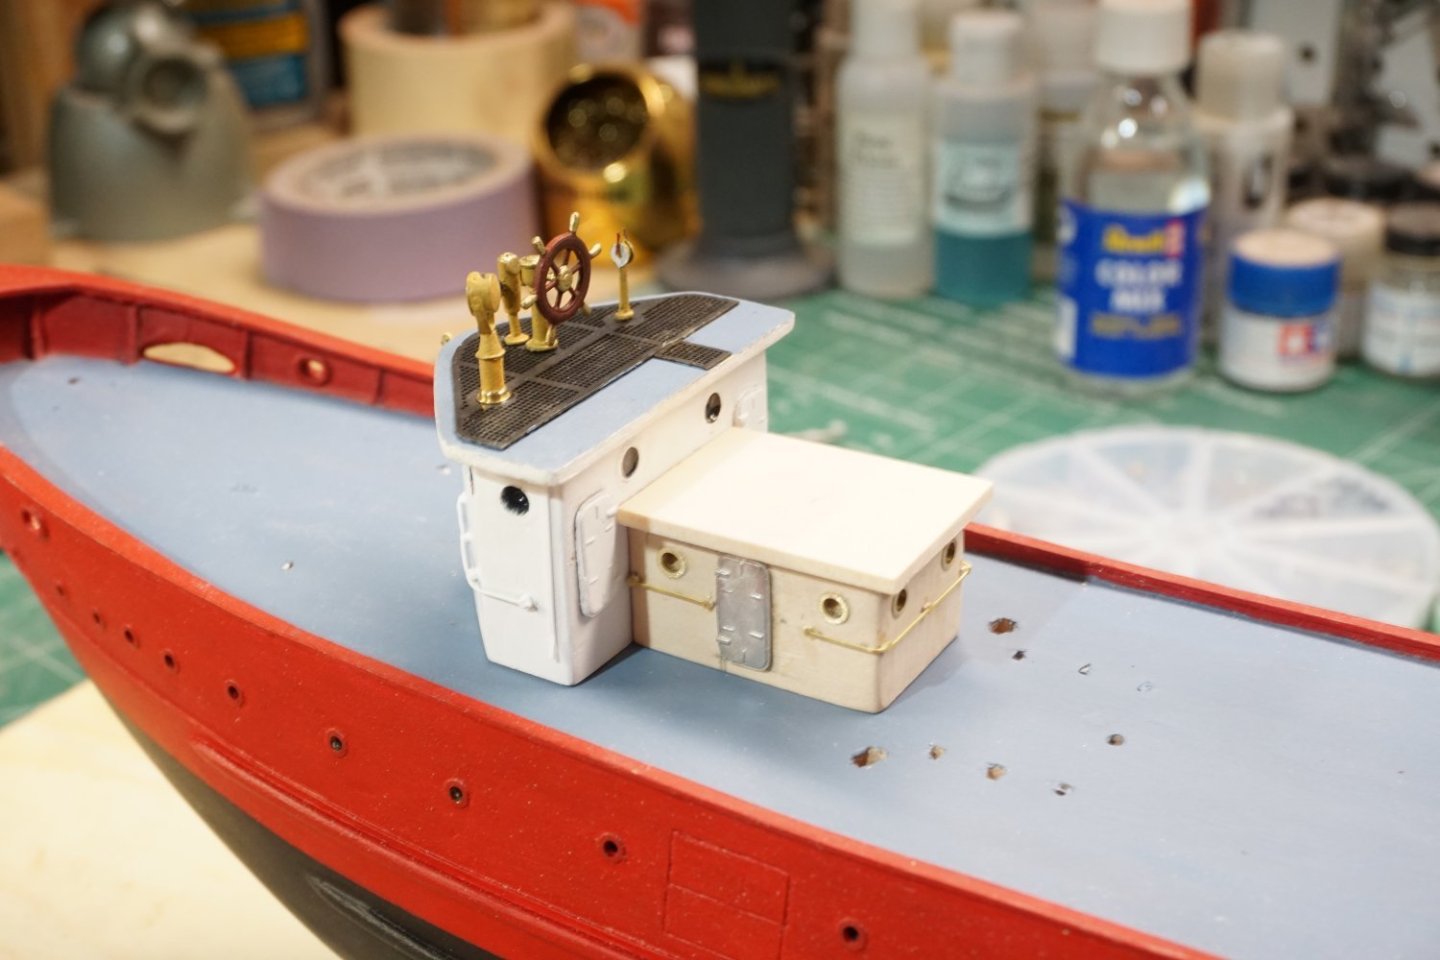
I spent several hours yesterday and today finishing up the pilot house and forward deck house. After bending the brass railings to fit, (which took a lot of persuading), I sprayed them with Tamiya flat white primer and set aside to dry. Installing the railings were a little tricky but came out Ok. The port and starboard lights is the only thing left and I will install these later. The photos show I need a little touching up to do around the pilot house side portholes which I will take care of as well. Now it is on to fabricating the stack.

- 29 replies
-
- 8
-
-
-
- Nantucket Lightship
- BlueJacket Shipcrafters
- (and 1 more)
-
Made some progress on the deck structures. The Pilot house was a challenge with all the portholes so close together, I had to be careful here using my Dremel tool. For the railings, I used a tiny piece of plastic strip behind the photo-etched railing to keep it away from the sides of the structures. to simulate the porthole glass, I used Microscale Kristal Klear. Not in the photos are the completed steps going into the pilot house and up to the bridge deck which I will add later in the build. The structures are not glued down yet just checking the alignment and taking measurements as I still have to spray paint the forward deck house.


- 29 replies
-
- 8
-
-
- Nantucket Lightship
- BlueJacket Shipcrafters
- (and 1 more)
-
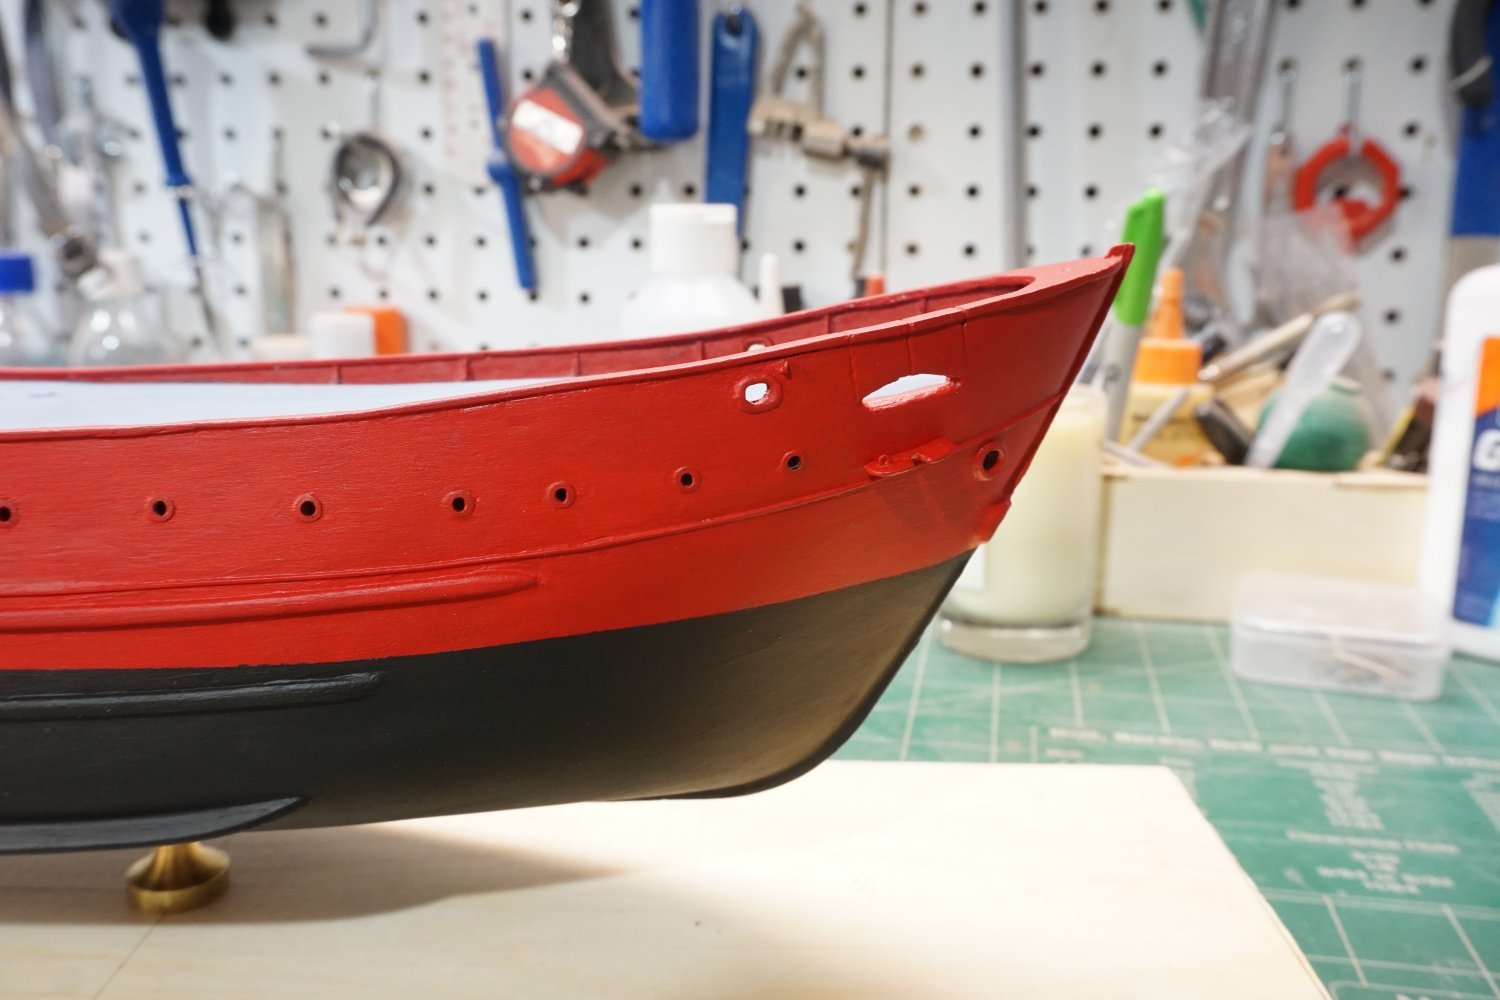
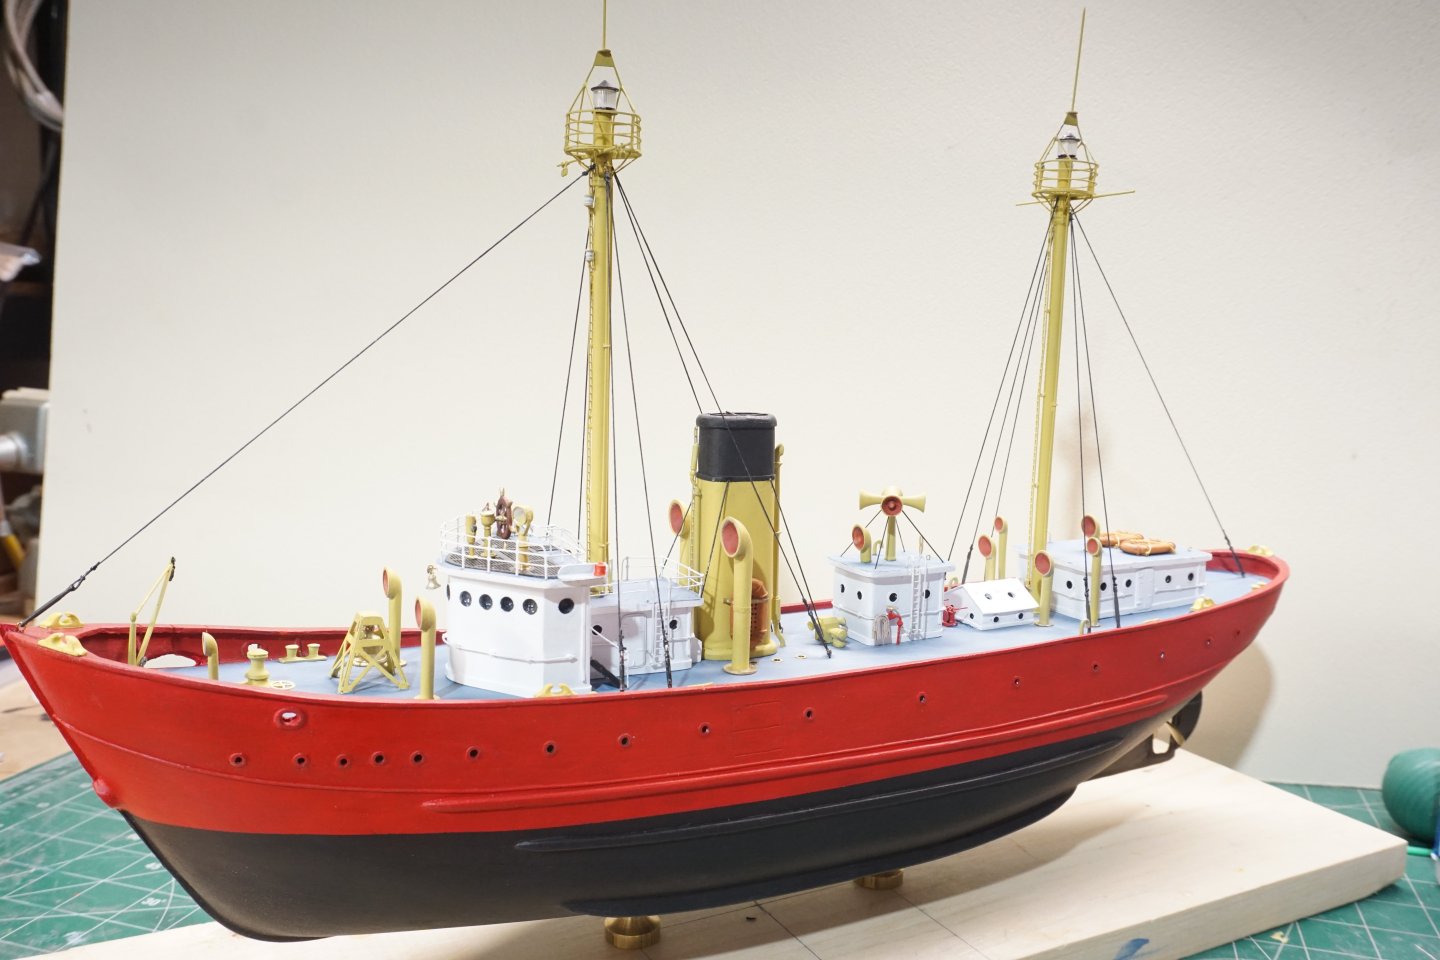
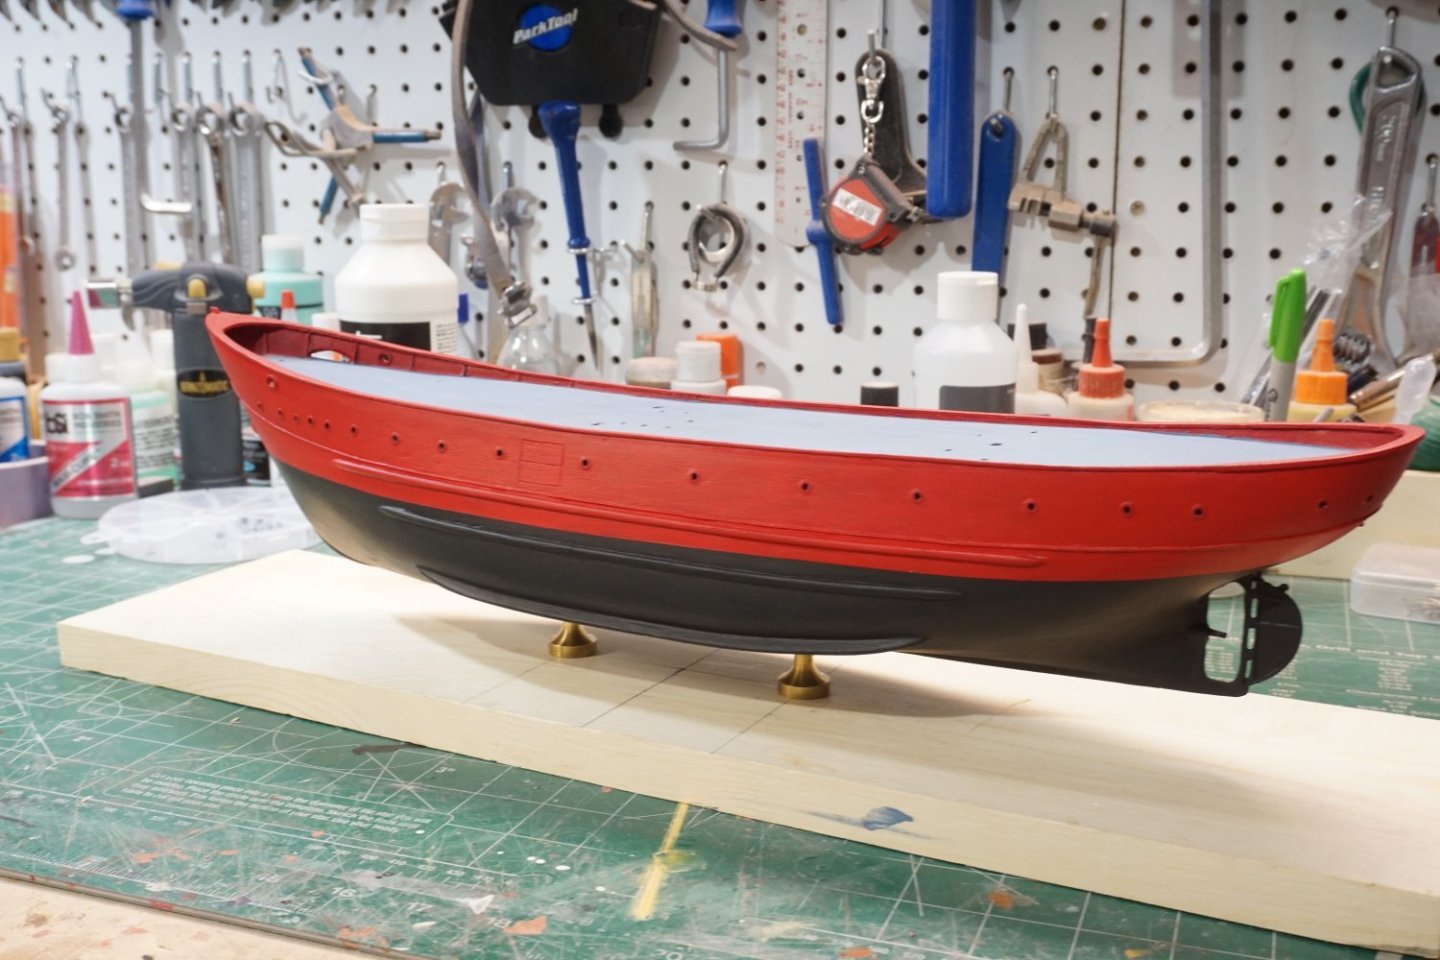
Installed rubbing strakes and bilge keels and then cut out the starboard slot for the spare anchor. After lots of sanding and some filling I brush painted 2 coats of Liquitex white gesso as a primer. Did some light sanding with 400 grit after gesso was dry, then I brush painted 3 coats of Liquitex red and black thinning with Liquitex matte medium to improve the flow. I normally use an airbrush, but this time I thought I would brush this as I was curious about the end result using the Liquitex acrylics. Brush strokes are minimal, and I am pleased with the end result. After dry I mounted the hull to its temporary base.

- 29 replies
-
- 7
-
-
- Nantucket Lightship
- BlueJacket Shipcrafters
- (and 1 more)