
MORE HANDBOOKS ARE ON THEIR WAY! We will let you know when they get here.
×


Greg M
-
Posts
179 -
Joined
-
Last visited
Content Type
Profiles
Forums
Gallery
Events
Everything posted by Greg M
-
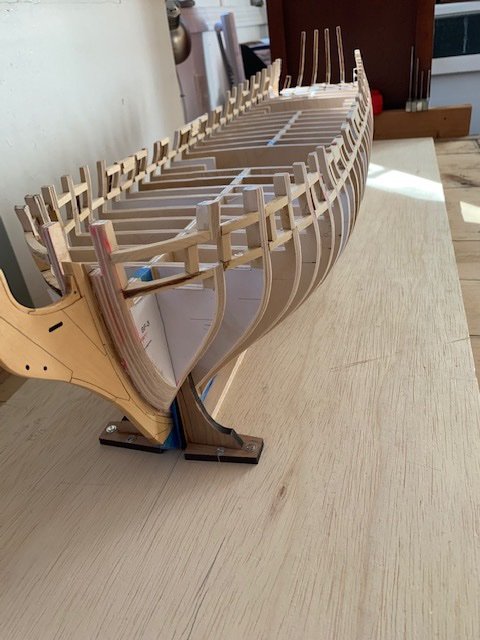
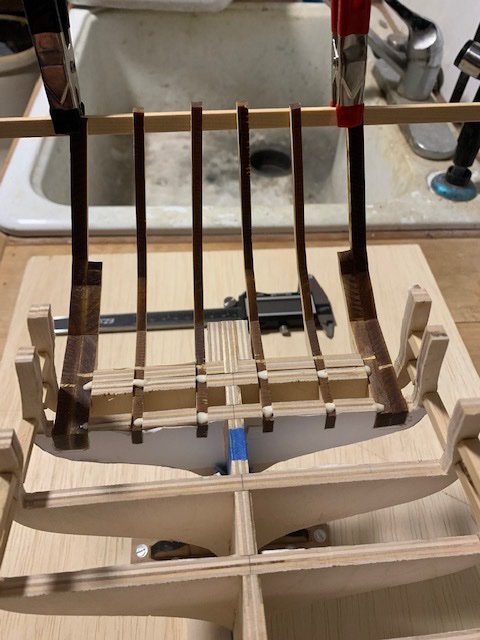
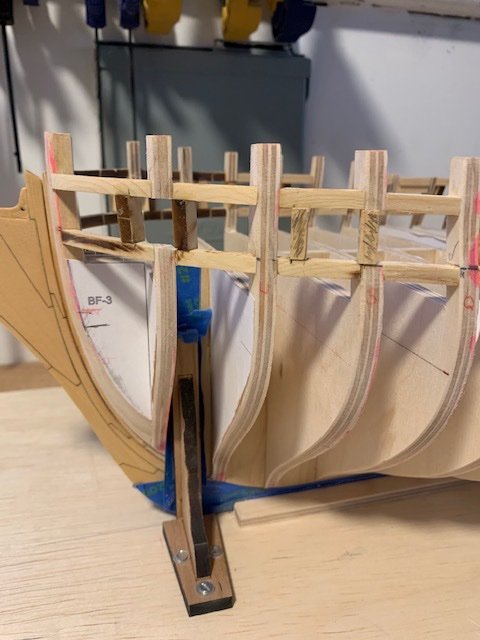
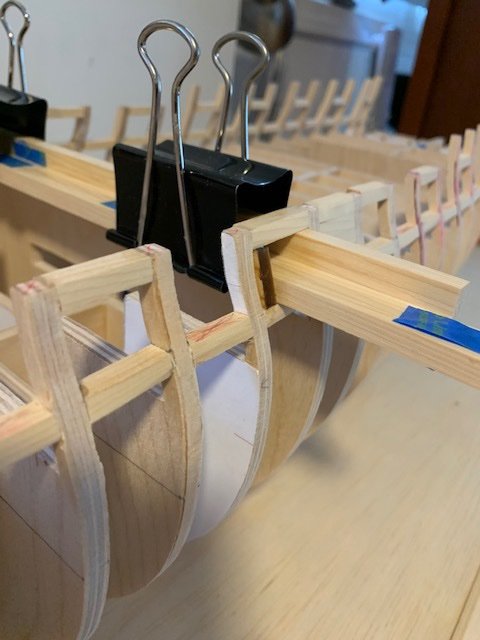
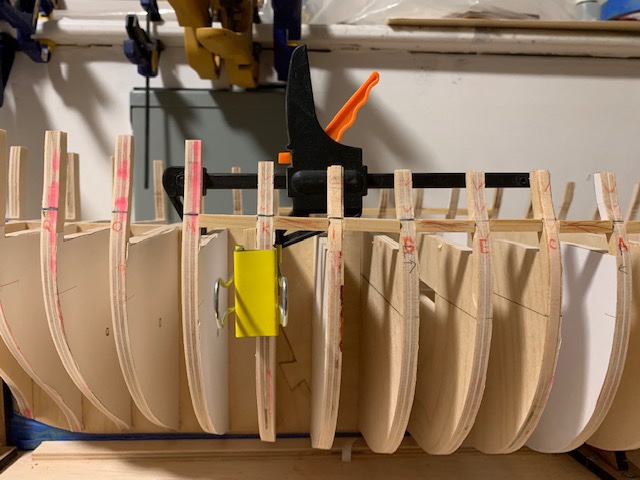
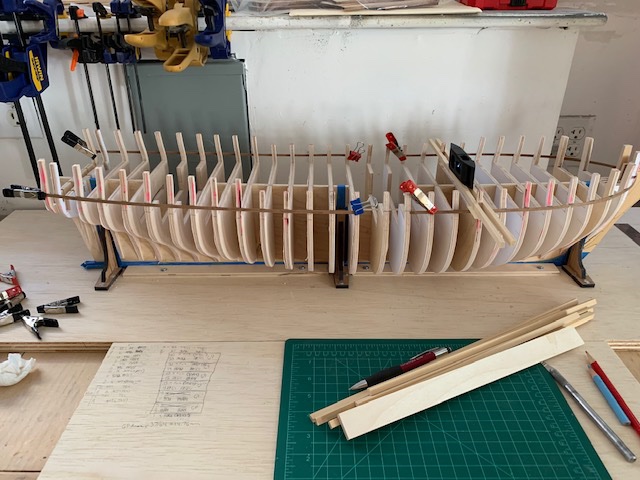
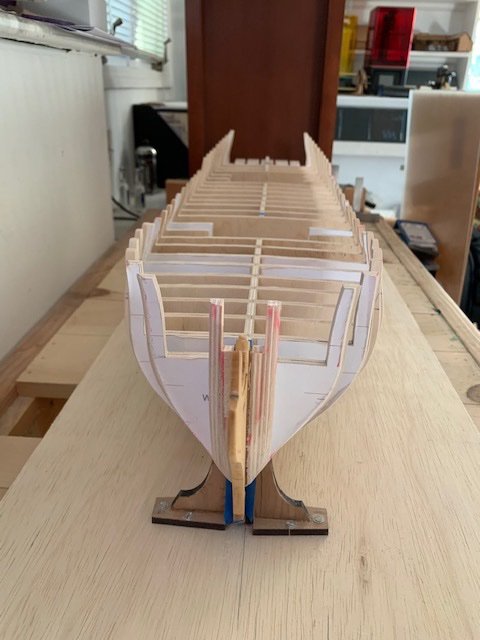
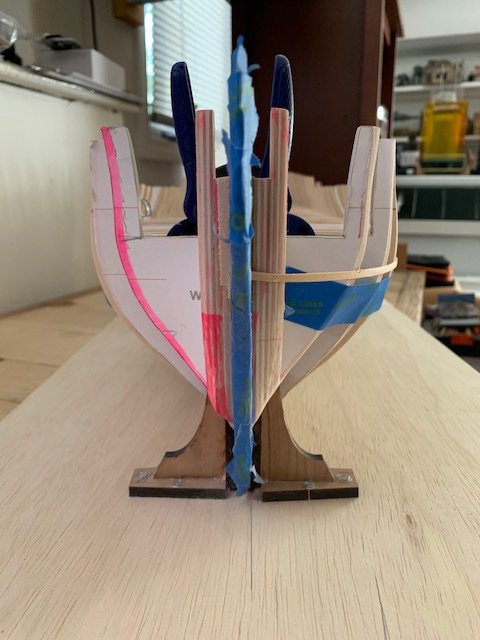
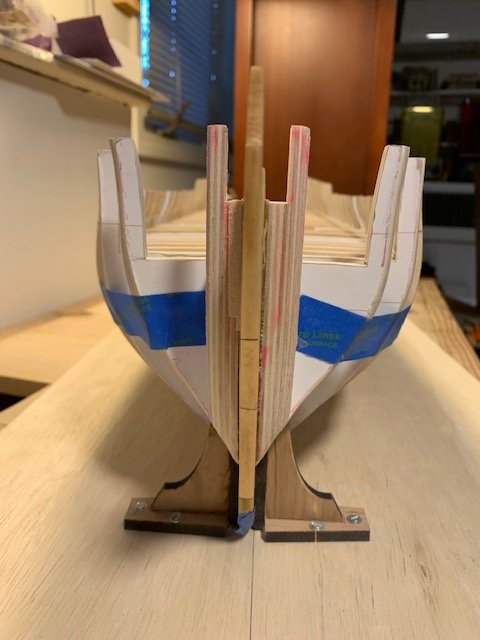
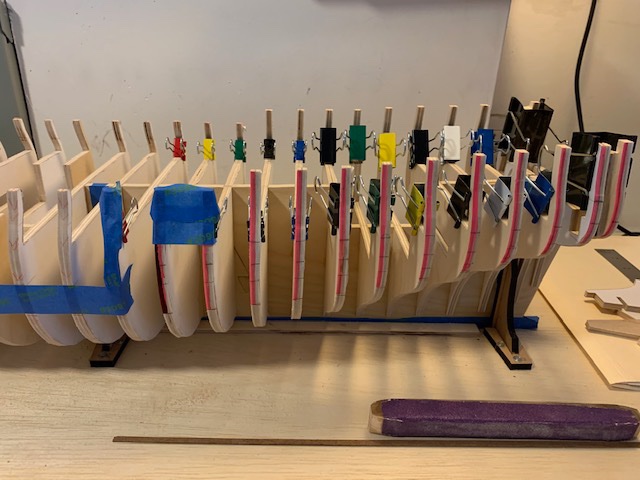
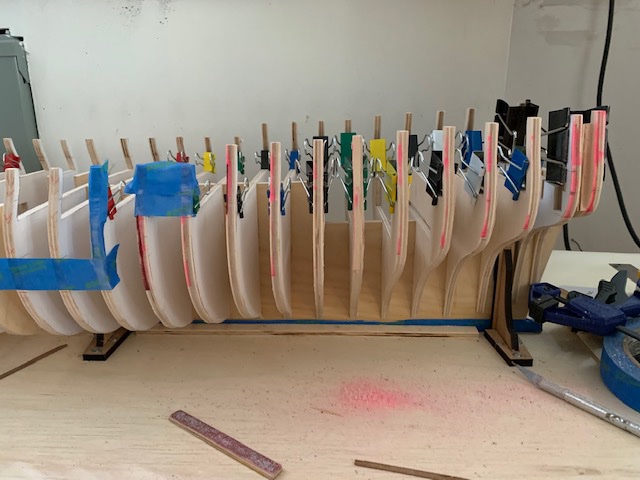
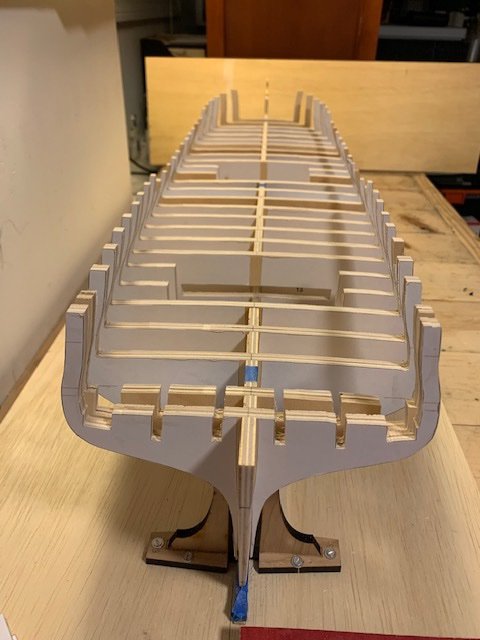
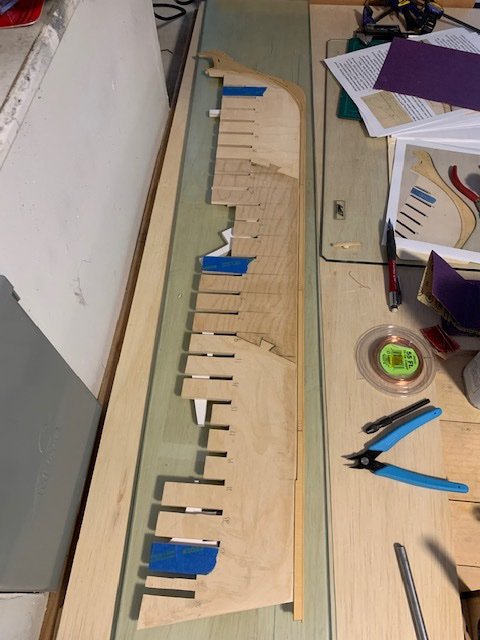
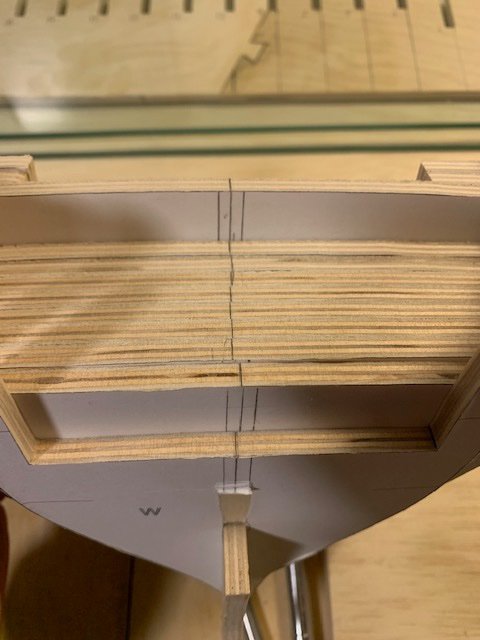
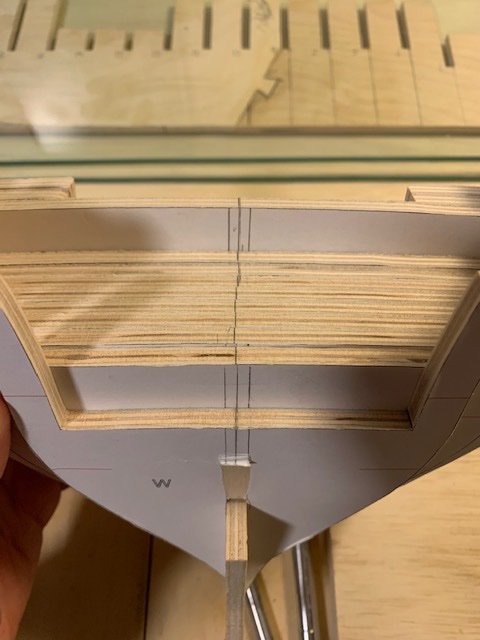
Great progress. The uprights faired up nicely. Sanding with just the pressure of my thumb did a great job of creating that slight depression in the uprights without overspending. A whole lotta sanding up to this point, but I'm super happy with the results. I've moved onto the stern. I'm trying something here as a bit of an experiment to see if it works. I set the double-frames first then clipped a batten across the tops. I then put in the four frames in between them aligned to the batten and tacked a drop of glue across frames 27 and 28 at each frame. I'm going to let this dry overnight, but I think this should keep any frame from rising or dropping as I install the transoms sills and worst case if it doesn't work, it should be easy to chip out the glue and restart without causing any damage.
-
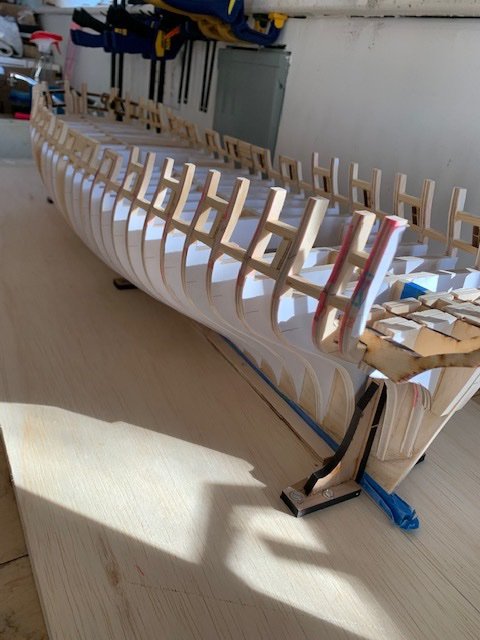
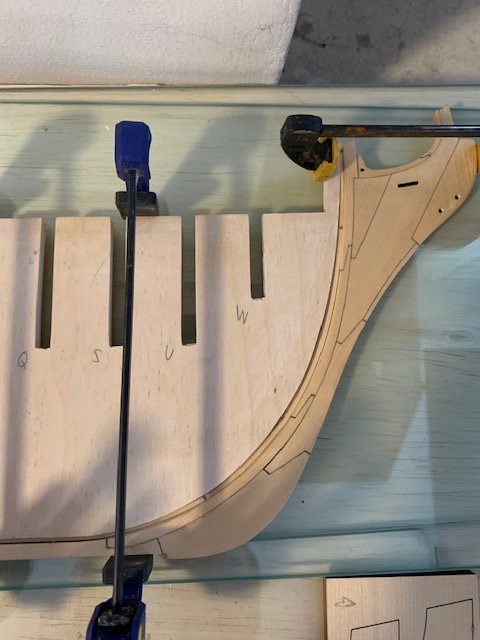
Thank you all for the likes. Quick update, which is more around a tip for anyone just getting going. I installed all the gun port uprights today. As I moved towards the ones in the bow that need to have the bulkheads cut, I removed starboard bulkhead S first. I thought everything was great until I went to install the gun port upright and noticed that it was a touch too long so it had pushed the top of the bulkhead and lintels out of alignment. I removed it, but due to lack of support it broke apart everything between bulkhead Q and U above the sills. It became a puzzle and took a bit of time to get everything back together and properly squared up, but it came out all right in the end. Simply installing a temporary piece between (W and U) and (Q and S) allowed me to cut through and install all the other upright without any problems. Then I just removed the temporary support with a set of needle nose pliers after sanding and installing the upright. Having a support under each side of the lintel was enough to stabilize everything. Also, discovered that hand backed 150 grit (sheet of sandpaper cut into a third, then folded into thirds) works awesome for sanding the gunport uprights without messing up the sills. I just need an hour or two to fair all the gunports and then onward to the stern.
-
Thanks Matt. I'm finding slowing down, taking my time measuring and writing it all down is keeping my enthusiasm up more than if I just kept moving. A lot less time doing things 2 or 3 times. Still making some mistakes and having to redo things, but much less than usual and it's not nearly as discouraging. I pulled out the Proxxon and what a difference it made. Probably reduced the time of cutting and sanding the lintels by a couple of hours. Fairing everything up took a bit of time and I knocked 2 or.3 pieces loose on each side that had to be fixed, but better to fix a bad glue joint now than when planking. Run looks nice from the stern. and from the bow. One question I had is I started putting in the gunport uprights and realized those will require a fair bit of fairing to the bulkhead curve as well. Any tips on fairing the uprights without messing up the sills? I'm assuming fairly high grit and patience are in order.
-
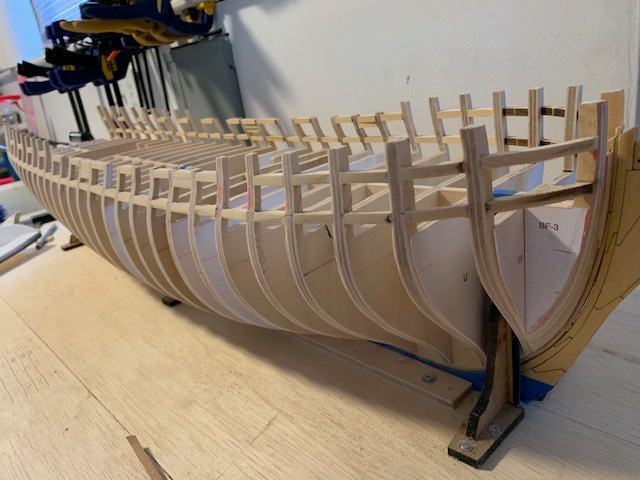
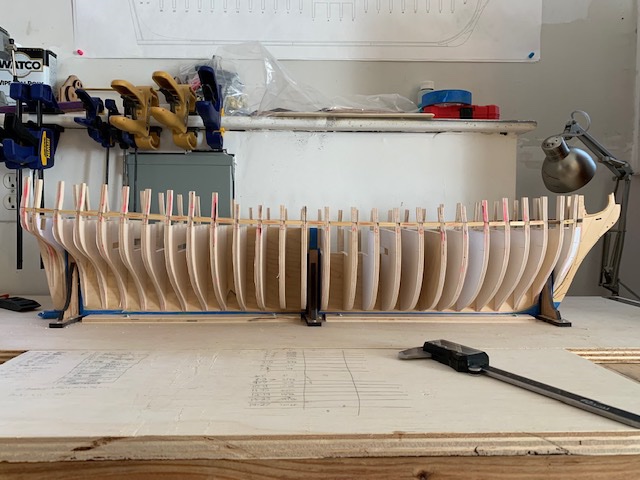
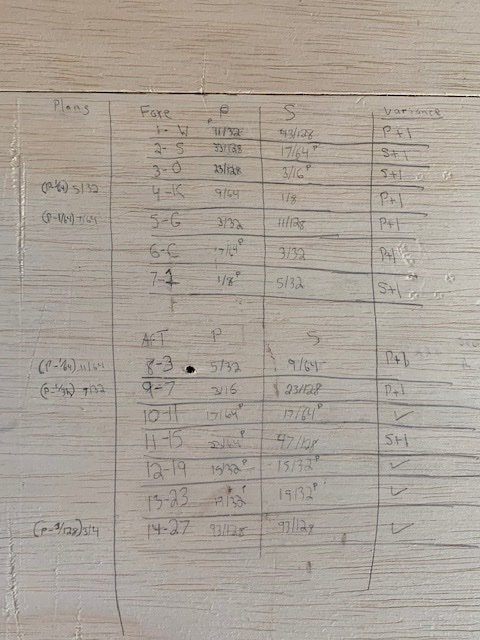
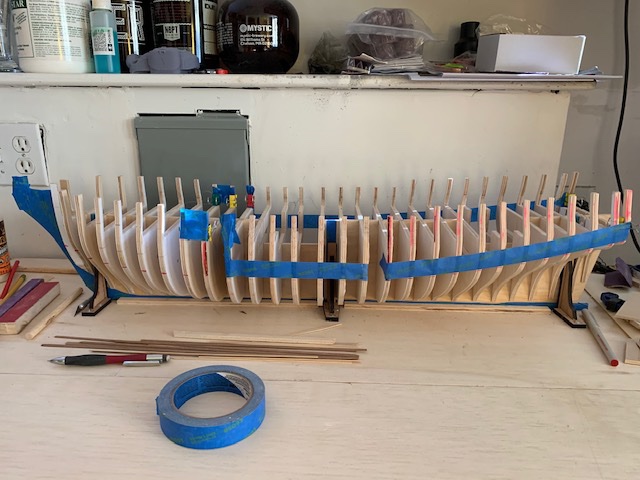
Thank you for the likes. Lower sills are in place. I picked up a Proxxon for milling strips in chapter 2, but haven't broken it out of the box yet. I am definitely done with using a razor saw ever again and am pulling it out and using that going forward. Found a technique that worked very well for squaring up the gun port sills. I took a really cheap Harbor Freight clamp that generates very little pressure but it can create just enough tension to hold the sill in snug. I then used the caliper measurements I took from the plan to fit the sill. Finally, I took another piece of stock, squared it up and placed it under the lower side of the gunport, then used a binder clip to secure it. I then adjusted the calipers for the higher side of the sill from the plans. Finally, I only had to remove the sill, glue and place the lower side on the stock and adjust the higher side with the calipers. I then would do the same sill on the opposite side, run a piece of stock across and make sure they were level and the sills were squared up before moving onto the next. I only did this for the gun ports and just eyeballed the blocking pieces. The run looks clean on the port side as well as starboard. One final thing I did was take the actual measurements of the gunports on both sides with the calipers to 1/128" (.2mm) in order to make sure there were no major discrepancies between both sides that should be adjusted now. The results are in the variance column where both sides are within 1/128" and 4 of the last 5 frames I did are spot on. Very happy with the results. One final observation is that I cross-referenced my measurements against the plan measurements and found that the areas where there were discrepancies were in the transition from the flat A-G frames forward and aft and the final small sill at the stern which was a bit tough due to its size to get good measurements. This is completely because of the way I laid my battens out earlier and caused me to smooth out the rise from the waist a bit more than it should be. The run looks smooth to my eye and the important thing is there is little variance between the two sides, so any fine adjustments that may need to be made at a later point would be applied equally. Pretty excited about learning to use a new tool and getting these gun ports framed in.
-
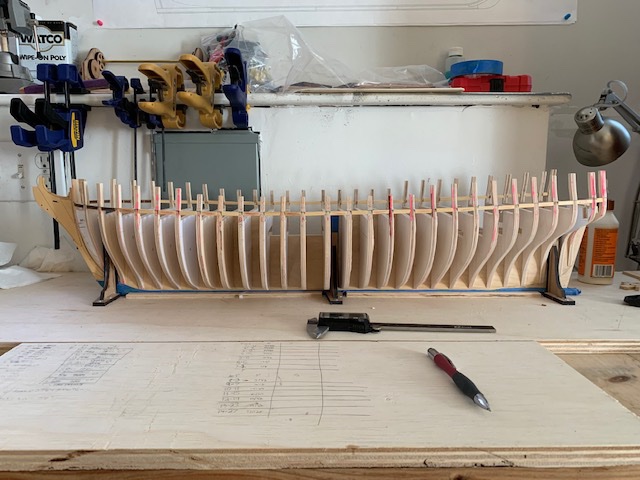
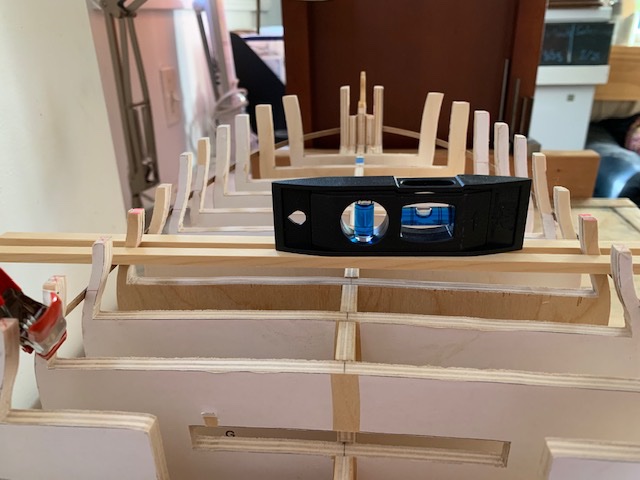
Thank You for the likes and advice all. I took a couple days off in order to work on the honey do list, but finally was able to get back into the swing yesterday. In the downtime, I had a lot of time to think about approaches to marking the run for the gun port sills. I frankly don't trust my eye for symmetry, but I picked up a set of calipers that will measure to 1/128" a couple months ago and have come to trust them. I went to the plans and measured from the bottom of the false keel to the top of the gun port sill (fore and aft) at each station. I chose to the nearest 1/64" as my reference point for all measurements. I definitely followed the measure twice and then measure again principal going so far as to reset the calipers between each measurement so I wouldn't fall into a rhythm of guessing the next measurement and writing it down too quickly. Regardless, what I found was the measurements were flat between A-G, so I marked those four frames as the middle and then focused on the foreward and aft sections independently. I set the calipers to the measurements and ran the battens from G forward to the stem and A back to the stern on each side trying not to pay attention to the reference lines until I finished the run. Everything lines up super nice with just a few frames where the marking don't match up to the reference lines, but it may have been enough to frustrate me to the point of doing something stupid or rushed in trying to adjust. I decided to check for level across the battens and found every one fit within the center lines, however you can see the bubble favoring the port side of the lines which was about a .25mm variance. Noodling on it for a few hours and trying to come up with a resolution, I went and checked measurements again and realized the bubble was reversed from the pictures (I needed to raise the port side to level). I had changed the direction of the ship between taking the photos and the issue the whole time is that my workbench is not completely level. I leveled the building board and the runs are now dead center. Oh man, missed the forest for the trees on this one, but decided to leave my "problem" up in the post in case anyone else tries the same thing to save themselves some grief and check that the building board itself is level. Everything is plumb, measured out and ready for the sills to be installed.
-
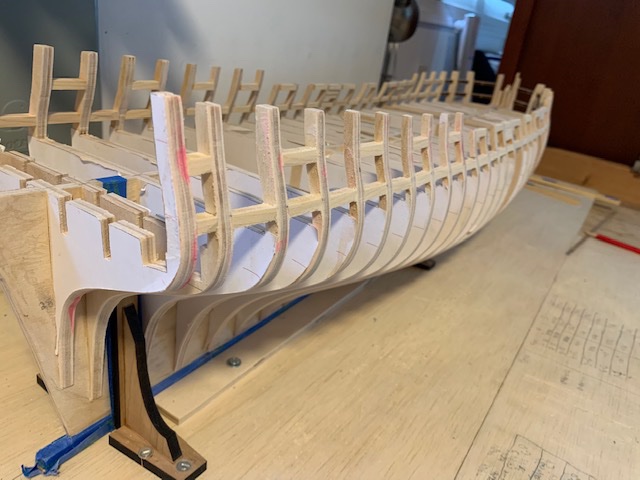
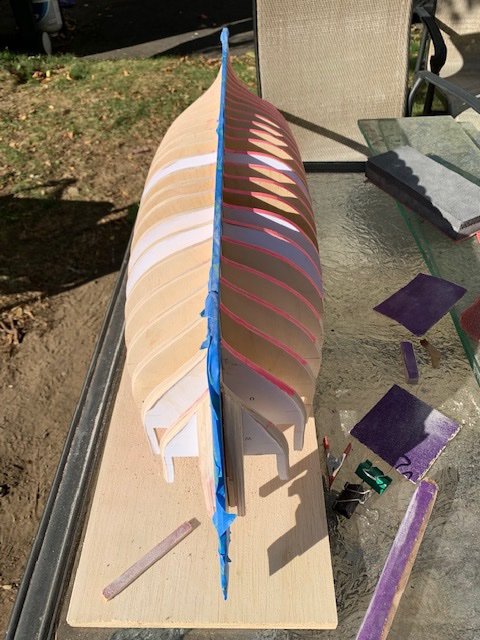
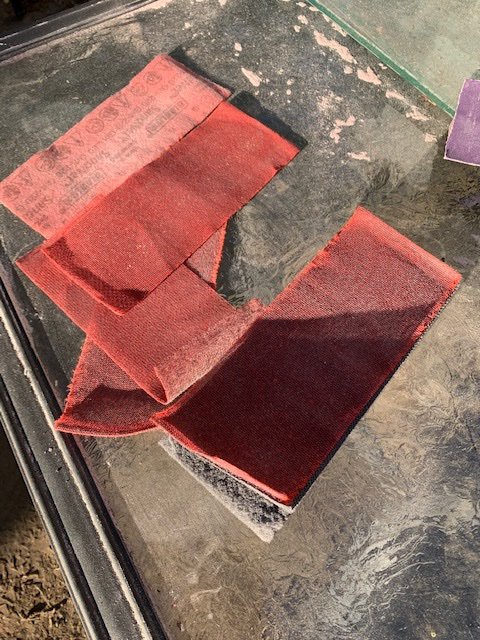
Thanks for the feedback and all the likes. Jim, thanks for the reminder on that sander. I remember seeing it quite a while ago and adding it to my wish list then promptly forgetting about it. I love the Dremel in the router table, but it's not the best freehand device. I think that sander is one of those things that were I to buy it, it would somehow disappear into my wife's craft room, so I would have to buy a his and hers. The fairing is complete. I can't believe how fast the underside went. I thought it would be a two day affair, but I was able to get some good time in the afternoon to just plug away at it. In hindsight, sanding the bow fillers took about the same amount of time as the entire underside of the ship. I created a little jig out of some 4x4 and used the pink highlighter to color all the frames. A couple frames also came up a bit short and ended up with a bit of basswood shim. I quickly realized I needed to go outdoors for this as the amount of sawdust being created was insane. I was going to do the same sequence of port center, then starboard center, port stern, starboard stern, etc, but just got on a roll and took the port side down in a couple hours. The hero of this story is the Diablo 1/3 Sheet dual density sanding block using an 80 grit sanding sheet. The soft side gave up the ghost and tore apart as I was fairing the last couple frames at the stern, but it was an absolute beast on the underside of the hull; 70 minutes for the entire starboard sidel. This exercise took me 7 days, but will easily be cut in half in the future. The port side took twice as long as the starboard at each stage as I worked my way through the best angle of attack. The lines look clean and this is definitely the most symmetrical model I've built.
-
Wow. Those bow frames were a bear, but I worked my way through it. Finally had to break out the 60 grit. The cone cutter I have is diamond-coated and it just fouled up too quickly to be of use. I ordered the Dremel one, but it didn't come until after I had finished the bow. It will come back into play soon enough. The drum sander worked well enough but creates quite a mess and the accuracy leaves something to be desired. No way I was getting closer than 1/8" to the stem with that thing. The 60 grit cleaned it up quickly though and it should require just some light sanding at the very bottom once I flip her over. The starboard side went a lot faster once I transferred the lines from the port side. I was a bit nervous removing the tape from the stem in case I had damaged it, but there was none. I'm energized right now as I feel the hardest and most tedious parts of the fairing the hull are over and the end is in sight.

-
I paint wargaming figures as well and "The Army Painter" primer is excellent although it doesn't shrink, so it's very easy to obscure detail if you are a bit heavy on the trigger. I highly recommend Reaper Brush On Primer if you plan on brushing. It creates more of a powder coating so it doesn't flake off in sheets if there's no tooth to the surface (never had metal flake primer, but have had smooth resin shed primer). Vallejo Polyurethane primer is awesome if you airbrush as it shrinks as it dries, so it's very difficult to spray too thick and obscure detail and it creates a very strong base if you let it cure for a day. All that said, if you have some Krylon primer sitting around, you can hit it with a couple light coats of that. Metal minis are very forgiving with the primer as they are very easy to strip down to base metal. I also give my metal (and resin) minis a good soak and brushing with Simple Green before priming to remove any residue.
-
That looks really nice. I may have missed it in an earlier post, but what paint colors did you use? The blue, red and yellow are all nice and vibrant. If your backhand is anything like mine, then avoid glueing them down now. If they are in tight enough that it would be difficult to remove them, then I would leave them as is. I would whack them 10 or 20 times while rigging and have to adjust them anyway. If they are loose enough to remove, I would take them off until after rigging and then glue them down as the last step otherwise I'd end up knocking one or more off.
- 436 replies
-
- 3
-

-
- vanguard models
- alert
- (and 1 more)
-
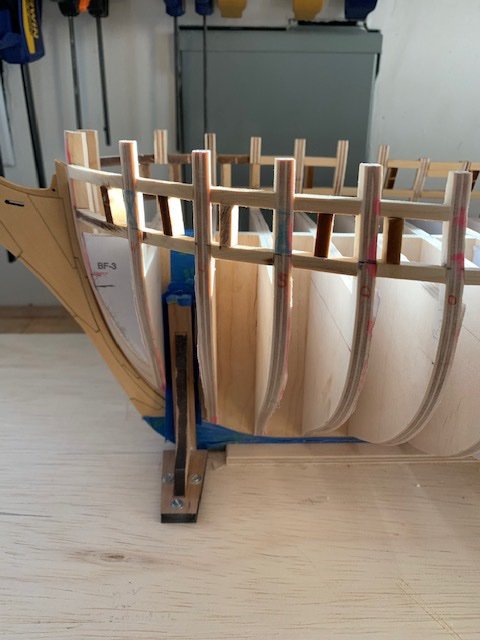
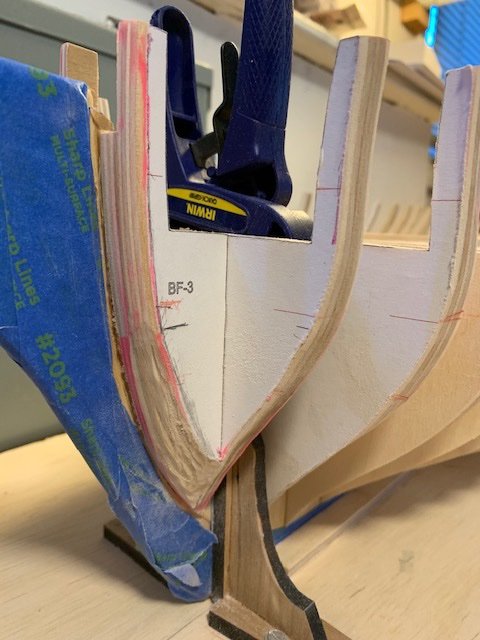
Thanks so much Guillermo. I have a cone cutter for the Dremel and didn't even think about using that. I used the drum sander on BF-3 a short while ago and it worked well, but I wouldn't trust it on BF-2 when I flip the ship and and have to get close to the stem and keel. The cone cutter will work much better.
-
Looking good Jeff. The Lively is such a fun build and as long as you keep picking it up, it will eventually get finished. Mine took from June 2006-Nov 2009. I still think it's the only kit I've ever seen that had Yew in it.
-
Thanks Rusty. I love my Dremel, but it's amazing how quickly even at the slowest setting it can over sand. I dry fit, scribed and rough sanded the bottom of the fillers to frame W before installing, so at least that should cut down the workload and risk a bit. Edit...that is a lot of wood to remove. Went to the plans and it's almost 5/32" across BF-3 and more across BF-2 when I get to the bottom. I think I'll take it outside tomorrow.

-
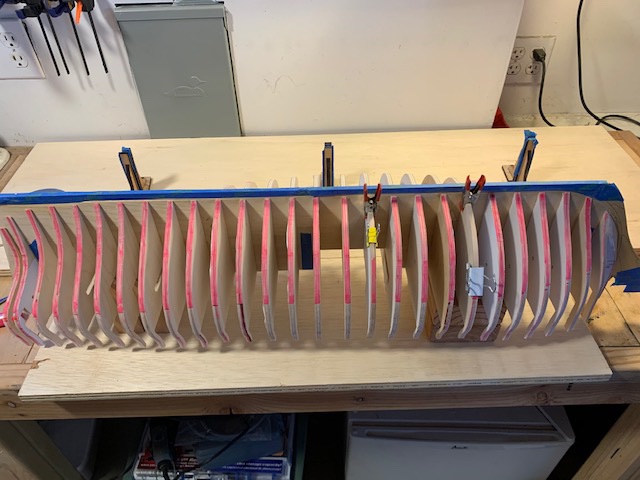
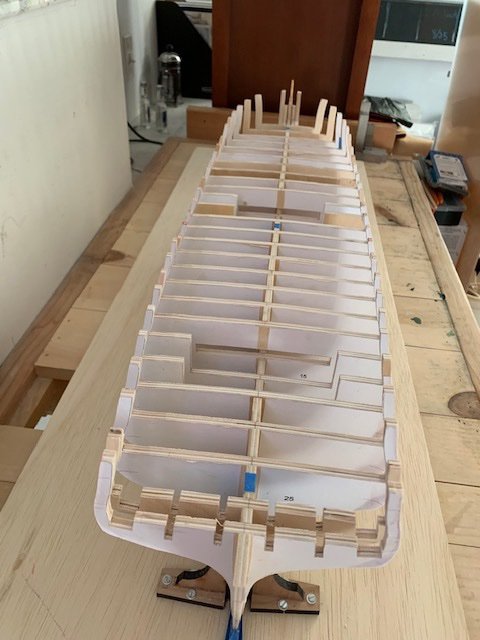
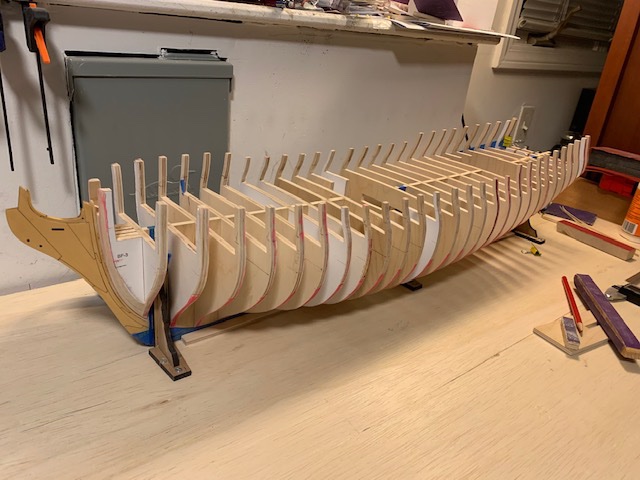
Thanks for the Likes everyone. Slowly working my way through fairing the hull. I'm not using the light ply, so I'm trying to be very methodical with my sanding and tackle it over a couple weeks. I broke up each side into 6 zones - fore/middle/aft and top/bottom thinking that the sanding technique is a bit different based on the ships lines. If I tackle a zone or 2 a day it should go fairly quickly without being too frustrating. I started with the port middle and used the red/yellow/green binder clips to mark out the boundaries to stop sanding. Yellow marks a transition frame so will be part of two zones. It's not very clear in the picture, but I marked the areas that are faired with red pencil marks. The yellow and red clips are fully faired above the deck line as well. I then did the same for the starboard side. What's interesting about this section is that a very small deviation (say 1/64") in the slots from center means one side needs to be shimmed and the other requires a whole lot of elbow grease. Moving aft...I simply swapped the small red and green binder clips, then covered everything that was faired with painters tape to protect it from incidental contact. I also marked a dark red line at the edge of the yellow clip to note a do not sand line and the rest of the frames got a bright pink highlight figuring that if the line did not disappear from a frame, it would need to be shimmed. The binder clips worked great in keeping anything from breaking. Everything cleaned up nicely; I needed to shim the large green binder clip. Frame 27 is going to require keeping an eye on it as it has a slight deviation to starboard, but I want to see how the lines look when the whole ship is faired before getting too aggressive with it. Here's where I am now. Getting ready to move to the bow. I could use some advice here as this is going to require the most aggressive sanding while being super careful around the stem. I've been using 120 and 150 grit up to this point, but I'm guessing 60 or 80 is probably the way to go. I thought cleaning up the bow fillers might be a good place to start and work back, but I wasn't sure what technique works best with the fillers or if it works better to save those for last? Mouse sander or Dremel or a sanding stick and lot of patience?
-
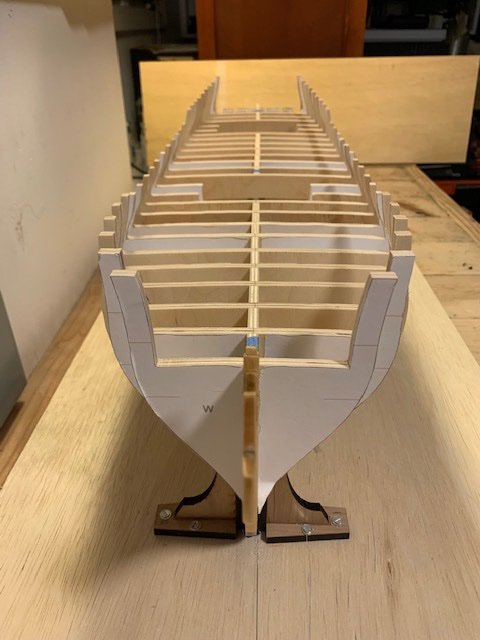
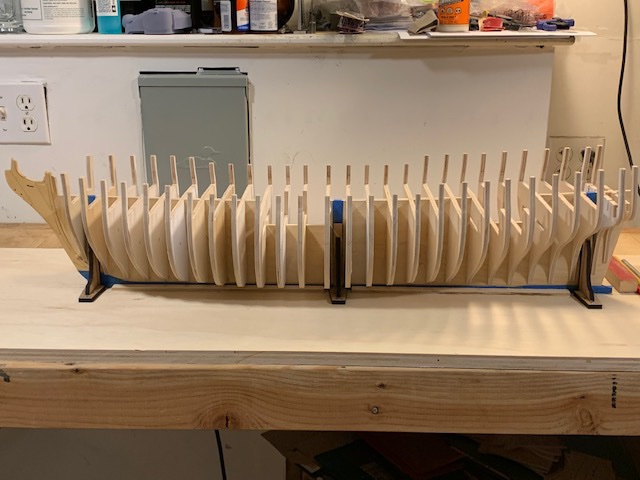
I put together the building board and sent the sheets of glass back to their home under the couch. I was a bit dismayed at first when I started to test fit the bulkheads as many of them seemed more off center than they appeared when I lined them up earlier. I flipped them and rather than being off center in the opposite direction, all of them came much more in line. I had to flip almost every bulkhead on the foremost piece of the former, but the other two only had a frame or two out of alignment, so I'll blame it on the former. On a side note, thanks so much for putting this build together Chuck. I stepped back once I looked down the lines of the ship and realized just how far my confidence/skills have already come in 2 short weeks. Can't wait to see where they will be at the end of the journey. Time to mark the reference lines on both sides of the bulkheads, glue it all up and then see how much sawdust I can make this weekend.
-
Thanks guys. Charles, thanks for tempering expectations. I remember about 15 years ago finding a couple logs of cherry from a tree that my father had taken down 10 years before and about half the wood cupped when I put it through a bandsaw. I always wondered why not all of it behaved that way. jaeger, thanks very much regarding the kiln. I found some other sources online building a tent and using a dehumidifier for the same purpose. I have one in my basement office that I use in the summer and fall that I could repurpose during the winter and spring.
-
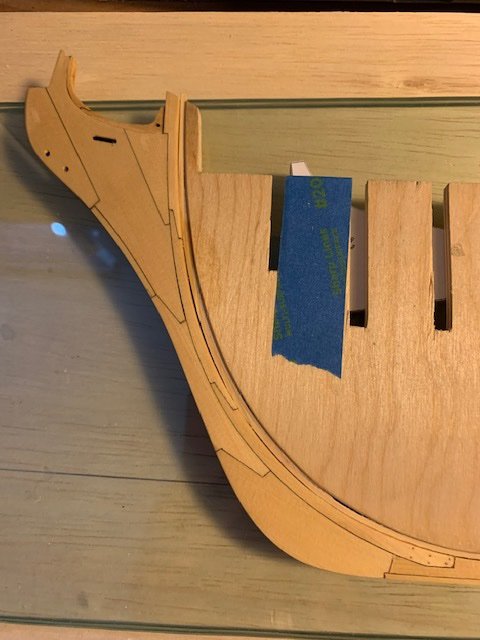
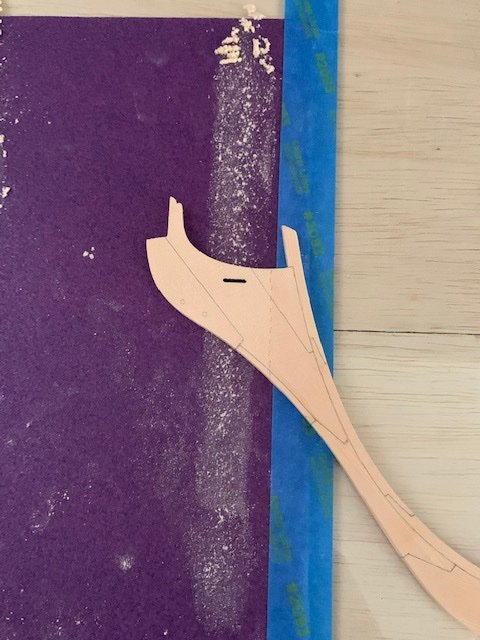
Thanks Chuck; I gave it a coat of WOP right after reading this. Thanks everyone for the reactions as well. I got a little too cute for my own good and tried to shape the rabbet strip by bending the strip to the inside of the stem, clamping everything together and shimming thin basswood between the former and strip before glueing everything up. I thought I had everything perfectly aligned as the picture to the left shows, but glueing the rabbet to the former compressed the basswood and created a gap between the strip and stem as the picture on the right shows. Regardless, I trimmed up the 1st piece of the keel prior to glueing up, so that and the rest of the pieces went in without problem and it shouldn't matter once the planking is in place. The joint is quite strong. Another coat of WOP tonight and overnight to dry, then I can put the glass away and get the building board set up.
-
Thanks very much. I wasn't sure if there were any special considerations for plum versus other fruitwood regarding harvesting, Sounds like I have another month or two to see if I can track down or jury rig a kiln.
-
Apologies if this has been talked about, but a search here only turned up passing references to plum wood. I have a plum tree that I planted about 12 years ago that is getting to its end of life. Between black knot and plum curculio and my daughters no longer climbing trees, I'm thinking it's time for it to go. How good of a wood for shipbuilding is plum? Comparable to cherry? If there's value to it, what's the best time to cut it down and how should I treat it after cutting it down? It's an Asian Plum (Shiro) grafted on European rootstock. The trunk root stock is about 2-1/2 feet long and 10 inches in diameter before branching. The primary limb coming off the graft is about 6-8 inches in diameter. Plenty of wood, just wondering if better for the firepit or modelling.
-
Looking awesome and very inspirational. You're doing an amazing job. As an aside, the manual for the Alert has to be the nicest one I've ever seen, although I got a kick where it said it's a 30-50 hour build. Guessing conservatively rigging the cannon is at least ten hours.
- 436 replies
-
- 4
-
-
- vanguard models
- alert
- (and 1 more)
-
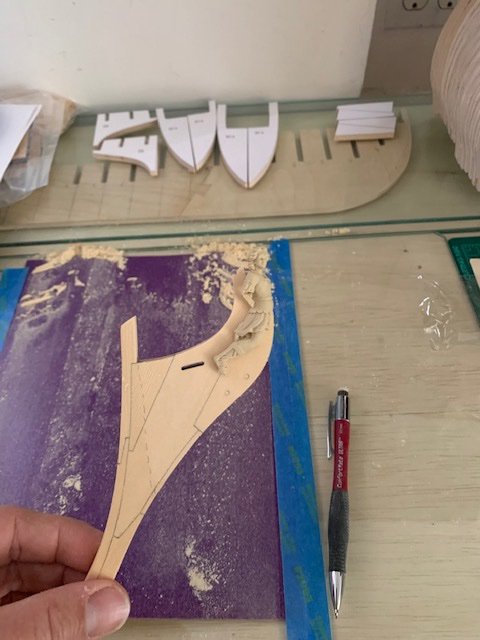
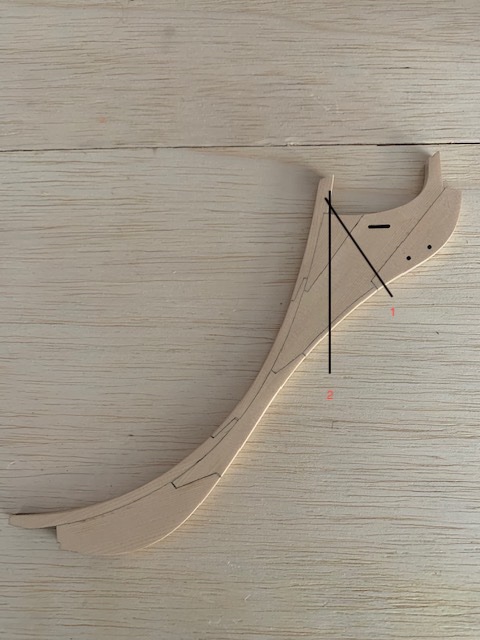
I had a moment of head scratching after tapering the first side of the stem before realizing that I was using the upright part of the upper stem (where the back of the figurehead rests against) as a guide on the sandpaper and so I didn't taper back far enough. I changed the angle up a touch on the second side so the top of the bobstay was perpendicular to the sandpaper and got a much better taper. I was able to go back and with a few passes on the first side everything matched up properly. The figurehead fits perfectly and from the top everything is a nice even taper, so very happy. Next time I do this, I would draw a north-south reference line on the stem that I would use rather than trying to focus on a reference point of the stem to keep everything trued up. Gammon Knee and extension are installed. All the appropriate edges softened. I got a little too eager and removed all the char from the inside of the stem, but I should be able to temporarily install the rabbet strip and adjust the former with the little sander to match up to the stem. Regardless, I'm super energized on the progress of the last couple days.
-
Thanks Chuck. That makes perfect sense and gives me the direction I needed.
-
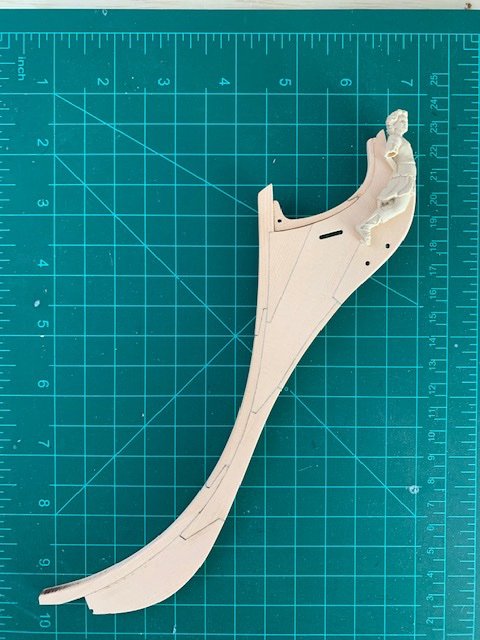
Thanks everyone for the likes. I glued and cleaned up the stem today. I can't believe how well everything fit together. I'm getting ready to taper and would love some help as to the best line to sand. Looking at examples, it looks like line 1 is the way to go, but wanted to doublecheck if I should go lower before getting too far into it.
-
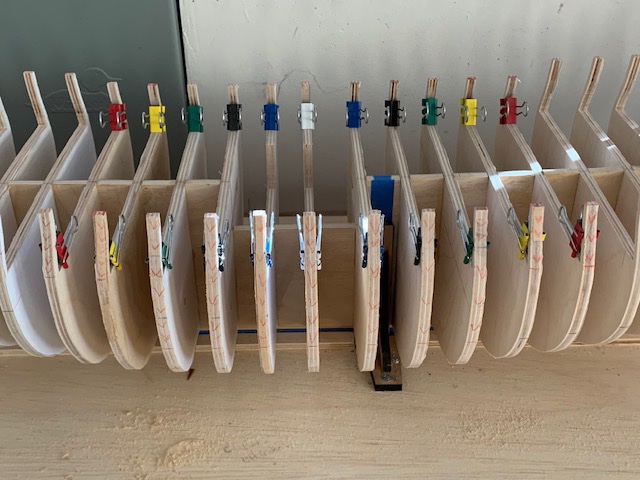
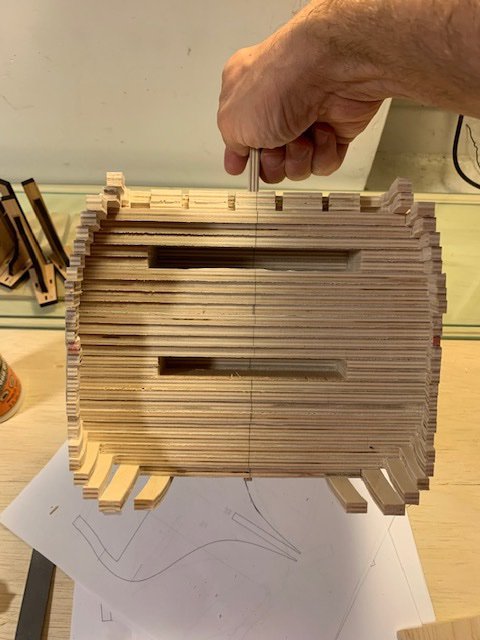
Frames have all been cleaned up and aligned on the "jig". Two buildheads (marked in red) are a little bit off at the top on one side. I think I may fair lightly a bit to remove any bumps or dips while the frames are so densely packed and the bumps stand out. But for now I'm going to put these aside, sit down and digest chapter one of the monograph and start at the beginning. I must have a bit of an allergy to birch. Even with a dust mask and sanding outdoors, super dry throat and coughing up a storm, so I'm going to take a few days away from this wood.
-
Quick update here. Marking the centerline on the top of the bulkheads is paying dividends. I cleaned up all the Letter bulkheads today and stacked them on a piece of scrap plywood to see how in alignment they are without the impact from the former slot. I knew the line wouldn't be perfectly straight, but any bulkhead way out of line should jump out. Of course, it's the first one I did (U) after the test piece; pulled out the file finally and got it nudged back in line. Thanks for the advice again Fred. I'm sure I wouldn't have caught this until it was glued up and I was fairing the hull or even after.
-
Wow. Looking great. Really impressed with your perseverance to restart at the point you did. I'll be watching with interest for lessons learned.