MORE HANDBOOKS ARE ON THEIR WAY! We will let you know when they get here.
×


Greg M
-
Posts
179 -
Joined
-
Last visited
Content Type
Profiles
Forums
Gallery
Events
Everything posted by Greg M
-
Beautiful work Bob. I echo Matt regarding your eye bolts.
-
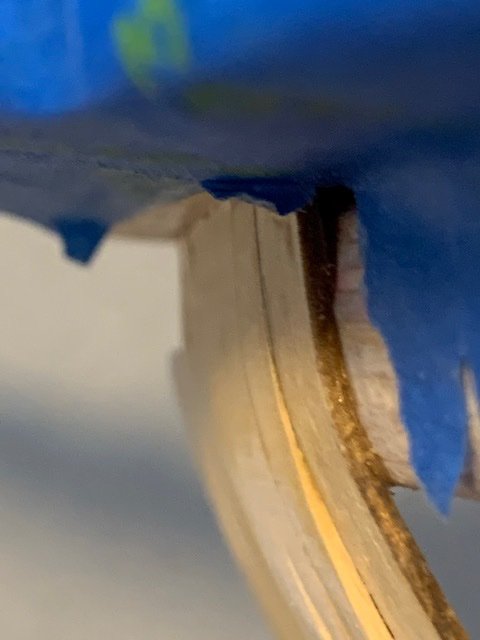
Looking good. Chucks recommendation regarding the painters tape is a really good one. The cedar is a fantastic wood, but it will ding if you look at it funny and you won’t even realize it. Wish I had been more diligent in keeping the tape on even when taking pictures.
-
I've been planking away the past couple days and decided to change up my workflow a little bit. Rather than focus on a strake at a time and having to change technique with each plank, I decided to focus on planking the bow of belt 1, then moving to the stern of belt 1. The first 2 bow planks went in without problem, but then I really struggled with the third one. After about 6 or 7 times back at the bending station and then during the final test fitting I managed to break the plank across the bow filler. Deep breaths and a fair bit of cursing later, I re-made the plank and realized I needed to tweak my process or I was just going to frustrate myself. The good thing about having a busted plank with the appropriate bend intact means I had a pretty close template to match the general curve for the first bend. I repurposed my beat up chopper when I was test bending and it worked well enough that I decided to keep using it. I start by spiling and bending the plank per Chucks videos. I then heat bend the plank on the bow filler while on the ship. I now know exactly where I need to adjust the plank. The only small snag is the plank no longer lays flat. Simply a matter of transferring the reference mark to the opposite side of the plank and clamping in front of the plank on the opposite side. The first belt is complete on the starboard side. I'll finish up the port side this weekend and then move to the stern. I lightly sanded the first 3 planks between the bow filler and frame W as I did get a little clinker effect initially, but that has subsided once W flattens. I know if left to my own devices and not edge bending the planks, I'd be super frustrated right now. So far, so good though. A week ago, I never would have thought planking the bow would be the (most) fun part.


-
Welcome aboard Jan. She's a super fun project. Looking forward to your build.
-
Thanks Ron and Matt and thanks for the likes. I bought a drafting pencil and sharpener and it's made a world of difference in making tick marks and straight edges.
-
It's a bit crazy to think it has been nearly 3 months since I've done anything with the Winnie. I had gotten really busy at work and fallen into a bit of a funk from fairing the interior. I thought taking a few weeks off might have been the medicine I needed and although it took a little bit longer, my head is back in the game. My goal is a strake a day; maybe two on the weekends, so should finish planking around the end of April, maybe a little bit sooner. Yesterday, I decided to start from the stern and found the travel iron did a great job bending planks over the filler piece. I was also pleasantly surprised that the spring clamps made good purchase on where the planks meet the lower tuck. The joints appear to clean up alright when I sand then back flush to the tuck. but the joint is so thin that edges start chipping out when I sand the curve back into them. I'm going to need to change my process a little bit and start glueing down from the stern to improve the seams. My first attempt at edge bending went pretty well. Not perfect, but it was a lot easier than I thought it would be and added a good deal of confidence. My second attempt took 4 tries and it still seems like magic. Can't believe how such a simple tweak to planking makes planking the bow fun. Probably will hold off on updates until I finish up each belt unless I run into some sort of disaster or epiphany.


-
Glad to hear you're back on your feet Tom. Back problems are the worst and trying to rush recovery just seems to just make things worse. I missed the conversation about the Baltic Birch and am glad everyone jumped in and said it was a bad idea. I used baltic birch on my Winnie and fairing the inside of the hull burnt me out and put me in a building funk for the last 3 months. If I could go back in time, I would have splurged on the National Balsa ply or ordered the bulkheads from Chuck. Looking forward to checking back in on your progress.
-
Thanks Ron. That’s awesome to hear. Glad my method helped you out. Around the holidays I got super busy and I haven’t had a chance to touch my Winnie since Christmas Eve or even really check out this forum. I’m hoping by this weekend to get back into the swing of things and finally start the first belt of planking and regular updates. Also a lot of builds I need to check in on.
-
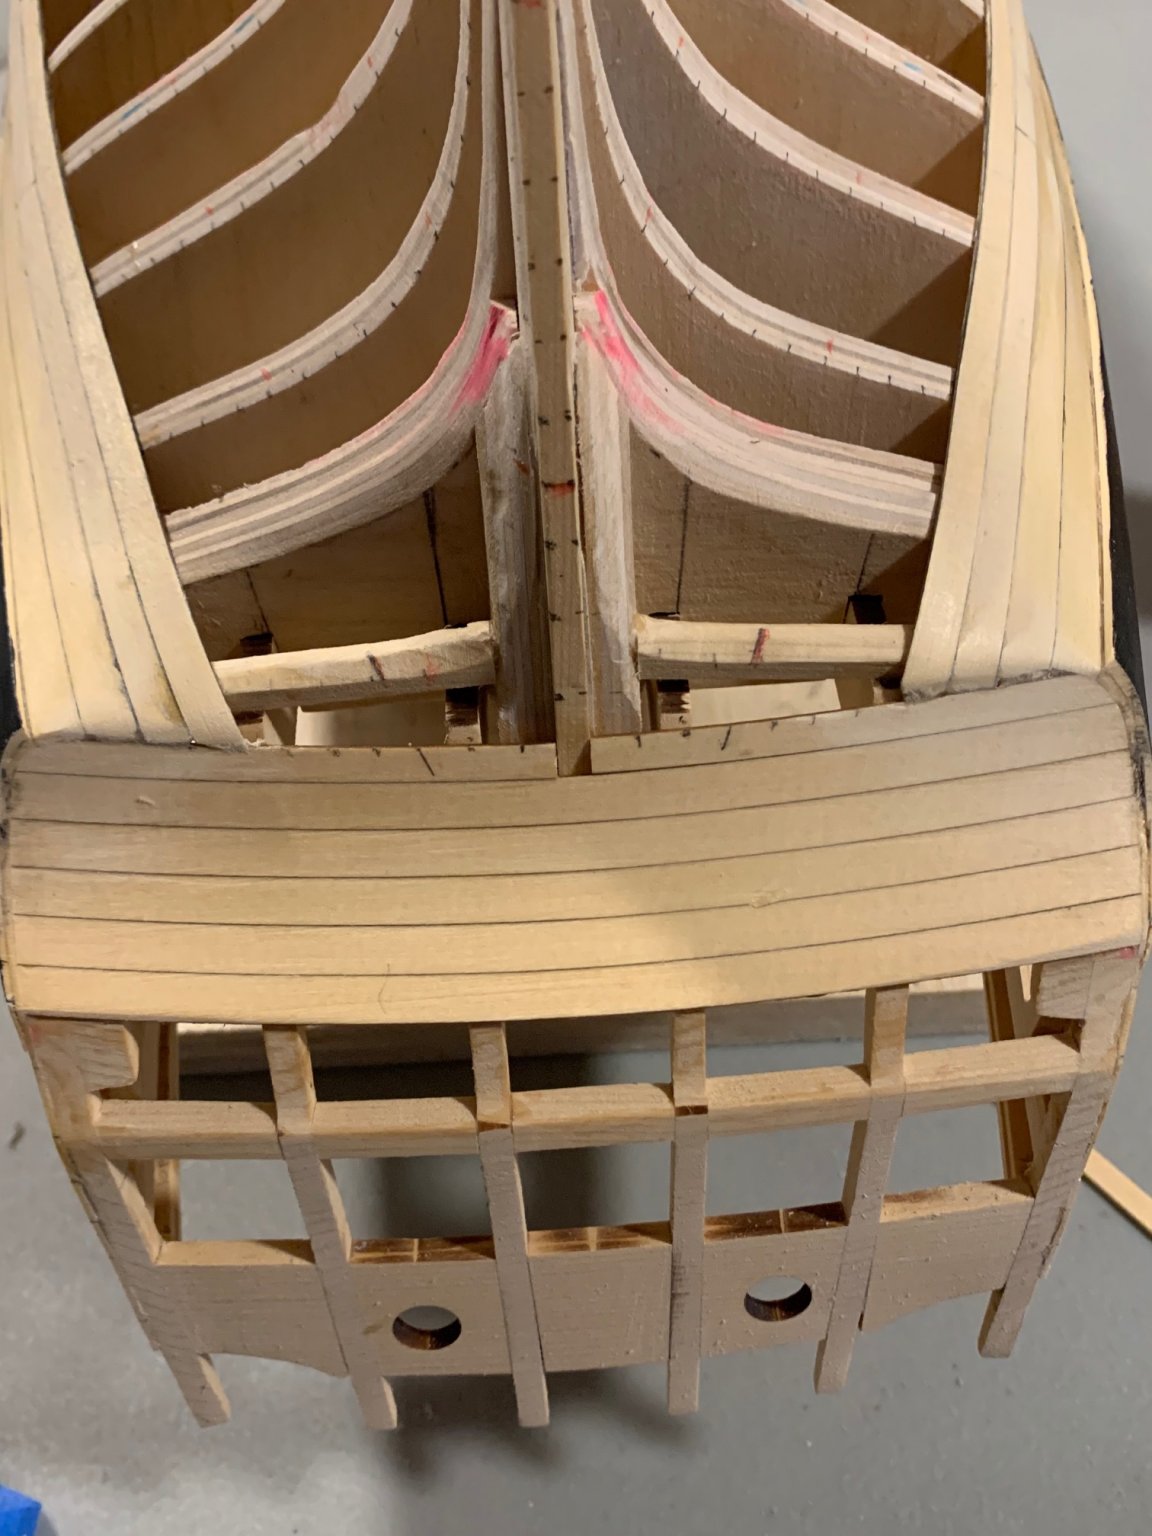
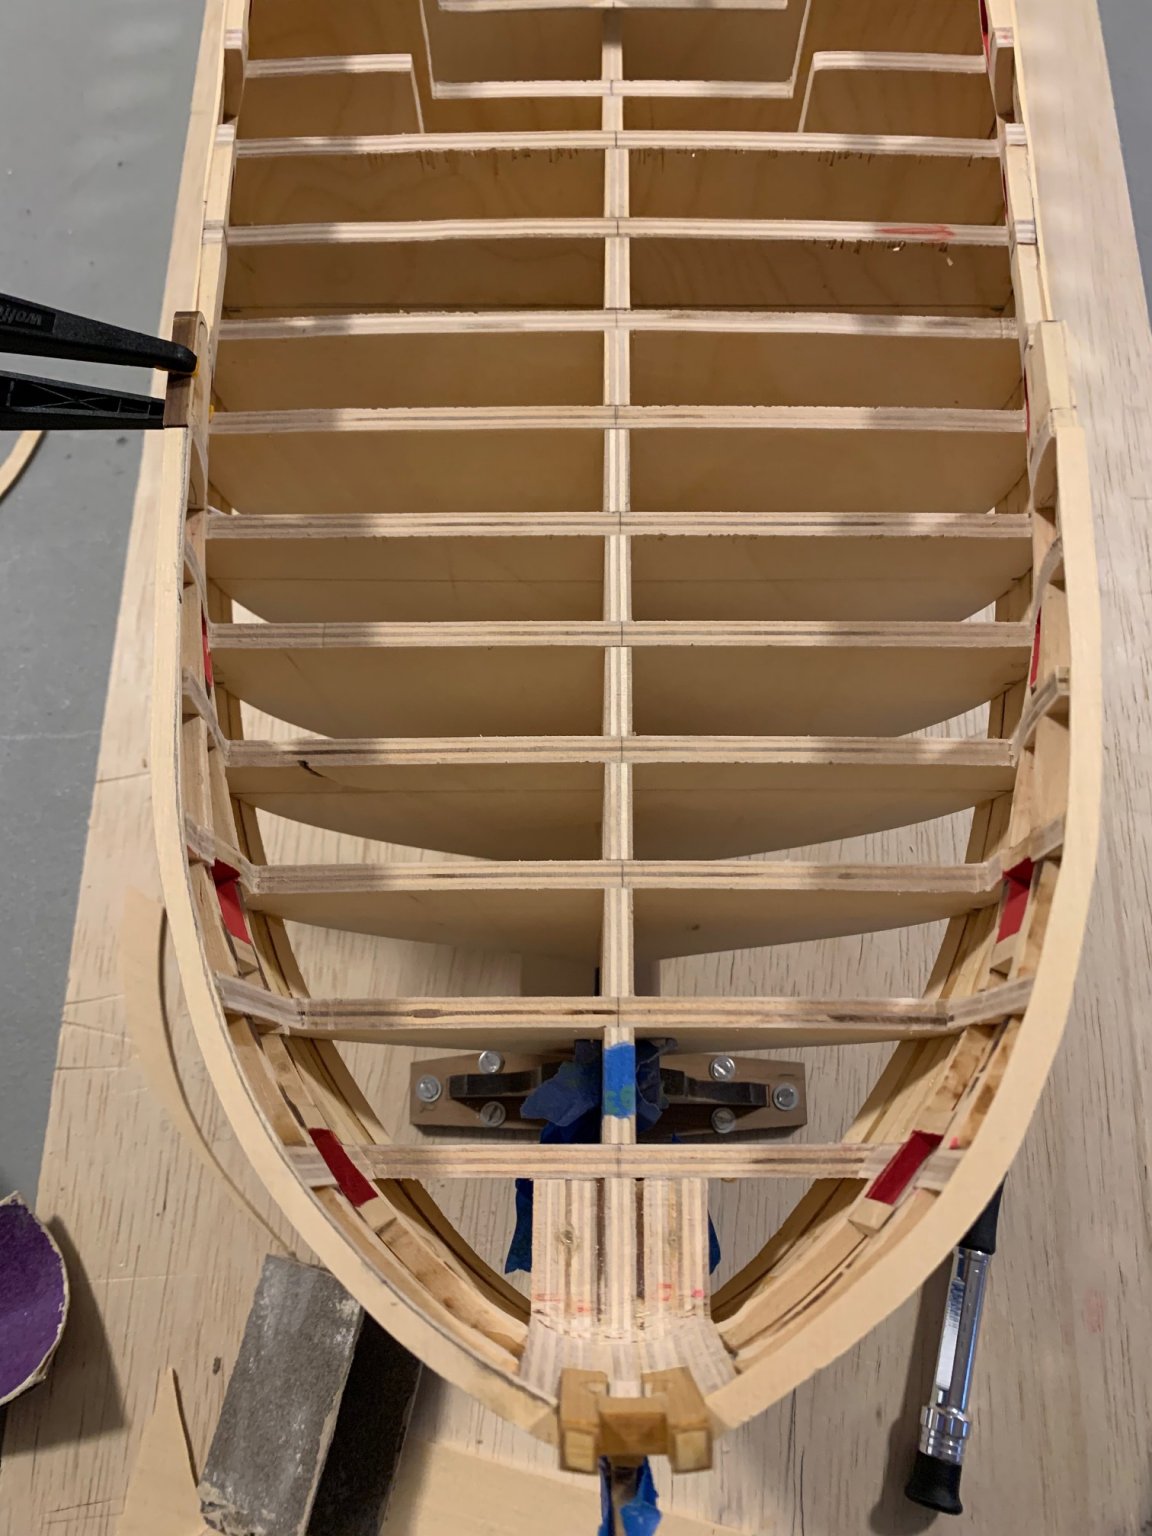
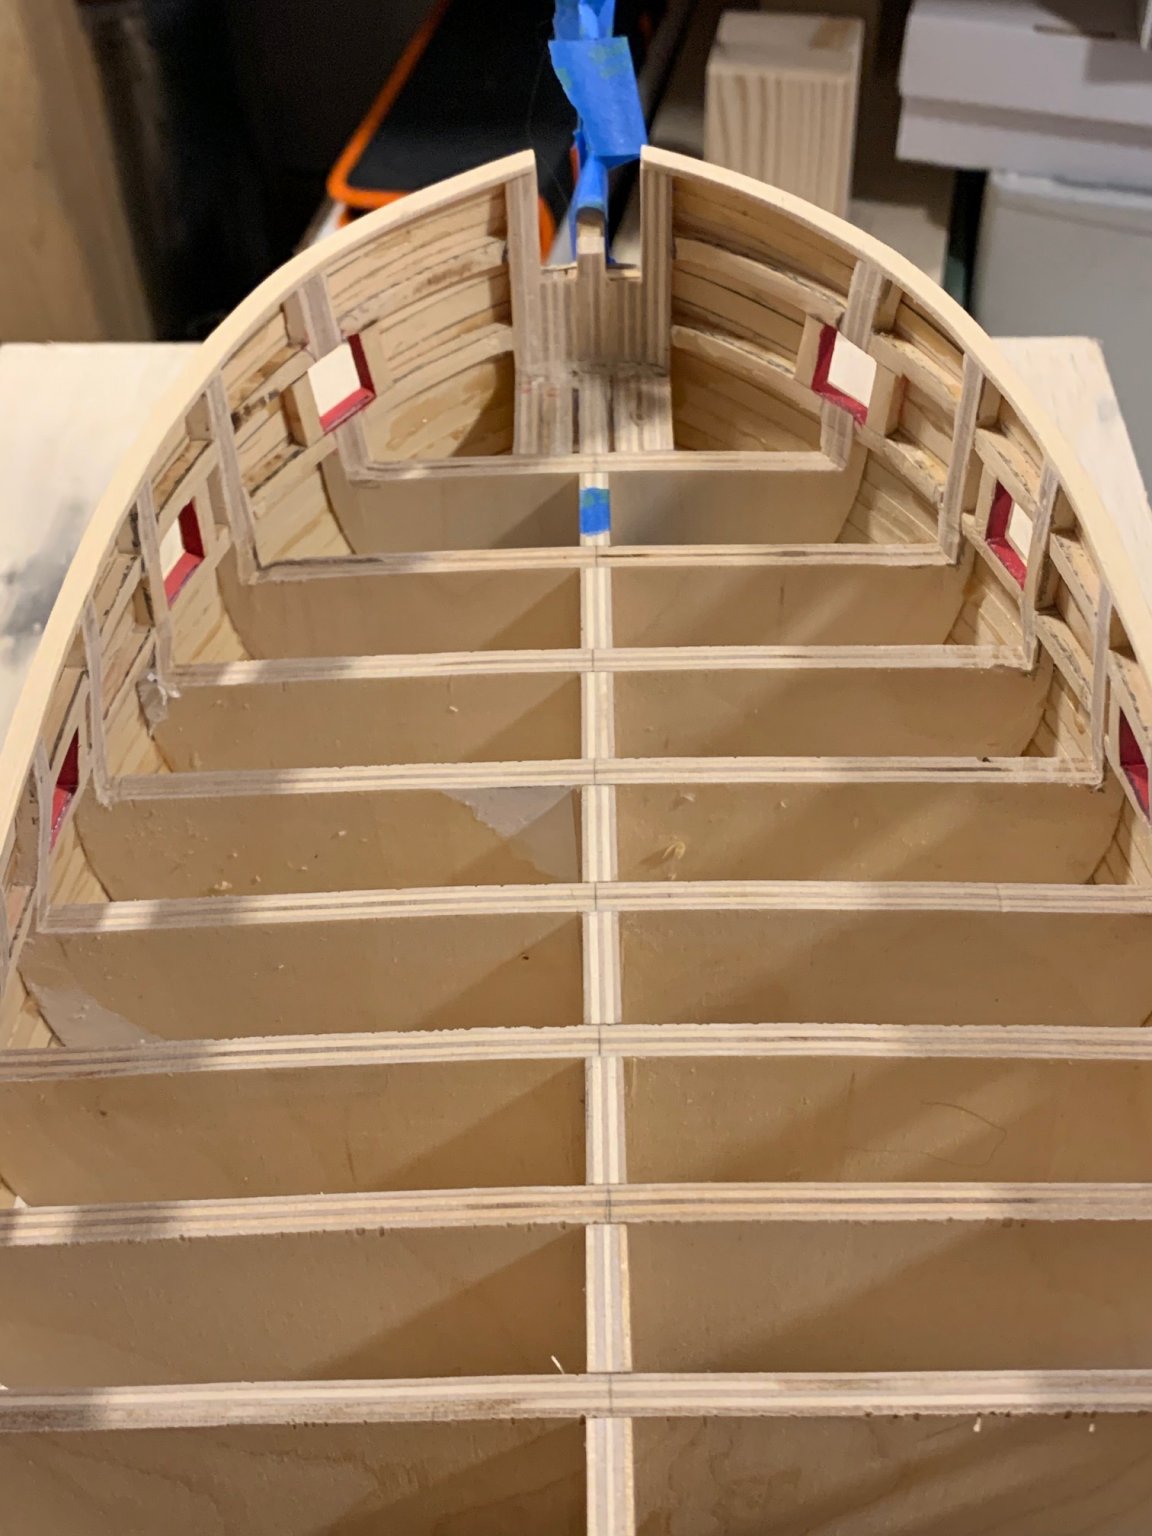
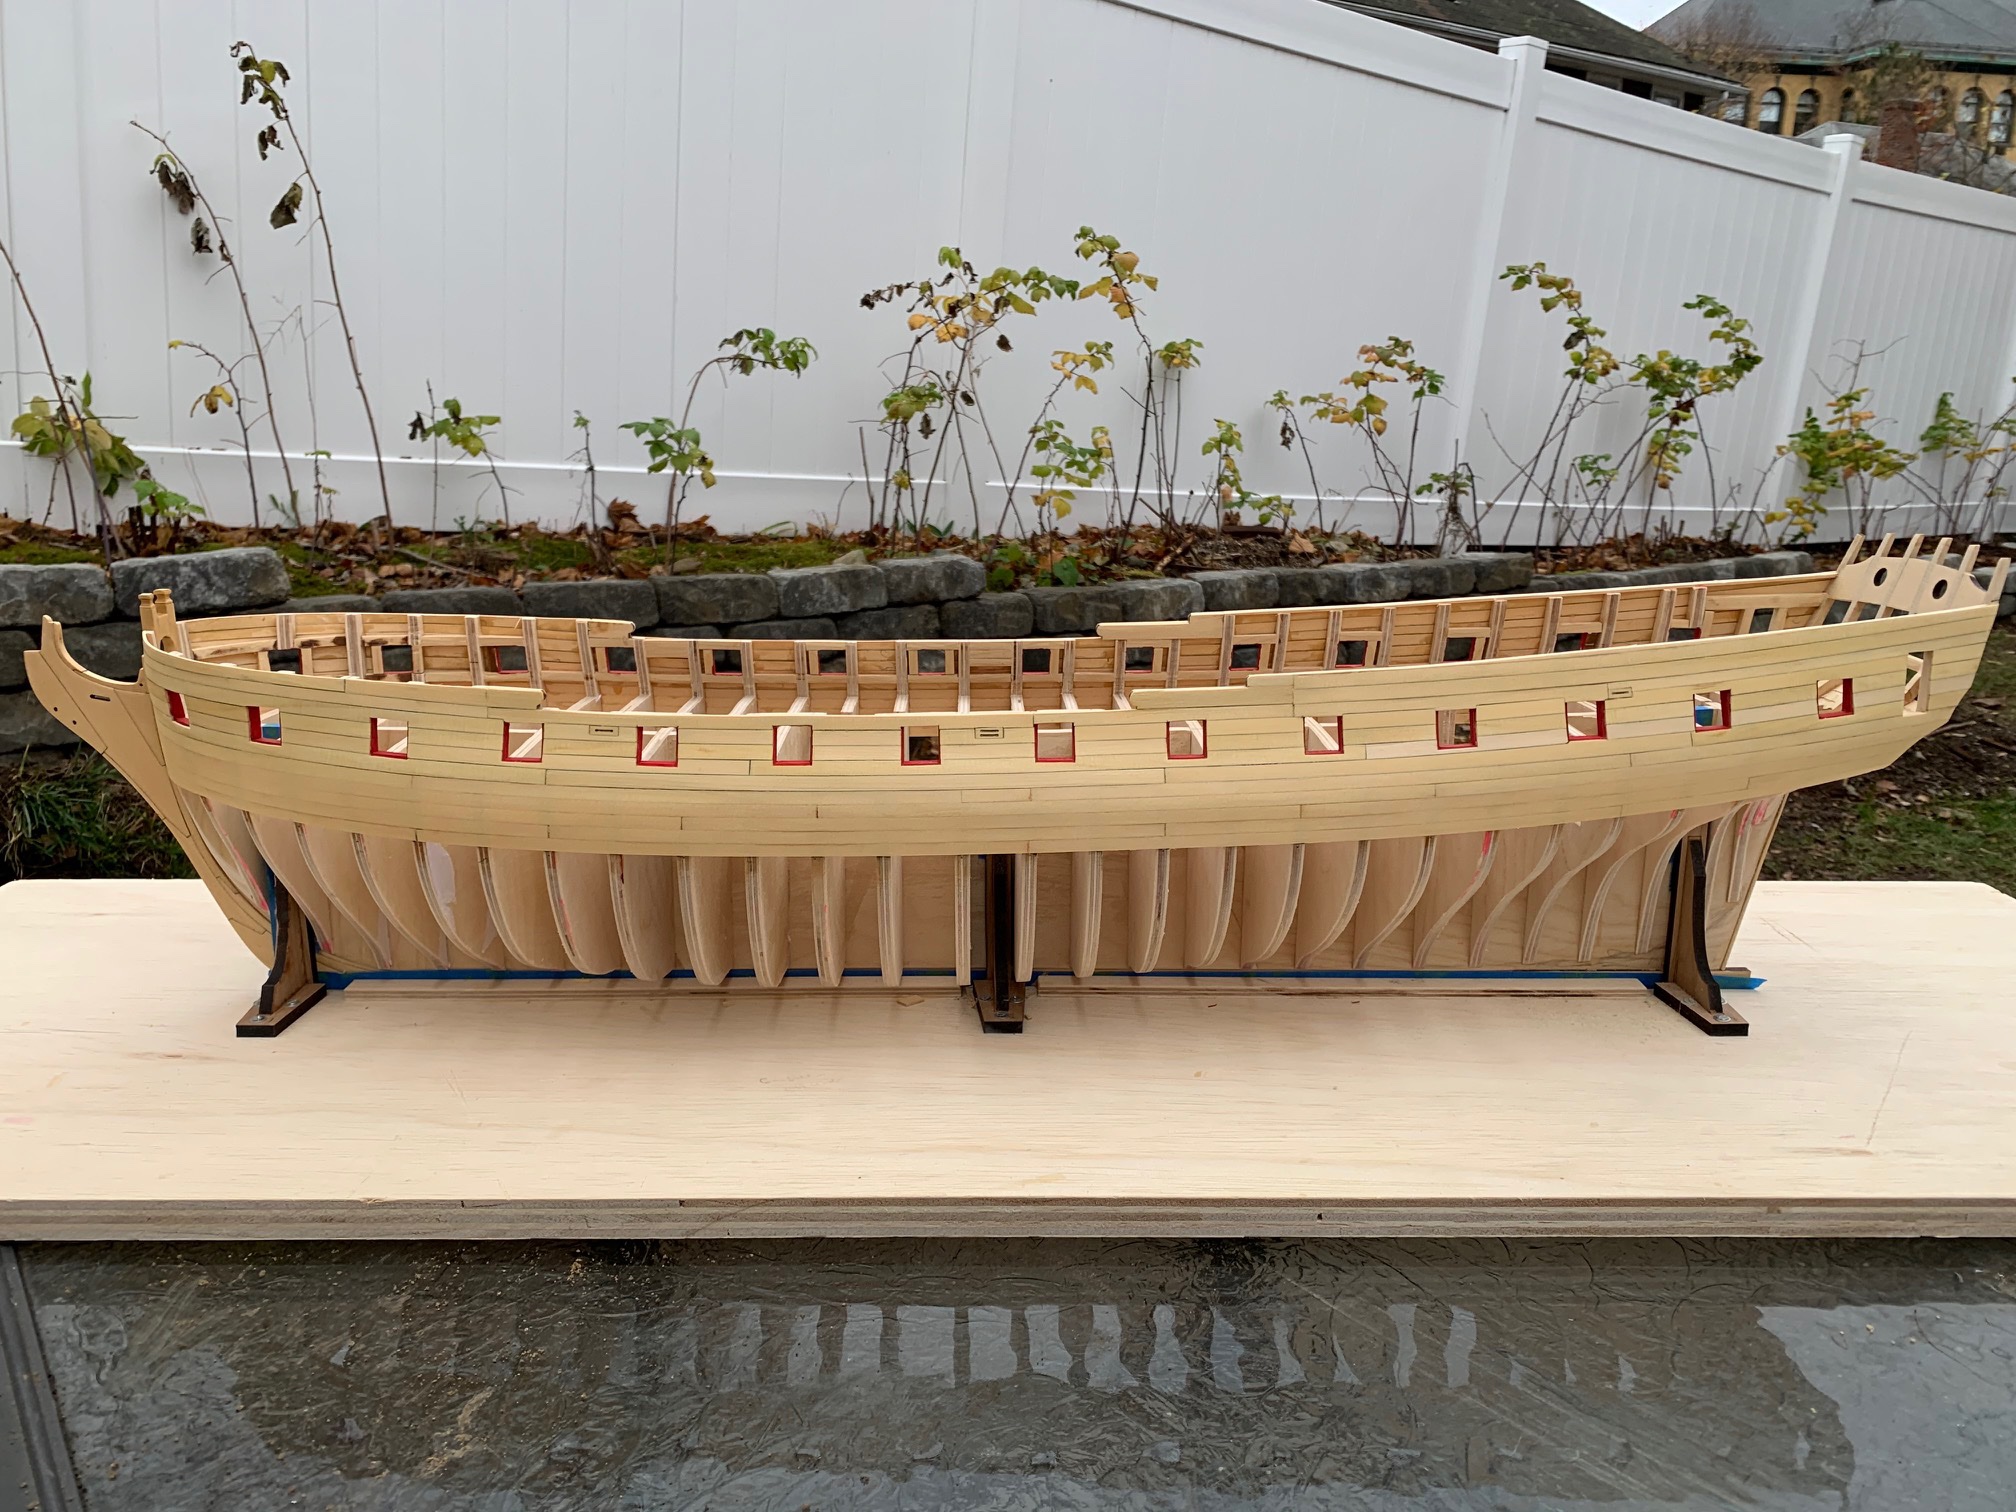
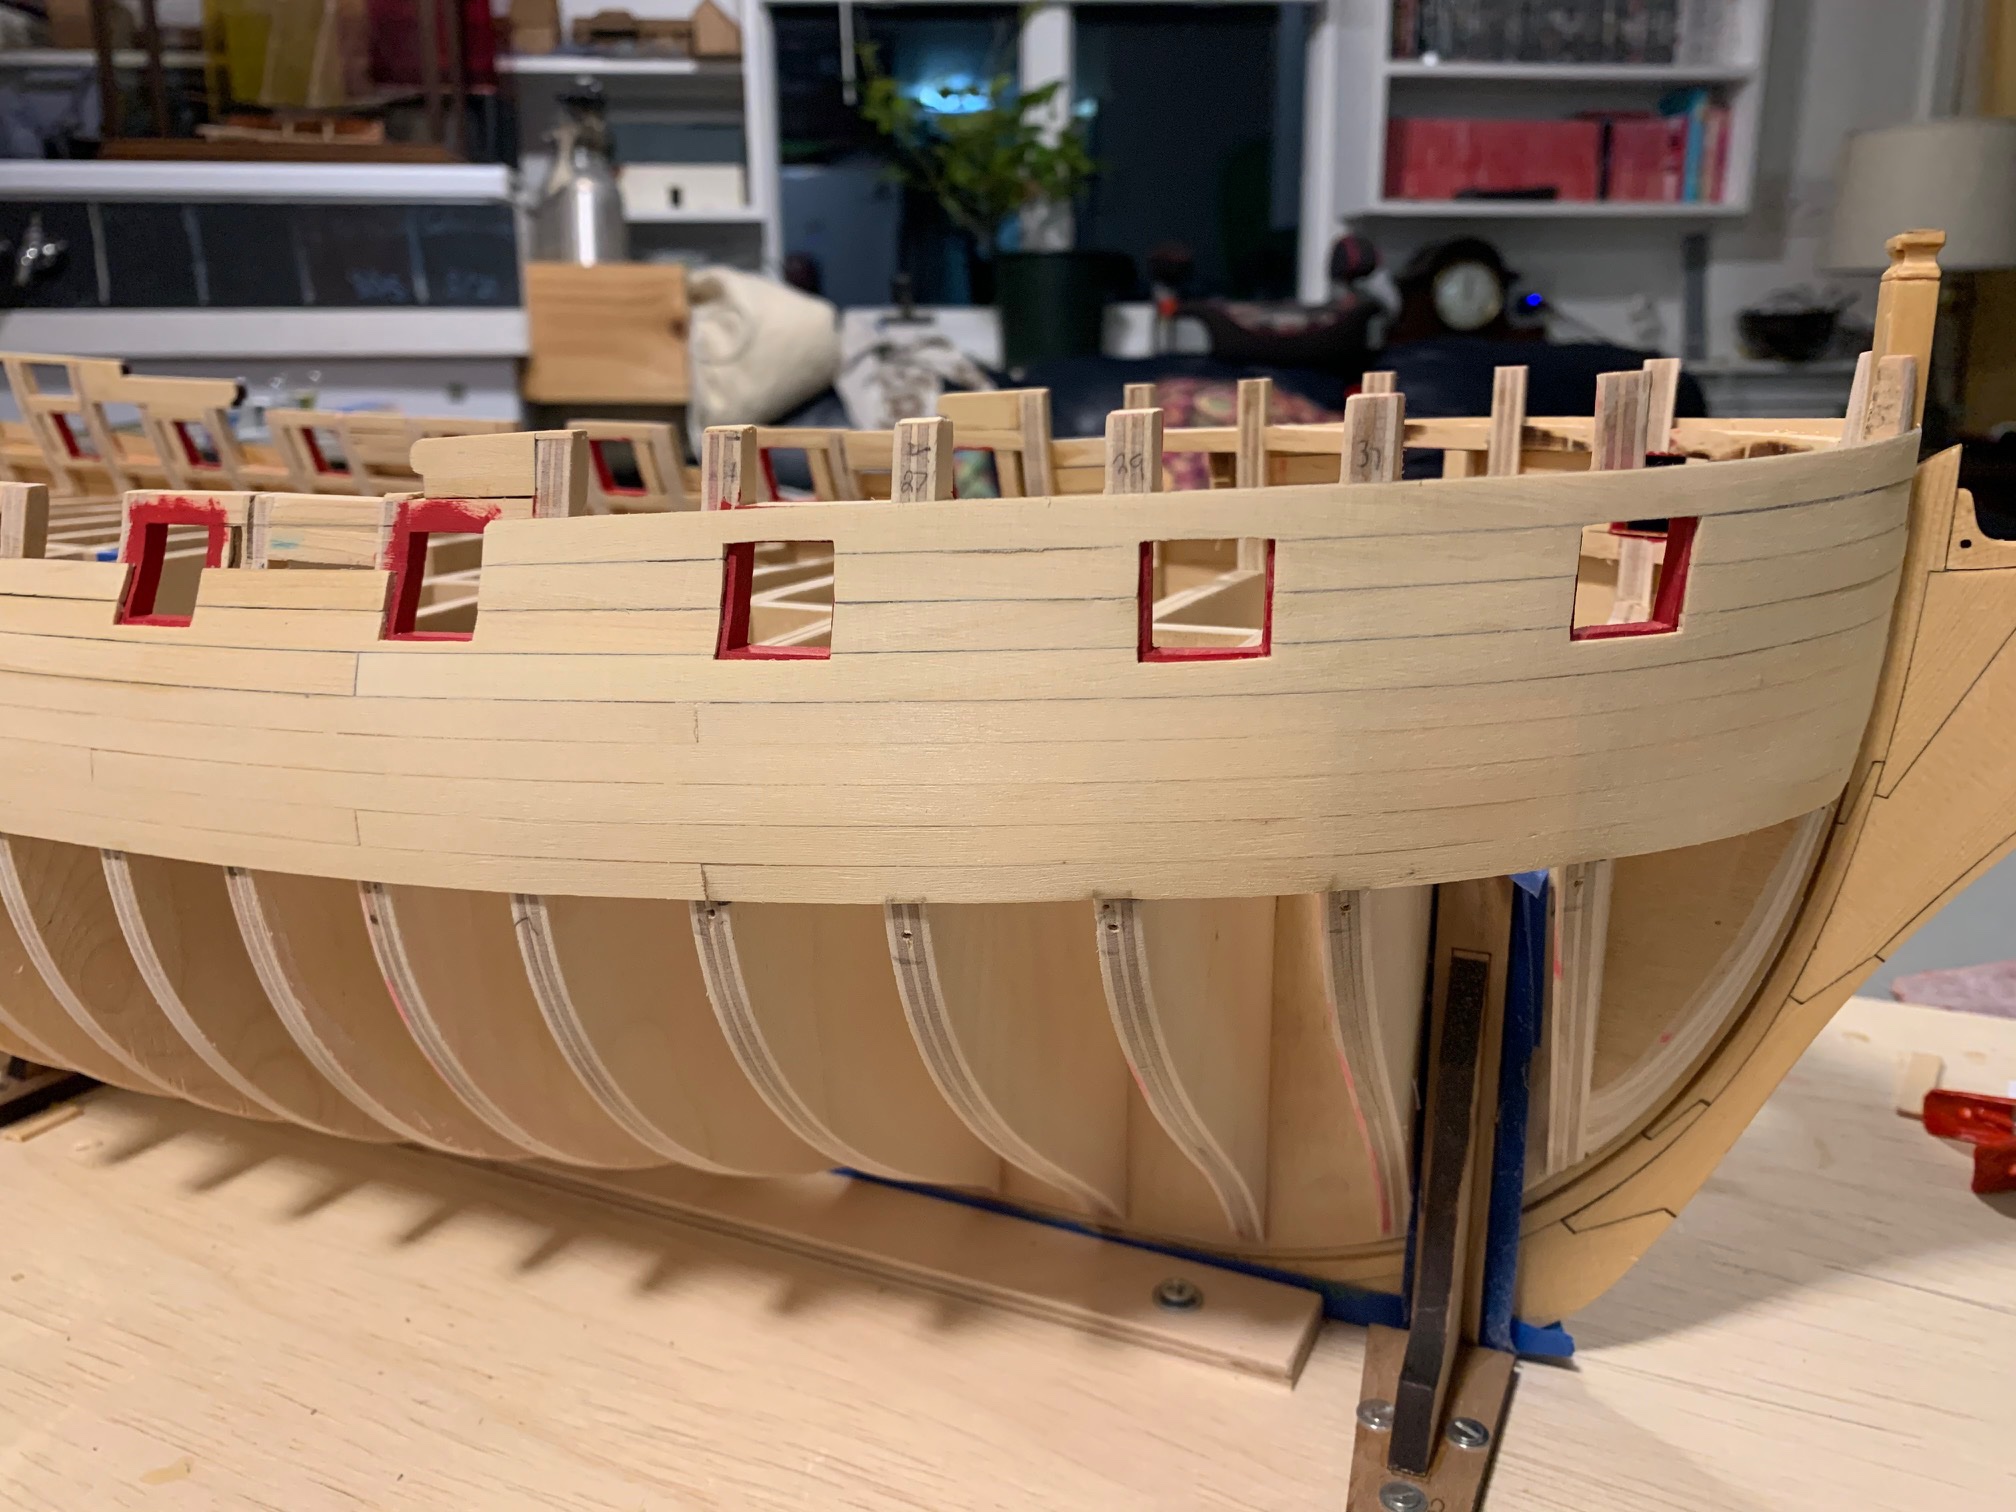
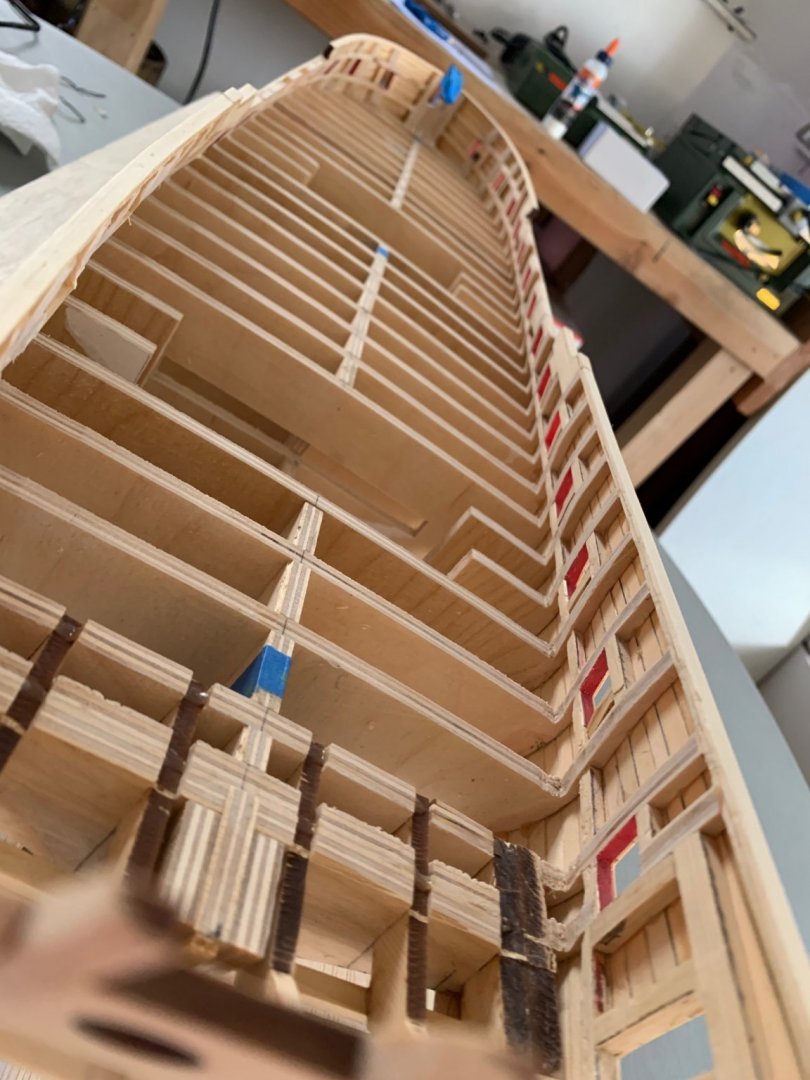
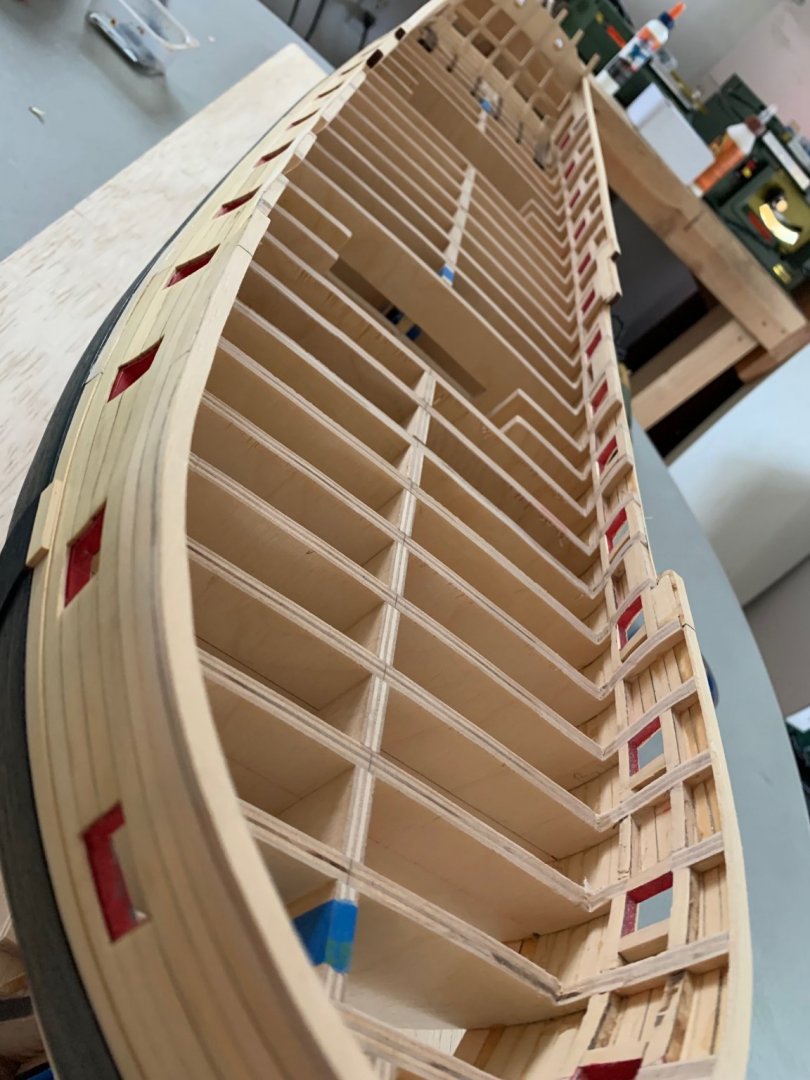
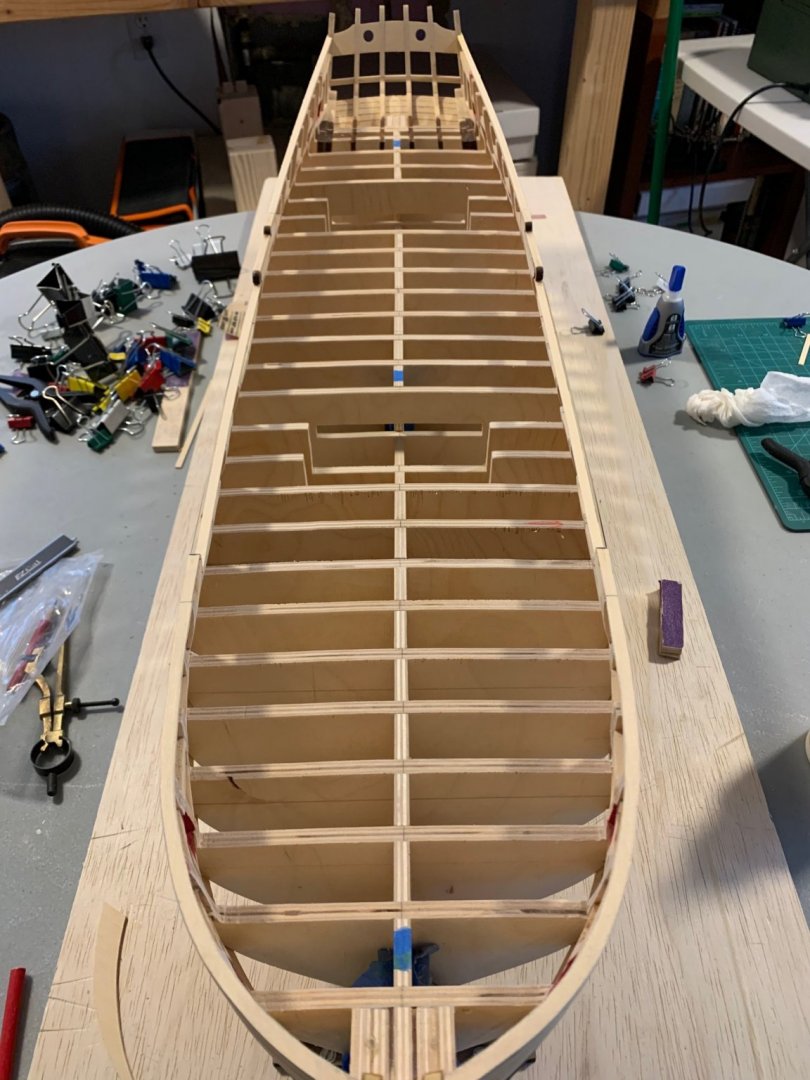
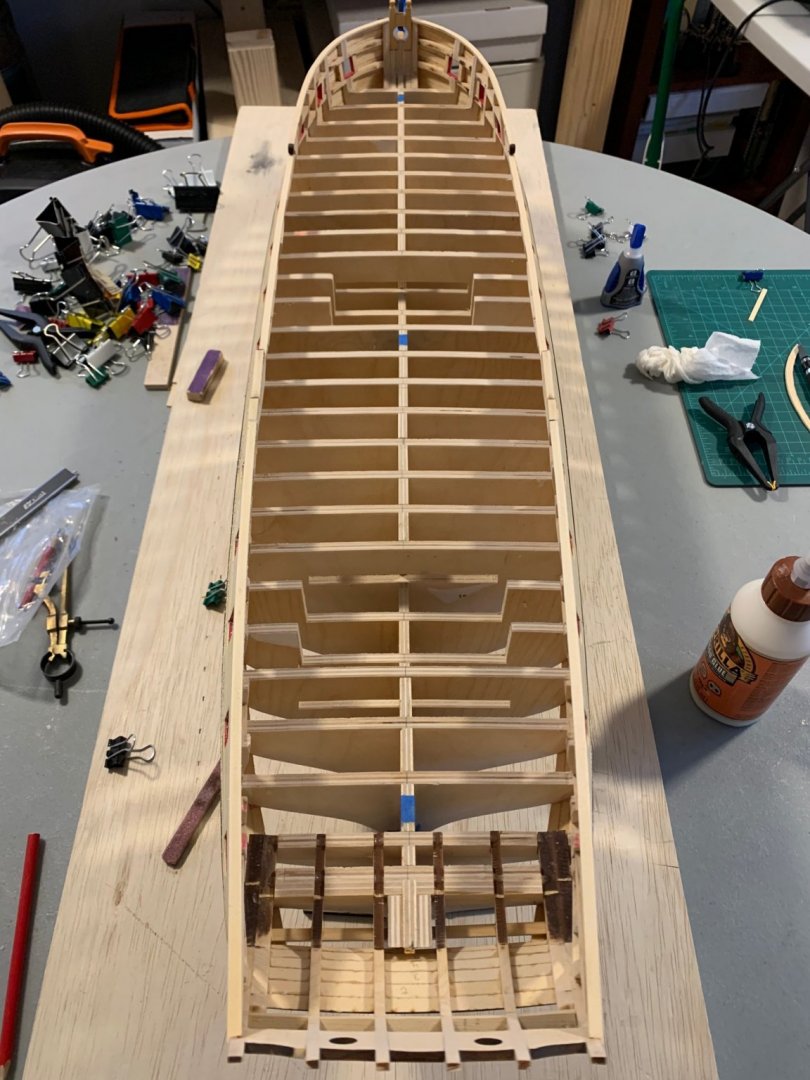
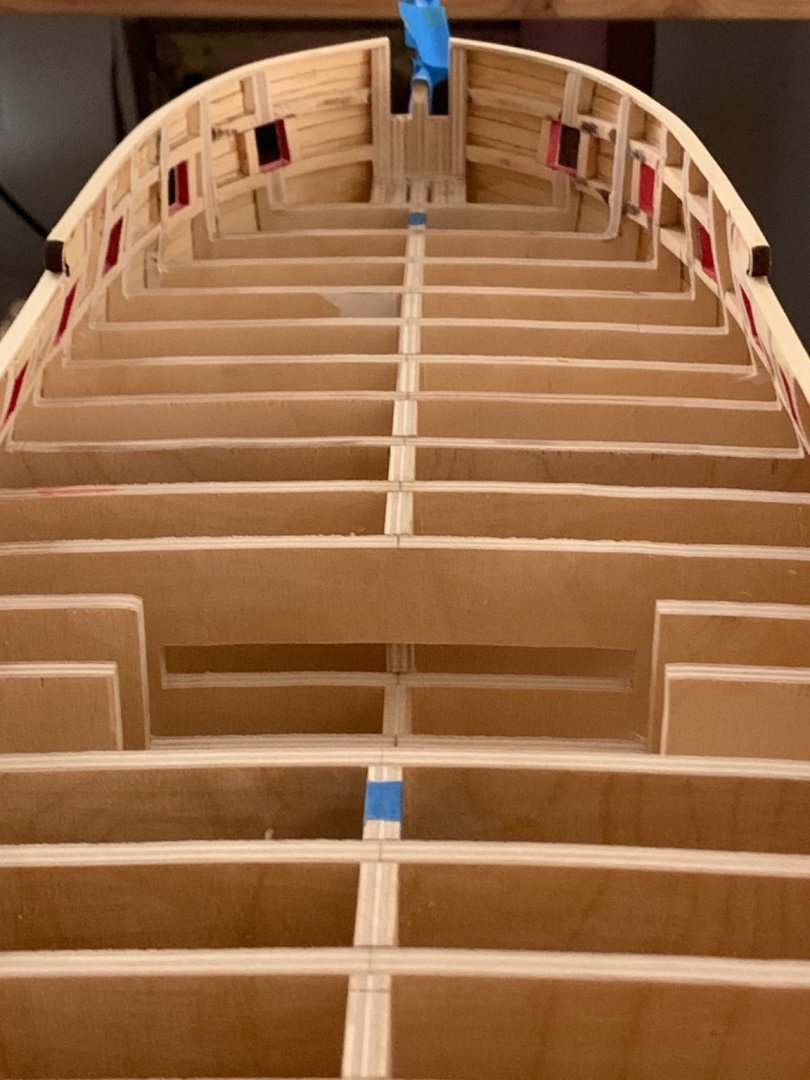
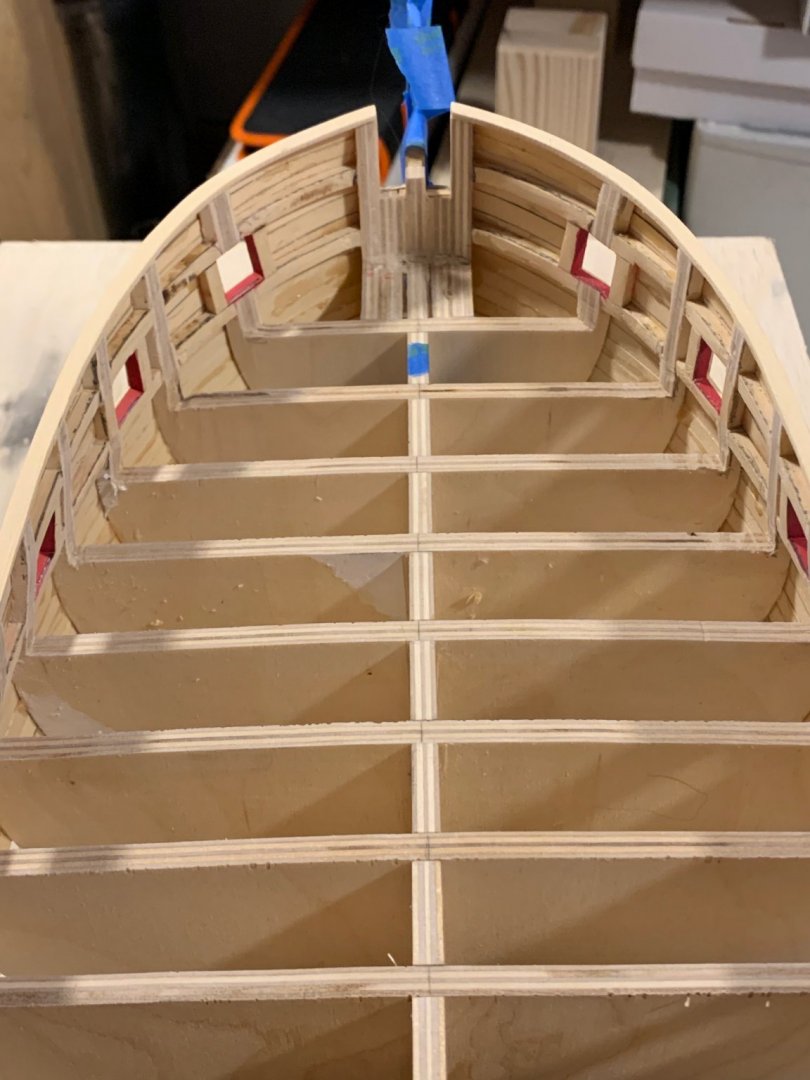
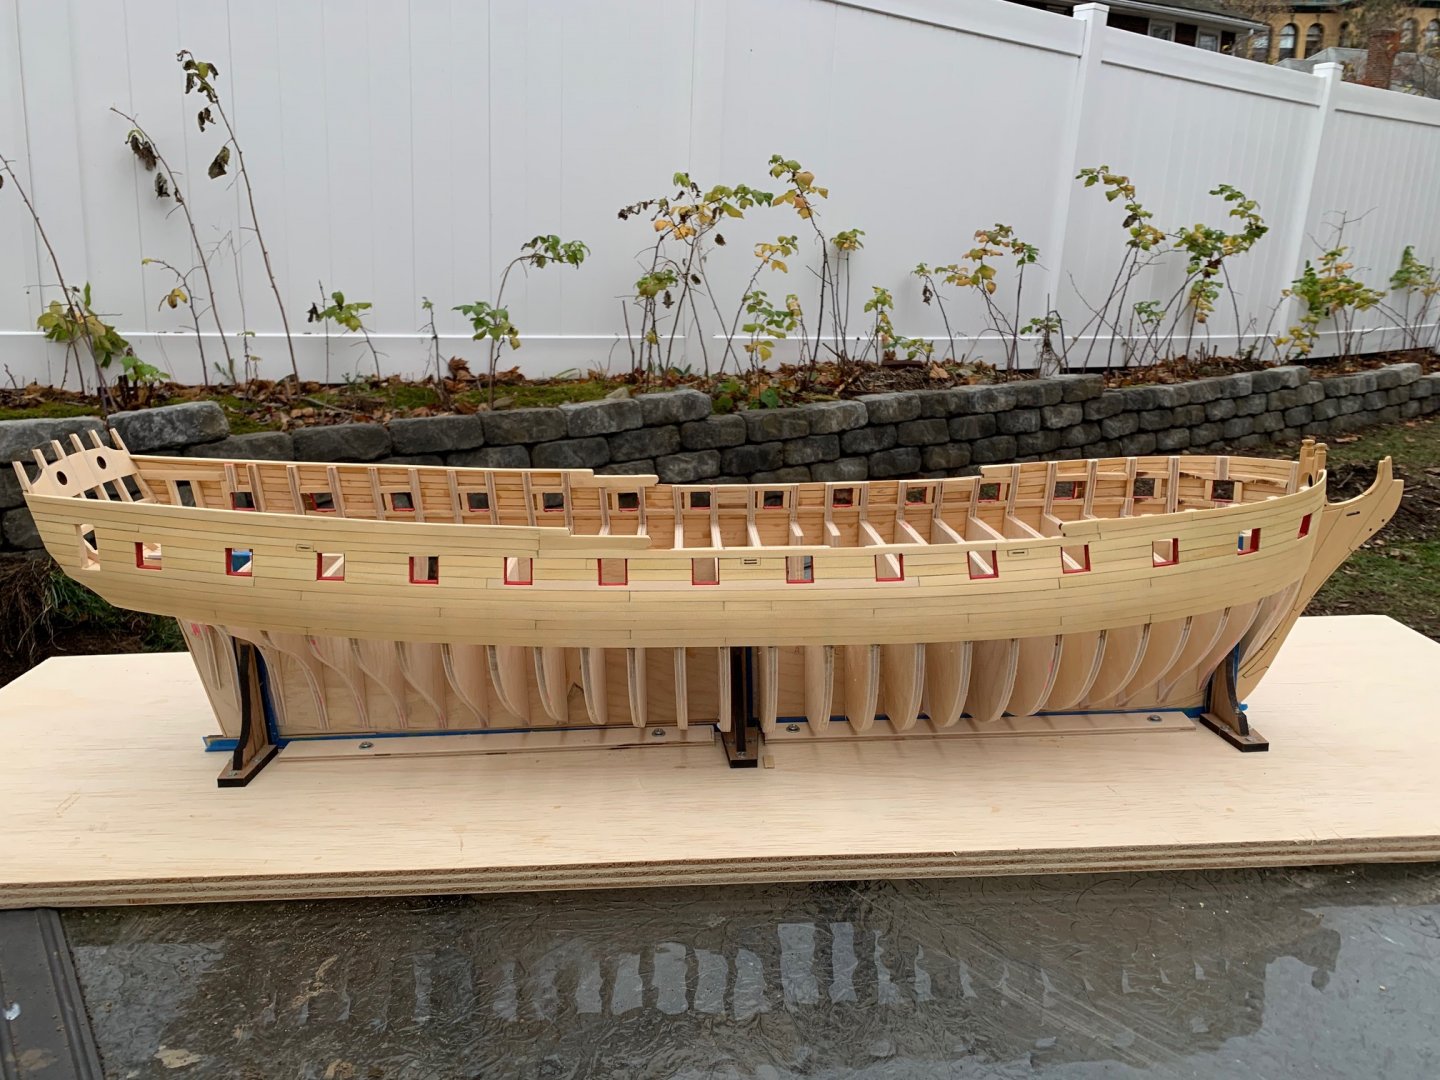
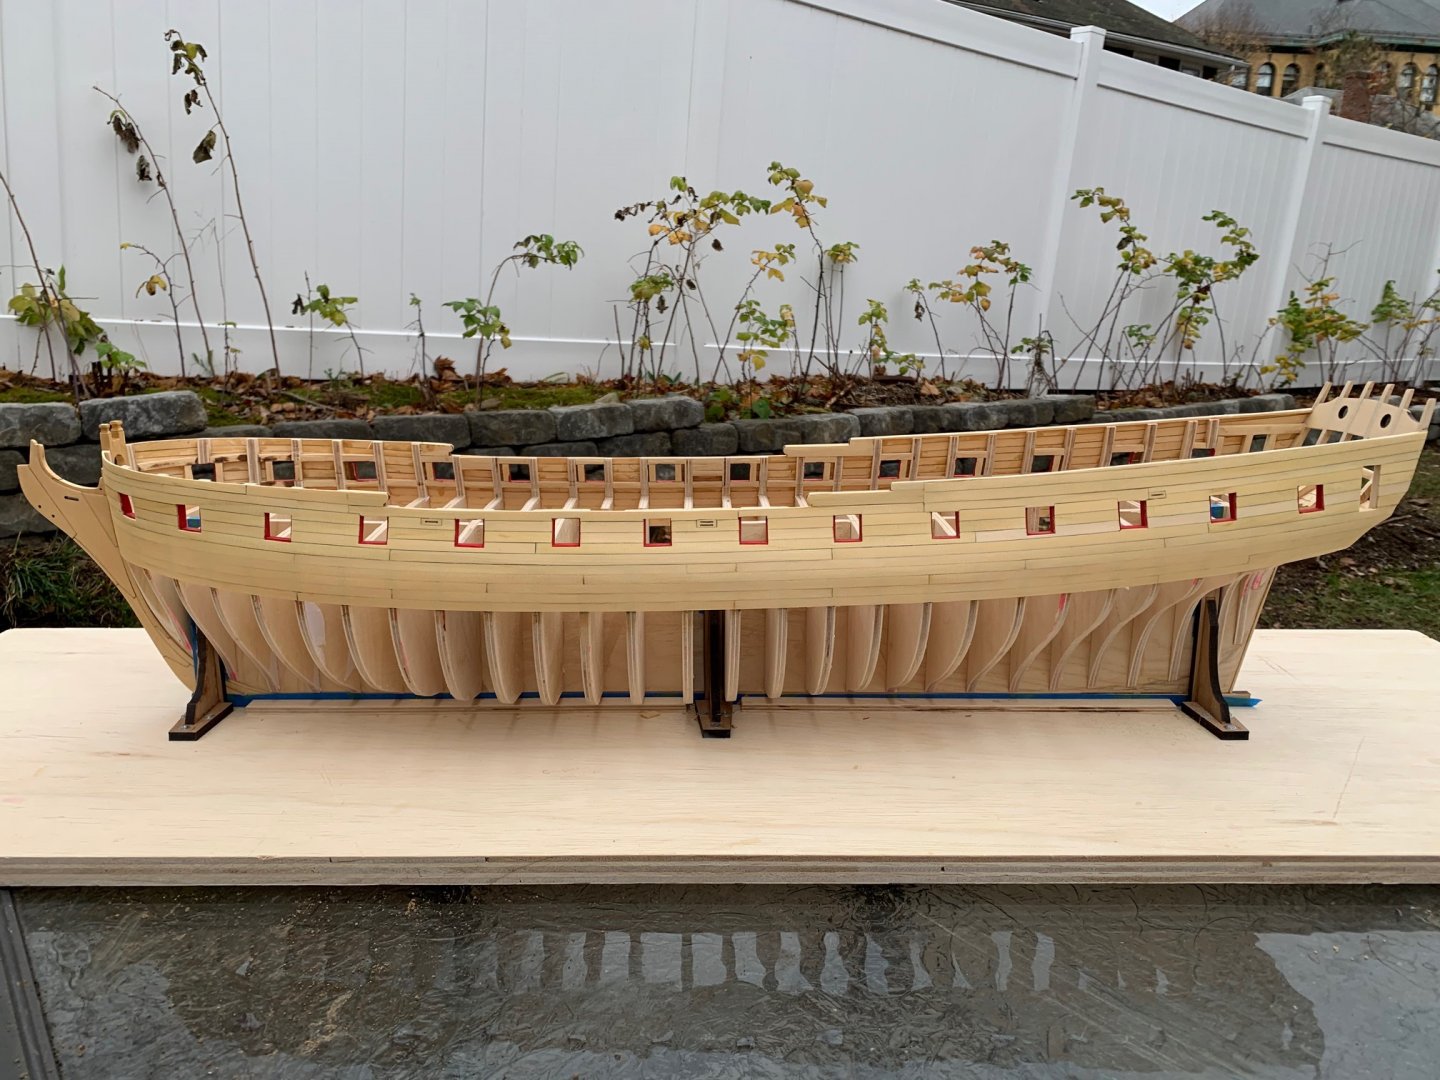
Life just got in the way for the past couple of weeks between the holidays and an amazing amount of random things that needed to be assembled around the house. Haven't even had an opportunity to check in on this forum in a couple weeks, but finally found some time. Finished rough fairing the inside of the hull. There's still about a 1/32" that needs to be still taken down, but all the rough edges have been removed and the final sanding can wait for a bit. Moving onto the stern, I got pretty aggressive with the drum sander on the aft most frames before marking off the cedar. There was just so much plywood to remove that taking it down gave better access to the cedar. I trimmed up the cedar around the aft most gunport and then very slowly and carefully chiseled down frame 28 that made up half of the gunport. In the future, I wold definitely cut those frame back further and frame out the entire gunport. Gunport 14 on both sides was remarkably time consuming trimming up and tested my patience more than an 8 year old. 4 chisel blades later, it cleaned up well. Once that gunport was done, the rest of the frames fell in line pretty quickly. In the last couple days I finally got to break out the tick strips, so I should begin planking the first belt this weekend. I really struggled with the tick marks on the stern. Belts 3 and 4 eyeballed up very well with the appropriate belt mark on the frames, but I kept getting an extra plank width in belt 1 and 2. I tried dividing out 6 plank widths on belt one before realizing that I should run a batten across the frame lines (the line across the filler piece and lower counter). The marks for the belts along the stern post were all good, but I was way off with the one on the counter. Regardless, I'll fix the tick marks for belt one and wait until after finishing the first belt before adjusting belt 2. Fun is about to begin. Can't wait.
-
Looking awesome JJ; trying to find the moulding you need to fix and can't see it.
-
Thanks Edward. I ended up buying a small shop vac so I can hold the Dremel in one hand and the hose in the other and it's been good at reducing the amount of dust that flies around. Aggressive hand sanding though I still try to bring it outside, which won't really be an option in my neck of the woods for a few more months.
-
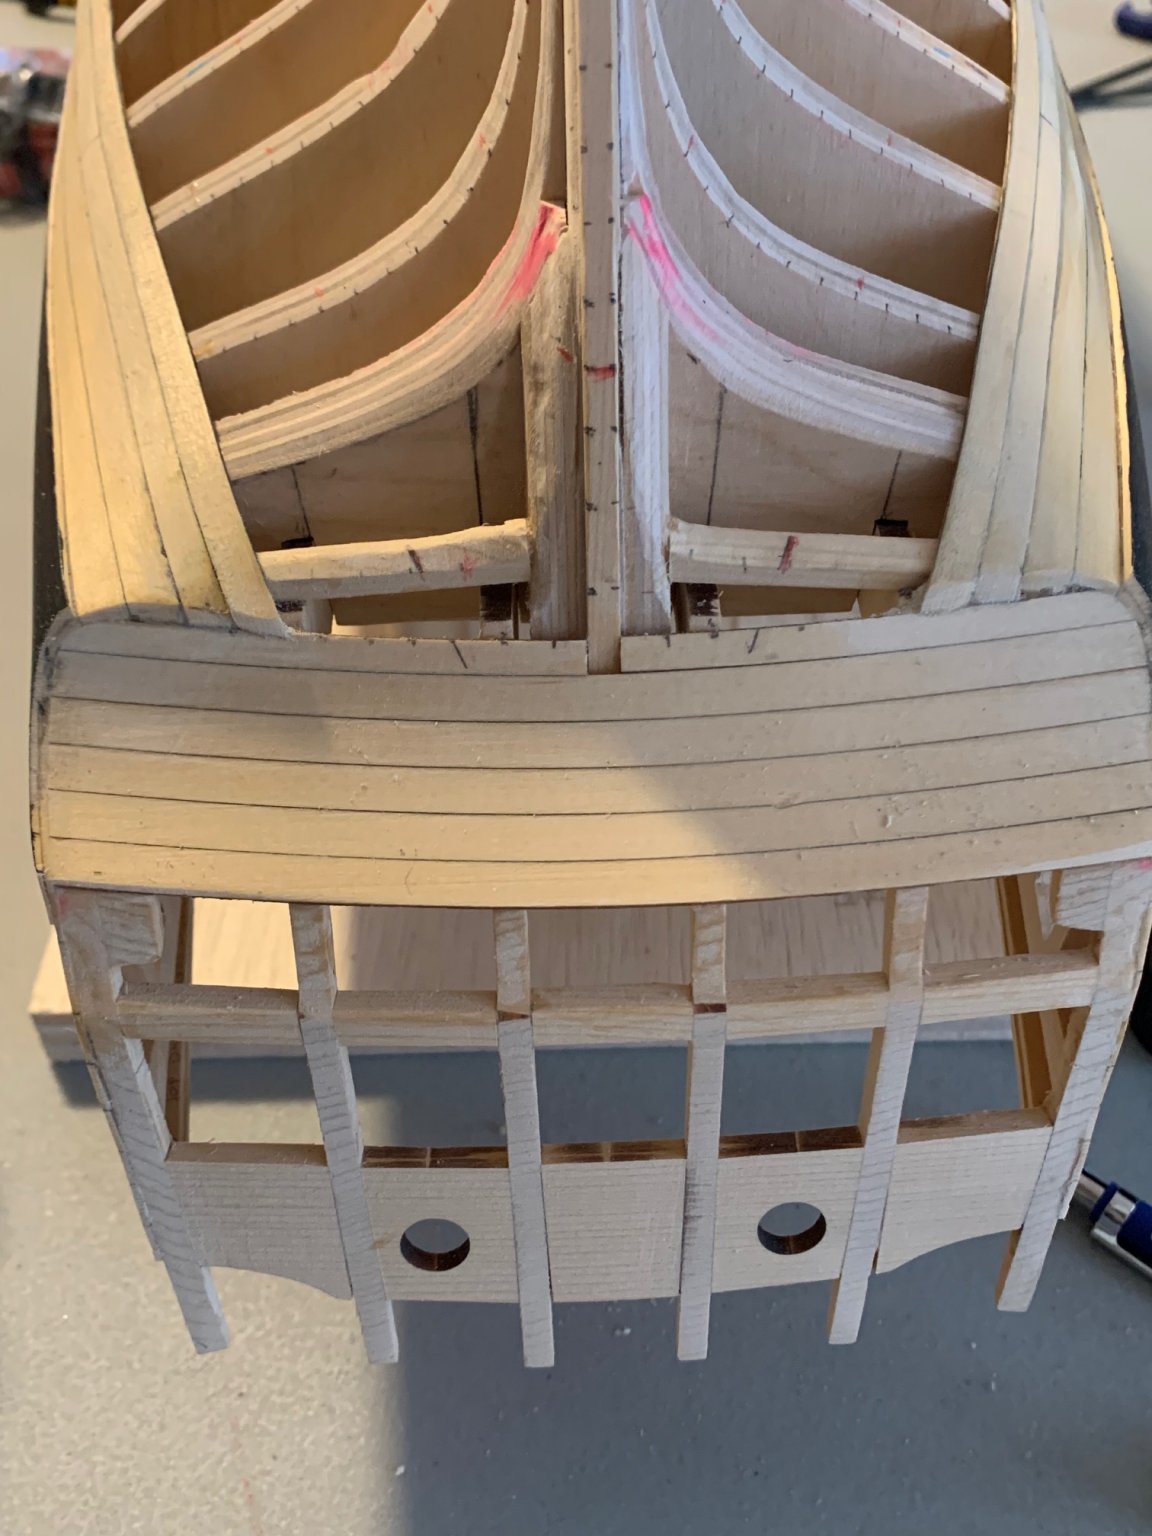
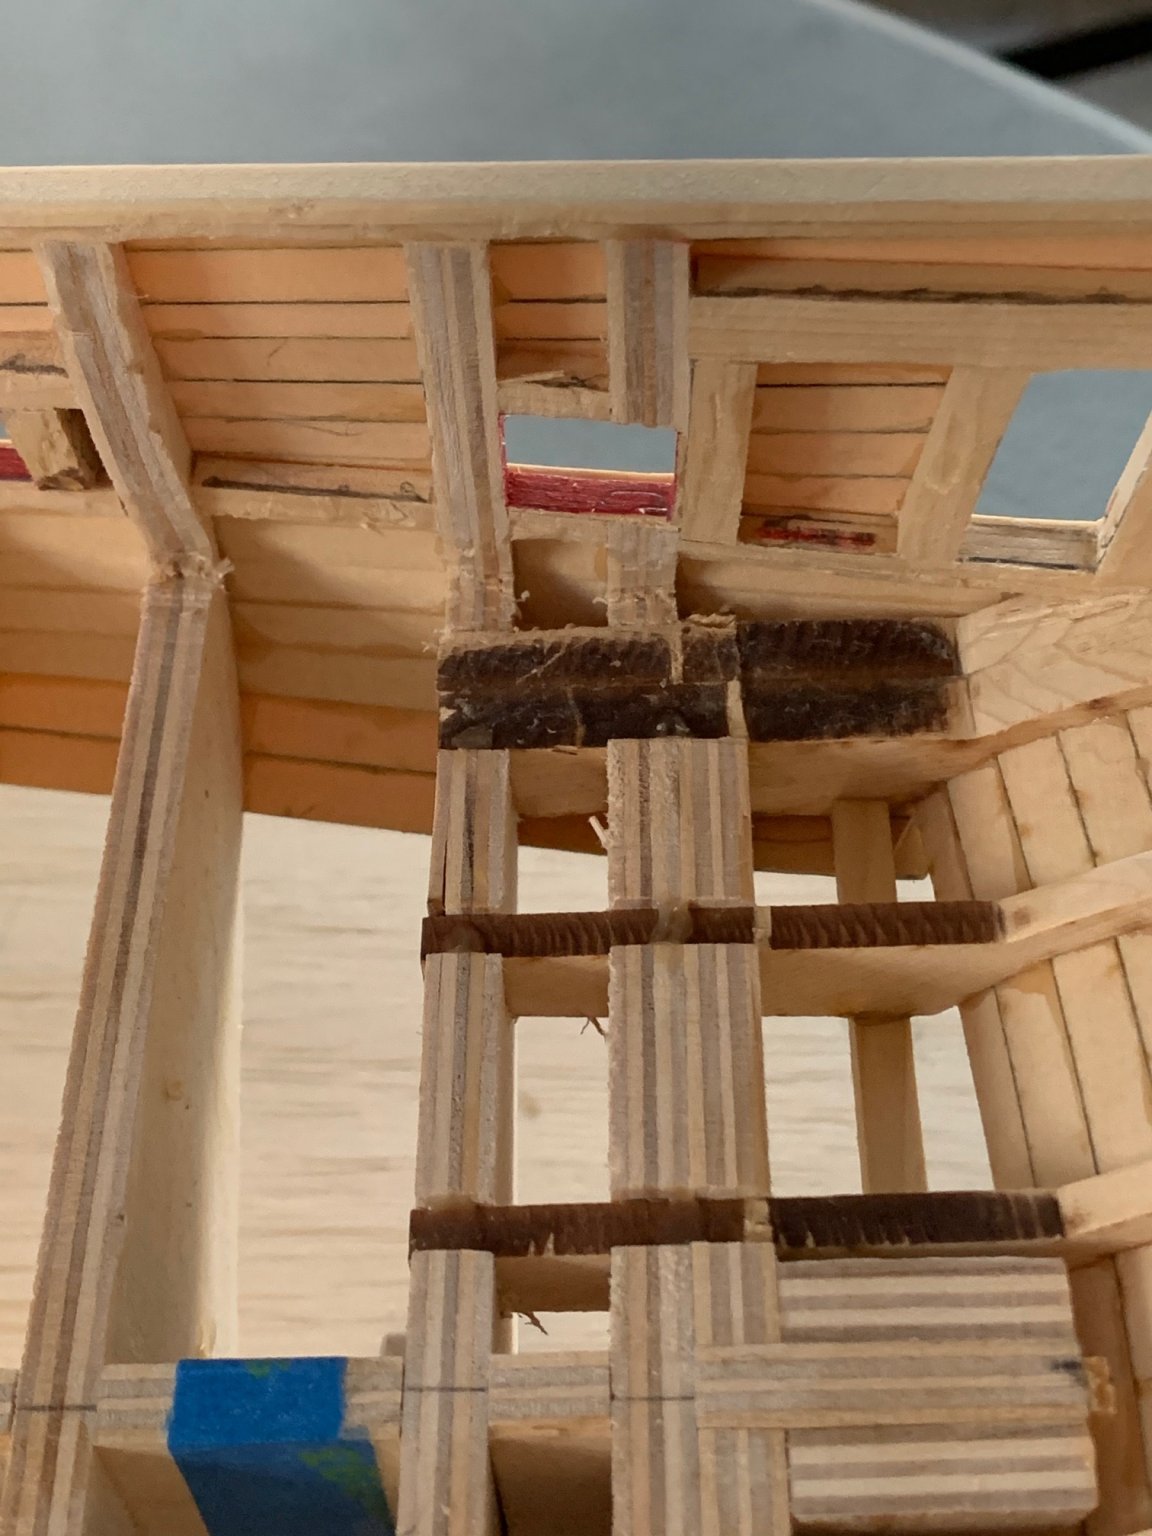
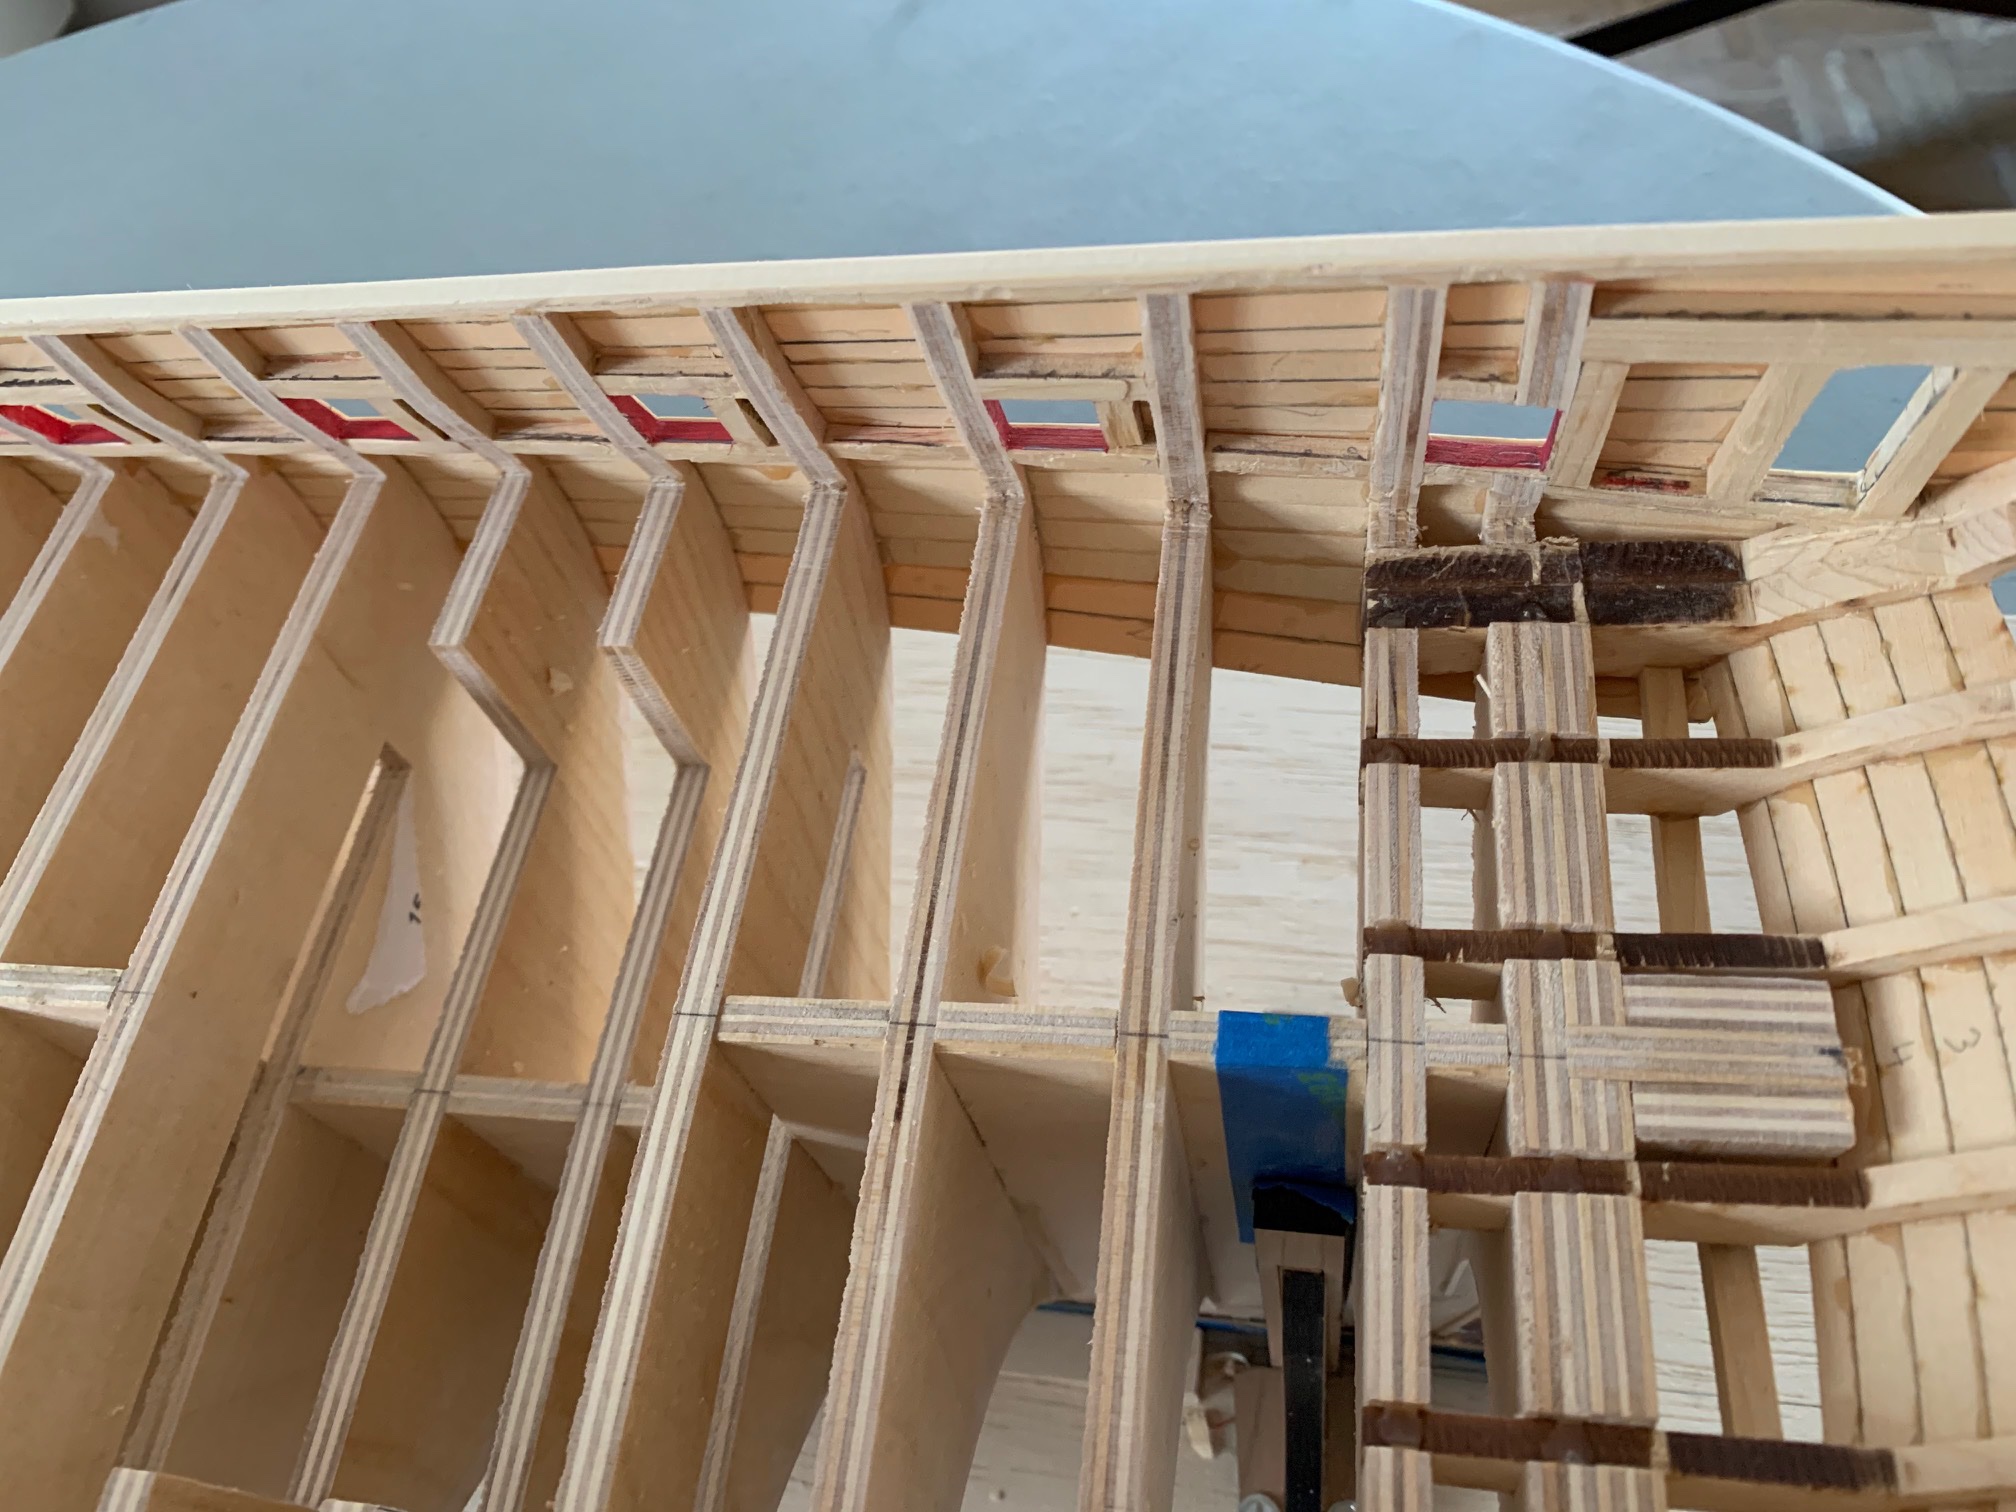
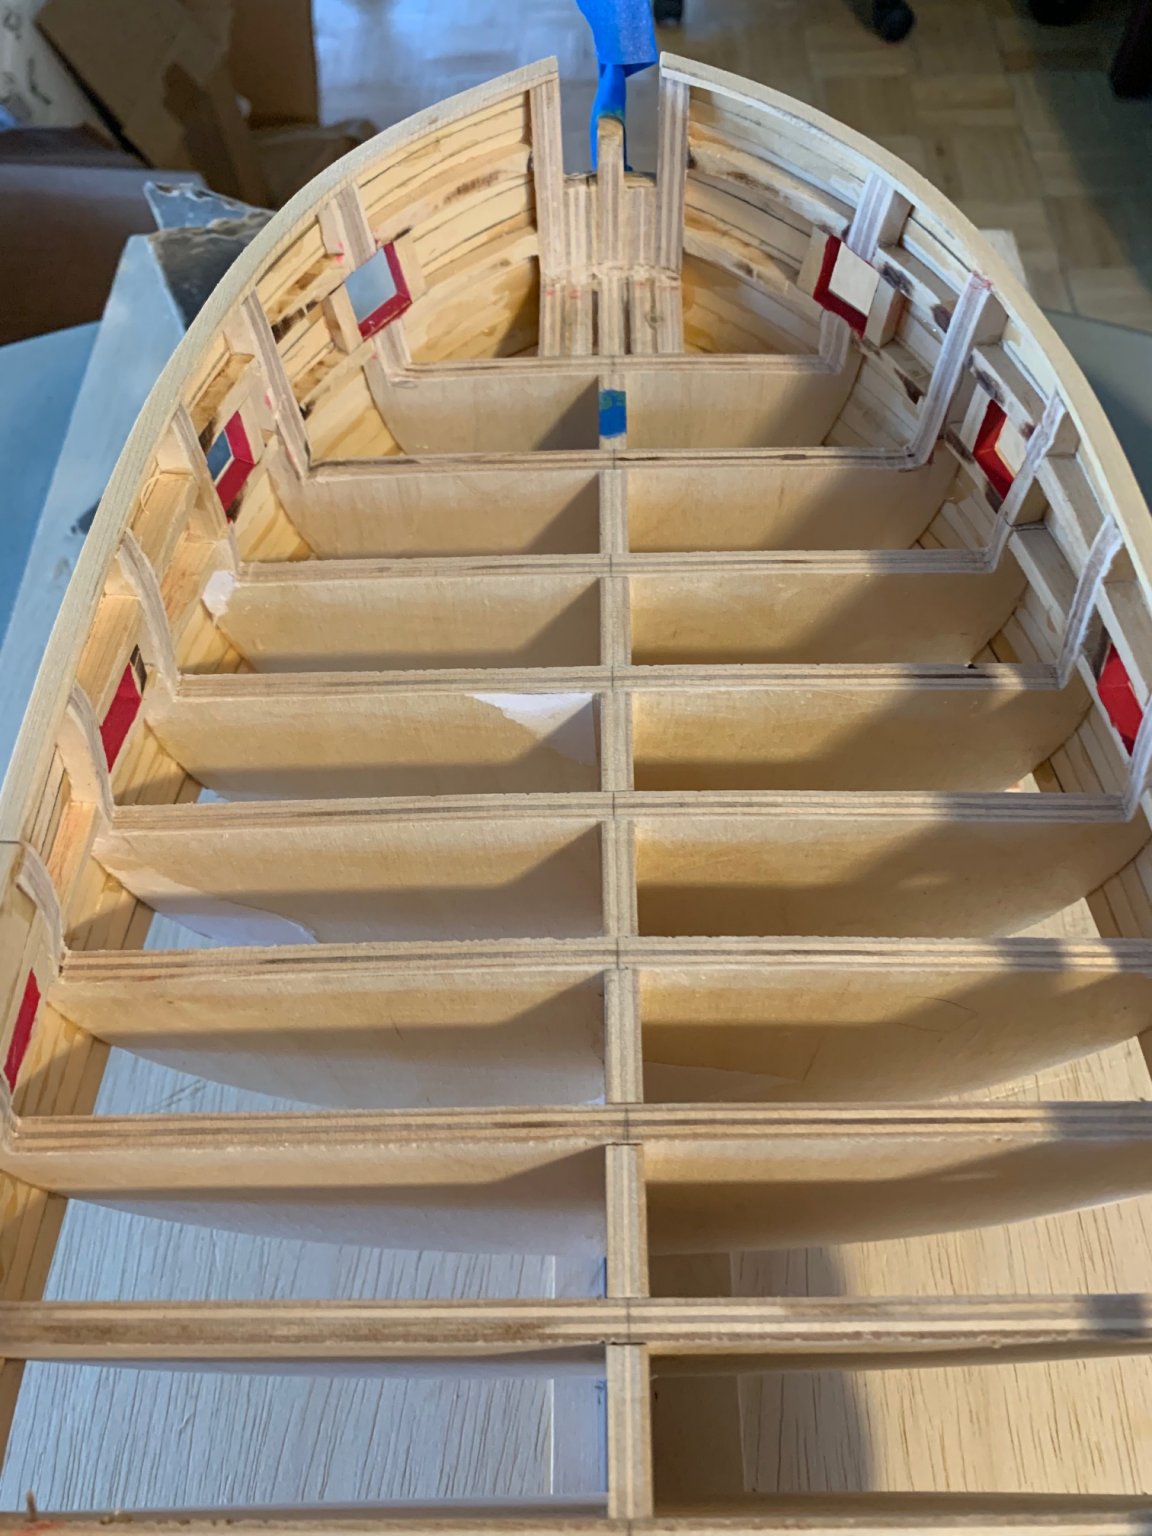
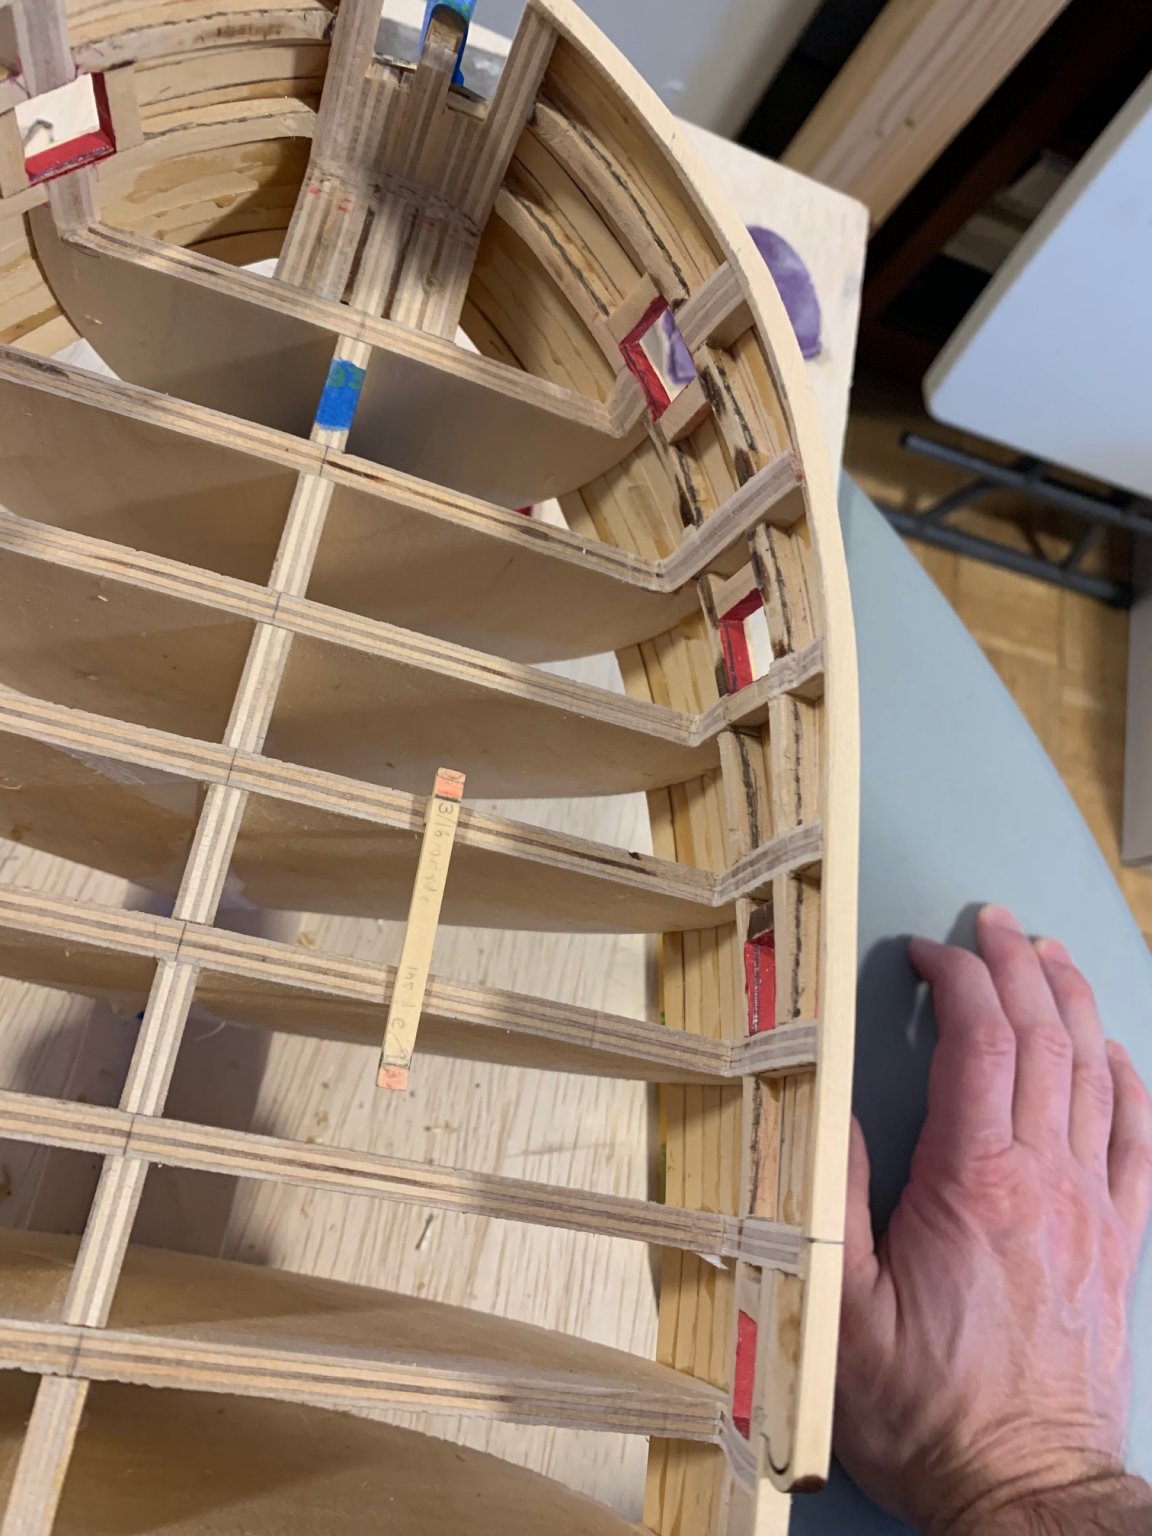
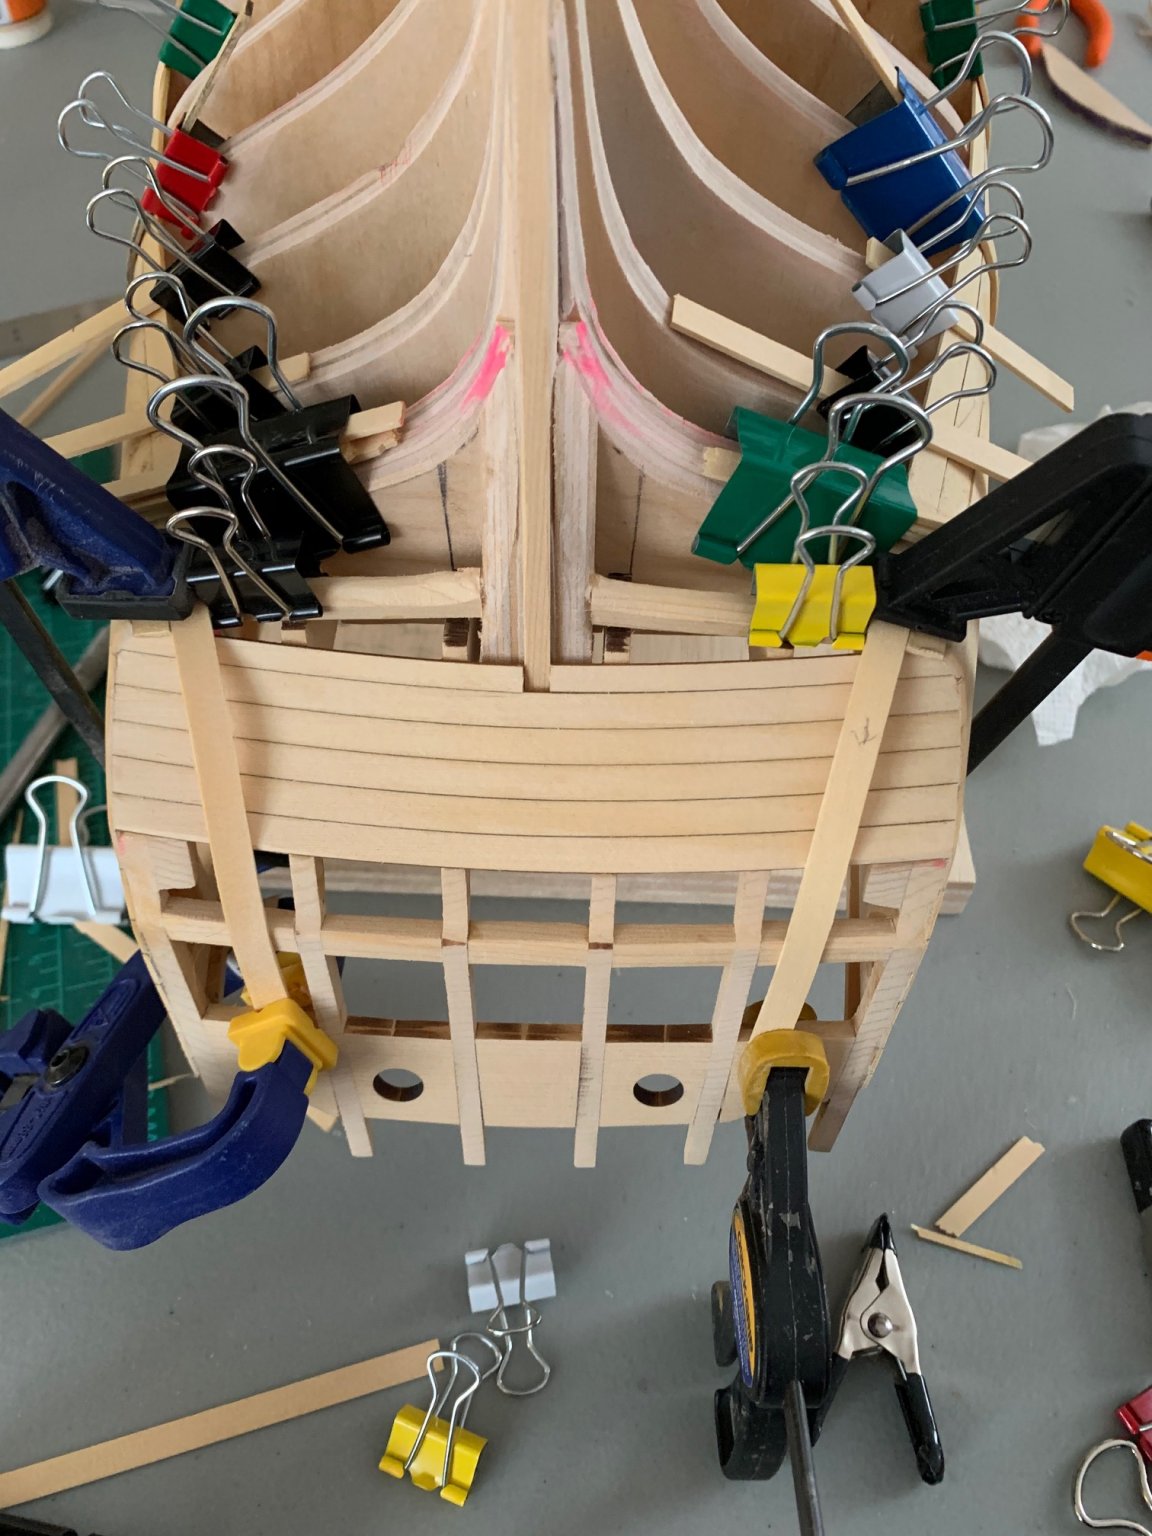
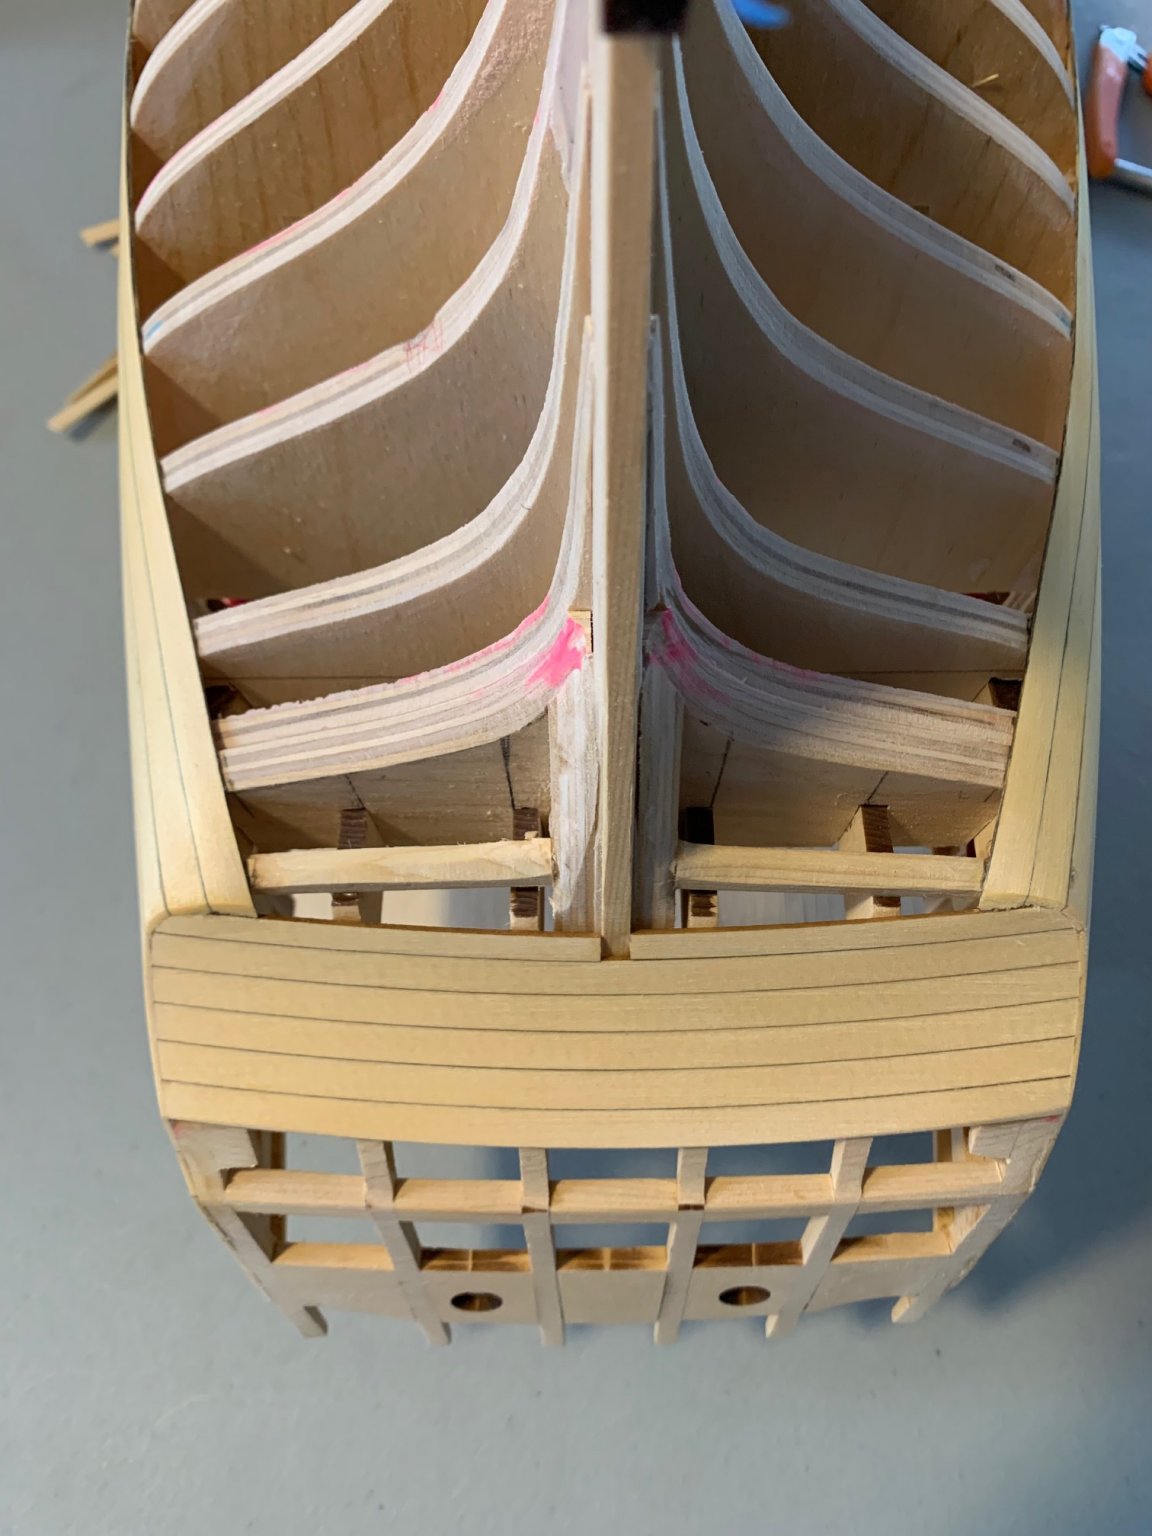
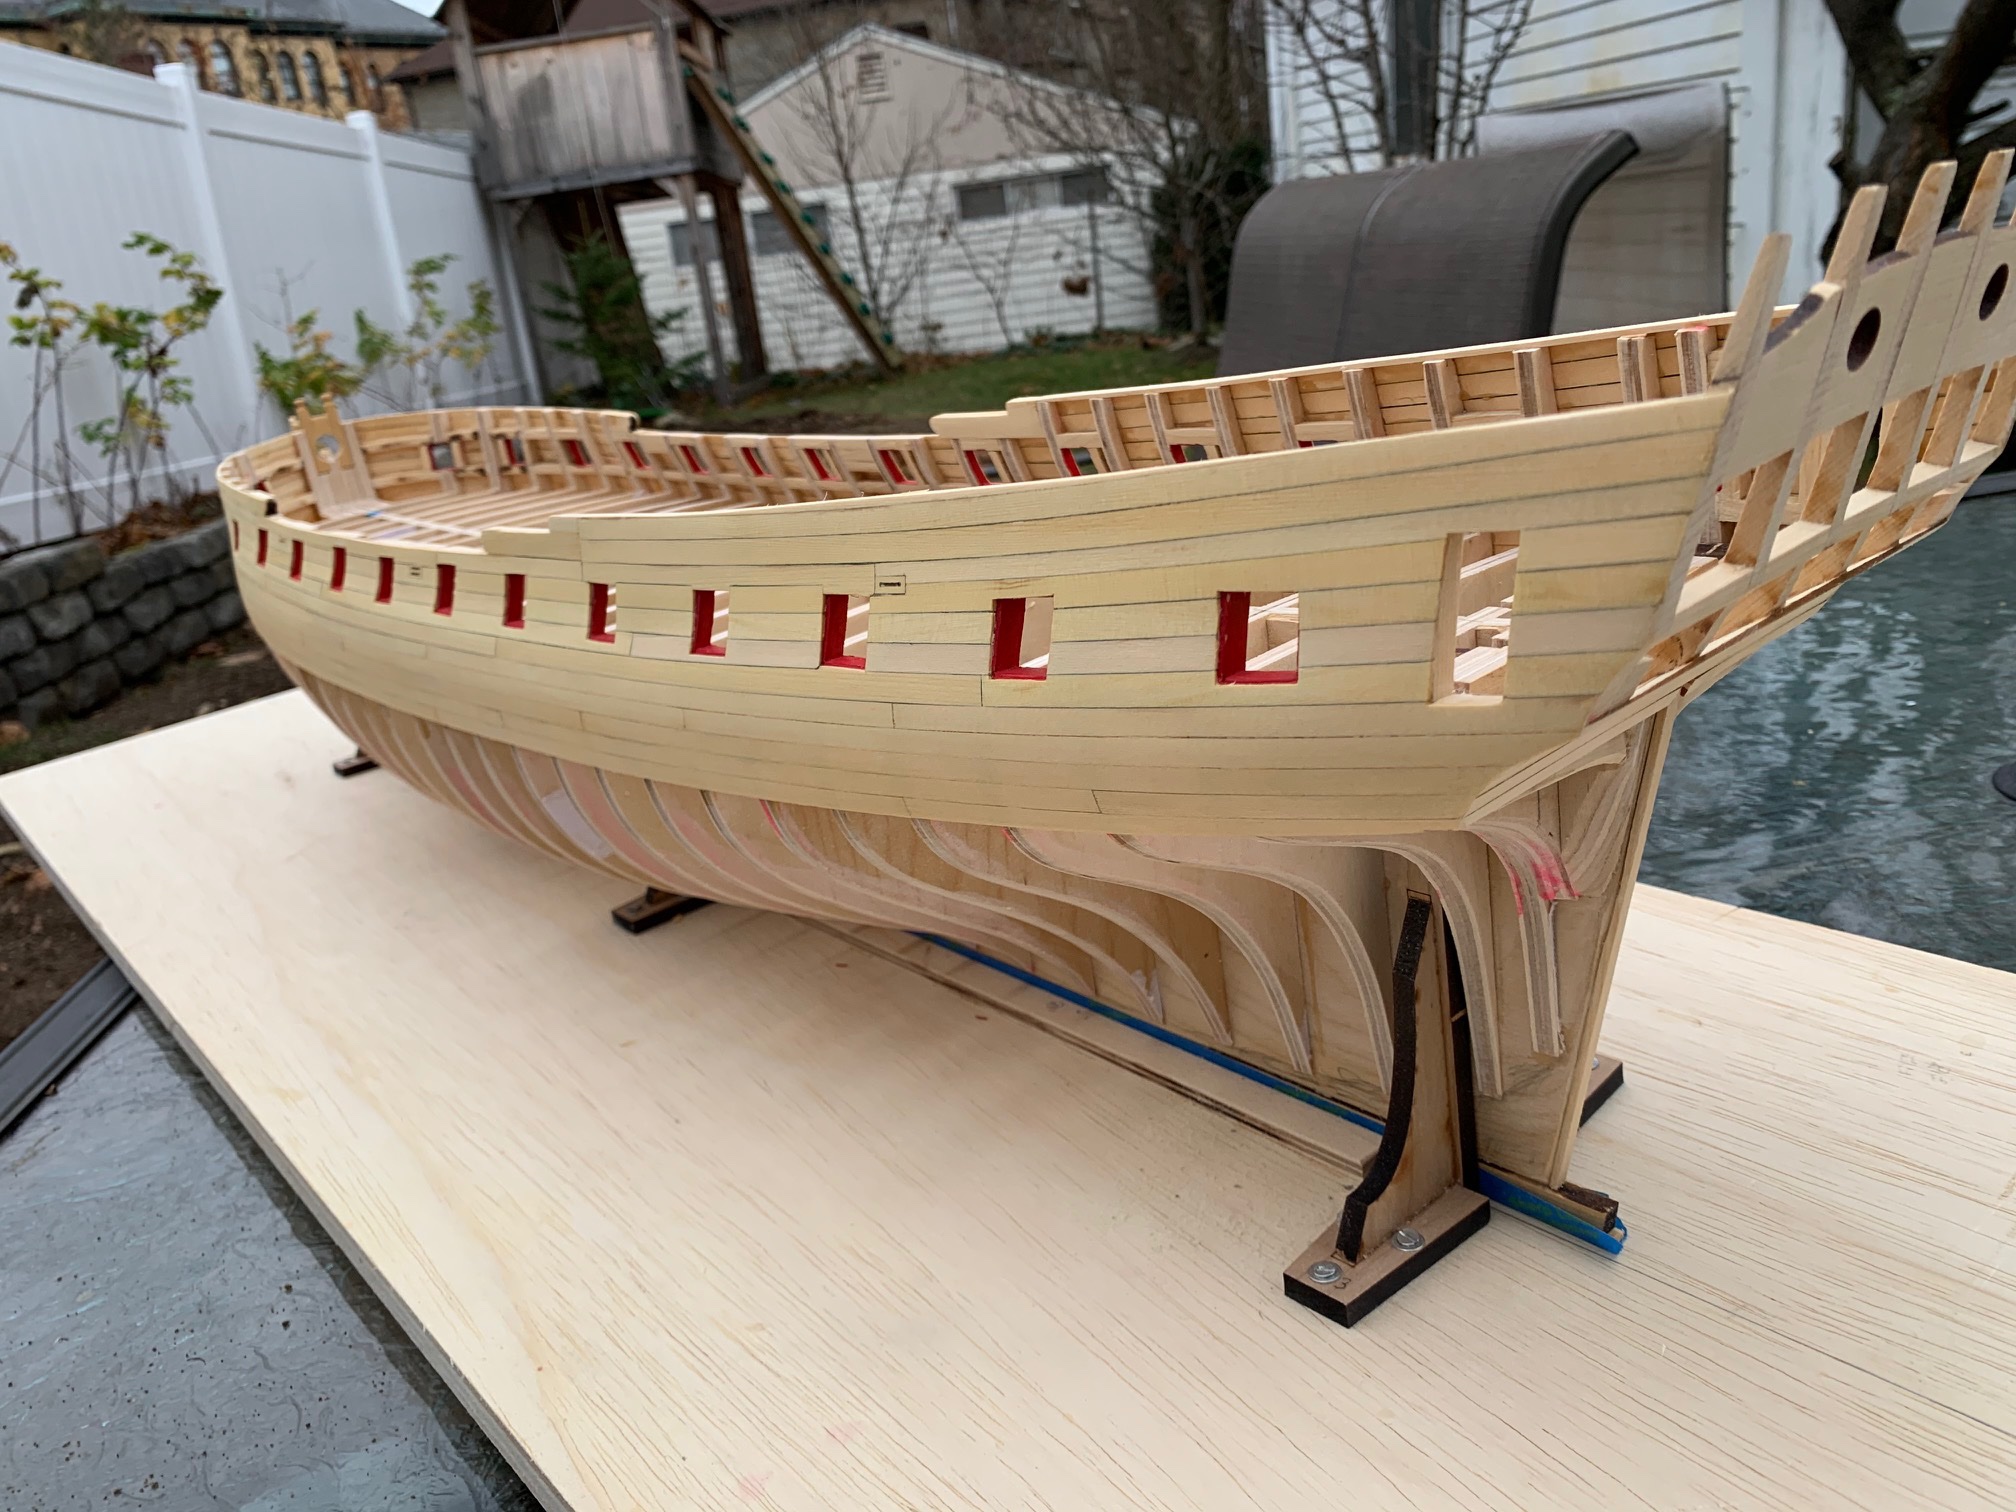
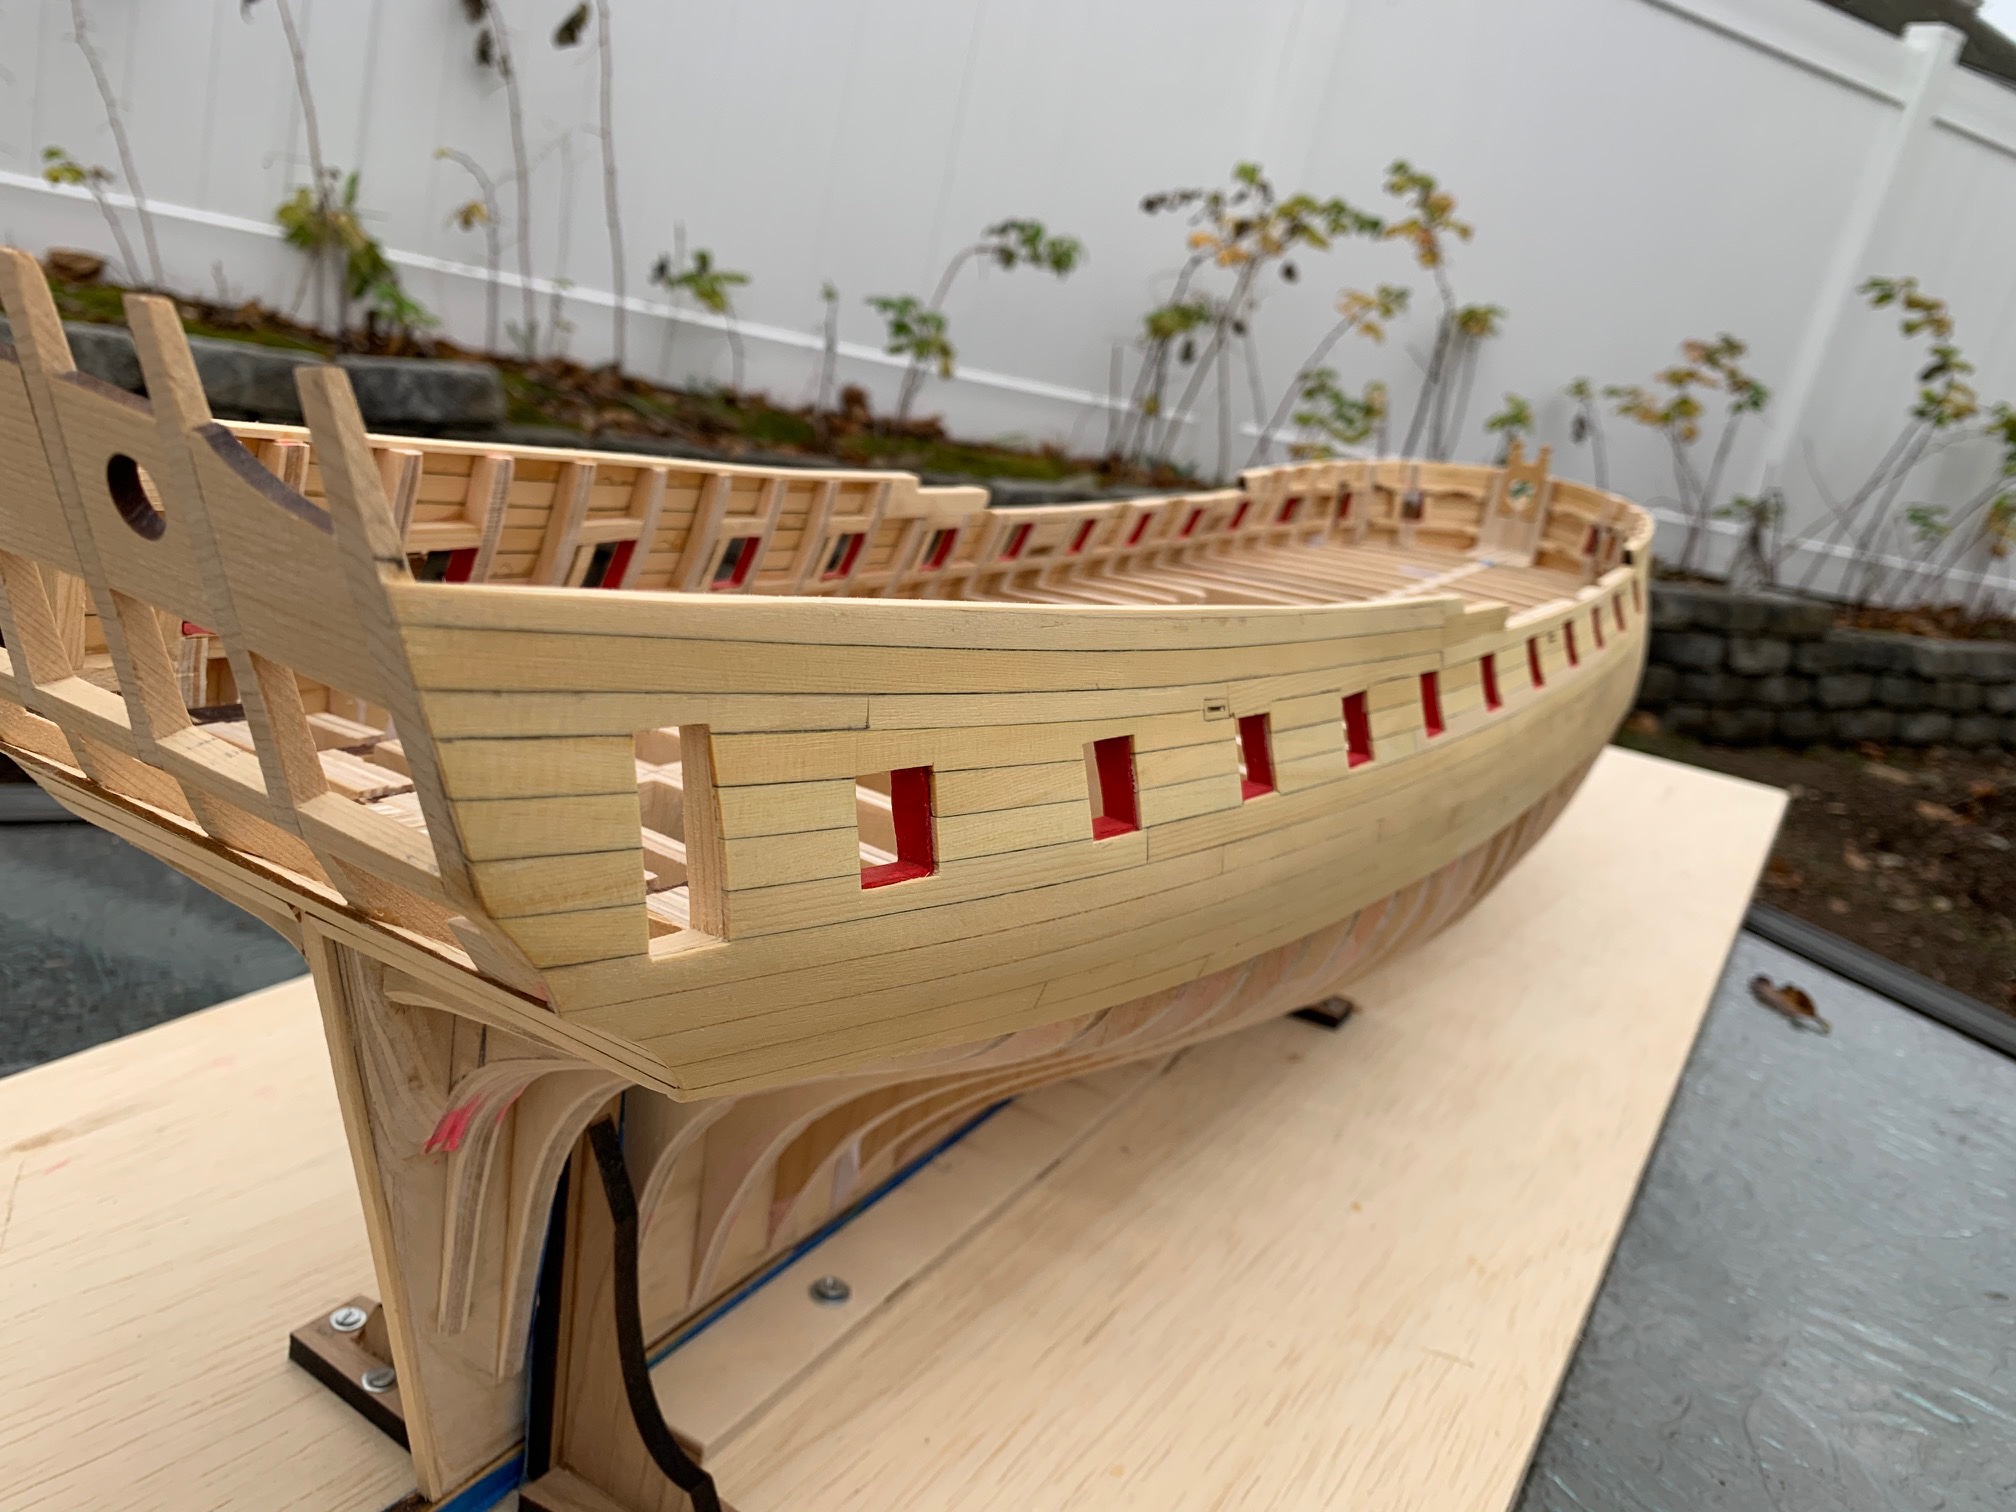
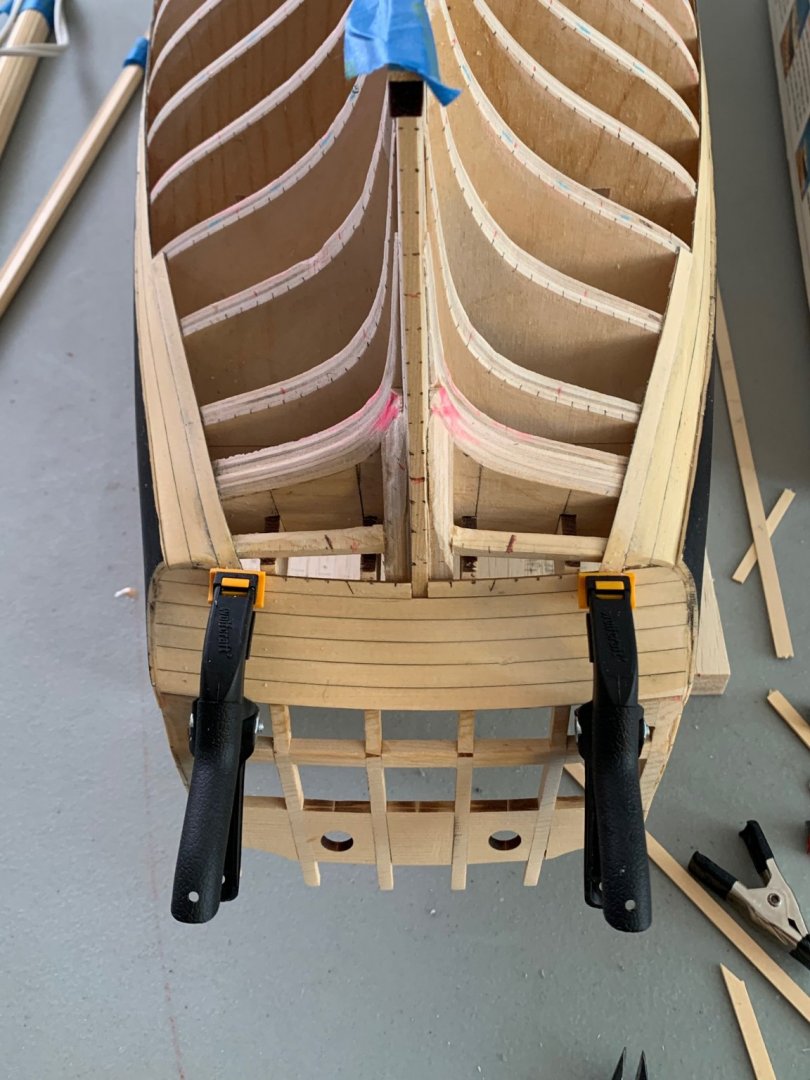
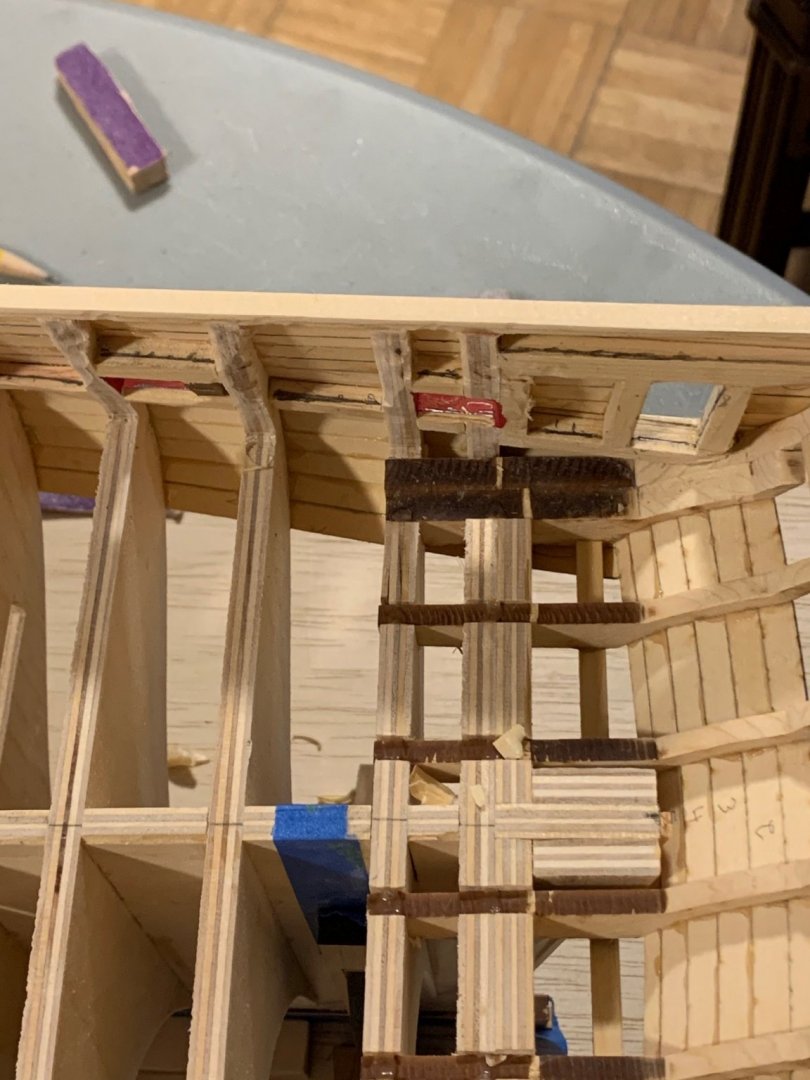
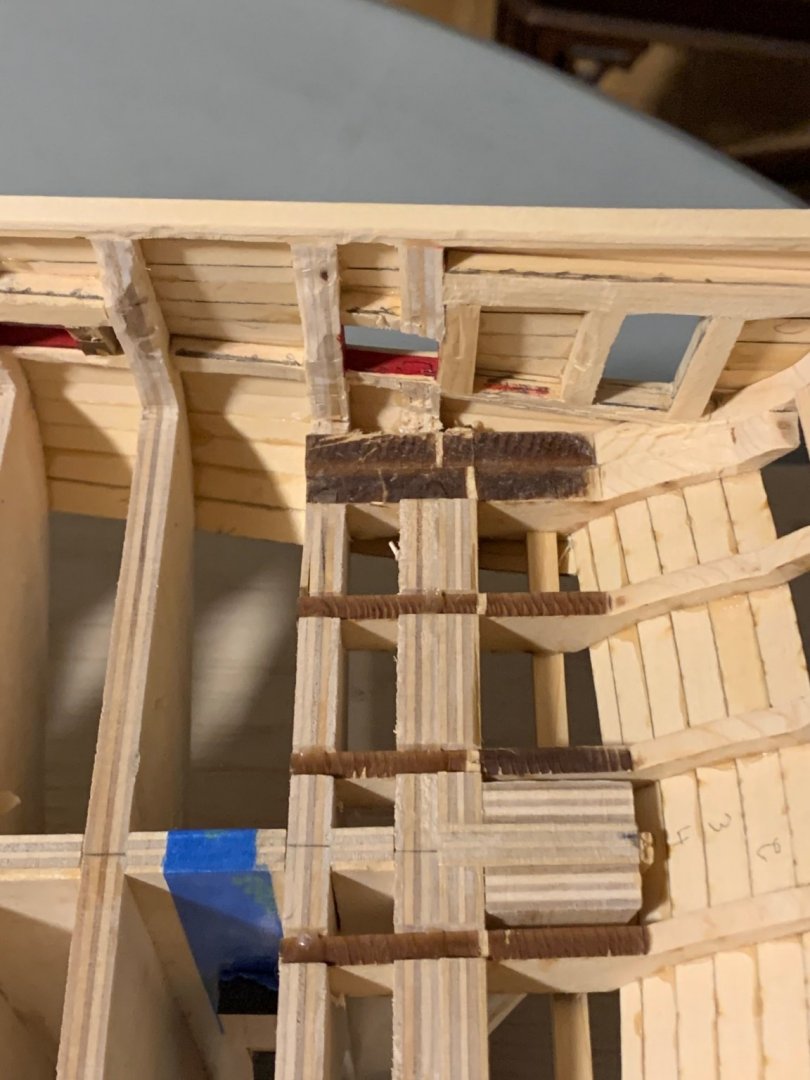
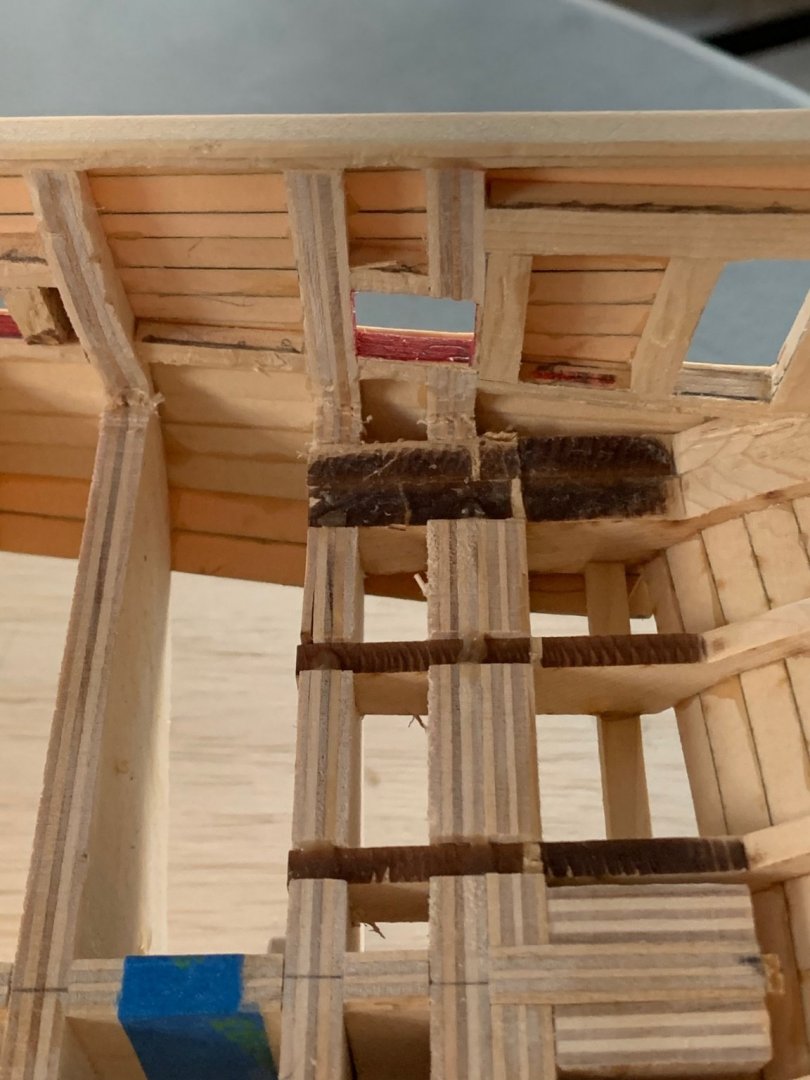
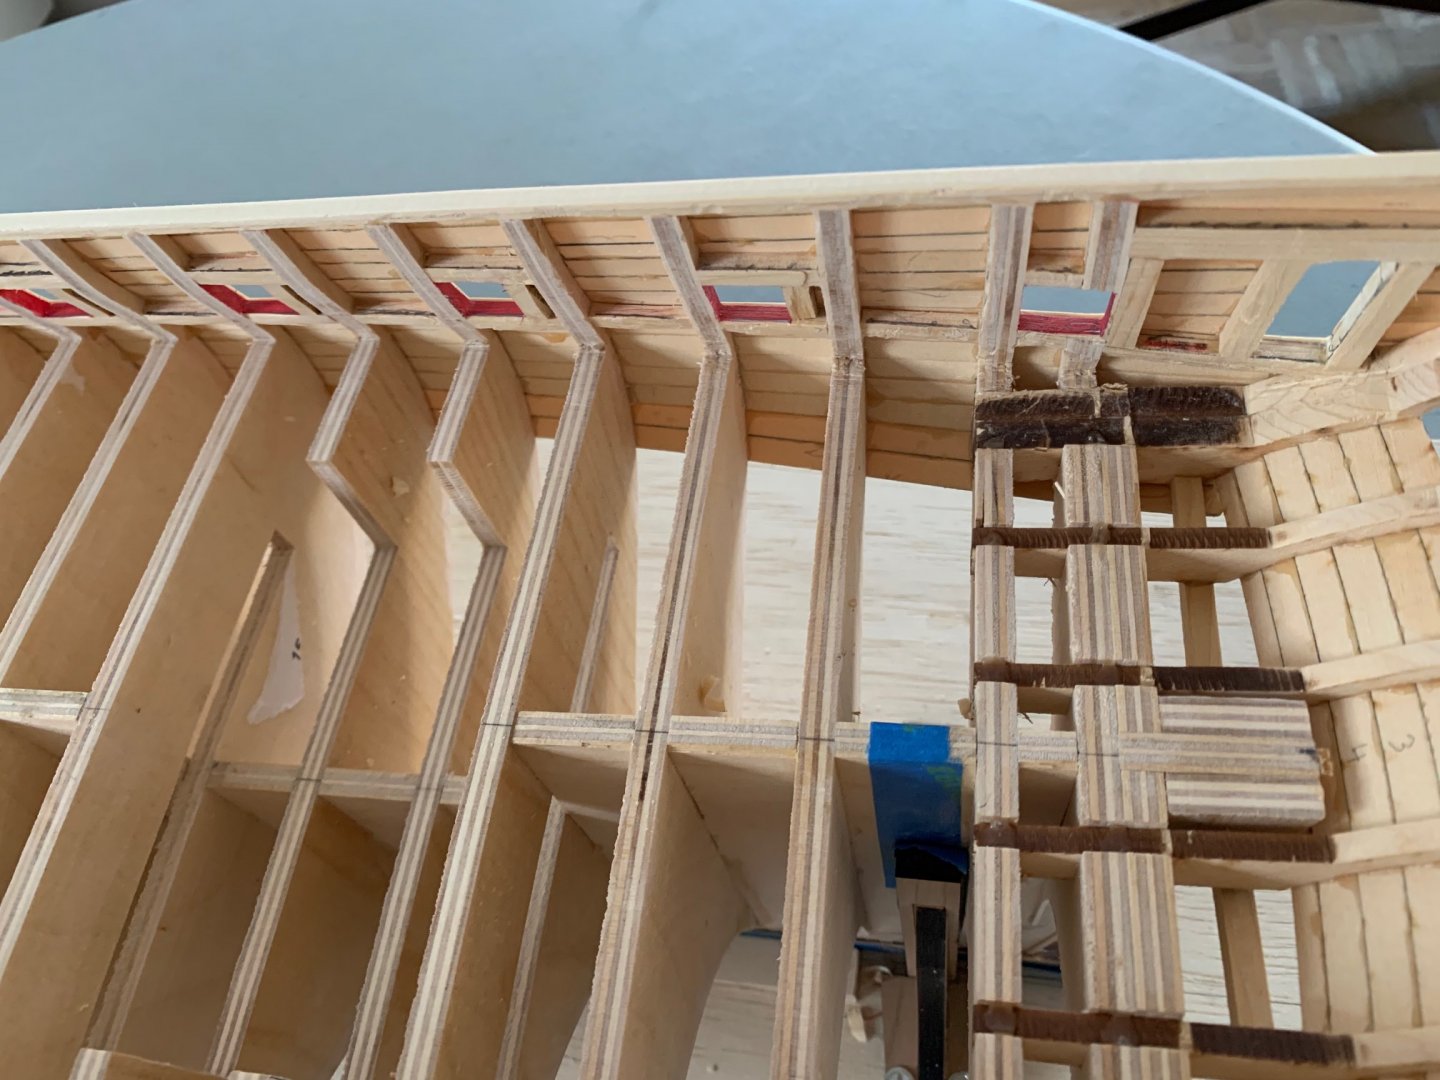
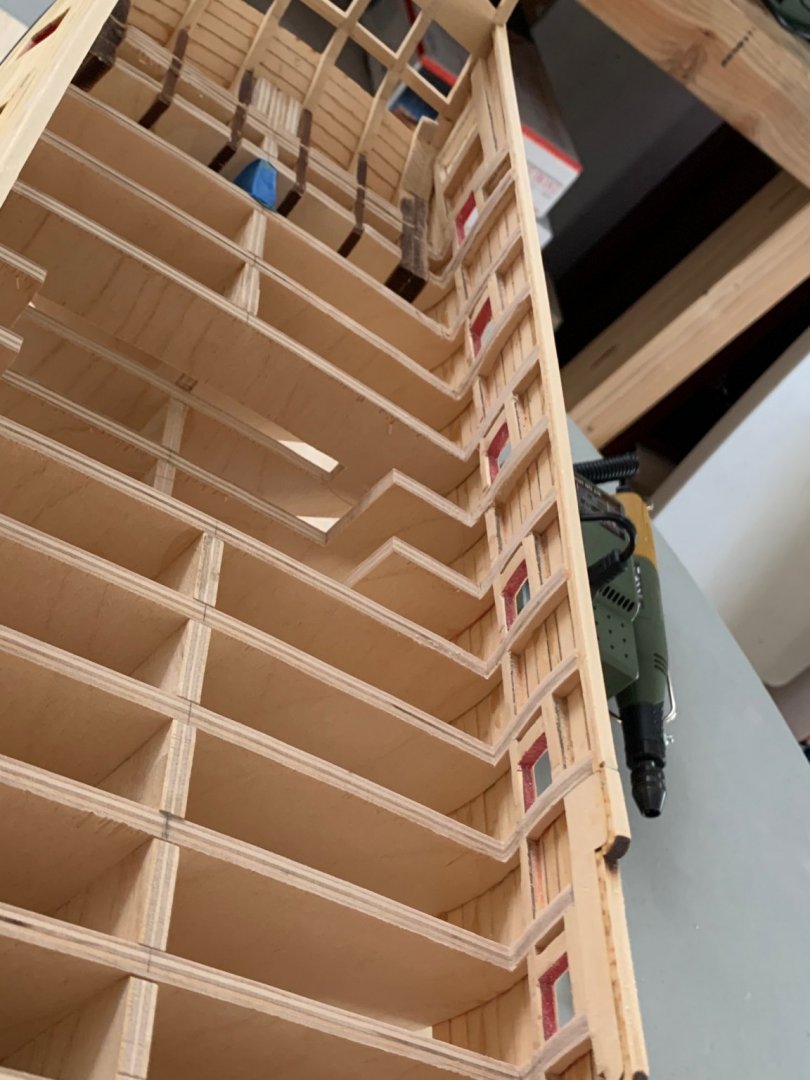
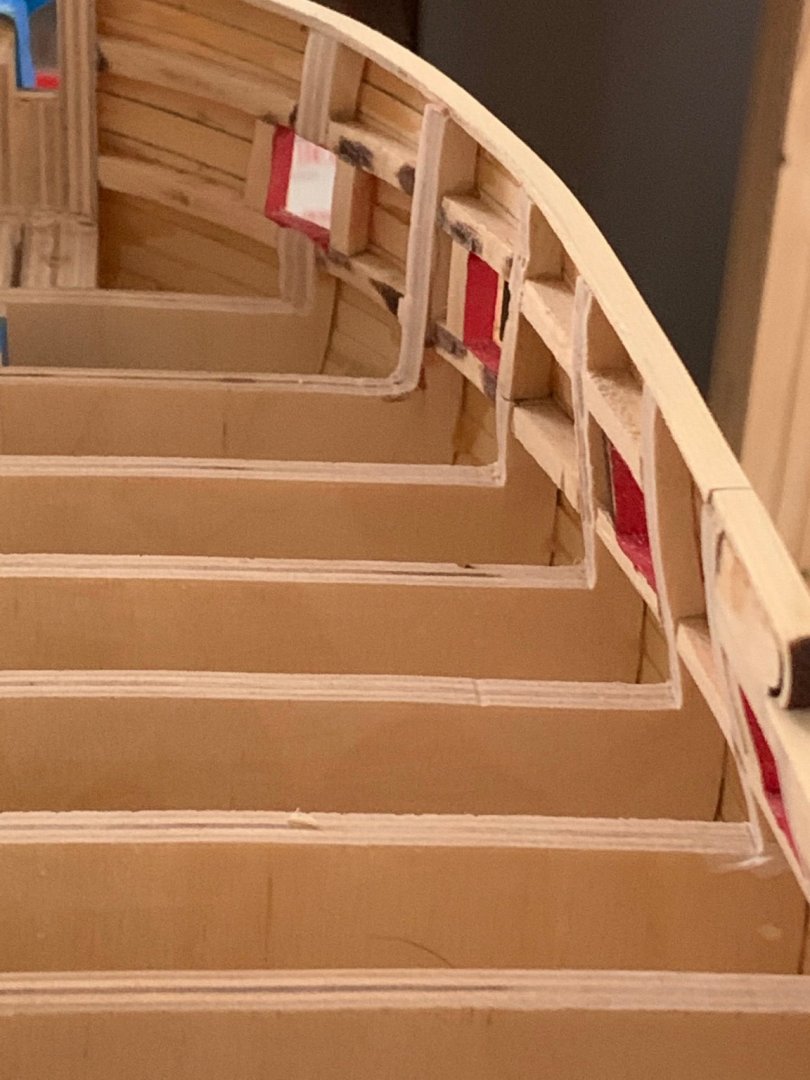
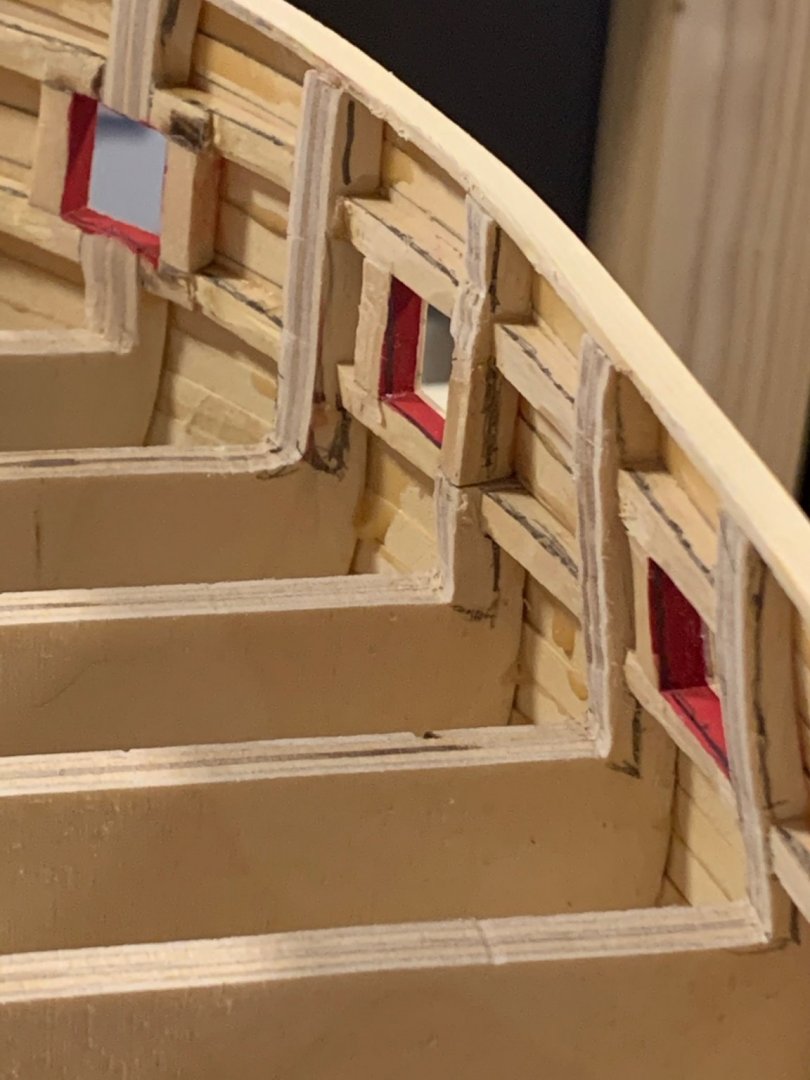
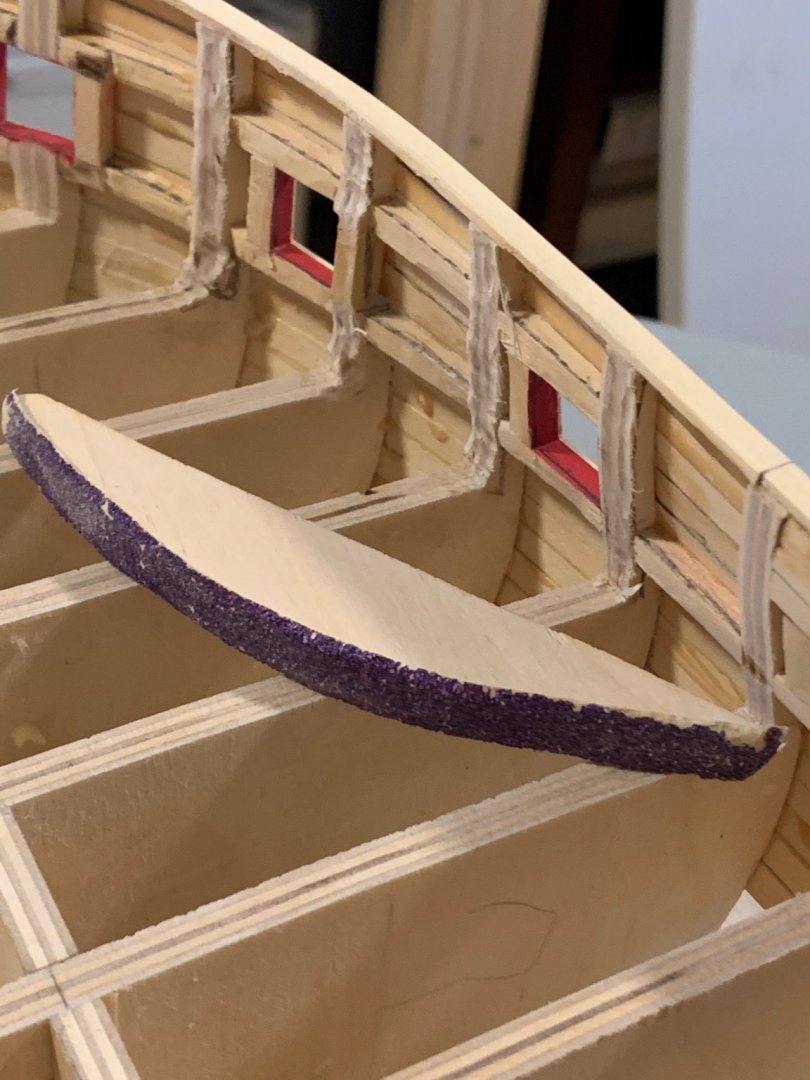
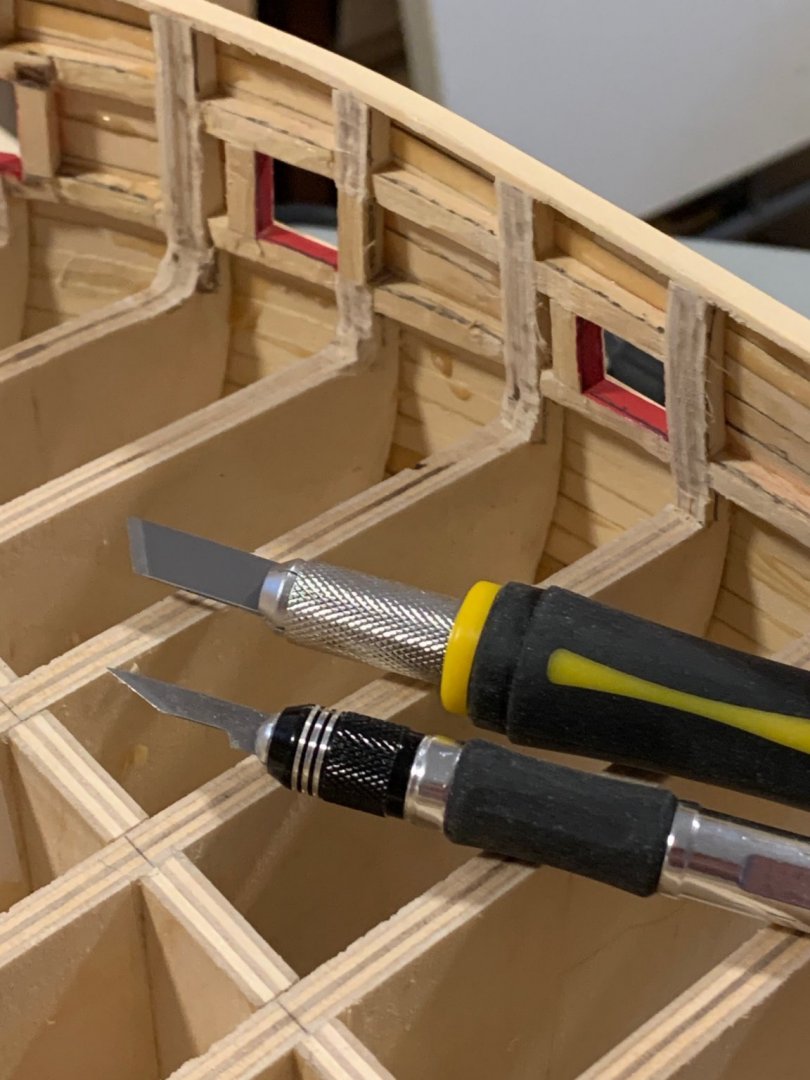
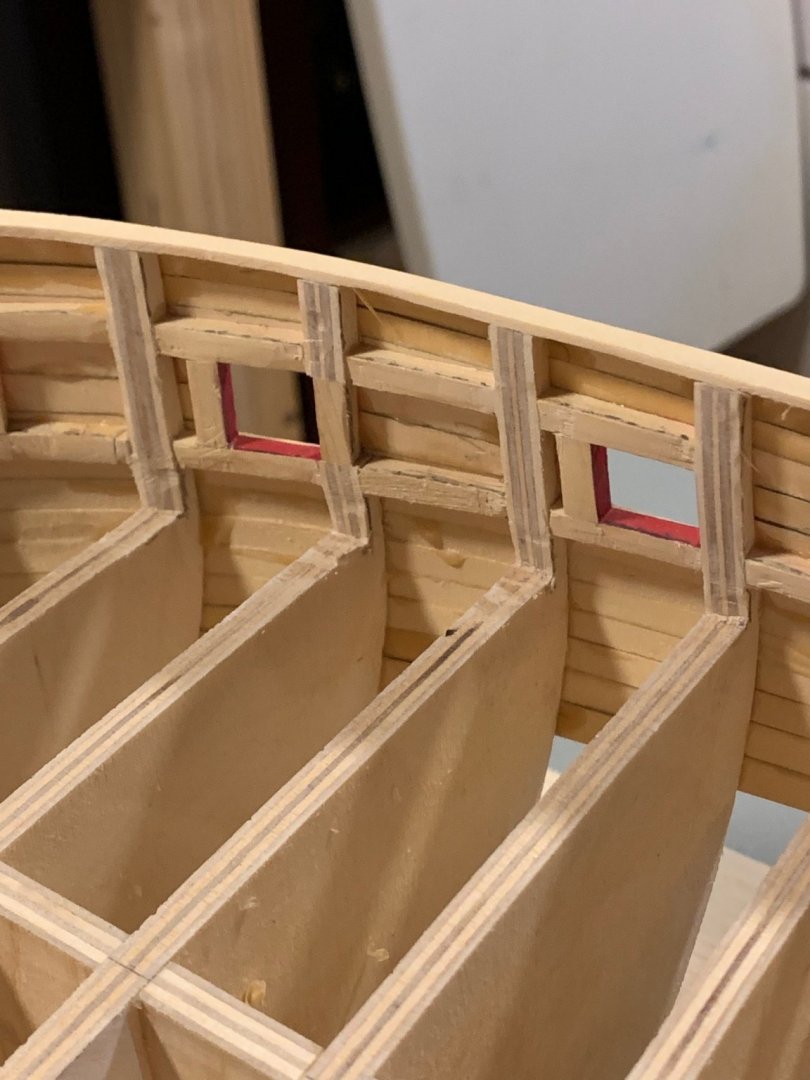
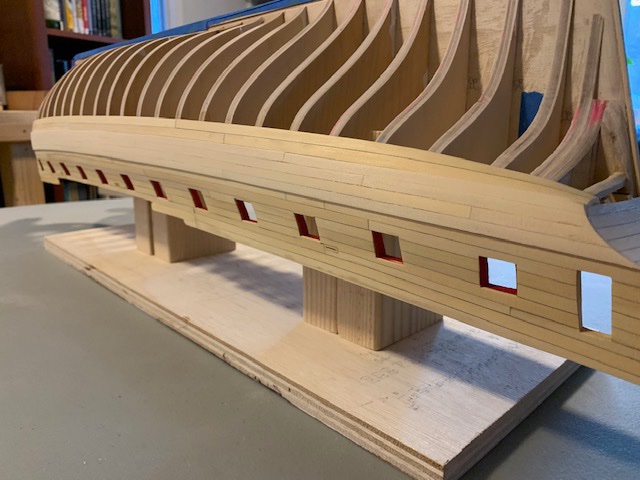
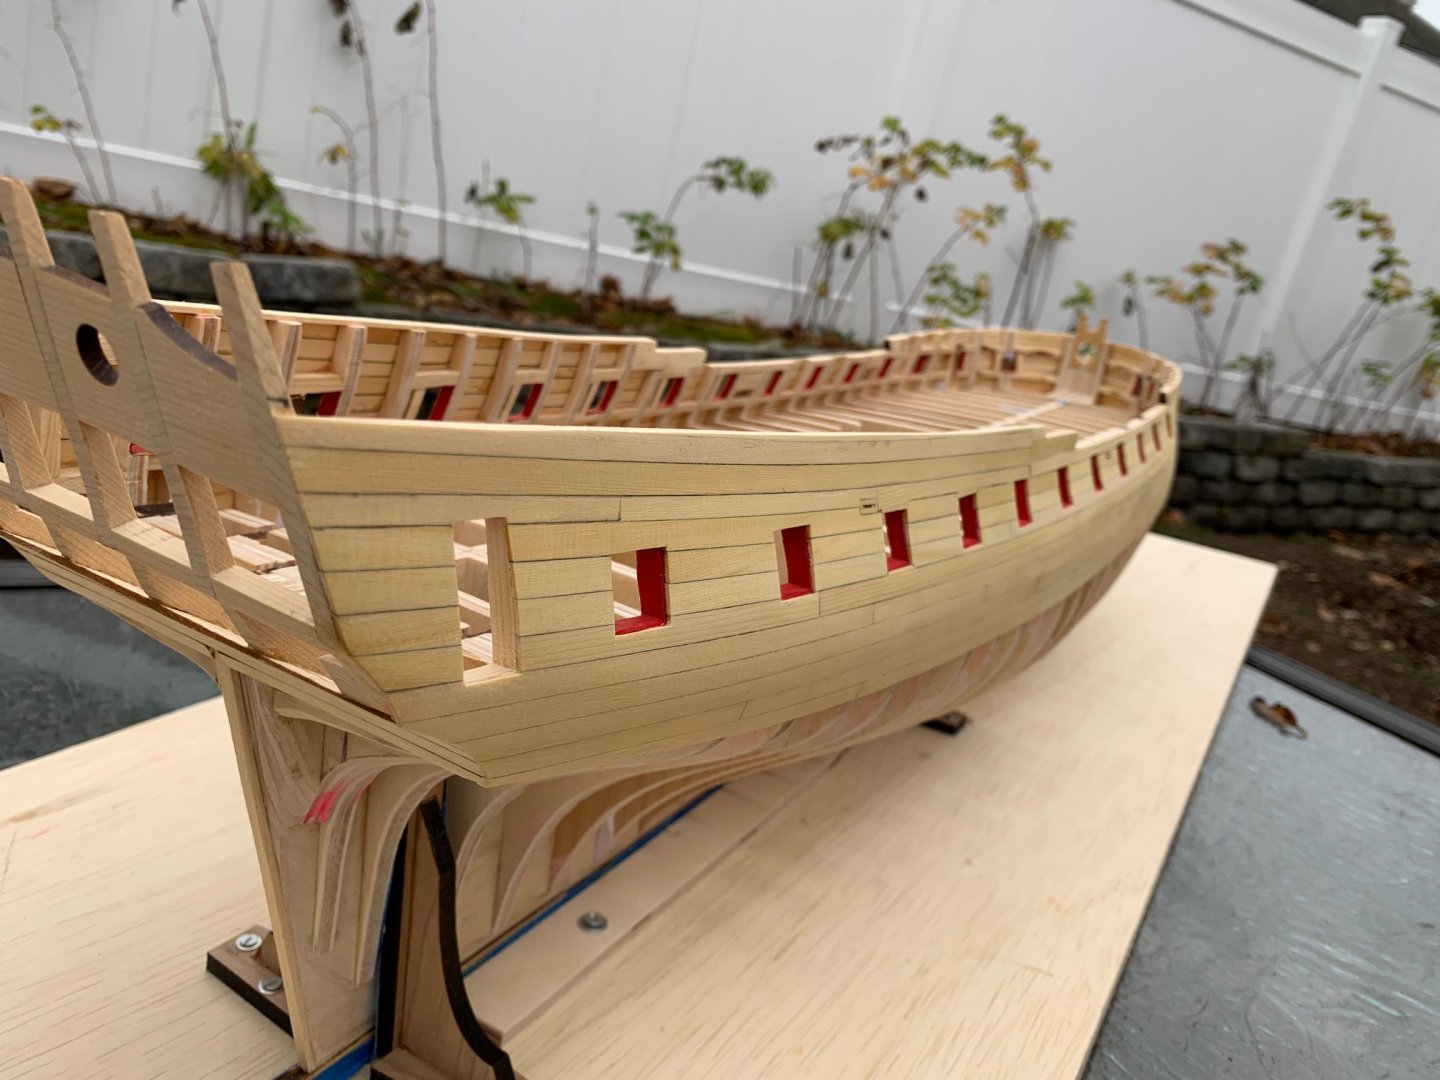
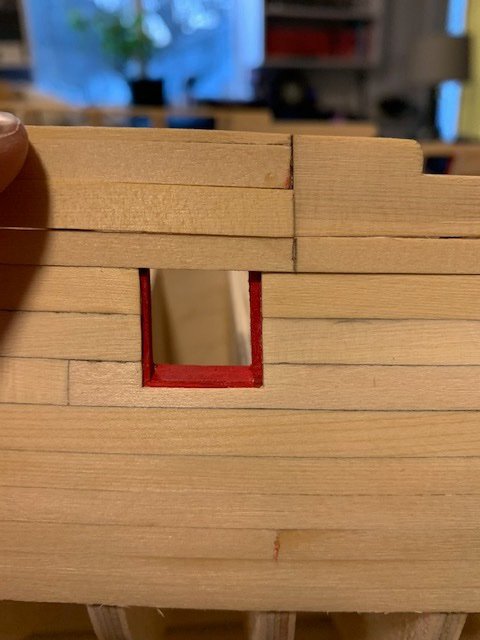
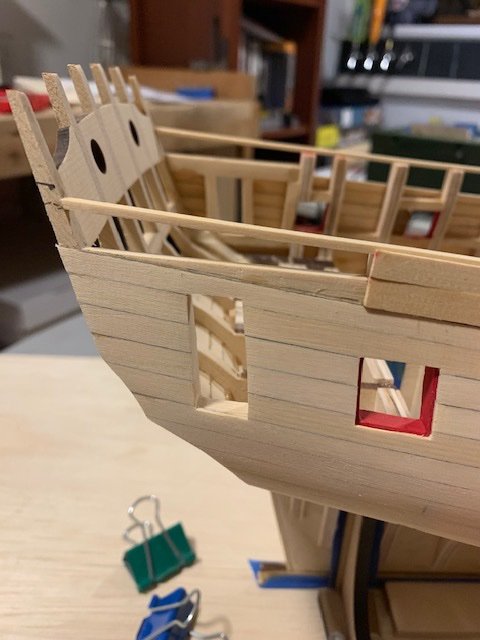
Thanks Matt. I think my Winnie has a poltergeist. I ran into a string of strange happenings last week; when I sucked one of the anchor linings off the ship and into the shop vac (no damage other than pride), I realized it was time to take a few days off from the ship. The anchor linings bent and installed great, but applying WOP before and after painting the wales sealed the wood to the point that the wood glue didn't hold well as evidenced by the vacuum removing one, so they ended up super glued. The fairing cap went on next. I tried using the scroll saw initially, but one of the weaknesses of the cedar this thin is that the cuts against the grain are extremely weak. Luckily, very easy to cut with a sharp blade. I cut to the outside of the line I drew to measure the rails, faired the outside of the hull and then used a compass to mark a 3/16" line along the inside. The starboard side has been mostly faired. The port side has not been faired outboard yet. Accidental mistake I made was reversing the rails when I installed them (the port one was installed on the starboard side) and they both fit well, so I know the bow is symmetrical. fairing caps installed and there's a couple frames at the waist that are going to need some attention, but the bow and stern are going to need a lot of attention Those stern frames are really going to require a lot of attention. The bow does too. Thankfully, I spent quite a bit of time on the bow fillers and Frame W. I used the drum sander to touch up the tips to match the cap rail, but there's a lot of wood to be removed and I figured this would be the hardest part of fairing inboard, so let's start there. It took a couple days and a lot of different techniques that sometimes well and sometimes didn't, but I made it through the port side. Moving over to the starboard side, there quite a bit of work to be done around gunport 2/3. I started by making a little gauge that was 3/16" on one end for measuring from outboard and 9/64" on the other end for measuring inboard. The 3/16" end has a small block glued on the back side to account for the lip around the gunports. I began by ticking out the measurements along all the horizontal cedar pieces including the gunports. I then carved to the outside of the line on these, giving excellent access to the plywood. I then repeated this process for the verticals. The drum sander came into play here. I found using the drum sander more like a gouge and keeping it messy makes for easier sanding. Too smooth and the sandpaper slides. For that reason, I didn't touch any cedar with the sander including the upright where I had to cut frame S. I then pulled out the 60 grit on a piece of plywood scrap from cutting the frames. It happens to be rounded at one end and flat at the other and has even amazing at sanding odd angles as I can be used vertically and horizontally . Now that the plywood has been cleaned up, the chisel blades comes into play for cutting out that angle between the deck and the uprights and the scalpel blade for any detail work on the cedar. Some light cleaning up with 100/150 to debur. There will still be some light tuning needed, but that can wait. Time to move onto the waist and stern, which should be more straightforward, so hoping to put the sandpaper back away for a bit in a day or two.


-
Sorry to hear about the off measurements. At least you caught it before you got too far into the build, so although you are out some money the feeling of all those lost days, weeks, or even months doesn't have the same demoralizing effect.
-
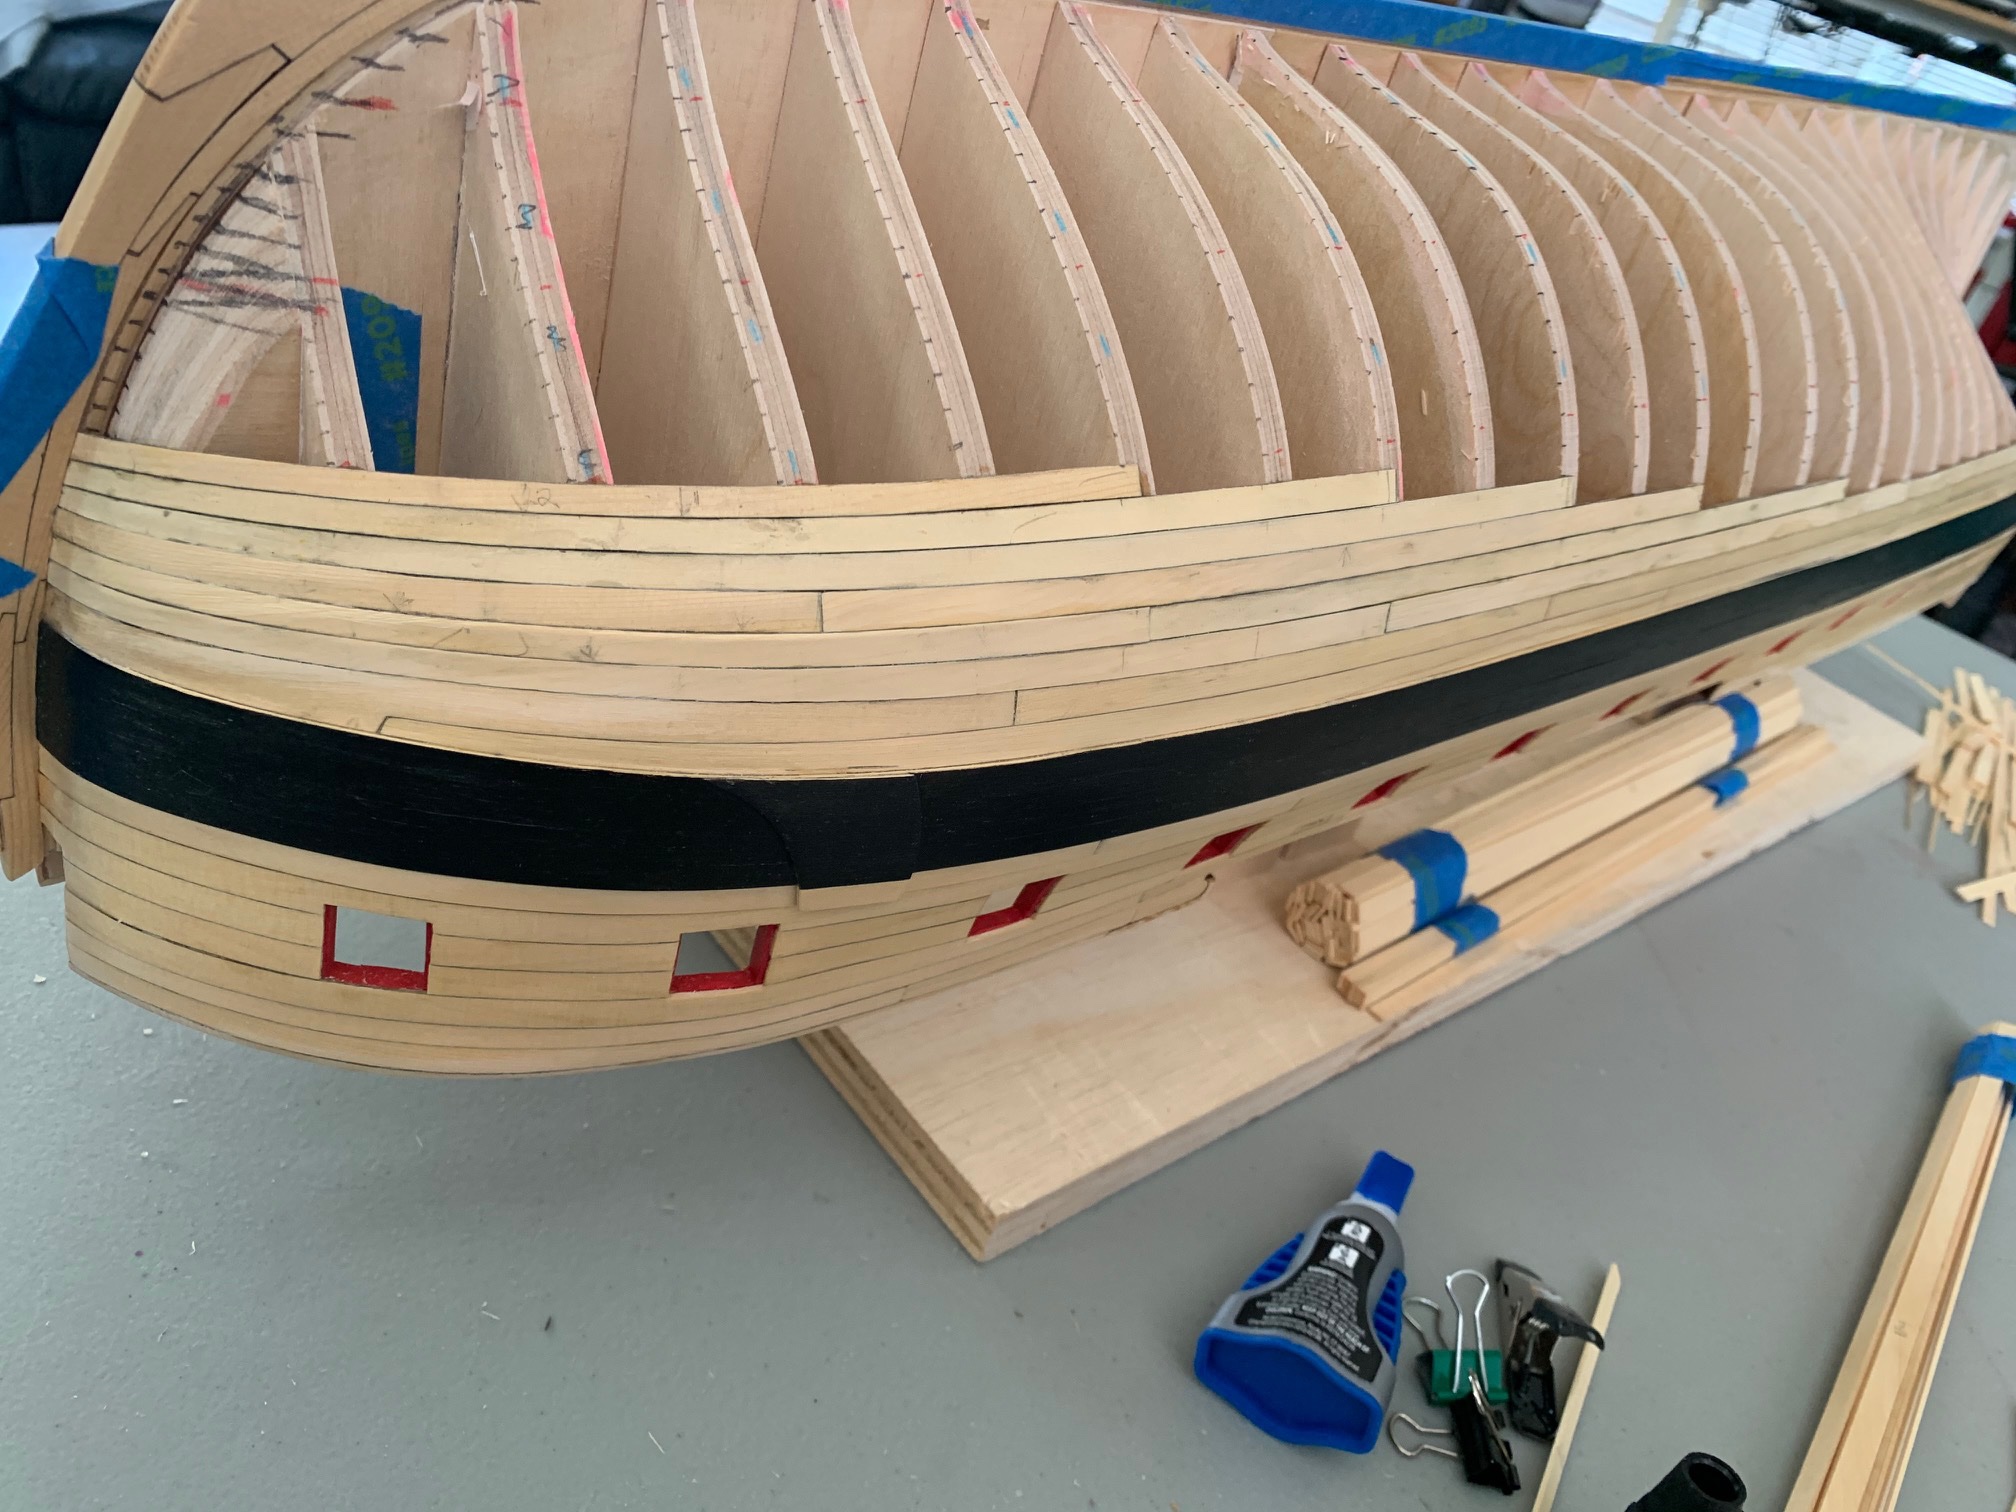
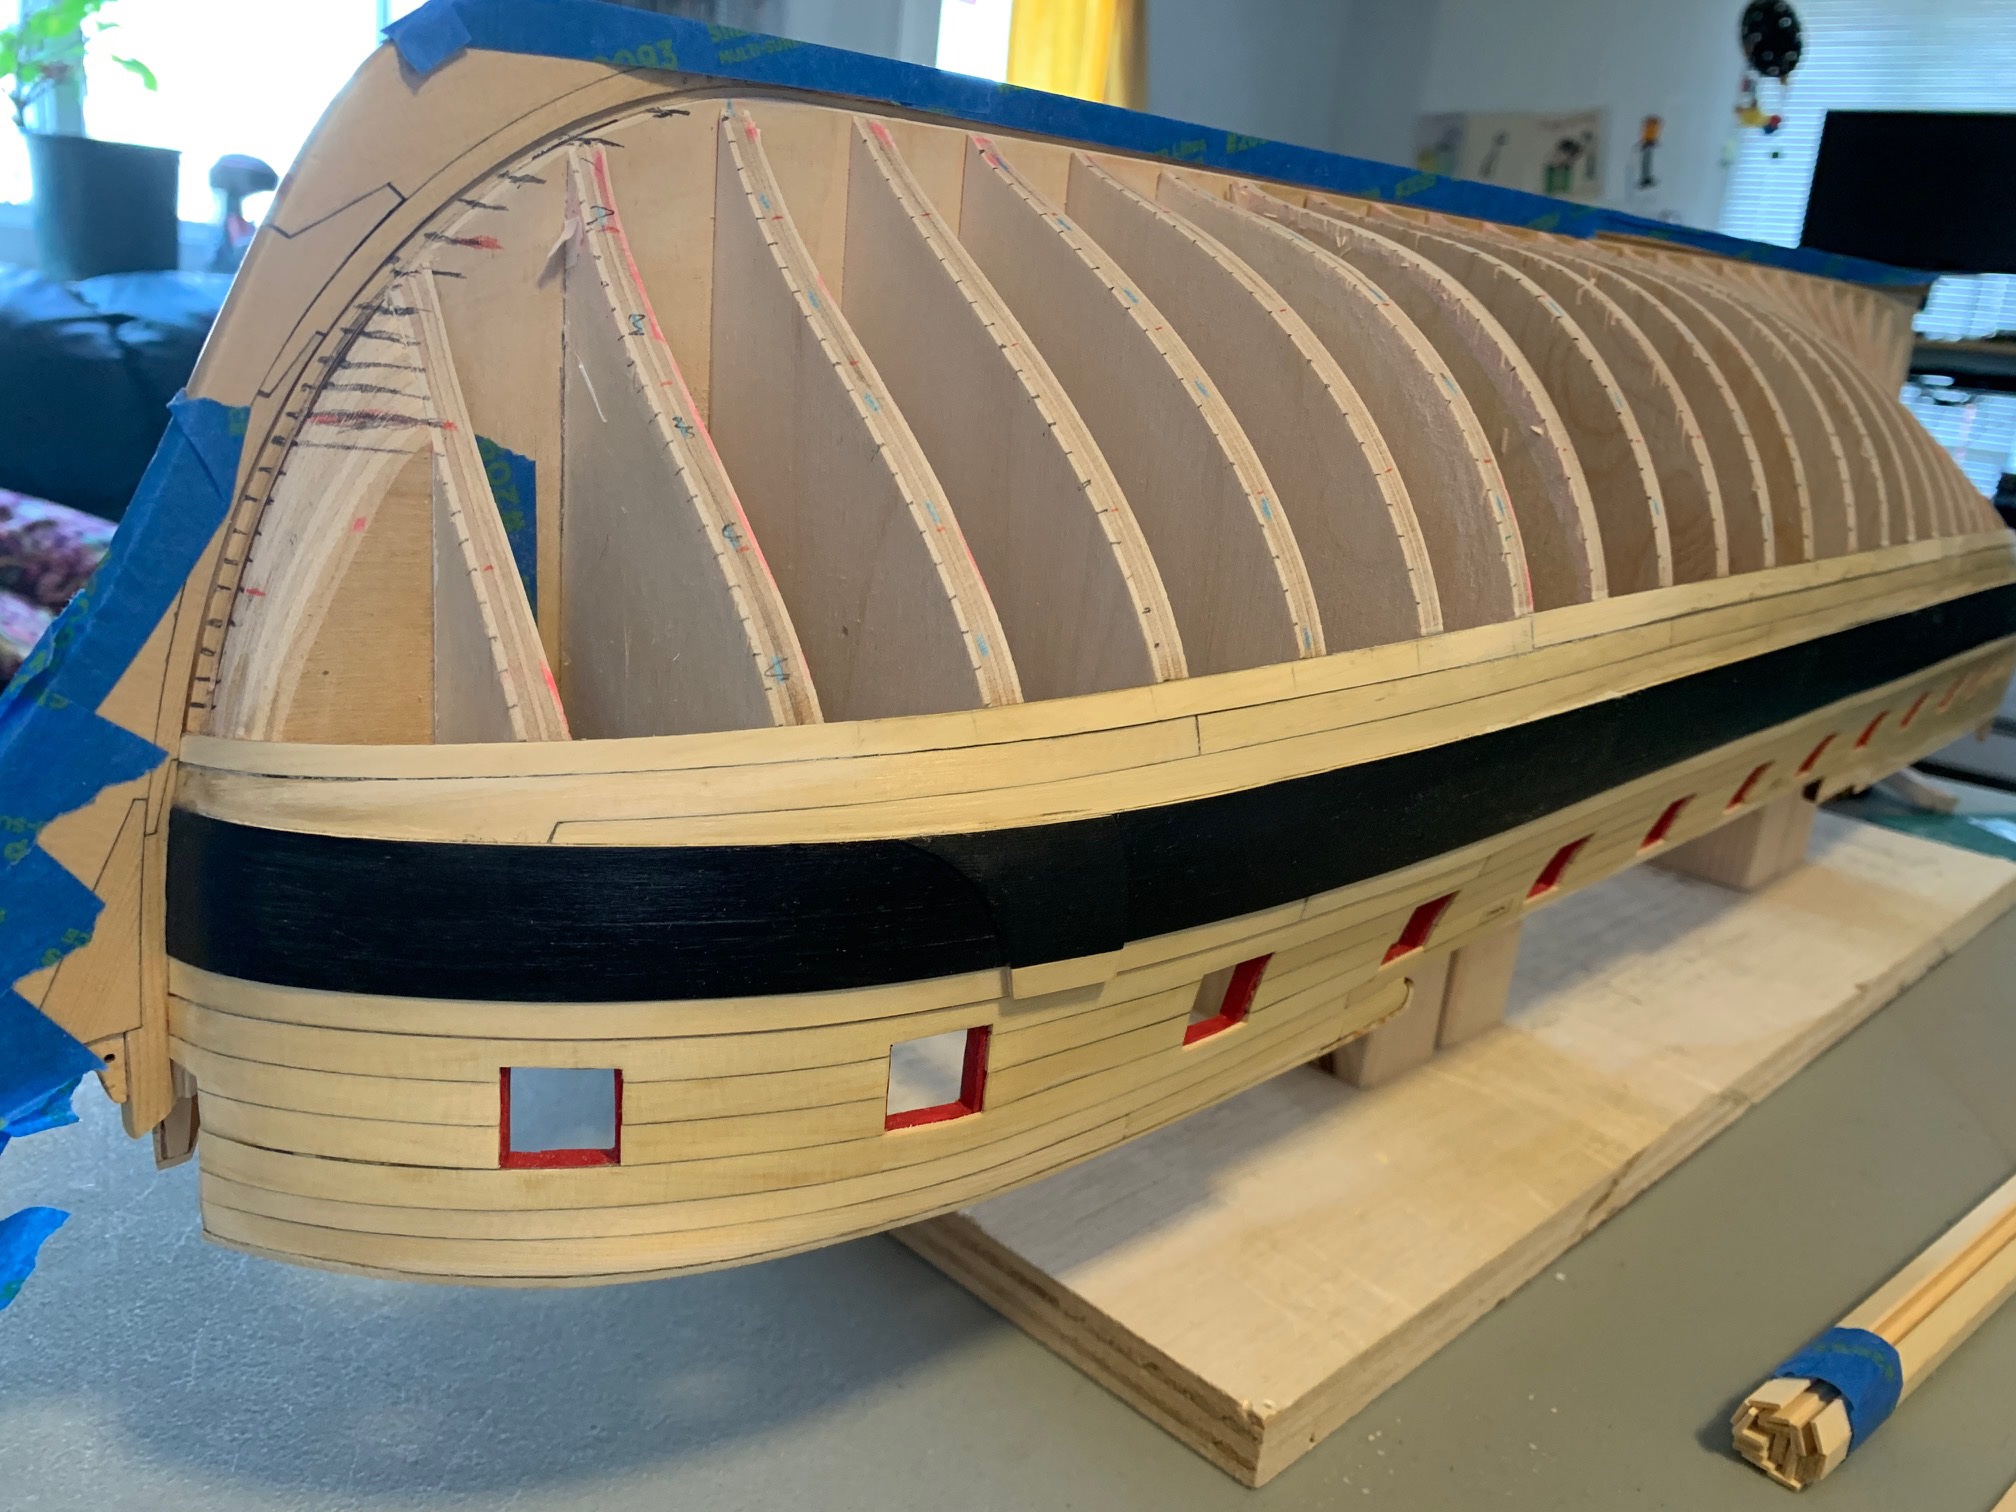
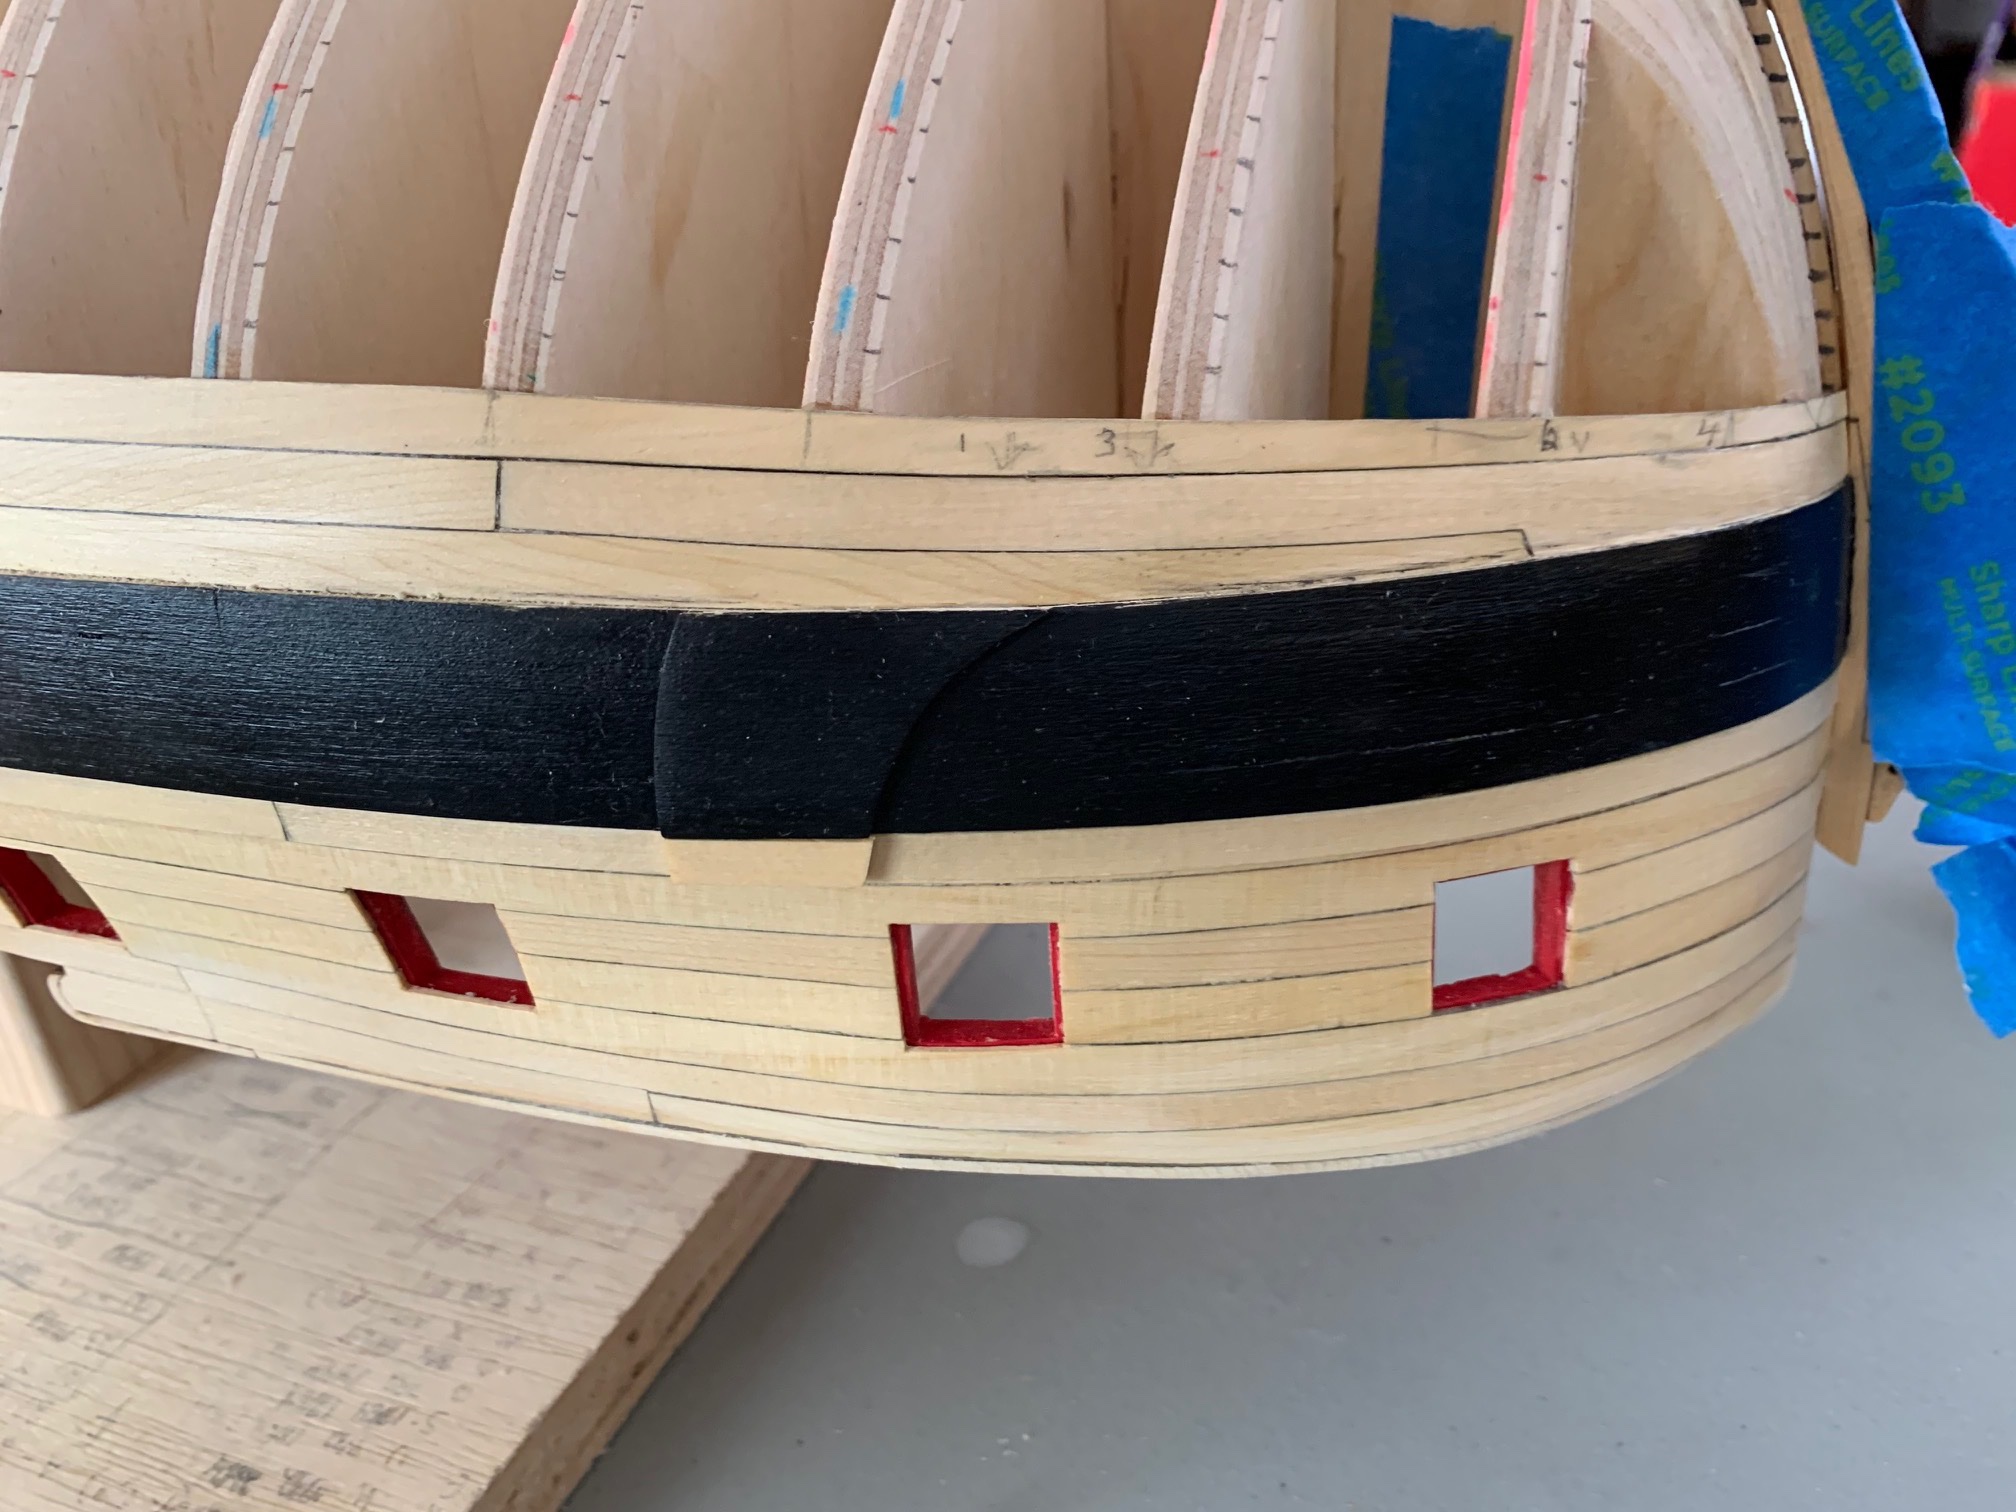
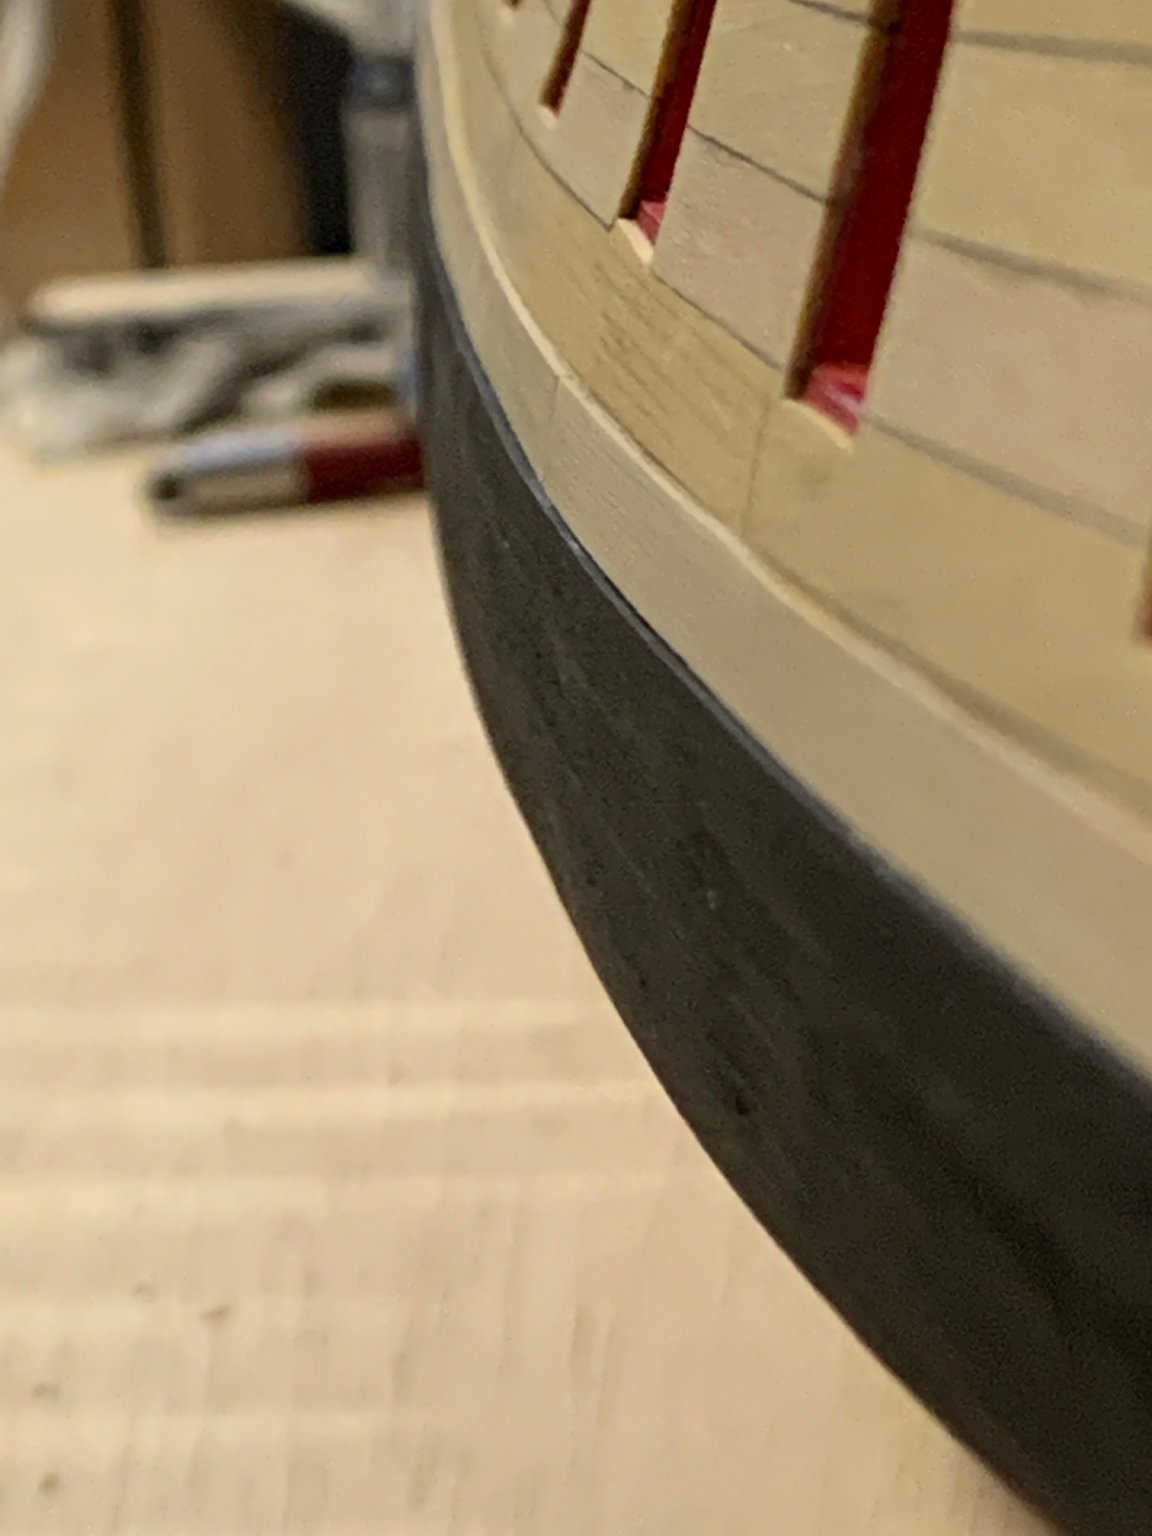
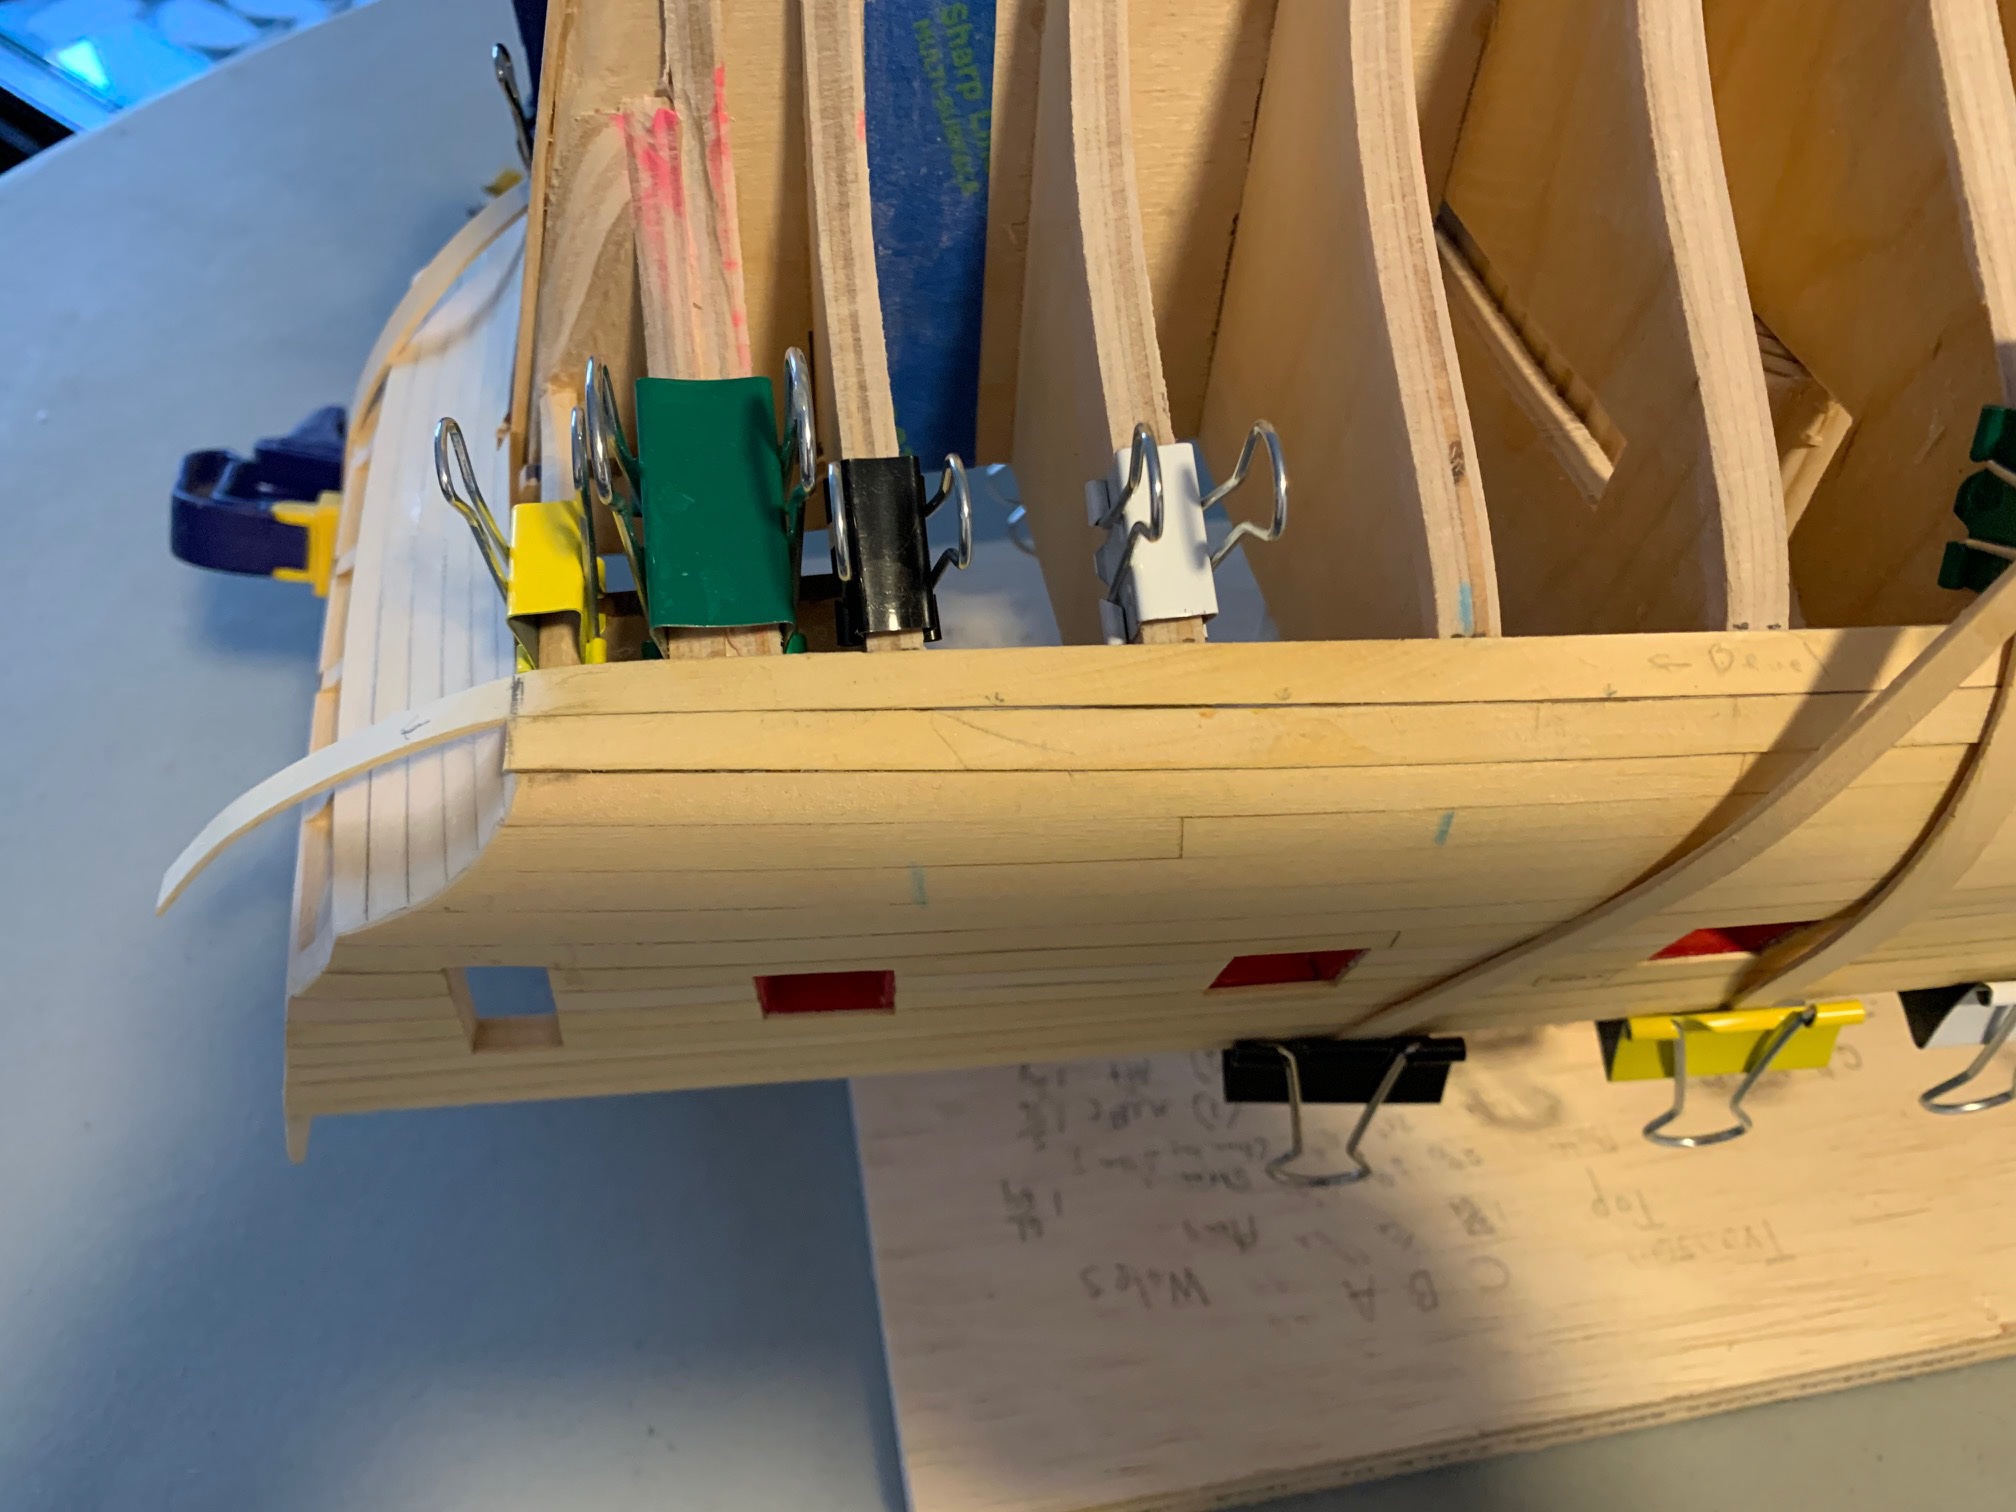
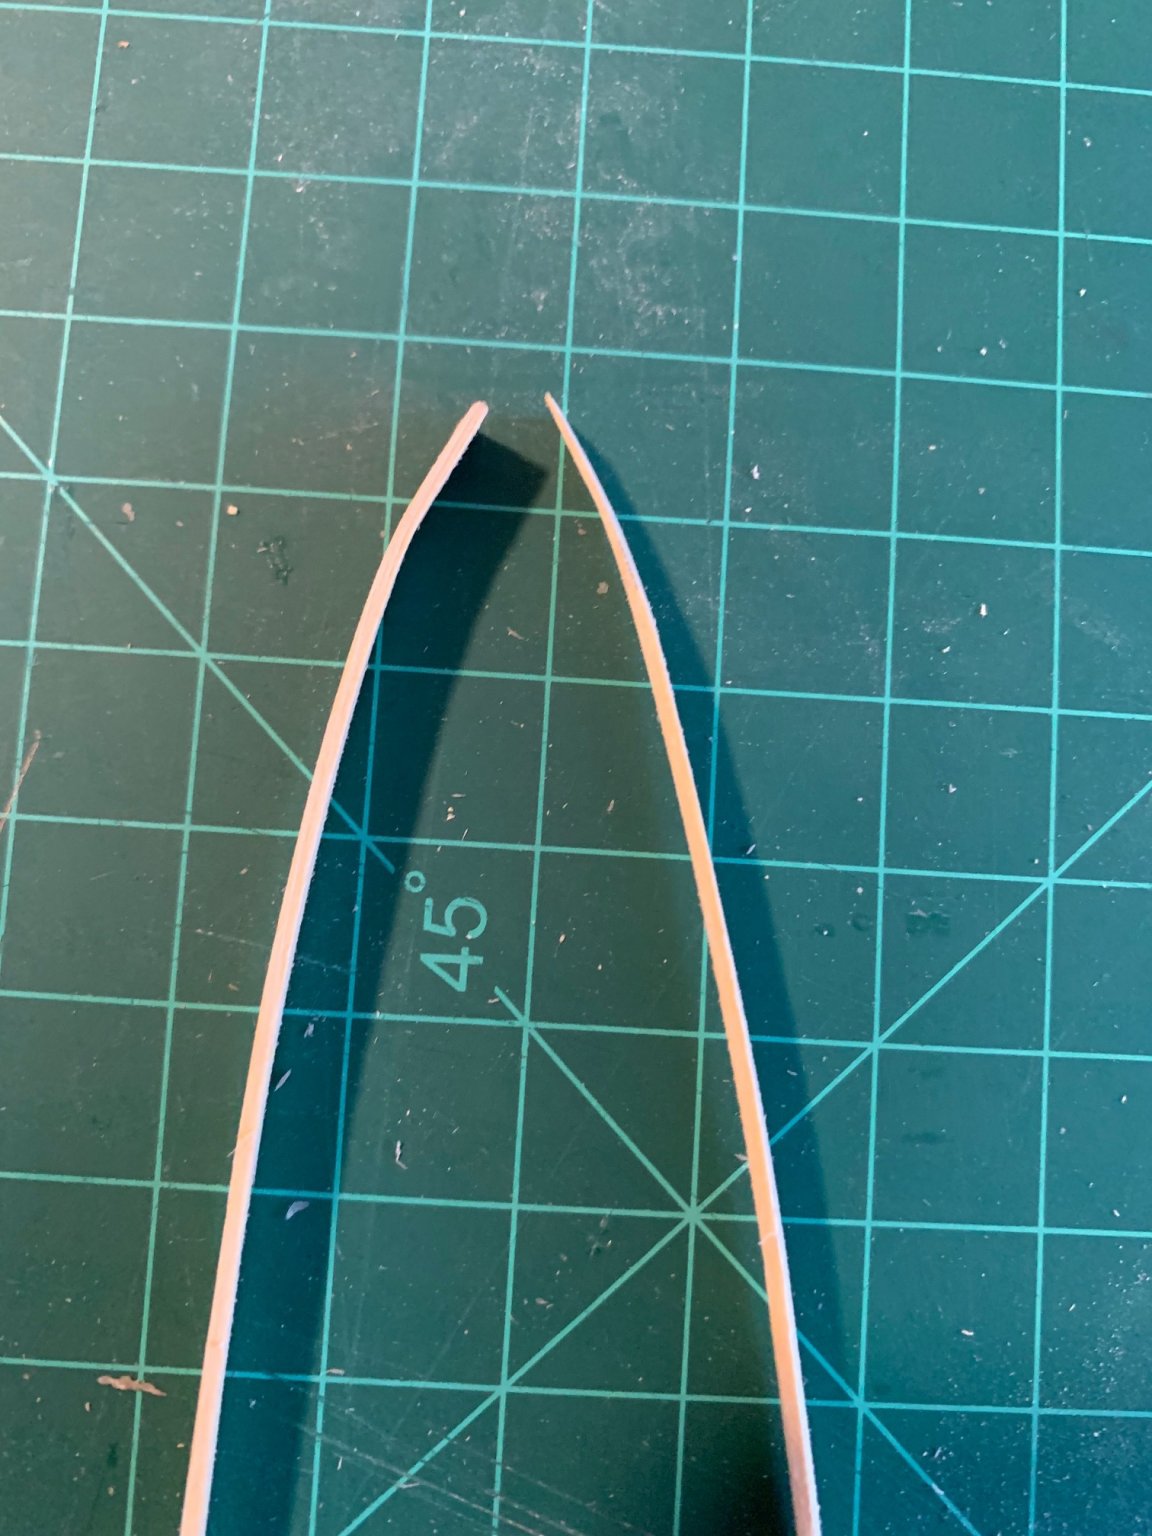
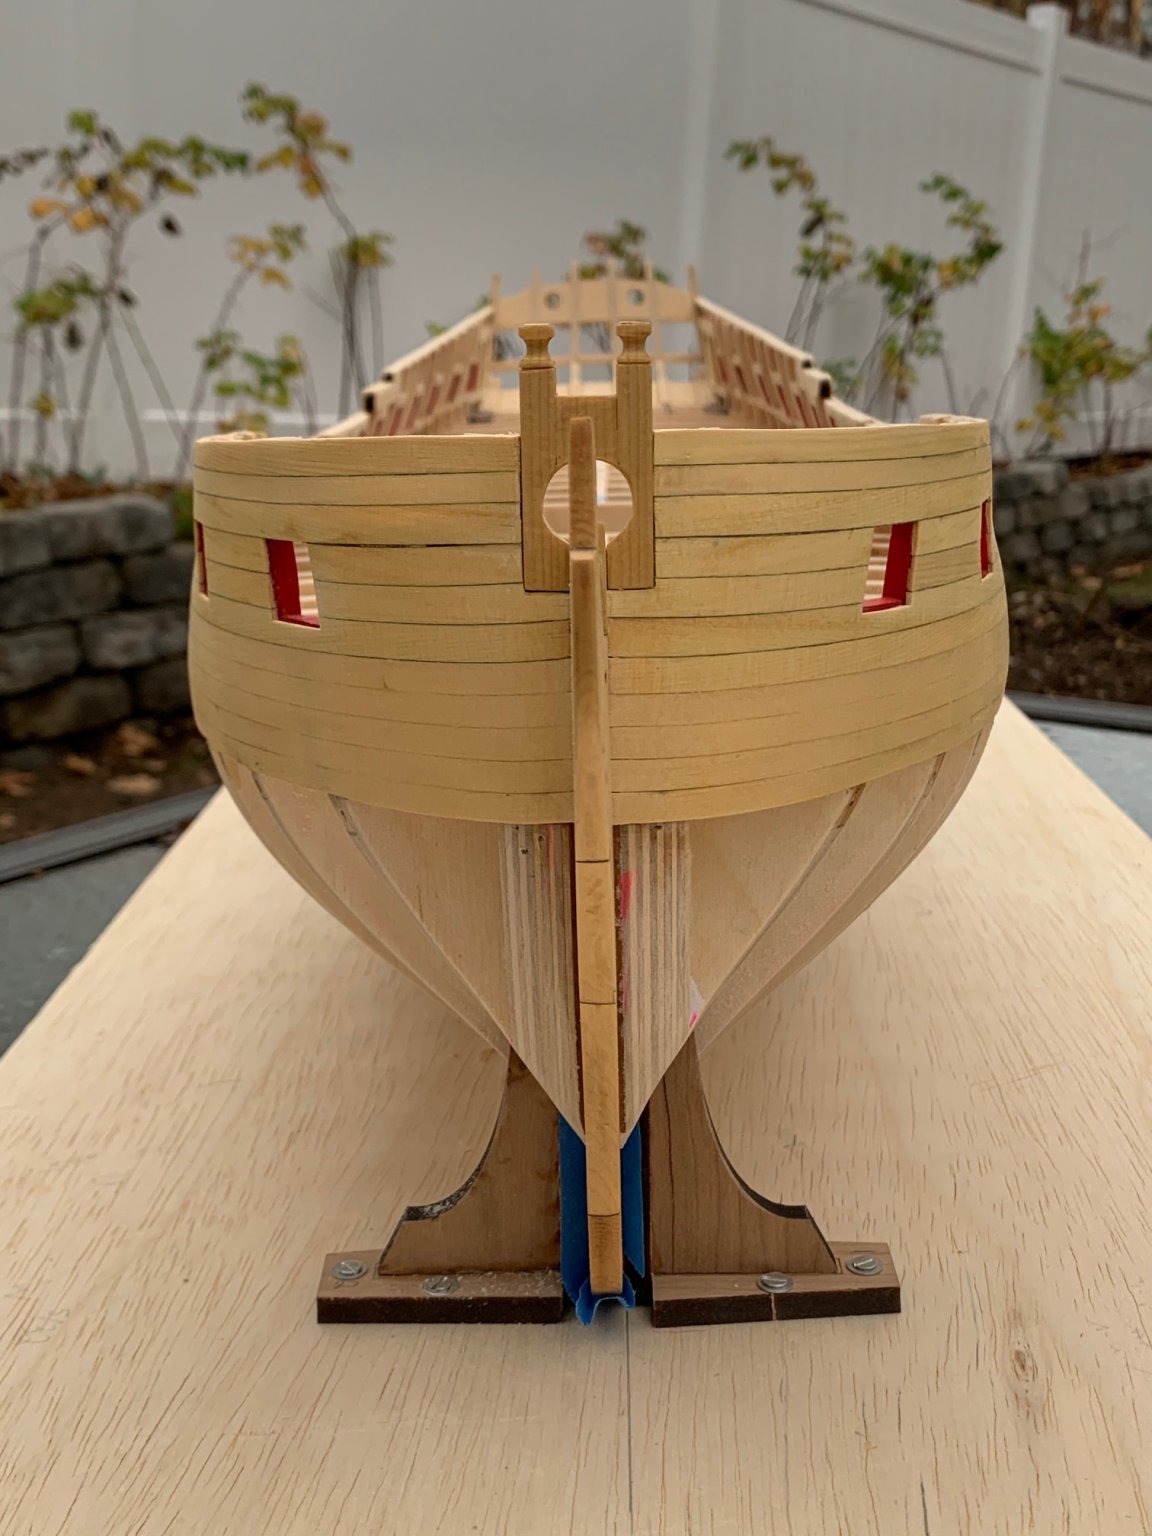
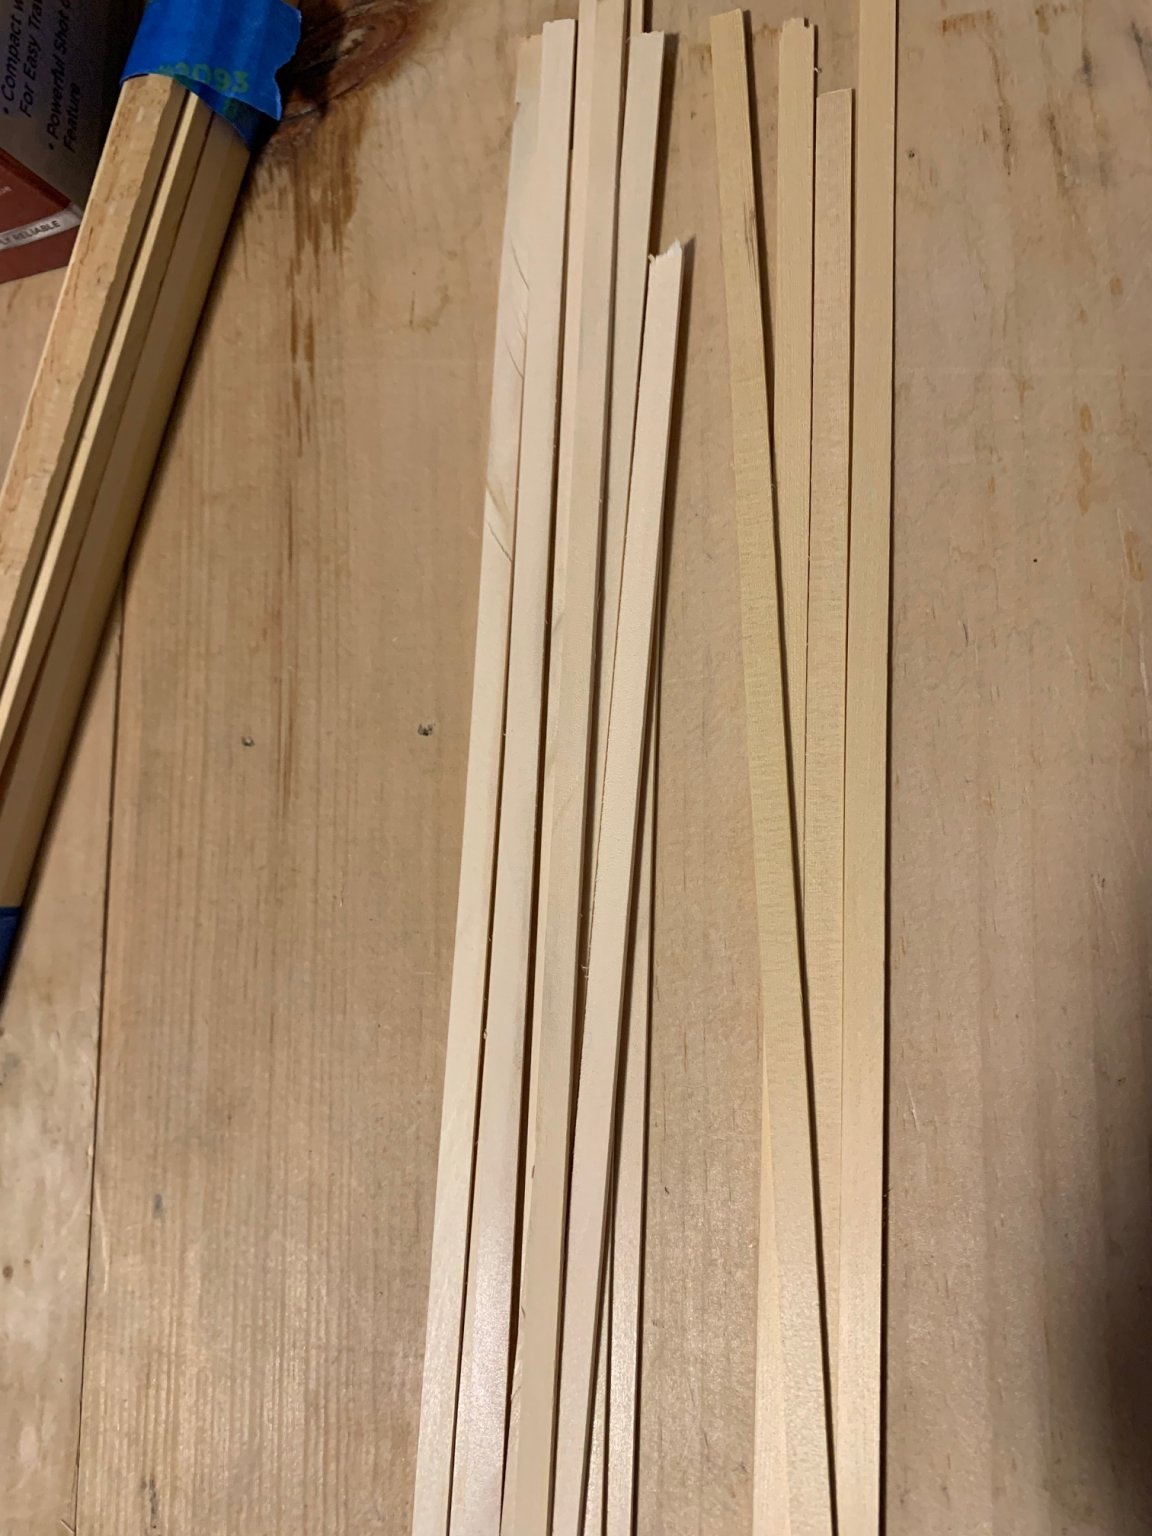
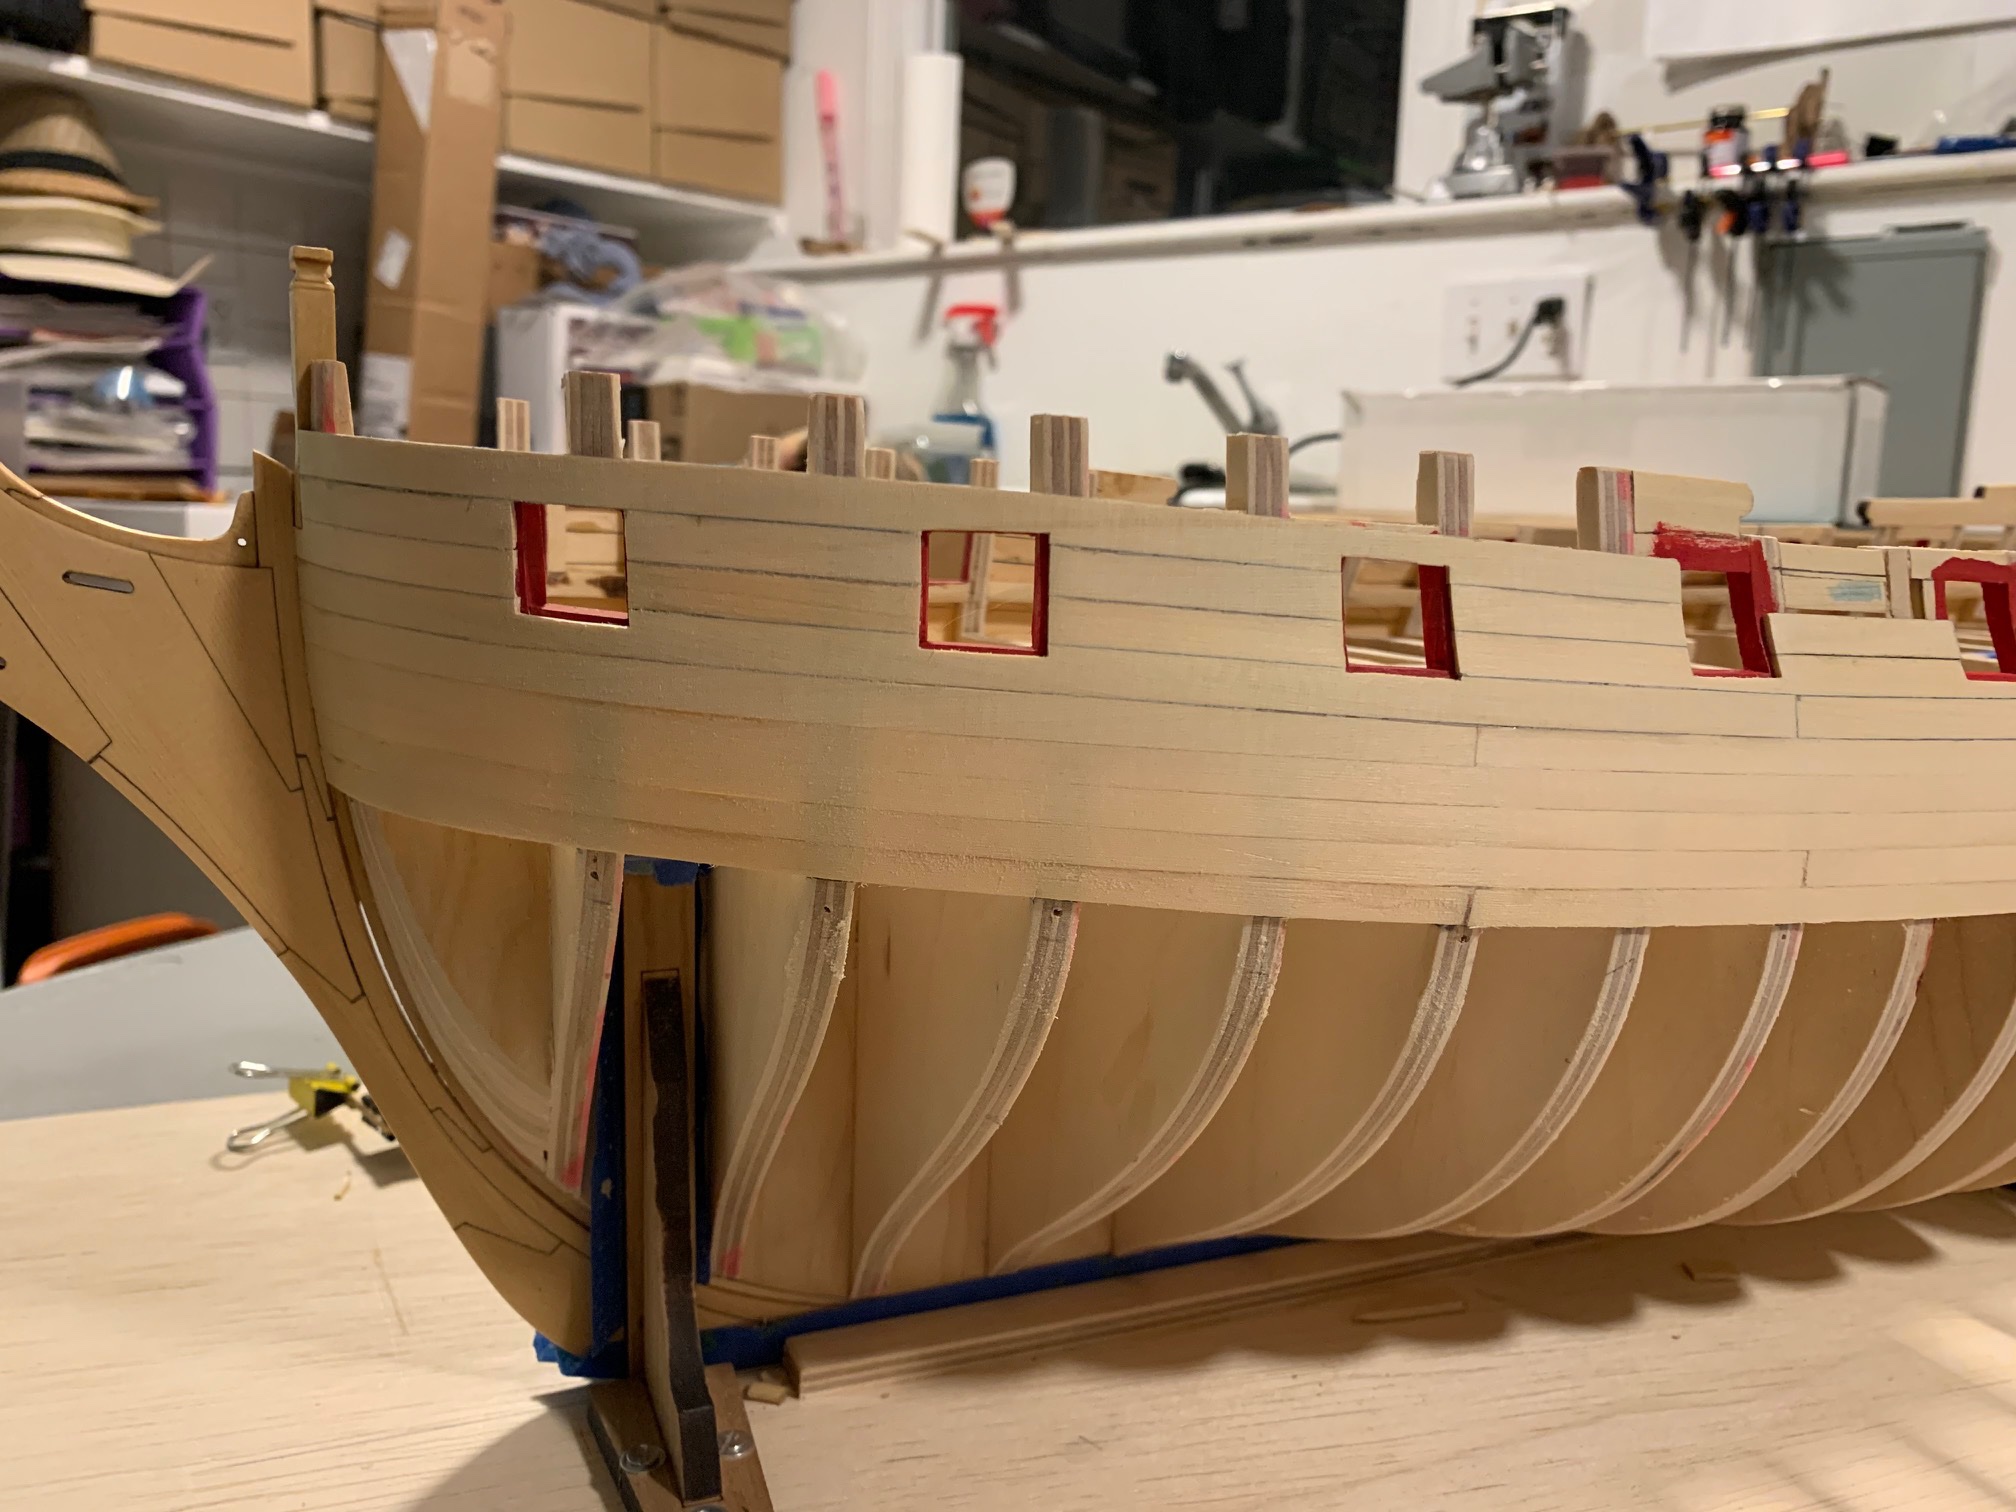
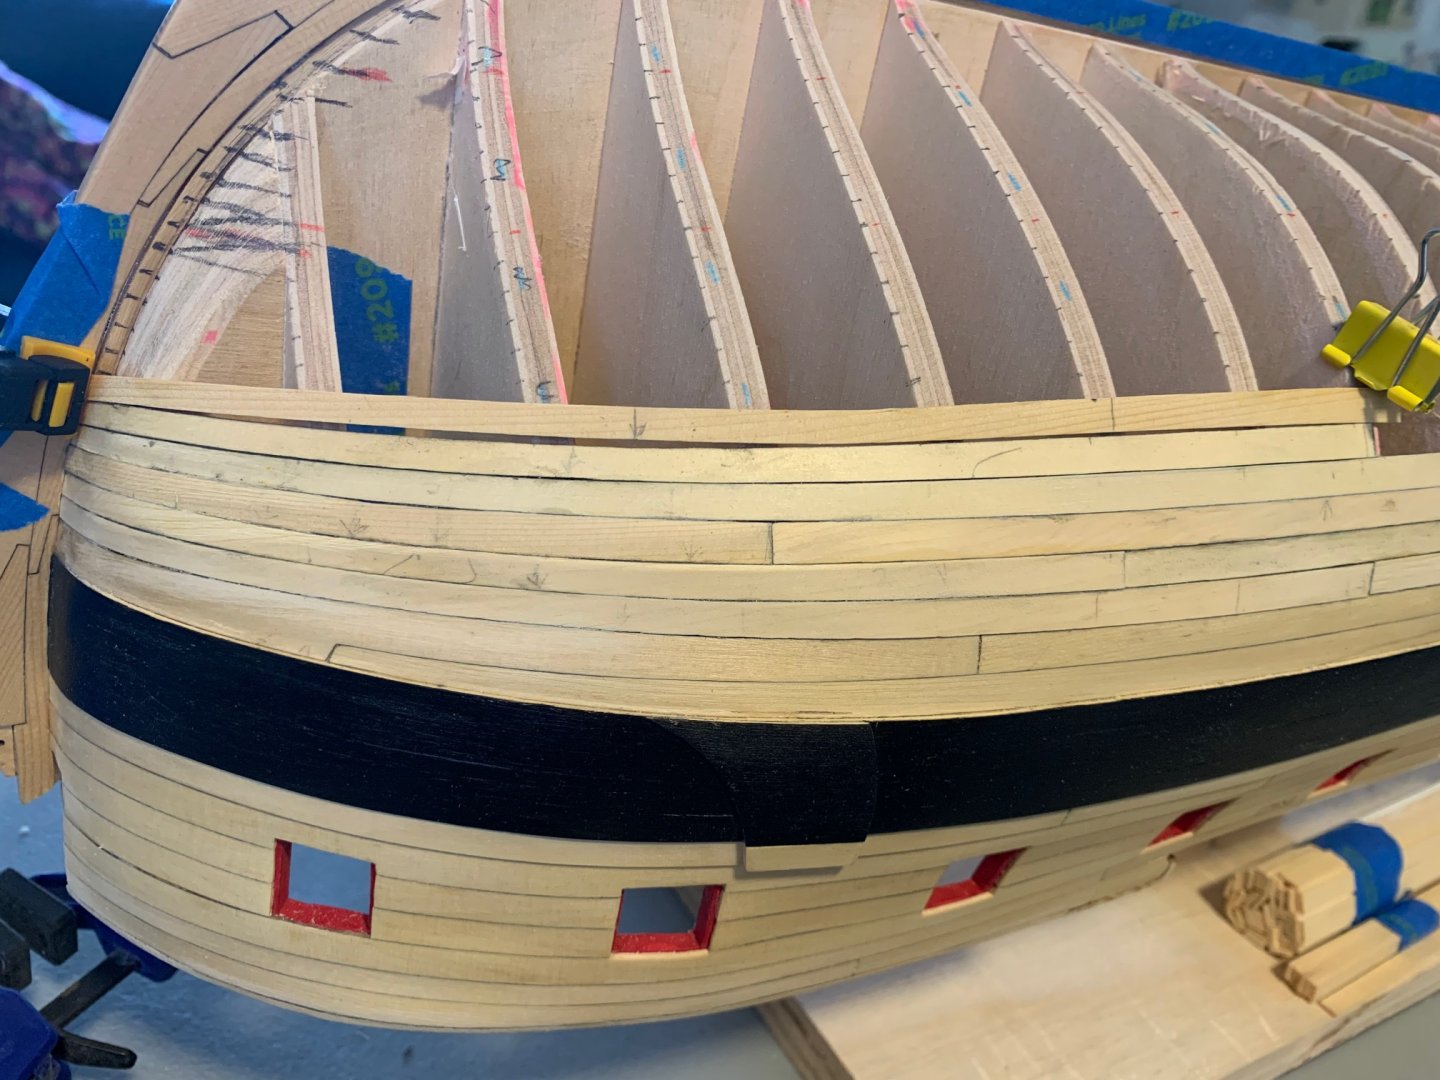
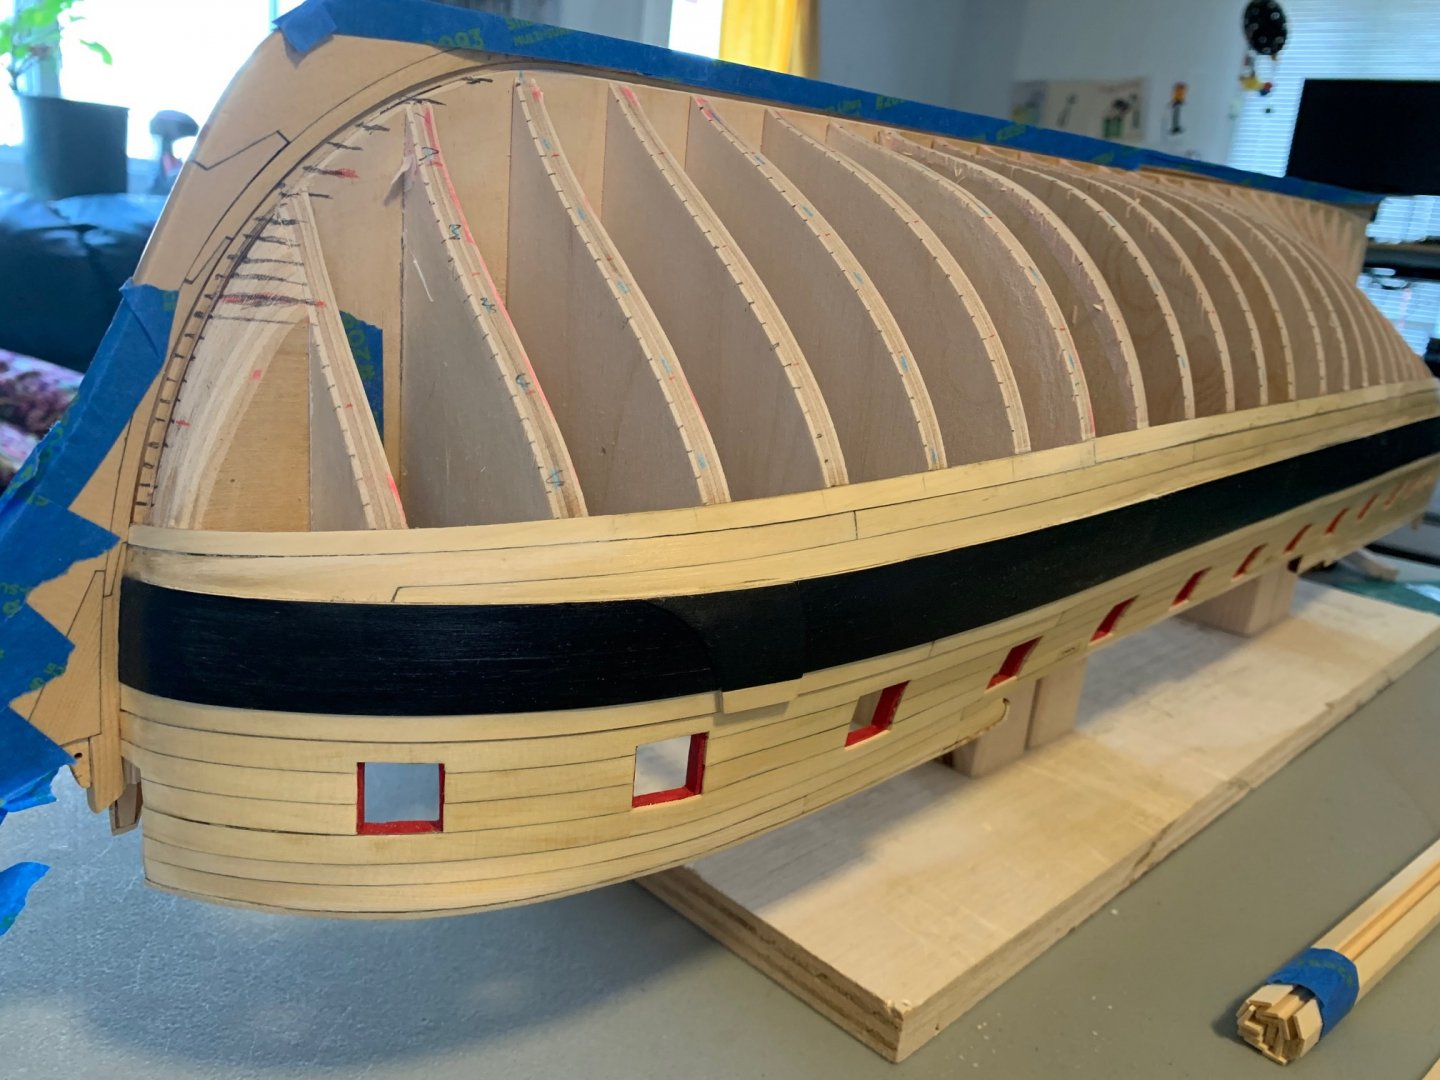
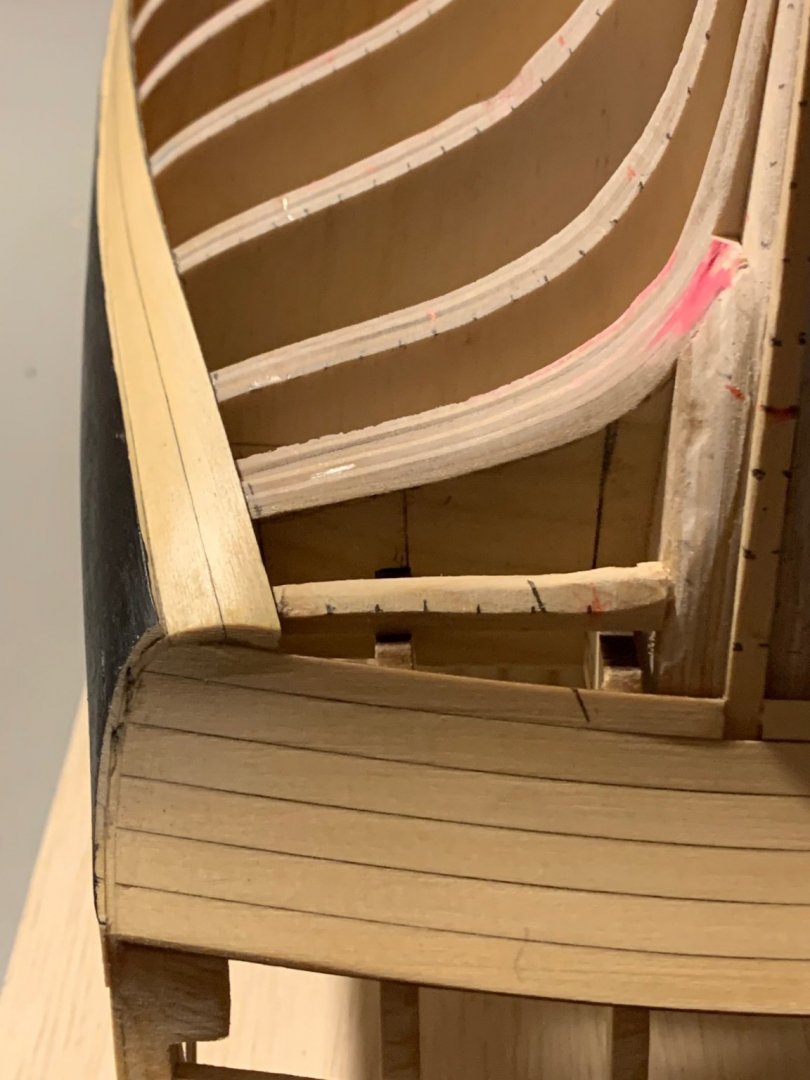
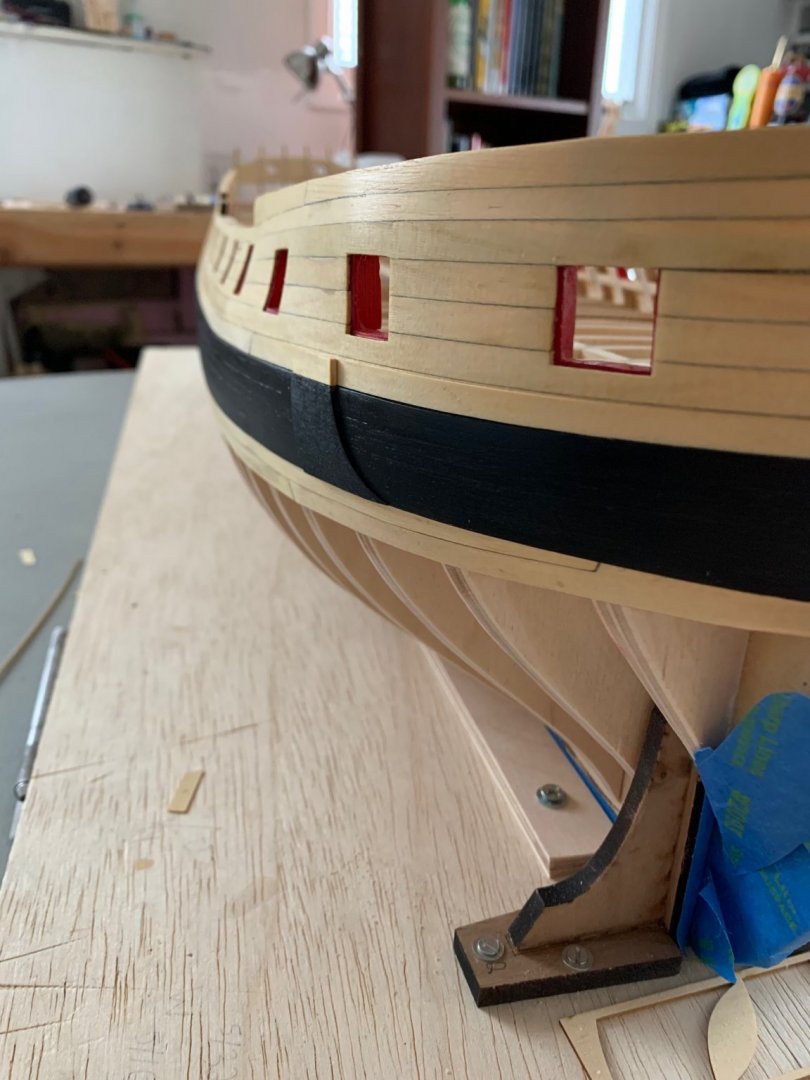
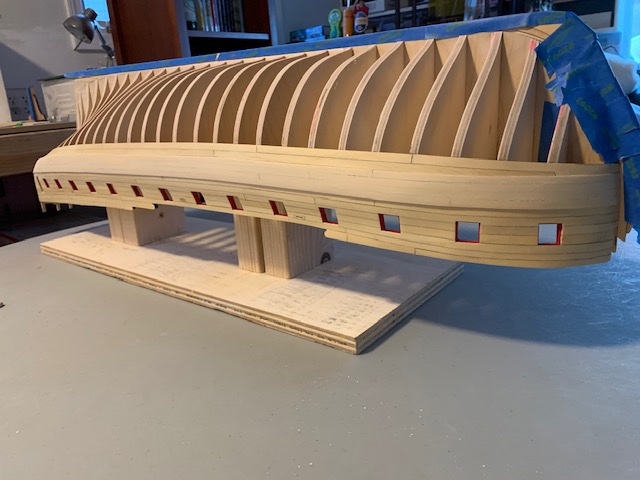
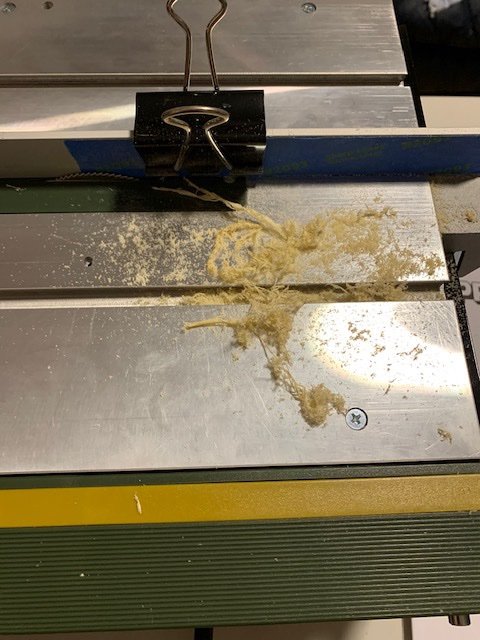
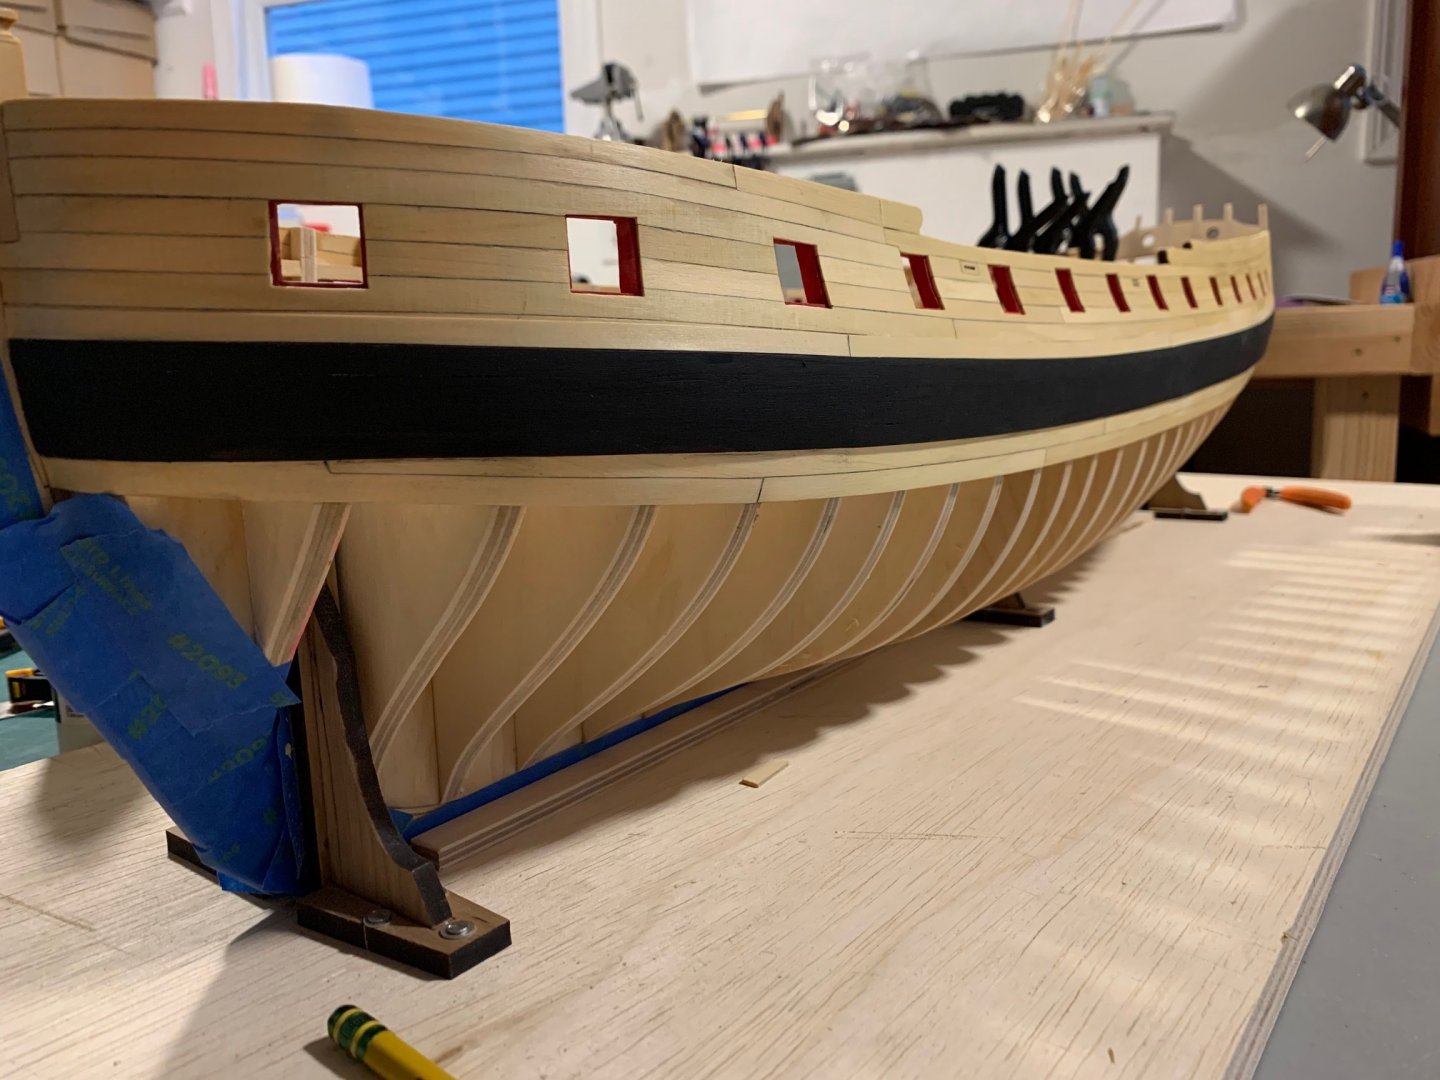
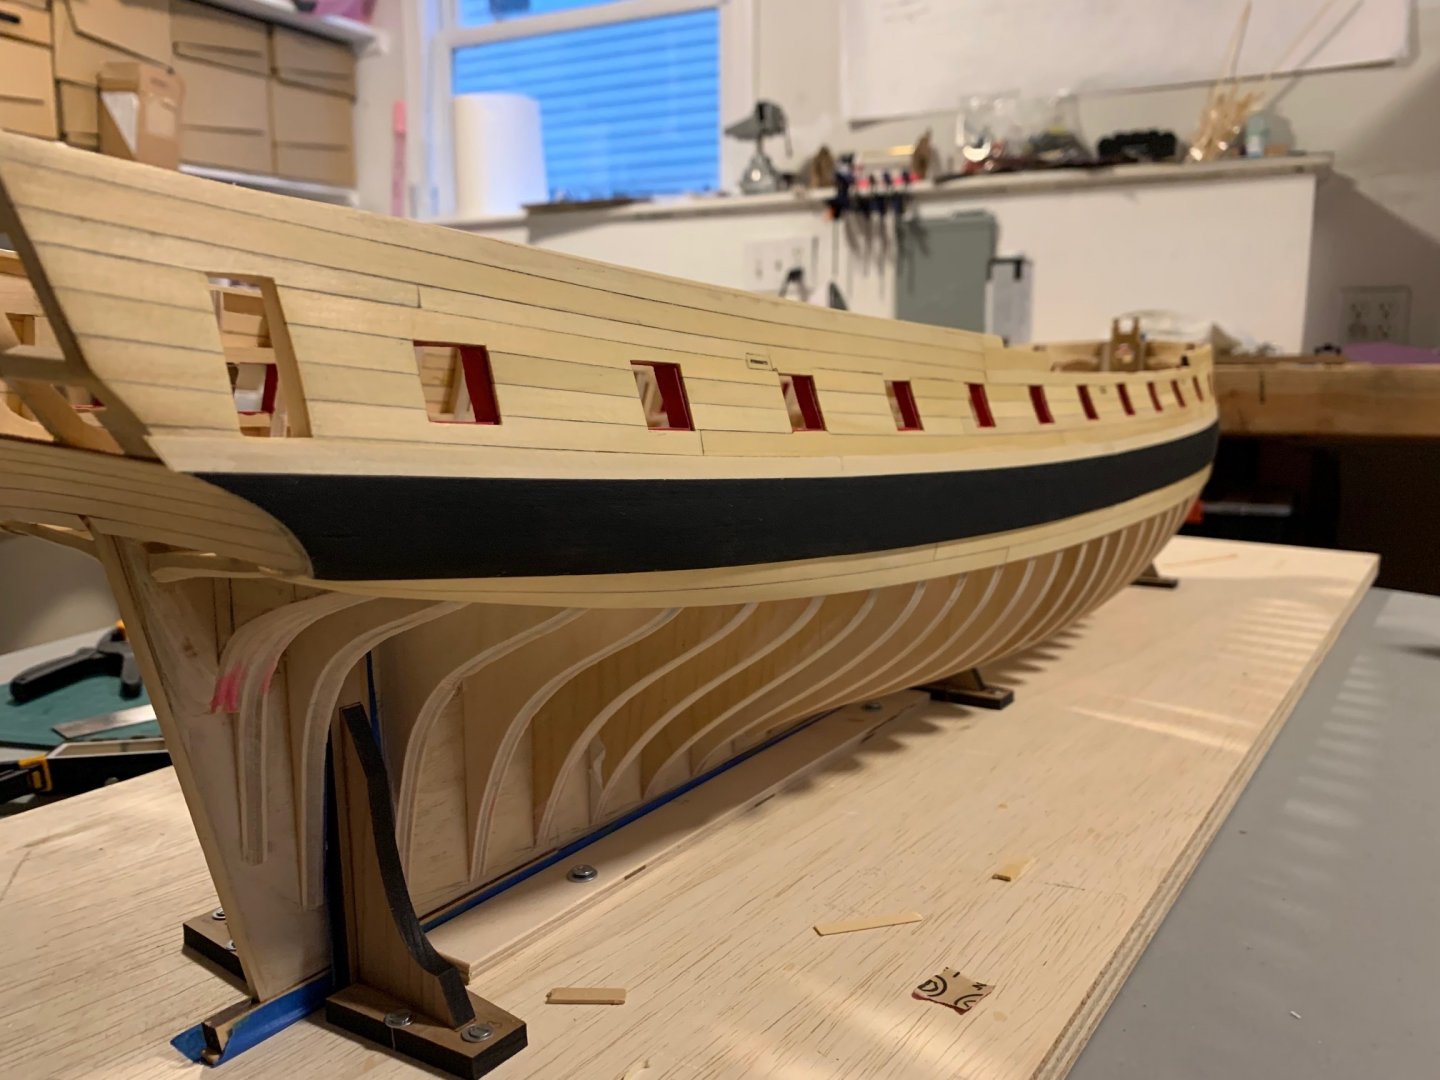
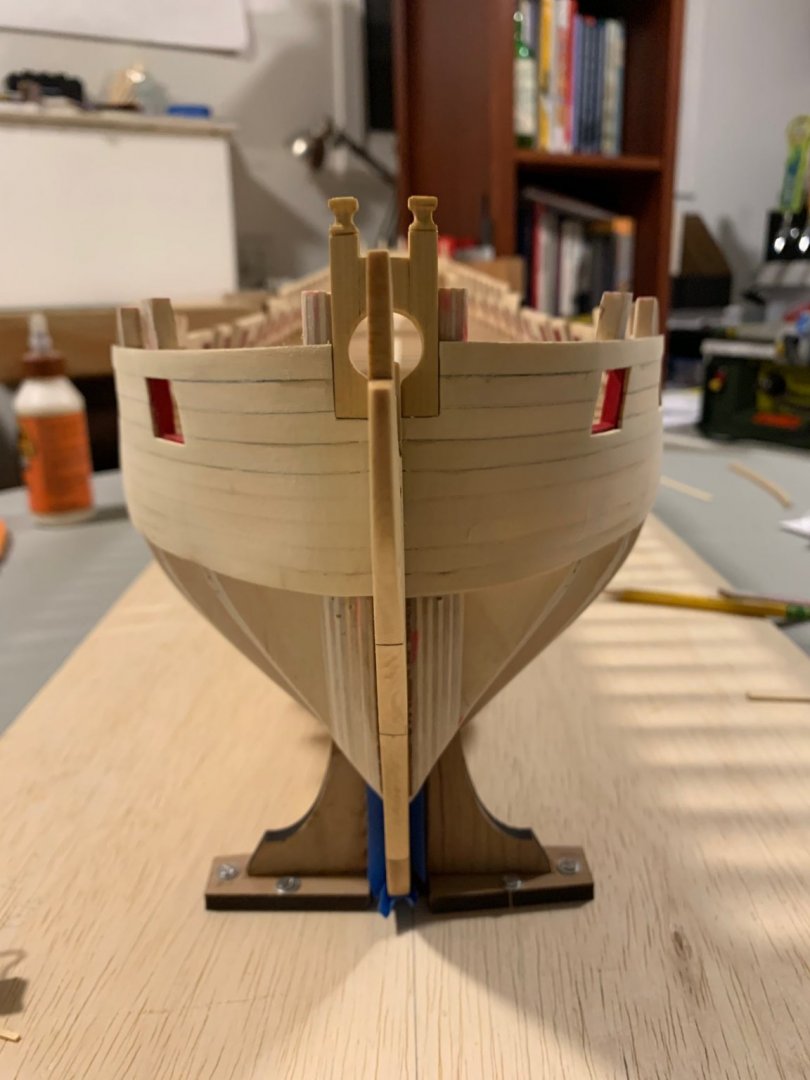
Thanks for the likes and advice guys. That's a great idea JJ. Still have a few steps before getting there including fairing inboard, but I'll give that a whirl instead of coming to that conclusion after some frustration. The Winnie is really starting to come together now, but I ran into some major problems as I was planking the wales. While setting up for a clamp at the stern, I appear to have hooked my finger on one of the planks and broke it in half and then about a half hour later when setting up another clamp at the stern, I lost my grip on the clamp and instead of shooting across the room, it shot directly into the lower counter and gouged a couple planks deep enough to not be able to sand out. Luckily, the first was a pretty easy fix and a good reminder to not pull on the planks. The second will be covered by a frieze, so no permanent damage done, more counting my luck that the clamp didn't gouge visible planking. Regardless, things are coming along. I happened to get in new clamps the other day and they have made the Wales and black strake 100x easier. It was one of those needle nose ones that gouged the counter. Apparently they will mar a surface when shot with enough velocity. The wales came out well and I gave them a good working out with 60 to 100 to 150 grit in preparation to paint them. Even though I tapered the planks at the bow, quite a bit of sanding/light chiseling was still necessary, but I did not mar the stem, and got it a nice taper into the rabbet. One interesting note is the top plank of the wale doesn't align completely with the plank underneath it and just happens to coincide with the triangle I had to cut out of the uppermost plank. I realized that because the stern where the 4 wale planks are located is essentially an arc so the outer layer is going to cover more distance than the inner layer. I should have beveled the 4th plank of the inner layer so that the black strake runs along the bottom of the door framing. The good thing is this will only be visible in the gallery and gives me extra confidence that my stern framing is correct. Onward to the black strake. I tried to rip some thin planks of 7/32" and it was a complete disaster, so I stepped back and re-evaluated. First, I installed a zero distance insert into the saw. Then I discovered a way to rip down some of my reject planks to 1/64" by putting a binder clip right up near the teeth of the saw blade. The plank will ride in the groove of the clip and the hardest part is getting the plank behind the saw blade. The end result is that it doesn't create all that much sawdust but a whole lot of strands. A side benefit was some of the plank entering the saw ripped down to paper thin for the first inch or so, so I didn't even need to taper the black strake at the bow at all. Got a nice pronounced step along the entire length. I switched over to white glue for this. The planking is so thin, I was worried about CA or carpenters glue bleeding through and changing the look. Turns out what I thought was paint bleed on the foremost gunport is a chip at the back of the plank. I notice it every single time I take a photo and it's going to be nice when the gunport cover goes in. The black strake landed right at the bottom of the Q Gallery framing. It's amazing once the wale is painted how it changes the overall look of the model. I went and put another coat of WOP on everything and noticed for the first time how much finish sanding is still ahead of me, but this will happen once all the planking is done. I'll get the anchor lining on tomorrow and then settle back in for some inboard fairing.


-
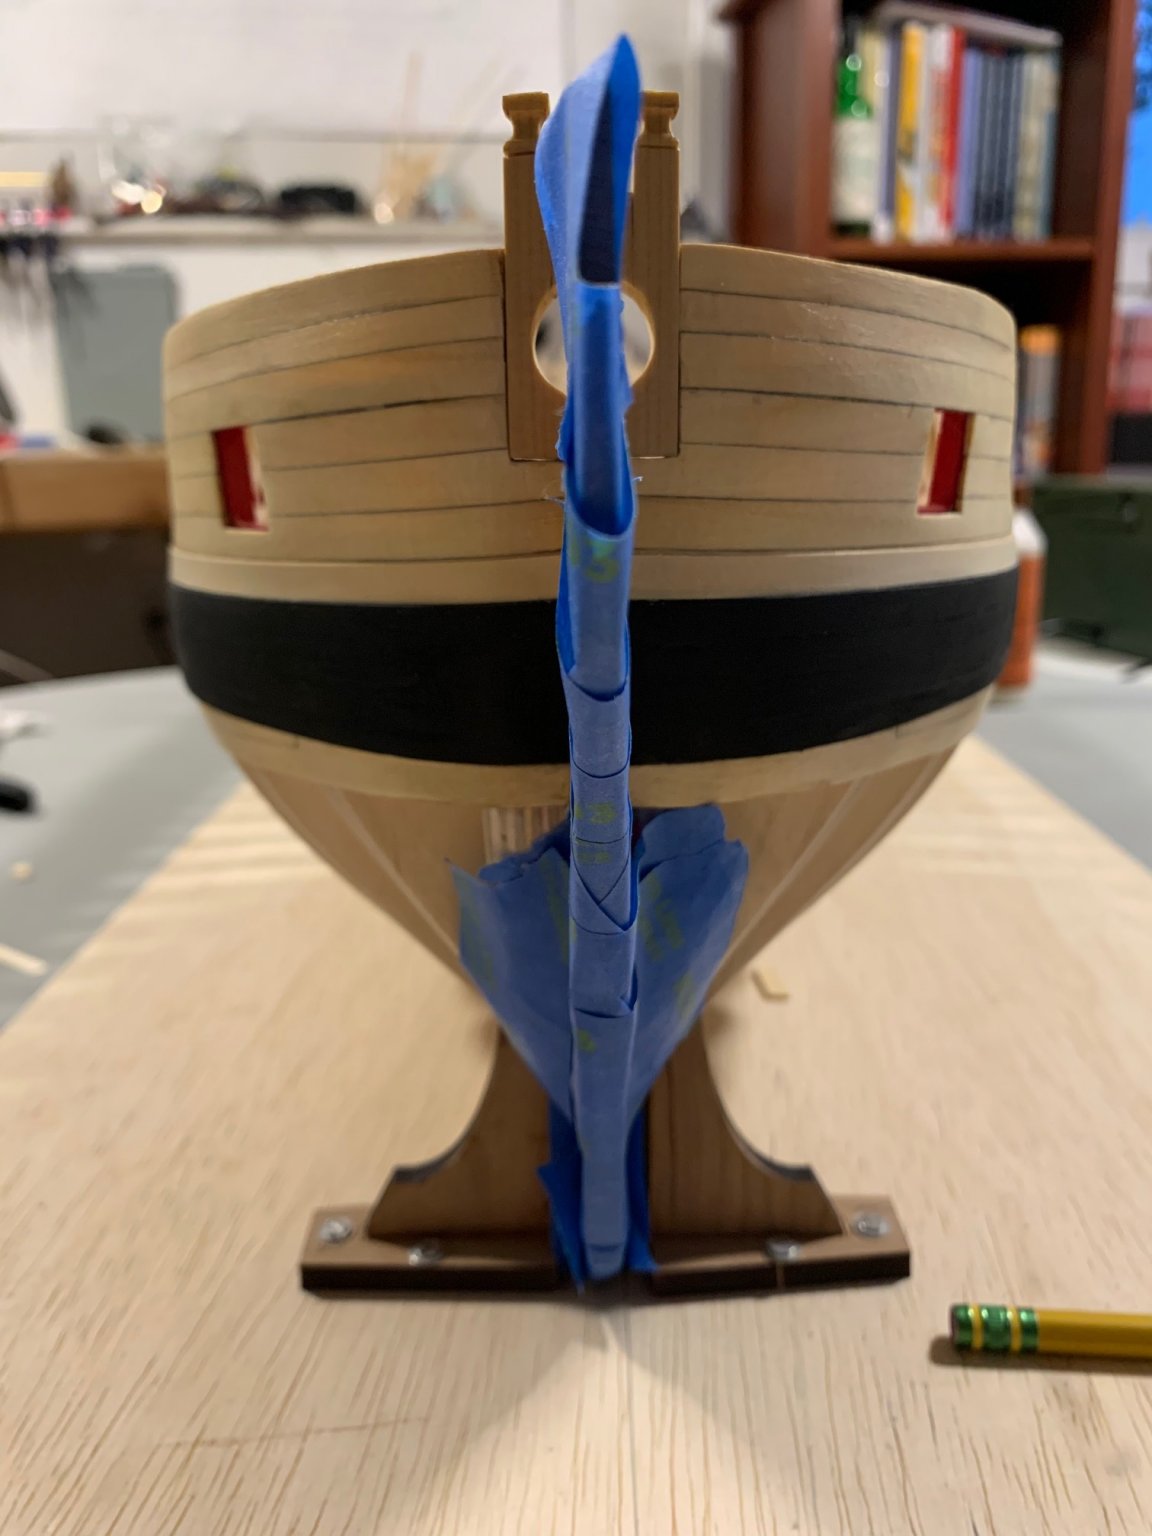
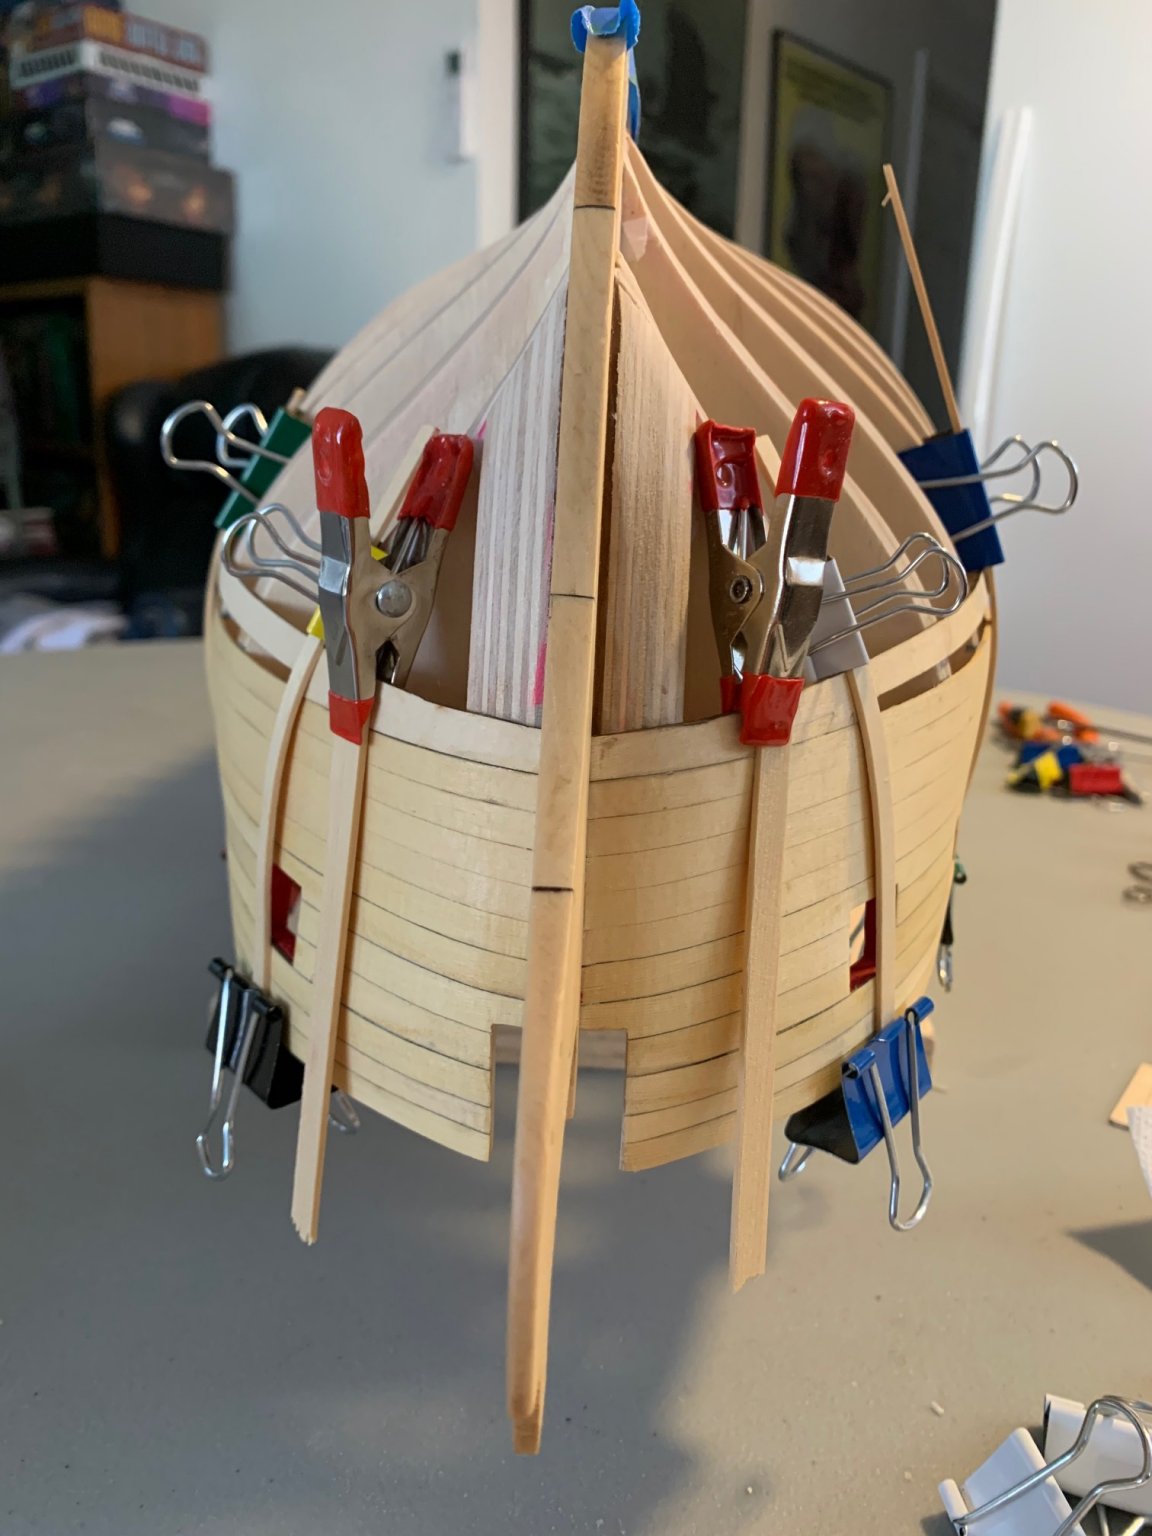
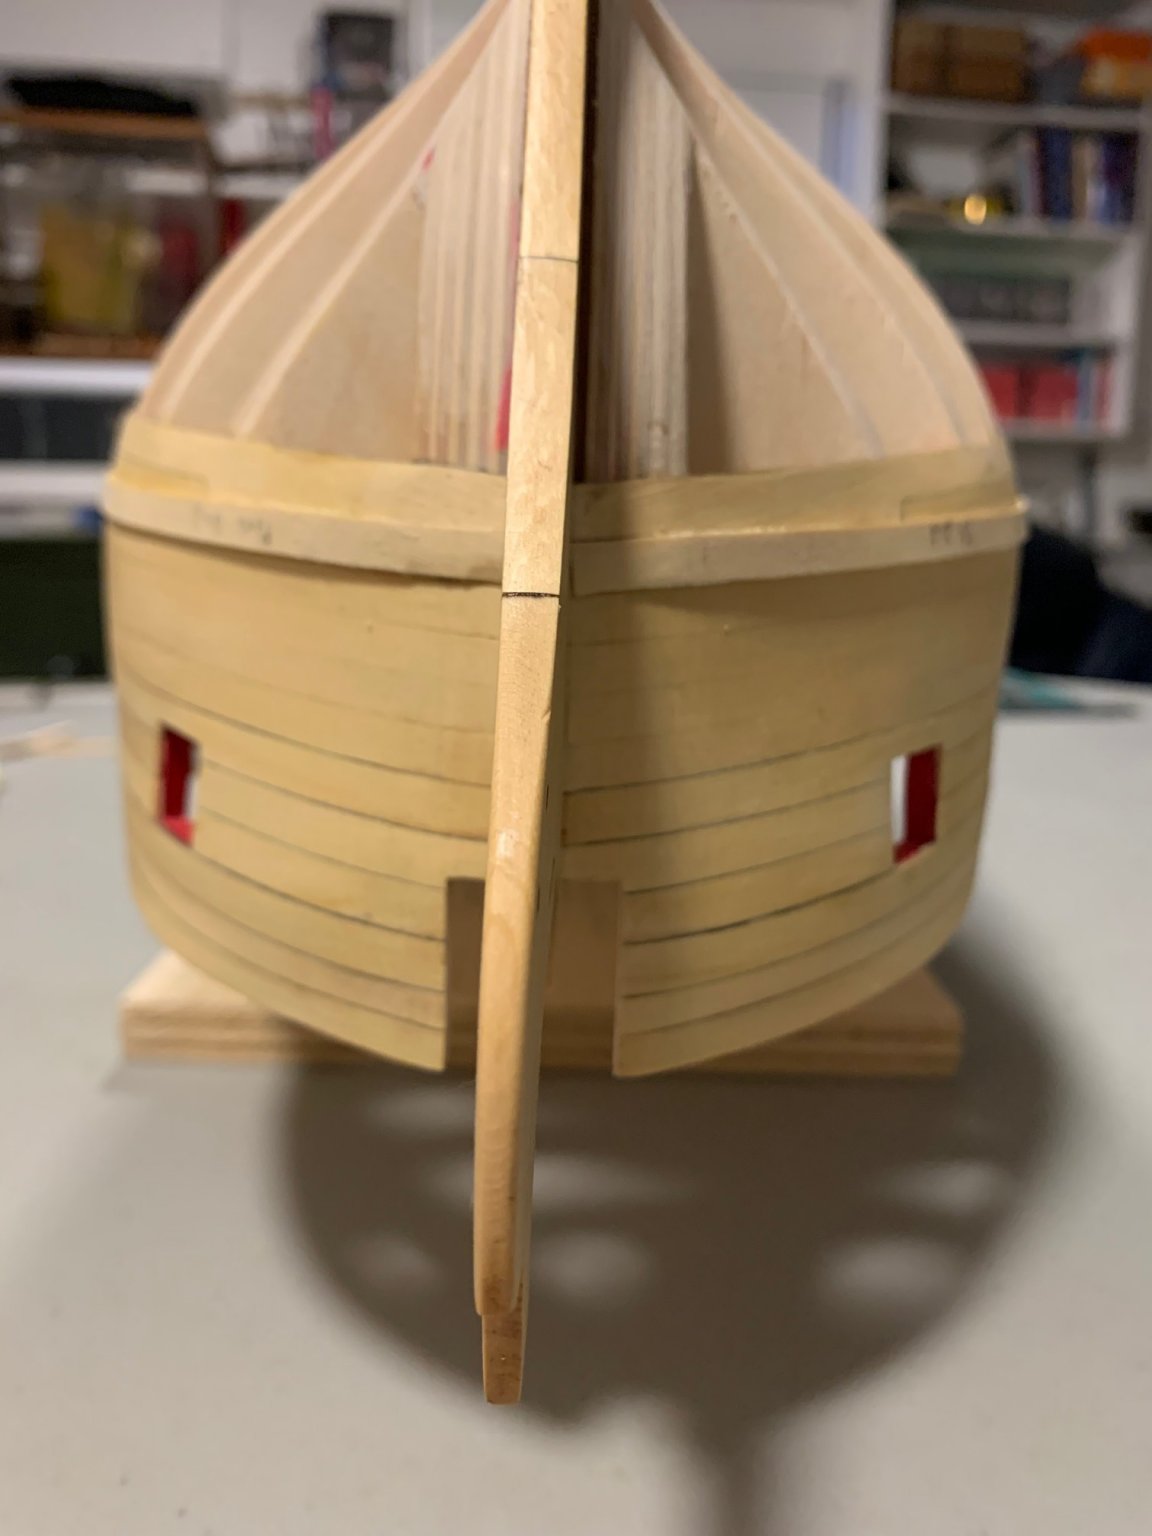
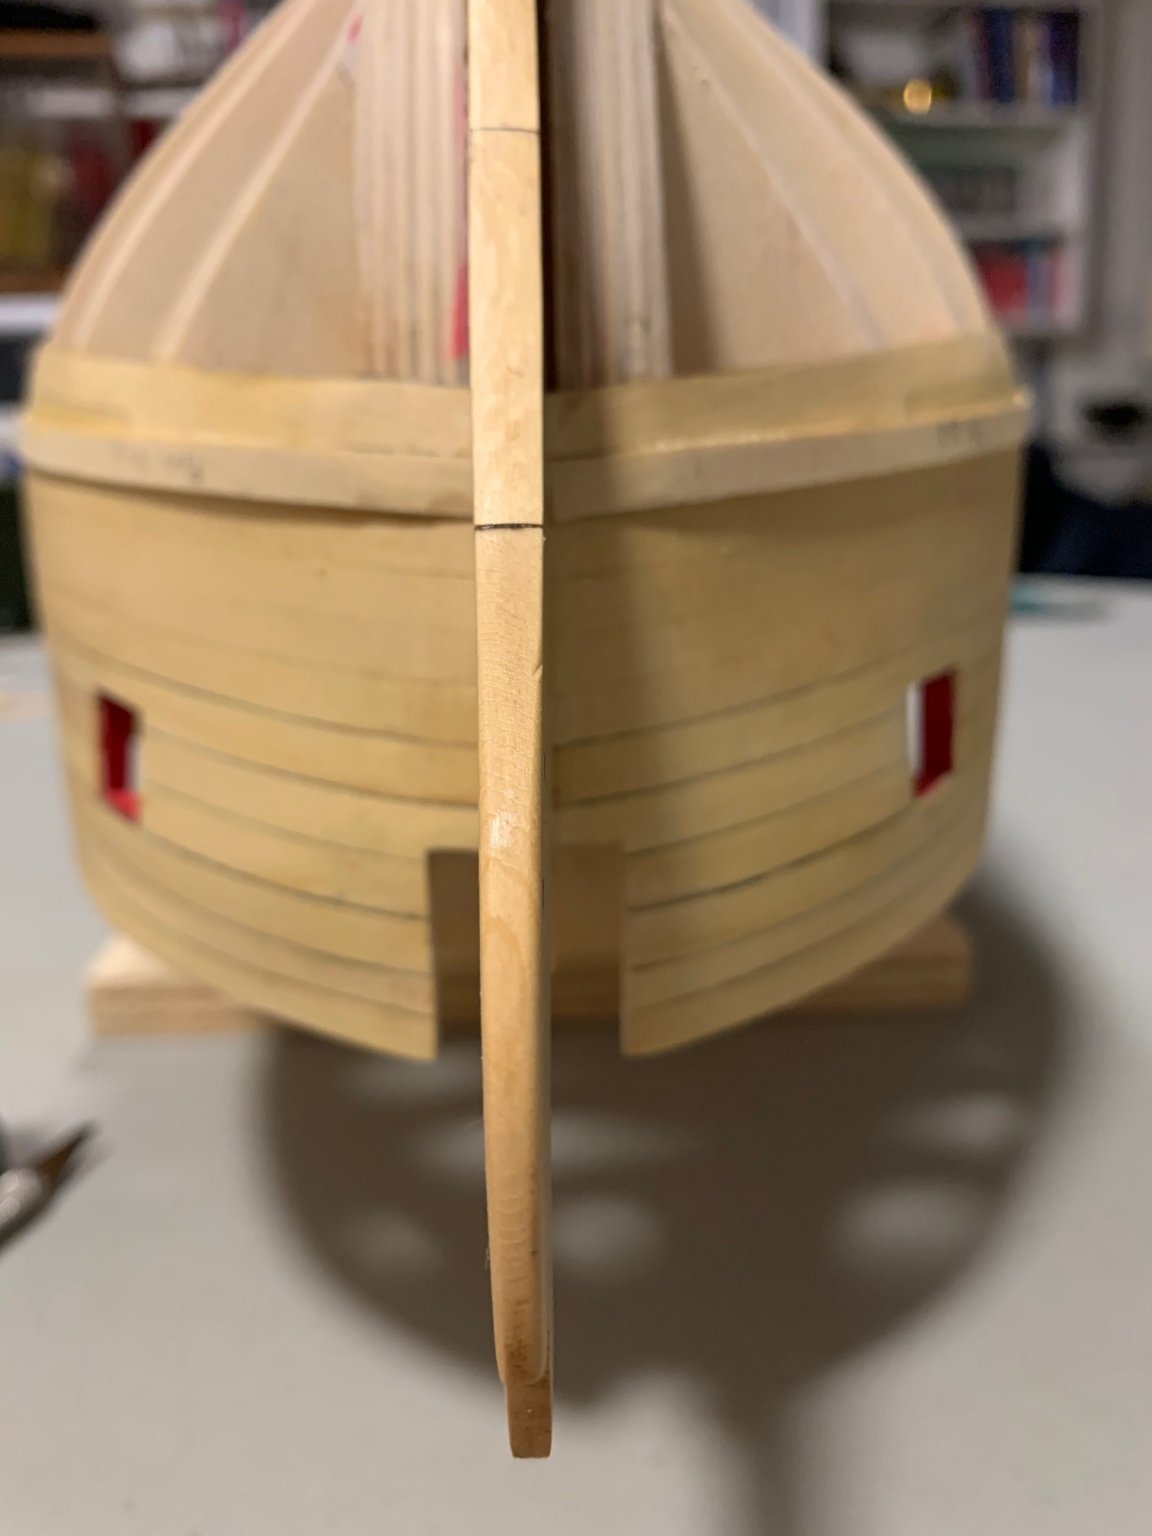
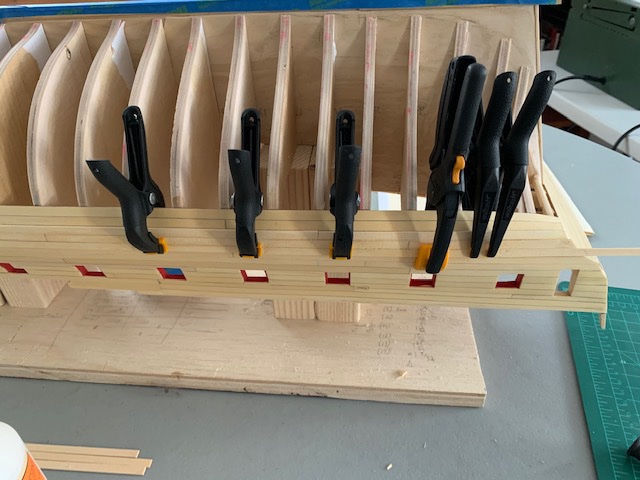
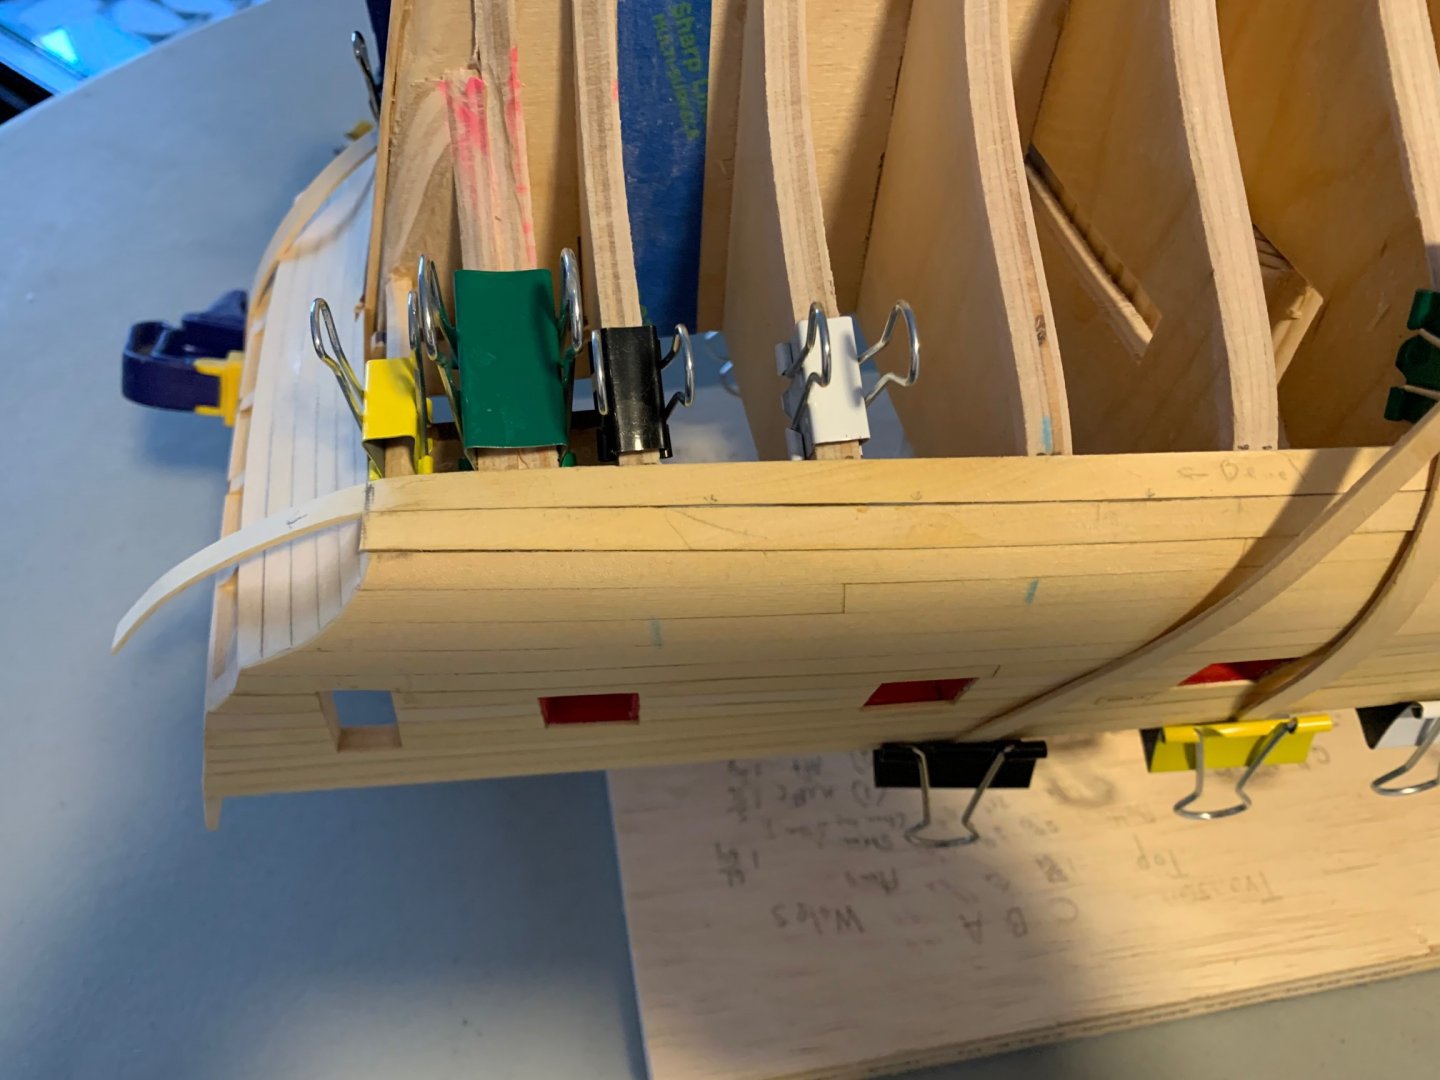
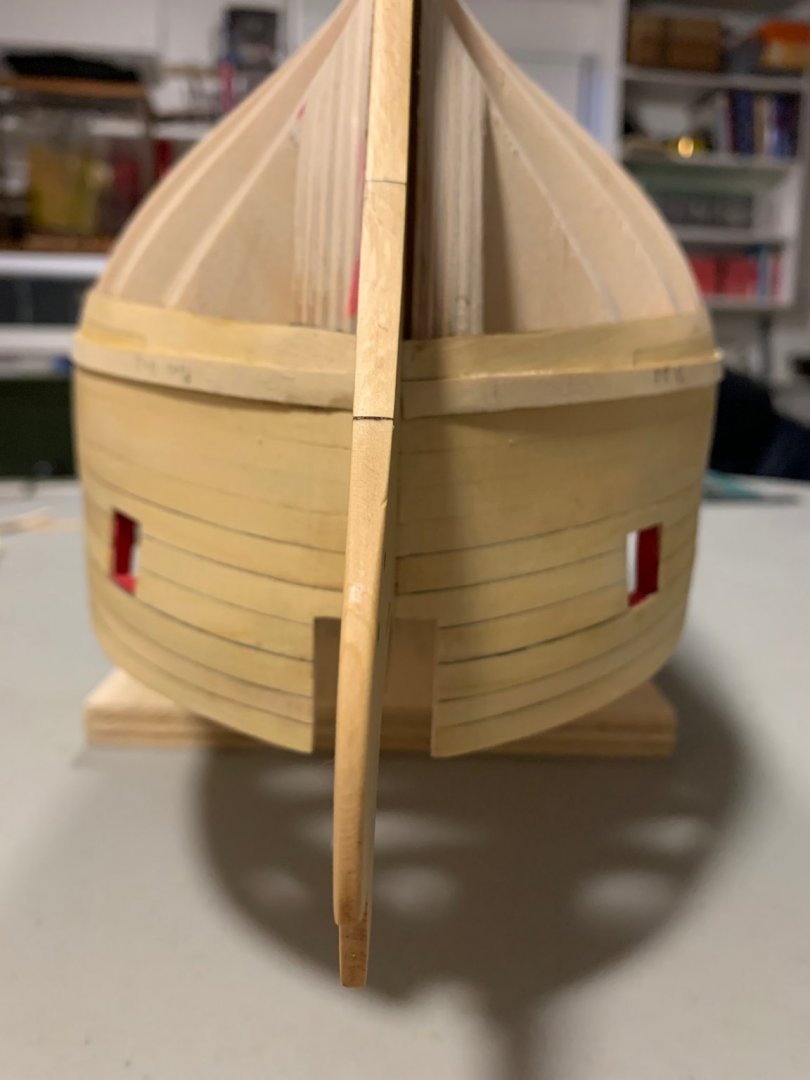
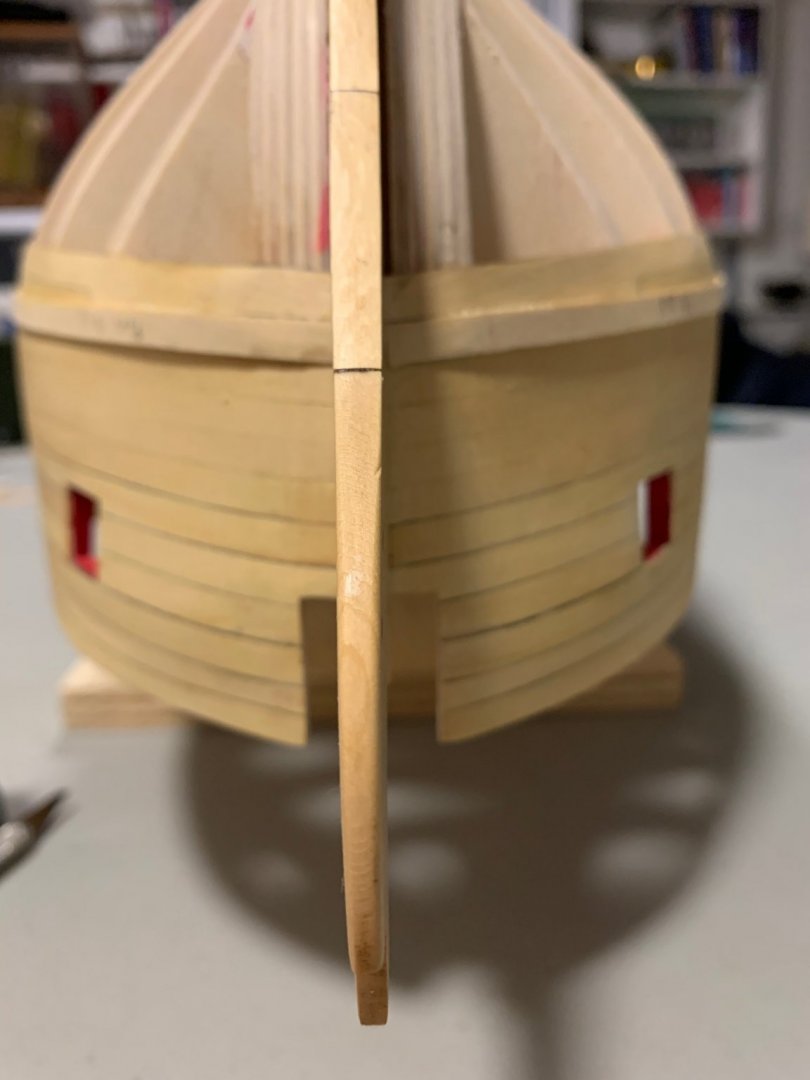
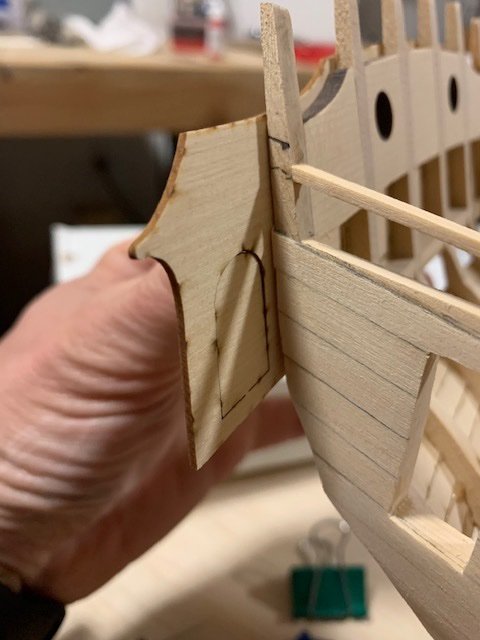
Thanks JJ and everyone for the likes. The past few days have been a lesson in creative clamping. This update is more about things I learned than showing much progress. The drop planks fit just about perfect, but I had some troubles with the twist from the bow to bulkhead W. The spring clamps made it a bit more severe than it should have been. What I've found amazing is a couple of drops of water makes the cedar pliable, so I was able to iron out the clinker from the bow. Even when I need a severe bend such as at the stern, soaking the plank for about 10 seconds at room temperature makes it pliable enough to not break. I let the plank dry for an hour or so and then start removing clamps one by one from aft forward and ironing as I remove them. The one on the transom is the last removed. The iron removes any springback that I had been getting from just water bending. Really looking forward in a couple steps to edge bending. Stern cleaned up nicely Moving onto the wales, I decided to thin the bow piece down before installing as I just know I will slip and gouge the stem if I do it after installing. I also switched over to CA glue at this point. Glad I did as I thought the wales went in well until I took this picture and noticed the port side being a touch lower at the bow. Fixed, aligned and the rest of the wales should be academic...I noticed a tiny ding on the stem in this picture; not a lot that can be done, but a reminder to be more careful.


-
The planking is done up to the sheer. I cut out and patched in a couple bad joints on the starboard side, gave it a smoothing sand of 100 grit and a coat of WOP. I'm pretty happy with the results and once the planking is complete, I'll smooth it down to 320. Thanks to everyone for the advice and encouragement up to this point. I finally got a travel iron delivered after some delays in transit, so now to start learning to bend planks.


-
Amazing joinery. Never ceases to amaze me how simple you make these very difficult pieces look.
- 607 replies
-
- 2
-

-
- winchelsea
- Syren Ship Model Company
- (and 1 more)
-
Thanks Mike. I measured every which way and the rails hit the transom exactly where they should. I'm going to chalk this up as some small deviations to the planking.
-
Awesome work JJ. Looks phenomenal.
-
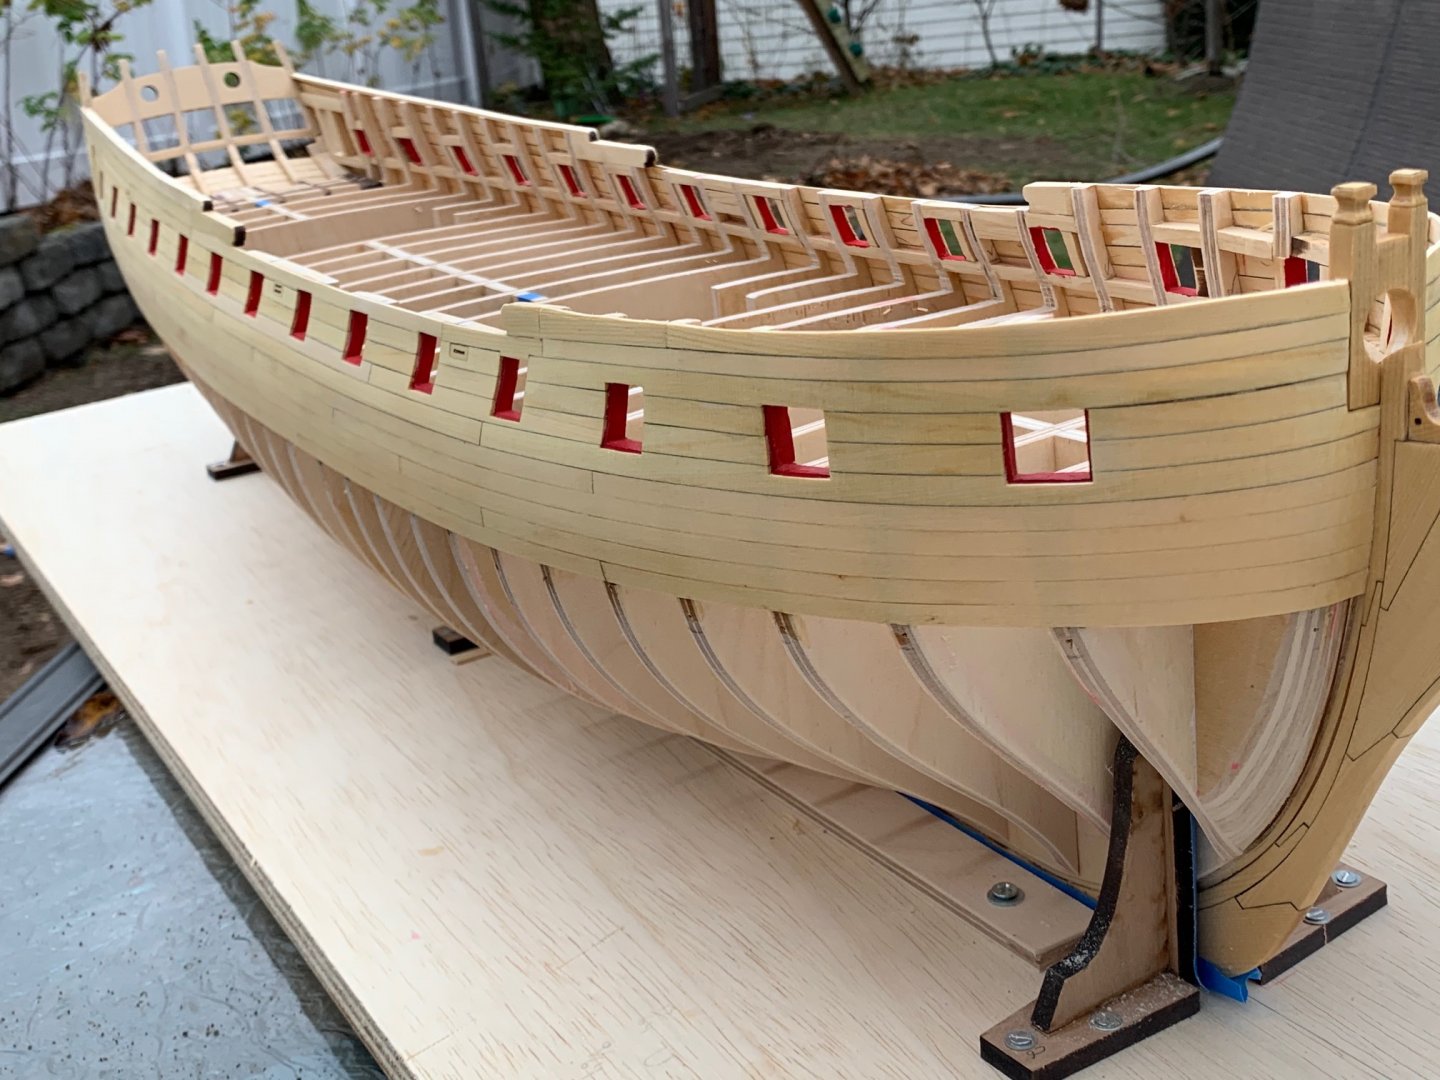
Thanks Ron. Appreciate the words of encouragement. I think the 7/32" billets were all uniform in color and the 1/4" less so, which is what threw me off once I got far enough along with planking. I'm sure once some WOP and time pass, things will look much more uniform. I made it through the 4th strake and I will not miss framing in the gunports in the least. Completely lost track of how many times planks had to be revisited, even after being installed and sanded. Made it through through and have now started on the row of 3/16" planking, figuring to complete the stern up to the aft hance piece before moving on. At the hance piece the 3 measured planks (3/16, 1/4" and 7/32") appears to align up perfect up to the bottom of the cap rail. Following it back, it look like at bulkhead 23, the planks start to slowly rise. The upper solid line is where the top of the final 7/32" plank will rest. This occurs on both sides at exactly the same point, so my measurements were consistent but off. The transom held up for comparison, so it looks like I need to raise the rail. I'm thinking I should be able to pop the rail from bulkhead 23 aft, add a support to the correct height along frame and feather in a small piece on top of the support.
-
Thanks Chuck; that's good to know. I'm using .3 as well and had gotten used to the consistency up to this point that dealing with a trouble piece of wood is still a head scratcher.
-
I didn't have any time this weekend to put into the Winnie, but I ripped all the billets I had on hand before it got too cold to take the saw outside. There's one billet where the blade just kept deflecting and about halfway through struggling with it I just gave up and moved onto the next one, which gave no issues. In the picture below are the offcuts from that 1 billet on the left and a plank from 4 different billets on the right. The color is completely different, more cream and not much yellow. I remembered back to the first 1/4" billet I ripped having the same problem, but not quite as bad. I lost maybe the first 5 or 6 planks before I was able to get it under control and chalked it up to learning cvurve. I pulled all the planks from that billet I had left and a few of them had that same coloration all or partway through. I'm assuming there is something different about the density or grain on those planks that is what is giving me trouble. Has anyone encountered this with cedar and if so, know if those planks yellow up with time? I noticed a couple made it onto the ship where they stand out a bit.

-
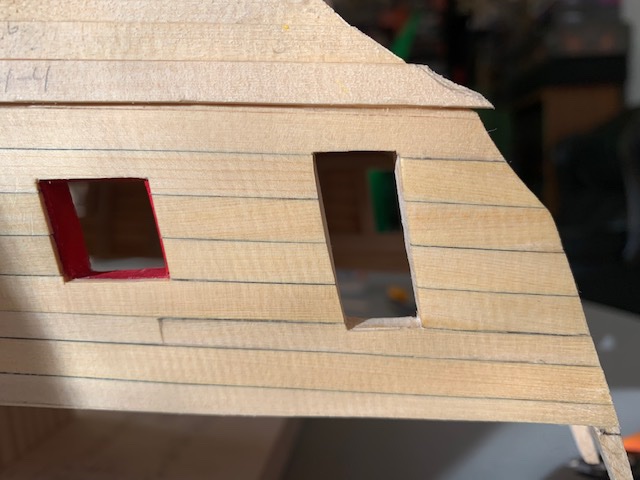
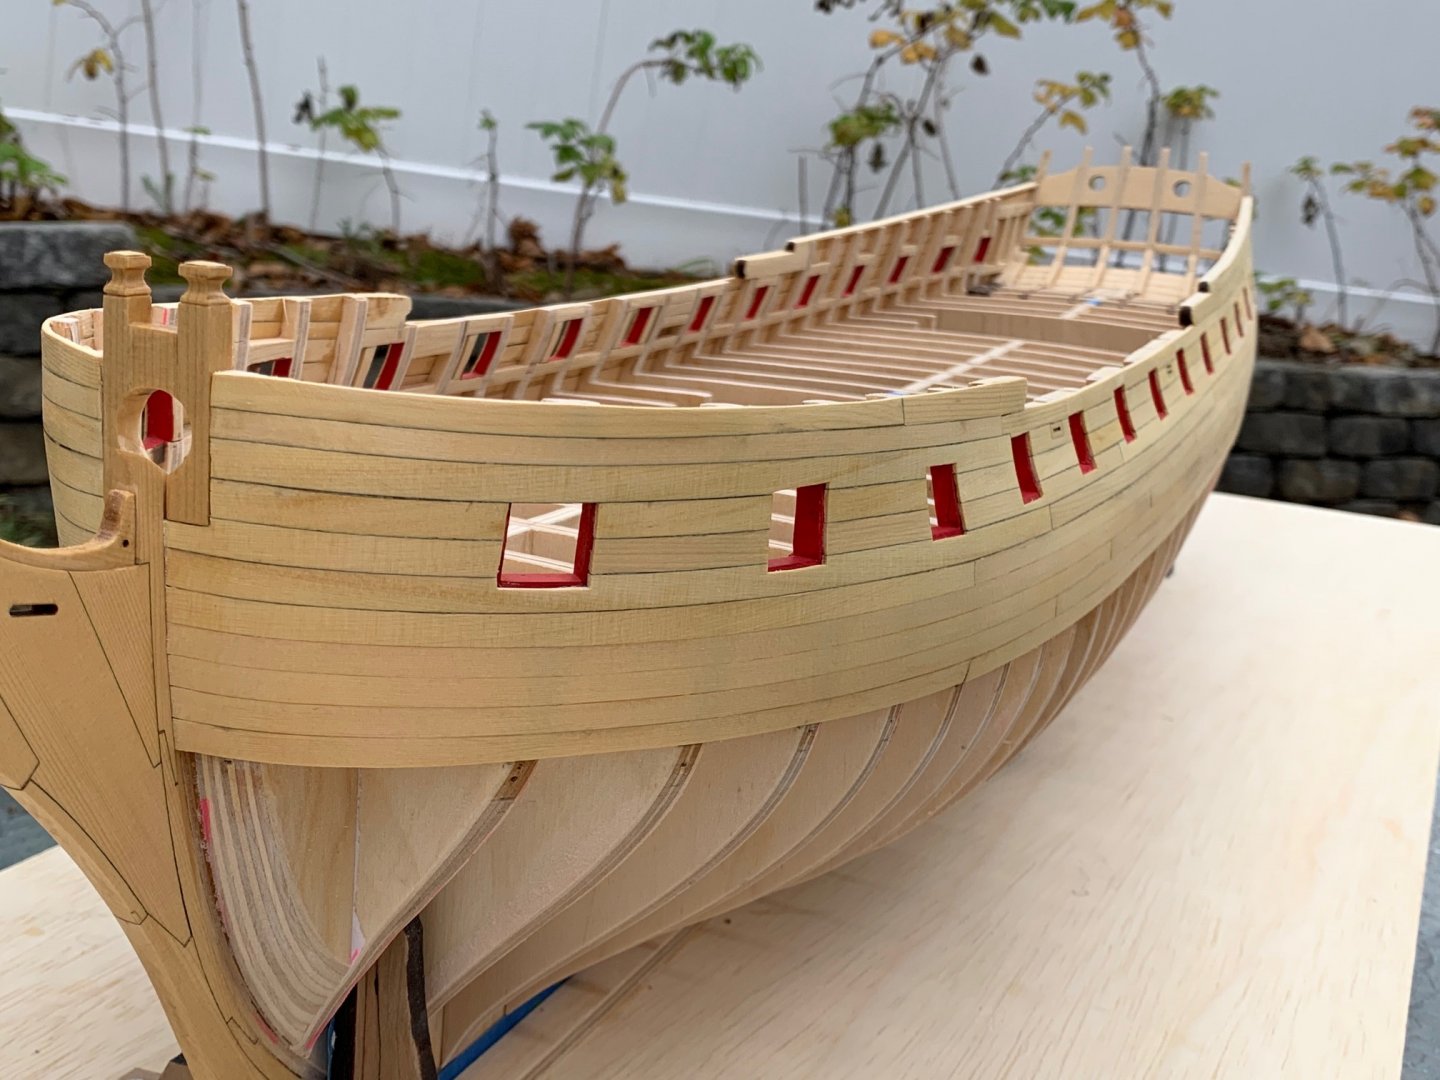
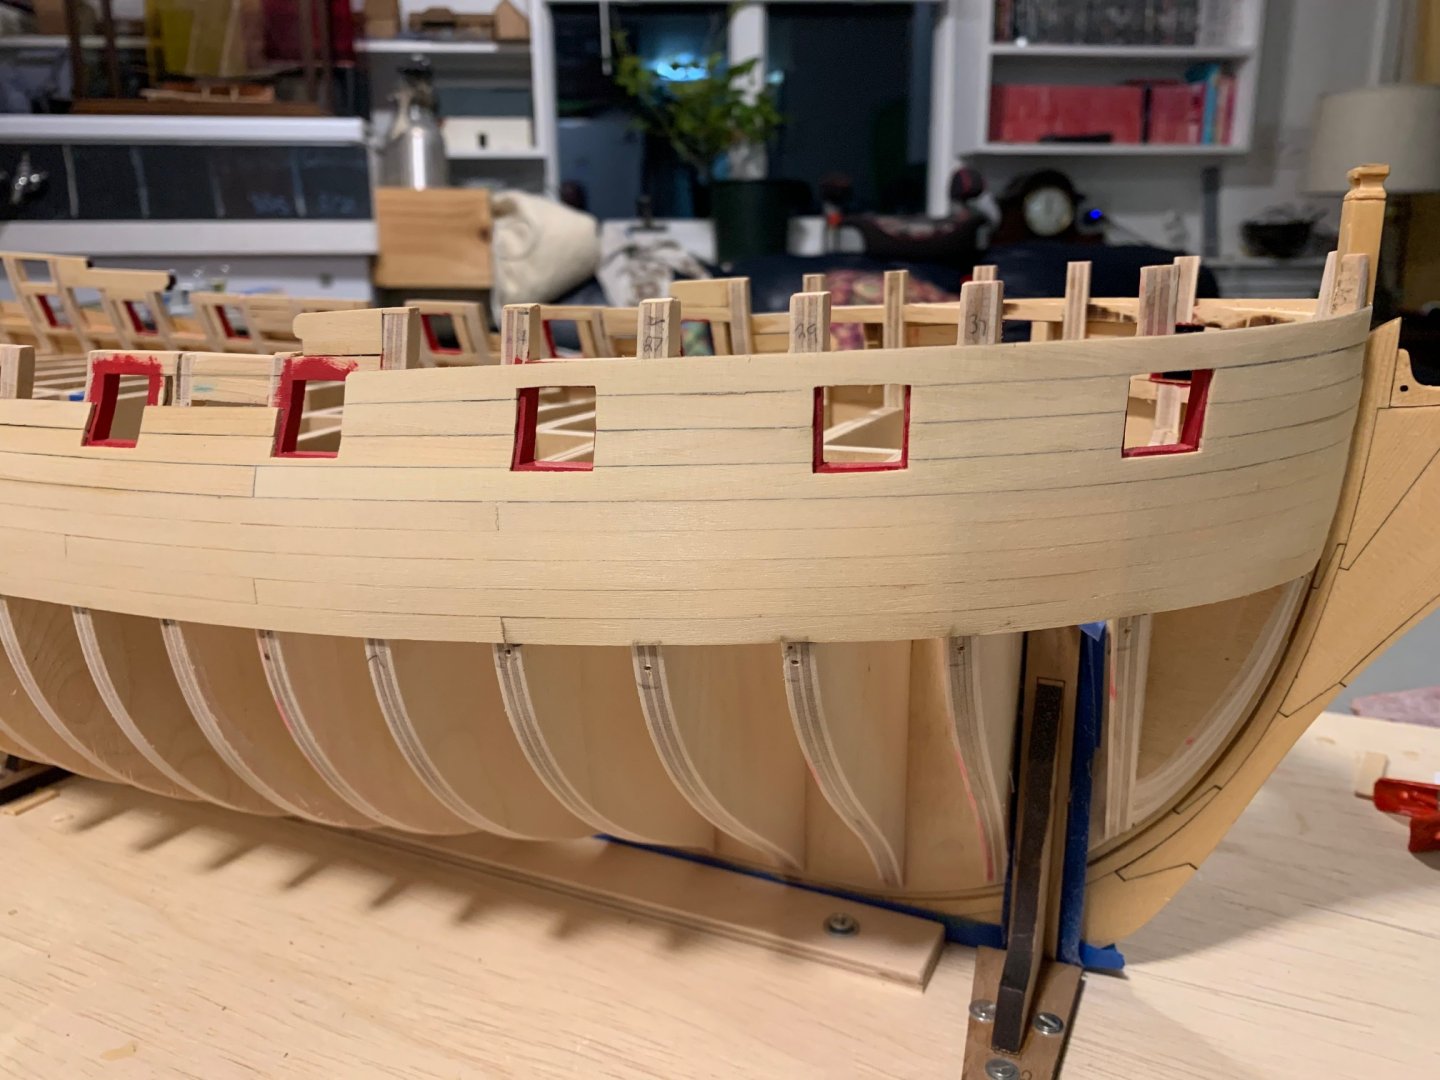
Appreciate the likes as always. I finished the 3rd 1/4" strake and it was a lot tougher than I thought it would be. I just couldn't find a reproducible technique that kept working for cutting each plank due to every angle being slightly different. Every time I thought I had a breakthrough, the next plank would prove it wrong. In the end, side cutters worked and a sanding stick worked best, as well as taking frequent breaks. I also found a simple jig of a binder clip and scrap piece of wood as an upright went a long way towards making sure the plank was perfectly aligned. I started on the 4th 1/4" strake up through the 4th gunport which is where the first tab will need to be created. Now that the first three gunports are fully enclosed, I gave everything a good sanding to remove any rough edges so I could make sure I didn't mess ups any gunports. I'm pretty happy with the results, although I found the first problem that I can't really fix. I don't know how or why this happened, but on some planks the glue I used caused some paint to transfer. You can see this on the lower left plank of the 1st gunport. I've never known acrylic paint to transfer once cured, but something in the glue must have softened it to allow it to bleed into the wood. Next step is to install the fixed blocks and finish up the 4th strake.


-
Having just gone through this, I would hold off sanding 28 any further until after 29 and the transom are installed. If you sand 28 to the steep angle off of 27, when you install 29, you'll end up with a bit of a saw tooth pattern between 28 and 29 rather than a smooth run. Sanding the underside of 28 at this point is a bit of a wasted effort.
-
I placed an order around October 13/14 and it arrived today. Postmark was November 13, so they are shipping.