Check out our new MSW Sponsor Innocraftsman
×

.jpg.44b4c10f4615fd46cc20721867b8f1f1.jpg)
DispleasedOwl
-
Posts
52 -
Joined
-
Last visited
Content Type
Profiles
Forums
Gallery
Events
Everything posted by DispleasedOwl
-
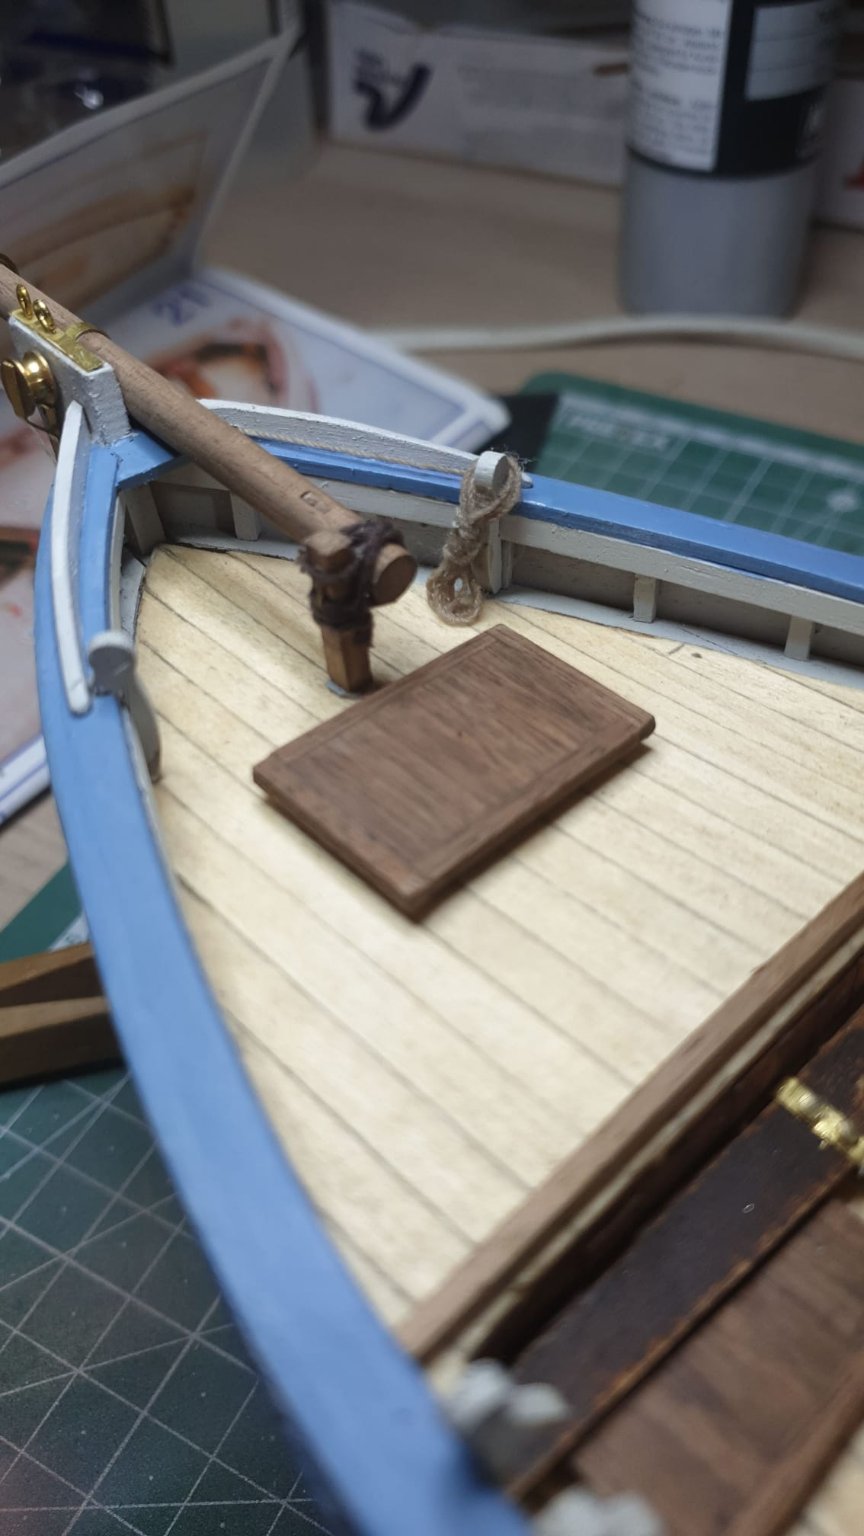
.thumb.jpg.5a33ce11c7bd2c0f448734dd2e7ea95b.jpg) Thank you! I too like the contrast between the pale wood and the dark stripe in the edges. For what i have been able to piece together, thats how the original JB looks like. It mustve felt nice sailing in this ship, the more time i spend on it the more time i want make a trip like that! Funny enough ive never been to a sailboat in my life.
Thank you! I too like the contrast between the pale wood and the dark stripe in the edges. For what i have been able to piece together, thats how the original JB looks like. It mustve felt nice sailing in this ship, the more time i spend on it the more time i want make a trip like that! Funny enough ive never been to a sailboat in my life. -
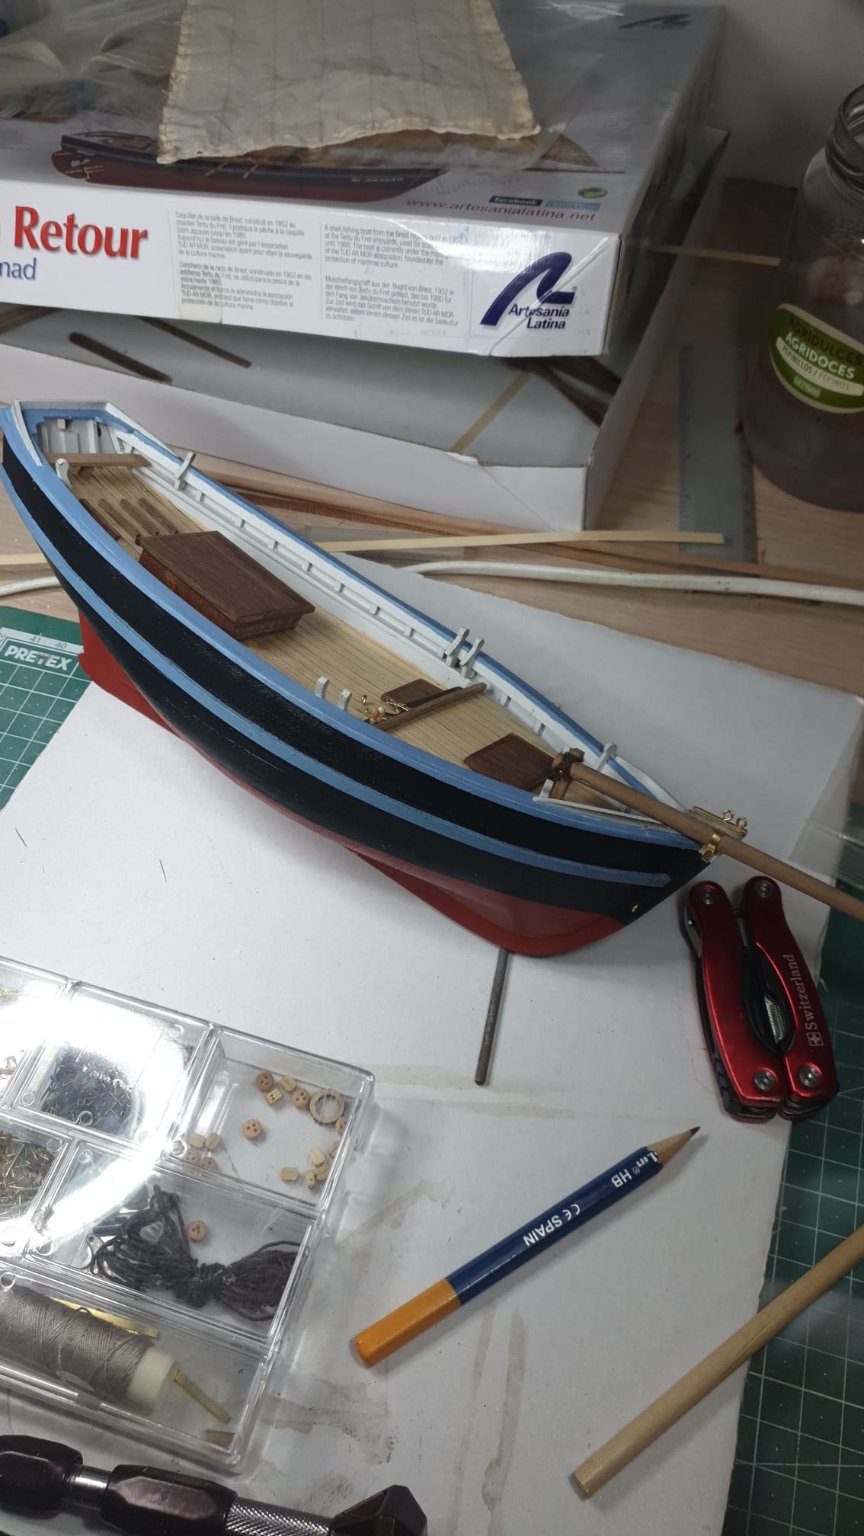
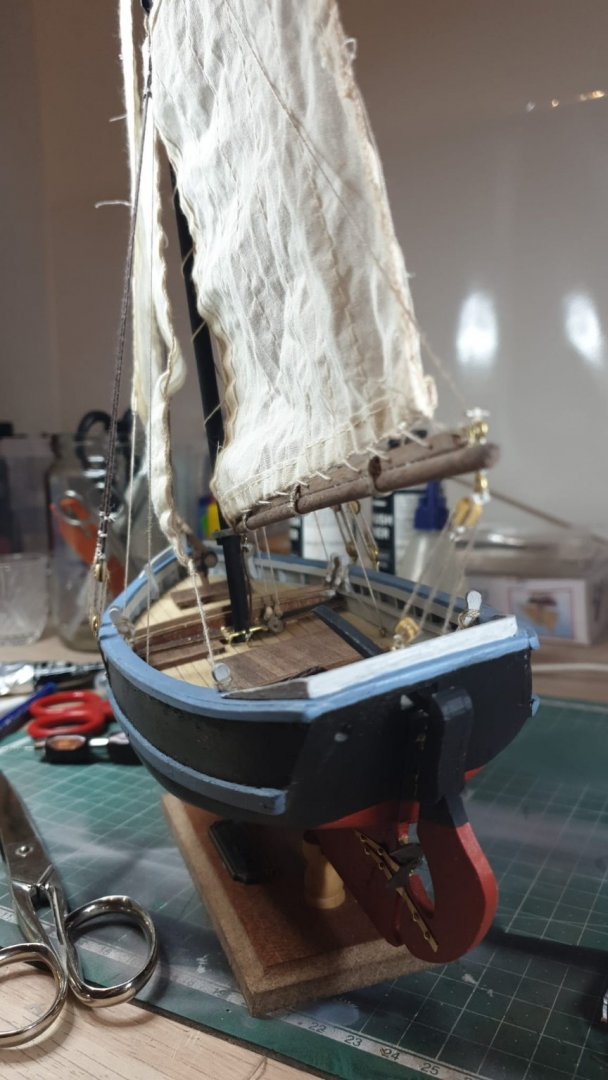
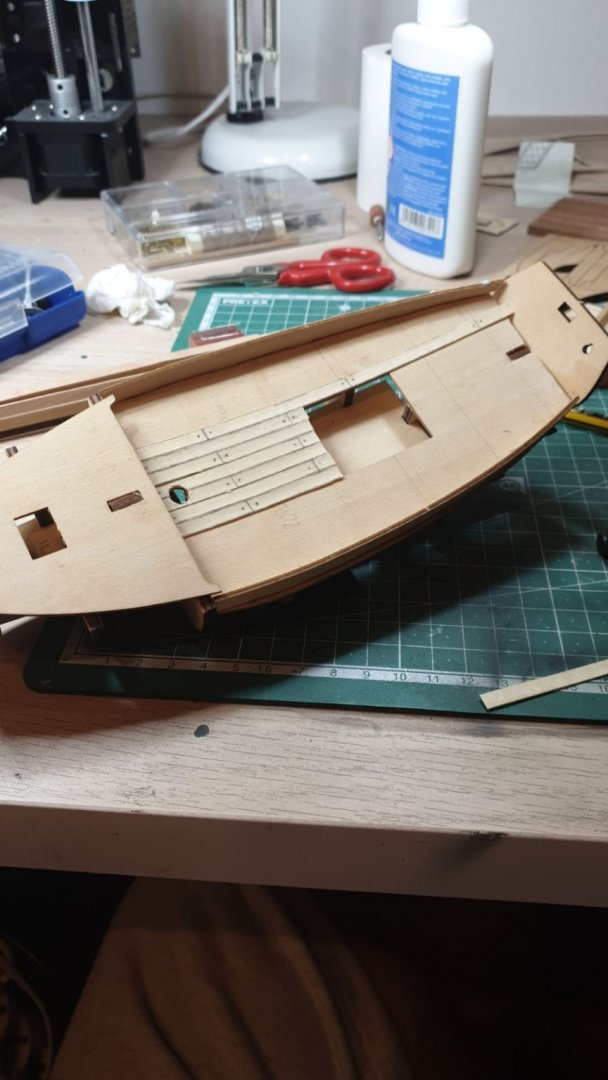
Now it was time to start planking the deck. In the kit, the side planks are not black, so i used a black marker to paint them, since i didnt have any black ink. Also, at the stern of the ship, a little piece is not supposed to lay flush with the deck, it is supposed to be raised! I decided to use a varnish that has a glossy finish for the deck and hull, and i couldnt be happier. Looks so good! (This photo was taken after priming the hull, i am sorry yet again)
.thumb.jpeg.6909c540819ab6a8a2b3f5cc3ecd679c.jpeg)
.thumb.jpeg.e578ffd94469935a2d36a56c58bf75d7.jpeg)
.thumb.jpeg.e8ba658adae508d5b7605d0a43e0dd90.jpeg)
.thumb.jpeg.e72aee4b6162690860d682c0773c57e2.jpeg)
-
Hi everyone! I had to take a break from the hobby since it was my last year of university but i can finally say, after 4 very hard and very long years, that i am a graduated engineer! Now that i once again have some time to spend as i see fit, i decided to continue on the build i left half-done when the exams and finals started. This is the first build that i do in which i try to apply all of the knowledge i gained from my previous ones to get the best result possible. I know i still have much to learn, and constructive criticism is always welcomed! Now, im sorry if the details of the first steps are not as detailed, its been some time and its proven difficult to find the pictures i took of this steps. First of all, building the main skeleton of the boat. After building it and making a few adjustements (we all know how AL makes its kits), i nailed the fake deck to it. I took my time to make sure it was 100% not moving and in place, and that resulted in a very satisfying nail pattern I also planked the lower deck pieces, since it was going to be easier if i did it prior to any other step Planking of lower decks ç Nailing the fake deck (I took this last photo after planking, im sorry, but its the only one i have :C) After this, it was time to start planking the hull. At this time, i asked the MSW forum about how do professional modellers manage to lay the planking flat to the keel. It was at this time that i learned about the rabbet line and the bearding line! I didnt even know what they were. Anyways, i did do the rabbet line, but since in this kit it has a back-bone type keel (the bulkheads go all the way up to the keel, making it really inconvenient to do the bearding line), it was suggested to me to first plank the hull and then sand the planks down before adding the keel. Since it was my first time doing so, it didnt look so good, but its not anything a little of wood filler cant solve. I ended up with a pretty good result, and i feel that i am getting way better at planking!
.thumb.jpeg.db433d495d7da2ec3a89eda61aa588a4.jpeg)
.thumb.jpeg.ed3c3e962b574d850cb867ae09b2a2bf.jpeg)
.thumb.jpeg.0ece56fb423a41e941aeac9c184b83cb.jpeg)
.thumb.jpeg.1e8622751ec2ca9b96deb58a5042fefb.jpeg)
.thumb.jpeg.4739f5f0e73d8d76dd7e45bc5a849733.jpeg)
.thumb.jpeg.bb51f91312c675742437691f7e4f9d1f.jpeg)
.thumb.jpeg.5a54bd23be17d91d82252cd6352dea73.jpeg)
-
Hi everyone With me getting more and more into this hobby i find myself not liking the ropes that usually come with the kits. Thats why i have been looking into purchasing one of Domanoff's rope walking machines. My only question, if anyone in here already has one, is: do they already sell the strands in those spools, or do we need to rewind them in the same ones that come with the machine? Also if anyone has any photos of how do the finished product look using those machines, i would gladly like to see them! Thank you very much
-
Hello everyone! I am asking another favour. I am painting the hull and i am how do i paint the lines on it. Do you have a special techniche/homemade machine that will at least mark the lines straight? I am looking at this post right here: And i am wondering how does he know at what height to start and end the line. Thank you in advance!
-
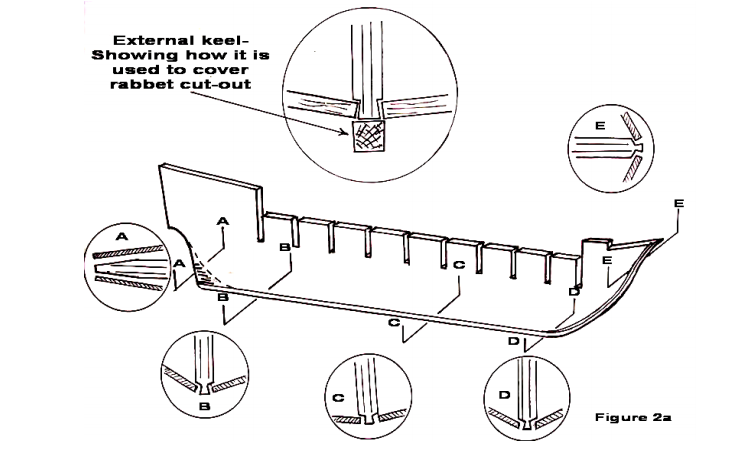
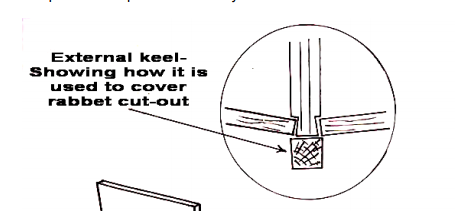
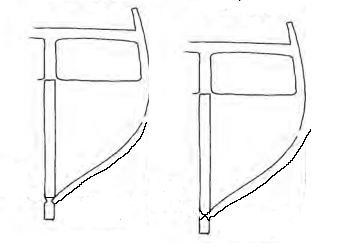
For example, in this image from one of the tutorials: If we look at C, how can i do that in this frame? The bulkhead strongback is not high enough Again, thank you all for your patience
-
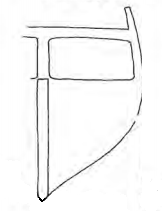
Another problem that i see when i look at this picture: is that, even if i understand it correctly, in my models, the bulkhead goes all the way up to the top of the bulkhead strongback, so i am unable to do this kind of shape. Do i need to sand of a little bit of the bulkhead so i can bake the rabbet? Let me again draw it for you
-
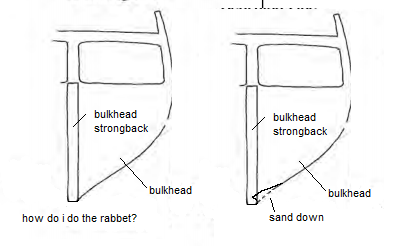
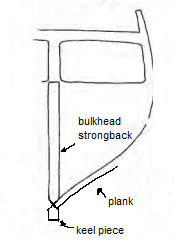
Thank you Gregory for the images! That was a very clear explanation of just what i needed. Since i started planking from the deck downwards, i can still carve out the bearding line. As for the rabbet, in a model in which the keel comes separate from the main body (skeleton) of the ship, do i need to carve out the keel pieces, place them and then insert the planks in the rabbet (left drawing), or do i sand down the keel pieces into a V shape and place them on the planks (right drawing)? Let me make a rought drawing in paint to show you what i mean. Again, thanks for your help I have made a mistake and done the rabbets incorrectly. I sanded down the strongback into an arrow shape for the planks to lay at a V shape so then i just have to place the keel pieces on top of them. Let me add a rough drawing to show you. I dont know if i did this correctly
-
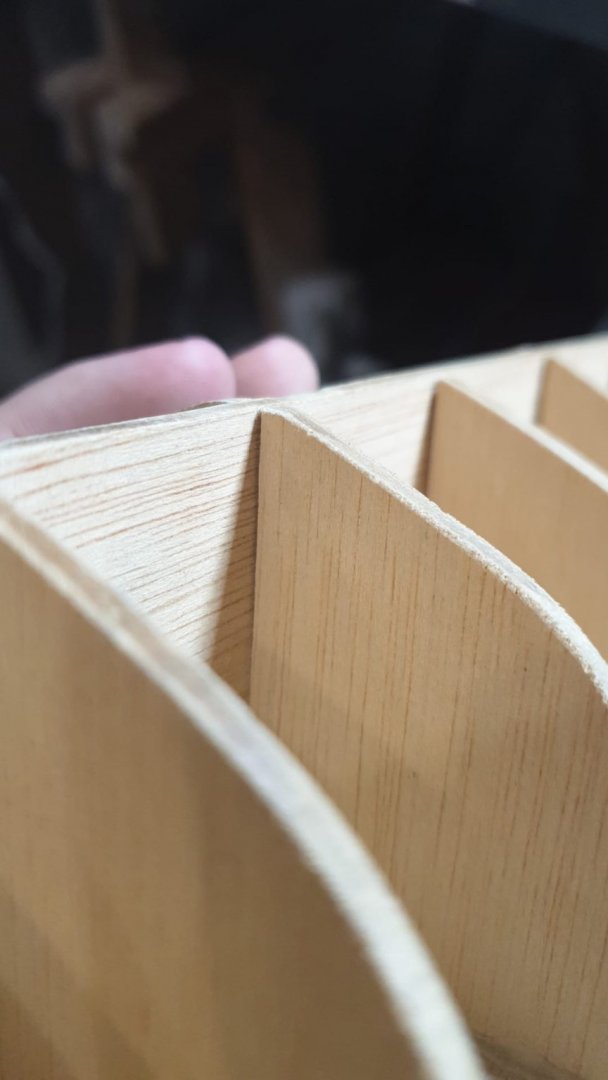
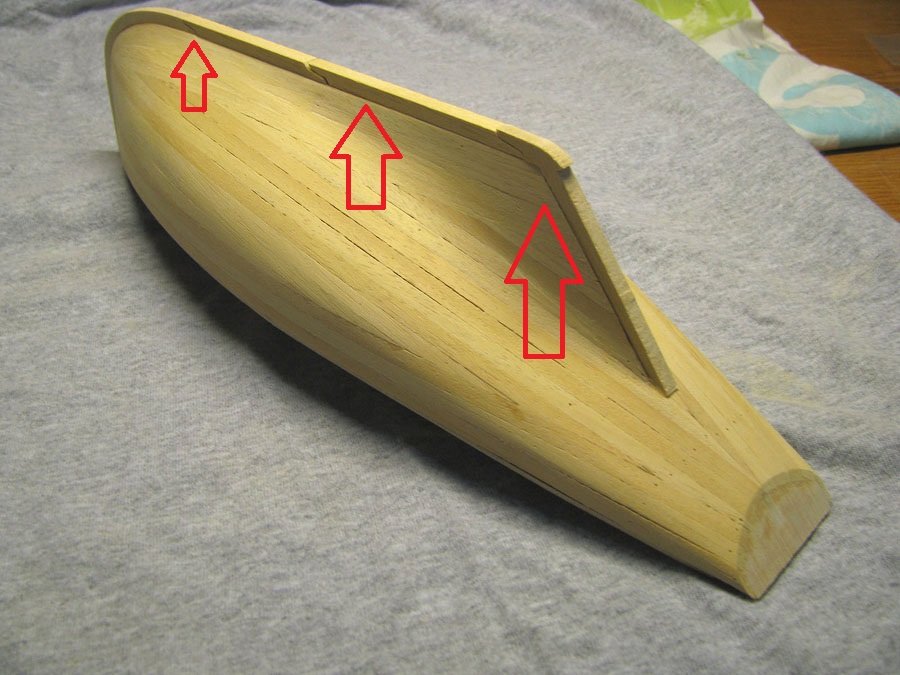
Hi everyone on MSW I am on my 4th build now (AL Jolie Brise) and i just started planking. Now, i have a few questions for the more experienced modellers regarding the keel and the planking around it. When i see finished professional builds i see how the planks around the keel lay against it perfectly flush and smooth, even on the rudder area (i dont know how its called). I had some trouble in my last build since it had a very tiny keel and the planks laying on it almost covered it up. My question is, how do you manage to plank that area, do you sand the frames, the false keel? I thought of sanding only the planks but they become so thin they tear apart, revealing the false keel under them. And also if you place the keel before or after planking. I will attach an image of another Jolie Brise build log from GreatGalleons so you know what i mean. Sorry for bad english. Thank you in advance Hugo Bosque
-
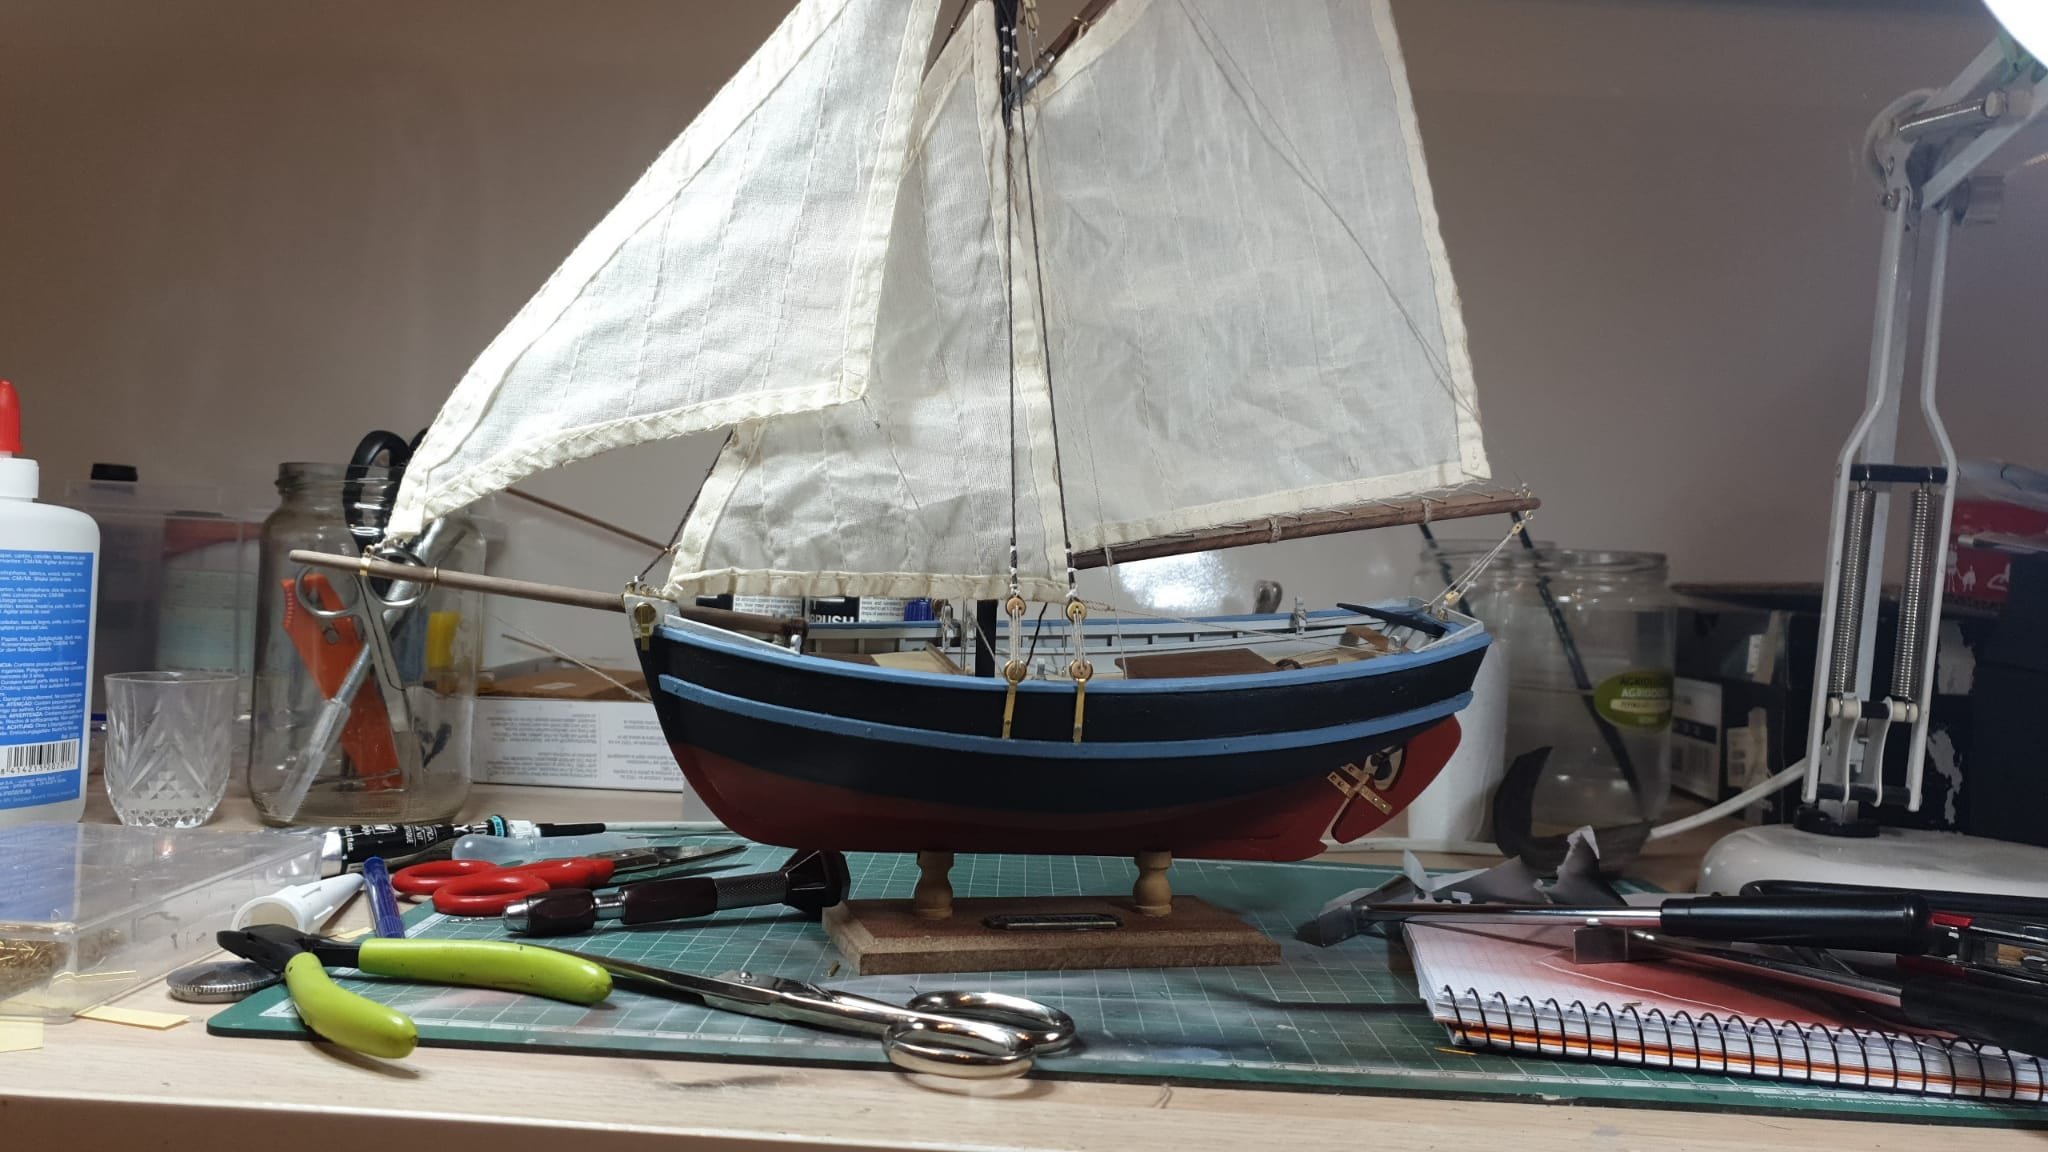
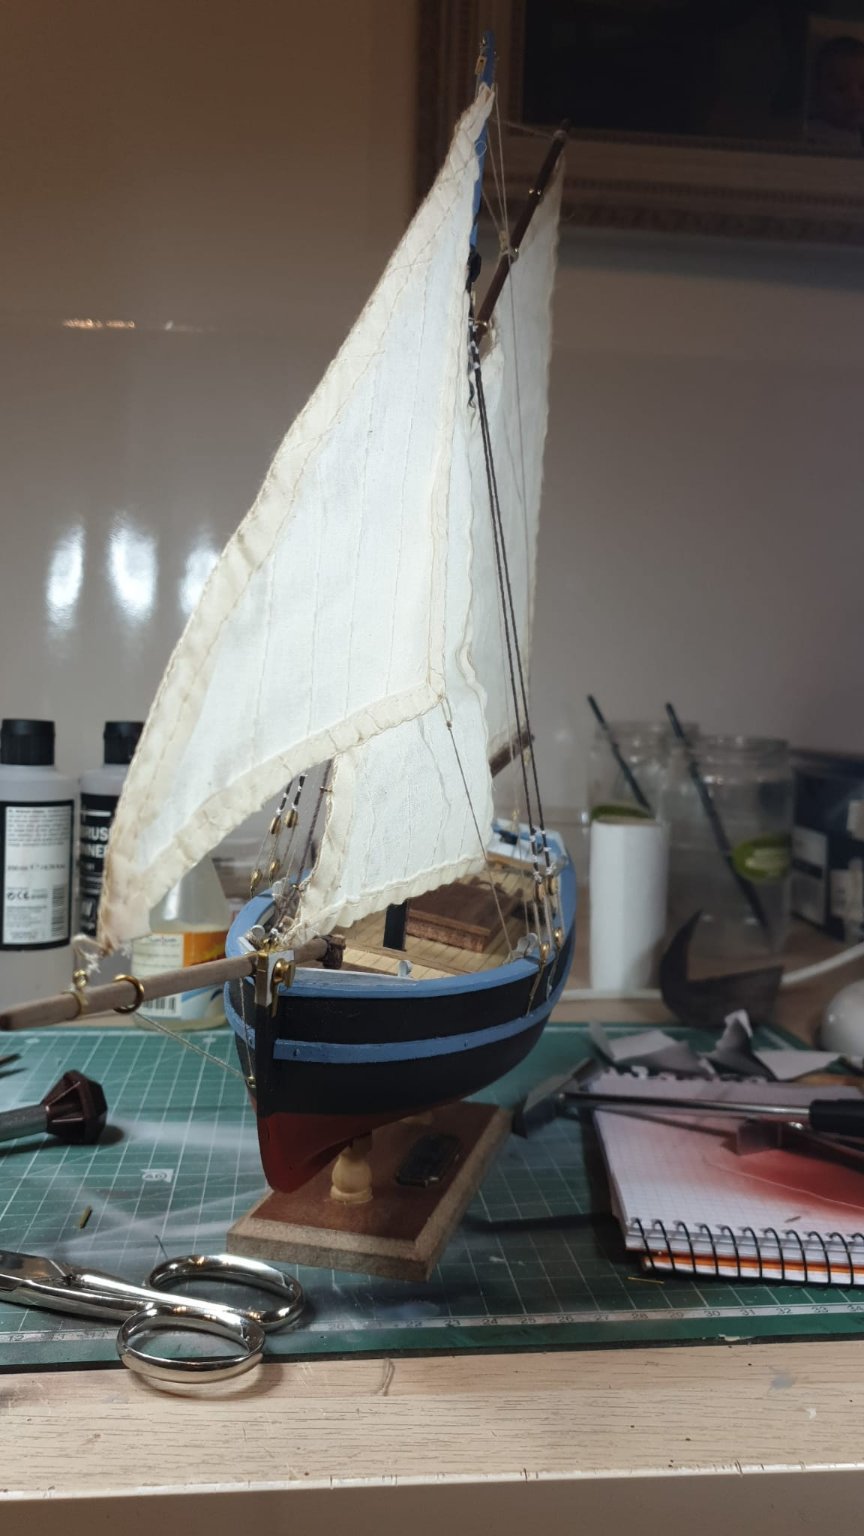
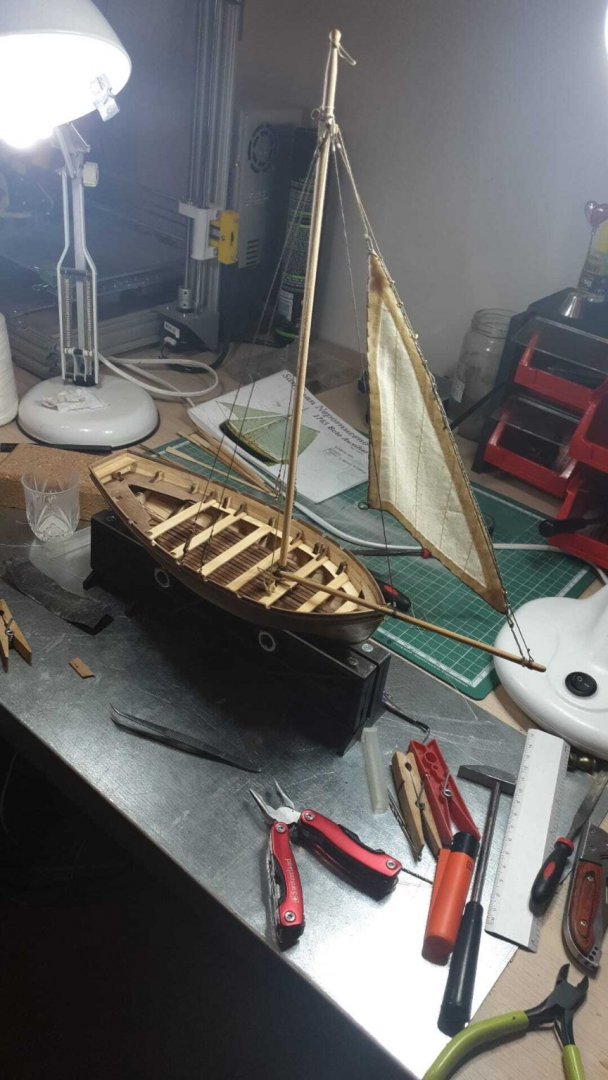
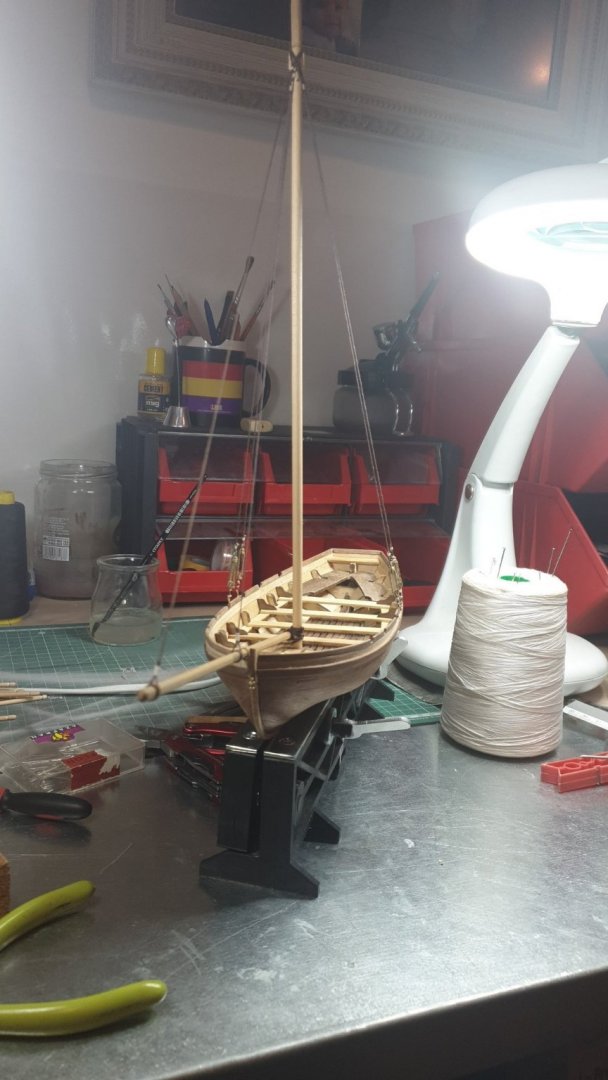
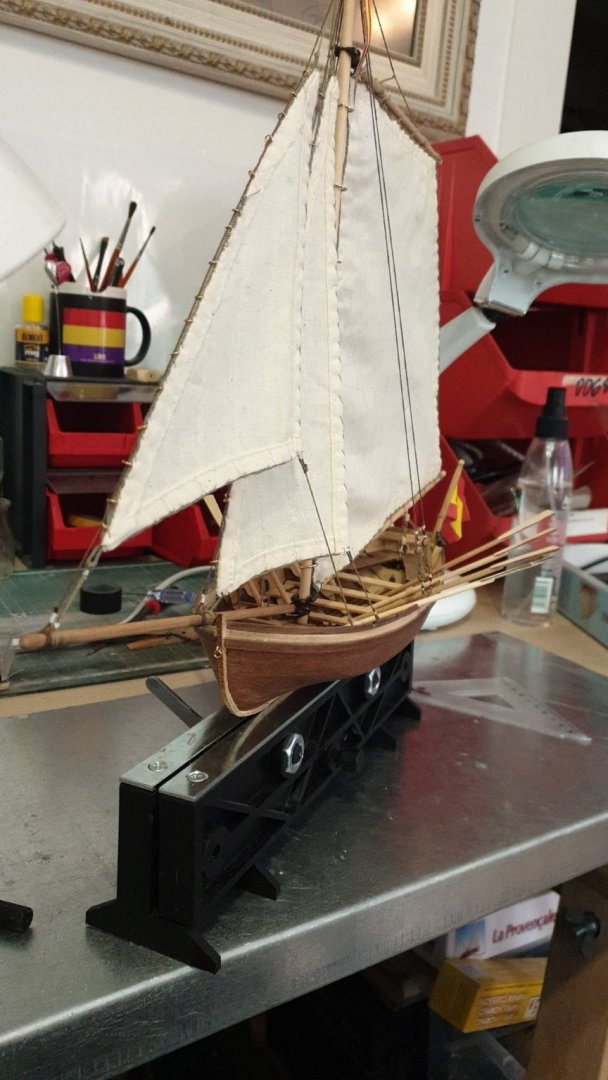
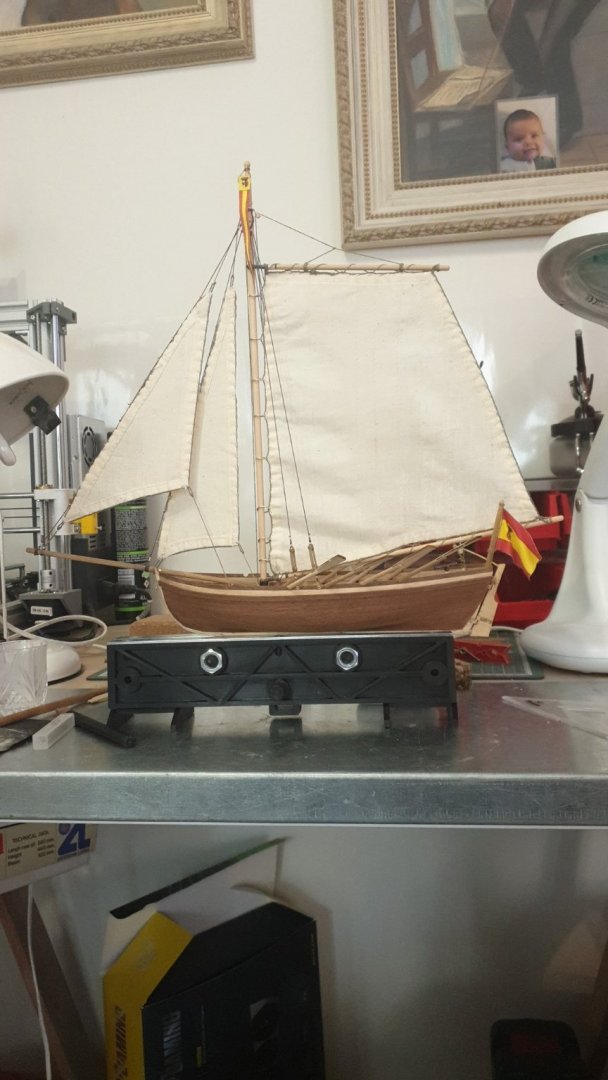
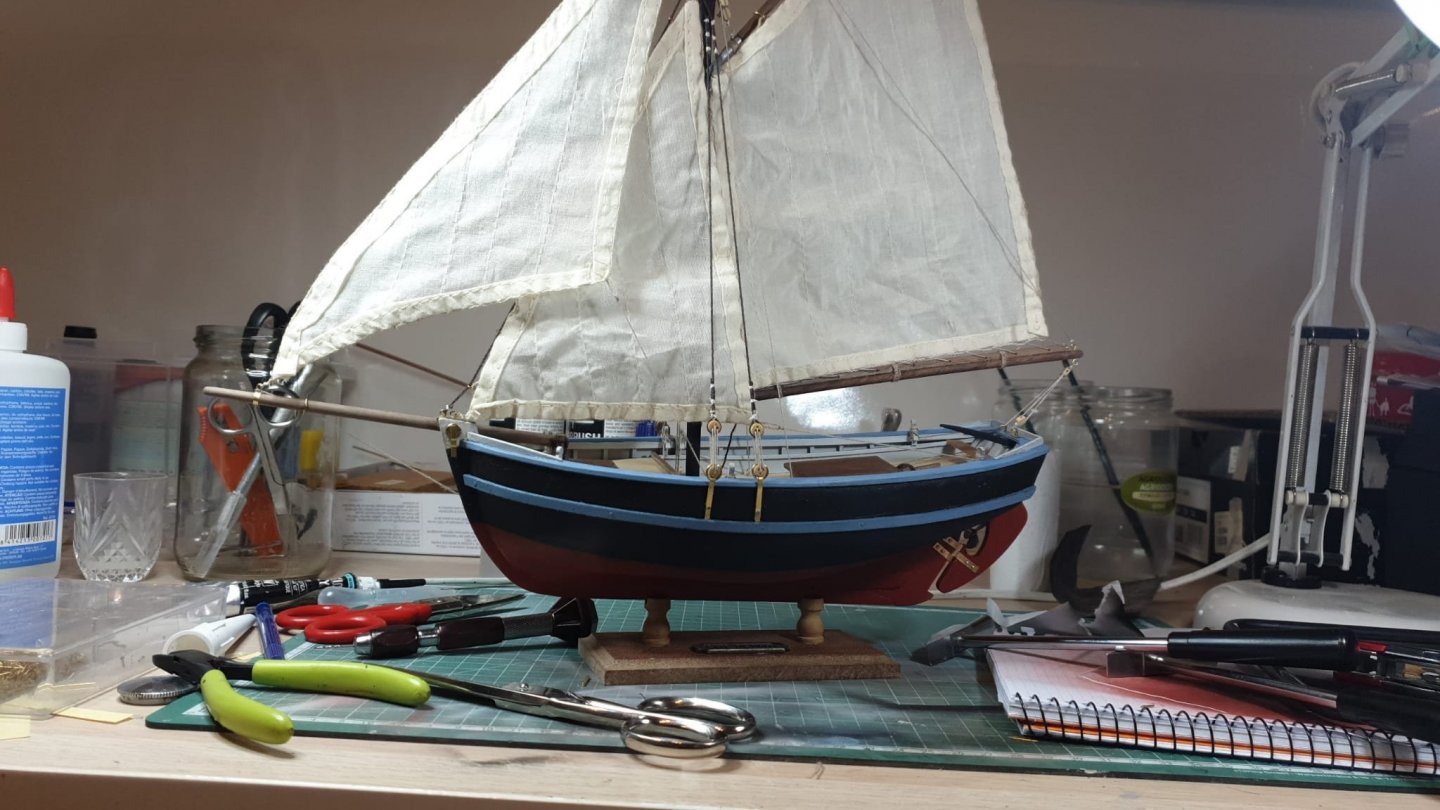
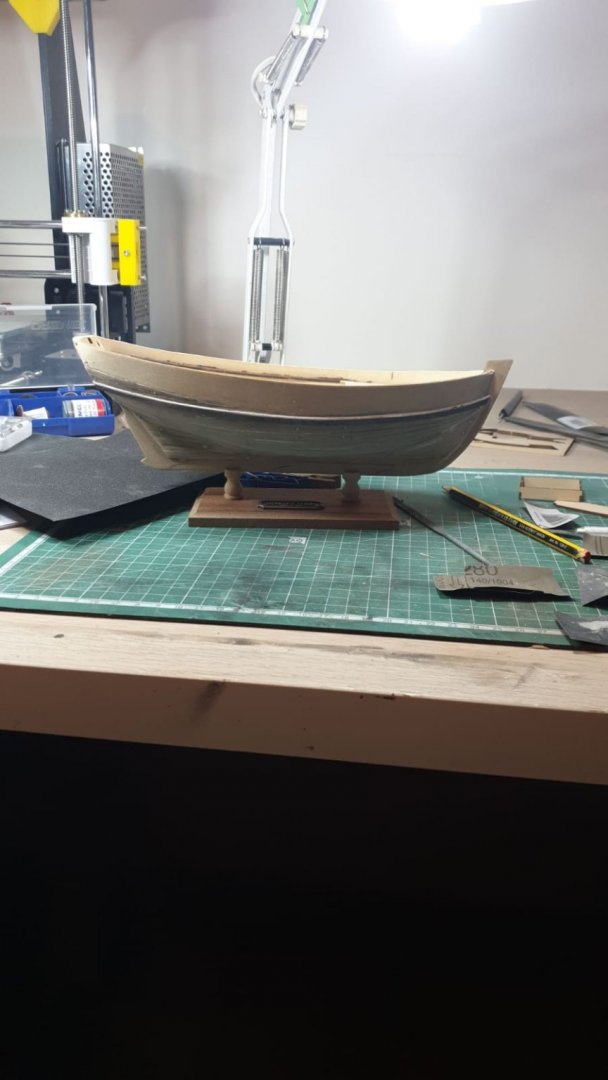
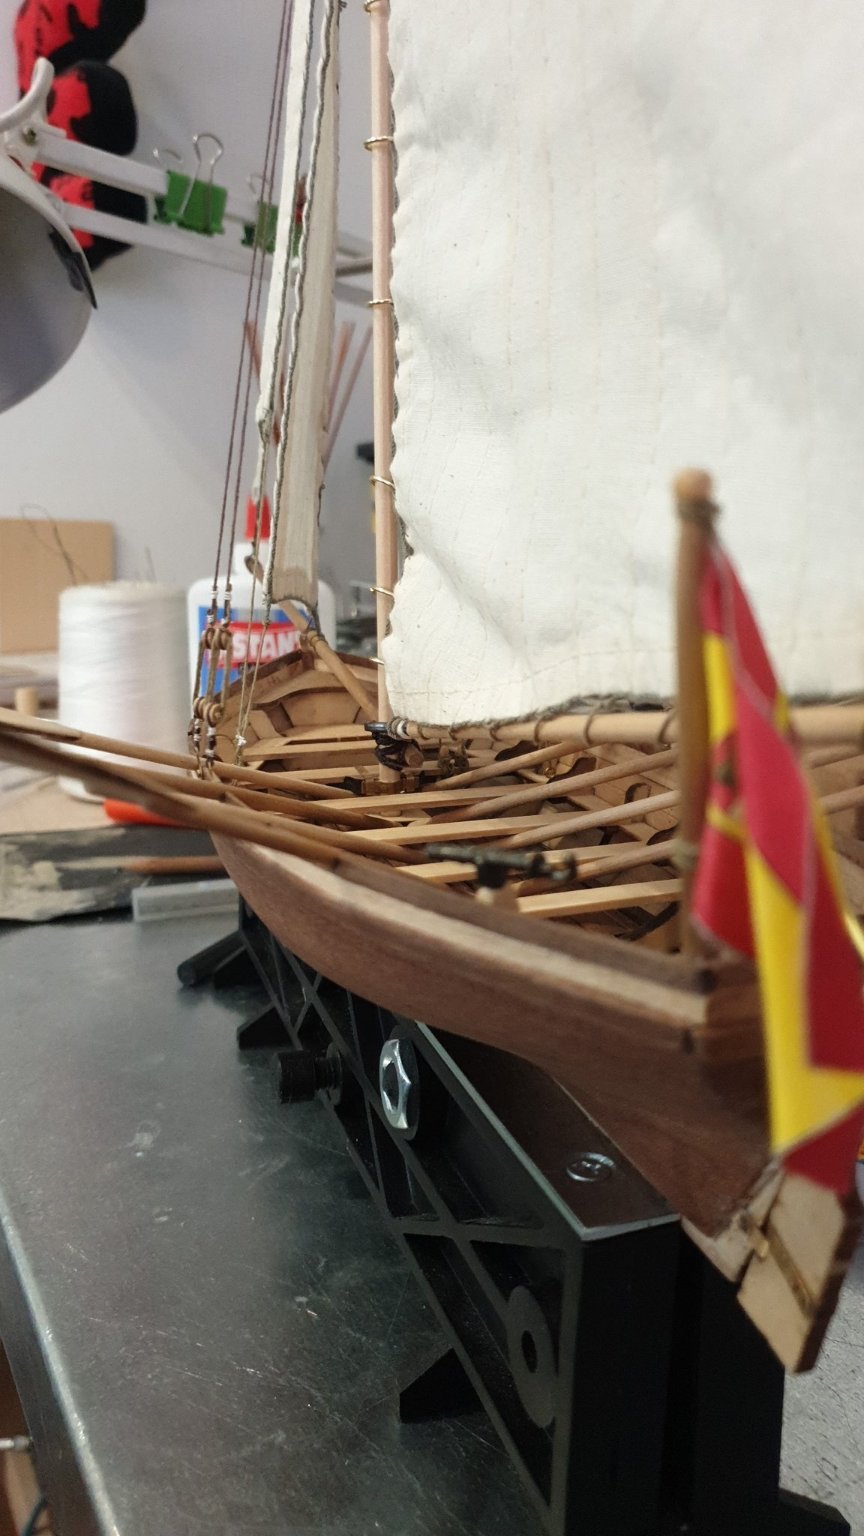
So, finals came and i did not have much time. Still i managed to finish the boat! I had to freestyle most of the rigging, since this kit does not include plans, and one of the sails did not have the same dimensions as in the box photo. Still, i think it turned out great. This kit does not include a base either, so i had to fancy some from some scrap wood i had lay ing around. Here are some pictures of the process: So, my thoughts on this kit? I had my challenges, and there were missing wood planks that i had to get from the remains of other kits. It may not be the best one for a first try, but it was indeed fun to build. The main problem, in my opinion, could be the lack of plans and how AL expects you to make up some of the steps not showed in their instructions. Well, onto the next one! Hugo Bosque Arenas Beginner Modeller 29/01/2021

- 7 replies
-
- 3
-

-
- ships boat
- Artesania Latina
- (and 2 more)
-
Hi everyone! After making a few kits myself, i found out that the ropes that come with the kits usually are not as good as i would want them. I have researched a bit and found out about ropewalks, even found the Domanoff PL4 and Prosak. Still, i dont have the money right now, and i would like to make a ropewalk myself. I have looked into it and found this post: Which is exactly what i was looking for. However, i have seen other designs in which the moving part also twists the rope in the oposite side. My question is, if anyone has tried both, is it worth it to add a motor to the other side? Thank you all
-
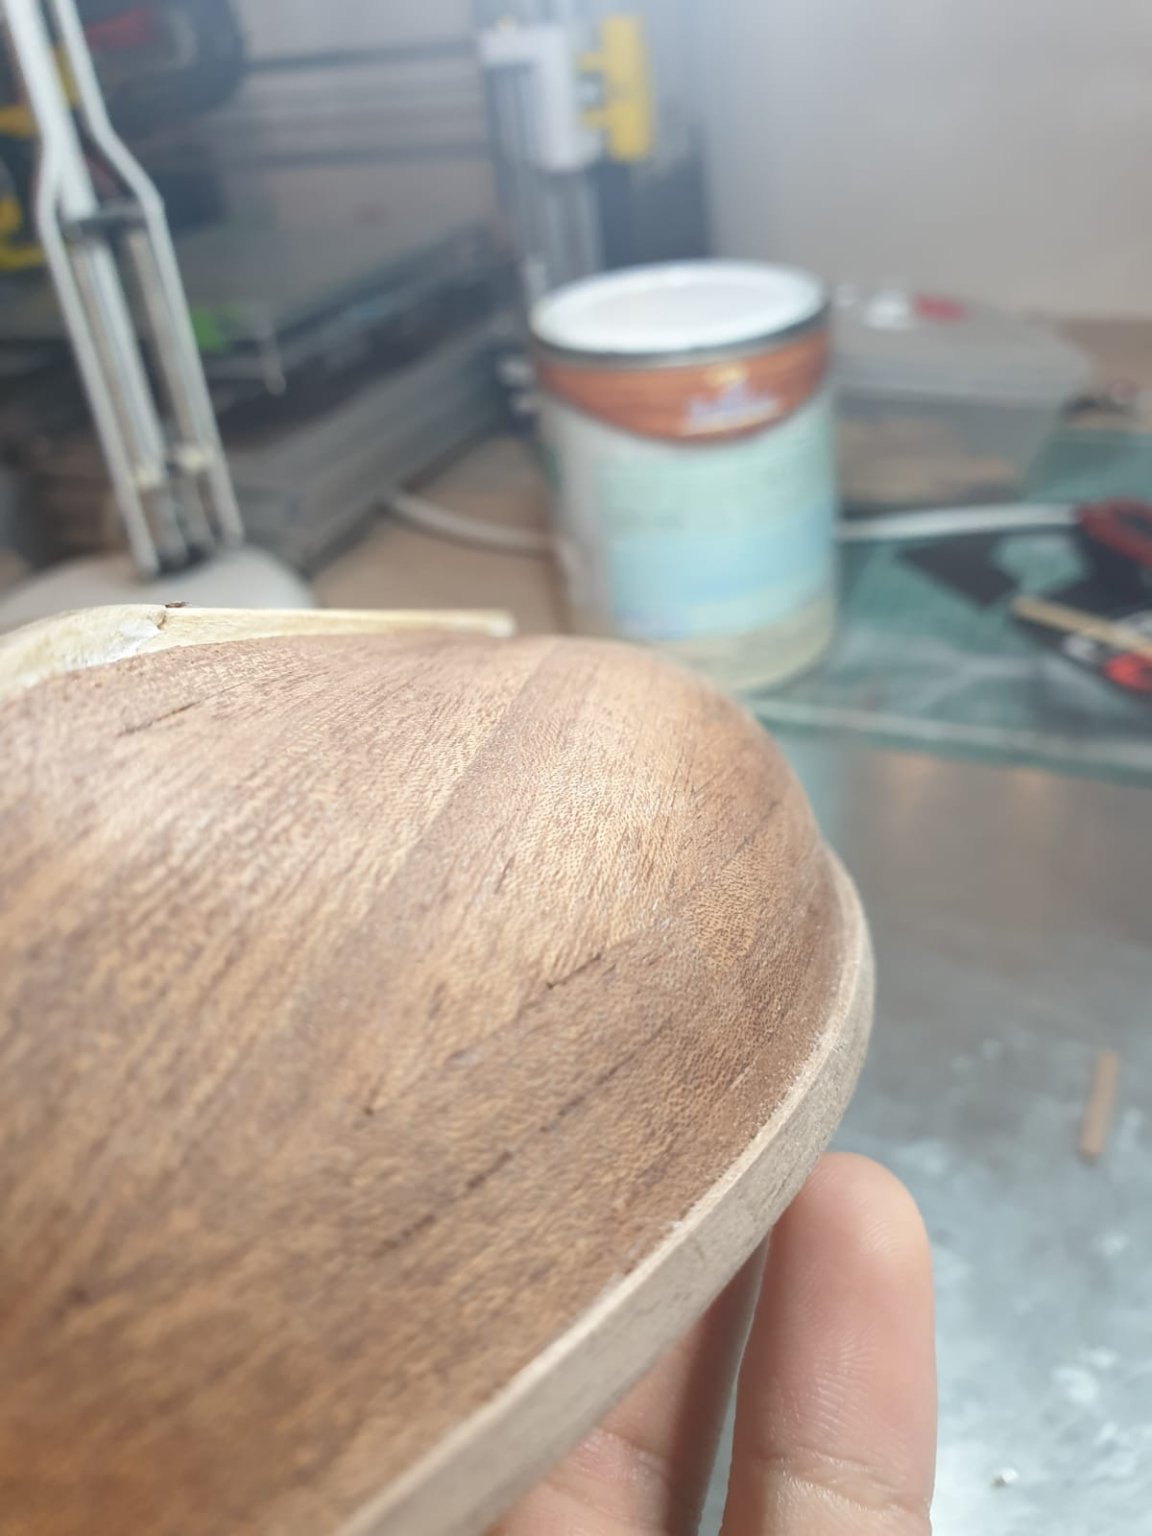
Then came the next layer of sappelli strips. This were much harder to bend that the regular framing planks, and i had to really take my time to glue them in place and make sure there was no gap between the strip and the hull. I wanted the finished hull to have a smooth surface, with no bumps or half loose strips. And when every single one was in place, i sanded them, then varnished, then glazed them. The final result is incredible. Its so smooth to the touch i knew i had done a good work. Not bad for my second hull! Here you can see a close up of my work. I am really proud of how it turned out! Hugo Bosque Arenas Beginner Modeller 21/12/2020
.thumb.jpeg.536bde8d0af57786b493823e88e26d79.jpeg)
.thumb.jpeg.684d5d3ad865af3ee1129ae3a7399fa8.jpeg)

- 7 replies
-
- 3
-
-
- ships boat
- Artesania Latina
- (and 2 more)
-
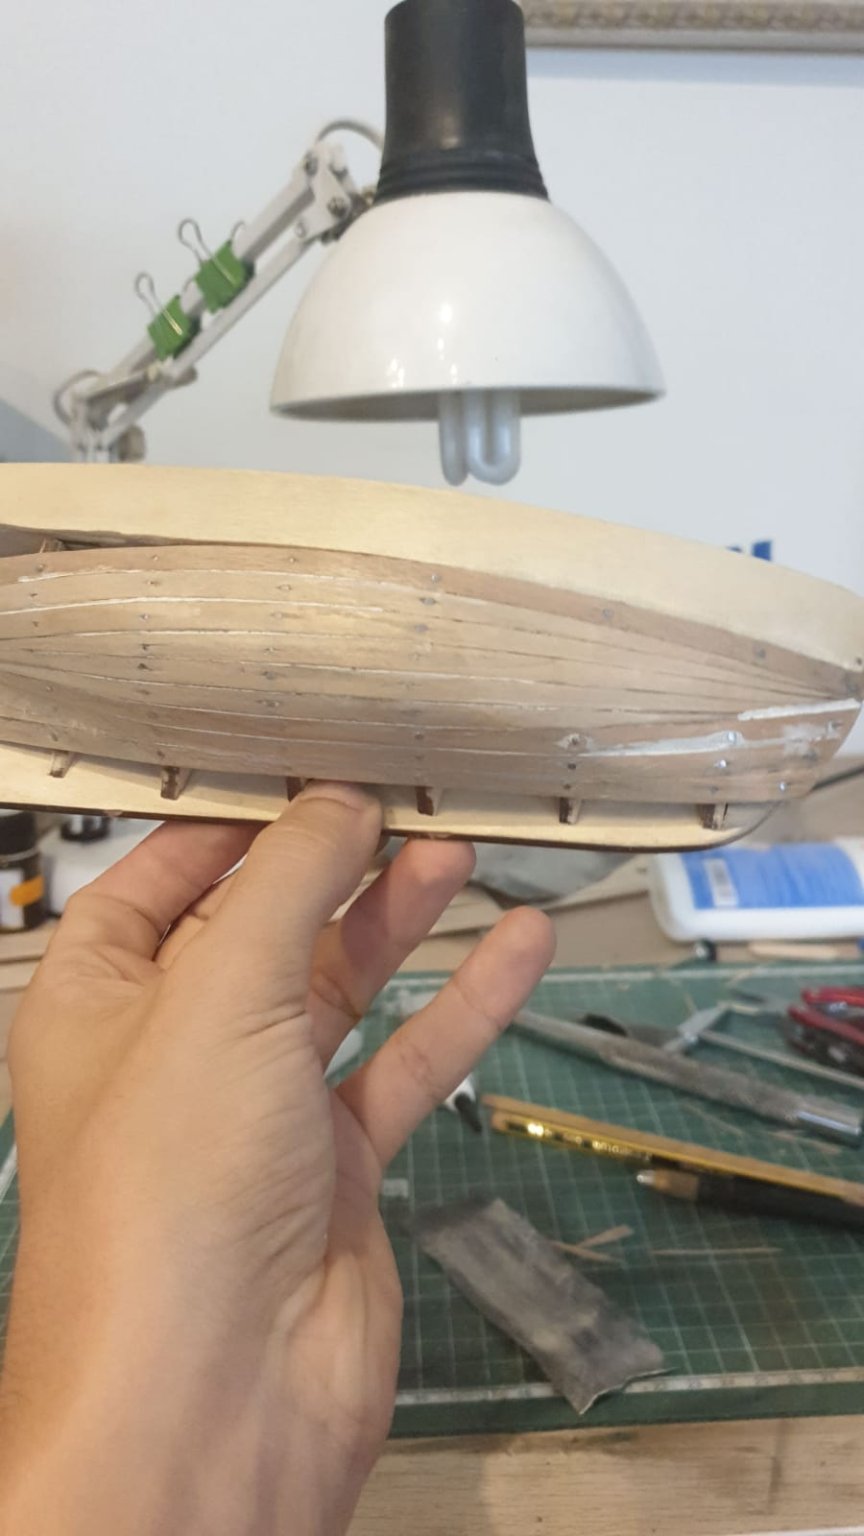
The next step was planking. Unlike in the Bon Retour, my previous and first build, the planks were not pre-cut to adjust to the curved shape of the hull. That actually was what i wanted, so i could practice for future and more complex builds. Since the hull is coated again in a thin layer of (i presume) sapelly wood strips, it didnt had to have the best finish. Still, i did my best, to gain some experience, and it didnt end up bad. In fact, i am quite proud! I then added a layer of wood putty and sanded until i didnt feel any imperfections You can see my progress here. I am getting quite used to the method i use for bending the planks. I did some testing, and i now (more or less) know how to bend them perfectly so they fit without having to apply any force. Yes, it takes a lot more time, but the results speak for themselves Hugo Bosque Arenas Beginner Modeller 20/12/2020
.thumb.jpeg.0714287e5d25571375458a369f712114.jpeg)
.thumb.jpeg.369062a96f4af698675e936fcb43b51d.jpeg)
-
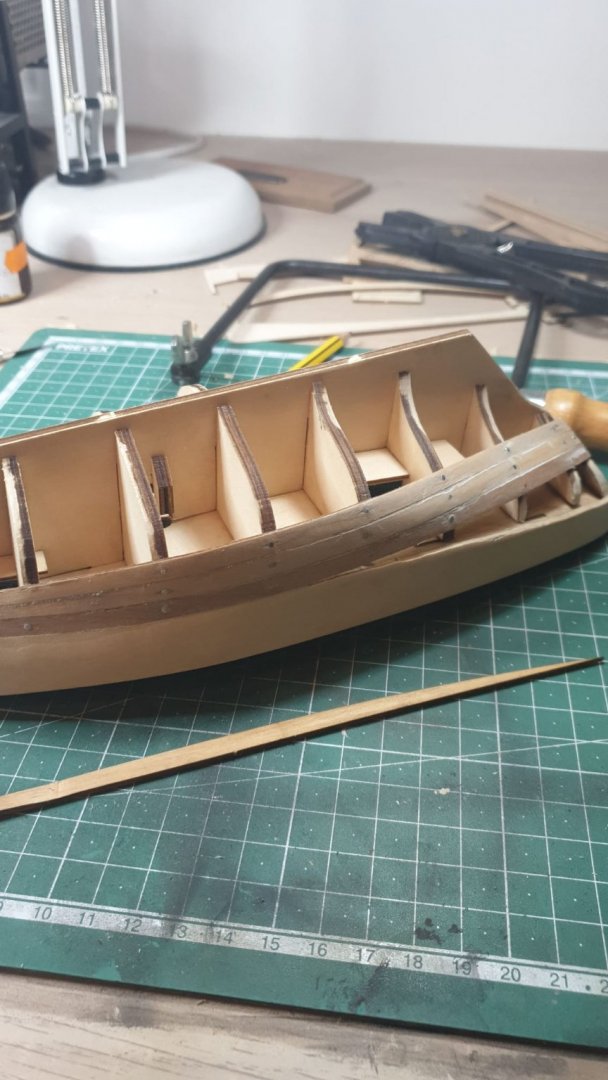
I will make sure then to be as clear as i can be! And if you want to ask me something in particular, go ahead, i will try my best to give you the most useful answer So, next step in the build was to make the boarding. Every plank had only a few points in which i could glue it to the frames, so i had to be extra carefull not to knock any while they where settling. After that was done, i cut the thwarts to size, and glued them to the frame. I paced the boarding planks a little bit more close to each other, because i think it looked way better, still leaving a tiny gap in between planks and this was the final result See that V shaped piece glued at the bow of the ship? It didnt quite match the frames when i started planking, so i made one myself that fitted perfectly. At this point, the model was extremely fragile, and that caused some frames and the false deck to break, so be careful. Hugo Bosque Arenas Beginner Modeller 20/12/2020
.thumb.jpeg.7759aea7aeb2b361f5bd6d7fd1313d37.jpeg)
-
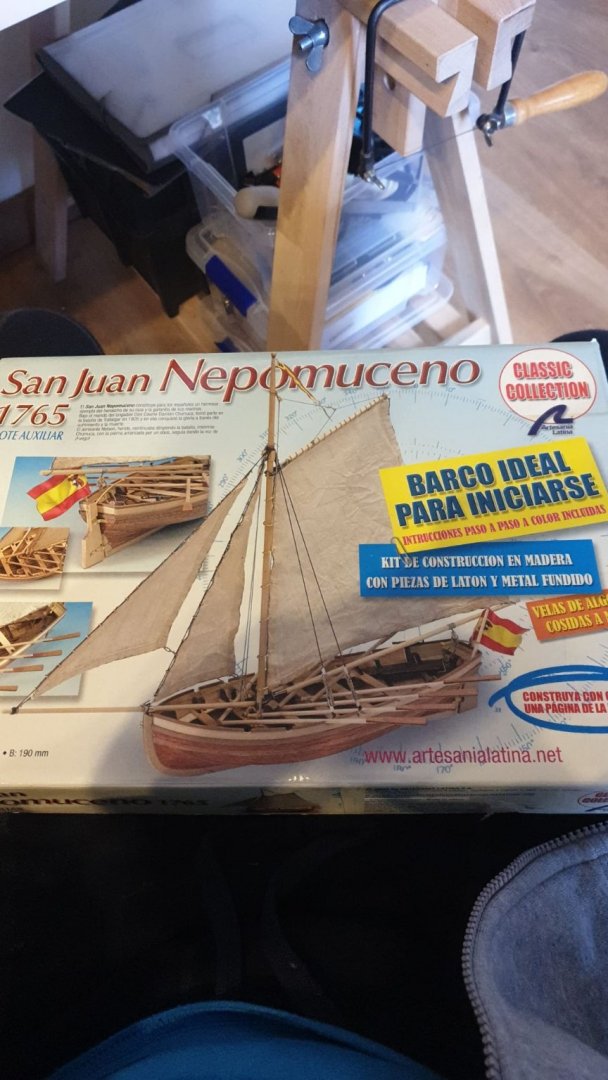
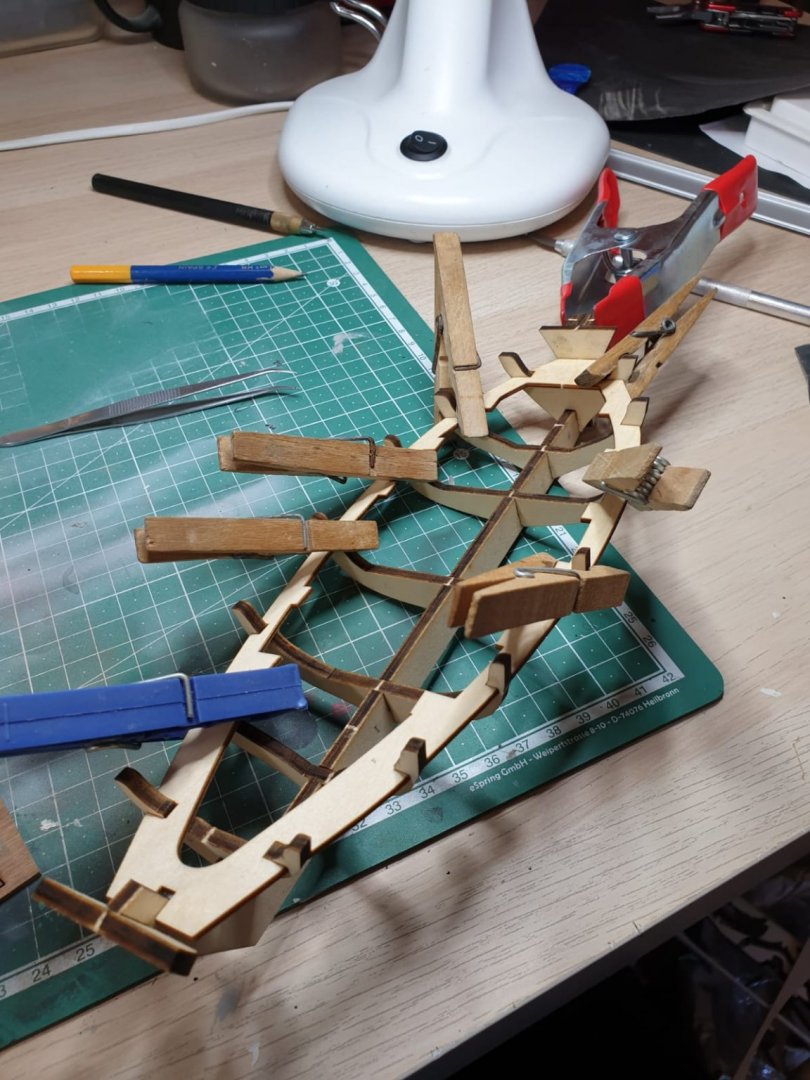
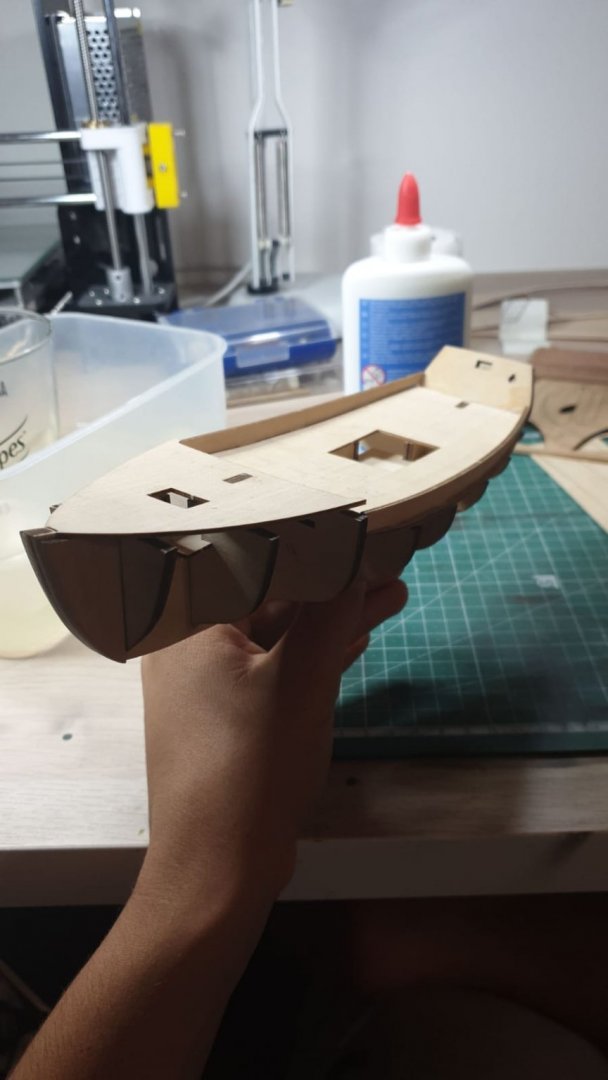
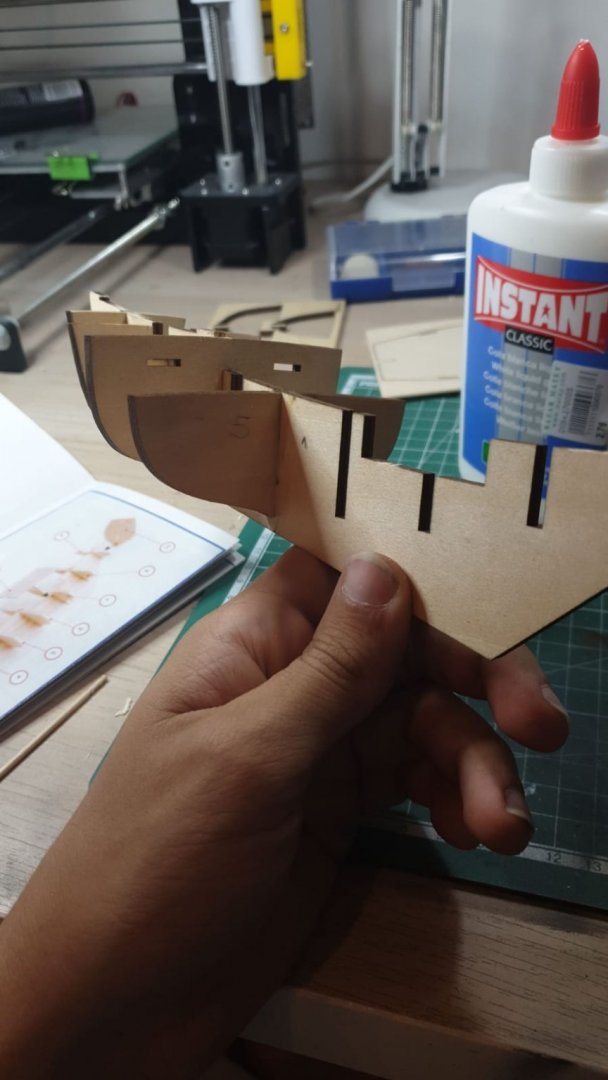
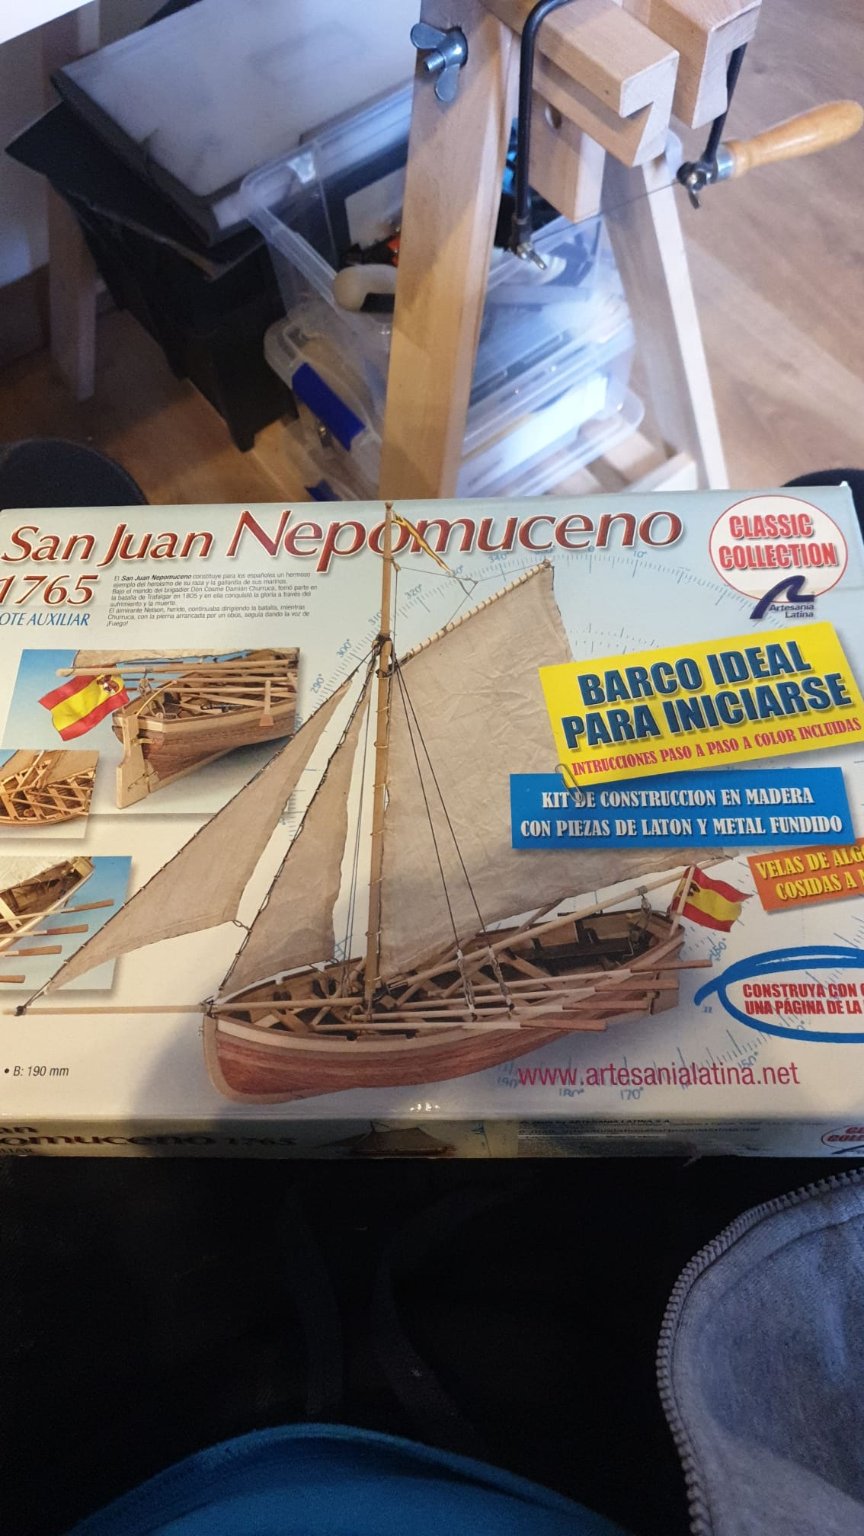
Hi everyone! Been a few months since i posted anything. Landed an internship while finishing my career, so its been quite busy. Anyway, i managed to spend any spare time i had left on this model boat i got in a second hand website. Its the San Juan Nepomuceno's Captain's Boat. I've looked around and it seems that this one is going to be one of the first completed build logs of this particular model, so i am quite honored. So, i got this kit after i finished my Bon Retour. I read about the original Man' O War, named after the Saint, patron of the spanish Marine Corps, its captain and its heroic stand at the battle of Trafalgar, being one of the last remaining ships to wave the white flag, and its captain Cosme Damián Churruca, who died at said battle, when a british canonball took his leg. During the battle he faced, alone, 6 british ships, and died still shouting to his men to keep on firing. The british, admiring his courage, had the ship in Gibraltar exposed to visitors, with the name of Churruca in gold letters written on his cabin. He was appointed Admiral posthumously, and in his memory his nephew received the title of Count of Churruca. Sadly, the ship served then under british colors, until it was sold and scrapped for materials in 1818. I really recommend giving this topic a good read, it is really interesting. One day i hope i will build the actual San Juan Nepomuceno, not just the little boat. Anyways, lets get on to the build log! Here is the box it came in. Its an old kit, the original owner seemed to have had it for a long time. That means the wood is not quite as strong, as well as (being an Artesania Latina model), the wood is not of the highest quality. I had to fill with wood potty some holes in the frames, and actually broke some parts, but i managed to glue them back together like nothing happened. The first thing i have to comment, aside from the really low quality wood from the kit, its actually its instructions. I suppose, since this is a beginners kit, they put a little bit more effort in making the instructions, and it shows. So, pros: good and somewhat clear instructions; cons: wood quality. First step was to assemble the frame. One thing that stood out was that the "deck" (Not the planks you stand on, but the little wood frame that goes arround touching all the frames) is not actually well cut. Some frames touched it just perfect, some others had a small gap. So i wet them, and fastened them with clothes peg, and it ended up bending just enough to fit perfectly. Since this is a second hand kit, some pieces were missing. I talked to the seller, a really nice guy, and he discounted from the prize the cost of a plank i could make the missing parts of. Real friendly guy. Also some of the parts that were not missing did not fit perfectly into the model, so i made my own from that same plank. More work, but better results, just like in every other thing in life Hugo Bosque Arenas Beginner Modeller 20/12/2020
.thumb.jpeg.25c1729fa96122b1e098a60a3cf663a6.jpeg)
.thumb.jpeg.8b7ac0505071cc2a0933c00f65f63a82.jpeg)
- 7 replies
-
- 3
-
-
- ships boat
- Artesania Latina
- (and 2 more)
-
Hi HakeZOu! Very nice kit indeed. I will follow your build log, since this is one of the next kits i am planning to do! For a first build, it turned out very beautiful! Im looking forward to seeing your next work Hugo Bosque Arenas
- 12 replies
-
- 1
-
-
- la provençale
- artesania latina
- (and 1 more)
-
And i am proud to announce that i have finished my first ever model ship! It turned out to be a very challenging, yet fun experience. Cant wait to jump on my next kit! My father-in-law loved the present, even remarked how beautiful it looked, so i took that as a compliment of my hard work. Thanks you everyone who stuck with me in this very thrilling experience. I am looking forward to reading you on my next building logs. Thank you from the bottom of my heart for the kind comments and the wise words. And thank you specially, Bob, and i hope to see you around in Spain when, as you said, the world returns to normal. Photos of the finished model: Thank you everyone and see you around! Hugo Bosque Arenas Beginner Modeller 13/10/2020

- 17 replies
-
- 6
-
-
- artesania latina
- bon retour
- (and 2 more)
-
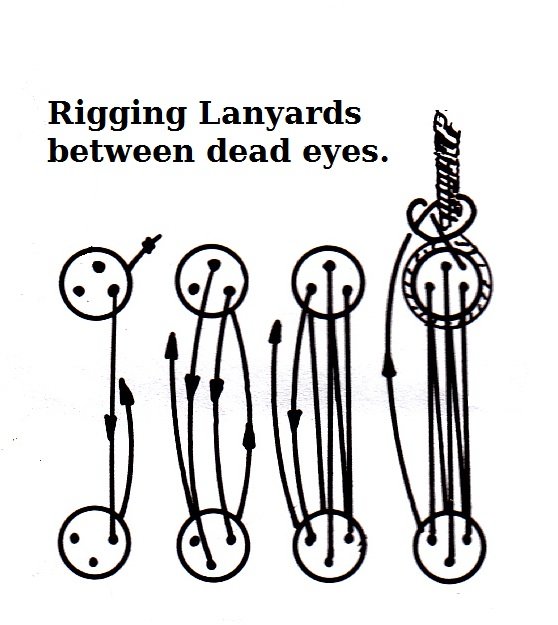
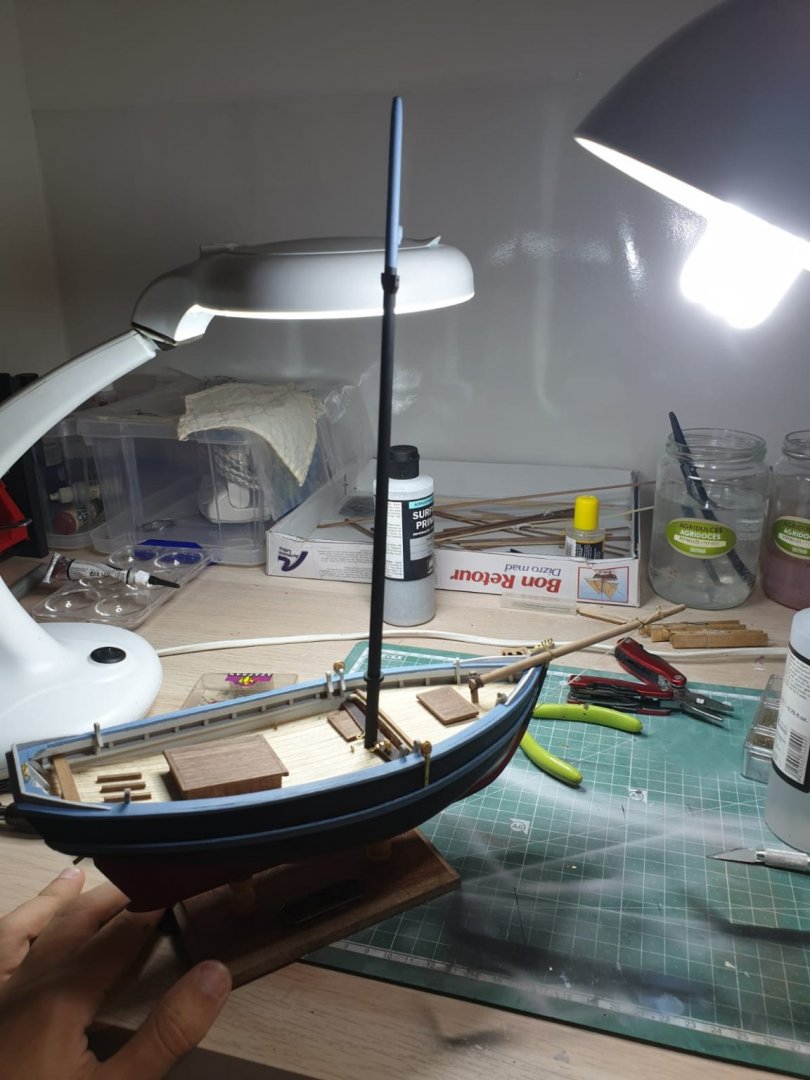
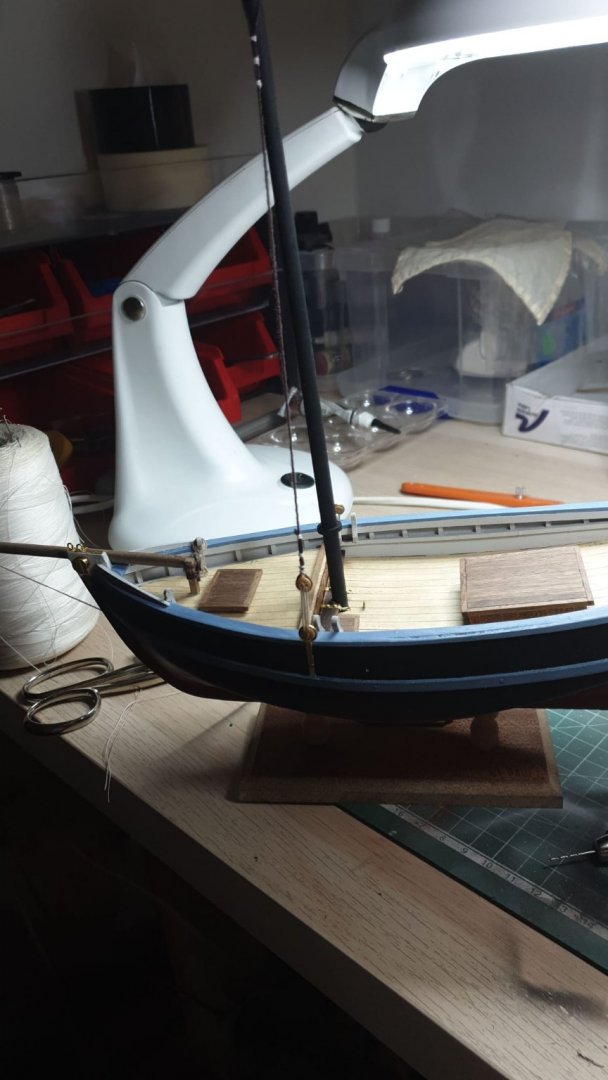
Thank you for the comments on the CA glue and the epoxy glue! I most definitely will try that out in my next model. Now, for the part i was most unexperienced with: mast and sails rigging. Sadly, there is not many images i took of this process, since i did it quickly in the span of 2 days. Still, i will gladly answer any questions if someone of you is doing this kit and has a problem with this step. Now, the very first step was to prepare, coat and paint the mast, and separatly the boom and gaff. Now, one of the things i realized was that the mast reduced its width the taller it got. So i had to sand it down. Now, i dont have industrial tools at my disposal, and i was really, but really unwanting, to do this step by hand. Luckily, my father had a BOSCH drill, (thank god), so i used that to prepare the mast. I also had a quesiton about how do i make the wooden blocks that are placed on the mast that keep the strops from sliding down. Bob, you very kindly pointed it out in this post, so i am leaving it here if someone wants to check it out: Also, this image was extremely helpfull when rigging the deadeyes: And so, here is the mast, painted and dry fitted to the hull: And here, with the first strop placed, securing it in place: A close up of the strops and the bolsters: And so i kept working. Looking over the plans, looking at how other modellers do their rigging, and i found a very helpfull post from another website that contains close up images of the rigging of this exact model. I will leave the link here as well, since it helped me a lot: https://brexitmodeller.com/forums/topic/1505-bon-retour-125-scale-artesania-latina/ Hugo Bosque Arenas Beginner Modeller 13/10/2020

- 17 replies
-
- 1
-
-
- artesania latina
- bon retour
- (and 2 more)
-
And so i started working on the details on the deck. Some covers for the (i presume) storage and the bowsprit. I also added the tiny brass eyeholes, and secured them with resin (We are remodeling our bathroom, i saw the sikaflex tube and i though, why not, there is no way this, once dry, comes off. I was very much in the right). I barnished the deck, the covers and started hating to work with brass (Seriously, how do you glue brass and wood? Any ideas?) Here is a little close up of the first rope coil i ever did! It turnedout very nice. I made them securing a pair of pushpins into a wooden plank and looping it around them. To add some consistency, once in place i added some water mixed with wood glue, so it stays in the same position. Hugo Bosque Arenas Beginner Modeller 11/10/2020

- 17 replies
-
- 3
-
-
- artesania latina
- bon retour
- (and 2 more)
-
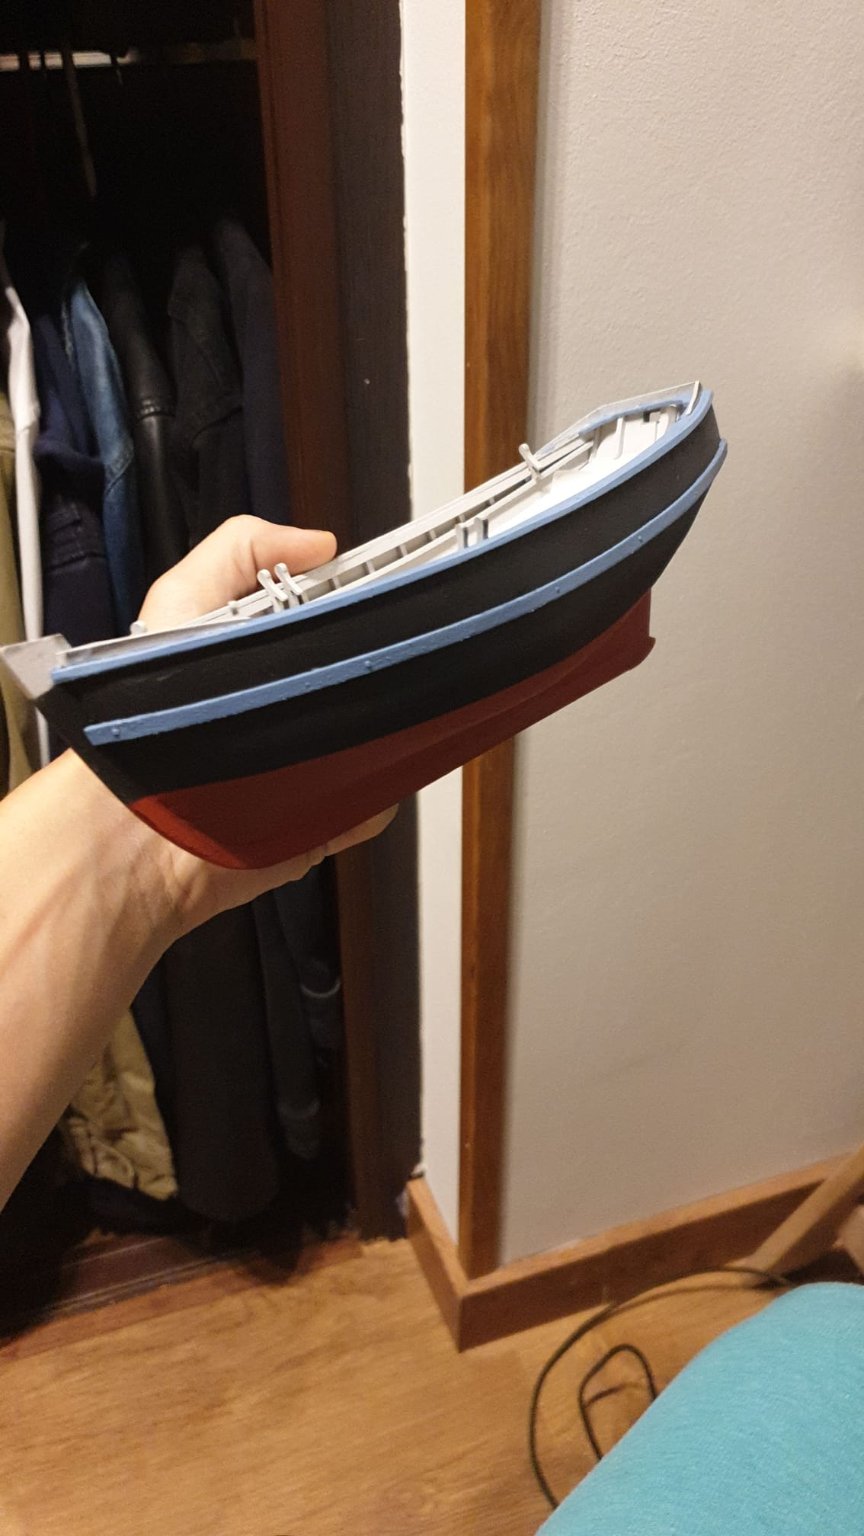
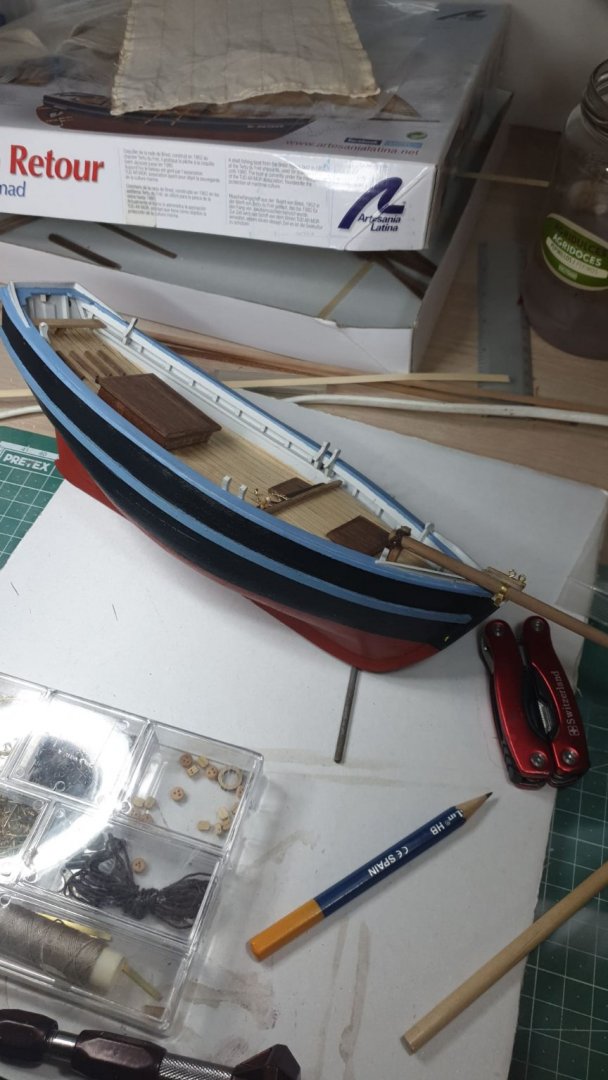
Next step was painting. I didnt know if either to paint the model as showed in the box or to do some sort of mix between red/white and black paint scheme. In the end, i decided to paint it as the original one, so i bought the paints and got my cheap airbrush and started to work. Now, if you have never worked with wood and an airbrush, let me tell you something. You first have to protect the wood from the paint. Since it is an airbrush, paints come very diluted, and with so much air and water, the wood will splinter. You will not get a smooth surface. There will appear some "pimples", caused by the wood absorbing the water. Do not panic. One of the solutions is to add a protective layer between the wood and the paint primer. I would recommend some sort of mate barnish, applied with brush or with the same airbrush. Now, if you have already have those pimples in your wood after priming it, just sand them and paint another layer. Keep repeating this until you have a smooth surface, and then apply another protective layer to protect the paint. You will a smooth, consistent layer of paint. And so i masked the boat, did everything i just explained, and this is the result! A nice, barnished, painted and beautifull boat hull! Hugo Bosque Arenas Beginner Modeller 11/10/2020

- 17 replies
-
- 4
-
-
- artesania latina
- bon retour
- (and 2 more)
-
Next step was deck planking. Not going to lie, it was quite fun! In the end i erased the fake nailheads because in my opinion, the made the model look very dirty. One thing that i never quite got the answer is, do i need to barnish the deck? I suppose, if i barnish it, i will protect the pencil marks and the deck will not end up that dirty. Oh well, trial and error, i will know the answer on my next model. Once the deck was finished, i started with planking the hull. This part i was the most afraid of, so i took my time and precautions. Chucks planking videos were extremely helpfull, so i will leave a link here, if someone needs them: Now, i have worked with wood before in my life. So i had a little bit of experience bending and filing the planks. I knew that, if i wet the wood, it would make it "bendy", but would also probably splinter it. I also knew that heat was the best way to manipulate this kind of wood. So i bought myself a tiny portable iron, and took my old soldering iron and i started to work. This kit is a little special, because some of the planks around the curve of the hull come already precut with laser. Thats one less problem then. The worst part was, that unleveled deck was already being funky. If you look closely, you will se that in the stern, there was a wide space with no planking on it. I had to work around it, and it turned surprisingly good! So i applied plastic putty in between the planks to seal any holes and i got to work I also learned that you are not supposed to push the nails all the way into the wood. Youre supposed to leave the head outside, so you can then clip it and be easier to sand. It was no problem, since my dremmel could easily sand the nail heads, so nothing lost there. In this image you can see what im talking about: More progress with planking: And so, planking was done! (Easier said than done, definitely): I learned a lot from this process. And i know i couldnt have learnt it from a book. The more i get older, the better i get at improvising! I also added the rubbing strakes (those side planks made of walnut) and the keel. I also added a layer of wood putty and sanded it until i was smooth and free of any cracks, impurities or holes (i dont have a picture of this step, i am so sorry) Hugo Bosque Arenas Beginner Modeller 11/10/2020

- 17 replies
-
- 3
-
-
- artesania latina
- bon retour
- (and 2 more)
-
It really is! Its was a present for my father in law, so it had to be something good 😁 Thank you very much! I look forward to learn a lot with you all Not bad! Surely you can come back to Spain soon, like you said, once the world returns to normal. Thanks for the kind comments! As for the abscence of posts, I was really busy. So, picking off where i left...
- 17 replies
-
- 1
-
-
- artesania latina
- bon retour
- (and 2 more)
-
Moving onto the false deck, I just thought i could glue it on. I was mostly wrong. I managed to glue it in place without any flathead pins, but some parts of it were not completely touching the entire surface of the top of the bulkheads. This proved to be a very important mistake, that proved to be extremely annoying and messing up my deck, being now lower on the port side, and not a nice, flat deck. Well, mistakes happen, and i must learn from them. Heres a photo of the false deck already glued to the keel and the top of the bulkheads. If you zoom in you can see how its not laying flat against them. My only solution was to try and "bend" the false deck using water and heat. It proved to kind of work. In my next builds, i will secure them with flathead pins, aside from gluing them on, so i dont ever run into this problem. I also added the side deck bulkheads (thats how the instructions call them). I will continue posting this build log tomorrow. Its already late and i have to wake up early to work. Goodnight to my fellow european modelers, goodday to the american ones! Hugo Bosque Arenas Beginner Modeler 08/10/2020
- 17 replies
-
- 5
-
-
- artesania latina
- bon retour
- (and 2 more)
-
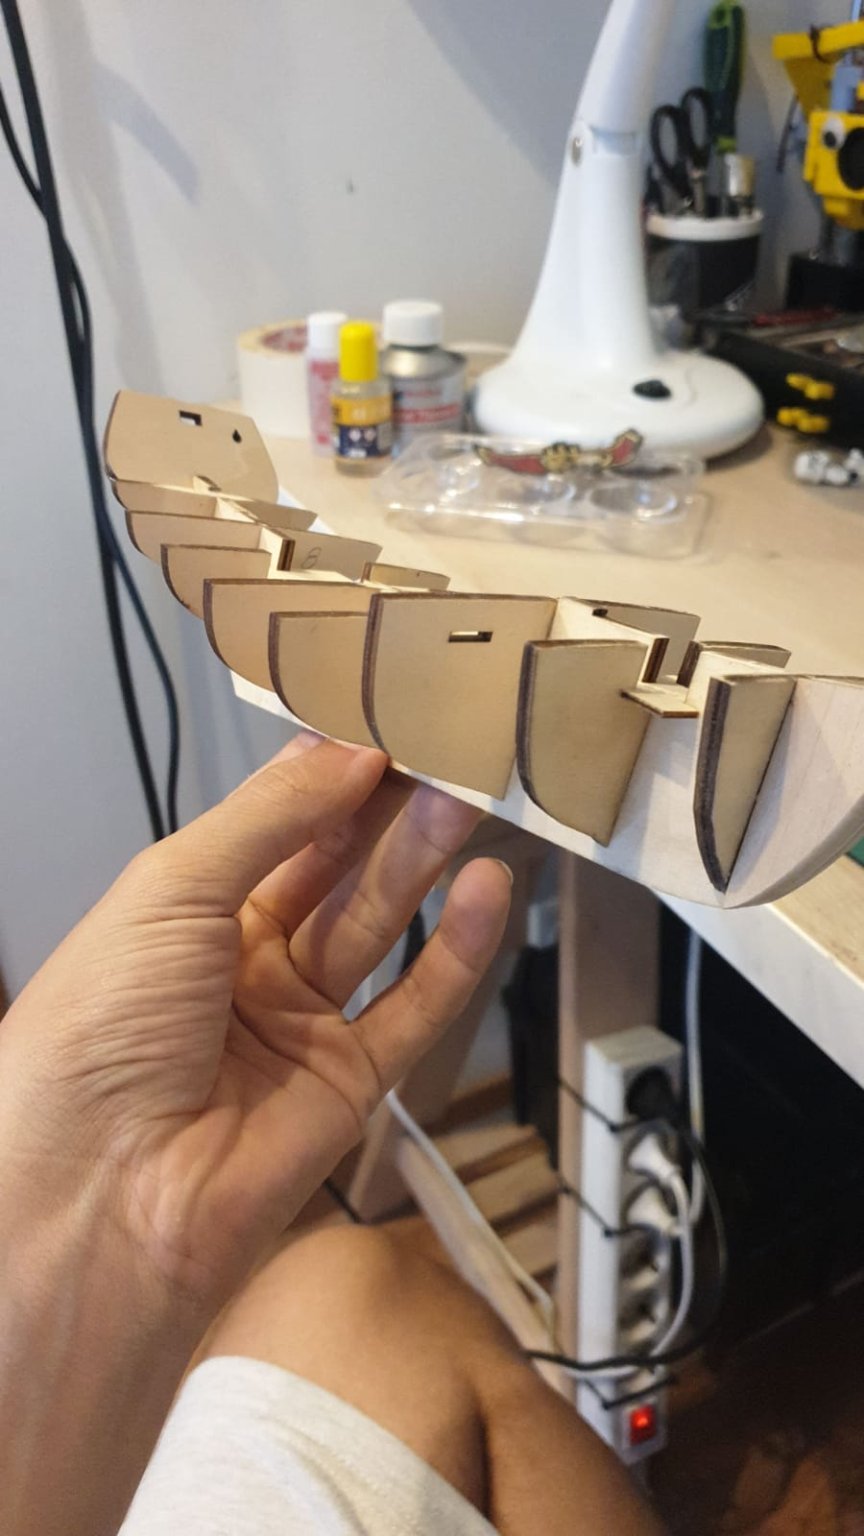
First of all, excuse my english. I will probably misname a part, or mix some names. For that i am sorry in advance. The very first thing i did when starting this kit was to read the instructions from top to bottom. I also got my hands in a digital copy of "Ship Modeling Simplified", so i read that as well. If you cant find it online, i can provide it to you no problem. In that book, it (very wisely) says: "On your first run-through everything should be assembled, piece by delicate piece, without going near the glue." So I dry fitted the keel and the bulkheads and made sure they are tight, but no too tight. Honestly, it took a lot more of sanding than i care to admit. Thanks to my trusty Dremel it was not such big of a problem. Heres a photo, with number writen in pencil on the pieces, of the first bulkheads assembled to the keel: And another one with all the bulkheads in place: Notice the little curve on the top of the bulkheads? For what Ive read, its intentional. This ship has a lot of deck curve, almos being concave on the lower deck and convex on the top deck. That is going to be a problem for past me, since i didnt notice it when i attached the false deck. I also placed some blocks, to force the bulkheads to stay at a nice 90 degree angle, and the stern blocks, and started to sand so that the planking would lay flat against the surface of the bulkhead. This proved crucial, and i am so happy i took my time to read other logs and research how its done. Now that i had the "skeleton" ready, it was time to fit the false deck. Hugo Bosque Arenas Beginner Modeler 08/10/2020

- 17 replies
-
- 3
-
-
- artesania latina
- bon retour
- (and 2 more)
-
Hello fellow modelers! This log is about my first ever model, the Bon Retour from Artesania Latina (AL). Even though this kit is designed as an entry level/beginner kit, i have found that it is NOT the case. I have read other posts commenting on how poor the instructions are, how blurry the photos in the instructions are and how little to nothing is explained about rigging. I can confirm it is true, so if youre looking for a kit to start, i wouldnt recommend this one. Try an easier kit, like "La Provençale", from Artesania Latina, or "Lancha del Capitán San Juan de Nepomuceno", also from Artesania Latina. Or even the HMS Bounty Jolly Boat! if youre still convinced to try out this kit, you can ask me anything you want, i will gladly help you with whatever i can. Being my first kit ever, i wanted to start with something small, to practice for when i get to something bigger that requires a lot more experience. I am sure a keen eye will spot mostly every mistake i made, butoverall i have learned a lot from this kit, and even more from you, guys, as a community. You have been of invaluable help in times of need, and i can't thank you enough. Thats why i dedicate my first ever build log to you, community of modelshipworld, for your wise words, deep knowledge and kind attention. Thank every single one of you. Anyway, lets get into the build log! Hugo Bosque Arenas Beginner modeler 07/10/2020
- 17 replies
-
- 3
-
-
- artesania latina
- bon retour
- (and 2 more)
.jpeg.7590138c7e066df7a6554e8b4042c23e.jpeg)
.jpeg.094270ddc0014870b17e5b410209c1c6.jpeg)
.jpeg.755d01716fdd2c047283b860f3dcab02.jpeg)
.jpeg.70c8d372b61e03beb45a4df044ff8053.jpeg)
.jpeg.34790053336085c0336163a4bb8c0deb.jpeg)
.jpeg.472547adcbcf22709ab808466fb25726.jpeg)
.jpeg.5b74e3753e58741c5bd95ff9c63617c2.jpeg)
.jpeg.b386c0b01a3ad82100b8cd5a22cd5b11.jpeg)
.jpeg.f597c28e395cad127ffc8f8816793258.jpeg)
.jpeg.1b6281af2affd28fda7a9014598493a5.jpeg)
.jpeg.7f4d4a6c2fdf8dea826e7f543aa7e86c.jpeg)


.jpeg.09a3ae7ba43c7ab8a15dd568af0940f2.jpeg)
.jpeg.28db9575f77ece8d96fac778ed6cace9.jpeg)
.jpeg.45d5bd1eba4bf0bfb0056ba86321bdee.jpeg)
.jpeg.987caced9cf4438be3da16ffe1d27077.jpeg)
.jpeg.433ff2a2d4ed2e65aab466f36652a01a.jpeg)

.jpeg.270f65d5e049f68474113981f4ade7d6.jpeg)
.jpeg.37bcdb48e7e7ebc47e15c4d17ebba30d.jpeg)