HOLIDAY DONATION DRIVE - SUPPORT MSW - DO YOUR PART TO KEEP THIS GREAT FORUM GOING! (Only 36 donations so far out of 49,000 members - C'mon guys!)
×


Capella
-
Posts
138 -
Joined
-
Last visited
Content Type
Profiles
Forums
Gallery
Events
Everything posted by Capella
-
 Thanks. I'll check it out. While organizing the planks and dowels, I used a digital caliper and noticed differences in widths varying by as much as a millimeter.
 -
Great info, Rob I decided to go the route of cutting 60mm lengths to plank the deck and staggering them in the pattern shown in the plans. The method that the plans appear to do, laying down full lengths of planks and penciling in the lines, in my mind will just end up looking cheesy. Cutting them will take longer, but I know I'll be happier with it in the end. I agree with your comments about the plans and parts list and how confusing they can be. I'm just going to take as long as I feel I need to to make sure I'm confident that what I'm using in a particular step is the right part.
-
Thanks, Chimp. Yes, there are quite a few Beagle build logs here, and most have been done or started in just the past couple of years (and I read them all and took lots of notes while waiting for mine to arrive), so I have lots of resources to pull from here.
-
Okay. Really, I'm still getting used to reconciling the physical parts with what I'm seeing in the plans and parts list. Thanks so much for your input and encouragement!
-
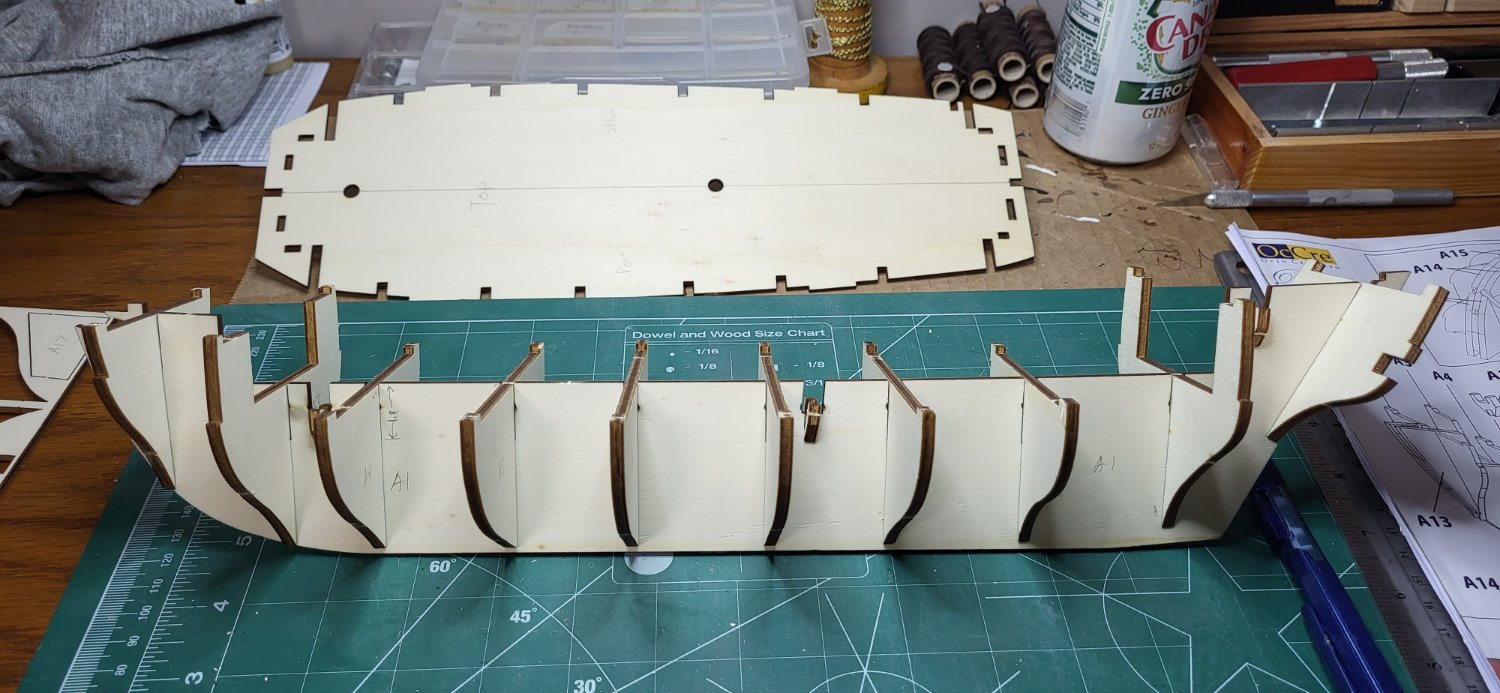
Keel, bulkheads, hull are done. On to the deck planking!
-
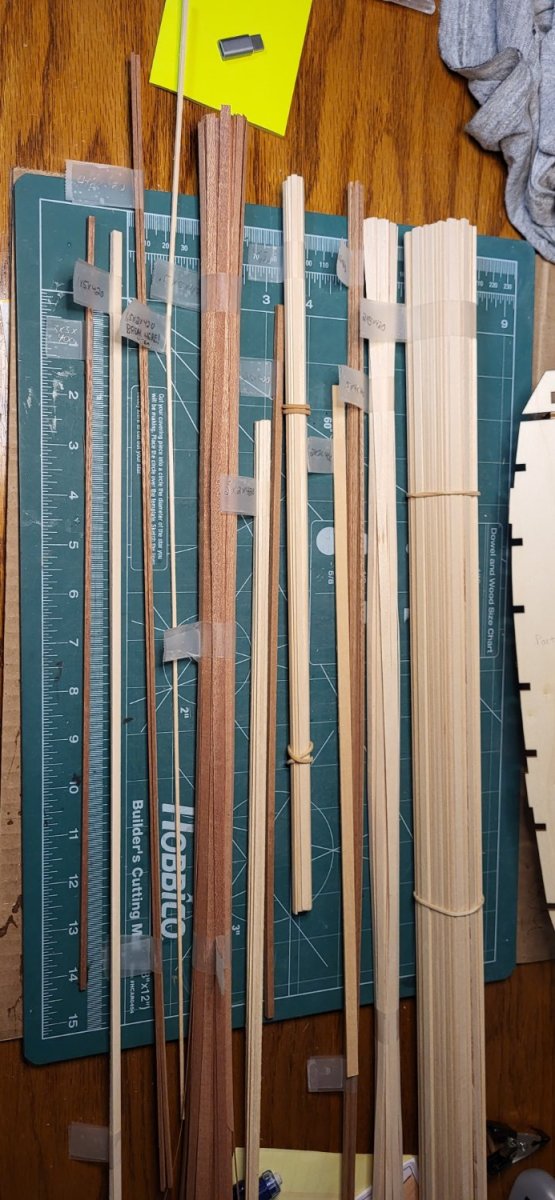
Organized and labeled all of the planks and dowels: Beagle build veterans, please read! As it is now, I'm having a hard time reconciling the planks with the drawings and the parts list. For instance, the first time you come across using any of the planks is planking the deck, which is indicated in the plans by A20, and in the Parts List A20's measurements are listed as 0.6 x 5 x 340, but after organizing everything by size (using a digital caliper), I don't have anything like that. The closest I have is 30+ pieces of white planks measuring .5 x 4 x 420. I assume, since the plans indicate to make the deck planks 60mm long, the overall length doesn't matter, but I just want to make sure that I use the right planks for each intended use. I'd appreciate any advice on this. Thanks!


-
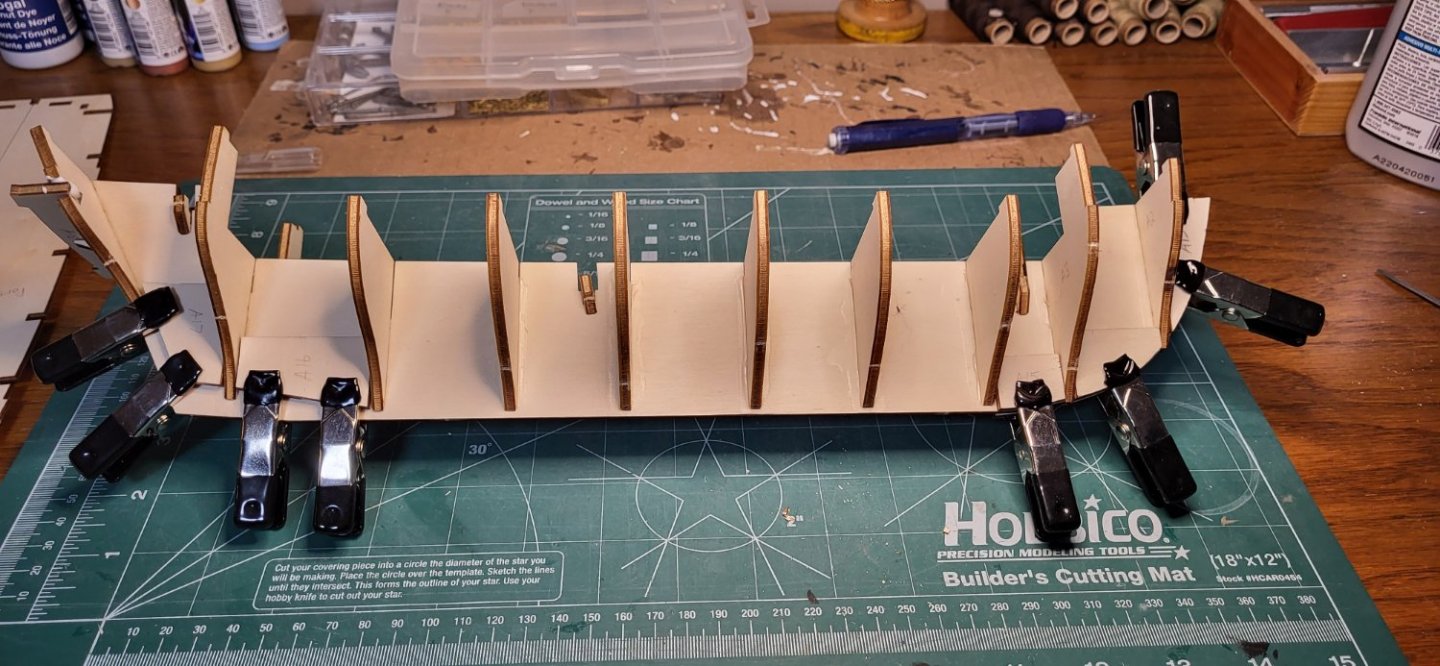
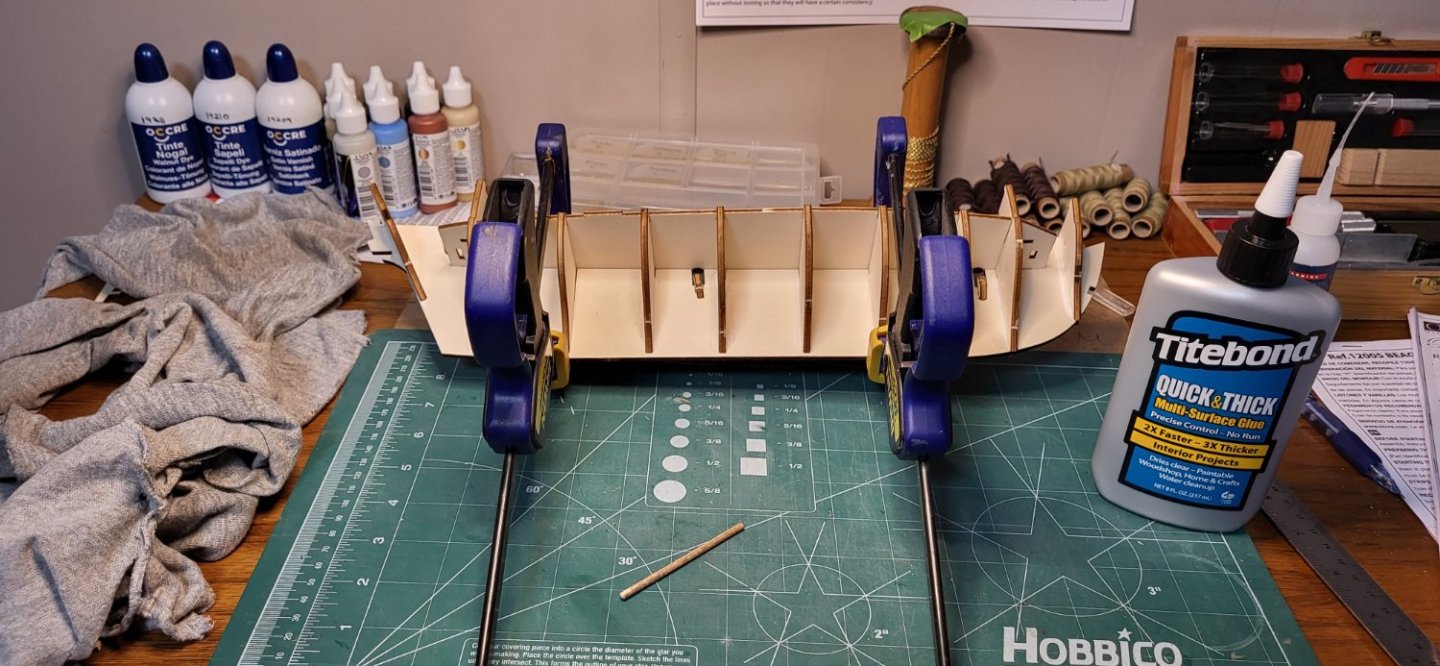
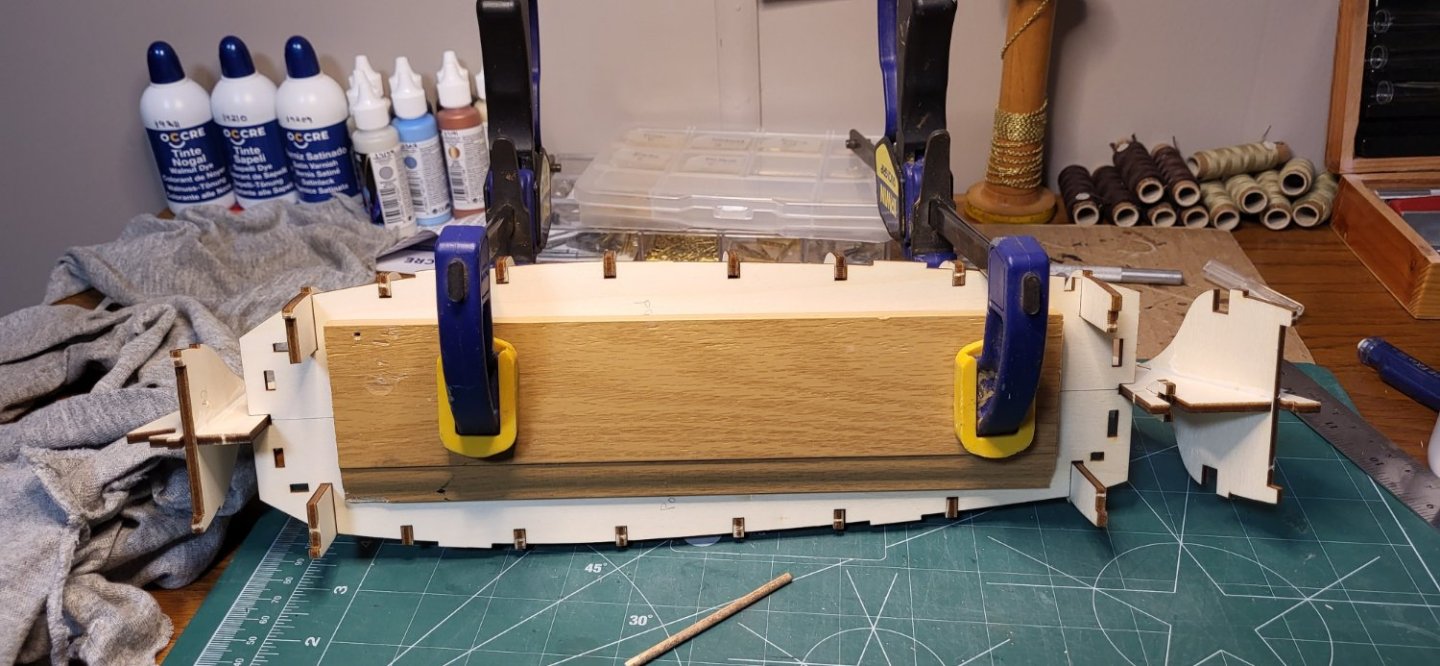
Finally found some time to get back to work. I just glued the bulkheads. I included the glue that I'm using - always a hot topic here. This is my first time using it, so I can't yet say whether I like it or not, but the set time is only 15 mins, vice regular Elmer's glue. The stick in the foreground is a dowel that I cut and shaped the tip to make it easier to spread and transfer extra glue around those tight places. Pretty happy with that minor innovation! I'll probably end up making several of different sizes as I progress and come across different gluing situations. I saw on another Beagle build log the use of a flat length of wood with clamps to hold the deck in place. Pretty good idea! The deck isn't glued on at this point. That's next once the bulkhead glue is dry. Next step: remove the clamps and deck, and plank it - the deck, not the clamps. 😉
-
I'll look for it! Right now I'm using Titebond Quick and Thick Multi-surface. It sets in 15 mins. I just started using it for the first time gluing the bulkheads in my current project, so I can can't yet comment on whether I like it or not, but I like the idea of a 1min set of time!
-
Thanks, Mark. Please see the paragraph that I added to the end of my post. I'm in a location where I usually have to rely on online purchases for anything but the most basic items in regards to modeling.
-
I have purchased items (planks and blocks) from Modelers Central and Model Expo before, but I'm wondering if you guys can suggest any other good online stores to purchase supplies specific to wood model ship building. At the moment I'm looking for the oft-recommenended Vallejo Matte Varnish; a good, quick-seting PVA glue; and a good, natural/brown-colored wood filler. I've googled them, but I come across online stores that I'm not sure that I can trust (quite possibly due to my just not being familiar with them) - not necessarily because I don't trust them right off the bat. I'd greatly appreciate any suggestions! Based on Mark's (need to point out: same (real) first name!) reply, I should point out that I live in rural Minnesota - very rural, and don't really have any stores nearby that are stocked very well at all with quality modeling supplies, so my best bet is to rely on online stores except for commonly-supplied items such as Exacto knives/blades, threaders, and other such basic crafting items.
-
Hey, Chimp I'm at this very stage now on my own Beagle and I'm wondering at what point(s), exactly, did you actually glue the bulkheads and deck? My thinking is to: 1) dry-fit the bulkheads 2) dry-fit the PLANKED deck on to ensure proper alignment of the bulkheads since the bulkheads lock in to the notches in the deck 3) glue the bulkheads on to the keel only 4) glue the deck onto the bulkheads and keel What are your thoughts/comments on this strategy? What steps, exactly, did you take in the above regards? Thanks!
-
I like your choice of how you "decked the walkways", but it looks like it may have been a bit tedious. I'm nearly ready to plank my own Beagle's deck. I'm not terribly concerned about historical accuracy, so I'm wondering if you're happy with your choice and if you have any other thoughts about it.
-
I'm glad you mentioned planking the deck first! I was so worried about getting the bulkheads square to the notches in the deck, that I forgot that the deck needs to be planked first. Thanks, @Patrick B
-
One thing that comes to mind regarding keeping the bulkheads square and using @RossR and @Patrick B's method is one needs to keep in mind any shift in the parts of the bulkheads that protrude up to lock into the deck, that those stay aligned so as not to force bending of the bulkhead to align with those notches in the deck. The way @RossR describes his experience with the Beagle, that almost sounds ideal, as that would keep those aligned in the way that I described above. I would think that dry-fitting the bulkheads, placing the deck on, and then gluing the bulkheads would be ideal, as the fact that the bulkheads lock into the deck would ensure that everything is aligned and square relative to each piece of bulkhead and the deck itself... I'm by no means an expert - this is only my second ship, and there are plenty of people with decades of experience over me, so if I'm mistaken, please set me straight! Thoughts, anyone?
-
Whaaat?! You're stealing your kids' Legos for your own personal gain?? How atrocious! 😃 That's a great idea, though - if I had Legos! I get how that would definitely keep things square, though. I'll see if I can come up with another method. I'm going to the store this evening to pick up some better PVA glue than what I currently have and was going to take a look at clamps - I'm sorely lacking in that area, too. Thanks for the tip, @RossR and @Patrick B. Much appreciated.
-
After finding the all-important template layout sheet, thanks to @RobTBay I mmarked everything and moved on to dry-fitting the bulkheads. I noticed that the mast supports are quite loose and I'll have to make sure I keep them properly aligned according to the mast angle when I glue those. But not now. Bed time. Looking forward to getting back to it!

-
Well, I THOUGHT I looked through the entire plans! Thanks much, Rob.
-
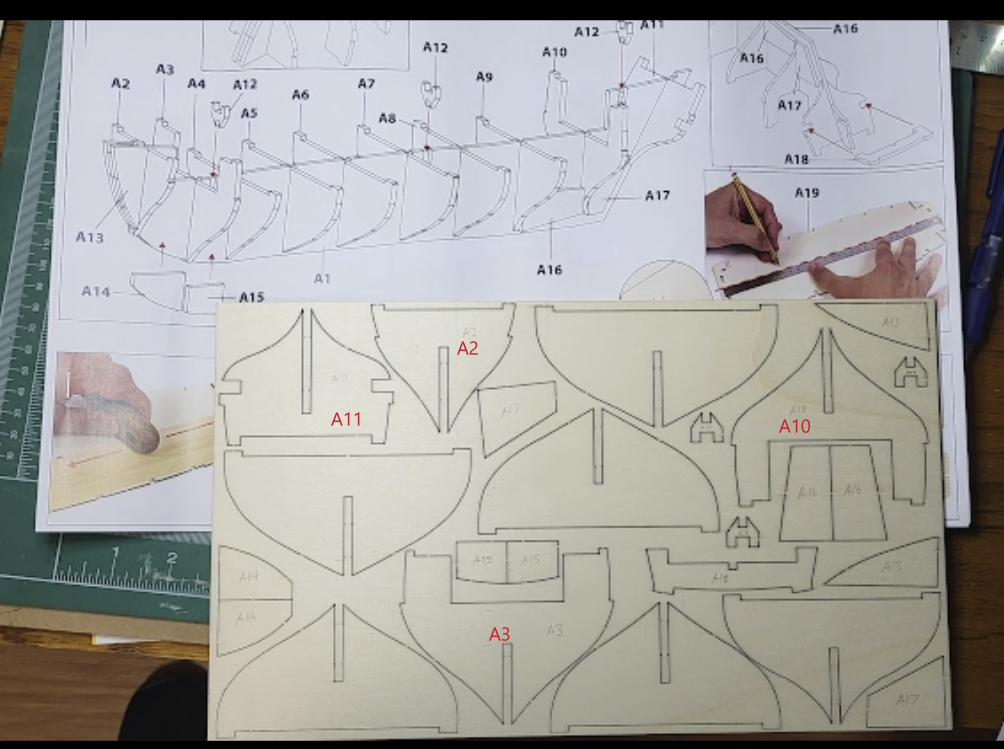
So, first step of course is the false keel and bulkheads. With page 1 of the plans and the bulkhead template in front of me I started marking the bulkheads with pencil according to the plans. But while doing so, I ran into a speed bump: I was able to identify all of the keel & bulkhead parts except for bulkheads 4 through 9. In the below image I indicated the bulkheads that I was able to identify. The other large six bulkhead pieces I have not been able to determine which is which. Some SEEM identical in size and shape, but I know they must change size as they go along the length of the ship. I looked all over the plans looking for something to help more accurately identify which bulkhead is which. I even checked out the video the plans link to and that didn't really help in this particular step at all. Any ideas or suggestions would be greatly appreciated! UPDATE: I thought I could possibly determine the position of each by measuring the extreme width of each unidentified bulkhead. I found that they are indeed of different widths. So, starting from the lower right bulkhead and moving clockwise to each of the unmarked bulkheads, measuring edge to edge the very top outside of each bulkhead, they are 10cm, 10.5cm, 10.7cm, 11cm, 11.15cm, and 11.3cm. Would it be safe to assume that they go in order of narrowest to widest, from front to back?
-
Okay, guys. Here goes! My kit finally arrived today and I couldn't wait to get off work to jump in. I'll spare you the pics of the box and the laid out templates, as there are plenty of those in the many Beagle build logs that have come before this. I started out getting myself familiar with the plans (Wow! Full color instructions and a detailed parts list) and the templates and parts. I thought it was a nice bonus how the parts are packaged in the compartmentalized container. Definitely keeping that to store left over parts.
-
Beautiful work, Pete! My Occre Beagle arrives tomorrow and I'm very excited to get started. Your, and the many other Beagle logs posted in the past few years will be of great help as I progress.
-
HI, Clementine. So inspired by your log! My Occre Beagle arrives tomorrow and I've been spending the past two weeks studying the plethora of Beagle logs here at MSW while waiting. I can only hope mine comes out looking as good as yours! I'll definitely be keeping an eye on your log as you progress.
-
So encouraged by your progress, Chimp! I'm waiting on my Beagle to arrive and have found there are PLENTY of logs for the ship here at MSW. I've made several notes from your log. Keep up the good work!
-
Maybe "Decked the walkways" would be more appropriate? Looks good!
-
Mine just shipped today - no estimated delivery date yet. Got your build log bookmarked - along with EIGHT other Beagle builds! Popular kit. But that just means more resources to have for us "follow-alongs"! 😉