JLong
-
Posts
121 -
Joined
-
Last visited
Content Type
Profiles
Forums
Gallery
Events
Everything posted by JLong
-
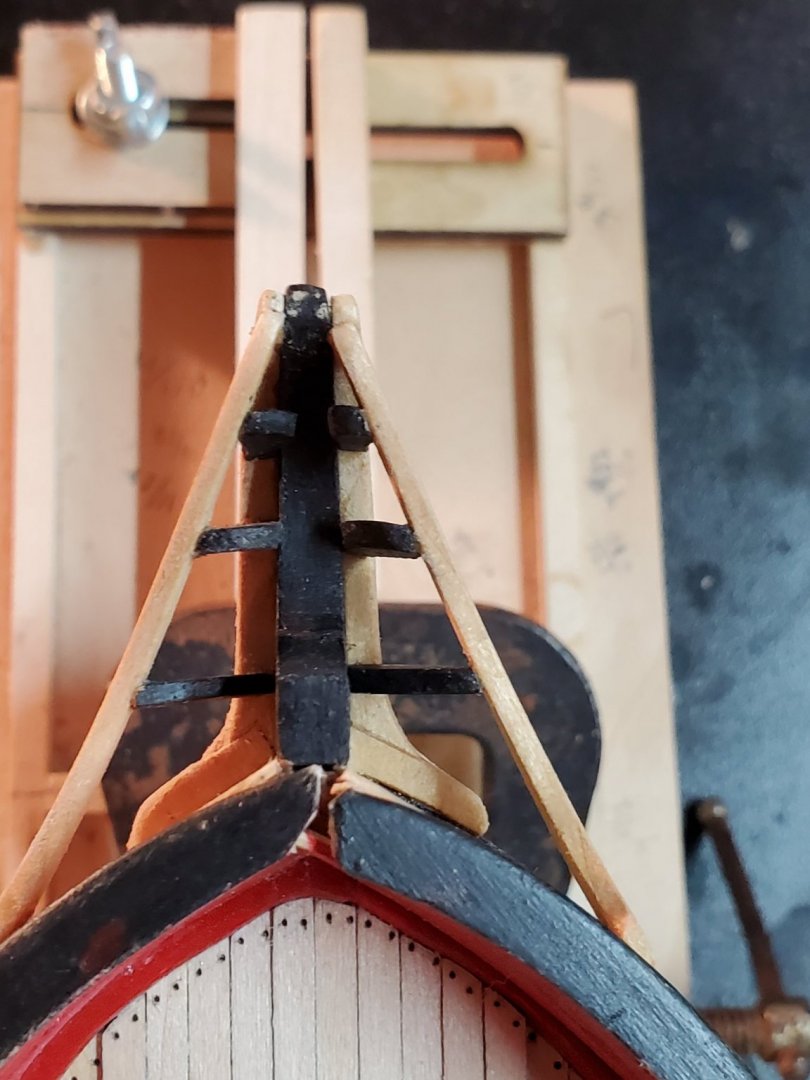
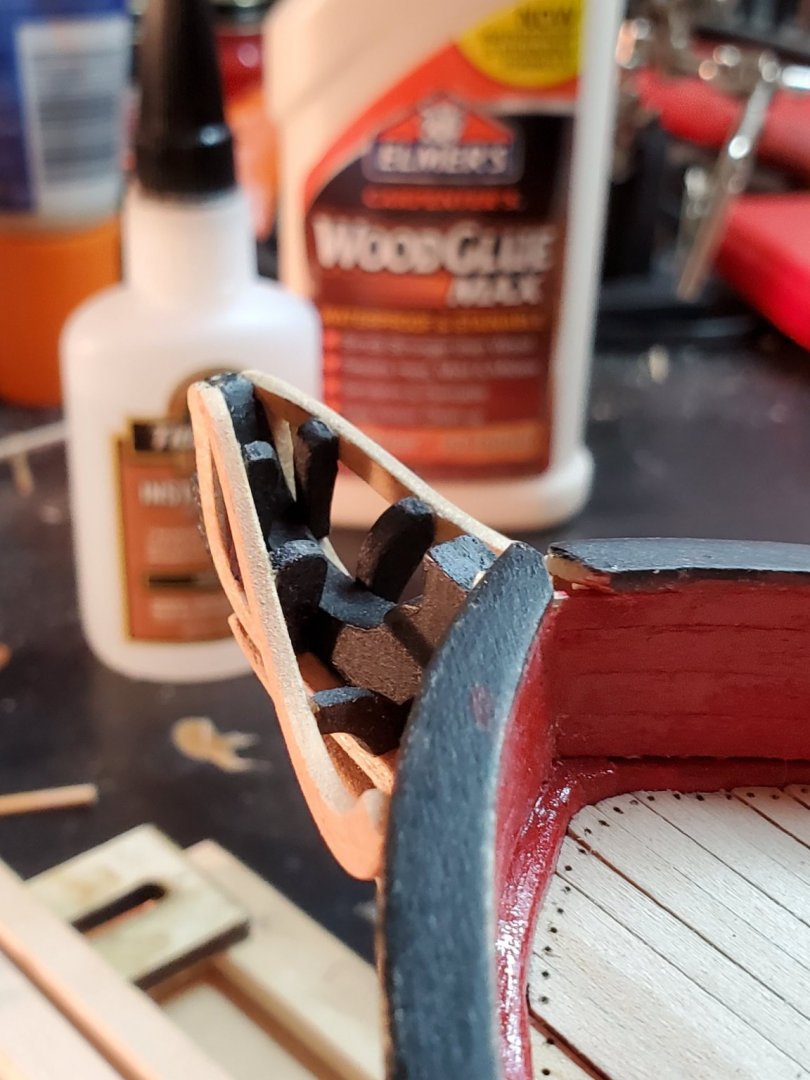
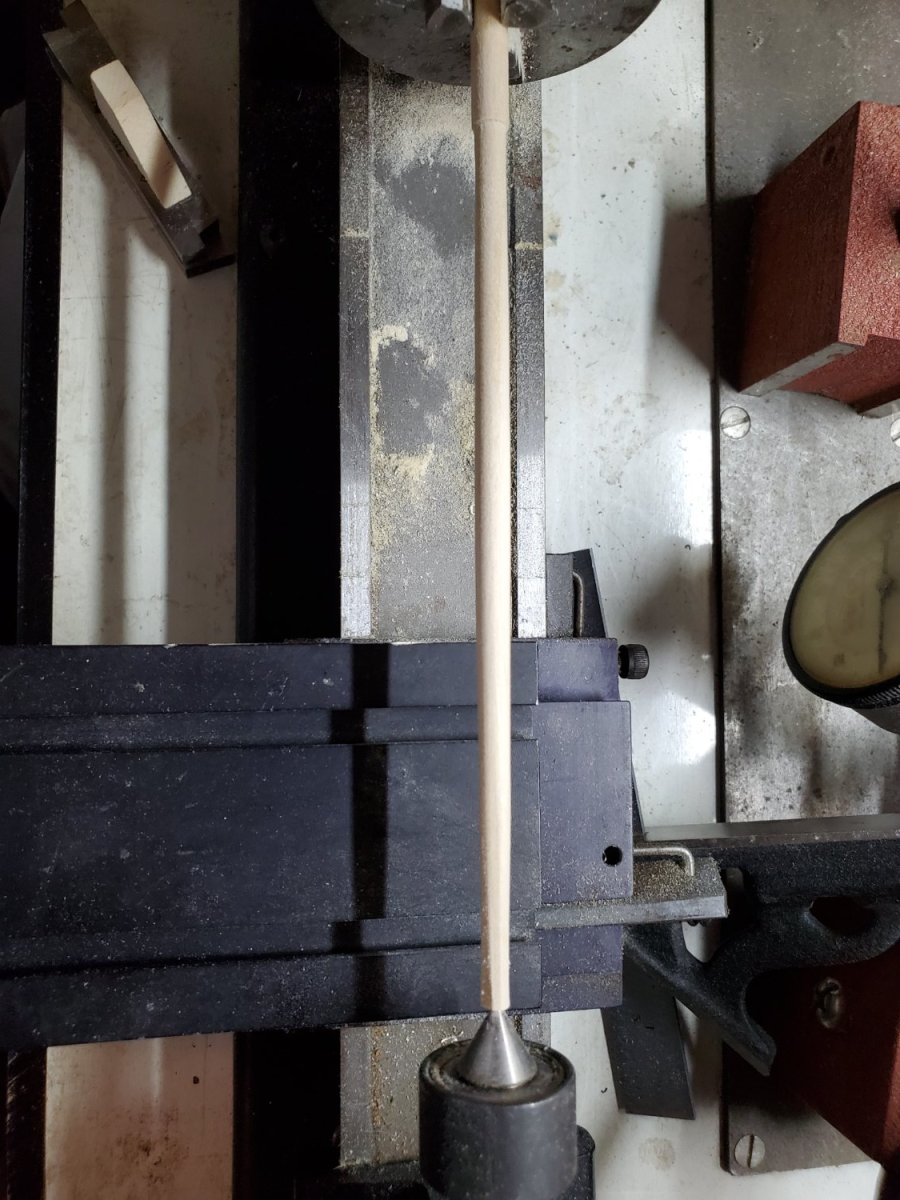
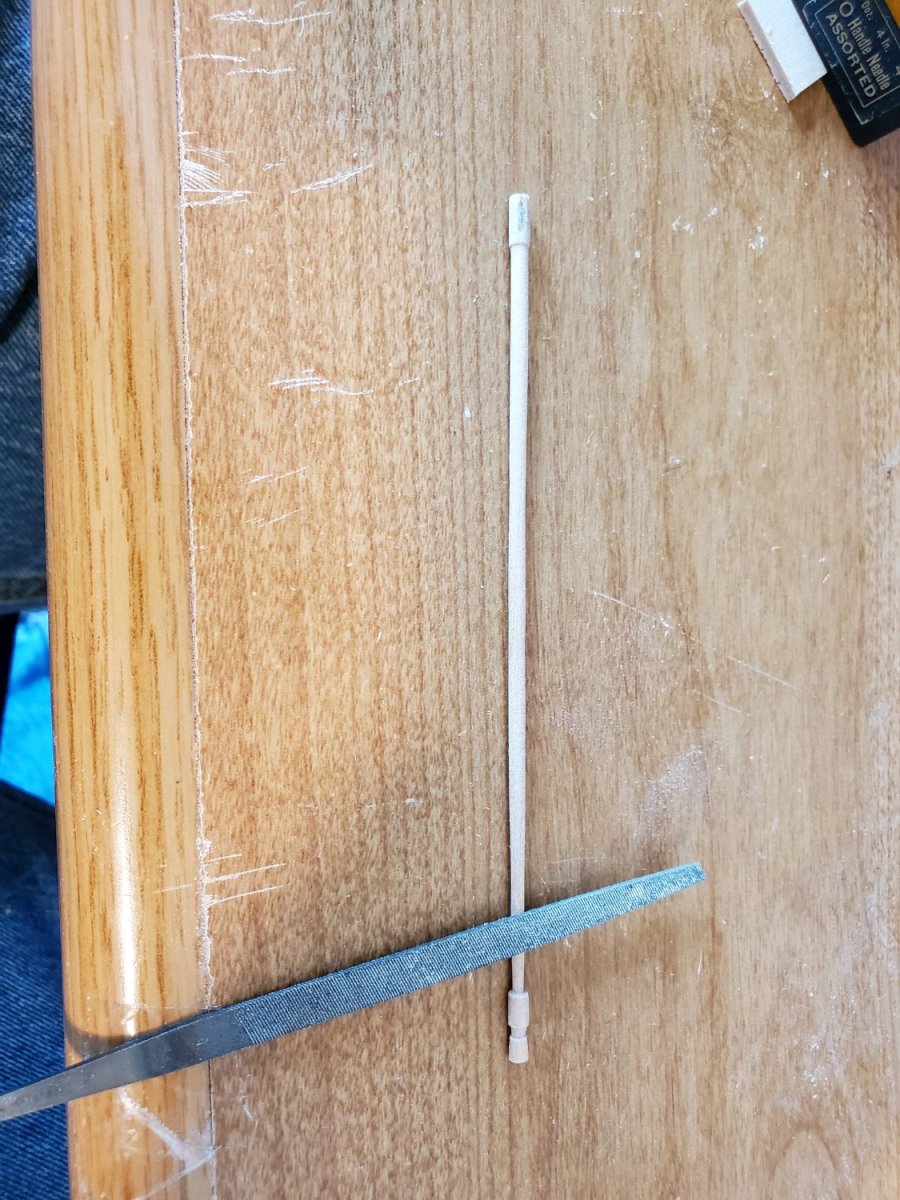
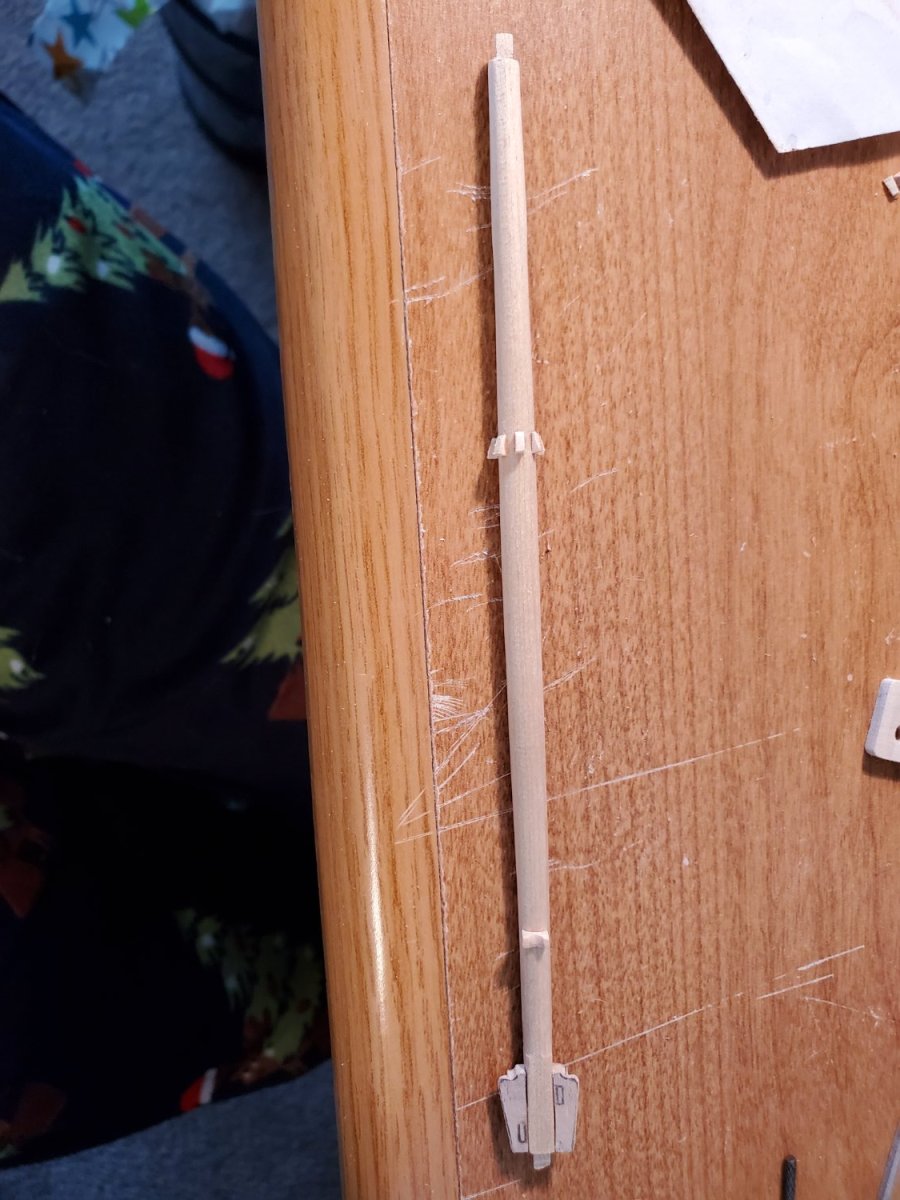
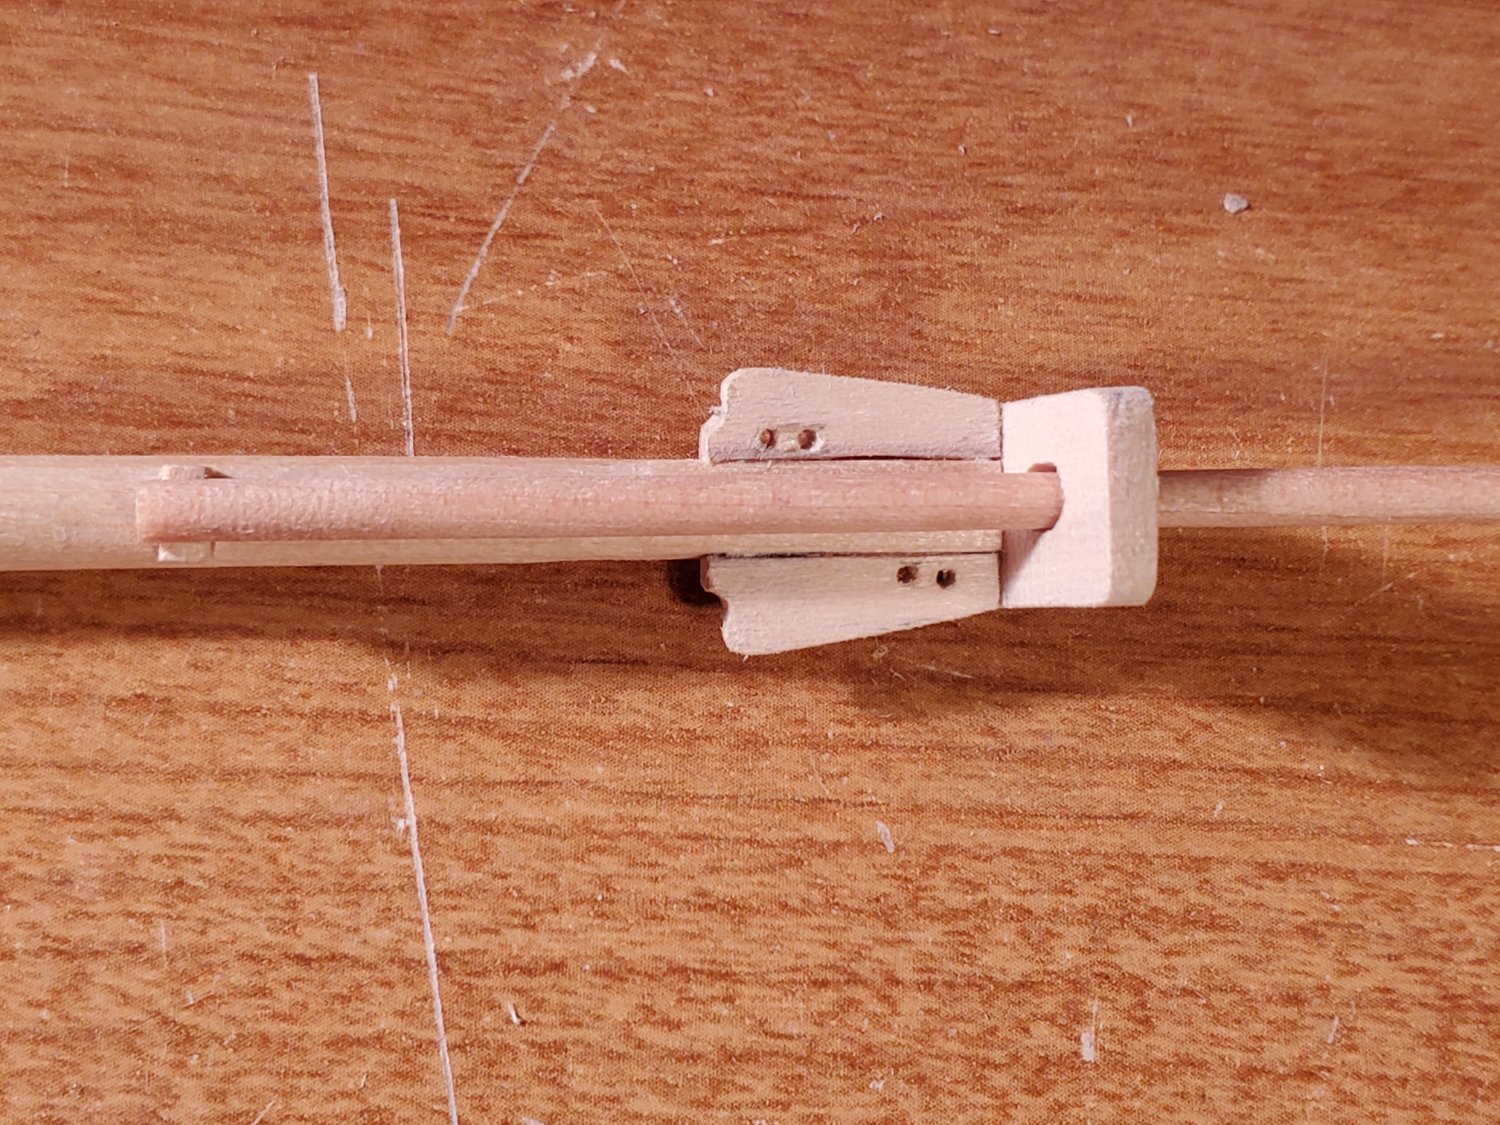
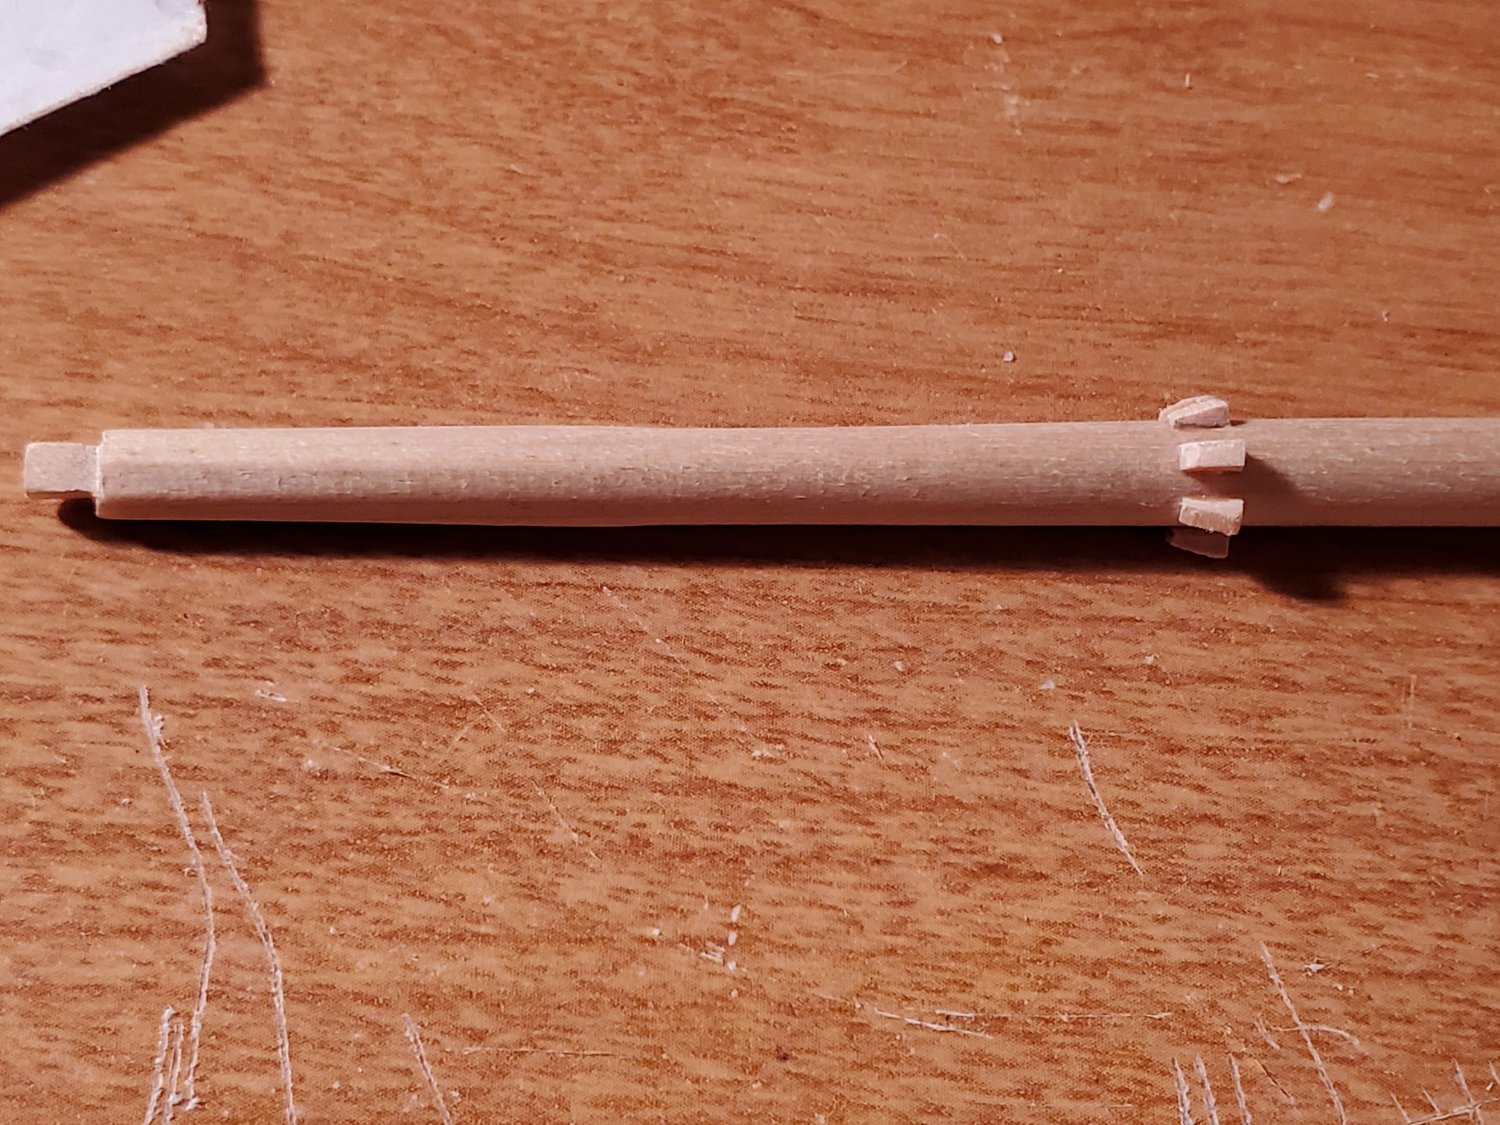
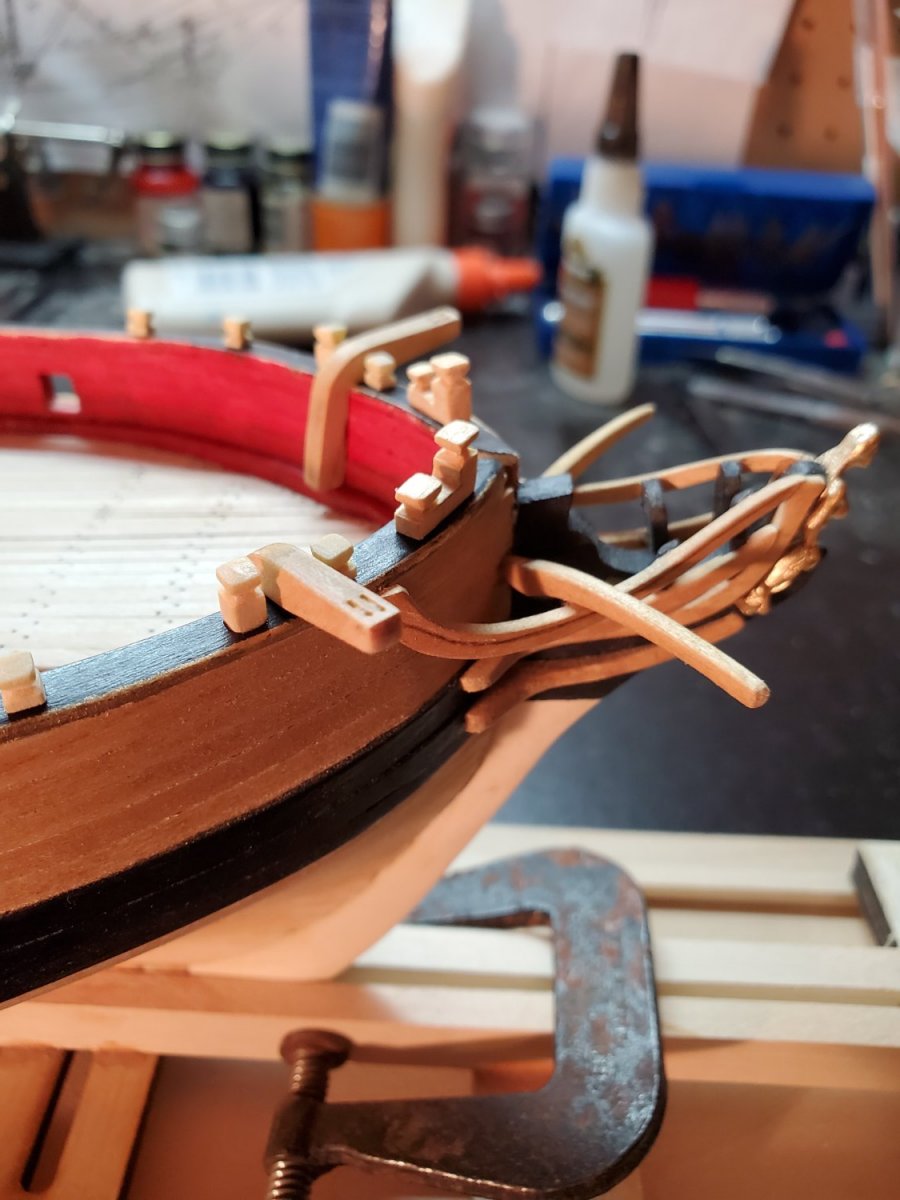
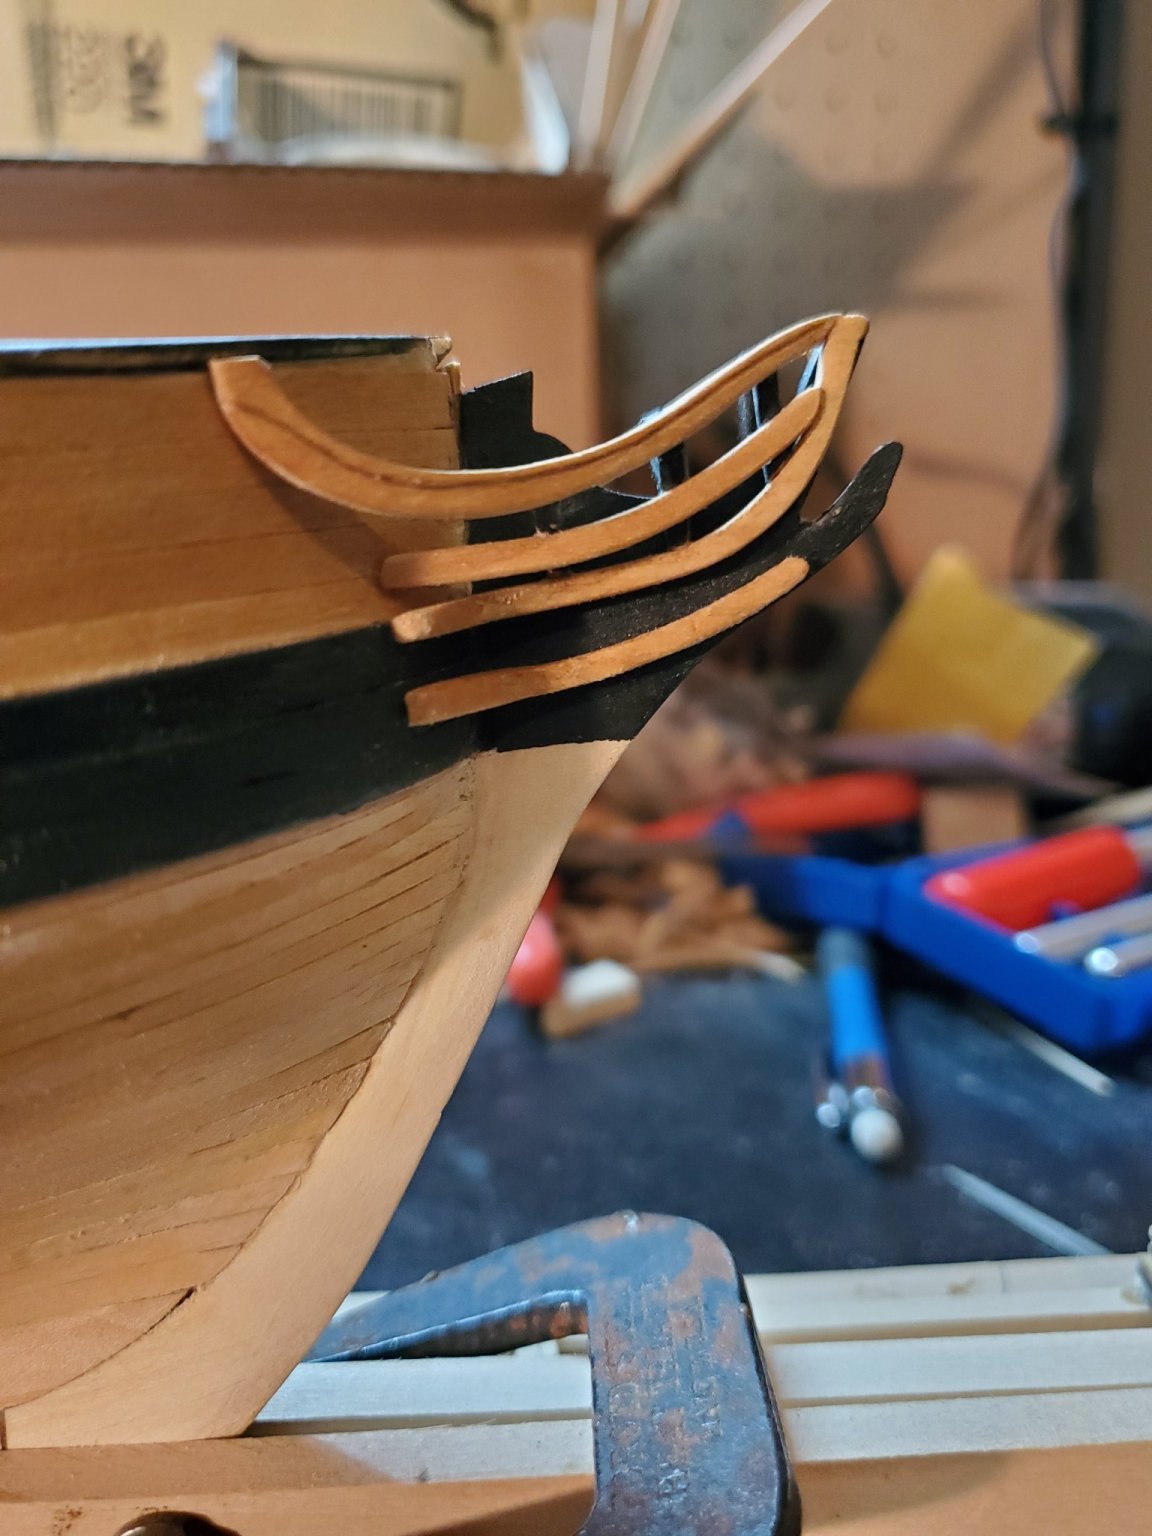
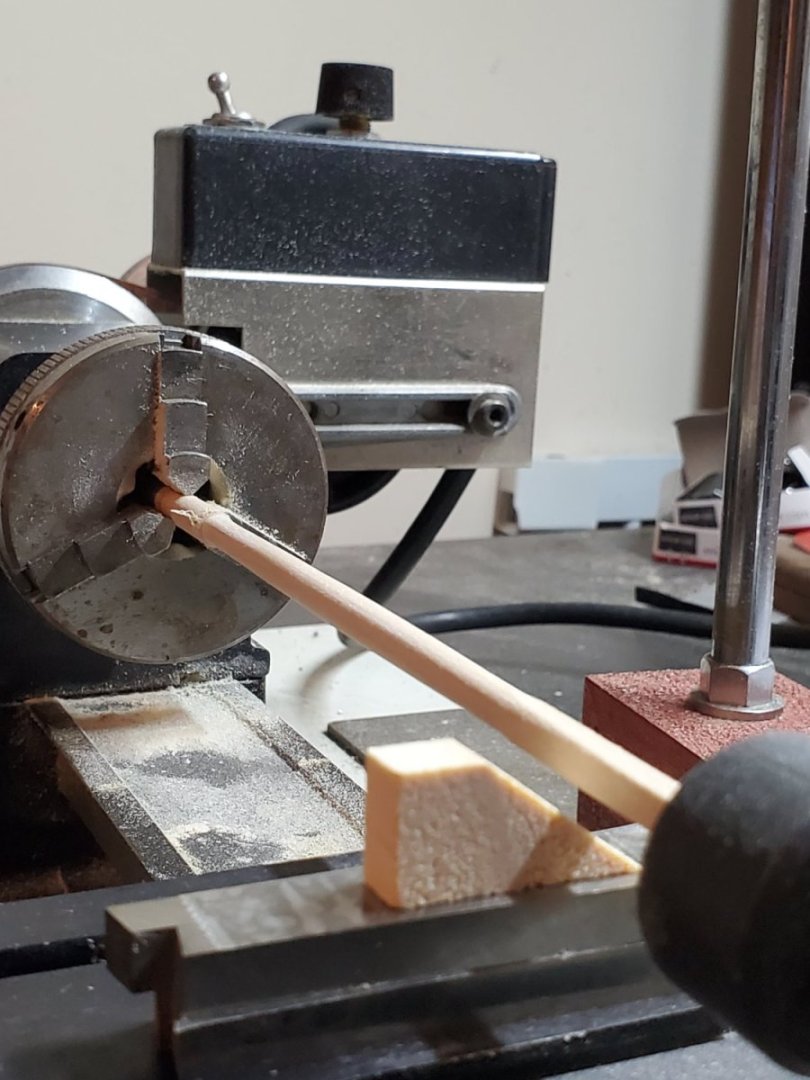
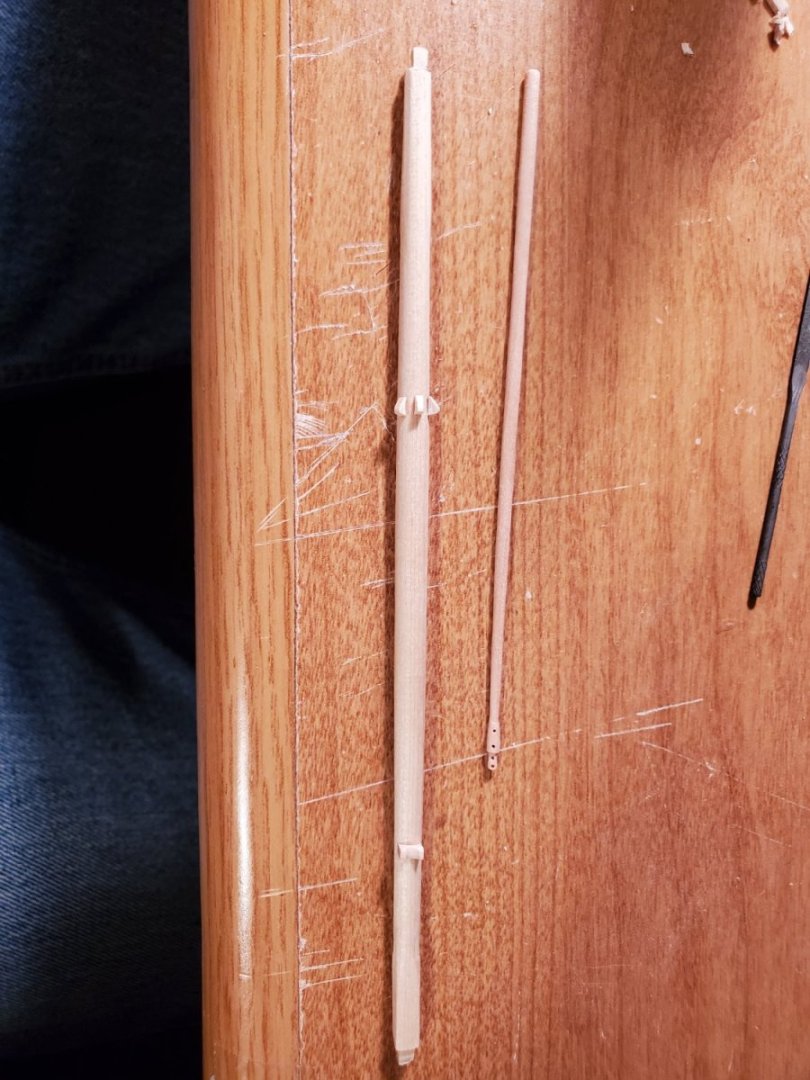
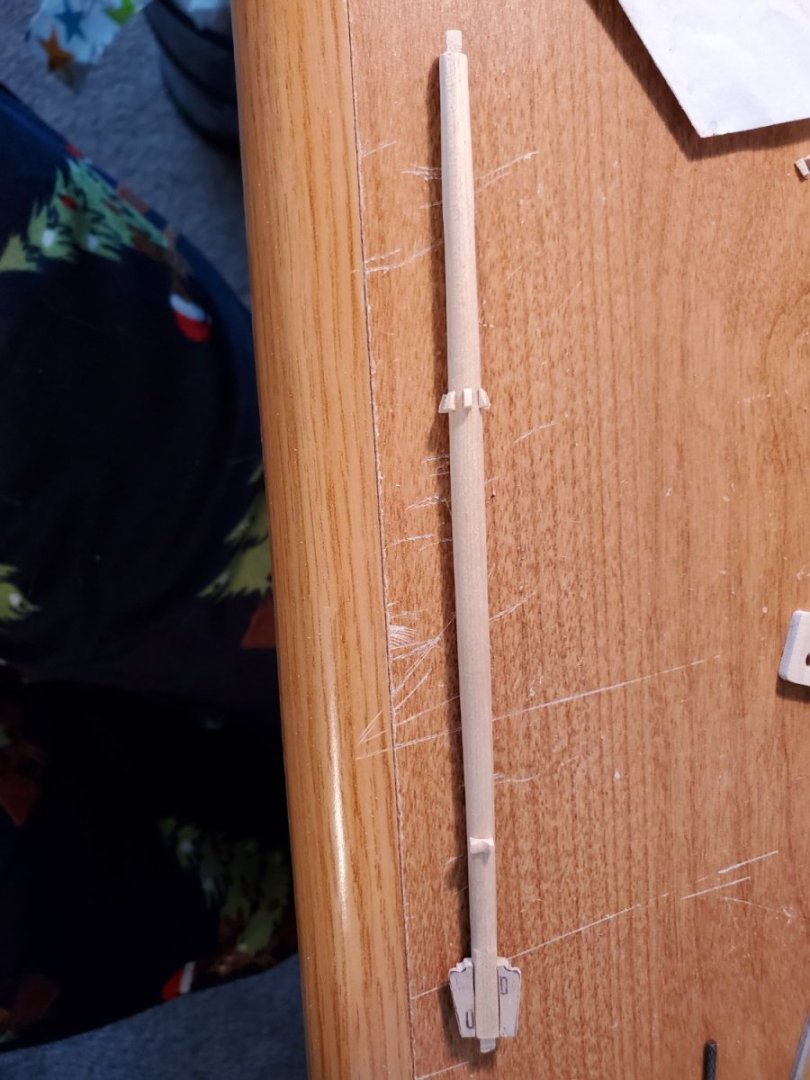
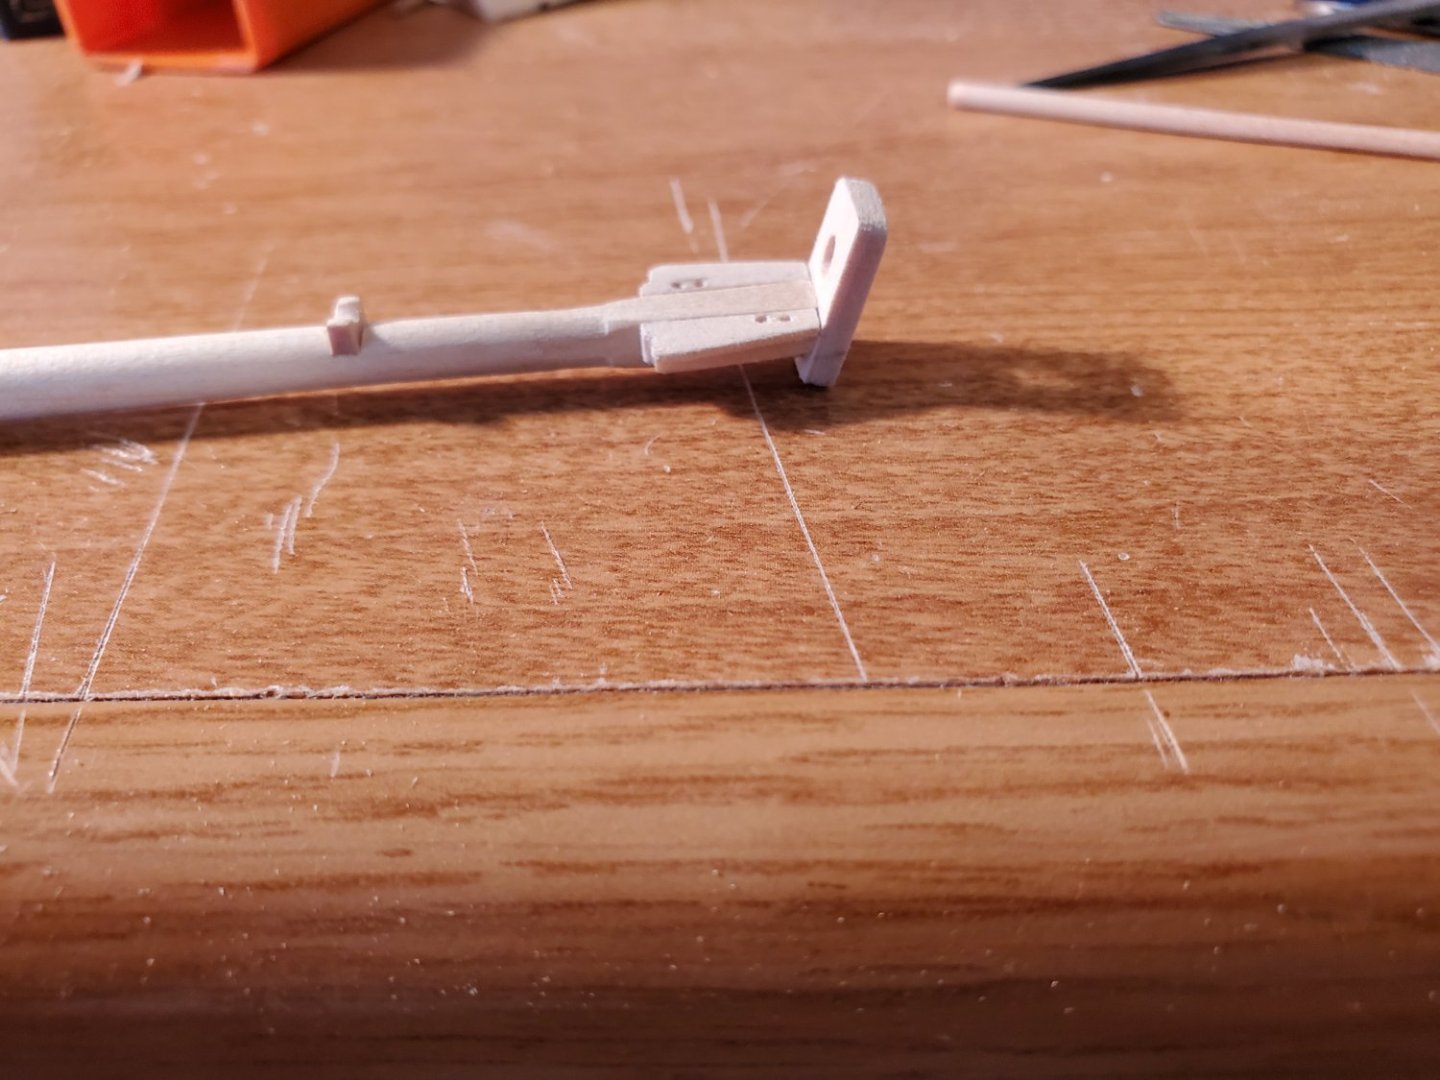
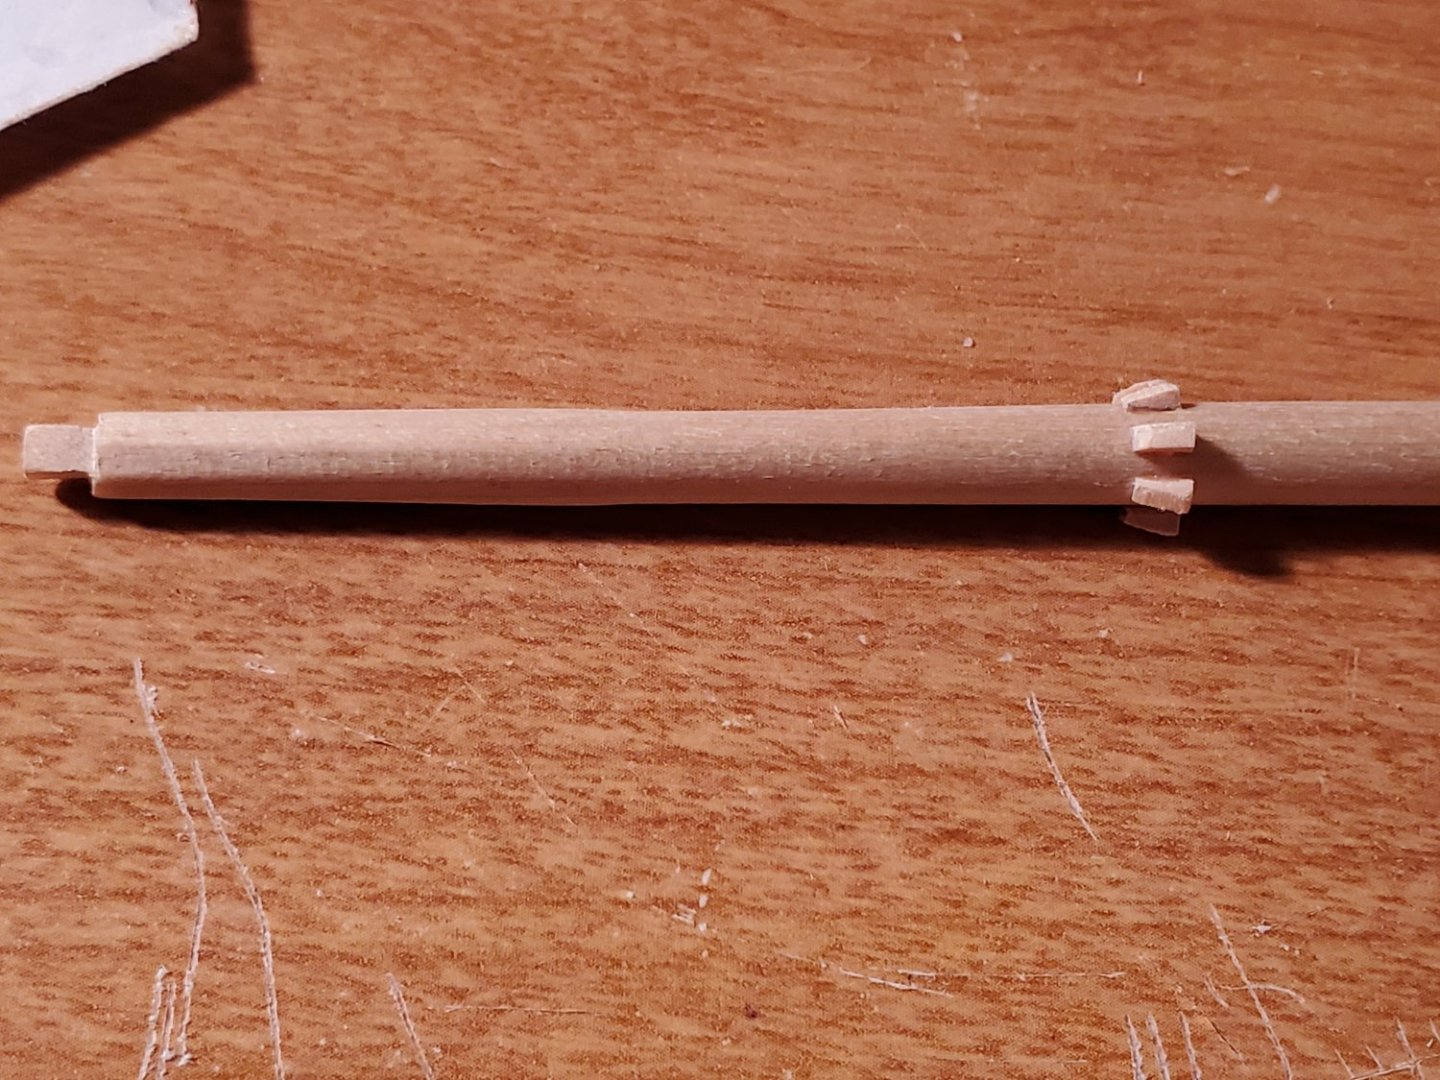
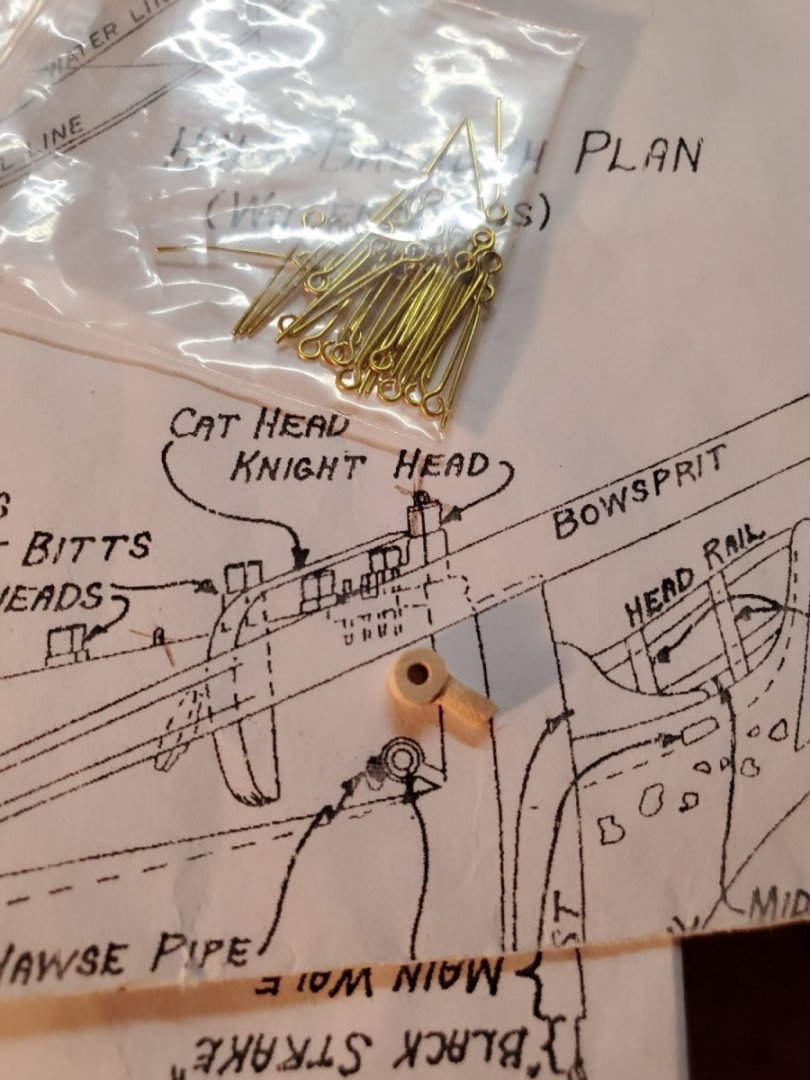
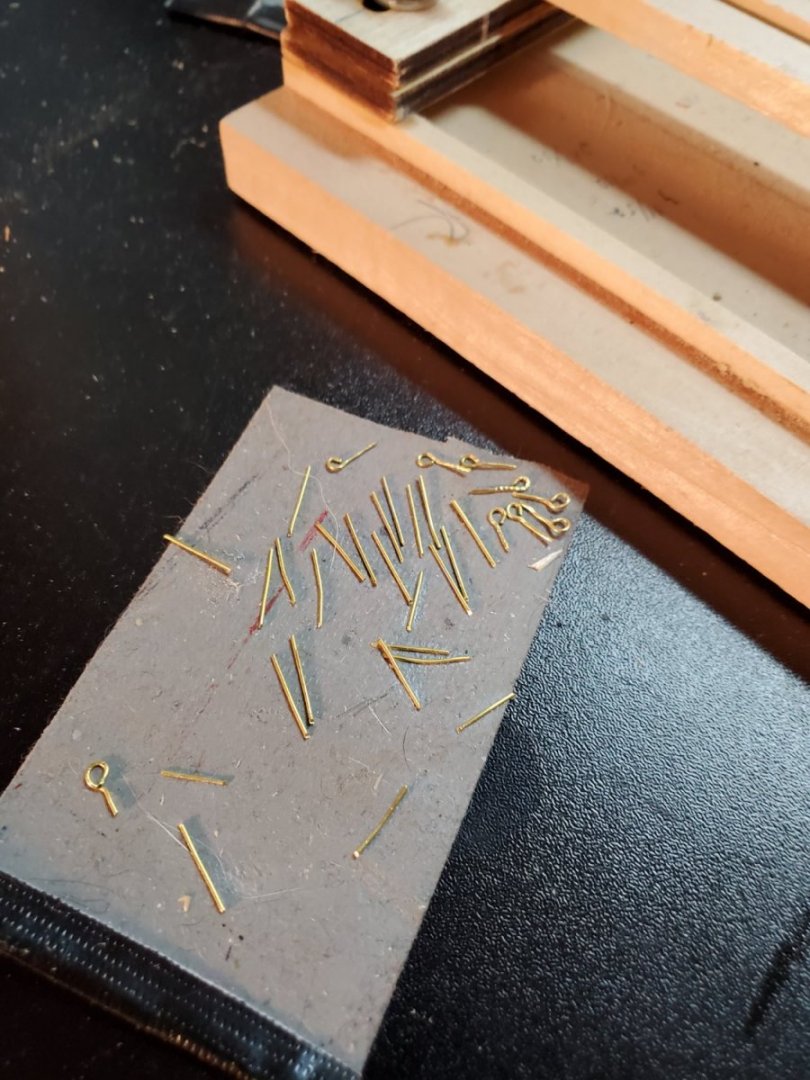
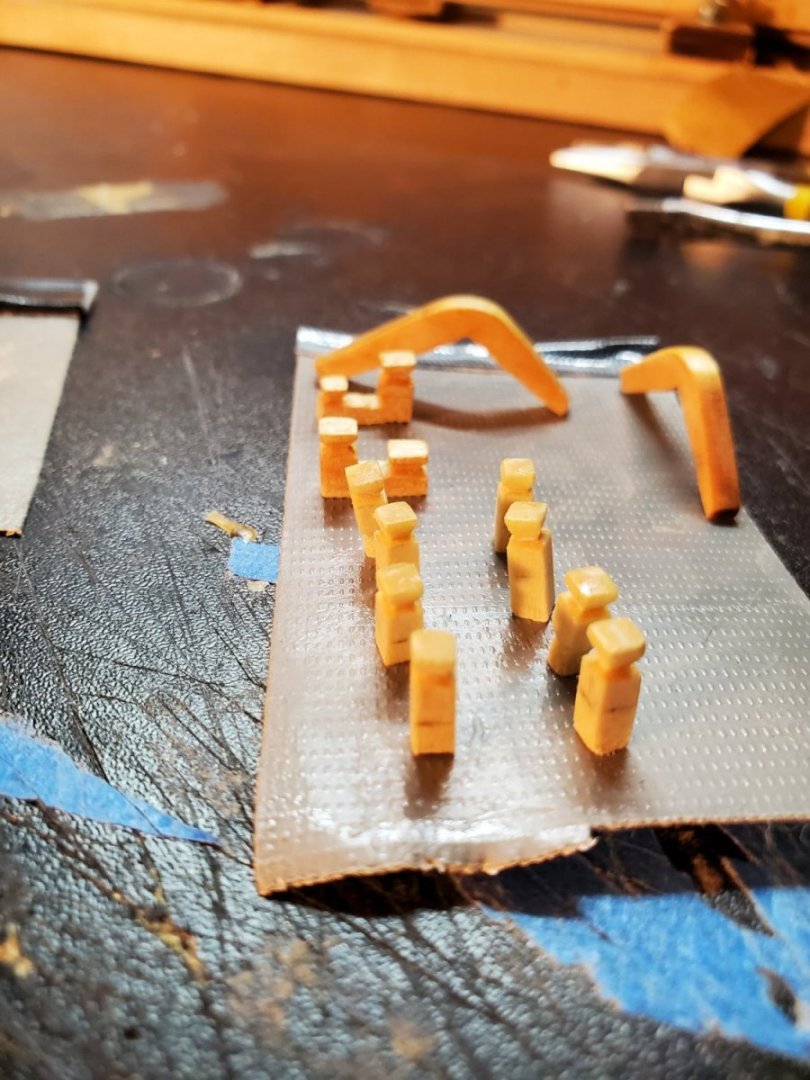
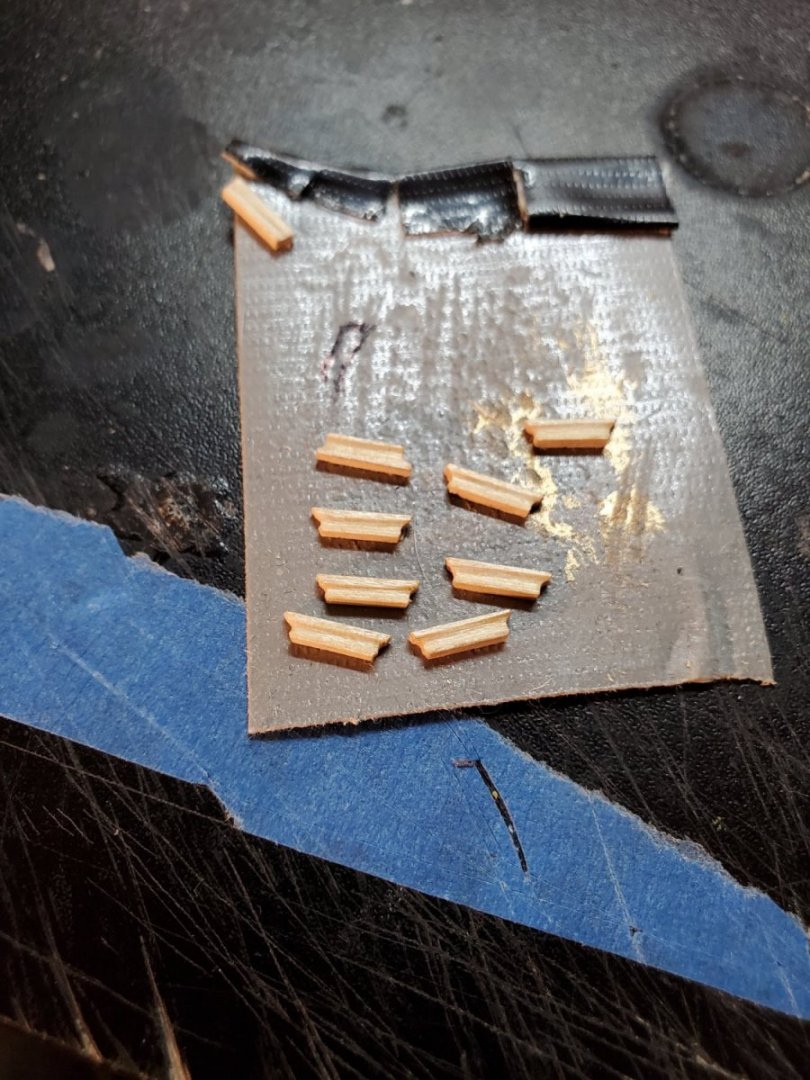
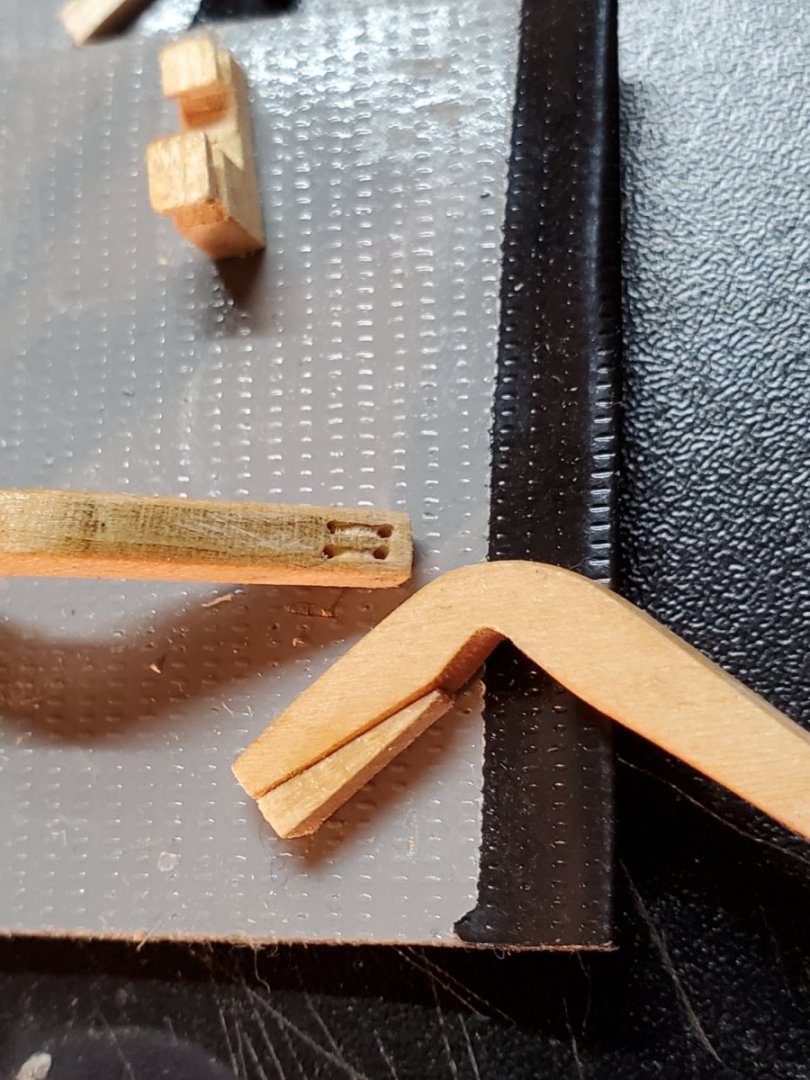
 Bowsprit work on the Fair American model ship. This might be my last post for a few months, as I'm moving in a few weeks, so won't be set back up and working for a little while. As mentioned before, I used my grandfathers little lathe to work on the bowsprit and jib-boom. There wasn't always enough space between the chuck and the spindle to fit the whole mast, so I could only do so much with flipping around, before resorting to by hand. I didn't want to chuck finished sections and risk marring them to access the other side. - disappointing. So, I started by marking out sections of the mast, and measuring dimensions on the plans. I kept shaping and tapering until the blends were perfect. After filing the aft end to a square, I created a 45deg block that I'd wedge against one side of the square so the corners were facing up. Now I can file down the corners to make it 8-sided. This is how my brain works, so that's how I approached it. I got the diameters on the plans to within 0.005in of size by calipers. Close enough! The Jib-boom was tougher, because its a smaller diameter. I went as far as I could with it on the lathe before it severely wobbled, and did the rest by hand. My technique was rolling the shaft with my fingers one way on the table, then dragging a file the other way to cut. Back and forth. Kind of like rolling Play-Do as a kid. This worked pretty well, actually. I bought some really fine grit sanding pads of 1500 and 2000, I think. The instructions say to "take as much care with finishing as your abilities allow''. So I wanted the finish to be as glass smooth as I could get. The Gammoning Cleats were a pain. They were so small, they kept splitting during shaping. Therefore, I had to oversize them to make them ''work'', and file them down a little more, once glued. I glued the Bees on upside down the first time - I was rushing today to finish them. I was lucky they weren't ruined in the process. But I fixed them, and they look okay. I always tell other modelers to go slow, take your time; I need to follow my own advice. The forward Cap I made by hand too. The small one included in the laser cut pieces, wasn't correctly sized. The Jib-Boom isn't glued in place yet, just here for looks. Because I'm moving, this is as far as I'm going with the build for now. I don't want to assemble it, and have it break off during shipping/boxing or something. I'll probably quintuple bubble wrap the pieces and physically walk them to the new house, for fear of them breaking in the car. I'm dreading moving the ship. So many hours of work. I might end up sitting in the passenger seat with it in my lap, while my wife drives to the new house at max speed of 8mph. This will be a true test of my marriage. I know where my priorities SHOULD BE, but my brain isn't convinced. Here's hoping everything moves well and intact. I'm excited about setting up ''shop'' in the new house. A fun new SCARY adventure awaits - anchors aweigh! - Jason -
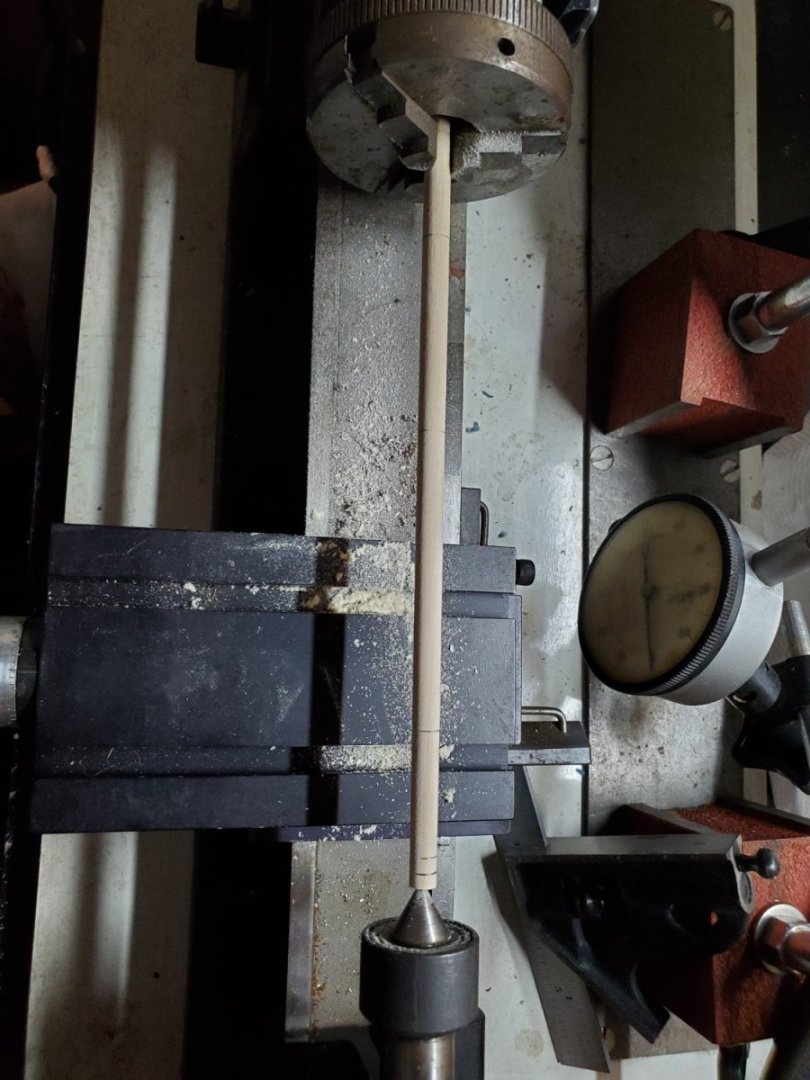


-
Cisco, I'm jealous you got to go to ModelCon. I didn't even know that it existed - so bummed I missed it. Its worth it to go slow on the planking - You're getting close to the end! Mine only took 6 short months to complete. I had to get creative with clamping too, just as you have. Build a thing to hold the thing that supports the clamping thing, from the other side and not run into anything else. As far as glue goes - I use Tite-Bond Wood Adhesive (medium). 30-45sec drying isn't bad. All the planking, and structural framing, I used Elmers Wood Glue. To each his own, of course. -Jason-
-
Dave, I had a similar issue with my Fair American build. I did all the tapering of bulkheads before gluing to the hull. During fairing, one or two bulkheads were short, or ''heavy'' as you have experienced, though not as dramatically. Laser cutting is only so good. I use the plans as law, and when possible, build to plan and not as-is. My fix was adding some 1/32 plank to thicken bulkhead areas that were low, then sanded back to fair the best I could. Wood filler also helped tremendously. You're doing a great job very early on with addressing the issues with the hull. Keep up the fine attention to detail and quality! I can't wait to see more of your progress -Jason-
-
Its been a while since I posted, lot of life happening this entire month. Sold a house, searched for houses, bid on houses, bought a house. I've started working on the Bowsprit, as time allows. I'll have pictures soon, but now working on packing the house up - we'll see how far I get. - Jason -
-
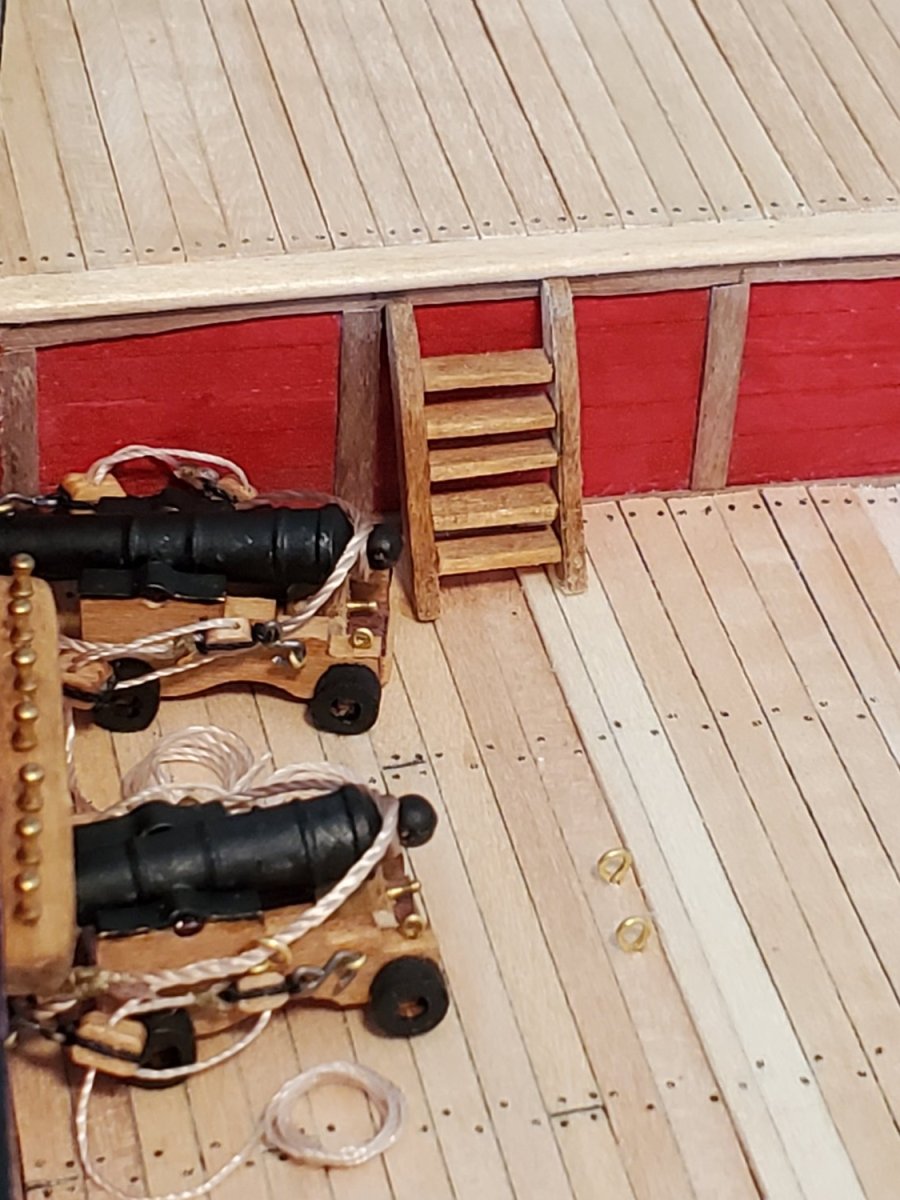
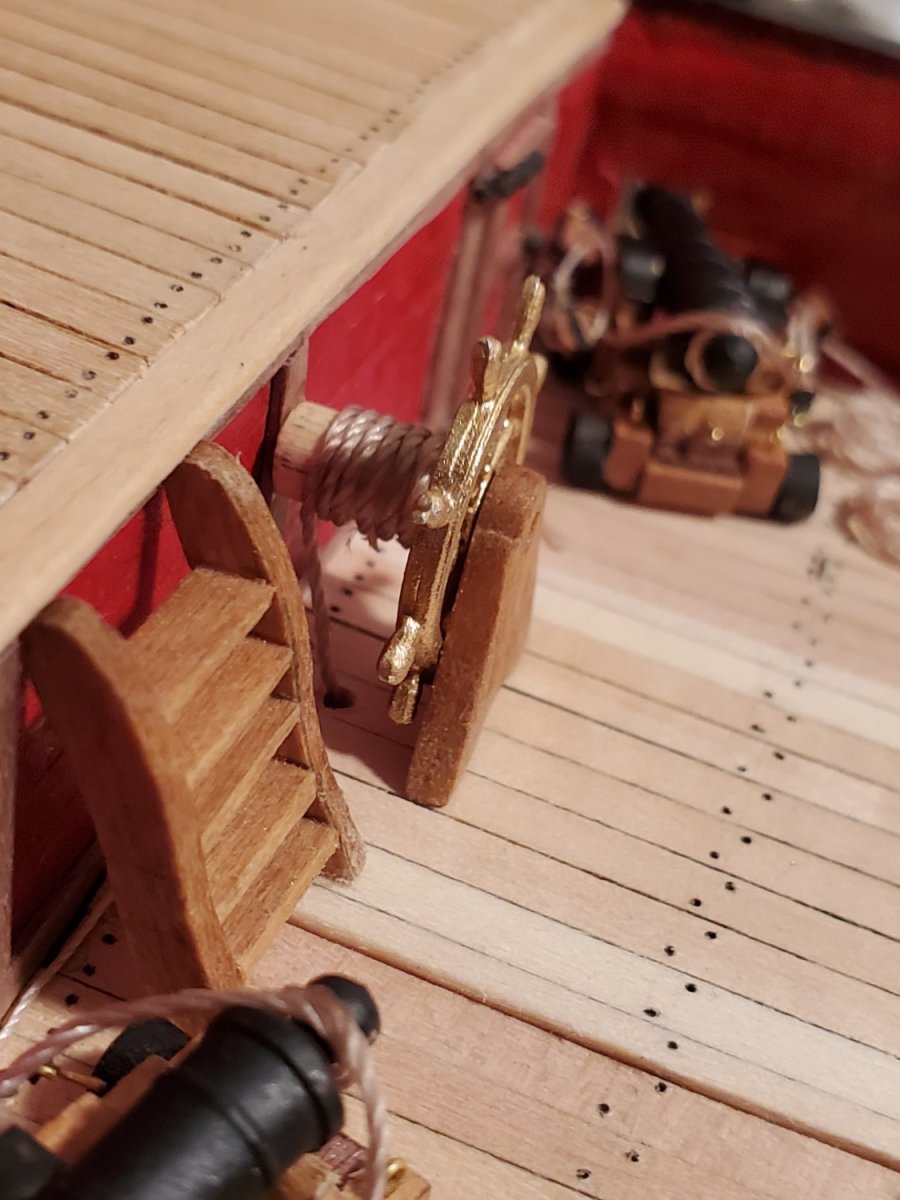
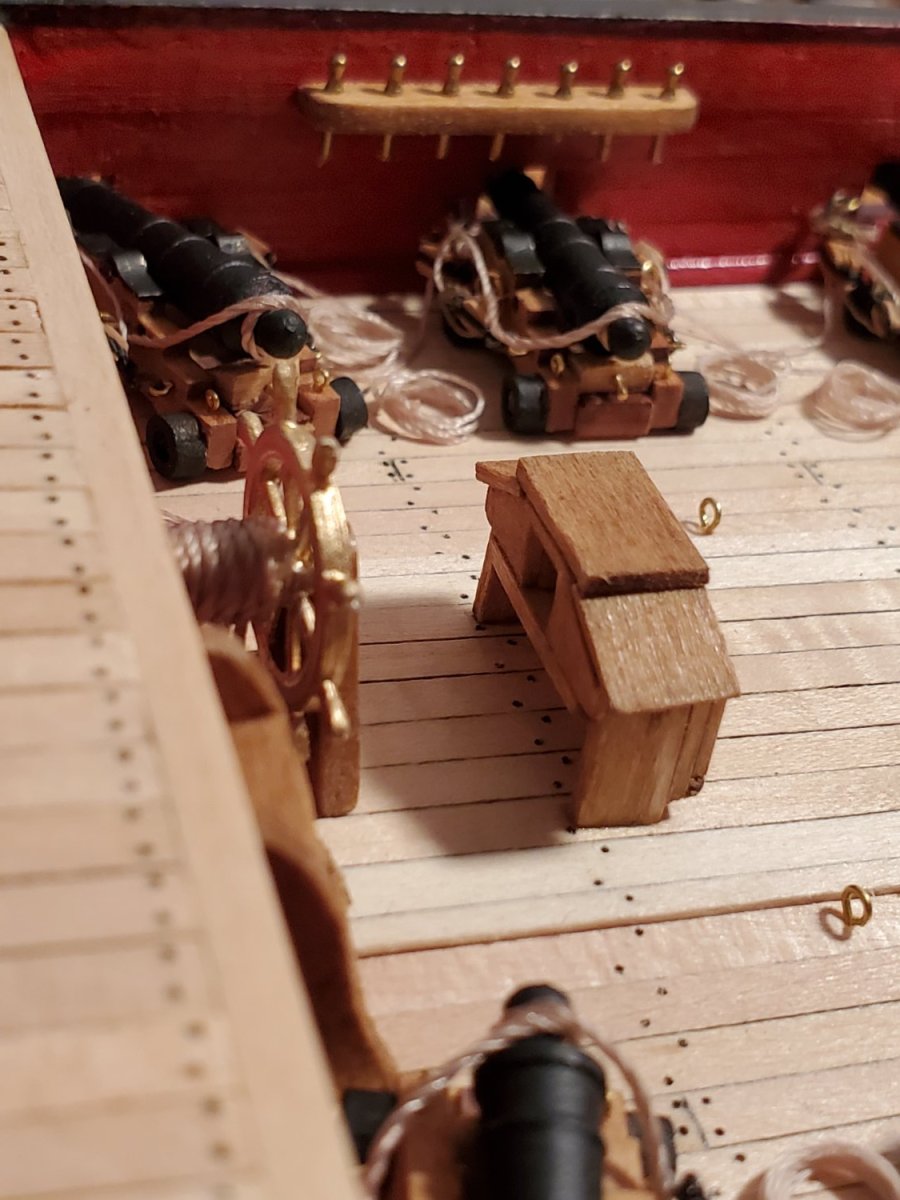
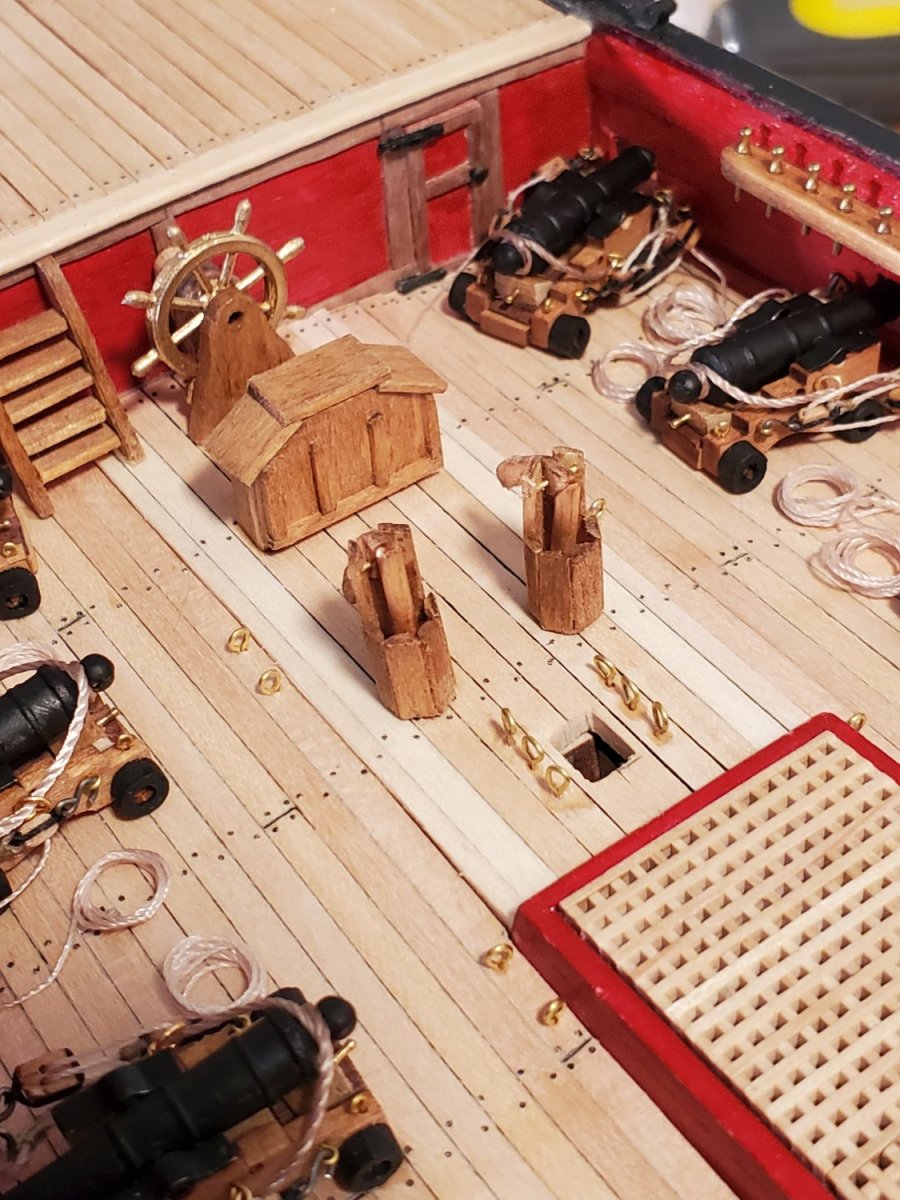
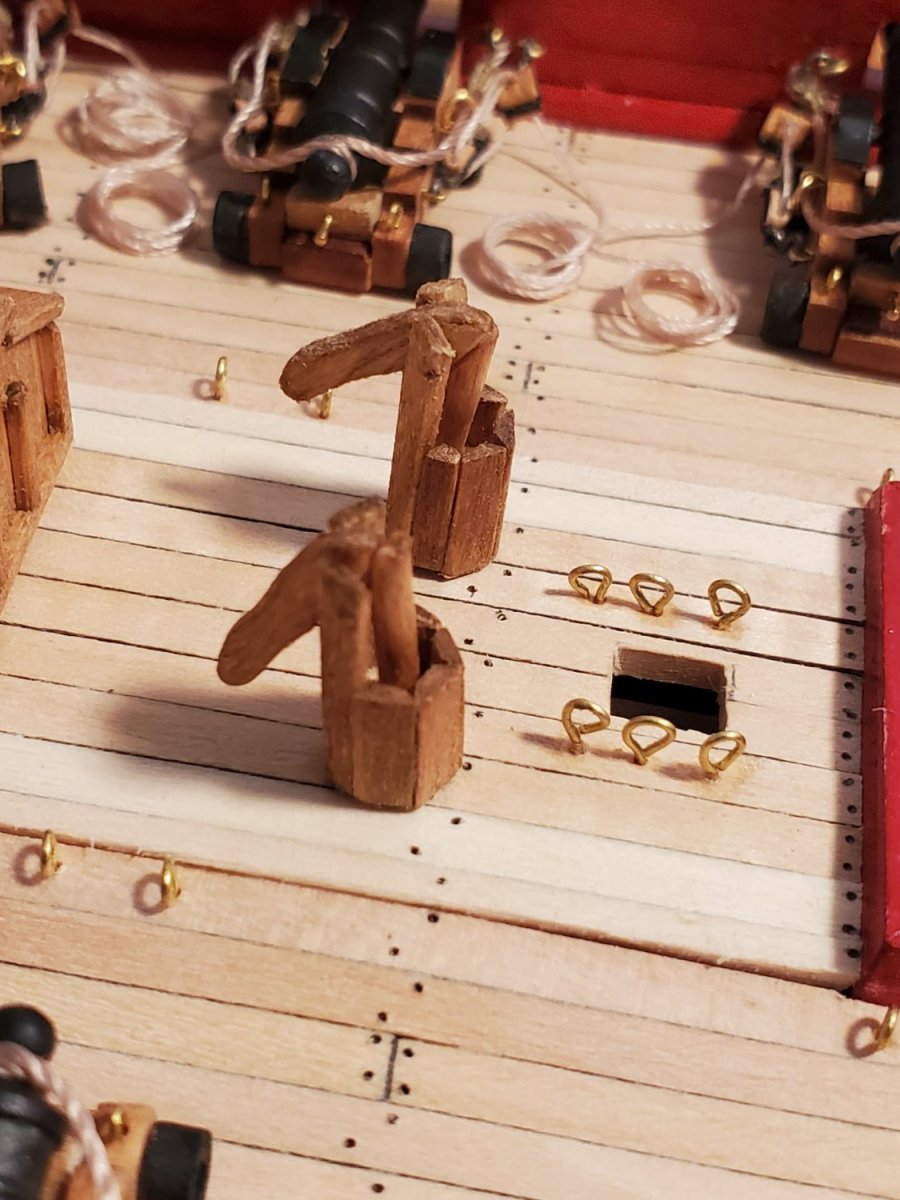
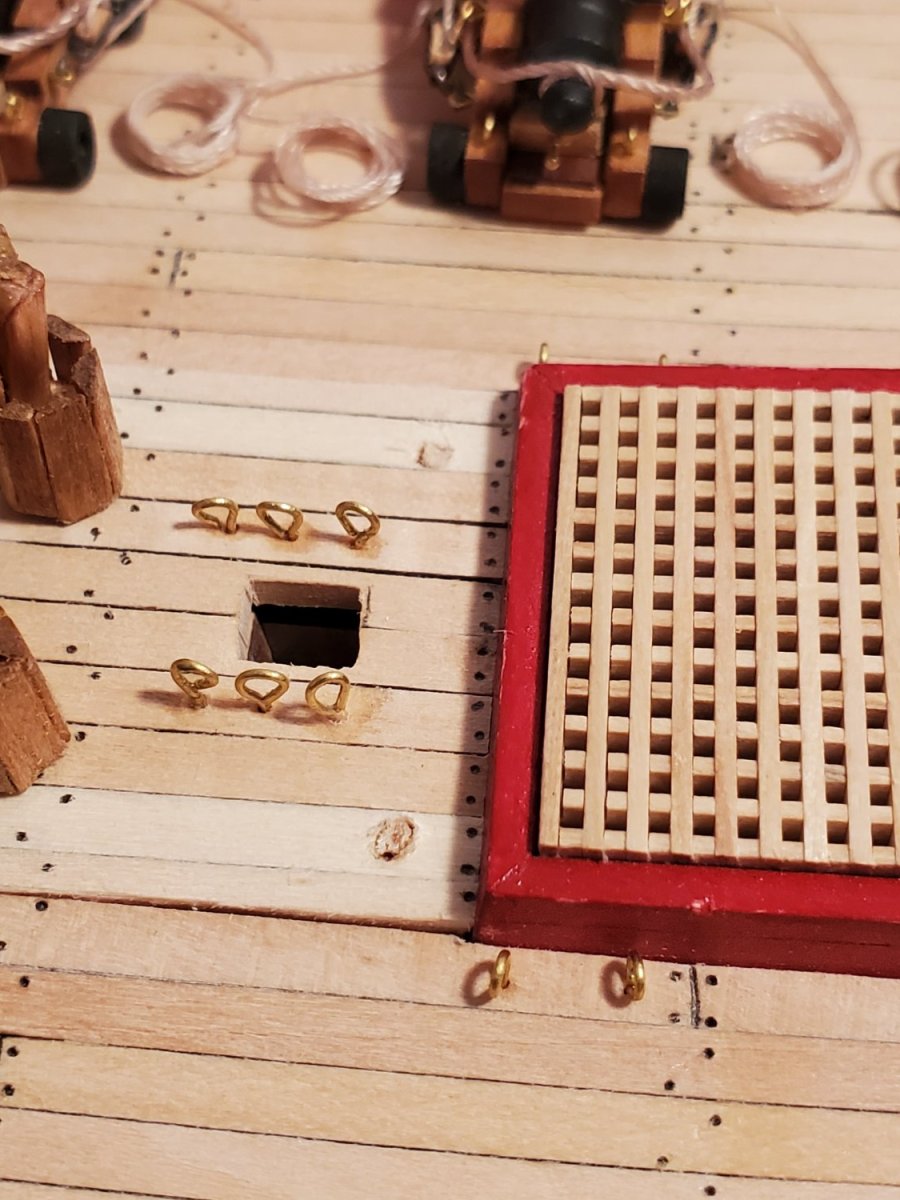
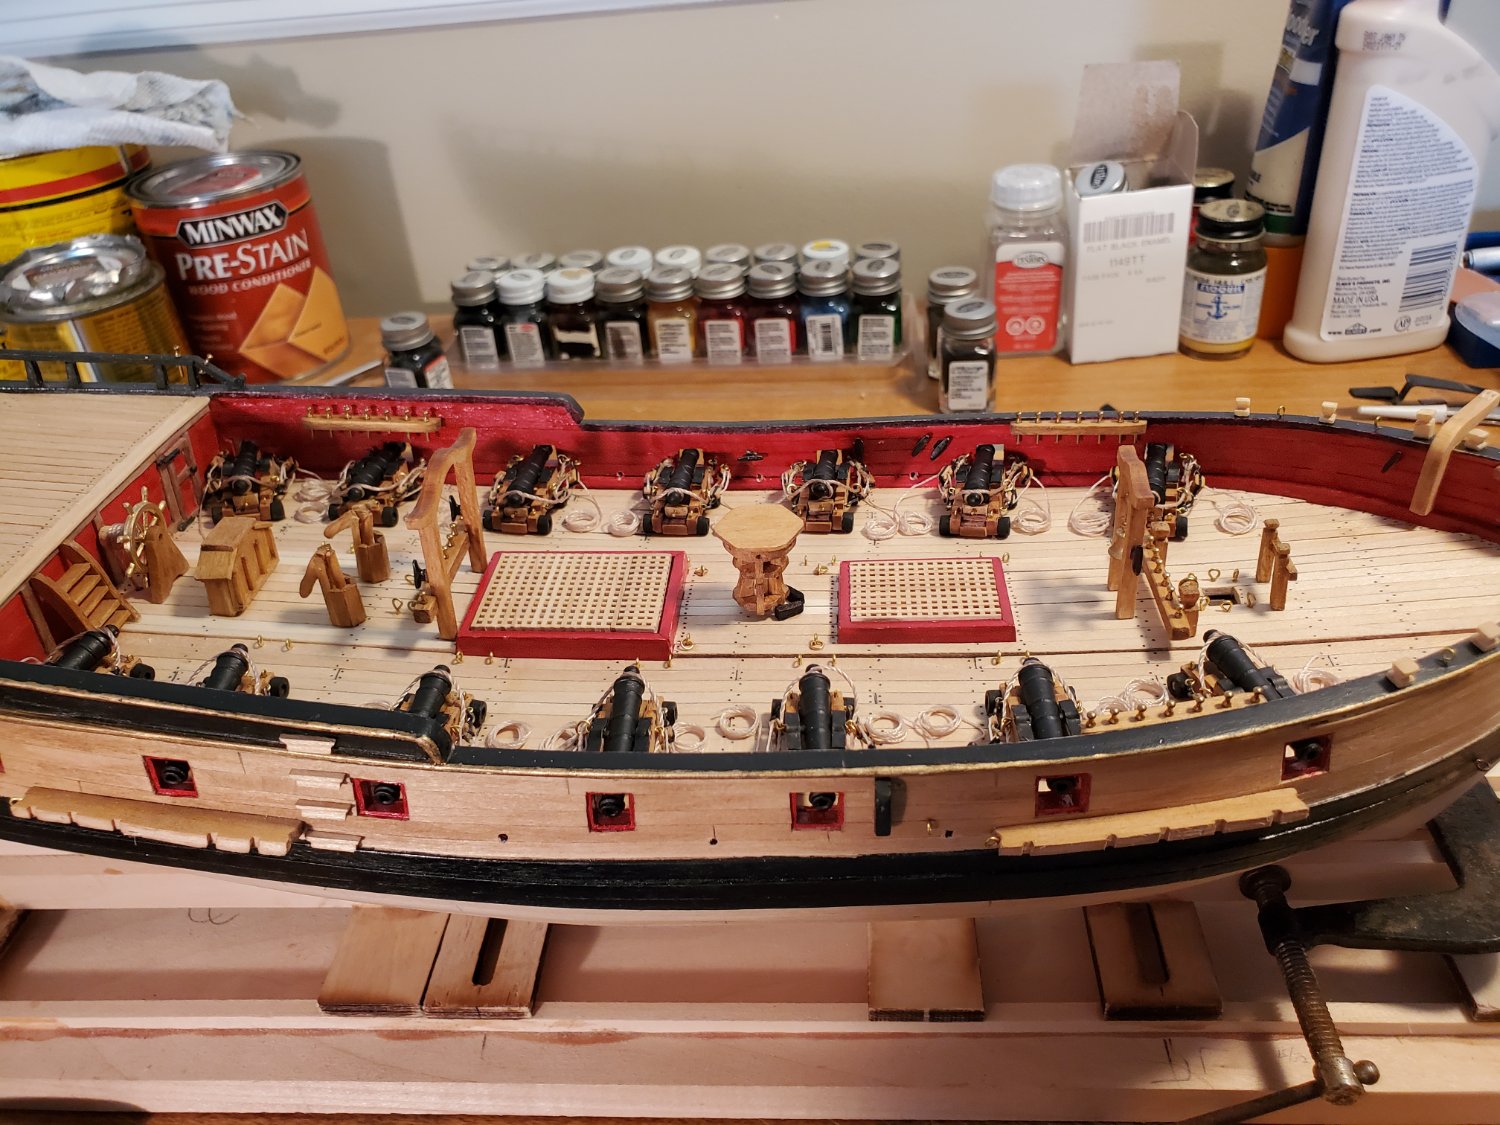
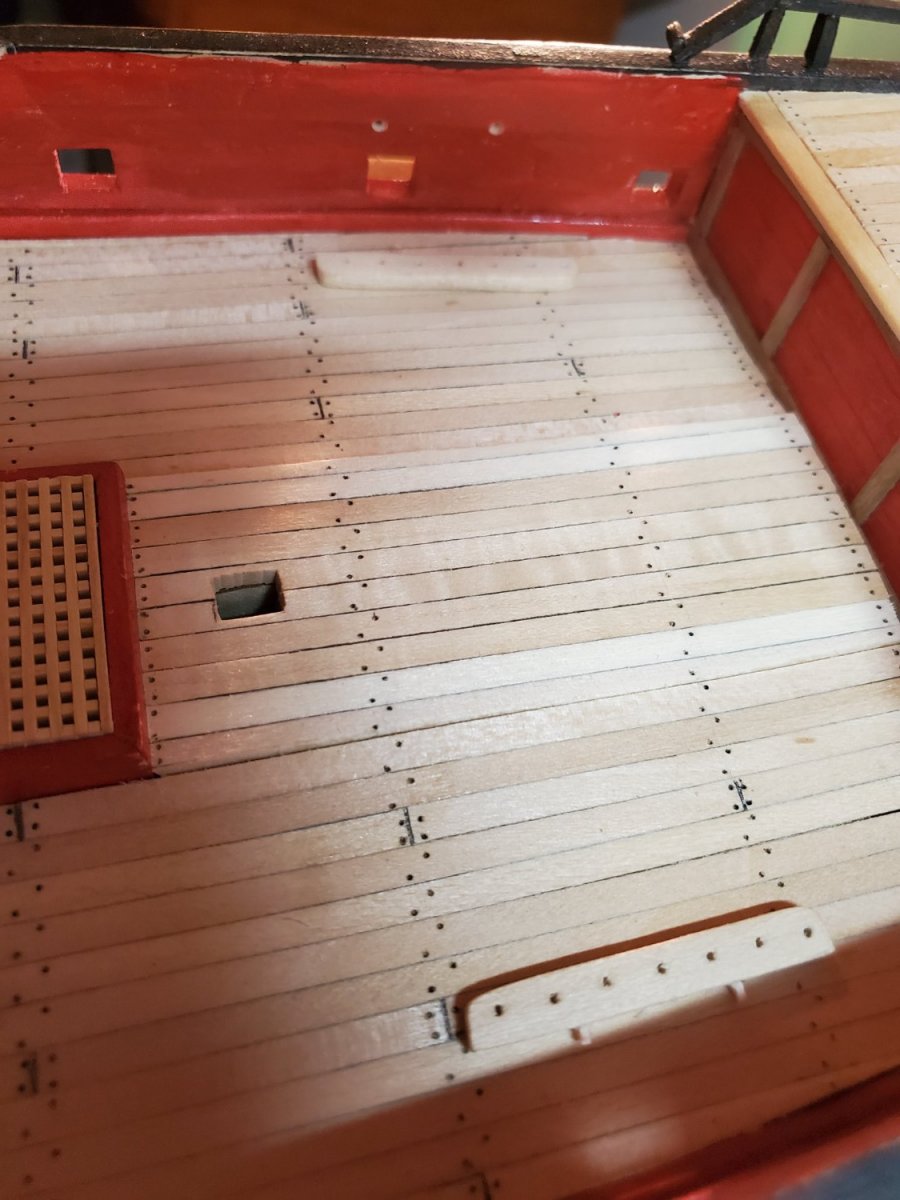
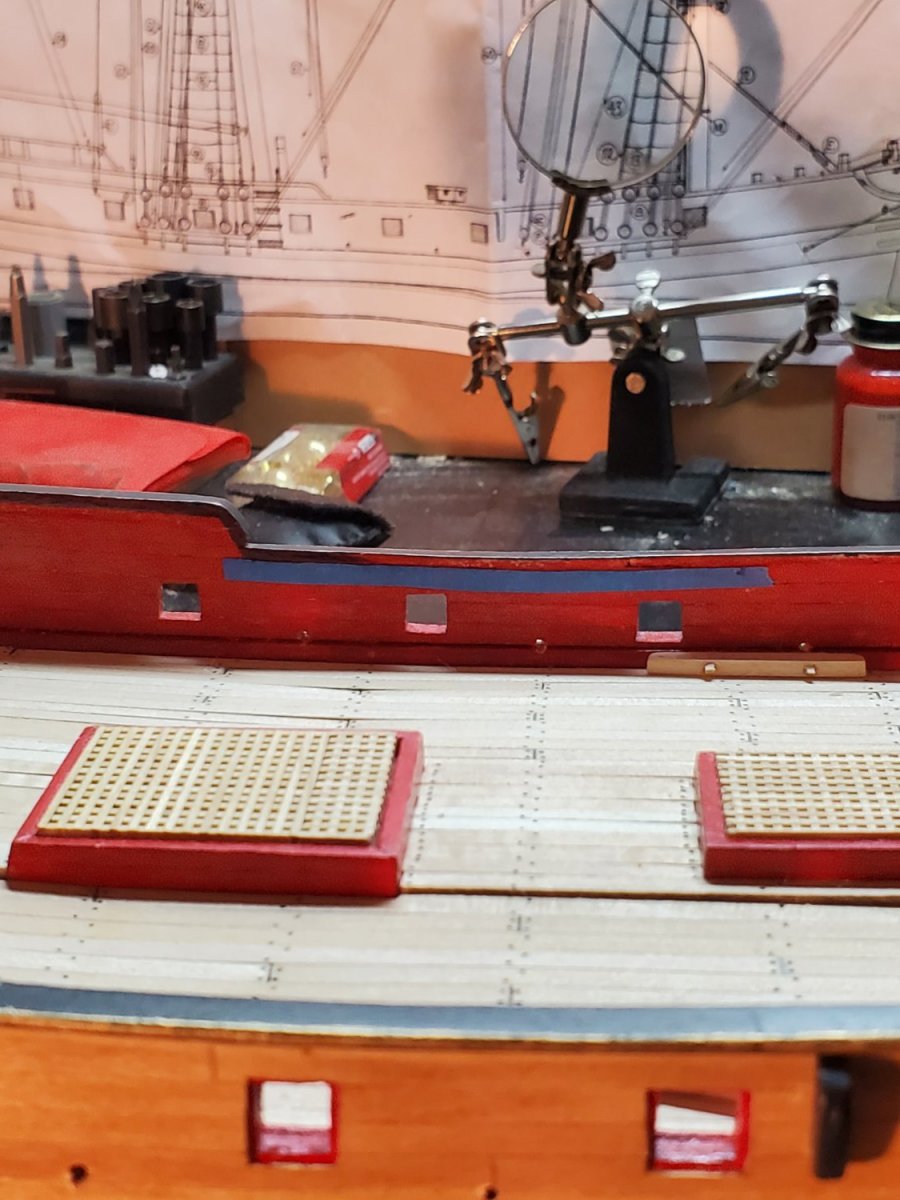
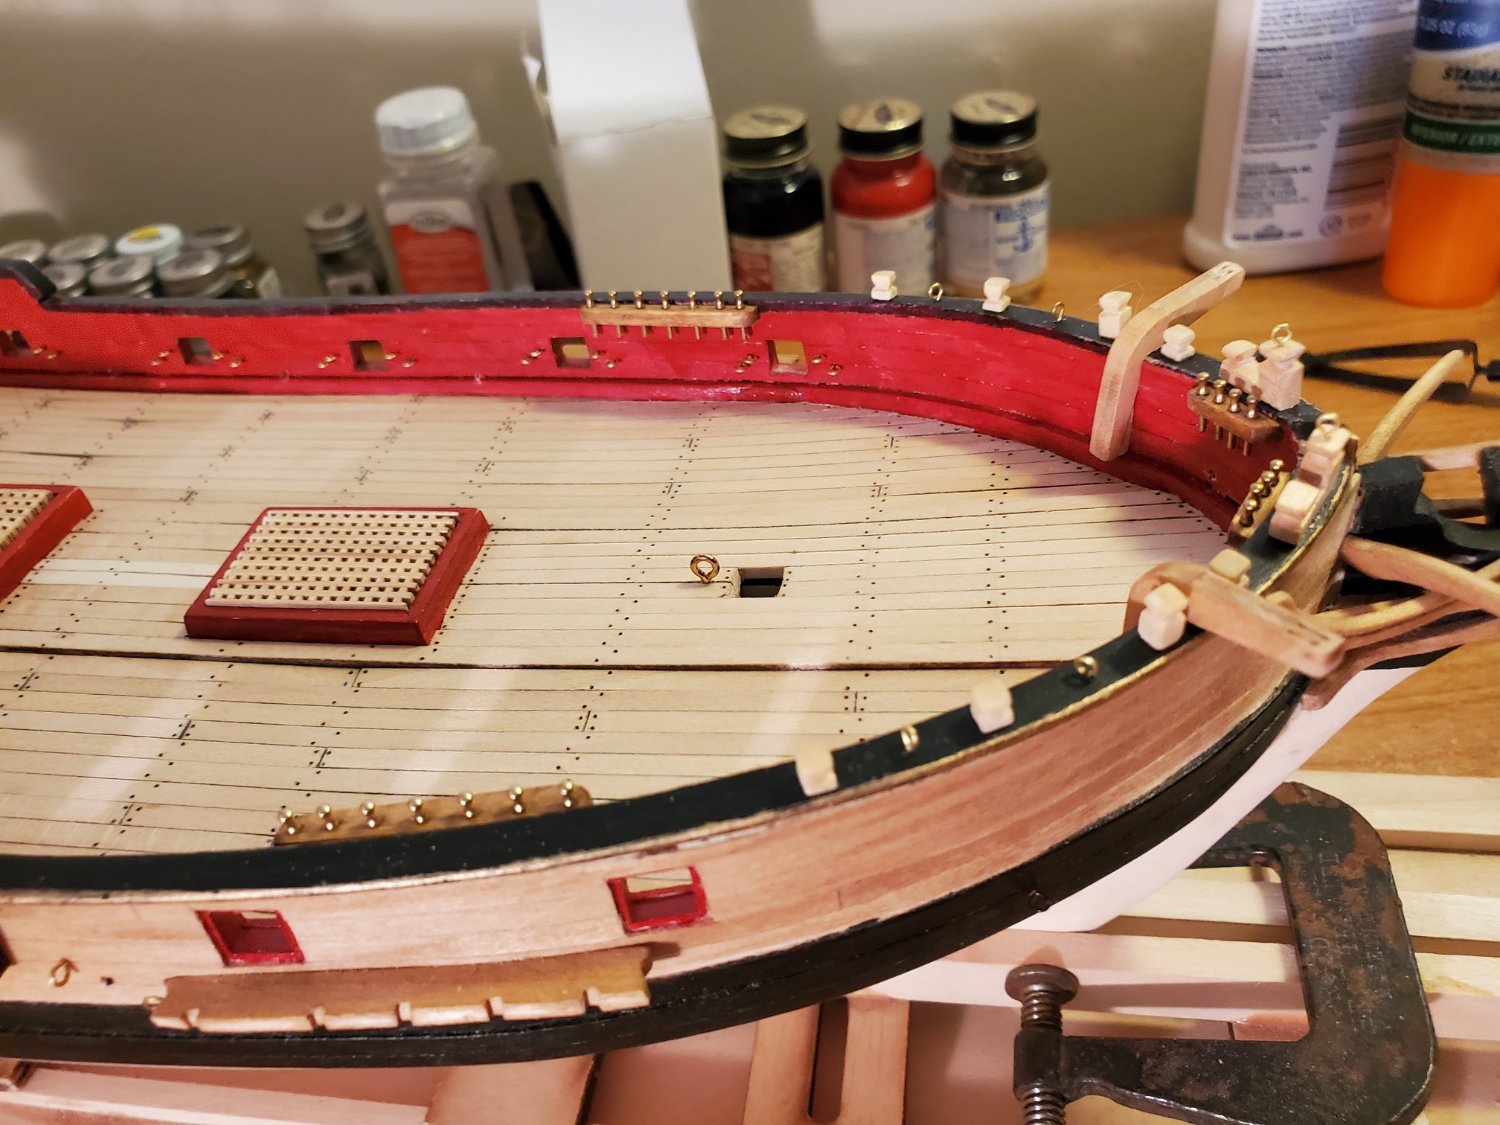
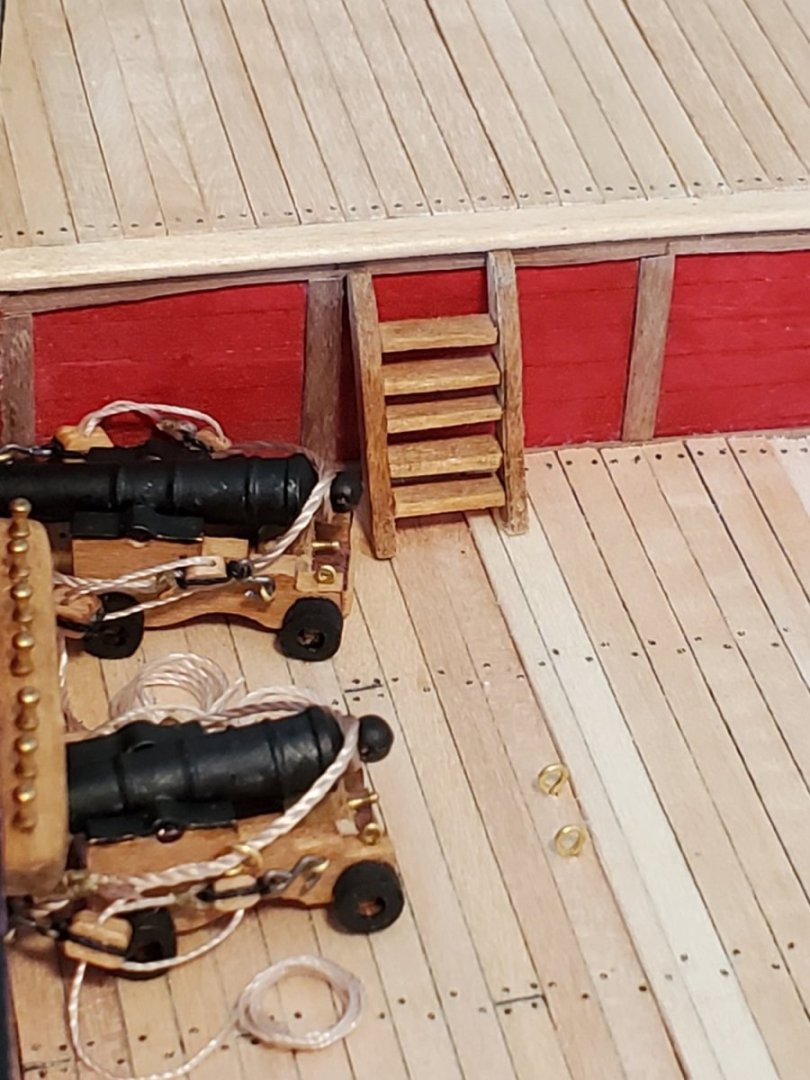
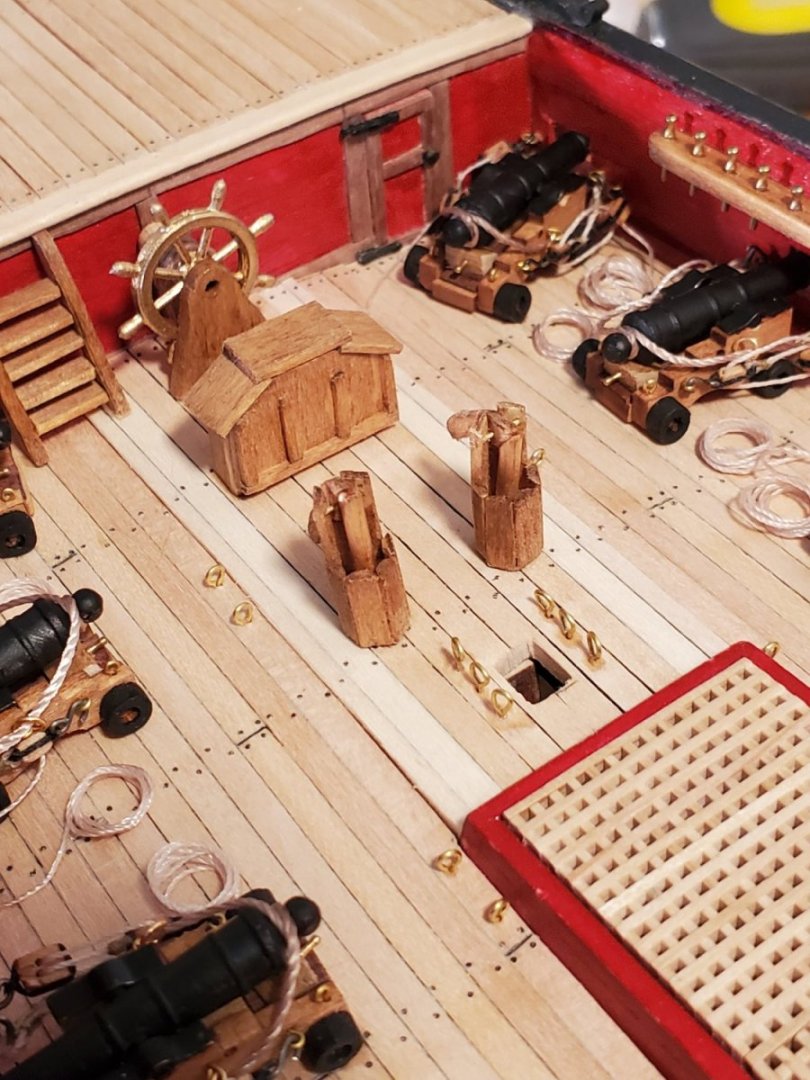
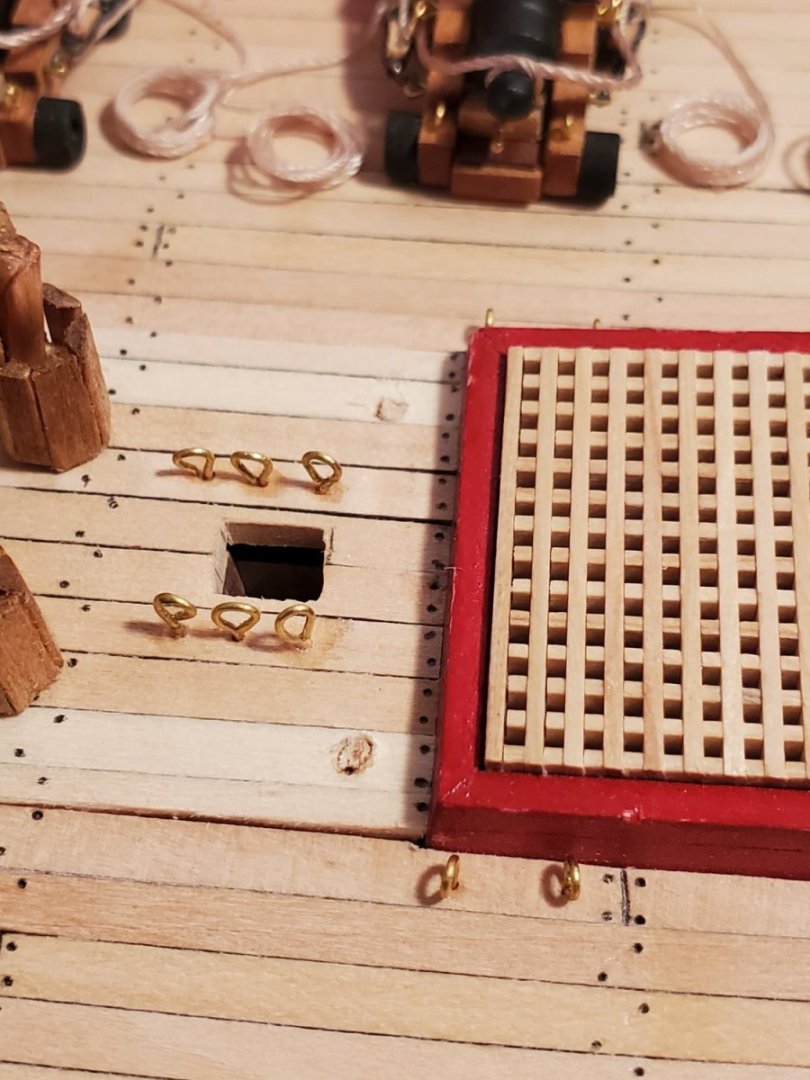
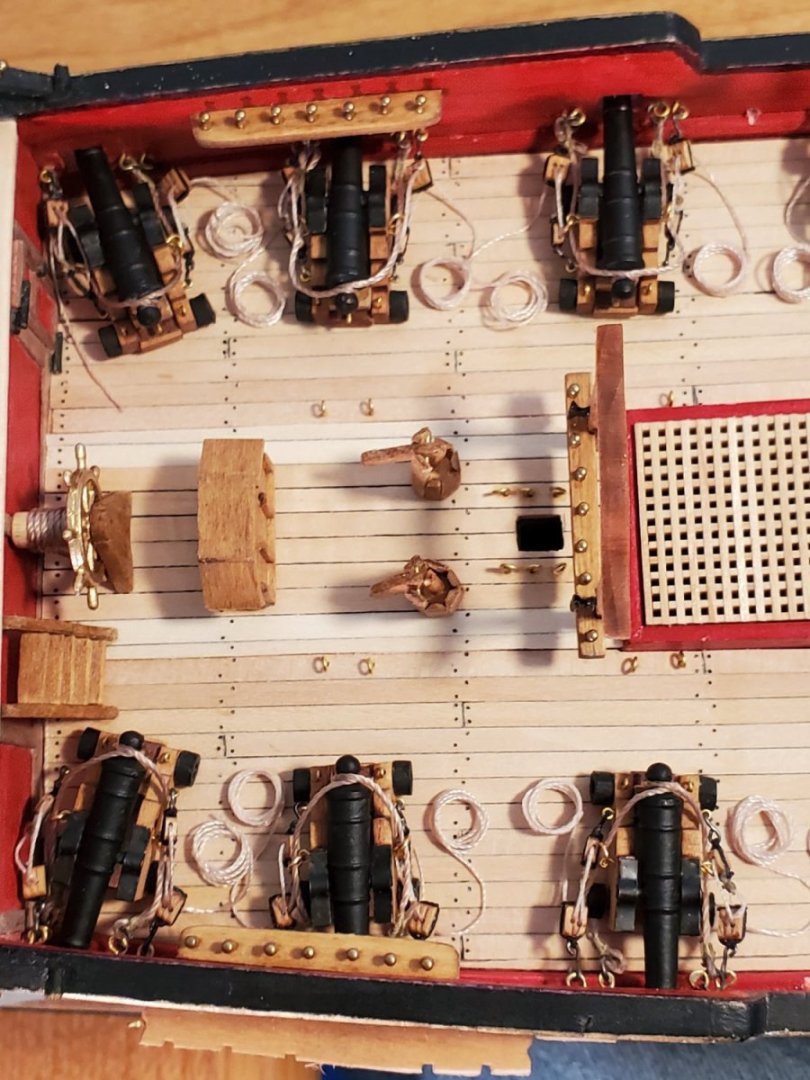
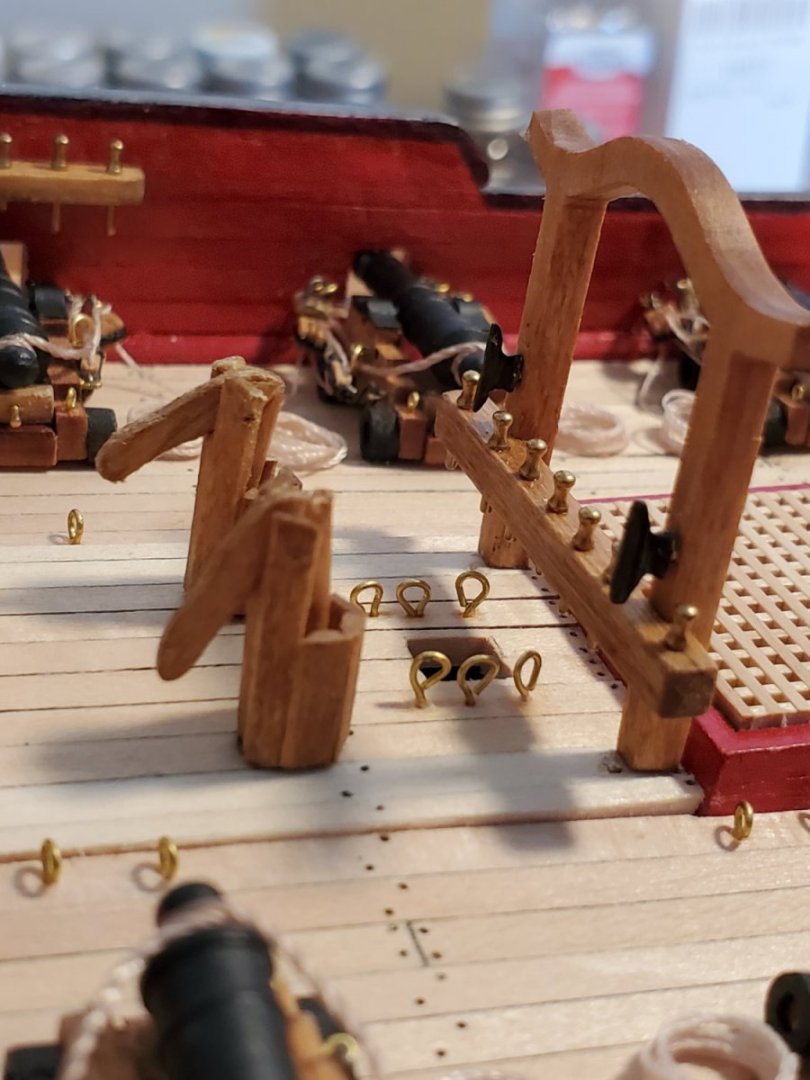
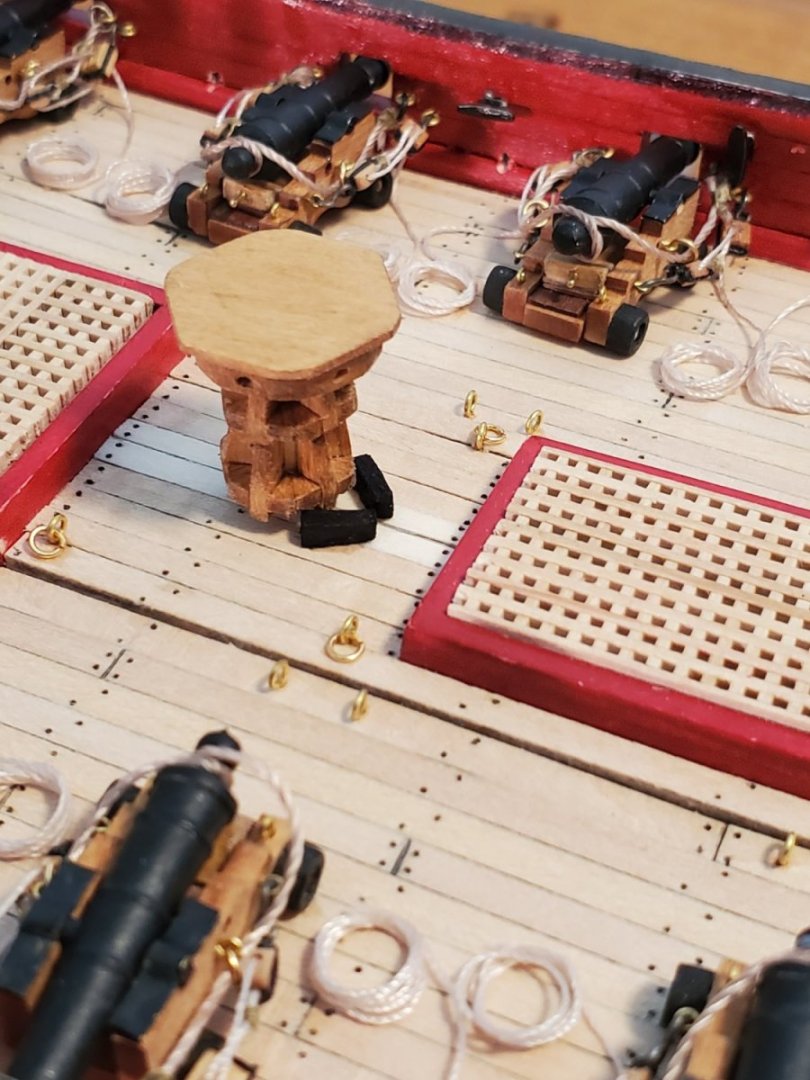
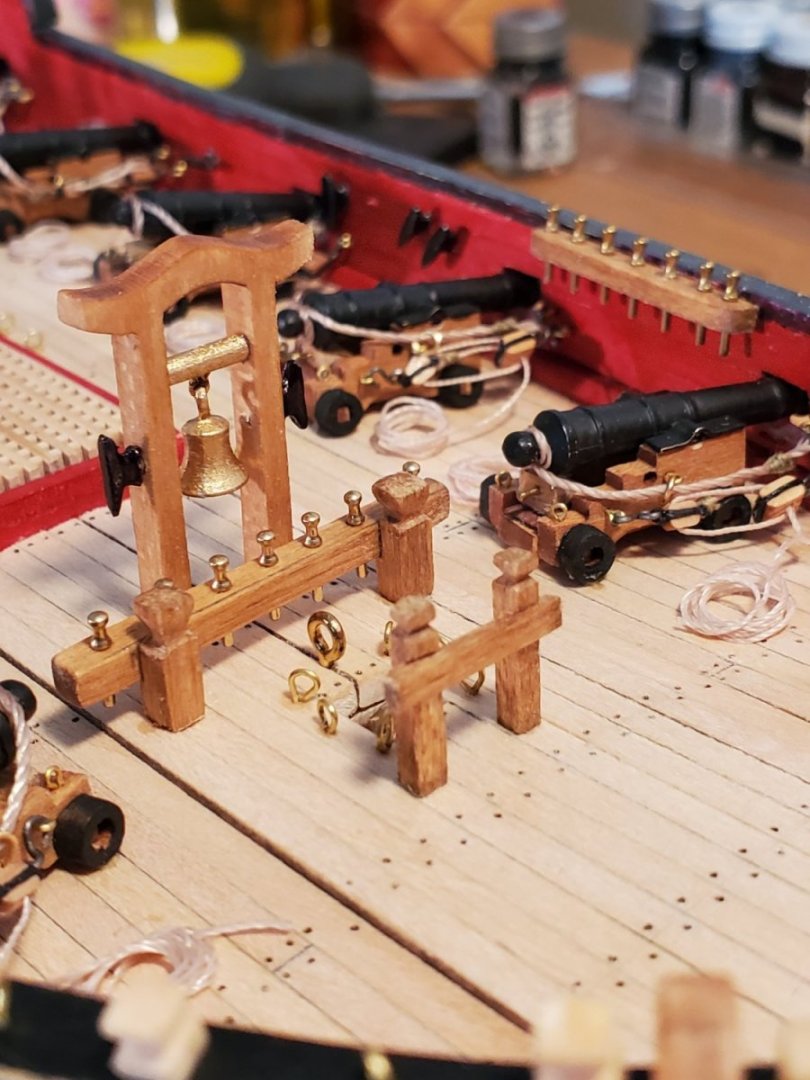
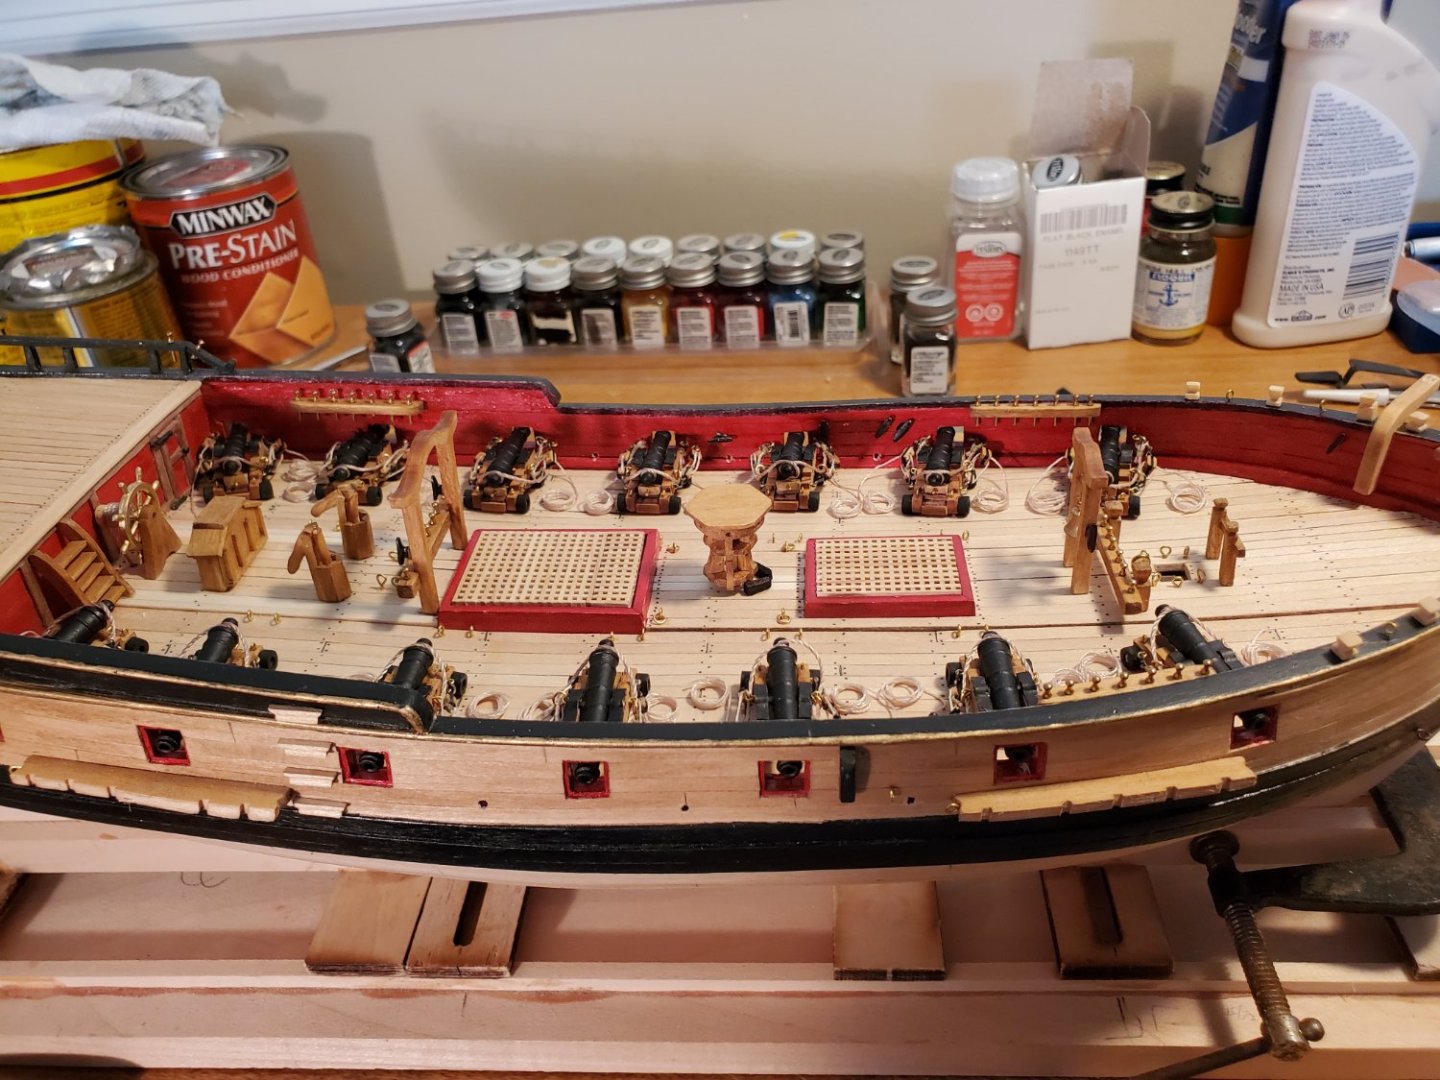
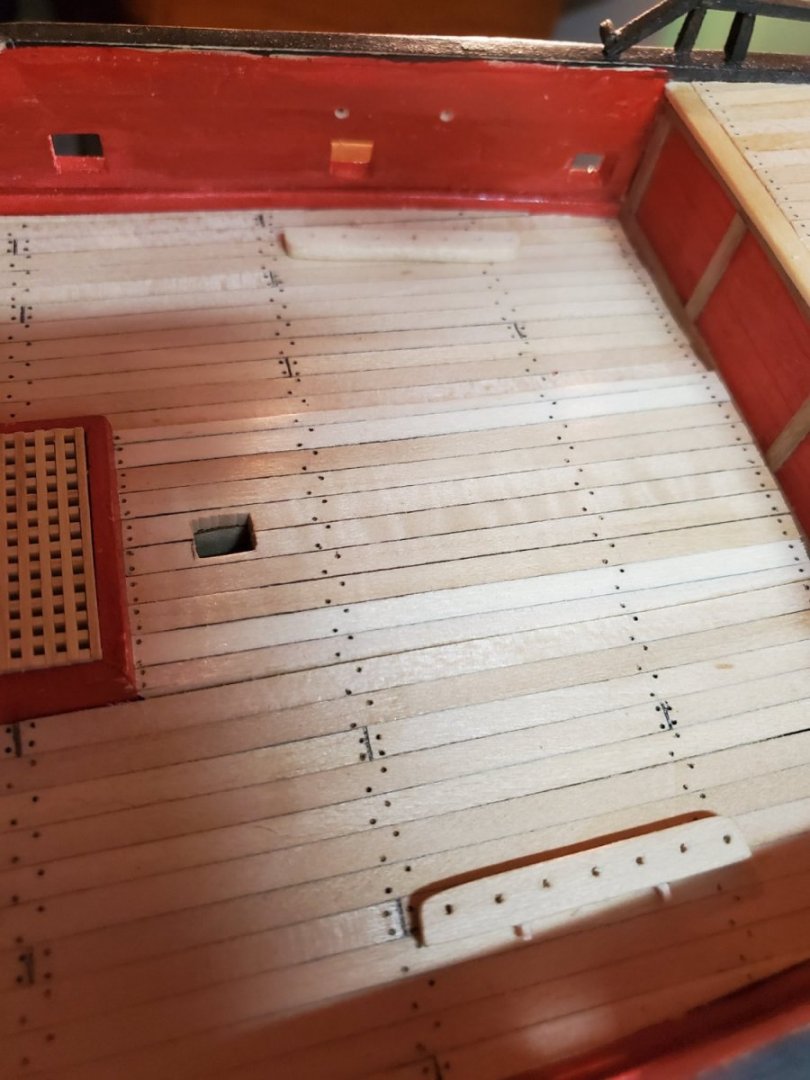
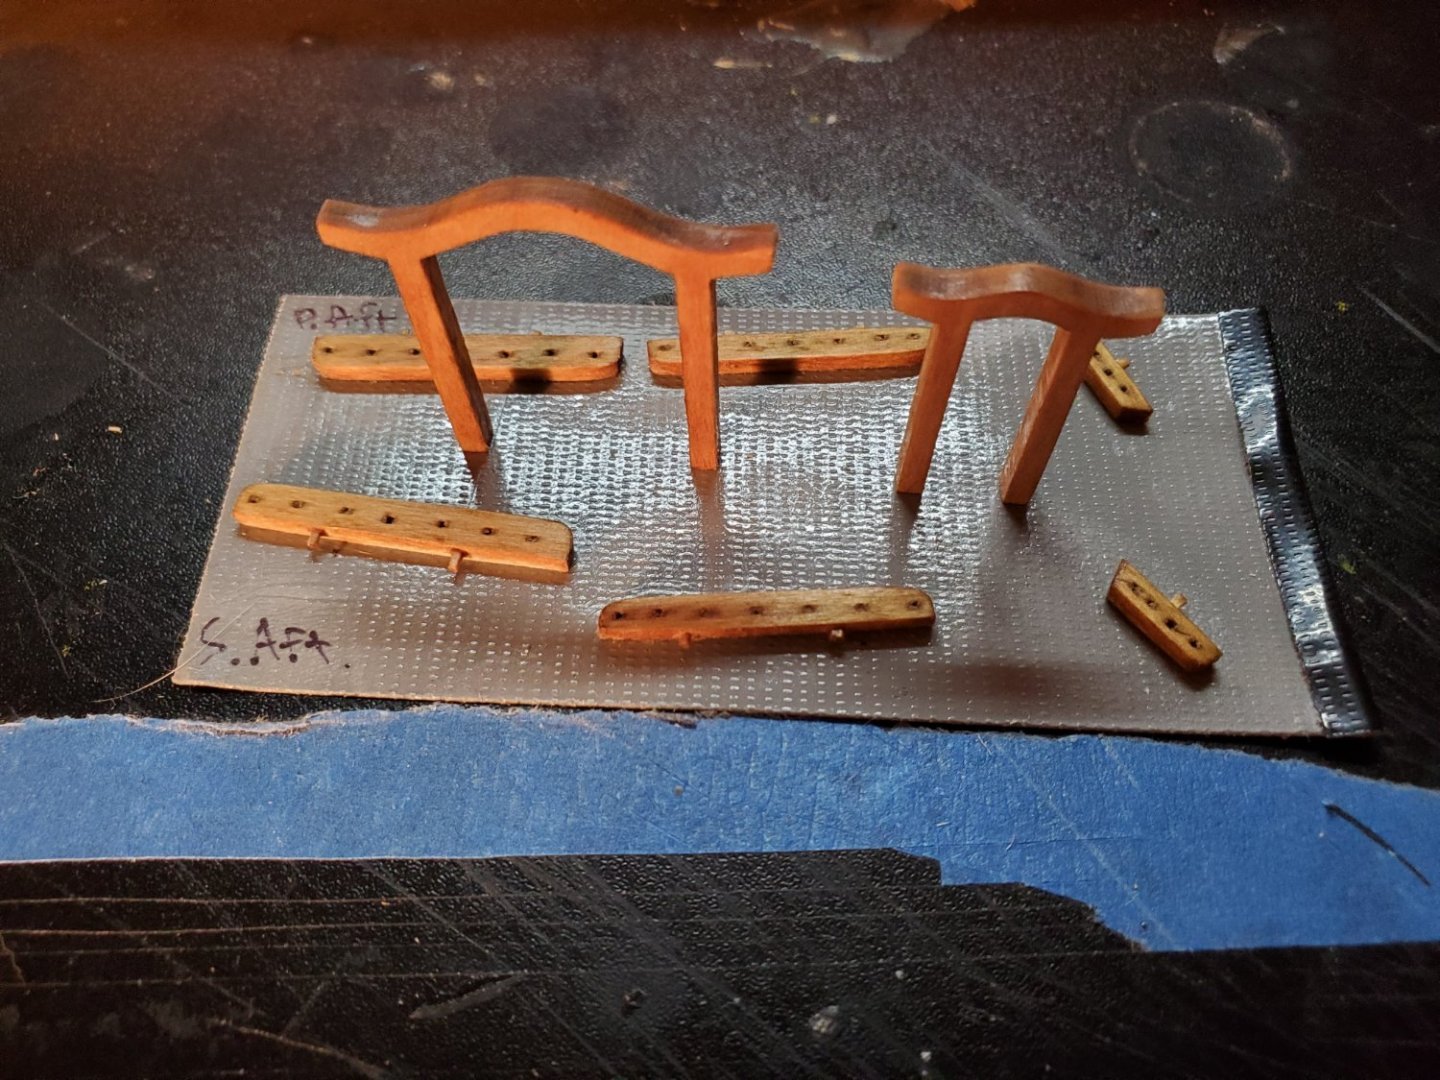
Deck furniture for the Fair American Model Ship I pretty much installed all furniture at one time. First, the Ladder. Because of the proximity to the aft cannon, I decided to move it a little more midship. As a result, I had to shave off the bottom of one leg for the thicker deck pad - oh the little details! The steering wheel went in afterwards. I wrapped rope around the axle, and stiffened the ends with glue so they'd feed straight down into the rudder line holes, as it would a real ship. I spent a lot of time early on with building the Binnacle. I was pleased to see it in place on the deck, finally. Then came the pumps. They also turned out pretty nicely. And then I messed up. I had previously added pin rails to both the Main Gallows and Riding Bits. They looked similar. I accidentally drilled holes in the deck for the Bitts, instead of the Gallows - obviously not the same spacing or placement. Grrrrrr. So the holes had to be filled in with toothpick dowels and sanded (badly). The Gallows will semi-hide the mistake, but I won't forget it. So it sort of hides the holes in the shadow; its not too bad. I'm a little worried about the glue/pins holding, once rigged. The last thing I want is for the ropes to pop the gallows off in the middle of rigging. Seems important, so I'm hoping it'll hold. However, I should have made the rail more inset into the Gallows, because now it is dangerously close the the main mast. The mast may lean back a bit at a 92deg angle, but it'll still be close. Not real sure what I want to do here. Maybe omit the center pin, and drill a relief 'arc' in the middle of the rail??? Thankfully the Capstan and pawls went in fairly easily. I might add a bundle of spokes tied up nearby on the deck, just for 'decoration'. The Fore Gallows, with cleats and the Riding Bitts were next. For some reason, I feel the Bitts and rail should be taller, but were made according to the plans. The Fore Bitts were last. I didn't add the Bowsprit Bitts yet, because I want to be able to test fit into the mast before mounting to the deck permanently. I don't want to risk damaging the Bitt just yet, so that'll have to wait. However the rest is complete! It'll be some time before my next progress update. I want to spend extra time on the masts to get them built correctly. I'd like to use my grandfather's jewelers lathe to turn them down. We'll see how that goes. - Jason -


-
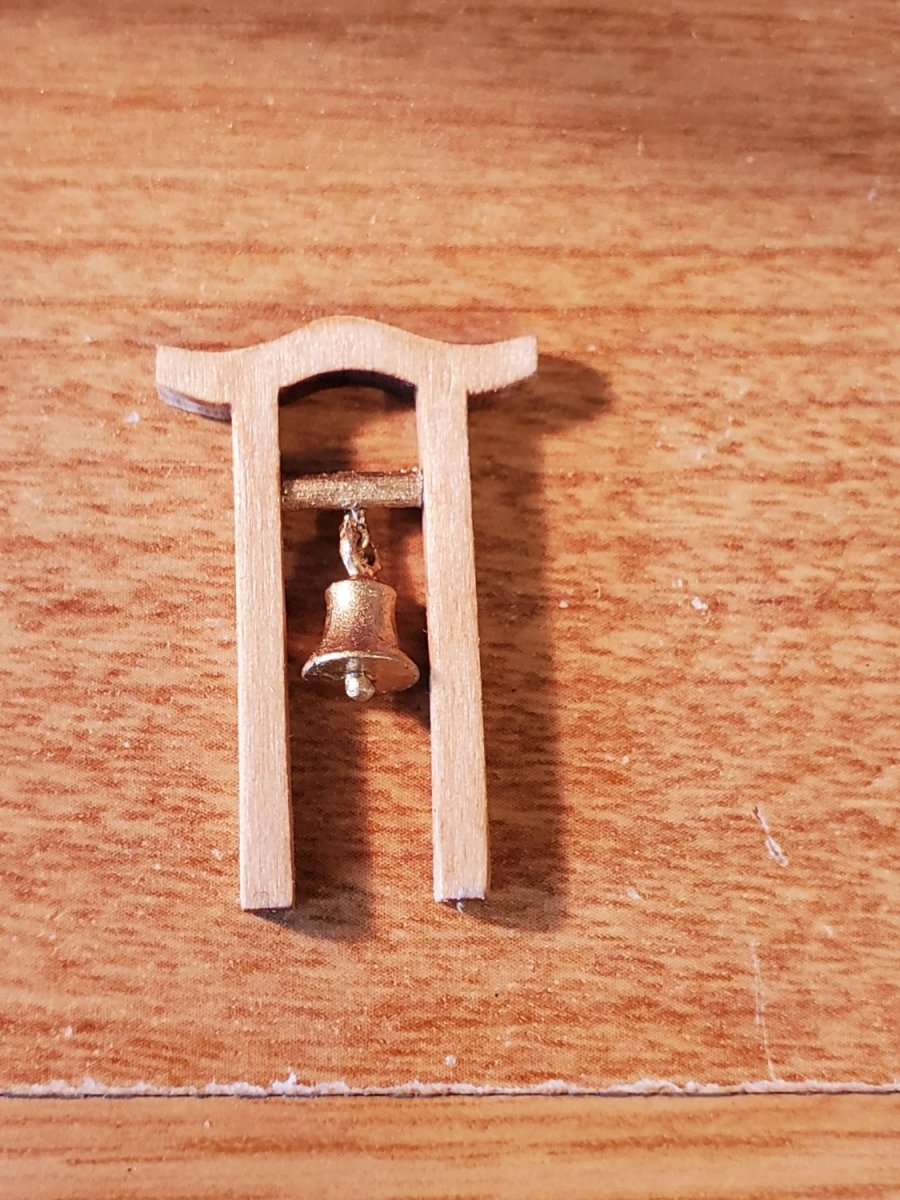
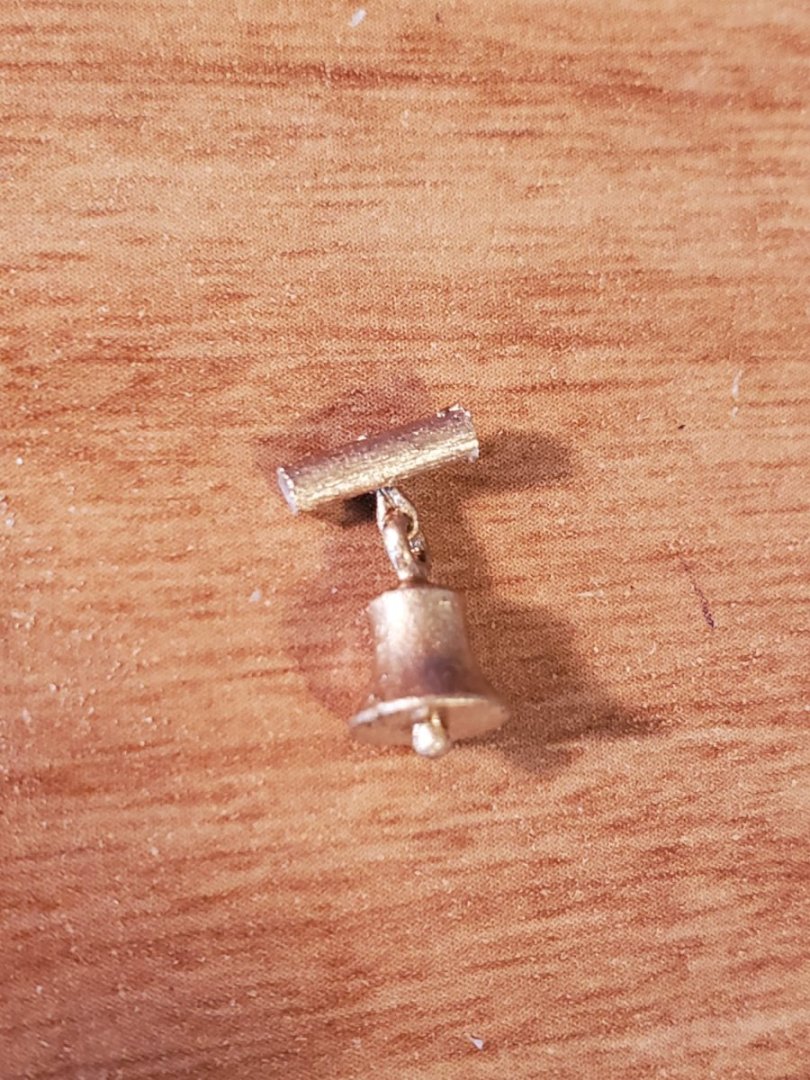
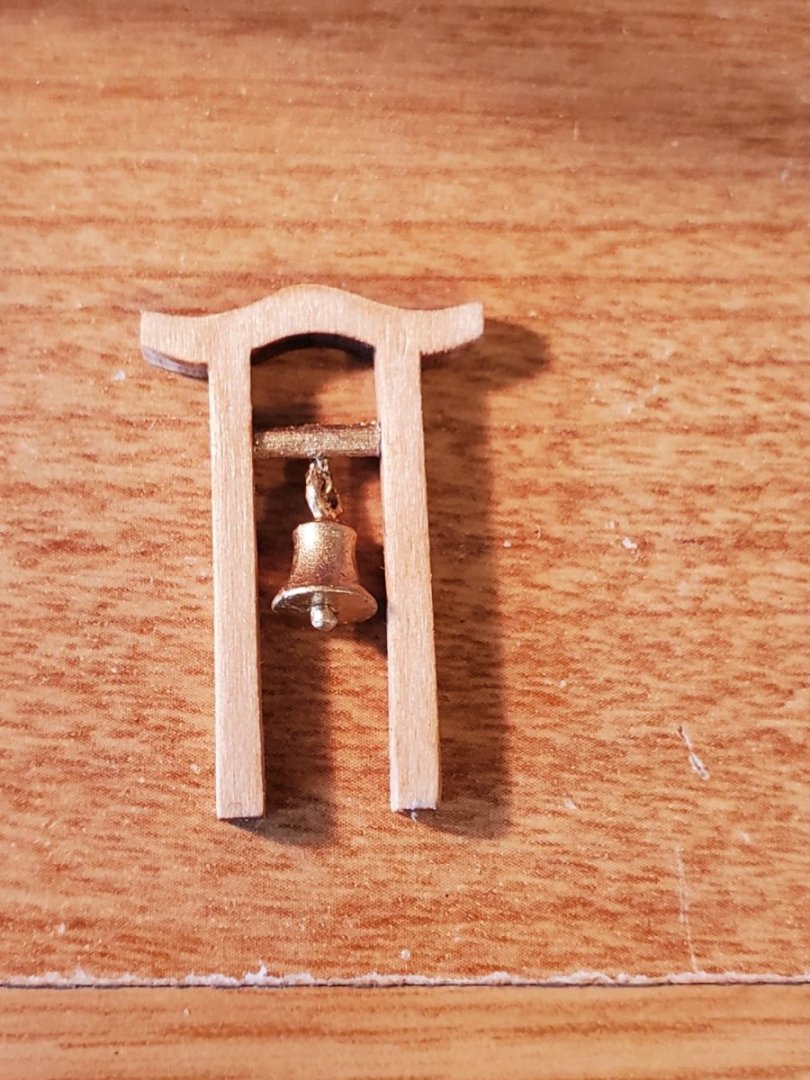
Finishing the cannons on the Fair American Model Ship: Was busy this last month will selling the house, and looking for new ones, and vacations away, and this annoying thing called life! After dedicating some down time, I got all the starboard cannons rigged now - for some reason, I had more difficulty with hanging the breech lines and blocks this side. I centered all the barrels as close to the middle of the gun port as possible. They're not all perfect. Tacked all the coiled ropes to the deck, and we're done. The deck furniture is next on the list. I started with the bell on the Fore Gallows. There was no clear depiction of how this is attached, so I fashioned my own dowel and wire ''hanger''. Apparently with the castings, what I thought was flash was actually the ''handle''. During cleaning and sanding, I scrapped this little detail, and it's gone now. I might later add a thin rope to simulate a ring-cord. Another learning moment - study the plans carefully, before starting any work. Anyway, I mounted the bell. This will be installed on the deck later The rest of the deck furniture is next up. More progress coming momentarily... - Jason -

-
Cisco, you're doing a really nice job on the planking. I had similar frustration with planking around the transom. Even with a ''smooth'' curve filler block, it's still a lot of bend. I would say the majority of my planks splintered in that region, but thankfully they sanded smooth afterwards. I want those narrow tapered long clamps you use - those would have come in SO handy during my build. What are those? In any case, clamping the planks is still a challenge - never enough room! Keep up the good work -Jason-
-
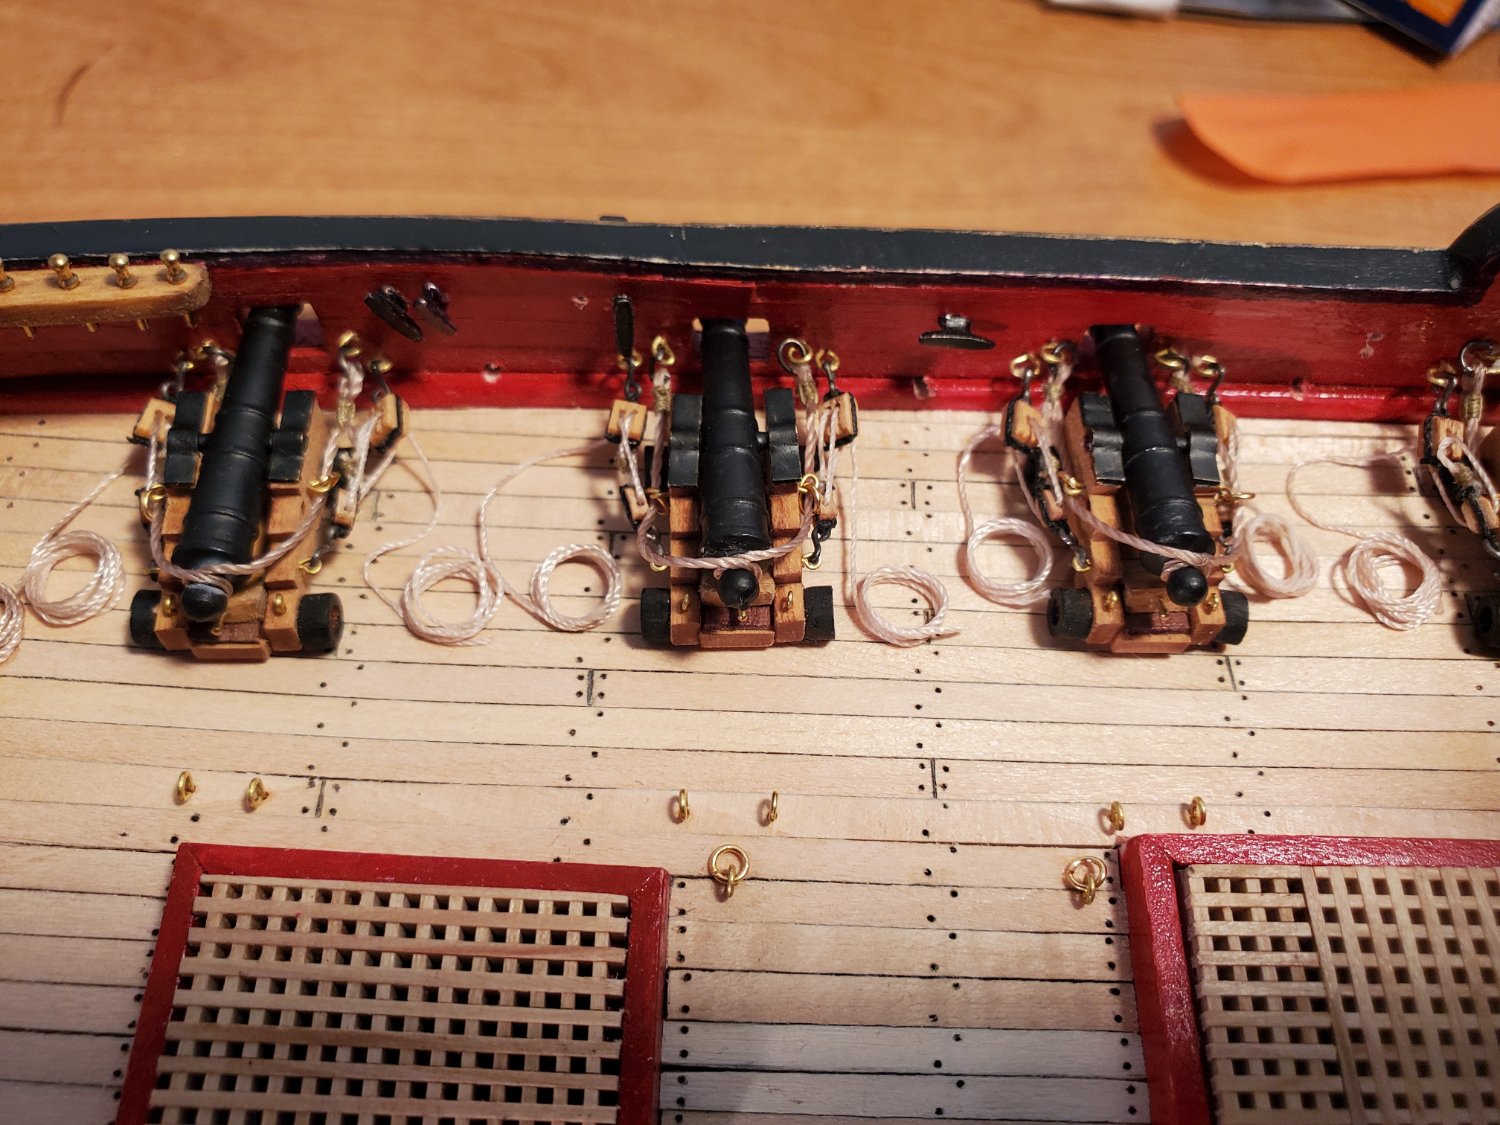
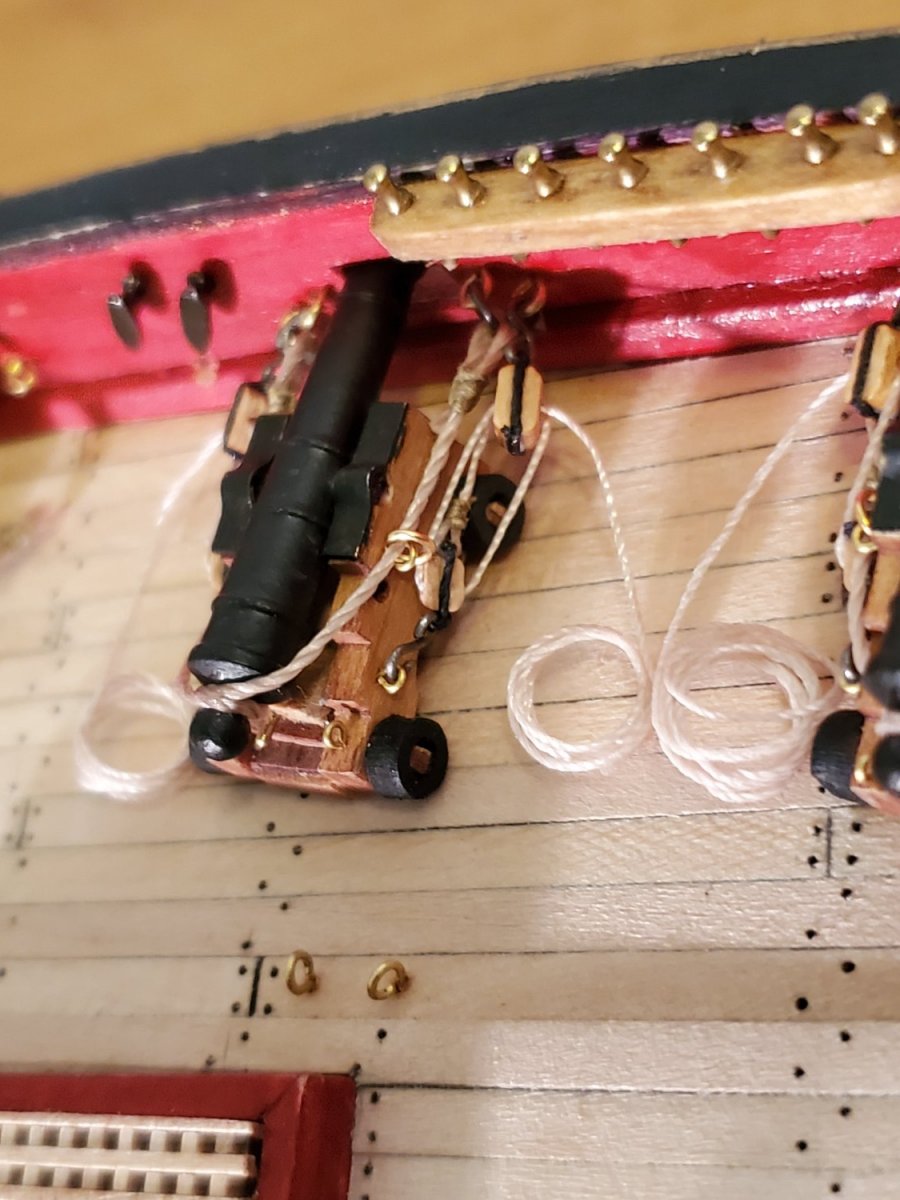
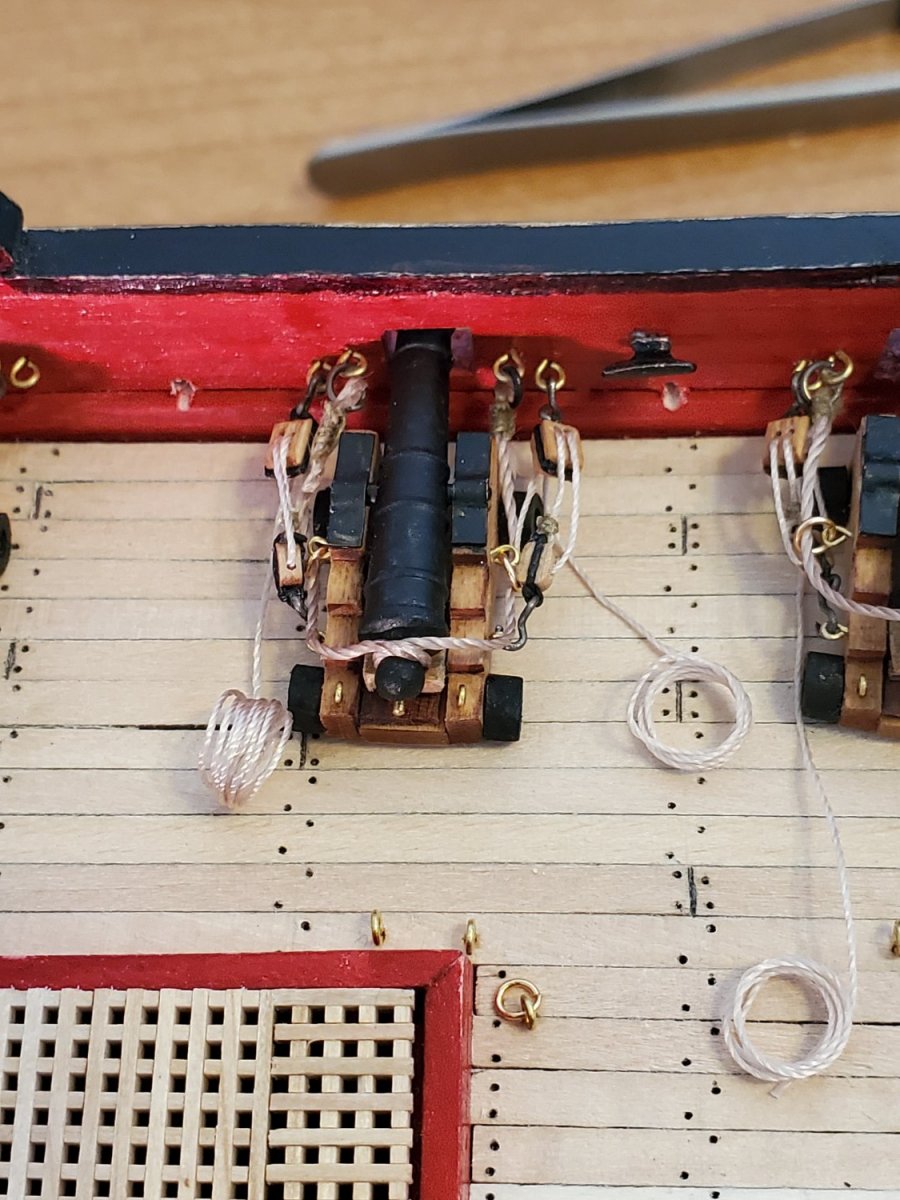
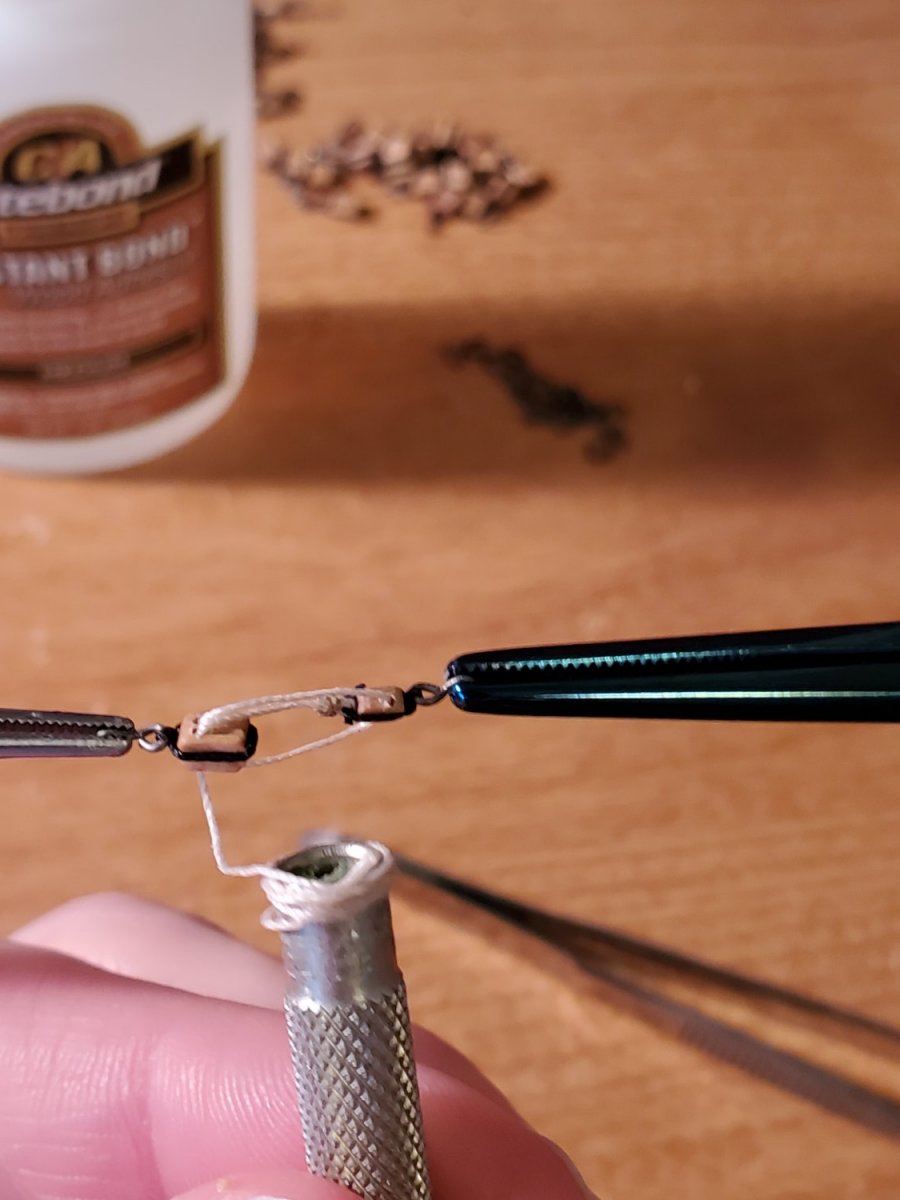
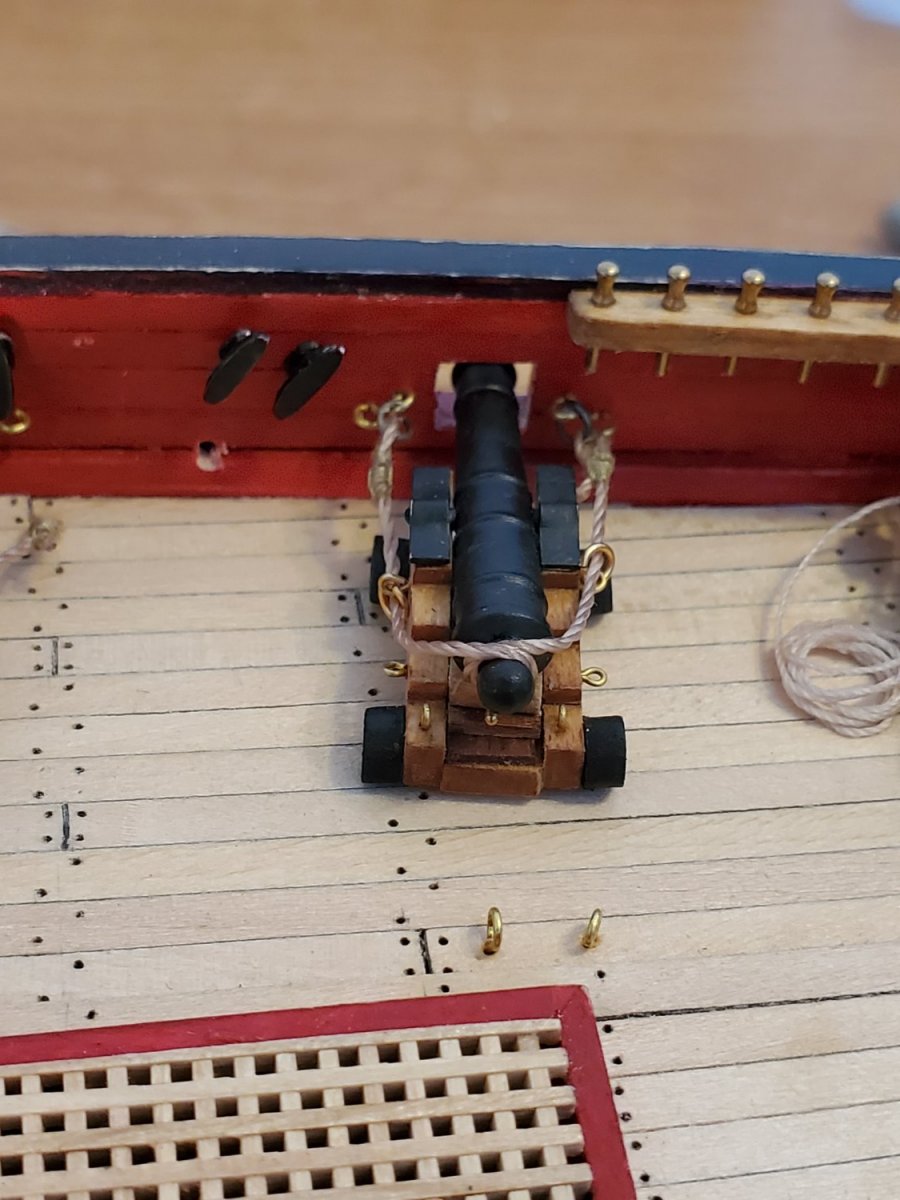
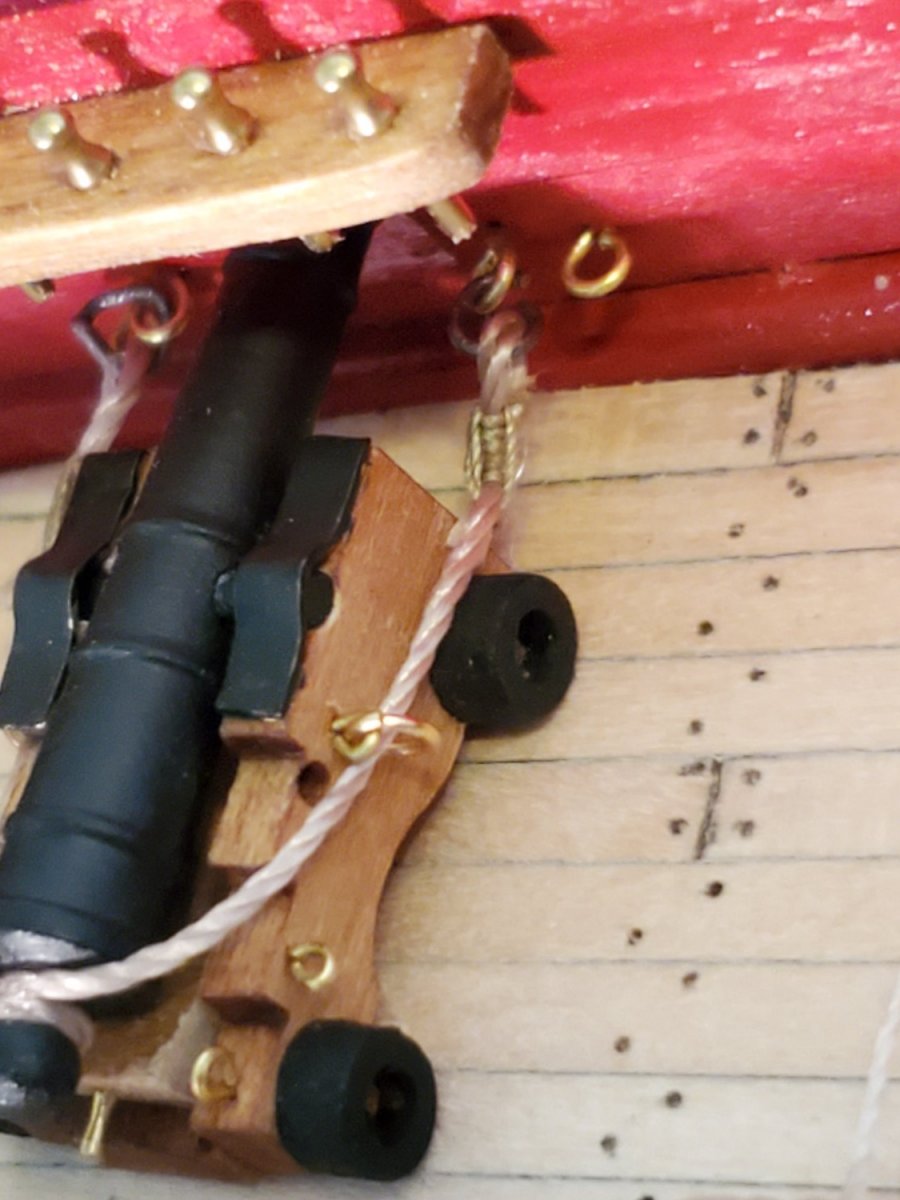
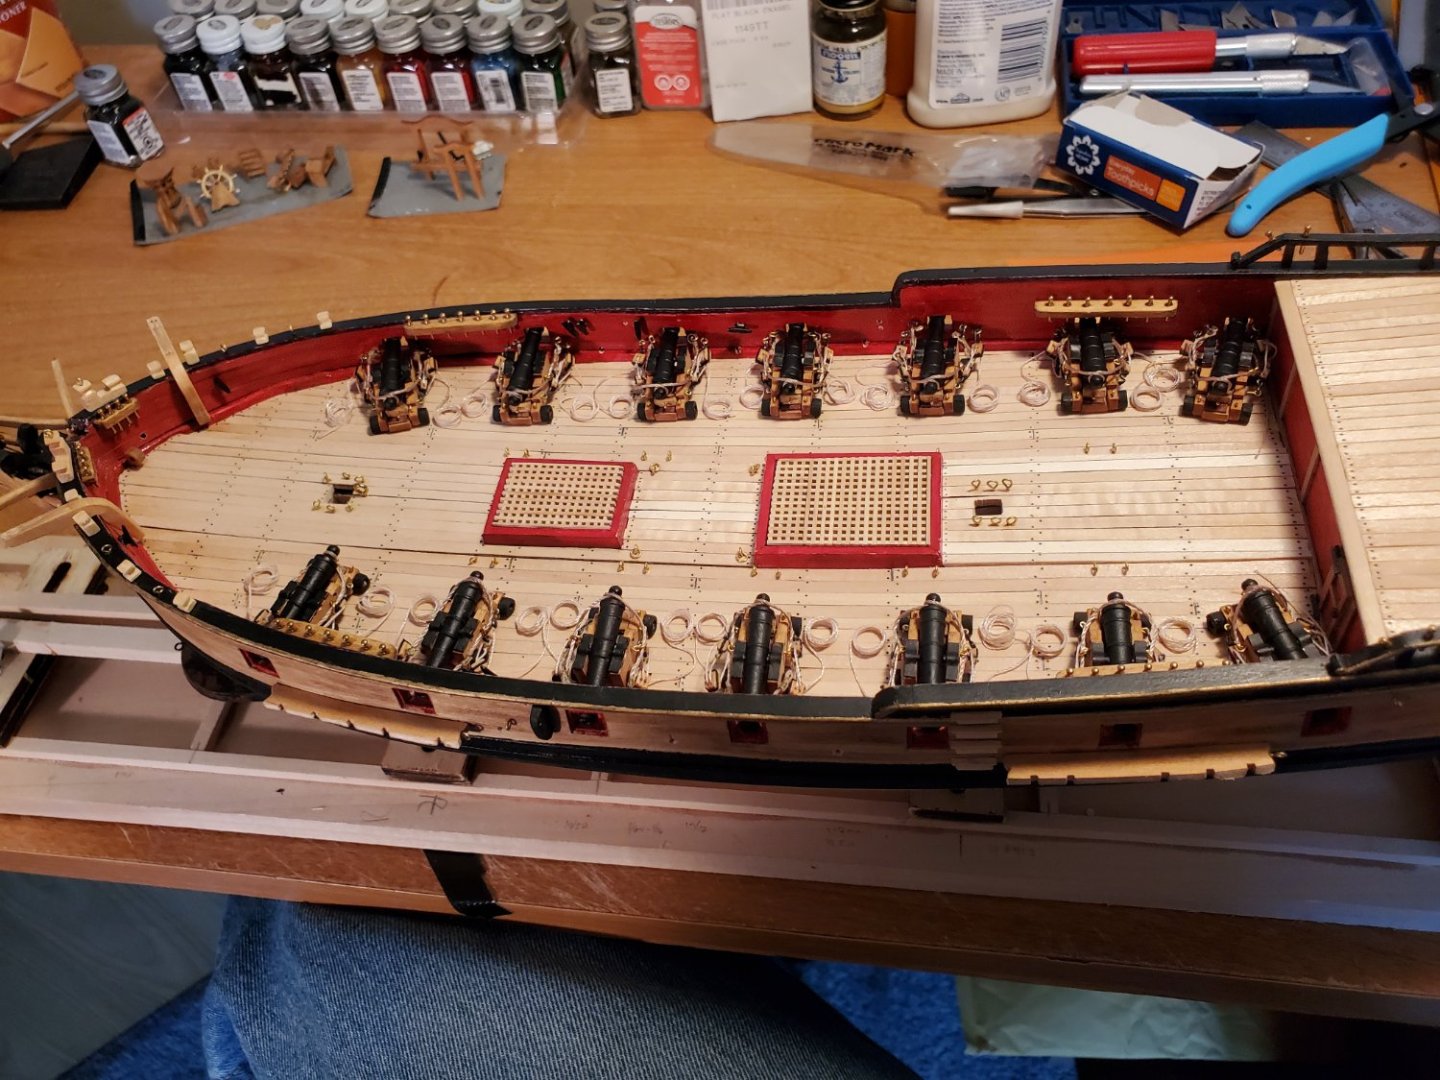
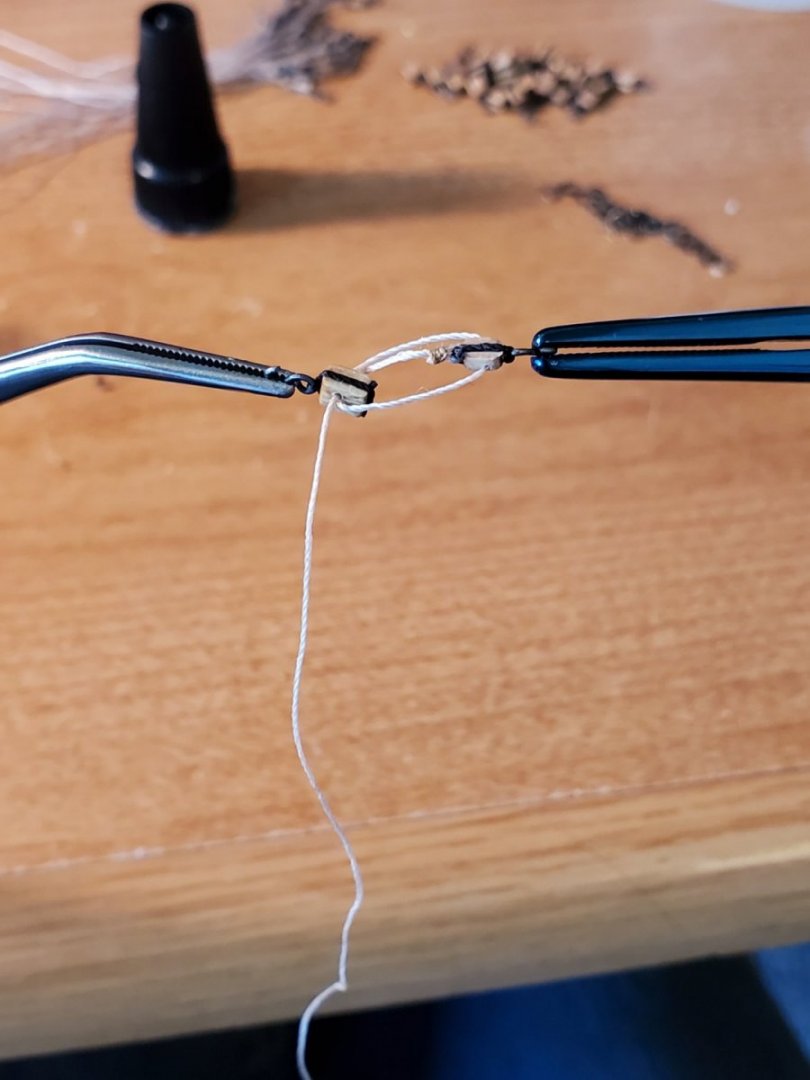
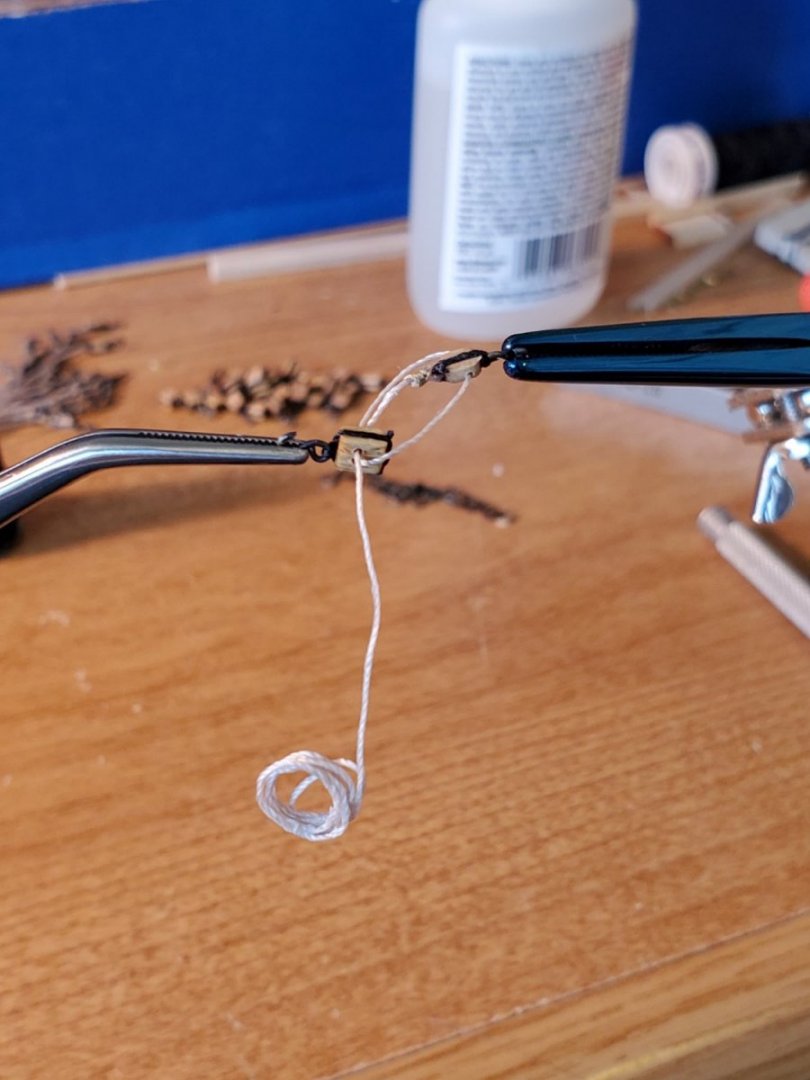
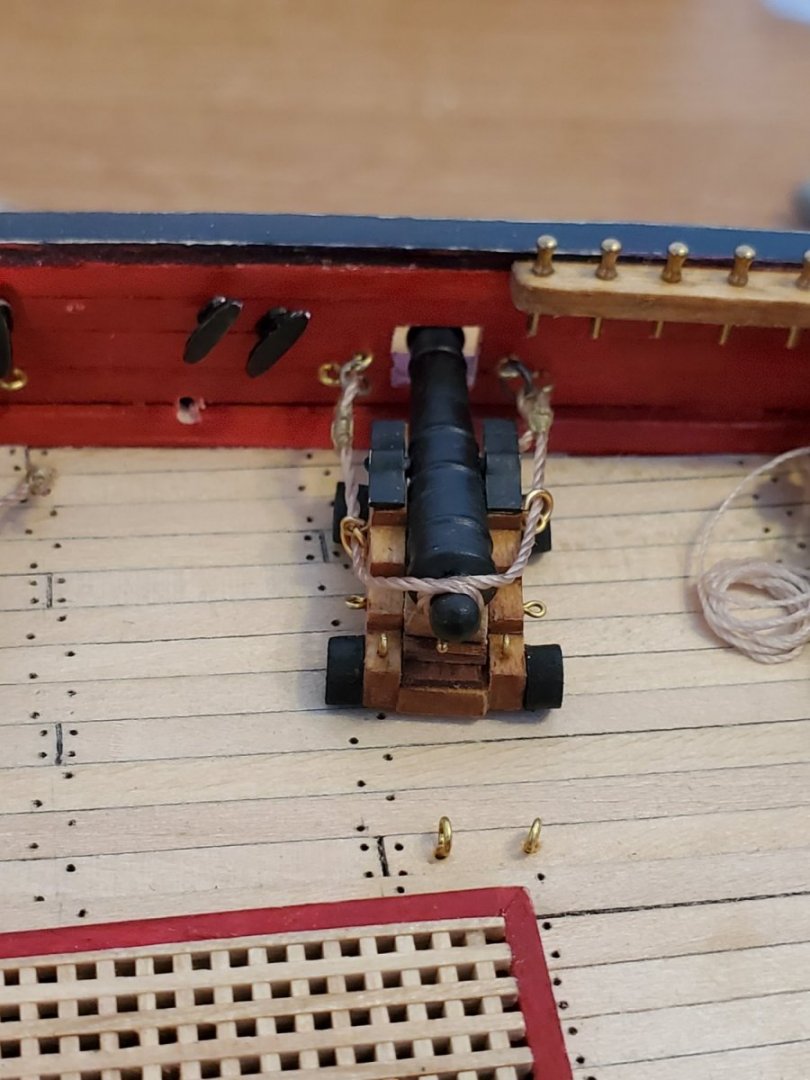
Rigging the cannons on the Fair American Continued... More than expected, this has been tedious work. I prefer to prep everything ahead of time, then do it all at once; But again...tedious. So far I am halfway done the cannons. Before starting, I'll take a small smear of glue on the end of the rope to stiffen it. Originally I didn't do this, and they shredded trying to get through the holes. This method works better. The double block and single are gripped on reverse action tweezers and hemostats. I have to be sure to feed the rope through the innermost hole, then thread through to the outer one. This way the rope ends up on the outside. Then reverse it for the opposite set. I leave the rope long a few inches, so I can coil it afterwards. Wrapping it around the end of a pin vice has worked well. While it's on there, dab with some glue to set, then pry it off the end before it fully dries. It makes a relatively satisfactory coil. I'll probably snip the end of the rope close to the coil, since the end is stiff with the glue, and doesn't look right. Because I didn't attach everything to the bulwark eyebolts first, I need to attach things now...the HARD way. Breech lines first. First, some tiny iron rings were fed through the end of the breech lines, above the seizing, then tacked temporarily with glue so they don't fall out. Then I carefully ''hung'' the loops over the inner eyebolts, and closed the rings with fine tweezers. Not completely successful every time, so some glue will keep them from falling out. The seizings on the breech lines turned out really neat - I'm happy I took extra EXTRA time to do them. Now that they're done, I can move on to the outhaul tackle. A similar 'tack' process ensued with the blocks - hang one end, glue tack, then hang the other, glue tack in place. I really wish I knew early on, to space the eyebolts for the blocks wider apart. Even with the guns pulled back a bit, there isn't much length between blocks to see the ropes. Another learning moment for the books! To show off the double blocks a little better, I'd turn the hooks such that the holes are facing up. It may all be smashed in there, but I'm pretty happy with the overall look of all the rigging here. Once everything was in place, I'll pull the gun carriage back a little bit, and smear some glue on the rear wheel, and attach to the deck permanently. Same with the coils - Once I'm done with all the cannons, I'll tack them to the deck too. As of right now, I am just about done the port side cannons. I'm hoping in the next few weeks I'll get the starboard ones done too. Again, I'm very happy I took the time to do seizing and more accurate knots for everything. It may not be visible to a casual observer, but I know its there. And so, I'll keep plugging away at it! More soon, - Jason -


-
Thanks for the kind words, Dave. She's really coming along now. Frustrating and challenging though it has been, I'm enjoying the authentic ''look'' of things too.
-
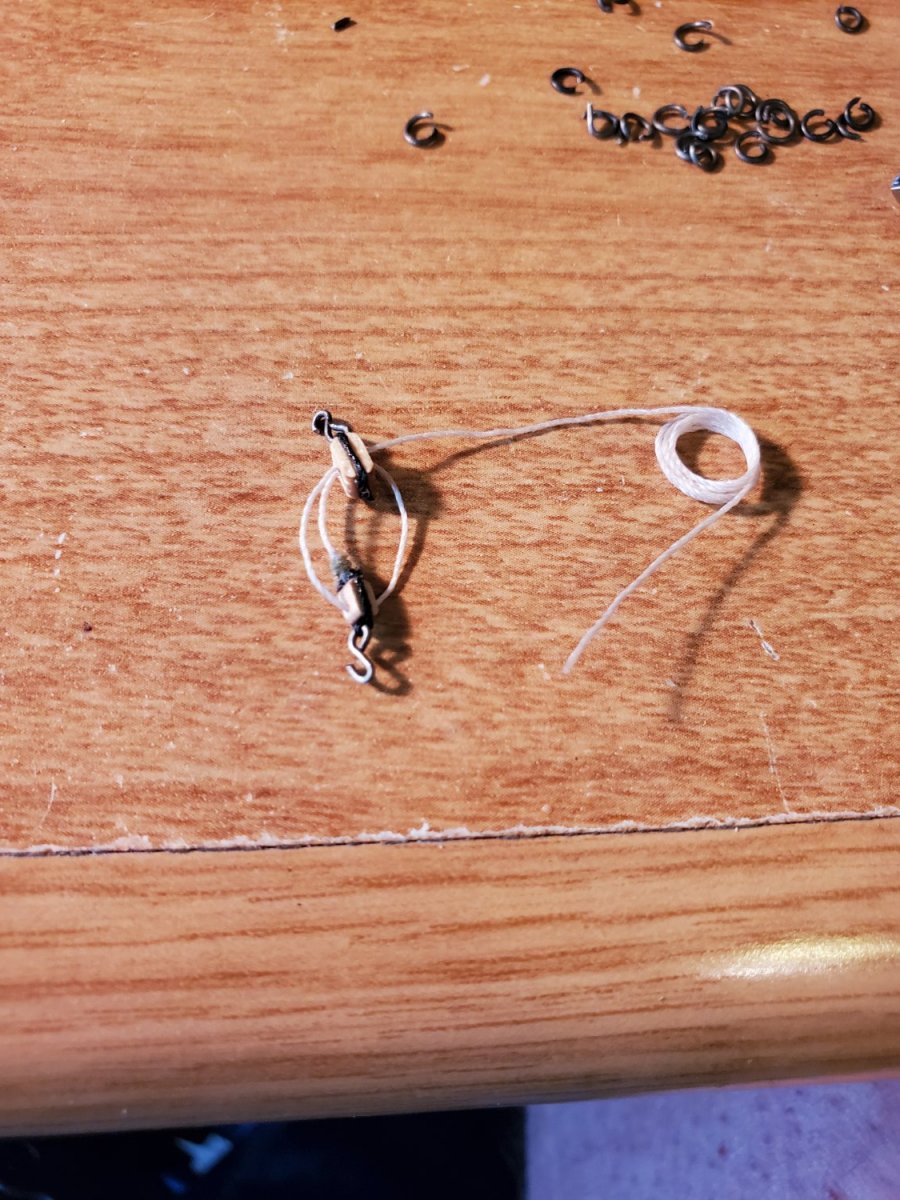
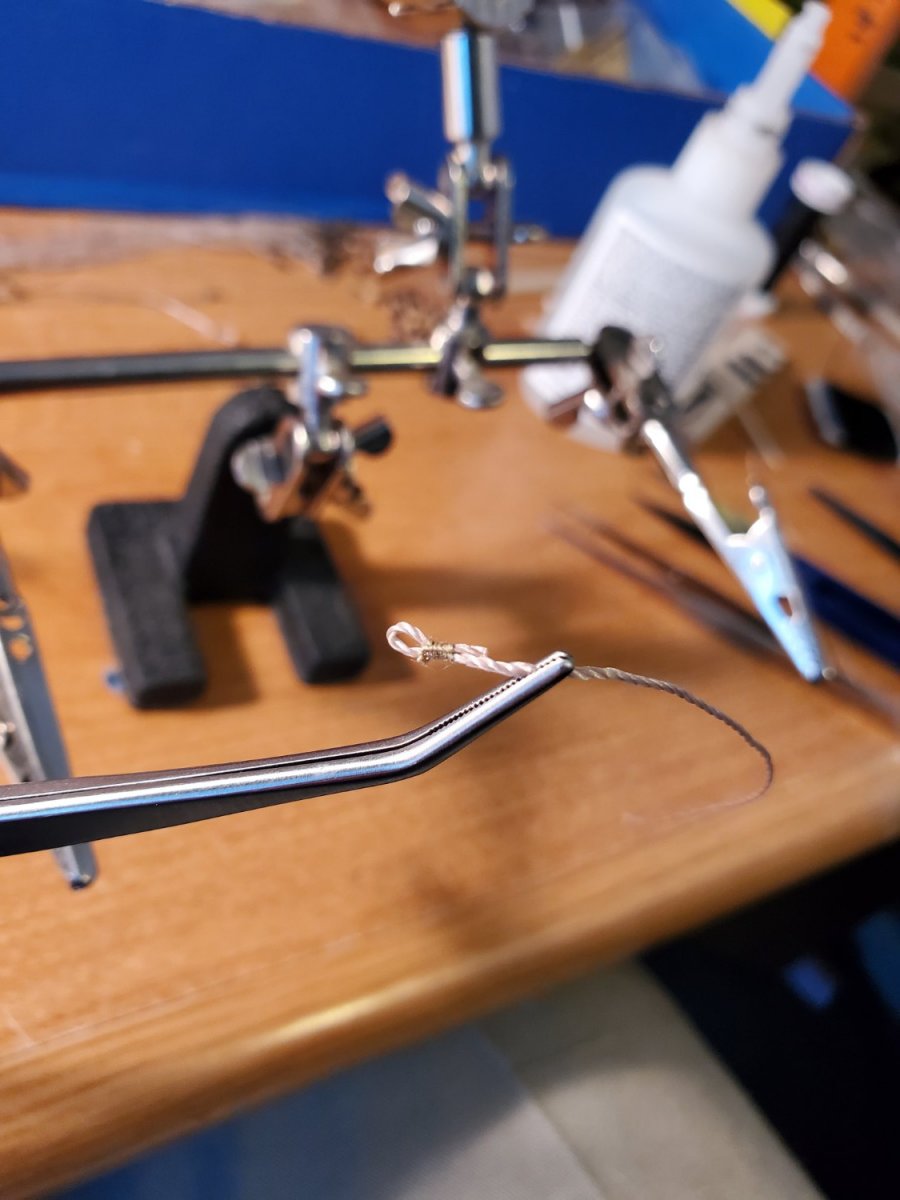
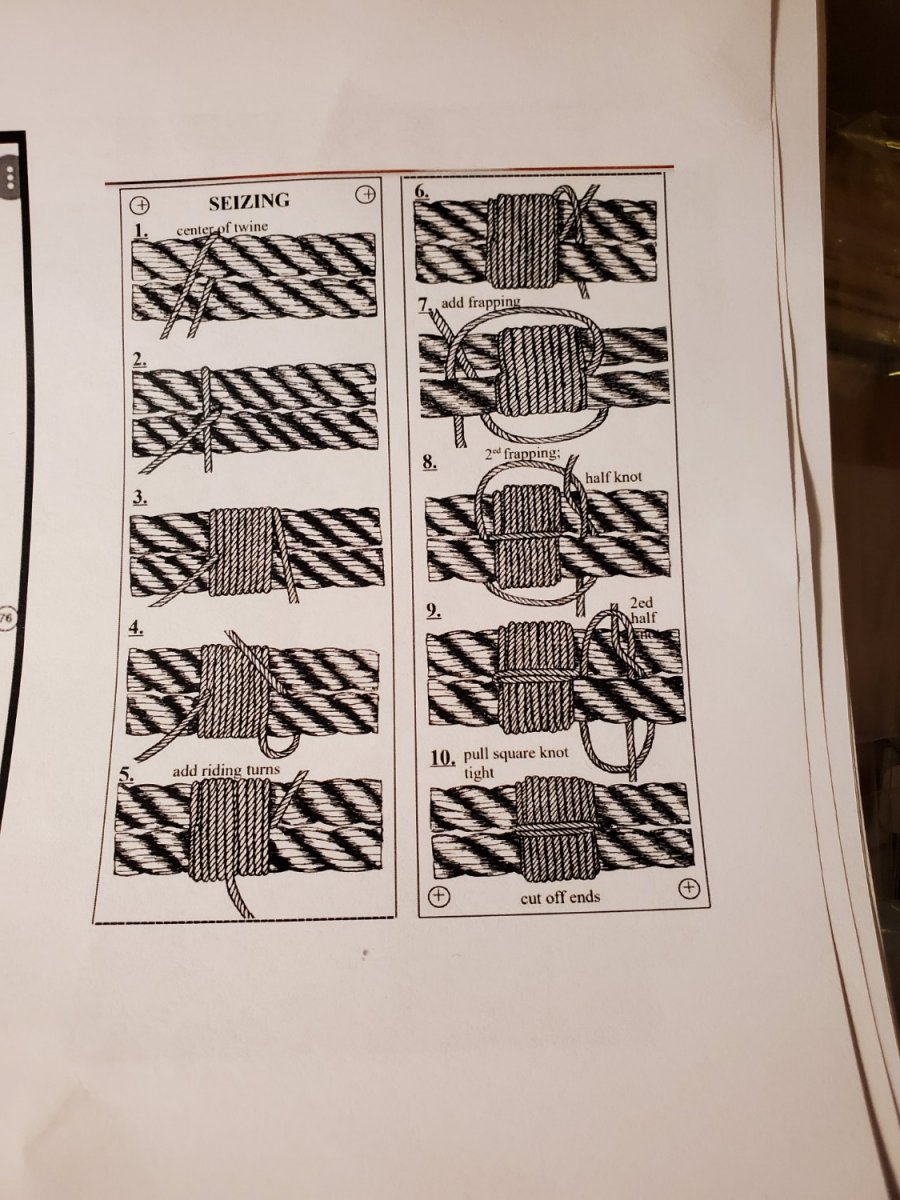
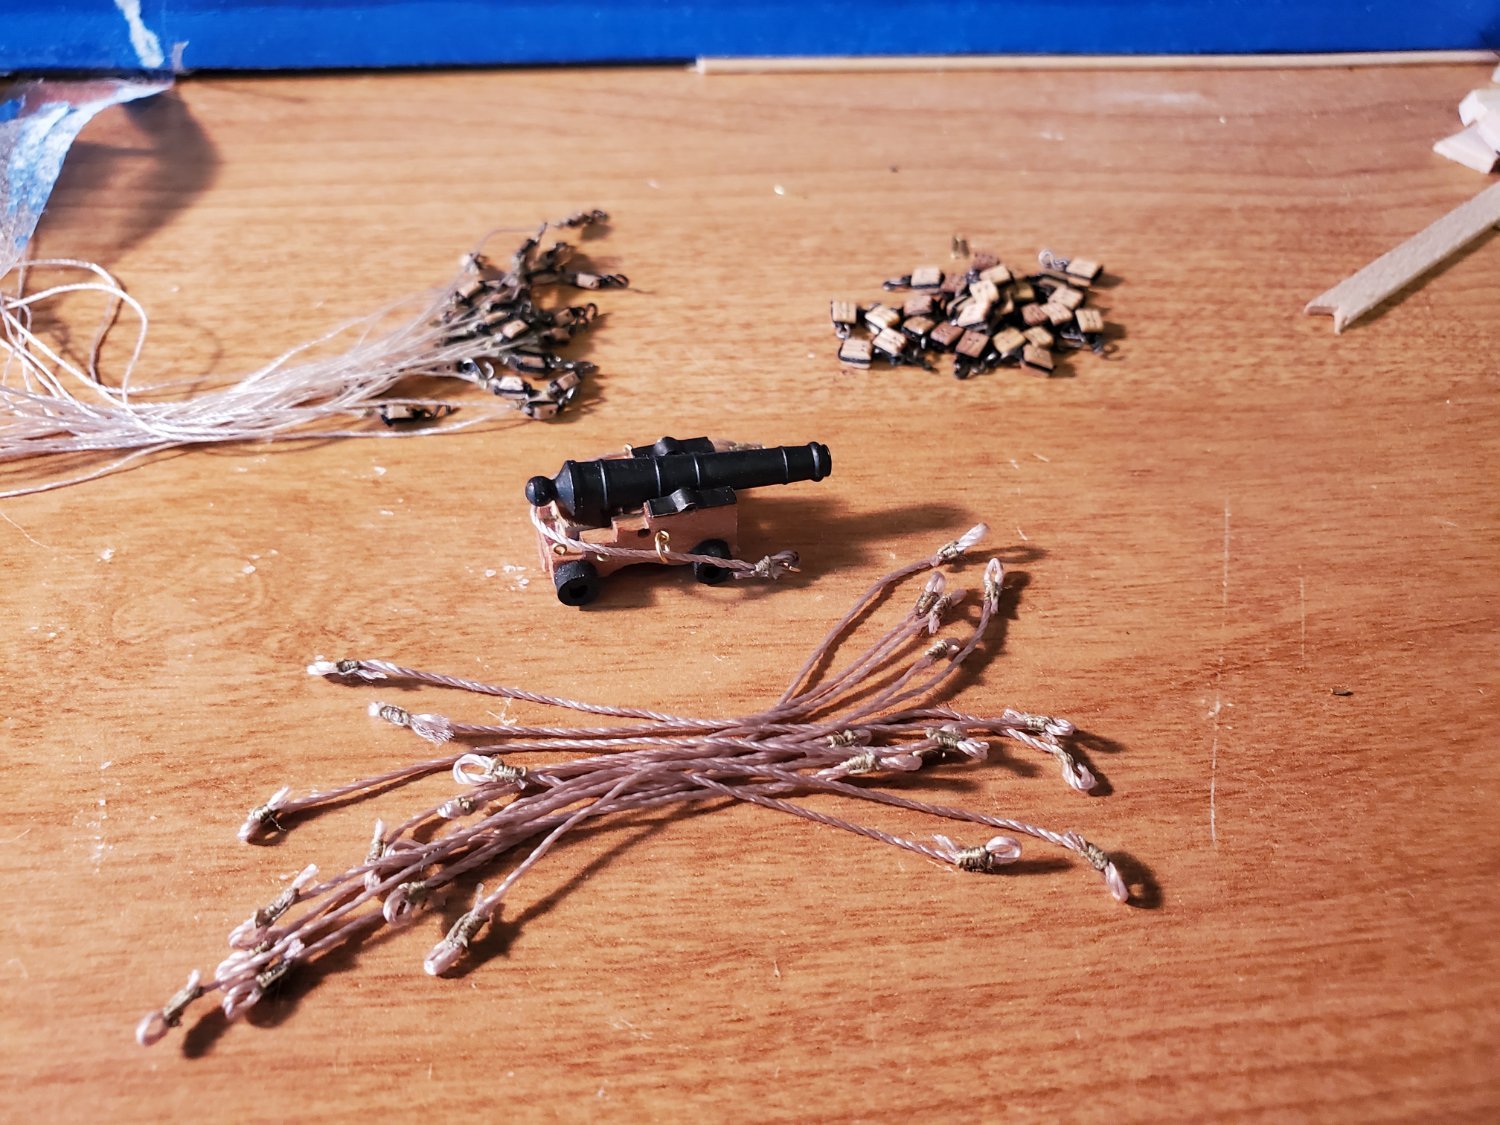
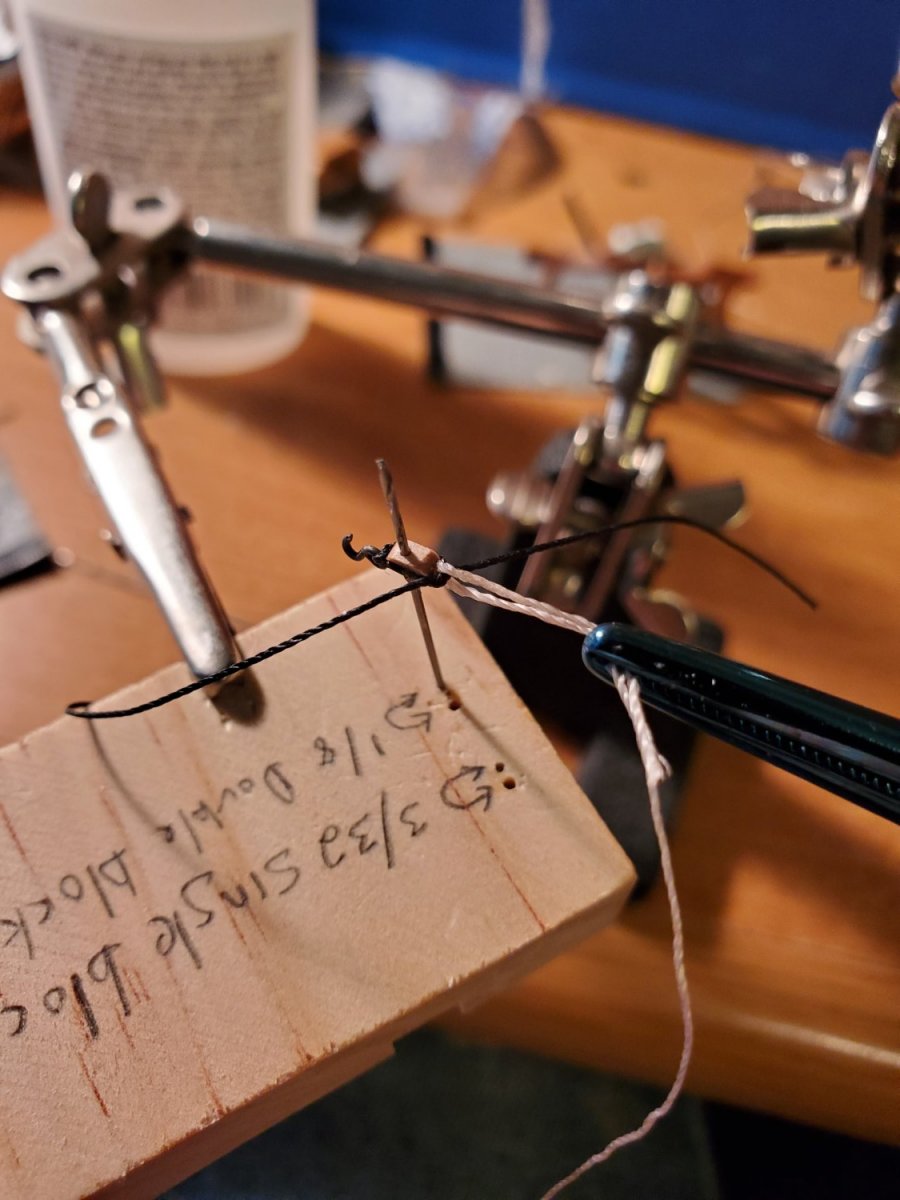
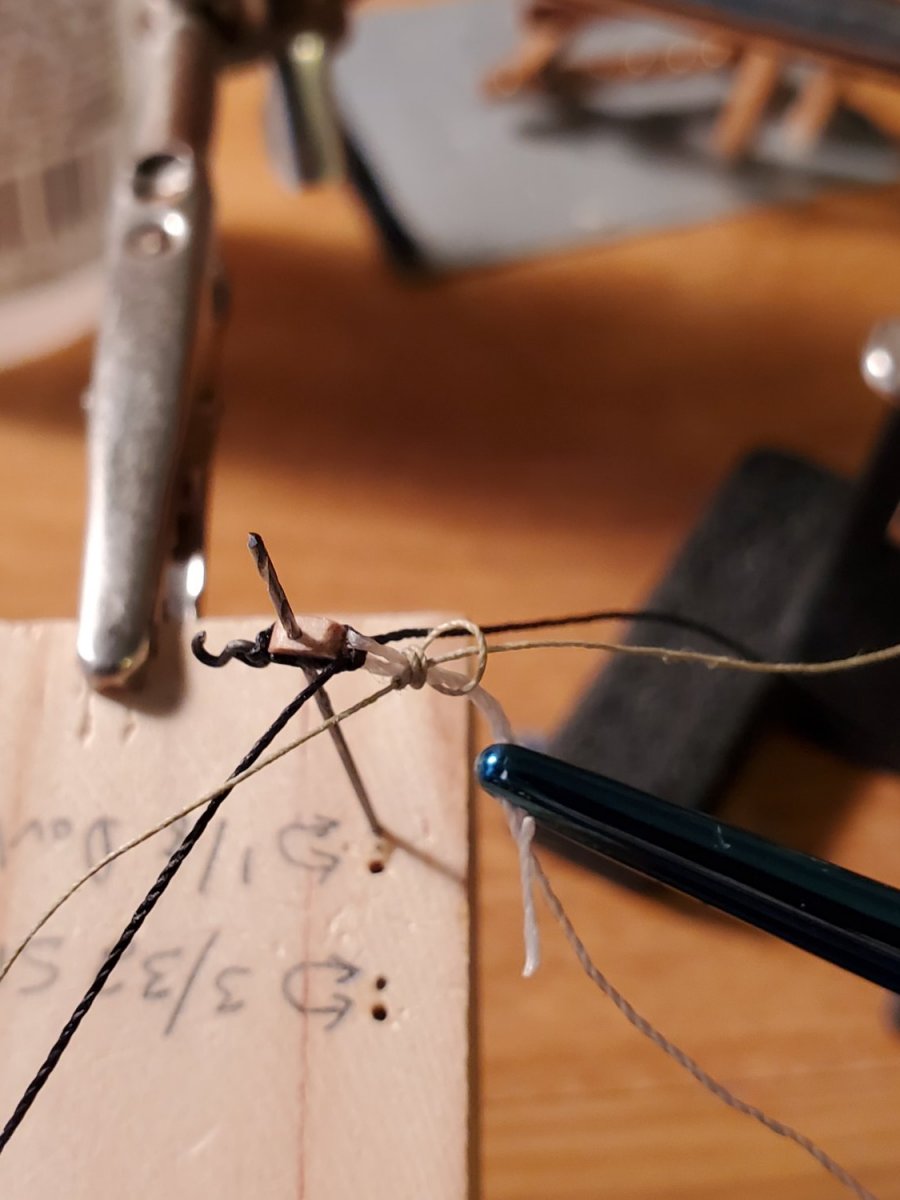
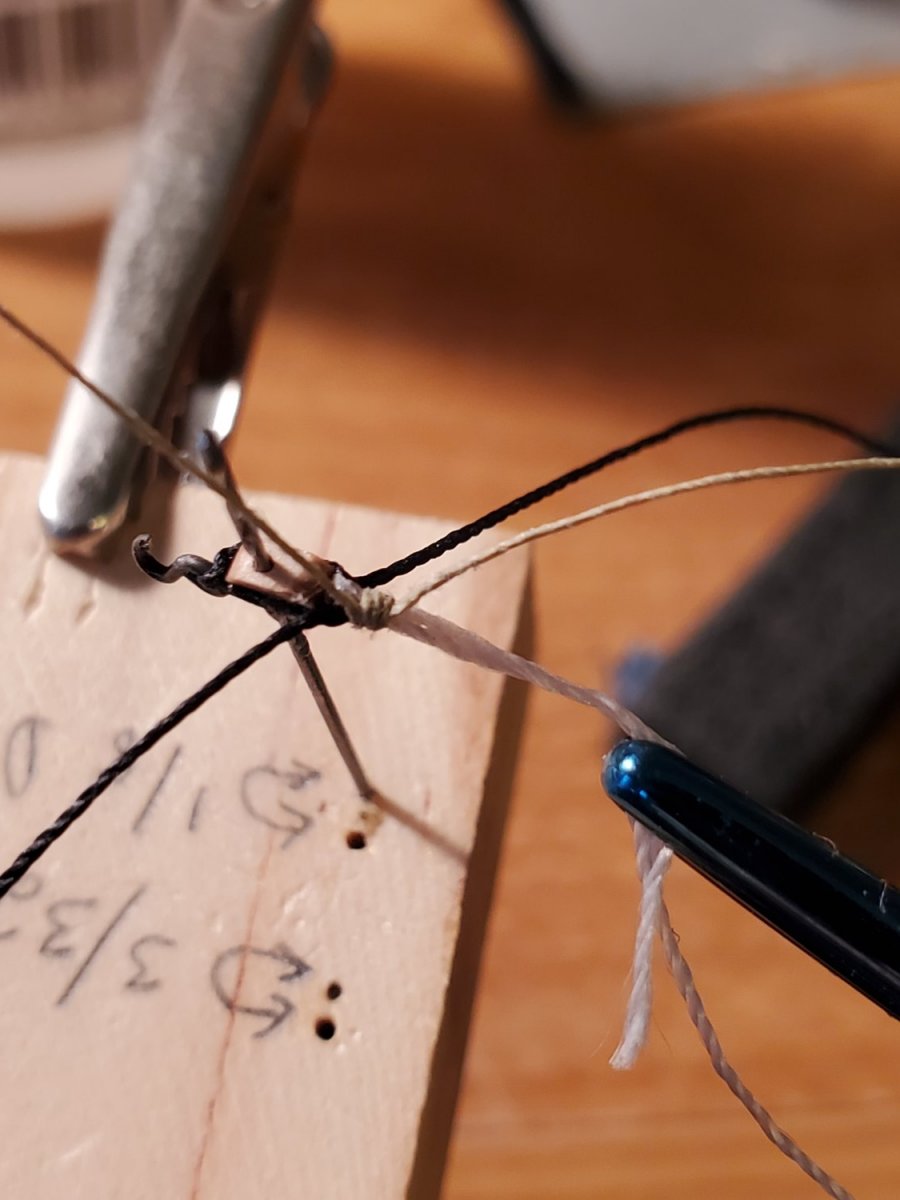
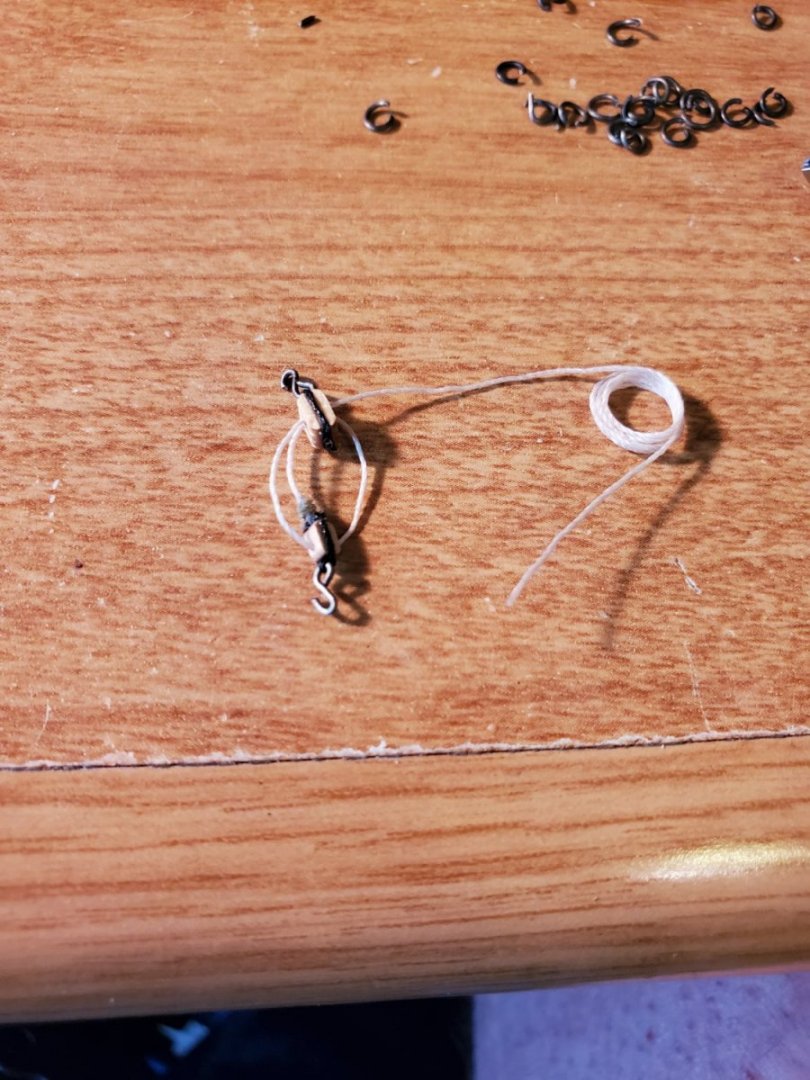
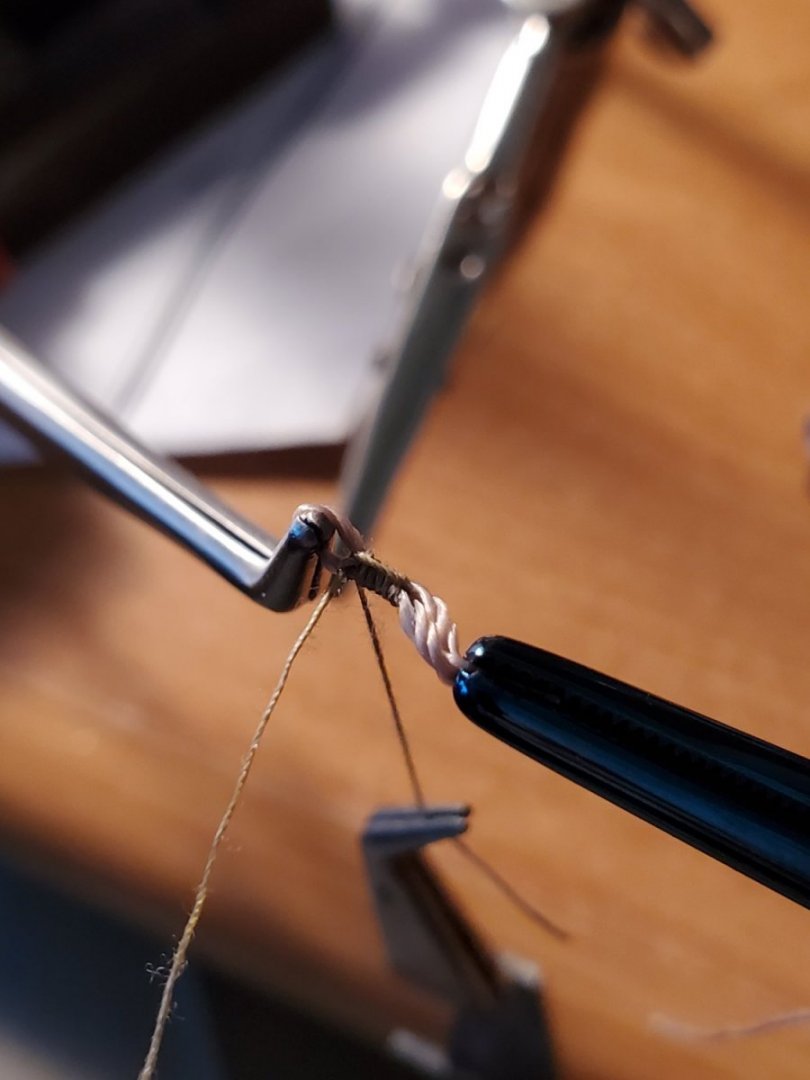
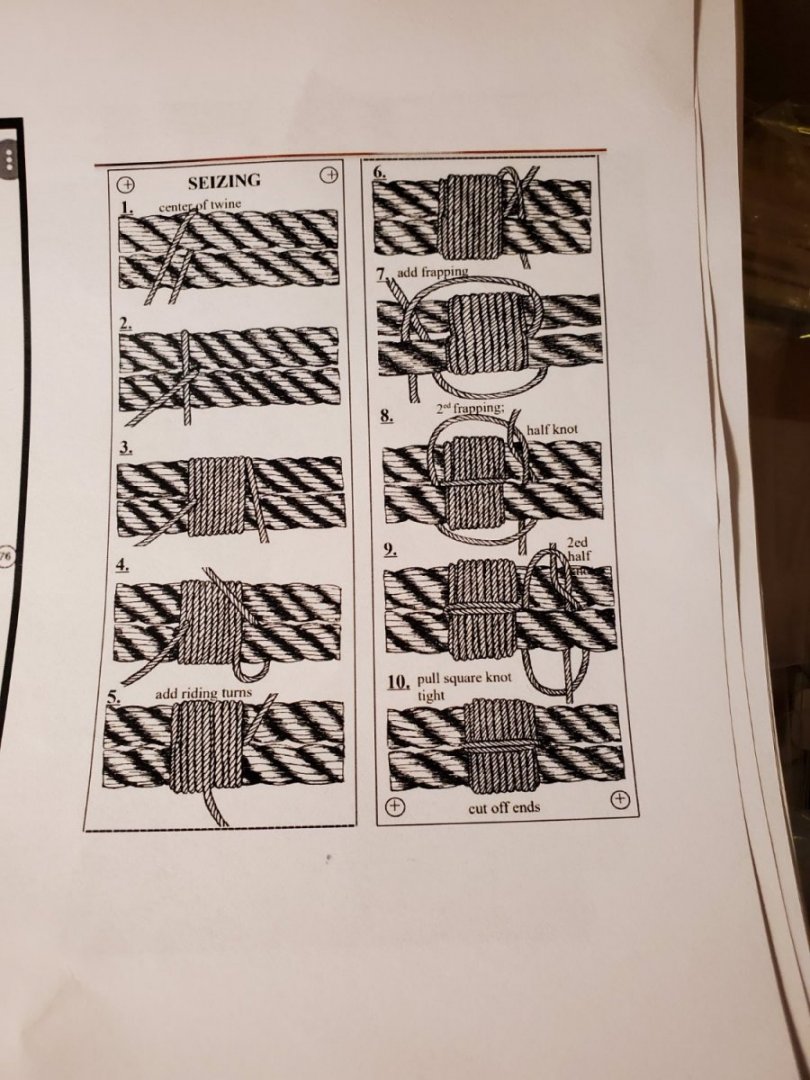
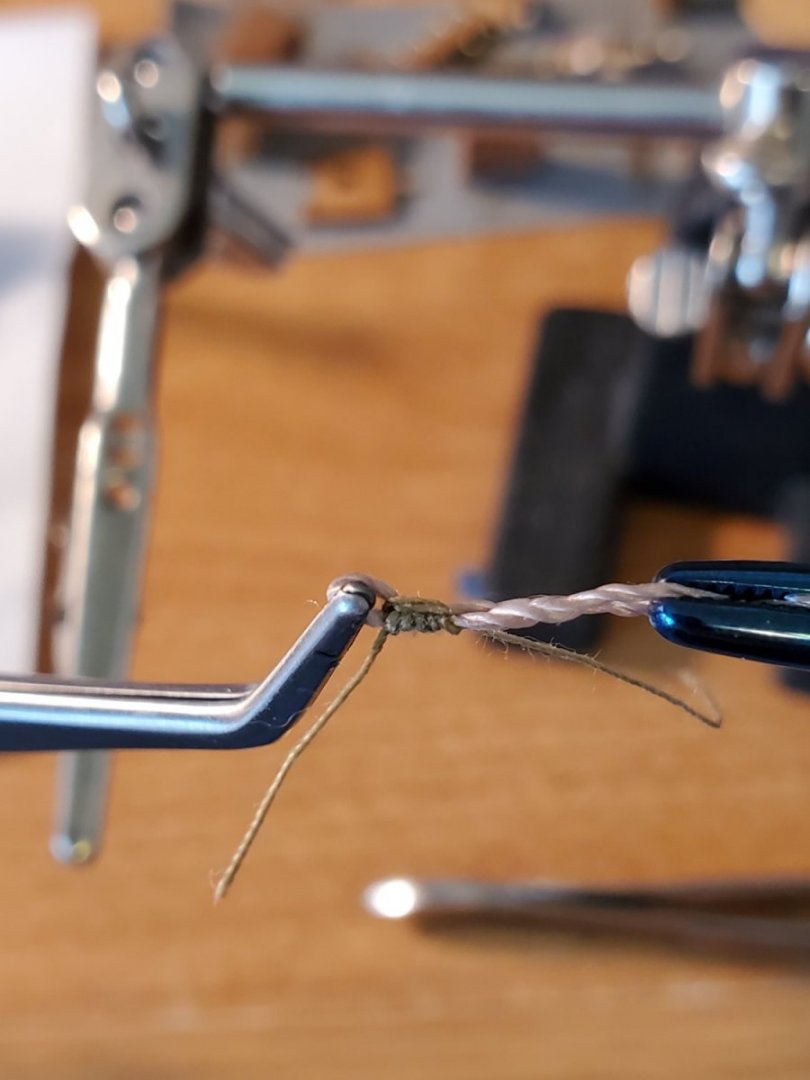
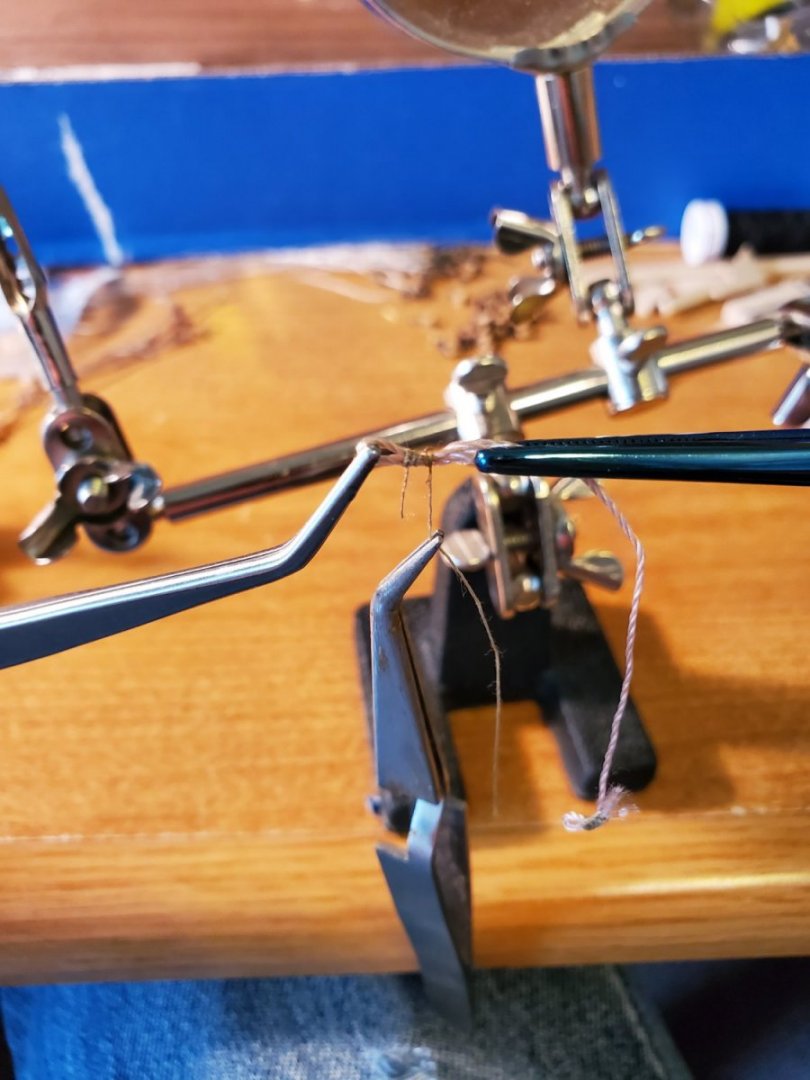
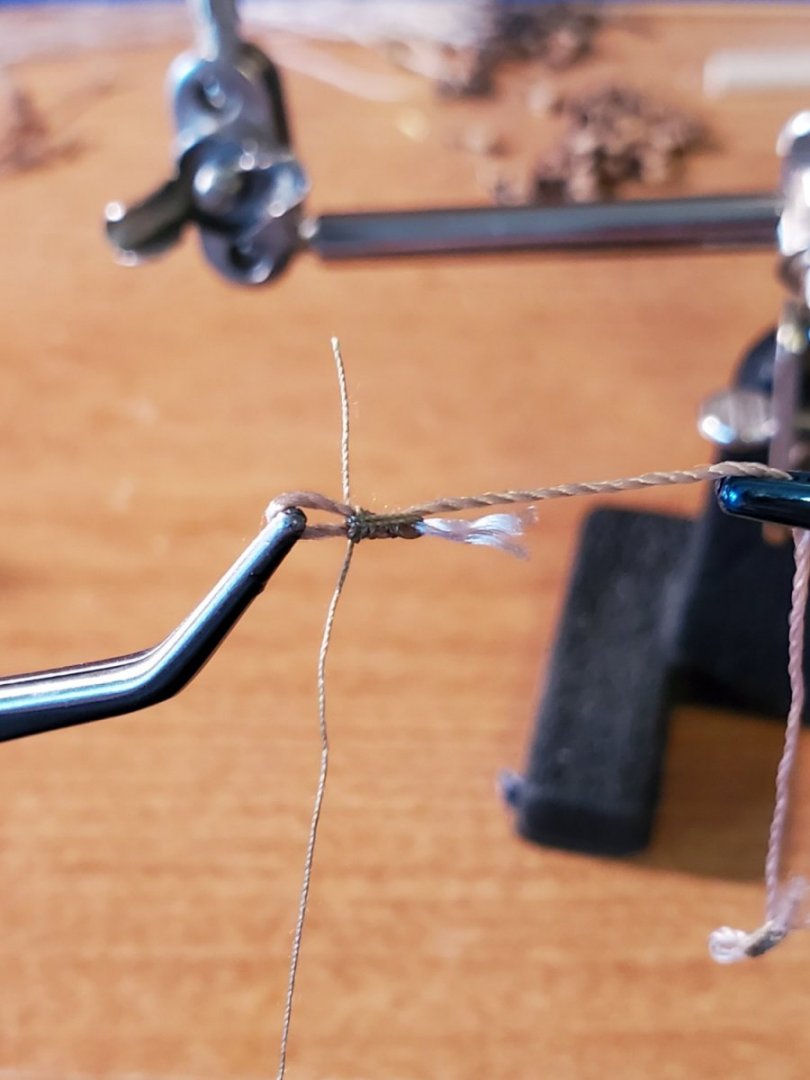
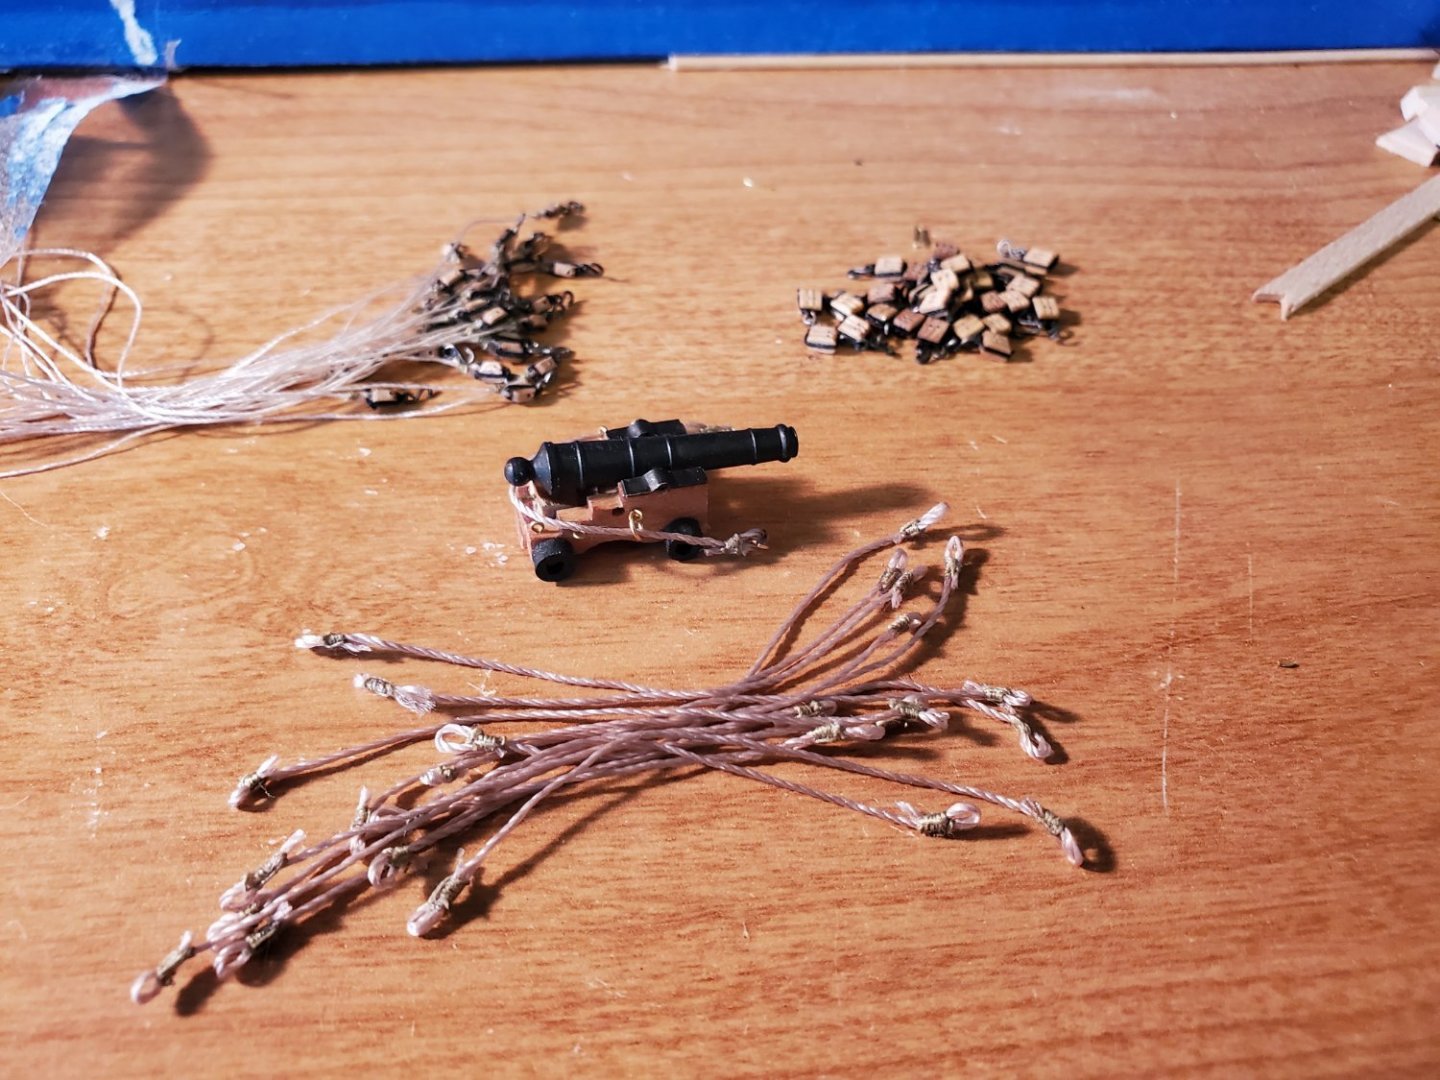
More progress on the Fair American Model Ship: Now that I have the blocks for the cannons done, I can focus on the breech lines. According to the picture in the instructions, the ends of the breech lines look triple seized, after looping through the eyebolt. While this would be nice, I don't have access or room or enough rope to do this. Instead, I plan to add one seizing to an empty loop, feed it through the rings in the cannons, and then add rings to the loops, to ''hang'' on the eyebolts later. Somewhere along the way, I came across a nice diagram of how to seize a rope: For the interest of time, and my own sanity, I won't add the riding turns in step 5; just one set of turns. I made one dummy breech line, and estimated I need about 2.563in between loops, to reach the eyebolts, and wrap around the cannon, as shown in the instructions. I added 0.5in to each side for loop length to grab to, so 3.563in total. I cut breech rope to 3.625in for safety. I seized with the same fine tan rope from last time, since I still had some left over. I dabbed the ends of the breech rope with glue to keep from fraying, so when I grab with hemostats, they won't shred. I hooked one end of seizing line in the middle, as shown in the diagram to start. Tacking with a blot of glue to keep it from falling out helped a lot. Then I could start the turns. After a couple, I grabbed the end with reverse action tweezers, and hung it. Another blot of glue here, helped tack it in place before frapping After one frapping, another glue tack.... And the second frapping... I'd finish with an overhand knot near the loop side. I tried to ''hide'' it inside the loop, but that wasn't easy, so it was tied a little to the side. Finished with glue to set the knots permanently, and trimmed the ends as close as possible. That's one. I couldn't imagine trying to do three of these each side, so one is enough for me! I completed the 14 total breech lines, and now I have everything I need to rig the cannons. Finally! Could I have just simple knotted the loops? Sure. But I wanted the look of actual seizings, so this is what I did. Next up, I hope to get the cannons fully rigged More progress soon. - Jason -

-
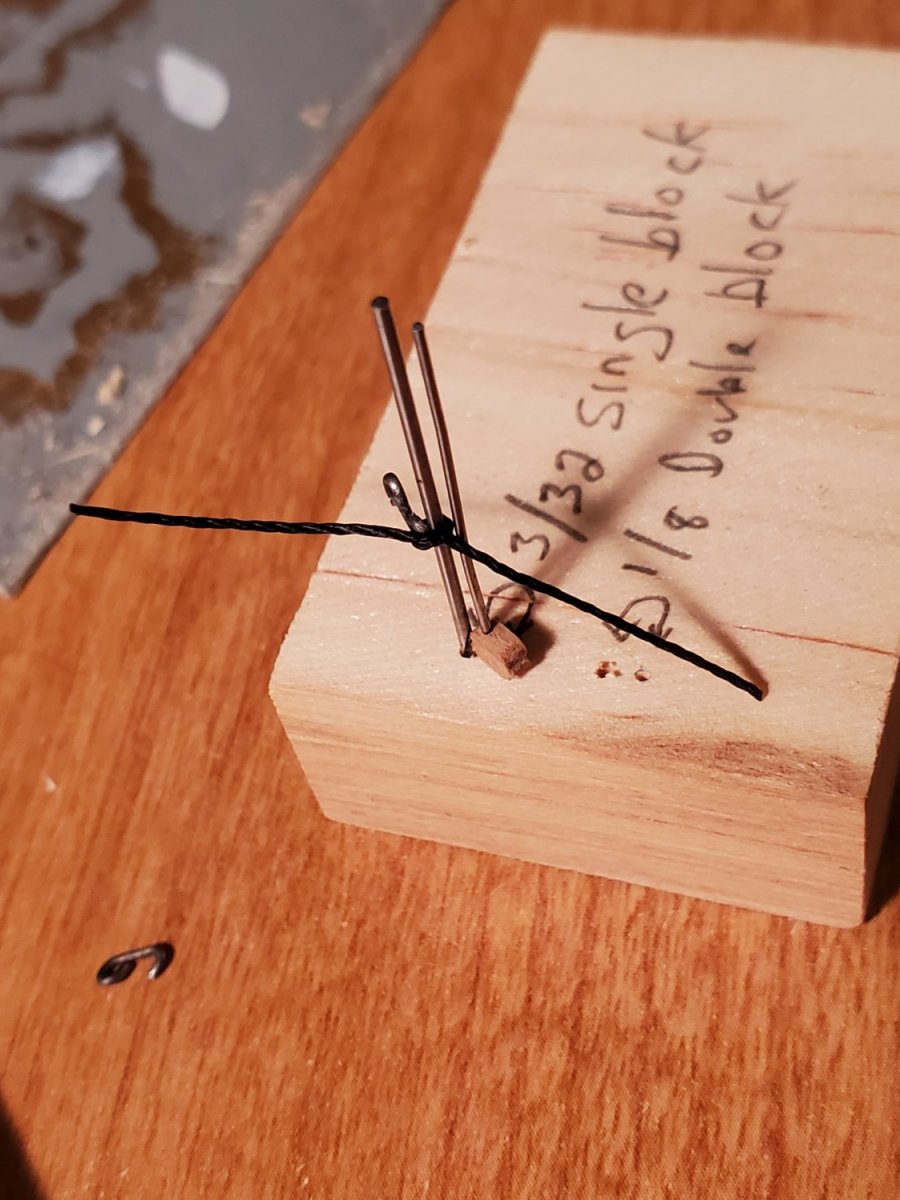
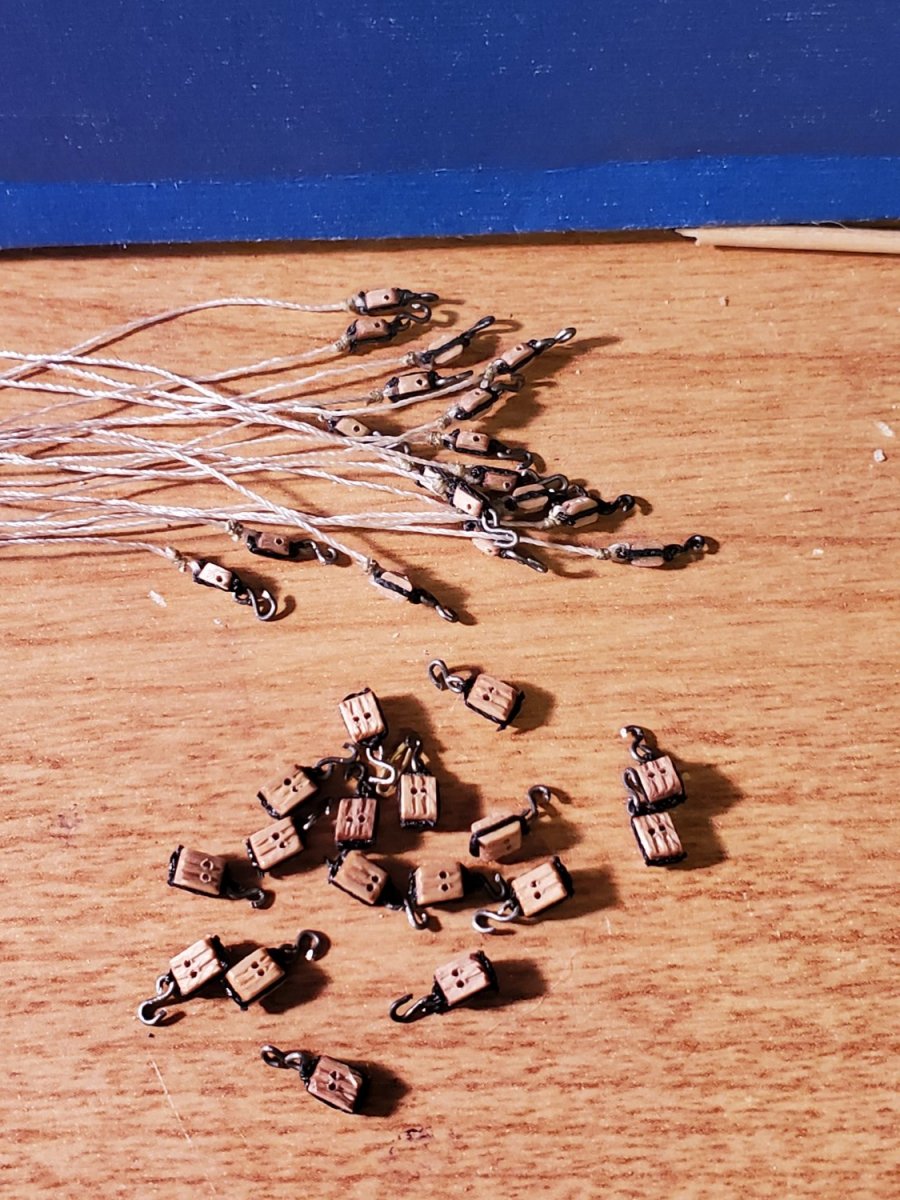
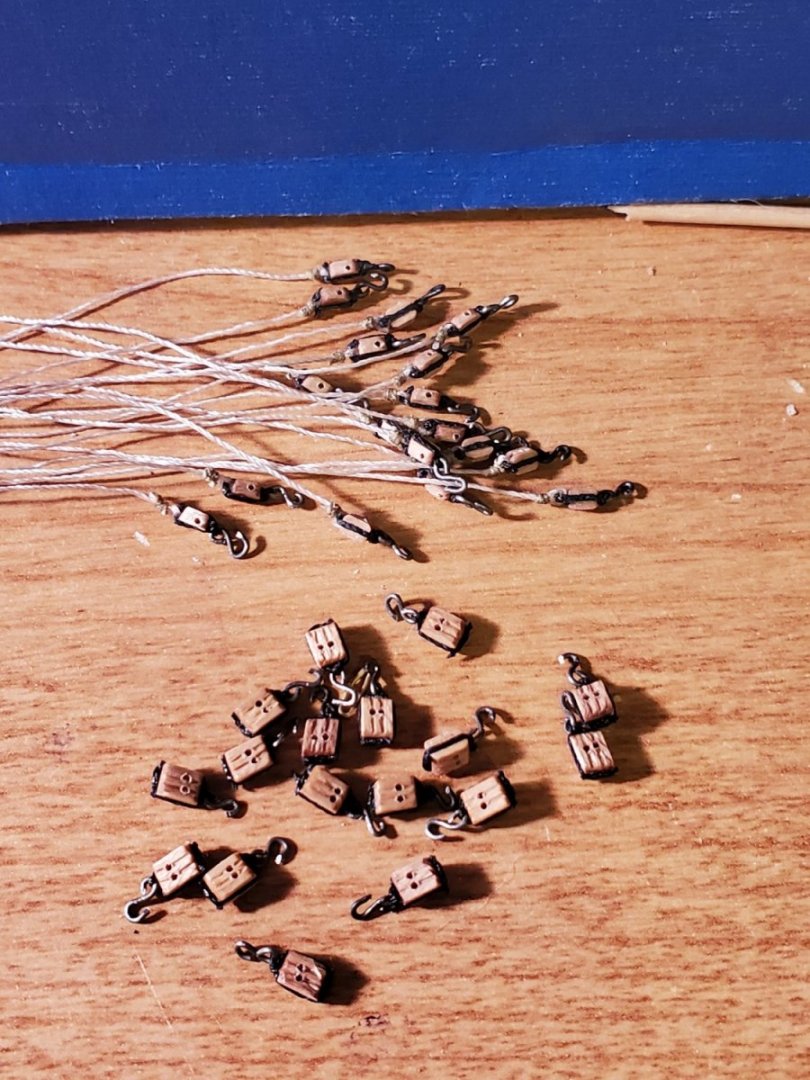
Fair American Model Ship: Rigging, stropping, seizing oh my! I've now started, and taken weeks to painstakingly make the blocks and tackle for the cannons. I've never done any of this work before, so all of this is new. I was surprised to find little information/pictures around techniques of stropping and rigging hooks to blocks. I had to really dig to find anything. Much of what is to follow is based on what others have done, then finished and modified to what I think looks good. I had seen one modeler create a jig to help aligning the block and hook for stropping. I did something similar. As stated earlier, I bought some small gage steel wire, and I used that to hand bend the hooks, using some super fine needle nose pliers - that came first; I only needed 56!!! I used the .012in black rope provided in the kit, to tie a tight overhand knot at the bottom of the hook., then slid it down the first ''pin'' on the jig. The hole in the single block came next. After a dab of glue on the top of the block and knot, I pushed the knotted hook down to the block, with long ends for tying. Another dab of glue on the sides so the rope sticks, temporarily. Then, a simple over hand knot, pulled tight, and more glue again. Let it dry for 30sec, then trimmed the ends. The finished block looks pretty good. However, of course I forgot that the manila rope was supposed to be in there too. At least it was good practice! So now that I remembered the manila rope, I can 'tackle' that - haha. Before the overhand knot, I added a blot of glue to the bottom of the block and 'tacked' a loop of manila .008in rope - this will keep it in place where I want it. I did the black overhand knot now, and dabbed with glue. Now I'm going to need to seize the manila rope. I grabbed the ends with hemostats, they worked pretty good. Luckily, from my first plastic model kit, I had plenty of super fine tan rigging rope left over on a spool; this will work perfectly for seizing. I used an ''insert fancy nautical term here'' knot, and pushed it as close to the overhand knot as I could, for neatness. It took several practice ties, to get the right technique and length correct. Added dabs of CA glue to lock all the knots in place, then trimmed the excess as tight/close as possible. Again, several weeks of making 1 or 2 single, then 1 or 2 double blocks per night, as time allowed. I made sure there was enough line length necessary for coiling later on. I ordered more .012 and .008in rope, so I wouldn't run out later. I know there is debate around 2x singles or 1x single and 1x double for the cannons. This is my choice. From my perspective, using 2x single blocks, gunmen would need more effort to run out the guns after firing. Using 1x single and double, the effort required to ''pull'' would be halved. I have seen other modelers rig a few cannons at the time, then work on something else in between, to break up the monotony. I like to do everything all at once, hence I am doing ALL the blocks and rope first, then rigging the cannons at one time. I don't want to have to set things up for stropping and rigging back and forth - I'll just do it all at once. I am currently still making up ropes for the cannons. I probably should have kept the eyebolts off the bulwarks, and rigged them first, but I don't want to pull them out now. I'll ''feed'' the ropes through the cannon rings, and hook the hooks and rings to the eyebolts with needle nose pliers. REALLY hoping that won't cost me later. I'll share pictures of the rest of the rigging next. I'm having a lot of fun doing this part, and it's looking really good to me. I'm KNOT kidding. - Jason -


-
Salty, I sort of like the idea of using alcohol to release the door, and possibly move it. That might work really well. Once, I get to the rigging, that's the area I'll start at. I'll know right away if I need to move it, as you describe - Thanks! I've made some painstakingly slow progress on the tackle for the cannons. I'll update on that soon too. - Jason -
-
Hi Chuck. Thanks for following along. Impressive, that you're working on the FA again. How far along are you? So far for me, it has been quite rewarding. Looking back where I started, and going through all the planking, and bow work, and now up to the cannons: A very fun project. I enjoy the fine details required for this model. I plan to print out a paper build log, to hang next to the mounted model, once finished - sort of a little story of the ship build. I have seen reviews, and comments from other modelers, that the Fair American is not a recommended ''first build''. The instructions start out really good, but sort of fade out in necessary detail as you progress; especially the rigging detail, or lack there of. I haven't quite decided how I'll do the stropping of the deadeyes yet. I bought some smaller gage wire, for the block hooks, etc - I think I might use that for the deadeyes and chain plates. We'll see when I get there! - Jason -
-
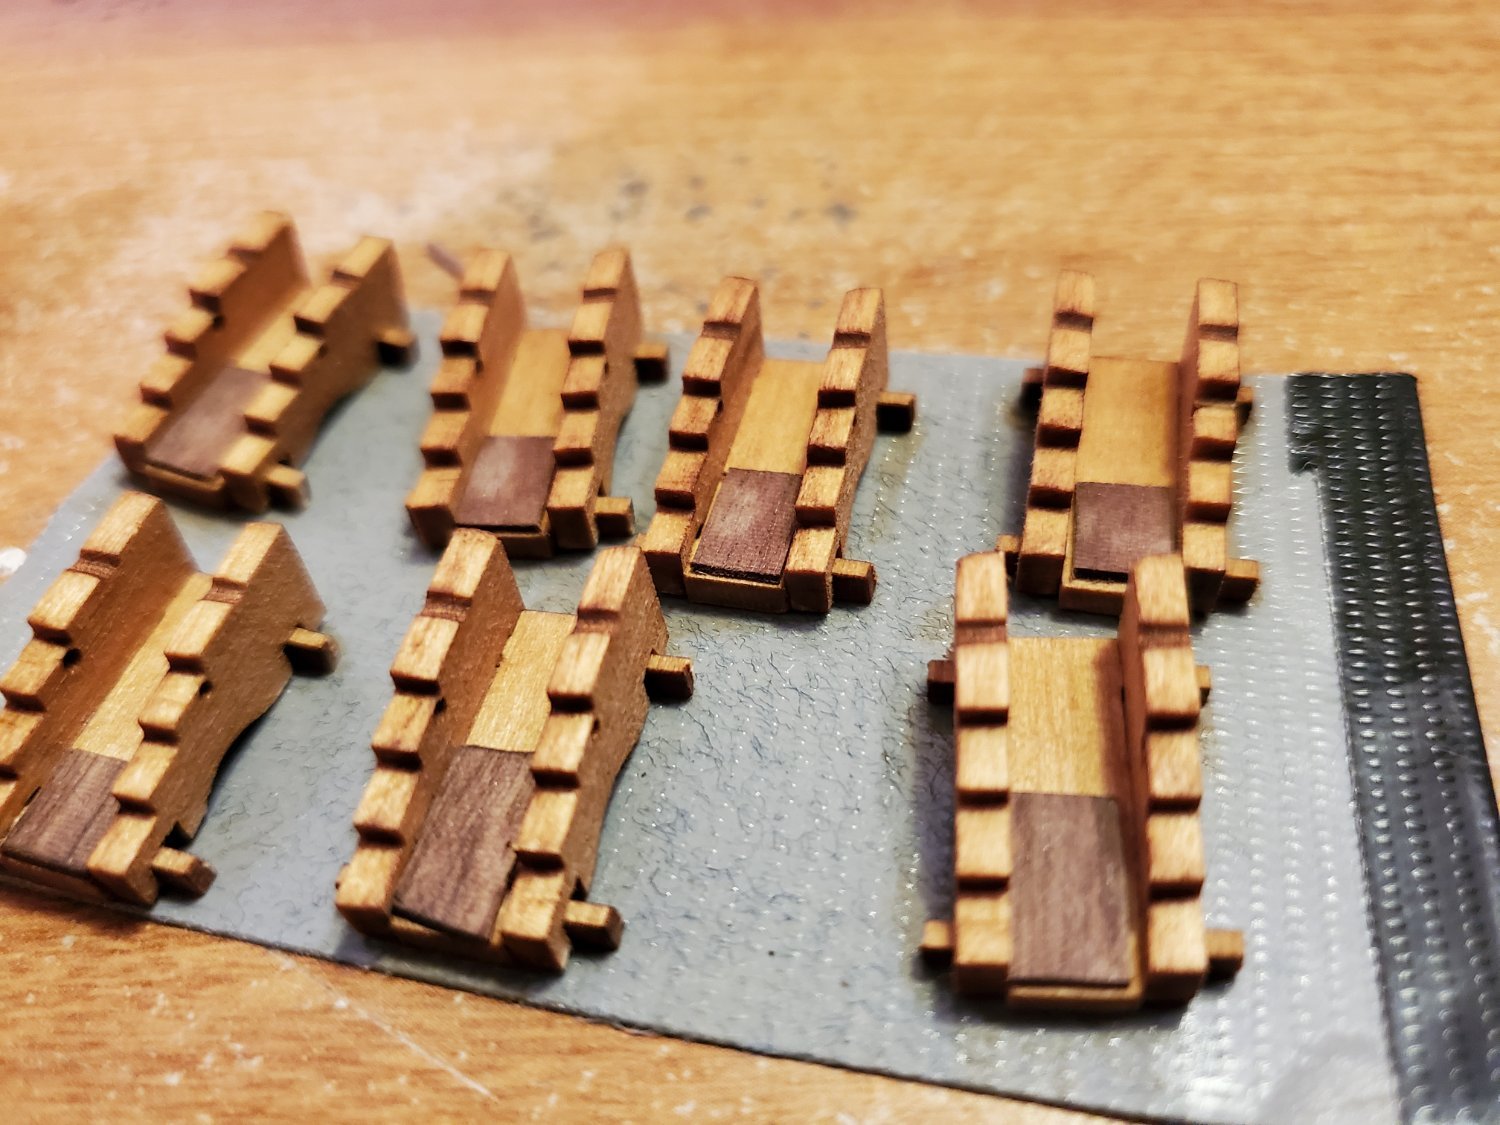
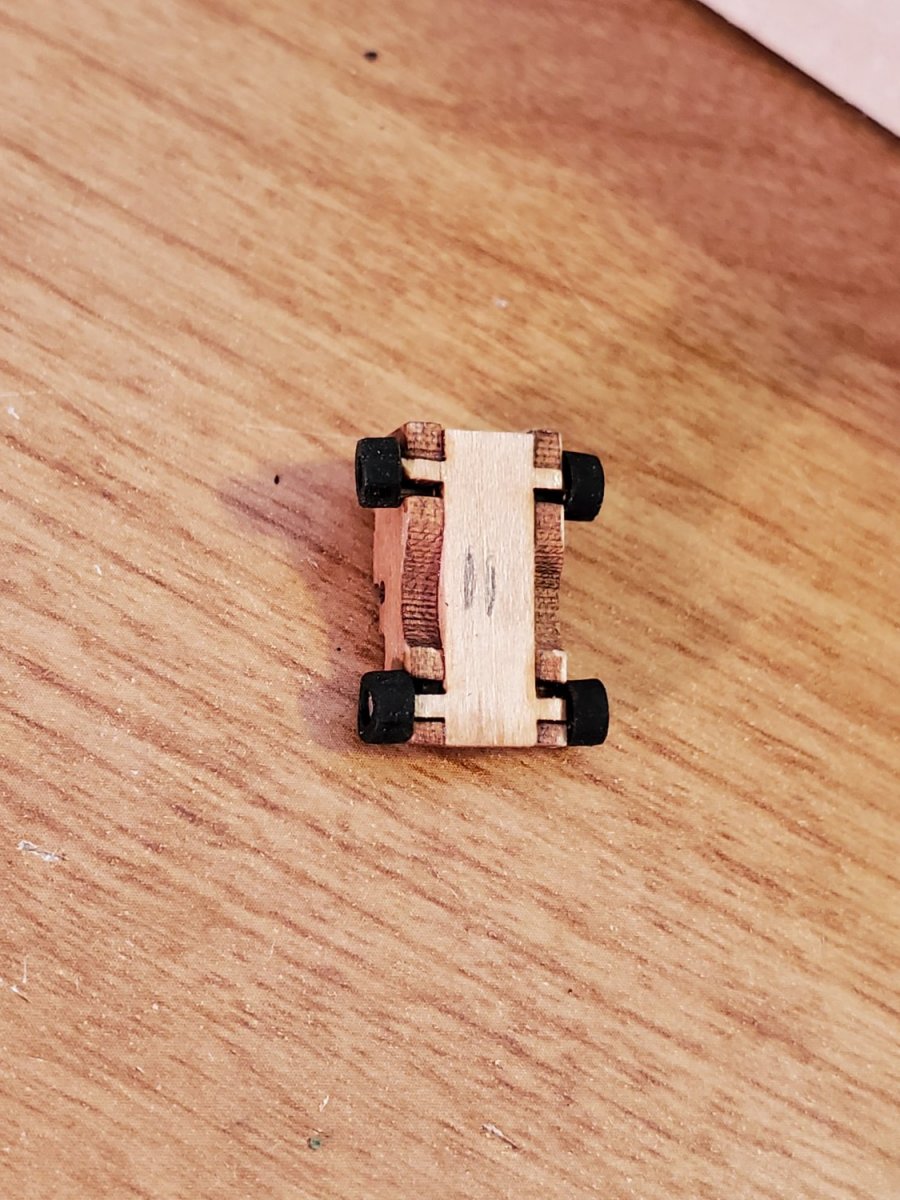
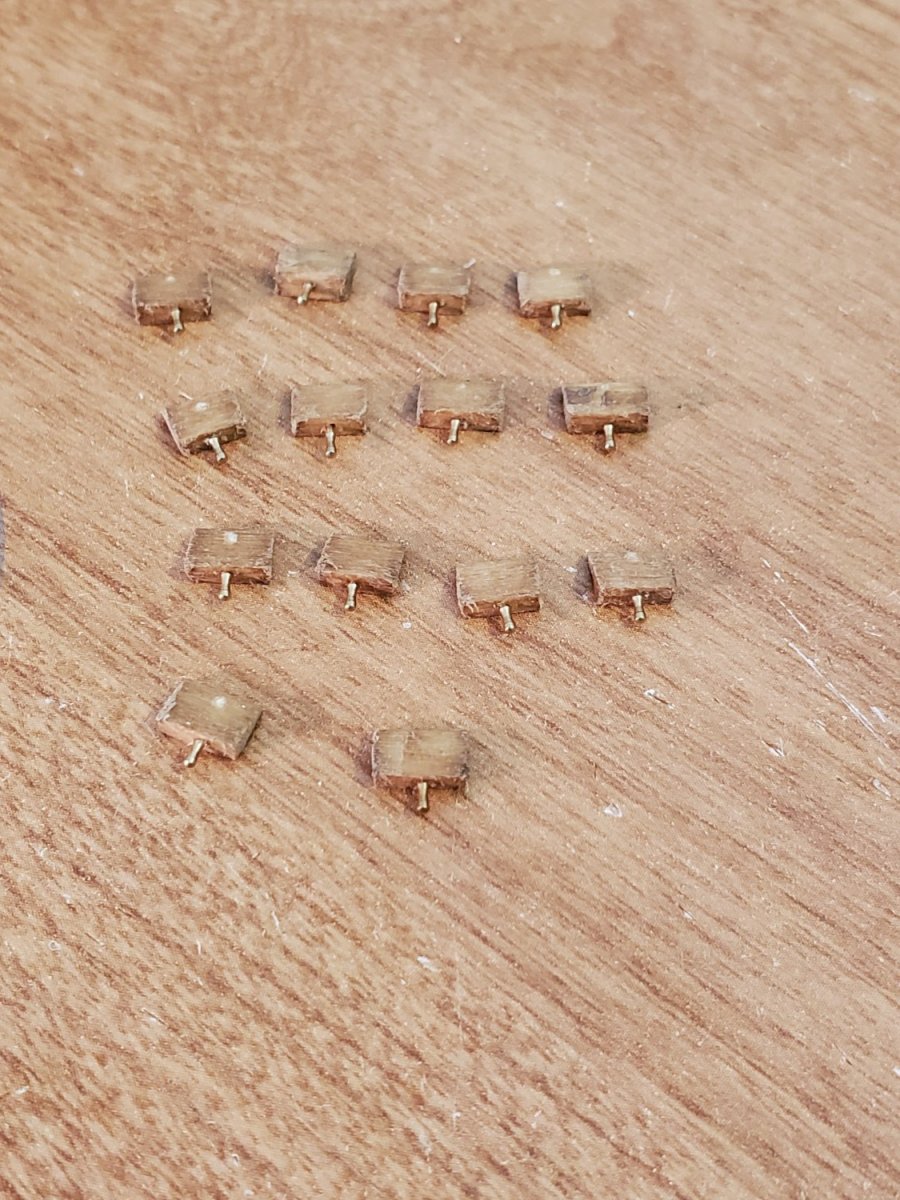
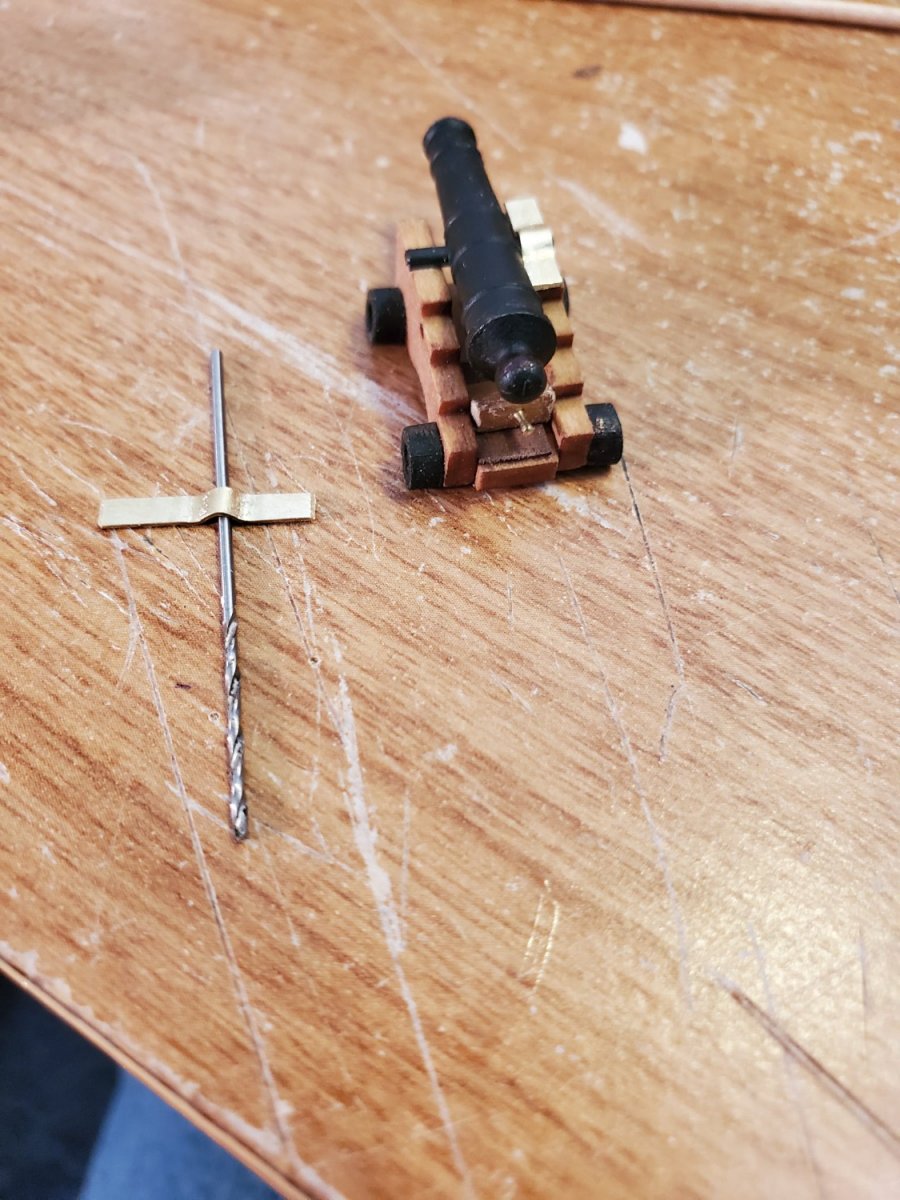
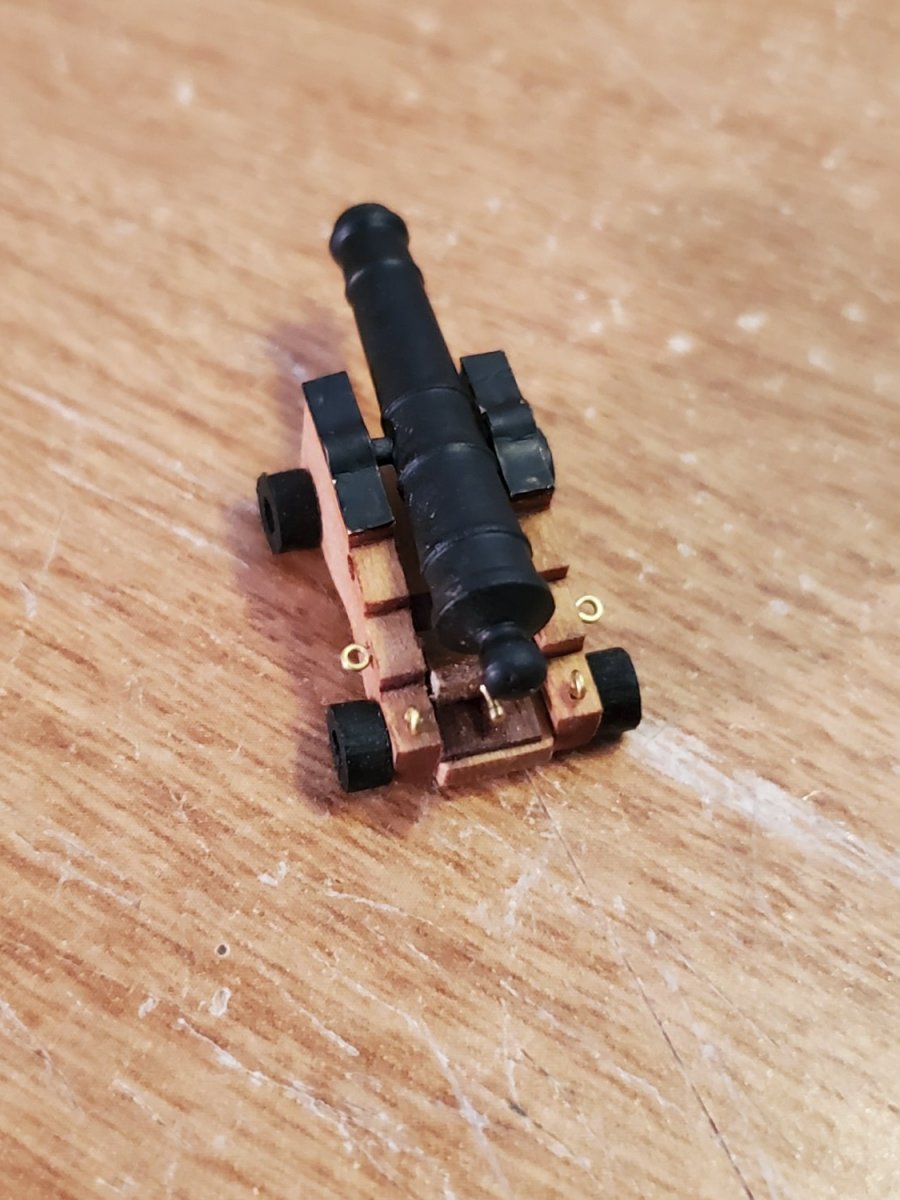
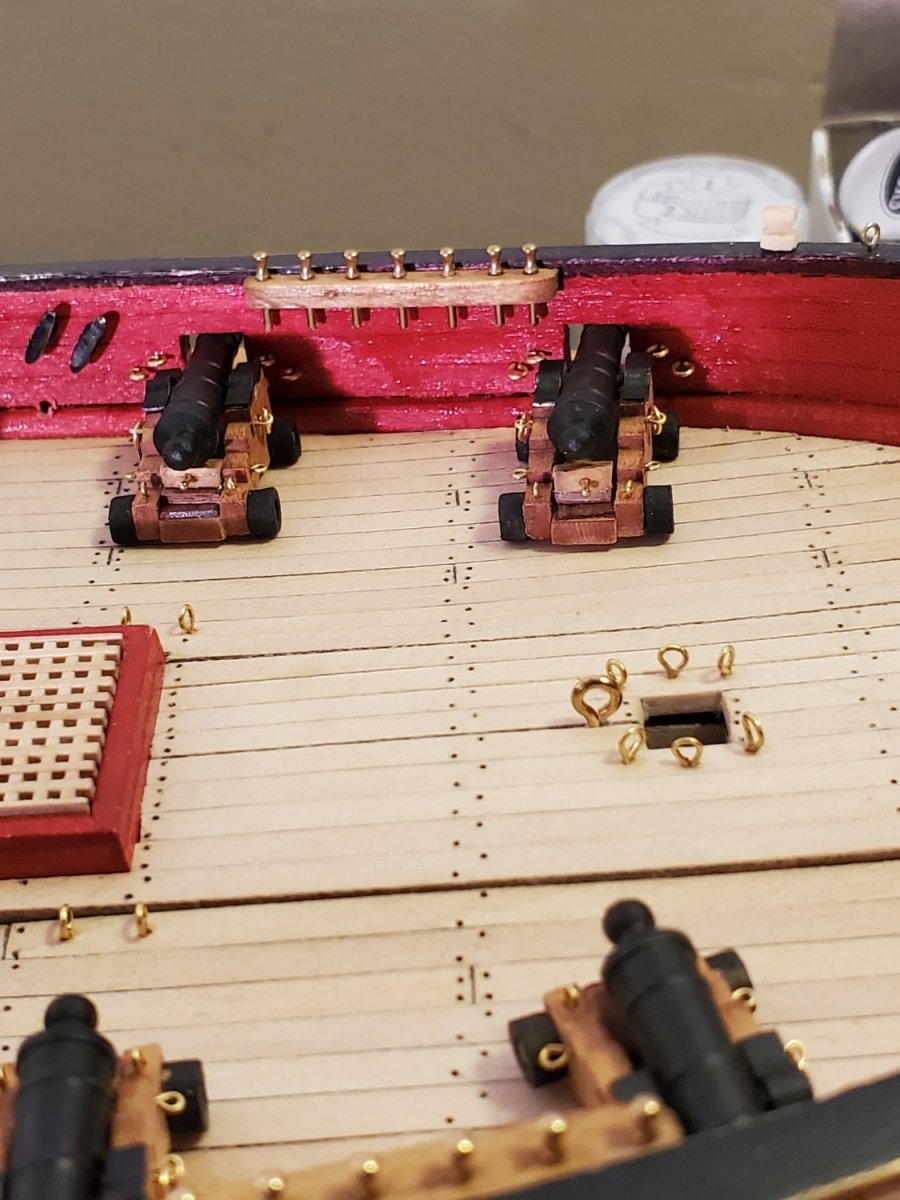
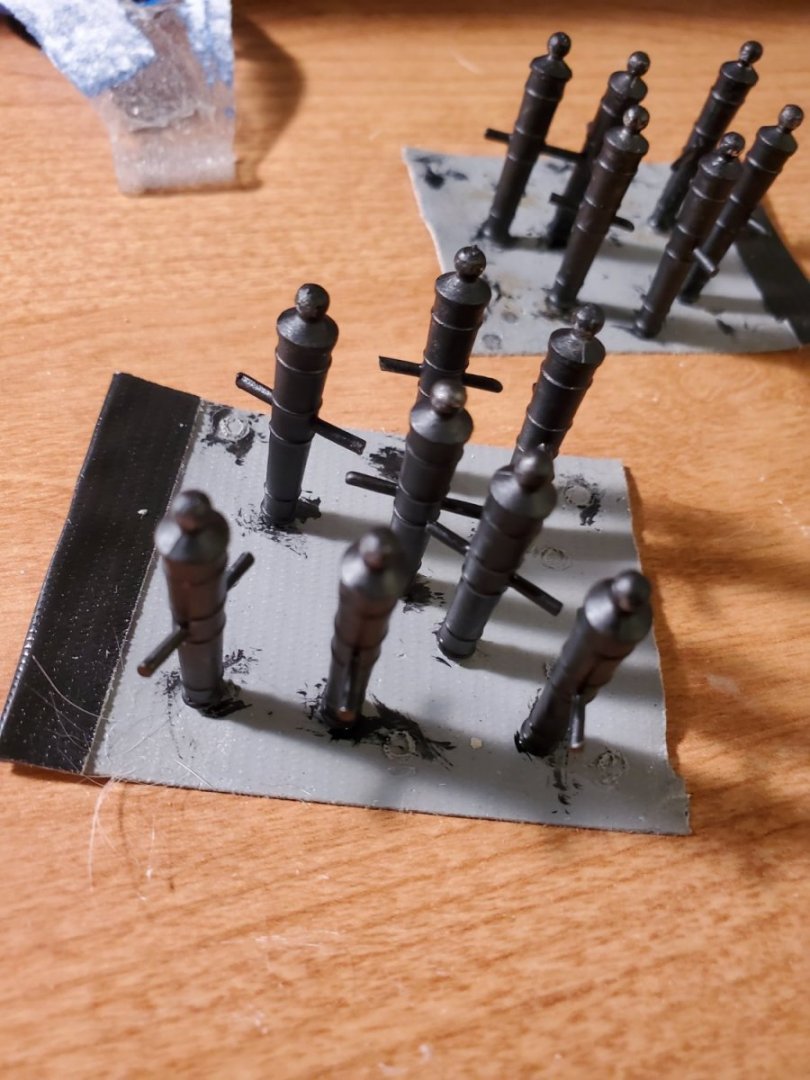
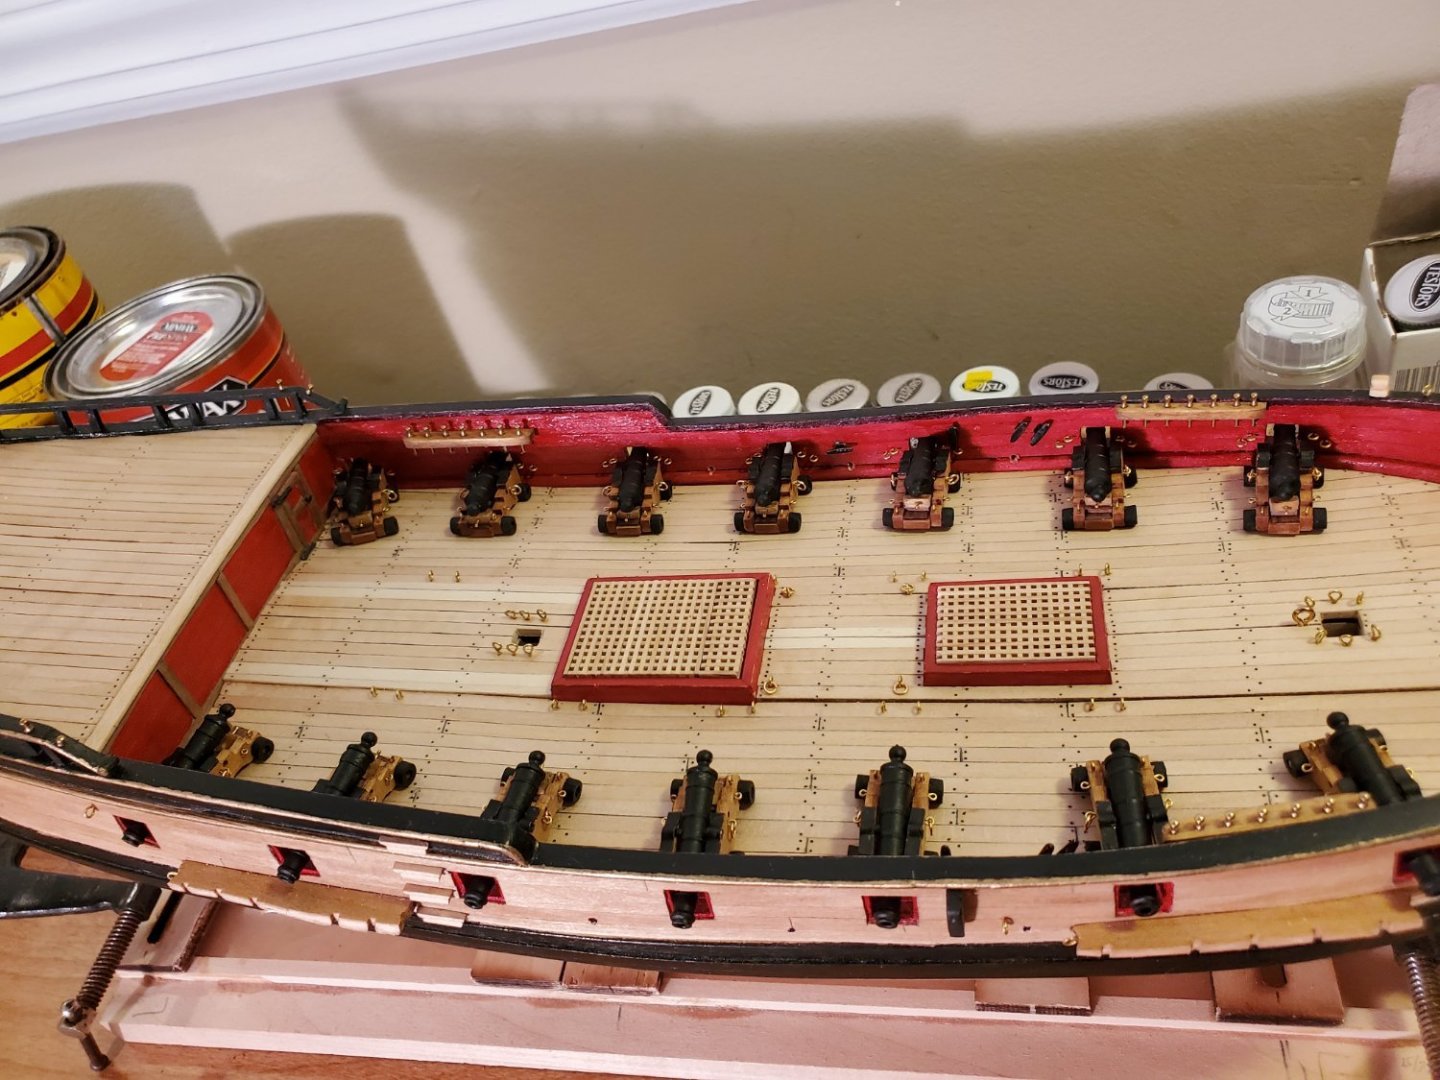
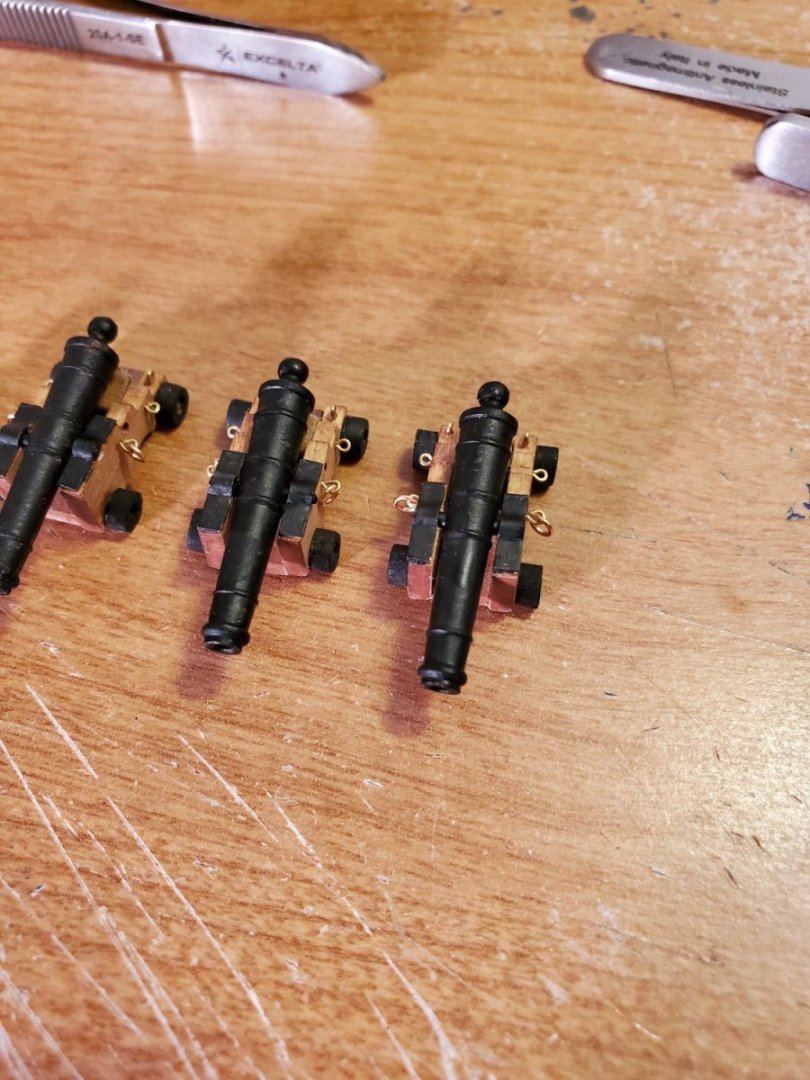
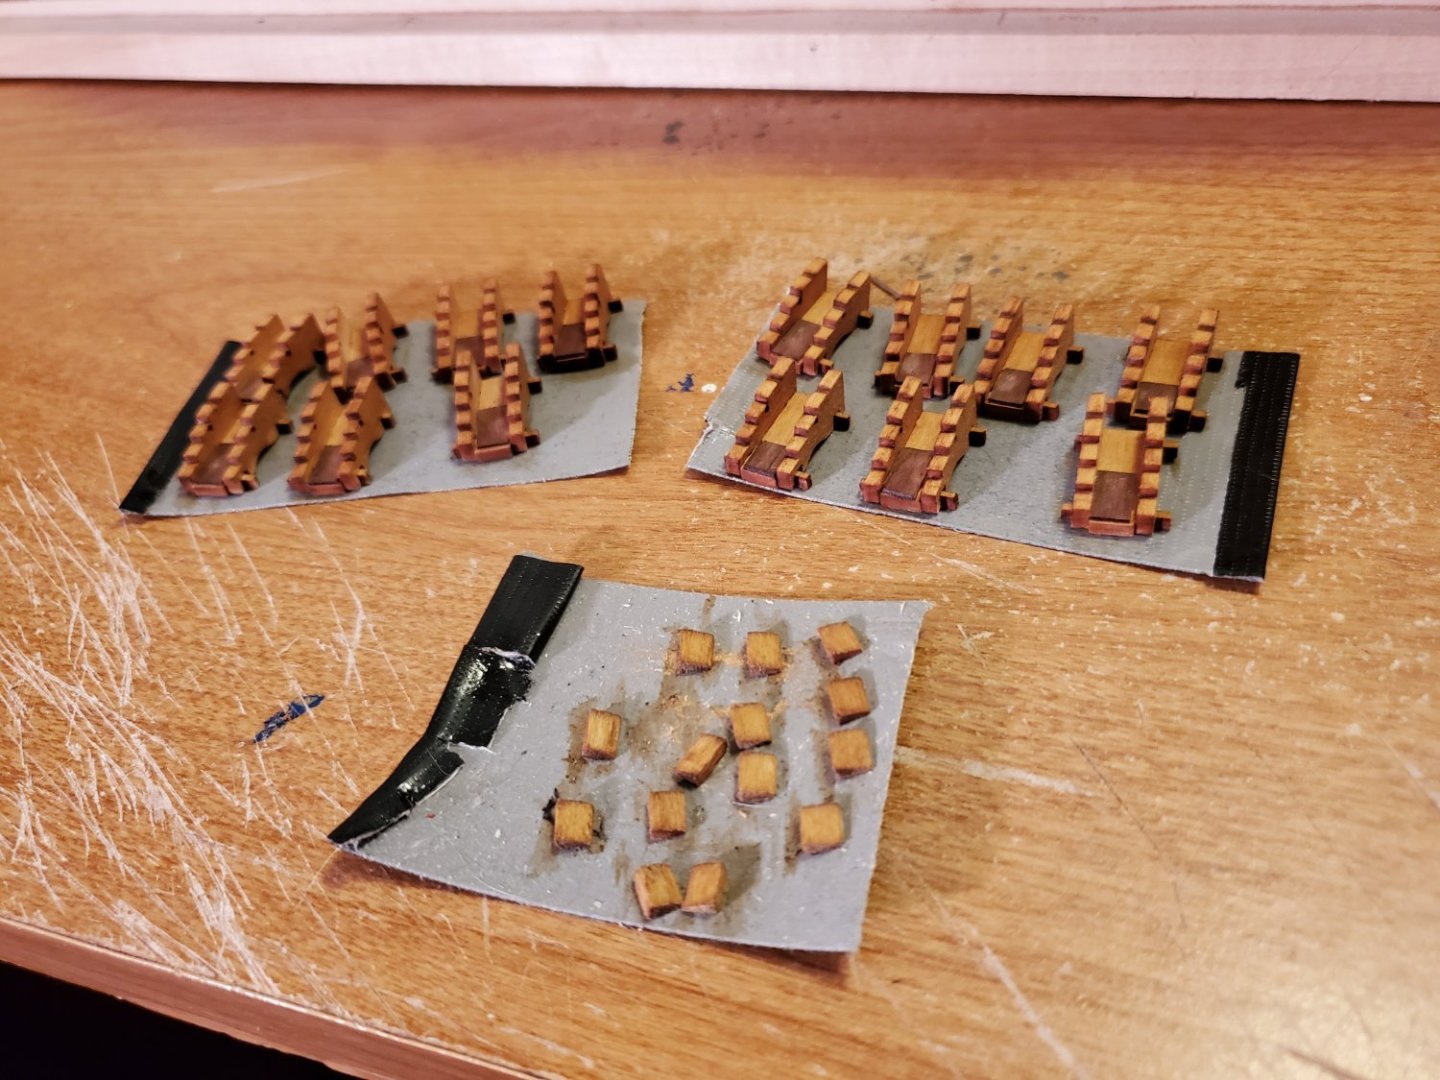
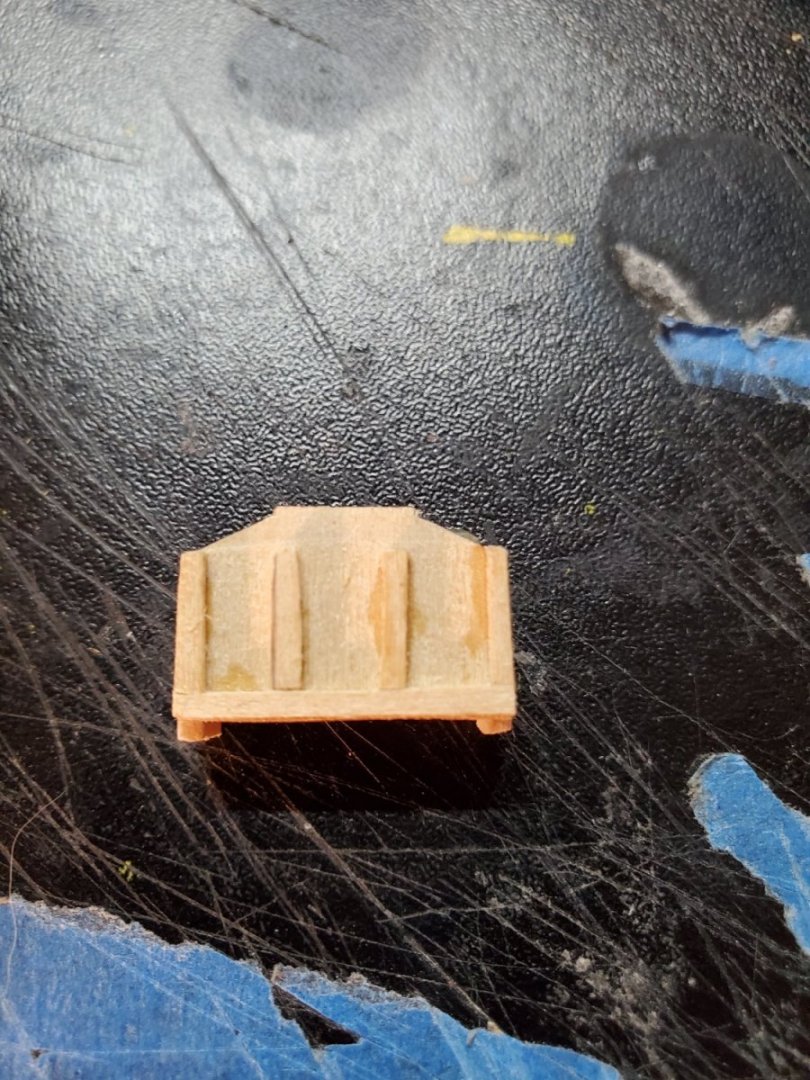
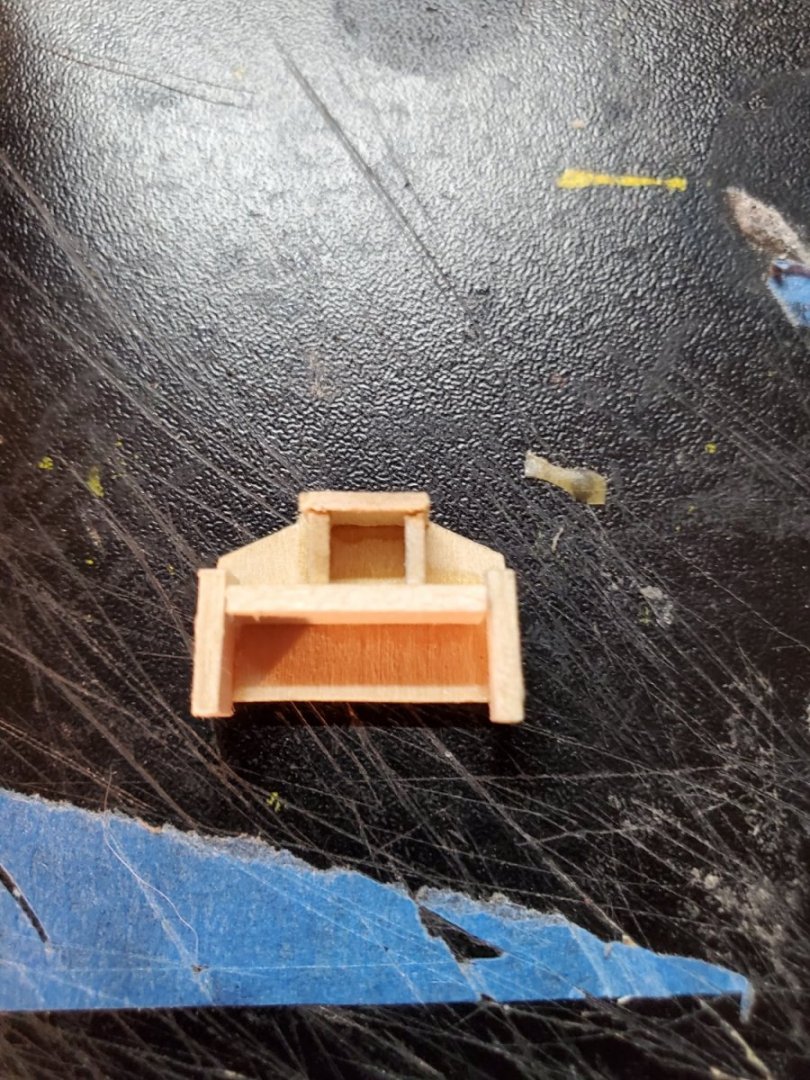
Sorry for the long delay between posts. Lot of ''Life'' going on in between there. Apparently the gun carriage images didn't process, but when I viewed them, they were showing fine. Very puzzling. I am reposting the same thing again, hopefully these pictures will process correctly: Progress on the Fair American Model Ship: Started work on the cannons. I've seen a lot of discussion on the layout and rigging of the cannons from many modelers. My plan is/was to do all the rigging shown in the instructions, including two outhaul tackles, since there were two eyebolts behind each cannon. In the plans, it appears the cannons are slightly tapered towards the front, but the pieces in the kit create parallel frames. I'm all about building things as-shown, but with all the rigging and barrels and everything else, this is a minor detail I can ignore. The gun carriages in the instructions didn't really make sense to me - I wasn't sure why the carriages needed to be built this way, if the kit supplied them already. I started with the carriages, gluing them with the quoin beds made from scrap walnut planks. Gluing was tough, as the pieces didn't want to stay glued, and the 'axles' broke off very easily. I made sure to file down the axles to allow the wheels to slip on without breaking. I made everything in batches. The carriages and the quoins, using upside-down duct tape to hold them. Although other modelers mention the pins are too small for the quoin/gun carriage, I felt they looked to scale, so I went with them. In hindsight, I should have made the quoin taller, to match the height of the cannons turned out to be, after in the gun ports, but I'll live with it. Flat black paint worked well for the guns themselves, just took 3 1/2 coats to get there!!! I knew that each gun carriage would fit into the gun ports a little differently, so I decided to number each one so I knew where they were located (forward/aft port/starboard) For the caps/straps, I used left over brass strips (gudgeon/pintle). I would form them over a small broken drill bit as shown - seemed to work pretty well. Afterwards I'd paint it black. I bought some 1/8" brass rings, and extra eyebolts for the carriages. I ended up bending many of them by hand, since there were so many needed. The carriages were stained, and the eyebolts/rings are left unpainted. Again, I like the look of the brass, with the stained wood. Its my model, and you can't stop me! Each cannon is now in place at each gun port. Another hindsight moment, was wishing I had moved the door more toward the middle of the house front, so the cannon doesn't impede it. As stated before, I'm keeping the deck furniture off until the cannons are fully rigged - I need the room! After so many weeks on the cannons, I'm pleased with them. They were fun to build. The rigging is next. I have been looking forward to this for a while. I've never made blocks or hooks or tackle or stays or halyards or clue lines. The magnifiers I got for Christmas are going to help tremendously! I hope to have progress photos of the rigging progress/process soon. - Jason -


-
Progress on the Fair American Model Ship: Started work on the cannons. I've seen a lot of discussion on the layout and rigging of the cannons from many modelers. My plan is/was to do all the rigging shown in the instructions, including two outhaul tackles, since there were two eyebolts behind each cannon. In the plans, it appears the cannons are slightly tapered towards the front, but the pieces in the kit create parallel frames. I'm all about building things as-shown, but with all the rigging and barrels and everything else, this is a minor detail I can ignore. The gun carriages in the instructions didn't really make sense to me - I wasn't sure why the carriages needed to be built this way, if the kit supplied them already. I started with the carriages, gluing them with the quoin beds made from scrap walnut planks. Gluing was tough, as the pieces didn't want to stay glued, and the 'axles' broke off very easily. I made sure to file down the axles to allow the wheels to slip on without breaking. I made everything in batches. The carriages and the quoins, using upside-down duct tape to hold them. Although other modelers mention the pins are too small for the quoin/gun carriage, I felt they looked to scale, so I went with them. In hindsight, I should have made the quoin taller, to match the height of the cannons turned out to be, after in the gun ports, but I'll live with it. Flat black paint worked well for the guns themselves, just took 3 1/2 coats to get there!!! I knew that each gun carriage would fit into the gun ports a little differently, so I decided to number each one so I knew where they were located (forward/aft port/starboard) For the caps/straps, I used left over brass strips (gudgeon/pintle). I would form them over a small broken drill bit as shown - seemed to work pretty well. Afterwards I'd paint it black. I bought some 1/8" brass rings, and extra eyebolts for the carriages. I ended up bending many of them by hand, since there were so many needed. The carriages were stained, and the eyebolts/rings are left unpainted. Again, I like the look of the brass, with the stained wood. Its my model, and you can't stop me! Each cannon is now in place at each gun port. Another hindsight moment, was wishing I had moved the door more toward the middle of the house front, so the cannon doesn't impede it. As stated before, I'm keeping the deck furniture off until the cannons are fully rigged - I need the room! After so many weeks on the cannons, I'm pleased with them. They were fun to build. The rigging is next. I have been looking forward to this for a while. I've never made blocks or hooks or tackle or stays or halyards or clue lines. The magnifiers I got for Christmas are going to help tremendously! I hope to have progress photos of the rigging progress/process soon. - Jason -
-
Thank you for the kind words. That's an interesting little history there. I'm not exactly sure of the origin of my name, but for me, it certainly refers to the length of time I've spent on this build! And, I'm located in the Delaware Valley, so maybe there's something there.
-
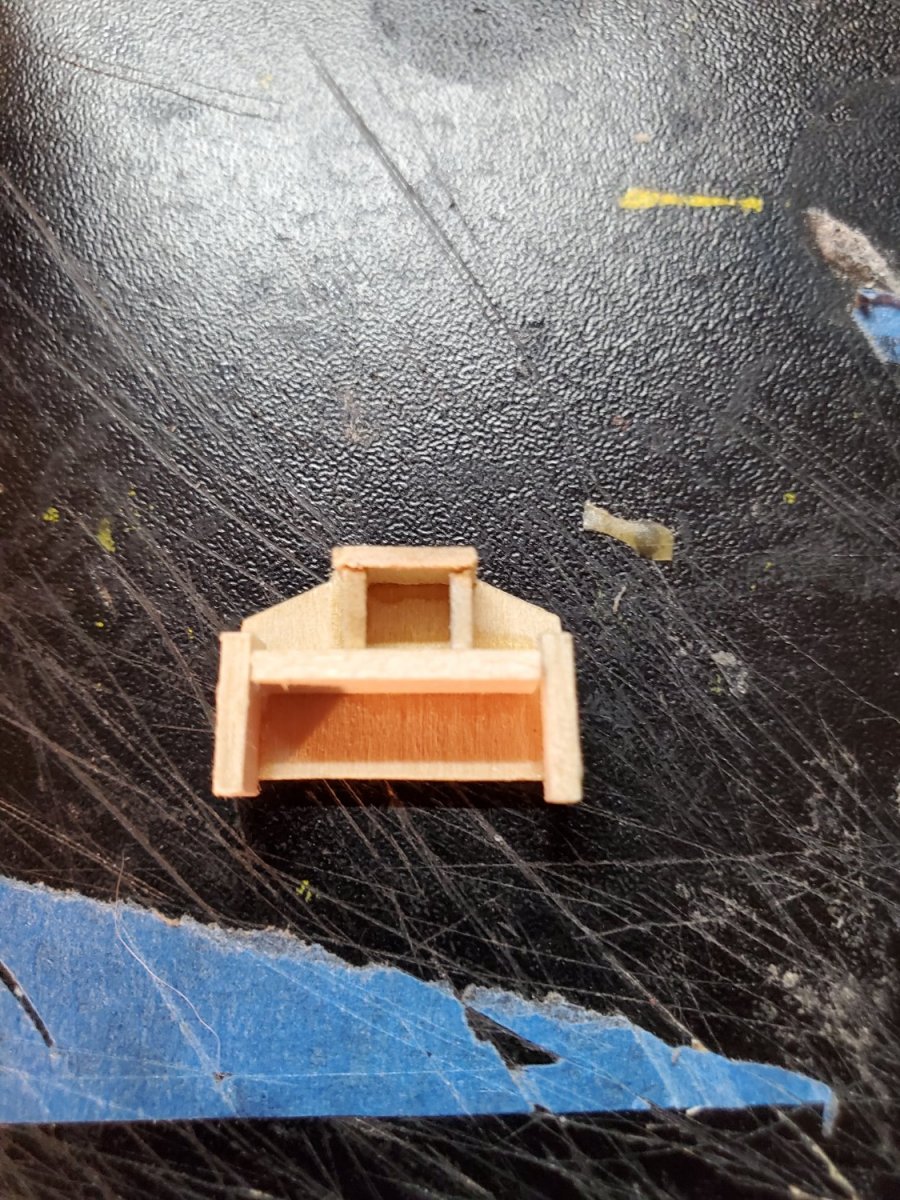
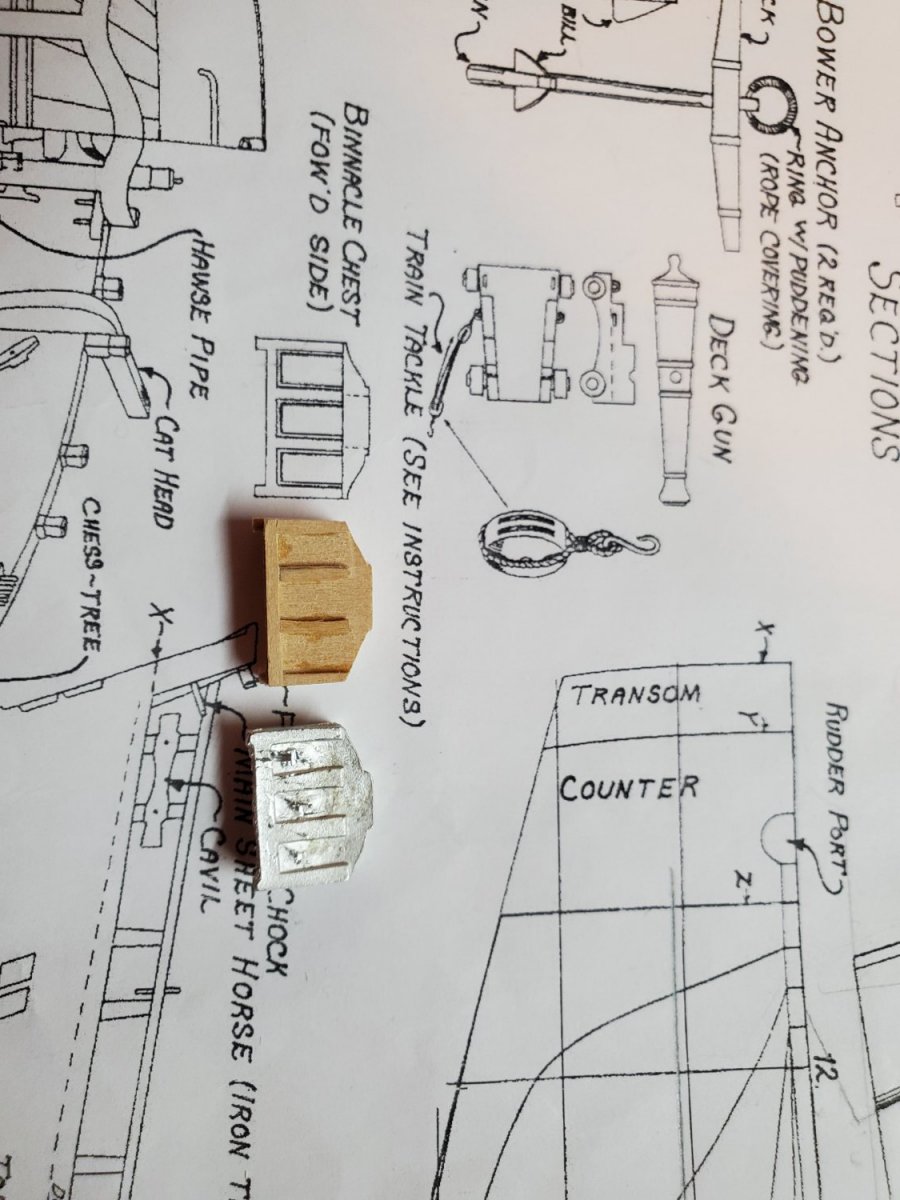
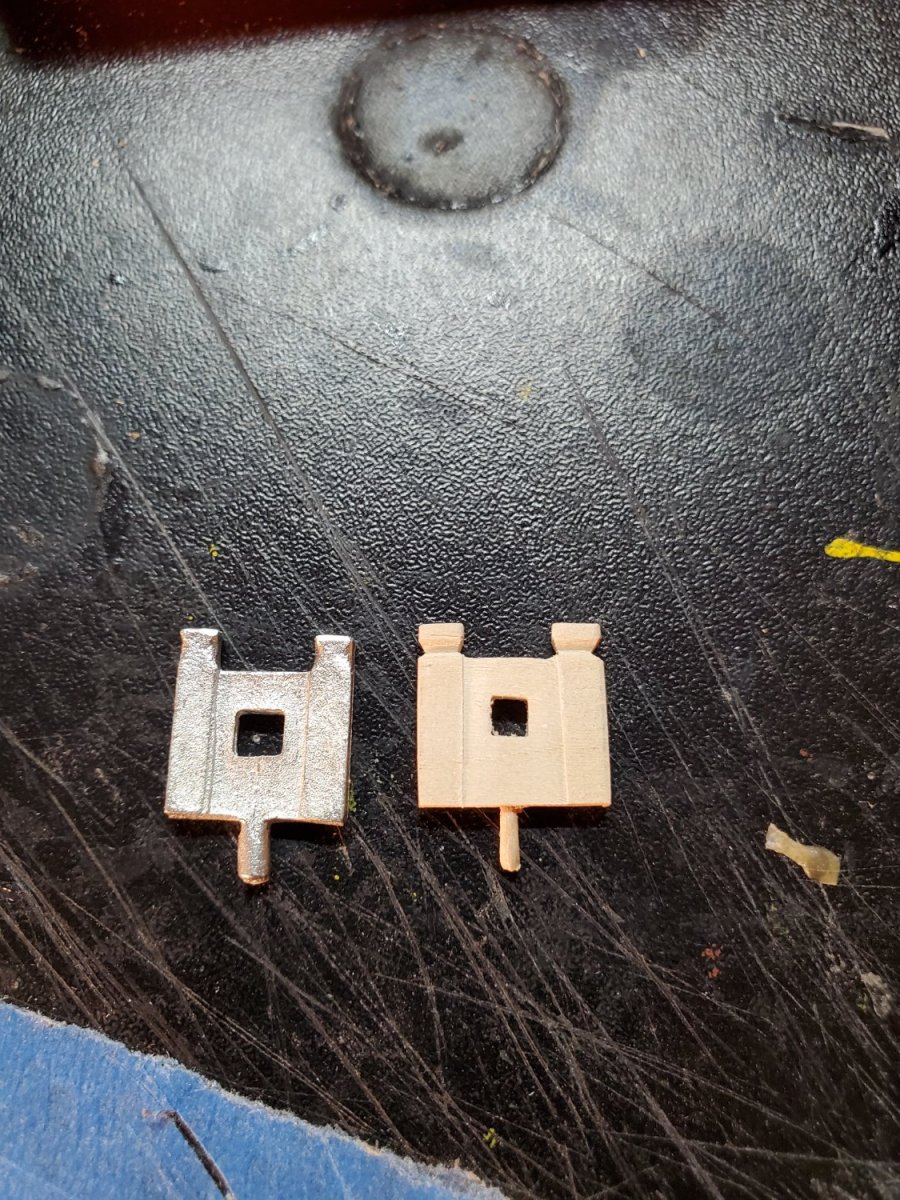
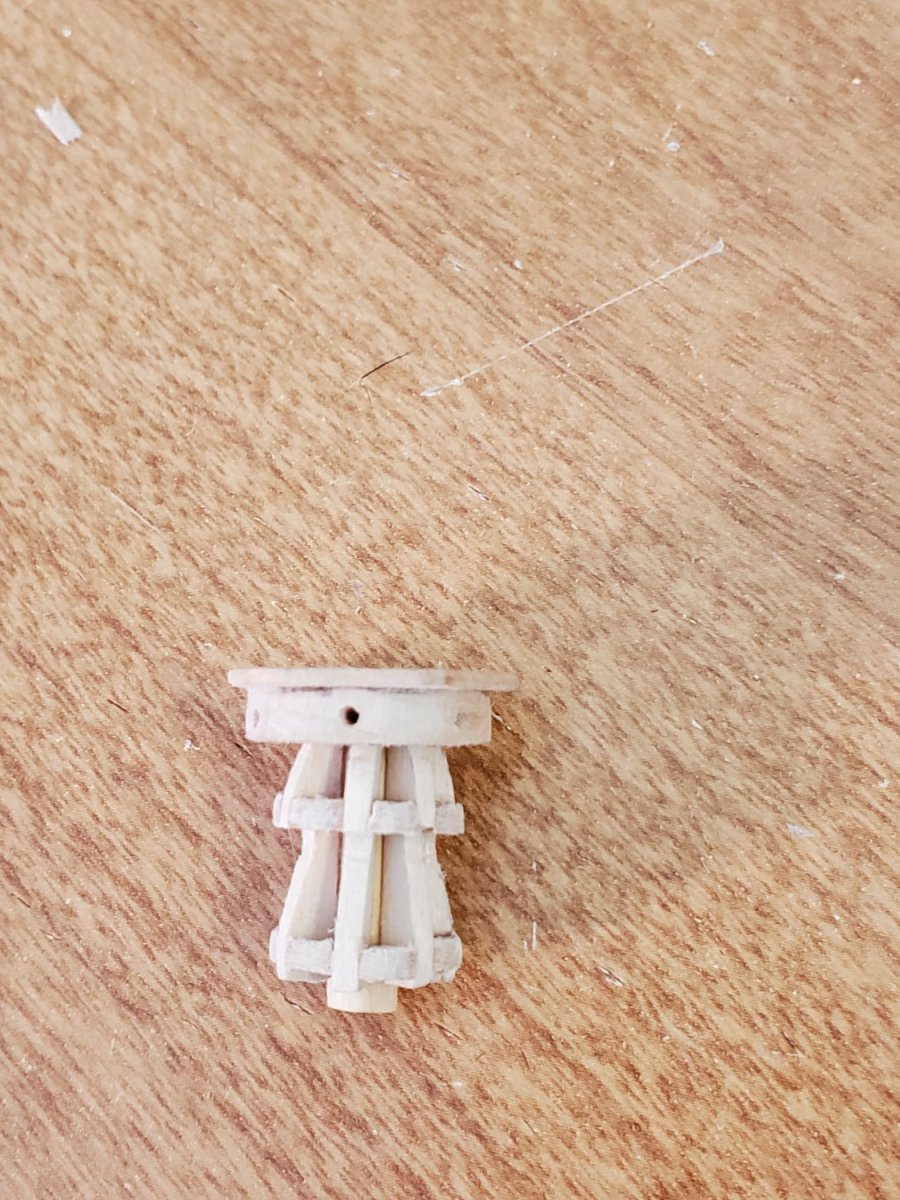
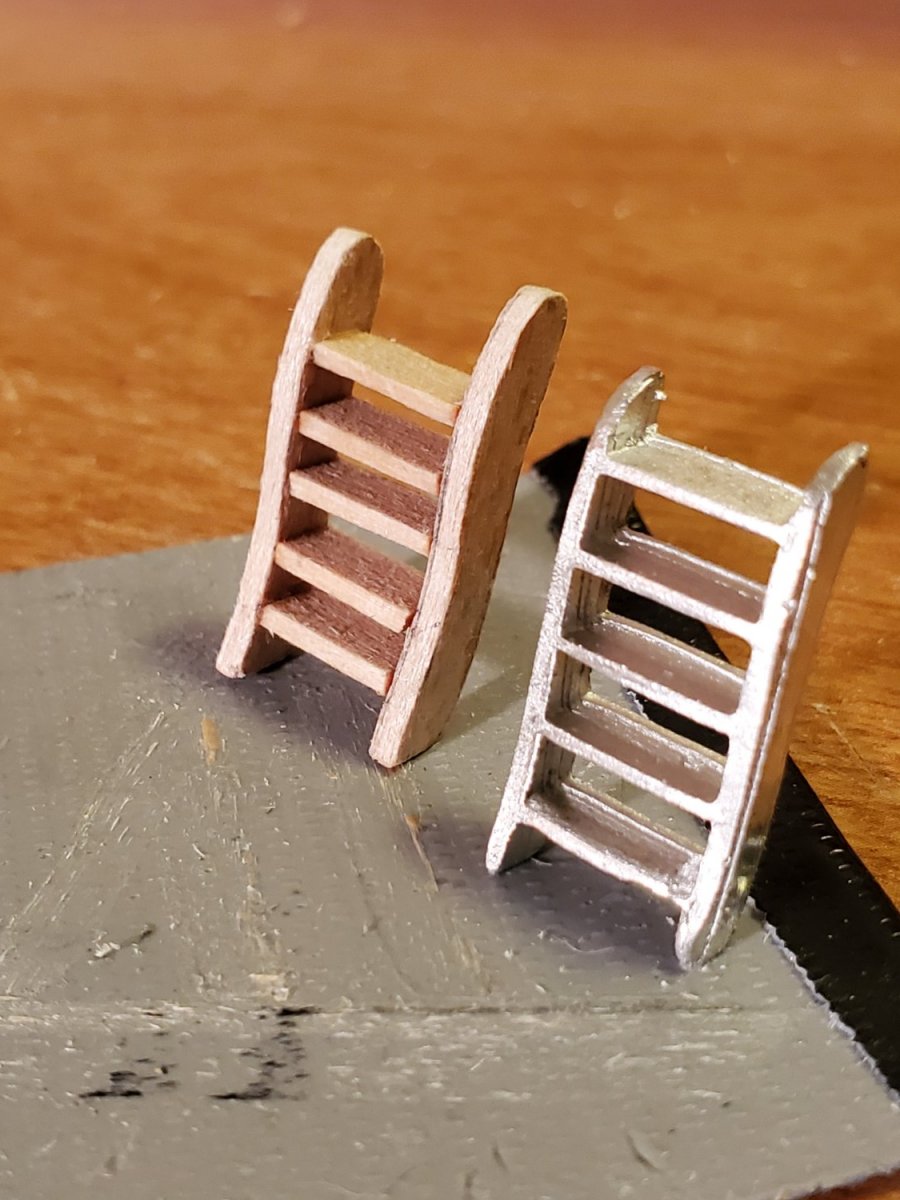
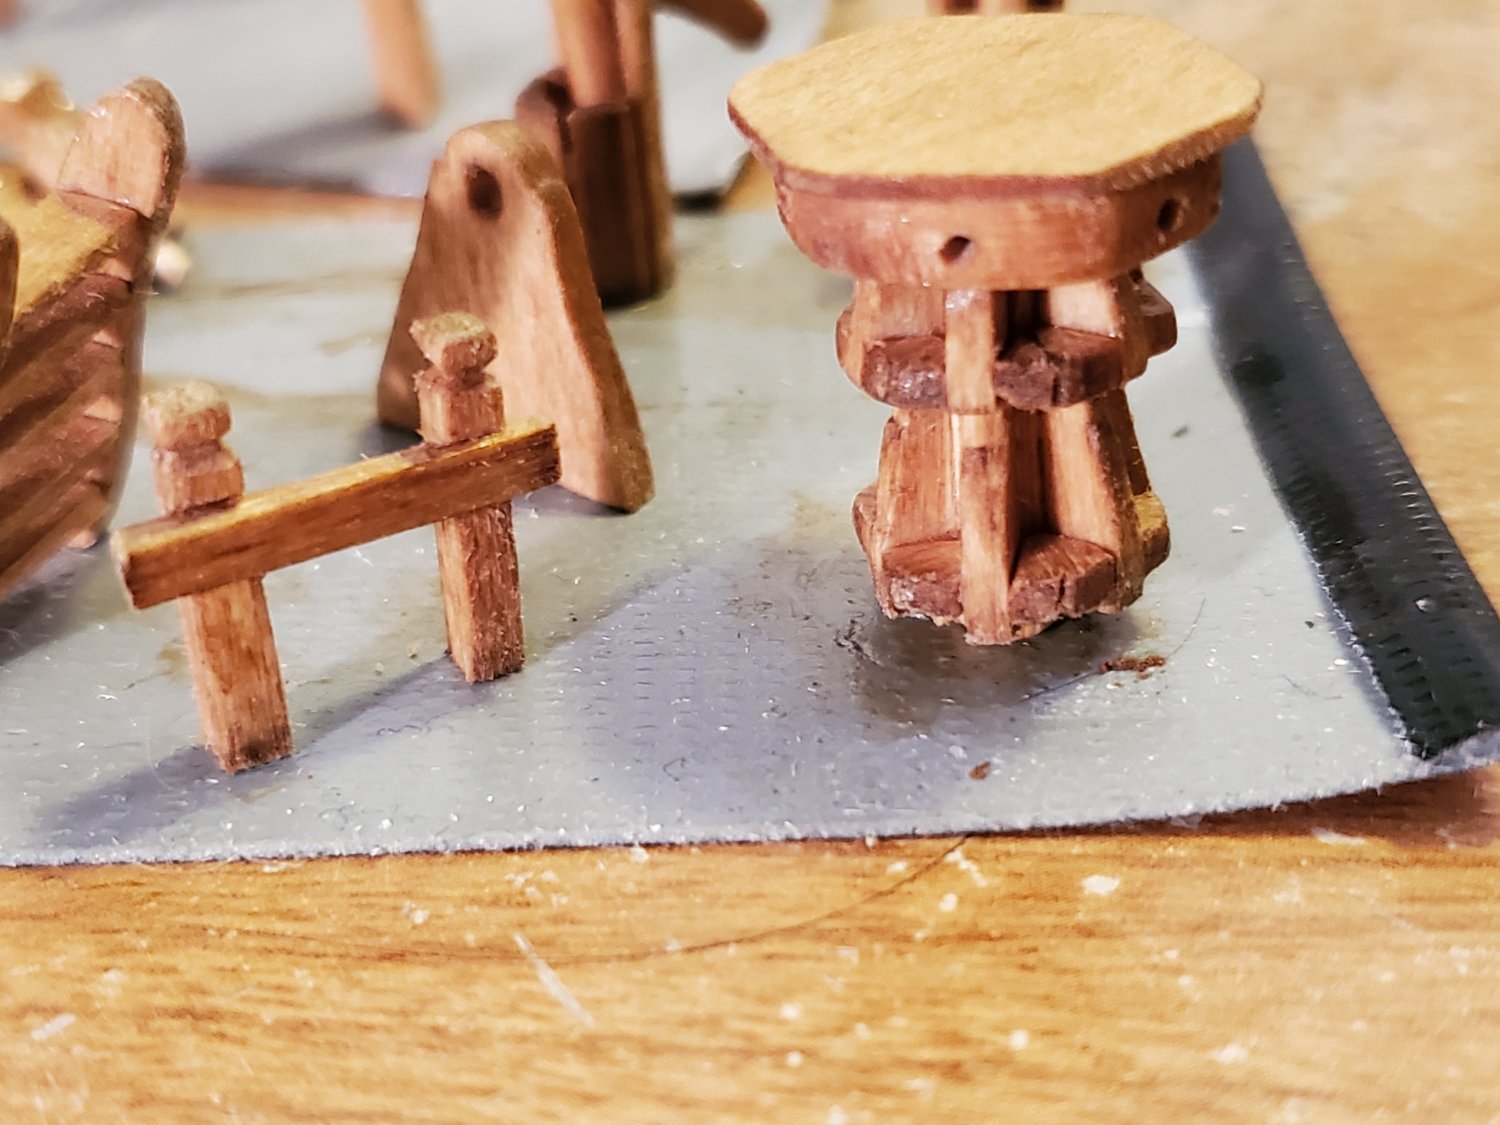
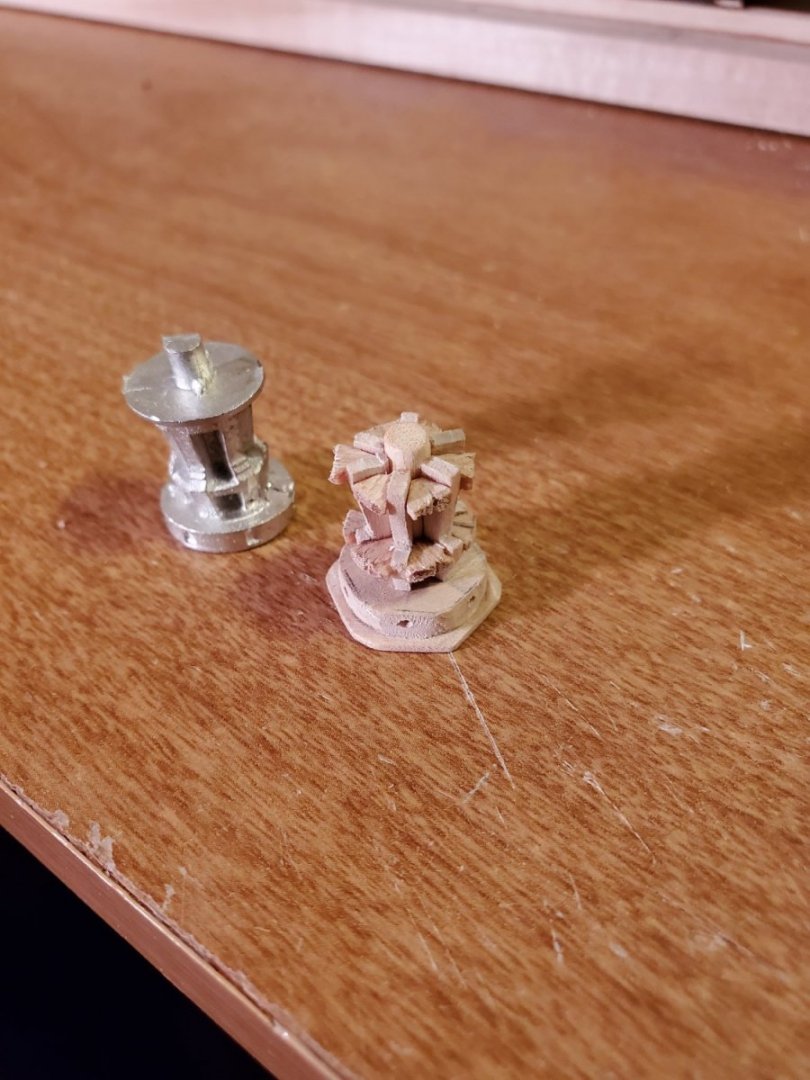
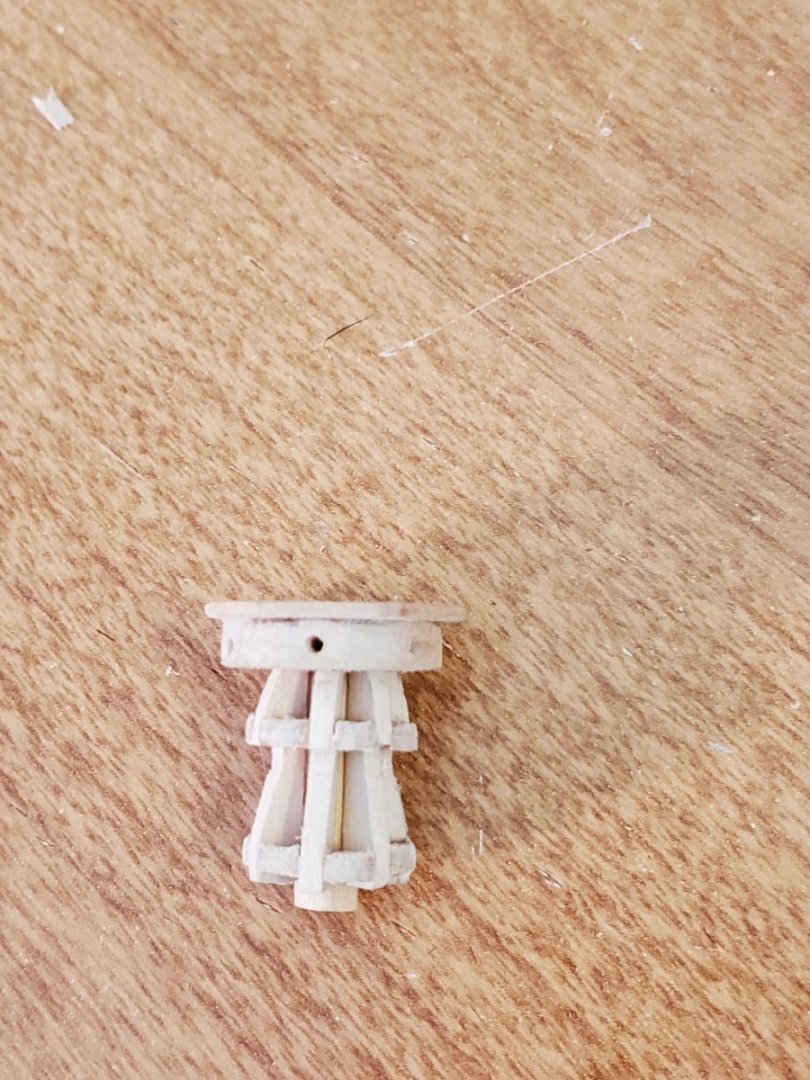
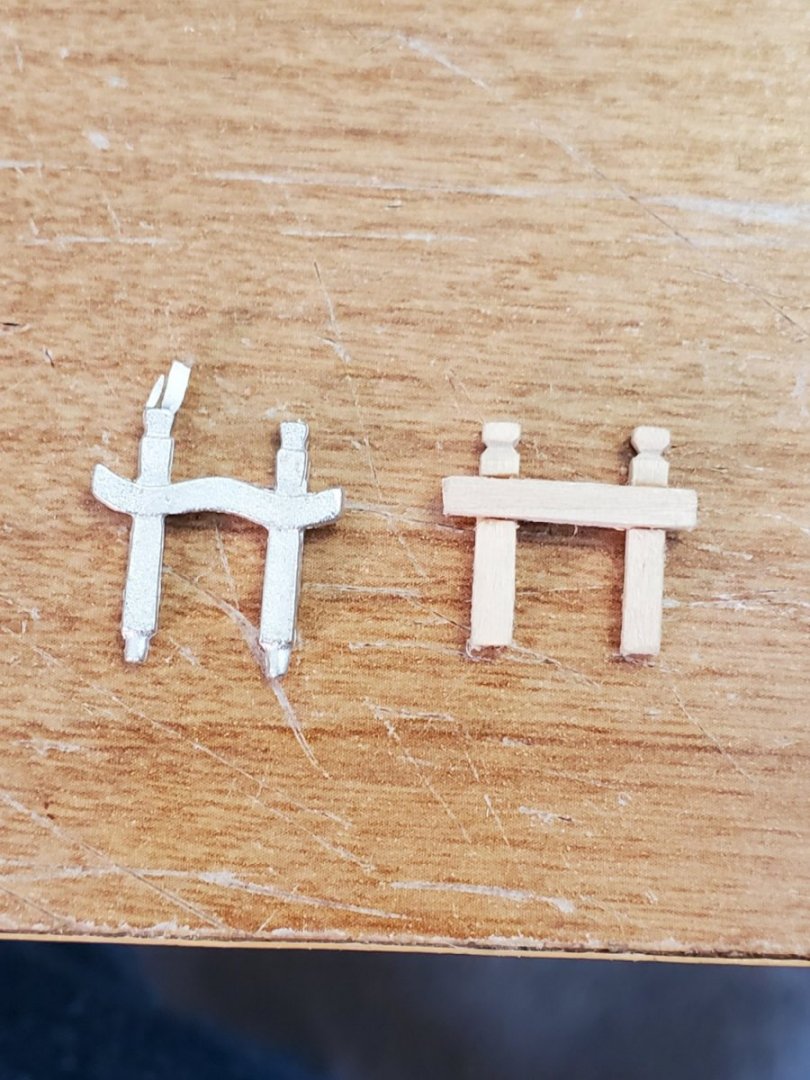
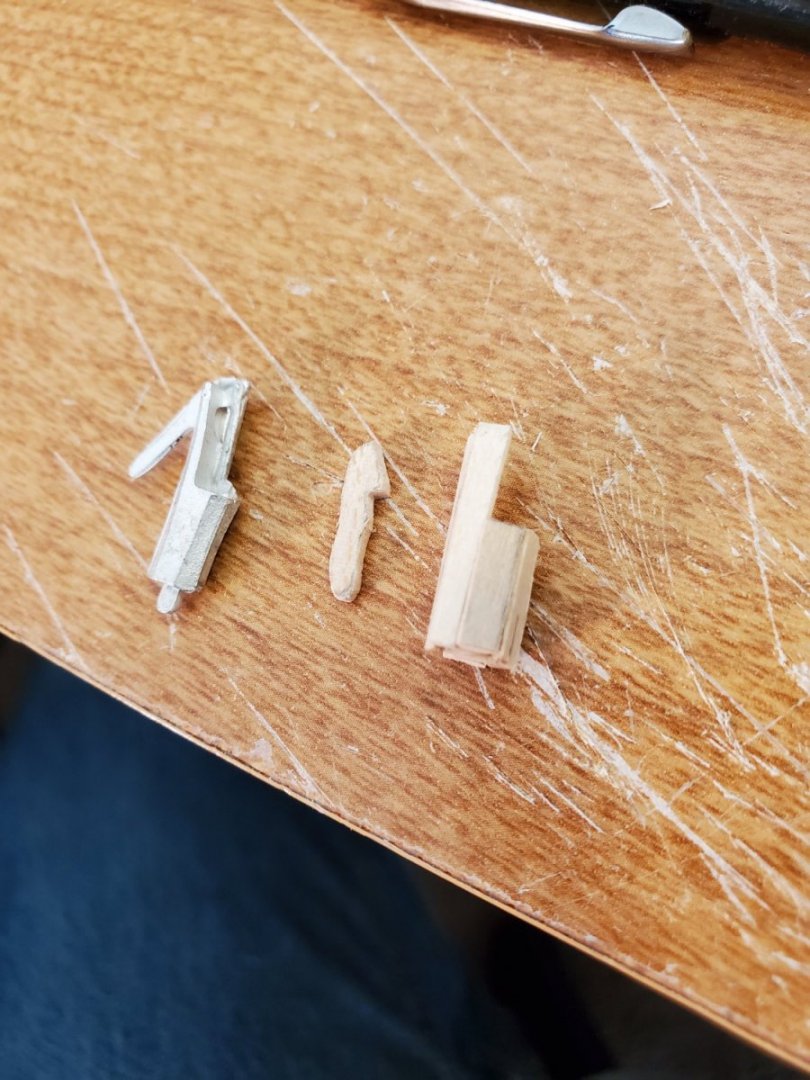
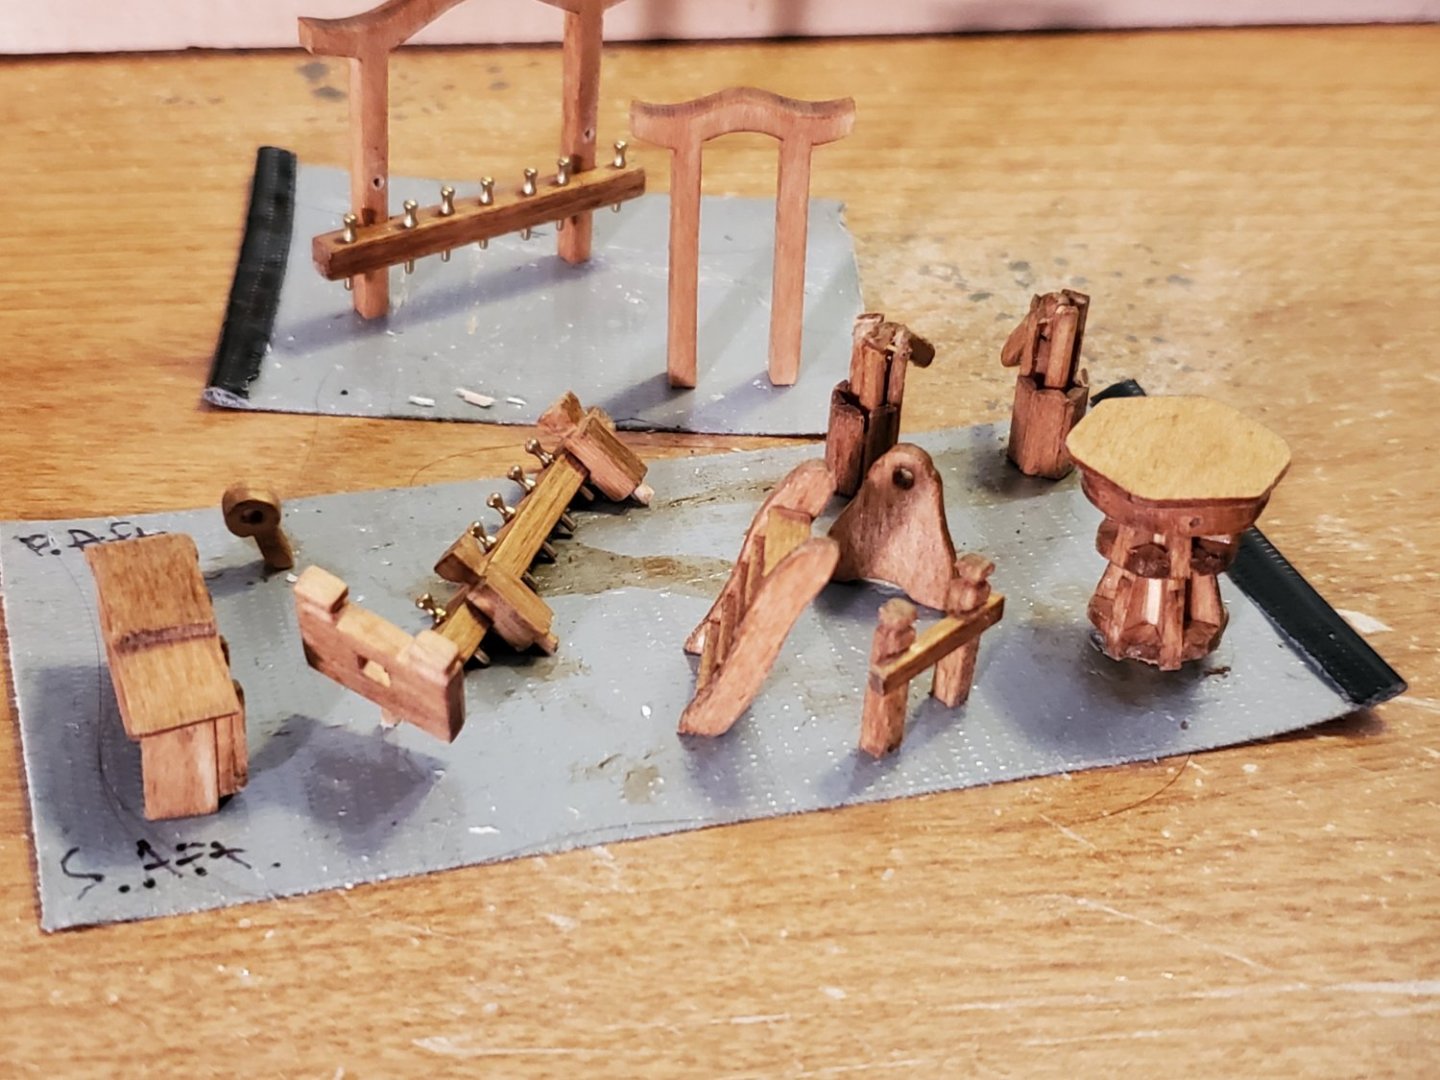
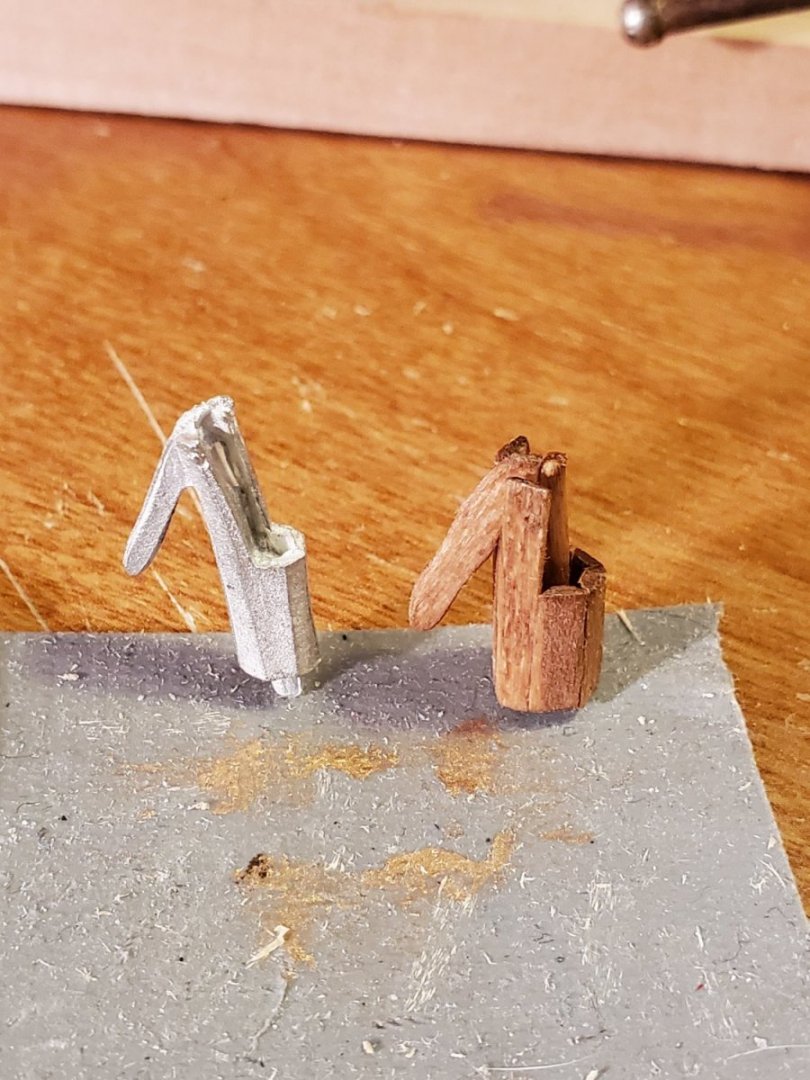
Still plugging away at the Fair America Model Ship, with a very tiny hammer and chisel: Looking at all the castings for deck furniture, the quality was not great. Plus, I wanted my model to have a more authentic feel, so I opted to build these pieces from scratch, using some remaining wood. The Binnacle had the most time in, after the Capstan. I wasn't really sure about how to build it properly, but from a distance, it won't look too bad. Maybe my next ship will incorporate to-scale dovetails and pull-out drawers ;-). In the end, it didn't turn out too bad, and I'm proud of the work. Next up was the Bitts. Ultimately, I put in belaying pins, as needed for rigging sails so I put those in later. Bitt.... By Bitt ... The Capstan took a lot of pieces to complete, but I got it done. Adding little wedges to simulate the finished rings, then sanded them down afterwards. I decided that I would keep the overall shape hexagonal, since it is what is shown in the plans The ladder was a fun piece. I only built one for opposite the door of the quarter deck. Turning to the pumps, they were a little tricky. I used a small dowel on the inside, then wrapped with little planks to mimic a barrel. The handle was just similarly shaped, as best I could. Difficult to see, but I added a little pin (from left over eyebolt brass) to attach the handle. At one point before gluing, it pumped! Once everything was built, I went ahead and stained them all. It looks a little red from this lighting angle, but in actuality it is a MinWax Pine. You may notice by now, a repeating pattern with upside down duct tape. It has been invaluable for holding pieces and not losing them on the floor, which happened often enough as it is. Folding one side down to remove the sticky, and provide a grab spot helped a ton. With the added bonus, that you won't ever see the bottom of these parts, so no loss if it's not painted or stained. I know it's not supreme quality craftsmanship, but it is certainly better than the castings. I'm happy with the results. Once the Gun Carriages are finished and installed, I can place all the furniture on deck; I want to make sure I have enough working room for the guns first. That's up next! More updates and progress soon, - Jason -


-
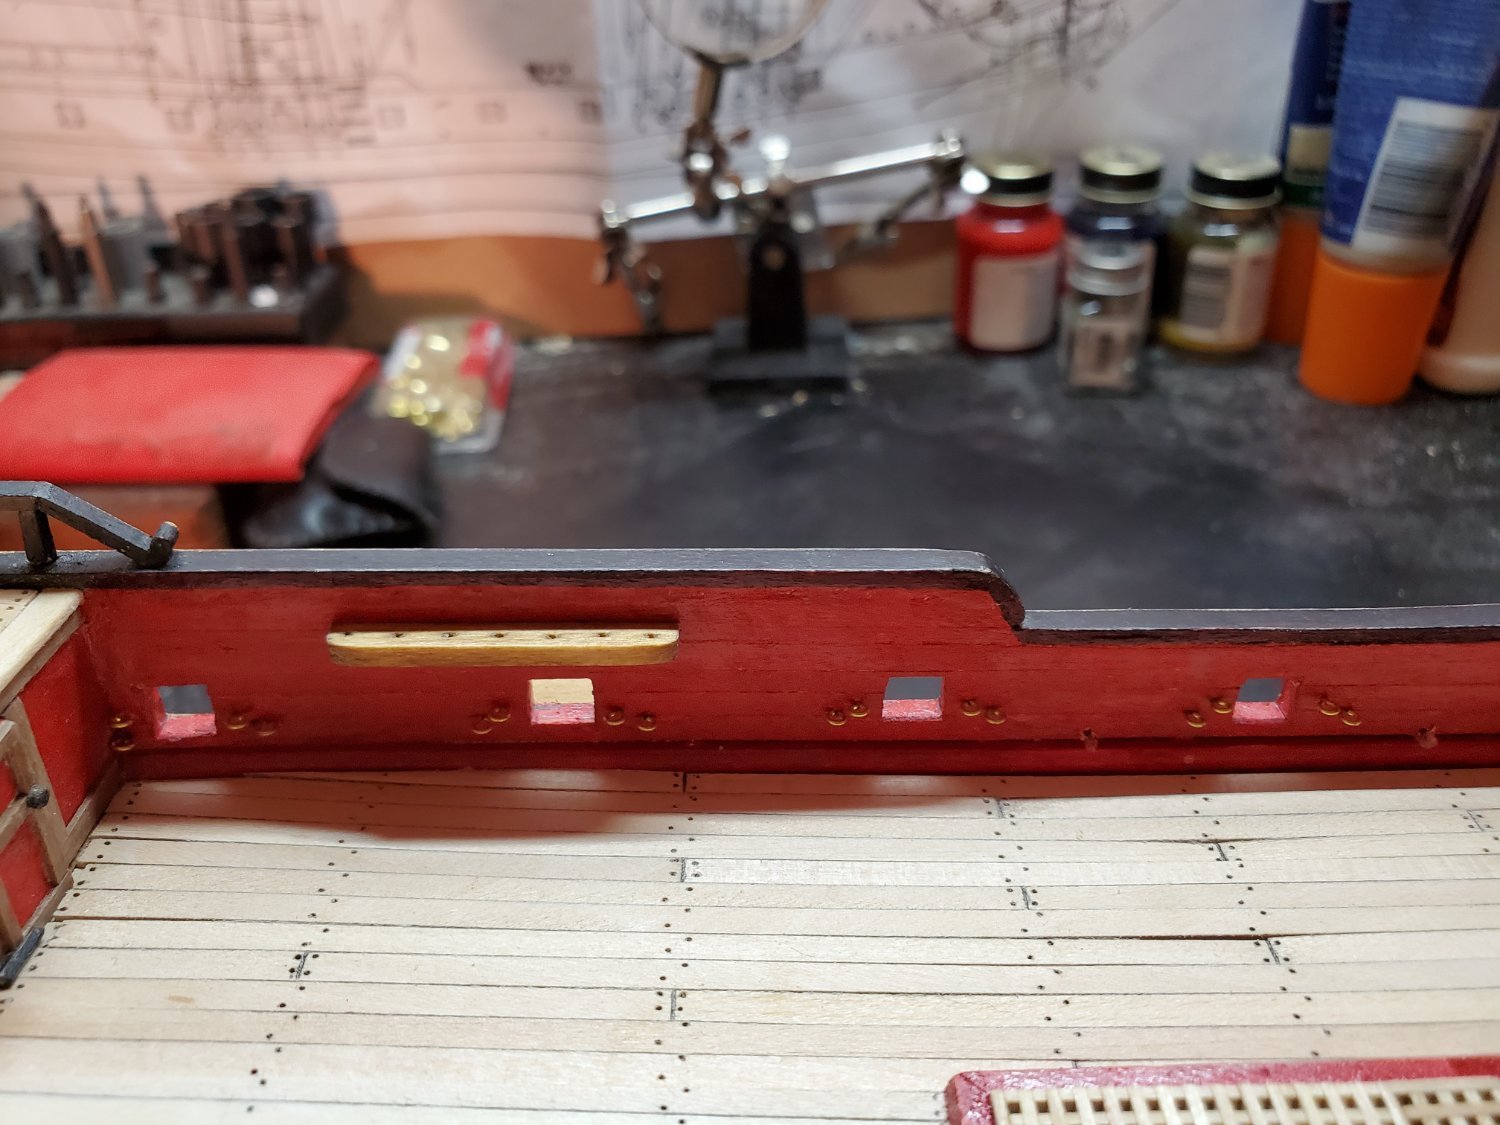
Continuing to work on the Fair American Model ship: The inner bulwarks needed some touching up, so I added a black trim line just under the rail. I'd seen another modeler do this, and I think it looks pretty good. Using some painters tape made the job a bit easier. My trusty ol' black Sharpie worked fine for me. I added some toothpick ends as dowels for the pin rails. The rails are ~1/32'' thicker than the plans show, but I felt that since these will be load supporting with rigging later on, they needed to be beefier. The gallows and pin rails all got sanded and stained before installing. I know the color scheme is supposed to be red/black, but I prefer stained wood better. This will also be true of the deck furniture, which I intend on building later. The belaying pins look nice. I also want to put sails on my model, so I'm going to need more pins for that rigging, so I ordered more from Model Expo. With all the eyebolts on the model, I quickly ran low. Since the stems of most of them don't need to be very long, I cut and saved the remaining stems. I went about and bent my own eyebolts from the stems. Could I have just bought more? - yes. But I didn't mind learning/teaching myself a new skill. The other thing I did was build a Mainstay Padeye. I wasn't going to use one of the eyebolts, as it is out of scale, and I don't feel it would offer enough support under tension. You can see the one I made is more to scale, and the wood stem will glue and grip better than a smooth brass would. Building tiny furniture is next on the list.... - Jason -


-
Thanks Tom. I had a similar thought about a different screw size, after the pedestals are in place. That's probably what I'll end up doing. Thanks for the kind words. I've really enjoyed the build so far and many learnings along the way. I'm sure once I get to the rigging, I'll have tons more questions. - Jason -
-
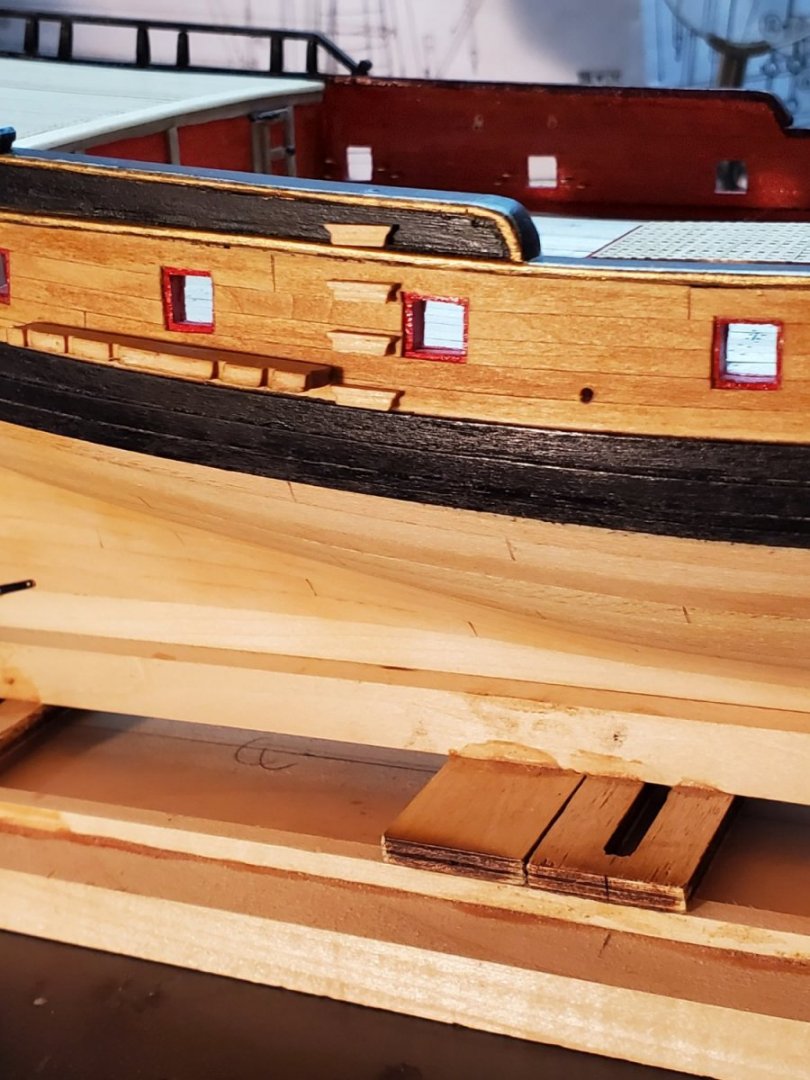
Mounting problems: Please help I'm a bit confused on the use/installation of the Pedestals to hold the ship. At this point, the instructions somewhat describe the leveling of the model, but not any details about how to mount, exactly. I bought the two pedestals suggested (MS0812 and MS0813) - they came with long wood screws, however they are the same width as the keel. If I were to screw them in from underneath, they would SHRED the keel!! This can't be right. Is the keel just meant to rest in the pedestals but not screwed or glued down??? I can pinpoint the waterline for leveling fine, but what do I do after that? Does the keel just wedge into the pedestals? Should I just glue the pedestals down to the baseboard, and forget the screws entirely? It seems like an important detail to get right. The instructions offer no help. Any guidance here would be welcome

-
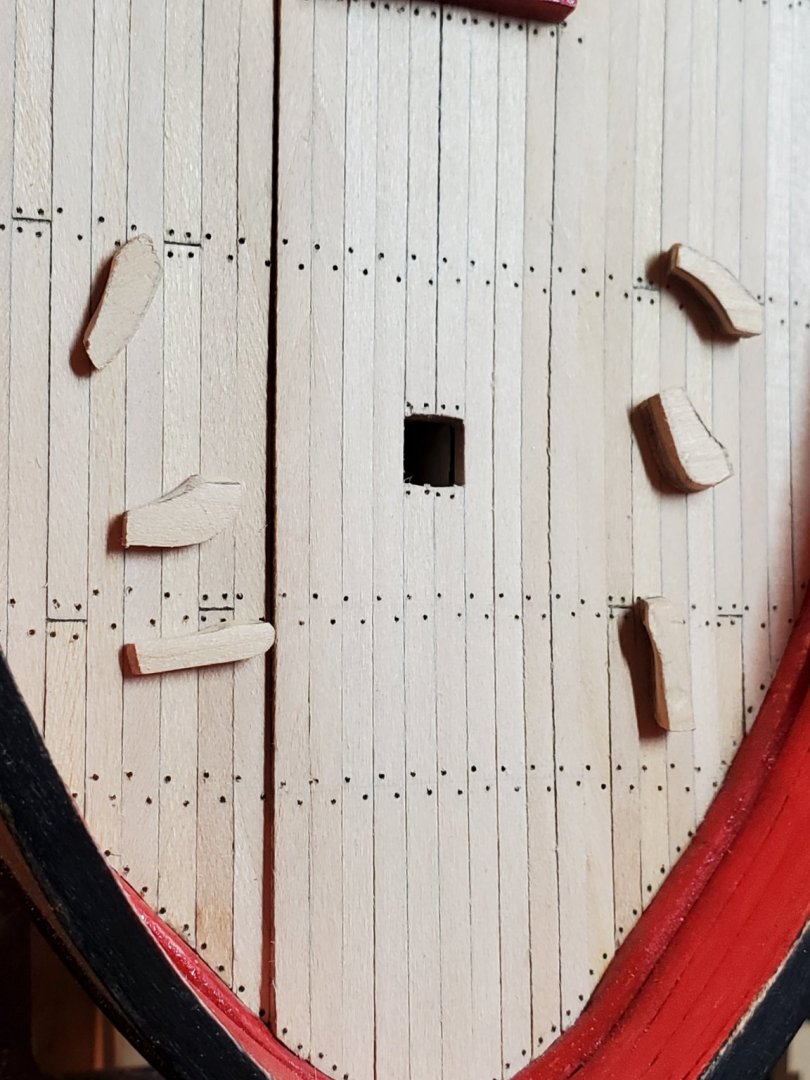
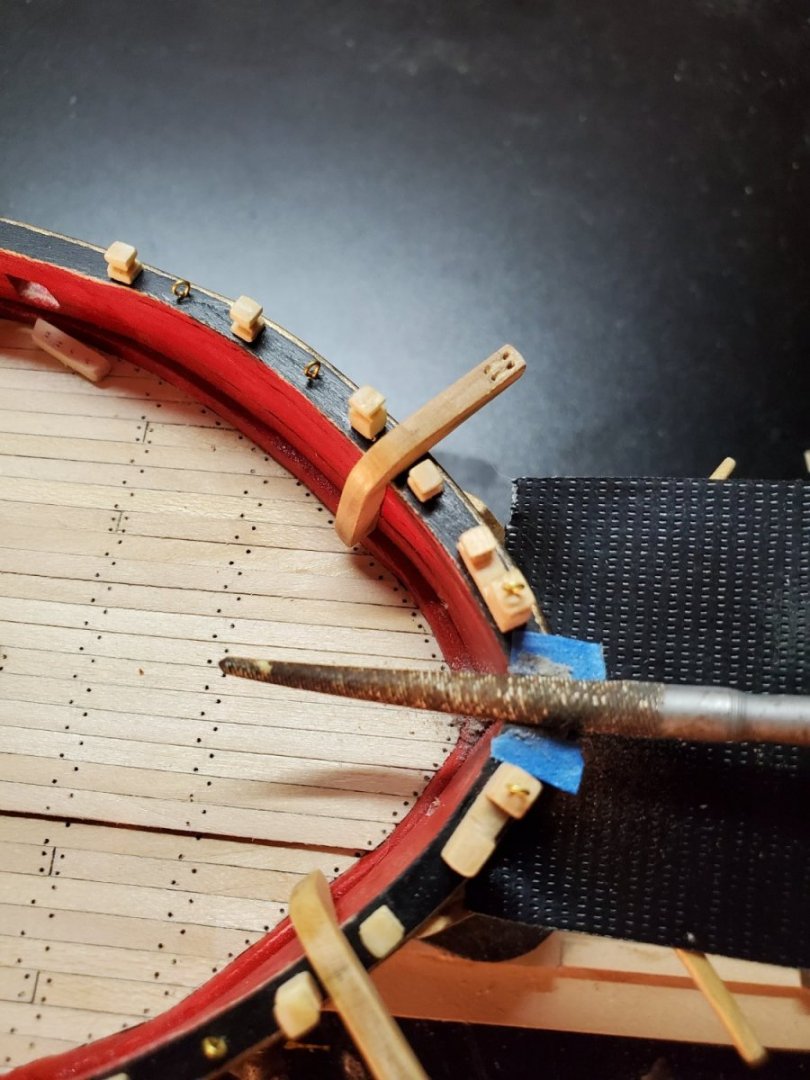
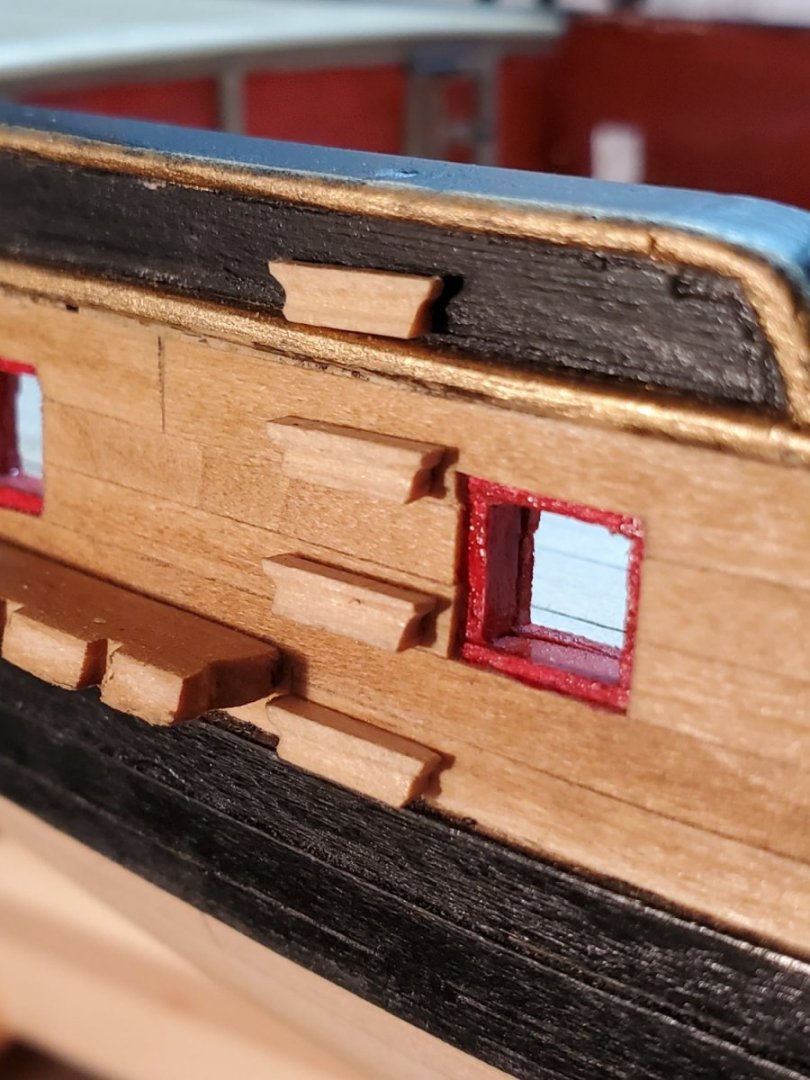
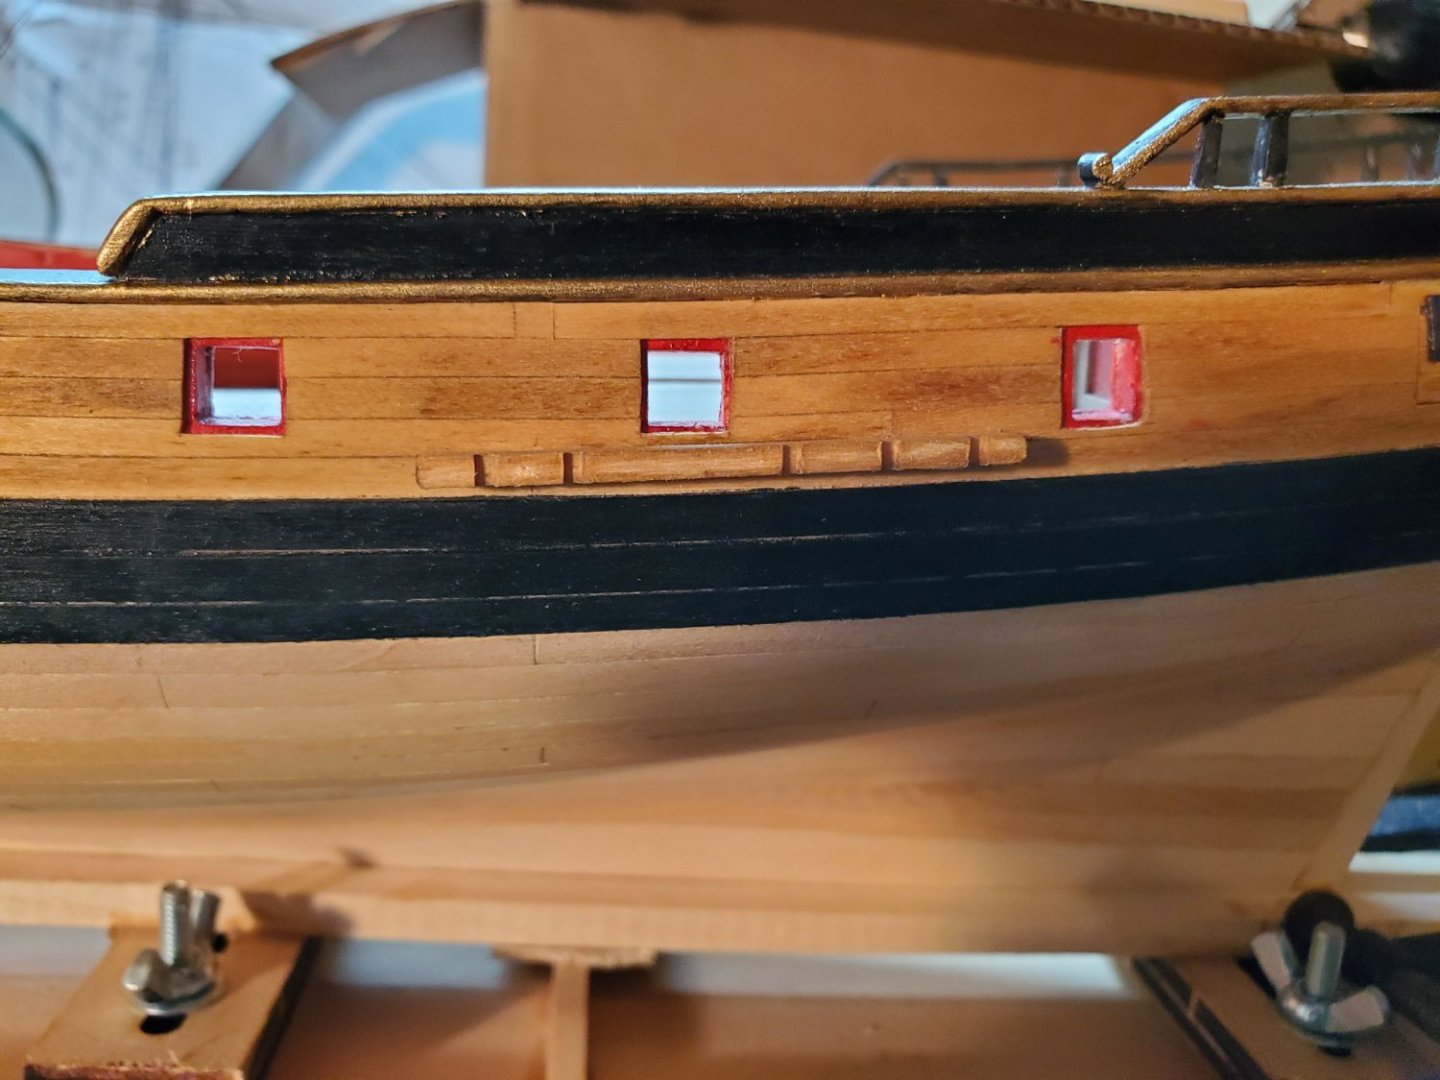
More progress on Fair American Model Ship: Gangway steps were next on the list. I decided to carve these from a single piece of wood, making the middle and sides curved, using a round file. Tricky little pieces, but they turned out nice in the end. The space between the gunport and the channels got a little close, but I'm happy with it. I then went to work on the timberheads and knightheads. I made them long to start, so they were easier to work with, before cutting to final length after they were shaped. You can see the little pencil tick marks. The instructions indicate they are to be painted black, but I wanted to keep the wood-look, so I just added some clear poly to finish. I can always paint them later, if I change my mind. The catheads didn't quite fit the inner bulwarks perfectly, without a small space, so I added a ''shim'', and sanded to fit. This will be somewhat hidden once installed, which is just fine for me! I used a small drill and a tiny rounded file to create the ''look'' of sheaves in the catheads; that is to say I wanted them to look like there was a pulley in there - just a small detail I included. All installed - now we're getting somewhere! At this time, I filed a rounded slot in the bow rail for the bowsprit. I measured it to be about 1/4" at this section, so the cutout is a hair oversized to accommodate. I drilled the pin holes for the pin rails in the bulwarks, and installed the brass eyelets all round. There were a LOT of them on the plans, many of which didn't appear to be used, once rigged. I plan to add sails to my build, so I expect they'll be used for that additional running rigging. Once I get to it, the deck furniture will be made from wood. the castings aren't awesome quality. That'll be a fun challenge! More updates soon, - Jason -

-
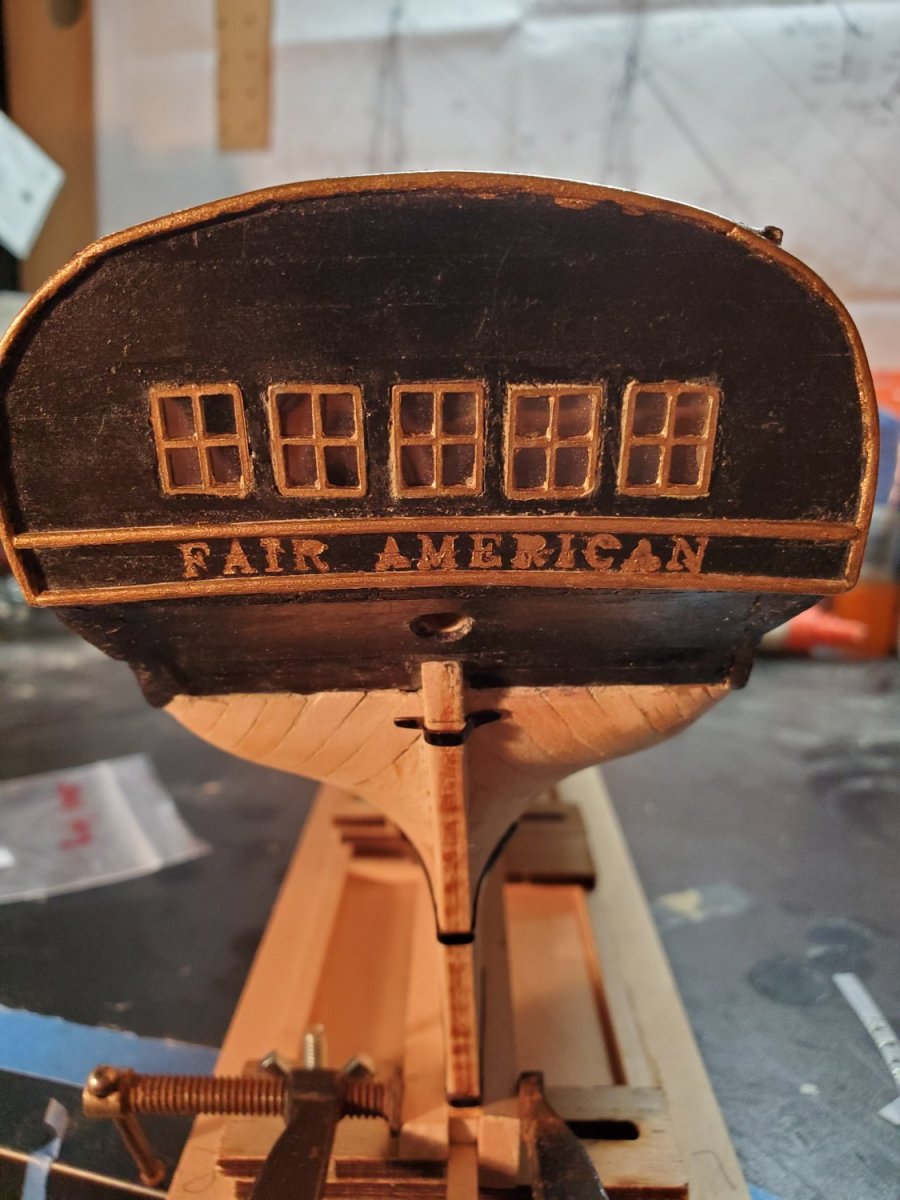
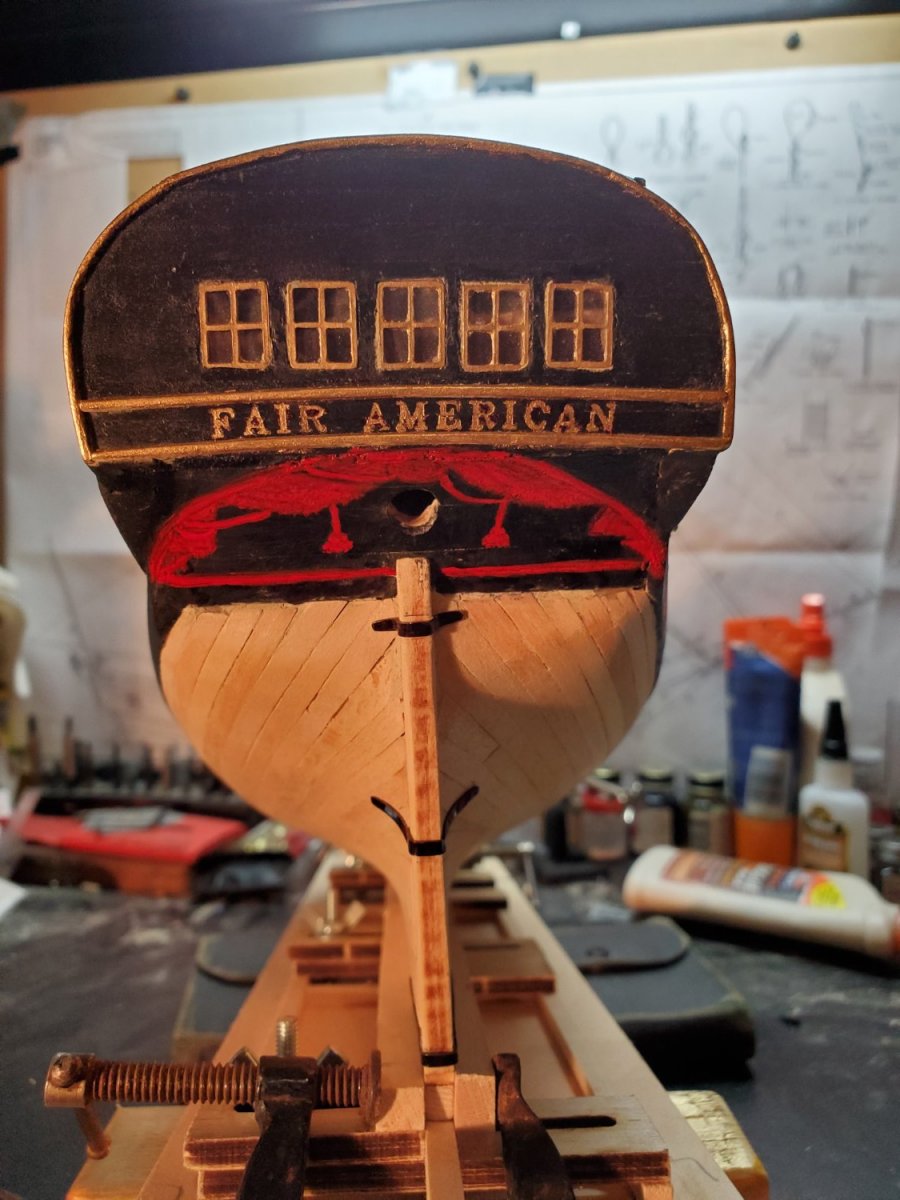
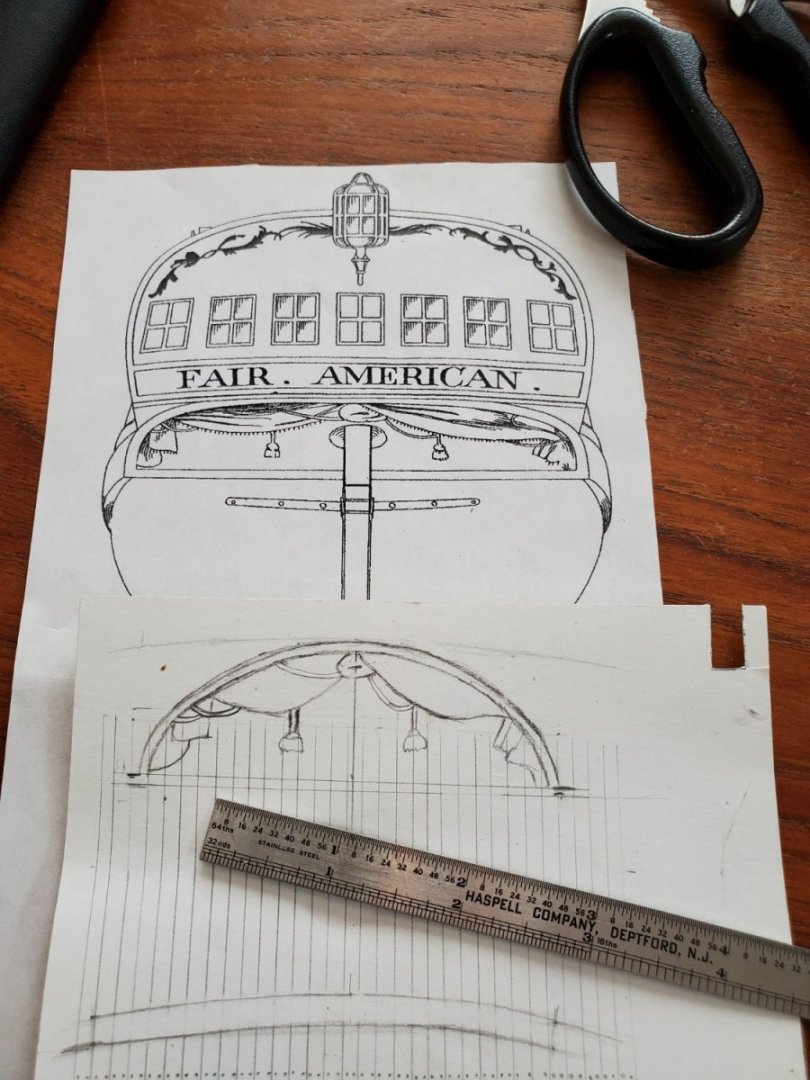
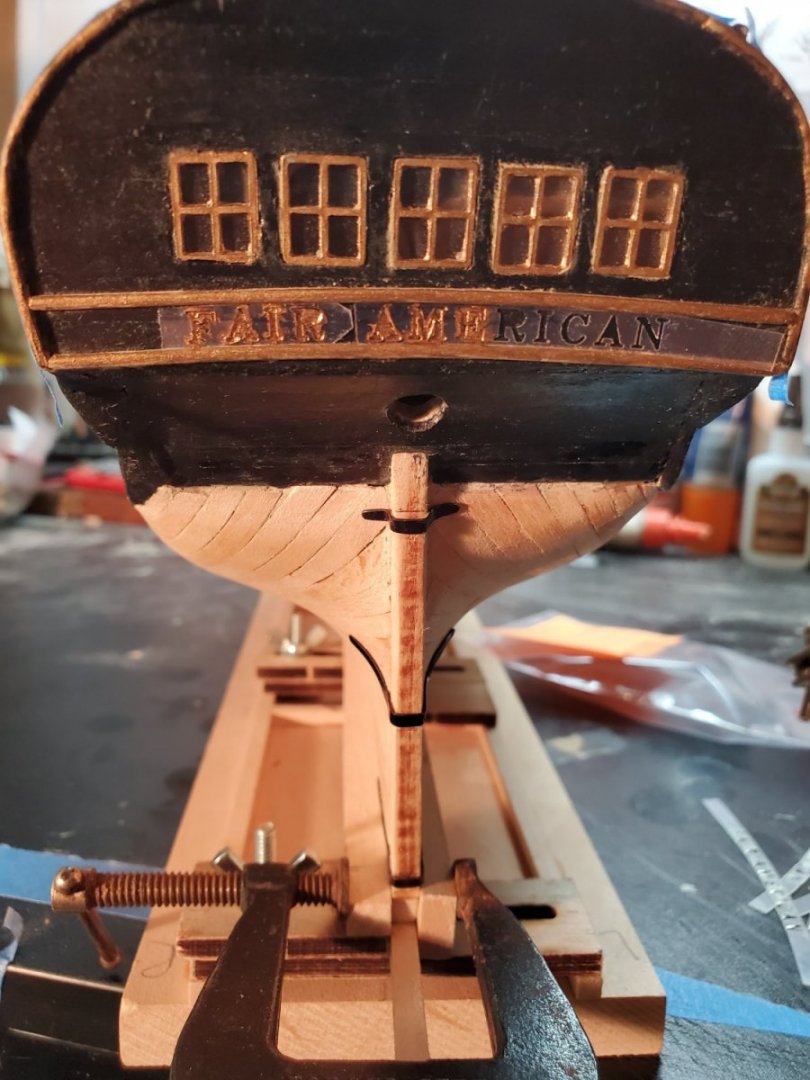
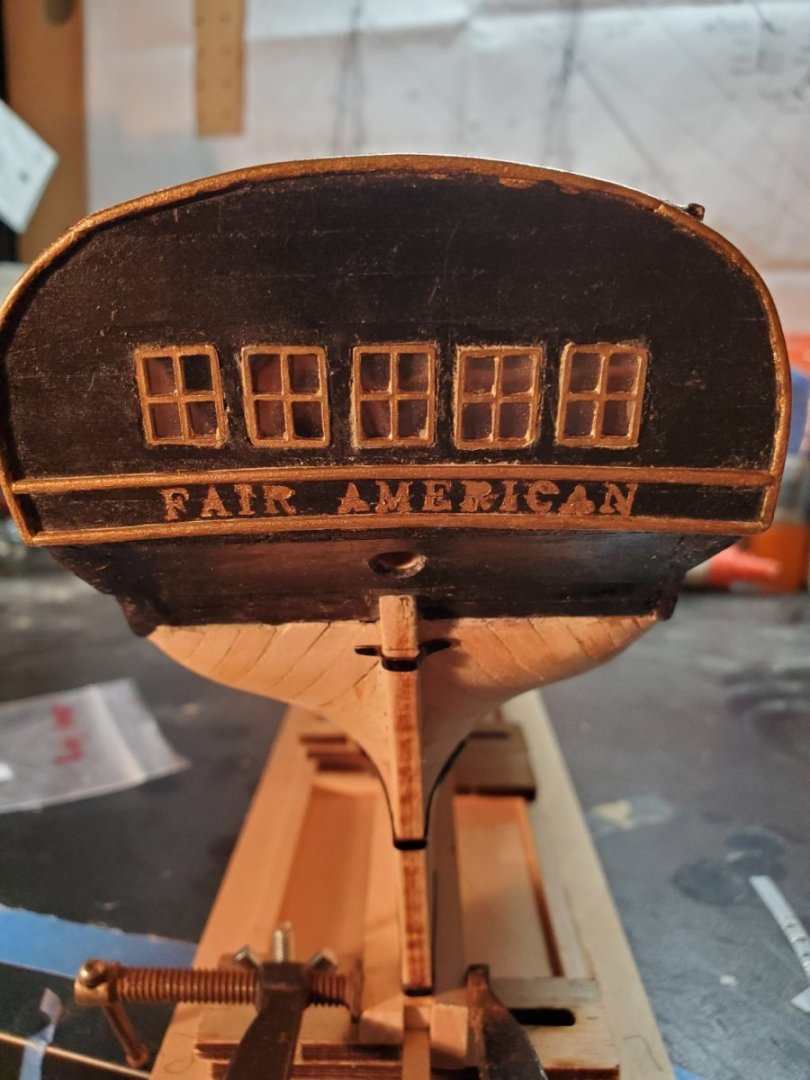
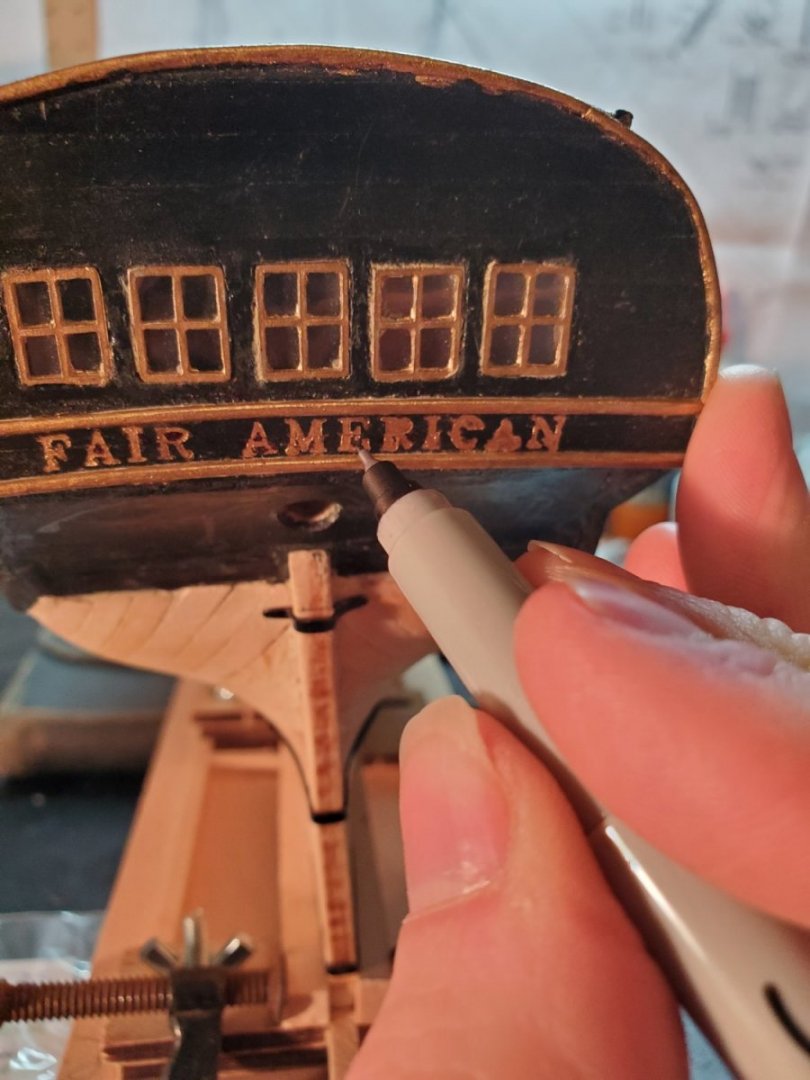
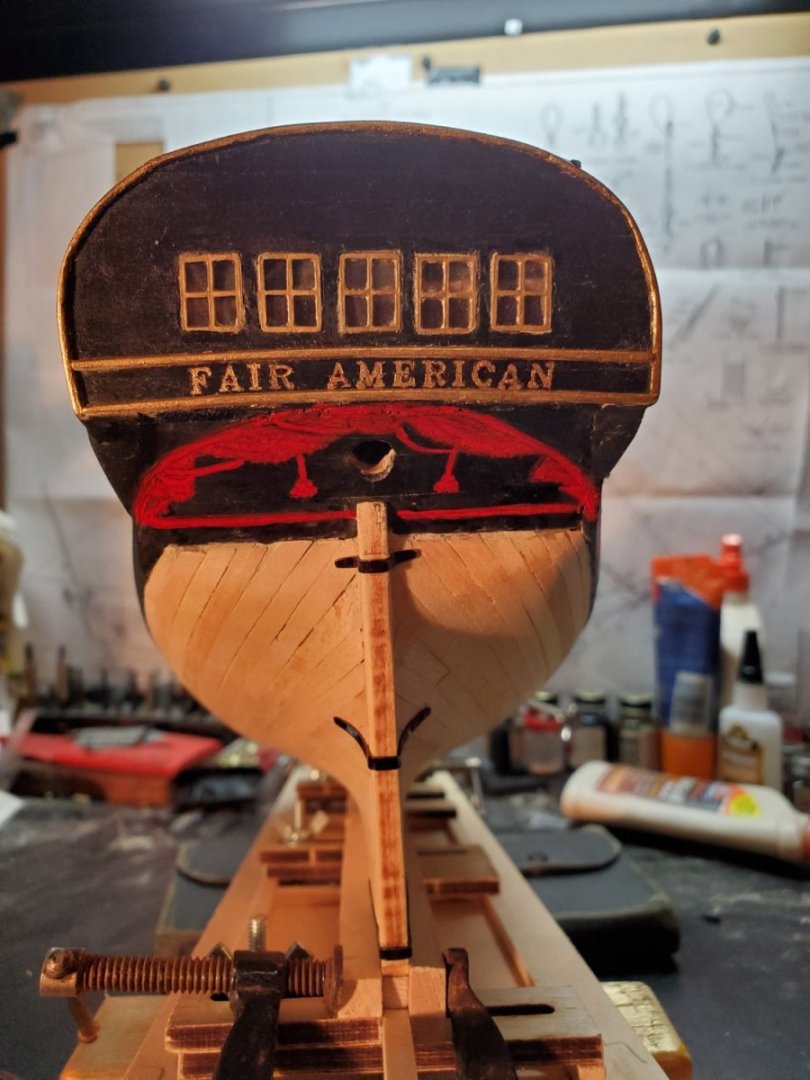
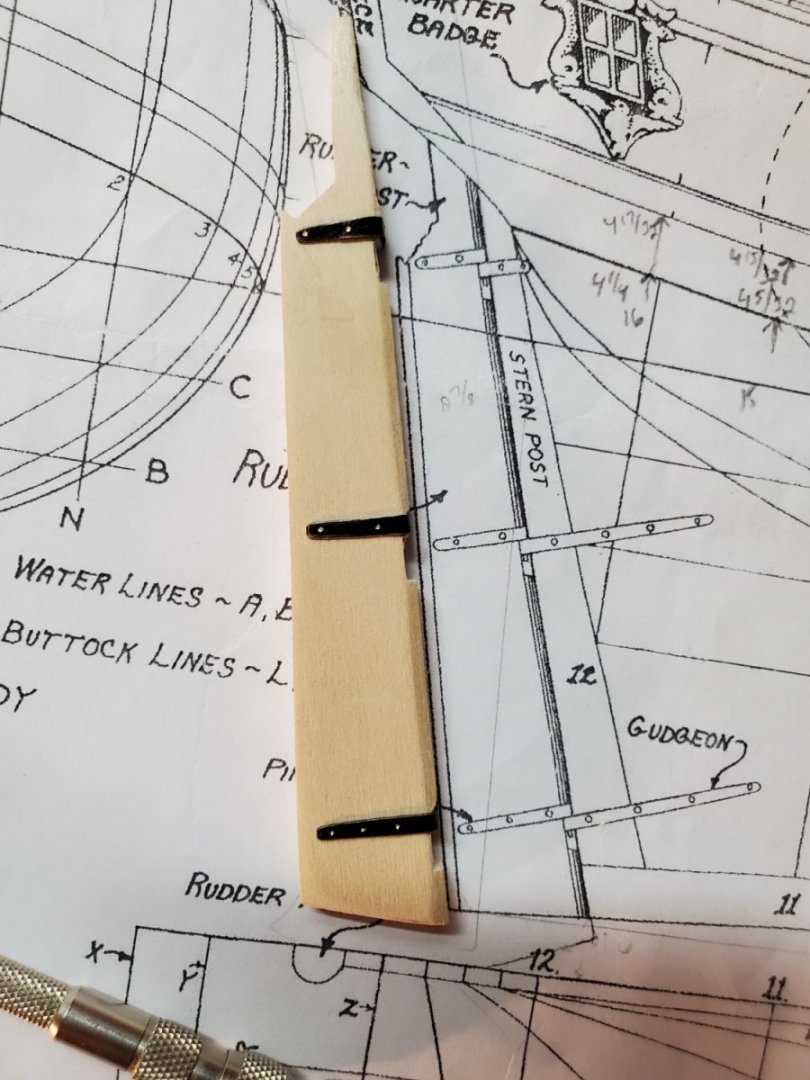
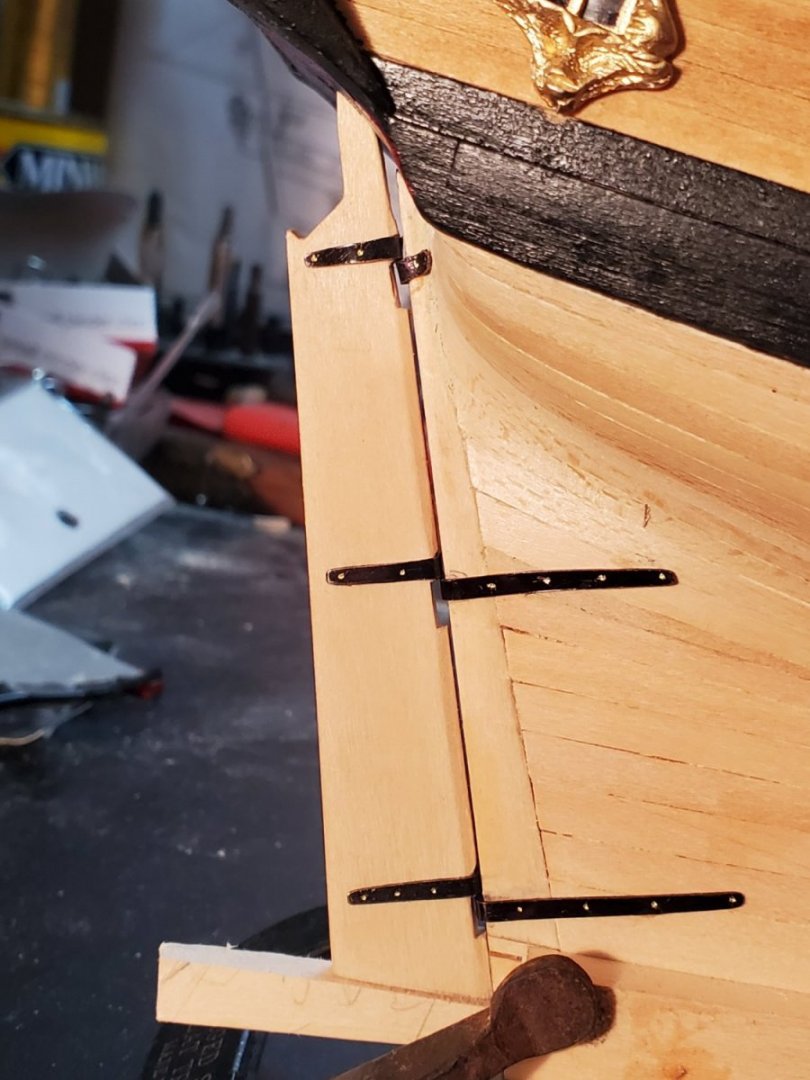
Continuing work on the Fair American Model ship: Having a boat without a name is bad luck, so I added one that seemed appropriate! My freehand painting skills leave much to be desired, so I created a little laser-cut stencil to help with the lettering. I made some quick measurements of the molding 'gap' so the stencil would fit in snugly. I had to trim it just a hair, but i wanted the letters just offset from the bottom and top. This technique didn't turn out too bad. Many of the letters were smeared, and the A's and R's needed to be blacked out. Fortunately for me, a fine tip black sharpie worked perfectly for touch ups! Next thing on the docket was curtains! This required some forethought. The counter isn't exactly a perfect arc, because it curves back and away from this view point. It's sort of flattened. I ended up measuring the length of the counter for vertical measurements, and simple port to starboard for horizontal. I drew the shape of the counter on an index card, and it has a more pronounced arc shape. When it gets laid onto the counter itself (3D), it will create the more 'smooshed' look that the plans have (2D). I took the stencil I drew and cut out small sections of curtains, then used a pencil to trace the overall shape. A few bulwark red brush strokes later, and the finished product emerges. Is it perfect, and museum quality artistry? For Jason Long's collection of first-time-making-wooden-model-ships: YES! Ships need to be able to steer, so this one might as well have a rudder. The gudgeon and pintle were easy enough to construct, but on this size scale, making it functional with pins, wasn't going to happen. So I opted for simply pinning it to the keel. Making small shallow drill spots in the brass after painting created a nice rivet appearance. This approach is similar to how I did the treenail look for the deck planks. I'm pleased with it! More updates soon - Jason -
-
Really nice progress. I'm enjoying seeing the build as you go along. You're going to need a really big shelf when it's all finished! Keep up the great work!
-
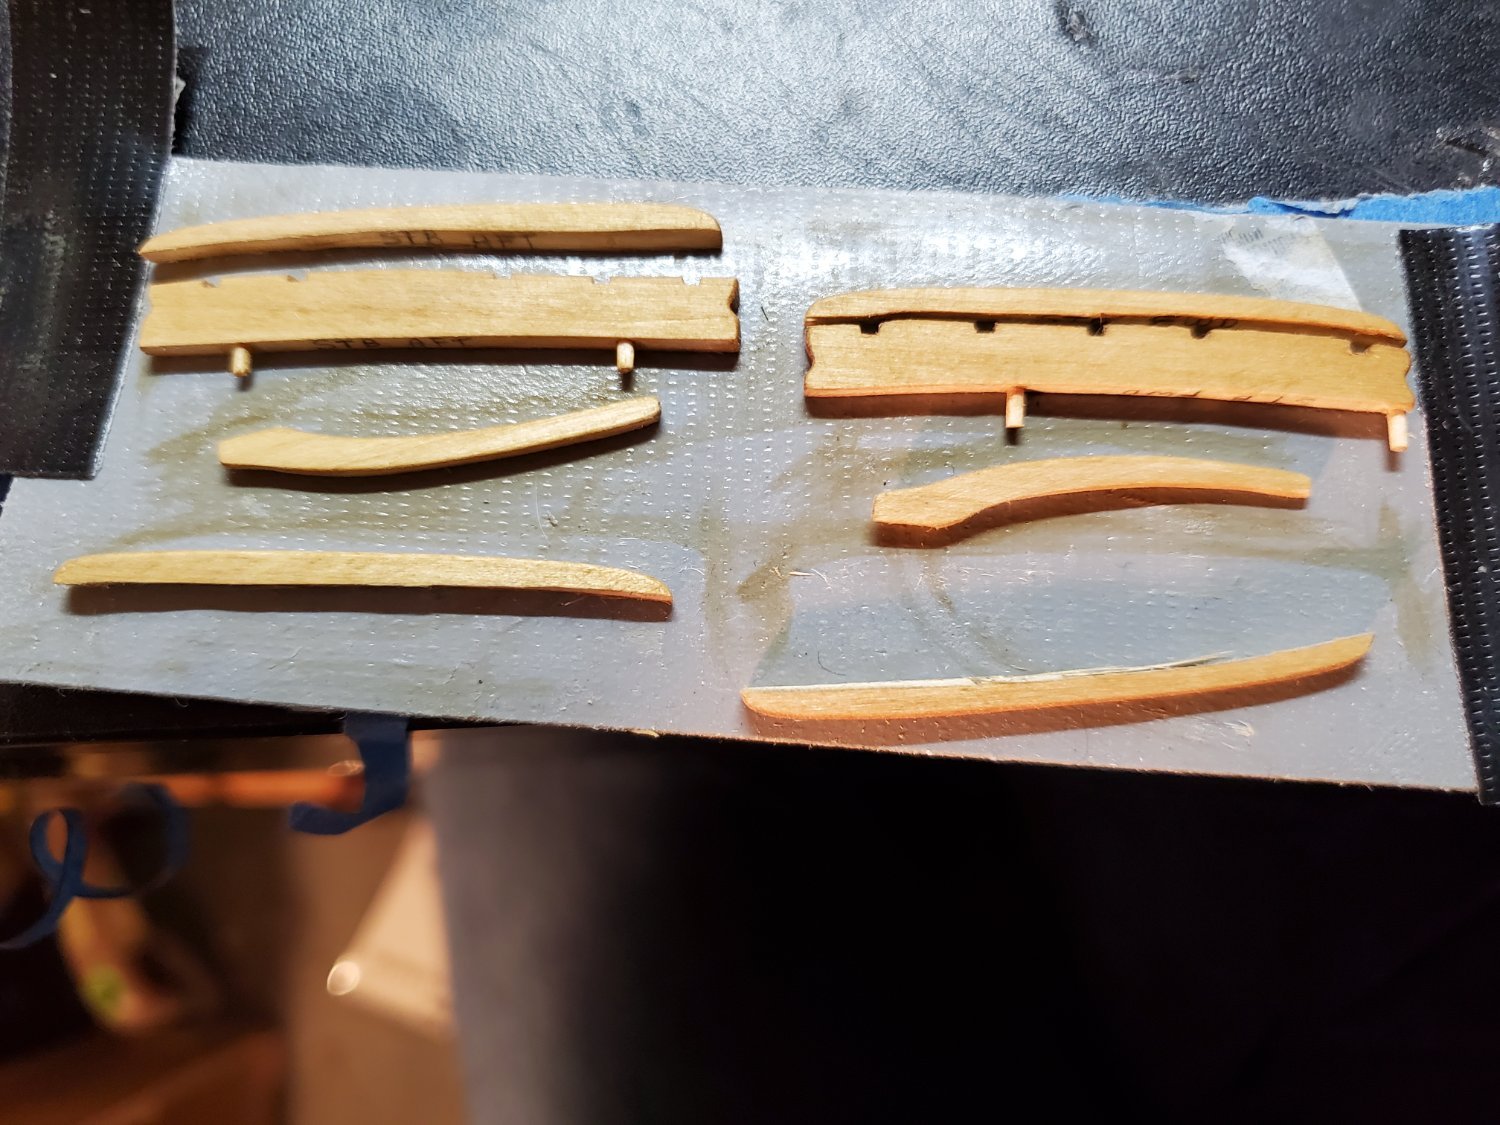
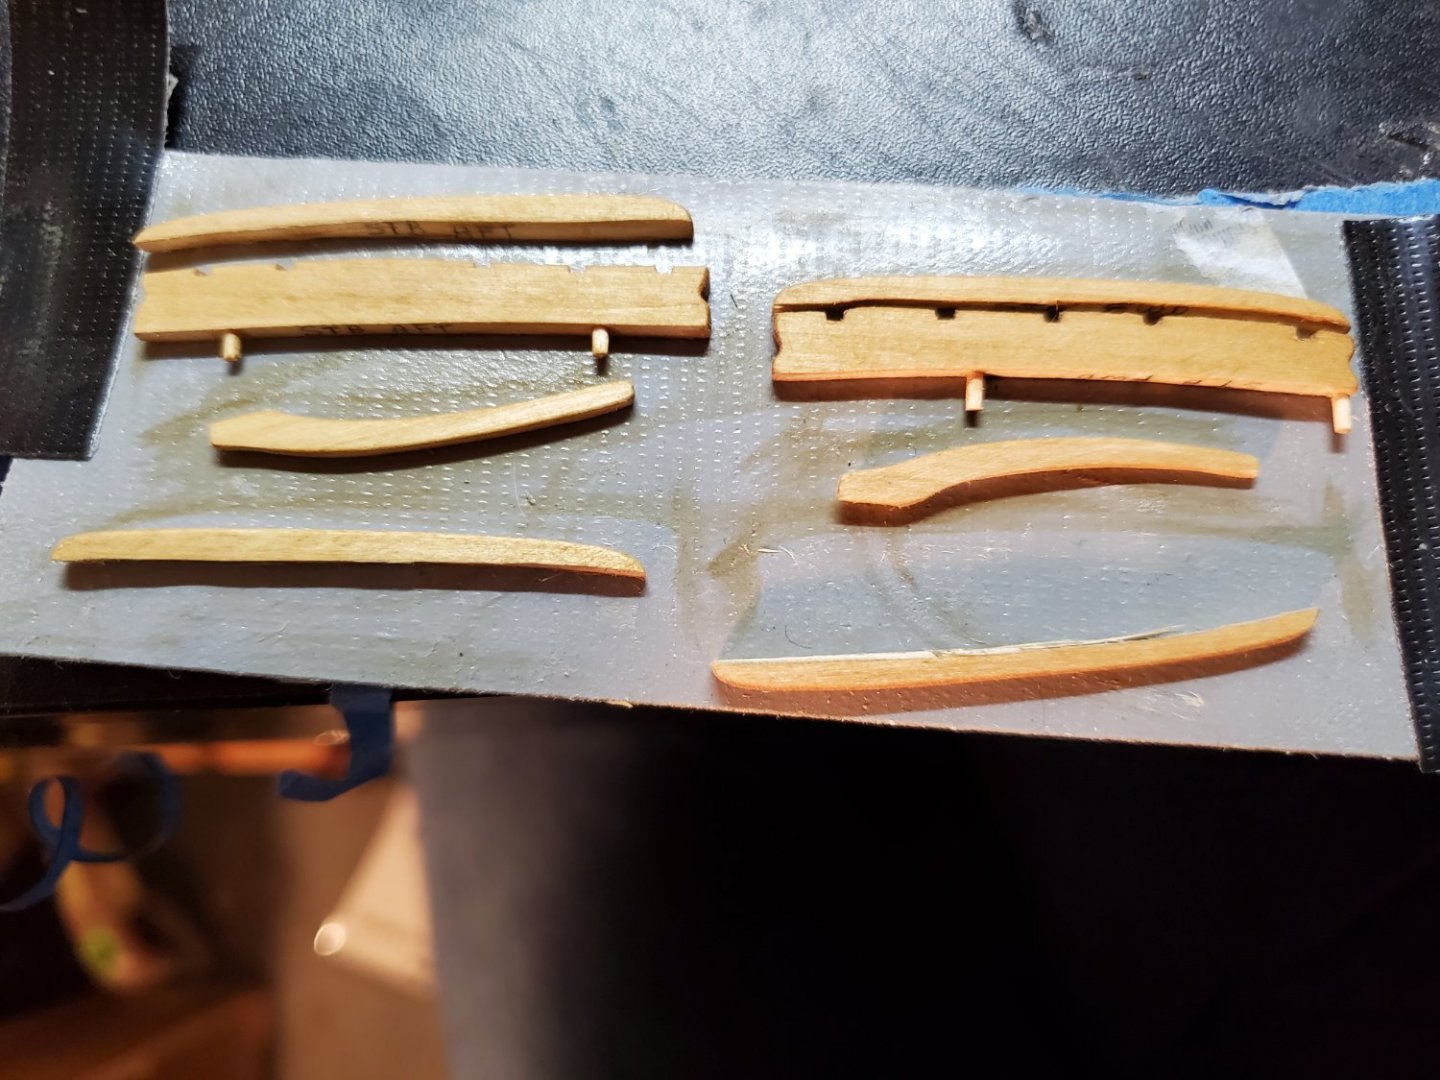
Finally back to progress on the Fair American Model Ship: Its been several months since my last post - work, the pandemic and holidays took up a lot of time and mind-space, and I didn't have a lot of time to dedicate to the build. So I'm into year 3 on this build overall. After the bow work from last time, I was able to get the channels and boomkins going. From the plans, the cap strip for the channels was a tapered piece, but for simplicity, I made it just one long strip. I took the dimensions from the plans and modified slightly to fit my model. I was concerned about mounting these pieces, since they'll carry the load from the shrouds to the masts. I used toothpick shafts as pins, as dictated in the instructions. Mounting them to the model, however, proved more of a pain. Sometimes the pin holes were a little low or high, causing the channel to be tilted. I'd have to file the pins down, or adjust the holes to get them to look straight. After fitting everything, they got stained with the Golden Oak stain, as before. I like the oiled wood look, more than black. Ultimately, the deadeyes and shrouds will add nice contrast, once it's rigged, so that's what I'm doing. QUICK TIP: Mark which channel and cap go to which side and location. I ALMOST glued a port main channel on the starboard side. Therefore, you can just make out "STB AFT'' on the insides of the stained channels. I wasn't really sure how to ''pin'' the boomkins, so they were glued to the hull, and to the head rail. I got them as symmetric as I could. Now I just need to avoid bumping into them forever. The instructions say to wait to install, but I need to make some head way, haha, so they're on there! I think next will be actually naming my ship, and adding a rudder. They seem like important details.... More soon, - Jason -

-
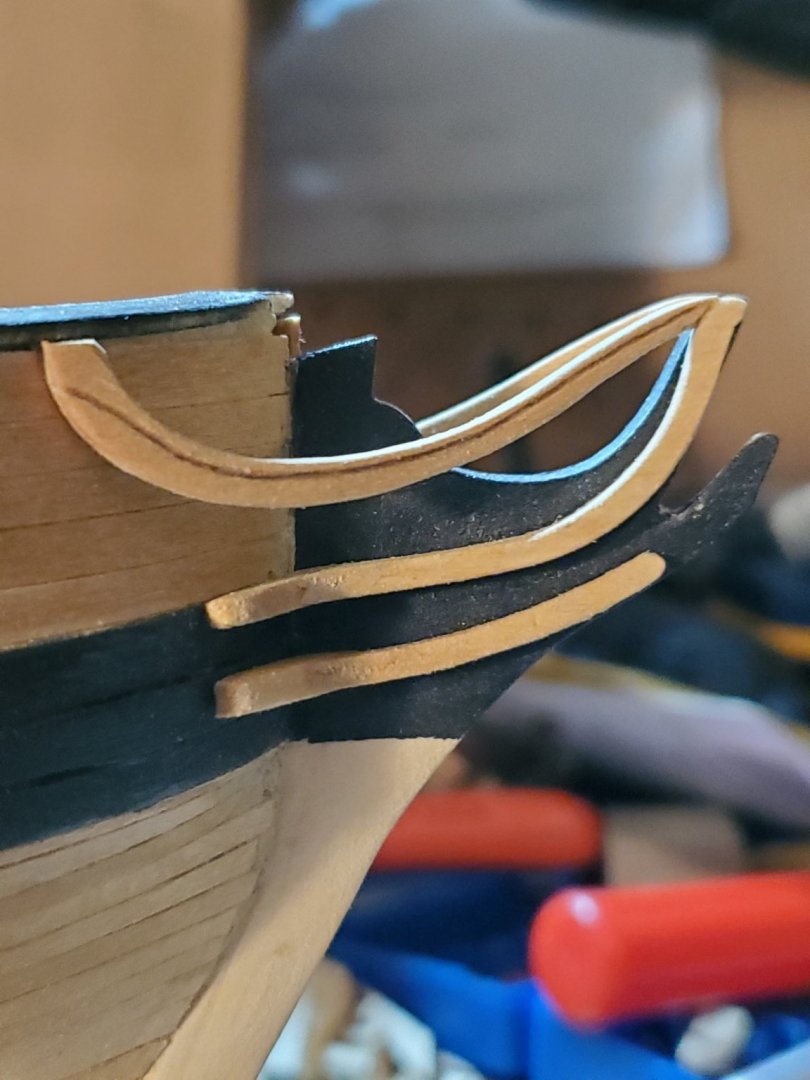
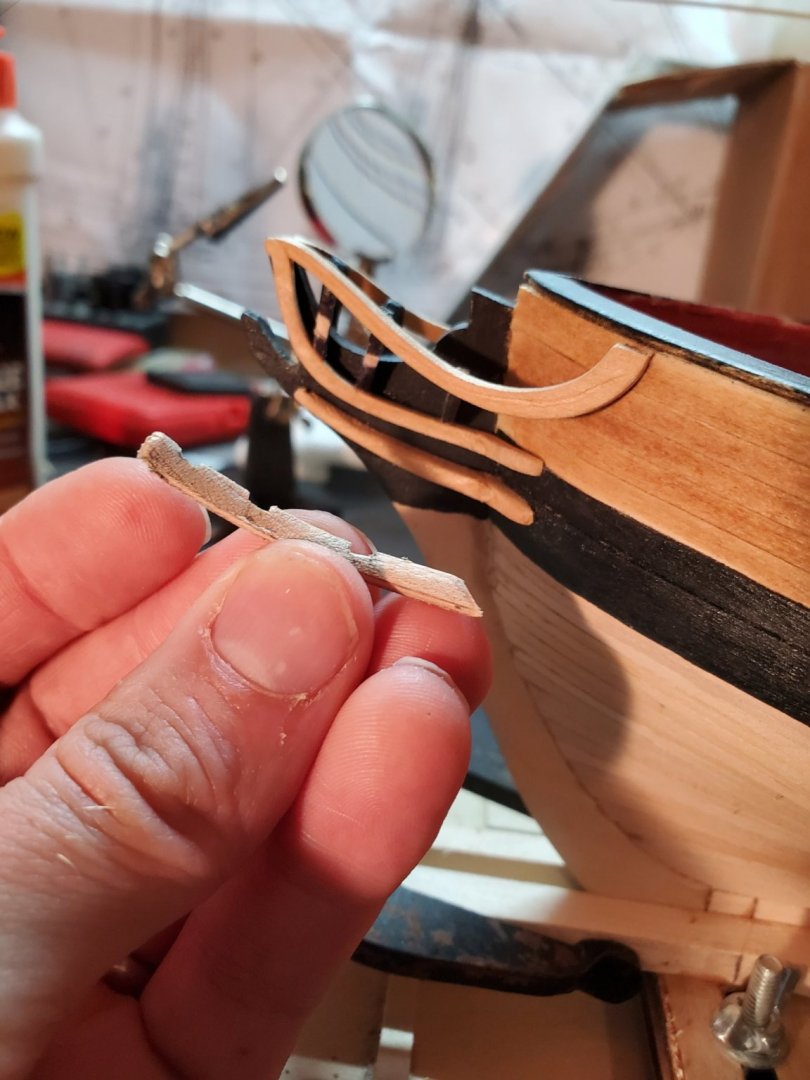
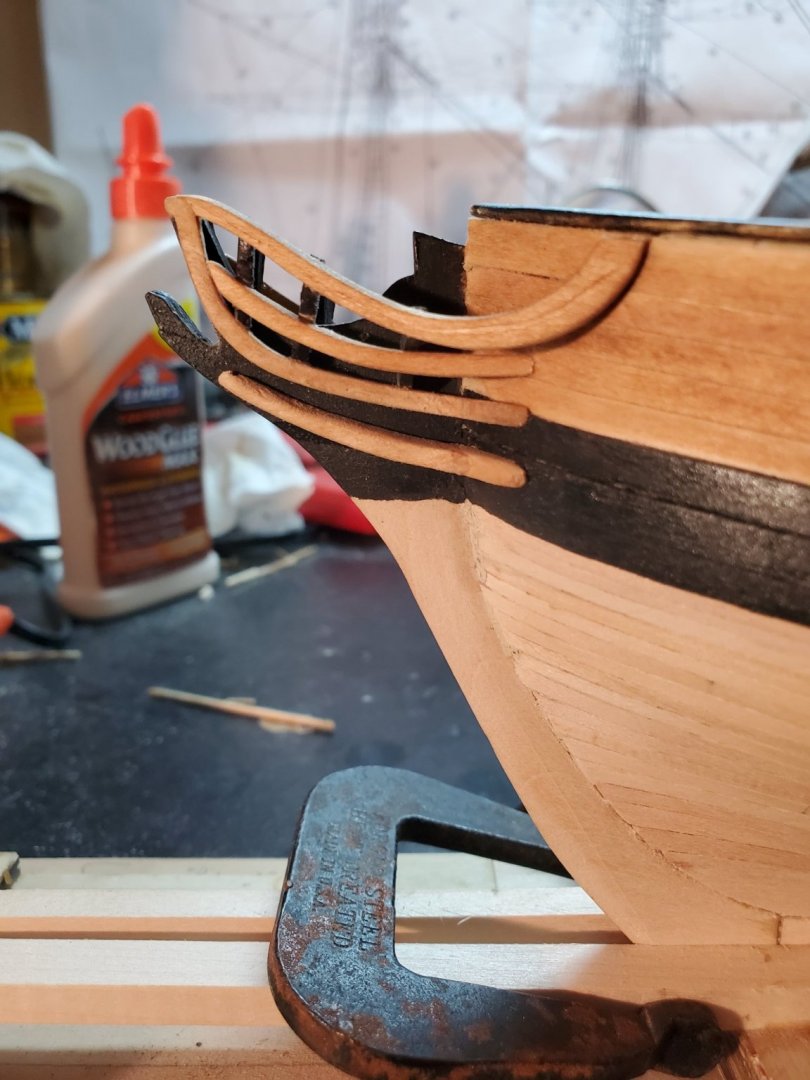
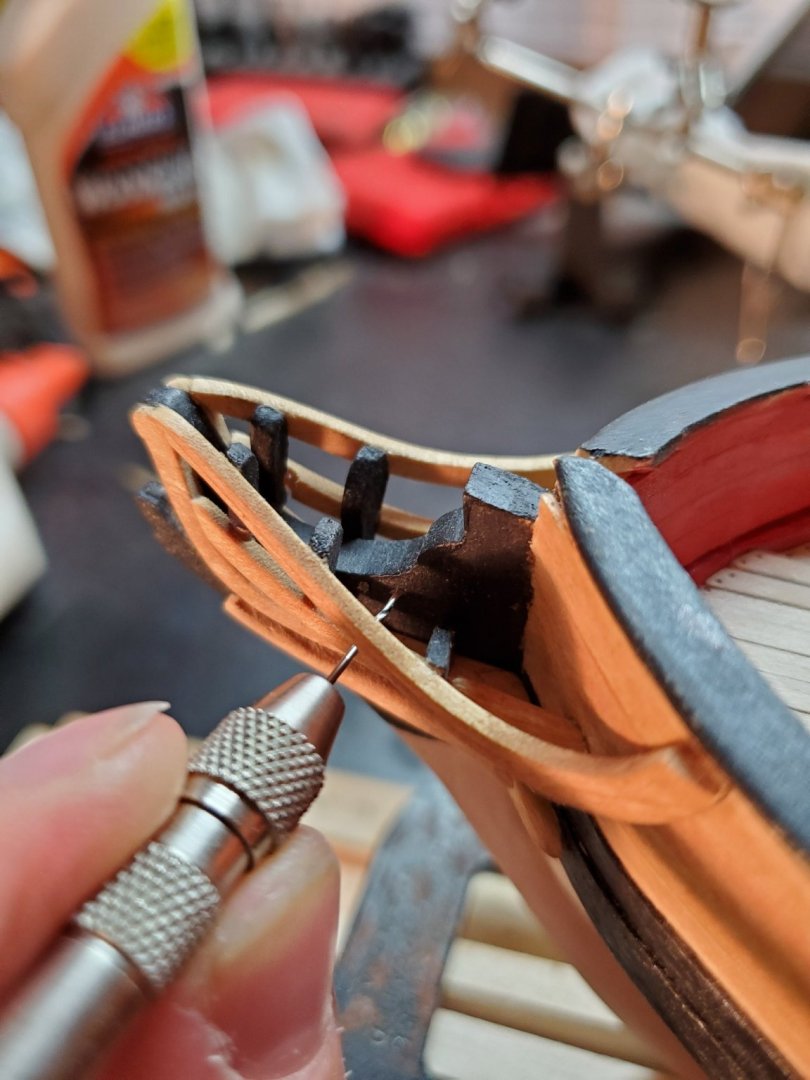
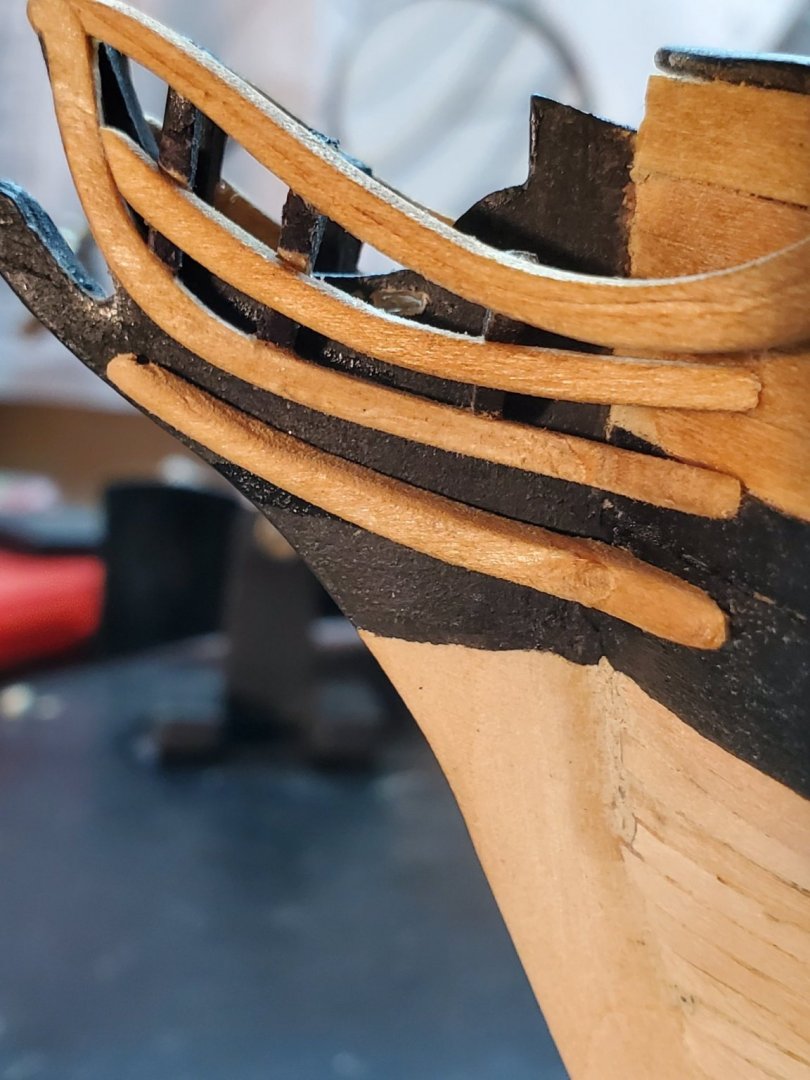
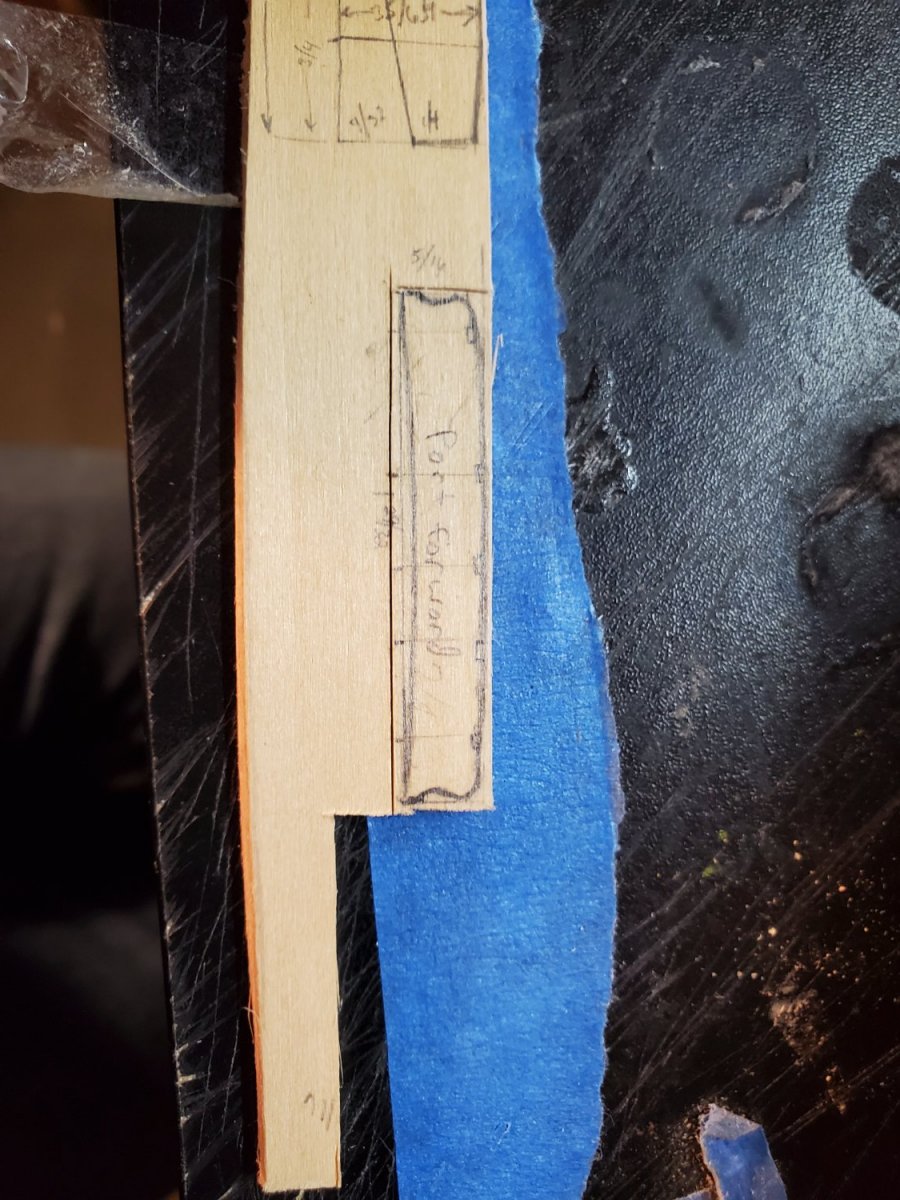
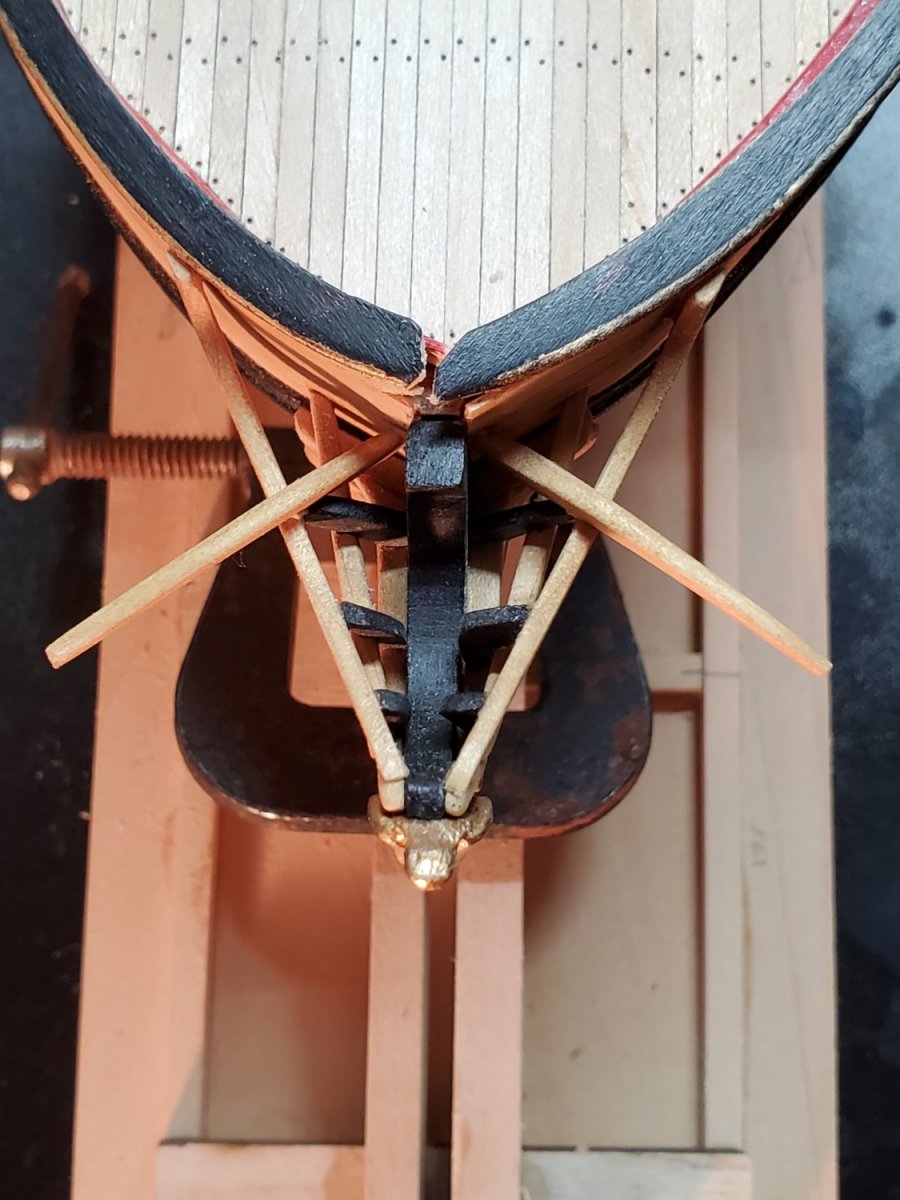
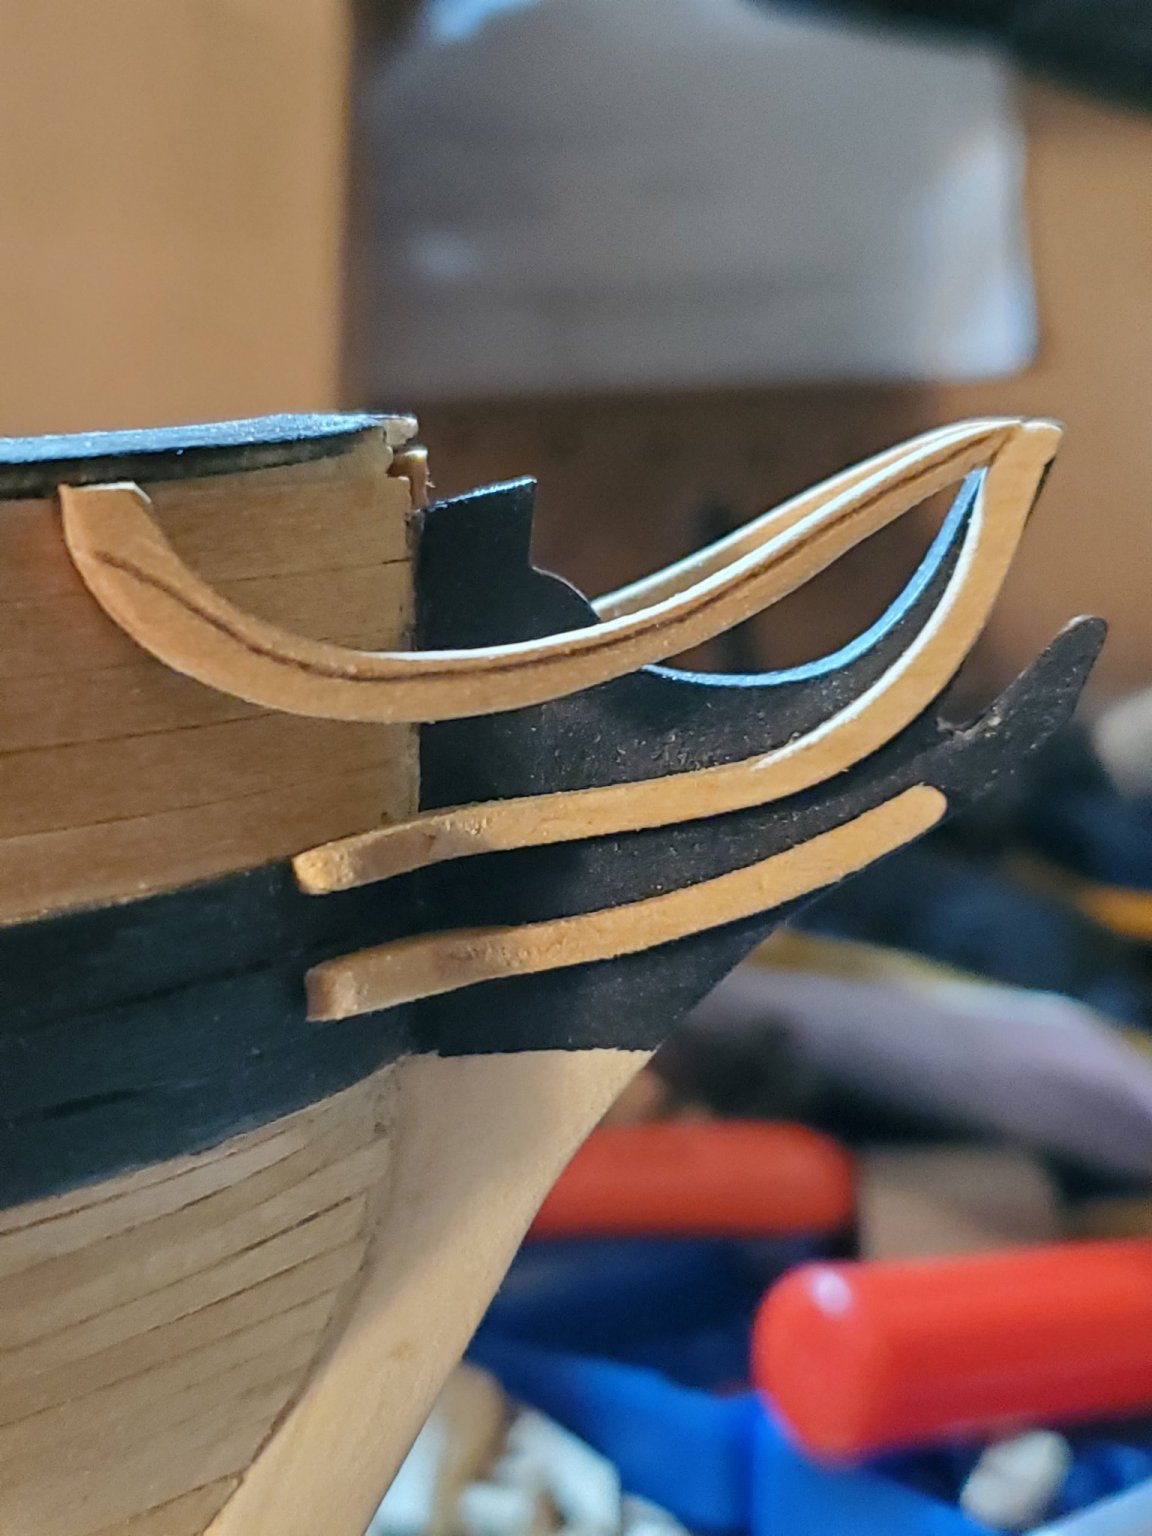
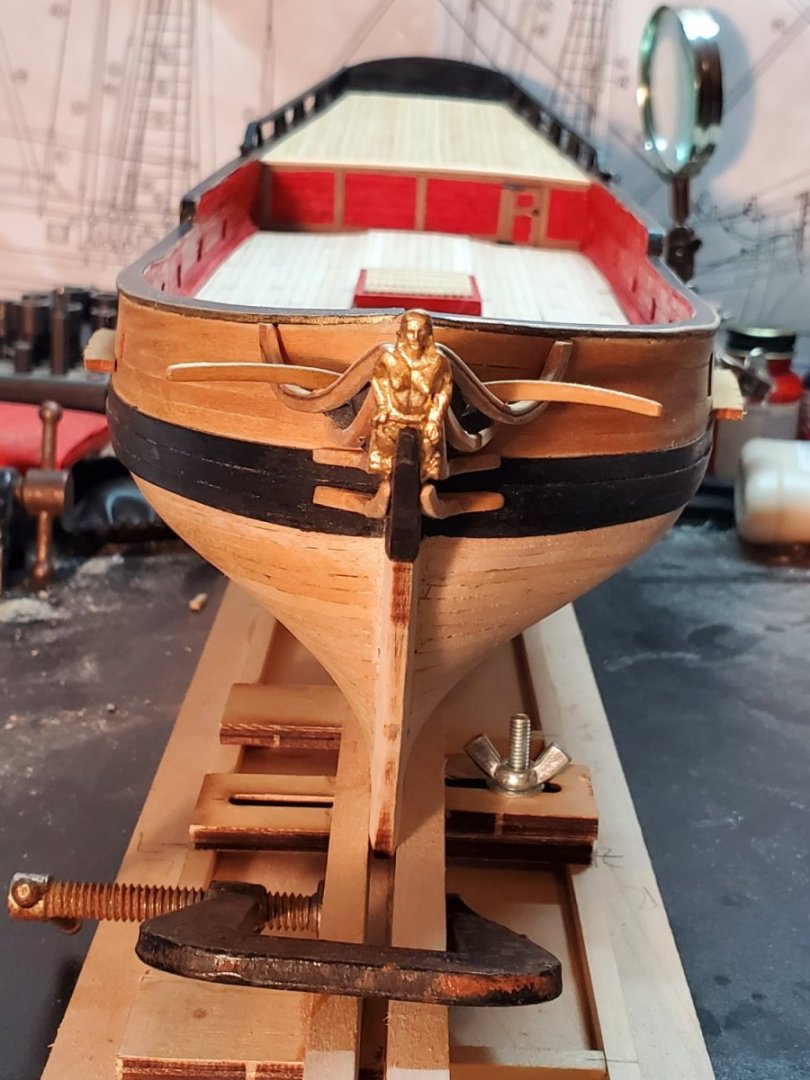
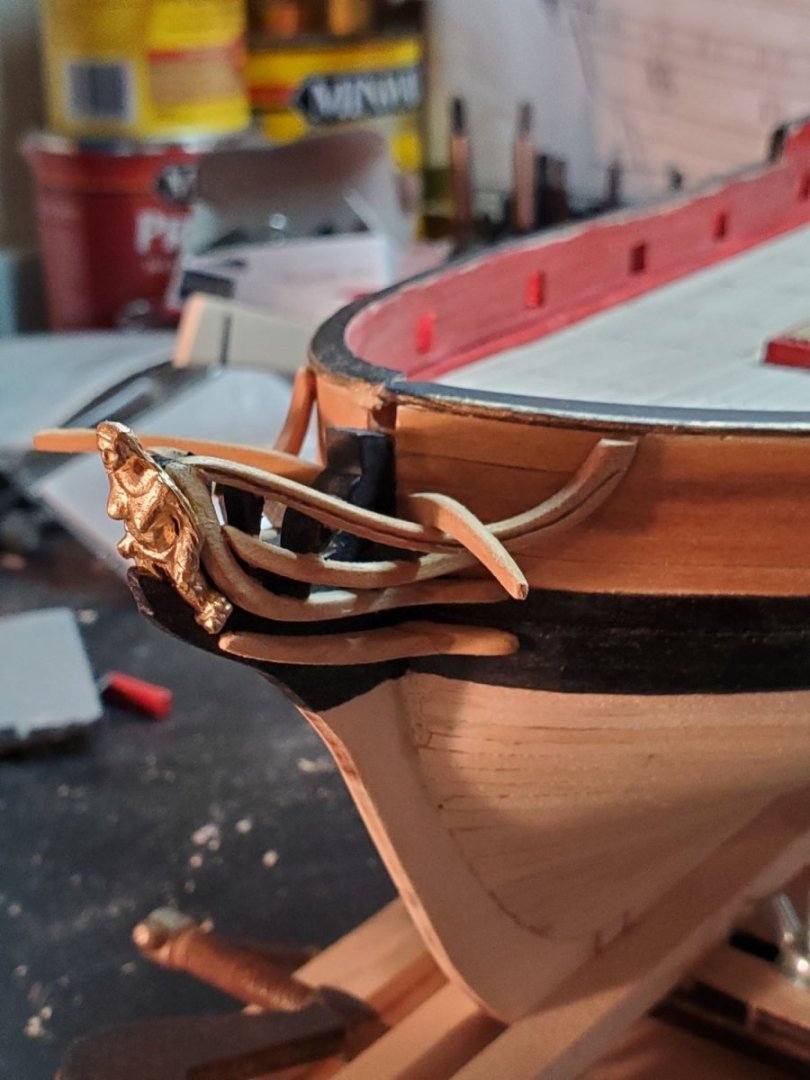
Bow work on the Fair American Model Ship: Back after a wonderful safari, now able to post some progress on the bow. From my previous update, I glued and carved the cheek knees and head rails. These were the easiest pieces for me to build, since I could take the measurements off the plans. For the head rails, the instructions say that they're actually ~1/8" longer than on the plans, due to them pointing towards the stem. I added 1/8" to the overall length on the wood piece, then drew lines every 1/4", then added 1/32" to each section to make up the extra 1/8" I needed. I sketched the profile from these sections. For the Head Rail, the plans and instructions show the bottom half is beveled/twisted by 40deg forward. Instead of adding this detail, I scribed a line, where that edge would go, followed with an Xacto blade, then a small round file to trace the edge. It leaves a nice molding line behind. Port and Starboard sides aren't exactly even, but the individual cheek knees were hard to mirror and glue. It'll do for now, I guess. The Head rail knees were BY FAR THE HARDEST THING TO BUILD! I really would have benefited from a front view of the bow on the plans, to see their exact shape. This is what I came up with. They have multiple curvatures and tapers that I couldn't build with out endless test fit and fix. The instructions give what one knee's shape might be, but no dimensions. Each one is a different height, shape, position and curvature. Really challenging. The head rail knees are horribly uneven. I did not enjoy this work at all. The middle rail was also a pain. I needed to cut reliefs in the knees and the back of the rail in order for it to fit properly. This took me several painstaking hours to finally fit. After finally gluing the middle rails on, the port side looks more uniformly spaced than the starboard. But its finished, finally. I took extra time to finely sand each piece before gluing. I added a very thin coat of MiniWax Golden Oak stain, to match the upper planking color. I like the look of the bow, with the stained rails. I think the hard work paid off!!! Oh, right - oops. I forgot the Gammon hole before I attached everything. Learning moment - pay attention to the little details. So I had to use a small drill to put that in, without scratching the rails already installed - not an easy task, but I got it done You can see the hole now, ''just'' above the middle rail. I didn't install the Boomkin, so that might be next. Probably should be so I don't forget it. Then it'll be the channels, if I'm following the instructions to the letter. I'd love to hear from other modelers how they tackled the beak/knees/rails/etc. Is there a better way than the instructions spell out? More progress soon. - Jason -