rtropp
-
Posts
936 -
Joined
-
Last visited
Content Type
Profiles
Forums
Gallery
Events
Everything posted by rtropp
-
OCCRE White Wood Putty
rtropp replied to mrsamimi's topic in Building, Framing, Planking and plating a ships hull and deck
I used white Model Lite filler on my Occre ship model. To get the color depth I added Occre's Sepeli dye. (I'm sure there a colors in the local hardware store that will match. but i recommend water based.0 I wanted to get it dark but too much liquid weakens the filler. So I would add a very little at a time and let some of the liquid dry out before adding more. It took a number of tries, and some time, but I did get a pretty good match for small spaces. Richard -
I find it more straight forward to attach the stem, make sure it is properly seated and trimmed, and the insert/attach the forward part the plank, finally gluing the rest of the plank as you move towards the stern. I suspect that there are certain build conditions that might dictate the sequence and am curious to learn about any and hear the preferences / suggestions of others. thanks Richard
-
Kurt, I have found a replacement. Its only about $27. It's called the Miter Cut from a company called Fourmost. They seem to focus on model car racing accessories. I ordered on to to see if it is the one I am trying to replace. Then see if it is as well built. Honestly, !175+ vs. $27. I have high expectations for the Miter Cut. Hope it lives up to them or I will talk myself into getting the Ultimation cutter. I am curious. What do you use when you are cutting planks to size? Thanks for all the help folks. Richard
-
that's very good information. The ultimation, while larger than I am used to, seems very stable and lends itself to accuracy. If what I ordered does not work out I will probably give it a go. thanks to all for some good information. Richard
-
ok, new info for me. Where I could not find the information on my existing miter cut tool, I used one of the new AI tools and found the manufacturer is still in operation. The replacement for my cutter/chopper, which I have used for years, is $28 with $7.50 shipping. So, for that price, I ordered one. They also had a similar device to saw small items. For the heck of it I ordered one of those ( since there is a flat shipping charge and it would not change if from the U.S.) One of the things I liked about the cutter was that it was small, and used readily available, cheap, hardware store blades and I already have boxes of those. I do not know about the saw blade but requested the manufacturer let me know if replacement parts were available. If you all would like I can do a quick review when they arrive. I came close to pulling the trigger on the Ultimate cutter but it is expensive and seems to take up a lot of worktop space. Thanks for your help Richard
-
I prefer the electric sander so I can use two hands to manipulate the item... but then, that is just clumsy me. Palmerit, do the blades of the ultimation last, say through a ship or two, or do they constantly constantly need to be replace like the blade on my Fourmost Products, Miter Cut Tool? Non-proprietary blades very much change the balance of the decision, as do the availability of replacement parts. Did you find a replacement source and if so, can you share it? Thanks, Richard
-
Thank you for responding. I have the Byrnes Saw, along with the Byrnes Thickness Sander, for a number of years now. I do not use it often, but when I do its great. But, I felt it was too powerful to use on very thin, i.e. second planking wood strips. I have a very old chopper that, after years, is starting to wear where the blade touches the black circular cutting stop. I looked at taking it apart to try and smooth or replace it but it seems to be one piece with the angle arm. It still works but I'm not always getting a clean cut at the bottom. Anyway, I am considering trying my hand at a scratch build and thought to look for a replacement or even a more accurate, and faster way of chopping. The chopper II is on Amazon for $85, a bit steep. There is a great looking machine that miss Olga showed on her YouTube videos, but it is well over a hundred dollars, and uses proprietary blades. Being honest with myself, I can get fairly decent cuts, with a flat tip Exacto knife... if I am careful and work very slowly. So this purchase becomes a luxury more than a necessity. The little electric chop saws I saw are pretty inexpensive compared to the manual ones, but not sure if I will end up with shredded cuts. So I was wondering if any of them would be good for very thin cuts, or should I bite the bullet and continue to look for manual cutters/choppers. Any ideas would be appreciated Thanks Richard
-
Does it make sense to use the Byrnes saw for the very thin second planking of most models? Are there special precautions required? I am just wondering, my Chopper is no longer usable so should I try to use the Byrnes. it is a powerful little saw and not sure that crosscuts using a sliding table would be a good idea? If not, what, at a reasonable price, would best replace the Shortline Chopper? thank you, richard
-
great thought. I have 1x30" and there are videos on utube that show how to make belts. think I'll give it a try. Richard.
-
so, no one knows who might sell a compatible sandpaper? Sorry I got it. Its just that 7 of 8 dollars for a 4.5x1 belt is a bit much, or am I wrong? Thanks. Richard
-
Hi, I am beginning to use the microlux 15229 more frequently but would like to find a more reasonable source for premade sanding belts. I'm pretty sure I have seen comments somewhere but for the life of me cannot find them either in the forum or online. I would appreciate any leads. thank you, Richard
-
Proxxon mini lathe verdict
rtropp replied to Srenner's topic in Modeling tools and Workshop Equipment
For me, the proxxon worked well for shaping masks and spars. It’s not a metal forming lathe, your getting a wood lathe for light use. The key that got me going was the process I ended up using to get some degree of accuracy. 1. Measure points along mast or spar from, hopefully, the 1-1 plans 2. Transfer to dowel. 3. Mounted on the lathe, cut small “rings” to the measured depth for each location where Thickness changes. 4. Use the cuts to control depth of sanding/filing on dowel 5.I use mostly sand paper on blocks of wood or small files to shape the mast or spar on the lathe. (Easier to control than chisels). 6. Once you have the series of cuts on the dowel it becomes almost like connect the dots. A tip from another member on using shrink tube (like in electronics use) led me to buy a small box of them. Anyway, I slide the grip end of the dowel into the three jaw chuck and use the shrink tube to help protect the wood. hope this helps. R -
Ed, hope your still out there. I was getting ready to start the Naiad per your book. I have the first book but cannot find the second one. I would hate to start and not be able to finish it. Do you have thoughts on how I might obtain a volume two? I appreciate your help, Richard
-
I am becoming a big fan of CA in my modeling and don't write off thin CA. Many parts are difficult to clamp, and my hands are not as good as they used to be at holding parts and waiting for them to hold with slower drying glues. There are various applicators that are sold for thin CA that give a lot of control. Instead of trying to control from the bottle I use tiny containers (from amazon and primarily for nail or tattoo artists). I put a small amount of thin CA into the container and use the applicators giving very fine control and the ability to place tiny/precision amounts of the CA. The thin CA leaches into the wood joints and for most, does a fine job of holding almost instantly. My process has increasingly become holding parts in place on the model and apply tiny amounts of CA. The parts hold in a few seconds and a lot less fumbling with clamps. If I make a mistake (and I do, often) I use a little debonder or acetone and I get to try again. I do not use the spray hardener often. I find I don't really need it and the odor is obnoxious. My takeaway is that I reduced the need to hold or clamp parts which is tough on the arthritis. Really it is mainly second planking that I use other glues. Thanks
-
Thank you all. Some great information that will help me move forward. I appreciate the great ship pictures. I would take the time to mask the hardware just for looks. Richard
-
Pore filler lacquer Recommended
rtropp replied to Krupi's topic in Painting, finishing and weathering products and techniques
Hi, I screwed up the hull of my Occre Albatross. Is there a way to paint over the varnished hull with white paint? Thanks, Richard -
Cristiano, is there any of that that is commercially prepared to be "painted" in white, especially mail order. Might want to give it a try to cover up a varnished hull that I messed up. Thanks
-
Hi Allan, The instructions show that the planks as one piece that run the full length of the boat with the second planking running right up to the edge of the bow, stern and false keel. Then a preformed keel is attached. No rabbet that I can see. I have pasted images from the manual. I figured that the plank length was probably off but didn't think about a rabbet. I thought that somewhat realistic hull planks would look better than one long plank. I also cut up the deck planks. The instructions suggested marks at every 100 mm to simulate deck planks. I went ahead and just cut the planks and used a simple staggard pattern in some semblance of realism. I thought that I should do the same for the hull but wasn't sure what length to use. I have been using common staggering patterns seen on this site but fudging here and there for width.
-
Occre's Albatros a schooner dating back to 1920, when the vessel was built at the state shipyard in Amsterdam. At 1:100 it is 22 inches when finished. The instructions as well as pictures online show the albatross first and second planking with mostly full-length planks i.e., 20-22 inches long. I was wondering if the planking on the actual boat would have been made up of shorter planks and, if so, what length would they have been. Thanks, Richard
-
Alann, I found this. http://www.modelshipbuilder.com/page.php?183. let me know if it helps, Richard
-
Steam Schooner, your lifeboats are along the lines of what I am trying to accomplish. Mine should be much easier because they will be covered by tarps so the inside will not be seen. My first try is to fill the plastic boats supplied with wood filler, than shape it and plank it. We'll see how it turns out. Richard
-
Dziadeczek, Those boats on at a glance are beautiful. I am inspired to try those no matter what I do with the tug. Roger, the Canute was built in 1931 in Denmark. Not sure if it used wood or metal and I may well end up painting the plastic to simulate metal as a quicker solution. But, I am trying to scratch build wood lifeboats/ship boats as a practice for a period warship I have on the shelves. From what I have seen of others work, building wooden ships boats could well end up as a much longer-term project. Thank you all for your help. Richard
-
Mark, I am starting to find examples. thusfar they are bread and butter, but I can keep looking. Thanks Dziadeczek, thank you for your reply. I do not have the Frolich available and I cannot find Post #89. I searched for your build but again came up empty. I guess I am not very good at searching. Can you tell me the title of your build or direct me to Post 89. I am very interested to see it. Thanks for the help, Richard
-
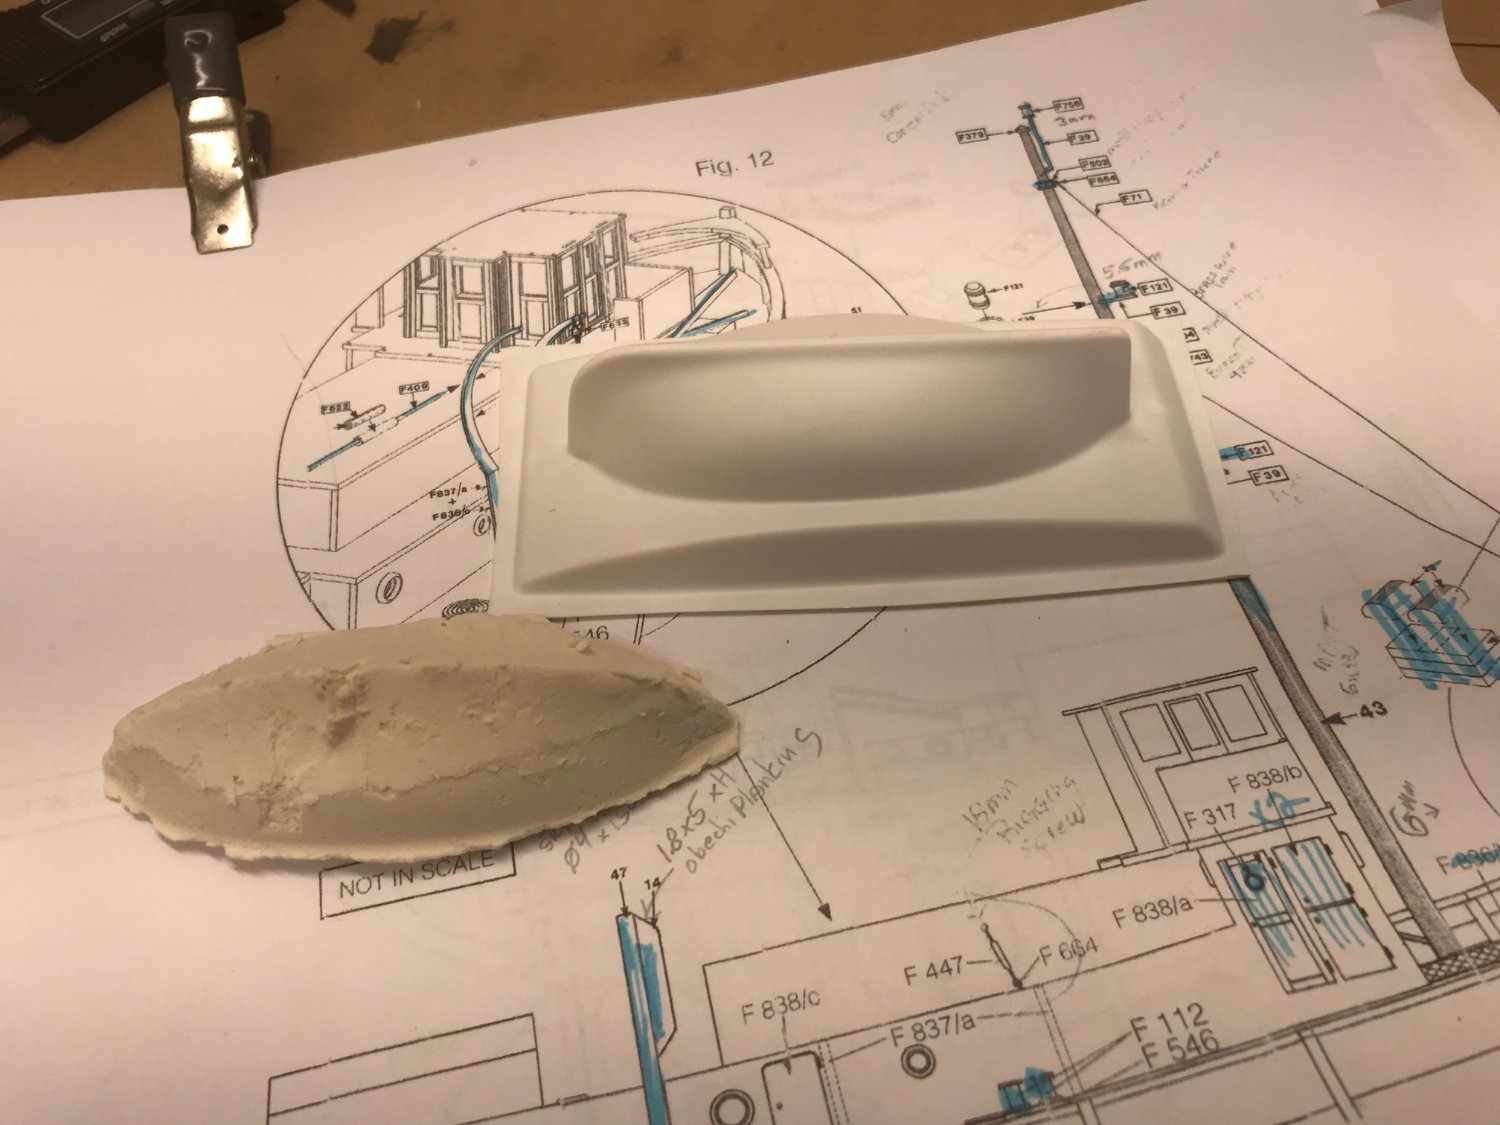
The model I am working on has thin, extruded plastic, lifeboats. (see photo) I would like to try to make one from wood. The lifeboat itself will be mounted with a cover tarp so only a portion of the outside will be seen. I dimly remember a posting, or article, that showed building a lifeboat from a mold. I searched but could not find the original posting or article. If anyone could give me a link or reference, I would appreciate it. So far, I tried filling the plastic lifeboat with wood filler. After it dried, I removed the molded lifeboat and next I will sand to fine tune the shape. Then I planned on trying to plank it in some way. I could also use the actual plastic form that came with the kit but not sure how well that can be planked. My last resort is to just trim and paint the form and use it on the model. This would not be my first choice but after a number of years away from modeling (Syrene was in progress) the ideas was to reacquire my building skills so I really want to finish off this model Tug so I can quickly get on to sailing model. I would appreciate any advice or a lead/link to existing demos, posts or articles. Thanks Richard

-
Wow. The knowledge that exists on this site is great. So far, the takeaway for me is that if I want to build a classic sailing ship, especially if I want to show more detail, I should strongly consider a plank on frame, like the Naiad or Swan projects that have instructions that really take you through the detail. (Especially if I want 1:64 or similar size.) It would probably be without rigging and blocks. The blocks are just getting too small for me to handle. If, on the other hand, I am looking at a 20th century warship or liner, I should consider the bread-and-butter style with an attempt at plating. Question: If I go with the bread-and-butter style, can the "slices" be hollowed out to reduce weight? 2nd question. Where would I get plans and/or cast parts for a WW1 warship? Thank you all for your time. A really great help to my planning. Richard