


DocRob
-
Posts
1,296 -
Joined
-
Last visited
Content Type
Profiles
Forums
Gallery
Events
Everything posted by DocRob
-
 Martin over on LSM is actually building this one. There is a lot of information about the original and some interesting tweaks for the kit. 1/24 Airfix Bf-109G - LSM 1/35 and Larger Work In Progress - Large Scale Modeller Cheers Rob
 -
Arado Ar-196 by Ian B - FINISHED - PLASTIC - German seaplane
DocRob replied to Ian B's topic in Non-ship/categorised builds
Your Arado looks fantastic and you managed to get the canopy done, great job. The bird looks so convincingly weathered and everything blends perfectly in. I have the -B version of the kit with the coward HPH canopy, which I plan to build soon. Now I have a great blueprint log at hand. Cheers Rob -
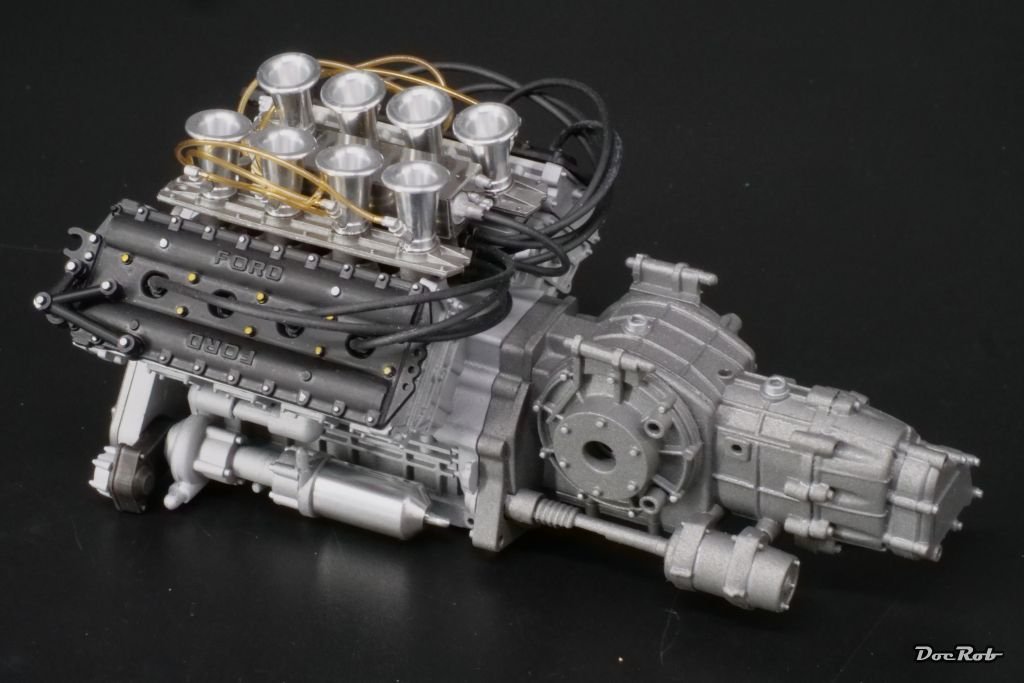
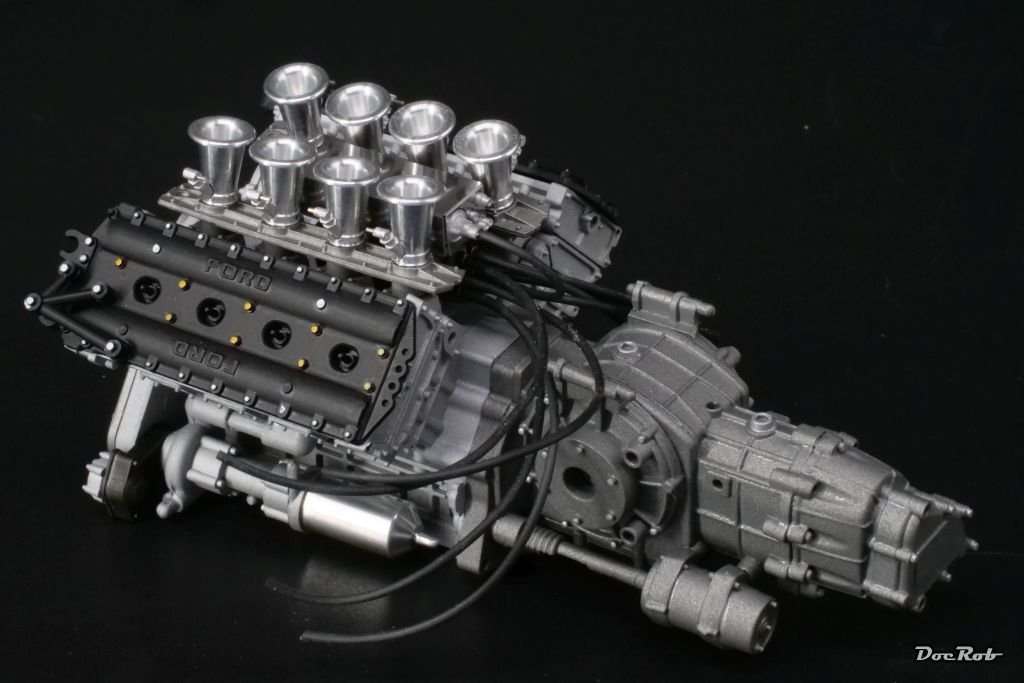
Thank you Alan, with the good fitting additional parts from MFH, it was relatively easy to assemble the engine. The most delicate parts were the clear tubes, which needed some 0,5 mm drilling and adding tiny brass rods for accepting the tube, but nothing too demanding in the end. Cheers Rob
-
Starcraft Adjutant AI by yvesvidal - 1/6 - RESIN/PLASTIC
DocRob replied to yvesvidal's topic in Non-ship/categorised builds
Wow, you are truly an adventurous mind, Yves, what a cool project. I love the result and enjoy reading about your processing, albeit, I think, I will not go this route with 3D-printing. Cheers Rob -
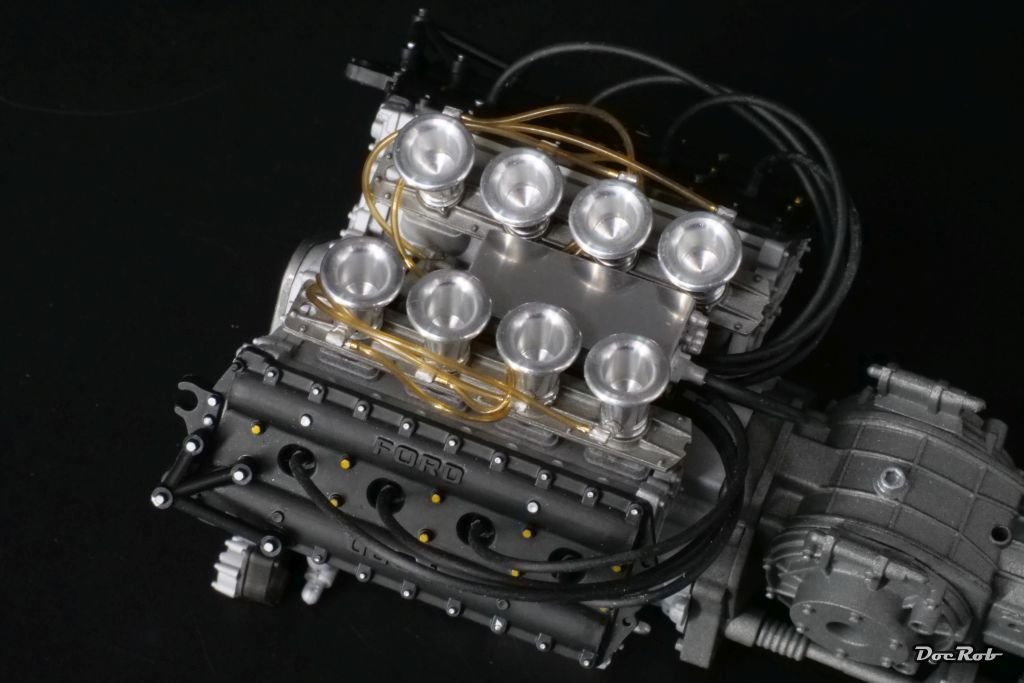
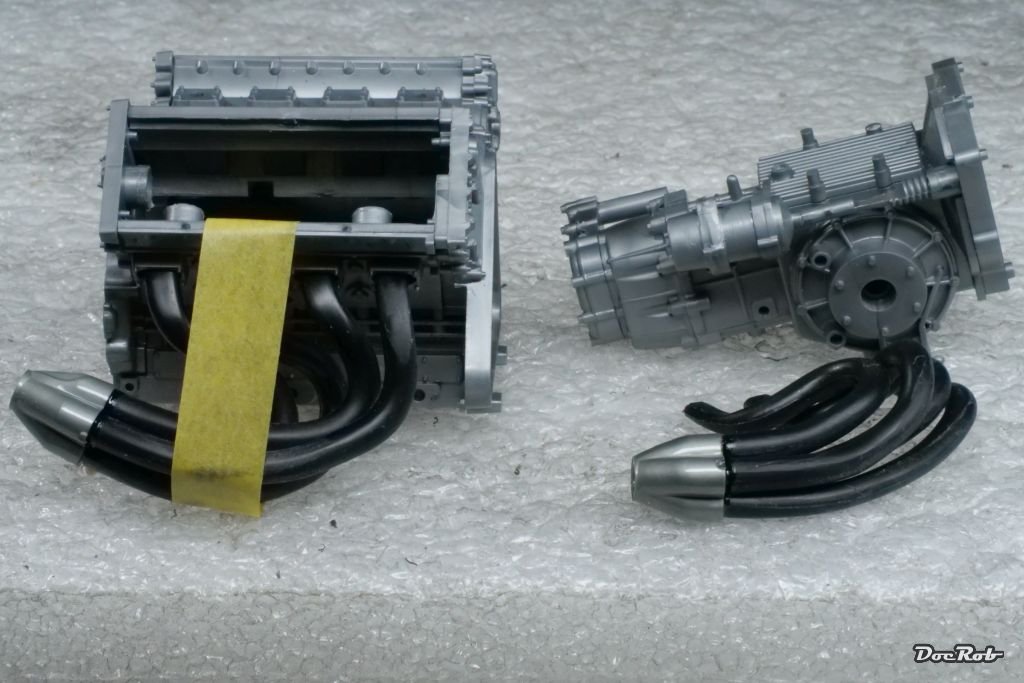
Today, I finished the engine and connected all the tubing. The yellow clear fuel lines were part of the MFH set, the black ignition cables were from the spare box, because the Tamiya supplied ones looked way too thick and out of scale. The MFH set fits the Tamiya plastic without the need for tweaking, great. Cheers Rob
- 70 replies
-
- 11
-

-

-
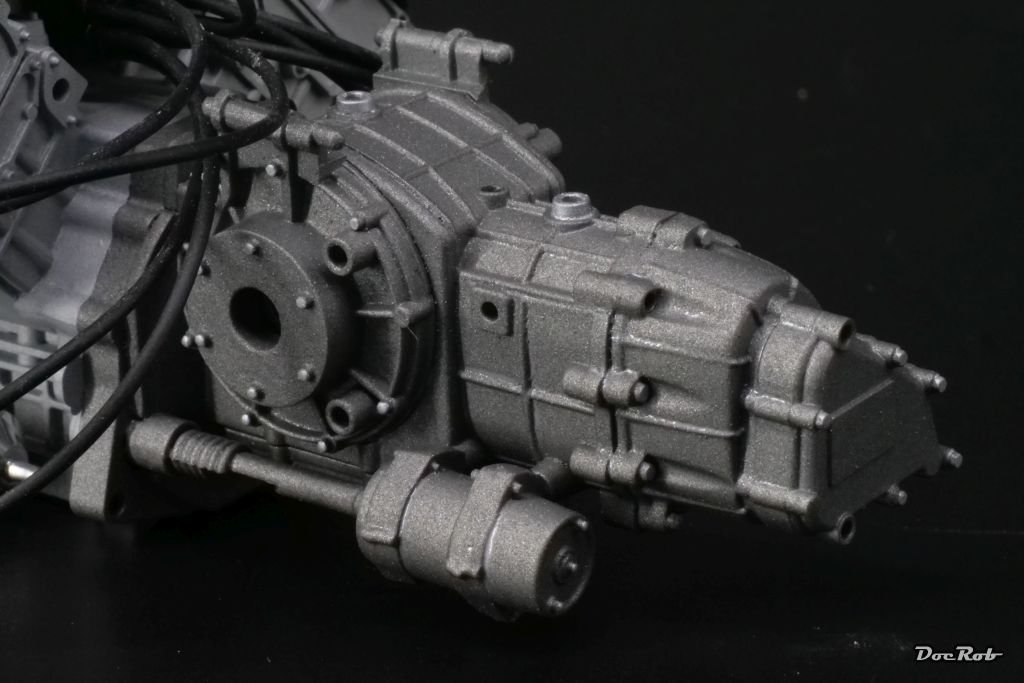
Engine and gearbox are halfway done. I used the MFH air funnel and distributor set, which is a big advantage against the kit plastic parts, specially the aluminum funnels. I also used black tubing from the spare box, the Tamiya material is too thick. I now own a silver pencil, but pictures show, that the Ford branding wasn´t silver with the 72d. All paints are from the Tamiya LP range and the screwheads were picked out with markers. The gearbox was painted with Zero Paints texturized color for Hewland gearboxes. Cheers Rob

- 70 replies
-
- 10
-
-
-
I started to prepare the engine and transmission for painting. Assembly is straight forward, albeit there´s a lot of clean up necessary. The exhausts are always a bit complicated to assemble, therefore, I decided to finish this task before painting. I glued the exhaust pipes with a tiny bit of glue into the silver four in one piece and then fiddled the other ends of the pipes into their holes in the engine block, before the glue cured. Fixed with a strip of adhesive tape, I added more glue to the four in one piece and let dry. Cheers Rob
-
Both are beauties, finish on both and rigging on the Moth look absolutely convincing, but love the seat cushion most. Cheers Rob
-
Wow Mike, your little jewel somehow skipped my intention until now. I´m fascinated what is possible in that scale, and how you let it look like an easy build. Cheers Rob
- 40 replies
-
- 3
-

-
-
- Five Star
- Akitsu Maru
- (and 1 more)
-
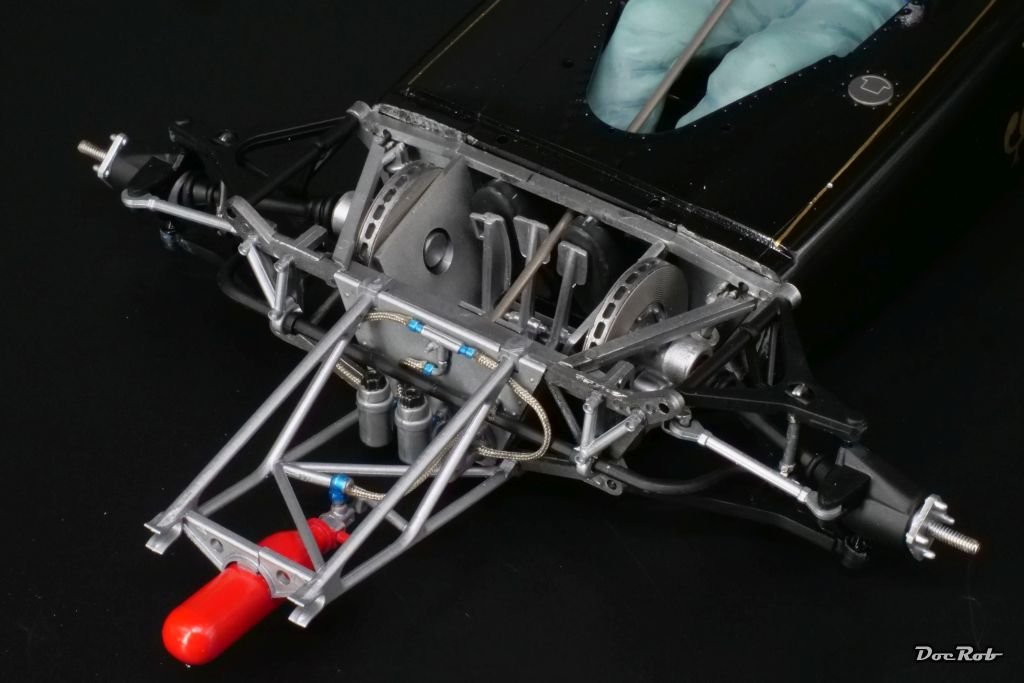
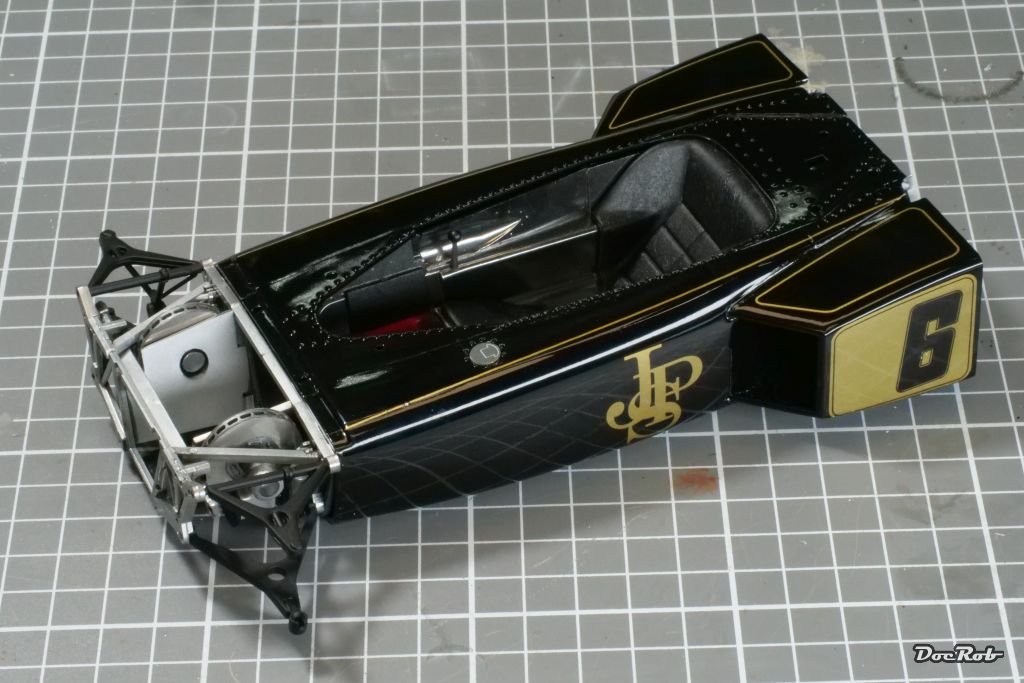
The nose section got finished. The assembly was fiddly, but in the end, I got it together. For a bit more rigidity, I glued all the parts in place, so I have no working suspension (I doubt, that this would be possible without modification) and no steering function. I added some braided lines, for which I drilled out the plastic fittings with a 0,5mm drill bit and inserted a tiny brass rod, to accept the braided hose. Mr. Fittipaldi will receive his arms later, when the upper cowling will be finally placed, along with the steering wheel. ...and the best, the front body fits over everything, without problems, it´s Tamiya, even, if it´s 50years old kit. Cheers Rob
- 70 replies
-
- 11
-
-
Thank you Gary, that was, what I thought, the steering may work, but the suspension, hmm, there were some too loose fitting arms and these tiny cups holding the wheel, ... The under body supports will help for sure. Cheers Rob
-
Thank you Gary, poco a poco, little by little is the way to go. Today, I finished painting the rims with the black hubs in front and the chrome rings. You are absolutely right, F1 cars are stuffed with lots of aggregates and structure in minimal space, always a bit delicate to get together. Was your front suspension and steering really working in the end? From the design of the parts, it seems almost impossible. Cheers Rob
-
White Freightliner DD by CDW - AMT - 1:25 Scale - PLASTIC
DocRob replied to CDW's topic in Non-ship/categorised builds
Nice work with that dinosaur of a kit. I build this or a similar truck, when I was very young. I considered building a Peterbilt 378 Long Hauler some time ago. There is a resin engine and nice PE parts available for this one, but I always shy away, when I see the Italeri label, as well as AMT. Cheers Rob -
Some progress at last. I finished the cockpit tub with the seat, fire extinguisher, and paddings and installed it into the body. The front suspension is only temporary installed and proved to be very fiddly to assemble. If it would be movable remains to be seen, but I doubt it, seeing the design. I also installed the radiators with their PE grills into their fairings. I have a lots of mishaps with this build lately, which are no fault of the kit, but mine. I airbrushed the three color front rims for the third time now, always finding some inacceptable flaws. Same with some of the firewalls and inner traverses, where the AK polished aluminum color showed some flaws, possibly a reaction with the plastic, despite being primed with gloss black. Overspraying, this time with Alclad led to the same result and I finally used Tamiya´s LP gloss aluminum, which worked. I´m not used to these kind of issues, I usually plan my approach thoroughly and do it once. Everything there´s something new, even with what looks like routine. Cheers Rob
-
Thanks Phil, I missed you over on LSM recently and whoosh, here you are . Progress is slowly at the moment, too many non modeling distractions, but this will change soon, hopefully. Cheers Rob
-
Bentley Blower by RGL - Airfix - 1/12 - PLASTIC
DocRob replied to RGL's topic in Non-ship/categorised builds
Nice, you already have some wheels, but I post a link for wire wheels anyway. I bought wheels and wir locks from them for my 1/12 Alfa Romeo 8C 2300. unobtainium.digital Cheers Rob -
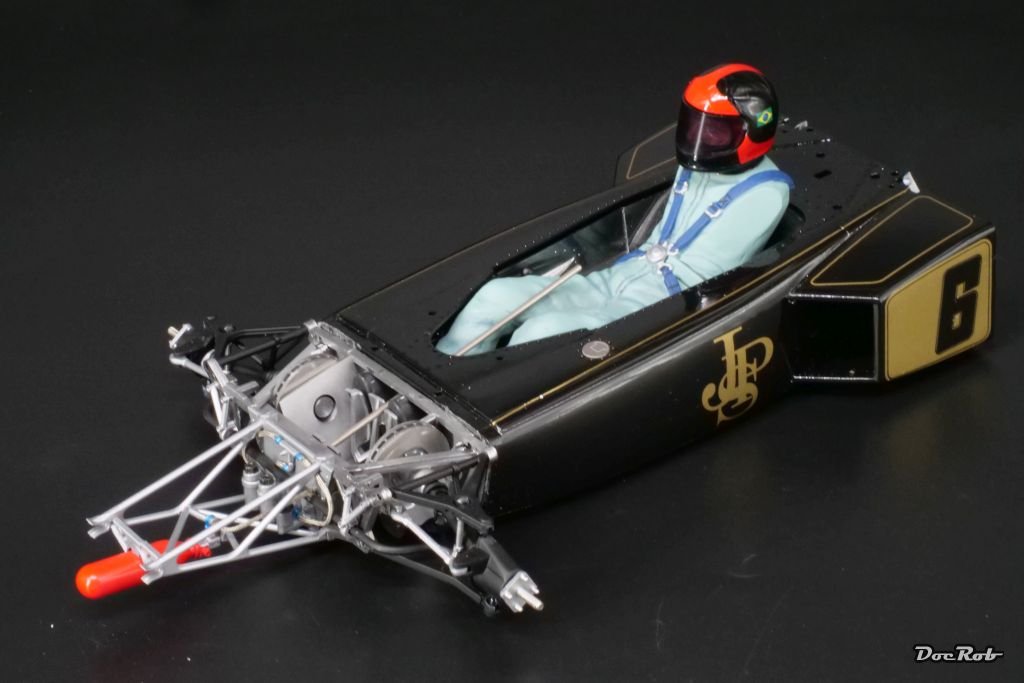
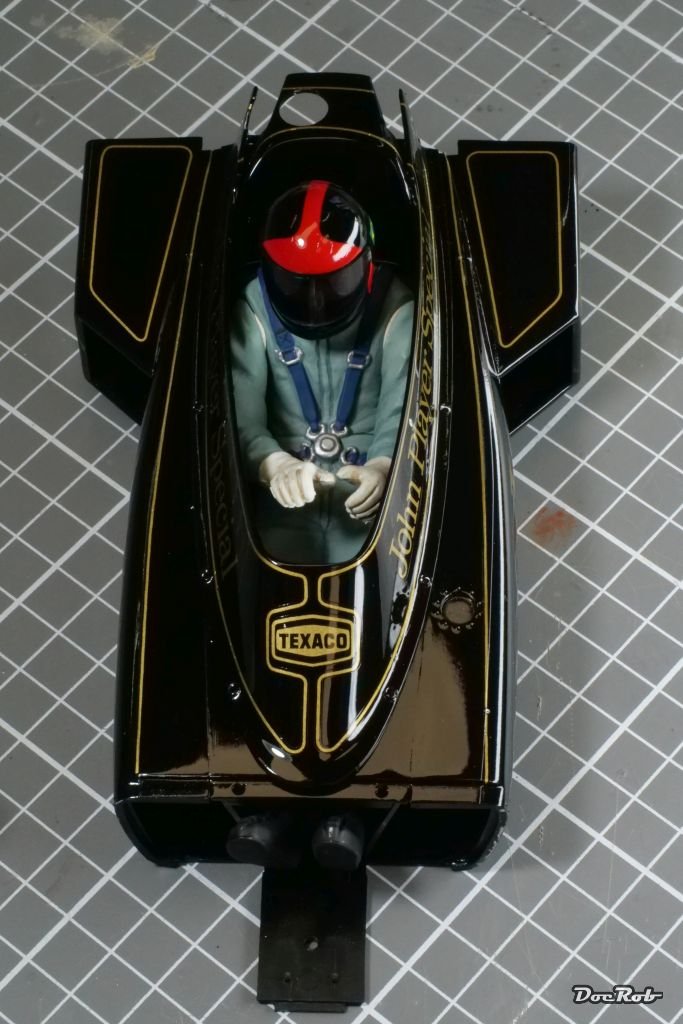
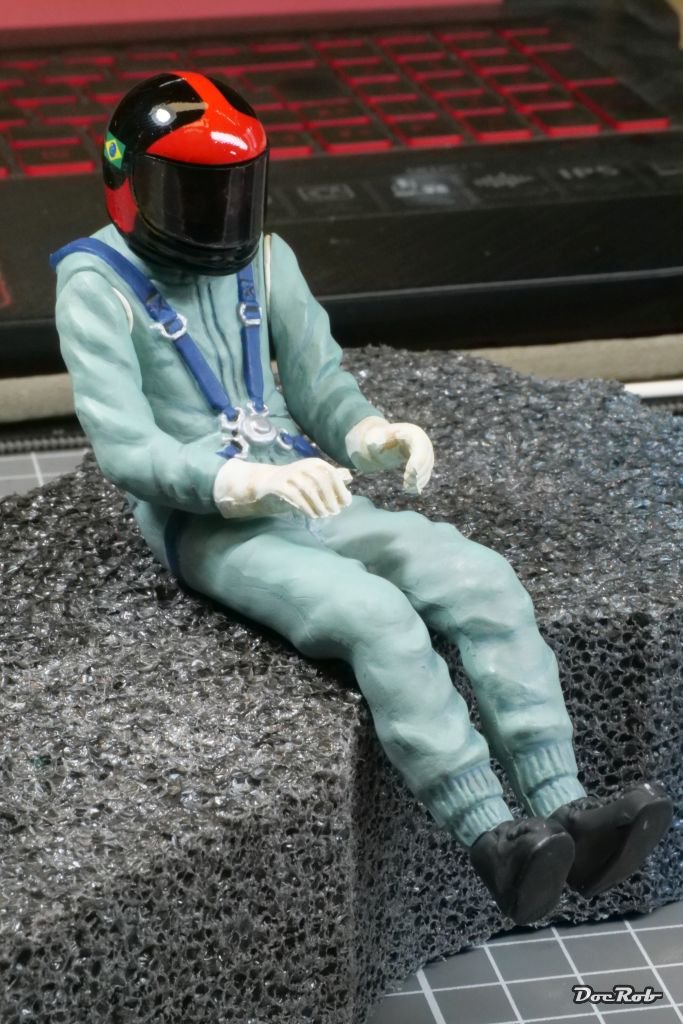
This update took a while, non the least, because Mr. Fittipaldi was a bit renitent. Actually, it was more the helmet and visor, which gave me headaches. Tamiya provides a driver figure and decals for the helmet, which wouldn´t go on wrinkle free. I used quantities of Tamiya extra strong and a hairdryer, before finally clear coating the helmet. Even more annoying was the visor. I wanted it tinted in smoke, like in real live, but equal which color and technique I used, it came always out bad. I tried AK crystal smoke and Tamiya smoke, sprayed or dipped, with misted layers or heavily applied, it never looked right. Finally, I tried my best, spraying AK crystal smoke lightly in numerous layers onto the before hand Future dipped visor and clear coated it. It still looks poor, but having stripped the visor umpteenth times, there may be no better result. The rest of the Fittipaldi figure was airbrushed and painted with Tamiya acrylics. I also tinted the clear windshield (not on the pictures) yellow, which came out better but not perfect. After a final clearcoat, it looks now very good. If somebody out there has a working technique for tinting larger clear parts evenly, pleas share it. Cheers Rob

- 70 replies
-
- 11
-
-
-
Lots of nice moustaches, among lots of detail. Again a dio, like a snapshot taken with a camera. Fantastic and fast work, rgl, congratulations on that beauty. Cheers Rob
-
Thank you Dan, after finishing with the finish, I have to actually start building the Lotus now . Cheers Rob
-
Simply stunning, I love the balanced colors a lot. Cheers Rob
-
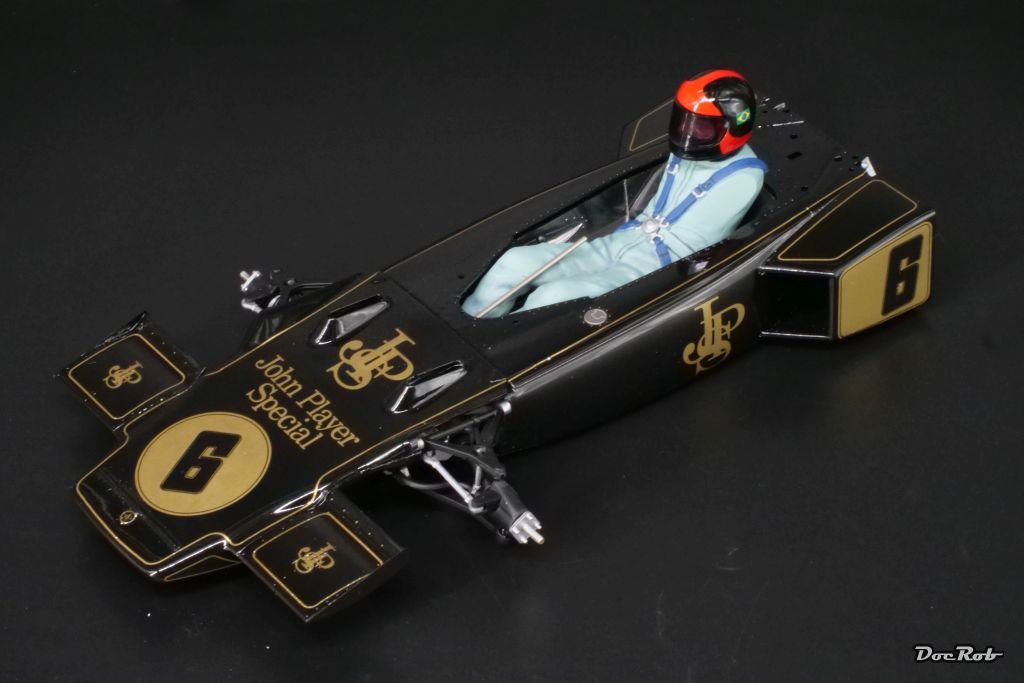
This is already clear coated and polished ubjs and I will not clear anymore over the added numbers. With fails, you have to have a story. Mine is, the numbers were changed sometimes from race to race, so maybe they weren´t applied to the highest standard. Cheers Rob
-
Thank you Gary, I like the finished black color as well, the repaired numbers, hmm, they are a compromise. I didn´t dare to sand and possibly fill any further, so under certain lighting situations the bubbles are slightly visible through the decal. Cheers Rob
-
Yesterday, I tested the Tamiya #8 onto my affected #6 decal for comparing the size and they fit like a glove, phew. Today was the day to rescue the finish of the Lotus. I took all my courage and cautiously sanded away the bubbles on the number decals with a fiber pen and the edge of a sanding spoon. I was eager not to destroy the underlying golden decals. It looked like this then: I then decided to polish all the body parts with Tamiya polishing compounds. This was ignited, because I watched some of the build videos of the 72D on YouTube and was shocked by the very bad surface quality of some of the paintjobs. I would not dare to show these. I used the coarse compound only on the number decals, which were sanded before and polished all the body parts with the fine- and finish compound. Lastly, I applied the Tamiya #6 decals over the old ones and despite it not looking perfect, it has to do. I´m satisfied with the finish now, with the black glistening like a Steinway grand piano and it looks even better than on the photos. Cheers Rob


- 70 replies
-
- 13
-
-
-
Very nice extra detailing, your Bugatti will be a beauty. Cheers Rob
-
Until now, I´m pretty calm, because I have a plan, let´s hope it works. Actually, I never had these issues before, but I´m very careful with applying the first coat of clear, didn´t help here. Cheers Rob
