


DocRob
-
Posts
1,296 -
Joined
-
Last visited
Content Type
Profiles
Forums
Gallery
Events
Everything posted by DocRob
-
 Thank you Gary, the reaction on the numbers is a bit weird, as they are from the same decal sheet as the gold decals. You may be right about this happening only to double layered decals, because there are smaller black backed decal on the rear wing, without this reaction. In a day or two, I will evaluate the situation and hope, I can solve it. My preferred plan is to sand the bubbles away carefully and then add the black numbers from the Tamiya decal sheet. Hopefully, they have the same size, but I will test before sanding with a spare #8 decal. Cheers Rob
 -
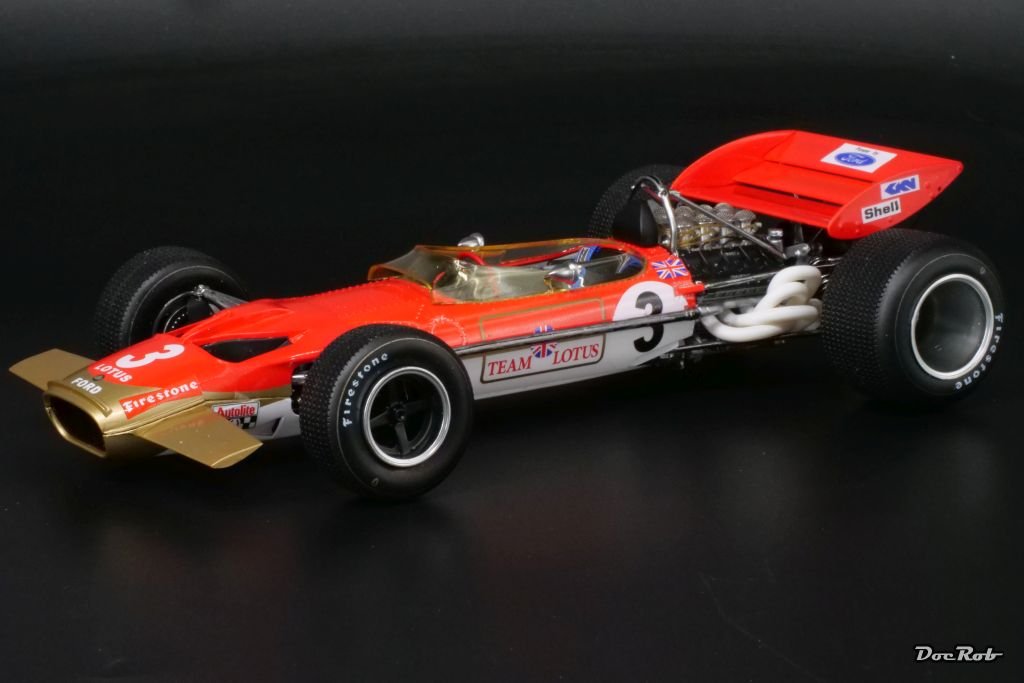
After 24 hours of curing time, I dared to look at the body parts a little closer. The Zero Paints Lacquer Clear was phenomenal to work with once again. I first sprayed a thin layer un thinned, to seal the decals, without harming them, blowing the color dry with the airbrush for faster curing and less reaction time. This layer has a bit of orange peel, but that doesn´t matter now. After about half an hour, I thinned the clear for the second coat with about 30% to 40% of leveling thinner and had a much better surface quality then before. Until now, no probs with the decals. The third and fourth coat followed after shorter periods of drying time, as I wanted them to melt into the former layers. The clear was thinned with about 55% to 60% of leveling thinner. The surface becomes almost perfect, but the black #6 decals got some tiny bubbles, a reaction with the clear coat or the thinner, unfortunately. I´m thinking about sanding the bubbles away very carefully and apply the Tamiya #6 decals onto them, which hopefully have the same size. I will check that before sanding with the #8 decal. I´m not sure, if I polish the body parts, as they look near perfect right now. I will decide that after two or three days of further curing time, before, I won´t touch the parts. Cheers Rob


- 70 replies
-
- 11
-

-
Decaling is mostly done. I have to do some touch ups and the Fittipaldi helmet. The pinstripes proved to be difficult to apply, especially around the cockpit. The front with the Texaco sign was a nightmare, because the pinstripes are separate decals, easy to guess, how fragile and difficult to arrange they were. I could have used the Tamiya decal for that, but there is a lot of carrier film all around. On the back of the cockpit, I used Tamiya´s pinstripes, which luckily have the same color. I will let dry for a day now and then clean off the water residues before clear coating. Cheers Rob

- 70 replies
-
- 14
-
-

-
Thank you Gentlemen, this build was a deeply satisfactory experience, demanding, but not overly difficult. @kingslug: If you ever start a MFH build, choose a F1 kit, they are easier to build by far in comparison with full bodied racers. Cheers Rob
-
Muchas gracias Ken and Craig, until now, it´s smooth sailing and I hope the rest of this 1973 kit is holding up. I was a bit young to see Emo racing in the Lotus 72, but just love iconic historic racers. Cheers Rob
-
After the three jars of Tamiya LP-1 have cured, I started with the decaling. The TBDecals are very good to work with, the carrier film is very thin and they can be slipped off the backing paper within seconds. Some of the stripes folded over, but none teared. I used only warm water with a drop of detergent for decaling, luckily there are not many curves to contour the decals around. The multi piece pinstripes on the body and nose were applied quite rapidly in one go, to get them aligned perfectly and symmetrical. I hope the decals are not too sensitive concerning a later clear coat to seal everything in. Cheers Rob


- 70 replies
-
- 14
-
-
-
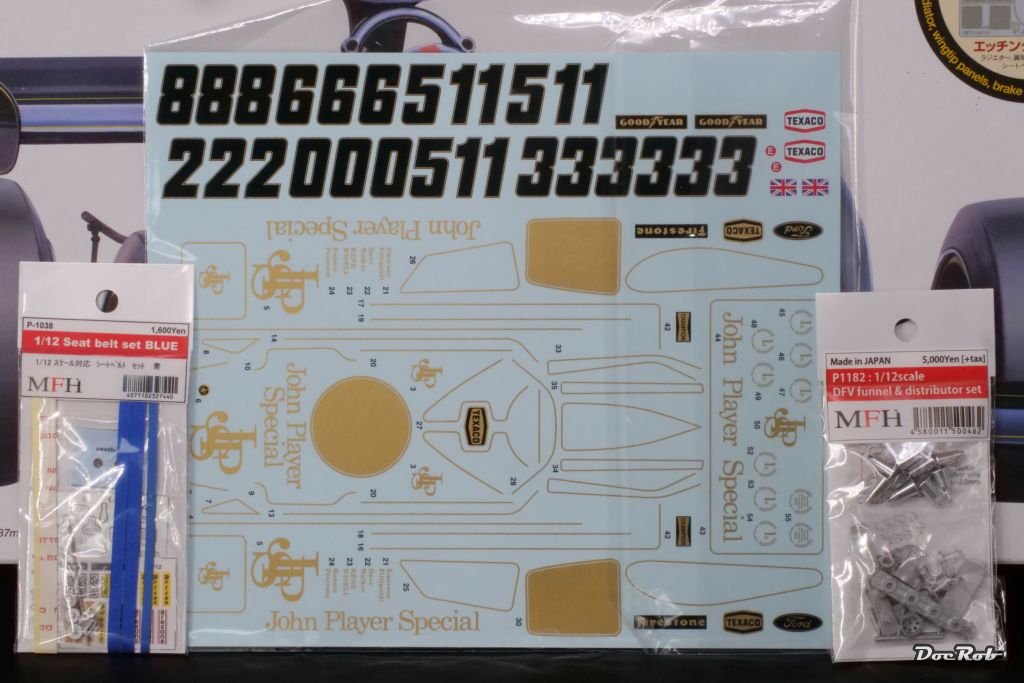
Thank you, when I was a kid, I only built some Airfix kits or worse. The 1/12 Tamiya kits were too expensive for my pocket money. I built my first Tamiya 1/12 F1 kit two years ago, the Renault RE20 Turbo, a decent, but not perfect kit. The Lotus 72D is surely a very old mold, but got updated in parts. There is a PE fret included, fabric seat belts and new decals, unfortunately without the JPS-branding. How it will build up, remains to be seen, but I´m optimistic overall. I will add some hoses and wiring along other details, like aluminum funnels and metal distributors. The MFH kits I built are of a far superior quality, but I think, with a bit of love, the Lotus can be build into a nice replica. Cheers Rob
-
Thank you Alan, I have developed a hate/love relation with high shine metal surfaces in modeling. They are difficult to achieve and very fragile, but very rewarding, when properly done. Cheers Rob
-
Thank you Gary, I remember your great build and am on a bit of a Lotus track myself right now. Photos I have seen suggest polished aluminum for the tub, maybe not as shiny as mine. Not much will be visible, if my plan, adding the driver figure works out. The gold color of the TBDecals sheet look good and I hope they are equally good to work with. Unfortunately there is no placement guide included, which would have been very helpful. I don´t know, how you approached the upper cowl. I took the sidewalls, taped them to the floor part temporarily and then glued in the two upper parts permanently. There is no warping at all. Cheers Rob
-
De nada Yves, I´m still in the learning process with car body finishes, but have established something like a working process, depending the used type of color. With the Tamiya lacquer paint, I start with a mixing ratio of about 40% to 50% of added levelling thinner. I always test spray, to see, if the paint is leveling well. The second coat got more thinner added (about 60%). It levels beautifully, but is very thin and therefore prone to color runners. It´s a bit of a struggle, but worth it in the end. I think, the better the preparation, the lesser is the sanding and polishing work in the end, which is hard to achieve in some "hidden" places, like on the wings corners. Cheers Rob
-
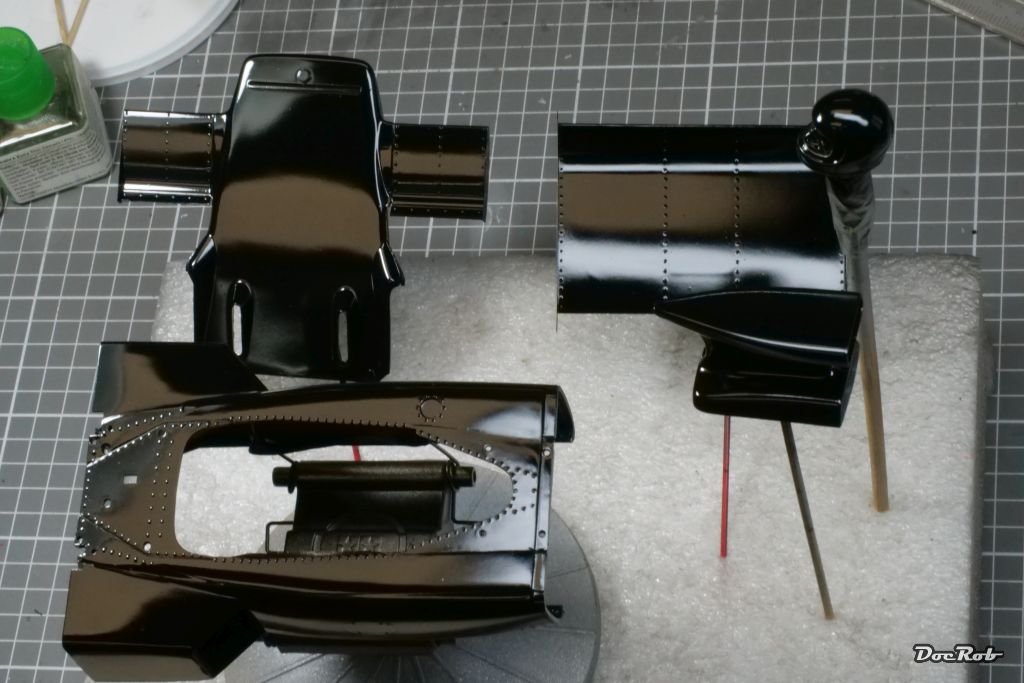
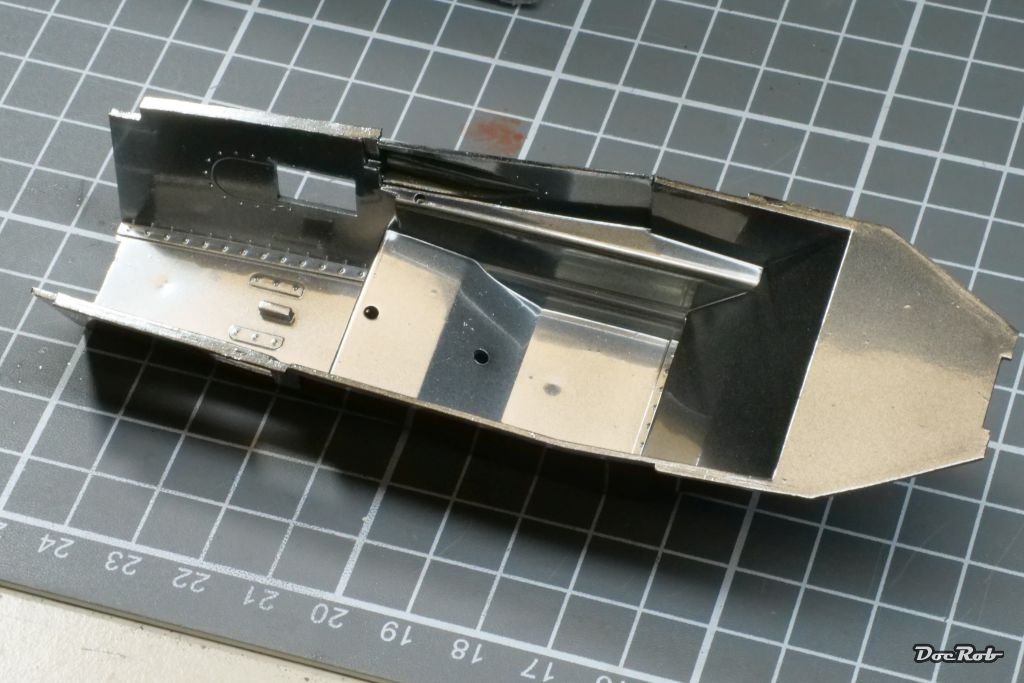
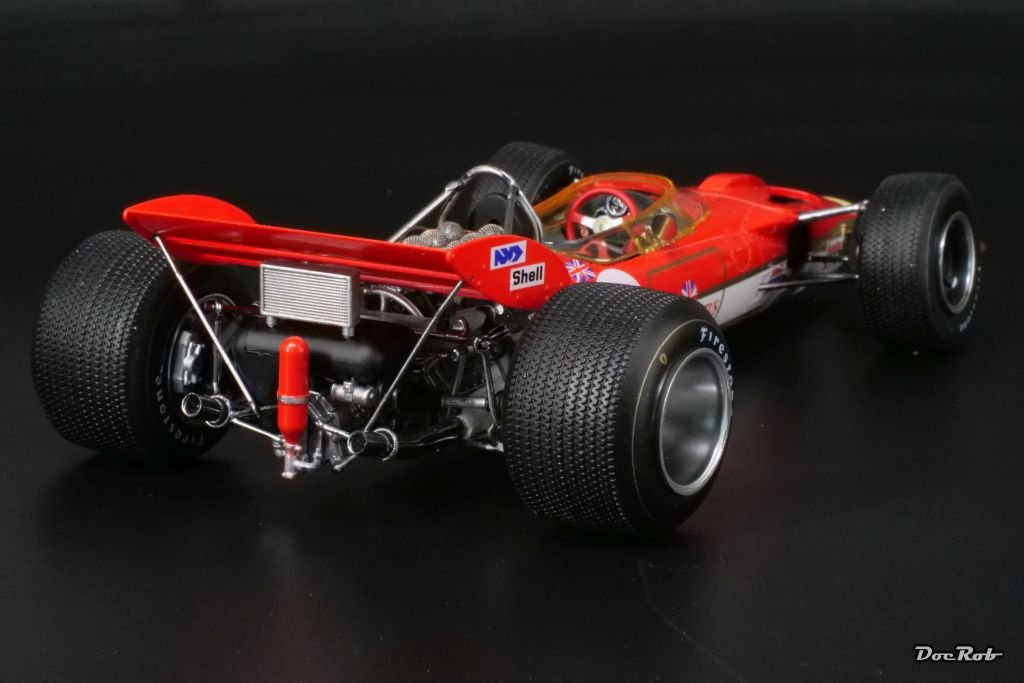
Over the last days, I did a lot of sanding and test fitting, to prepare the body and wing parts for painting and decaling. I decided to add the front wings to the nose and built up the upper side of the body along the radiator housings for not having to glue these parts later after painting and decaling. This way, I could ensure a proper fit and alignment of the parts, which will help later in the build. I primed the parts with Mr. Surfacer 1500 black primer and then sprayed Tamiya LP-1 gloss black on, heavily thinned with leveling thinner. Unfortunately, I had some tiny color runs, which easily happens with paint, thinned so much. After drying, I sanded away the imperfections and today, I resprayed the black body color. Now it looks decal ready with a near perfect high gloss finish. I also sprayed the cockpit with Ammo´s polished aluminum, which is shining fantastic, even better to the human eye, than on the picture. I read rumors, these Ammo metallic are the same as Alclad, but I don´t know for sure. Anyway, polished aluminum sprays perfectly in very fine layers over a base coat of Tamiya LP-1 gloss black. Cheers Rob
- 70 replies
-
- 11
-
-
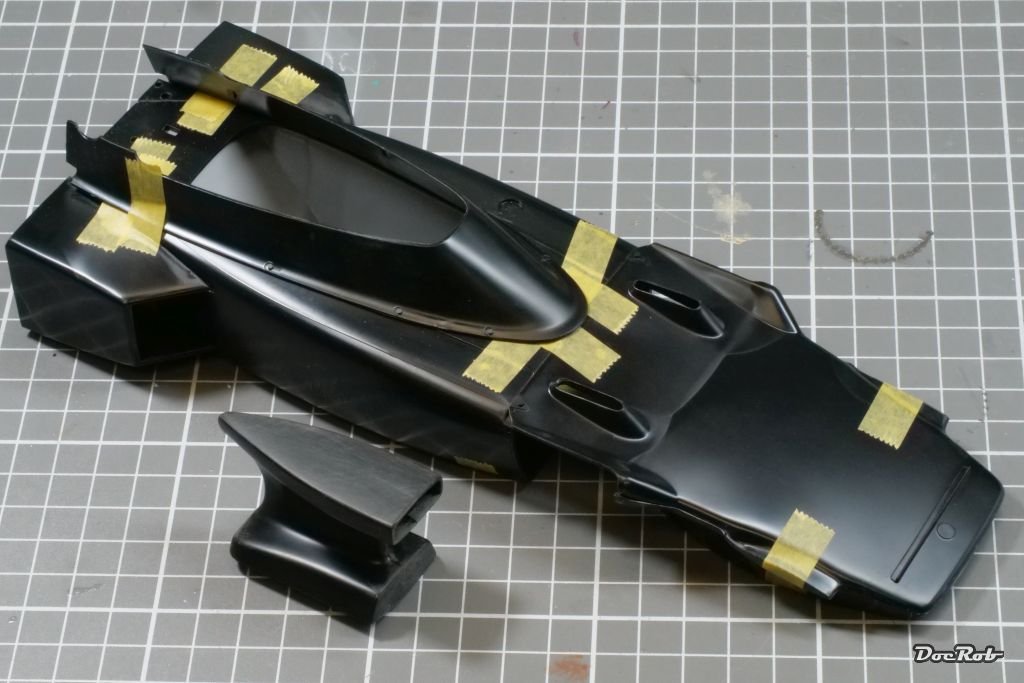
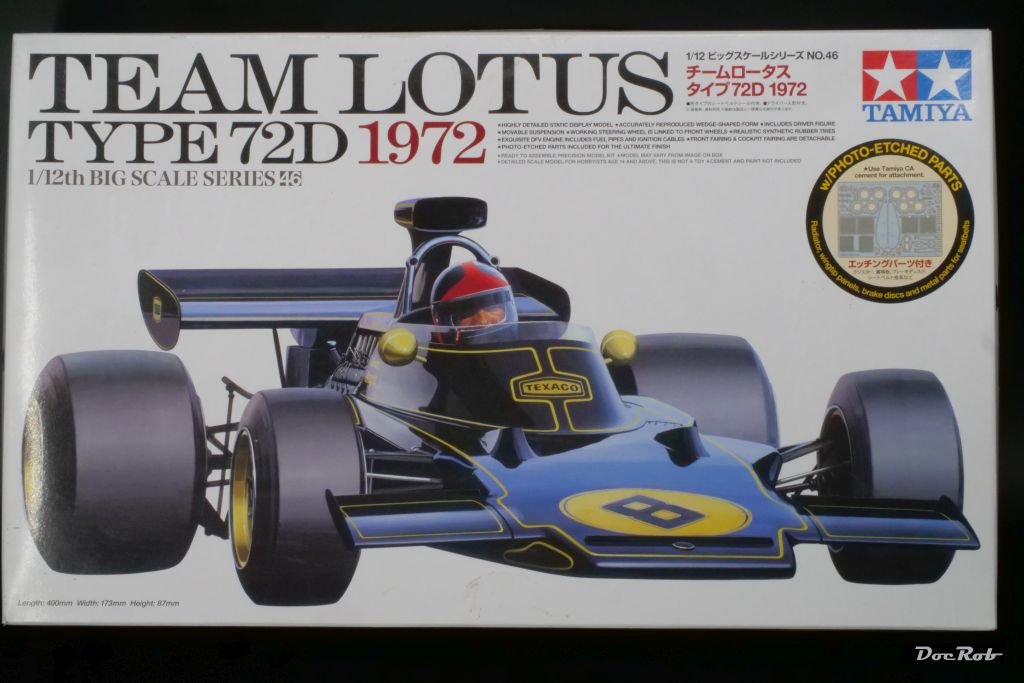
Hola amigos of the 70´s Formula 1 cars. For my next build, I chose the most iconic one of it´s time, the Lotus Type 72D, produced by Tamiya first in 1973. It´s an old kit, which will need a bit of attention. Tamiya re-released the kit a while ago, adding PE parts, seat belts and new decals. The decals unfortunately don´t have the JPS branding included and therefore, I added a complete TBDecals sheet. Other extras will be MFH aluminum air funnels and distributor and maybe MFH seatbelts, if I don´t use the included driver figure of Emerson Fittipaldi. Here are the extras; For a start, I test fitted the body section, to see, how the fit is and what will be my painting and decaling approach. There will be a lot of sanding and maybe filling to get rid off the seams. I started with the air intake and it took a lot of sanding, to erase the parting line. Cheers Rob
- 70 replies
-
- 11
-
-
Nice, the guy on the right, way back seems to be a giant. Cheers Rob
-
Congratulations, well earned. Cheers Rob
-
D7E Bulldozer by RGL - FINISHED - Hobby link - 1/35 - 3D-printed
DocRob replied to RGL's topic in Non-ship/categorised builds
Very nice dozer, Greg. I really like the multi colored chipping. I have a 1/35 Doobie D9r kit started, where I plan multi layer hairspray chipping. Metal base color, chipping fluid, primer, chipping fluid and finally the body color. I have no idea, if it works. Cheers Rob -
VTOL(s) by yvesvidal - FINISHED - 1/48th - PLASTIC
DocRob replied to yvesvidal's topic in Non-ship/categorised builds
A fantastic collection of more or less flying curiosities you have there, Yves. I love them all, but have to admit, the Coleoptere is a stand out. Interesting, that they were not able to calculate the lift of the annular wing correctly. It might have to do with the low speed when converting into vertical flight. Good to have computer simulation now, but your models show, there was a time in the 40´s and 50´s where everything was thought possible. I have a 1/32 Natter in stash and I am considering to build it in plywood finish, when time comes. Cheers Rob -
Absolutely beautiful, good to see you back here. Cheers Rob
-
Somehow I missed your great build, Dan. I really like your methodical approach and the Bulldog looks fantastic. Cheers Rob
-
This is getting better and better Alan, Your knight looks splendid and I love the idea with the paper insignia. Color rendition and metallic sheen are excellent. On the first picture, the shield looks very shiny. I would have thought it to be matte in appearance, but this is just me. Cheers Rob
-
Lotus 49C by DocRob - FINISHED - Ebbro- 1/20 - Plastic
DocRob replied to DocRob's topic in Non-ship/categorised builds
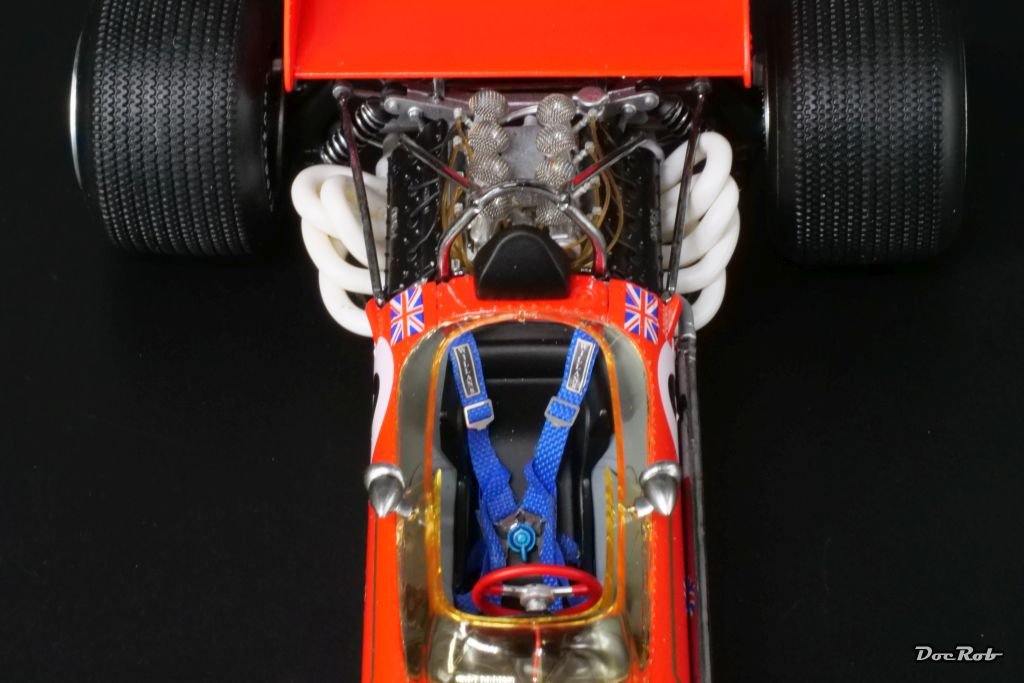
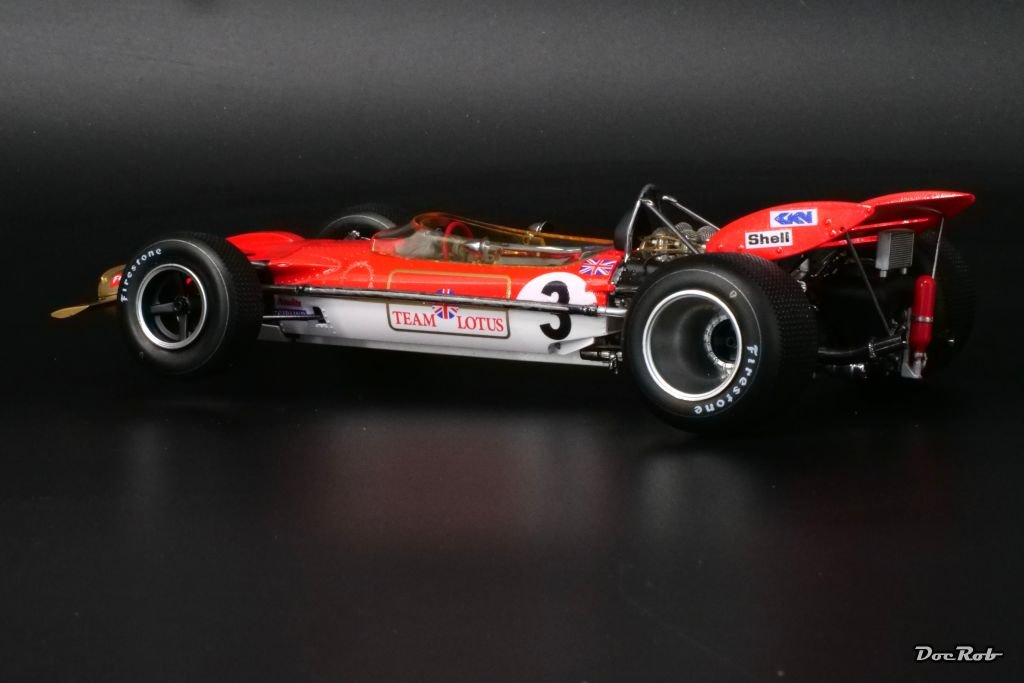
Thank you Gary, the Lotus does look good on the shelf, but it was far from an easy build. The pre-printed tires are definitely a highlight, unfortunately not copied by many companies. The added MFH details for the engine and air intakes definitely were a good invest, as the engine is so visible. Due to the fragility of the kit, I omitted further detailing with tubes and hoses. Cheers Rob -
Lotus 49C by DocRob - FINISHED - Ebbro- 1/20 - Plastic
DocRob replied to DocRob's topic in Non-ship/categorised builds
Thank you Phil and Allen, F1 cars tend to be delicate to build generally, due to lots of components in minimal space and fragile constructions. It wouldn´t have taken too much to make a premium effort with the kit for Ebbro. There are many details and clever engineering included, but poor implementations in some places, specially where the pr-chromed sprues come into play. Like you, Allan, I love the cars of this period, albeit I wasn´t following F1 racing as a youngster. I detest the later turbo monsters and after that detour, it became interesting again in the late 80`s. Cheers Rob -
Lotus 49C by DocRob - FINISHED - Ebbro- 1/20 - Plastic
DocRob replied to DocRob's topic in Non-ship/categorised builds
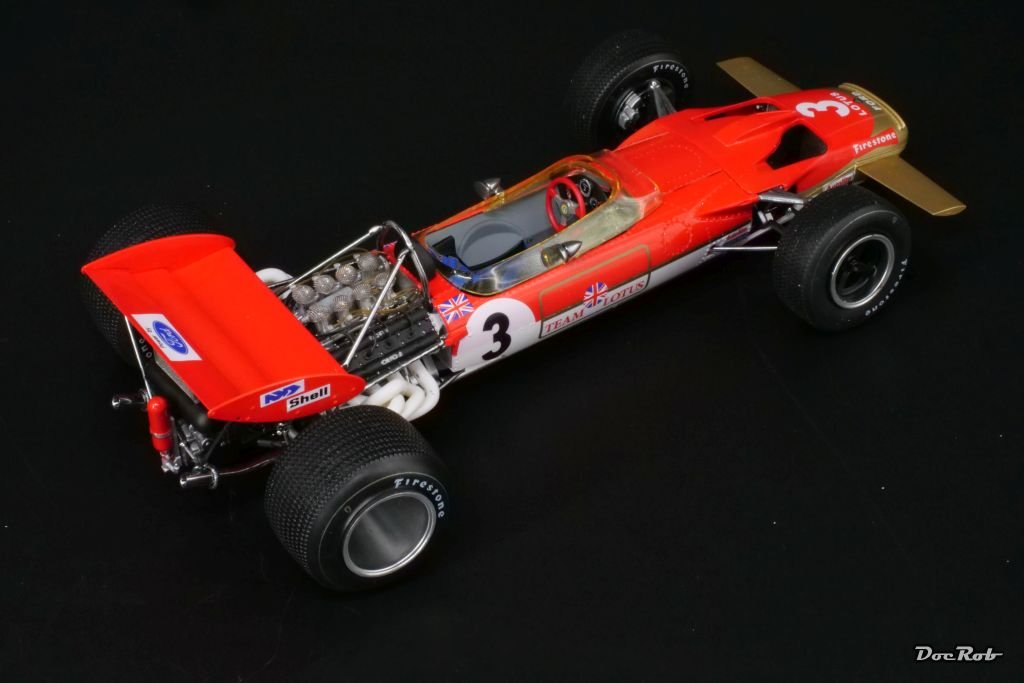
Thank you Ken, you are right about the cockpit no digital display, no traction control, just what you need for driving. I don´t know exactly, but I think, it was one of the first F1 cars with seat belts. Not all of the pilots liked them, because it was difficult to open them quickly after an accident with fire breaking out. When I remember correctly, Jochen Rindt, the driver of my car died soon after the Monaco race, possibly because he wasn´t wearing the seat belts correctly for the fear from fire. Cheers Rob -
Lotus 49C by DocRob - FINISHED - Ebbro- 1/20 - Plastic
DocRob replied to DocRob's topic in Non-ship/categorised builds
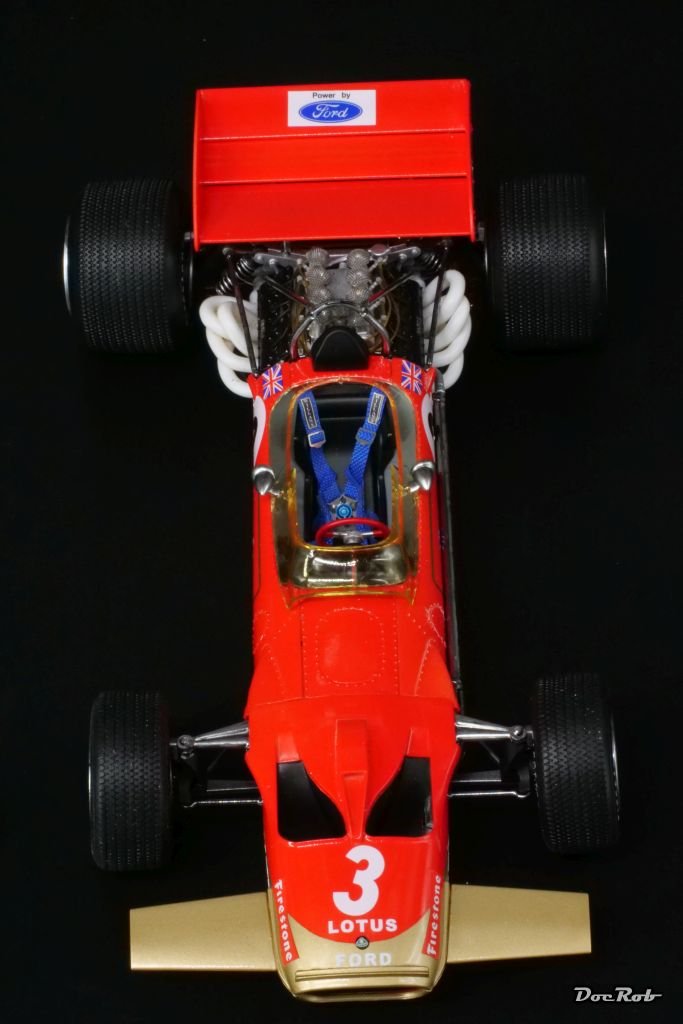
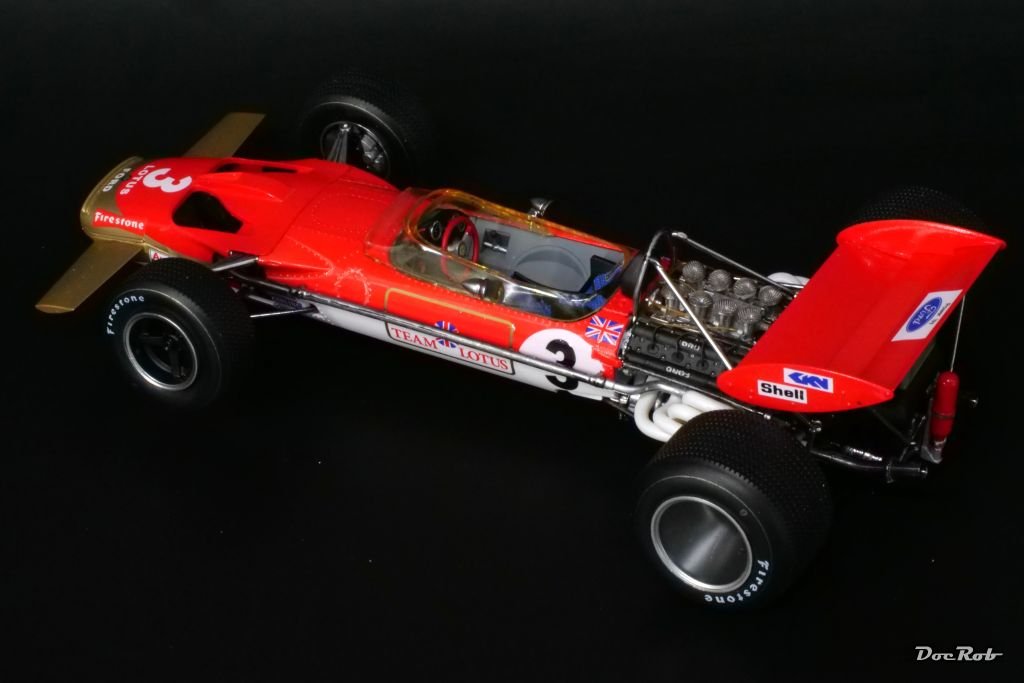
I got the Lotus 49c over the finish line. Final assemblies were the rear wing, the tiny metal nets over the air intakes, the steering wheel and clear parts around the cockpit and many small parts. The wing was easier mounted then thought, luckily. The rods were fragile and I can understand, why wings were banned sometimes in F1 due to the risk of flying around and hurting somebody. I hope, I did Jochen Rindt´s 1970 Monaco winner some justice. The build was not always pleasant, but I like the result despite some shortcomings. Cheers Rob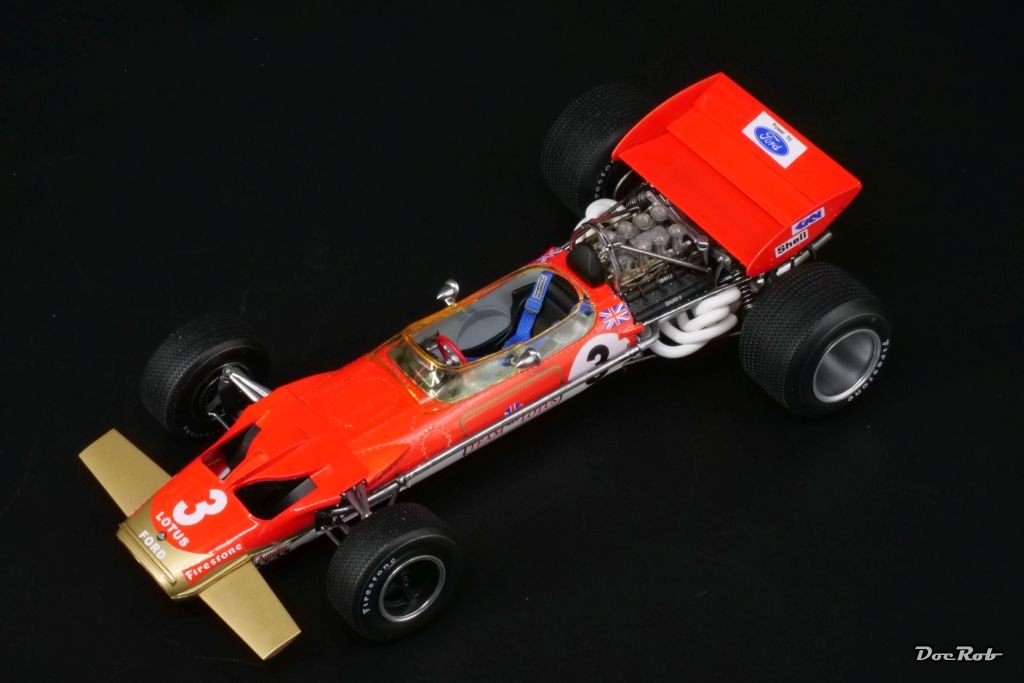


- 32 replies
-
- 10
-
-
-
That will end as a nicely busy scene, Greg. It will look like a snapshot with a camera, great. Cheers Rob
-
Lotus 49C by DocRob - FINISHED - Ebbro- 1/20 - Plastic
DocRob replied to DocRob's topic in Non-ship/categorised builds
Thank you Gary, it´s good to see the checkered flag near by with the Lotus. There will be an extensive touch up session before I call it finished. The sprayed chrome is very sensitive to the touch, luckily a chrome pen works relatively well. With the delicate construction, I omitted further wiring and piping. That will have to wait for a Tamiya Lotus 79 in 1/20 scale. Cheers Rob
