DocRob
-
Posts
1,296 -
Joined
-
Last visited
Content Type
Profiles
Forums
Gallery
Events
Everything posted by DocRob
-
 Somehow your Iron Duke build skipped my attention, Alan. I have no idea, how you made it at that super tiny scale, but the finished ship looks fantastic. I guess, you need an eyeball massage now. I would never go beyond 1/350 and even that is very tiny, detail wise. Cheers Rob
 -
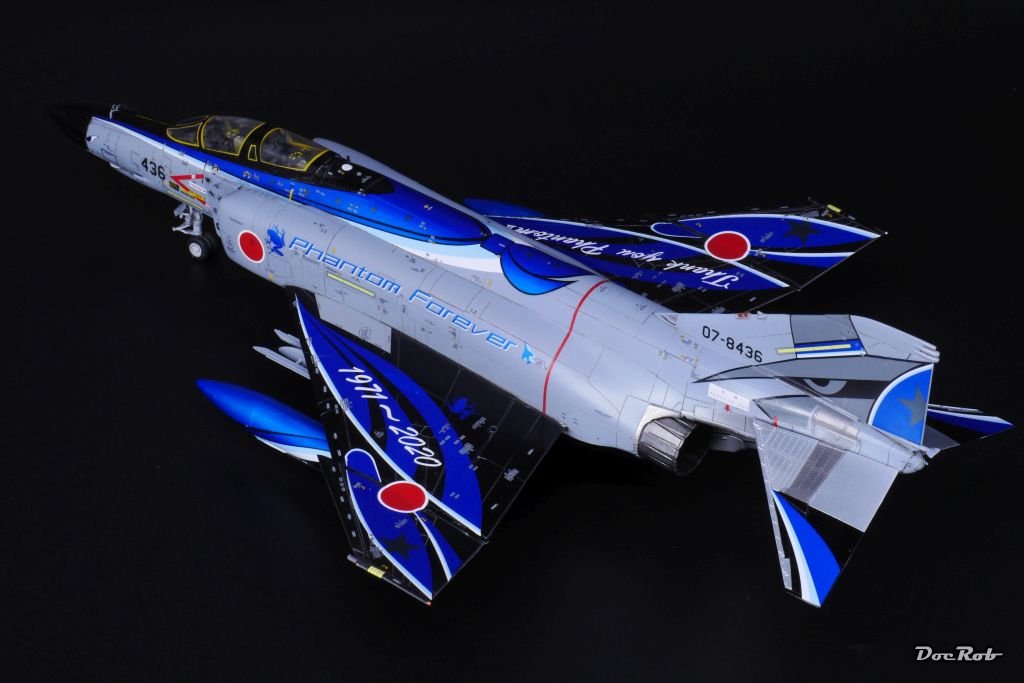
Thank you Craig, the kit falls together virtually, so you can enjoy the painting and finishing. Stencils can be a pain, but are luckily of very high Cartograph quality. The biggest problem was to match the blue metallic of the external fuel tanks to the decals. I even thought about building a second Kai Phantom with the yellow livery and that´s rare by me, because I hate repetitious work. If you are interested to dig a bit deeper into the build, there is a link to my WIP over on LSM. Done - F-4EJ Kai Phantom - The Last of it's Kind ZM 1/48 - LSM 1/48 Work in Progress - Large Scale Modeller Cheers Rob
-
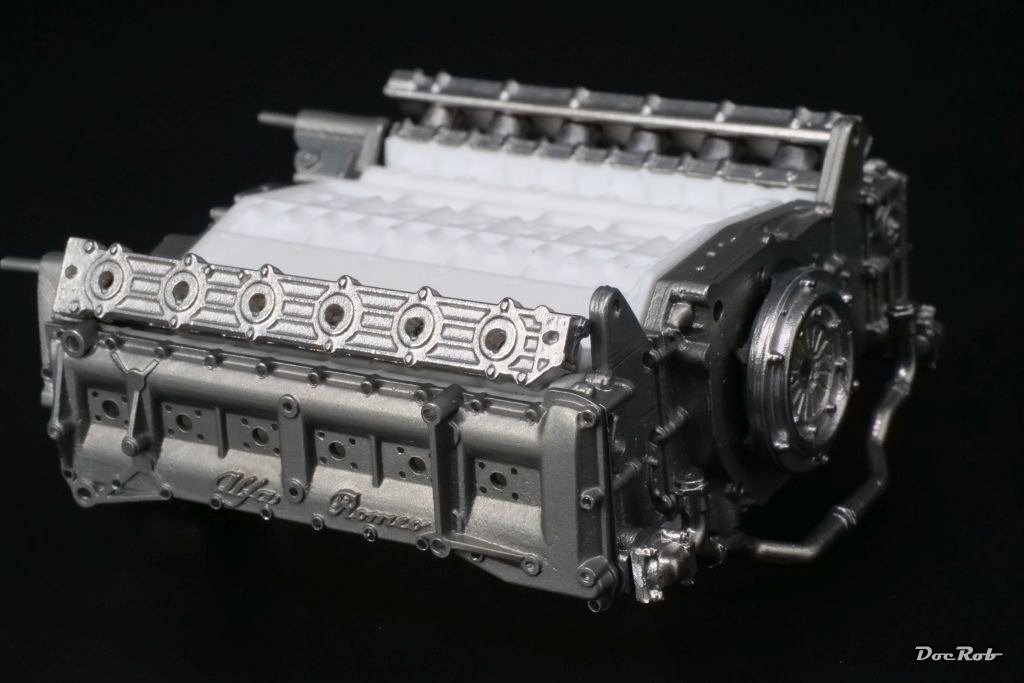
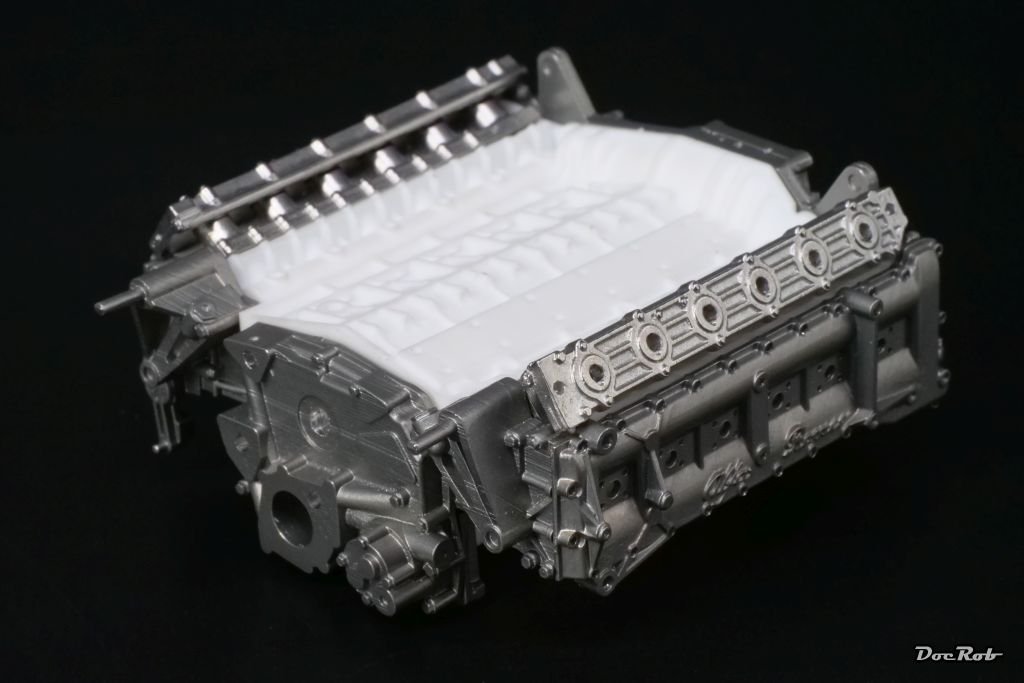
I paused a little with modelling, using the time for long hard swimming sessions in the Atlantic, to regain some power and stamina, but now, back to the Brabham. After about 150 or more holes drilled, most of the Alfa flat twelve engine is prepared for painting. Shown parts are only dry fitted, nothing is glued as of yet. There will be a ton of rivets been inserted into their holes after airbrushing. Cheers Rob
-
Nice loot Craig, you need a trailer, when visiting a show . The Salvino´s Monte Carlo is in my stash as well and I can tell yo, that the ZM F-4 kits are absolutely fantastic. How do I know? I built one . Cheers Rob
-
All looks fantastic in black and red Craig, I love the piping and have to store that idea for later. Cheers Rob
-
Congratulations to your awards and raffle wins, Craig. The Maserati is a piece of art. Cheers Rob
-
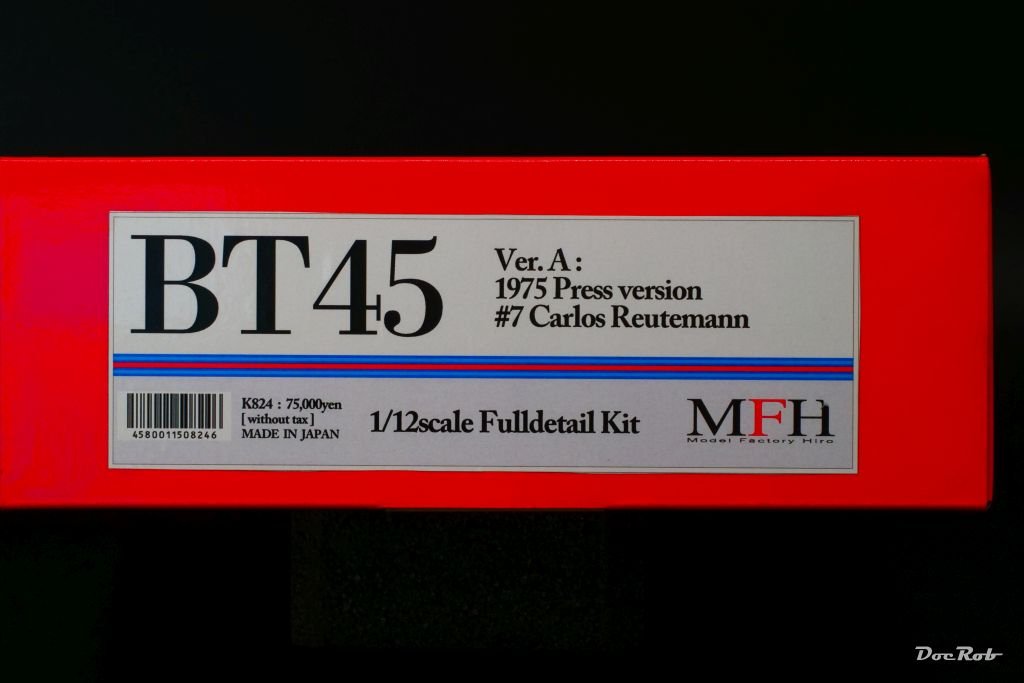
Thank you Gary, I hope it´s a bit less demanding than the Cobra Coupe, where I put a bit too much onto my inexperienced shoulders. I got it done, but I hope the BT45 will be easier to build, without doors, bonnets and tons of clear parts. I had the same preoccupations like you, when I started my first MFH kit, the Crocker motorcycle, but dearly loved the build experience, except for the chain. It´s a learning curve and good tools are needed, especially pin wises and tons of drill bits. Thorough preparation and understanding, how everything builds up are also important. I like a challenge with my projects and another option would have been to start the Tamiya 1/12 Brabham BT44b, the predecessor of the BT45, but when I saw the parting lines of the old kit, I thought no, lets build the real deal. Cheers Rob
-
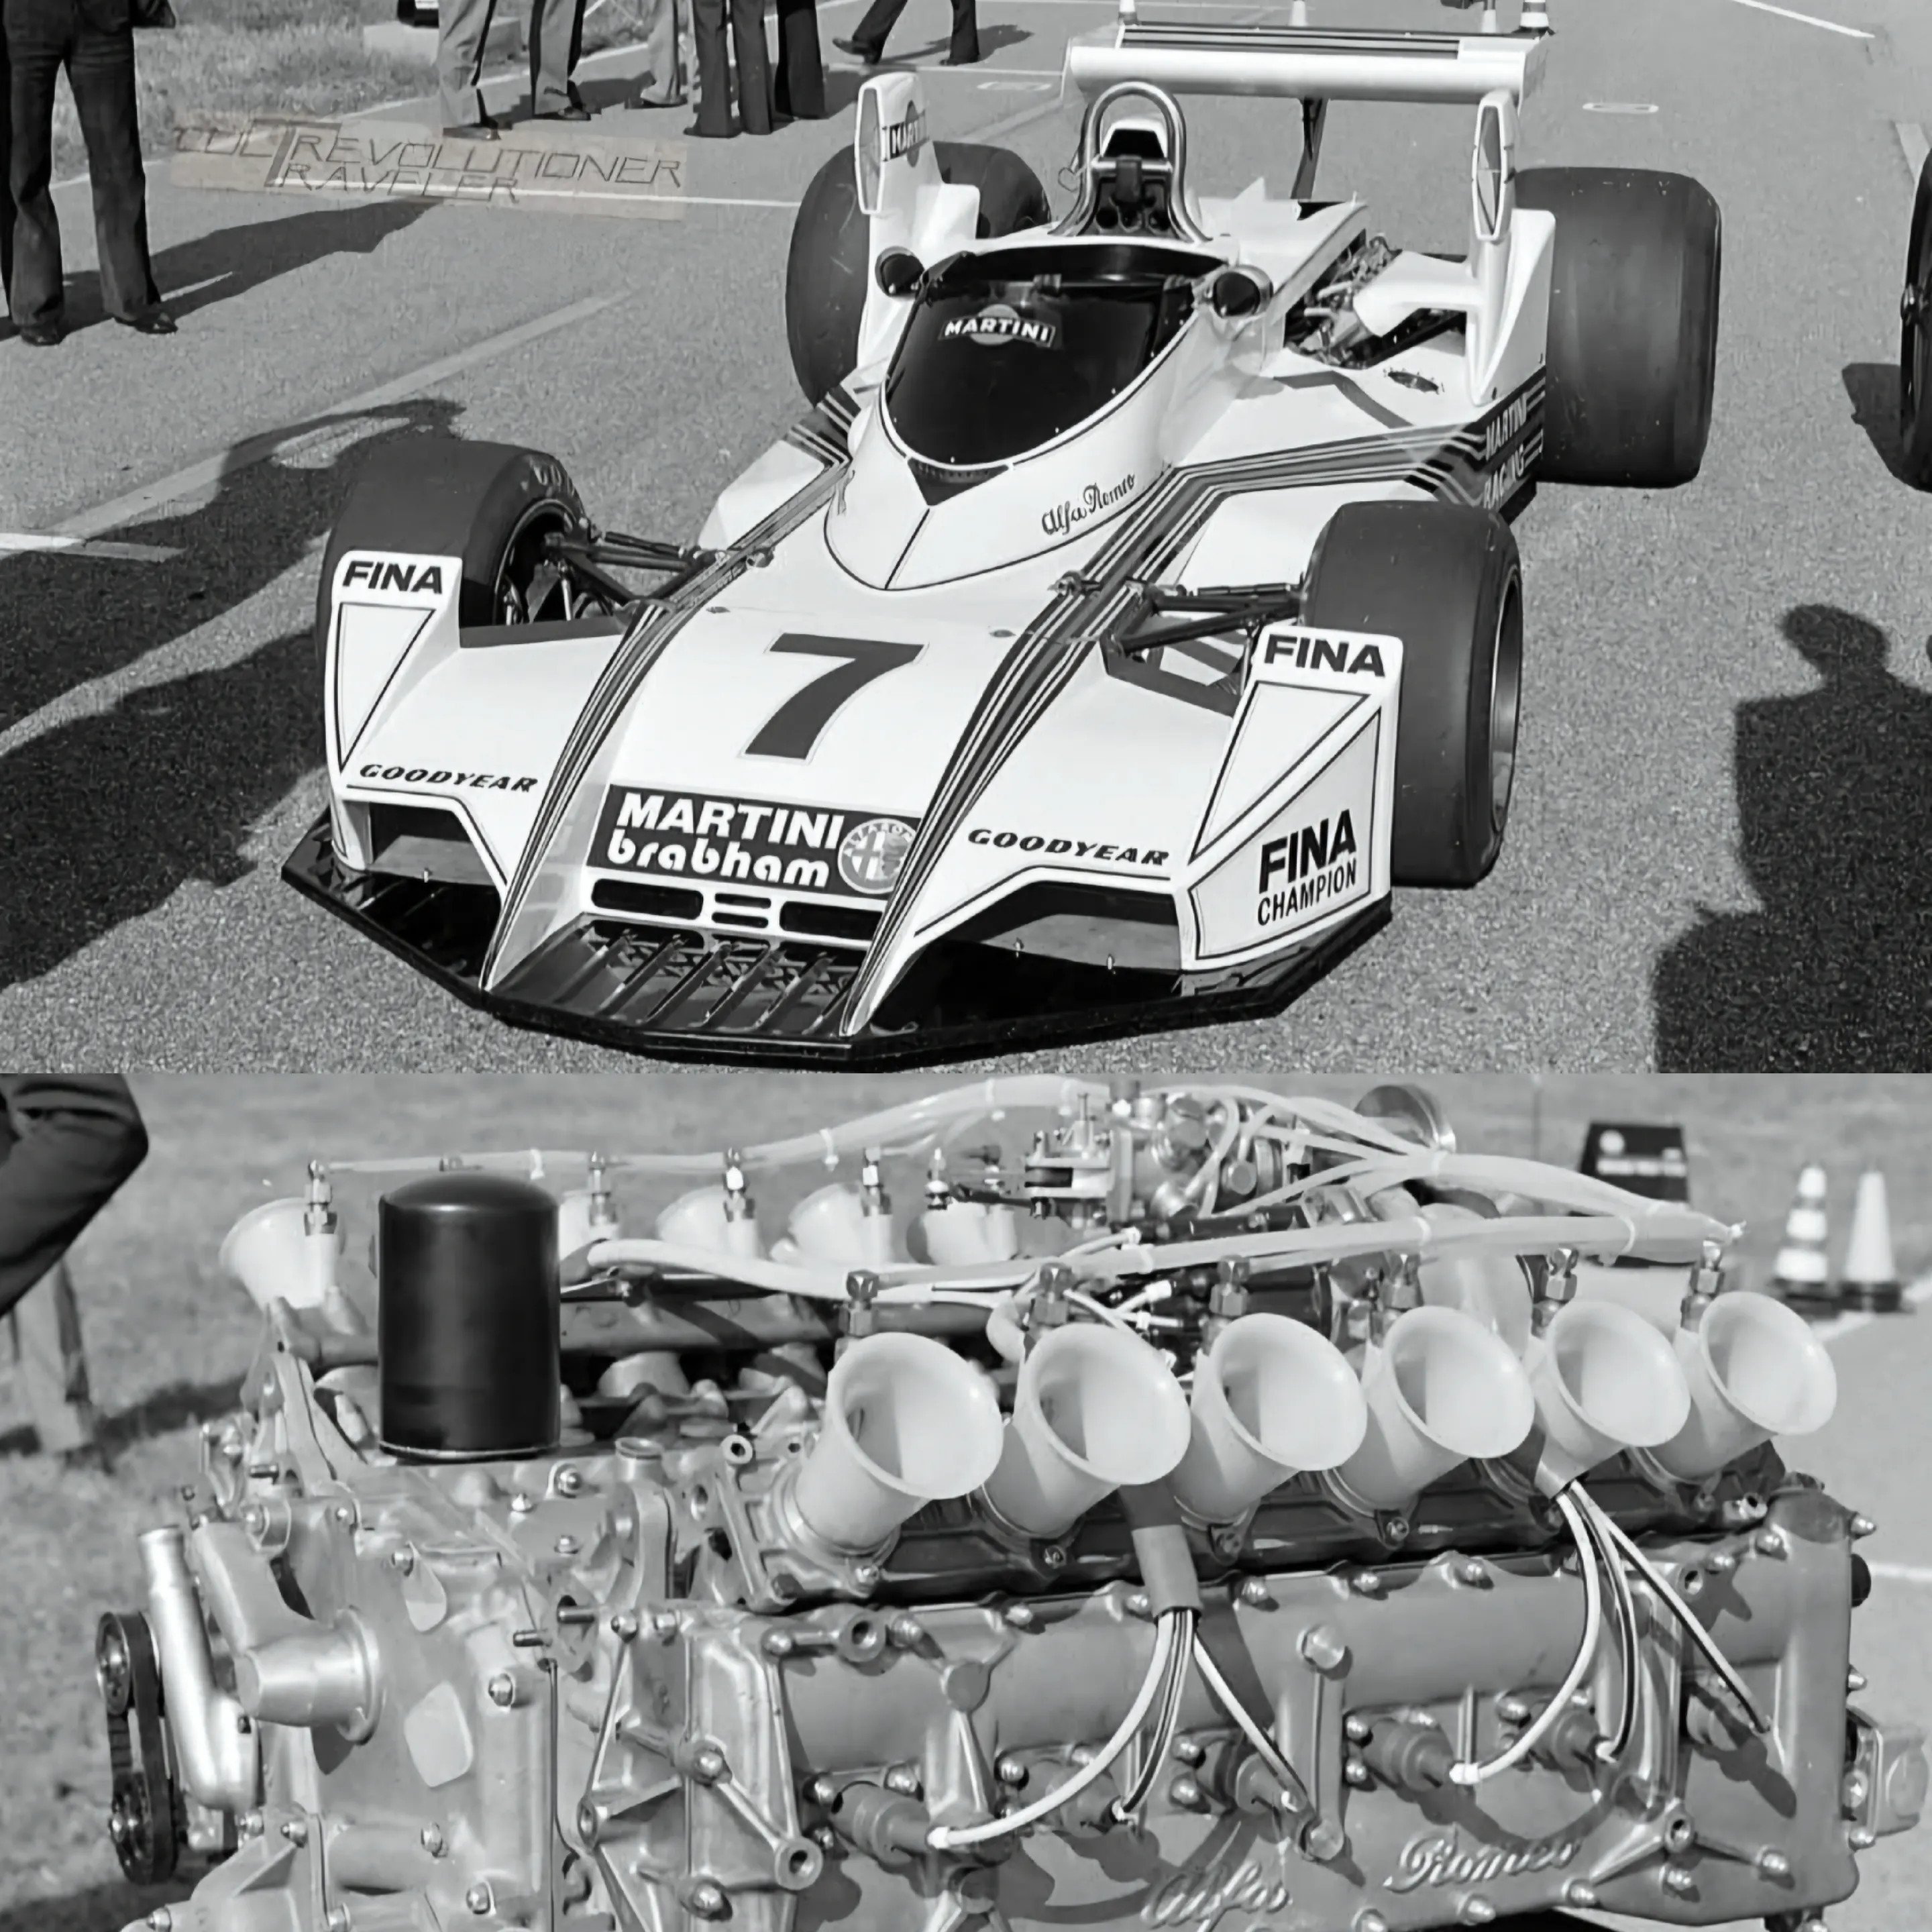
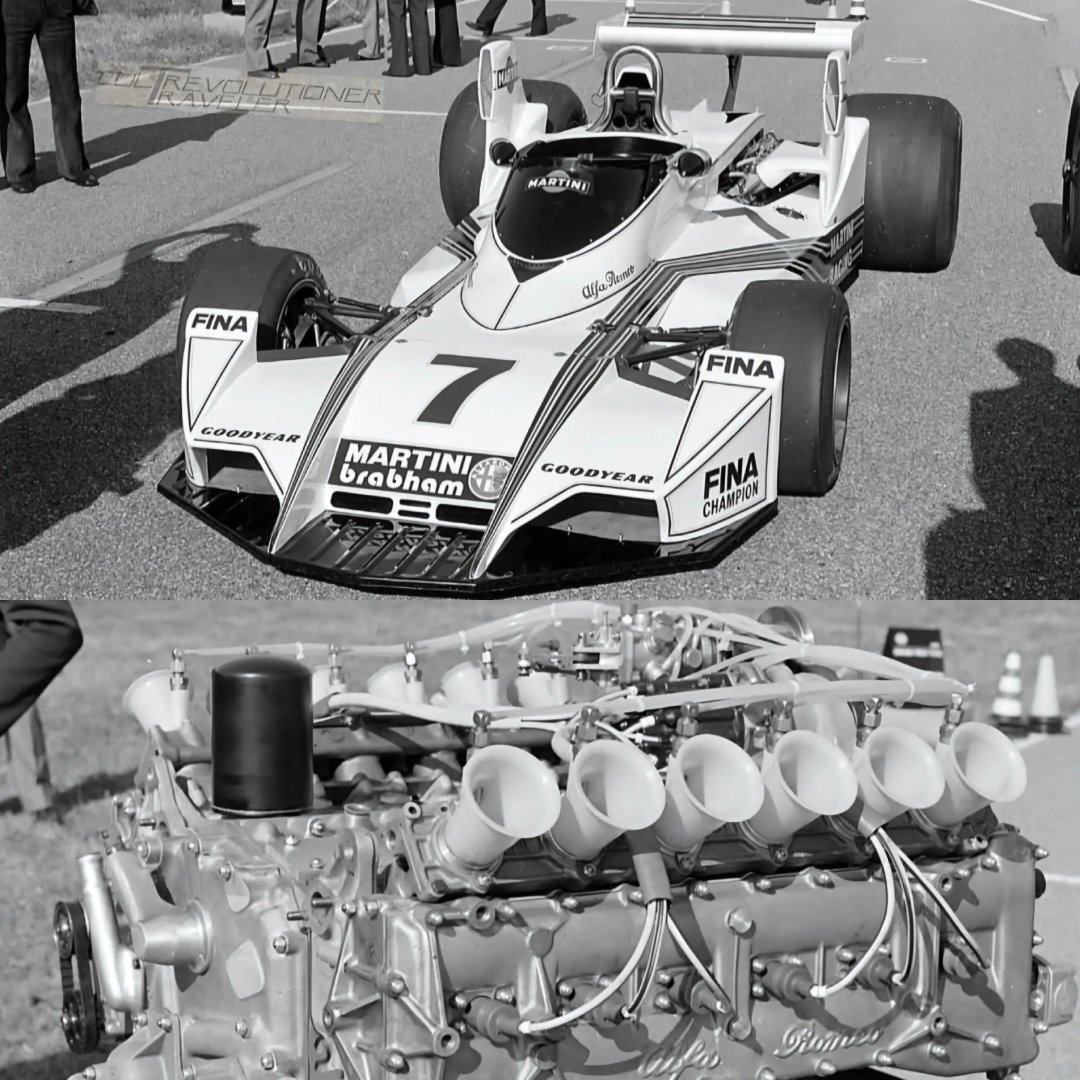
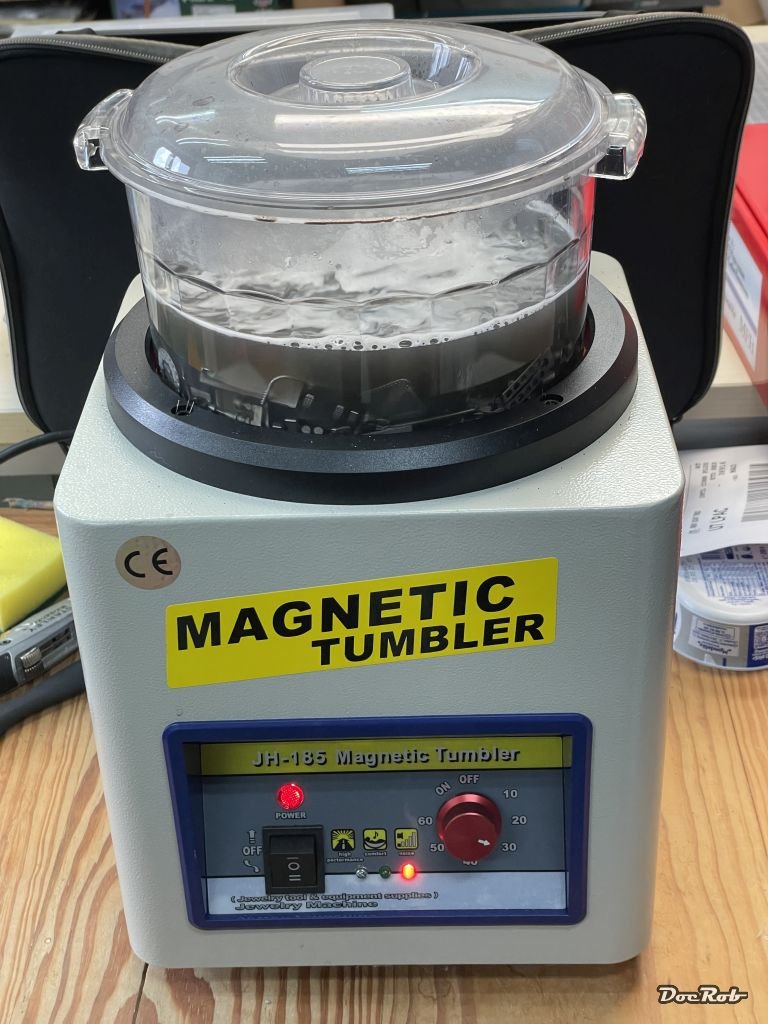
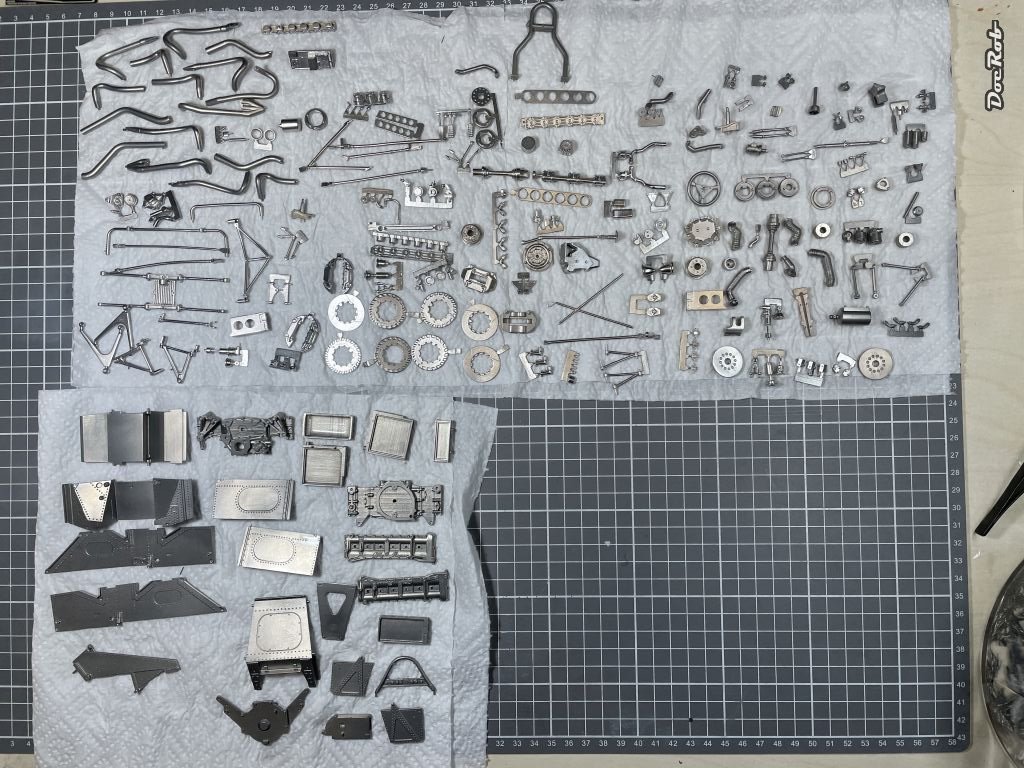
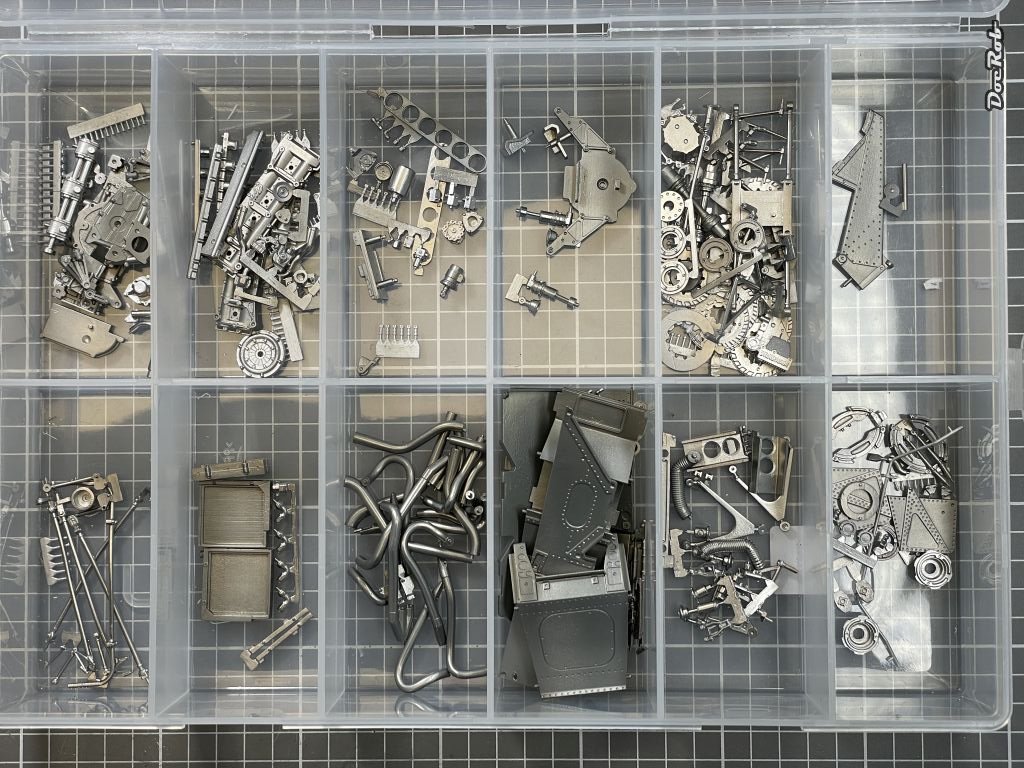
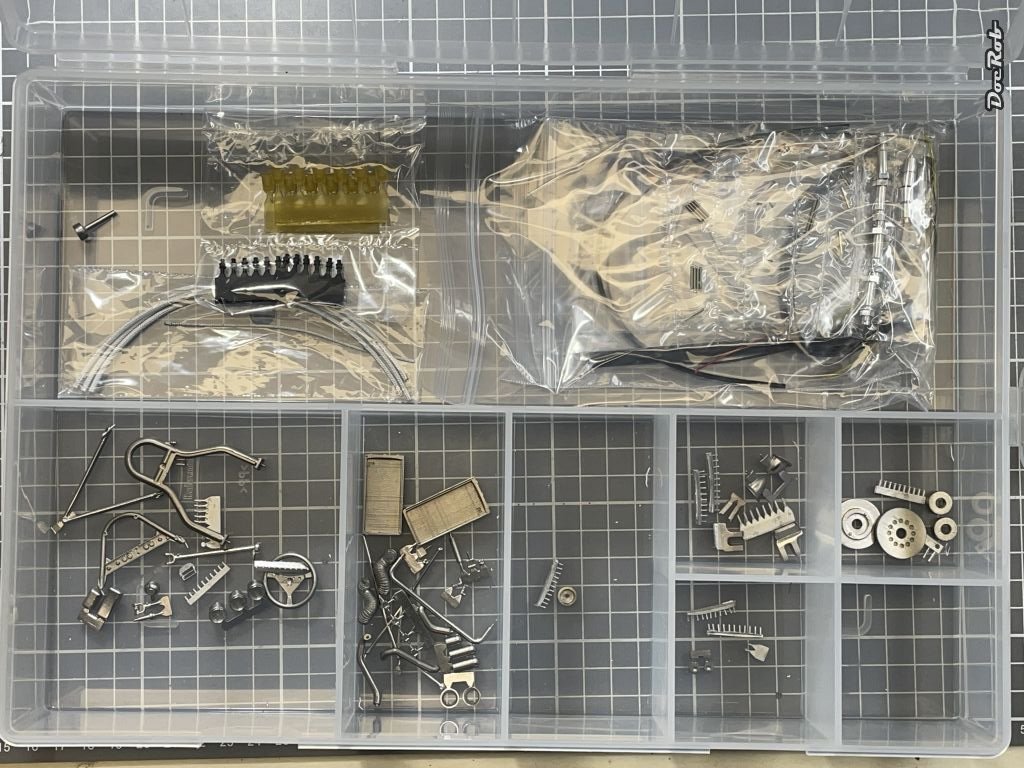
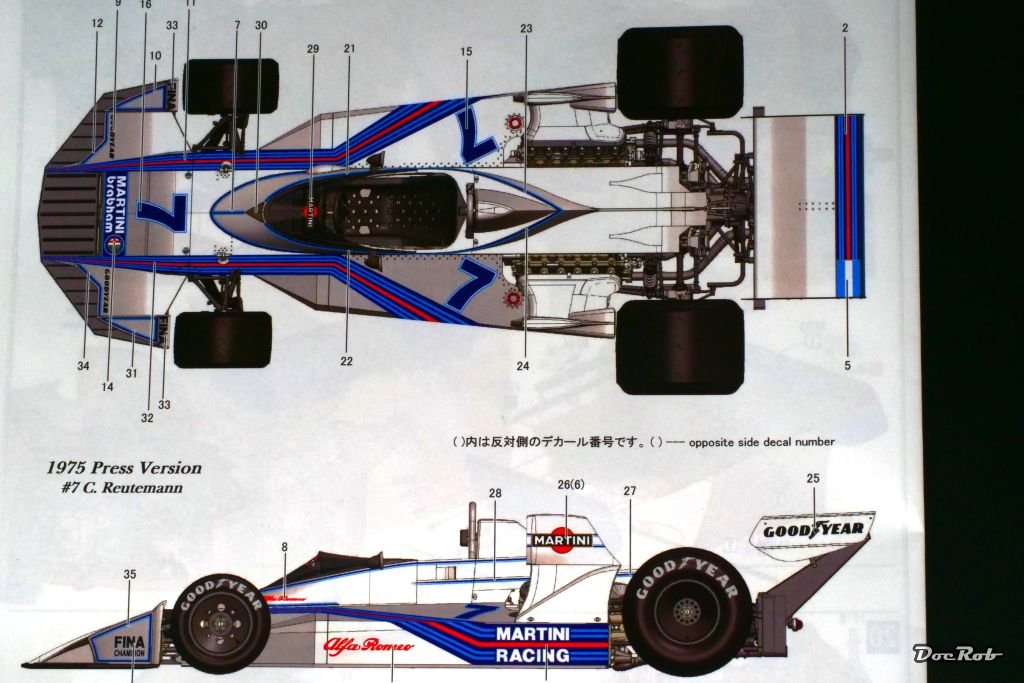
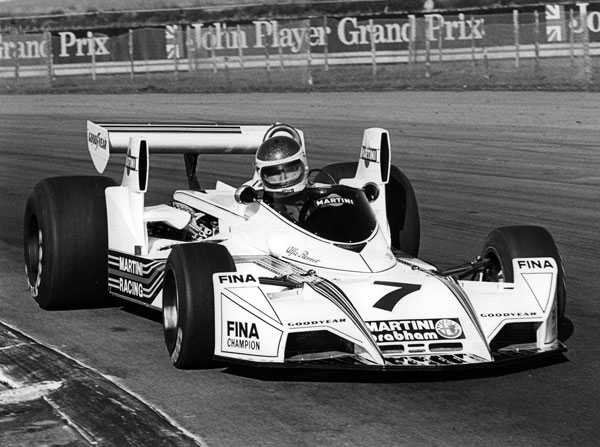
My next project after the sweet Honda RC166 build will be a bit more demanding and time consuming. I picked the red Brabham BT45 "Press Version 1975" out of the stash and started to get a bit familiar with it´s content. Press Version meant, it was the car, how it was presented to the press before the 1975 season started, the car in this configuration actually never raced. The press version has a white paintjob with Martini branding, where the BT45´s used during the 1976 season was painted red and had some alterations, mostly around the nose section. The #7 car was piloted by Carlos Reutemann, the #8 car by Carlos Pace. Bothe Carlos´s didn´t had any success with the car, but I found the design absolutely cool. In the seasons before, Brabham had their very successful BT44 (b) on the track, but decided to switch from the 8 cylinder Cosworth DFV engines to the Alfa Romeo flat 12 cylinder engine for economical reasons. The design from the BT44 to the BT45 changed a lot and the latter was ultra flat with the Alfa engine. Unfortunately the engines were not very reliable. Some pictures to show the car a bit better were borrowed from the net. MFH kits are not easy to build and you need to be organized. Starting a build requires some preparations, the first being cleaning the white metal parts in a magnetic tumbler filled with soapy water and 0,3 mm stainless steel needles. Drying time This is followed by a very eye straining task, checking if every part is there with printouts from the part list and then, all whit metal parts are sorted into boxes, according to the steps in the manual. I generally like MFH kits for design, engineering, lots of labor and love, which went into issuing their kits, but there are some points of critique as well and I think, I will communicate them to MFH, because, these issues are easy to solve. - The parts list are only shown on the MFH web page as pictures, you have to print out, in my case in relatively bad quality. These part lists are immensely important throughout the whole build. I would appreciate, MFH including these into the manuals. - As we speak about manuals. You get a printed version, but it helps to have a second set for notes. For some of the MFH kits, there are PDF versions available, but not for all. I would like MFH to issue the manuals on their web site in PDF, which is not the case. - Tamiya always shows the wire or tube length, which needed to be cut in their manuals. MFH only mentions in which step of the manual the other end of the tube / wire leads. This causes endless page turning. Cheers Rob
- 68 replies
-
- 11
-

-
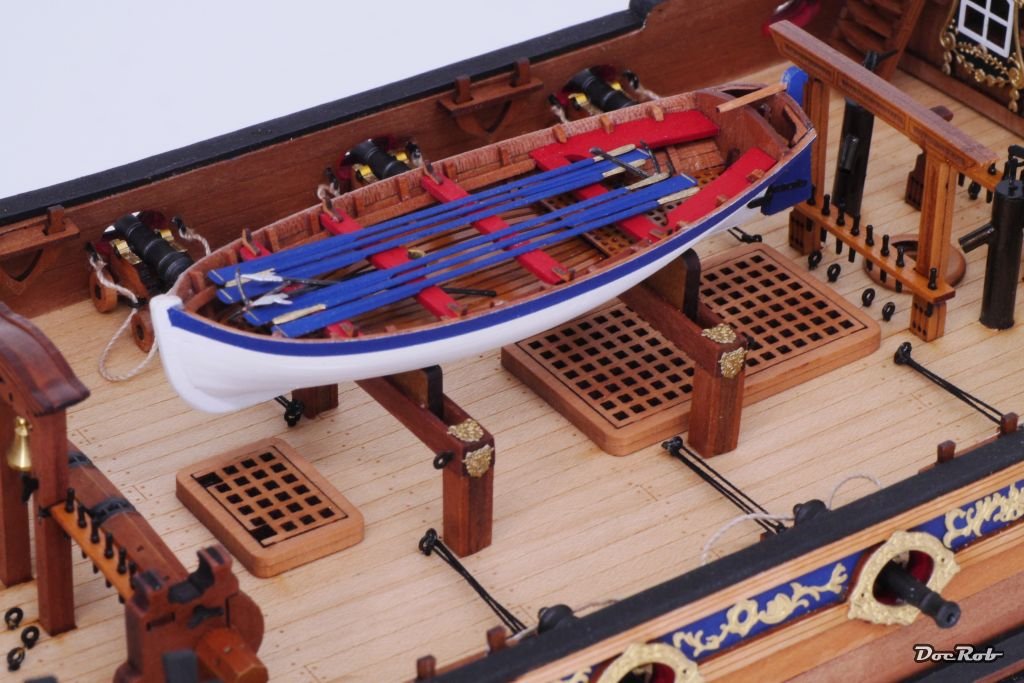
What a beautiful and elegant boat Mike. She came out great. I love the contrast between the off white and very rich wood colors. Cheers Rob
- 47 replies
-
- 3
-

-
-
- Annapolis Wherry
- Chesapeake Light Craft
- (and 1 more)
-
I have some rolls of lead wire in different diameters. It is very good to work with, soft but keeps as bent and is good to paint. I think it is made by PlusModel. Your coppery look fits great to the engine. Cheers Rob
-
A very interesting thread, Phil and a fine build as well. I built one of these Vanguard cutters as a boat for my Duchess of Kingston, which was my first serious wooden ship build. It was delicate for a beginner like me, time consuming, but somehow entertaining and a nice challenge. I haven´t dug that deep into realistic planking and was very happy, how my little bugger came out. For my Sphinx build, I ordered PE replacements, as there are three boats to build and that would be too repetitive for me. Cheers Rob
- 54 replies
-
- 5
-
-
- 18 ft cutter
- ships boat
- (and 1 more)
-
Bummer about the printed engine, Craig, but the kit engine doesn´t look too bad either. The wiring is a nice touch, is that copper wire? Your red finish came out great and I´m as well thinking, red is the color to go with Ferrari´s. On my Honda RC166, I used pink primer as a base for a red topcoat for the first time and it came out great. Cheers Rob
-
Honda RC166 by DocRob - FINISHED - Tamiya - 1/12 - multimedia
DocRob replied to DocRob's topic in Non-ship/categorised builds
Thank you Ken, it´s all about finish with car and bike kits. To me it´s a relatively new world, which I try to master with consistent results, equal if it´s on metal, resin or plastic. Cheers Rob -
Honda RC166 by DocRob - FINISHED - Tamiya - 1/12 - multimedia
DocRob replied to DocRob's topic in Non-ship/categorised builds
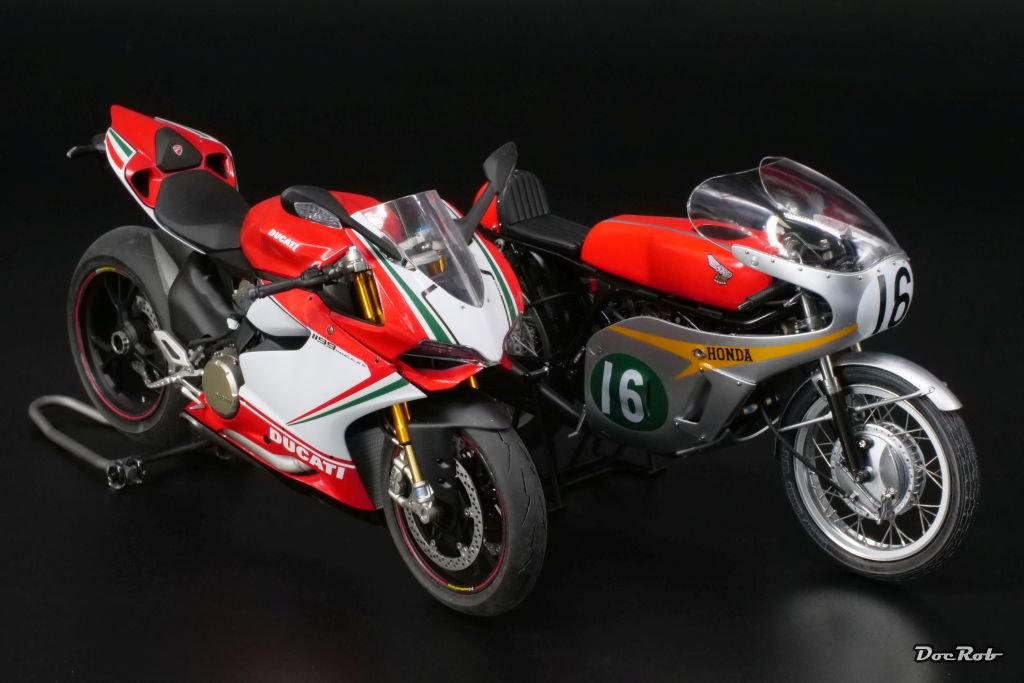
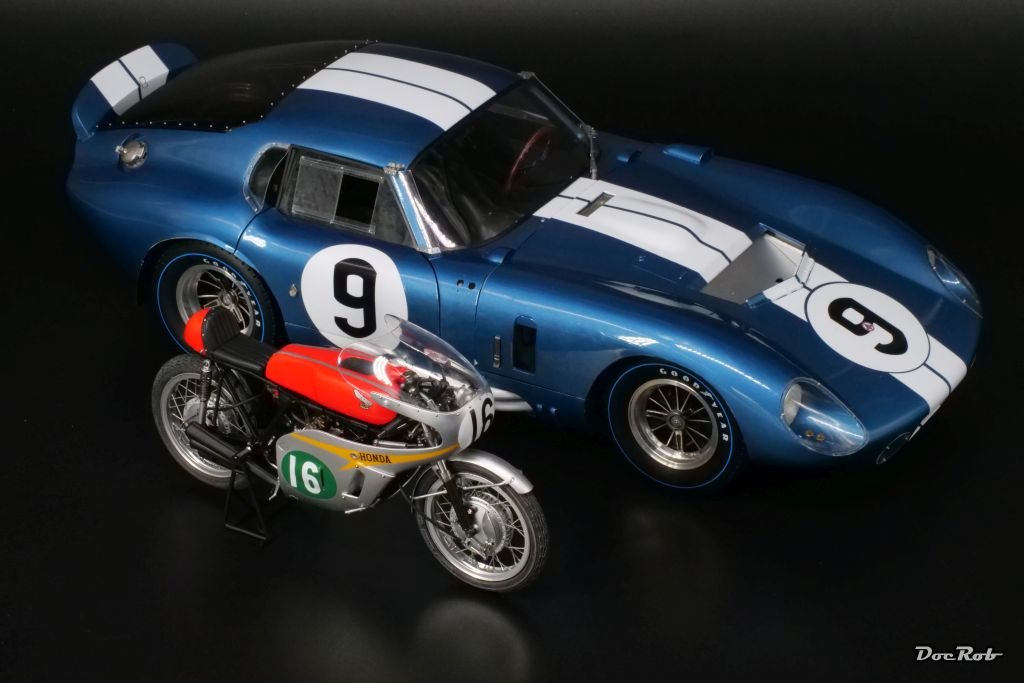
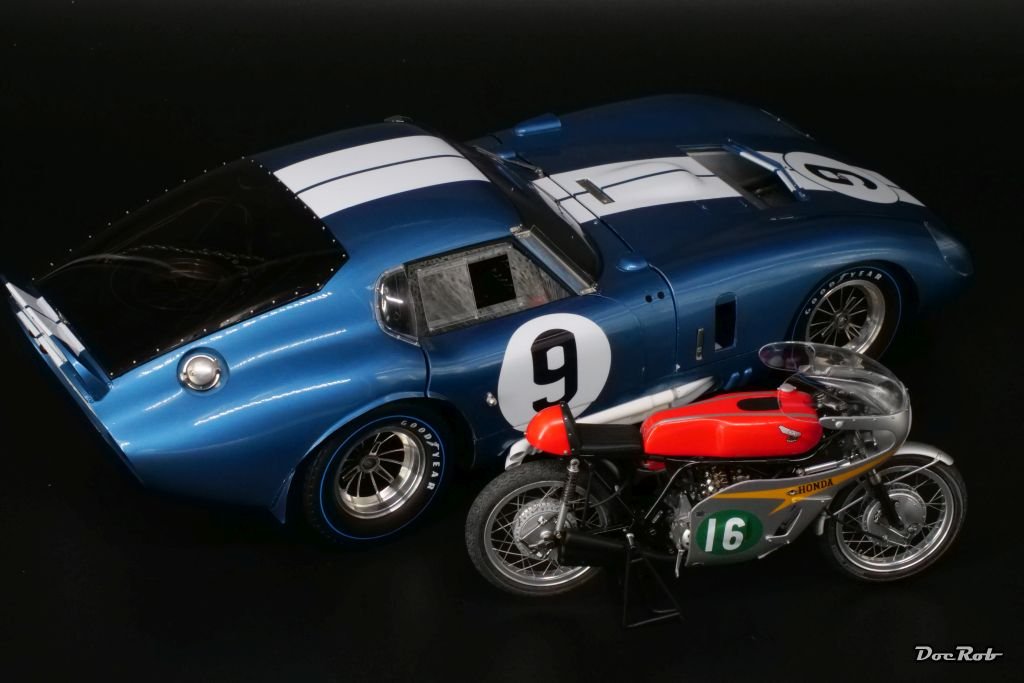
They are only separated by one year and two cylinders. Even the top speed doesn´t differ that much, but what a difference my last two builds have in appearance. Here, I picked my very first motorcycle build out from the shelf and sided it to the tiny Honda Cheers Rob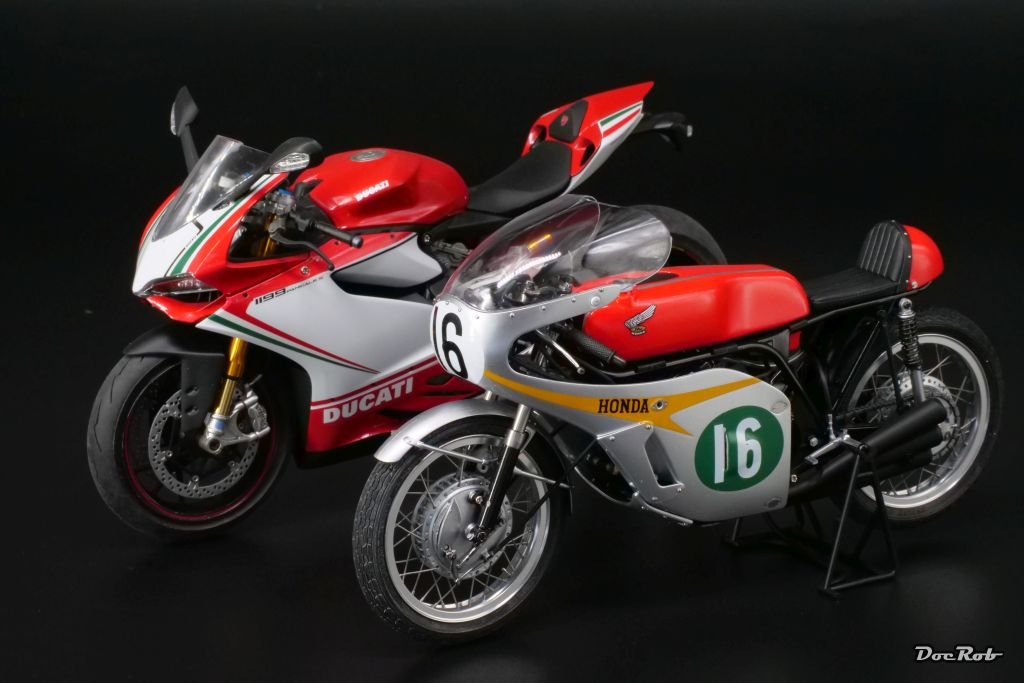
-
Honda RC166 by DocRob - FINISHED - Tamiya - 1/12 - multimedia
DocRob replied to DocRob's topic in Non-ship/categorised builds
Muchas Gracias, Gary, Craig, alan and shipman. The RC166 is one of the best engineered plastic kits, I ever build. You feel the love, Tamiya put into the model. It is really easy to get a decent result with that kit and the added detail kits helped as well. I had so much fun, building the Honda, I almost regret it´s over. @shipman, that must have been a very special moment. I guess, capturing the sound on video doesn´t live up to the original entirely. It is absolutely fascinating, how Honda build so much technology in such a small frame and the result was perfect and even looks great. Cheers Rob -
Honda RC166 by DocRob - FINISHED - Tamiya - 1/12 - multimedia
DocRob replied to DocRob's topic in Non-ship/categorised builds
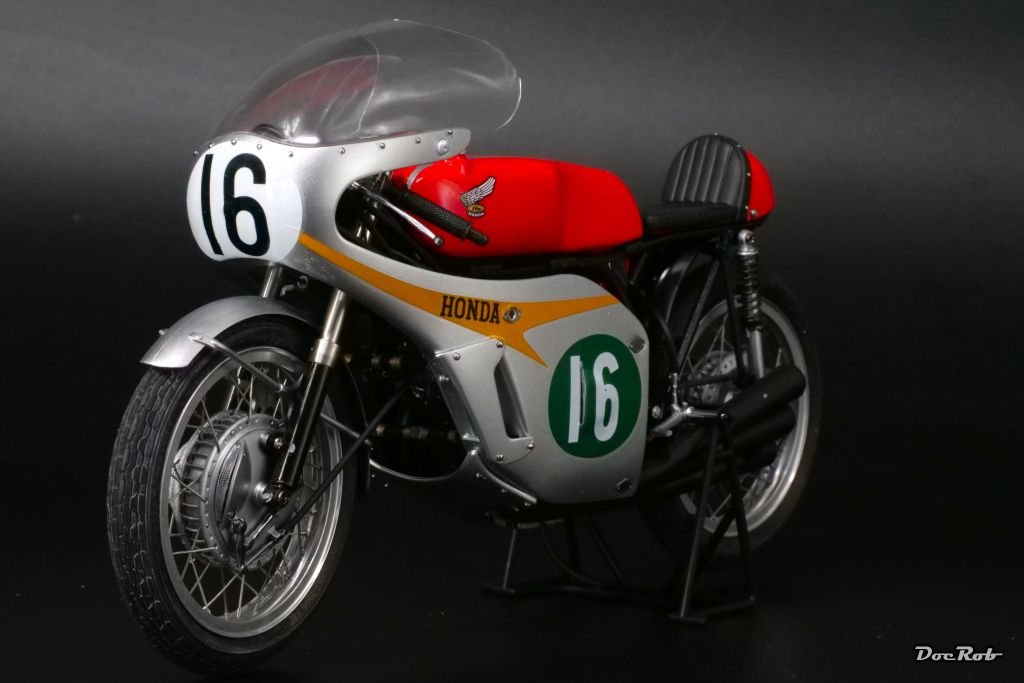
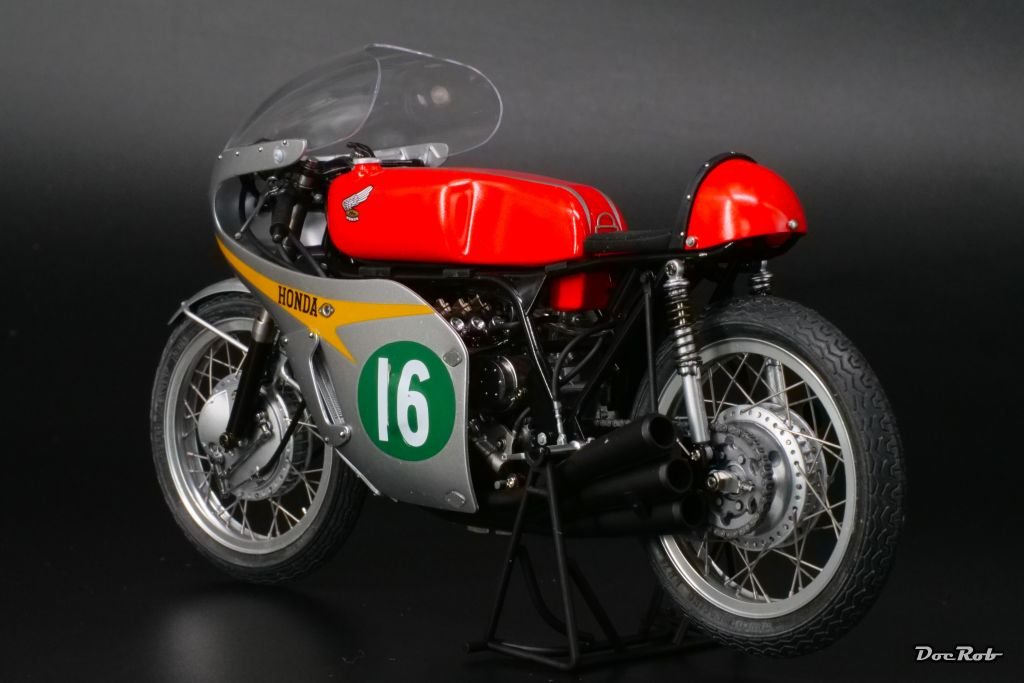
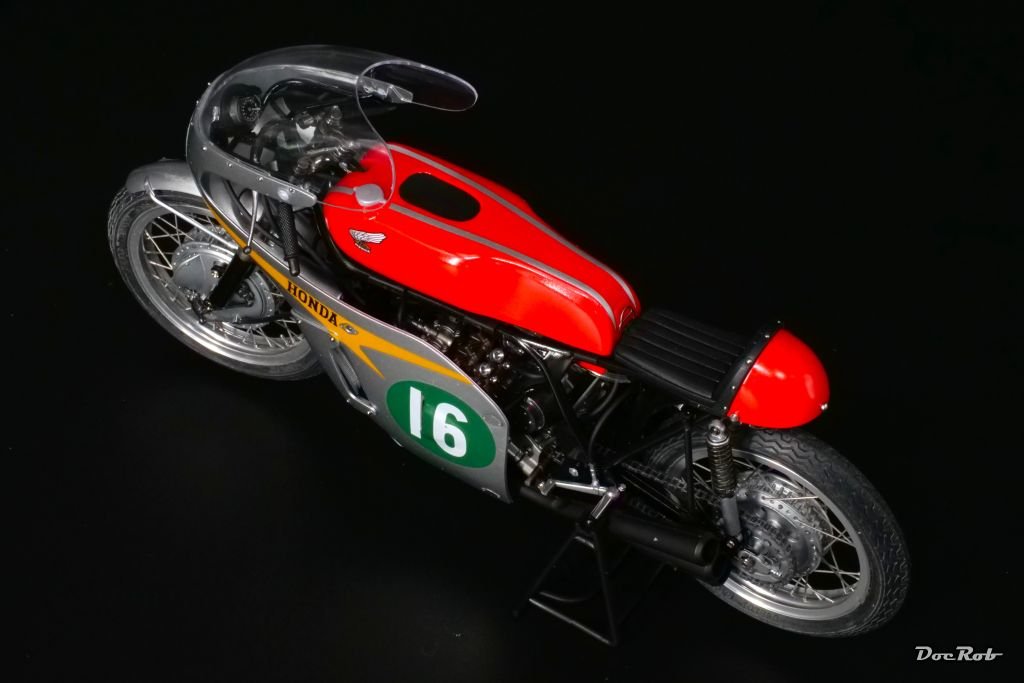
The speedy little Honda was a fast project indeed. It took me only two weeks to accomplish and leaves me with a "is it really done ?" expression. The fairing was the most problematic part of the build. I sprayed it with AK´s Extreme Metal flat aluminum and when I added some mild Tamiya decal fluid, I got a bad paint surface. The fairing needed respraying and then, I glossed over the flat aluminum with Alclad aqua gloss, after my Mr. Color GX100 clear wasn´t working. Not for the first time, it produced a candy cotton effect, equal, which mixing ratio I took. When it works, GX100 is perfect, but often it doesn´t for me and I don´t know why. Then I applied the decals which were generally nice to work with. They contoured well with Tamiya Mark Fit Strong fluid applied on top, using a hairdryer as well. For some reason, the 1 of the #16 deformed a tiny bit with the Mark Fit, but I corrected this with a marker. The numerous tiny metal rivets were applied, using a flat cut toothpick with low tack double sided adhesive tape. Before, the molded rivets were cut away with a sharp blade and after marking the center with a steel needle, I drilled 0,5 mm holes. Cheers Rob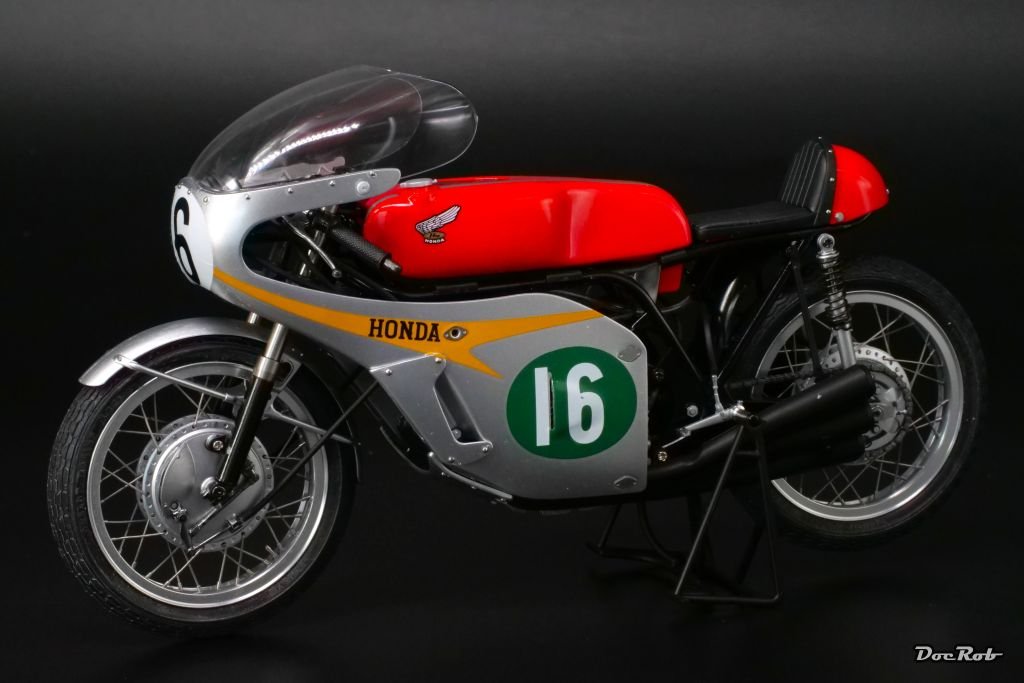
- 44 replies
-
- 13
-

-
-
That engine looks beautifully detailed. For my 1/24 Fujimi Ferrari 250 GTO, I have a set, made by USCP, addressing the most visible shortcomings of the engine, the air funnels and ignition wiring with 3D printed parts, but your set is even better. USCP also produces exhausts for the 250 GTO, which are nicely detailed. I don´t know, if they are correct for your kit as well. Cheers Rob
-
I can´t like as fast as you build Craig . Cheers Rob
-
That was fast Craig and looks top shelf as well. I guess, decaling took about half the time. Cheers Rob
-
Honda RC166 by DocRob - FINISHED - Tamiya - 1/12 - multimedia
DocRob replied to DocRob's topic in Non-ship/categorised builds
Thank you Dan, but it is, at least sound wise, mine is not high pitch dentist drill screaming like the real thing . Cheers Rob -
Honda RC166 by DocRob - FINISHED - Tamiya - 1/12 - multimedia
DocRob replied to DocRob's topic in Non-ship/categorised builds
Yesterday, I airbrushed the fairing, gas tank and rear. For the parts, I used Tamiya´s LP bright red with Mr. Color pink primer as a base. Today, I started decaling, which worked well. The Tamiya decals were easy to use and the carrier film is nearly invisible. The tiny rivets on the seat proved to be difficult to apply. I used a flat cut toothpick with low tack double sided adhesive tape, which helped a bit Cheers Rob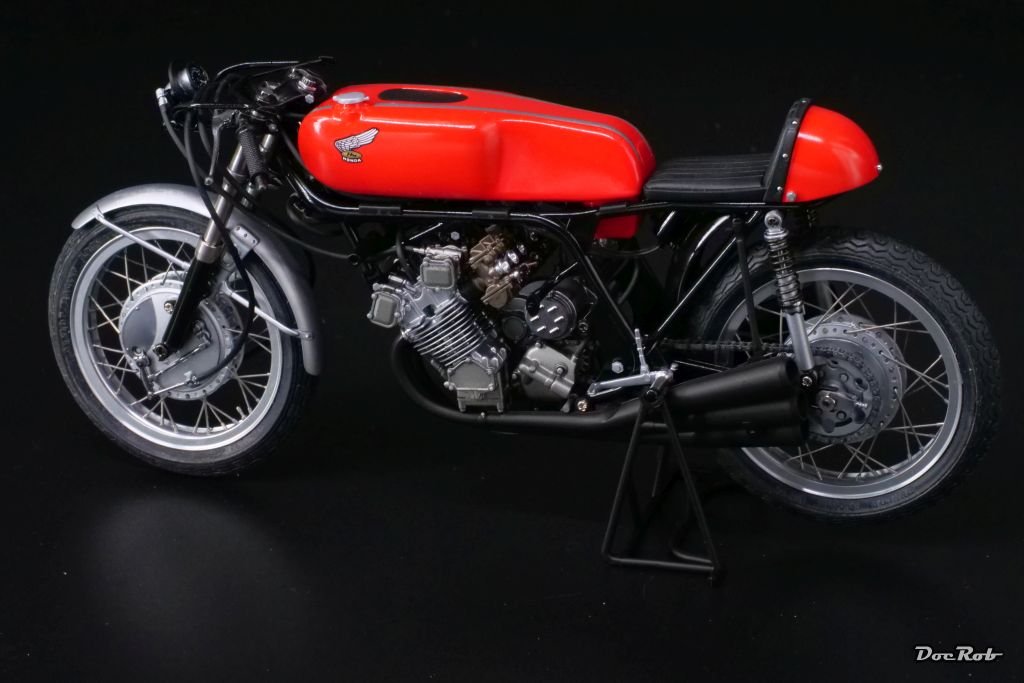
- 44 replies
-
- 10
-
-
-
Honda RC166 by DocRob - FINISHED - Tamiya - 1/12 - multimedia
DocRob replied to DocRob's topic in Non-ship/categorised builds
Thank you Alan, it is indeed a very beautiful kit, well engineered and designed. You can feel that there was a lot of love going into it. Cheers Rob -
Honda RC166 by DocRob - FINISHED - Tamiya - 1/12 - multimedia
DocRob replied to DocRob's topic in Non-ship/categorised builds
Thank you shipman, I used to be a halfway decent landscape and available light photographer, back in analogue times. I stopped photographing for years, as my favorite film, Agfa black and white slide film vanished and fell into a deep early digital hole, not liking what the cameras were able to deliver, since some years ago. I never got back full throttle on photography anymore, but still like the hobby, but less obsessed than in my early years. Since years, I try to take good pictures of my builds, but find it very difficult. Lighting, depth of field, color rendition and of course macroing isn´t easy, at least to me and I´m a bit lazy to improve my skills. Cheers Rob -
Thank you Craig and Alan, I had to use, what little time I had with the sun. There are still the hanging doors to fix, an area, I worked on for numerous hours during the build, but had no success. Anyway, I´m mostly happy how the big Cobra Coupe came out and that I pulled through. Cheers Rob
-
De nada Craig, it helped a lot on some of my projects, mainly the carbon fiber decals on my McLaren MP 4/6 and on numerous Wingnut Wings WW1 planes, which got plastered in decals, like the huge AEG G.IV. Your decal job looks fantastic, all snuggled down nicely. You chose the best looking livery out of the four available. Cheers Rob