DocRob
-
Posts
1,296 -
Joined
-
Last visited
Content Type
Profiles
Forums
Gallery
Events
Everything posted by DocRob
-

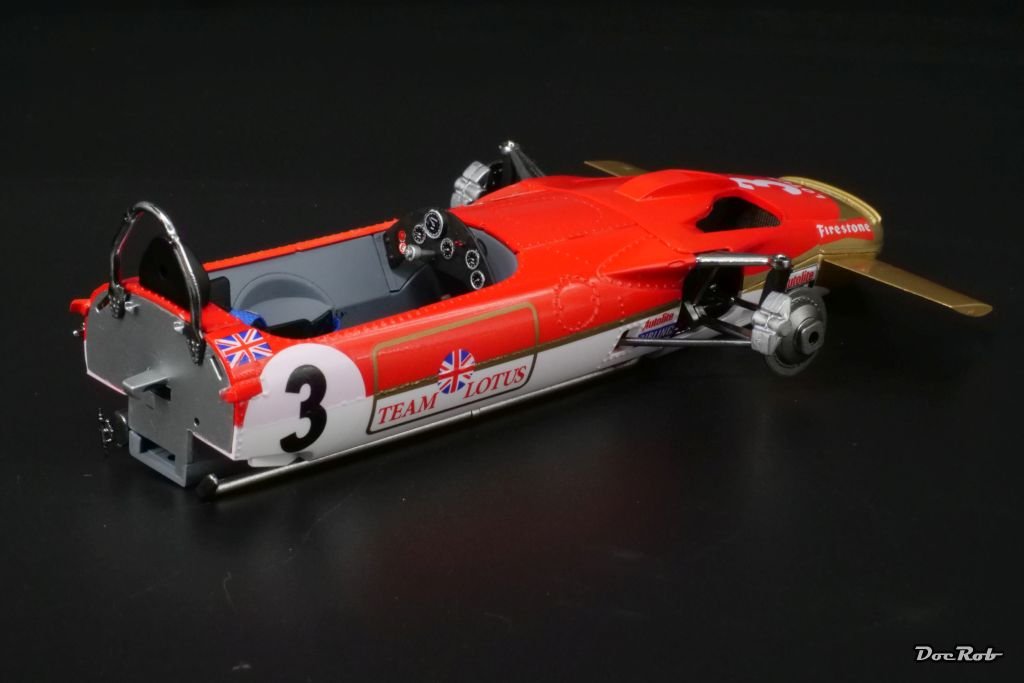
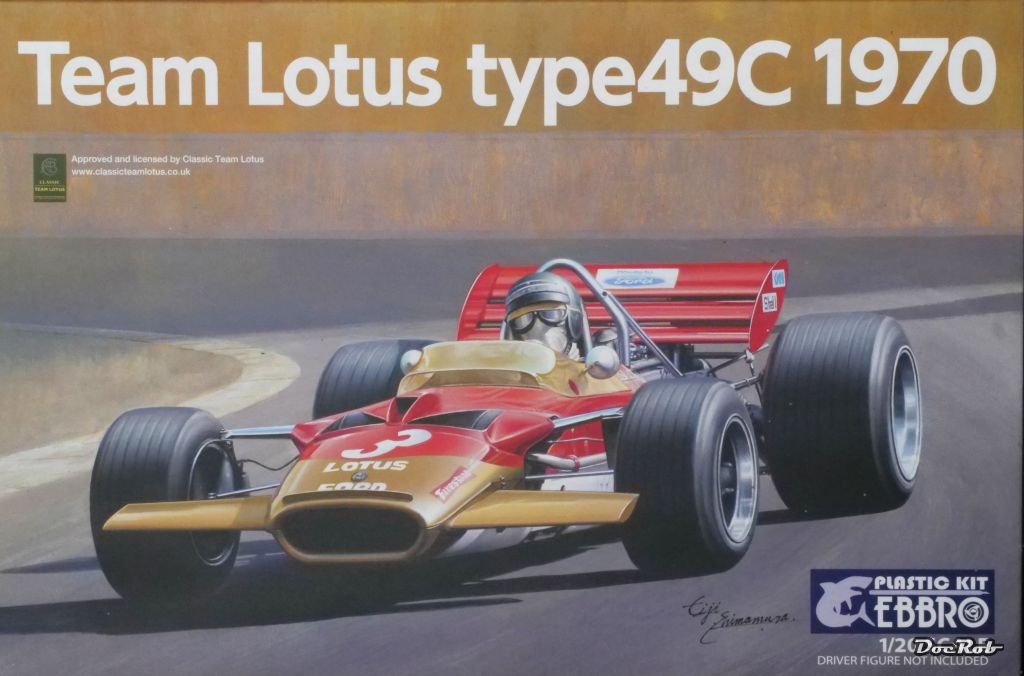
Lotus 49C by DocRob - FINISHED - Ebbro- 1/20 - Plastic
DocRob replied to DocRob's topic in Non-ship/categorised builds
Thank you Yves, but the result wouldn´t be sufficient for further macro photos. The Lotus was supposed to be a fun build, but was more of a nuisance then. I hope fot the best with the fragile rear wing construction, but could imagine some more probs on the horizon. Cheers Rob -
Lotus 49C by DocRob - FINISHED - Ebbro- 1/20 - Plastic
DocRob replied to DocRob's topic in Non-ship/categorised builds
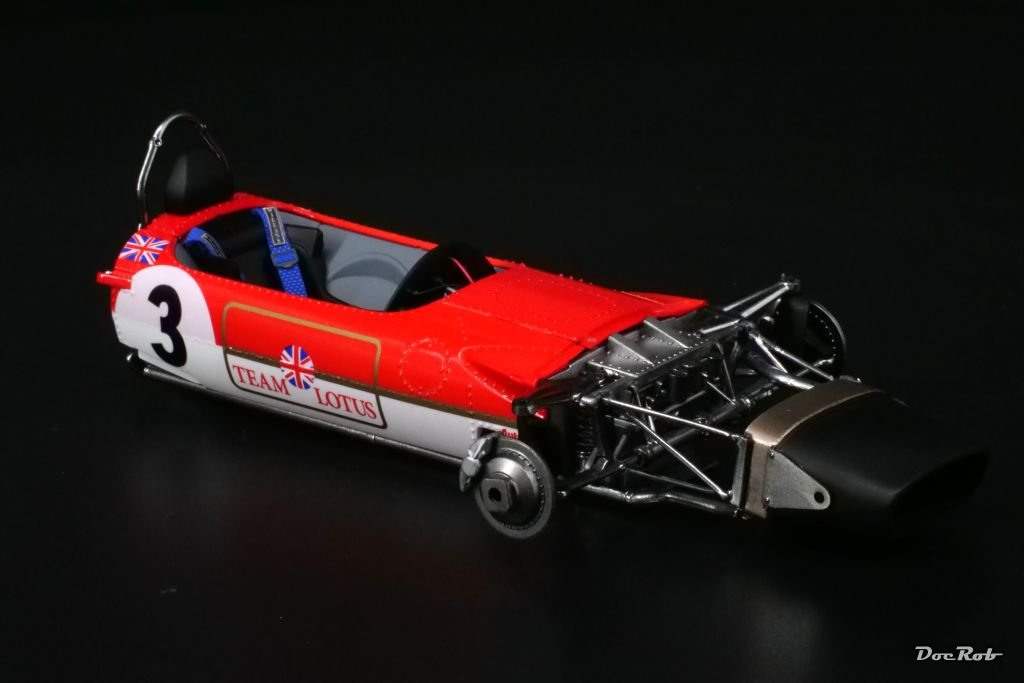
Almost done, the Lotus and my nerves. Assembly is very difficult due to fit issues and the complexity of the car itself. There were the exhausts with a special PITA award mentioning. I had to break them from the engine, because it would have been impossible to install the four chromed rods, connecting the body with the rear suspension. I had to shave off a lot of the exhausts undersides to fiddle them in and glue them in place. Cheers Rob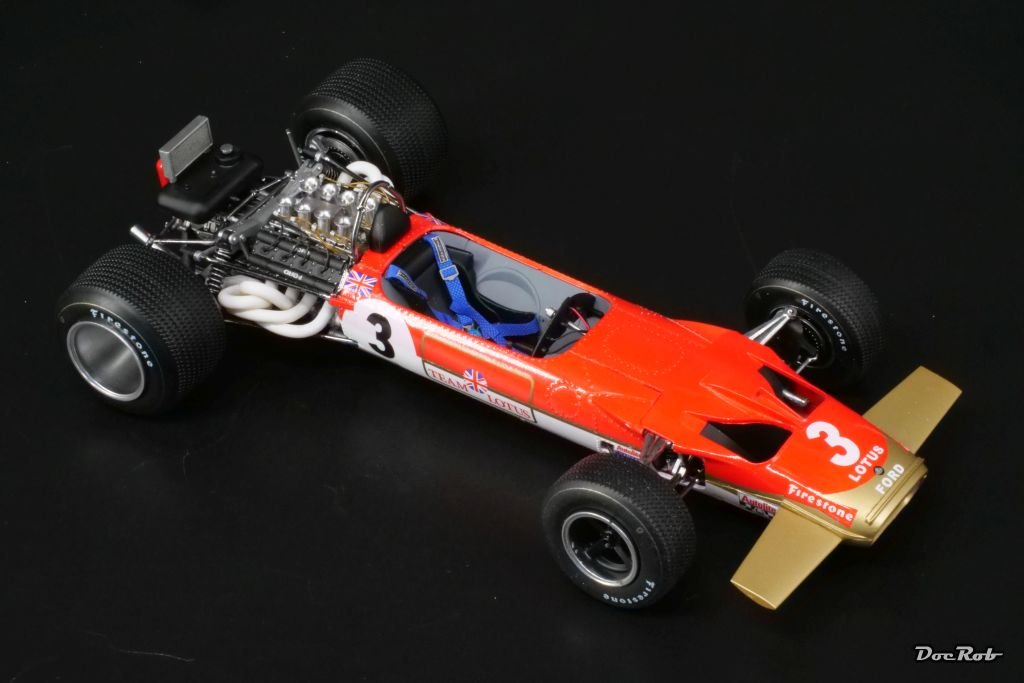
- 32 replies
-
- 11
-

-

-
Lotus 49C by DocRob - FINISHED - Ebbro- 1/20 - Plastic
DocRob replied to DocRob's topic in Non-ship/categorised builds
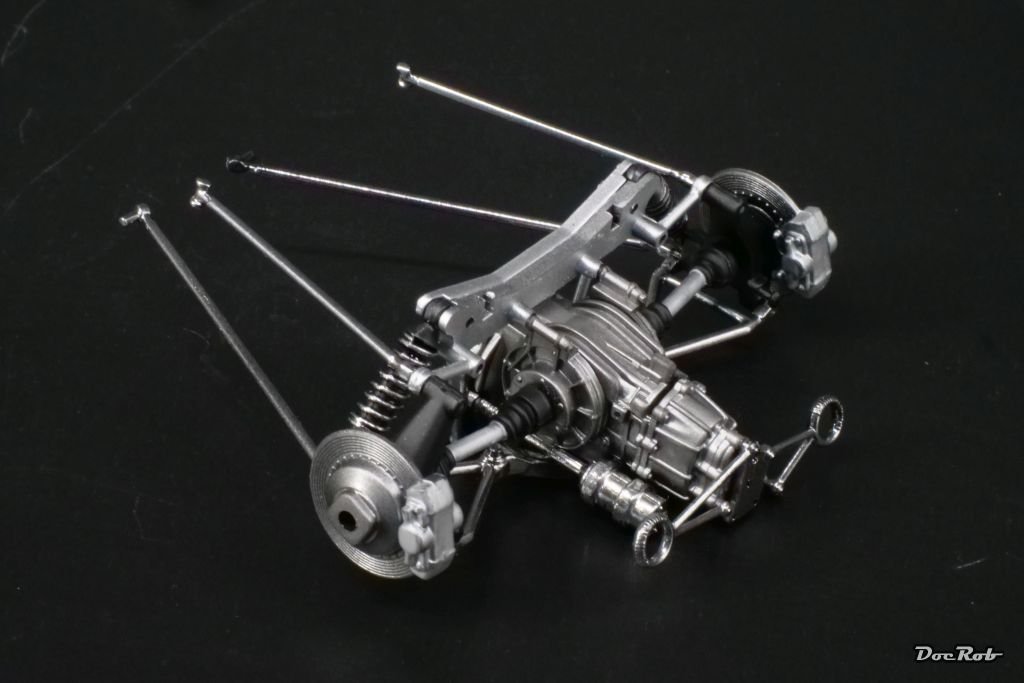
A lot is going on lately, not modeling wise unfortunately, but I´m still onto the Lotus 49. Everything is prepared and painted and waiting to be assembled. The kit is a VERY mixed bag quality wise. Some engineering is fantastic and you need no glue to assemble, others areas are downright terrible, specially where the pre chromed parts come into play. I de-chromed the sprues with oven cleaner, because the detail looked soft. Unfortunately it wasn´t the chrome, the plastic got covered in a layer which looks like clear resin as a base for the chrome and this is not removable. It´s also impossible to glue the de-chromed parts with plastic glue, they call for CA. I had to drill most of the holes on the back end out, they were simply to narrow. One of the best aspects of the kit are the pre-printed tires, an approach, I wish other companies would copy. The rims were sprayed polished aluminum and semi gloss black, as the chrome looked wrong. I assembled the gearbox with the rear suspension, an area, where there is great engineering, intersecting the parts with almost no need for glue. One of the worst area of the kit were the exhausts, which were chromed, albeit they need to be painted black or white, depending the car you show. The de-chromed plastic doesn´t take paint well and need CA to glue, not easy, when you assemble the four parts per side with only seconds to fit them to the engine case, moving and wiggling the fragile parts. Cheers Rob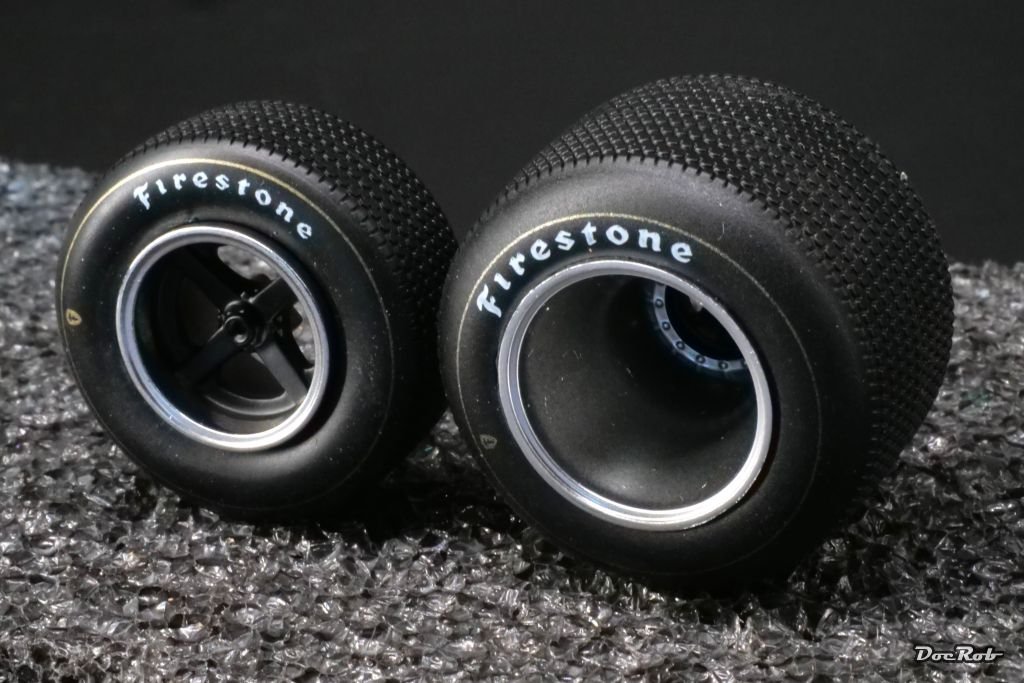

-
Metallic paint questions....
DocRob replied to CPDDET's topic in Painting, finishing and weathering products and techniques
Ak´s Extreme Metal range works also very well, except for their black base, which like Gary mentioned never cures properly and stays tacky. Like Gary, I use Tamiya LP1 gloss black as a base for high shine finishes. Your anchor windlass would be best painted with dull matte aluminum and AK has brass and bronze in their portfolio as well. They spray as perfect as Alclads, but are a bit more durable, when it comes to masking on top. Chrome and polished aluminum is a tad shinier with Alclad, but it´s only a fraction. Cheers Rob -
Lotus 49C by DocRob - FINISHED - Ebbro- 1/20 - Plastic
DocRob replied to DocRob's topic in Non-ship/categorised builds
Thank you Alan, most the Lotus cars of the era are absolute beauties, no matter if green and yellow or red, white and gold or black and gold. Thanks for your information about the silver pencil, I will buy one. I tried AK´s silver weathering pencil, but used dry, it is too grainy. Used dampened, it would have flown too much, equal with a silver marker. Initially I used a soft pencil, which fabricated great contours, but not enough silverness. My last attempt with a brush was not too successful as you can see, with the letters barely protruding. Cheers Rob -
Lotus 49C by DocRob - FINISHED - Ebbro- 1/20 - Plastic
DocRob replied to DocRob's topic in Non-ship/categorised builds
Thank you Gary, I have two 1/12 scale Tamiya DFV´s as well, the Lotus 72 and Brabham BT44. These will be further detailed with MFH sets, like this one. Than there is one for a MFH Lotus 77, but I missed their actual release, the McLaren M23 with the same engine, which would have been a nice display together, depicting the final race of the 1976 season in the rain in Japan. Then there are numerous incarnations in 1/20 scale from Tamiya and Ebbro in my stash. I hope, I don´t get bored by replicating this engine so often. Cheers Rob -
Absolutely fantastic, Greg. I love the weathering and grime. Are you planning to add figures? Cheers Rob
-
Lotus 49C by DocRob - FINISHED - Ebbro- 1/20 - Plastic
DocRob replied to DocRob's topic in Non-ship/categorised builds
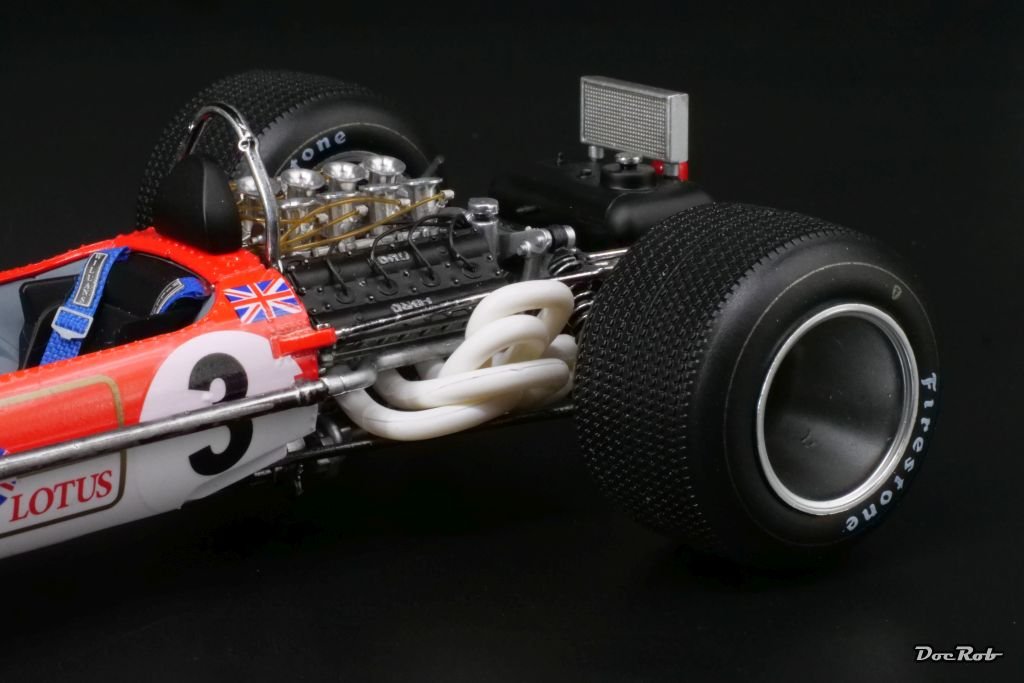
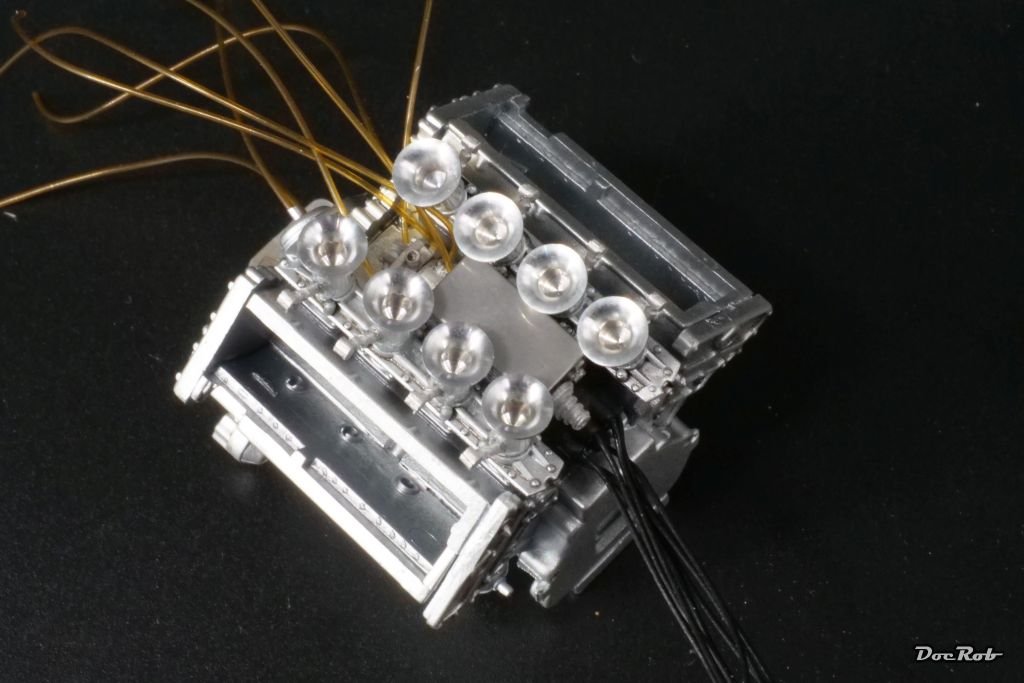
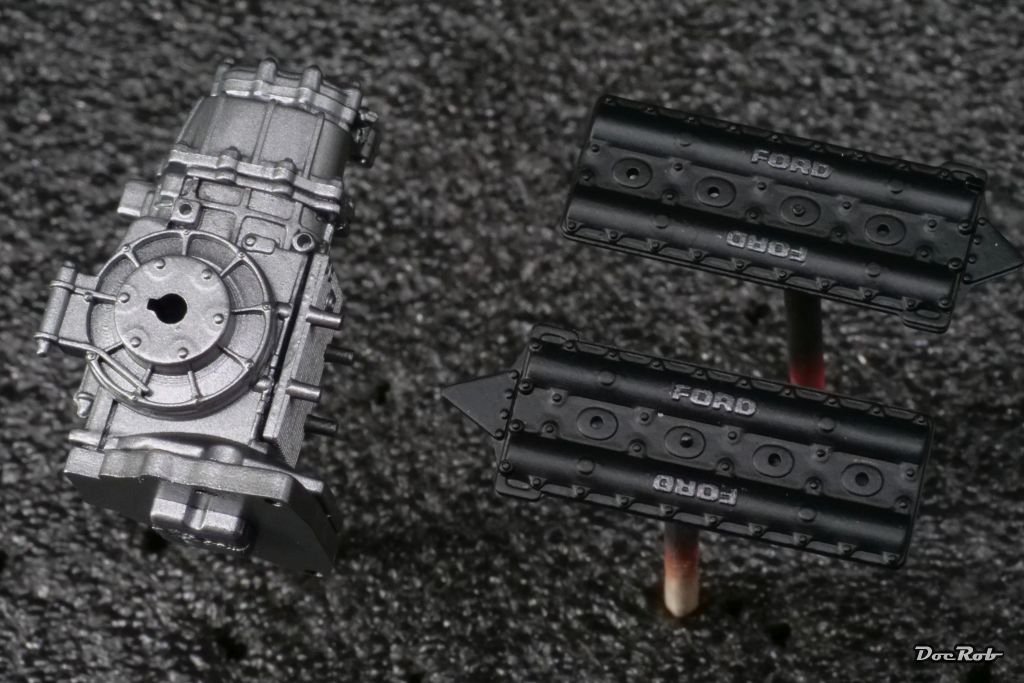
Finally, I got the wild hairdo of the engine straightened out. I combed and parted the fuel lines and ignition wires and glued them into place with CA. It wasn´t that terrible a task than thought, but needed a steady hand. My hand was less steady, when I tried to refine the Ford brandings with a brush and paint. I will rework it, when I have a completely unmoving hand, but today, I exhausted myself with swimming and running, not the best combo for painting these only slightly protruding buggers. The worst about macro photos, you can´t hide anything, the engine is tiny and looks better to the real eye. Cheers Rob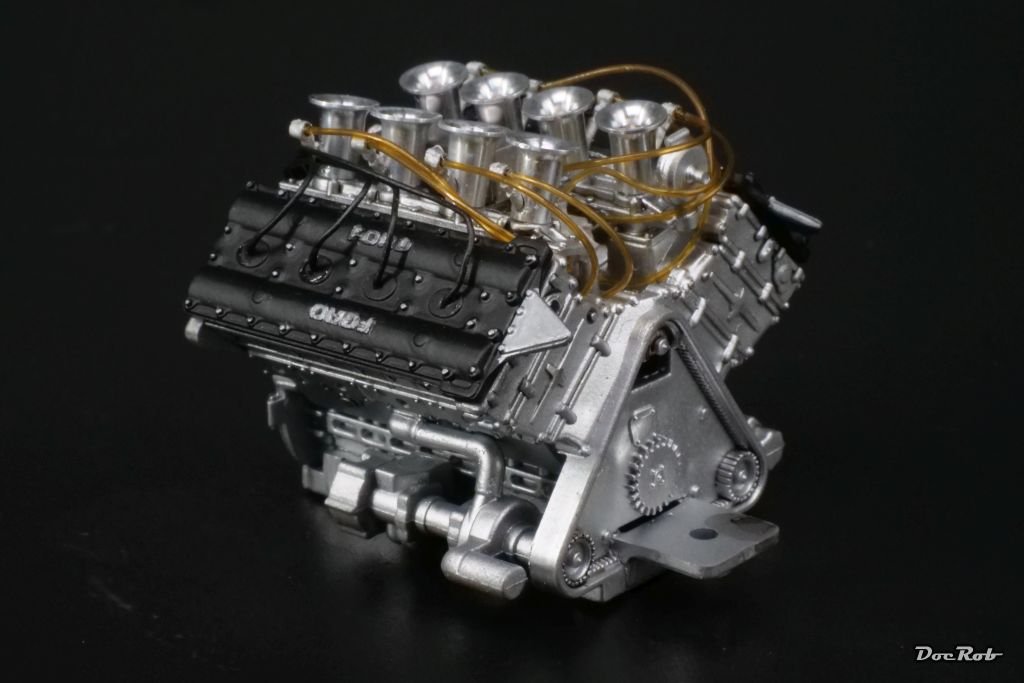
-
Lotus 49C by DocRob - FINISHED - Ebbro- 1/20 - Plastic
DocRob replied to DocRob's topic in Non-ship/categorised builds
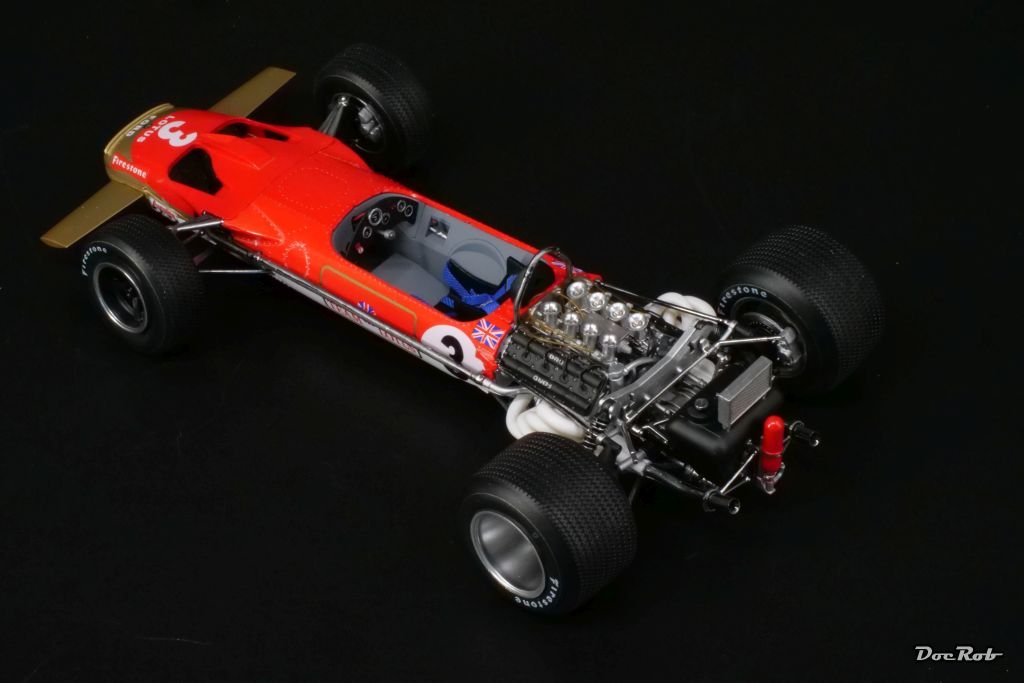
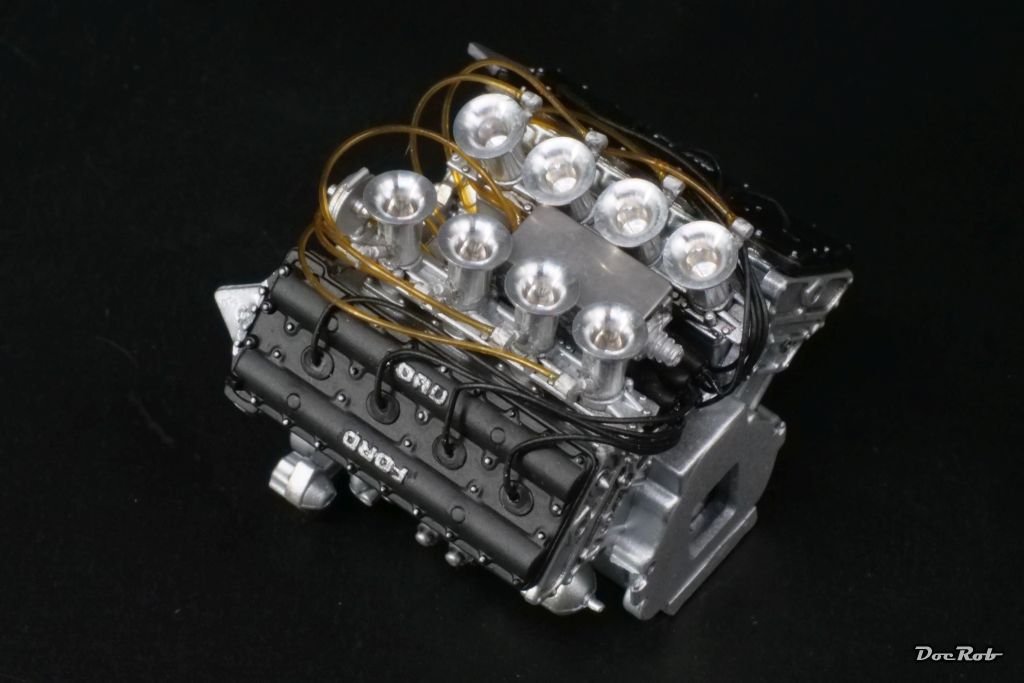
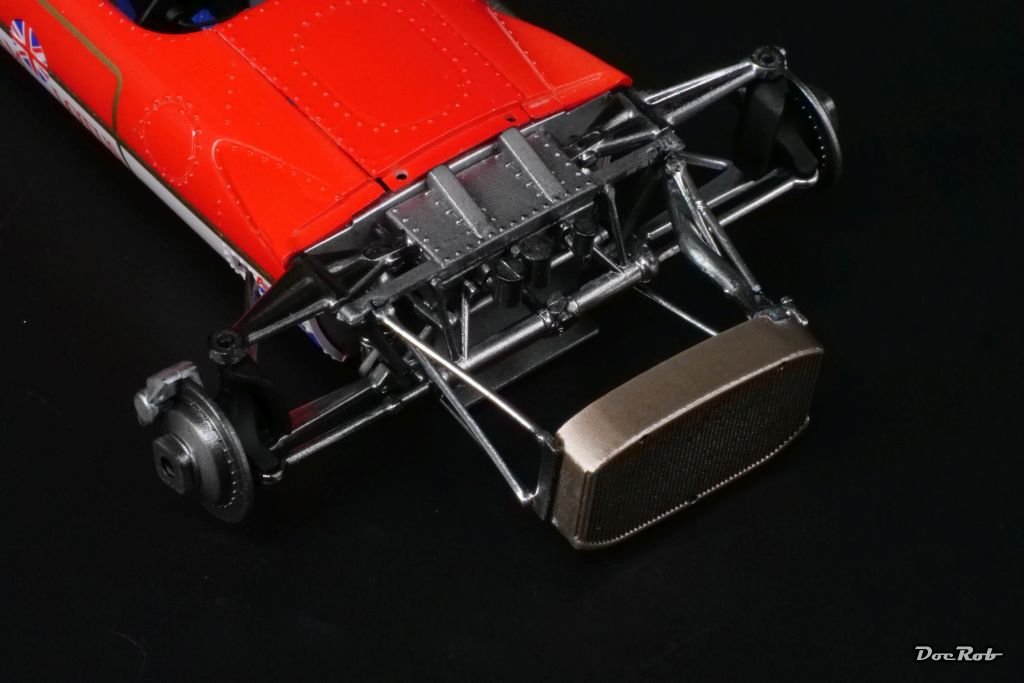
I have seven or eight kits with the legendary Ford / Cosworth DFV engine implemented and this is the firs time I build one. Actually the Lotus 49 was the first car in a long row using this engine, which proved to be the most victorious F1 engine of all time and for years set a kind of standard in F1 racing until it got finally replaced in 1983. I decided to give the kit engine some extra love and added a MFH set with turned funnels and fuel and ignition distributors. The engine will be very visible, so a bit extra detailing will improve the looks. I glued the yellow transparent fuel lines to the distributor with CA and then did the same with the ignition wiring, made from black 0,4 mm cable. Drilling the numerous 0,4 mm holes was delicate and gluing everything in place after shortening the tubes and wires will be equally difficult. I also assembled the gear box and sprayed it gun metal. I decided against the texturized color from Zero paints for that task, because I think in 1/20 scale the texture might be a tad too much. The valve covers were sprayed firs aluminum, followed by semi mate black, which I planned to carefully erase with a toothpick on the Ford logos. It didn´t work that way, so out with the AK Aluminum pencil, which also wasn´t successful due to the grainy application. It had to be the good old soft pencil, not perfect, but good enough for me. Cheers Rob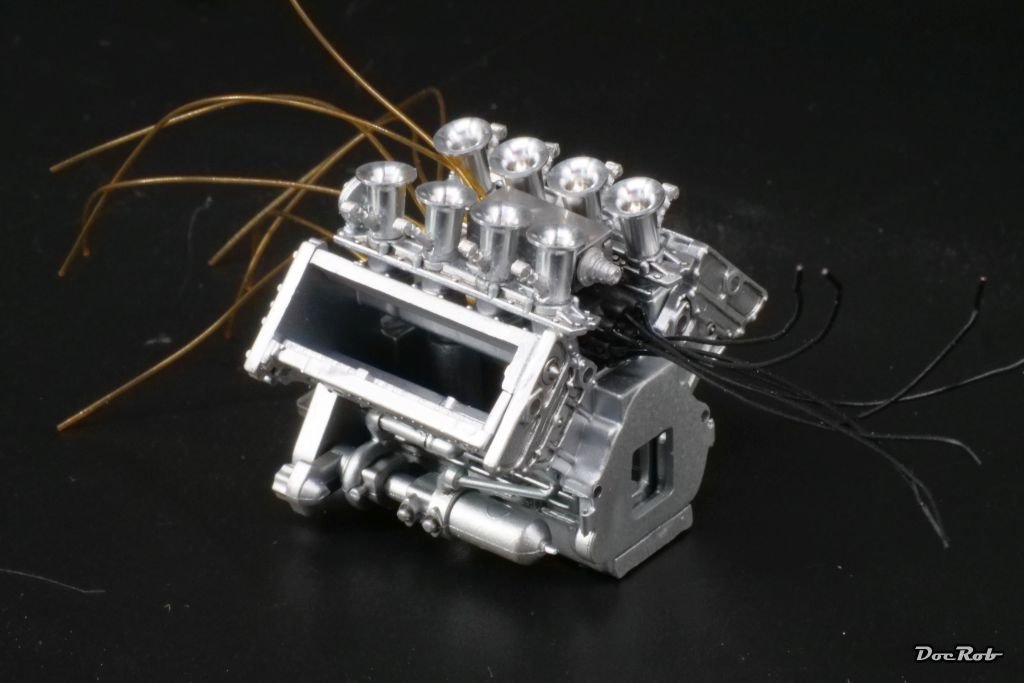
- 32 replies
-
- 10
-
-
Porsche Turbo RSR 934 by gsdpic - Tamiya - 1/24 - PLASTIC
DocRob replied to gsdpic's topic in Completed non-ship models
Nice Gary, a grubby Jägermeister Porsche, I love it. To me the grime looks realistic and what I like, is that there is shininess left, where only bits of grime accumulated and the dirtier areas are dull. The grade of shininess is a very important aspect in weathering. Cheers Rob- 1 reply
-
- 3
-
-

-
Lotus 49C by DocRob - FINISHED - Ebbro- 1/20 - Plastic
DocRob replied to DocRob's topic in Non-ship/categorised builds
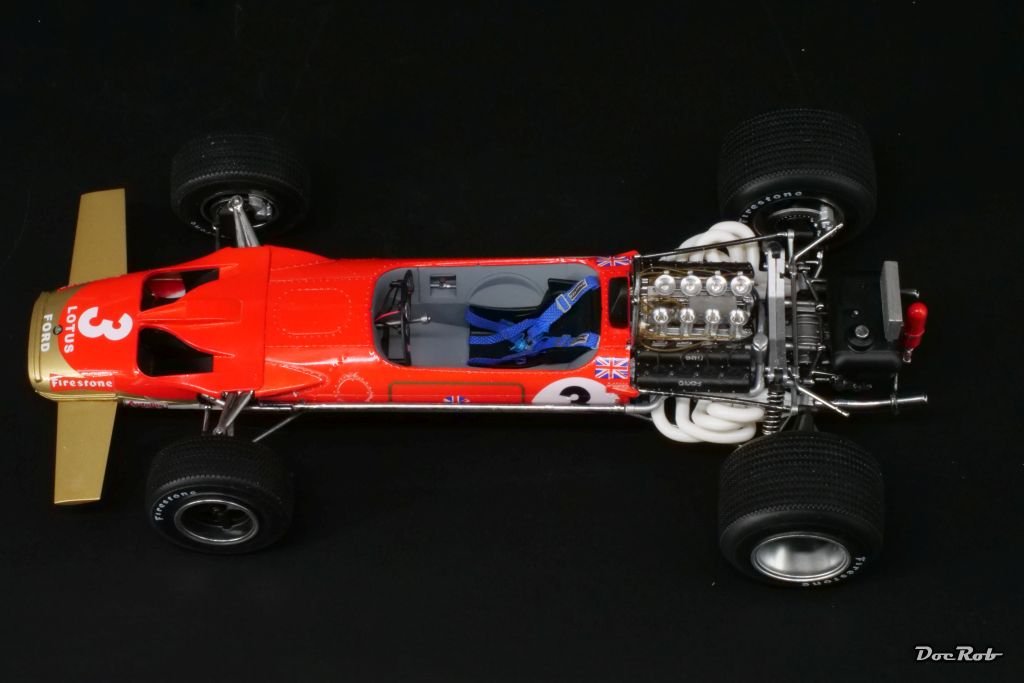
Next was the assembly of the front section and around the cockpit tub. While the red and white body parts fitted well, the front suspension and radiator proved to be difficult to get together. I had to widen many holes with drill bits to and did some cutting to accept the fitting parts. My expectations were a bit higher fit wise, but I was wrong, which showed when I added the front body parts and found out, that there is no way to glue them in the correct position. Here is how it looked inside the nose with suspension and radiator in place After half an hour of carefully detecting the culprits, it was clear, the radiator was too far to the front for about two millimeters and I have no idea, where I made a mistake. I then decided to cut the radiator framing and cooling hoses and glue the radiator directly into the front cone. All the struts are completely hidden in the body, so no harm done other than a wounded ego. Now the front body parts went on easily and I added the wings as last step before the engine will get build. Cheers Rob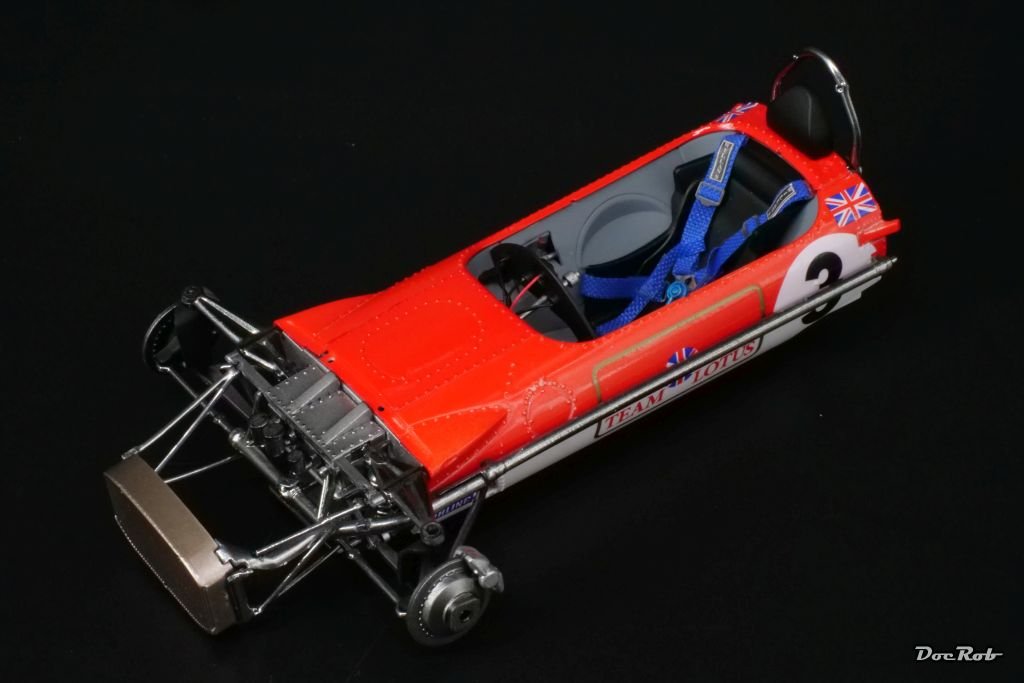
- 32 replies
-
- 11
-
-
Lotus 49C by DocRob - FINISHED - Ebbro- 1/20 - Plastic
DocRob replied to DocRob's topic in Non-ship/categorised builds
Thank you Gary, exactly my thinking about the 49C being somewhat in the middle of development from the early 49 to the Lotus 72. It´s interesting, how long the always same engine was used in F1 racing. Until now, the fit is decent, even with the multiple body parts, where I feared problems, luckily unfounded. The chrome sprues looked a little soft detail wise and I de-chromed them with oven cleaner, only to find out, the softness was not because of the chrome. Cheers Rob -
Lotus 49C by DocRob - FINISHED - Ebbro- 1/20 - Plastic
DocRob replied to DocRob's topic in Non-ship/categorised builds
Lets hope so Yves, it is my first Ebbro kit and I hope there will not too many obstacles with the build. For now, everything looks promising. Cheers Rob -
Lotus 49C by DocRob - FINISHED - Ebbro- 1/20 - Plastic
DocRob replied to DocRob's topic in Non-ship/categorised builds
Thank you Ken, I learned through a forum post about pink primer as the best base for red colors. I used it the second time with the Lotus and really like the results. Cheers Rob -
Lotus 49C by DocRob - FINISHED - Ebbro- 1/20 - Plastic
DocRob replied to DocRob's topic in Non-ship/categorised builds
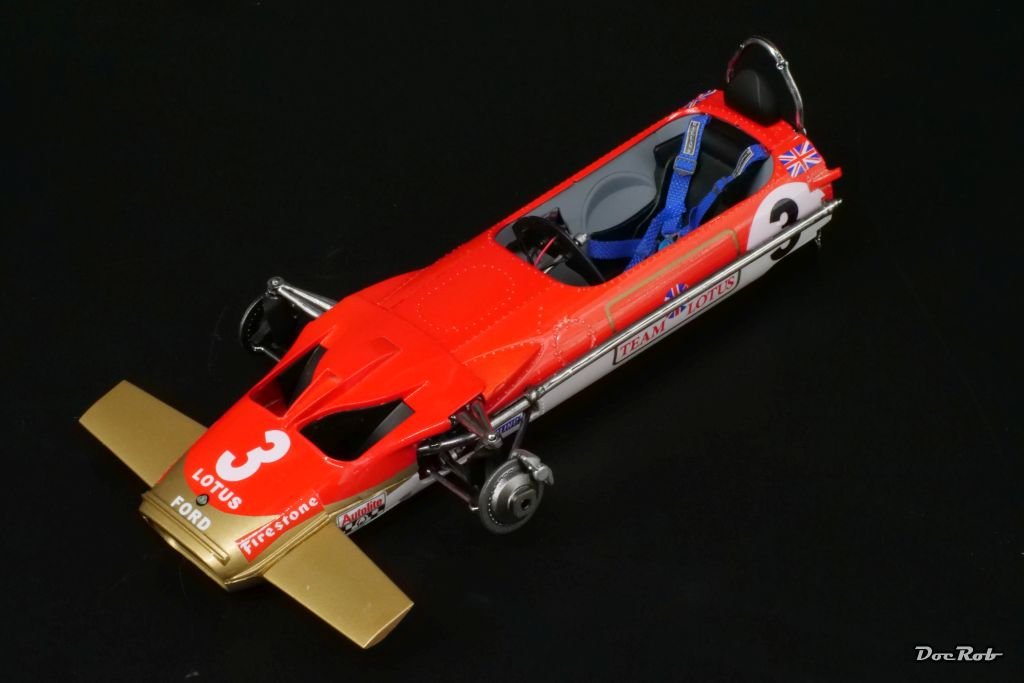
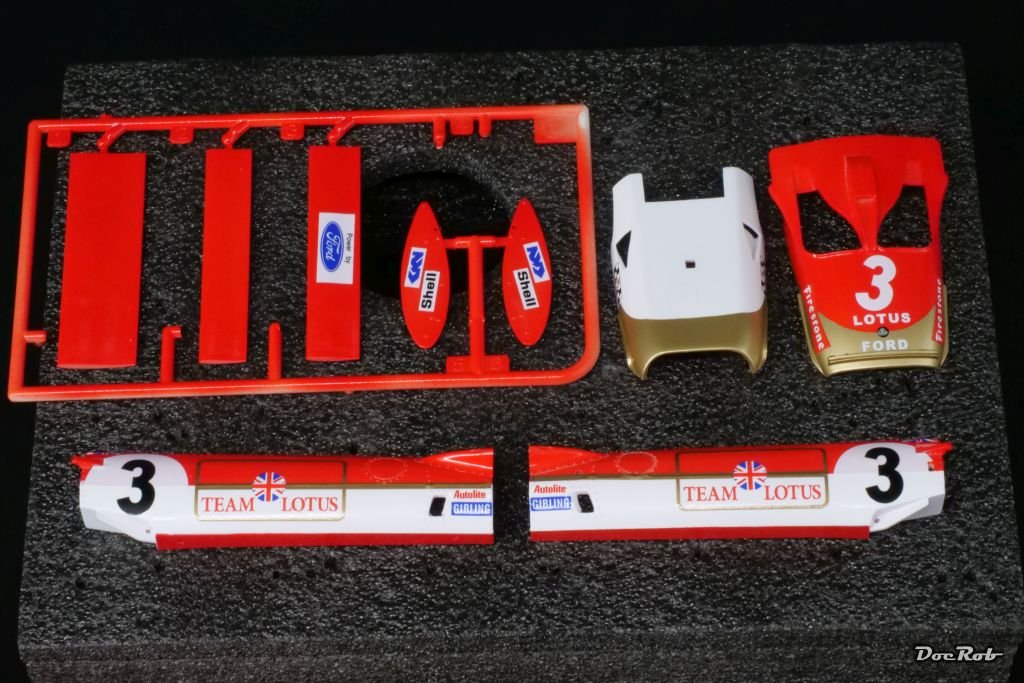
My initial plan of decaling the white and gold livery with the supplied decals went wrong, I had some tiny crinkles, which I may could have solved with a hairdryer and some decal fluid, but I misaligned one decal and was not too keen of cutting all the edges of the decal with a sharp blade. Luckily I made copies of the decals as backup, to use them as templates for masks. After removing the decals, I masked everything with Kabuki tape and sprayed the white and gold onto the red. Then I applied the decals, which were ok but not great quality wise. Some colors are a bit strange and there is a slight offset for example on the Union Jack´s. They needed some Micro Sol to get them settled over the rivets. Meanwhile, the parts are gloss coated with Zero Paints Lacquer clear, which sprays extremely well. I usually spray three to four layers per color or clear coat for car bodies. I thin the paint or clear with Mr. Leveling thinner. It has proved best for me, to start with a first coat of color with about 30 to 40% thinner only misted on. This thin coat dries super fast and the risk of damaging the plastic or decals with the hot paints and thinners is reduced. The next coat is applied a bit heavier and possibly thinned with another 10% of thinner. The third coat has 50 to 60% thinner, which let it level very easy and the surface is very shiny. The last coat, if necessary is thinned with about 80% of thinner, which levels even better, but care has to be taken not to produce color runs. The first coat needs to dry properly, as it works as a protective shield for the plastic and decals, the others are applied with only some minutes of drying time, which causes the following heavier thinned coat to eat into the one before and level better Cheers Rob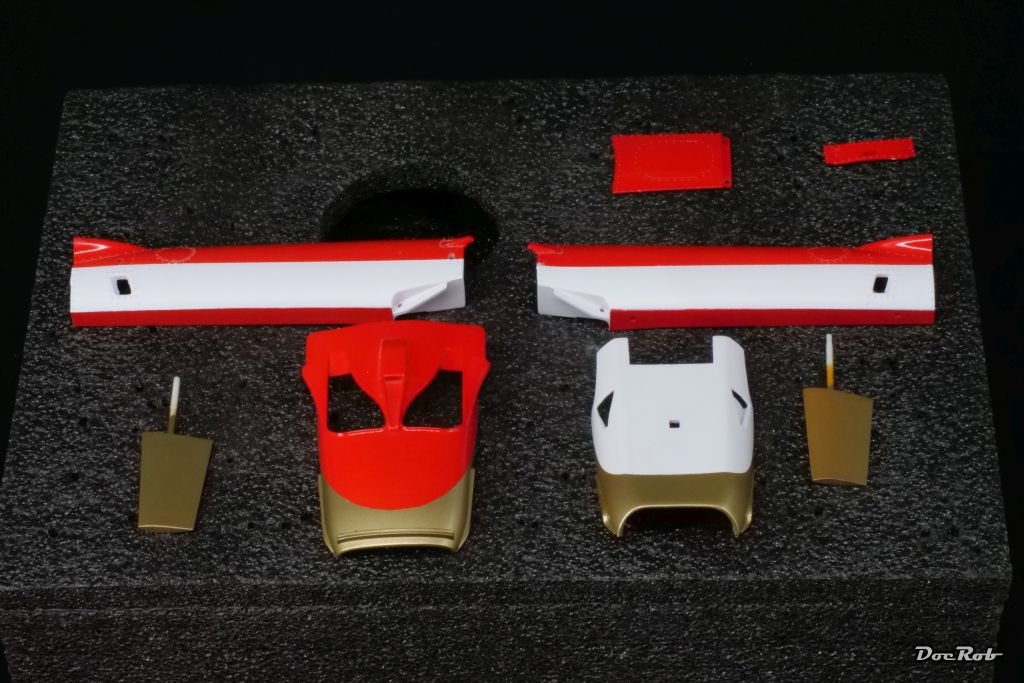
- 32 replies
-
- 10
-
-
Lotus 49C by DocRob - FINISHED - Ebbro- 1/20 - Plastic
DocRob replied to DocRob's topic in Non-ship/categorised builds
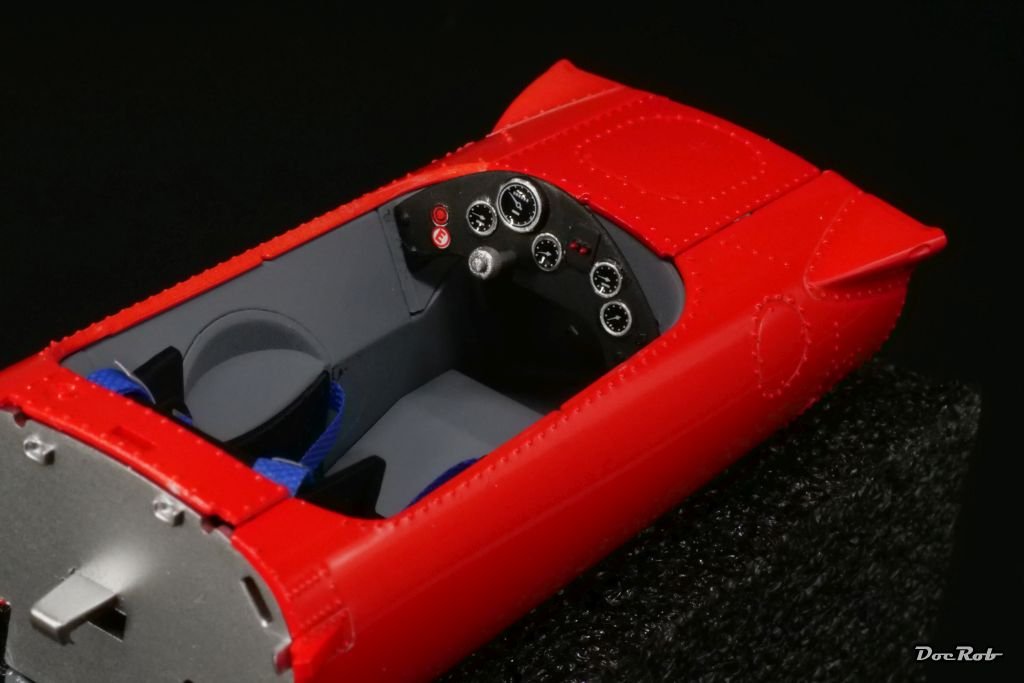
I test fitted the red airbrushed and gloss coated body parts around the tub and to my surprise the fit was very good. The instrument panel received the supplied decals for the dials, which were than sealed with a drop of Pledge for a better glass appearance. The later visible backside got the instrument housings drilled with a 0,5 mm bit and I added some 0,4 mm black and red cables for further detailing. Cheers Rob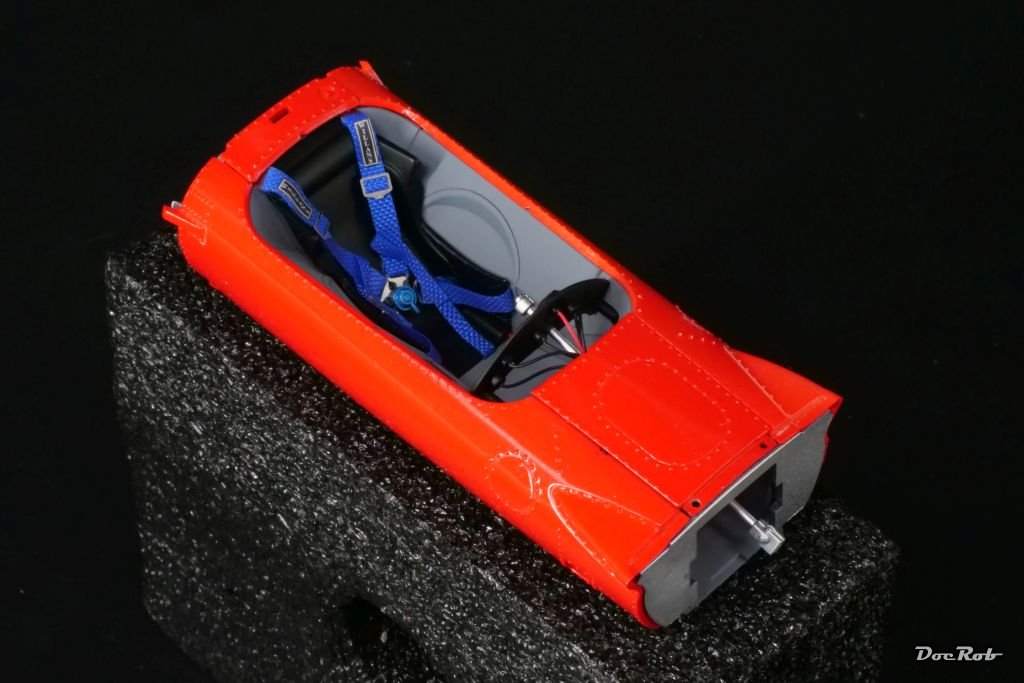
-
Lotus 49C by DocRob - FINISHED - Ebbro- 1/20 - Plastic
DocRob replied to DocRob's topic in Non-ship/categorised builds
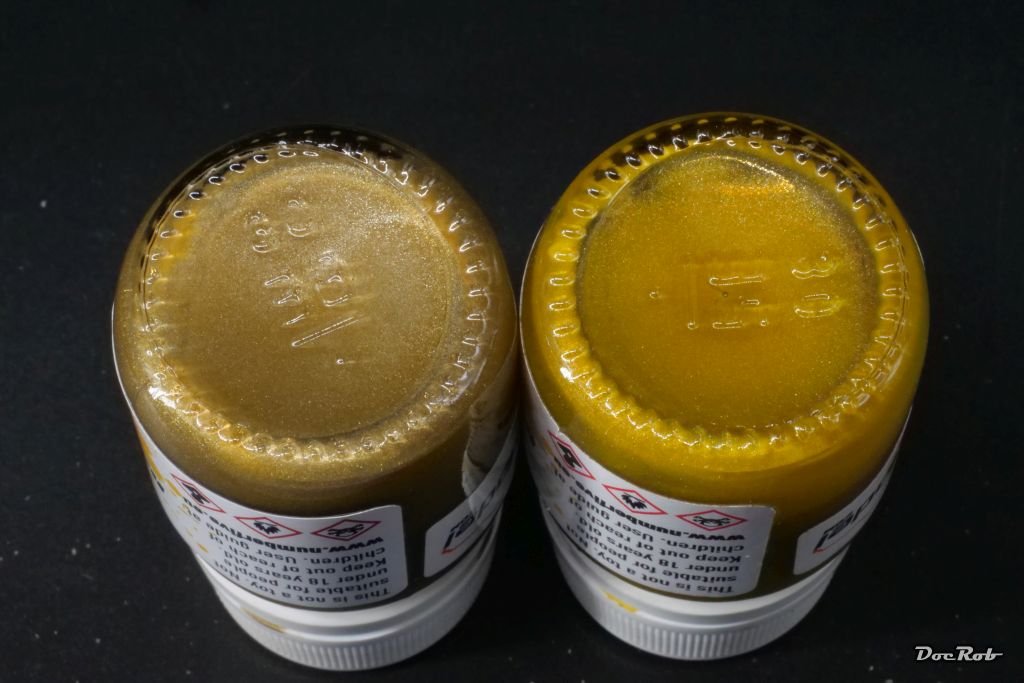
Next were the body parts, which I initially wanted to paint red and use the supplied decals for the white and gold trims. The parts were primed with pink Mr. Surfacer 1500, a good base, then followed by Number 5 Lotus red, which sprayed beautifully, thinned with Mr. Leveling thinner. The wing parts were left on the sprue, which I rarely do, but it would have been difficult to hold the parts during the painting stage Pink Red You may noticed, I also sprayed the front wings and little spoiler with Number 5 Lotus 49C gold, but the hue looked completely off and was completely different from the color of the decals. I then rummaged through my car color stash and found some Wolf Racing gold from the same brand, which fitted almost perfectly. Wolf gold left, the completely off Lotus 49C gold right. Cheers Rob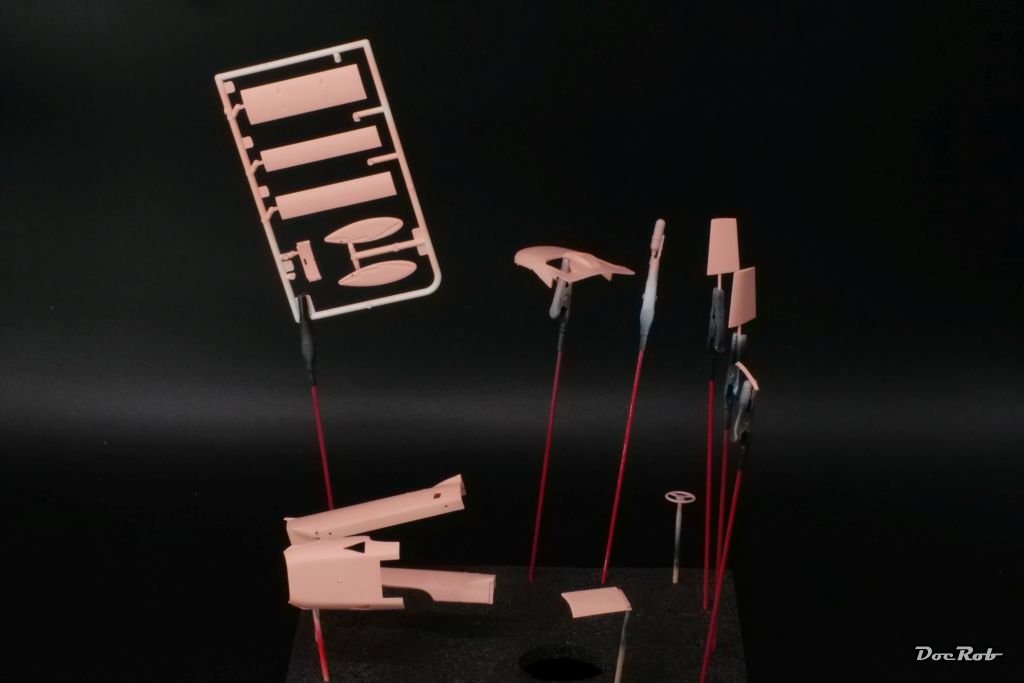

-
Lotus 49C by DocRob - FINISHED - Ebbro- 1/20 - Plastic
DocRob replied to DocRob's topic in Non-ship/categorised builds
I started with the cockpit, which was a straight forward construction. The light grey tub receives the seat and some spars, gear shifter and of course the instrument panel. The kit supplied decals for the seat belts are not my cup of tea in this scale and I substituted them with fabric ones from MFH. Fiddly to build, but they look way better. You have to cut the fabric to length and add the buckles and then glue the fabric with supplied double sided adhesive tape, which I also used to hold the belts in place. I like that solution, because you don´t have to mess (literally) with CA Cheers Rob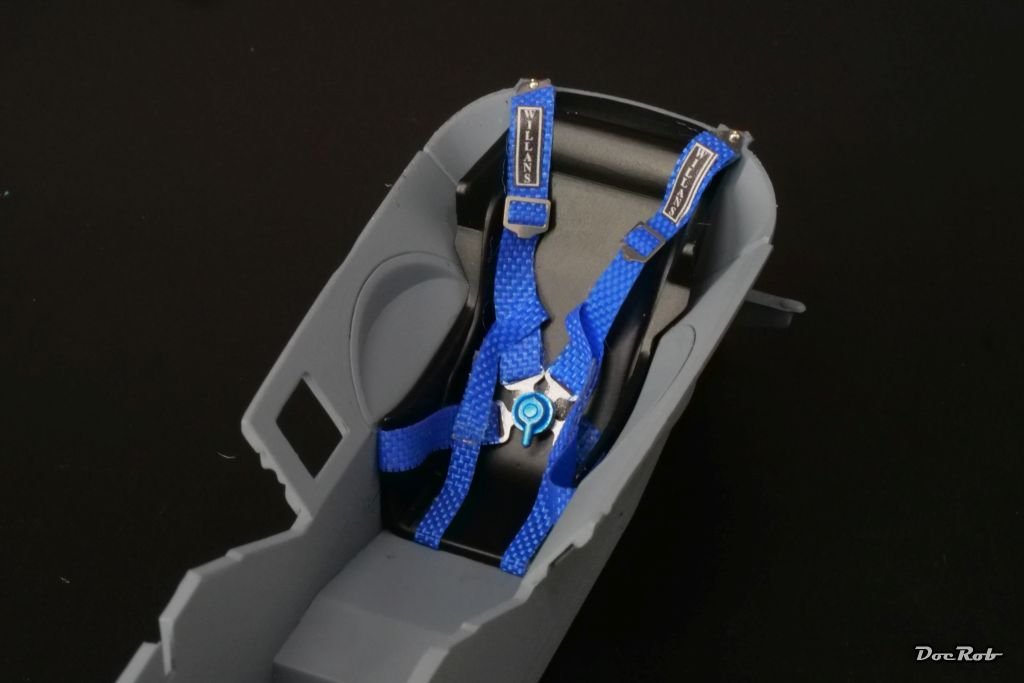
-
I was not sure, if I should write a log for this build, but hey, there are not so many car builds around here. Ebbro the producing company is unfortunately not longer existing and we modelers lost a great source for 1/20 historic F1 cars. The Lotus 49 started it´s career in 1967 in the green and yellow Lotus livery. The later 49B and 49C models, were the first to sport full sponsorship brand colors, in red white and gold to my knowledge. My build will show the 49C as Jochen Rindt´s, who won the Monaco Grand Prix in 1970. By that time the 49´s where already replaced by the Lotus 72, but Rindt disliked the later type. The kit itself is nicely designed with black, grey, white and chrome sprues, along a yellow tinted clear sprue for the windshield. The tyres have the branding and stripes already printed on, nice. The manual sports some similarities with Tamiya´s. I will add some extra detailing for the engine with Model Factory Hiro details and fabric seat belts from the same company and some piping and wiring. Cheers Rob
-
Thank you Alan, I liked the look of that Spanish version instantly, when I saw it first and added the Schneider kit later. I just recently re-read some of Hemingway´s books again and traveled a bit in his footsteps, but that was merely by accident and not intentional. Last year, we have been to Pamplona, where he wrote "The Sun Also Rises" and had our coffee in the lovely belle epoque Cafe Irun. This June, we have been to Valencia and had the same room like him in the beautiful Hotel Reina Victoria. Unfortunately the often mentioned classic hotel bar didn´t exist anymore. Cheers Rob
-
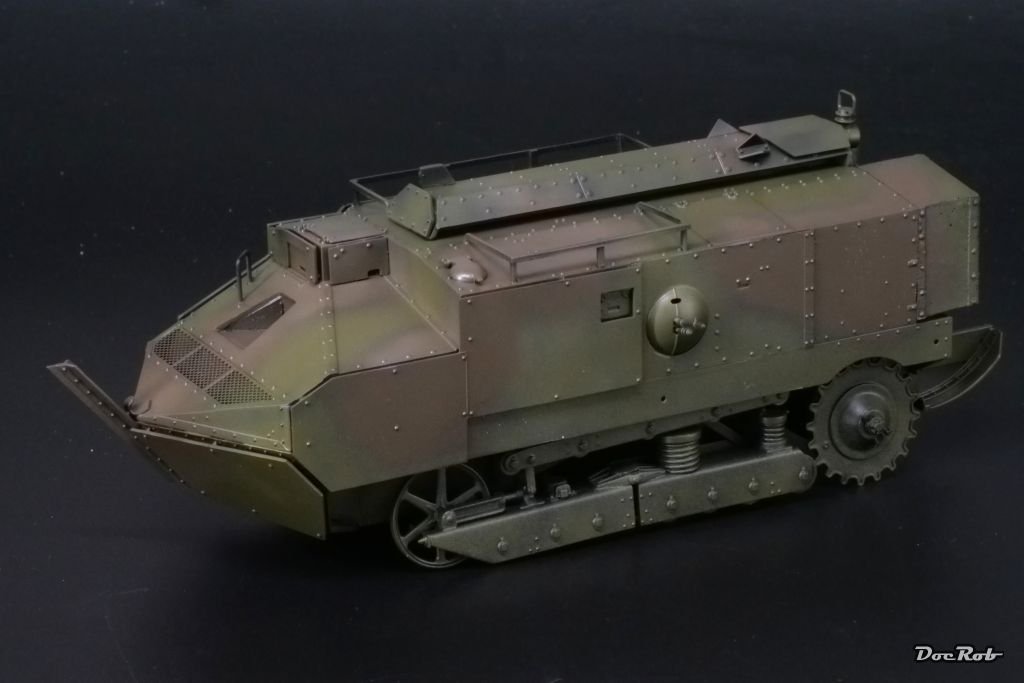
What would be a tank used by Spanish Anarcosindicalistas without a little agit prop . Decals were very thin and most were good to work with, but some disintegrated and needed to be repaired. Cheers Rob


-
Schneider CA - Armoured by RGL - HobbyBoss - 1/35 - PLASTIC
DocRob replied to RGL's topic in Non-ship/categorised builds
You are on hyperspeed with your French monsters, Greg. I like your Schneider with the vivid camo. do you brush paint? Your weathering blended the camo very believable. I can´t see any chipping, which is hard to believe with a heavy used vehicle like yours. Cheers Rob -
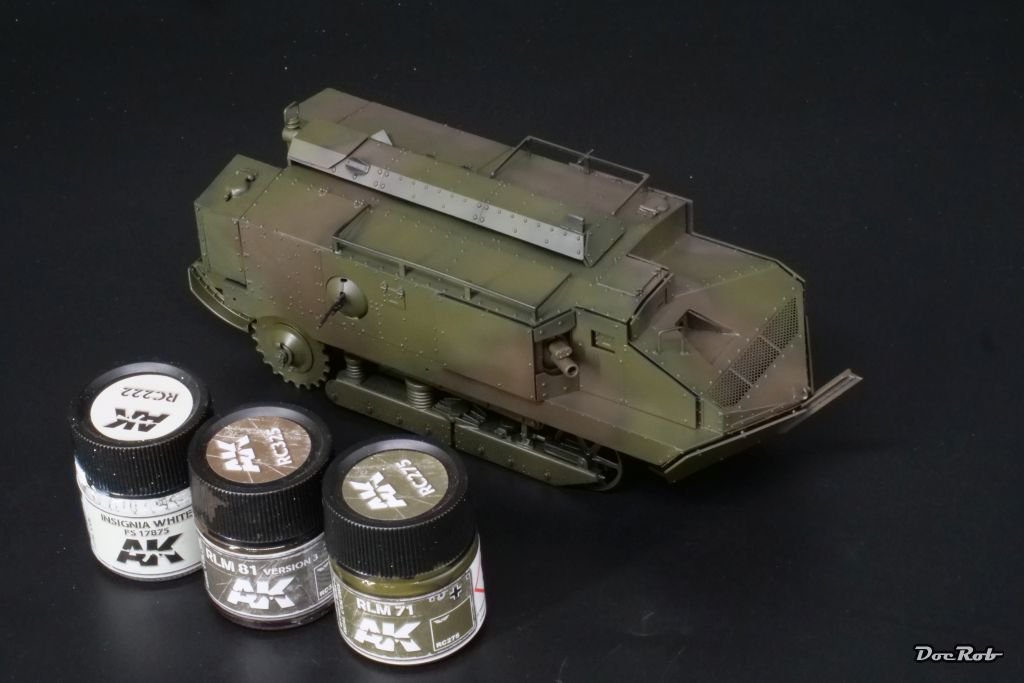
As I mentioned above, the twist with this build will be, that this outdated fossil from 1916 was still in use in 1936 in the Spanish Civil war with the Republican forces against Franco´s Nationalists. I guess, over their period of duty, the six? Spanish tanks served in Maroc and with their age, I assume, their state of maintenance not to be the best. I will try to show this appearance through the camo paintjob, which was sprayed translucent and freehand over the black primer, with heavily thinned AK Real colors. I made a second pass with both colors, adding a drop of Insignia White and tried to work a bit with highlight, shadow and modulation, which is not easy with a non-monochrome body. Anyway, that will be the starting point for further painting and weathering stages and of course for decals. Cheers Rob
- 21 replies
-
- 12
-
-
Schneider CA - Armoured by RGL - HobbyBoss - 1/35 - PLASTIC
DocRob replied to RGL's topic in Non-ship/categorised builds
It seems, you go for a more delicate camo scheme than me, French style. Cheers Rob -
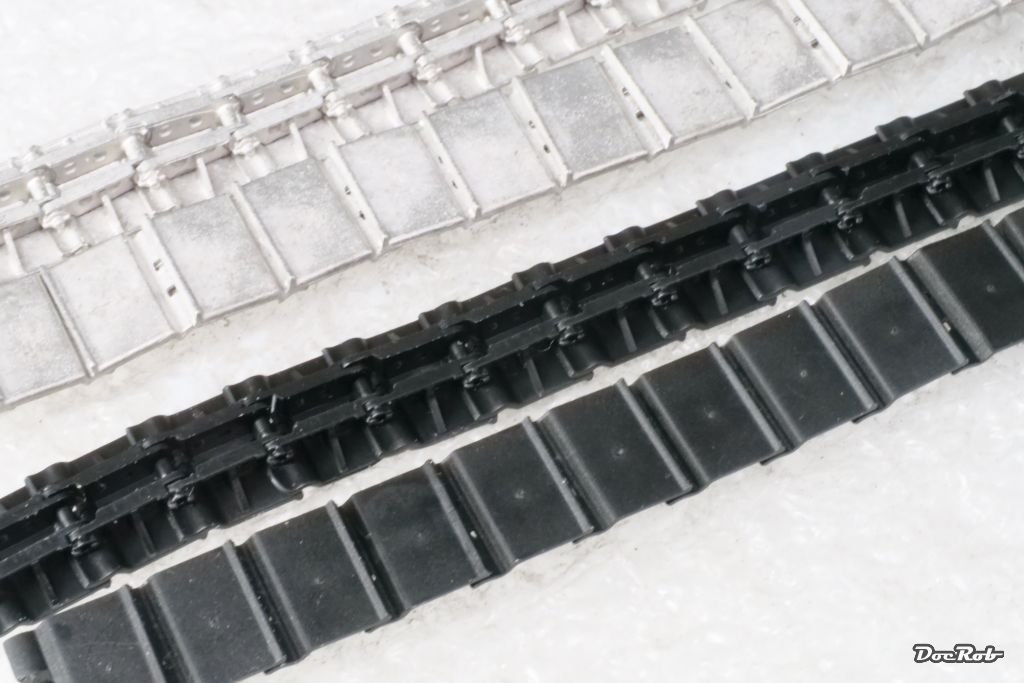
After a fellow modeler over on LSM mentioned it, I opened the Meng FT 17 box and found the tracks to be ready cut and easy click and after 10 minutes, I had two with the suggested length of 32 links per side. There are some spare links as well. They don´t look bad and I may use the Meng plastic ones for the Schneider, where they are not so visible. Meanwhile the Schneider itself got black primed with Mr. Surfacer 1000. Cheers Rob