


wmherbert
-
Posts
143 -
Joined
-
Last visited
Content Type
Profiles
Forums
Gallery
Events
Posts posted by wmherbert
-
-
-
I'm in the glue camp. Holds them in the right position. I still tie some temporary lines to hold everything more secure until shrouds are complete. I think trying to do shrouds and stays with loose masts would be incredibly frustrating.
I glue the masts. tie temporary shrouds. Then fore and back stays, then running rigging, and then shrouds last. That way I'm working from inside to out. I've found it's easier to do running rigging first without shrouds in the way.
But whatever way gets it done for you is just fine.
Bill
- Coyote_6, Scottish Guy, Keith Black and 2 others
-
 4
4
-
 1
1
-
David, great job!
Your added details to the kit were well worth the extra time and effort
-
Welcome and have fun! Remember that your best friend will not look at your completed model for than about 30 seconds so don't stress over everything. (Or anything)
And your daughter will just want to take it in the bath with her.
Bill
- Keith Black, mtaylor, Scottish Guy and 2 others
-
1
-
 4
4
-
As one who likes sails on these schooners I think you will like the silk span. I used the medium and followed tom Laurie's videos. It was a little tricky figuring out how to get rid of the fold creases before you start. I've done about 5 models with sails so far and have gotten a little better on each. And did my first furled sails on my current build .
My advice is to attach as much of the sails to the masts and spars off the model as possible and to double check the given sail patterns from the kit against your actual model.
-
Nicely done.
The equipment you made for the top of the pilot house came out well. A nice touch.
All the little odds and ends are fun to make and add a lot of interest.
Your hose worked out well in cloth. I made mine with silkspan but it didn't roll up as smooth. I think the cloth worked out better.
I agree, not much deck space left.
Bill
-
Looking very good. I like the nice touch of making the grating for the platform.
I had trouble with the handrails also. I also had to install the lower rail in sections. Came out fine like yours but it seemed like there had to be a better way.
Not a lot of rigging so you're nearly at the end!
Have you made a stand for it?
Bill
-
Great job on the windlass! A huge improvement.
-
David,
The life boats came out very well.
I have seen Tom Laurie's video. I made up some sails today. I'm going to attach the mast hoops to the sails before slipping them on the masts and booms while off the model. Then I'll try furling them. I'll let you know how they come out.
You're making nice progress.
Bill
-
David,
Looks like you got it figured out right. The only part you can't see is what is going alongside the life boats on the sides of the house. I remember seeing a photo somewhere showing that section as an exposed rod like you have done but I can't find it now.
I noticed in your photos that there are two taller vent pipes aft of the house that I didn't notice. So back to some more construction.
I started shaping mast and spars while glue elsewhere was drying. Looks pretty straight forward .
Any thoughts on sails? I think I might try furled sails with silk span. I like sails on models so I will give some thought to furled or full.
Also I noticed that the aft galley exhaust pipe has guy wires for support while forward one doesn't.
I've been avoiding ladder construction.., but cant keep putting it off.
Bill
-
I'm a fan of sails on a model. Yours are looking good.
Also nice rope coils.
Bill
-
David,
Ladders came out great.
The wing walls look a lot better with the wall framing rather than the solid slab of wood the kit provides. It's my next construction too.
Where do you get the strip metal you used for the ladders?
Bill
-
Wiping the end of the thread with some CA makes it much easier to get the line thru the block. And drill out the hole in the block so the line can pass thru easily.
- Keith Black, woodartist and mtaylor
-
2
-
 1
1
-
Welcome. And don't worry , your English will probably be better than us americans
- Keith Black, Vlax, mtaylor and 1 other
-
4
-
I too have a long way to go on my soldering skills, or lack of them.
I did ok on a 1:48 scratch built tug on my first attempt at soldering rails but failed miserably on a 1:72 plastic LCT kit. But on the plastic kit I used polystyrene rod and glued it. Came out pretty good. I think I will try that again for the ladders. Also I'll try gluing brass rod pieces.
Bill

- David Lester and GrandpaPhil
-
2
-
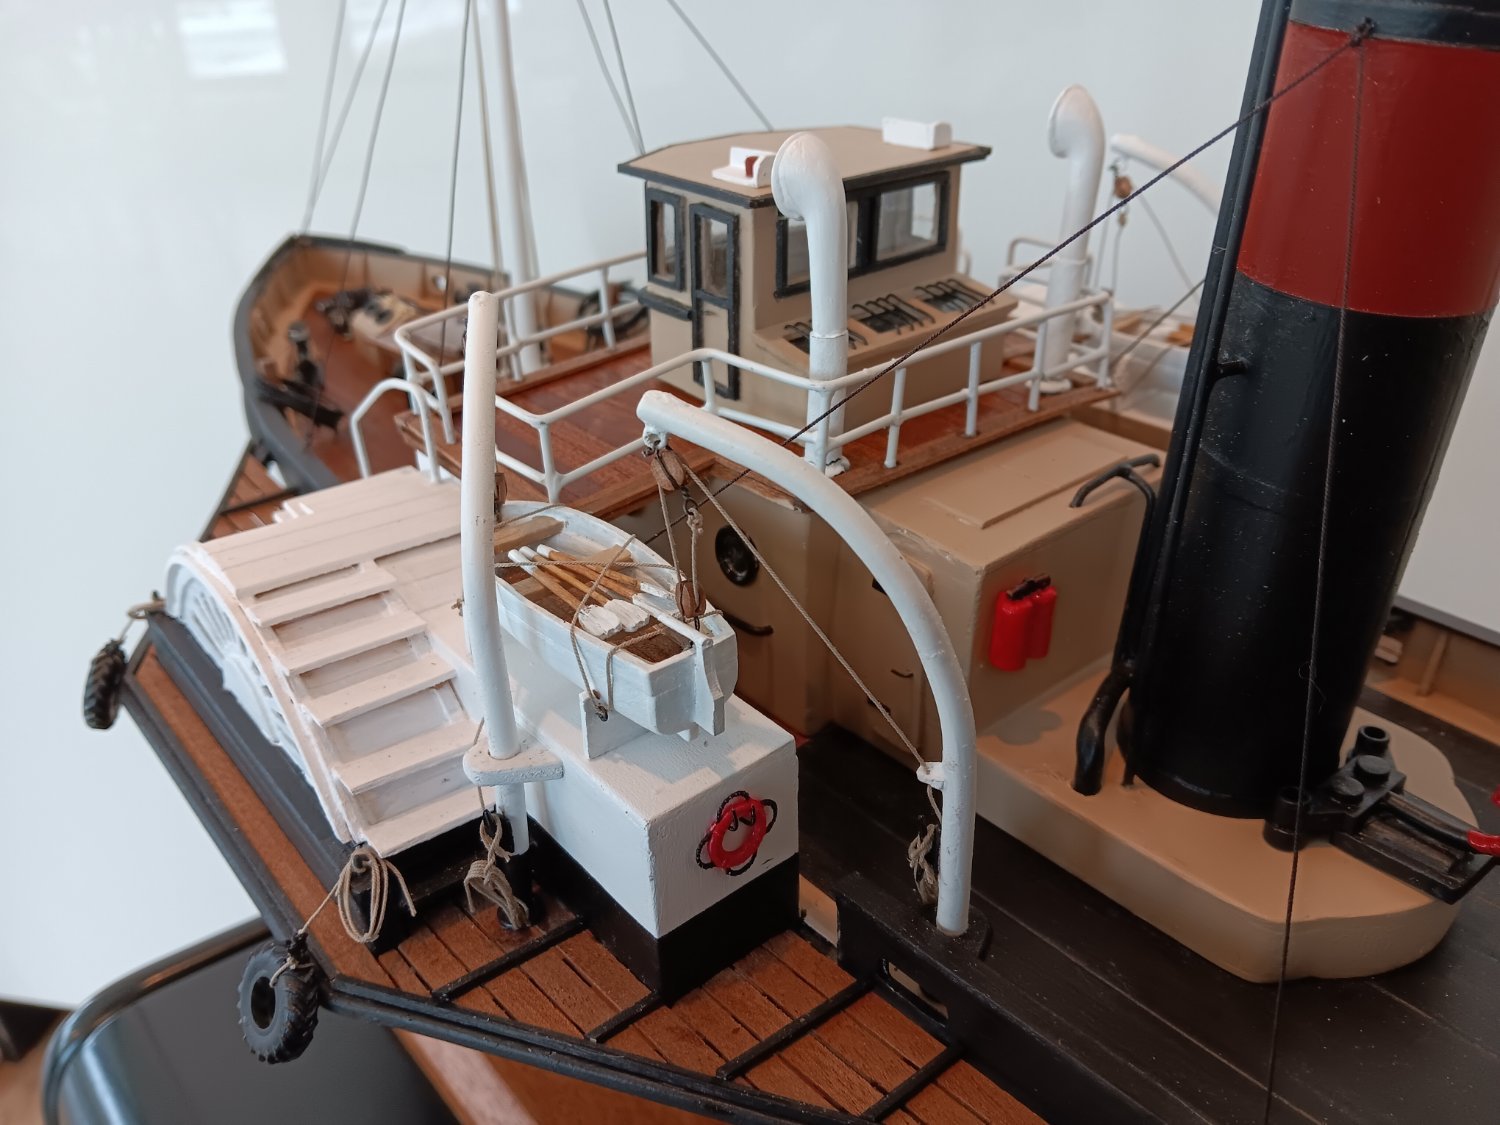
David, looking very nice.
I like the opening pilot house window. (I will copy that)
The hose valves are a nice touch.
Did you use the plastic for the glass in the pilot house? Also did you paint the interior of the pilot house black or is that just the photo?
I added plastic behind the port lights in the main house but I'm not sure if you can actually it.
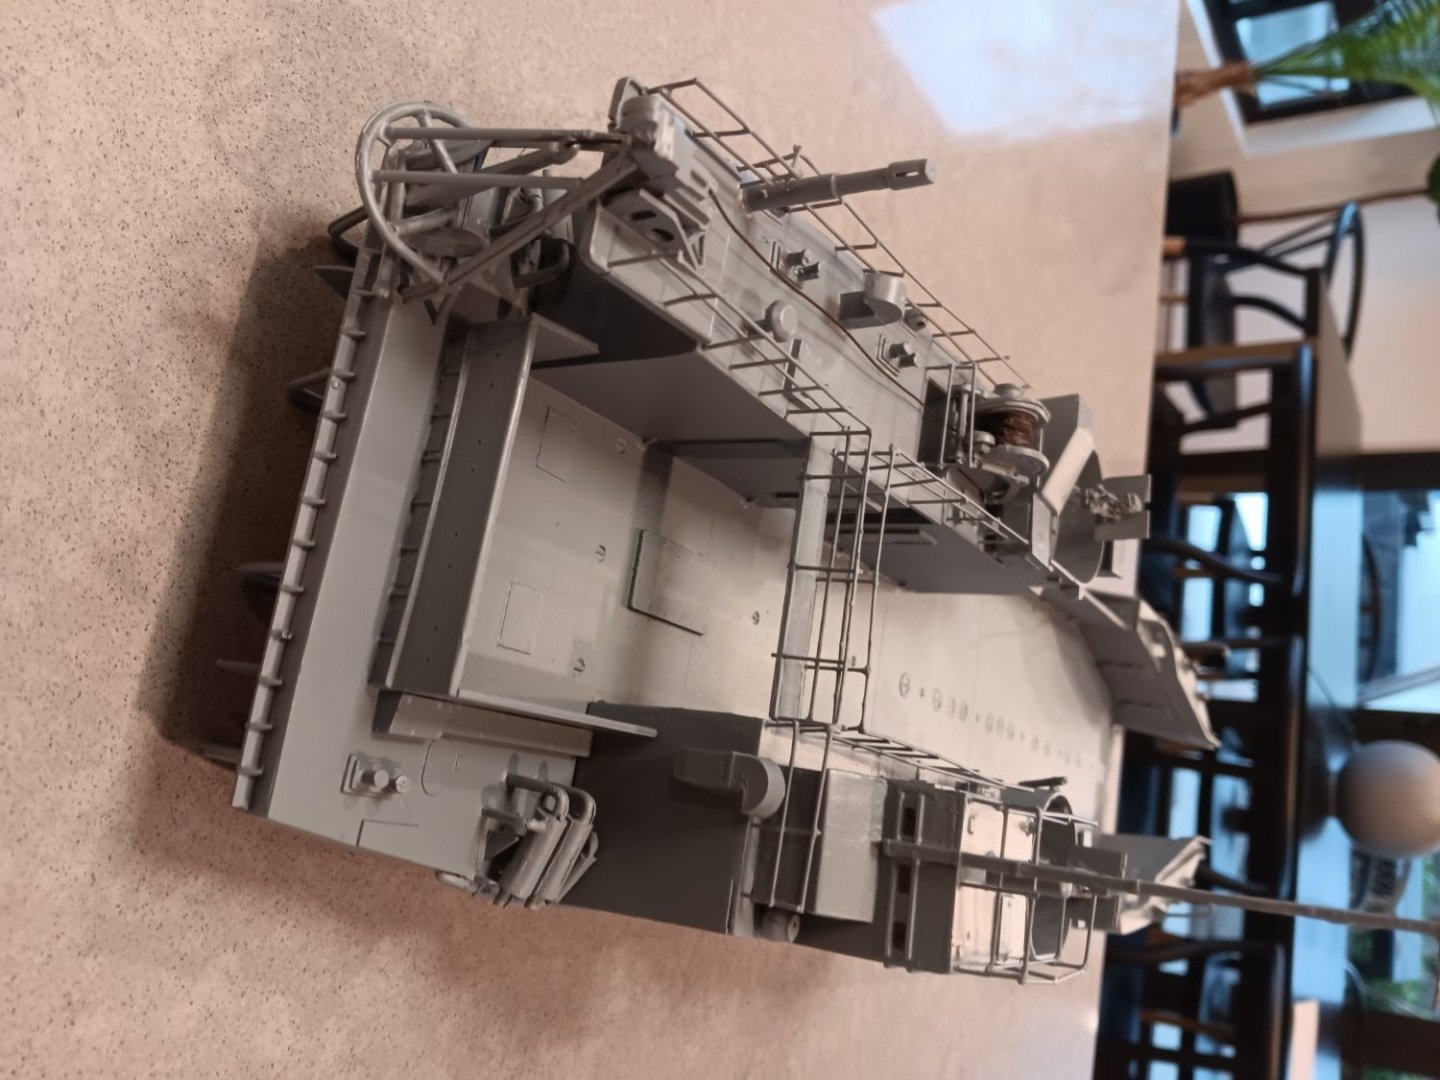
I've been working on the stack. Trying to get the top piece to look like the real thing and shaping the flattened sides of the stack itself . I would like to figure some way of making the small flat vent near the bottom. I'm sure you will come up with a good idea that I can copy!
And there is a little box on the back wall of the main house that will be fun to construct.
What are your thoughts on the ladders?
Bill
-
Welcome. I saw Passagemaker about 18 years ago on the hard in a boat yard in Trinidad
Bill
- mtaylor, AJohnson and Keith Black
-
3
-
David,
Good idea for the fire hose. I'll try with some silkspan too.
Looks like you are coming along fine. The forward plating is a nice touch.
Now that the house roof is on pretty much everything else are details.
I'm about as far along as you are. Just about ready to build the house. I have just about all of boxes etc built and ready for paint. I need to do final coat of topside paint and then paint rub rails. Then mount rudder and put on stand.
This is a pretty fun model.
Bill
-
Looking good.
are you going to plank the sides of the main house?
I tried making the rack for the fire hose that is on the ship but not the kit. Rack came out fine but haven't figured out what/how to make the hose.
This model has a bunch of deck structures that are kind of fun to make and miscellaneous vents and pipes that should add to the details that always seem to add a lot to a model. I'll be interested in how you approach these.
Bill
-
Welcome. Is that a kit or scratch built? Really nice looking
- Keith Black, mtaylor and Shuriksun
-
3
-
-
Planking came out very nice. Not much fairing to do.
Bill
-
-
Look at the trouble figuring all this out for a ship less than a hundred years old, In the time of photographs and films and still existing. Then think about the accuracy of information about ships from 2-300 years ago.
we need to keep on mind that these ships were not built as museum pieces but as working craft that changed over the years as usage and technology changed. So historical accuracy is important to an extent but remembering it's just a snap shot of a moment in its life. We get to chose what we want it to look like. For example I've never liked the blue gray paint color and reddish deck paint and feel no guilt about changing it to how I would have painted it.
Bill

1921 Bluenose by John Ruy - Model Shipways Kit No. MS2130 - 1/64 scale - Canadian Fishing Schooner
in - Kit build logs for subjects built from 1901 - Present Day
Posted
One method that works for me:
I rig the throat and peak gaff halyard and topping lift with the mast and boom and gaff laying flat on a table off the boat. Then I place the sail and tie the mast hoops and rig the sails to the boom and gaff. Makes it so much easier. Everything stays in place while tieing and running lines. Then I'll set the masts with temporary shrouds until I get all running rigging close to the masts done. Only then do I do the stays and shrouds. That way I have much less work inward of the shrouds.