-
Posts
91 -
Joined
-
Last visited
Content Type
Profiles
Forums
Gallery
Events
Everything posted by Herby63
-
Finaly the furniture for the aft deck, as shown in steps 28 and 29. Now it's time to paint a little (a lot ! ) Until next update, enjoy modelling.
- 87 replies
-
- Mikasa
- Merit International
-
(and 1 more)
Tagged with:
-
And some more features of the fore deck. Only the grey stuff is Merit, all the rest is brass and resin from Pontos. Until next update, enjoy modelling.
- 87 replies
-
- Mikasa
- Merit International
-
(and 1 more)
Tagged with:
-
Next came all the parts for the fore deck: Bent, soldered, cleaned up and assembled all the parts shown in step 26. Most are Pontos replacements. Until next update, enjoy modelling.
- 87 replies
-
- Mikasa
- Merit International
-
(and 1 more)
Tagged with:
-
Back to the model: The last part to prepare for the middle part of the main deck. Pontos part 519 is bent into a box and soldered, and glued with Merit part G39 to the fore funnelbase. Until next update, enjoy modelling.
- 87 replies
-
- Mikasa
- Merit International
-
(and 1 more)
Tagged with:
-
As promissed a few post ago: the displaycase. As I would never have been able to make such perfect joints, I ordered 2 frames, one for my next project, a fully detailed DKM Bismarck (the one in the picture is operational and thus not so detailed) and one for MIkasa (standing). They came in at last. In the picture below: - the 2 frames - bottomplate for Mikasa - plexiglass sheets cut to measure - 1 woodn beam 12 mm thick (as thickness as the horizontal part of the frame - 1 aluminum profile for LEDstrips - 1 grey cover for the profile in order to difuse the light - 2 meter Ledstrip 5V with USB-connector First I drilled a 4 mm hole through the horizontal part of the frame. I drilled 2 10 mm holes for the lampfittingparts (hollow threaded rod 30 mm in length) at a distance exactly maching the holes in the bottom of the model. The 12 mm thick slats turned out to be just a tiny bit less thick than the frame so I cut them to length and added some leftover wood from my Victory-project. The bottomplate is now glued in the center of the frame. and weighed down. After glueing the plexigglass (polycarbonate) I testfitted the showcase in the frame. glueing leaves to be desired, but the fit is perfect. While the clear varnish is drying, I cut the aluminum profile to length to fit exactly in the case, wired up a corresponding length of LED-strip and glued the strip to the profile. Test of the connections Profile attached to the baseboard with superthin double sided tape As the USB-cable was rather short, I replaced is by a computermouse cable. Here the connection at the underside is shown, easy to repare or replace and allows for many connections to be added as I plan on lighting up the model from within as well. And finaly a picture of the hull on the stand with LED-strip lit (too much light in the room to fully appreciate the effect of the warmwhite light). Until next update, enjoy modelling.
- 87 replies
-
- Mikasa
- Merit International
-
(and 1 more)
Tagged with:
-
Thanks to the followers for clicking the 👍-button. Inspired by the success in soldering the handrails to the front plate of the aft bridge, I released the front plate of the fore bridge, which went surprisingly easy. After repeating the soldering process and roughing up both contact surfaces with a coarse sanding stick, I glued the plate to the front of the bridge again. Then I filled up the small holes in the sides of the aft bridge, soldered the parts for the booms and glued them with SloZap to the sides. Until next update, enjoy modelling.
- 87 replies
-
- Mikasa
- Merit International
-
(and 1 more)
Tagged with:
-
I took a second chance on soldering the handrails to the front plate as this has to be done on the aft bridge as well. SUCCES this time. In stead of applying the soldering paste to the pins of the handrail, I put the smallest amount on the points on the plate. First I soldered the ends , straightening the brass plate against a steel pin and then, one by one, the other points. (the knife is only for reference) Next I bent and soldered the brackets to the bottom plate. The 2 outside ones are at a 45° angle. Finaly I glued both plates to the Merit bridge, using both yellow (thick) and pink (thin) Zap CA-glue. Until next update, enjoy modelling.
- 87 replies
-
- Mikasa
- Merit International
-
(and 1 more)
Tagged with:
-
I pimped the merit brackets for the mast stays pith some Pontos parts (Nrs 157 en 158) and attached them to the fore and aft bridges. Then I soldered the brackets (Pontos parts 513 and 514)together and attached them to the sides of the bridges with CA-glue. Until next update, enjoy modelling.
- 87 replies
-
- Mikasa
- Merit International
-
(and 1 more)
Tagged with:
-
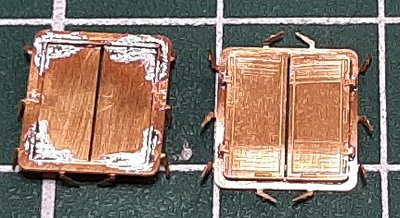
Time for a little update. I drilled out the porthols and glued the messing parts. Then I soldered the doors from the back and glued them with PVA-glue to the bridges (single doors to the front bridge and double doors to the aft bridge). Until next update, enjoy modelling.
- 87 replies
-
- Mikasa
- Merit International
-
(and 1 more)
Tagged with:
-
Fore bridge: I tried soldering the parts shown in the bottom left corner of the previous picture. The brackets on part 138 went OK. The handrail to part 139 however did not want to stick. I had to clamp down this piece as it was bent due to the etching process. The contact points were so small and the heat could not be applied in such a way that the very small amount of soldering paste woul melt. So i glued the handrails with PVA-glue. The rails to the sides of the bridge I glued too, in order not to mix them up (error in Pontos instructions, numbers are switched). This was not a good Idea. The handrails are easily knocked off when handeling the part. More about that in a future update. Till next update, enjoy modelling.
- 87 replies
-
- Mikasa
- Merit International
-
(and 1 more)
Tagged with:
-
Fore and aft bridge: I started removing all details that will be replaced by Pontos parts. I also filled some portholes that turned out oblong due to the casting techniques used. Till next update, enjoy modelling.
- 87 replies
-
- Mikasa
- Merit International
-
(and 1 more)
Tagged with:
-
Steps 20/21: boat decks. I removed the protruding datails of the Merit parts as I did ont the main deck. Then I soldered rigging brachets and boat supports to the baseplates, and finaly used 5 minutes epoxy to glue the brass plates to the plastic base. After curing, I cut the excess glue off. Till next update, enjoy modelling.
- 87 replies
-
- Mikasa
- Merit International
-
(and 1 more)
Tagged with:
-
Browsing through the manuals I came across the following part for the midsection of the main deck. Pontos parts 29, 352 and 2x 353 are soldered together with a little soldering paste and heat applied from the back. Till next update, enjoy modelling.
- 87 replies
-
- Mikasa
- Merit International
-
(and 1 more)
Tagged with:
-
- 87 replies
-
- Mikasa
- Merit International
-
(and 1 more)
Tagged with:
-
The Pontos handholds were glued in with PVA-glue nd the Pontos shutters for the 4 rounded casemates were bent, soldered and glued with SloZap. Till next update, enjoy modelling.
- 87 replies
-
- Mikasa
- Merit International
-
(and 1 more)
Tagged with:
-
I allmost forgot to put Pontos part 364 to the front of part B8. The handholds were removed from the casemate sides , Pontos templates applied, and 0,4 mm holes drilled usong the Tamiya electric handy drill. Till next update, enjoy modelling.
- 87 replies
-
- Mikasa
- Merit International
-
(and 1 more)
Tagged with:
-
So here come the 2 Pontos reels for the middle deck. I then collected and cleaned up the midship bulckheads for step 16. and finished the day by preparing the casemate sides by filling the recesses for the hinges of the shutters wirt Vallejo putty, leaving them to dry overnight. Till next update, enjoy modelling.
- 87 replies
-
- Mikasa
- Merit International
-
(and 1 more)
Tagged with:
-
Step 15: deckfurniture of the middle deck. All Merit parts are replaced by Pontos Photo-etch, bent and soldered together. Only the reels remain to be assembled Till next update, enjoy modelling.
- 87 replies
-
- Mikasa
- Merit International
-
(and 1 more)
Tagged with:
-
I assembled the ventilation shafts from step 14 and jumped to steps 24/25 to finish theremaining ventilation shafts. Those are mounted on the fore funnel base. To finish off step 24 I cleaned the cutters, added the rudders and glued the supports on the cover of the largest cutter. I also replaced part G39 by the Pontos equivalent and glued it together with part G44 on the funnel base, but forgot to take a picture. No doubt it will be seen in future updates. Till next update, enjoy modelling.
- 87 replies
-
- Mikasa
- Merit International
-
(and 1 more)
Tagged with:
-
Merit Step 13: The bottom parts of the ventilationshafts have been glued together with Tamiya Extra Thin cement. I cleaned up the seams of these parts, scraping with an X-Acto knife, using needle files and medium and fine sandingsticks. According to my humble opinion, a maximum of 10 of the 14 ventilation shafts have "trumpet like" openings. The other four have a ring with crossed half round ribs. According to contemporary pictures that have been coloured, the "trumpet like" tops have red louvres. Although those "trumpet like" tops are present in the Merit kit, they are nowhere mentioned in the manual, and the gratings that are supposed to represent louvres have diagonal holes and bands. In the Pontosset there are round gratings with exactly the right diameter. But these are for the searchlights. However, this gave me an idee. Previously I built the Trumpeter 1/200 Bismarck, with a lot of functions. In this kit there are 8 gratings for 7 searchlights. Those happen to have the same diameter. And I also have a second Bislmarck kit, that I intend to upgrade with a Pontos detailing set to make a very detailed display model. Therefore I have an extra grating. The Pontosset for the Bismarck also contains 8 gratings but those are fully closed. In case I want to install LED's in the searchlights, as I did in the first model, those gratings are not usable, and thus available for Mikasa, giving a perfect illusion of clased louvres. The half round ribs have been glued woth a dash of Pink Zap, and attached to the round tops with PVA-glue. Excess glue is easily removed with a damp brush. Till next update, enjoy modelling.
- 87 replies
-
- Mikasa
- Merit International
-
(and 1 more)
Tagged with:
-
I assembled and soldered all Pontos parts to replace the plastic parts of step 11. Till next update, enjoy modelling.
- 87 replies
-
- Mikasa
- Merit International
-
(and 1 more)
Tagged with:
-
Steps 11 and 12, all brass parts glued on ant the slots for the boat supports filled with Vallejo Plastic Putty. Ready for paint. Till next update, enjoy modelling.
- 87 replies
-
- Mikasa
- Merit International
-
(and 1 more)
Tagged with:
-
Now that a considerable number of parts have been detached and collecte into numbered boxes, it's time to start assembly. Merit step 11: cleaned up the plastic parts with file and fine sanding stick. Part B9: drilled out the 6 holes in the sides and chamfered from the underside. I removed the centerpart drilling holes, one next to the other and straightened the edges is with a knife I bent and soldered the Postos boat supports and glued them on part B9 with SloZap. Till next update, enjoy modelling.
- 87 replies
-
- Mikasa
- Merit International
-
(and 1 more)
Tagged with:
-
Next I collected the Merit parts and Pontos wooden parts for steps 30 to 35 (front and rear bridge), 40 (main guns) an 43 and 44 (funnels). Till next update, enjoy modelling.
- 87 replies
-
- Mikasa
- Merit International
-
(and 1 more)
Tagged with:
About us
Modelshipworld - Advancing Ship Modeling through Research
SSL Secured
Your security is important for us so this Website is SSL-Secured
NRG Mailing Address
Nautical Research Guild
237 South Lincoln Street
Westmont IL, 60559-1917
Model Ship World ® and the MSW logo are Registered Trademarks, and belong to the Nautical Research Guild (United States Patent and Trademark Office: No. 6,929,264 & No. 6,929,274, registered Dec. 20, 2022)
Helpful Links
About the NRG
If you enjoy building ship models that are historically accurate as well as beautiful, then The Nautical Research Guild (NRG) is just right for you.
The Guild is a non-profit educational organization whose mission is to “Advance Ship Modeling Through Research”. We provide support to our members in their efforts to raise the quality of their model ships.
The Nautical Research Guild has published our world-renowned quarterly magazine, The Nautical Research Journal, since 1955. The pages of the Journal are full of articles by accomplished ship modelers who show you how they create those exquisite details on their models, and by maritime historians who show you the correct details to build. The Journal is available in both print and digital editions. Go to the NRG web site (www.thenrg.org) to download a complimentary digital copy of the Journal. The NRG also publishes plan sets, books and compilations of back issues of the Journal and the former Ships in Scale and Model Ship Builder magazines.


