HOLIDAY DONATION DRIVE - SUPPORT MSW - DO YOUR PART TO KEEP THIS GREAT FORUM GOING! (Only 24 donations so far out of 49,000 members - C'mon guys!)
×

kgstakes
-
Posts
400 -
Joined
-
Last visited
Content Type
Profiles
Forums
Gallery
Events
Everything posted by kgstakes
-
I guess I should have rephrased what I was asking. I need a blade that is 1/32 thick. Maybe you understood and I’m not understanding exactly what you’re saying 🤷🤷
-
kurtvd19, If I'm understanding this correctly, I could buy slitting blades and use them as a "dado set"? That would be nice, I do some ship building, honestly I'm building my first one now Mississippi Riverboat by Occre. But I also do miniature furniture and try to do the same joinery as I would do for full size pieces. Tell me more about these slitting blades or send me someplace and see what they do. Thank you for all your help.
-
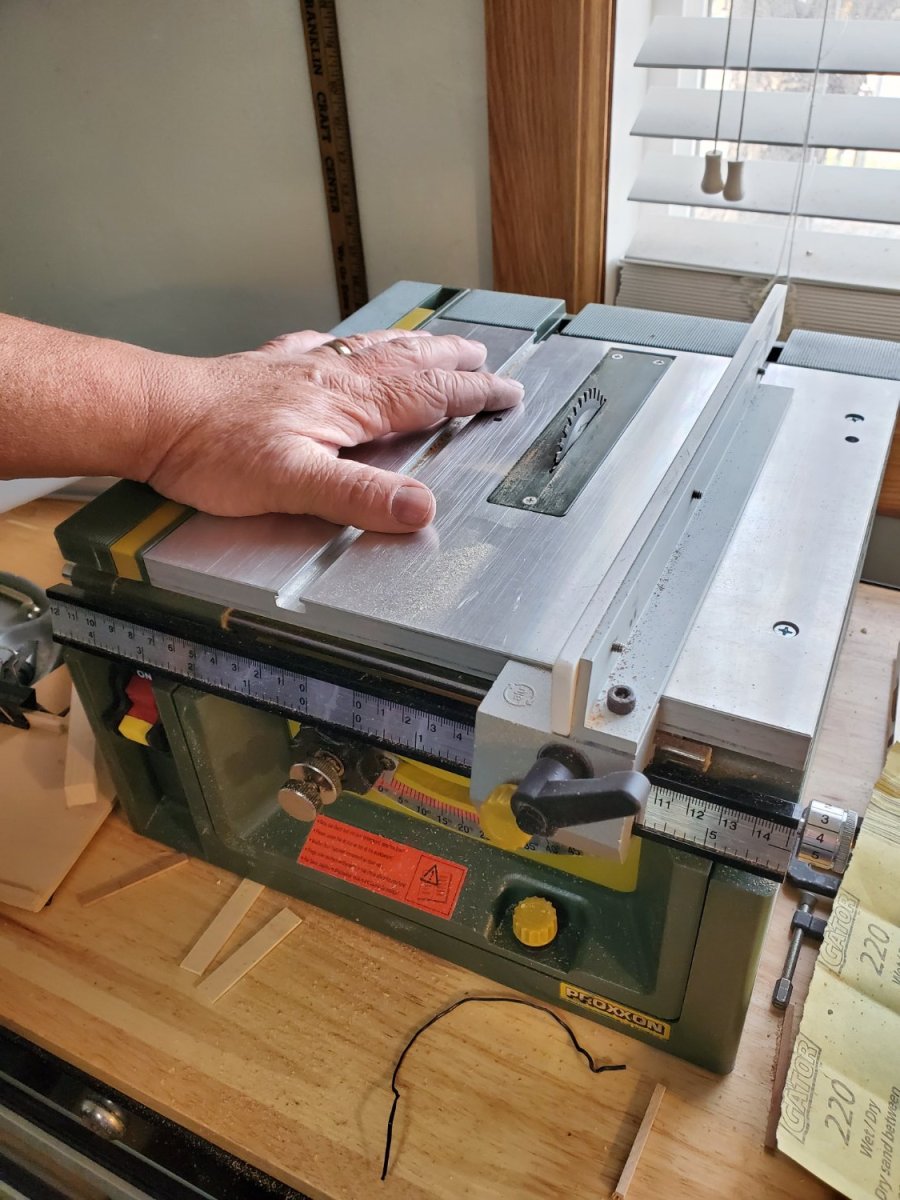
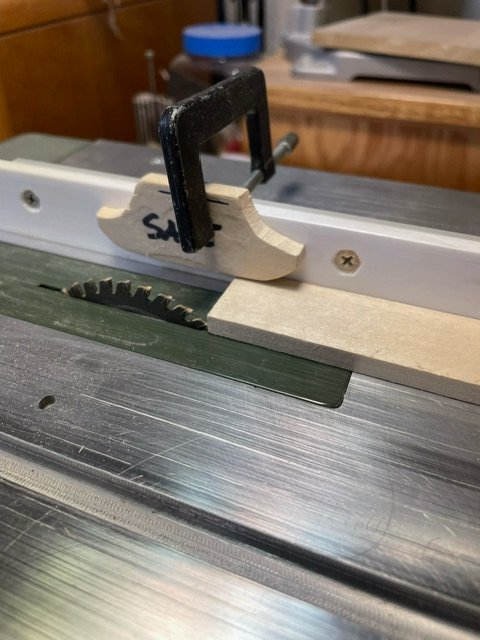
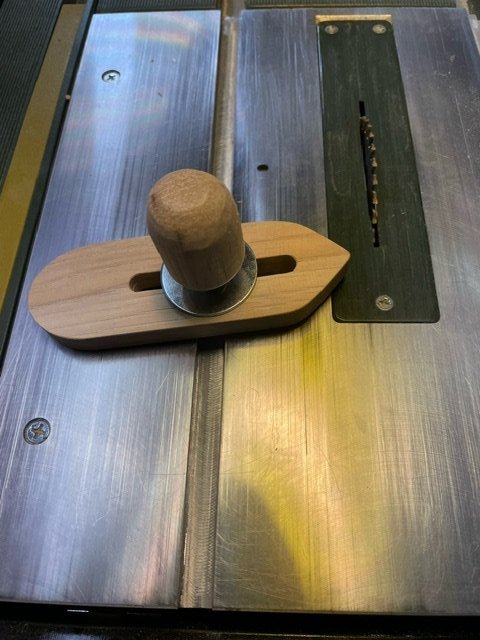
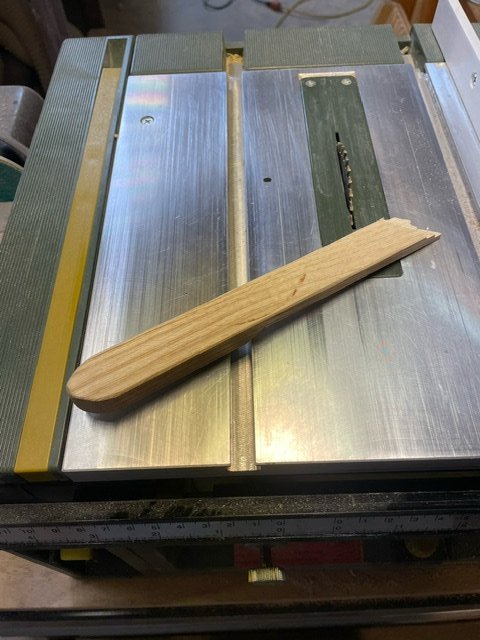
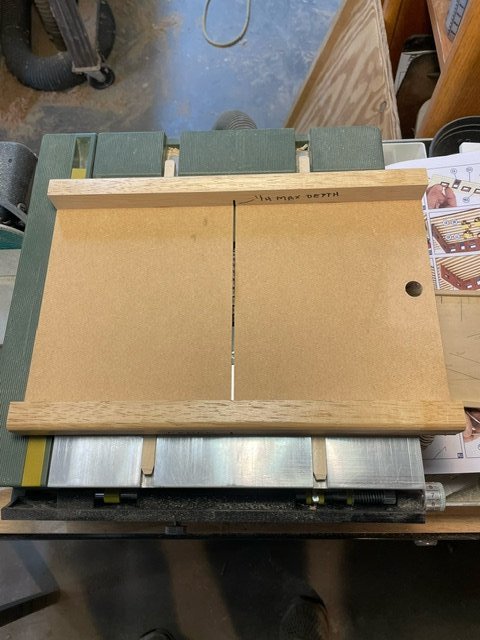
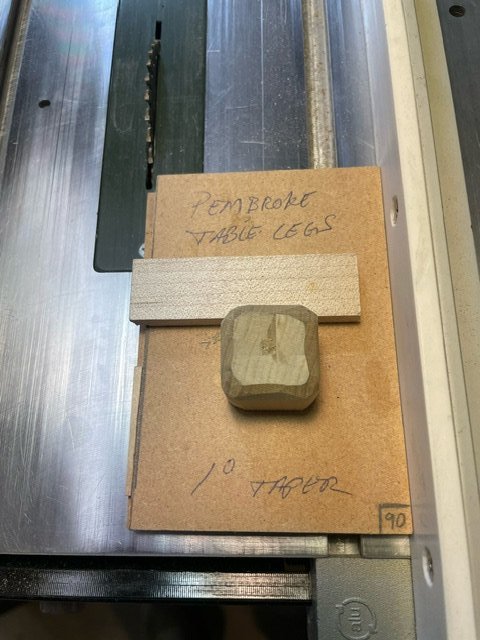
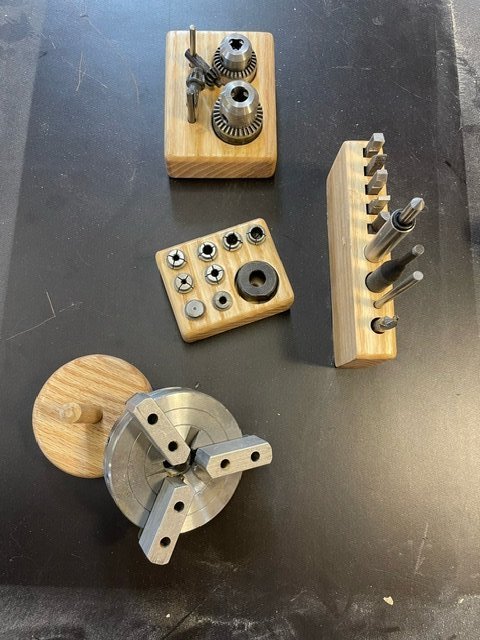
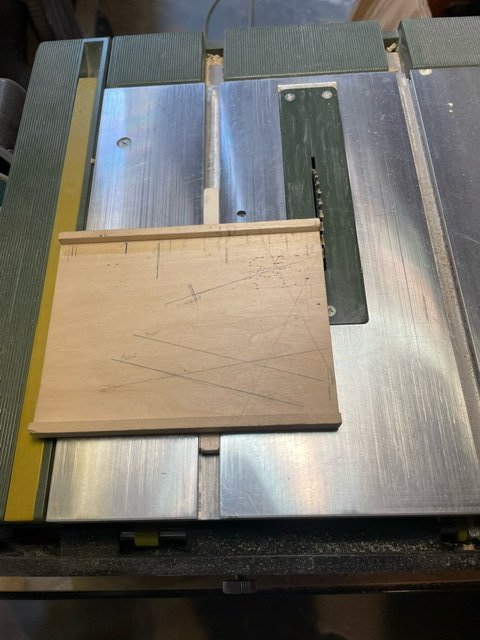
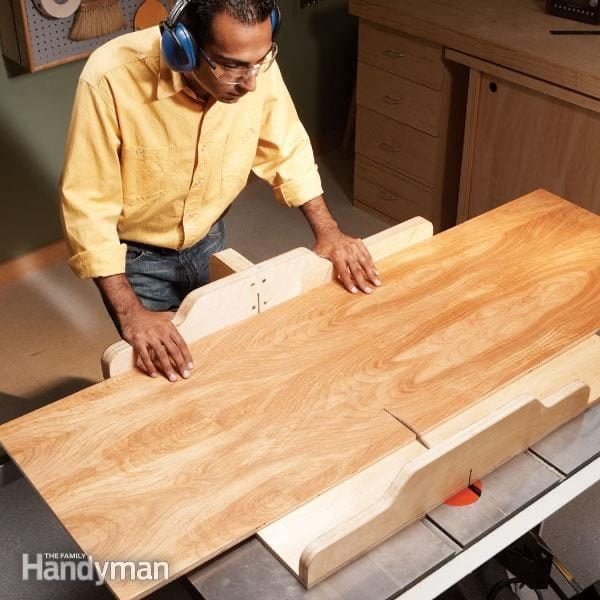
I've made many "jigs" or "accessories" for my large table saw over the years and now that I have a modeling table saw I've duplicated many of the things I've done with my big table saw. Shown below are some of the "jigs and/or accessories" I've built for the model table saw. Like to see what everyone has done to make a job easier or more importantly safer. I use a piece of basswood as a sacrificial fence when cutting a groove on the edge of a board. Example shown next This is the side of a 1/12th scale dresser and the edge dado or groove was done with the sacrificial fence for no damage would happen to the actual fence. I use this jig to help hold small pieces down against the table when sawing. Use this to cut thin strips of wood. Everyone needs some sort of a push stick. Getting to the point have to redo the end again. My table saw sled. Use this a lot for cutting stock down to length or I use a stop block for multiple cuts. This one I use for making box joints for boxes or drawer construction. Finger board to keep stock up against fence. This jig I made to cut a taper on a table I was building. 1 degree taper. My first sled I built for the table saw and with this one I really use for multiple cuts. I use a stop block on this mostly. You can also do angle cuts by mounting a scrap block at the angle and then cut you piece. Then lastly, has nothing to do with the table saw just added here to show a storage idea for different accessories for your tools. These are for my Taig lathe but I've made others (similar to the 3 jaw chuck for holding table saw blades. What do you have for jigs, accessories, or tool storage ideas??


-
- 9
-

-
Keith, Work with what you have and hey, if it works and does the job you need, who cares what you use. Only thing anyone on here needs to do is be proud of the work they've done and that's it. Did you set up a jig to hold the drill? Got a picture of your set up?
-
That's good to know about the duplicator, I've been looking at them and wondering how good they do. I was thinking turning legs for tables, chairs, etc.
-
 Chuck, I just want to say one thing, I'm amazed at what you do. I can "see" all the work you put into this project. Great job. I just drop my jaw with amazement with what you do and what everyone does on here.
 -
What type of work do you all do on a lathe? I've heard some to masts, but what else have you made? Can you post pictures of what you've made so everyone can see? I'm working on building a base with a couple drawers for my Taig lathe but will get to turning a few things in the near future. Also, any fixtures you have made for your lathe would be cool to see too.
-
I see a discussion about where to get them was on here but I have another question. I know this is a ship building forum but I also build miniature furniture and was wondering what is the thinnest (I guess that's spelled right) blade you can get for a table saw? Reason I'm asking is I would like to make dadoes for drawers and use 1/32" (.79mm ??) thick material. I realize deflection and heat build up is an issue with thin blades but are they available that thin? Oh, and you all are using slitting blades for cutting, may I ask why? Are they thicker than a "normal" blade that you would use and more stable?
-
I found the table saw I was talking about earlier. I don't know anything about this guy but the saw looks like a beast. Problem I see with it is that it would probably cost so much to mass produce that it probably never came to market. Does anyone have this machine?
-
Jaagar, All I can say is the Proxxon works for the work I want to do with it. It will cut 3/4" thick oak (crosscut). I have no need to rip any thing thicker than 1/4" thick. I have a 10" tablesaw that I can take larger boards and cut it down close to the sizes I need and then use the proxxon for cutting pieces for modeling. I have other tools to do the hard work of milling large stock down for modeling. Tablesaw, Bandsaw, Sanders, Planers, etc. so I don't need to put the wear and tear on a much smaller motor than is necessary. I want to keep all my machines running for a very long time with out undo stress on small motors that can't handle that type of work day in day out. Yes, Brynes saw has a larger motor than the Proxxon, but why do work on a small machine that is basically max it out when you could purchase even a cheap full size tablesaw to do the heavy work for you. Again, I get great results, and I'm not here to say which is best, I was just comparing both machines, As you all probably did before you made a purchase. Micro Mark tablesaw may be a clone, the I highly doubt you can put the Proxxon in the same class as the Micro Mark. A lot of Miniature Machines that are copied. But none are as good as the original. a few years back I seen a table saw that way way higher grade than any other miniature saw. If I can find it I will post it and see if anyone has any information on it and or have used it. Thanks again for everyone's input about the two saws and their problems, their successes. Great to hear different opinions on the saws. LOL we all definitely proud of what we all have, no doubt.
-
I don't know what the older Proxxon tablesaws had for a "clamping devise" for the fence but as of a few years ago this is the way they have it now and it keeps the fence in line. You tighten the small knob and then tighten the larger one and seems to keep it straight and parallel. On the right side of the scale, there is a knob that you can turn to micro adjust the fence. Which helps in getting a very fine cut. What ever you own, use it, enjoy it, and happy building everyone !!!

-
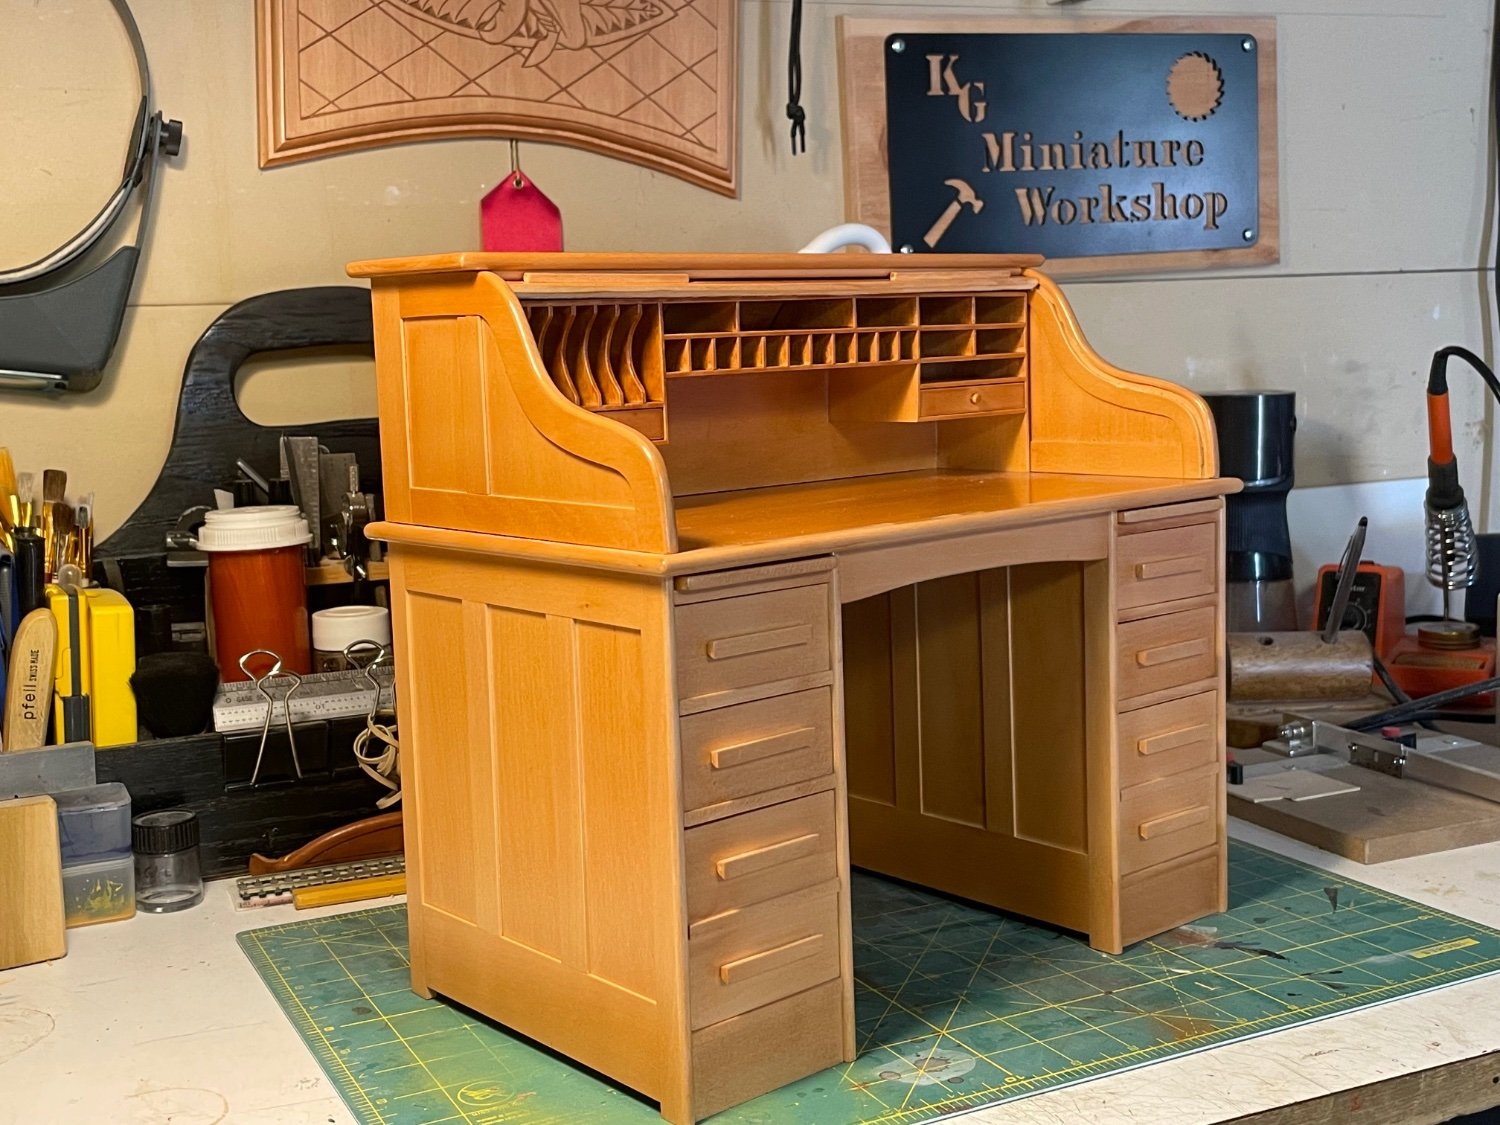
One last thing about these saws (I think we’ve gone off course slightly a few times). Both saws are good for model making. One may be better than the other. I’ve had great success with the proxxon (my scale roll top desk was built entirely with the proxxon table saw (see picture). All with mortise and tenon joinery. If you like the Byrnes saw great, if you like the Proxxon saw great. I just picked the best one for my needs. Y’all picked the best one for your needs. If you know how to use the saw you purchased and can great results, that’s really all that matters. Who really cares what machine you have, heck you may have a home made saw that you get great results from and that’s great. i just started this thread to see what others have seen or compared these two saws like I did before chosing one to purchase. I think we’ve beat this dead horse enough let’s start something new or start a new title and continue with the “accessories” that we all have for the table saws. That would be nice to see and share with each other. (If it hasn’t already).

- 56 replies
-
- 11
-
-

-
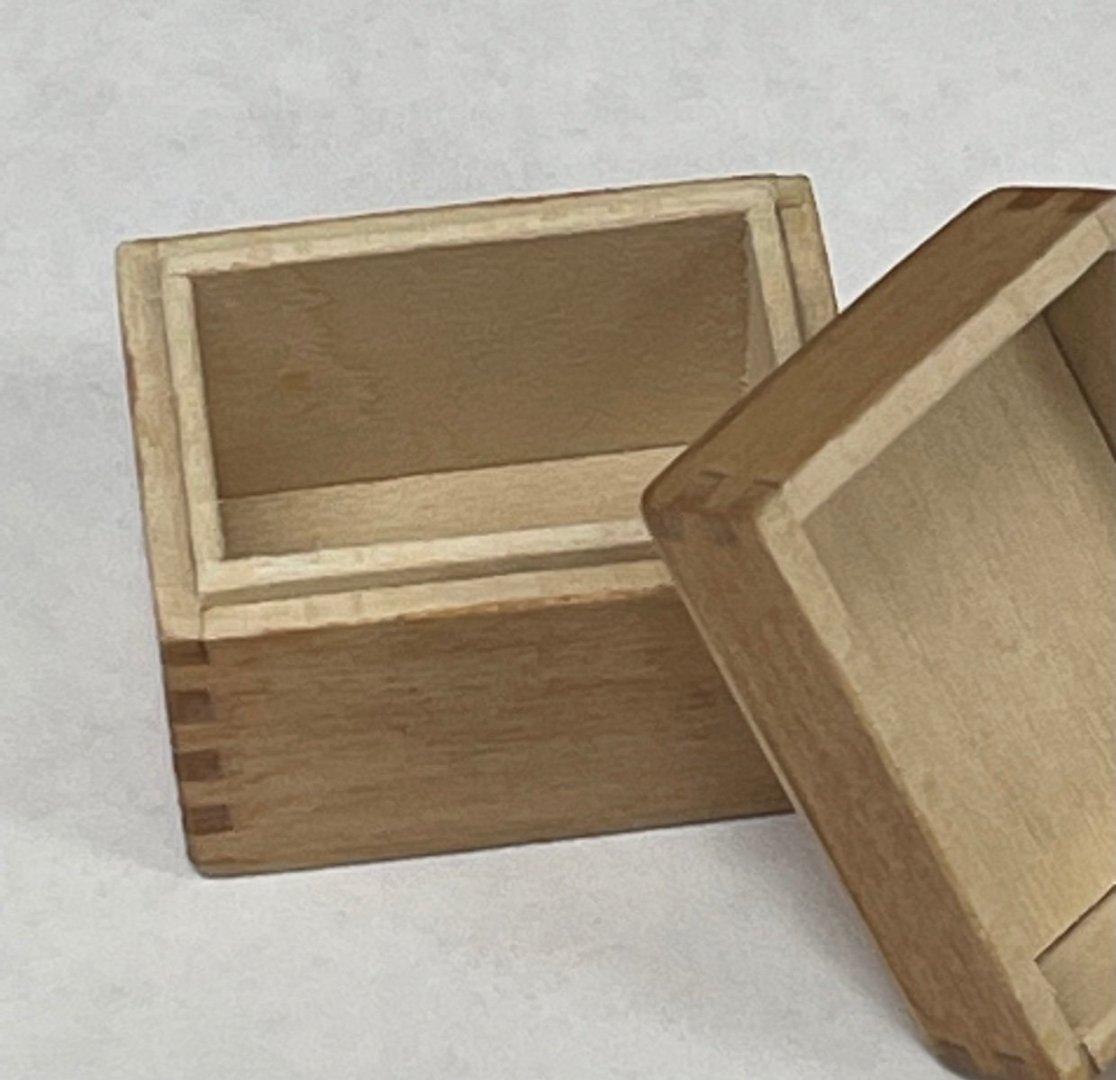
You say it’s not a true parallel, I beg to differ. Unless you’re looking for something down to the thousandths on an inch, you’re probably right. But explain to me how I can get these cuts (inside pieces) to fit if things are not parallel on a proxxon saw?? oh and this is the size of the box

-
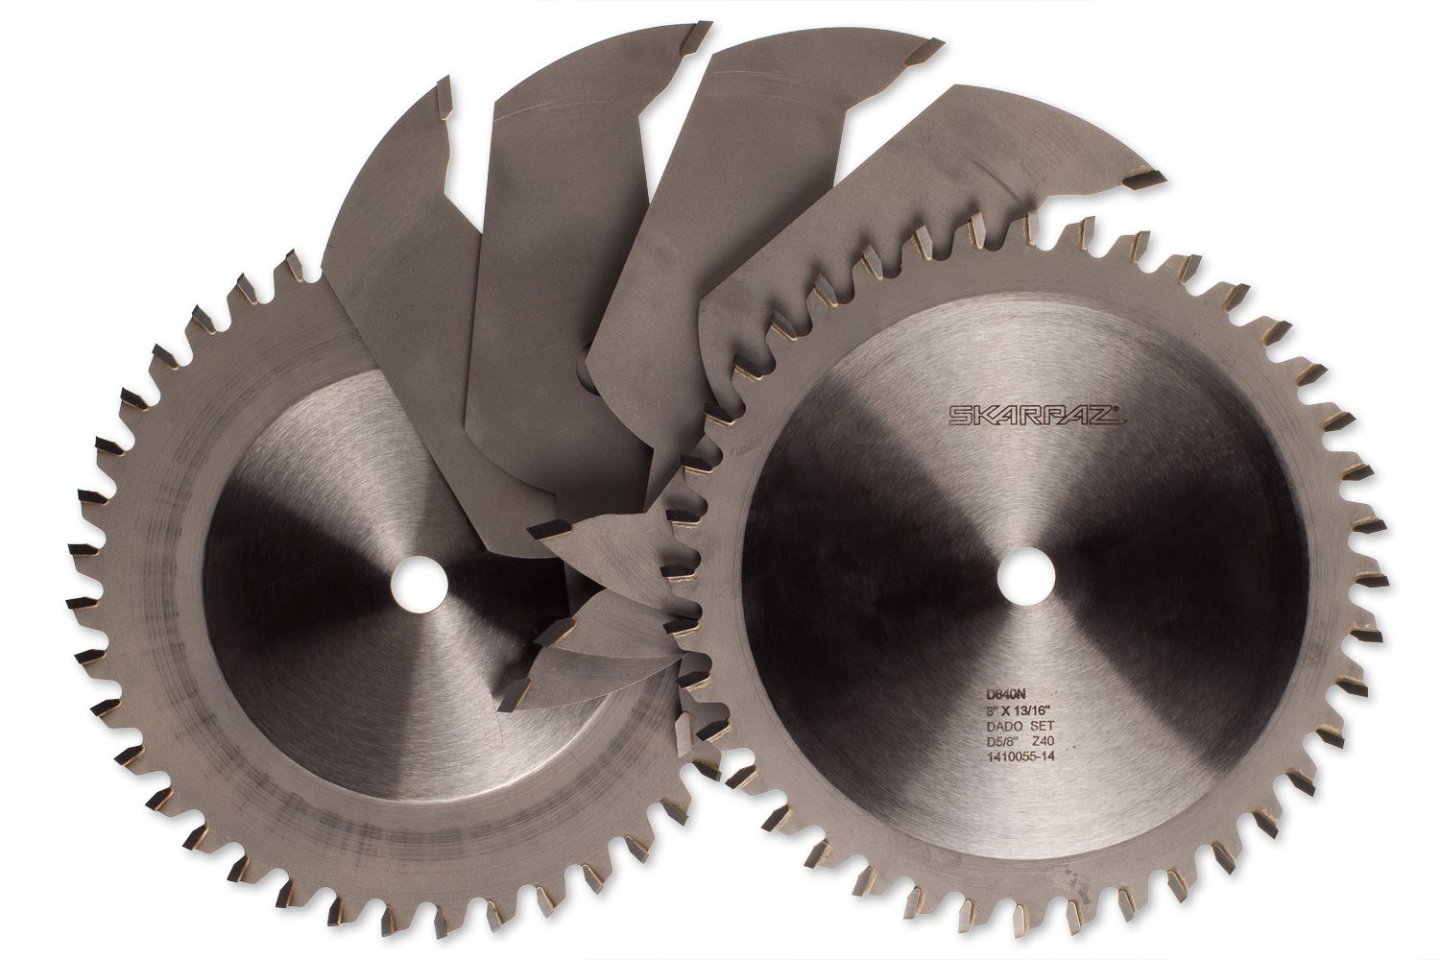
Someone mentioned that a stack dado set is a smaller diameter, this is not true. If you have a 10” table saw (takes 10” blades) you can get 10” stack dado set for it. The reason you don’t see them much is you don’t need that big a blade to make the dado. My table saw table takes 10” blades but I decided to purchase an 8” set. But the 10” sets and even 12” sets are out there mostly for commercial use but you can find them. Diameter:10", Tooth:40T,Kerf:0.812''
-
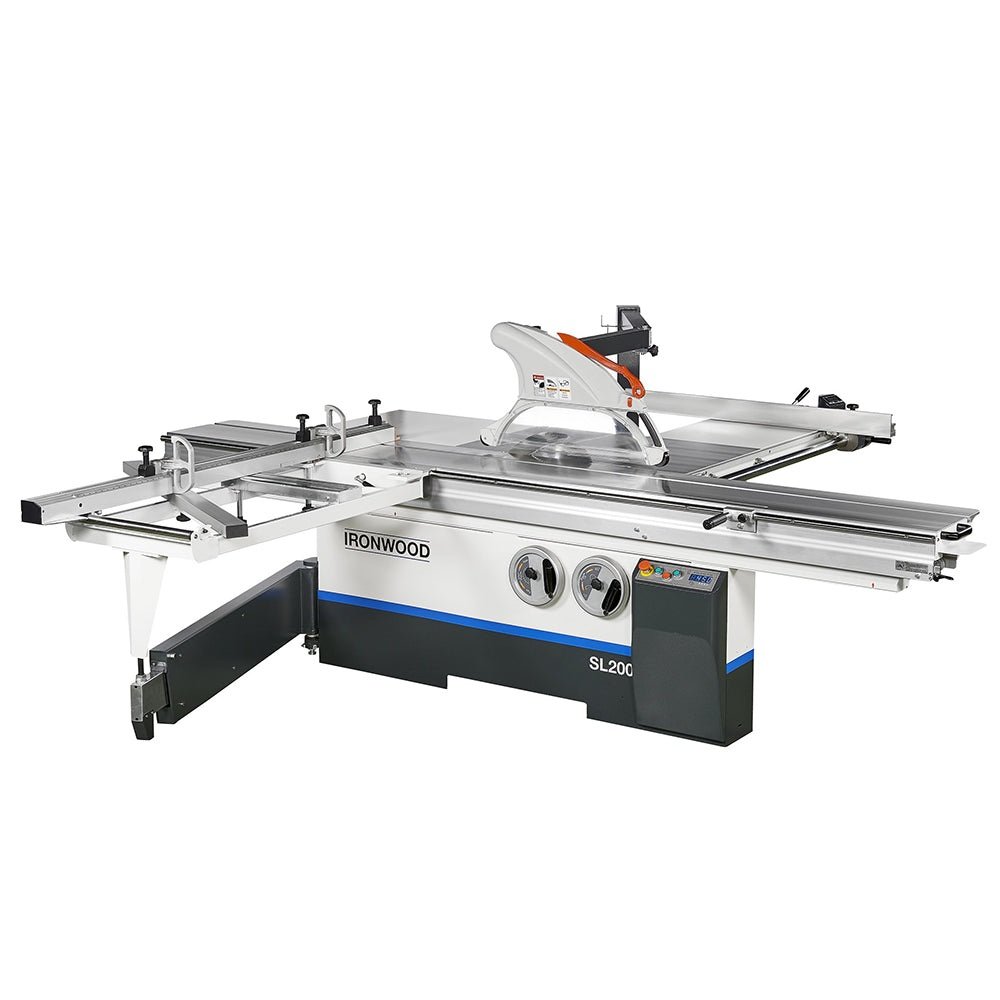
We’ve all been using the words sliding table on a table saw and a sled for the table saw. example of a true sliding table saw This is a true sled on a table saw hope this shows the difference. I use the names interchangeably but shouldn’t. Sorry for any confusion on my part. Wish I had that sliding table saw in my shop!!😀😀
-
I’ll also add something here about tear out on “lumber” . If you know you need a piece say 2” wide by 4” long. Instead of ripping the piece to width first do this. Cross cut to 4” long then rip to 2” wide. The side that has the tear out, rip that part off. Now you have a board that is cut to size and no tear out. When I said 2”x4” I’m assuming you’re cutting on your mini table saw. But actual size 2x4 not scale. If scale 2”x4” use a chopper or slicer by ultamation.😀😀
-
When dado blades are used (stack blades) you get a more even square dado to the face of the wood. With a wobble blade dado it’s not a true square cut with the surface of the wood. I wish I had my wobble blade for my big table saw so I could show you what I mean but for miniatures, micro mark’s wobble blade would be so small that you probably wouldn’t notice any gap in the joint. The name of the blade “wobble” is misleading. Everything is tight on the arbor. What you are doing is adjusting the “tilt” of the blade on the arbor. The arbor is still at a 90 degrees to the table it’s just the blade is tilted with the washers. The washers have an angle on them for the amount of the dado you want to make. Hope I explained that correctly for everyone.
-
Tear out to me is one of two things. Lack of support at the end of a cut. or not fine enough blade to make the cross cut. Take a router for instance, there is are two ways you can route the end grain of a board. 1) use a back up the piece with a scrap board so no tear out. 2) route end grain first then route the sides (with grain) last. In routing I always start on the end grain then with the grain then other end grain and finish with the grain. In doing this as you route around your board you are cutting out any tear out from the previous cut. With a table saw cutting end grain or cross grain, (take plywood for instance) you want to cut with a fine blade to get you the best cut. Same goes for lumber, either slow way down to minimize tear it out cross cut with a fine blade. (Even then slow down towards the end of the cut). Hope that clears up some questions about tear out on wood.
-
stack dado sets were available for full size saws the wobble dado was the only blade to use if you wanted dadoes for cabinet making. Only the high end shops were using stack dadoes and they were out of most people’s and companies price range at the time years back. The wobble blade works fine but you will not get a square dado cut by using it. Haven’t had the need for one but I did see that micro mark had them for sale. As for the blade, I was thinking it was the washers that made the blade wobble so just swap out the blade to the one you like to use.
-
Pulled the Trigger == Lathe coming
kgstakes replied to kgstakes's topic in Modeling tools and Workshop Equipment
Just messing with it seeing actually how small a piece I can do. Dam good to me anyway.
- 49 replies
-
- 11
-
-
Pulled the Trigger == Lathe coming
kgstakes replied to kgstakes's topic in Modeling tools and Workshop Equipment
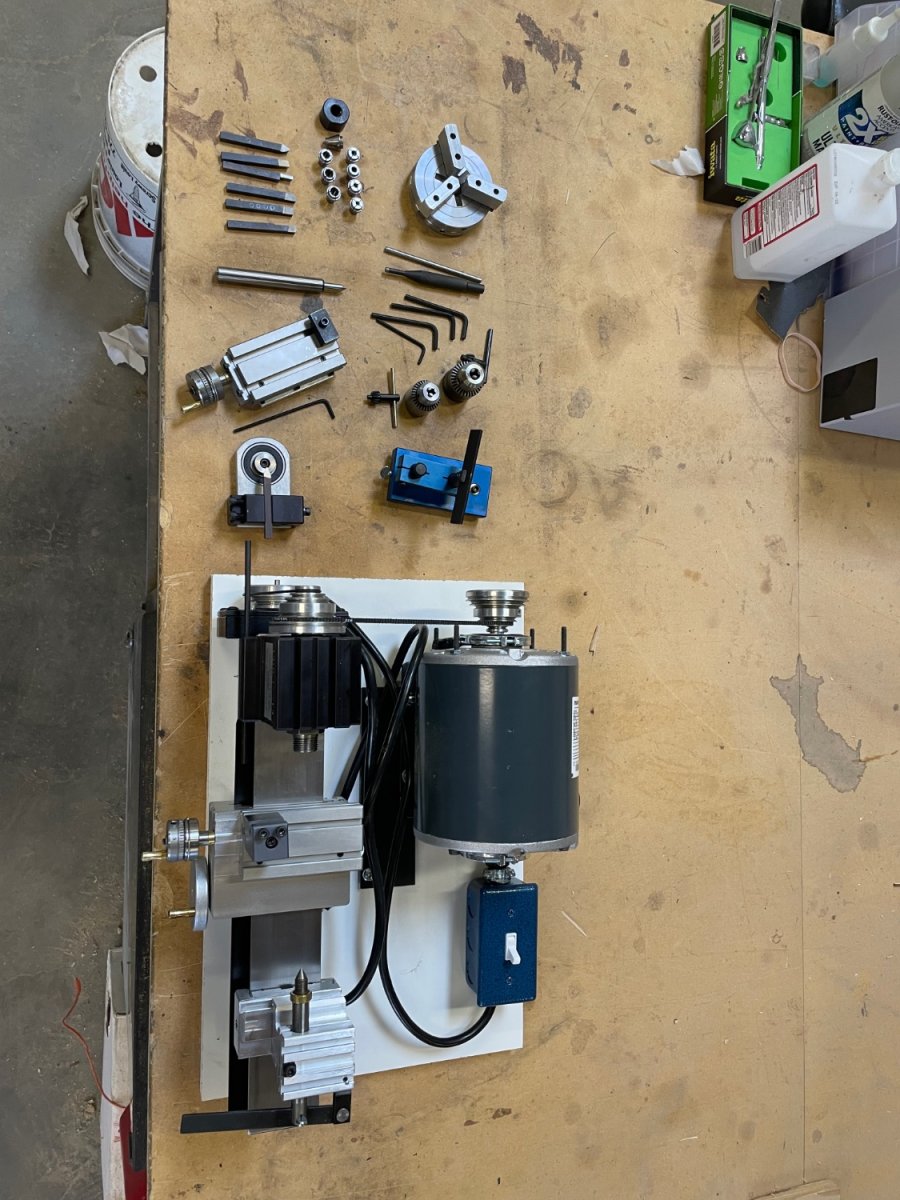
Here’s a picture of everything I purchased with my Taig lathe
-
My only complaint about the Byrnes saw is that the blade did not tilt. Saw looks really really good for all kinds of cuts and the price is worth it but I just wanted the option to have the blade tilt rather than have a optional table tilt. I’m sure with a fixed blade you can get really accurate cuts that’s just the decision I made by going with proxxon. i think both saws will do the job well just depends on what you want out need.
-
What I use mine for is basically any time I’m cutting small parts, I use the sled (sliding table). The miter gauge is good for some stuff but if I want an accurate 90 degree cut I use the sled. Or if I want to do a miter cut on a small part and don’t want it to go flying across the room or drop on the floor (where you can’t find anything). I use the sled or I call it a sliding table. If you build one, take your time and make real sure the fence that you are going to be using on the sliding table (or sled sometimes called) is perfectly square with the blade. And the runners that go in the miter slots are perfectly parallel with the blade. And the runners are square with the fence on the sliding table. If you do that it will serve you well for many years. I drilled a hole in mine to hang on the wall next to the table saw so it’s out of any harms way when not in use. One last thing I want to point out that I didn’t in the video. When you cut the slot in the sliding table, use only that blade when using it. That way you have a zero clearance and nothing will drop in to the blade area.
-
Pulled the Trigger == Lathe coming
kgstakes replied to kgstakes's topic in Modeling tools and Workshop Equipment
Well, after a snow storm and delays my lathe is here!! All assembled and gave it a spin just to make sure everything worked correctly and made sure all belts were aligned. Here is a picture of the Taig lathe. I also bought the powerfeed, jacobs chuck (next size up 3/8 capacity) live center, 3 jaw chuck, collects and holder thingy, LOL don't know what it's called. Anyway and then also purchased the tool rest (wood turning), extra belts, radius tool, compound top slide, I think that was it. This weekend I'll put everything out and post another picture. May even turn something this weekend. I do want to build a base for it with drawers for all the attachments and I need to put the on/off switch someplace more handy. That's really my first project (after I mess with it a bit).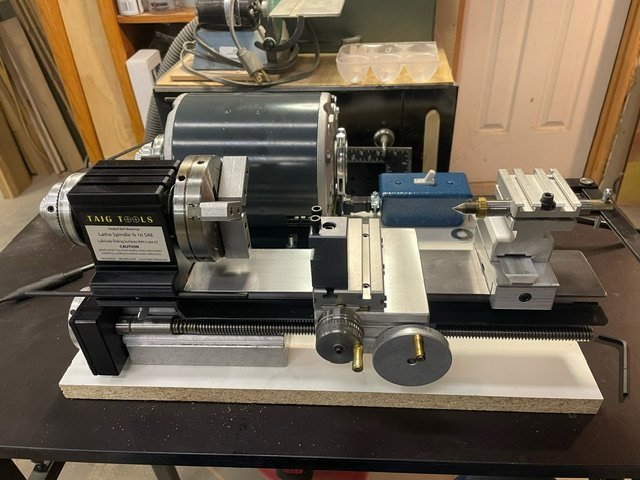
-
I sent it to my computer, lets try this again Table saw sled.mov