bbrennan737
-
Posts
11 -
Joined
-
Last visited
Recent Profile Visitors
347 profile views


-
 James G reacted to a post in a topic:
Skiff by bbrennan737 - Model Shipways/Midwest Products - 1:12
James G reacted to a post in a topic:
Skiff by bbrennan737 - Model Shipways/Midwest Products - 1:12
-
James G reacted to a post in a topic:
Skiff by bbrennan737 - Model Shipways/Midwest Products - 1:12
-
ccoyle reacted to a post in a topic:
Skiff by bbrennan737 - Model Shipways/Midwest Products - 1:12
-
yvesvidal reacted to a post in a topic:
Skiff by bbrennan737 - Model Shipways/Midwest Products - 1:12
-
yvesvidal reacted to a post in a topic:
Skiff by bbrennan737 - Model Shipways/Midwest Products - 1:12
-
bbrennan737 reacted to a post in a topic:
USS Kearsarge by gak1965 - BlueJacket Shipcrafters - 1:96
-
bbrennan737 reacted to a post in a topic:
Lowell Grand Banks Dory by CAlanR - Model Shipways - 1:24
-
bbrennan737 reacted to a post in a topic:
Lowell Grand Banks Dory by CAlanR - Model Shipways - 1:24
-
JacquesCousteau reacted to a post in a topic:
Skiff by bbrennan737 - Model Shipways/Midwest Products - 1:12
-
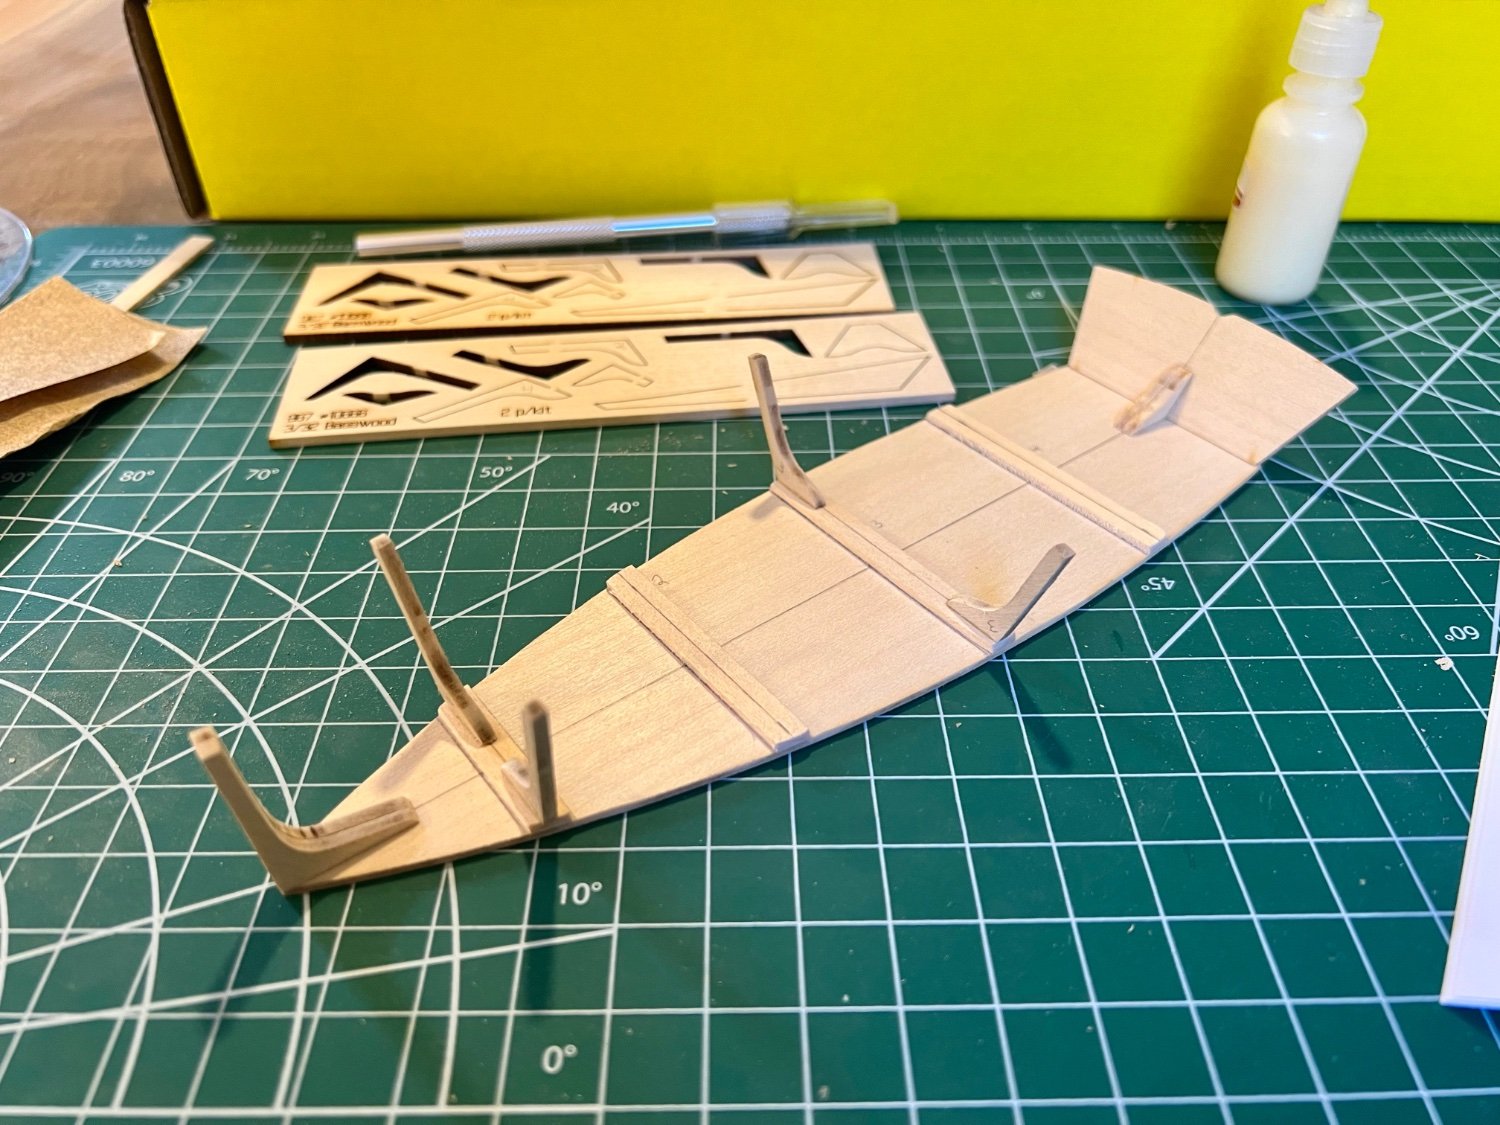
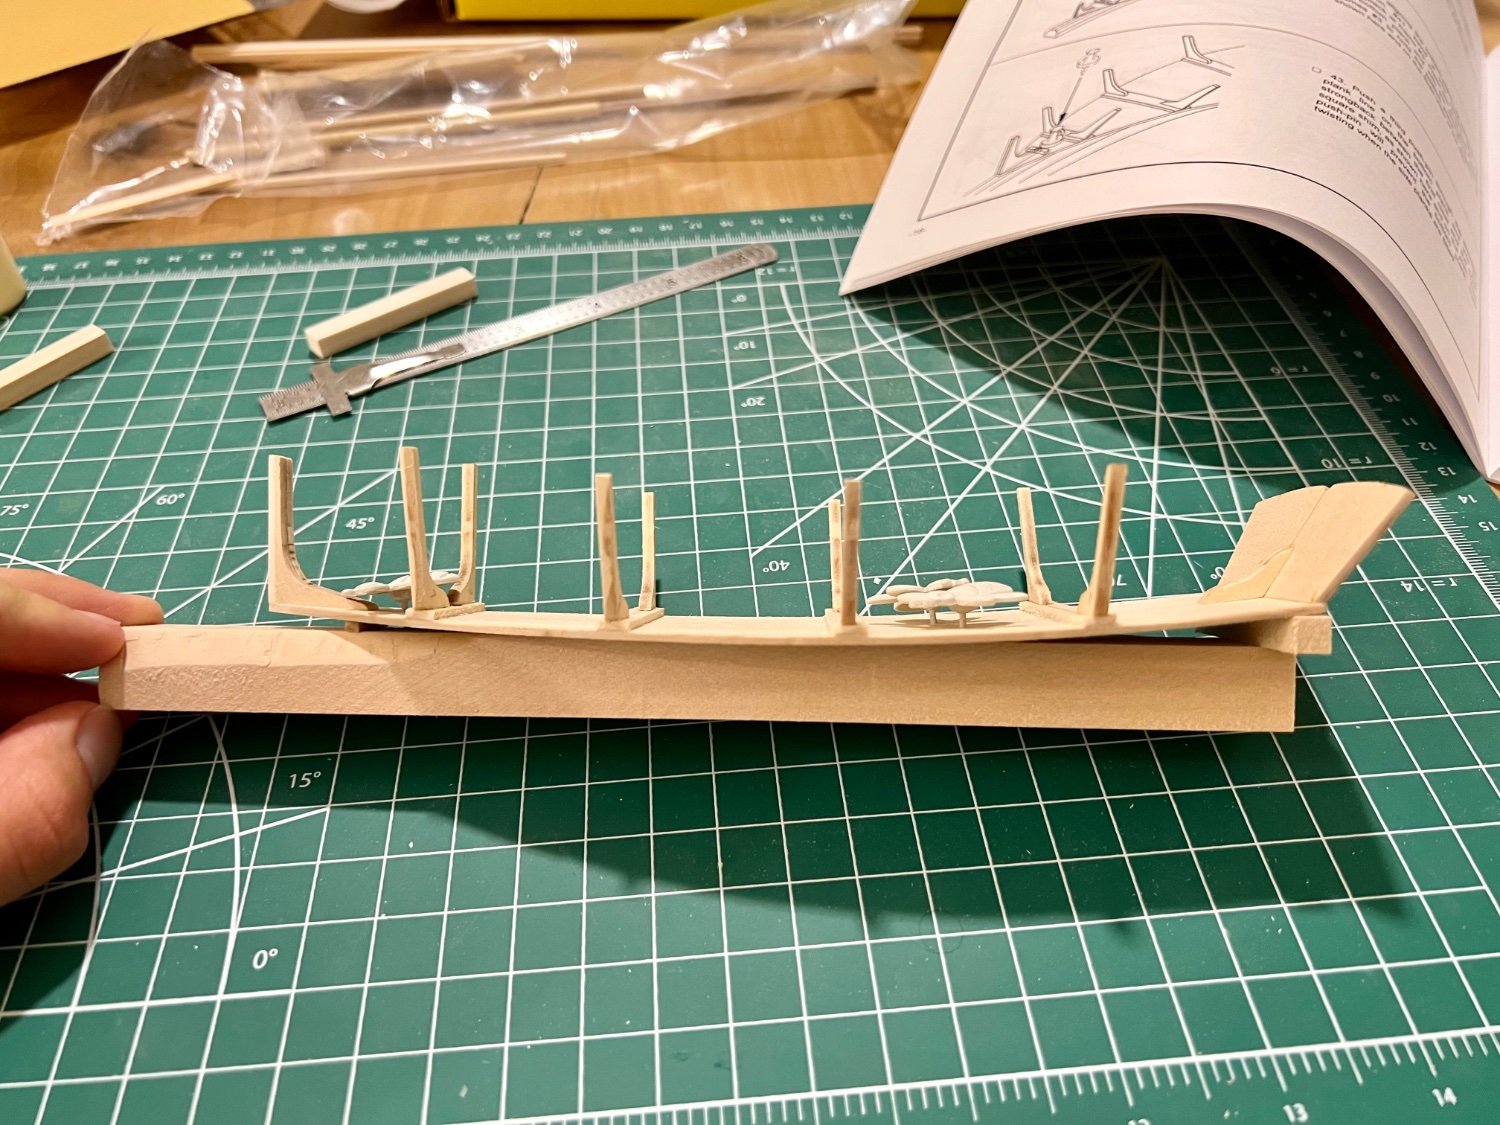
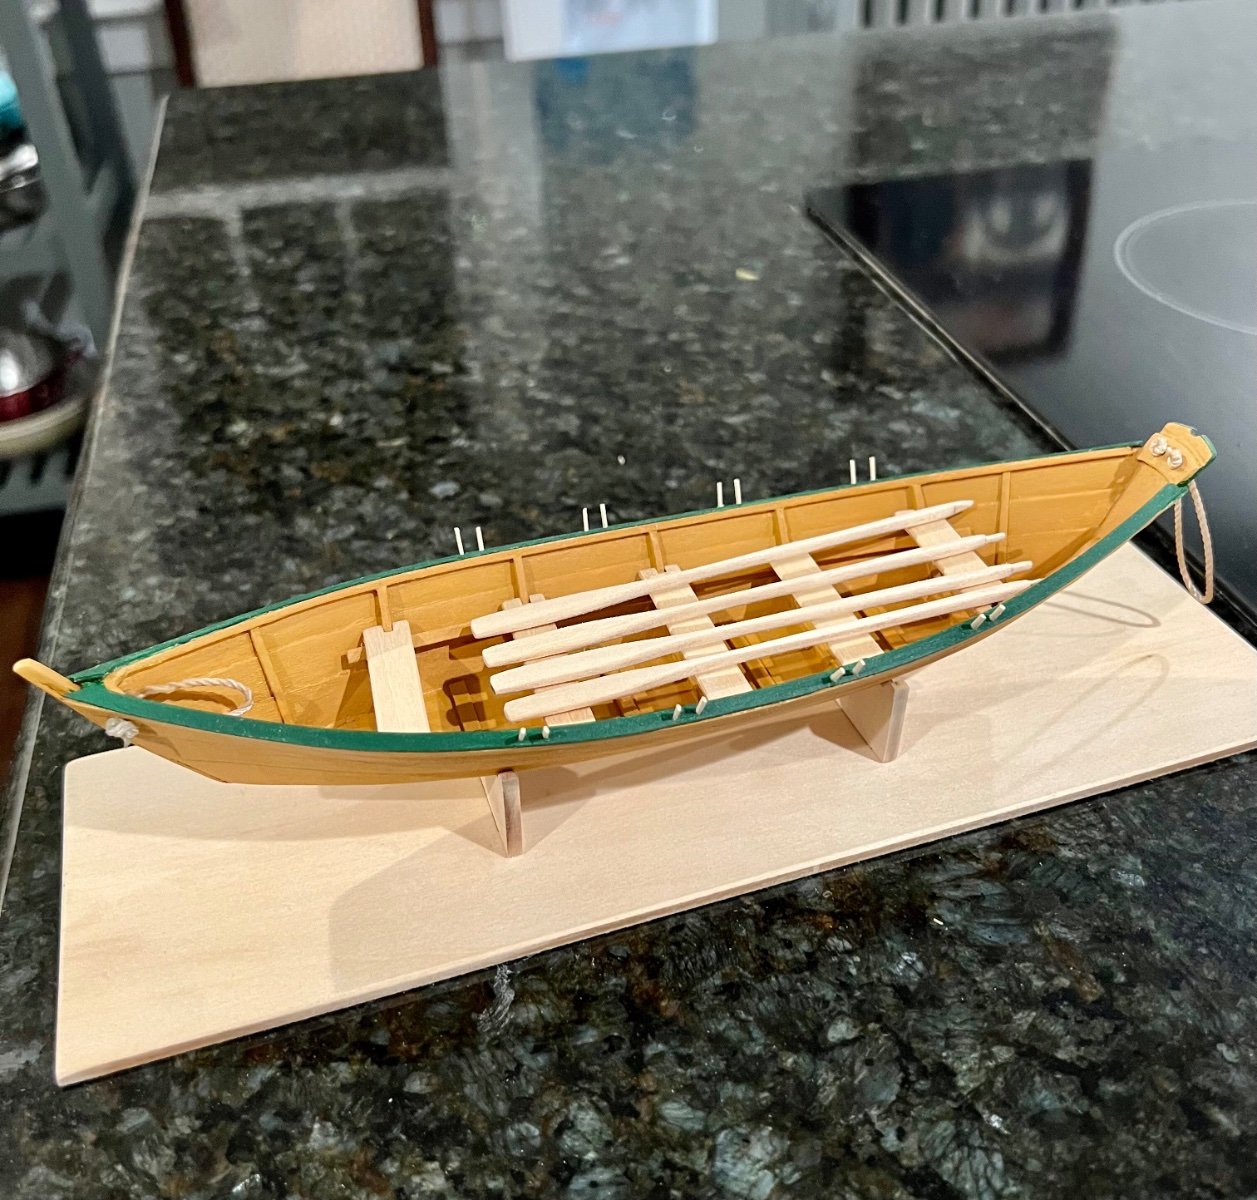
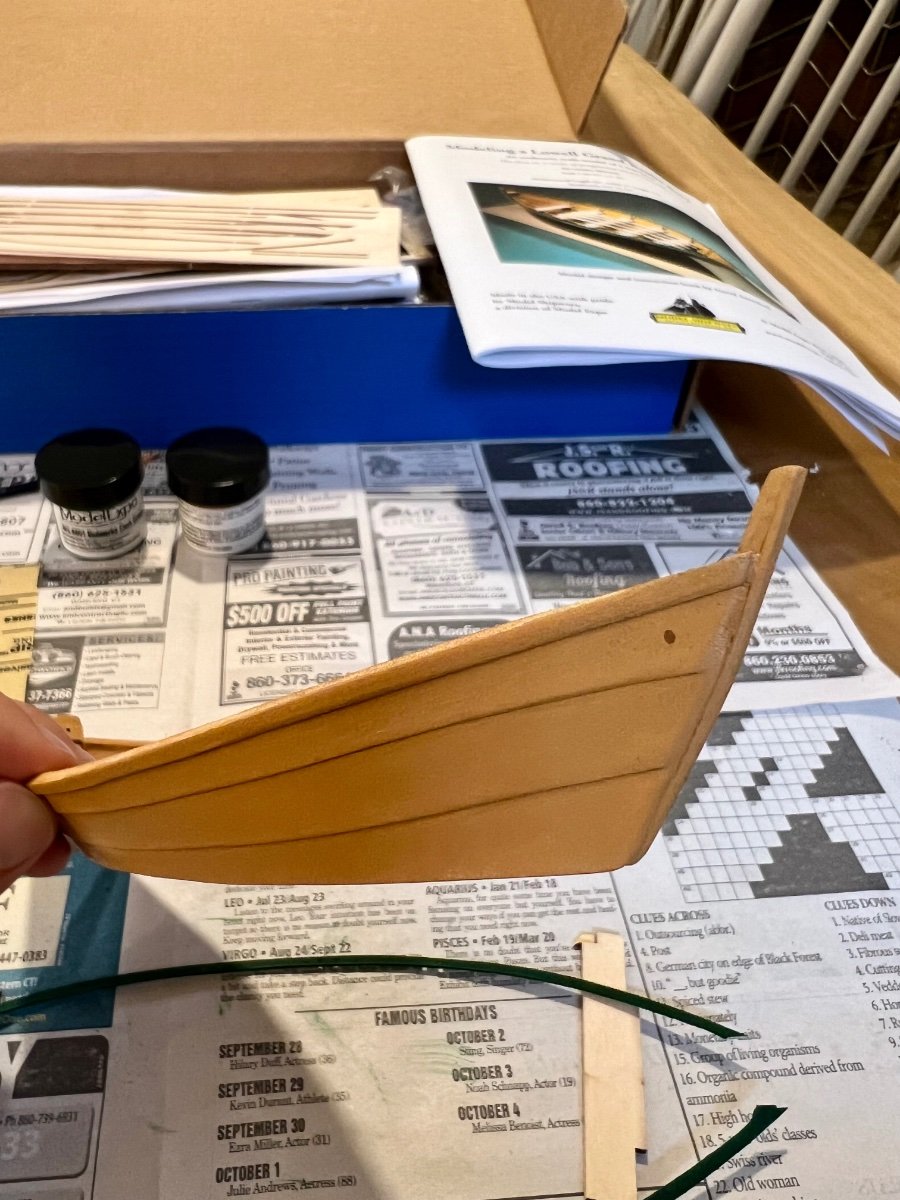
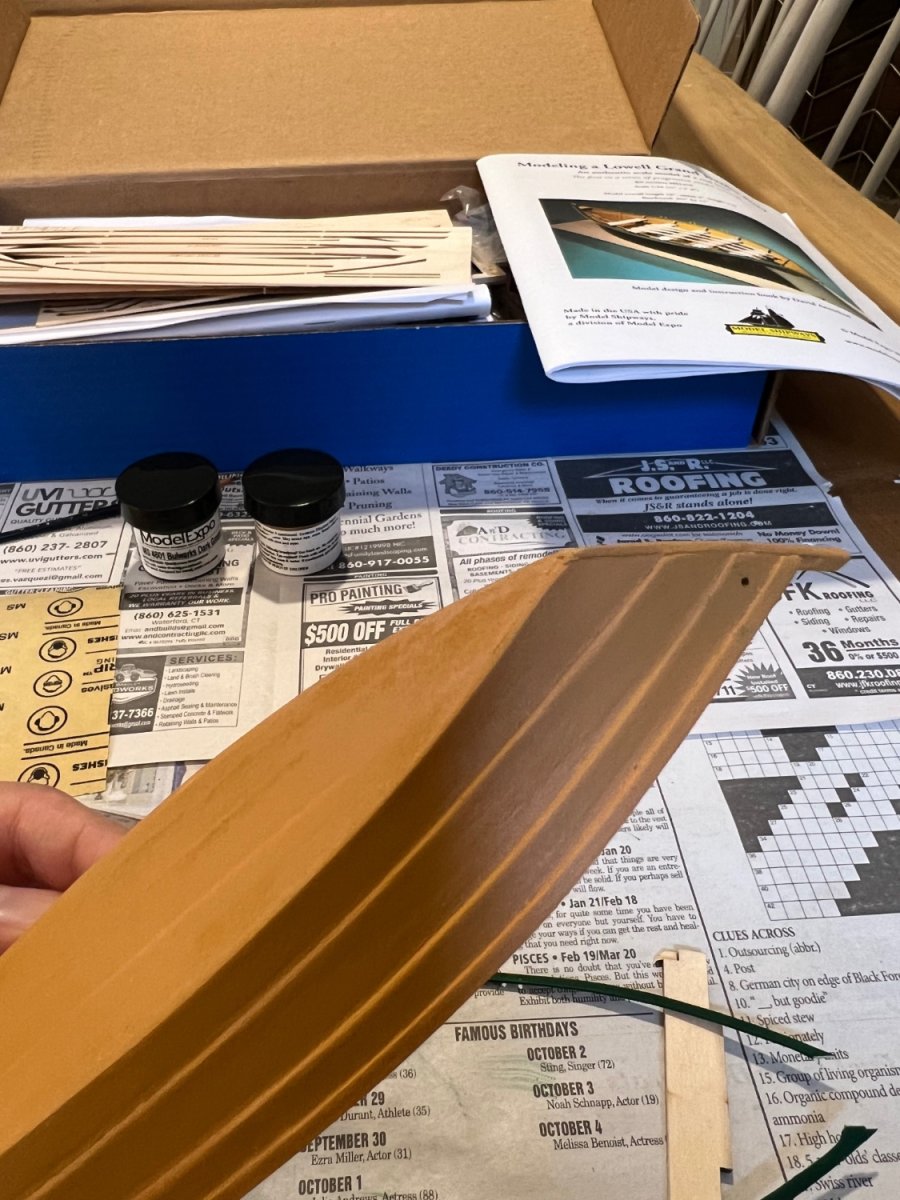
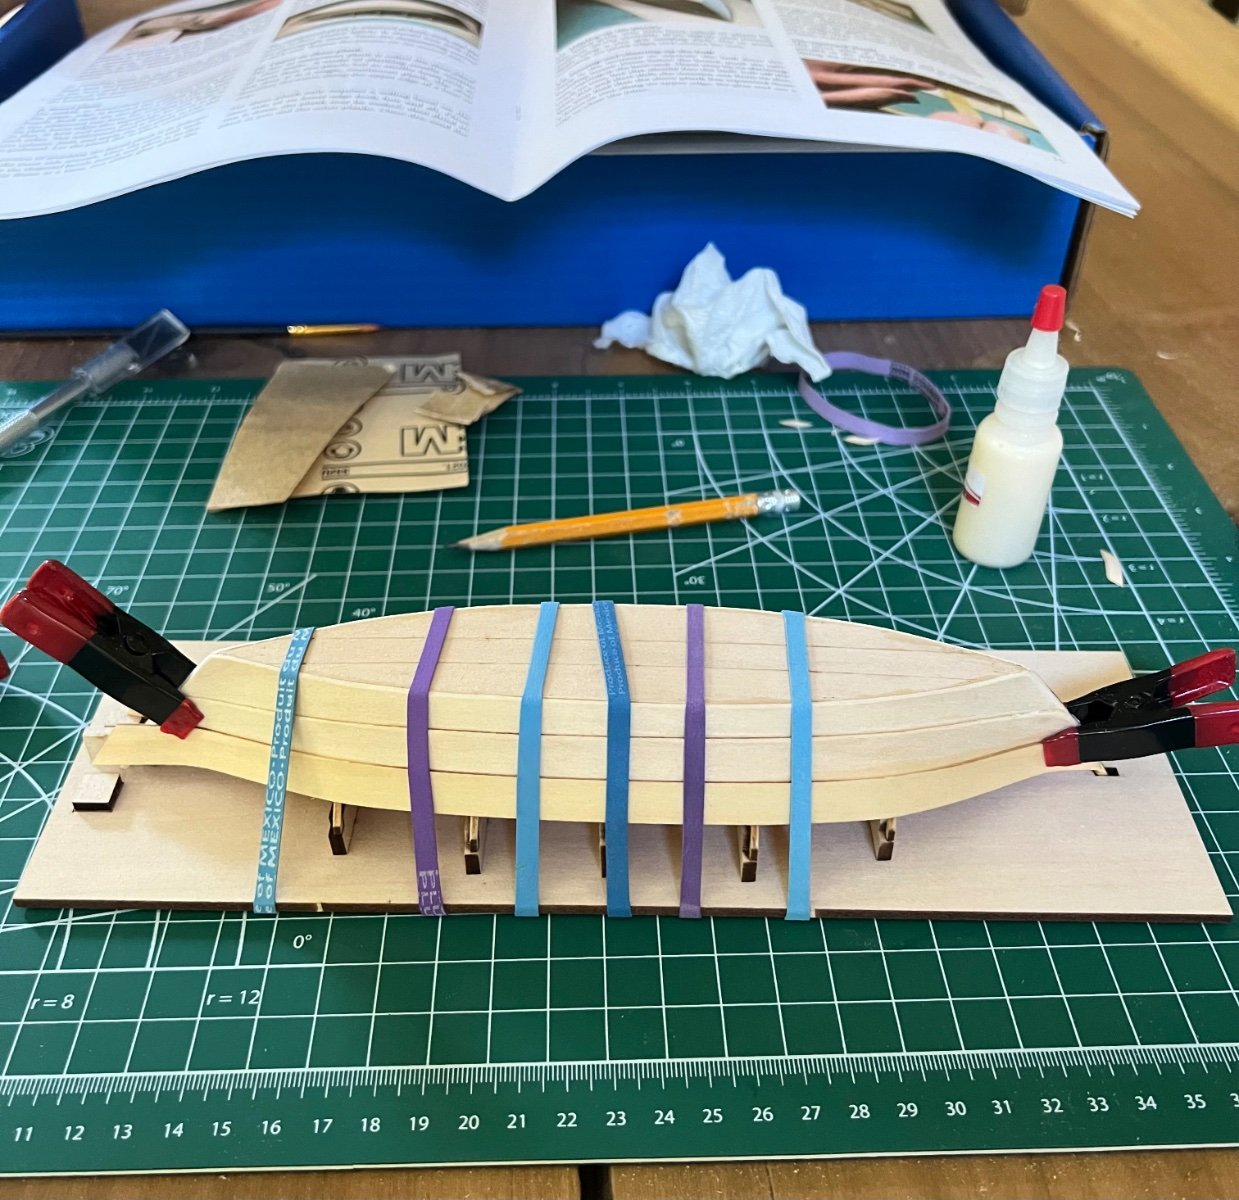
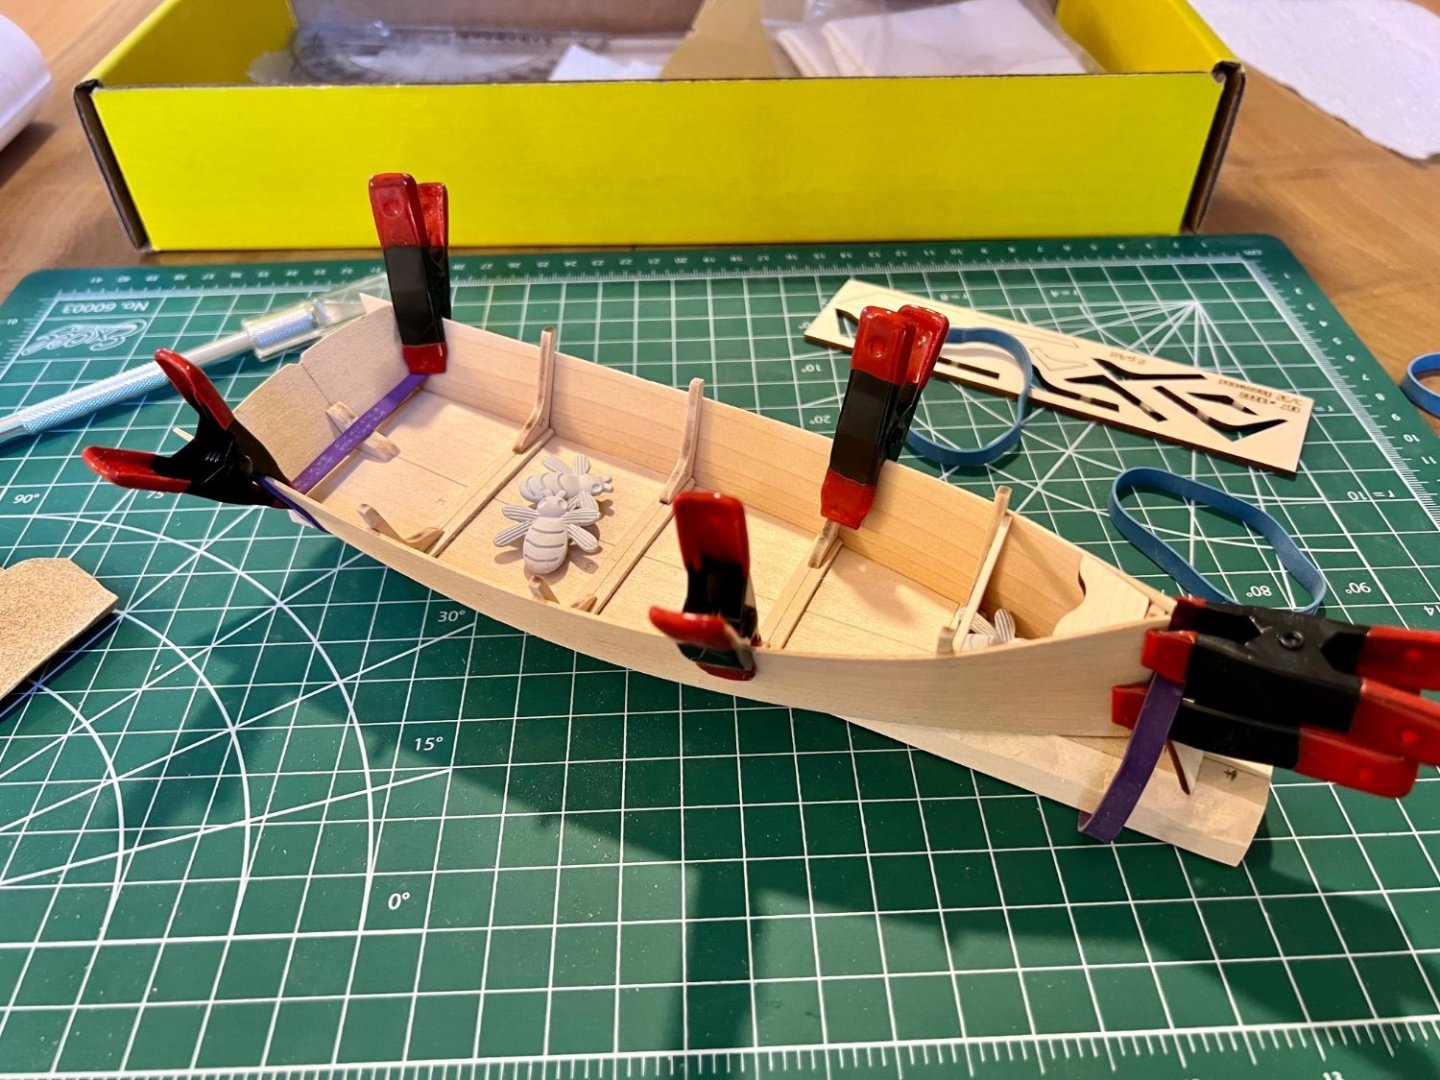
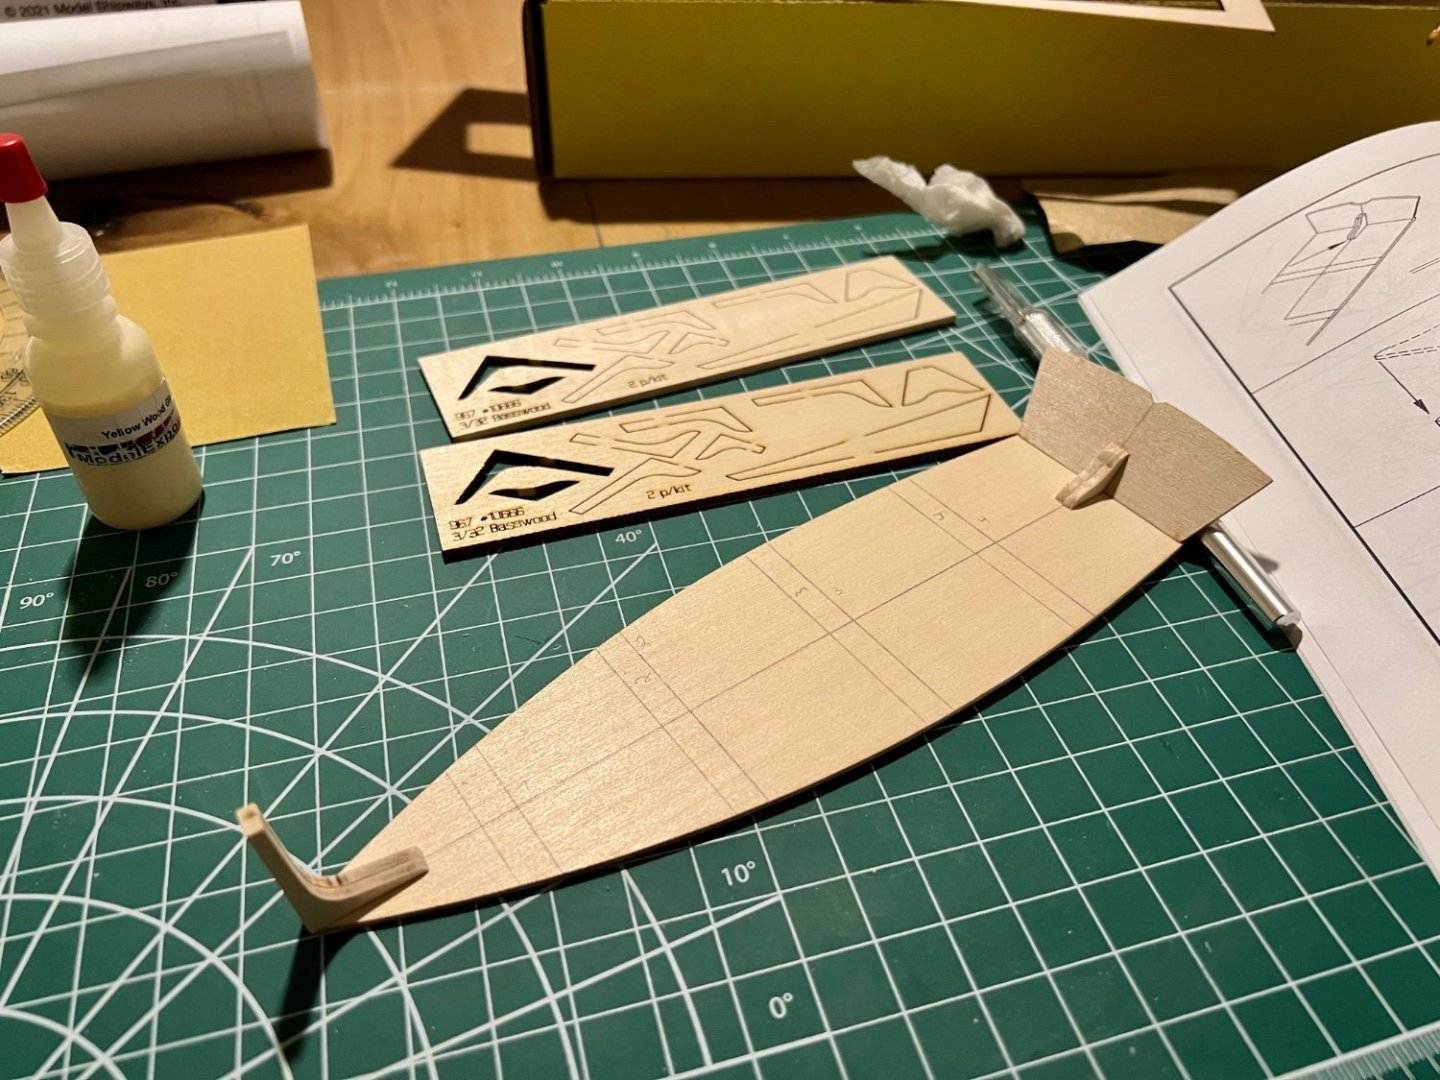
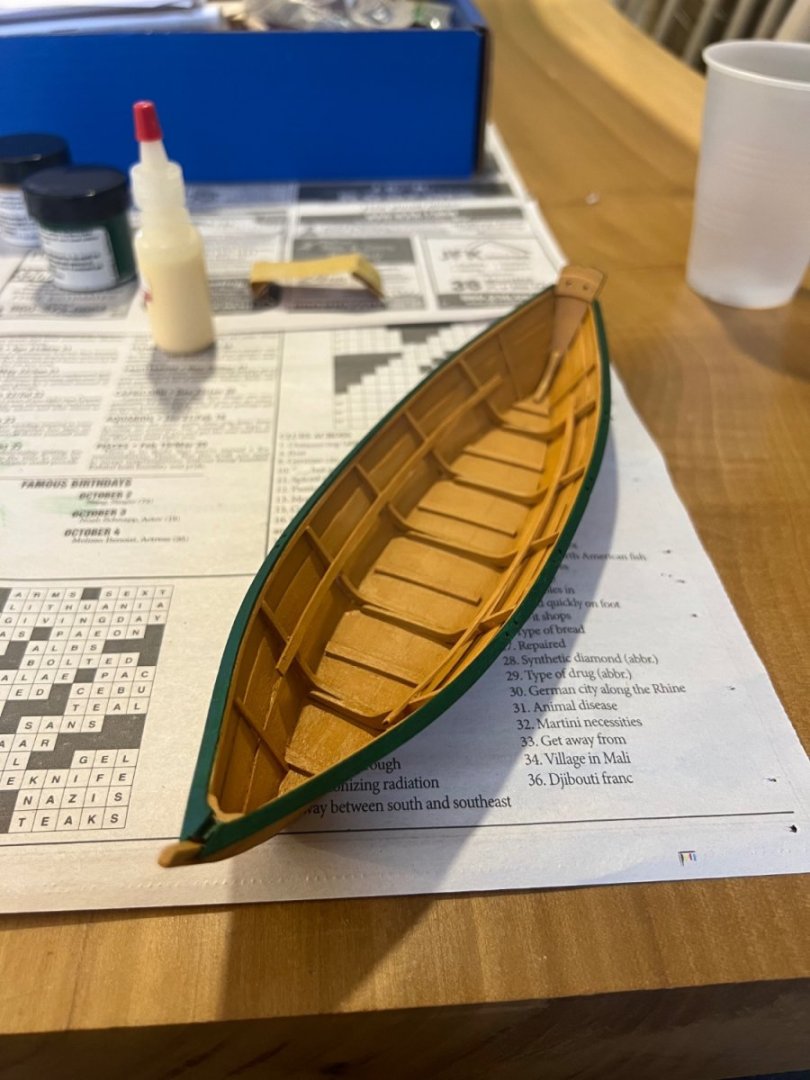
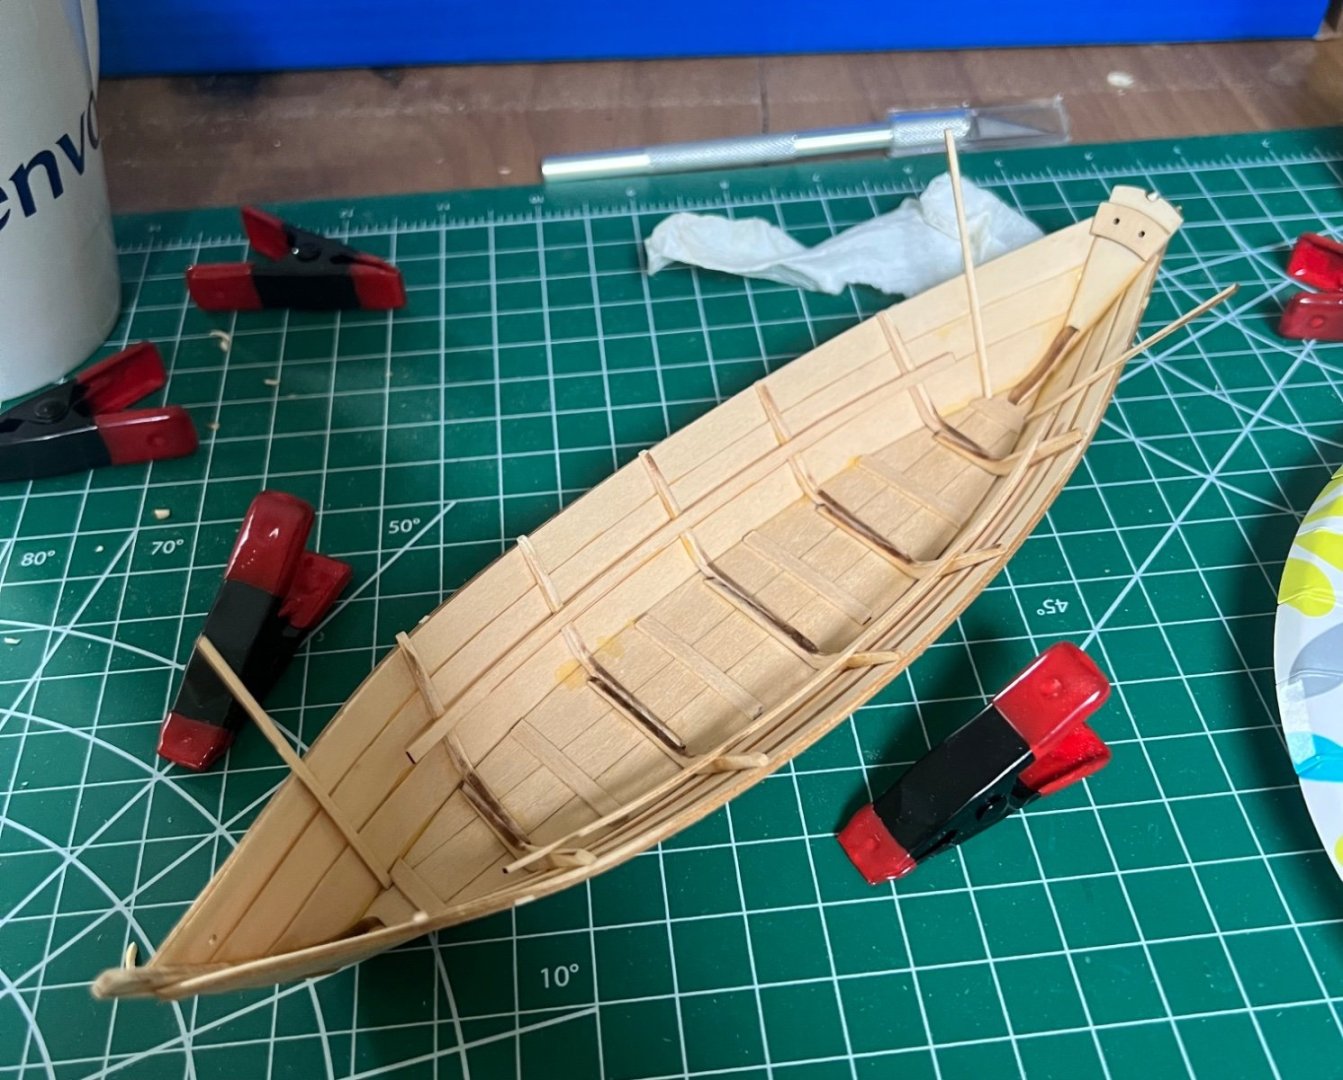
Finally got some time to pick back up on the build. Added the cleats - simply used the drawing from the plan to cut them, and sanded them flush once in place. Beginning work on the frames I took a moment to number each one individually as each pair of frames are different sizes. Next step was to bevel the bottom of each frame (except frame 3, which should remain at a 90 degree angle). I was happy to have previous exposure from the dory for this as the instructions don't explain what a bevel is - not to say that one couldn't easily figure out how to do it, but I'd imagine some may come to this kit with zero experience and these terms and methods aren't defined. Once all the frames were in place I began fairing - which at this point the instructions did explain this how-to process. I find it interesting that they took a moment to explain fairing, but not beveling. Maybe MS can add in such notes in a future edit. Next was to create a strongback as a jig for bending the bottom plank, and to install the planks. The kit included a hefty 5/8 x 7/8 x9" block to use. Using a metal square ruler it was simple to follow the directions to measure and mark all the needed lines. A rather significant 45 degree bevel is needed to be cut into the front inch and half or so into the block. I'd imagine this would be a quick way blunt my x-acto knife, so this was a perfect moment to try I some new small wood chisels I just got. It made quick work on the block. Not the cleanest method to cut into the wood, but as this was just needed for clearance for planking I wasn't worried about aesthetics here. Next shims were added towards the forward and aft. I had to sand the back end of the block as it wasn't completely even, and I'm sure if left untouched things wouldn't remain square for long. Once everything was ready and aligned the instructions said to take some push pins to bend the bottom plank in position for planking. I thought this was a less then ideal method compared to soaking and using some weights or clamps for the bend on the dory. Not to mention being reluctant to poking holes in the model. But as part of my goals for this build is to learn some new methods I continued to follow the manual and used the push pins. This was a great moment to check to ensure that the bevels I made on each frame were formed correctly. The manual also had me add a spall to the first frame, and a stem brace for rigidity during planking. Looking at how well the frame appears to be attached to the strongback the stem brace seems a bit redundant, or possibly interfering if not centered perfectly. I then prepared the planks - only 2 solid planks are in this kit. Compared to the dory this was a breeze. The manual doesn't mention soaking them, but my planks did take a 5min hot water bath and they bent into place easily. Learning from my previous build I also thought it would be a good idea to look ahead and test fit the breasthook to ensure a good fit. The picture above is unglued as I will allow the planks to dry overnight before attaching. As a beginner I'm finding the simplicity of this build engaging and enjoyable, as well as being able to compare and contrast with the manual with previous skills.


- 3 replies
-
- 4
-
-
- Model Shipways
- skiff
- (and 1 more)
-
bbrennan737 reacted to a post in a topic:
Bluenose by MajorChaos - Model Shipways Kit No. MS2130 - 1/64 scale - Canadian Fishing Schooner
-
bbrennan737 reacted to a post in a topic:
Skiff by bbrennan737 - Model Shipways/Midwest Products - 1:12
-
ccoyle reacted to a post in a topic:
Skiff by bbrennan737 - Model Shipways/Midwest Products - 1:12
-
ubjs reacted to a post in a topic:
Skiff by bbrennan737 - Model Shipways/Midwest Products - 1:12
-
hof00 reacted to a post in a topic:
Skiff by bbrennan737 - Model Shipways/Midwest Products - 1:12
-
JacquesCousteau reacted to a post in a topic:
Skiff by bbrennan737 - Model Shipways/Midwest Products - 1:12
-
bbrennan737 reacted to a post in a topic:
New Bedford Whaleboat by kayakerlarry - Model Shipways - Scale 1:16
-
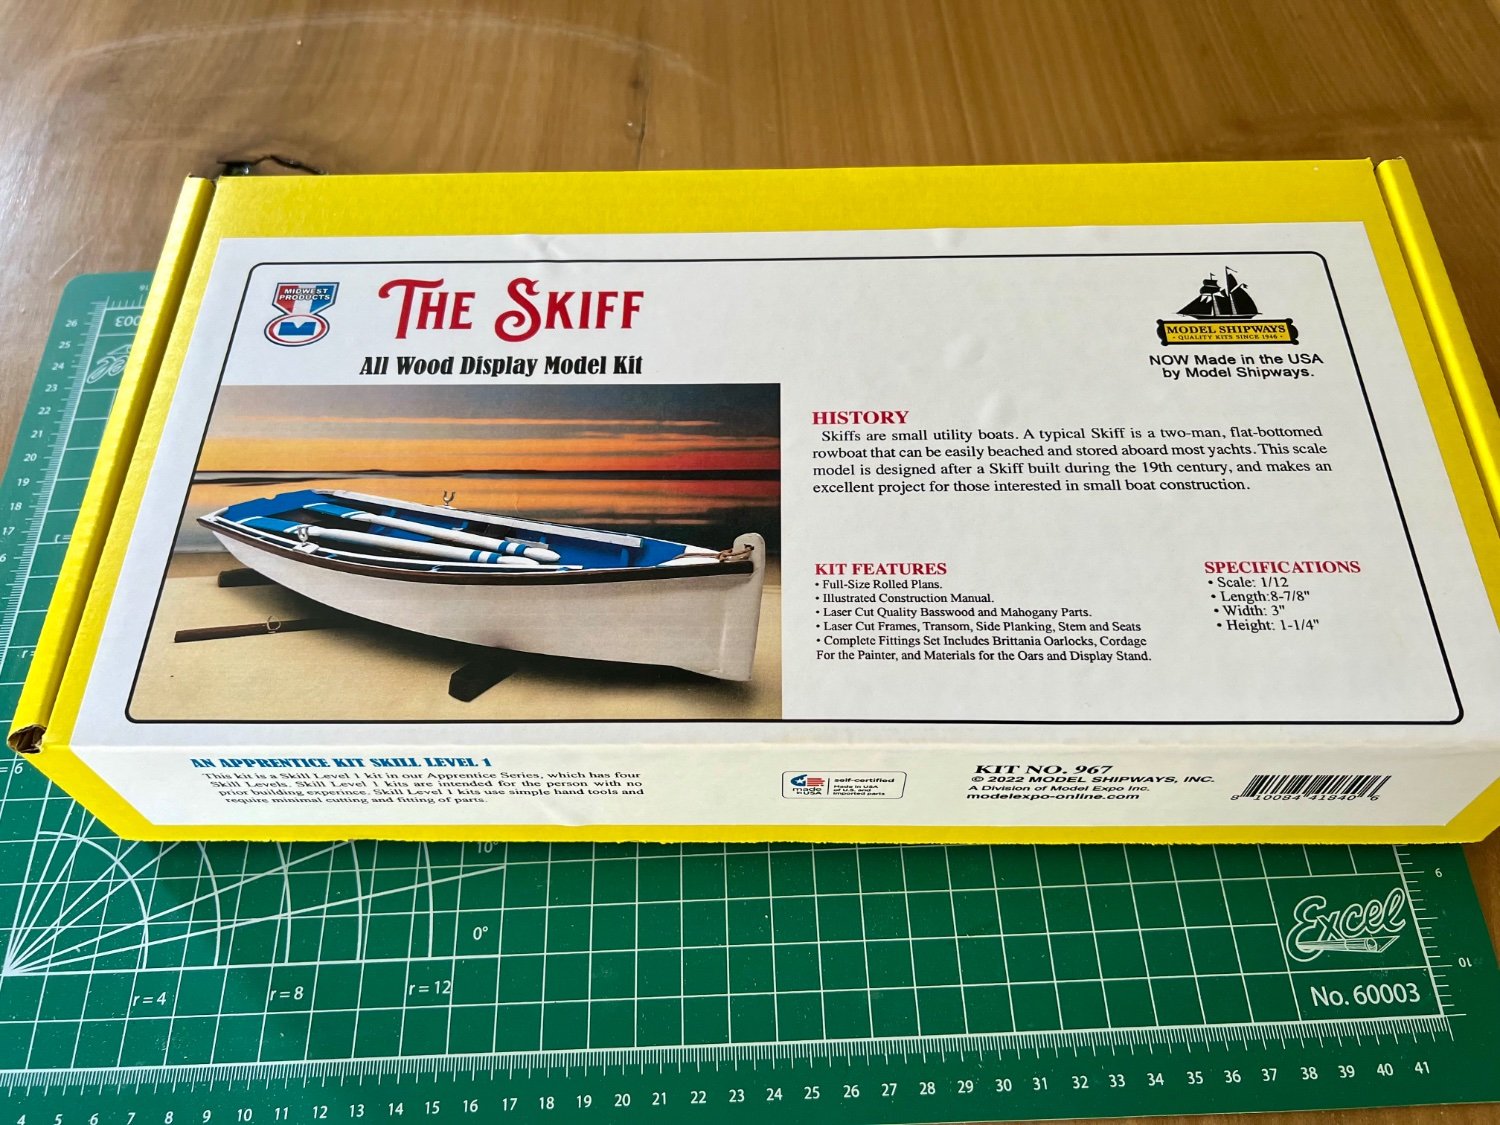
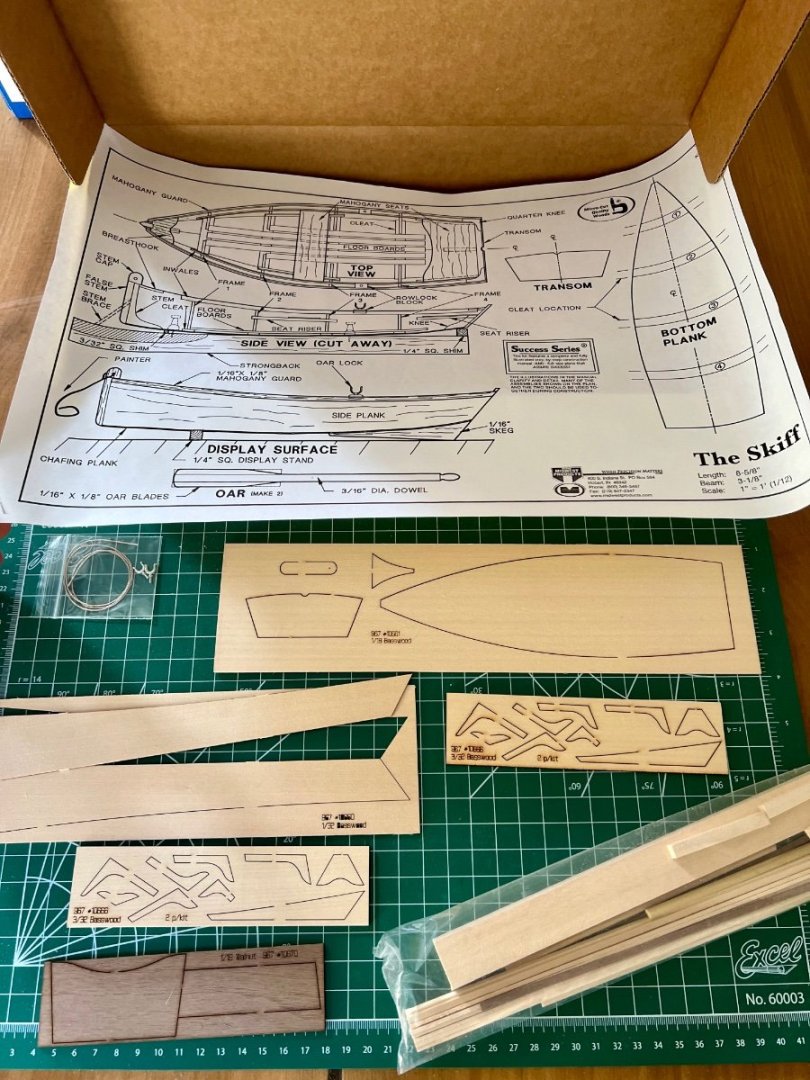
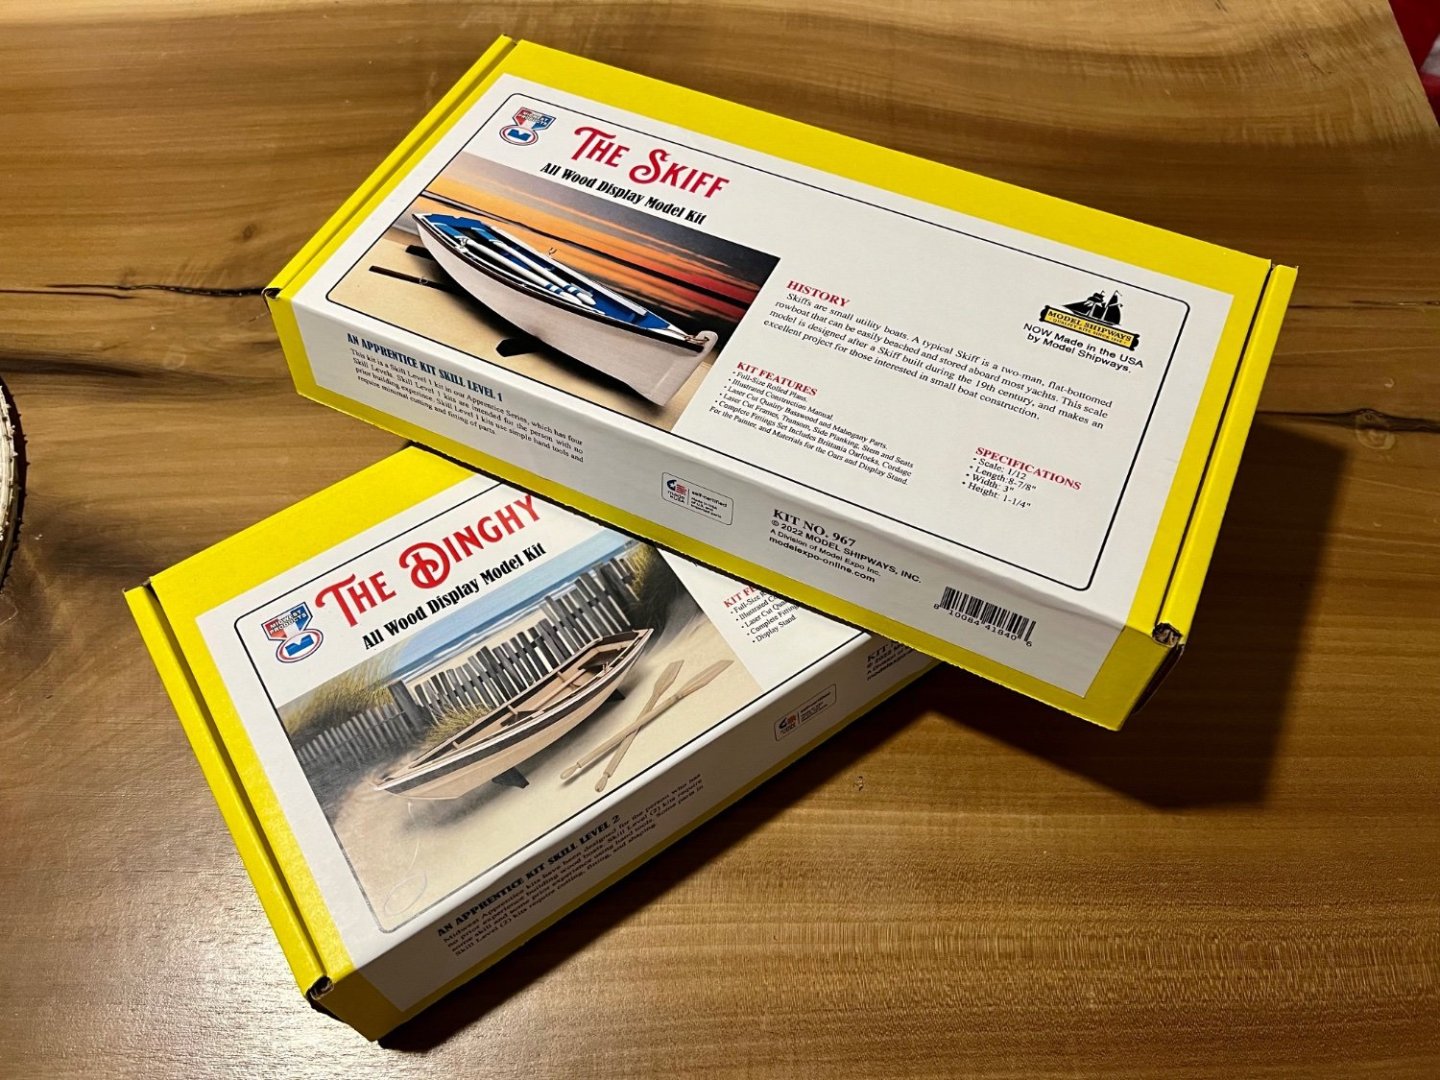
Greetings! Having completed my first build last month, the MS Grand Banks Dory from the introductory Shipwright Series, I said I was going to practice on another model before moving up in skill level. I am excited that MS/ME has acquired and began reproducing many Midwest kits of the past, as they appear to be perfect for beginners like myself. I chose this Skiff kit with the goal of improving my basic skills, and building on lessons & mistakes I made on the previous model. I've also done some research on the older Midwest kits, so I will try to point out some differences on this Model Shipways rerelease as I notice them. I would skip over the box, but as I haven't seen any build logs for this MS produced Skiff I'll take a moment to show it. First major difference with the box is the picture of the model has an entirely new paint scheme compared to the old Midwest colors. I think the deep blue is attractive and will plan to follow this paint job when the time comes. The box does appear to have a hybrid branding - the old Midwest logo is featured, but also clearly has MS branding added as well. As a result I've titled this build as an MS-Midwest build to help clarify that this is a rerelease version. From the box description and learning about skiffs for this build, later 19th century seems like an appropriate era for this build log. The side of the box has MS '22 trademarks, but interestingly it keeps the original Midwest kit number of 967. When doing some research of the old Midwest produced kits they made two different scales for the Skiff - kit #947: a 1:6 scale model advertised as a "Yacht Skiff." And kit #967: simply titled "The Skiff" in 1:12 scale. As of right now only this single Skiff model appears on the ME/MS website, which is this 1:12 model. Opening the box the contents appeared as expected - same standard as MS laser cut wood. As shown in the picture - one of the side planks was already free but thankfully no damage. Everything appeared to be in order, however the instruction manual had some strange printing errors. I won't go into detail out of respect for ME/MS, as they replied within hours of my email and sent a new instruction manual right away, and said they would check other kits. Starting off with the bottom plank - markings needed to be measured and penciled in. In contrast to the Dory I just built that had guide markings, having to make simple markings like this made me feel more engaged in the build. I then installed the stem, knee, and transom. I took time to make sure everything was square, perhaps more so then my last build, and definitely used less glue as I learned from last time to gauge how much is needed. Next I'll finish getting the cleats ready, and attach the frames in the coming days. So far I'm enjoying the rereleased kit and think it is a great complement to the Dory build.

- 3 replies
-
- 6
-
-
- Model Shipways
- skiff
- (and 1 more)
-
bbrennan737 reacted to a post in a topic:
Grand Banks Dory by FortressHarris - FINISHED - Model Shipways - 1:24 - first build
-
bbrennan737 reacted to a post in a topic:
Grand Banks Dory by FortressHarris - FINISHED - Model Shipways - 1:24 - first build
-
bbrennan737 reacted to a post in a topic:
New Bedford Whaleboat by kayakerlarry - Model Shipways - Scale 1:16
-
bbrennan737 reacted to a post in a topic:
Grand Banks Dory by bbrennan737 - FINISHED - Model Shipways - 1:24 - First Build
-
@JacquesCousteau thank you! I appreciate the support!
- 19 replies
-
- 2
-
-
- Grand Banks Dory
- Model Shipways
- (and 3 more)
-
@Paul Le Wol thank you sir! Excited to begin work on the next one
- 19 replies
-
- 2
-
-
- Grand Banks Dory
- Model Shipways
- (and 3 more)
-
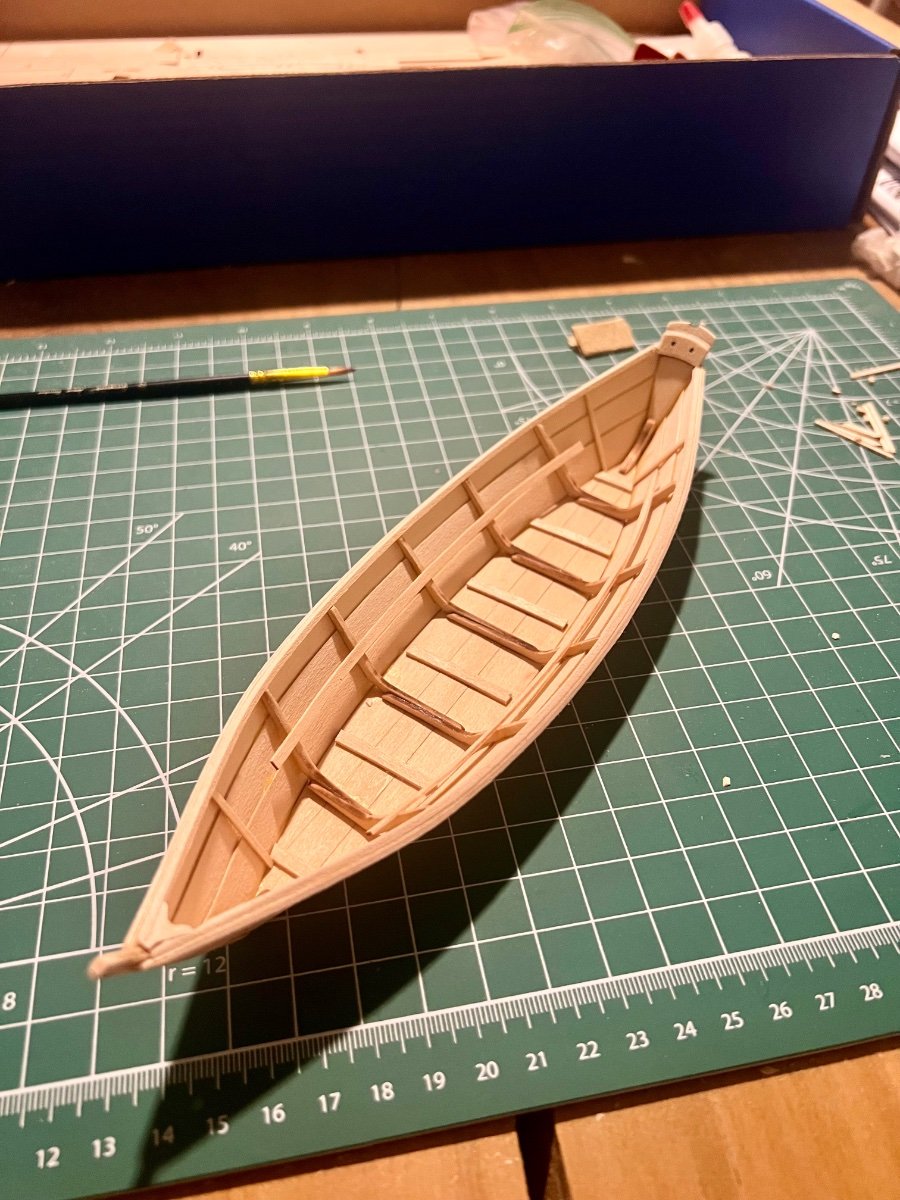
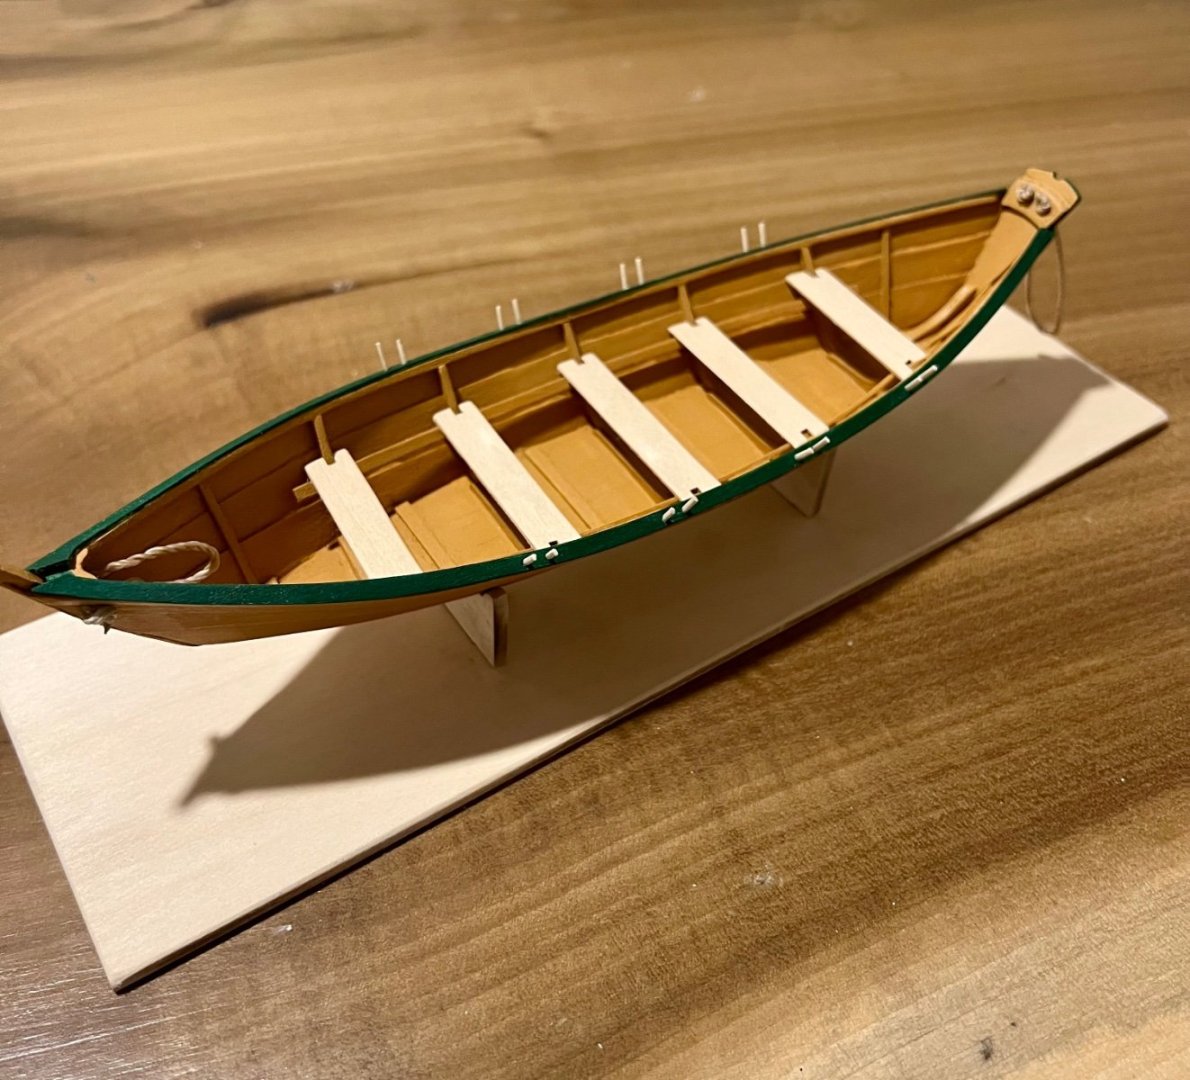
Happy to report that the dory was completed over the weekend! After the second coat dried and was sanded down again, I applied the third coat and felt it looked sharp enough to call it the final coat. I did find that the supplied ME green paint went on heavy each time. I didn't make any adjustments with the paint this time, but I'm thinking if I use the bulwarks dark green in the future I'll add some water to the paint mix. As the cap rail was glued in place you can clearly see that it didn't quite match up on each side. I didn't have any filler on hand, and it will be something I can add in and touch up in the future. Moving on to the beckets - I definitely had some difficulty. Trying to get the supplied rope line into the holes was a challenge. Even after applying an appreciable amount of glue to the ends of the line, the rope still tried to unravel. It took several coats of glue to really shape the ends tight enough to fit, but I eventually got there. Once I was satisfied with the length and knots I glued the line and after holding the shape for a few minutes while it dried it has held its shape nicely. It was only after the fact that I was reading about a technique of gluing one end of rope to a small needle or toothpick - I will certantly try this tactic next time. Adding the thwarts, oars, and thole pins went smoothly. I did not add any decorative leathering to the oars - I was considering painting the detail on, but I think it will look better with some brown paper when I find some, so they are the only component that will stay unglued for now. Measuring and fitting the thole pins was simple enough, and by using a pair of tweezers installing them was a non issue. I used the supplied baseboard, and may apply a stain in the future. I think it looks nice enough as is, but I know I'm going to want to practice staining in the future and think it might give the base a more finished look. Here she is in her completed state: There were lots of mistakes and lessons learned. The stern sits higher then it should, and the cap rails could use some filler to polish up the look back there. And the big gap from the cap rails at the bow will absolutely need filler. But overall, I'm excited to have completed my first build! As a true beginner with no prior wood modeling experience I'd say this kit met its design goals as an introdcutory kit. It gave me challenges, but never felt overwhelming. The instructions were mostly clear, apart from some moments of thinking to myself "huh? what is this trying to explain?" I think it was well done and David Antscherl did a great job designing a "first kit" model. I really enjoyed the build - and think I'll be hooked on model building for a long time. The Norwegian Pram is next in the 3-kit combo, and looking through the contents and instructions the Pram looks like a perfect next step up from the dory. However, as I enjoyed this build so much, and knowing the mistakes and lessons learned I wanted to get just a bit more experience first. I ordered 2 of the rereleased Midwest kits from ME/MS. Both models look like a lot of fun, and will help ensure I get some more practice before tackling the Pram. I'm thinking I'll start with the Skiff as it's claimed to be at skill level 1, vs the Dinghy is advertised at level 2. However, looking at the contents and other logs they appear to be very similar in complexity. I'll likely get started on the Skiff this weekend, and will begin a new build log for the project. I'll see what research I can do over the next few days on some older build logs from the Midwest kits. Partly to learn and get a road map for my own builds, but also because I'm curious what differences (if any) are on these kits made by ME/MS vs when produced by Midwest. We shall find out soon! Also, if anyone knows how to edit the log title to add "Finished" feel free to do so or let me know how - I can't seem to find a way to to it myself. Thanks! Edit - I figured out how to change the title.

- 19 replies
-
- 12
-
-
- Grand Banks Dory
- Model Shipways
- (and 3 more)
-
Finished the second coat. I didn't have any spray primer, and I figured I'd try and see how it would be to hand paint the entire model. After the first coat there was some raised grain as the instructions said to expect. After it dried overnight I then took my time sanding, and applied a second coat. So far I'm thinking its coming along well. Will begin working on the seats and oars tonight while it dries again overnight. I'll see how it looks in the morning, but without any priming I'm expecting it to need to be sanded and a third coat applied.


- 19 replies
-
- 6
-
-
- Grand Banks Dory
- Model Shipways
- (and 3 more)
-
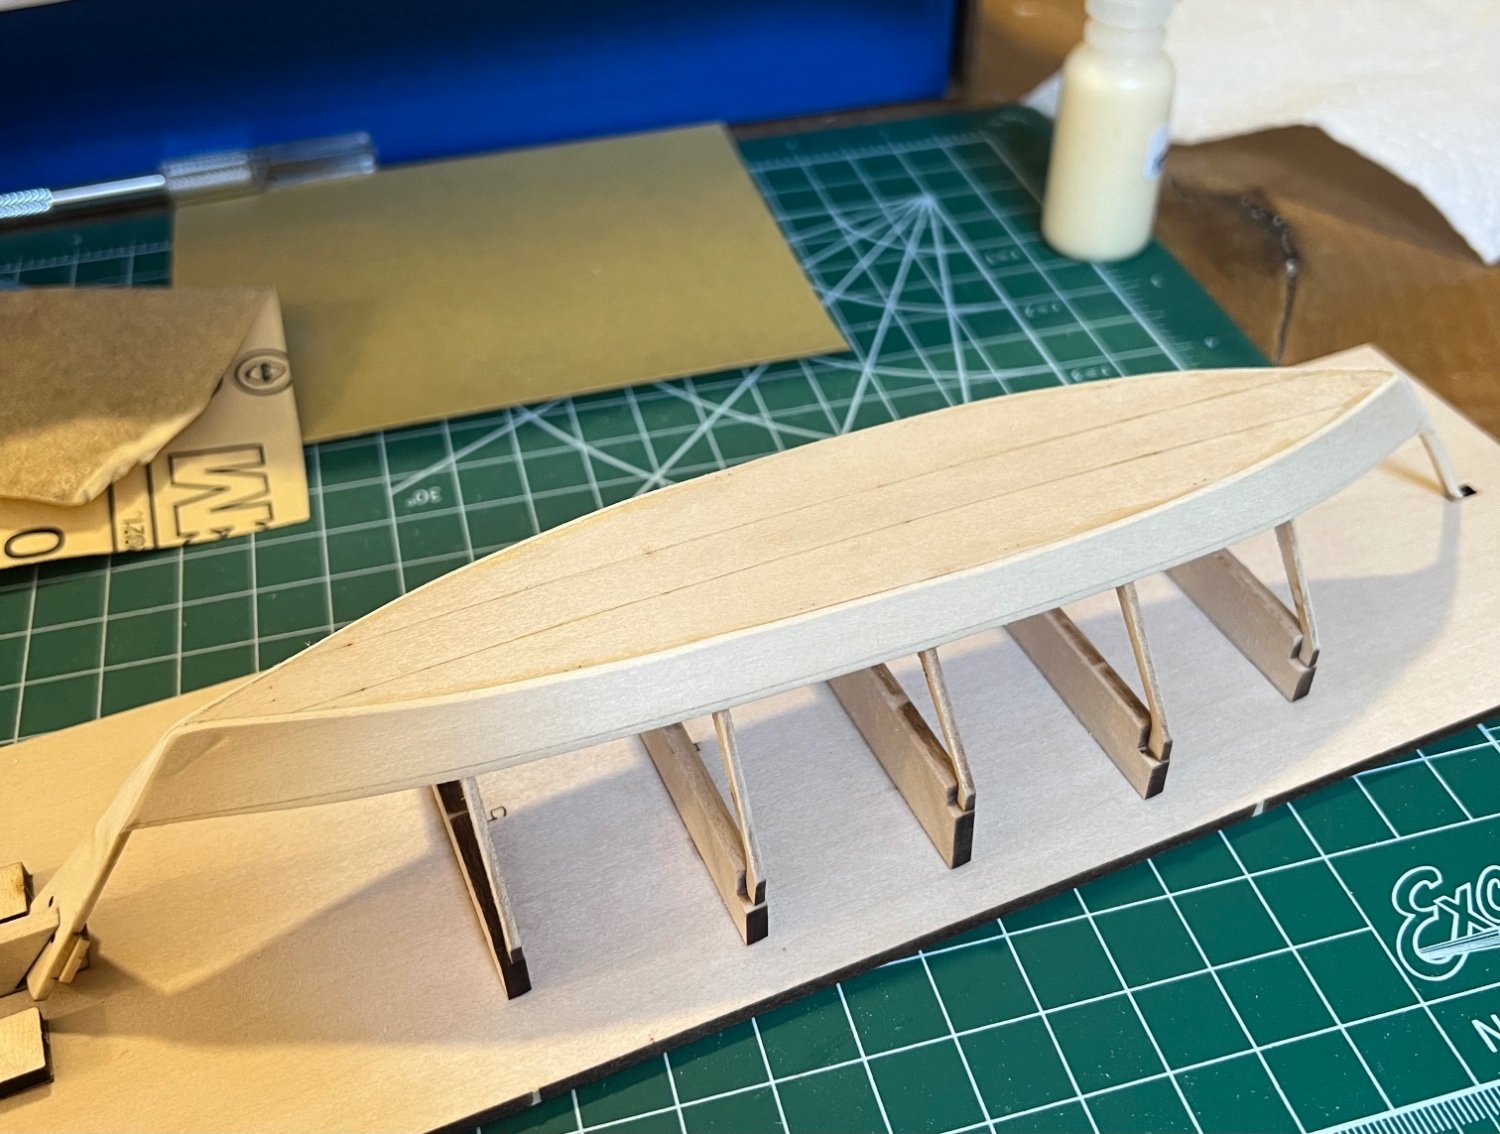
Added the gunwale. I didn't have a chisel blade, but the exacto knife provided in the kit worked nearly as well. I worked slowly to not cause and damage the frames or poke into the planks. I then cleaned up the breast hook and beveled it best I could. Beveling wasn't an issue, but trying to get an exact fit proved difficult as the sides of the gunwale was angled more than I expected...which I'm guessing means the whole frame is more convex then it should be. The only solution I could think of here was to create a slight bevel on the gunwale. Sanding the top everything is nice and flush, but the final result does appear to need some filler. Looking ahead though I think adding the cap rail should cover the big gap. The camera focusing on the stern was a taunting coincidence - clearly the transom is in place higher then it should. Not sure what I did wrong here - did I overlap the planks more then I should? Or was there another fit issue along the way? I'll have to do some investigating. Regardless of what I did wrong I think it's still a serviceable model as I did a test fit of the cap rails and then appeared to fit pretty well. I'll take the time to explore where I went wrong and use it as a learning experience for future models. Now on to painting.

- 19 replies
-
- 6
-
-
- Grand Banks Dory
- Model Shipways
- (and 3 more)
-
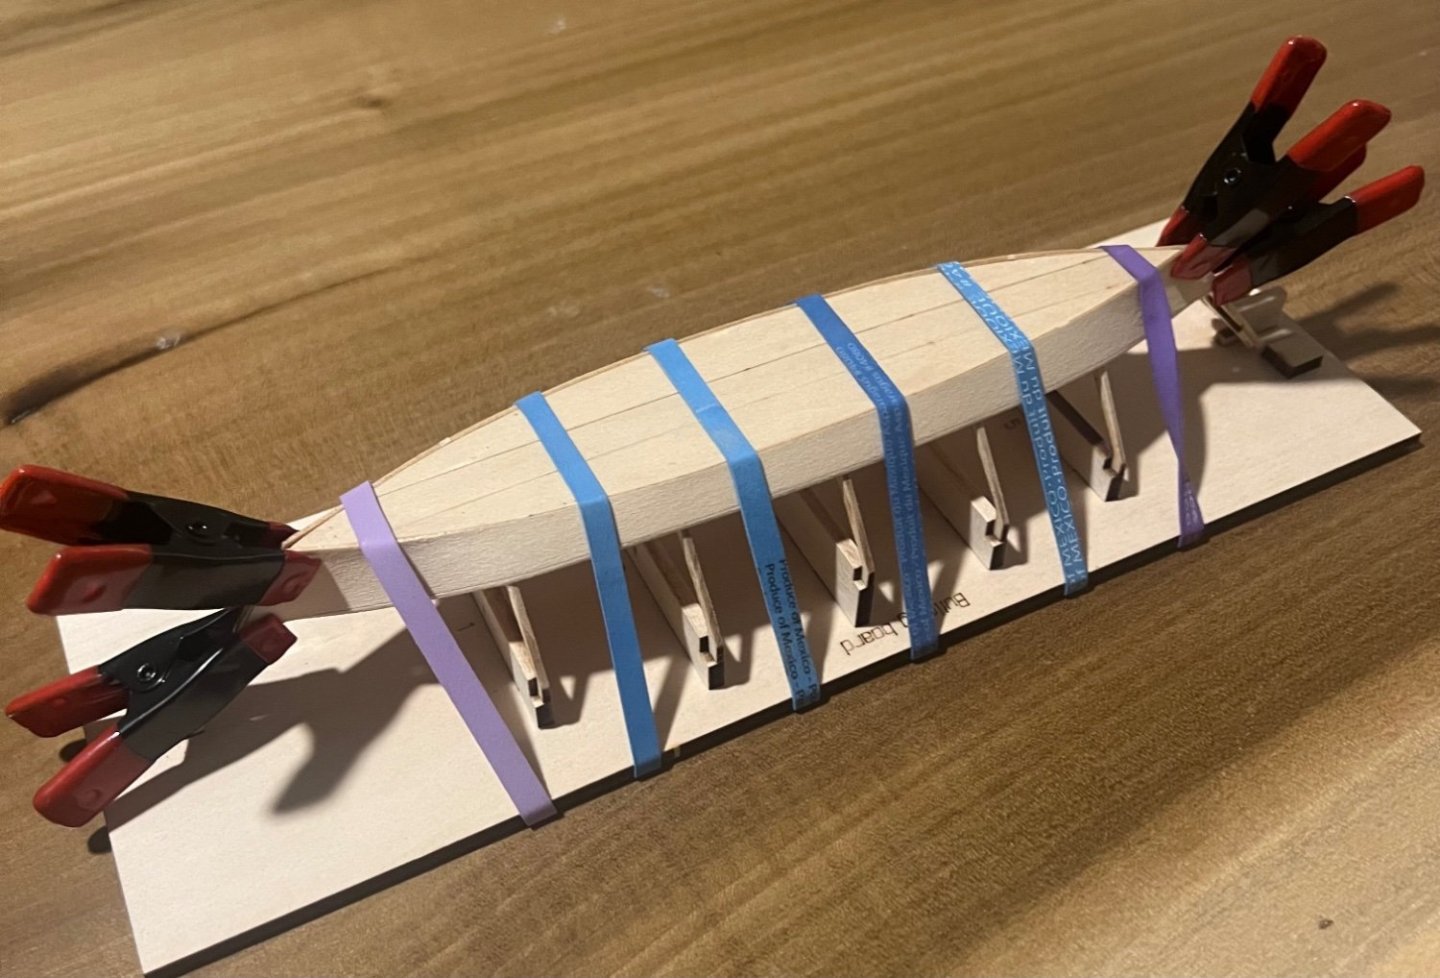
Got a lot done since my last post. Things are coming together well, but it hasn't been without its challenges. After all the planks dried there must have been a pull on the jig as one of the ribs snapped, similar to FortressHarris on his build. Thankfully it was a clean snap, and gluing it back in place wasn't much trouble. Once I was satisfied that everything had dried correctly I freed the hull and sanded and cleaned up spots I may have missed before. I added the false stem, which did take a bit of fiddling to fit straight. Next, I moved began fitting and attaching the side cleats - they went on and cut down without any trouble. When it came time to fit the bands around the top edges, and noticed a strange pinch near the stern from the clamps. I guess I didn't learn my lesson well enough from the previous dent from clamping. Wetting the wood solved the issue as it did previously. It was at this point that I realized just how much wood glue had seeped onto the bottom as the planks went on. I did spend some time trying to wet and clean those spots up, but had mixed results. I know others use IPA to help remove some glue, I'll have to pick some up later.
- 19 replies
-
- 8
-
-
- Grand Banks Dory
- Model Shipways
- (and 3 more)
-
Progress continued this week. The broad plank went on nicely. I wanted to ensure that I had the correct fit and make sure the planks attached symmetrically so I went a bit ahead and sanded the bottom of the plank. Towards the stern you can see a pinch from the clamps - this was a nice reminder to check if the clamps are causing damage and to use some padding in the future. Thanks to other build logs I tried wetting the board and after a while the dent filled itself back out. I soaked and bent the remaining planks. Looking forward to seeing the drying results in the morning. o


- 19 replies
-
- 5
-
-
- Grand Banks Dory
- Model Shipways
- (and 3 more)
-
Made some progress tonight - prepped and bent first planks. Pretty straightforward process. Sanded in a bevel and then soaked the planks in hot water for 5min as per the instructions. They bent easily and appeared to fit relatively well. Took some wrestling with some rubber bands and clips to make sure they would stay in place overnight. We'll see in the morning how they dry out. My first thought was to bring the planks bottom edge right up to the bottom boards, but the instructions mentioned to have a little extra over the side. I'm sure they will sand down nicely once glued and dry.
- 19 replies
-
- 6
-
-
- Grand Banks Dory
- Model Shipways
- (and 3 more)
-
Hi there - new member and new to the world of wooden model ship building. Like many new builders I have some experience with plastic models, and went to school for aircraft maintenance. But knowing that wood requires an entirely different skill set I wanted to start fresh at the beginning and set myself up for success. My interest in wood actually started back in the spring: after a visit to the Mystic Seaport Museum's model workshop and a long discussion with a gentleman (I can't remember his name) they had a free raffle for what I believe was a Midwest kit (I remember the signature yellow box, but not which model). I didn't win, but was inspired to get a beginner model anyway. After trying to find the same kit they were giving away I naturally found my way to the Model Expo website and was very pleased to discover their Shipwright Series. I ordered the 3-kit combo and as the cool weather begins I hope to enjoy the journey of developing the skills of this wonderful hobby. Beginning with the Dory has been a pleasure so far - glad to report I'm really enjoying it. Started the kit yesterday afternoon and have completed the bottom planks, stem, and transom. I also installed the frames on the building board. So far everything looks as though its dried square. I will come back tonight to remove the remaining char and make sure everything had stayed in place.

- 19 replies
-
- 9
-
-
- Grand Banks Dory
- Model Shipways
- (and 3 more)