

FreekS
-
Posts
215 -
Joined
-
Last visited
Reputation Activity
-
 FreekS reacted to Valeriy V in Libertad 1925 by Valeriy V - Scale 1:100 - Spanish Type F Light Cruiser
Details of the foremast before and after installation on the forward superstructure.
-
FreekS reacted to Valeriy V in Libertad 1925 by Valeriy V - Scale 1:100 - Spanish Type F Light Cruiser
The control post platform is located on the foremast.
-
FreekS reacted to Valeriy V in Libertad 1925 by Valeriy V - Scale 1:100 - Spanish Type F Light Cruiser
The control post is assembled, but for now it is without small parts.
-
FreekS reacted to Keith Black in Sternwheeler From the Susquehanna River's Hard Coal Navy by Keith Black - 1:120 Scale
Thank you to everyone for the comments and likes.
The handrail is finished and with that the heavy lifting for this ugly duck is done but I still have a couple of days adding the final details. After just four months the push boat portion of this build log is almost done and then it's onto making the barge.
I've answered all the initial port side questions as best I could and I'm pretty pleased with the results. In the beginning the port side blank spot had me intimidated but as I added known elements the port side mysteries slowly revealed themselves.
I wish I could take credit for meticulous planning the pump placement where everything would fit like a glove but that's not the case. I placed it where I thought it should go but in truth it's much more of "even a blind hog finds an acorn every now and then".
Thank you for your support and for following along.
Keith
-
FreekS reacted to Dr PR in USS Cape (MSI-2) by Dr PR - 1:48 - Inshore Minesweeper
Thanks to everyone for your comments and likes.
Here is a bit more progress:
I have started assembling the O1 level superstructure.
The sides of the pilot house are attached to the after pilot house bulkhead and the after bulkhead on the deck house.
Here are a few views of the pilot house details before the forward bulkhead is attached.
The deck was covered with brown linoleum tiles. I won't try to replicate the tile lines or the random pattern - they are too small to see at this scale.
Here are a couple of photos of the deck house on the hull.
The front and top of the O1 level are not attached yet, and are just sitting there. The O1 house is not attached to the main deck level house. Likewise, the main deck level deckhouse is not glued to the hull. There are still a lot of details to add to the superstructure and it will be easier to work on the parts off the hull.
The next step will be the bulwark around the open bridge. For that I will remove the O1 level house so it isn't in the way.
You can see one of the characteristics of minesweepers - a high pilot house up forward. This helps to see mines in the water ahead. Lookouts were posted on the O2 level above the pilot house to watch for mines. They carried M1 Garand rifles, and I was stationed there with a Browning Automatic Rifle (BAR). We were to shoot at any mines we saw, primarily to mark the location for the 50 caliber machine gun crew at the bow, and so the helmsman could try to avoid the mine. If we got lucky we might even detonate the mine, or sink it. We never fired at a real mine while I was aboard.
-
FreekS reacted to Dr PR in USS Cape (MSI-2) by Dr PR - 1:48 - Inshore Minesweeper
More fiddly bits.
The binnacle was turned out of a piece of 1/4 inch (5 mm) aluminum rod - part of a small wind chime (I didn't have a brass rod the proper diameter). The dome was shaped using a hand drill and files. The binnacle on the ship had two sliding doors that closed in front of the compass rose. To simulate this I carved the aluminum with a #11 blade and a tiny chisel made from a dentist's tool. It was a slow process! The two thin brass rods sticking out were for the two knobs.
On the right the binnacle is in position in front of then helm. It was painted with the brushed bronze paint I used on the propeller. A few other small details can be seen. The voice tube from the bridge hangs over the helm station. The tachometers for the engines are on either side of the helm, and a sound powered phone call station is at the lower right. A phone hand set and a few more pieces will be added beside the binnacle and above the windows.
Here is the lee helm or Engine Order Telegraph (EOT). It is made from 11 different pieces. It is 1.14 inches (29 mm) high from the base to the top of the handle (a bronze belaying pin). That is 4 feet 6 inches (1.4 meters) at 1:1 scale.
I buffed it up good and then applied a layer of clear acrylic varnish to keep the shine. However, it appears the varnish may have reacted with the brass, and it is a lot duller a day later!
I don't know if the EOT was ever used. The ship had a throttle beside the binnacle that the helmsman could use to control the engines. However, I do recall using standard engine orders - Ahead/Back 1/3, 2/3 and Full - when pulling away from the pier, so maybe it was normally used. The throttle might have been used to change propeller speed a few RPM in station keeping while sweeping mines.
The 6 inch (150 mm) 15# CO2 bottle was turned from a 0.185 inch (4.7 mm) brass rod. The cone is styrene rod.
I still have 14 more pieces to go on the forward bulkhead and side bulkheads of the pilot house.
-

 FreekS got a reaction from Ian_Grant in HMS Lion by Ian_Grant - 1/150 - RADIO - RESTORATION - WW1 Battlecruiser
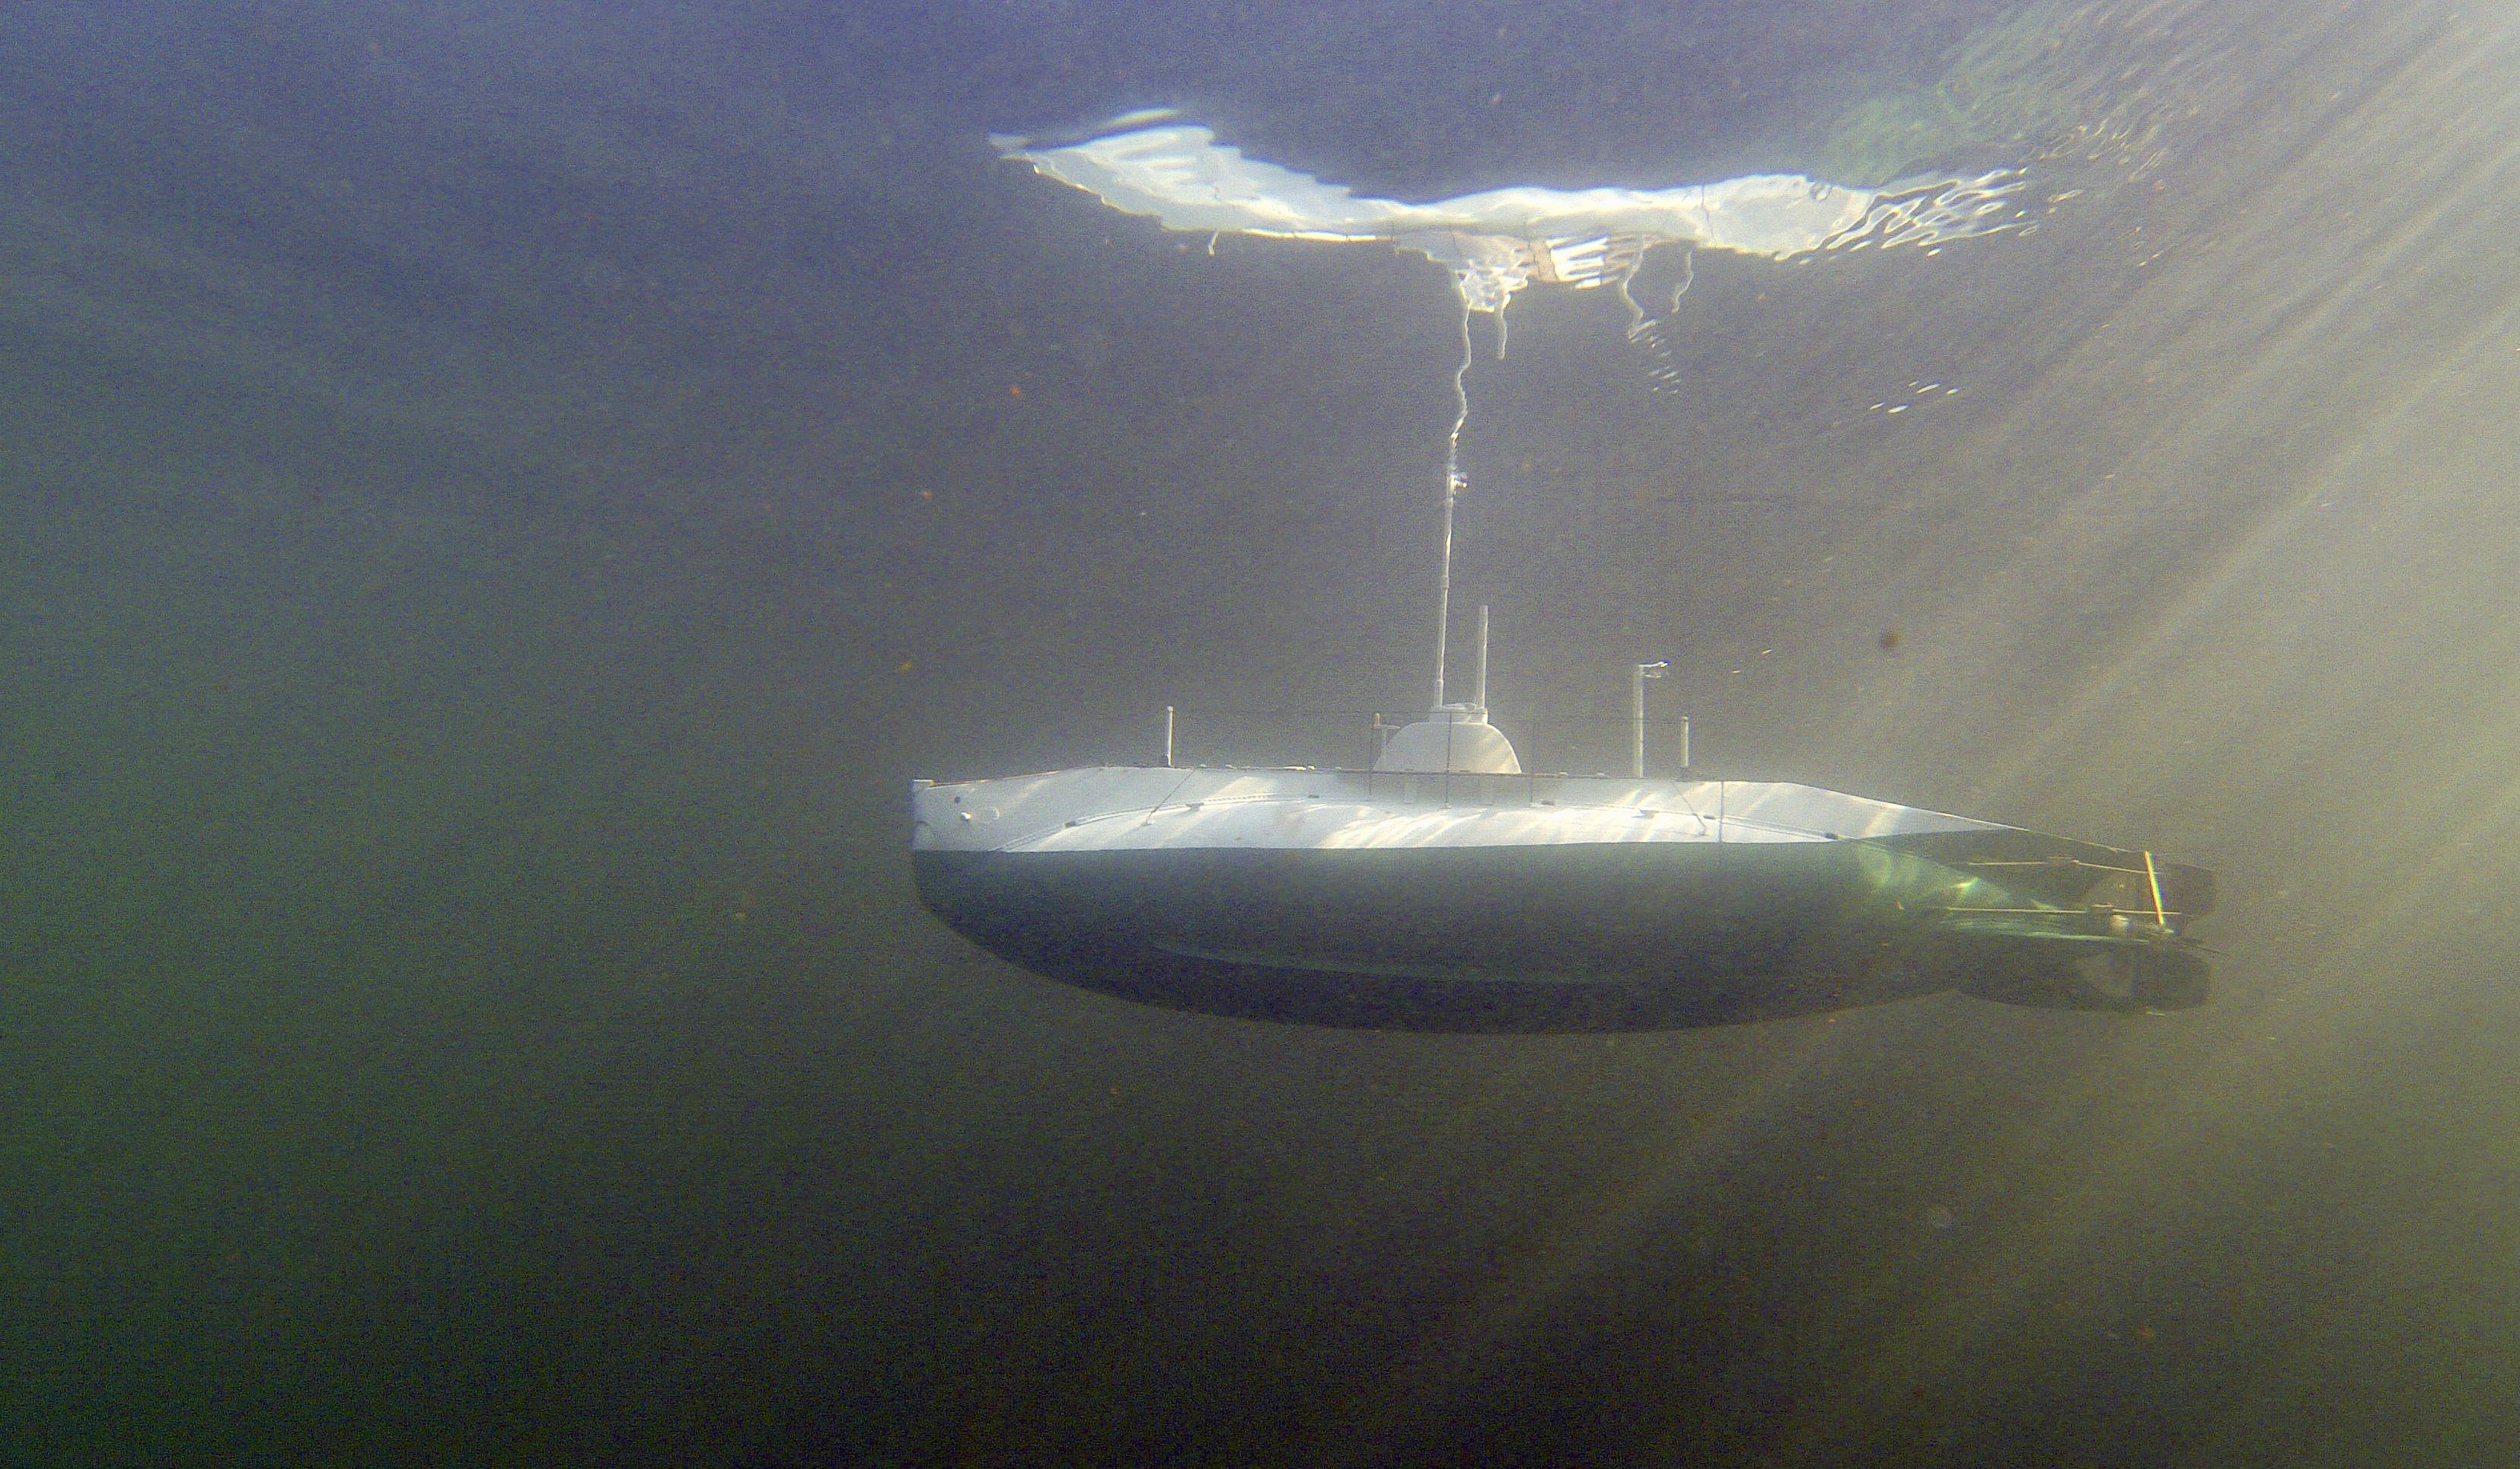
Looks very nice! One of my club members has a sound module that includes the engine (of a MTB) starting and the sound rising with speed. Very impressive. I’m still contemplating what kind of sounds I could use in my submarines!
-
FreekS reacted to Jim Lad in Herzogin Cecilie 1902 by Jim Lad - Four Masted Barque
Had a bit of a break between our holiday and starting treatment, so here's a final final update for a while! 🙂
The mizzen upper topgallants are now rigged and the sharp eyed might also notice that the fore lower shrouds are also sporting ratlines. Only one more square sail to go and then the full ratline, lower sheet, brace thing happens, plus some deck details I can't put on yet.
The 'Duchess' will hopefully return to active duty in mid November!
John
-
FreekS reacted to Dr PR in USS Cape (MSI-2) by Dr PR - 1:48 - Inshore Minesweeper
One coffee cup coming up!
First I drilled out a piece of 1/16 (1.59 mm) brass tubing to about 0.050 inch (1.3 mm). Then I drilled two 0.016 inch (0.4 mm) holes for the handle. The handle is 0.012 inch (0.3 mm) brass wire. The wire was soldered into place and the interior filed to remove the wire stubs.
Then the cup was cut off from the tube, polished and painted. The paint needs to dry more before a second coat is applied.
Here is the 1:48 scale 3 inch (75 mm) cup next to the real 1:1 thing. I calculate it will take about 120,000 "cups" from the scale cup to fill the real thing.
And here is the navigator's cup on the chart desk.
In the real Navy you would never place a coffee cup on the chart desk. But the Cape was McHale's Navy, and we went by Cape rules.
The really difficult part was painting the Navy seal on the cup. That took a steady hand!
-
FreekS reacted to Keith Black in Sternwheeler From the Susquehanna River's Hard Coal Navy by Keith Black - 1:120 Scale
Thank you to everyone for the likes and the kind comments.
Not much to report this evening. I've been working with 24 GA annealed wire trying to create the river to pump, pump to water tank, and tank overflow water lines.
Making these little lines is about to drive me batty. "How hard can it be" you ask, well, pretty dang tough! The home run piece between the pump and tank has been the most difficult. I'll think I'm almost there, I make a slight adjustment and then I'm back to square one. The challenge is not only connecting the two point but also making the line square while following the roof angle.
I'm still not 100% satisfied with the pump to tank line. Once the engine room is attached I may start over using what I have as a pattern.
The overflow and river to pump lines are acceptable.
i did manage to get a steam pressure gauge and water level sight gauge made and attached.
I still have the tank to boiler water line, two exhaust and three steam lines to run before I can permanently attach the engine room.
To each of you, thank you for your support and for being part of the journey.
Keith
-
FreekS reacted to Dr PR in USS Cape (MSI-2) by Dr PR - 1:48 - Inshore Minesweeper
Here is a bit more progress.
This is the pilot house aft bulkhead and some of the instruments that will be mounted there.
The large box is the Mk VII Magnetic Sweep Controller. Below it are two Navigation Light Panels. The small box is a KY-83S Keyer. Above it is a Transfer Panel for the Mk VII. At lower right are a gyro repeater and a barometer. Most of these parts mount on the gray rack to the right of the radio room door.
I found a photo of the Keyer and used it to create the graphic on the face of the box. The Mk VII controller graphic is fictional - I can't find a photo of it. The Transfer Panel graphic is also guesswork. The gyro repeater and barometer graphics are actual photos. The light panel layout is shown in the blueprints, but the graphic is guesswork.
The box that is mounted on a bracket is the ship's EDO Model 320A radar unit. It will be mounted on the pilot house forward bulkhead.
Here is the equipment mounted in place. The red object is the General Alarm switch, and the yellow one is the Chemical Alarm. The actual units were octagonal with a handle, but th 1:48 scale they are too small to model correctly.
The shelf below the Mk VII was for an electric megaphone.
I guess I should put some books in the bookshelf over the chart table.
-
FreekS reacted to Keith Black in Sternwheeler From the Susquehanna River's Hard Coal Navy by Keith Black - 1:120 Scale
Thank you to everyone for the likes and the comments.
I got the Myers water pump made and installed. It's been a long time since I've made a piece of any complexity that hasn't been under a roof.
There are 7 pieces to the electric motor and 14 piece to the pump not counting the belt. The water pump pulley isn't a pulley per se but it's the only wheel I had that worked in scale. Those that followed my Tennessee build may recognize it as a sew on clothes snap.
The electric motor is 0.10 inches W x 0.20 inches L. The pump is 0.275 inches W x 0,50 inches L.
This is just a fun photo putting this little guy's size in prospective.
Thank you to everyone for your kind support and for following along.
Keith
-
FreekS reacted to Dr PR in USS Cape (MSI-2) by Dr PR - 1:48 - Inshore Minesweeper
I have been working on the O1 level deck house and the pilot house details. First up is framing the windows.
I had already installed the window frames as mentioned above. Now I needed to install the windows themselves. Unfortunately, none of the real mahogany I have is small/thin enough, and I don't have the tools to make a lot of consistently small pieces. The sashes (the parts holding the glass) were 2 inches (51 mm) wide, and that scales to 0.42 inches (1.1 mm) at 1:48 scale. I just happen to have two packages of 0.0416 x 0.416 inch (1 mm x 1 mm) basswood scale lumber from Midwest Products Co.
I needed to install strips of this wood into the window openings, more or less centered into the depth of the opening so there would be room for the "glass" behind the sashes. For this I made a tool from a piece of scrap wood (on the left in the picture) as a base and glued on two pieces of wood 1/32 inch (0.8 mm) thick that were shaped to fit into the window openings from the inside.
The window opening was placed over the tool. Pieces of the 0.042 x 0.042 inch basswood were cut to fit into the window opening and glued in place.
This put the sashes recessed a bit into the openings in the window frames, with space behind to install the clear window material. But what should I use for the "glass?"
I thought I would try to cut some glass microscope slide covers. In theory I could get four window panes from a single 22 x 22 mm 1 oz. cover glass. These varied in thickness between 0,0045 to 0.0065 inch (0.114 to 0.165 mm) and would be a perfect fit into the space behind the sashes.
HAH! Fat chance!!
After shattering a half dozen cover slips with nothing resembling a rectangular window pane I decided another solution was needed.
Note to self - never again even think of trying to cut microscope cover slips!
I do have some 0.005 inch (0.127 mm) thick clear styrene sheet from Evergreen Scale Models so I used that for the windows and air ports (seems I tried the cover slips for the air ports on the lower deck house sides and didn't learn the lesson then!).
I eventually finished all the window sashes for pilot house in the forward end of the O1 deck house. The smaller doors into the fan room at the rear were also installed. They were made the same way as the doors in the lower deck house. The air ports also were the same as in the lower deck house.
Next up was painting the window sashes and frames prior to installing the styrene window panes.
I mixed up a batch of reddish-brown "mahogany" paint for the sashes and internal window and door frames. The external frames were painted the same gray that the house sides will be painted. I wanted to finish painting everything close to the clear window panes so I don't have to worry about getting paint on them when the deckhouses are painted. The interior of the pilot house will be detailed with additional trim around the windows and doors, so I wasn't too anal about getting a clean edge around them now.
After the paint dried I glued the styrene window panes into the openings. The openings were all close to the same size (except one that was actually 1 inch narrower on the ship) but still varied by slight amounts. Each pane was individually cut to size and then glued into the opening with very small drops of Duco Cement in the corners of the openings.
Then it was time to start assembling things. I had a lot of trouble with the forward end of the lower deck house and had to try three times to get everything aligned correctly. The O1 deckhouse was a bit easier. The house sides were parallel, and everything fit to the bridge deck at right angles.
To help with the assembly I made a frame out of thick cardboard that would hold the pieces in place while the glue set. The two side panels for the front of the deckhouse fit to the center panel at 150 degree angles (30 degrees angled back from the front surface). The two vertical parts of the frame were carefully cut to the exact shape.
After gluing the three deckhouse front panels together along the edges additional pieces were glued on for reinforcement. A thin (1/32 inch plywood) bottom piece was used to support the angle of the front pieces, but this also serves to support the bottom panel of the interior of the front of the pilot house. Below the windows is the counter top of the interior where several instruments will be positioned in front of the helm.
This is just the beginning of detailing the pilot house. Most of the interior was paneled, with mahogany trim around the windows and doors.
Nearly every surface was covered with instruments and wiring. The blueprints show the positions of everything in great detail. Making and wiring all of this stuff at 1:48 will be interesting.
The blueprints give the Navy part numbers for all of the equipment, but not much detail is included for what each part looked like. I am searching the Internet for photos, instruction manuals and such.
For example, at the lower left is the EDO Model 320A navigational radar receiver control. Apparently the Navy used these on several small vessels. But I can find only a few mentions of this device on the Internet and no photos. I have lists of US Navy electronic equipment from this period (1950s to 1960s) and none mention this equipment! Just tracking down the EDO company and it's products has been a challenge.
Add to this esoteric items like the Mk VII magnetic sweep controller and "navigational light control panels" and what I end up with will loosely represent all of the equipment here. But it will look like a pilot house, and that is the goal.
-
FreekS reacted to Keith Black in Sternwheeler From the Susquehanna River's Hard Coal Navy by Keith Black - 1:120 Scale
I got a few items's checked off the list this past week.
Added the stair railing.
The stair railing was the moat time consuming as it was mostly trial and error
Added control lever and steam pressure gauge in the pilothouse and it's now permanently attached.
Added the water tank, exhaust pipe, steam whistle, drive shaft (as much as can be seen) and step over
Thank you to everyone for the likes and for your support, I appreciate it so very much.
Keith
-
 FreekS got a reaction from FriedClams in USS Cape (MSI-2) by Dr PR - 1:48 - Inshore Minesweeper
Great method to seal the sides of the masking tape! Thanks!
-
 FreekS got a reaction from Canute in HMS Lion by Ian_Grant - 1/150 - RADIO - RESTORATION - WW1 Battlecruiser
Looks very nice! One of my club members has a sound module that includes the engine (of a MTB) starting and the sound rising with speed. Very impressive. I’m still contemplating what kind of sounds I could use in my submarines!
-

 FreekS got a reaction from Keith Black in HMS Lion by Ian_Grant - 1/150 - RADIO - RESTORATION - WW1 Battlecruiser
Looks very nice! One of my club members has a sound module that includes the engine (of a MTB) starting and the sound rising with speed. Very impressive. I’m still contemplating what kind of sounds I could use in my submarines!
-
FreekS reacted to Ian_Grant in HMS Lion by Ian_Grant - 1/150 - RADIO - RESTORATION - WW1 Battlecruiser
A little more progress. I've had Lion on the water at three club pond sails. Very relaxing and it's fun to chat to the same 5 or 6 other guys who show up at the park. This week there was a boy hovering around interested; gave him a shot at steering her around. Among other things in a constant flow of talk, he remarked, "You must be the youngest one here". HaHa. Says something about the hobby.
I added the port and starboard navigation lights, at the level of the charthouse deck. Still need to make white ones for the foremast/mainmast.
I started working on the mainmast stays, then realized they would get in the way of drilling holes and adding stanchions for the aft shelter deck railings (which I have been procastinating about for weeks!). I now have the stanchions for the inner railings made, glued in, and painted grey. I decided to add the boats in the aft well deck before the railing threads were in the way. I spent a l-o-n-g time painting these boats; even then in the end I decided to forego painting bootstripes and red u/w hull on the steam pinnaces since it seemed too much more taping etc for results not all that visible. Here we see the two steam pinnaces, and two stacked boats. The port side will contain the "admiral's launch" beside the pinnace. I can't find a suitable, cheap, 3D file so I'm going to use a whaler hull which printed nicely. I added trailboards at bow and stern and will paint up all fancy for the admiral's use. Don't know whether they slapped grey paint all over these boats in wartime or not. Also visible in the pic are the "green ball" and "red flag" of the helm indicator for ships following when in line ahead, and the inner rail stanchions. I added handrails to the two ladders, from 0.5mm brass rod.
I printed a prototype for the Hotchkiss gun emplacements; she carried two on the aft end of the shelter deck according to Norman A. Ough's drawing. God knows how I will make tiny Hotchkiss guns.....TBD.
Last, I finally glued on the forecastle breakwater which also has been sitting around painted and ready for weeks.
I ordered and have received (just this week) a sound board with USB programming cable and speakers. It's a great little board which plugs directly into an RC Receiver channel (taking power from it too), specifically the channel which has a 3-position switch on the Transmitter (commonly used by pilots for full flaps/half flaps/flaps up). In this case you click it up say "n" times, then click it down once. "n" is the number of the sound track you want to play (board can store many), and clicking it down triggers the audio play. The board can store almost half an hour total of sound.
I have WAV files for bosun's call, klaxon, and the old-time steam driven triple-note whistle. Club members suggest "God Save the King" (this is 1916!) and heavy gun fire to go with the rotating turrets. I'd also like to play a voice calling "battle stations" but I have not yet found it with a British accent, only American.🙄 Should be fun!! For example, other club members with model Corvettes have sonar pinging, sonar pinging with a return echo from a sub, gunfire, depth charges exploding, "action station" calls (no Brit accent but they're models of Canadian corvettes).
We're starting our trip the day after tomorrow so it will be a while for the next update. Thanks for following!
-
FreekS got a reaction from Canute in USS Cape (MSI-2) by Dr PR - 1:48 - Inshore Minesweeper
Great method to seal the sides of the masking tape! Thanks!
-
 FreekS got a reaction from Paul Le Wol in USS Cape (MSI-2) by Dr PR - 1:48 - Inshore Minesweeper
Great method to seal the sides of the masking tape! Thanks!
-
FreekS reacted to Dr PR in USS Cape (MSI-2) by Dr PR - 1:48 - Inshore Minesweeper
I have been putting the finishing touches on the hull.
First off was painting the hull. I used the laser level to mark off the top and bottom of the boot topping (black stripe at the waterline). Then I used yellow-green auto detailing striping tape to mask off the boot topping area. The upper gray part and the lower red parts were then painted.
After the paint dried overnight I removed the striping tape. Then more tape was applied over the gray area just above the top of the boot topping. Another strip of tape was placed over the red paint at the bottom of the boot topping. This masked off the areas around the boot topping area.
Then I painted along the edges of the boot topping, using gray paint along the upper edge and red paint at the lower edge.
This paint sealed the edges of the tape. If any paint flowed under the tape it would be the same color as the paint already there.
After this paint dried I applied the black paint to the boot topping, flowing over the edges of the tape slightly. It looks pretty sloppy at this point.
After the black paint dried I removed the striping tape. This left nice clean edges for the boot topping.
I still need to finish painting the transom. The areas between the guard timbers cannot be masked and must be painted by hand. I will wait until tomorrow morning to do this after a good night's sleep and my first cup of coffee.
The blueprints say the gray was Haze Gray formula 5H. I couldn't find any supplier of this color - it has since been discontinued for a different formula. The original haze gray used in WWII was a much darker blue gray. After the war the US Navy changed to a much lighter neutral gray that was called "Ocean Gray" for a while. I think this was what we used on the Cape and the USS Oklahoma City CLG-5. But the name seems to have been changed back to Haze Gray, Then later on yet another Haze Gray formula was created and I think this is what is used today. But there seems to be a lot of confusion as to which "Haze Gray" was used and when. I gave up trying to match the 5H color and used a fairly neutral light gray.
The red is supposed to be Anti-Fouling Red formula 121. Again I couldn't find this exact color, so I chose a moderately dark red. The blueprints call for Boot Topping Black formula 3. I just used some black paint I had in my paint box. The paints were all acrylic "craft" paints. They dry quickly and are water washable.
DecoArt Slate Gray DAO68
DecoArt Primary Red DA199
craft smart Black 371081
These paints coat well and required just two thin layers applied a day apart. The only problem I had came when I removed the striping tape after painting the boot topping. The tape lifted the red and gray paints from the brass stem band. The brass was smooth and shiny, and apparently did not have enough "tooth" (roughness) for the acrylic paints to adhere to. However, the paint had only dried over night, and if I had waited a week or two before applying the tape it might have held up better. But it was easy to touch up the missing paints.
With the painting mostly done I could install the propeller and rudder. The Bluejacket Shipcrafters propeller was a bright shiny silvery color, but the blueprints call for a bronze piece. I painted it with FolkArt Brushed Bronze metallic acrylic paint. It dried hard, and I have seen no chipping of the paint with handling.
I left the sea chests for the propulsion engines and minesweep generator engines bare metal. The "zincs" around the sea chests, propeller and rudder are thin pieces of brass. I painted them with some ancient Chromatone silver enamel paint that I think I have had since 1977!
I still need to apply some rub-on numbers for the draft markings at the bow and stern. And there is the hull number to be applied in true Cape fashion. Then I will seal everything with a satin acrylic varnish.
-
FreekS reacted to Dr PR in USS Cape (MSI-2) by Dr PR - 1:48 - Inshore Minesweeper
I'm back! I was occupied for about 2 1/2 weeks auditing the books for a non-profit that I am Treasurer for. I was checking every penny coming into and leaving the organization for 13 years, including restricted and unrestricted funds. I found a few errors, and after corrections everything balances for every month of the entire 13 years!
Then I finished laying all of the deck planking on the Cape model.
Don't ask how many individual planks there are - I have no idea! But there are a lot!
Just aft of the superstructure are two grouts running perpendicular to the plank lengths. This was a "portable" or lift out deck section directly above the main propulsion engines. This is still a rough planking. I have scraped, filed and sanded a bit, but the final smoothing and finishing is still to do.
The planks varied in width and height between 0.052 and 0.072 inch (1.3 and 1.8 mm). I carefully measured distances from centerline to deck edges all along the length of the ship - and they were the same everywhere (I was pretty careful with this when I put the plankshears and nibbing strakes on). I figured random choices for planks would even out to port and starboard, but it didn't work that way (Murphy again). The starboard side at the stern gained about 1/4 a plank width at the edge of the deck well. From there I used thinner planks on the starboard side and thicker planks to port. The port side came out perfect with a full plank width finishing out the planking along the stern planksheer. But the starboard side was still almost a half plank too wide and had to be cut into the nibbing strake. But I doubt anyone would notice, and that area will be covered with minesweeping gear anyway.
The next time I plank a deck - especially if the planks are so thin that they bend easily - I will draw a series of lines parallel to the centerline and equally spaced on either side. These will serve as references to catch any planking "creep" wider or thinner on one side from the other.
The deck planks are about 1/16 x 1/16 inch (1.6 x 1/6 mm) and that is pretty small to be making nibbing. Because the deckhouse sides are not parallel, and the nibbing strake curves along the deck edge, the planking pattern was pretty complex along the sides of the deckhouse. This led to a problem with tapering planks along the deckhouse sides and nibbing planks into the nibbing strake. Bringing the decking from the bow and that from the stern together caused a problem, and this was exacerbated by the varying plank widths. The starboard side came out almost perfect, but I had to do some creative planking on the port side to make things come out right.
The last plank on the model ended up sandwiched between outboard nibbed planks and inboard tapered planks. It had to fit into a one plank wide groove - and was nibbed into the nibbing strake. And because it was the last plank it had paper grout strips down both sides. I picked a pretty narrow strip (about 0.060 inch or 1.5 mm) but it was a tight fit with the paper grout glued on. This called for some creative widening of the groove between neighboring planks. But it finally dropped into place with a bit of pressure.
I know some people think the grout between planks on a model should be more imagined than seen. But the Cape's decks were holystoned and bleached, and the grout stood out very visible.
The "grout" on the model is black paper 0.005 inch (0.13 mm) thick, and that is 0.24 inch at 1:48 scale. The blueprints say the grout was 1/4 inch wide in the ship's decks.
-
FreekS reacted to Keith Black in Sternwheeler From the Susquehanna River's Hard Coal Navy by Keith Black - 1:120 Scale
Thank you to each of you for the comments and the likes.
I'm calling the steam engine is done. I could add the reversing leavers but they would be on the starboard side and wouldn't be visible with the engine room attached. The engine can only be really viewed from the port side and with the reversing levers on the starboard, it's work that to me is somewhat pointless.
The crank is straight, there was no way I could make journals and get the nine eye pins (rods and bearings) to align. That task was tough enough with the crank being straight!
I get a real kick taking my boxes of bits and making something mechanical. The engine's final dimensions are engine body, 0.90 L x 0.41 H X 0.31 W inches. Flywheel to tail shaft is 1.15 inches. It took 64 individual pieces to make the engine.
There's no mistaking it's an engine even though little can be see when surrounded by the engine room.
It seems it's like this is becoming my signature, build an engine and bury it.
Thank you for your support and for being part of the journey.
Keith
-
FreekS reacted to Keith Black in Sternwheeler From the Susquehanna River's Hard Coal Navy by Keith Black - 1:120 Scale
Thank you to everyone for the comments and likes.
There should be a steam engine in there somewhere.
In the heat of battle. All that mess working on a piece less that an inch long.
Cylinder heads and steam chest glued to plywood backing. I have a large work surface but invariably I work at the bottom edge of the table, that's why I have so many escapees.
The top end is done. Horrible photo, no more taking photos on a white background.
I'm pleased with the top end, hopefully I can get the bottom end to match. It took 31 pieces to make the top end. I was trying to hold the top end length to 0.70 inches but it came out to be 0.90 inches. This means the completed engine will be about 1.1 inches, to scale that makes the engine 11 feet in length. What a monster!
Thank you for your support and for following along.
Keith
-
FreekS reacted to Keith Black in Sternwheeler From the Susquehanna River's Hard Coal Navy by Keith Black - 1:120 Scale
Regarding the steam engine.
We know it was a non condensing steam engine because we see the exhaust being emitted directly into the atmosphere. We know it was vertical steam engine and not a horizontal engine. We know the height was no more than four feet high as the exhaust pipe from the engine can be seen through the engine room window viewed from the bow.
If it was an expansion steam engine the exhaust would be water. The idea of a non condensing expanding engine is not a possibility according to what I've read and I've done a bunch of reading/research over the past two days trying to come up with an engine design I can make.
The power of a two cylinder expanding engine was only suitable for a launch, so that eliminates a vertical two cylinder non condensing engine because of the lack of power and a vertical three cylinder non condensing engine also sounds like it wouldn't have also had the power to push barges. I did find a photo of a model of a vertical three cylinder non condensing reversing engine, see photo.
They did make a special marine vertical four cylinder reversing non condensing steam engine but I can't find a model or better yet, historical photo of one.I did find a photo of a vertical four cylinder reciprocating (V-4) but that wouldn't work because there would have two exhaust pipes coming off the engine, not one.
The vertical marine four cylinder reversing non condensing steam engine was powerful and smooth running engine. Because of the length of the drive shaft and the wheels being gear driven, minimizing the amount of vibration would have been a huge factor.
What's a guy to do? The only thing I know to do is get creative and add a cylinder to the three cylinder engine shown.
"Houston, disregard that last transmission" ....