FriedClams
-
Posts
1,342 -
Joined
-
Last visited


About FriedClams

Recent Profile Visitors
5,425 profile views


-
 Paul Le Wol reacted to a post in a topic:
Lancha Chilota by JacquesCousteau – Scale 1:32 – Chilean Coasting Sloop
Paul Le Wol reacted to a post in a topic:
Lancha Chilota by JacquesCousteau – Scale 1:32 – Chilean Coasting Sloop
-
Dr PR reacted to a post in a topic:
Pelican 1943 by FriedClams - 1:48 - Eastern-Rig Dragger
-
TOM G reacted to a post in a topic:
Pelican 1943 by FriedClams - 1:48 - Eastern-Rig Dragger
-
 MAGIC's Craig reacted to a post in a topic:
Pelican 1943 by FriedClams - 1:48 - Eastern-Rig Dragger
MAGIC's Craig reacted to a post in a topic:
Pelican 1943 by FriedClams - 1:48 - Eastern-Rig Dragger
-
MAGIC's Craig reacted to a post in a topic:
Steam Schooner Wapama 1915 by Paul Le Wol - Scale 1/72 = From Plans Drawn By Don Birkholtz Sr.
-
Glen McGuire reacted to a post in a topic:
Lancha Chilota by JacquesCousteau – Scale 1:32 – Chilean Coasting Sloop
-
Glen McGuire reacted to a post in a topic:
Steam Schooner Wapama 1915 by Paul Le Wol - Scale 1/72 = From Plans Drawn By Don Birkholtz Sr.
-
Keith Black reacted to a post in a topic:
Lancha Chilota by JacquesCousteau – Scale 1:32 – Chilean Coasting Sloop
-
 JacquesCousteau reacted to a post in a topic:
Lancha Chilota by JacquesCousteau – Scale 1:32 – Chilean Coasting Sloop
JacquesCousteau reacted to a post in a topic:
Lancha Chilota by JacquesCousteau – Scale 1:32 – Chilean Coasting Sloop
-
Paul Le Wol reacted to a post in a topic:
Steam Schooner Wapama 1915 by Paul Le Wol - Scale 1/72 = From Plans Drawn By Don Birkholtz Sr.
-
FriedClams reacted to a post in a topic:
Lancha Chilota by JacquesCousteau – Scale 1:32 – Chilean Coasting Sloop
-
 You're doing a great job maintaining historical accuracy on these sail and rigging details. But I'm not surprised as this has been a signature on all your work. Looking fantastic! Gary
- 286 replies
-
- 4
-
-
-
- Chile
- Latin America
- (and 5 more)
-
FriedClams reacted to a post in a topic:
Lancha Chilota by JacquesCousteau – Scale 1:32 – Chilean Coasting Sloop
-
FriedClams reacted to a post in a topic:
Lancha Chilota by JacquesCousteau – Scale 1:32 – Chilean Coasting Sloop
-
Those two stanchions and the bulwark planking fit together nicely, Paul! I like that Vallejo paint color - a warm neutral gray, not bluish. Looking great. Gary
-
FriedClams reacted to a post in a topic:
Steam Schooner Wapama 1915 by Paul Le Wol - Scale 1/72 = From Plans Drawn By Don Birkholtz Sr.
-
FriedClams reacted to a post in a topic:
Steam Schooner Wapama 1915 by Paul Le Wol - Scale 1/72 = From Plans Drawn By Don Birkholtz Sr.
-
FriedClams reacted to a post in a topic:
Pelican 1943 by FriedClams - 1:48 - Eastern-Rig Dragger
-
FriedClams reacted to a post in a topic:
Pelican 1943 by FriedClams - 1:48 - Eastern-Rig Dragger
-
FriedClams reacted to a post in a topic:
Pelican 1943 by FriedClams - 1:48 - Eastern-Rig Dragger
-
FriedClams reacted to a post in a topic:
Pelican 1943 by FriedClams - 1:48 - Eastern-Rig Dragger
-
FriedClams reacted to a post in a topic:
Pelican 1943 by FriedClams - 1:48 - Eastern-Rig Dragger
-
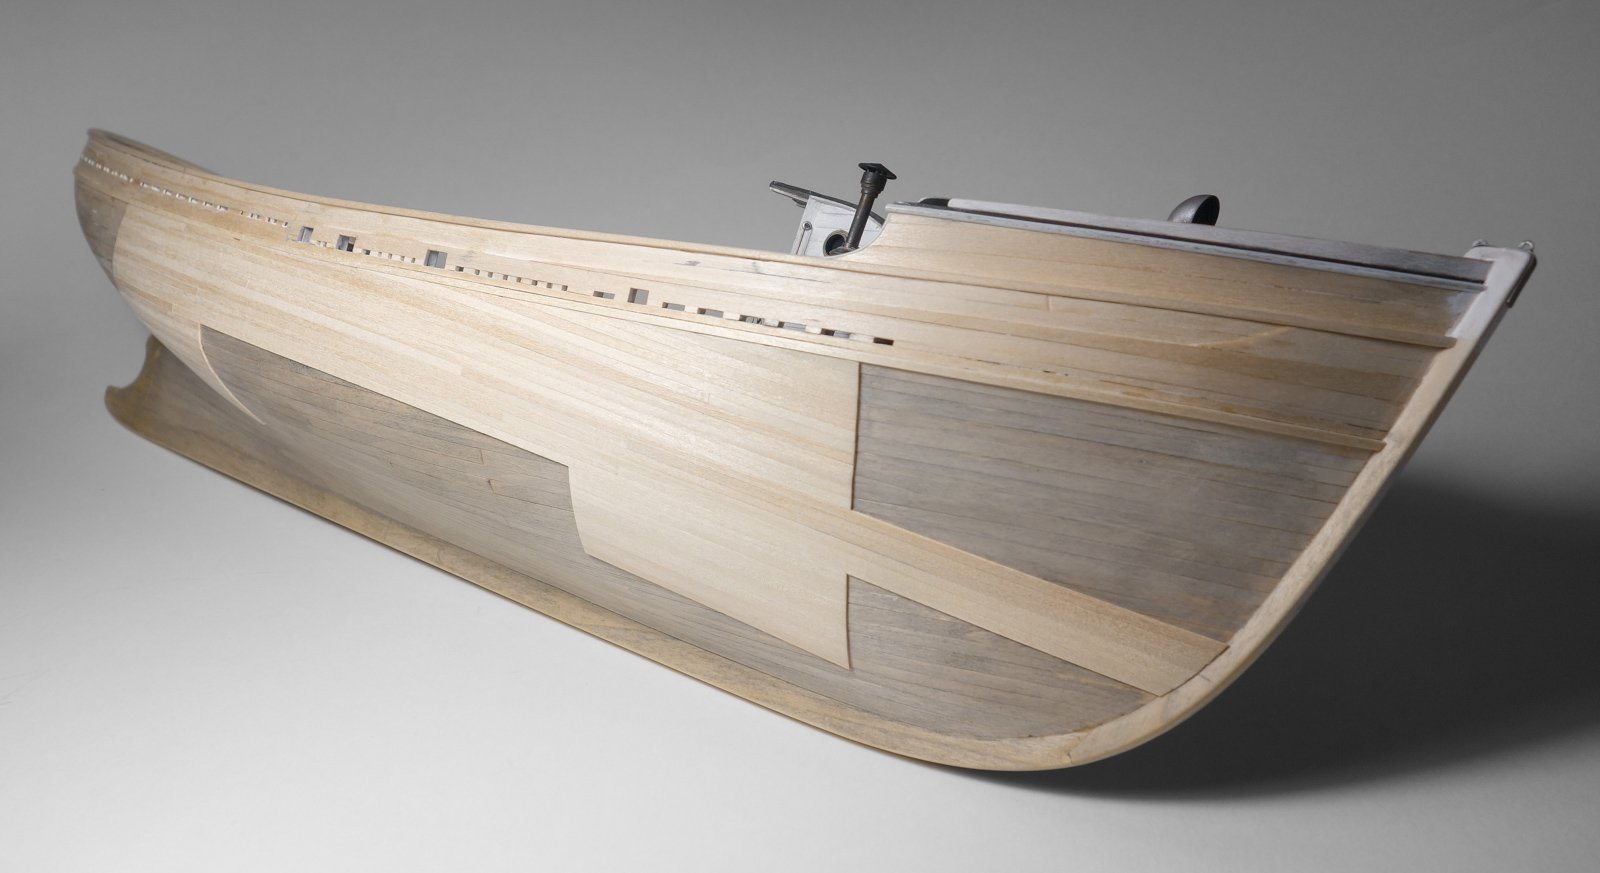
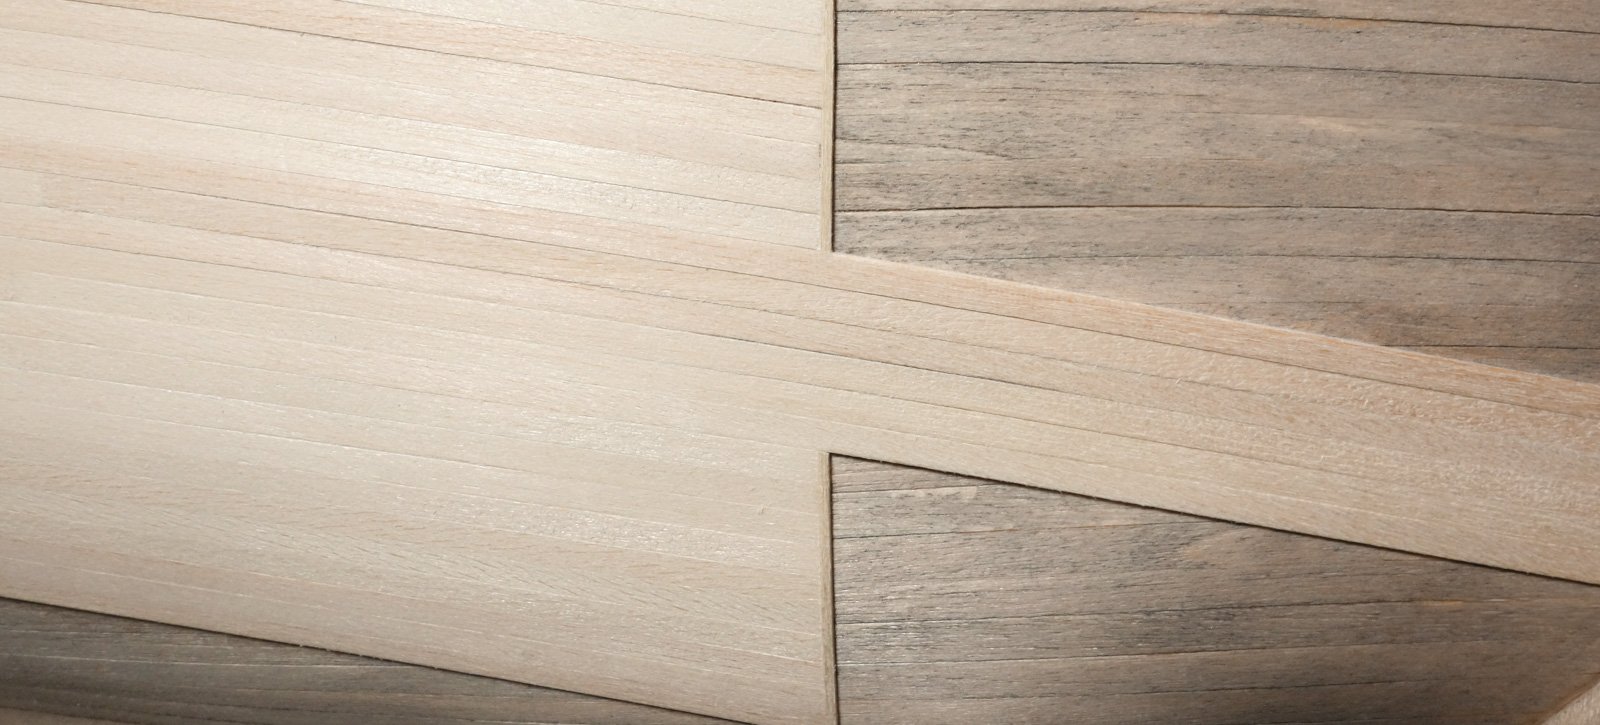
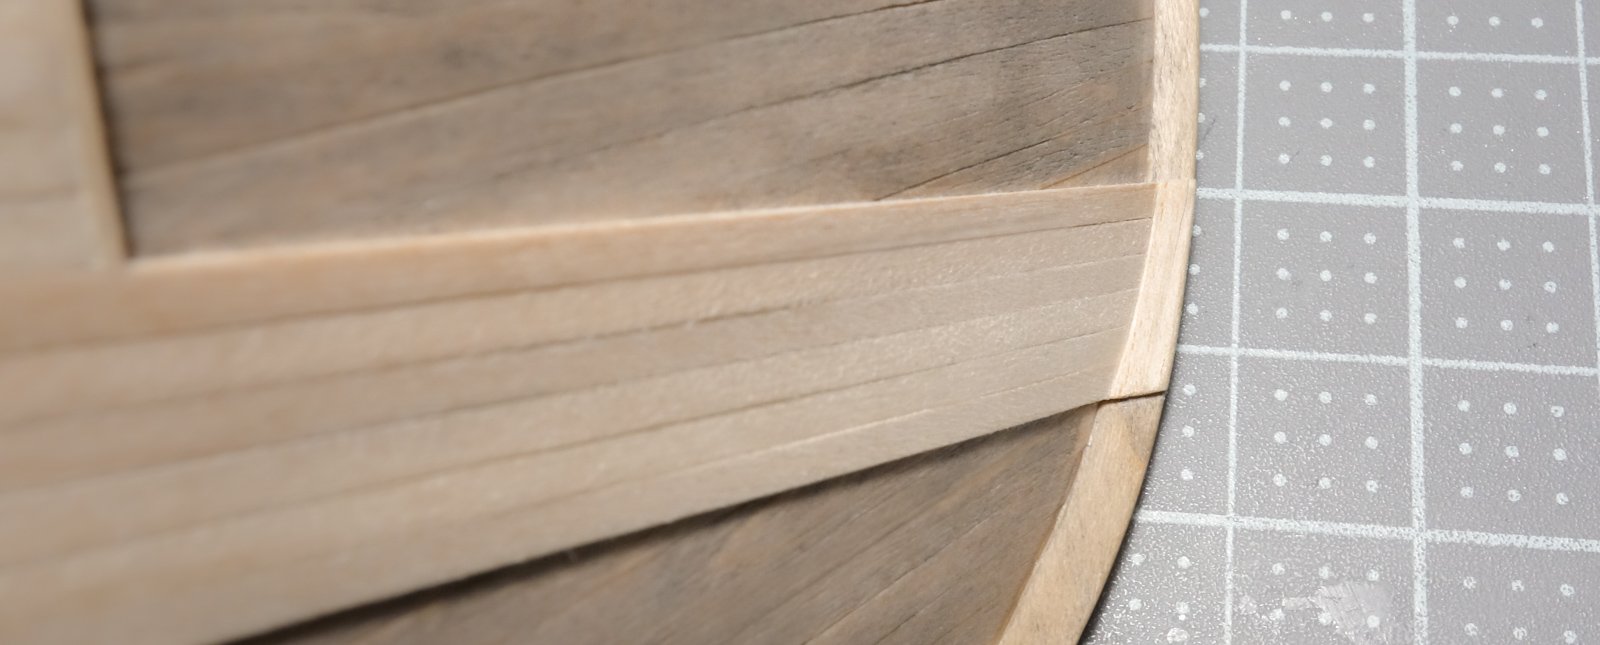
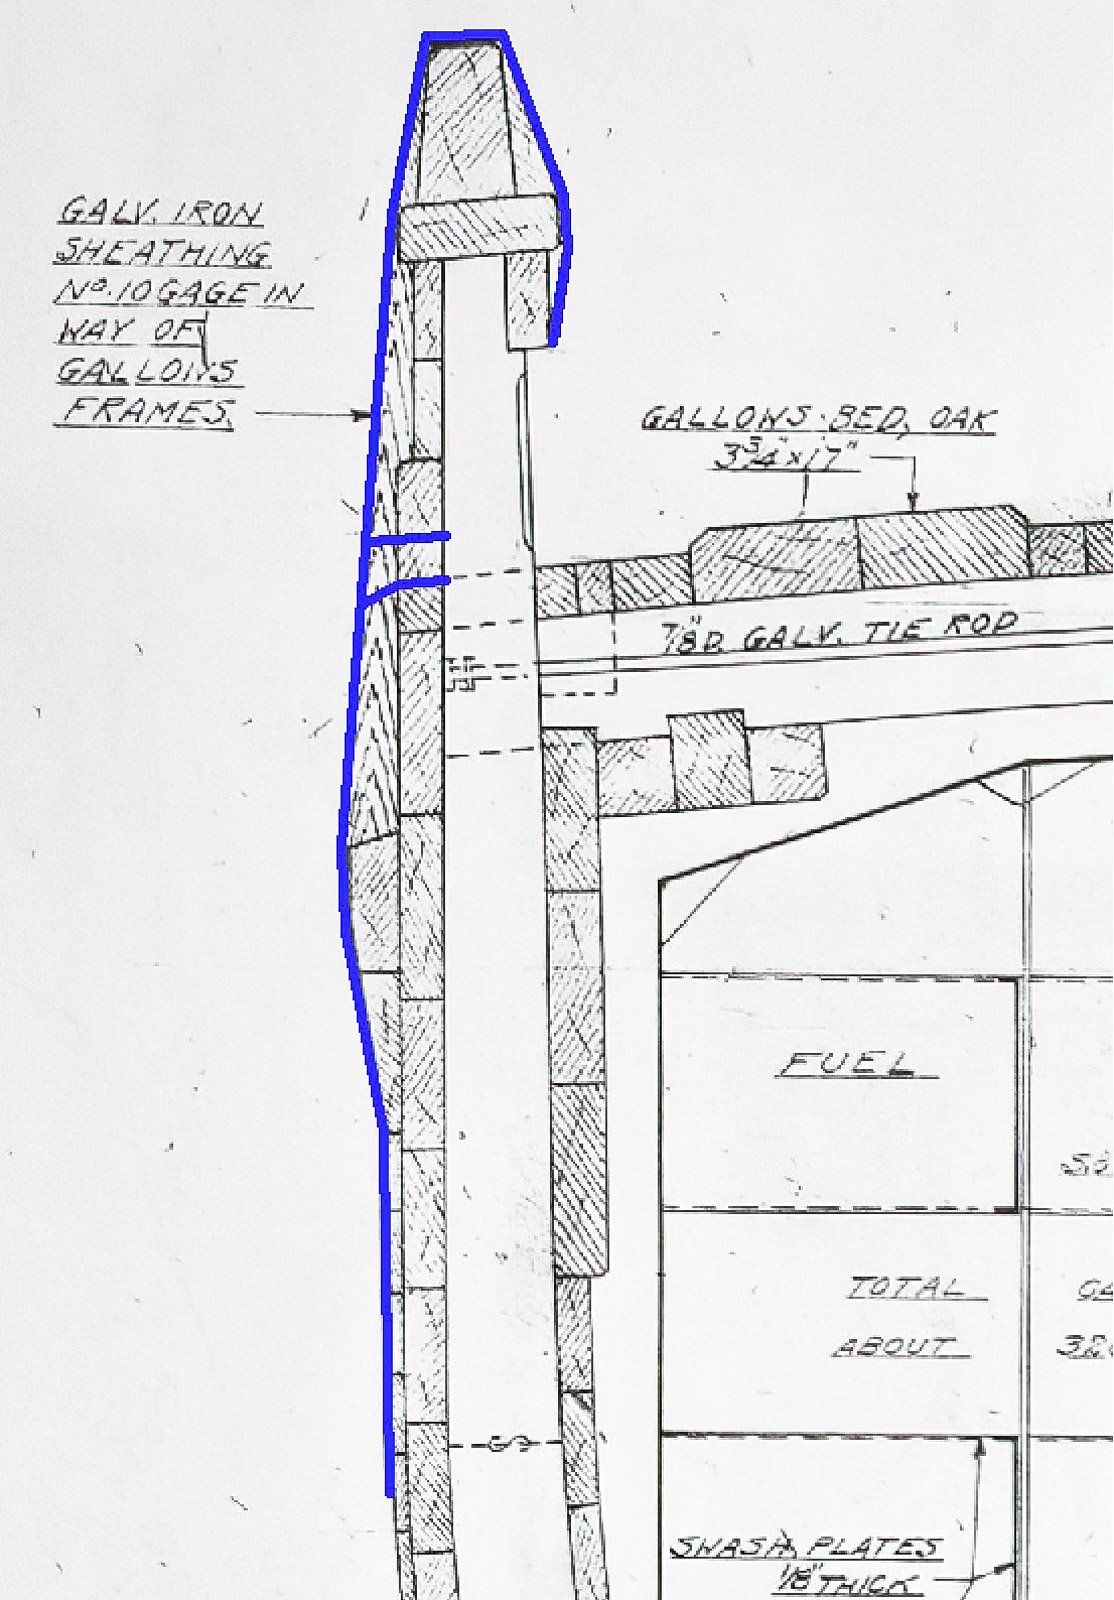
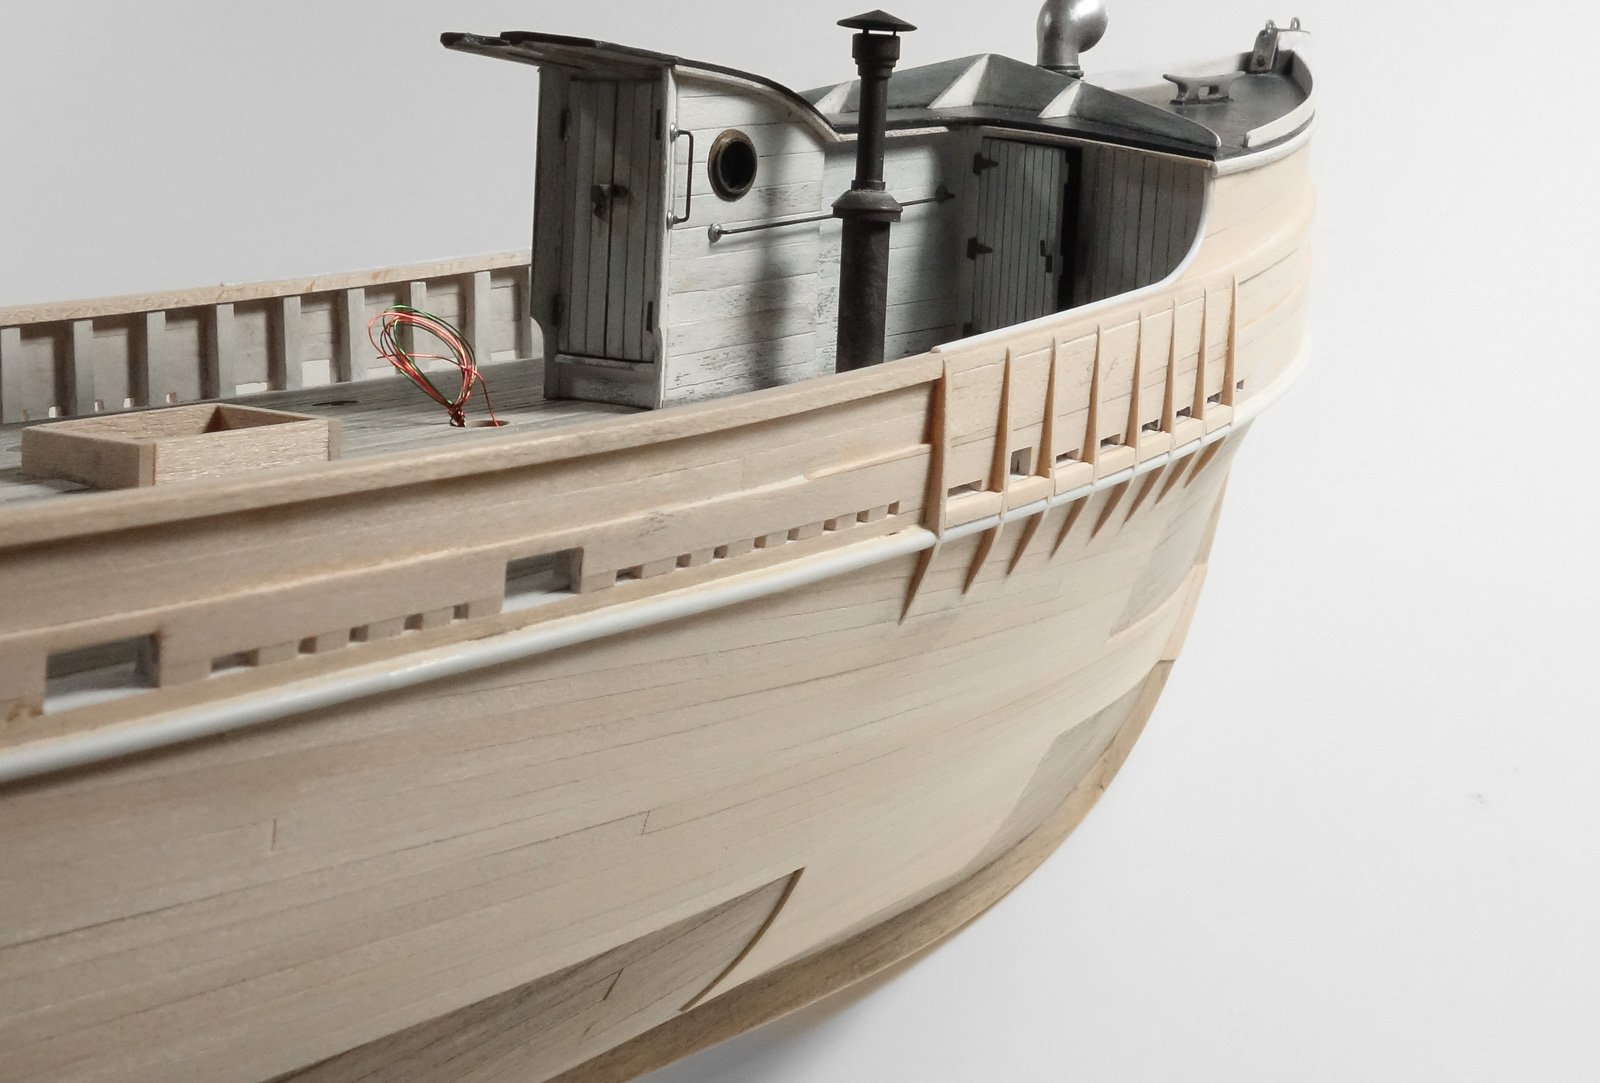
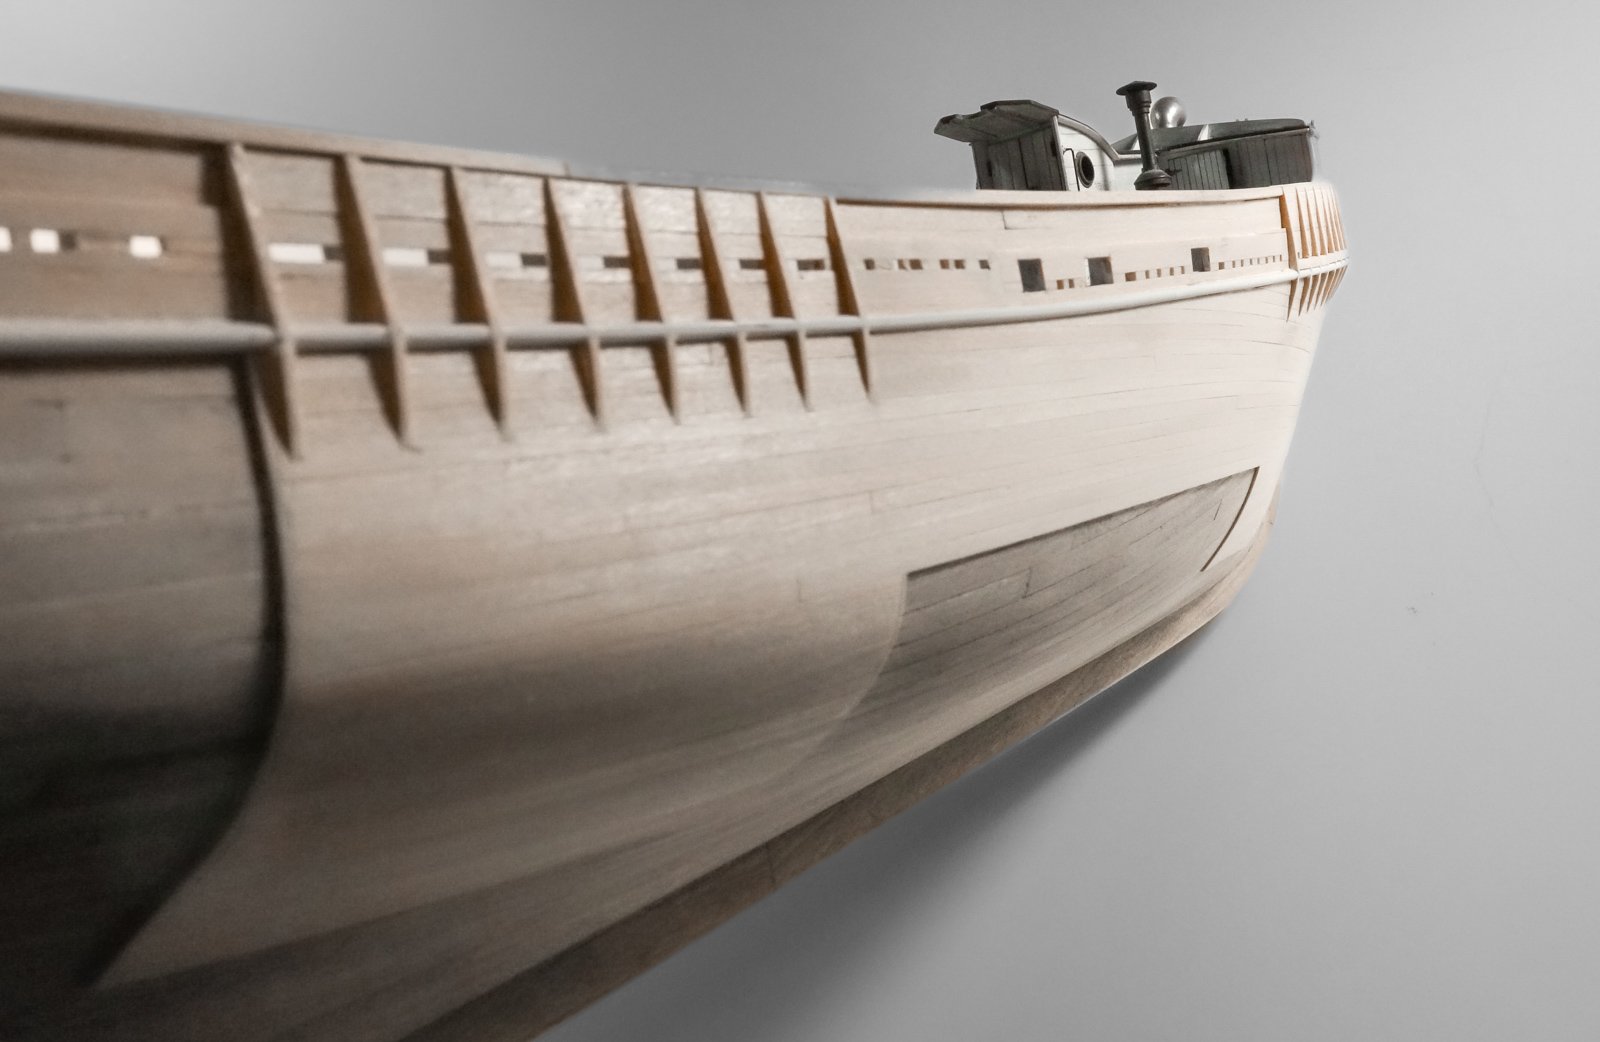
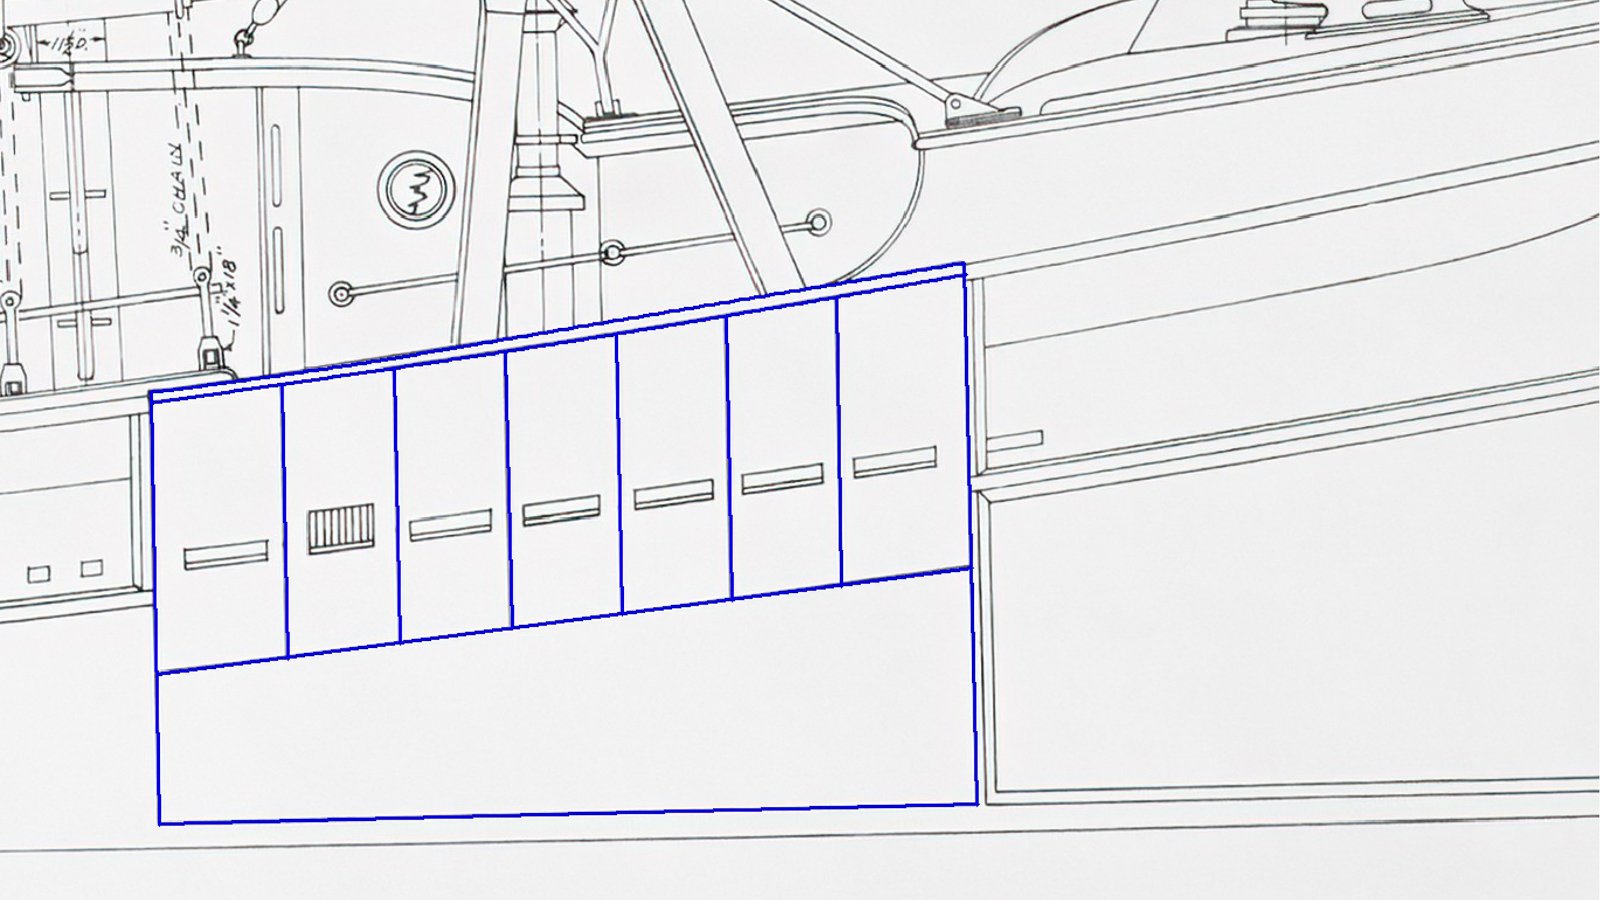
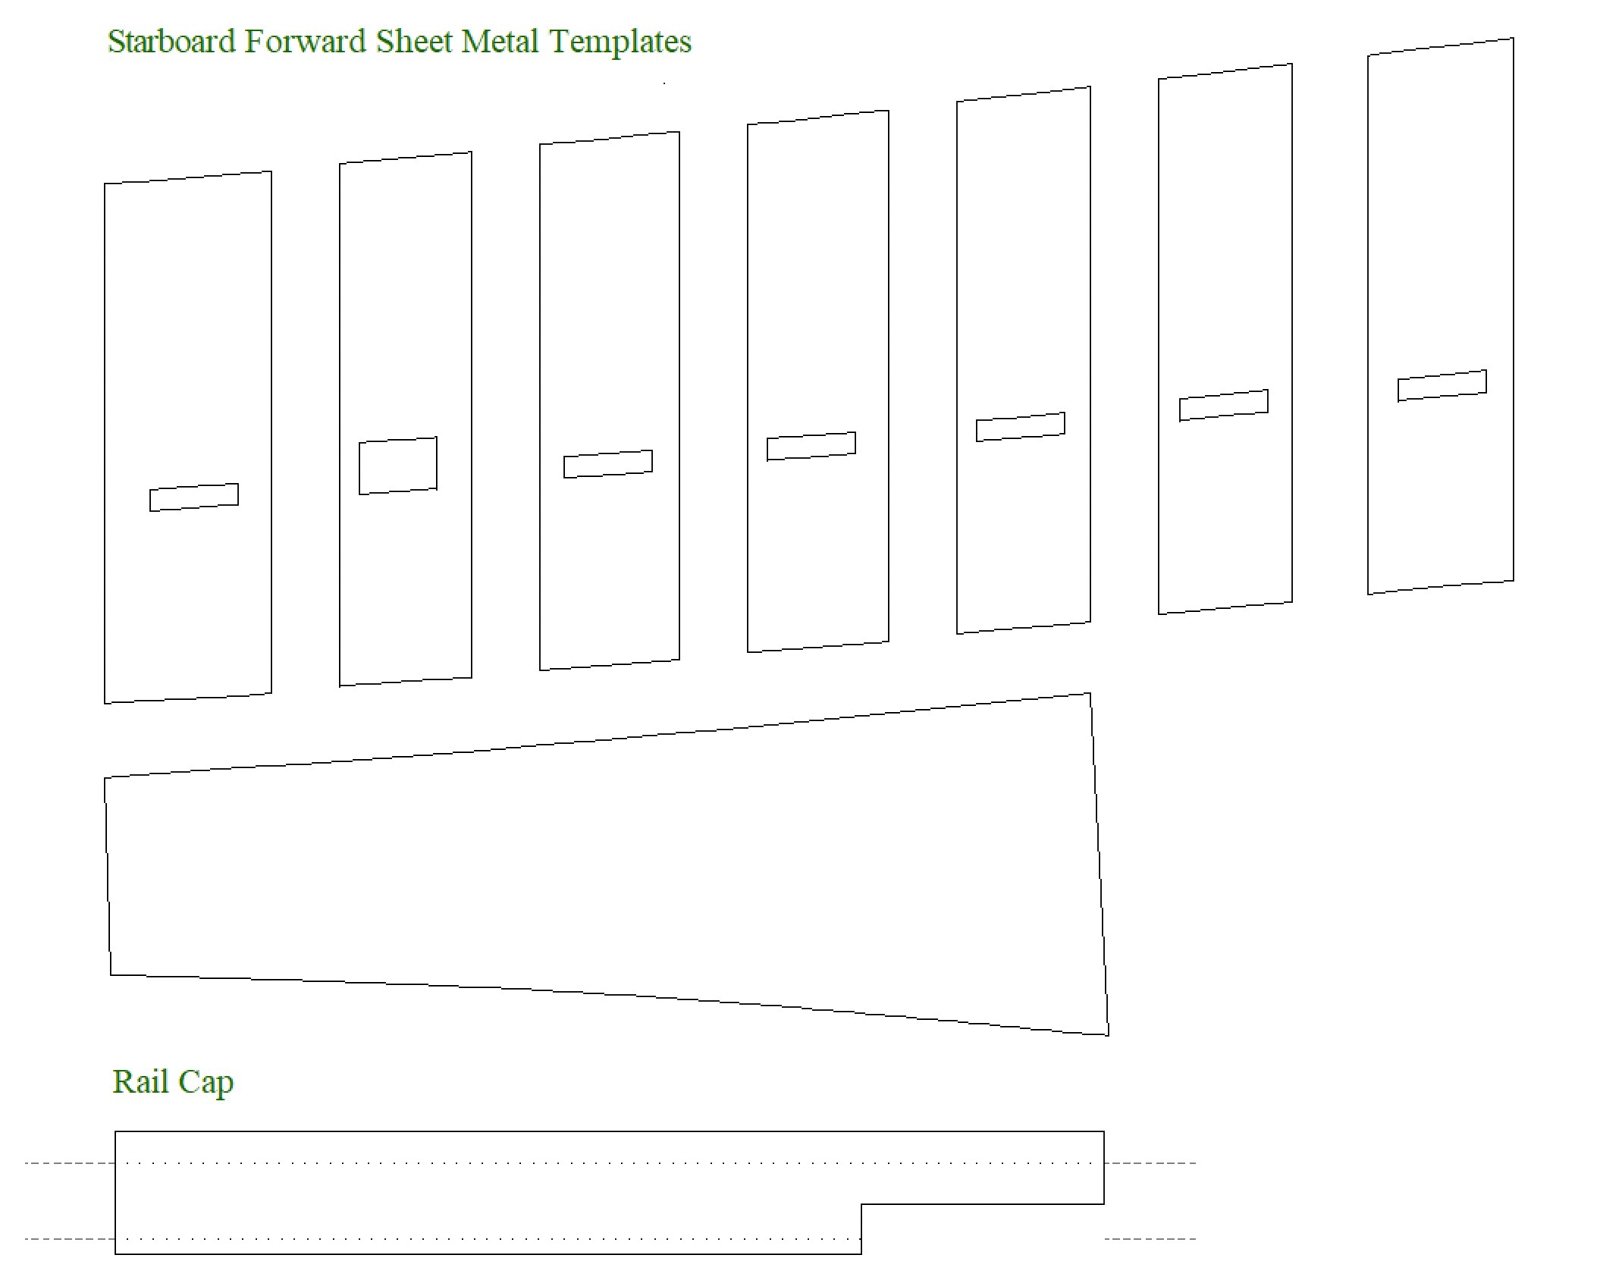
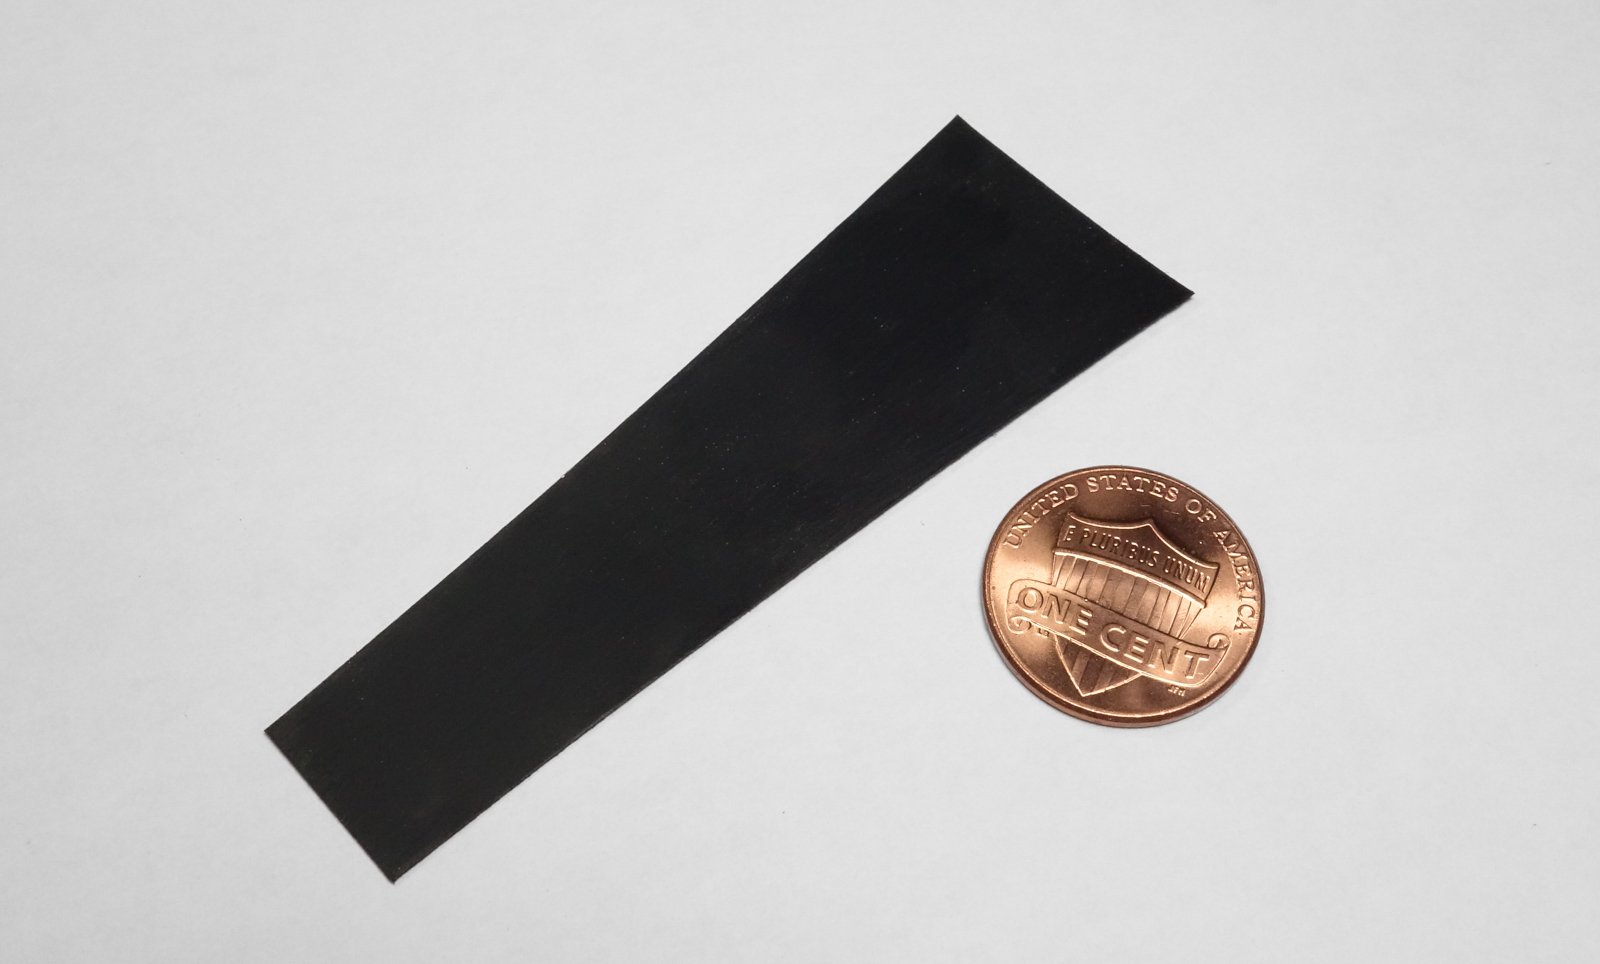
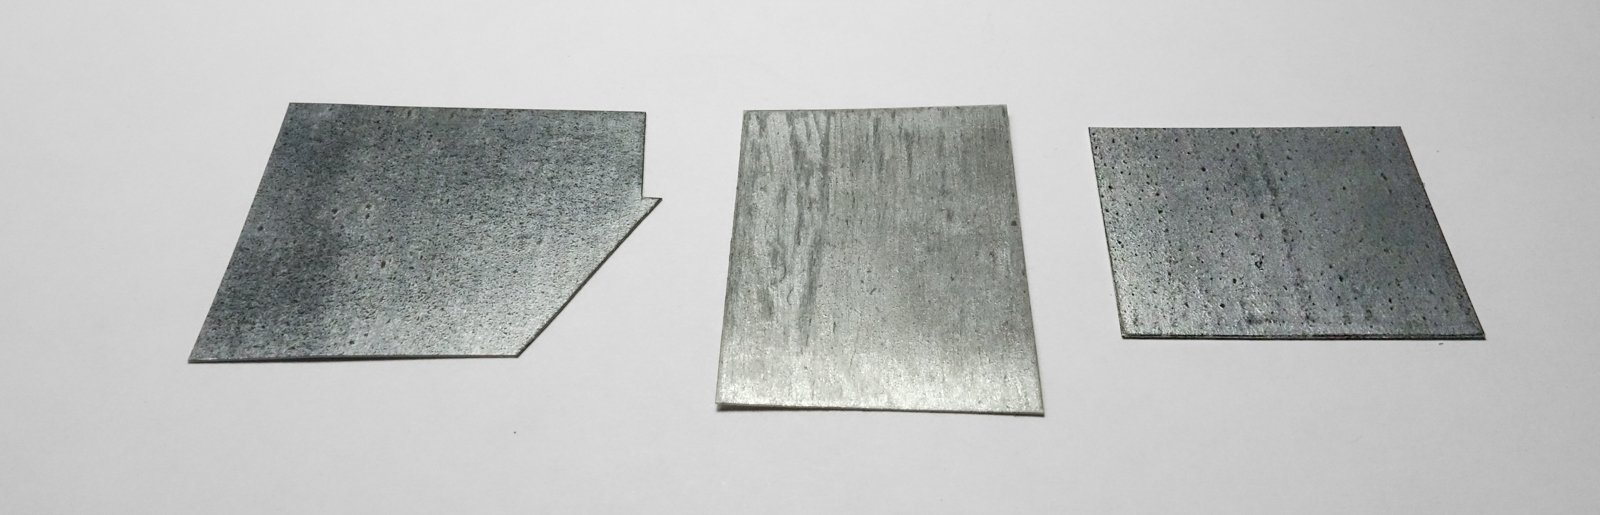
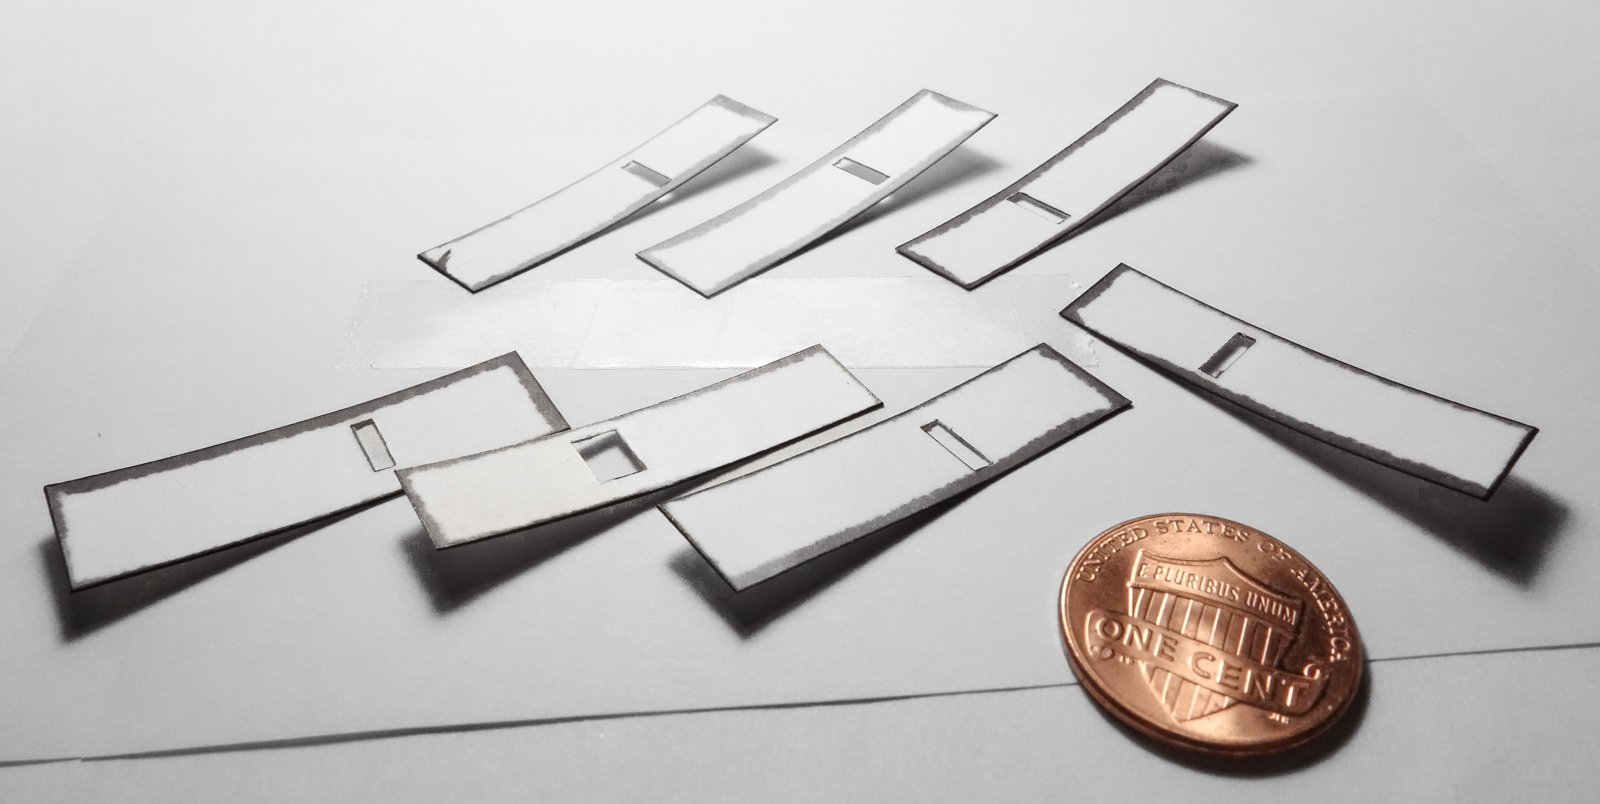
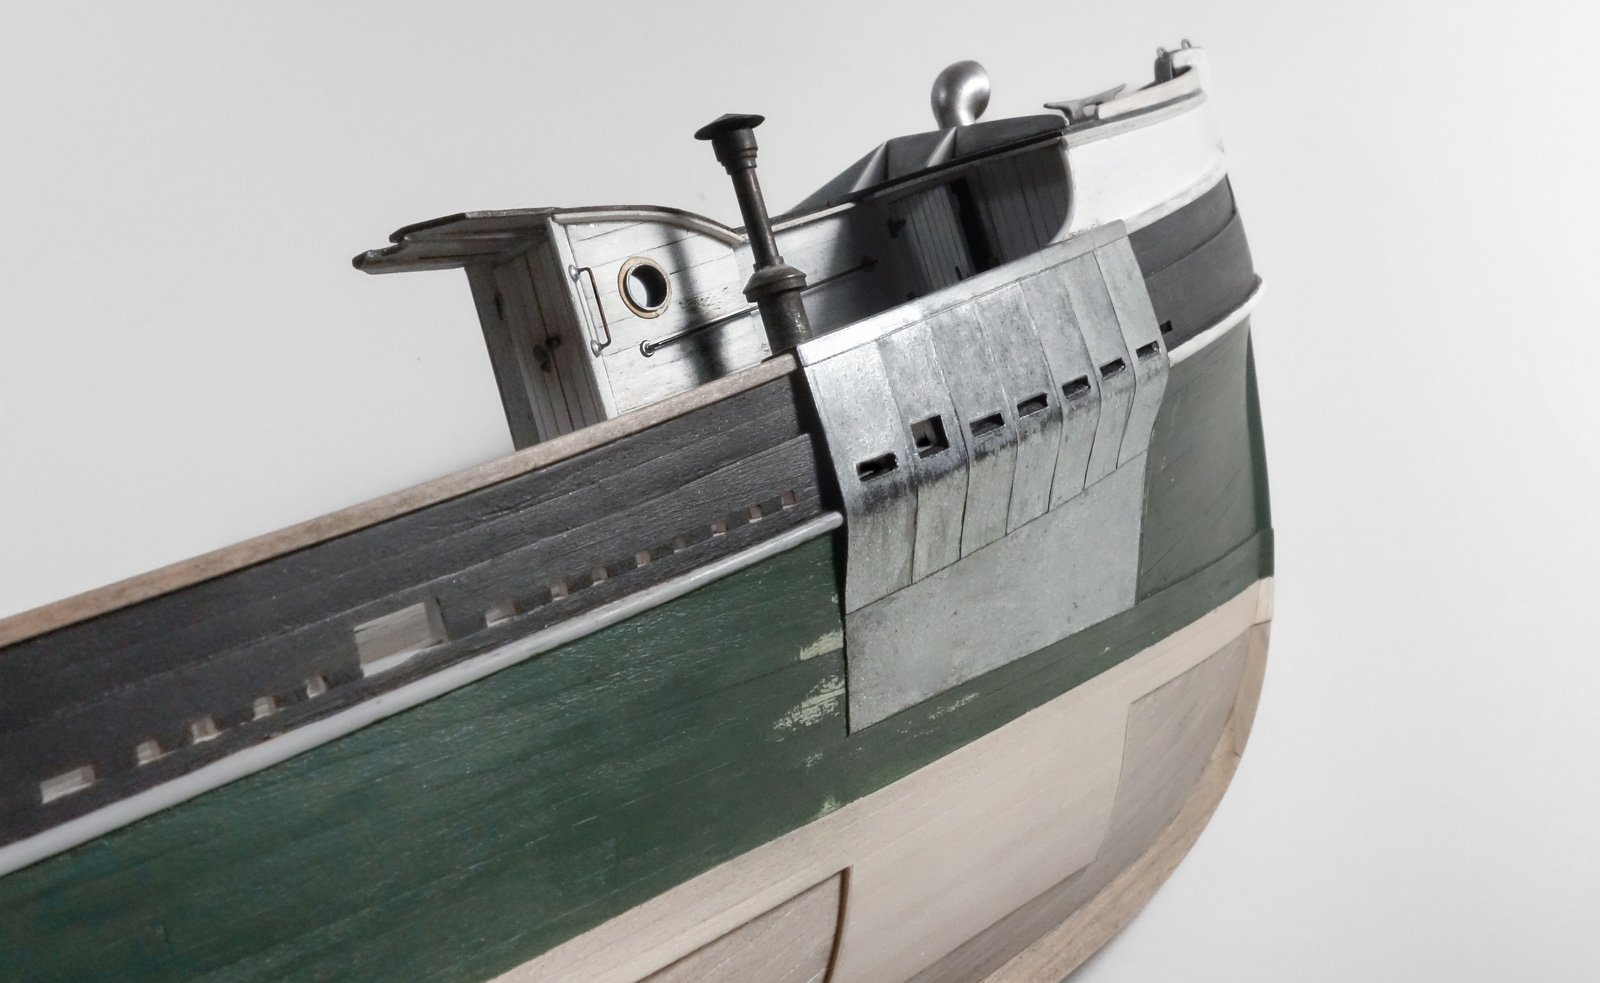
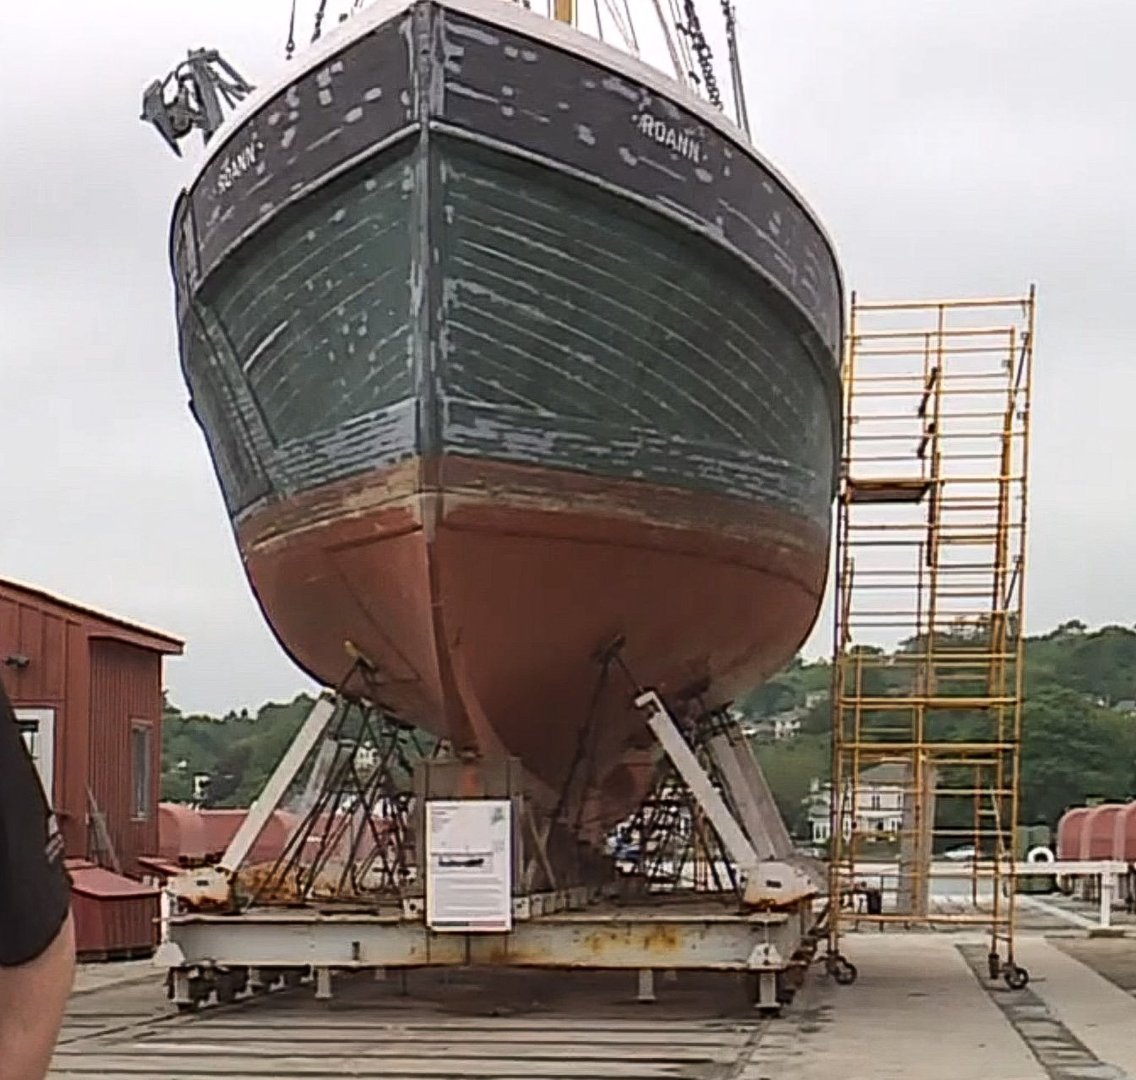
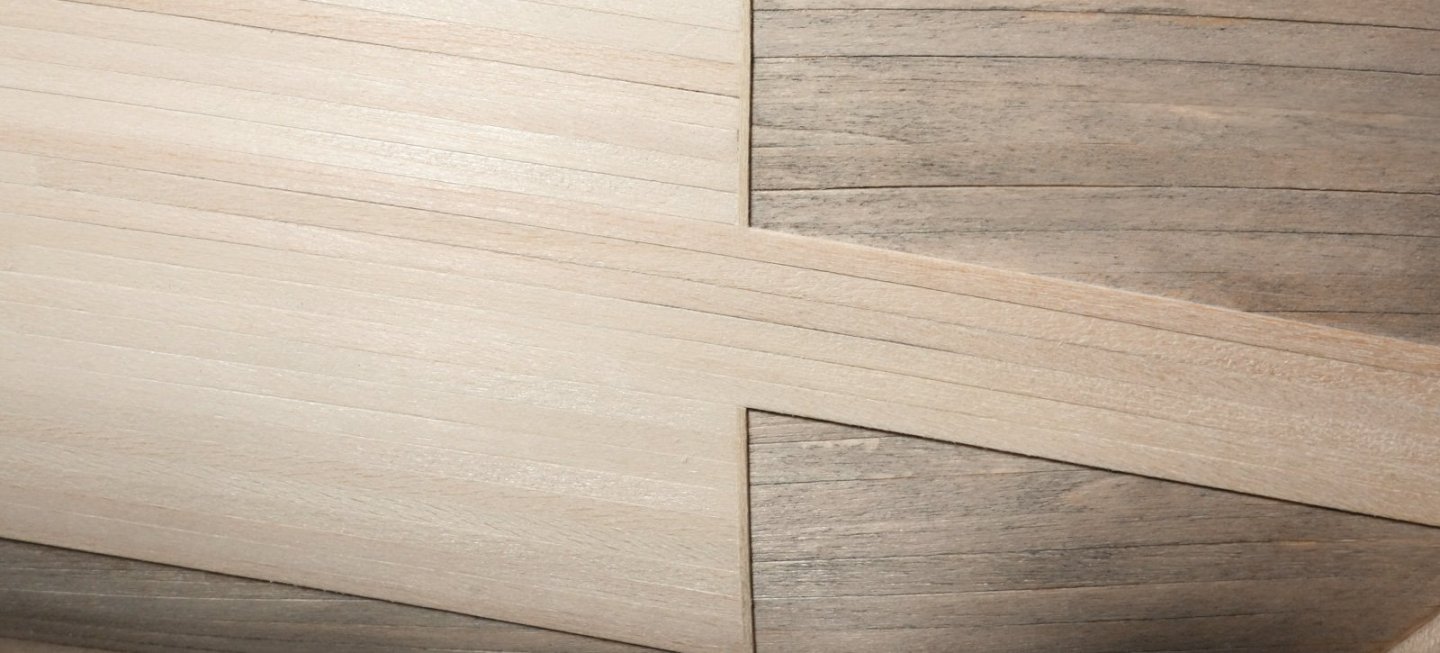
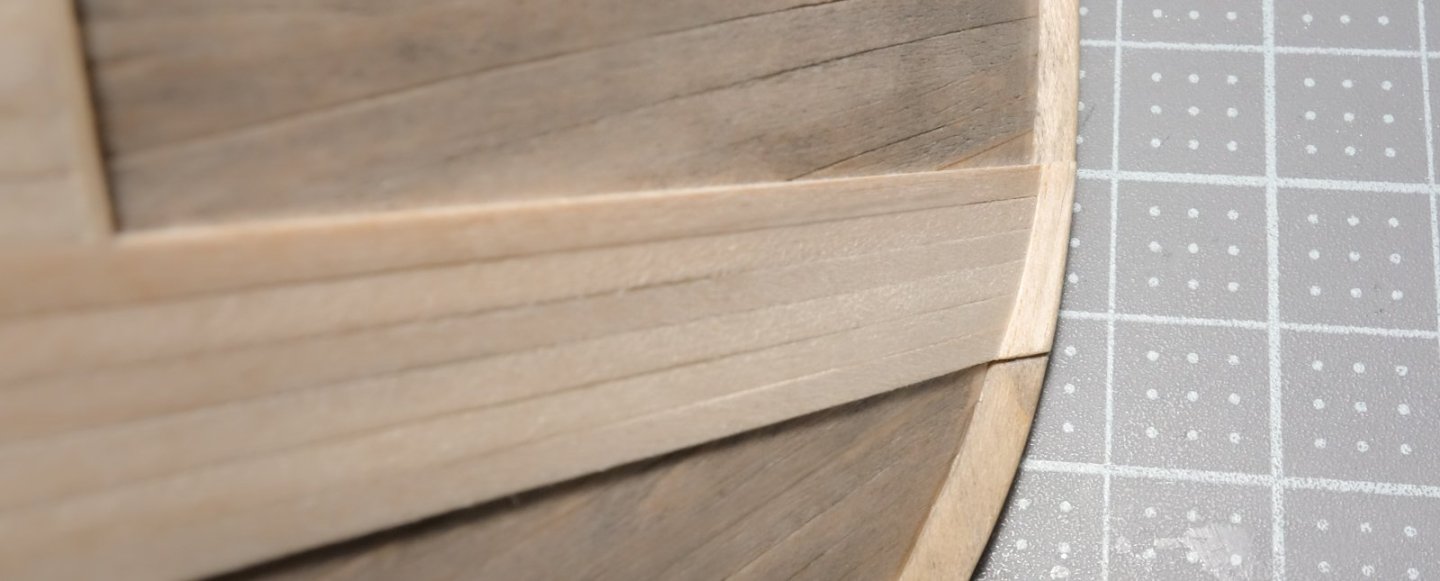
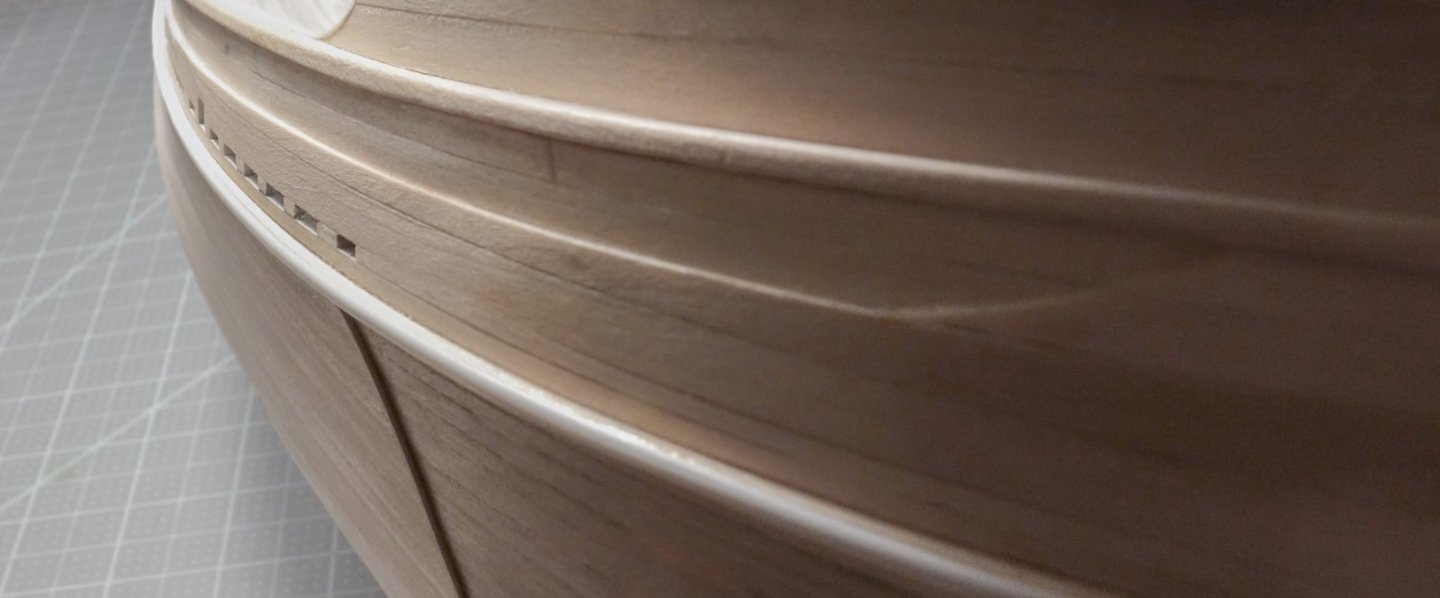
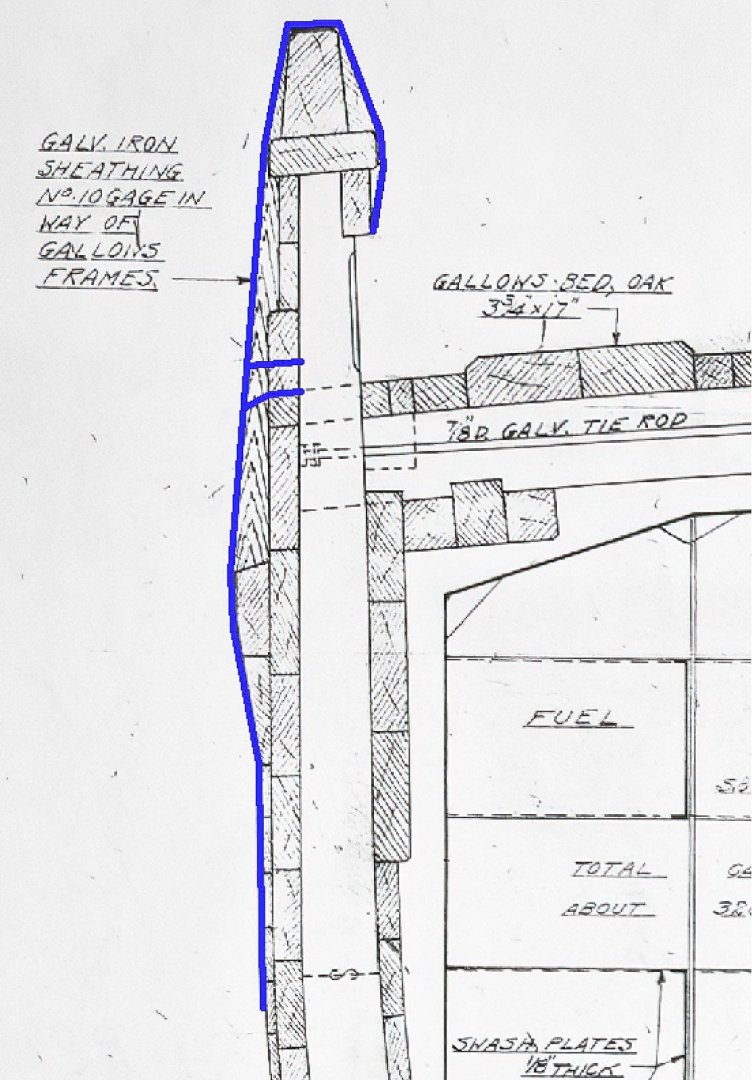
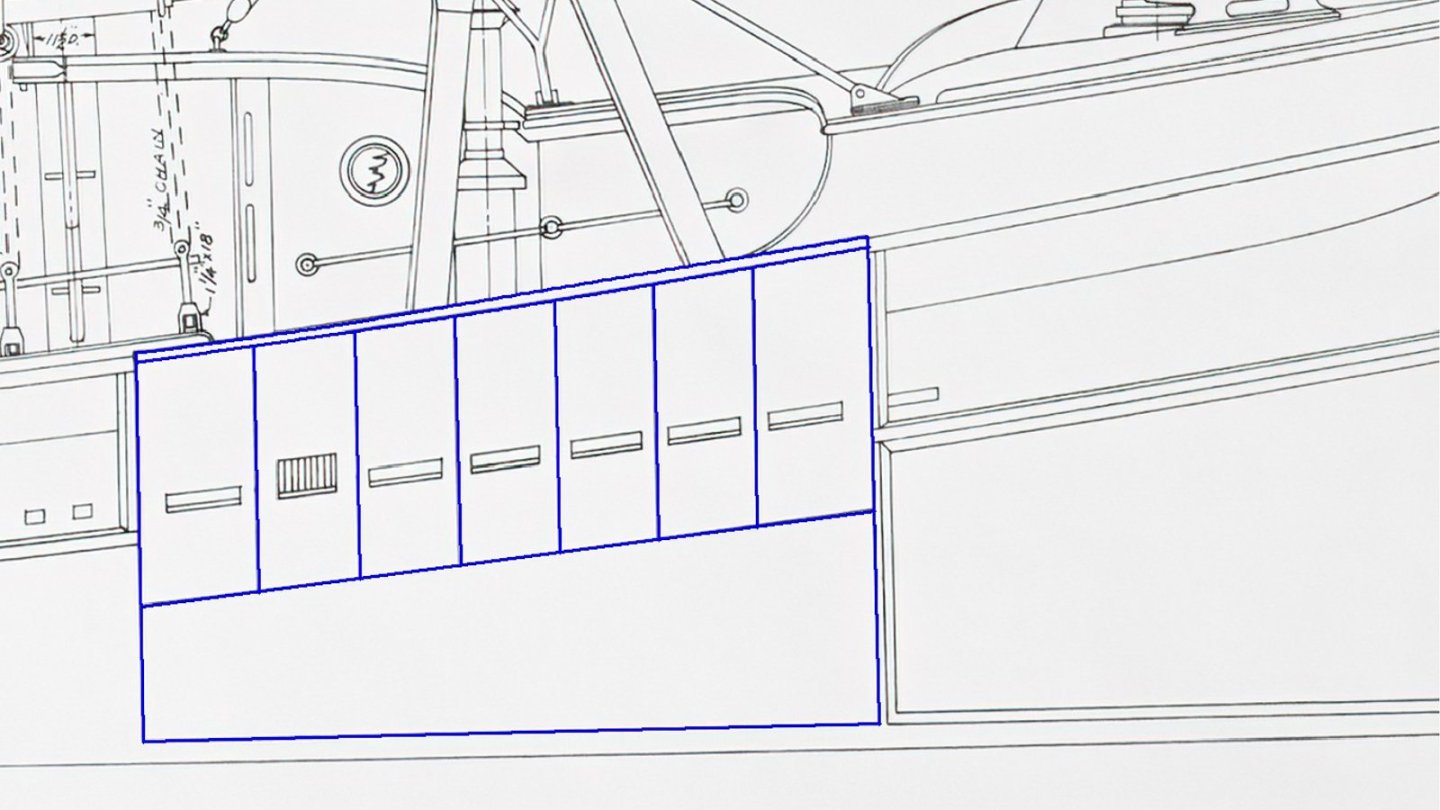
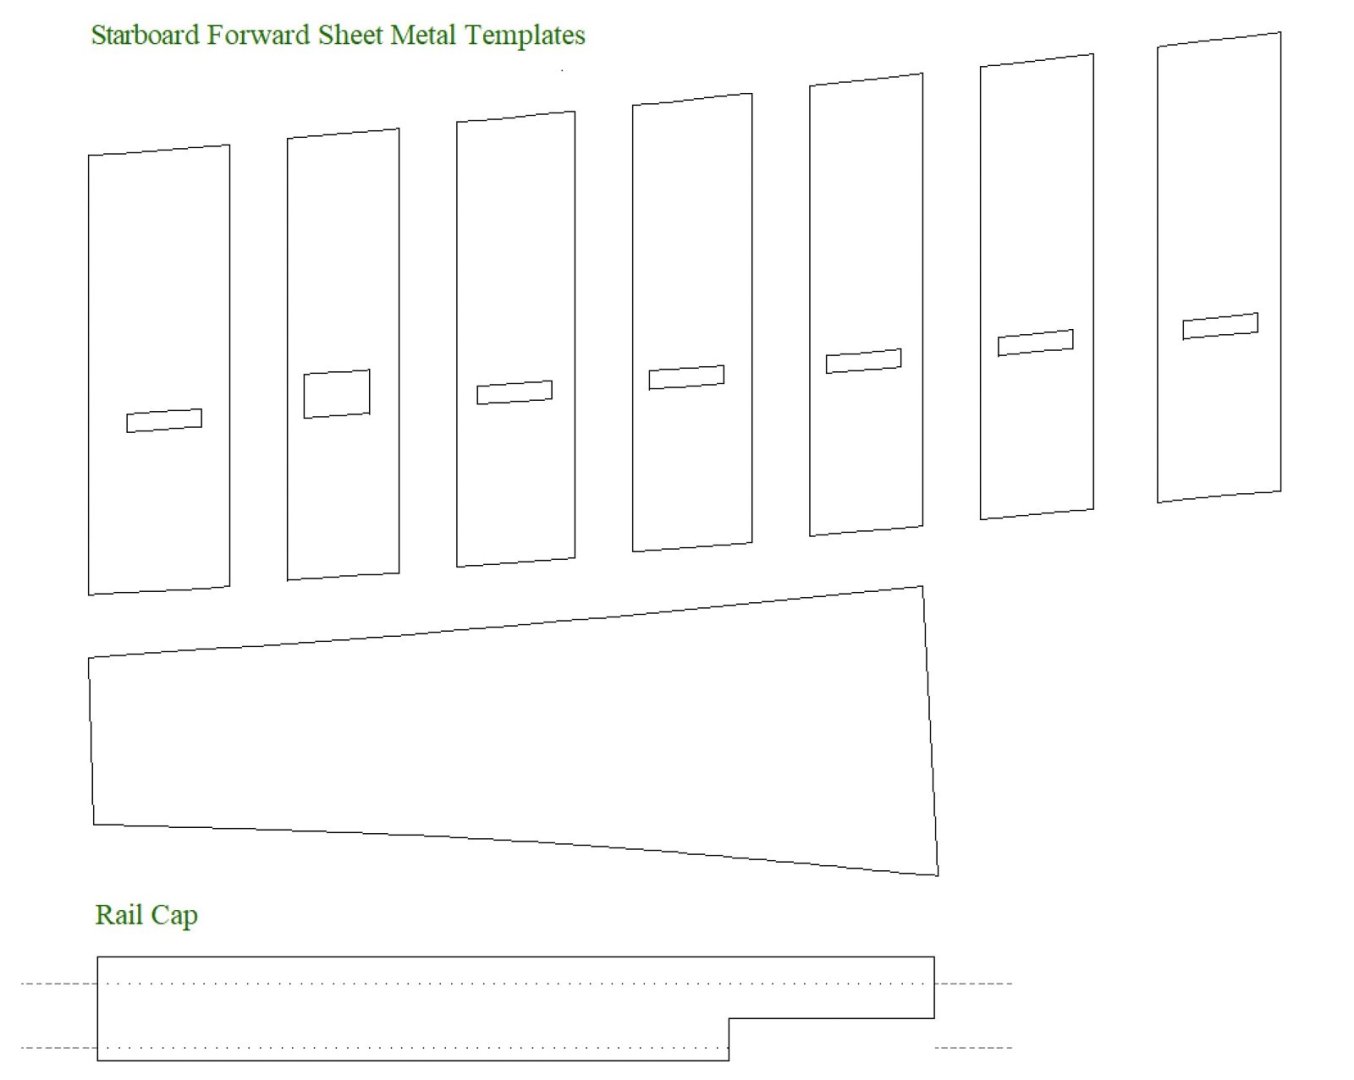
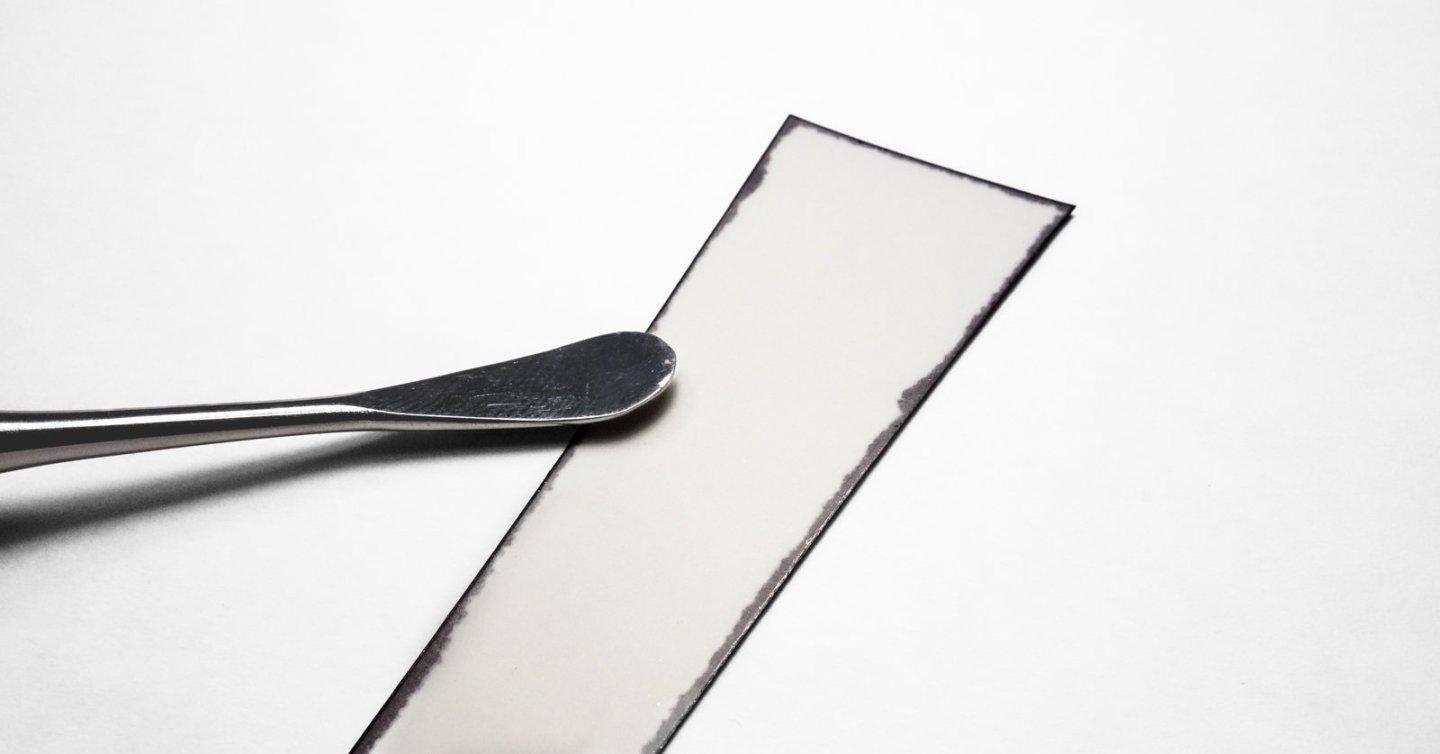
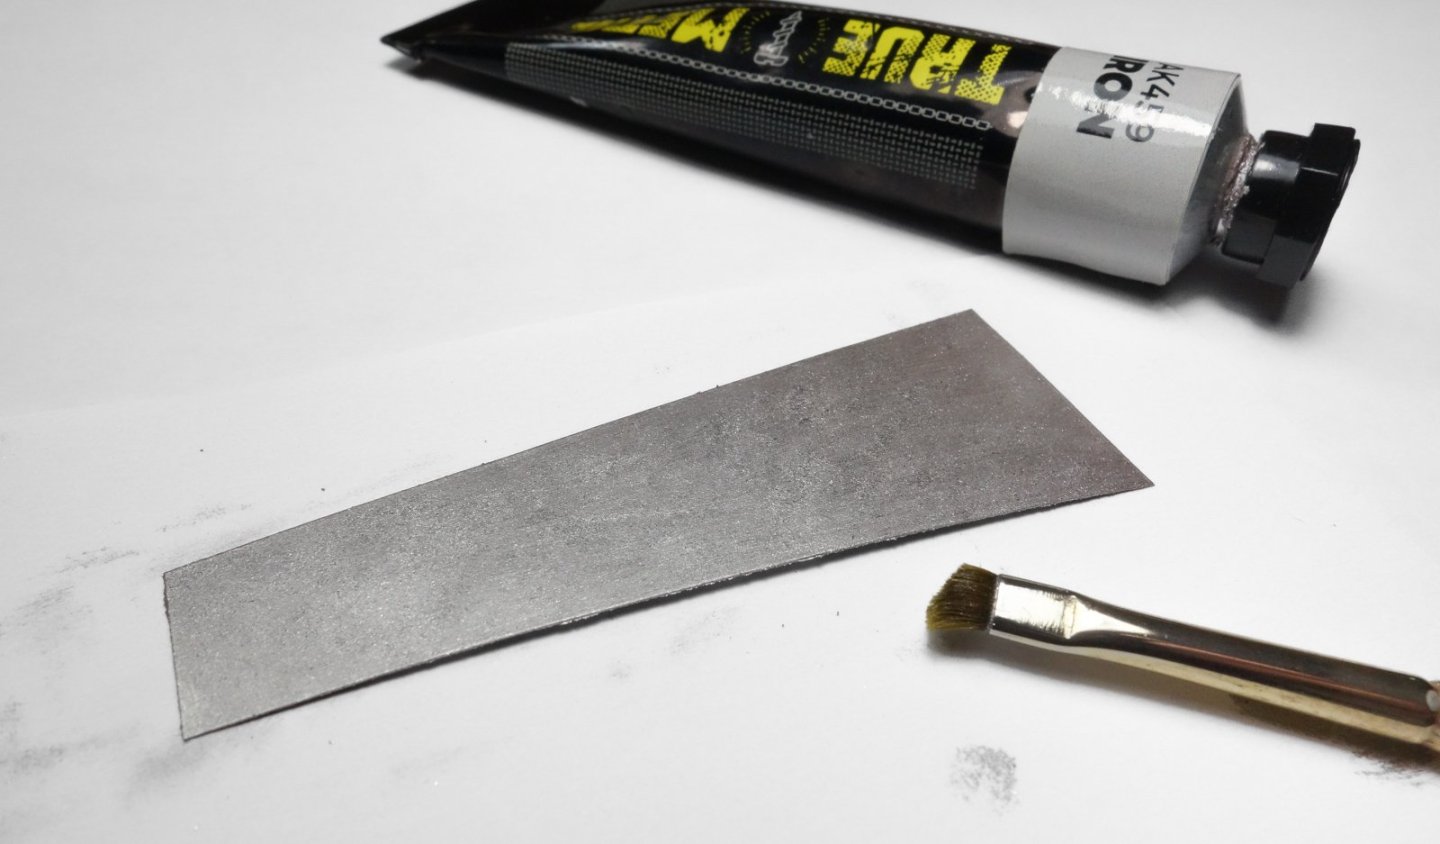
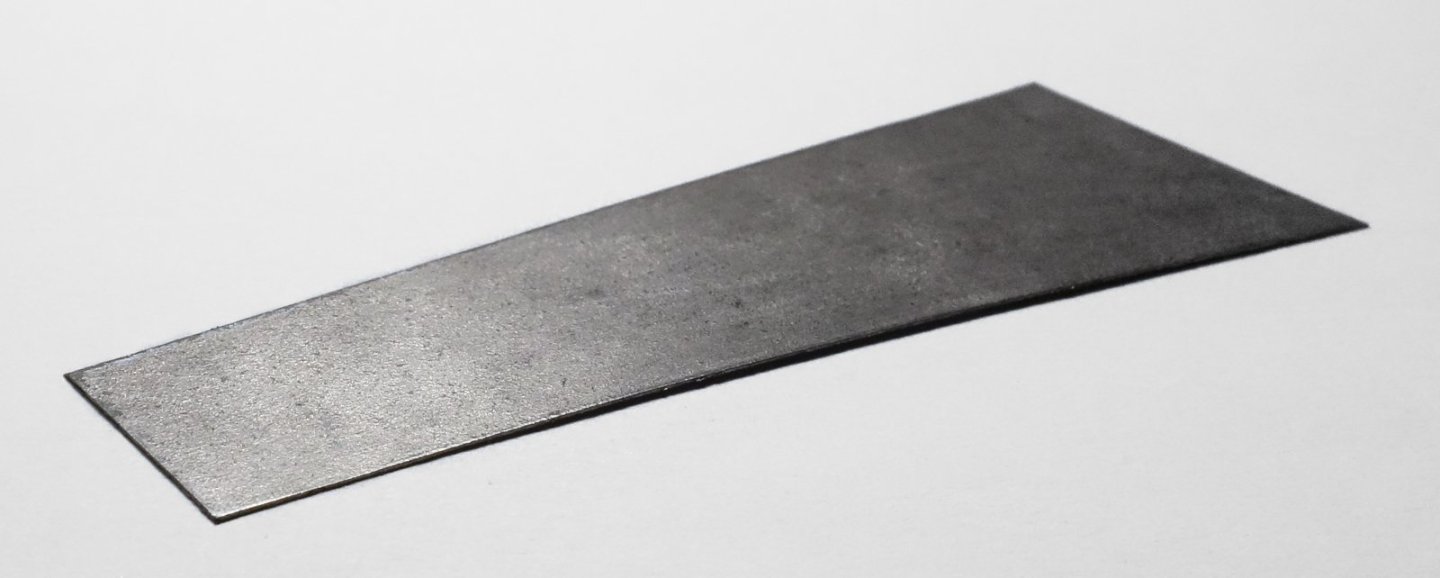
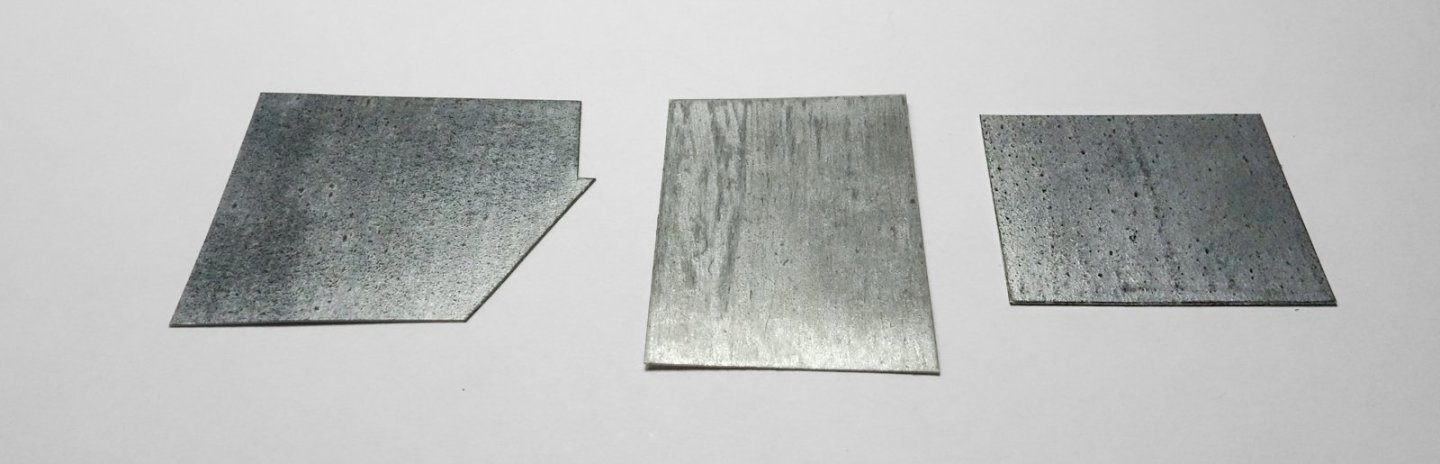
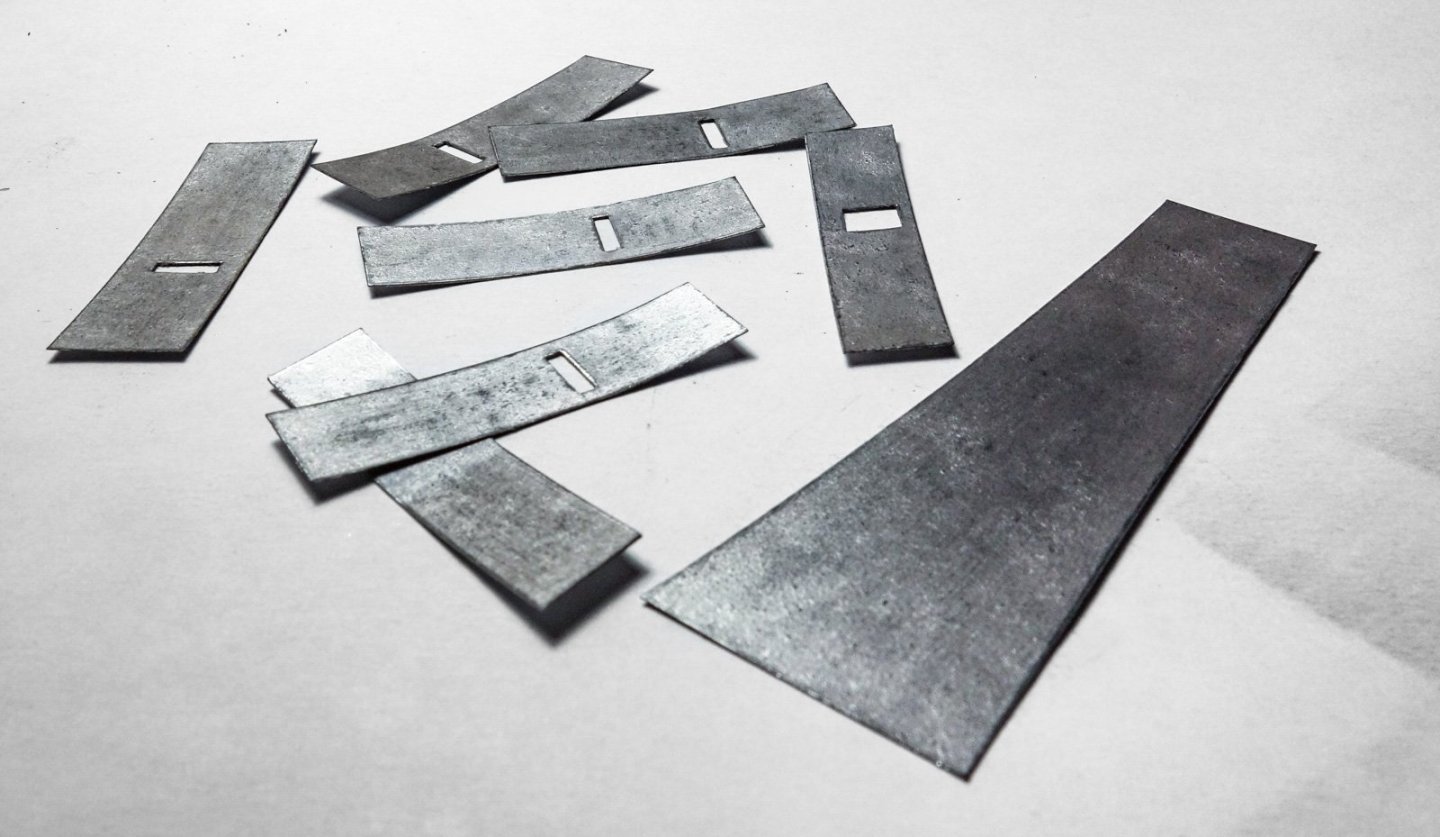
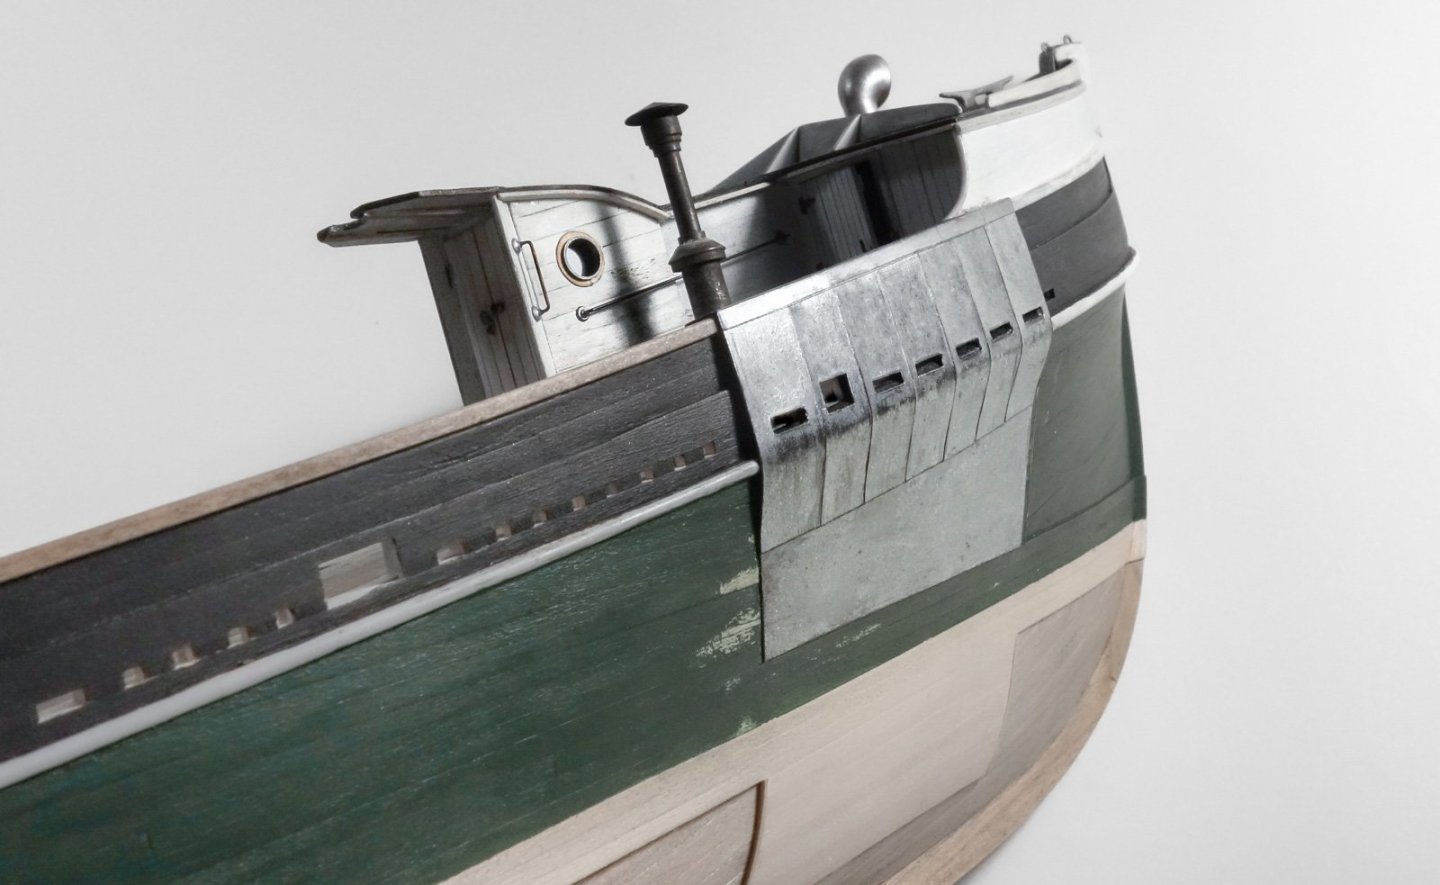
Greetings Fellow Modelers, Thanks for the comments and "likes". In the past several months, the most I’ve seen of the Pelican has been when walking by it. This is due to a lack of time and not a lack of interest, but with a friendly nudge from Phil, here’s an update on what I have been doing - sacrificial hull sheathing and protective sheet metal in way of the gallows frames. I want to mention that Phil @Dr PR has already installed protective hull sheathing (a feature rarely modeled) on his excellent USS Cape build. Check it out if you haven't already. In my last post, I described the construction of the gallows frames and associated brackets. It would seem logical that the next step is to now paint, weather, and install these frames. But doing so now would greatly complicate installing the sheet metal below the gallows. This led to yet another task that had to be done before the sheet metal could go on - laying down the protective hull sheathing. Many mid-century wooden fishing boats in New England had partial sheathing that protected the hull from damage when raising and lowering the heavy trawl gear. This sheathing (typically ¾” oak) was sacrificial, and the planks were installed straight and untapered making them easy to replace/repair. The Roann, built in 1946, is a small eastern-rig dragger in the collection of the Mystic Seaport Museum. It was designed by Albert Condon a few years after he designed the Pelican. In the photo below one can see that the sheathing under the starboard gallows extends down below the waterline nearly to the keel. The sheathing also extends forward in a waterline band all the way to the stem. This forward band of sheathing was added to protect the hull from floating ice slabs at a time when harbor freeze-overs were not uncommon. Because the Roann was not equipped to “drag” off port side, only the waterline sheathing was installed, which extends back to midships. Based on the plans and other boats by the same designer, here’s what the sheathing looks like on the Pelican. The boards are scale ¾” by 4” and will be applied to both sides, because this vessel could drag off both sides. Vertical strips of wood are installed against the end grain to reduce water absorption, crushing and splintering of the board ends. Perhaps tar or some other waterproofing was slathered on the ends before the vertical strips were attached. The sheathing extends onto the stem. I added the rub rail which sits just below bottom of deck. It’s made up of two pieces which combined stand out from the hull about 3 scale inches. The outer piece is half round styrene. In the cross section below the sheet metal under the aft gallows is highlighted in blue. The metal is #10 galvanized steel, about .138” (3.5mm) thick. I don’t have a forward cross section of this detail to show, but it’s very similar. Note the added wood structure that holds the sheet metal out from the bulwark and guides it over the rub rail. The main area of sheet metal consists of seven vertical sections, so the structure is constructed to support them. Here’s the forward support framing. And the aft framing. The drawing below shows the individual sheet panels and their arrangement – also there’s a “U” shaped cap that fits over the rail. I drew up the forward starboard sheet-metal group in CAD and then adjusted it to match the “as-built” framing of the support structure. On the full sized boat, the vertical panel seams overlap, but on the model they simply butt to each other. The drawing was separated into individual panels to be used as templates. Thinking that copper would be the material to simulate the metal, I purchased foil that closely scaled to the actual #10 gauge used on the real boat – but that was a bust. While the copper was malleable enough, it dented, scratched and crinkle creased way too easily and so I tried a variety of different materials including aluminum, brass, paper, card and styrene. Each had appeal and issues, but for the small panels on this model, I decided on using inkjet photo paper instead. More precisely, the reverse side of the paper because of its smooth coated surface. It sort of looks and feels like styrene and there’s no sign of fiber. When folded, it creates a nice sharp bend, and the cut edges are clean and fuzz free. This paper is left over from when I had an ink printer, and I suspect any dense hard surface paper would work just as well. Out of curiosity, I did try painting the front “photo” side of the paper. Not good. Think of how an old photo looks that’s been folded, creased, reopened and flattened. Anyway, I printed out the templates directly to the reverse side of the photo paper and cut free the lower section panel to work on first. The upper seven vertical panels will shingle over this panel. I began by slowly going around the perimeter with a black permanent marker allowing time for the paper to absorb the ink. I then flattened/burnished the edges with a spoon shaped sculpting tool. I then colored it with oxide black acrylic ink. I painted it with True Metal “iron” and stippled it to remove brush strokes while allowing some small peaks to remain. No attempt at a uniform look. Letting the paint dry half an hour or so, I then polished the surface with a scrap piece of clean styrene sheet. I just flop the styrene (about 4” square) on top and briskly rub in one direction at a time. The thickness and pattern of paint that was applied in combination with the speed and pressure used when polishing will yield different results. This process reminds me of the drywall texturing I did on a house we renovated about thirty years ago. Called “orange peel knockdown”, it was all the rage back then and great for obscuring a less than stellar drywall installation. The procedure was to splatter spray drywall mud on the wall, wait for it to partially dry, and then knockdown the peaks with a clean trowel. Similar idea here in micro scale. You can create a variety of different looks by modifying the paint thickness, texture and by how long you let it dry. The test piece on the left in the photo below is True Metal iron on .05” styrene. The paint was gently streaked vertically with just the edge of a toothbrush, allowed to dry then polished with the styrene sheet. In the middle is TM steel with a speck of burnt umber oil paint added and then applied to 24lb copy paper. The paint wasn’t quite dry when polished leaving long streaks. On the right is TM iron on the back side of photo paper. Because all these materials are thin, any imperfections on the work surface will telegraph up onto the surface of the "metal". This can be used to advantage. Back to the example on the right, I took a piece of double-sided cellophane tape with a fine thread stuck to it and fixed it to my work surface. Placing the photo paper on top and polishing it left a vertical image on the metal. A close look even reveals where the butt end of the tape was. This works so well because the paint is wax based and it’s looking for any excuse to clot. A slight protrusion or hump that develops a hot spot when polished is all it needs. For size reference, the piece on the right is a tad over 1” square. I cut the seven vertical pieces out and blackened their perimeters. It would have been great to do this as a single piece, but it needs to bend in two dimensions, so that was out. Painted. So here it is all glued to the boat. I used aluminum for the “U” shaped rail cap and applied the same paint and polish to it. The paper cap just looked lumpy. The hull paint is not final and it’s more of a color test than anything. Hull weathering won't be for some time, but I want to see how the metal weathering will look surrounded by those colors. Typically, I like to start with something that looks new and progressively add wear and age. This "metal" clearly needs darkening, dents, gouges, streaking, rust and other fun stuff. I wish I liked this metal more than I do, so, I’m going to take another crack at using styrene for the aft metal work and see how they compare. I'll post those results and that of the weathering. Until next time – Take care and thanks for stopping by. Gary


-
Having a hard time catching up to you, Rob. You're moving fast and everything is looking terrific. Gary
-
Really sweet work on those catwalks, Roel! Gary
-
Wonderful, Glen - congratulations! Gary
- 301 replies
-
- 2
-
-
-
- Constitution
- Bluejacket Shipcrafters
- (and 1 more)
-
Beautifully done, Dan - congratulations! Gary
-
Nice work, John - everything looking very good! Amen. Gary
-
Nice progress, Phil. Wonderful CAD work and I'm looking forward to seeing these 30 or so deck fittings come to life. Gary
- 253 replies
-
- 1
-
-
- minesweeper
- Cape
- (and 1 more)
-
Catching up on your progress and everything looks great - sails, anchor, water bottle and logs. A shout-out to @wefalck for sharing the bark technique, very convincing - surprisingly so! Gary
- 286 replies
-
- 3
-
-
-
- Chile
- Latin America
- (and 5 more)
-
Wonderful work, Paul! HA! Yes, scuppers are always nice to have in the rear-view mirrors. Very nice progress and everything looking great. Gary
-
Excellent SIB and display, Glen! Very nice indeed. Gary
- 106 replies
-
- 4
-
-
-
- Kentoshi-Sen
- bottle
- (and 1 more)
-
Thanks to all for the discussions in this log - it makes for interesting reading. Your pilothouse looks great, Keith! The weathering on both the vertical siding and roof feels like just the right amount. It has that look of honest wear and neglect without being overdone, which can be challenging at such a small scale. You have a good eye and controlled hand - well done! Gary
-
Congratulations, Glen - a very generous act and a fantastic job. Gary
- 301 replies
-
- 3
-
-
-
- Constitution
- Bluejacket Shipcrafters
- (and 1 more)
-
This sternwheeler is simply begging to be modeled, Keith and just the kind of subject you can really dig your teeth into. Just keep a toothbrush handy and don't swallow the soot. Grabbing the popcorn and looking for an empty seat. Gary