Lost and Confused
-
Posts
40 -
Joined
-
Last visited
Recent Profile Visitors
317 profile views


-
 mtaylor reacted to a post in a topic:
Revell H-364:995 (1959)
mtaylor reacted to a post in a topic:
Revell H-364:995 (1959)
-
Keith Black reacted to a post in a topic:
Cutty Sark by David Chapman - Revell -1/96 - PLASTIC - beginner's build
-
Scottish Guy reacted to a post in a topic:
Cutty Sark by David Chapman - Revell -1/96 - PLASTIC - beginner's build
-
 The provided plastic sails can look just fine if carefully cut and installed
- 97 replies
-
- 2
-
-
- Cutty Sark
- plastic
- (and 3 more)
-
Scottish Guy reacted to a post in a topic:
Revell H-364:995 (1959)
-
Canute reacted to a post in a topic:
Revell H-364:995 (1959)
-
I would go for the older version as the plastic is likely of a higher quality, and hasnt been "nerfed" by Revell. Also the older shrouds made of black line are far superior to the molded plastic ones in todays kit. (In my humble opinion). Also Im sure that the rigging instructions are FAR more comprehensive than the ones in the '17 kit. These are barely useable. I am working on the 2017 Revell CS and I am using a lot of aftermarket parts , and so far she's lookinj pretty good. Good luck whatever you decide
-
 Keith Black reacted to a post in a topic:
Cutty Sark by David Chapman - Revell -1/96 - PLASTIC - beginner's build
Keith Black reacted to a post in a topic:
Cutty Sark by David Chapman - Revell -1/96 - PLASTIC - beginner's build
-
Scottish Guy reacted to a post in a topic:
Cutty Sark by David Chapman - Revell -1/96 - PLASTIC - beginner's build
-
Well mates, ill never see 60 again either but I find it to be an advantage. When i built models in my youth, I would go along for awhile and then run out of something :ie. paint, glue etc. Or need a tool that I could not improvise. Alas, i would have to wait for Friday to get my allowance. 5 bucks went a long way back then. Now if I want it, Im off to Hobby Lobby or on the web to Amazon or whoever has what i need. I also have muuuuuuch more patience which is (not too arguably) the most important ingredient to the hobby. Keep at it man, your CS is lookin good. My Cutty is kinda on the back burner now as its getting time to do my outdoor gardening and lawn work. Cant be having the neighbors complaining. keep those pics coming. ill post a few of mine when I take a few more.
- 97 replies
-
- 3
-
-
- Cutty Sark
- plastic
- (and 3 more)
-
Hello fellow modelers. I'm whittling away on my revell 1/96 Cutty Sark and have run into a problem. I have rigged the lower and topmast shrouds and am at a loss on how to install the upper deadeyes on them in a satisfactory way. I have made makeshift jigs from cardboard with some success but am not getting the uniformity I want. I saw a jig made from twisted wire and made one but it didnt work for me. I have come too far on a very (my very best) build to settle for low quality in this area. To me, a nice presentation of the shrouds, deadeyes and ratlines are very, very important to the overall quality of the build. Any photos of jigs or tips for this are greatly appreciated. The masts are not yet installed. Am doing the topmast and topgallant ones off-ship. Still having a time. Have cut them away twice now because they didnt meet my standard. Thanks again.
-
Nice looking job, David. My Cutty Sark kit came with 2 different sizes of chain, although I ended up not using either one. There are multitudes of markets for chain out there, easily learned about, just by reading these forums. Same with rigging line. Even going "stock" with this kit, as you intend to, it might be wise to download some more comprehensive rigging plans, as the ones provided by Revell are extremely vague at best. I downloaded the Campbell plans which are used by the majority of CS builders. If nothing else, with these you can figure out the grey areas in the Revell plans. You can find them hereabouts for free. I have found that I spend more time looking stuff up, than actual modeling. Check out other folkses build logs and many of your questions will be answered before you even ask them. These guys are here to help. Keep up the good work.
- 97 replies
-
- 2
-
-
- Cutty Sark
- plastic
- (and 3 more)
-
Thank you all for your helpful replies. I have decided to wax my rigging lines. I have a block of beeswax that I've used on several models...I don't know about my model lasting 100 years, but the wax can't hurt. Thanks again. Onward
-
Im using Amati rigging line from HIS model. Is that cotton, polyester, or what?
-
Im gettin ready to commence the standing rigging on my Cutty. I have waxed my rigging lines on all of my other builds. See here and there that many dont use wax. Which way is best??
-
Lost and Confused reacted to a post in a topic:
Stepping masts on Revell Cutty Sark 1:96
-
Lost and Confused reacted to a post in a topic:
Stepping masts on Revell Cutty Sark 1:96
-
Lost and Confused reacted to a post in a topic:
Stepping masts on Revell Cutty Sark 1:96
-
Lost and Confused reacted to a post in a topic:
Stepping masts on Revell Cutty Sark 1:96
-
Stepping masts on Revell Cutty Sark 1:96
Lost and Confused replied to Lost and Confused's topic in Masting, rigging and sails
mucho goosto matey. Thanks for the input -
Stepping masts on Revell Cutty Sark 1:96
Lost and Confused replied to Lost and Confused's topic in Masting, rigging and sails
You don't think the angle on the mizzen is excessive? -
Stepping masts on Revell Cutty Sark 1:96
Lost and Confused replied to Lost and Confused's topic in Masting, rigging and sails

-
Stepping masts on Revell Cutty Sark 1:96
Lost and Confused replied to Lost and Confused's topic in Masting, rigging and sails
-
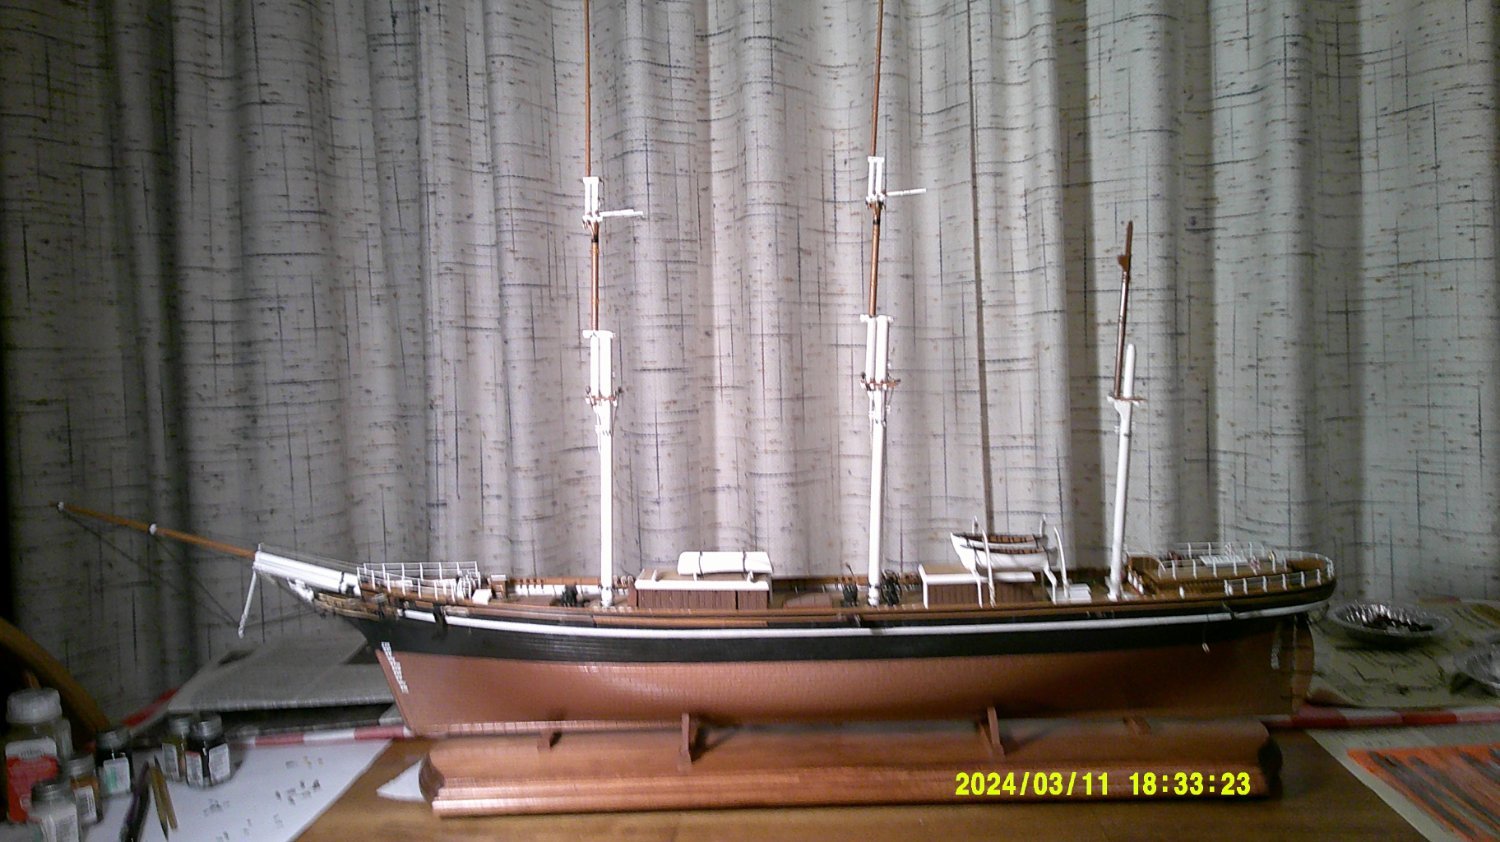
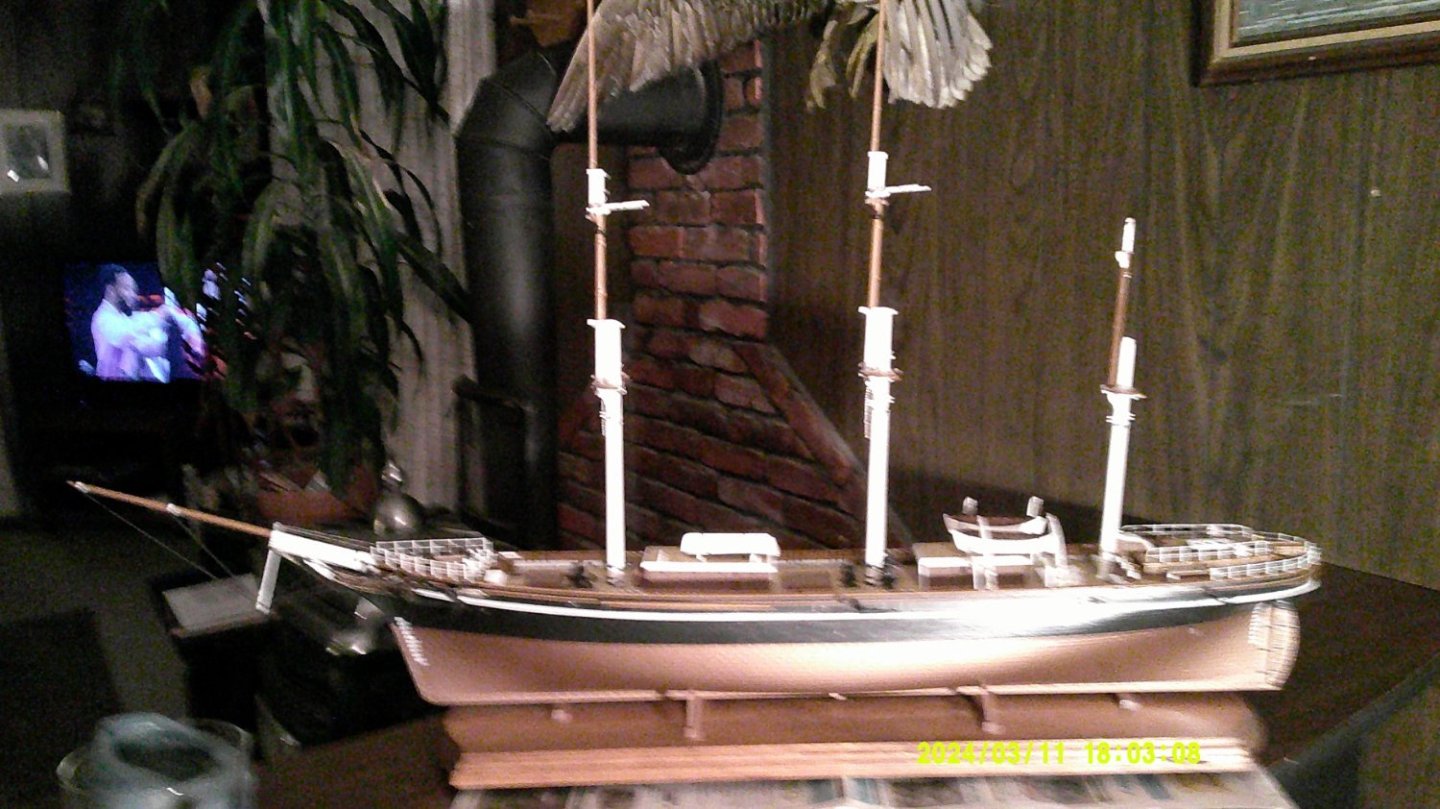
I am well along on my plastic Cutty and am presently assembling and pre-rigging the masts. I see that the mast bases are molded angled, apparently so that the mast is set at the correct angle, I read somewhere, about 85 degrees. The fore and mainmasts are ok, but it seems that the angle is excessive on the mizzenmast Like about 10 degrees from vertical to the aft. Are all these kits like this or just mine?. they also want to cant to port when dry fitted....I've been filing material off of base to make a correct fit, but have created a lot of looseness. I read that alot of you dont glue your masts but I dont see any way around it when the time comes. I plan to use a level and plumb bob and mount them 1 at a time and rig, then proceed to the next. Perhaps if I used wood glue, it would fill the gaps, yet allow for removal, if required. I am determined to get a s perfect alignment as possible as this has been a weak point for me on past builds. What do you guys think? Im open to all suggestions. Heres a very poor photo, but you may get the point. Thsnks DSCF0027 - Shortcut (2).lnk
-
By the way....Welcome aboard......There are some master modelers here.....You might check out the build logs....Check out Bruma's Cutty Sark, build log if you want to see something just wonderful.....very inspiring
- 97 replies
-
- 3
-
-
- Cutty Sark
- plastic
- (and 3 more)