
Sjors
-
Posts
5,536 -
Joined
-
Last visited
Reputation Activity
-

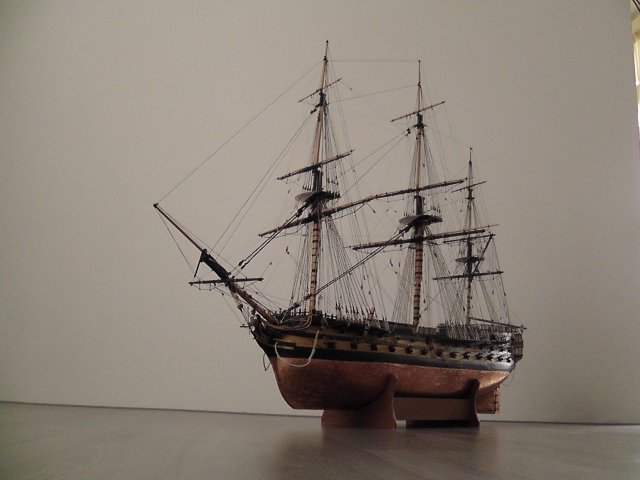
 Sjors reacted to Blue Ensign in HMS Indefatigable 1794 by Blue Ensign - FINISHED - Vanguard Models - 1:64 scale
Post twenty-one
Light at the end of the tunnel.
I am now alternating the plank strakes from top down and keel up which should leave the final strake below the round of the hull at midships.
This is a good place to have it in case the final strake works out to be less than uniform in shape.
0752
So, Gromit, how’s it looking – RUFF.
Have faith Gromit, there’s a fair bit of fettlin’ to do yet.
0761
Five strakes now remain, and I have re-marked the ‘ticks’ hopefully for the last time.
0755
0757
Don’t say it William, I’ve heard it all from Gromit.
0760
Has it only been three weeks since I started planking, how time flies when you’re having fun. 🙄
Onwards…
B.E.
15/04/2023
-
Sjors reacted to Blue Ensign in HMS Indefatigable 1794 by Blue Ensign - FINISHED - Vanguard Models - 1:64 scale
Thanks Alistair, Glenn has provided you with the answer. You can make them yourself using the spring clip with one of the handles from another inserted lengthways to provide the tongue.
Post Twenty
… and more planking.
0731
A couple more plank strakes are now added up from the Garboard and slowly the gap reduces. I am content that the midships gap each side remains even at 60mm.
0736
I now have ten strakes left each side to complete the first layer planking.
0729
At the stern, once I reached the stern post I began tapering; this is not a hull shape that requires wider planks at the stern.
The tick marks have been recalibrated three times to this point.
0737
0749
0751
0750
Two, maybe three days should see the first planking completed and ready for sanding, and I suspect a little filling.
B.E.
12/04/2023.
-
Sjors reacted to Kevin in HMS Indefatigable 1794 by Kevin - FINISHED - Vanguard Models - 1:64 - Feb 2023 to June 2025
good morning everyone
thank you for comments and likes especially for my mum, she is coping in Hospital, but quite weak from the effects of Covid, the shock of what has happened. Was meant to be transferred to the BRI in Bristol today to have a stint inserted, but will be delayed as she tested positive again on Sunday, but needs two concentrative negative results for this procedure
as for the build, im quite happy with the results on the port side a couple of sealers to still be put in. As its my first ever hull to be left unpainted, i have made some mistakes, the obvious one is that i started tapering far to early and did far to much, the result is that i had some silly planks to insert under the hull, we all live and learn, it would be a shame to paint it now, i just hope i can make it look far more presentable to allow her to be in just varnish
-
Sjors reacted to Blue Ensign in HMS Indefatigable 1794 by Blue Ensign - FINISHED - Vanguard Models - 1:64 scale
Post Nineteen
Hull planking continues
I can now work out the planking runs.
If my arithmetic is right, on paper at least I will need (20) strakes of 6mm stuff and (I) of 5mm.
At the bow the planks will need to taper to 3mm.
0718
I am using the MSW download planking fan which has the added advantage of being the correct 6mm spacing at the maximum width of the base of the fan.
The provided lime strip is of a nice quality but there are variations in widths. A random sample indicates a range between 5.3 – 6.0mm and thickness 0f 1.42 - 1.58mm. These small variations do have a cumulative effect and create ridges and hollows. This is not a big issue and there is plenty of meat to sand out the irregularities.
0706
On first layer planking I use tick strips to mark the central and every other bulkhead with the planking lines.
Variations in plank widths will also impact on the marked plank runs and there will inevitably be error creep as the strakes are applied.
0707
At this point five more strakes have been added, together with another strake adjacent to the Garboard.
0713
On this build I didn’t bother to thin down the false keel in the area around the bearding line to accommodate the second planking. I thought I would follow Jim’s example and finish the first planking short, and fay it to suit the second planking against the stern post.
0714
0716
0709
Edge bending is now required on all bow strakes.
0720
0721
Not a pretty sight in its raw state, but hopefully she will emerge as a swan at some point.
0726
I will now re-mark the tick strip results in the remaining space and apply another five strakes.
B.E.
10/04/2023
-
Sjors reacted to drobinson02199 in HMS Victory by drobinson02199 - FINISHED - Caldercraft - Scale 1:72
Finished the foremast topmast shrouds and ratlines, and THAT'S IT for ratlines on this model!😃
I looked back to when I started the shrouds, and removing the 6 weeks I was away on vacation, I was dong shrouds and ratlines for 4 1/2 months. That's as long as some other models I've built took overall. Not sure what it is about this model that makes things go so slow -- maybe the size?
Regards,
David
-
Sjors reacted to Kevin in HMS Indefatigable 1794 by Kevin - FINISHED - Vanguard Models - 1:64 - Feb 2023 to June 2025
good evening everyone
thank you for comments and likes
day 40 port side 2nd planking in Boxwood
things have calmed down in the household, mum is still in ospickle but she has now been given covid, after avoiding it for three years, so she is only allowed one visitor, we have my sister visiting so as she dont live local she is seeing her and not me
the planking continues, yes most can do it better, but i am happy with what i have produced so far, i think it will be acceptable, she will never make a show though
-
Sjors reacted to Blue Ensign in HMS Indefatigable 1794 by Blue Ensign - FINISHED - Vanguard Models - 1:64 scale
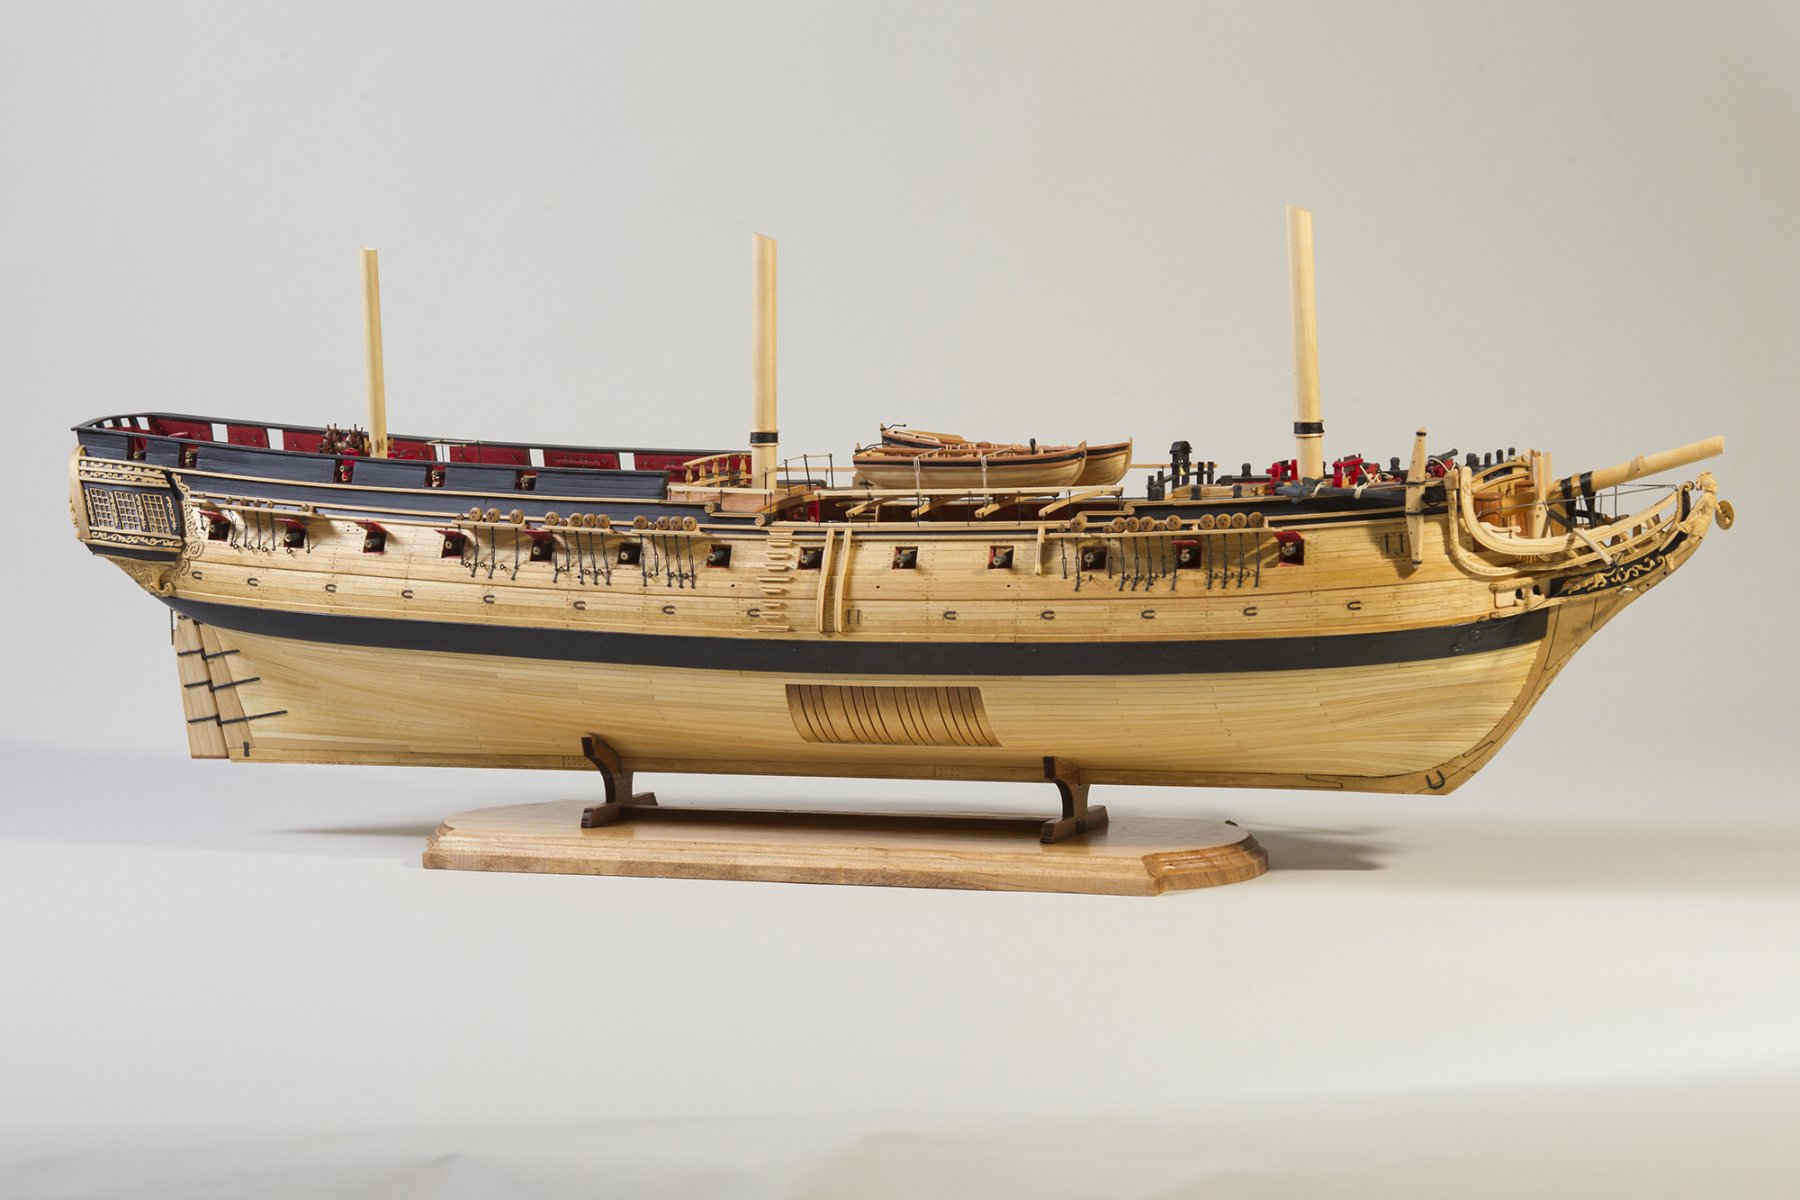
Post Eighteen
Planking continues – Garboard strake
This is the point where I need to fit the Garboard plank to determine the planking requirements for the remaining area.
Garboards can be tricky planks to fit in terms of shape and where to end, and they always cause me some head scratching.
Some may think why bother, this is only the first planking that is to be covered, and perhaps even covered again by coppering.
For me it’s about keeping options open.
If the second planking is good enough not to be covered, then fitting a garboard on the first planking run will give a valuable insight for shape and position on the second show planking.
It does mean that extra planking widths will be required.
I am using a 10mm wide board, but I need to temporarily fit the keel and stem pieces to properly work out the shape and termination point at the bow.
0685
A real pleasure to get the keel elements in place even if only for a while. Beautifully cut, a perfect fit, and great to have a quality wood finish for the parts rather than mdf.
Perversely my next move is to cut an mdf stem piece against which to form the Garboard. I can’t risk the proper stem during the working process.
0689
Time to fire up the scroll saw.
0692
I don’t see any reason not to leave the keel pieces in situ at this stage, as the Garboard is the only plank that abuts, and it will assist the fitting.
0693
A lot of time is spent tweaking the plank to gauge the right position. I’m never fully confident that I’ve got it right, but whatever the outcome doing it on the first layer will show the way for the second planking.
0695
I take the pre-caution of taping the keel, in part to avoid the planks getting glued to the keel at this point.
0698
0699
0700
0701
0702
I can now begin the next phase of planking.
B.E.
07/04/2023
-
Sjors reacted to Blue Ensign in HMS Indefatigable 1794 by Blue Ensign - FINISHED - Vanguard Models - 1:64 scale
Post Seventeen
Hull planking.
On my builds I have always tried to follow the procedure I will use for the show finish. Perhaps with a little less adherence to a full tick strip method, but still utilising tapering, edge bending, and spiling as a method to achieve a reasonable planking job.
This gives me an insight into how the timbers will flow when I get down to the ‘proper’ job using show timbers.
The planking will be done with the hull inverted, this gives me better control.
0658
I opted to plank a first section down to the lower deck level which involves five strakes.
I used tape to indicate the line at the bow.
Starting at the Bow and using a tick strip I have calculated that very little taper is required – less than 1mm starting at Bulkhead four.
Joining all planks at the central bulkhead is a practical approach, but the look of it offends my eye even tho’ this is only the first layer. We all have our foibles, I guess.
I work side and side about, strake by strake.
I opted to fit a long forward plank, and a shorter aft plank cut from a longer strip to facilitate the bending.
0655
The aft plank is soaked, and the bend at the aft end is formed by heat.
0657
The bends up to the lower transom are fairly easy to form if sufficient soaking time is allowed.
0667
Once formed I temporarily pin them in place and heat blast them.
0660
At the bow end the lower two strakes required a little edge bending around bulkheads two and four to achieve the fit.
0664
0668
0671
Still in very much a rough state which the sanding should take care of.
0677
0680
0681
0684
I like to check the planking run with the hull the right way up, looking ok so far I think.
B.E.
05/04/2023
-
Sjors reacted to Kevin in HMS Indefatigable 1794 by Kevin - FINISHED - Vanguard Models - 1:64 - Feb 2023 to June 2025
good evening everyone
day 34
been a few days since my last post
2nd planking is going on, its never as good as i envisage it to be, but considering im not painting it, its is better than i normally present my work
the transom is in pear and i decided to remove it as i think it would look better in Boxwood,
-
Sjors reacted to Blue Ensign in HMS Indefatigable 1794 by Blue Ensign - FINISHED - Vanguard Models - 1:64 scale
Post Sixteen
A workshop enhancement
I have been feeling cramped of late as I try to manoeuvre the ‘Indy’ beast around, with only 600mm of depth available.
My latest acquisition is this work stand.
Bott work stand.
It is in the same range as my work bench and equal in terms of depth and (adj) height but being portable I can re-position it to give me either more length or depth to suit.
0647
In a straight line I now have seven foot+ length to play with.
0649
This ‘L’ shaped configuration is likely to prove even more useful. It allows me to walk around the model and provides more space for turning.
0651
I am hoping it will remove the frustration of working in a space a tad too small to freely manoeuvre the hull without risking bashing it on the wall.
A small price to pay for the added convenience.
B.E
01/04/2023
-
Sjors reacted to drobinson02199 in HMS Victory by drobinson02199 - FINISHED - Caldercraft - Scale 1:72
Finished the main mast topmast ratlines. Now on to the fore mast.
Regards,
David
-
Sjors reacted to Blue Ensign in HMS Indefatigable 1794 by Blue Ensign - FINISHED - Vanguard Models - 1:64 scale
Cheers, Guys.
Post Fourteen
Before I fitted the central strake of three I used a micro saw to remove the gunport sections of the upper strake.
0613
I used a length of 8mm x 1.5mm limewood strip to fill in the central gap, a little tapering towards the bow and stern and the fit is good.
0614
0617
I glued the plank to the frames and along the edges of the adjacent planks.
0623
The gunports were the fully opened-up before re-fitting and gluing the pear patterns into place.
0626
The blurb indicates areas where glue should not be applied, relating to the extensions to the bulkheads which will later be removed.
I added double sided tape to these areas to temporarily secure the patterns in the upper areas.
0637
Speed gluing and clamping is the name of the game.
0638
In this shot she looks more 64 than 44, what a lovely chunky beast.
0639
0644
0643
Fitting the patterns concludes this section of the build.
B.E.
30/03/23
-
Sjors reacted to Kevin in HMS Indefatigable 1794 by Kevin - FINISHED - Vanguard Models - 1:64 - Feb 2023 to June 2025
good evening everyone
thank you for comments likes
day 28 1st parts off keel, prow, stern post
outer layers for transom and upper gun ports
and more gun port fairing
also a lot of deck fittings are being made up between planking etc, but i am trying to avoid messing my log up to much
-
 Sjors got a reaction from Olli Sukunimisson in Duyfken by Sjors - Kolderstok - scale 1:50 - VOC reconnaissance yacht
I just told you that it is a slow build.
After two tuesdays of building at the club, all the frames are done 🙂
I think I have to build more instead of watching other projects and not so much talking
Sjors
-
 Sjors got a reaction from GrandpaPhil in Duyfken by Sjors - Kolderstok - scale 1:50 - VOC reconnaissance yacht
Last tuesday it was the first evening at the modelclub.
Because everybody wanted to see what i was doing i only glued 3 frames.....
The rest of the time was giving information about the proces of building.
A few things I'll be doing at home like painting.
There are two doors.
One is going behind a deck and the other one is going on the back of the stern.
That's the one with the white color on it.
Sjors
-
Sjors got a reaction from GrandpaPhil in Duyfken by Sjors - Kolderstok - scale 1:50 - VOC reconnaissance yacht
Here is a new build.
I will build this one at a hobby model club.
So it don't go fast!
Between 1997 and 1999 a replica of the Duyfken( Little Dove ) was built in Freemantle ,Australia to commemorate the first discovery of Australia.
When she was in Holland I was visiting her and I always want to build her.
And Kolderstok make a kit so at least her she is.
Length 650 mm
Width 250 mm
Height 550 mm
And then a few pictures of what was in the box
Sjors
-
Sjors reacted to Blue Ensign in HMS Indefatigable 1794 by Blue Ensign - FINISHED - Vanguard Models - 1:64 scale
Post Thirteen- completing the fairing
Having applied the test planks at all levels along the hull, paying specific attention to the bow and stern areas I have reached the point where enough is enough.
Or perhaps not quite.
The next stage is to apply the patterns (248/251) around the bow. They are formed around the extension pieces of bulkheads 1 -5, which have a subtle convex shape to them that the pattern should follow.
0596
To this end I did find it necessary to soak the patterns to achieve a good conformity.
0598
0599
I did do a little more fairing in this area to further fay the longitudinal gunport strips into the extension shapes.
0601
0602
These bulkhead extensions are eventually removed, but the subtle shape remains.
0603
The patterns are now re-clamped into position.
0608
A milestone of sorts is now reached with the fixing of the first plank.
The lower plank runs beneath the bow pattern and level with the lower gunport frame.
The lime bends well and with the plank clamped into place, it gets the heat treatment to produce the bow curve.
0607
The aft section of this strake has a slight lateral upward curve from bulkhead 12 to the stern, which again was induced using heat after pinning to the hull.
0606
These photos also show the second plank fitted which runs level with the upper gunport frame.
0609
The section between the two planks are now filled, but I found that an additional 6mm strip doesn’t quite fill the space leaving a gap of around 2mm.
I suppose the intention is to fill this with off-cut slivers but I think I have some wider stuff lying around so I’ll dig it out and spile it to fit the space.
B.E.
27/03/23
-
 Sjors got a reaction from Alex K. in Duyfken by Sjors - Kolderstok - scale 1:50 - VOC reconnaissance yacht
I just told you that it is a slow build.
After two tuesdays of building at the club, all the frames are done 🙂
I think I have to build more instead of watching other projects and not so much talking
Sjors
-
 Sjors got a reaction from Beef Wellington in Duyfken by Sjors - Kolderstok - scale 1:50 - VOC reconnaissance yacht
I just told you that it is a slow build.
After two tuesdays of building at the club, all the frames are done 🙂
I think I have to build more instead of watching other projects and not so much talking
Sjors
-
Sjors reacted to Blue Ensign in HMS Indefatigable 1794 by Blue Ensign - FINISHED - Vanguard Models - 1:64 scale
Post Twelve.
Hull fairing - Day 0ne
Considering this is one of my least favourite aspects of ship modelling, the day went well.
The support board held the hull securely, and the ‘Mouse’ sander performed well.
0580
I started with the hull upright and sanded the topsides down to gundeck level.
I started with vertical strokes on the gunport side timbers, and followed on using a long sanding stick along the hull.
0577
0578
The hull was then inverted and the ‘mouse’ brought into play. I used P80 sanding sheets.
I am grateful to Jim and Chris for the heads up on this little tool.
0584
0583
This is the state after around three hours work.
Time now to test the plank lay.
0587
The 1mm thick lime strips bend easily around the bow without any need for pre-bending, but I will pre-bend when I start planking to take the resistance out of the wood.
I am particularly interested in the run of the planks up to the lower transom.
0588
To this end a test plank is pre-bent using hot water and heat.
0590
0591
0592
0593
0594
0595
Looking ok so far, I hate to see any hint of a sharp angle in the plank runs in this area, they should have a smooth and even curve.
That’s enough for one day, I’ll look at it again tomorrow with a fresh eye.
B.E.
24/03/23
-
Sjors reacted to Blue Ensign in HMS Indefatigable 1794 by Blue Ensign - FINISHED - Vanguard Models - 1:64 scale
Thank you Kevin, and Pavel.
@ Kevin - I think 'only slightly ahead' is slightly understating it. 😁
@ Pavel - Thankyou for looking in on my build.👍
Post Eleven
Fairing the Hull.
This is such a big beast, I couldn’t quite decide the best way to approach the fairing business.
Not easy to hold while fairing, altho’ holding at angles during the process is almost a certainty.
I finally decided that having the hull inverted was the best approach, so I knocked up a simple jig to hold it inverted.
0569
This consists of nothing more than styrene packing material cut to fit snuggly inside the hull and hold it clear of the base during the process.
0570
The packing should protect the delicate bulkhead extensions.
0571
Battens were fitted to the board to hold the hull in place during the sanding.
This arrangement will also double up for the planking and coppering of the hull.
0572
All the necessary stuff is assembled, but I won’t be doing the fairing in my workroom, too much dust.
I need to wait for a quiet, mild day, without the gusting winds we have at present. The forecast for these ‘ere parts doesn’t look that brilliant over the next few days, so I may return to the small boatyard and Medway.
B.E.
23/03/23
-
Sjors reacted to Blue Ensign in HMS Indefatigable 1794 by Blue Ensign - FINISHED - Vanguard Models - 1:64 scale
Post Ten.
Internal bulkhead frames – sanding – what joy!
The purpose here is to get a smooth line to which attach the inner bulwarks, quick works in 18thc parlance. The spirketting will be added later.
0520
I found it easier to sand the frames with the hull upright, using a combination of an angled finger sander and sheet paper cut to size. Working from the opposite side, my free hand supporting the bulkhead extensions.
Contrary to this posed photo, it is advisable to work with bare lower arms to avoid snagging cuffs etc on the bulkhead extensions.
0547
I used a combination of 80/120 grade papers.
The fit of these parts is very good, a slight bevel on the leading edge of the foremost (optional) part all that was required.
0541
The fit along the deck line is very clean, as are the three join lines between the four sections. The top-line rises a fraction above the upper longitudinal gunport rail which will be sanded flush with the Longitudinal top rail.
Under clamps the sections seemed to conform well to the framing without the need for wetting. I did blast them with heat under clamping.
0544
I applied the starboard side sections sequentially, applying pva directly to the frames to enhance adhesion it was then left overnight to cure.
The procedure was repeated on the Port side next morning.
0551
Atop the longitudinal rails are fitted the deck beam strips (Deck clamps) which slotted into the bulkheads without issue. Into these the Upper deck beams are slotted, again without any issues.
0563
0566
I also took the opportunity to add carlings below the hatchway openings of the deck. I really don’t like to see those thin edges of the false deck, particularly for ladderways and hatches with the gratings removed.
0556
The foremost deck beam incorporates a representation of the Bowsprit stop. This will be removed and re-set some 15mm further back between the legs of the Fore Topsail bitts, which will then allow the manger boards to be installed.
The inboard face of Bulkhead 1 is disguised in shades of black and grey. In an oob build this area is hidden but with my build the Gundeck will be visible thro’ the unplanked upper deck.
It is another smoke and mirrors device to help mask this pob construction compromise.
0554
0555
0562
The Upper deck beams fitted across the deck and slotted seamlessly into place. It is useful having the reference numbers stamped on both beams and clamps.
0567
Once the fit is established the ‘clamping’ strips are glued into place and the beams removed for a later stage.
I now need to stiffen my resolve to begin the hull fairing.
B.E.
22/03/23
-
Sjors reacted to Kevin in HMS Indefatigable 1794 by Kevin - FINISHED - Vanguard Models - 1:64 - Feb 2023 to June 2025
good evening everyone, the boi is very tired today, but is happy eating and woofing
day 23
thank you for the comments and likes
busy day in the mancave
quarter galleries made up, not being fixed to the hull at this stage, but as an alignment aid
the stern builds up but only to fit one piece for now
and here it is the two above pices are for now soley to align this up, once happy a pencil line is drawn under it and the wood from the tuck is removed
once dry, outside in the sunshine for sanding
gunports squared off and first of many red coats going on,
god im loving this build, and only another years worth of her left
-
Sjors reacted to Kevin in HMS Indefatigable 1794 by Kevin - FINISHED - Vanguard Models - 1:64 - Feb 2023 to June 2025
good evening everyone
first of all thankyou for the comments wrt the the boi, he attended the vets today, and was put under, whilst they did xrays on his teeth and biopsies on his gums, on inspection they do not believe it to be anything nasty, but the results will be back in a week, no teeth were required to be removed,
build day day 22 1st planking completed
a bit messy in places but it went without any real issues, tomorrow is set aside and get some sanding done
-