SKID
-
Posts
30 -
Joined
-
Last visited
Content Type
Profiles
Forums
Gallery
Events
Everything posted by SKID
-
 EJ_L, I also have this same kit. I hope to someday have time to begin it. When I was looking around for sails and other items I came across this site that had all kinds of castings and other things for this model, and many others. I have not purchased from them but understand they are a good company. http://www.cornwallmodelboats.co.uk Just type in La Couronne in the search menu.
- 608 replies
-
- 3
-

-
- la couronne
- corel
- (and 1 more)
-
There is some AL Rigging line here. Match up your size and color. http://www.historicships.com/Rigging/Rigging%20Menu.htm
-
Rich, not sure if this one is the size you need. 2nd one from the top. http://www.bluejacketinc.com/fittings/fittings20.htm
- 1,755 replies
-
- 1
-
-
- constitution
- constructo
- (and 1 more)
-
Lori, welcome aboard. What kind of repairs are you looking for?
-
Seems they have only released it to a small group in Eastern Europe and they are hardware specific. I see many people are requesting to add them to the list. http://forum.game-labs.net/index.php?/topic/392-focus-testing/
-
Thought this was interesting. A new computer Naval Action computer game. http://www.navalaction.com/ If you look in the forums they are looking for 3D Modelers to model everything from ships to canons to deck furniture. http://forum.game-labs.net/index.php?/topic/507-2014-establishment-architects-shipyards-fitting-companies-ironworks-wanted/
-
3sheets10, MSW has many great articles in the Articles and Downloads section. Take a look at the planking guide and it may help with explaining spilling and stealers and a few other things. http://modelshipworldforum.com/resources/Framing_and_Planking/plankingprojectbeginners.pdf
-
3dsheets, it looks like you filed the bow flat. Can you take some pictures of the bow? You will want it to come to a point in the front and some of it will be filed down for the false keel but some of it will be at a point at the top.
-
Al Sieffert, welcome aboard. I would say based on my experience is get the deck done, planking done. Paint if you are painting anything, and then varnish the deck and hull. Then as you go, varnish any deck furniture and accessories, etc. I would also check any build logs in progress or complete to see when they were at the point of varnishing as well. That may give you a better idea as to when. Also, start a build log so we can follow along and give advice when needed.
-
Fir the side where the decks do not line up I would sand the edge of the deck down to get it to match the edge of the stern step deck. don't worry about getting it too close to the bulkhead as you will be planking that area. As far as bulkhead 10, you do want it to be recessed as you have it now but you want that bulk head to be even with the end of the deck. so try to put a wedge in between bulkheads 10 and 12 on the right side of your picture to lift 10 up a little so it is more even with the deck. Hope that makes sense.
-
I am not sure I see where it is uneven. Can you draw on the picture and circle the area's that you think are uneven.
-
From what I recall the angle of the deck looks correct.
-
I know a photo speaks a thousand words but I don't have any from my build. Wish I did bit I finished my Swift well before I discovered this site. Anyway, on my plans on the photo page, step 5 shows that you have to file part 12 and 10 so they are flush and flat. if you jump to photo 7 in the lower right corner it shows that when you plank it the planks will have to set flat all the way to the end of the stern. Just remember that all of the bulk heads will have to be filed down so that the planks will rest flat on them so when you glue the planks they will have something to adhere to and will not have any kinks or sharp bends in them.
-
I hate to tell you but you have allot more sanding to do.. You need to fair the bulkheads so that when you lay a plank down on them they will set flush and not bend funny or buckle. Please download the Simple Planking Tutorial and pay close attention to page 9 to see what I am referring to. http://modelshipworldforum.com/ship-model-framing-and-planking-articles.php You need to file that bow down to a point so the planks make a point at the bow, then part way down you will grind some of the point down so the false keel fits. Your instructions may not be the same as mine, but steps 4-5 talk about it but it sure isn't clear. Go to the builds logs for kits in progress and type in Swift in the search window. There are a few Swift's in process and you can see how some of them accomplished this.
-
I am glad it's working out for you. Looking forward to seeing your progress.
-
Tyler, you would have to contact AL or try to go back to where you purchased the kit. Maybe local hobby store. Other options could be to just by some wood and make a template and cut out your own. The other option is even though it is mangled you may be able to still use it. This is just the frame and there is nothing exposed after the planking and false keel are applied.
-
Kirk, welcome aboard. Whereabouts in Michigan are you from?
-
Brian, I have plans for the AL Swift. They show they were printed in 1993. I would say based on what you have in the picture you may not have everything needed. There is an assembly guide with pictures, then there is the parts list, and then a sheet for the rigging and sails. Seems like you are missing allot of that.
-
George, I would say you have several options to consider. If assembled would the parts straighten themselves out being glued together. Sounds like you have already tried the wetting technique. Maybe try steaming with an iron. Other ideas would be to contact the manufacturer for a replacement sheet. Another would be to buy your own wood and create a pattern to cut out on the new wood. Hope you find a solution that works for you.
-
Navyyeoman, welcome aboard. I would look at some of the build logs of other builds in progress. Here is one that shows how he coppered his build. http://modelshipworld.com/index.php?/topic/423-uss-constitution-by-bob-riddoch-model-shipways-scale-176/page-1?hl=constitution I would also look at the MSW Copper Sheathing Guide and see if that helps. http://modelshipworldforum.com/ship-model-framing-and-planking-articles.php Also, start a build log of your build so we can follow along and give advice when needed.
-
Jay, very handy cradle, what a great idea.
-
George, what ship is it? Can you post a picture of what is happening? I think I get what you are saying.. I would recommend running your lines through some bees wax. This helps to straighten the line so it will relax from being coiled up and will also help with all the frays on the line. This is a handle tool to have. The lines run right through the groves. http://www.modelexpo-online.com/product.asp?ITEMNO=SA622
-
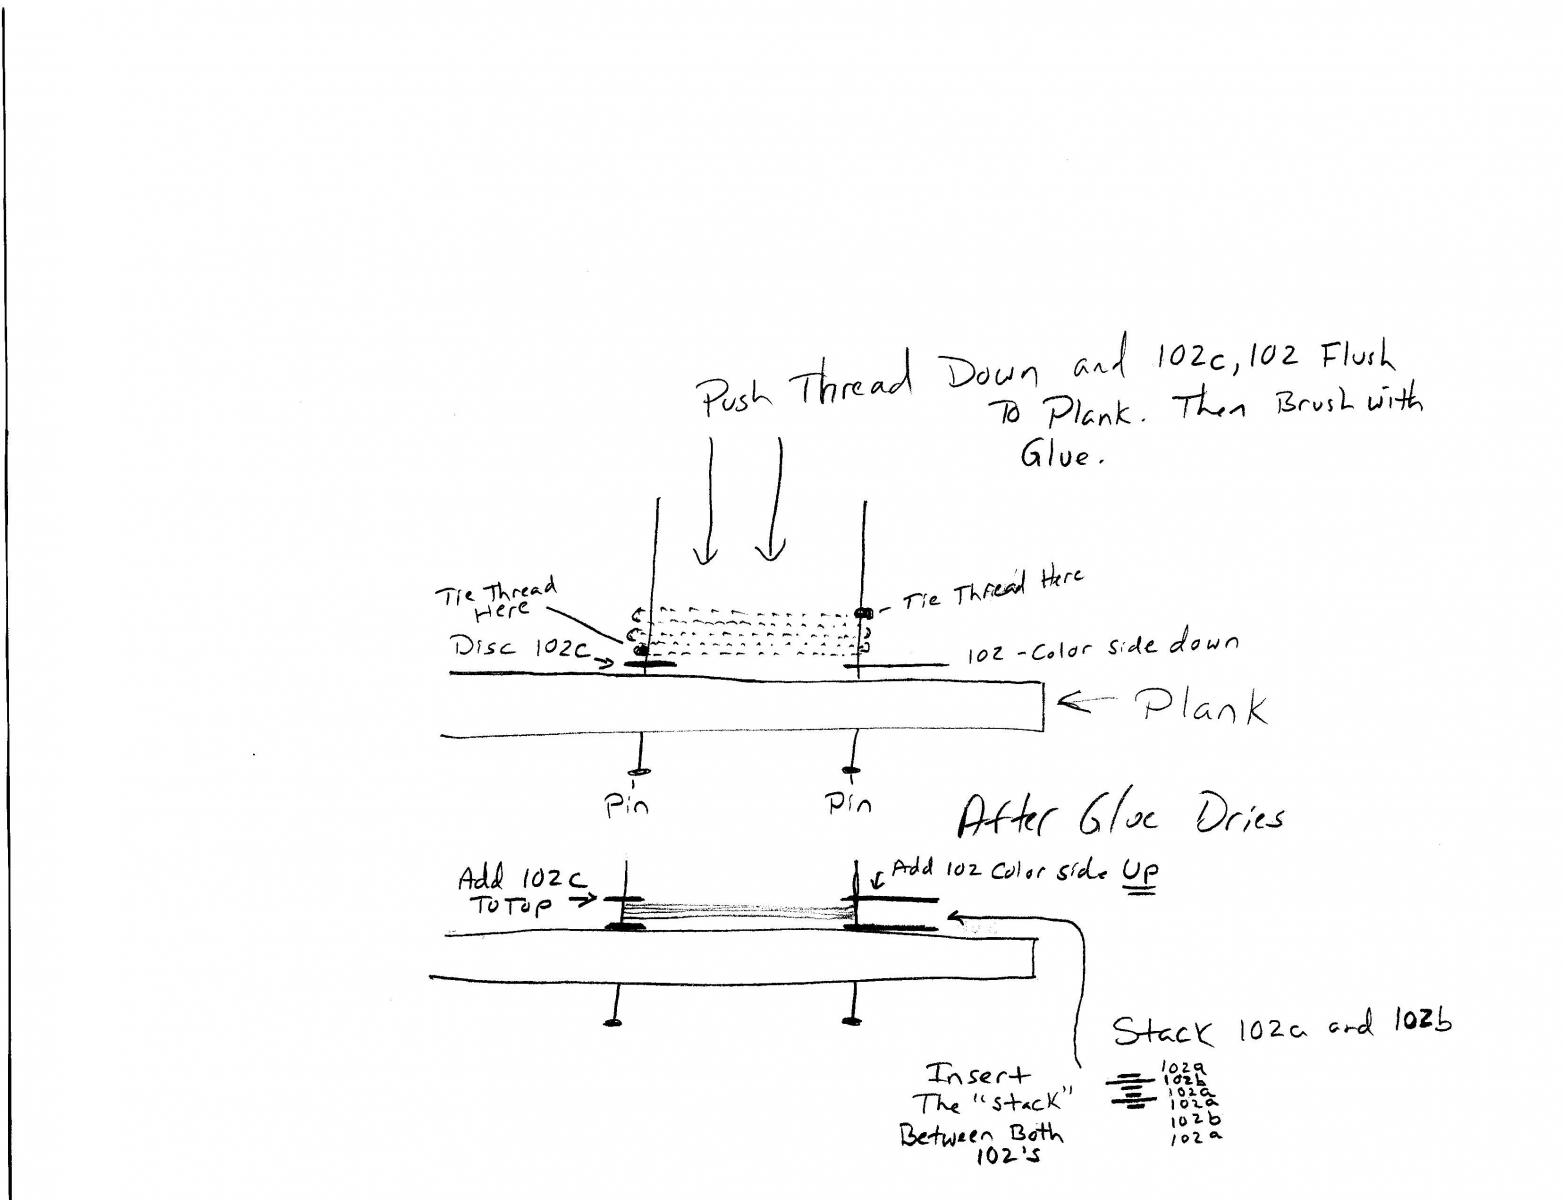
Sarah, I am no expert but I will toss in my take on what the directions are telling you what to do. Let me know if the drawing makes sense to you.
-
Ina, in doing a little bit of research I came accross these articles about Sculpley. Seems easier than carving and if you make a mistake it looks easier to repair. http://www.thenrg.org/resources/articles/Using%20Polymer%20Clay%20for%20Your%20Ship%20Model%20Ornamentation.pdf http://www.shipmodelsocietyofnewjersey.org/resources/Downloads_page/sculpeydoc.pdf http://modelshipbuilder.com/e107_images/custom/The-MSB-Journal/msbjournal-may-2008.pdf (page 29)
-
Brett, your off to a good start. Keep up the good work. As far as fillers you can use Balsa as you can shape it easily. Basically all you are trying to do is to give the planks more of a surface to glue on to instead of just the bulkheads. I myself did not use any fillers and just glued the planks right on to the bulkheads and it did just fine.