kriss
-
Posts
29 -
Joined
-
Last visited
Content Type
Profiles
Forums
Gallery
Events
Everything posted by kriss
-
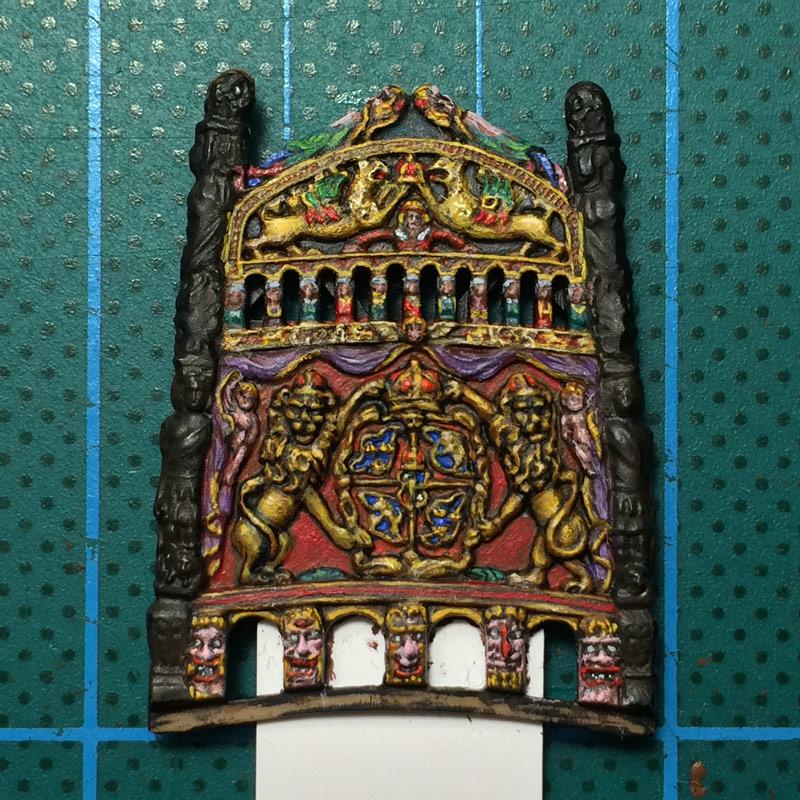
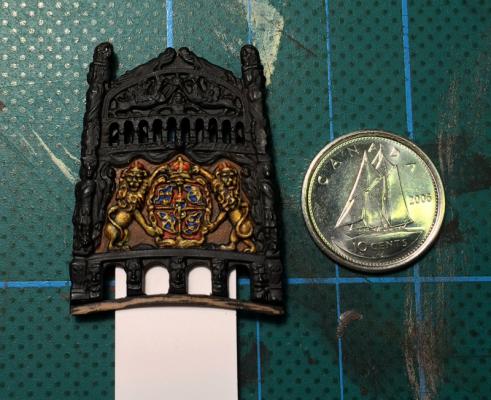
The Vasa transom is one of the most time consuming paint jobs I've done in quite a while. You need to mix up a ton of colors, the scheme isn't very uniform, the detail is minute and there's a need to double check the color references (plural) ever so often, which doesn't stop you from having to second guess some of it anyhow. The combination of all of the above makes for some very slow progress. That said, it's one of the iconic bits of Vasa, warranting some attention. Still need to fix the posts, do some cleanups - and oh, the other three parts of the transom... Having had the chance to sit down with all the detail up close and personal, I must say that Revell did a bloody excellent job modeling this part of the kit. Out of the available kits that I've seen (Airfix, BB, Sergal, Corel) it seems like the most accurate representation of the real thing out of the box. Very impressive, given the scale.

- 49 replies
-
- 10
-

-
Vasa indeed had a lantern, but it hasn't been found, or has been found and not reassembled (http://dir.groups.yahoo.com/neo/groups/SwedishWarshipWasa/conversations/topics/1449) - one personal guess is that the lantern would be one of the simpler things to salvage even back in the 1600's, if it was still attached as the ship hit the bottom. As for the shape, good question. There's a mention of some typical Dutch designs from the era in Old ship figure-heads and sterns - see http://www.amazon.com/Ship-Figure-Heads-Sterns-Dover-Maritime/dp/0486415333 (Click Look Inside, search for Zeelandia. Pages 158 and 159 are your paydirt). They're all simpler than the glitterball. Good book in general, by the looks of it. Nice illustrations of a lot of various bits and bobs. Haven't had time to read through my paper copy yet. There's also a lantern depicted in the Vasa documentary, see http://www.dn.se/Images/2011/12/27/TV-vasa1-430.jpg for a still. Not sure how well researched this is, but it seems pretty typical for the period and the dutch, judging by the above book.
-
The supports for the.. plank thingie (the three iron bars between the leftmost two gunports) have pretty distinct shadows, where the angles match those of the gun ports, explaining the looks in the picture.
-
Some general painting tips (I'm sure there's quite a few in the forum that Anja linked as well): - Use the biggest brush you can reasonably use for any given job. As long as the tip is in good condition, bigger brush means more paint/water in the brush, means more work done faster. I very, very rarely use anything smaller than a size 2 even for the tiniest of details. - Get the cheapest brushes you can lay your hands on that still have a good, pointed tip until you're comfortable that you can maintain them properly (i.e at such a time when a brush hasn't yet gotten bristled after two weeks or so in heavy use). If it looks like a good quality brush, as opposed to something that already lost half of its bristles in the store, it probably is good enough. Anything north of 3€ is definitely overkill for most people. - Stick with acrylic paint rather than enamels, especially when starting out. Much easier to maintain your brushes, less chemicals involved and it's way easier to dilute the paint. - Thin layers - always thin layers. If it takes three layers for the paint to properly cover your surface, so be it - it's always preferable to do several thin layers rather than tacking on one thick layer. Some colors benefit from being built up in several layers - yellows, for instance, tend to look much better when built as layers ranging from Black / Red'ish brown / Golden orange / Golden yellow rather than Golden yellow / Golden yellow / Golden yellow. Your mileage may vary and it's definitely a matter of preference and what style you're after. - Learn how to do careful drybrushing (plenty of youtube videos on this) on some spare pieces. Where you'd get some natural highlights on a full size ship, it just doesn't happen the same way on a model - some cheating is required.
-
md1400cs, NickvN: Much appreciated! I feel I'm missing out some on the joy of actually building the ship - on account of it being plastic and all - so I guess I take that out in brush hours instead. At least Vasa is well suited for that. matti: Thanks! I think I'll leave the plastic be. Ideally I'd get rid of it (and all the other flat plastic background above the G A R S bar - i.e the stuff surrounding old Gustavus himself and the griffins), but it'd be a decent amount of work to do so, require way smaller files than I have and I'm not sure that the end result would look all that good. Seeing the scale, even doing it with a scalpel would be somewhat tricky; any mistakes would be hell to repair and easy to make. It's not often that I duck out of doing a reasonably sized detail, but this is one of those times On the topic of primers, there's primer and primer - anything from the automotive world is designed to expand when setting, covering scratches / minute detail and generally making you miserable, indeed. Then there's primer specifically made for miniatures that rather contract ever so slightly when setting - whole other ballgame. I use Citadel's Chaos Black for a combined primer and basecoat, mostly out of habit and ease of access. There are other brands (P3, Vallejo) that are a bit cheaper and I'm told equally good. The lions on the transom are somewhere along the lines of six coats of paint, counting the primer.
-
Transom painting. Work in progress (if all that black wasn't evident.. ), but it's getting there.
-
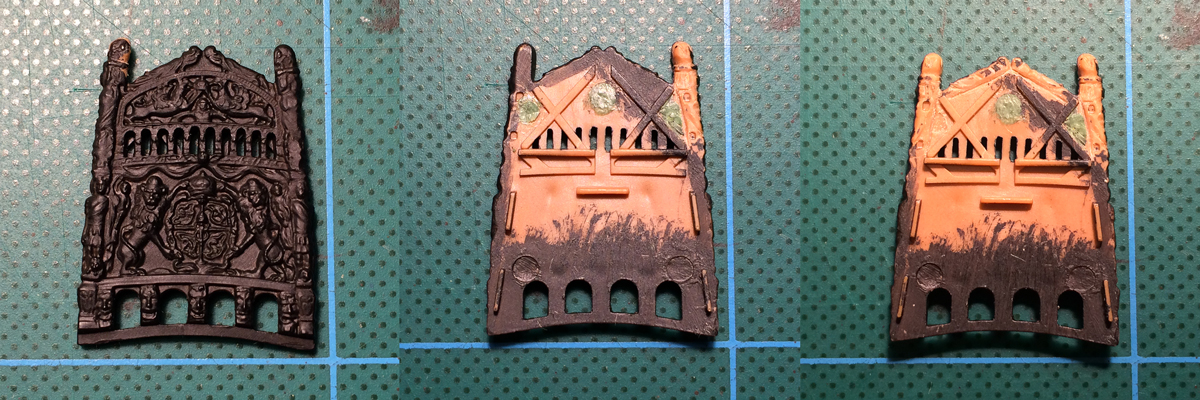
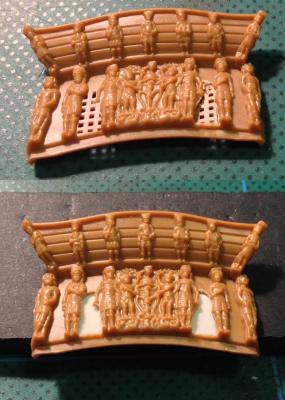
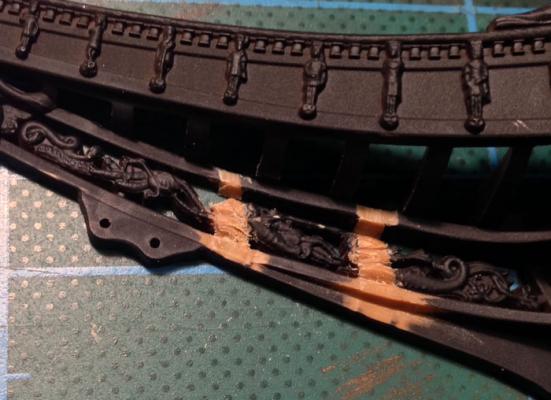
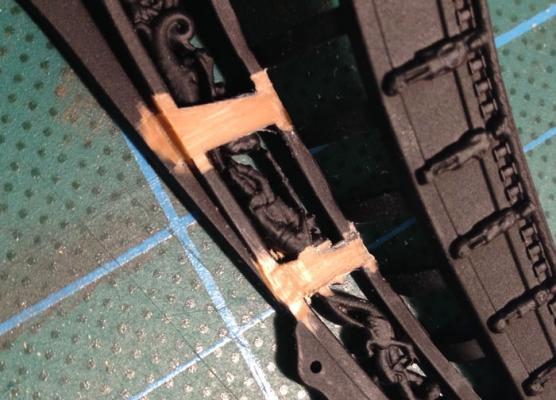
NickvN: Thanks for the encouragement :-) The Vasa model kit is semi new, by plastic ship model standards. Figured I'd get started on painting the transom. Got derailed when I realized I had forgotten to do all the necessary trimmings, which brings us back my love/hate relationship with Revell. Allow me to illustrate: What you're looking at is the top third or so of the transom. The outward facing side, or leftmost picture, is pretty neat in terms of the casting quality. Good detail, the tradeoffs are understandable. It's bloody murder to get the spray primer to reach every crevice, but that's fine. The inward face of that piece, however, is pretty damn flat - besides for the casting artifacts (sigh). Considering that the top half of it will be visible when mounted, I'm not at all happy with that. Granted, it's not one of the most eye catching pieces of the ship, but it'd nevertheless have been pretty damn nice of Revell to make it just slightly sculpted rather than totally flat. So I had to swap the painting session for a knifing session. Middle picture, in progress. Right picture, done (mostly). Contrast isn't great, but you get the gist.

-
First update in a bit over a month - I'm apparently getting lazy. Lots of small and uninteresting work getting done on the model. Figured I had about 1/4 the amount of hull joints I should be having, so I took a while to scratch some new ones. Not very interesting in terms of pictures. Also did some painting. Feels good to actually get started there, and it's a bit more.. visual - photo worthy. Still a lot of work left, especially in detailing and highlights. That said, I'm somewhat happy with the wood thus far. Will be interesting to see how it turns out with the gunports and cannon in place.

-
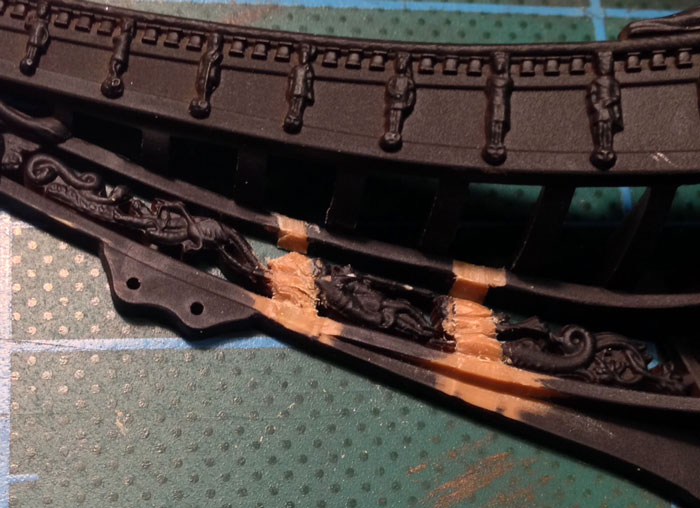
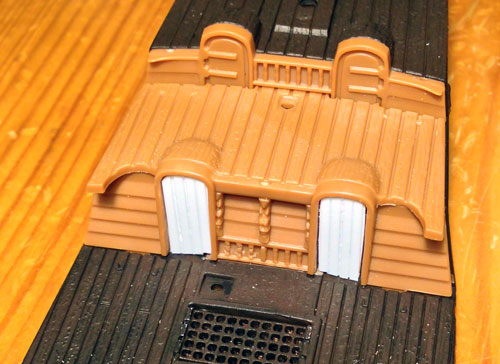
Matti: Them lions were a bit of a drag, yes. Got sort of meditative after a little while, which helped. Well worth the time in the end, methinks. Ulises: Thanks. Yeah, part count is pushing 3x the original count now. I'm glad I'm not on a deadline or this would suck.. ;-) Spent some more time over the weekend gluing the gratings in place proper, making sure they're level with the deck. Figured it'd make sense to add a little extra detail to bring it a bit more in line with other models (the 1:10 museum model, the Clayton Johnson model). Also started working on the aft castle structure. Lots of woodwork with very poor definition that needs some additional Xacto lovin'. The doors as cast don't look good, so I'll have to redo those too - thankfully not an overly tricky job. Need to figure out if the big doors at the bottom should have three wider planks or four narrower ones. If anyone has authoritative info here, I'm all ears. Additionally, I need to figure out whether the iron bars on the door exteriors should be very plain or somewhat ornate. All the models I've seen sport plain bars (or no bars), but it seems strange that they'd make the whole bloody ship into a gaudy floating pimp palace, while leaving some of the iron detailing plain. It was certainly possible to make more ornate bars back in the 1600's - whether they ever did for ships, no idea. Research time...
-
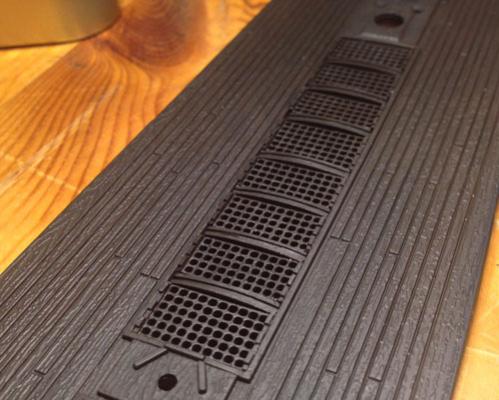
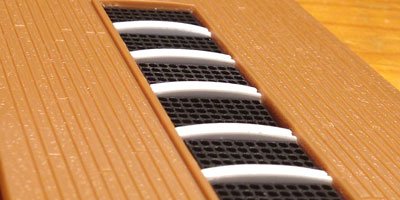
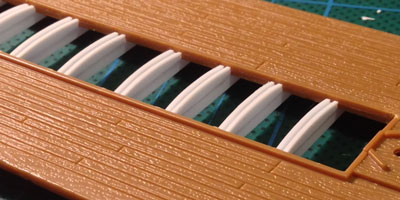
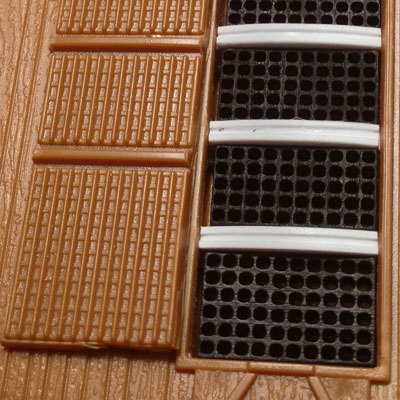
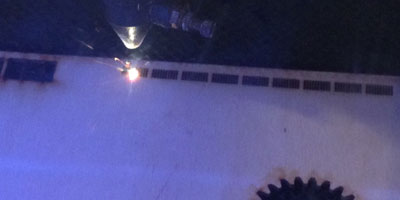
Productive week. Had a date with a laser cutter. Four and a half minutes worth of coherent light lovin', and I got the *bleep* gratings started proper. Still some detailing left. Okay, still a crapload of detailing left.. The results were OK. Not totally stellar, but it's a lot less work than trying to do it properly by hand, looks very nice from six inches and out - and seeing it'll be painted anyhow, I don't mind that to much. Zzzzaaap Something's burning Mounting brackets Original to the left, replacement (WiP) to the right For reference, if anyone else is going down this (insane) path: Grating size calculation, OpenOffice format. Laser ready paths, Illustrator CC format (assumes 0.2mm cut width)

-
Per: Funny, I actually wanted a Vasa model back when I was yea high. Never got one, which was probably just as well, or chances are it'd have ended up just like yours. Had a little bout with the flu, which, for better or worse, meant some more quality time with the brushes. All the lions are over and done with. Still need to do the backs, hinge mod, minor cleanups and the final highlights. Whee.
-
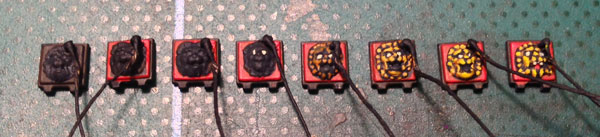
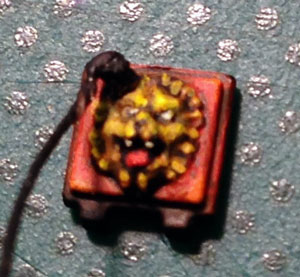
Half the gun port fronts painted, half still to go, plus all of the backs. Don't ever want to see a Lion King poster again. It's the circle of life... I've developed a love/hate relationship with Revell over these. There's six or so different models of these lions, which really is above and beyond what they needed to do here and fits the real ship with its variety of lion head shapes and sizes nicely. To put it in perspective, it seems(!) that both Corel and Billing Boats use one single lion style for all the ports. That said, the casting is so-so. One of the styles is rather well defined and would look great when just drybrushed or washed. The other ones range from decent to outright bad. Painting stroke by stroke by hand was the only semi good looking option. The size is also not to scale, which is understandable - the detailing would be minuscule if it was. I found out that the gun port hinges are screwy - if used as cast, the gun ports will be facing more downwards than outwards when glued in place, which 1) is a shame, 2) doesn't match the real Vasa. The hinges as illustrated in the build manual don't have this problem but would look pretty crap closed instead - I'm guessing this was a last minute change on Revell's side. Every gun port will need a few half millimeter long bits of plastistrip attached to fix this. With a bit of luck the hull halves will be glued together by christmas or so. Need to do the above mentioned fix for all the gun ports, paint the remaining half, paint the guns themselves, paint most of the aft, some of the sides (the bits that'll be obscured by the gun ports) and finish the deck - including the bloody grating - plus paint it. What could possibly go wrong?

-
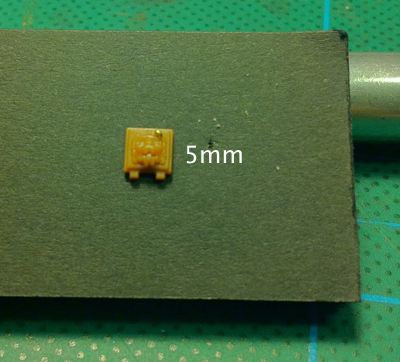
docidle: First of all, pardon the late reply (been travelling and not really kept up to speed on the hobby stuff). Thanks for the encouragement - the gammoning for me was an exercise in Xacto and patience It took me three and a half months from the start of the build, but I'm actually getting to the point where it's time to whip out the paint pots and do some damage. Since I'll be painting the entire model, on account of it being plastic, I figured I'd shoot for non-realistic highlights, roughly in the same style as period naval paintings; highlights a bit more extreme than they'd be for a flat/natural look. Smaller details warrant sharper highlights. Figured I'd start with the drudge bit, them gun ports. The definition on the ports is so-so - can't just drybrush and get a good result. It's also one of the pieces of the model that's eye catching, justifying some attention. The combination means that it'll take a while and a half - I'm guessing along the lines of 15-30 minutes per port, times 50 ports. Whoppee. Will definitely have to shift in and out of modeling and alternate painting other parts too, or I'll go bonkers. The original size is 5x5mm Closeups always look so depressing

-
Matti: Thanks! Steve: Useful advice, indeed. Yeah, the rebar ratlines are going the way of the dodo :-) Hadn't considered the load on the masts and spars, will have to think about that. It's not the fiddliest pieces of plastic I ever had the pleasure of manhandling, but rigging is certainly Here Be Tigers territory.. As for waxing, yes, that'll happen, unless just I happen to find a linen thread that's hard and thin enough for the purpose. As it happens, my better half waxes her own thread for reenactment gear, so we're rather (too) well stocked in the wax department. In other news, work will take me to Canadaland (also known as Kelowna) for just about a month, putting a pretty effective hold on my activity and the build until october or so. Best of luck with your respective projects They didn't look quite proper without their sheilds
-
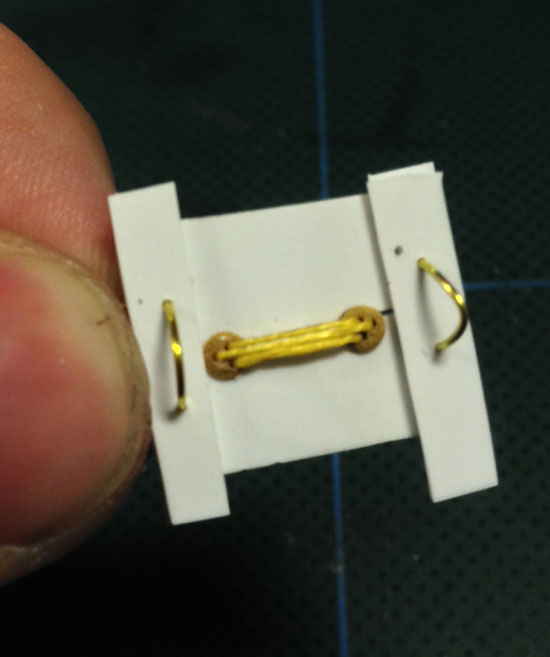
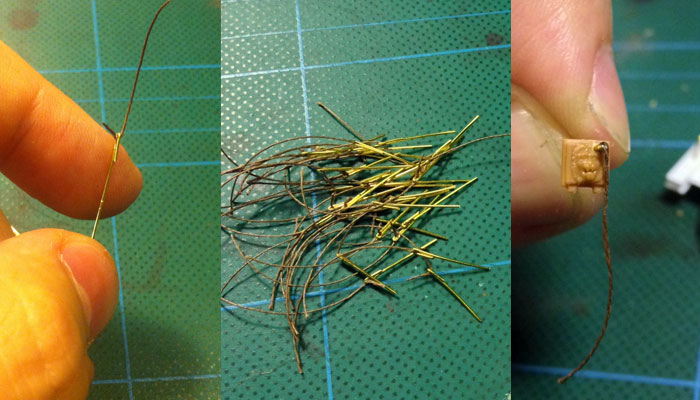
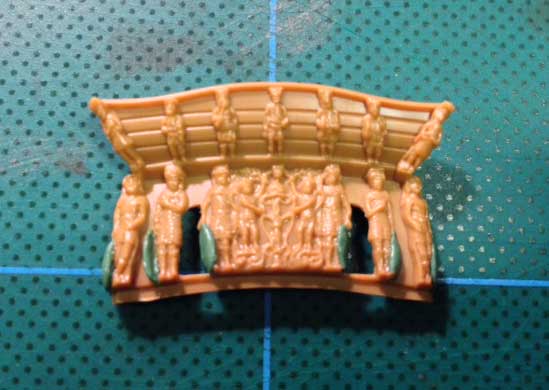
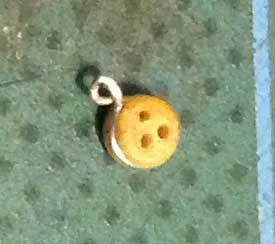
Not sure about young eyes, but they're keen enough for this :-) Definitely shooting for full rigging, will see if I actually get there. As an old teacher used to say, Aim for the stars, land in the treetops. Certainly helps to post stuff to MSW every once in a while - partway as an excuse to get work done, partway to get inspiration by the talented people around here and the pretty damn nifty builds going on. This weekend's work has, by and large, revolved around deadeyes - they're now all mounted and primed. I really like the looks of the ones the museum put on Vasa, but it'd - realistically - be blood hard to mass produce those at 1:150 and still get consistent looks. Seeing I needed 90 of these mounts, this was a bit of a concern. I ended up doing a compromise that looks about the same from a little distance, is rougly to scale and easy to mass produce with a consistent result - basically just by twisting some wire. The recreated Vasa mounts: What I ended up doing: Figured it'd be a good time to start fixing up the aft section as well, seeing there's a decent chunk of work to be done. Some of the sculptures are badly defined. Some of that can be saved by a creative paint job, but there's etching to be done as well. The gothic knights also lack shields - this might be a for a reason, but I think it looks better with them shields than without them, so they'll have to be green stuffed. That, however, is for later. For now, I just started out cleaning out the windows. The ones on the gothic knight tier of the aft are flush on the model. I wanted them slightly recessed, and a with much, much smaller grating than the molded one. Something similar is going on with the upper windows as well (not pictured). Makes a hell of a difference for the looks. Toyed with the idea of copying Matti's LED work, but decided against it in the end - I think the scale is a bit too small for it to make sense.

-
I'm slab dab in the middle of a repetitive stretch. I don't mind repetitive, but the images don't get very impressive. All gunports are primed and ready for painting. Took a bit longer than anticipated (surprise..), but they do look pretty damn nifty when attached to the model. On the downside, I need to paint them - and a large swathe of the sides - before I can attach them (attaching them much later on would be preferable, but no can do. Getting the gun port ropes properly glued to the inside wall of the ship would be too tricky from the outside...) So the current project has been getting the sides somewhat ready for painting. One of the things I wanted to preserve from the real ship was the planking joints - etching out at least a few of them with the back side of an X-acto blade. The other thing that annoyed me was the molded rope holding the bowsprit and the head together. Molded rope looks pretty poor next to real rope, and there'll be plenty of that before the build is over. The way the rope bundle was cast also implied a nice big solid blob of plastic (interestingly enough, all the Revell promo shots of the bow of the model are done from angles hiding this fact) - can't have that. Still work in progress. That said, the brown sections will be covered by the rope in the end, so I'm not going to get overly detail oriented here. Believable > OCD.

-
What did you use for the feet? Green stuff, or something else?
-
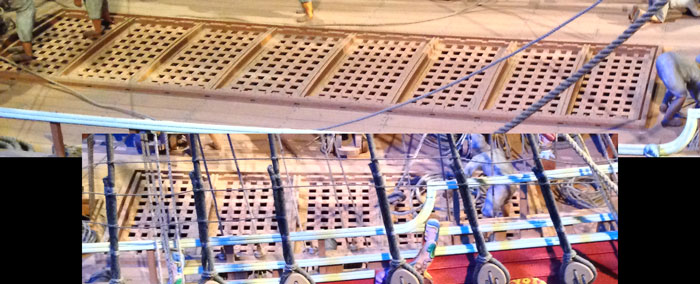
Managed to visit the museum. Pro tip: 1 PM on a sunny friday afternoon in the tourist season? Not the best time to go there, unless you have a thing for queueing. Need to sort, upload and label 232 pictures to Flickr. That'll happen one of these days. For now, here's one of the specifics I went there for - the ongoing serial of What does the damn deck grating look like, really? Both pictures taken of the 1:10 model, from the port side This is the 1:10 model, granted, but I went and had a long, hard look at the sections you could spot (some are downright hard, on account of the pretty steep railing near the aft and the fore) - it seems to match. No wonder there. On the wtf side of things, it really seems that the mid section of gratings should be a section of 8 gratings, rather than a section of 7 where one is double wide. Airfix, Revell, Billing Boats and Corel and Clayton Johnson's model seem to disagree. This sounds a bit implausible, so I'll have to think that one over. Problem being, I have a hard time seeing the 1:10 model being wrong too, seeing that it's produced by the museum itself. The double wide cover looks better. Need to wrap the whole issue, stop waffling and get the CAD drawings done, seeing there's a spot of a delivery time attached to Shapeways orders.

-
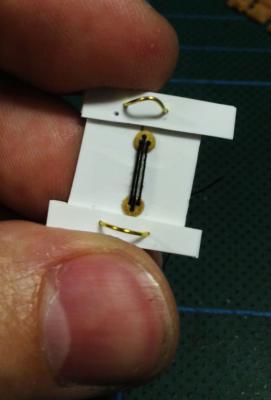
Rivet counter, eh? That sounds like me Jokes aside, I can see the charm both in OCD and in getting the big picture right and not caring about detail. Thanks for the encouragement! Speaking of OCD, my 2mm Billing Boats deadeyes arrived today. Ironically enough, I live next door to Denmark. Proved easier to order the damn things from the US. Hello, globalization. Figured it'd probably be a good idea to make a jig to keep the things in place while threading them - said and done. The end result is pretty close to the original (see the first post in this thread) in size, but they look a lot better. Plasticard and brass wire - man's best friends. Linen thread. A bit too thick for my taste.. Cotton thread. Better. I'm happy with the results, but quite open for suggestions if there's a saner way of going about this. The ship does, after all, have close to 200 deadeyes to thread... The other thing that has been keeping me busy would be the gunports. Adding the ropes to them has proven fiddly, but meditative. Roughly halfway done, got a few left to do on the port side of the ship. Starboard is yet to be done. The portsickle, from construction to finished item.


-
I wouldn't have complained, put it that way ;-) But it's a small and cheap kit, I can see why they chose the scale they did. I'll just make the best of it.
-
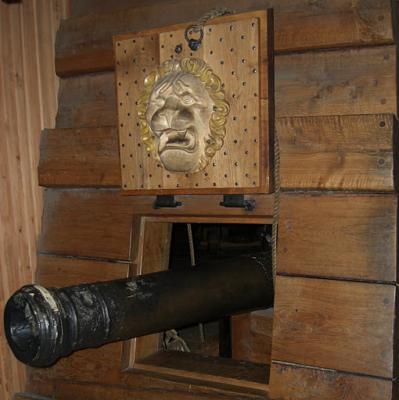
mtaylor, dgbot, thanks. Yeah, I realize the ship is a bit on the.. detailed (*cough*) side of things to start out with, but at least most of that is molded and only time consuming in the painting stage, I'm thinking. Speaking of time consuming, current project, gun ports. Why gun ports? I'm blocked for the deck grating. Seems that the BB model differ from the actual ship in the # of holes in the grating, and I don't have a photo reference for the entire deck from the 1:10 model at the museum. Thankfully heading to Stockholm next friday, and for once I have a few hours to spare while in town. Hello Vasa. Long time no see.. But I digress - gun ports. One thing I sort of lack in the Revell model is the rope going from the inside of the gunport, into the ship. I can definitely see why it's not there on a model this scale, but I rather like it, so if at all possible, I'll try to model them. Images shamelessly stolen from Somewhere The main problem with the Revell kit here is that the lions on the inside of the ports are way, way too big. There's no good space in which to place the ring. But hey, hard to say what it'd look like without trying. Said and done: The jury is still out on the looks. It's technically a bit too big, but I'm not going to be religious about scale, seeing Revell hasn't been either. Whether it'd turn into detail or clutter.. well, I'll have to sleep on that. At least it's no more than a few minutes of work per gun port. The really big drawback is that I'd have to glue them on fairly early, making handling the ship without breaking the ports off an interesting proposal.

-
Hard to tell from a photo, but it sure looks like you nailed the red. Like you said; not flat, but without excessive highlights. Very nice.
-
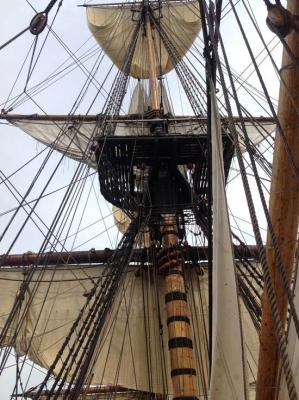
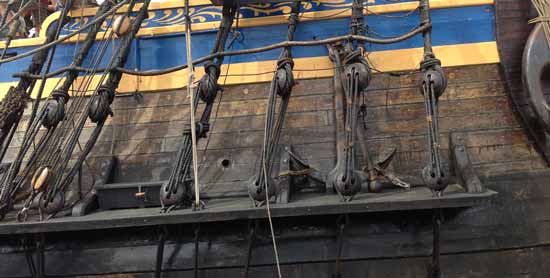
Another update of progress, just not on the model itself - more of the research'y kind. Sorry about the false flag. Lucked out to find Götheborg in the Visby harbour during the Medieval week. The ship is a hundred and twenty odd years younger than Vasa, granted, but it's there and you can actually walk on the damn thing - without getting chased off by security. Figured I'd snap some shots of details I wasn't quite sure what they'd look like and that had proven elusive or proved me lazy enough not to look them up yet. Some of the finer points of the rigging will be quite painful in 1:150, but it seems doable to fake it somewhat, given some careful planning. Also got a much better sense about the deck planking and what the wood grain should look like for the masts. Shouldn't be too tricky to paint the plastic in a similar style, and just hope that the preferred choice of wood didn't change a whole lot in said 120 years between Vasa and Götheborg. A few pictures attached for your viewing pleasure, full set available on Flickr.
-
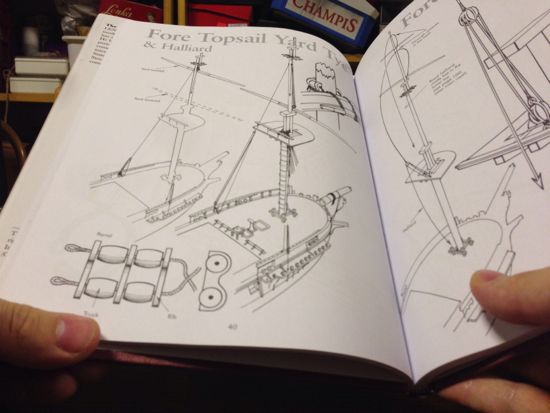
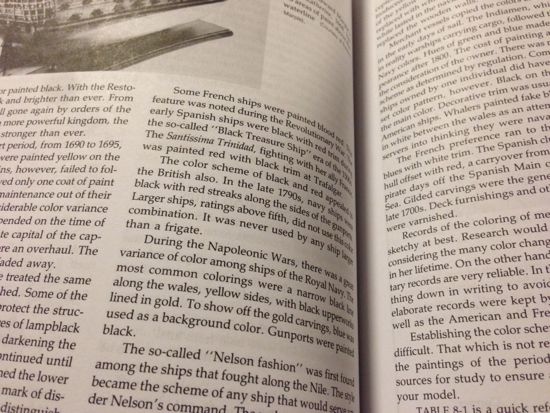
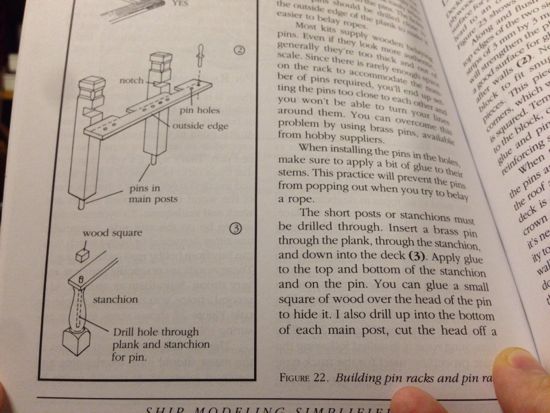
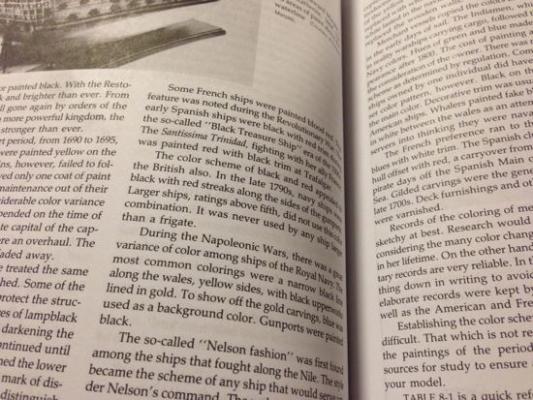
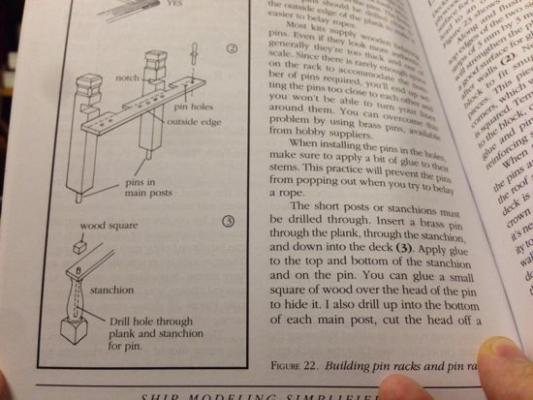
For the past three weeks, I managed to spray the cannons with some primer and realize that my chances of producing the grating purely by hand at .5mm - which is roughly what I need - is not going to happen, at least not with the tools I have. Very productive indeed (if you notice something dripping here, that's sarcasm). On the positive side of things, some snailmail deliveries managed to show up - they're not really part of the build per se, but hey, it's a lot about the process, not just the result. The books - of course I had to get books to realize just how much up shift creek I'd be on this project - showed up. For your perusal: Ship modeling simplified, Frank Mastini At 114 pages plus glossary, and covering a lot of ground in those pages, this book is probably the most worth while of the trio I ordered. Do's, don'ts and general building concepts and above all terminology are covered very nicely, most often with illustrations. Never again will I have to guess or Google what a backing link or a stunsail boom is. This is a good thing. The Happy Talk is kept at a minimum, the text is nice and to the point. Reading the book, I'm very happy I didn't start out on a wooden model. Then again, the scale would probably have been nicer to work with than 1:150. You win some and lose some. Rigging Period Ship Models, Lennarth Petersson The part that seems like the biggest piece of voodoo is the rigging, I'll admit. There's a metric crapload of lines going pretty much all over the place, and from most pictures on the interwebs, it's not really evident how - or sometimes where - they're attached. This book illustrates these bits nicely - even very nicely. No text, just illustrations. Feels bloody good to have a proper reference guide, even if it really covers ships a few hundred years older than Vasa. I have no idea whether any major concepts changed in that time. Yet. But yes, proper reference = good, once I stop my grate-OCD and get a move on so I ever get to the rigging, that is. Ship Modeling from Stem to Stern, Milton Roth Wheras Ship modeling simplified did a good job of explaining the concepts and terminology by means of crisp, clean illustrations and well edited text - this book doesn't. Some areas are covered in great detail - the section on guns, for one, is 16 pages long and very nice. The section on rigging - again, one of the least obvious buts to a novice, is 14 and crap. There's even a ten page section on ships in bottles. For a book called Ship modeling from stem to stern, one would think that some more focus would be put on actual ship modeling, rather than filling out the damn book with paragraph after paragraph of whatever tidbit the author found the most interesting. Illustrations range from good/decent to outright bad. It's evident that the author is a subject matter expert, and he certainly doesn't let us forget this. The book is probably still worth having as a reference - the bits that do have proper illustrations and proper depth are good - but I'm very happy I didn't just buy this one book and stop at that. Finally, my one non-book purchase: a gorilla stand for the phone, allowing for, alongside a voice activated camera app, hands free photos to be taken. I'm thinking it'll prove useful in the process of getting all this documented proper. Hold fiddly bits, shout at camera. Next up - vacation. No update in at least a week and a half, so hah. During which time I'll figure out how to go about the grating. The options right now are upgrading my tools for woodworking quite a bit - which is probably not worth it in the long run, seeing I don't do much in terms of woodworking - or getting either a hobby 3D printer or a CNC mill. Alternatively, send the machining jobs off to Shapeways. It's cheating, but it's high tech cheating and a good excuse to get some new toys. I can live with that.

-
Overall, it's not a bad model, despite my moaning and groaning (and this is as far as I can tell, seeing my frame of reference when it comes to ship models is.. shall we just say somewhat limited). I'm just spoilt with Games Workshop's plastics. Incidentally, your build was one of the ones I ran across while researching stuff