
MORE HANDBOOKS ARE ON THEIR WAY! We will let you know when they get here.
×


kruginmi
-
Posts
629 -
Joined
-
Last visited
Reputation Activity
-

 kruginmi got a reaction from Keith Black in Lady Anne by kruginmi - FINISHED - 1:50 - kitbash of Artesania Latina Harvey
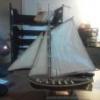
So, after a bit of a hiatus from this site and a return to document my Jylland efforts, I realize I never posted the final pics of the Lady Anne. To recap I configured the deck (Krug design) to handle the Pride of Baltimore II rigging and true to form that is how I outfitted her. She turned out pretty nice and met my expectations.
Still haven't made a display case but I keep her close by my work at home desk to give me happy thoughts when I need them.
Stay Building My Friends, Mark
-
 kruginmi got a reaction from Keith Black in Lady Anne by kruginmi - FINISHED - 1:50 - kitbash of Artesania Latina Harvey
Hey, I really appreciate the note. I am a prime example that there is no time limit on working on ships. Take yours out, clean her up and think about doing one thing a week. It adds up. The rigging targets for me were one line a day, at least 5 days a week.
I still have her in front of me on my work at home setup, still uncased. Enjoy the hobby and draw outside the lines!
Mark
-
 kruginmi got a reaction from Spellapeaka in Lady Anne by kruginmi - FINISHED - 1:50 - kitbash of Artesania Latina Harvey
Hey, I really appreciate the note. I am a prime example that there is no time limit on working on ships. Take yours out, clean her up and think about doing one thing a week. It adds up. The rigging targets for me were one line a day, at least 5 days a week.
I still have her in front of me on my work at home setup, still uncased. Enjoy the hobby and draw outside the lines!
Mark
-
 kruginmi got a reaction from Knocklouder in Lady Anne by kruginmi - FINISHED - 1:50 - kitbash of Artesania Latina Harvey
So, after a bit of a hiatus from this site and a return to document my Jylland efforts, I realize I never posted the final pics of the Lady Anne. To recap I configured the deck (Krug design) to handle the Pride of Baltimore II rigging and true to form that is how I outfitted her. She turned out pretty nice and met my expectations.
Still haven't made a display case but I keep her close by my work at home desk to give me happy thoughts when I need them.
Stay Building My Friends, Mark
-
 kruginmi reacted to Spellapeaka in Lady Anne by kruginmi - FINISHED - 1:50 - kitbash of Artesania Latina Harvey
Absolutely stunning! I have many times referred back to this build log while working on my Harvey kit. I've made some progress during COVID, but alas, I have not worked on mine for about a year. I really need some time to finish her up. So close. But I fear it will not come close to rivaling your skill and craftsmanship on display with this beautiful ship. Very well done sir! Thank you for posting the final pictures.
-
 kruginmi got a reaction from ccoyle in Lady Anne by kruginmi - FINISHED - 1:50 - kitbash of Artesania Latina Harvey
So, after a bit of a hiatus from this site and a return to document my Jylland efforts, I realize I never posted the final pics of the Lady Anne. To recap I configured the deck (Krug design) to handle the Pride of Baltimore II rigging and true to form that is how I outfitted her. She turned out pretty nice and met my expectations.
Still haven't made a display case but I keep her close by my work at home desk to give me happy thoughts when I need them.
Stay Building My Friends, Mark
-
 kruginmi got a reaction from Canute in Sterling Models Half Hull Constitution
I have had this one tucked back in the stash. Don't even remember where I procured it. A 1/2 hull Constitution by Sterling Models. Biggest thing you notice is the 3/4" by 9" by 24" mahogany board supplied to mount it.
Mixed media with cast metal, decals and brass name plate.
Anyone ever run across this before? Definitely room for scratch (haha). No idea when I will get to it. A throwback to another time (given I come from the 60's, shall we say my childhood).
Mark
-
 kruginmi got a reaction from thibaultron in Sterling Models Half Hull Constitution
I have had this one tucked back in the stash. Don't even remember where I procured it. A 1/2 hull Constitution by Sterling Models. Biggest thing you notice is the 3/4" by 9" by 24" mahogany board supplied to mount it.
Mixed media with cast metal, decals and brass name plate.
Anyone ever run across this before? Definitely room for scratch (haha). No idea when I will get to it. A throwback to another time (given I come from the 60's, shall we say my childhood).
Mark
-
 kruginmi got a reaction from GrandpaPhil in Jylland by kruginmi - Billings Boats - 1:100
I picked up a 1/96 propeller and lifting frame from Cottage Industries targeted for the Revell CSS Alabama for not too much money. Not an exact match but better than the kit supplied one:
With some filing and shaping I could do something with that. I wish I had the lifting frame when I built out the prop area but I think I could modify to make it fit. Not too far out whack for what I see in pictures of the actual ship.
When you put both together I have a good starting point for some filing and tweaking, on both the ship and supplied pieces. I will not have the lifting component actually rigged in to raise, but it will look the part.
See how it looks. Always have the option to go to plan B and use the original (let alone scratch something up).
Mark
-
 kruginmi got a reaction from mtaylor in Jylland by kruginmi - Billings Boats - 1:100
I picked up a 1/96 propeller and lifting frame from Cottage Industries targeted for the Revell CSS Alabama for not too much money. Not an exact match but better than the kit supplied one:
With some filing and shaping I could do something with that. I wish I had the lifting frame when I built out the prop area but I think I could modify to make it fit. Not too far out whack for what I see in pictures of the actual ship.
When you put both together I have a good starting point for some filing and tweaking, on both the ship and supplied pieces. I will not have the lifting component actually rigged in to raise, but it will look the part.
See how it looks. Always have the option to go to plan B and use the original (let alone scratch something up).
Mark
-
 kruginmi got a reaction from Prowler901 in Jylland by kruginmi - Billings Boats - 1:100
I picked up a 1/96 propeller and lifting frame from Cottage Industries targeted for the Revell CSS Alabama for not too much money. Not an exact match but better than the kit supplied one:
With some filing and shaping I could do something with that. I wish I had the lifting frame when I built out the prop area but I think I could modify to make it fit. Not too far out whack for what I see in pictures of the actual ship.
When you put both together I have a good starting point for some filing and tweaking, on both the ship and supplied pieces. I will not have the lifting component actually rigged in to raise, but it will look the part.
See how it looks. Always have the option to go to plan B and use the original (let alone scratch something up).
Mark
-
 kruginmi got a reaction from robdurant in Jylland by kruginmi - Billings Boats - 1:100
I picked up a 1/96 propeller and lifting frame from Cottage Industries targeted for the Revell CSS Alabama for not too much money. Not an exact match but better than the kit supplied one:
With some filing and shaping I could do something with that. I wish I had the lifting frame when I built out the prop area but I think I could modify to make it fit. Not too far out whack for what I see in pictures of the actual ship.
When you put both together I have a good starting point for some filing and tweaking, on both the ship and supplied pieces. I will not have the lifting component actually rigged in to raise, but it will look the part.
See how it looks. Always have the option to go to plan B and use the original (let alone scratch something up).
Mark
-
 kruginmi got a reaction from VTHokiEE in Sterling Models Half Hull Constitution
I have had this one tucked back in the stash. Don't even remember where I procured it. A 1/2 hull Constitution by Sterling Models. Biggest thing you notice is the 3/4" by 9" by 24" mahogany board supplied to mount it.
Mixed media with cast metal, decals and brass name plate.
Anyone ever run across this before? Definitely room for scratch (haha). No idea when I will get to it. A throwback to another time (given I come from the 60's, shall we say my childhood).
Mark
-
kruginmi got a reaction from GrandpaPhil in Sterling Models Half Hull Constitution
I have had this one tucked back in the stash. Don't even remember where I procured it. A 1/2 hull Constitution by Sterling Models. Biggest thing you notice is the 3/4" by 9" by 24" mahogany board supplied to mount it.
Mixed media with cast metal, decals and brass name plate.
Anyone ever run across this before? Definitely room for scratch (haha). No idea when I will get to it. A throwback to another time (given I come from the 60's, shall we say my childhood).
Mark
-
kruginmi got a reaction from GrandpaPhil in Jylland by kruginmi - Billings Boats - 1:100
Hey Mark, I purposefully posted that aircraft as a backdrop behind the current ship build. No intent for a separate build log. -
Probably last you will see of it. (A26 Invader, Comet kit)
Mark
-
kruginmi got a reaction from mtaylor in Jylland by kruginmi - Billings Boats - 1:100
Hey Mark, I purposefully posted that aircraft as a backdrop behind the current ship build. No intent for a separate build log. -
Probably last you will see of it. (A26 Invader, Comet kit)
Mark
-
kruginmi got a reaction from GrandpaPhil in Jylland by kruginmi - Billings Boats - 1:100
Back on to the gun deck cannon backing pieces. Should have these completed this weekend and I am thinking carving of the stern blocks will start.
It has been a bit of time since the last update. I had to shift focus onto a second project that jumped in priority. I left a small hint in the attached photo of what that could be. Let me see who can figure it out....
Only the smartest will figure it out. Let's get to that inner planking (did I say too much there?)
Mark
-
-
kruginmi got a reaction from mtaylor in Jylland by kruginmi - Billings Boats - 1:100
Back on to the gun deck cannon backing pieces. Should have these completed this weekend and I am thinking carving of the stern blocks will start.
It has been a bit of time since the last update. I had to shift focus onto a second project that jumped in priority. I left a small hint in the attached photo of what that could be. Let me see who can figure it out....
Only the smartest will figure it out. Let's get to that inner planking (did I say too much there?)
Mark
-
kruginmi got a reaction from Prowler901 in Jylland by kruginmi - Billings Boats - 1:100
Back on to the gun deck cannon backing pieces. Should have these completed this weekend and I am thinking carving of the stern blocks will start.
It has been a bit of time since the last update. I had to shift focus onto a second project that jumped in priority. I left a small hint in the attached photo of what that could be. Let me see who can figure it out....
Only the smartest will figure it out. Let's get to that inner planking (did I say too much there?)
Mark
-
 kruginmi got a reaction from yvesvidal in Jylland by kruginmi - Billings Boats - 1:100
Big day today in the life of this model - it gets the holes for masts to allow those dramatic side shots:
Now the 'masts' seen are from the original kit and will not be used. They were available and a consistent diameter less than the target masts so why not. I did need them to insure I had everything in alignment when sighting down the center line.
First step was to attach the all important blocking for support and strength.
Then securing to the ship stand and verifying level I got it on the drill press. I actually drilled twice. The first was with a smaller diameter hole to verify all was right before I enlarged with a second round.
The moment of truth was when you sighted down all three 'masts' while looking at the hull. This alignment is beyond me with the camera so you have the closest I can get.
Everything looks good. When I get the backings on the gun ports I can start planking again. I do need to have a look at the cathead's. I do not have them on my plans and need to insure they are still possible haha.
Mark
-
kruginmi got a reaction from Keith Black in Jylland by kruginmi - Billings Boats - 1:100
Wow, Anders - again you are giving new information. I followed the link but am at a loss given the language difference. I have no idea if they ship internationally, the cost to do so or how to navigate the menu options. I will work on a solution.
I know your picks will show my best attempt at placing the cannon ports will be off somewhat. I did what I could with the information I had.
Mark
-
kruginmi got a reaction from GrandpaPhil in Jylland by kruginmi - Billings Boats - 1:100
Gun deck cannon ports starboard size complete (sans the last port). No backing plates.
As a side note: Looking at the pics (again) of the museum ship the planks are evident on the side of the ship at medium to close range. One part of my brain thinks a doubly planked hull would be awesome, the other says knock it off. I am trending towards stick to the original plan.
Mark
-
 kruginmi got a reaction from Javelin in Jylland by kruginmi - Billings Boats - 1:100
Finished up one side with the gun deck ports. Like most things with ships, given the quantity of repetition your technique and speed increase. The aft most port requires the planking below to be added first.
I have only put the backing on 4 ports so far. Doing some fine tuning with plank alignment.
Mark
-
kruginmi got a reaction from GrandpaPhil in Jylland by kruginmi - Billings Boats - 1:100
Time to make up the handy dandy cannon port sizer gauge (lower gunport).
Time to walk around the hull and finish off the gun deck cannon ports. To repeat myself, the kit provides only the front half of the gun barrels, so a backing piece is required. This is actually a good thing because there is not inner structure holding up the plank between cannon port (why they weren't full cut out before this plank was installed.
So I will work my way around going every other port to cut out and glue in the backing piece. The remaining hull opening provides perfect access for my clamp of choice. I had thought about framing out each port but the lids will be closed (with a circular center hold the cannon sticks out) and with the wood filler and smooth external finish I didn't deem the extra work worthwhile. This is 'IF' I keep up the quality and uniformity of each and every port. Not the time to slack. Lather, rinse, repeat.
Cheers, Mark