
MORE HANDBOOKS ARE ON THEIR WAY! We will let you know when they get here.
×


kruginmi
-
Posts
629 -
Joined
-
Last visited
Reputation Activity
-

 kruginmi got a reaction from thibaultron in Rigging Instructions 1/96 Revell Constitution
I will add a pic of something this is a better thing added in the newer instructions - Belaying pin identification. The older instructions just have numbers shown on which pin to attach to. The new ones have the same, but a separate breakout that identifies by name what is what.
There are two pin out diagrams for the upper works. The above shows one of each. There are a total of 219 attachment points identified between the two diagrams. -Mark
-
kruginmi got a reaction from thibaultron in Rigging Instructions 1/96 Revell Constitution
I agree they are newer versions. Just interesting that they occupy really the same real estate (same size paper) but for some reason it was decided to modify how presented.
I believe the instructions are adequate for the model as built. Giving a heads up to people getting this kit of the differences out there.
-
 kruginmi got a reaction from thibaultron in Rigging Instructions 1/96 Revell Constitution
I currently have 3 kits of the 1/96 Revell Constitution. The original was started by my Father prior to his passing that I have recently pulled out to finish. The other two I have picked up for missing and / or extra parts in the build (warpage, etc). What I didn't expect to see was the difference in rigging instructions. The good news is that essentially they say the same thing, one set goes about it more verbally while the other set is more visually based (this set also had separate sheets for with or without sails). I provide the following comparisons:
I actually see them as complimentary, though I give the edge to the (I believe older) set that is more visual. Drawing out each mast separately keeps the whoops factor minimized. Just throwing this out there for other 1/96 Revell builders for their information.
Mark
-
 kruginmi got a reaction from Spellapeaka in Lady Anne by kruginmi - FINISHED - 1:50 - kitbash of Artesania Latina Harvey
Worked on first of two main mast stays (both port and starboard) - pretty happy with the result. After I get the port one fashioned up will probably need to start on the ratlines. Not too many.
Had to find (make) my 'Put'r There 3000' for actually rigging - especially to tie them up at the cleats. With the meat hooks I have for fingers only way to go. My essential tools in addition to this for rigging are two fly typing clamps (need more), hemostats and my vise for holding the clamps when possibly. Could also throw in my magnifying glass(s). Peepers just aren't the same as before.
I am approaching this rigging as have some fun while doing stuff. So.....while I do look at suggested rigging thicknesses I also look at my supply and choose what I think would work. Having the blocks on hand showed the ones I chose that had to go through the blocks had to fit. Color selections are entirely on me (very liberating). I did decide early on that I was going to settle on two sizes of blocks from Syren for ease (and cost). My calculations over the whole ship showed 186 blocks required (single, double, triple - both sizes). The 1/8" were the smallest I wanted so therefore that and 3/16's were the answer.
Having fun so will keep at it, -Mark
-
 kruginmi got a reaction from GrandpaPhil in Lady Anne by kruginmi - FINISHED - 1:50 - kitbash of Artesania Latina Harvey
Worked on first of two main mast stays (both port and starboard) - pretty happy with the result. After I get the port one fashioned up will probably need to start on the ratlines. Not too many.
Had to find (make) my 'Put'r There 3000' for actually rigging - especially to tie them up at the cleats. With the meat hooks I have for fingers only way to go. My essential tools in addition to this for rigging are two fly typing clamps (need more), hemostats and my vise for holding the clamps when possibly. Could also throw in my magnifying glass(s). Peepers just aren't the same as before.
I am approaching this rigging as have some fun while doing stuff. So.....while I do look at suggested rigging thicknesses I also look at my supply and choose what I think would work. Having the blocks on hand showed the ones I chose that had to go through the blocks had to fit. Color selections are entirely on me (very liberating). I did decide early on that I was going to settle on two sizes of blocks from Syren for ease (and cost). My calculations over the whole ship showed 186 blocks required (single, double, triple - both sizes). The 1/8" were the smallest I wanted so therefore that and 3/16's were the answer.
Having fun so will keep at it, -Mark
-
kruginmi got a reaction from Spellapeaka in Lady Anne by kruginmi - FINISHED - 1:50 - kitbash of Artesania Latina Harvey
So, got to this point today. Just 2 running backstays left on the foremast.
-
 kruginmi got a reaction from marktiedens in Lady Anne by kruginmi - FINISHED - 1:50 - kitbash of Artesania Latina Harvey
So, got to this point today. Just 2 running backstays left on the foremast.
-
 kruginmi got a reaction from Keith Black in Lady Anne by kruginmi - FINISHED - 1:50 - kitbash of Artesania Latina Harvey
So, got to this point today. Just 2 running backstays left on the foremast.
-
 kruginmi got a reaction from egkb in Lady Anne by kruginmi - FINISHED - 1:50 - kitbash of Artesania Latina Harvey
I need to up my game as I go forward. Currently Going through entire Ashley book of knots to ID potentially useful knots that I can use at scale. Then will make a cheat sheet for use.
First question is how best to attach blocks to bolts affixed in deck (limited access) for last remaining backstay. Pondering snipping small gap at base to allow slipping on stropped block constructed off ship.
Mark
-
kruginmi got a reaction from Spellapeaka in Lady Anne by kruginmi - FINISHED - 1:50 - kitbash of Artesania Latina Harvey
Much better......
-
kruginmi got a reaction from egkb in Lady Anne by kruginmi - FINISHED - 1:50 - kitbash of Artesania Latina Harvey
Much better......
-
kruginmi got a reaction from Keith Black in Lady Anne by kruginmi - FINISHED - 1:50 - kitbash of Artesania Latina Harvey
I need to up my game as I go forward. Currently Going through entire Ashley book of knots to ID potentially useful knots that I can use at scale. Then will make a cheat sheet for use.
First question is how best to attach blocks to bolts affixed in deck (limited access) for last remaining backstay. Pondering snipping small gap at base to allow slipping on stropped block constructed off ship.
Mark
-
kruginmi got a reaction from Keith Black in Lady Anne by kruginmi - FINISHED - 1:50 - kitbash of Artesania Latina Harvey
Thanks Martin. Thinking about the diluted white glue. Will see how it looks.
thread type made a huge difference
Mark
-
kruginmi got a reaction from Keith Black in Lady Anne by kruginmi - FINISHED - 1:50 - kitbash of Artesania Latina Harvey
I know the twisting is a common issue. I have tried quite a few things today, insuring the tension is uniform across all 3 threads, no thread is caught up in its hole, etc. I even wet the threads to see if any small fuzz was hampering.
One thing I did find interesting is that if I do get the tension just right (basically very little) (or very slack) the deadeyes will align themselves correctly. However the shroud is quite loose. If you pull up on the shroud the upper deadeye will immediately start twisting around 1x, 2x, etc. Release the tension and it returns to the original startup.
I know wood and most things hull, but this rigging stuff is a learning curve. I need to figure this out before I proceed.
I am going to try some different thread and see if that helps any.
BINGO: went with a same diameter but more 'waxy' thread and everything is behaving as it should. It makes sense but can't say I totally expected this. Phew. I need to redo all the shrouds but that is okay. Better product in the end.
-
kruginmi got a reaction from Keith Black in Lady Anne by kruginmi - FINISHED - 1:50 - kitbash of Artesania Latina Harvey
Much better......
-
 kruginmi reacted to MartinJ in Lady Anne by kruginmi - FINISHED - 1:50 - kitbash of Artesania Latina Harvey
Here is the way I thread the lanyards: I build a jig (see below). It needs to be tight to the deadeye, or you can use a very thin shim to hold it in place. Once the threading is done, I paint the lanyards and the deadeyes with a clear matte varnish or diluted white glue. Thus everything stays in place and ready to mount on the channels and on the shrouds.
-
kruginmi got a reaction from egkb in Lady Anne by kruginmi - FINISHED - 1:50 - kitbash of Artesania Latina Harvey
My view is that the 'Harvey' configuration is the default basic kit way to recreate the look (less complexity). When the rigging in total is viewed, you can definitely make this assumption.
The running backstay seems more accurate and befitting such a ship so that is what I will use. For the orphaned deadeye I will just punt and wait until all the standing rigging is complete and then ponder what would look best.
Thanks for the comments! -Mark
-
kruginmi got a reaction from Keith Black in Lady Anne by kruginmi - FINISHED - 1:50 - kitbash of Artesania Latina Harvey
So...coming up to a decision point and I throw it out for suggestions on what course to follow.
The original 'Harvey' had two (2) fixed backstays off of the foremast. This was built before the grand awakening and change of direction.
These directly attached to the two fixed points above the mast cap
The 'opportunity' before me is that on the Pride of Baltimore II they only used one, with the second backstay being a running variety and fixed inboard of the bulwarks. I do have these connection points established on the hull.
So what do I do with the second backstay deadeye?
My current thoughts are to go with the PoBII configuration and not use the deadeye. I will have to throw some rigging on it to connect to the railing or something to avoid the inevitable - "Looks like you forgot something" (hey - actually think someone will look closely at this when done haha). My rationale is that this is a working ship and each captain has their own druthers on rigging. So.....the latest guy decided he liked a running backstay better. I could also just remove the deadeye and leave the hardware (damage at sea? LOL).
Any other thoughts out there? -Mark
-
kruginmi got a reaction from Keith Black in Lady Anne by kruginmi - FINISHED - 1:50 - kitbash of Artesania Latina Harvey
My view is that the 'Harvey' configuration is the default basic kit way to recreate the look (less complexity). When the rigging in total is viewed, you can definitely make this assumption.
The running backstay seems more accurate and befitting such a ship so that is what I will use. For the orphaned deadeye I will just punt and wait until all the standing rigging is complete and then ponder what would look best.
Thanks for the comments! -Mark
-
 kruginmi got a reaction from gieb8688 in Lady Anne by kruginmi - FINISHED - 1:50 - kitbash of Artesania Latina Harvey
So...coming up to a decision point and I throw it out for suggestions on what course to follow.
The original 'Harvey' had two (2) fixed backstays off of the foremast. This was built before the grand awakening and change of direction.
These directly attached to the two fixed points above the mast cap
The 'opportunity' before me is that on the Pride of Baltimore II they only used one, with the second backstay being a running variety and fixed inboard of the bulwarks. I do have these connection points established on the hull.
So what do I do with the second backstay deadeye?
My current thoughts are to go with the PoBII configuration and not use the deadeye. I will have to throw some rigging on it to connect to the railing or something to avoid the inevitable - "Looks like you forgot something" (hey - actually think someone will look closely at this when done haha). My rationale is that this is a working ship and each captain has their own druthers on rigging. So.....the latest guy decided he liked a running backstay better. I could also just remove the deadeye and leave the hardware (damage at sea? LOL).
Any other thoughts out there? -Mark
-
kruginmi got a reaction from egkb in HM Schooner Ballahoo by egkb - FINISHED - Caldercraft - 1:64 Scale - First Proper Wood Build
Alright, I need to know. How do you accomplish such nice rigging tie offs? I need an Eamonn intervention.
My threads tend to go every which way except for where I need them (like evenly moving up the shrouds above the deadeyes). Teach me your ways.....
The bigger the blob the better the job doesn't always apply LOL.
Mark
-
kruginmi reacted to egkb in Lady Anne by kruginmi - FINISHED - 1:50 - kitbash of Artesania Latina Harvey
Could you combine them.. or do both ? least you won't have that 'empty/missing' feel .. Rem the only person you need to convince is yourself, so which do you prefer?
E
-
kruginmi got a reaction from egkb in Lady Anne by kruginmi - FINISHED - 1:50 - kitbash of Artesania Latina Harvey
Hey Eamonn, have to get to it while the iron is hot. Had some time off from work so just started. I can't promise so much activity all the time haha. Picked up a Stratocaster guitar and working to learn that. So many hobbies, so little time.
All the best to You Eamonn,
Mark
-
kruginmi got a reaction from Spellapeaka in Lady Anne by kruginmi - FINISHED - 1:50 - kitbash of Artesania Latina Harvey
Moved on to the Fore-mast. Of course the chain plates had more eye-bolts in them so the jig couldn't be used the same way. So...time to adapt.
I clamped to the bulkhead on the deck side.
Then the process remains the same. It seems as soon as you get good at something, it is time to move on (haha). I have a few backstays still to go.
Then came the all important check: are the masts in line and appear to be perpendicular to the deck......
I can live with that result.
Stay Building My Friends, Mark
-
kruginmi got a reaction from gieb8688 in Lady Anne by kruginmi - FINISHED - 1:50 - kitbash of Artesania Latina Harvey
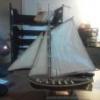
So this happened today. So much for removing the main mast for storage, guess I am committed now LOL. Next up is the fore mast.
Funny how in the mind these shrouds took on the aura of the Victory, with seemingly thousands of ratline knots to tie. This is a LOT easier. Besides, every fifth run will be a wooden rod making it even easier.
-Mark