HOLIDAY DONATION DRIVE - SUPPORT MSW - DO YOUR PART TO KEEP THIS GREAT FORUM GOING! (89 donations so far out of 49,000 members - C'mon guys!)
×


Dfell
-
Posts
251 -
Joined
-
Last visited
Content Type
Profiles
Forums
Gallery
Events
Everything posted by Dfell
-
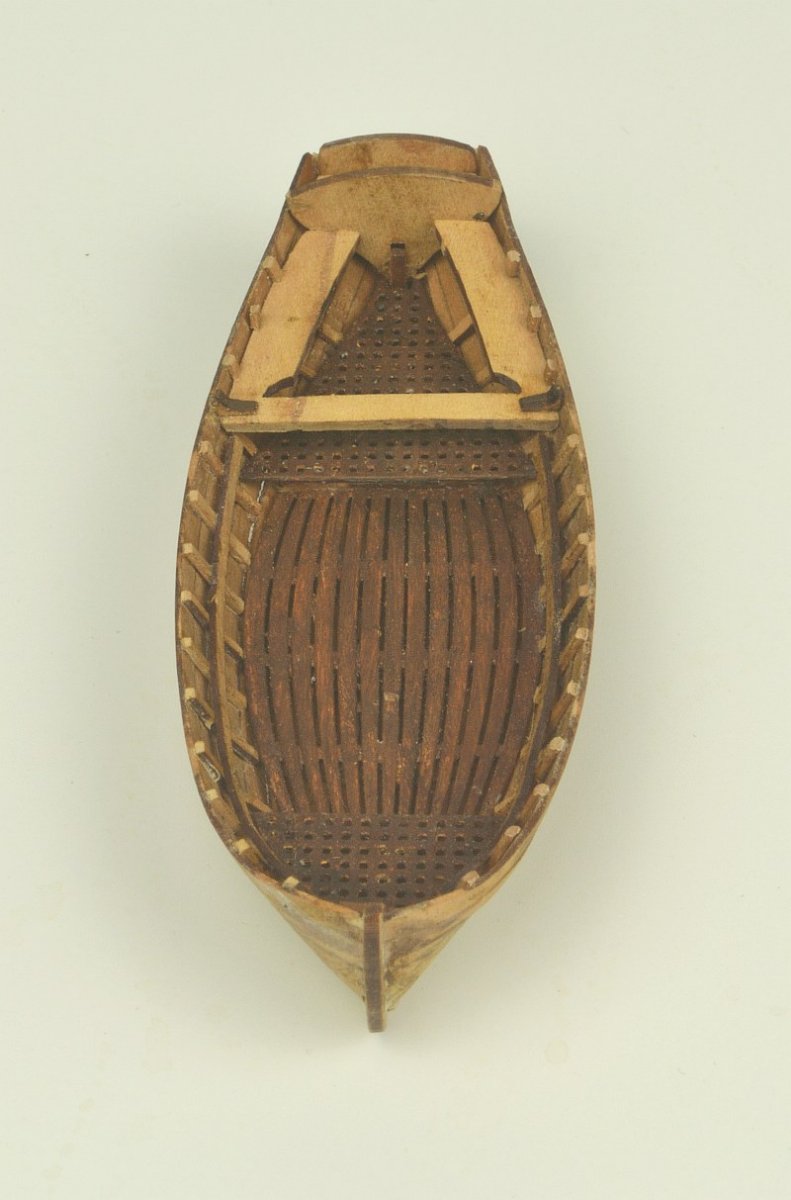
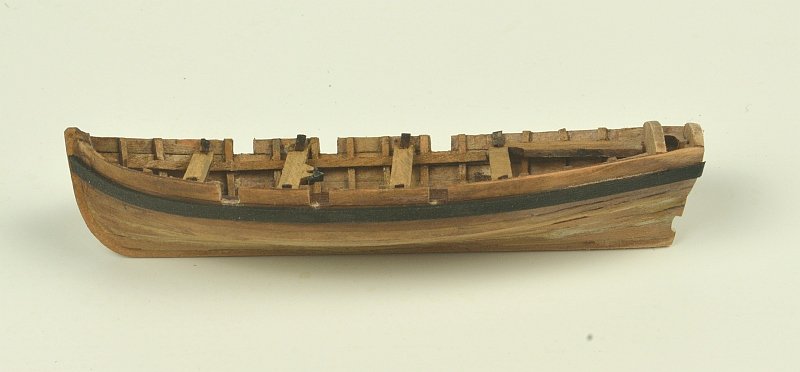
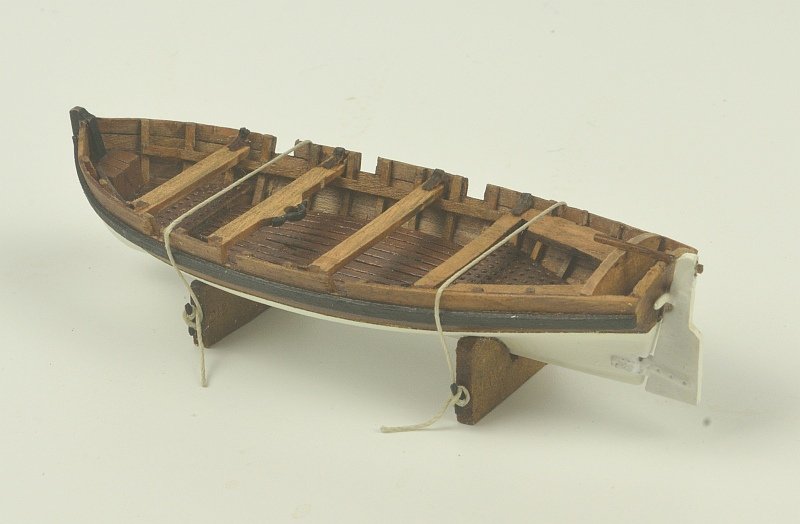
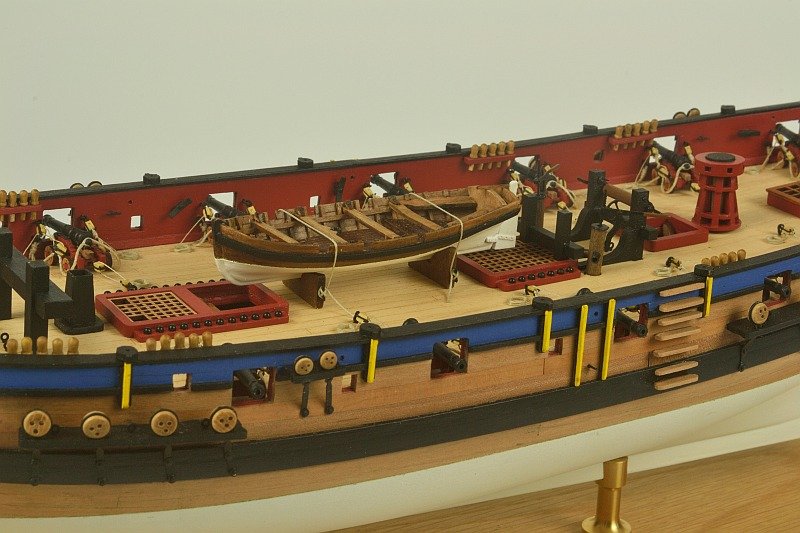
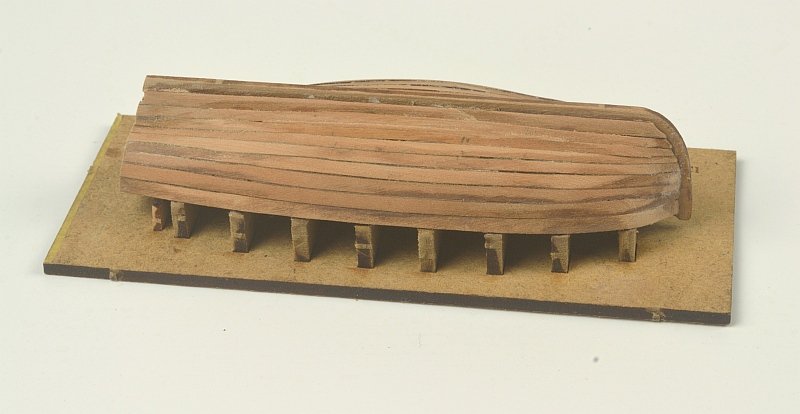
Hello - Ship's boat all done. Not too keen on it as it has turned out rather dull / dark compared to others. Stained the wood as there was various shades / colours that did not seem to go together. Anyway here it at various stages. Dry fitted onto deck Bit of a disappointment with my work - may change my mind to include it. Thanks for looking. Regards Doug

- 102 replies
-
- 12
-

-
- Flirt
- Vanguard Models
- (and 1 more)
-
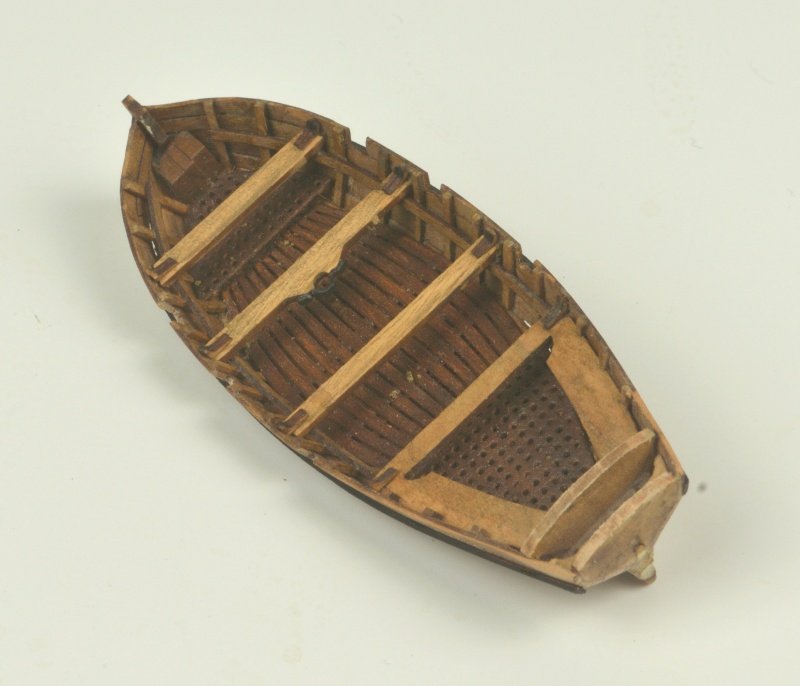
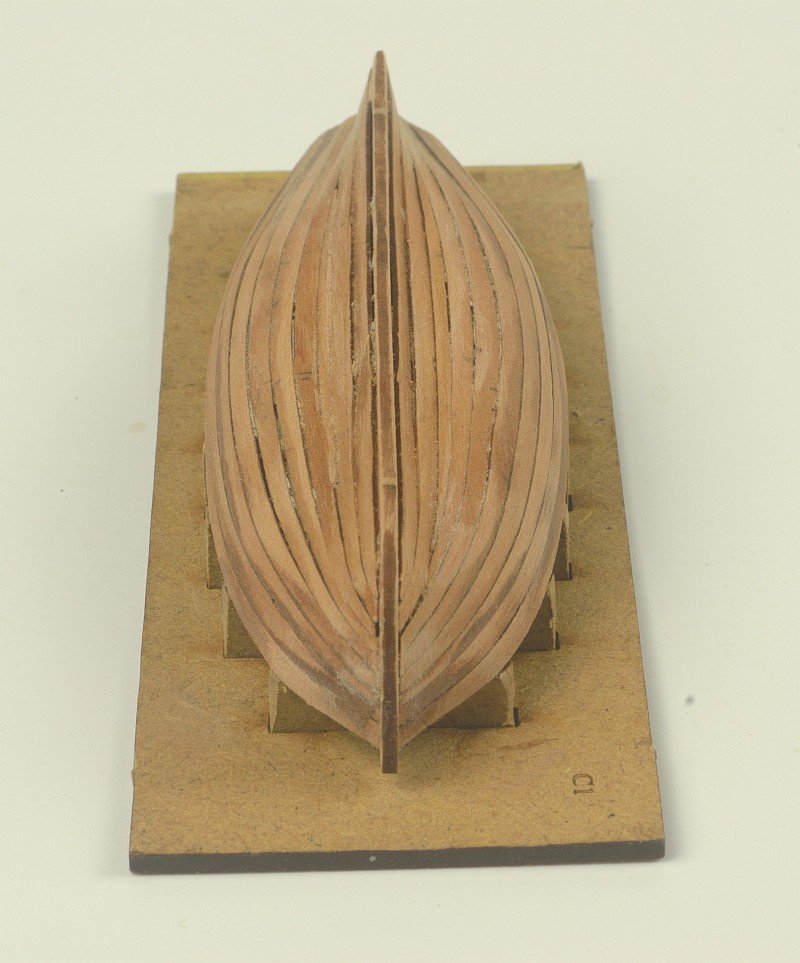
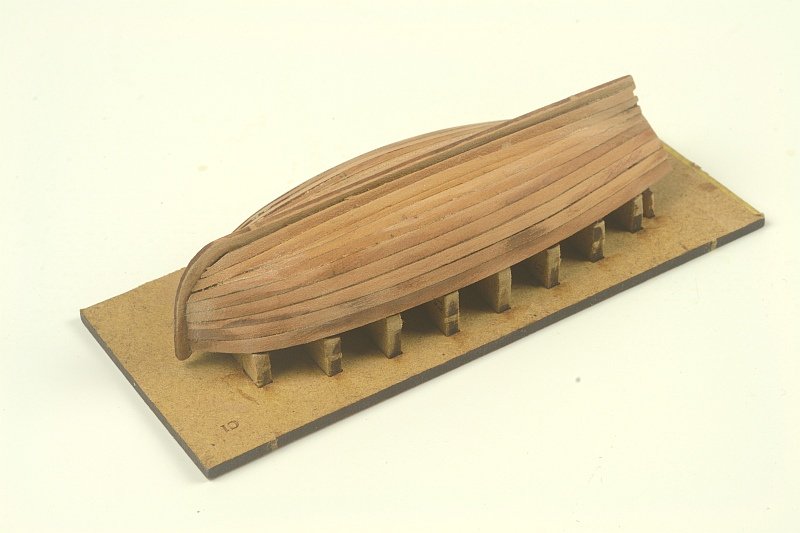
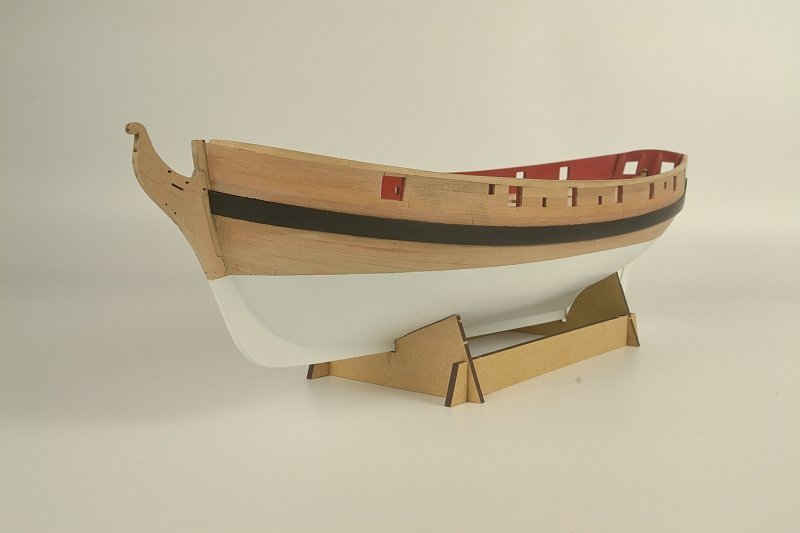
Hello - just a small update. Hull planked for Cutter - not easy. Used rubber bands wrapped around hull with toothpicks under rubber bands where they were not exerting enough pressure to hold planks in place. Mainly used PVA glue on the edges of the planks so they're not glued to the Bulkheads - super glue used on ends of planks and on the last few planks near the keel Some initial sanding and a little filler but little more will be done prior to spraying hull white. As a lot of people have said these Cutters are bit of a project just on their own. Thanks for looking in and appreciated the comments previously left. Regards Doug
- 102 replies
-
- 12
-
-
- Flirt
- Vanguard Models
- (and 1 more)
-
Hello Allan No worries - certainly did not take it as a criticism - in fact I have learnt a little more about these ships. Thank for looking at my build and the discussion that came from it. Regards Doug
- 102 replies
-
- 1
-
-
- Flirt
- Vanguard Models
- (and 1 more)
-
Hello Gregory I realised I probably gave the impression the instructions are difficult - I not sure what I was trying to say other my historical knowledge of these boats especially the names of things is not very good. The instructions and photographs are excellent along with the quality of the parts which as you say make it possible to do the build well. Chris am sure would make his Vanguard models as accurate as possible. Regards Doug
- 102 replies
-
- 3
-
-
- Flirt
- Vanguard Models
- (and 1 more)
-
Hello Allan - appreciate you looking in and your nice comments. Unfortunately I don’t know the answer to your question concerning the tapering ‘cos am not understanding what it is you’re asking as my knowledge about these ships is lacking somewhat - perhaps someone like Blue Ensign would be best. I find it hard enough just to follow the kit instructions….. The rigging line is leftover from previous builds as the kit doesn’t supply the thinner thread. Regards Doug
- 102 replies
-
- 2
-
-
- Flirt
- Vanguard Models
- (and 1 more)
-
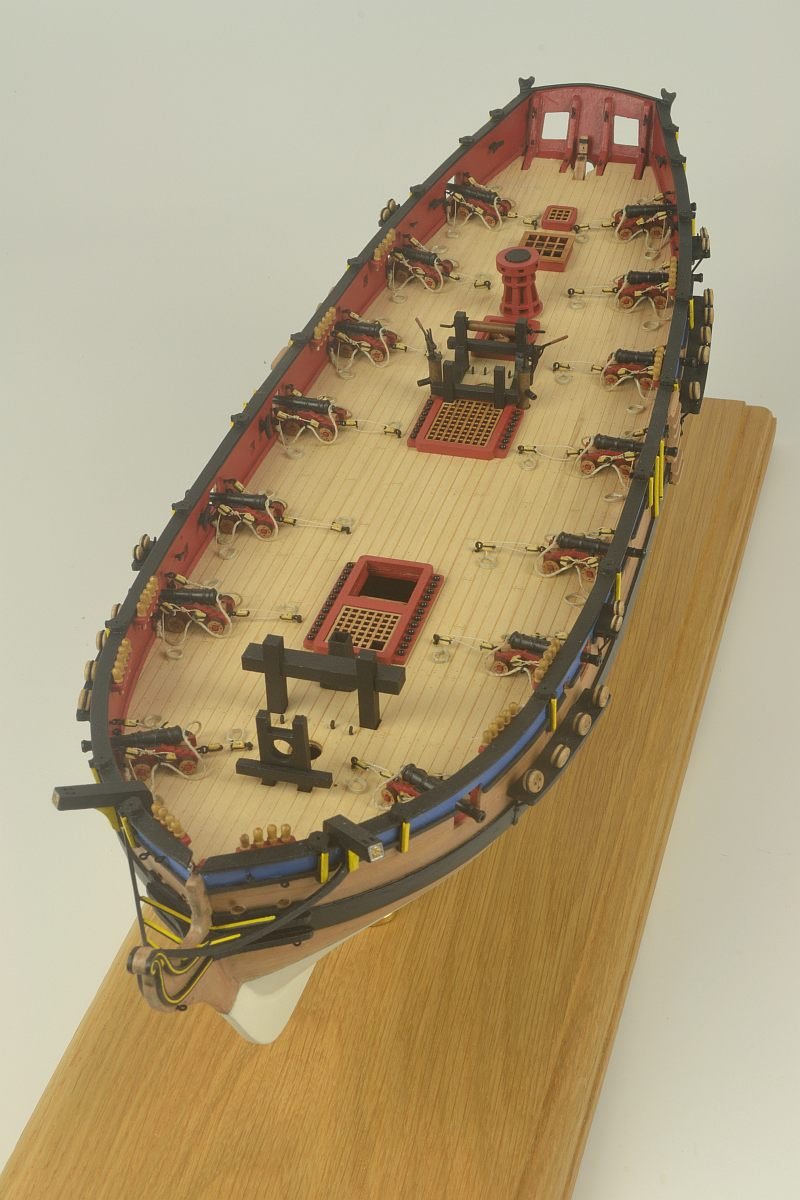
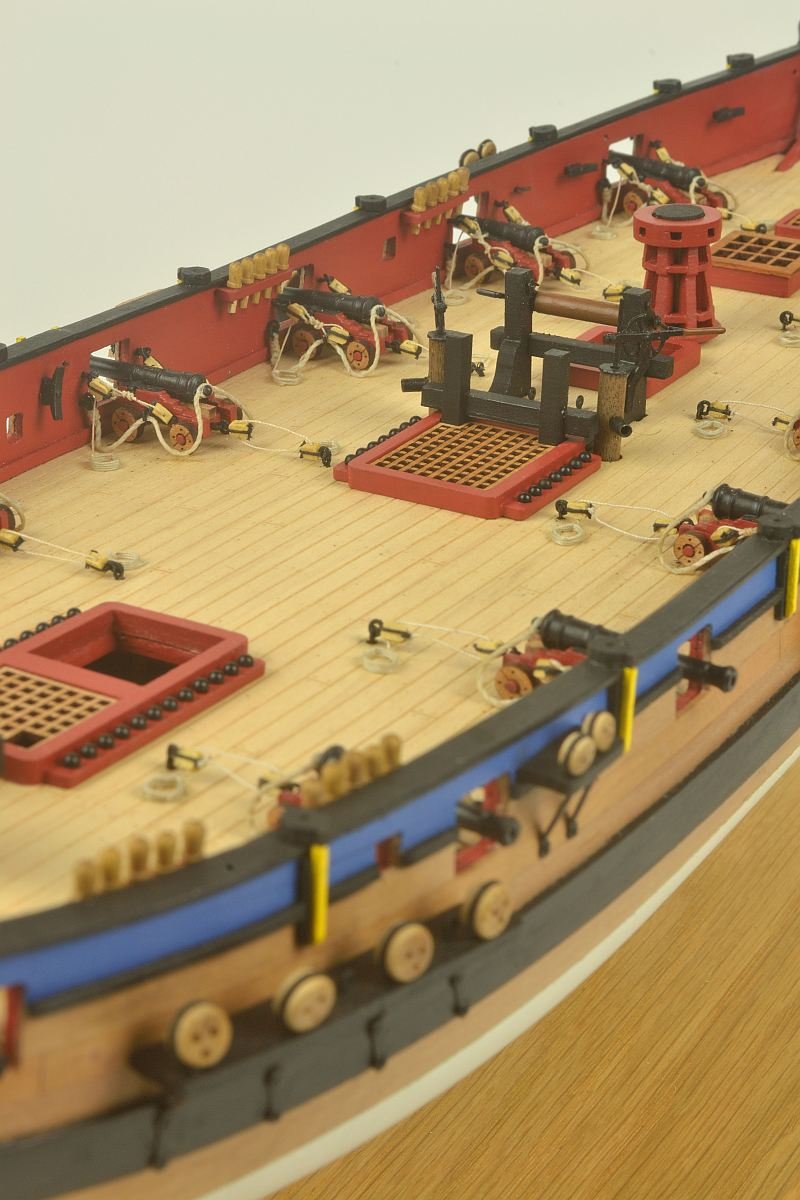
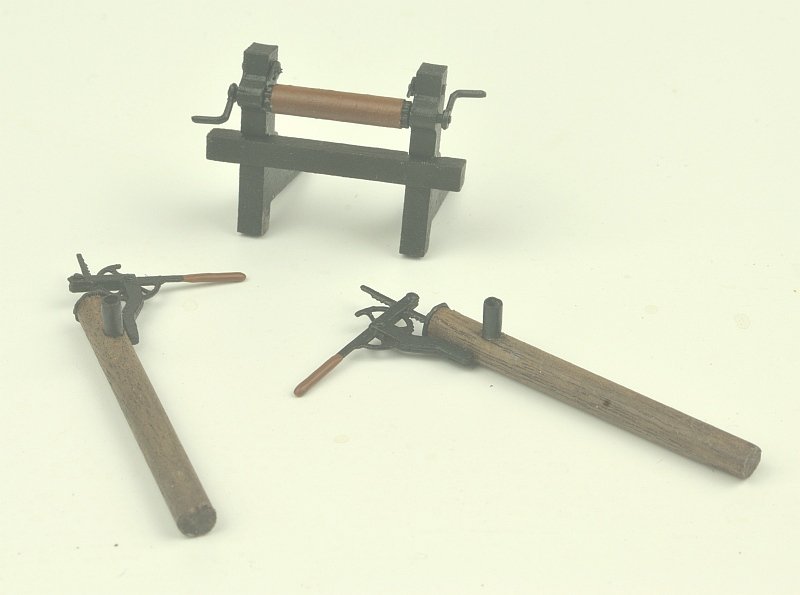
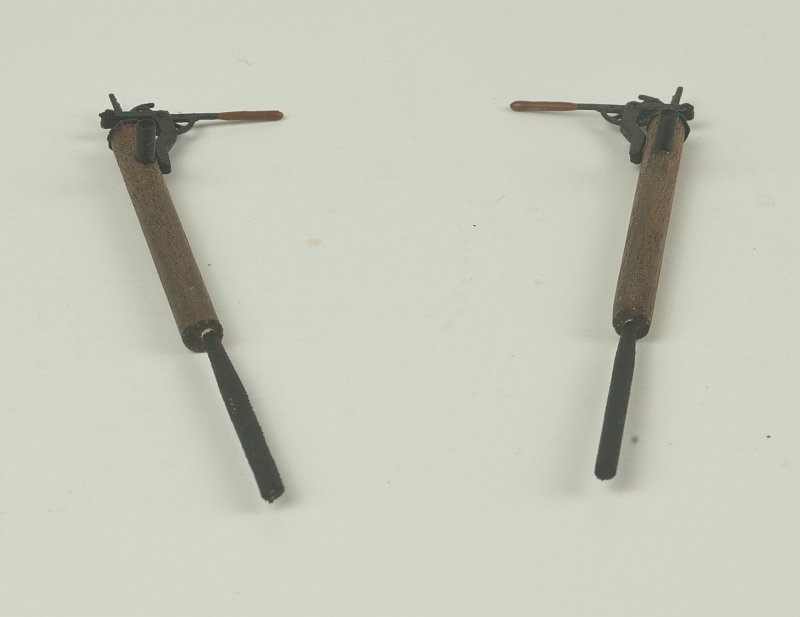
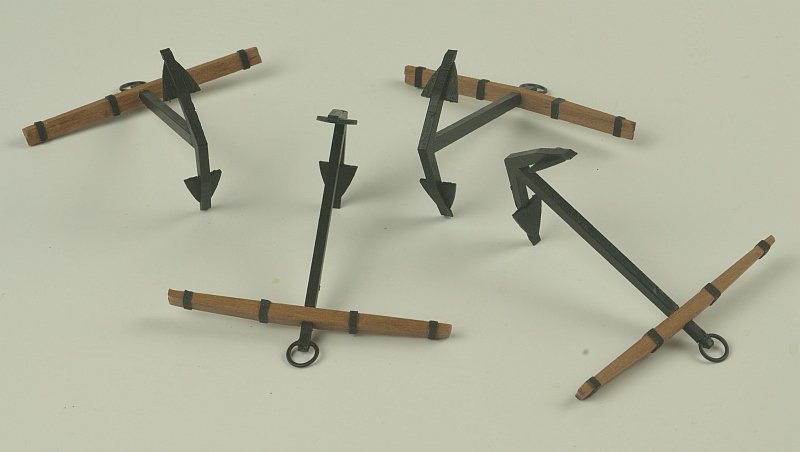
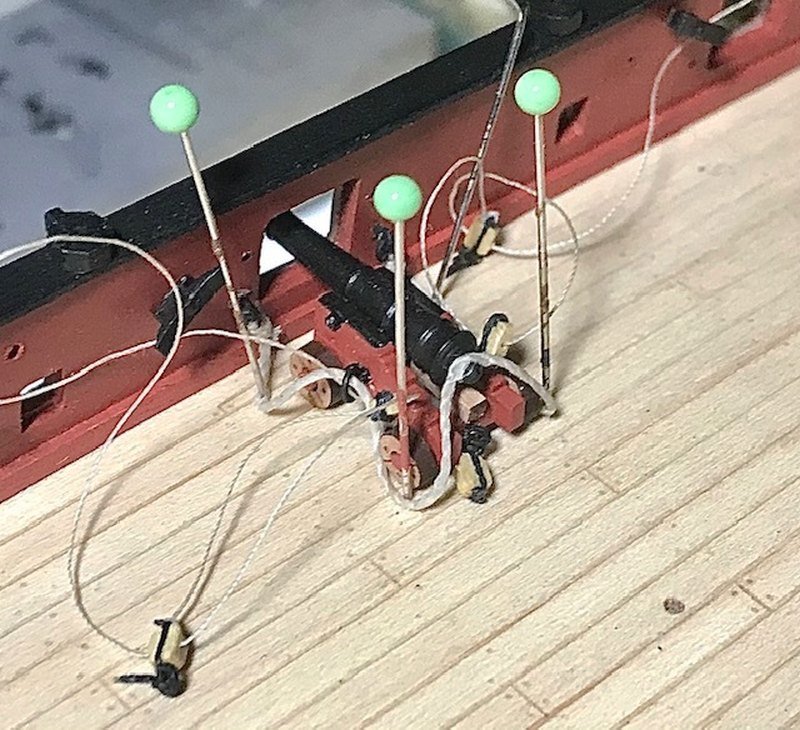
Hello - quite a few steps forward. Pumps made with added spout plus winch assembled. The instructions say to make the pumps with a 40mm long dowel but as they drop through the hole situated below on the lower deck resulting in the pumps being too low. Therefore have added a toothpick painted black so the pumps drop down to the required height. Anchors assembled - using black tape for the metal bands. Finally got all the cannons rigged and all the deck stuff mostly glued in place except pumps - to be fitted at a later stage when safe to do so. Now have started the Cutter as per instruction. Thanks for looking and the 'Likes'. Regards Doug


- 102 replies
-
- 11
-
-
- Flirt
- Vanguard Models
- (and 1 more)
-
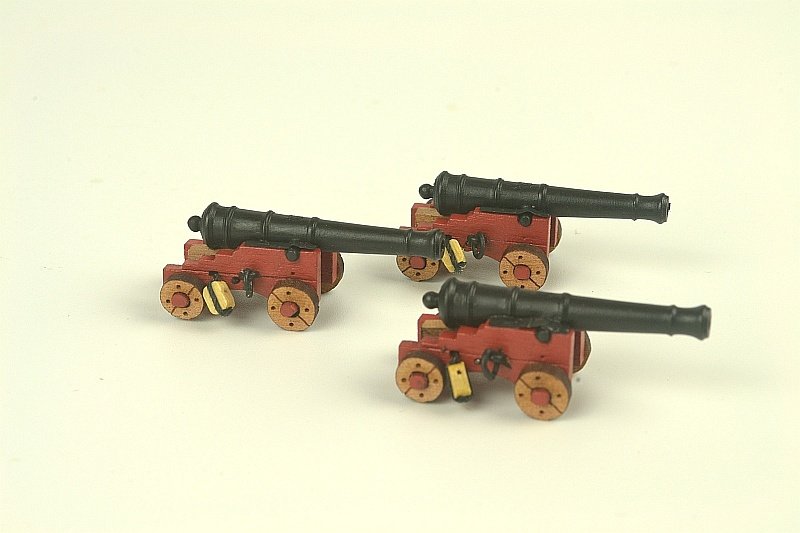
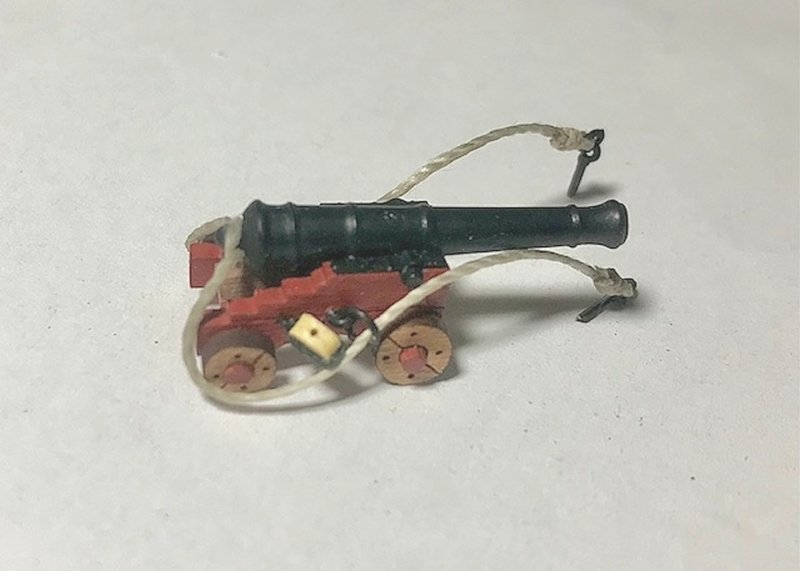
Hello - it's been awhile since last posting as work on the cannons has been excruciating as they are so small as everyone has mentioned plus a spell of the dreaded Covid and other things getting in the way. Anyway here are some pictures of the cannons at various stages. Only done one half so far with a rather bad attempt at some frapping. Thank you for looking and I will push on and get the other side done. Thank you whitejamest for your comment - much appreciated. Regards Doug
- 102 replies
-
- 13
-
-
- Flirt
- Vanguard Models
- (and 1 more)
-
Very nicely done - lovely build
-
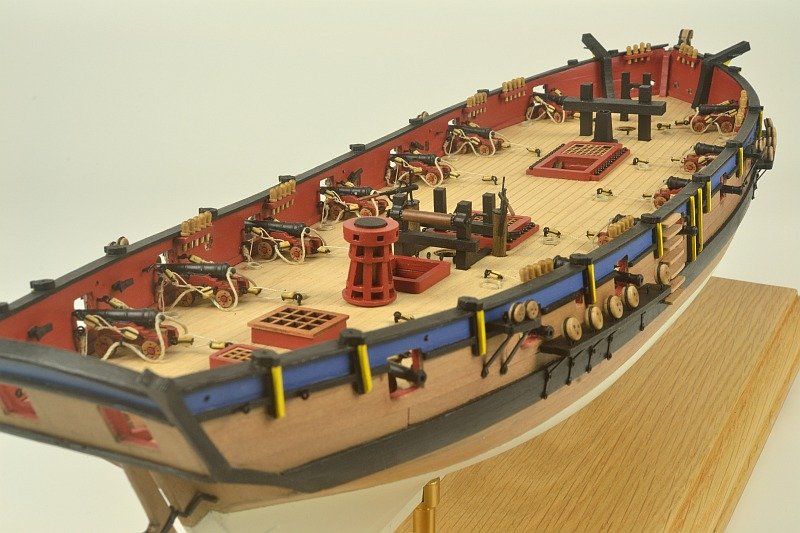
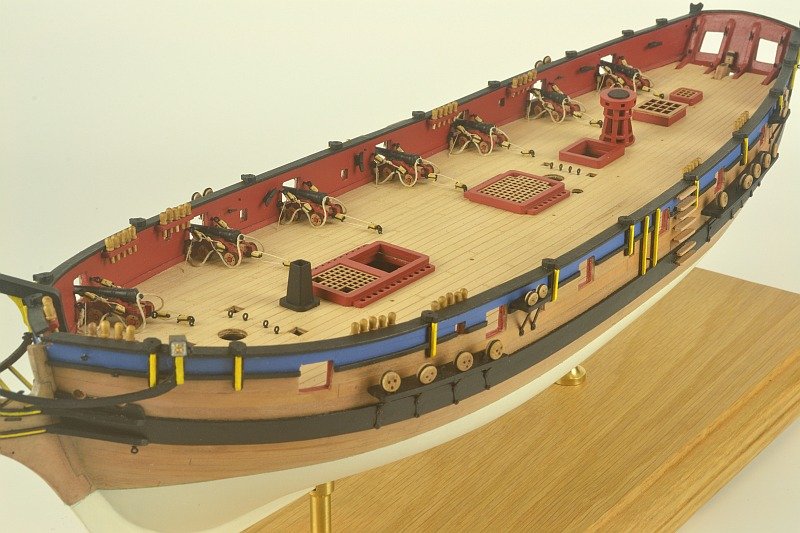
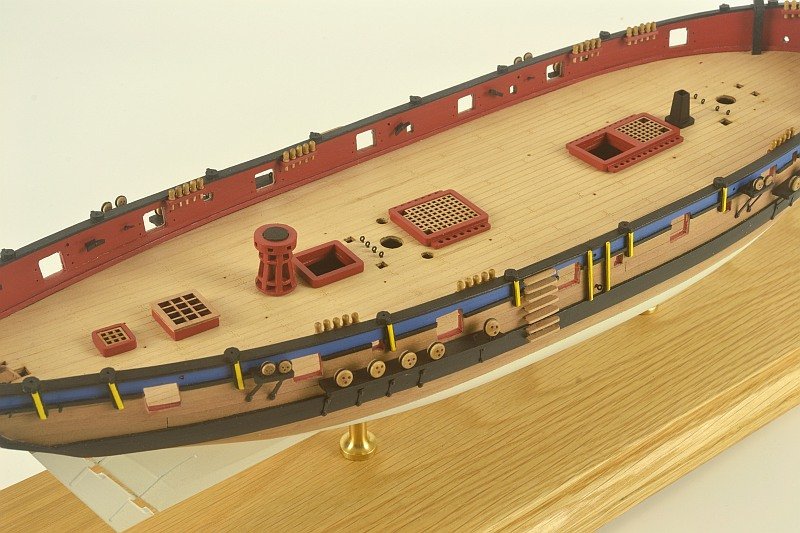
Hello – a bit of a step forward. Have managed to fit HMS Flirt using brass mounts onto a plinth. Used the smallest brass stand from Amati but found the next size up did not match the top and bottom sections of the smaller one. So doing some measurements got a friend to make one by 3D printing which I was then able to check that the waterline was level before finding a local engineer to make one in brass. Deck 'furniture' in place but not glued down as I first will get the cannons in place and rigged. The cannons are made - just adding the small blocks. Thank you for looking. Regards Doug

- 102 replies
-
- 13
-
-
- Flirt
- Vanguard Models
- (and 1 more)
-
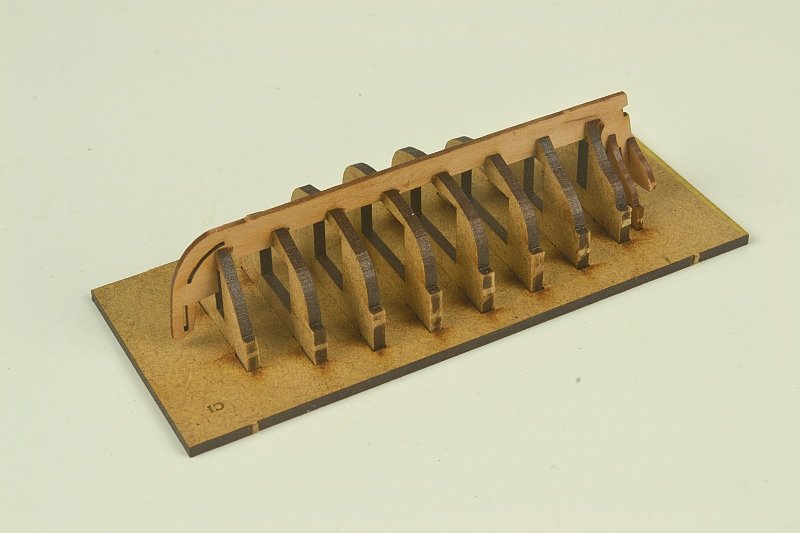
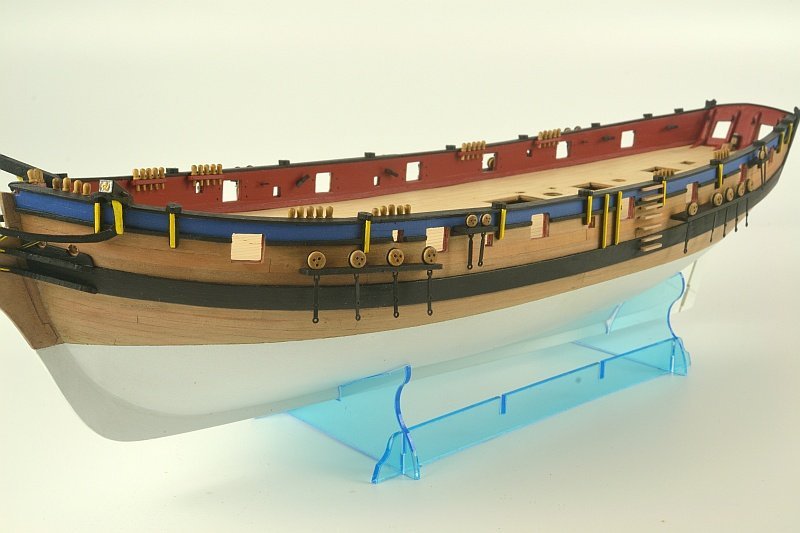
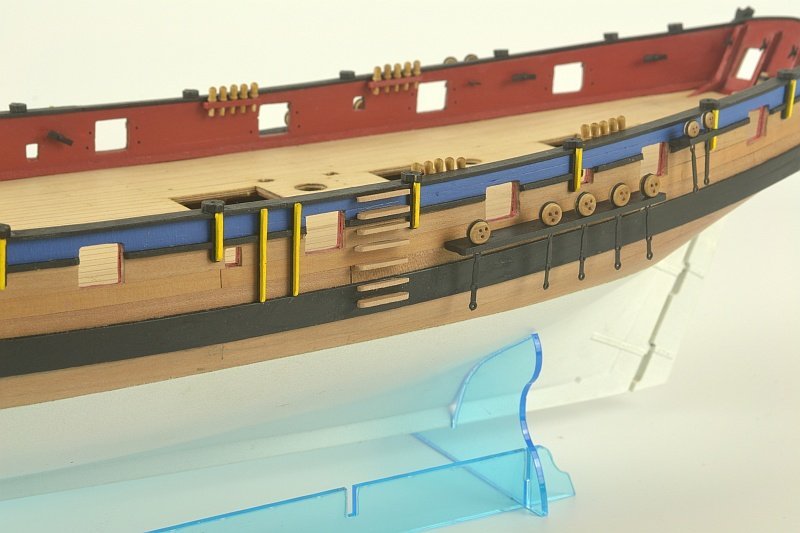
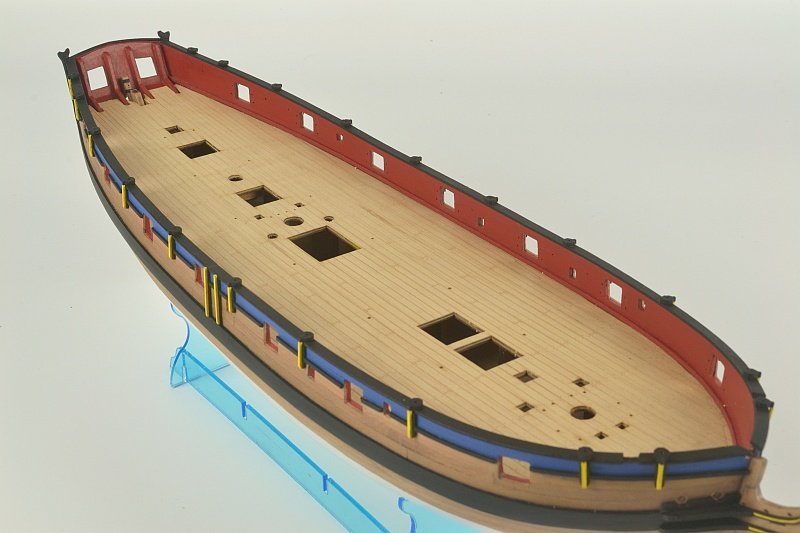
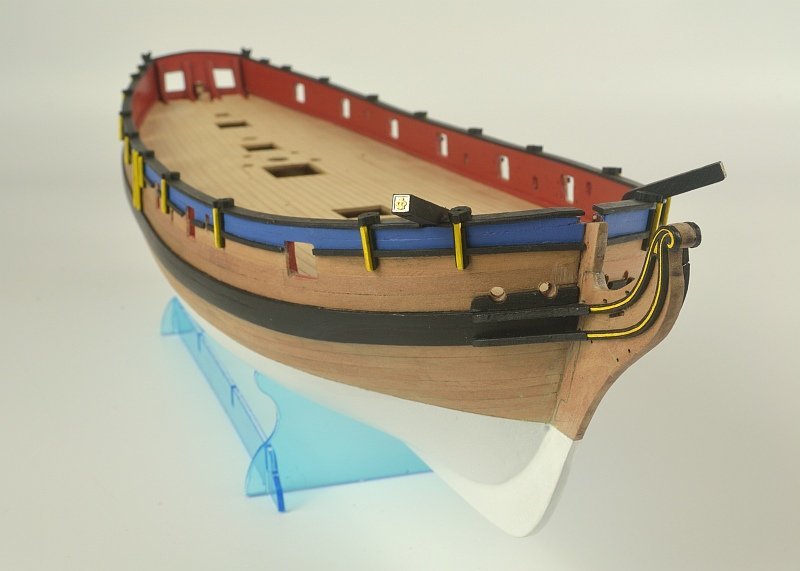
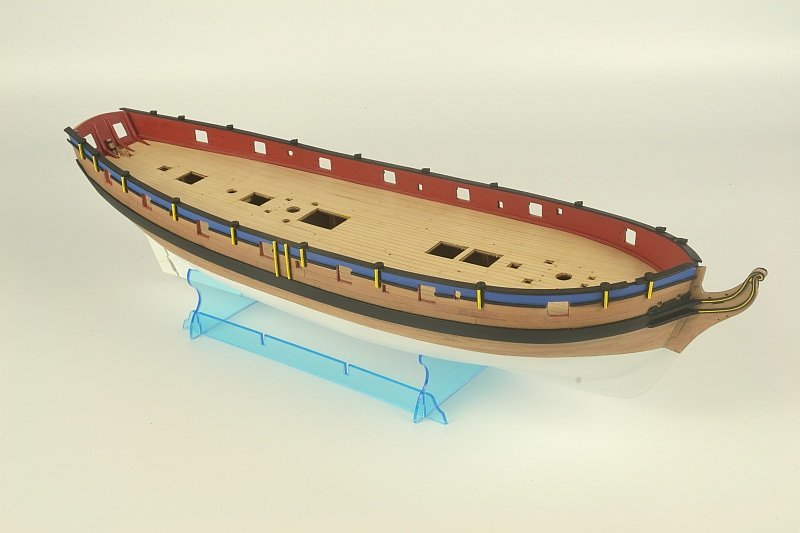
Hello - Deck Bulwark Cleats plus Belaying Pin Racks all pinned into place as instructed. The Belaying Pins I opted for wooden ones. Also the Channels pinned into place with the Deadeyes which have the Strops yet to be pinned down at the correct angle. The Steps I have decided to leave unpainted. I opened the Strops to take the Deadeyes by sliding the Strops over a tapered dowel - they are very delicate. Found sliding Strops over a tapered dowel helped to keep their shape whereas using tweezers to open them up found I was distorting them but then again maybe doing it wrong. Thank you for looking. Regards Doug
- 102 replies
-
- 13
-
-
- Flirt
- Vanguard Models
- (and 1 more)
-
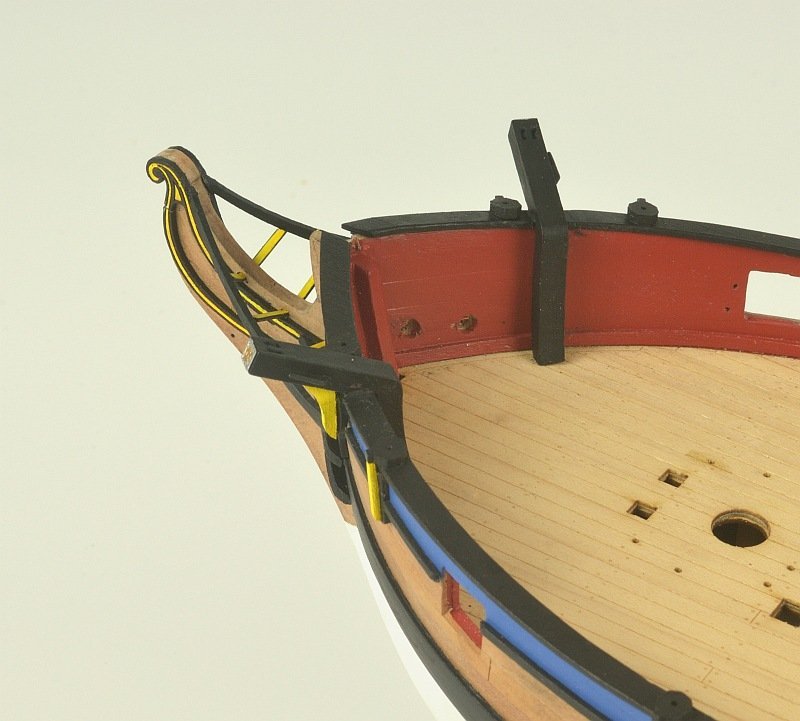
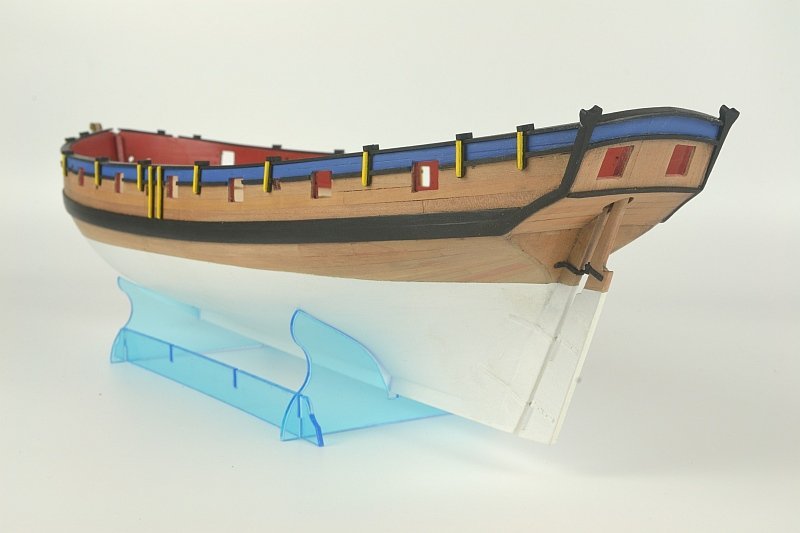
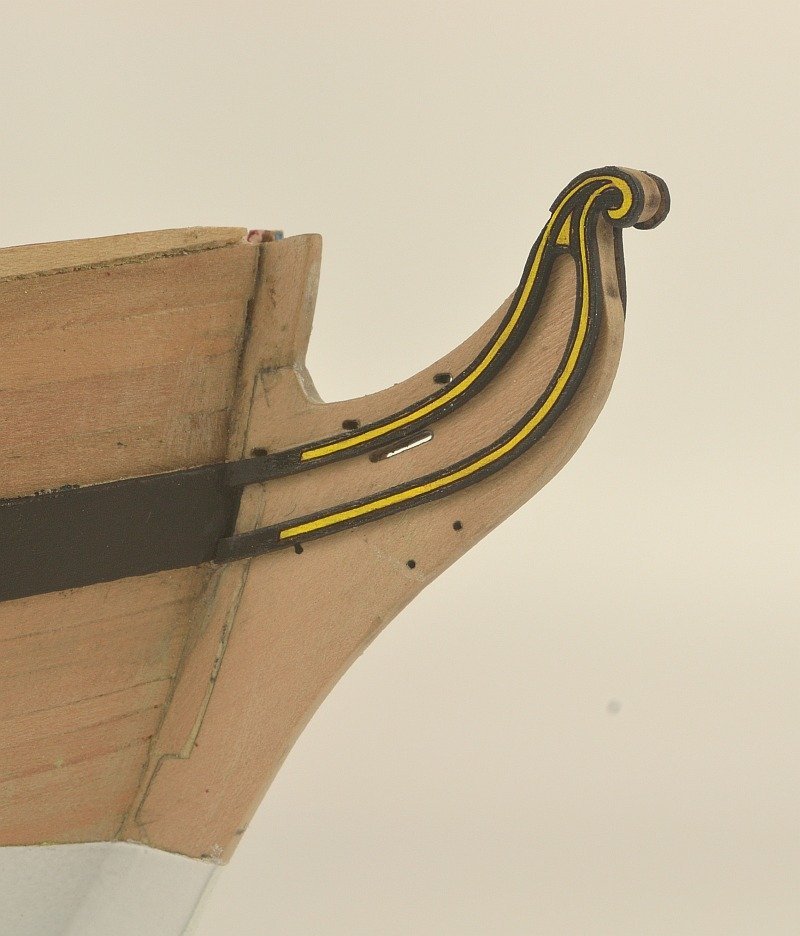
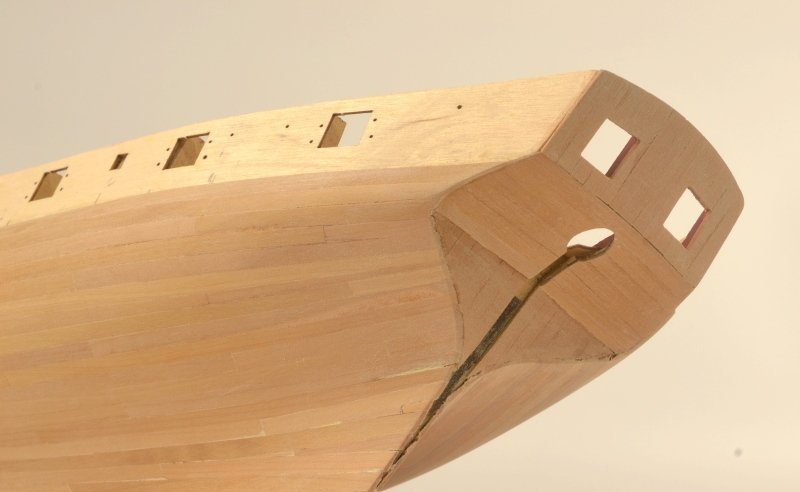
Hello - now the bow is done. The Main Rails and the Rail parts assembled plus the Cathead Knees as instructions although have painted the Rail parts underneath slightly different to how James H did. I kept the yellow stripe with a black surround to be in keeping with the Swivel Gun Supports. Thank you for your nice comments - BobG, DelF, glbarlow and Theodosius. BobG - you're doing fine so far. Hopefully you have recovered from your medical treatment / op and you will be soon back at doing the hull planking. Also thank you for the 'Likes' Regards Doug

- 102 replies
-
- 12
-
-
- Flirt
- Vanguard Models
- (and 1 more)
-
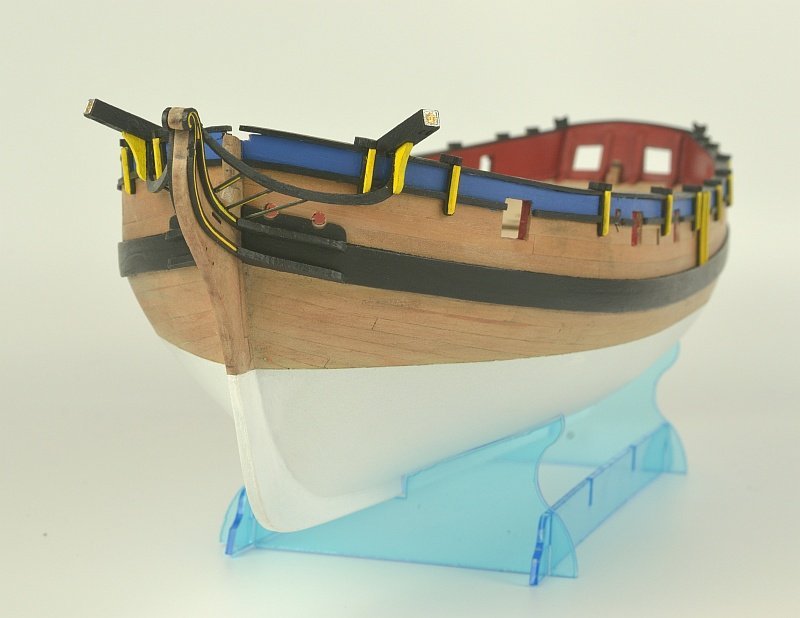
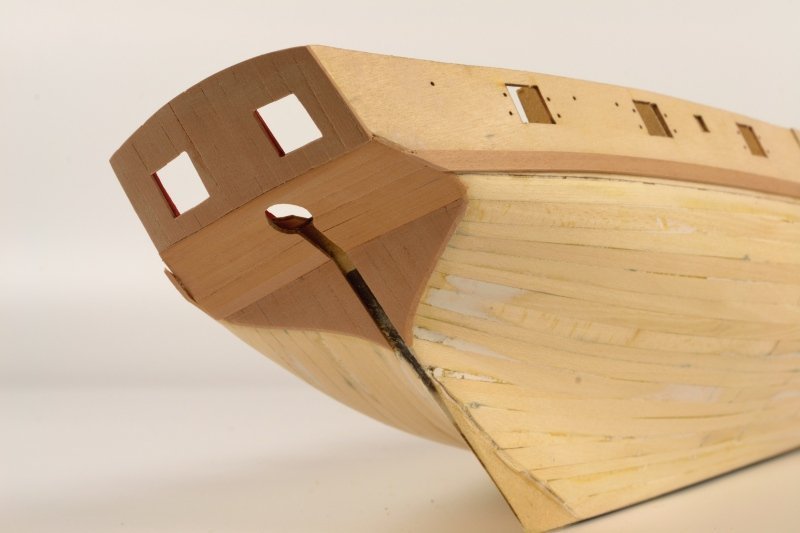
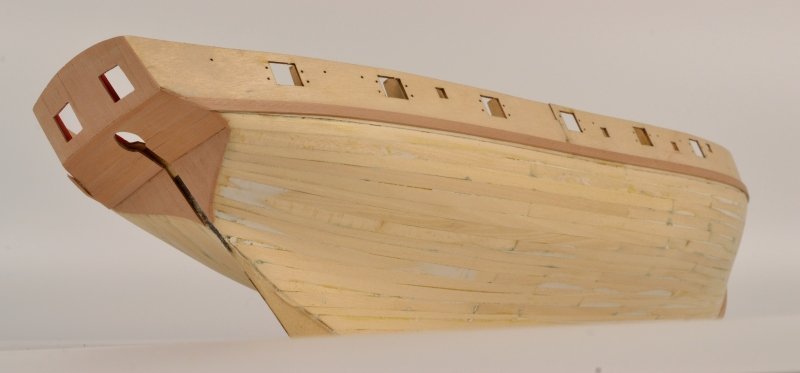
Hello - some more progress - the stern completed. The instruction say to glue the Boom Crutches flush with the Stern Board but decided to fix them so the Stern Board Rails would be flush with them. Also did not fit the top rail (part 60) - just put a Capping Rail. Catheads fitted - little sanding required to get them to fit neatly. The Cathead End Caps painted in silver and gold. Regards Doug
- 102 replies
-
- 17
-
-
- Flirt
- Vanguard Models
- (and 1 more)
-
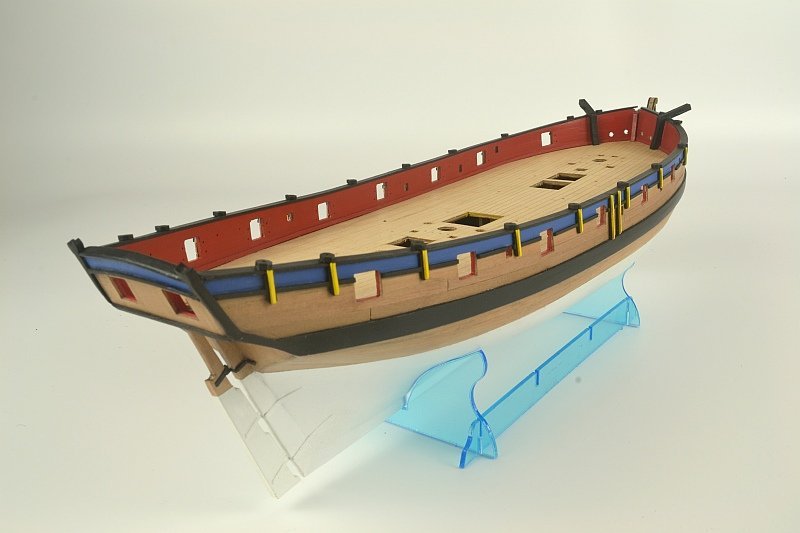
Hello - further progress. The Upper rails and Swivel Gun Posts fixed in place having painted the upper area in a blue. The blue is Humbrol 25 with some white and purple added. The Stern section is next on the to do list. Thank you for looking and previous comments. Regards Doug
- 102 replies
-
- 16
-
-
- Flirt
- Vanguard Models
- (and 1 more)
-
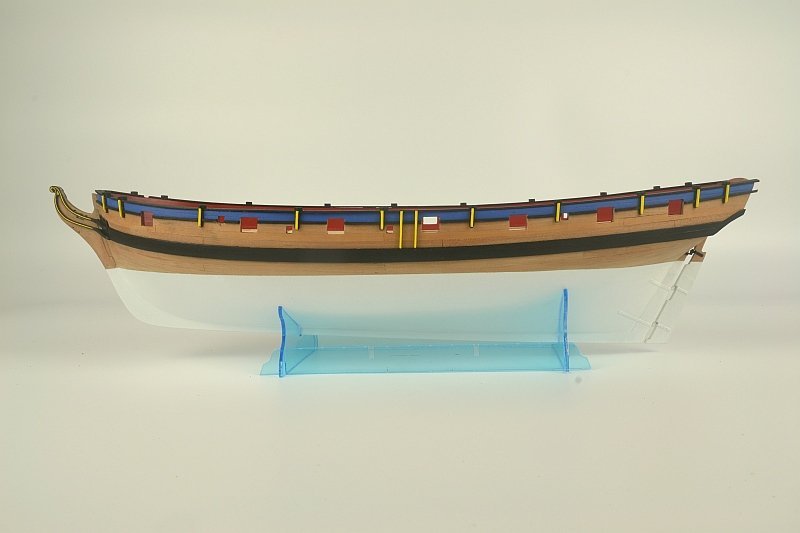
Hello - Having had a discussion with myself as part of me wanted to keep the build as it should be and along with comments by Blue Ensign and others have decided to correct the water line, The decision on how to mount HMS Flirt will have to be worked out at a later date. One corrected waterline. The Wale and waterline work better with each other. The Hair Brackets are attached. Coloured using a felt tip pen. Thank you for the advice / comments Blue Ensign, glbarlow and Theodosius. Also for the 'Likes'. Regards Doug
- 102 replies
-
- 11
-
-
- Flirt
- Vanguard Models
- (and 1 more)
-
Hello glbarlow - yes I did. Seemed just about okay and when I come to properly fit them should be able to make some adjustments if needed. Thanks. Doug
- 102 replies
-
- 1
-
-
- Flirt
- Vanguard Models
- (and 1 more)
-
Hello glbarlow - yes it was a difficult decision. Kept looking at it on the stand and felt the keel not being level was harder to take compared to how much the stern was raised up. Anyway cannot change it now 😕 Just hoping when the masts etc are in place it will look okay. Blue Ensign - thank you for the explanation. Maybe I should have put this up for advise before doing anything. At the time did not think the stern was raised too much and thought might get away with it. I apologise to Chris for not doing what he had designed as it should be. Regards Doug
- 102 replies
-
- 1
-
-
- Flirt
- Vanguard Models
- (and 1 more)
-
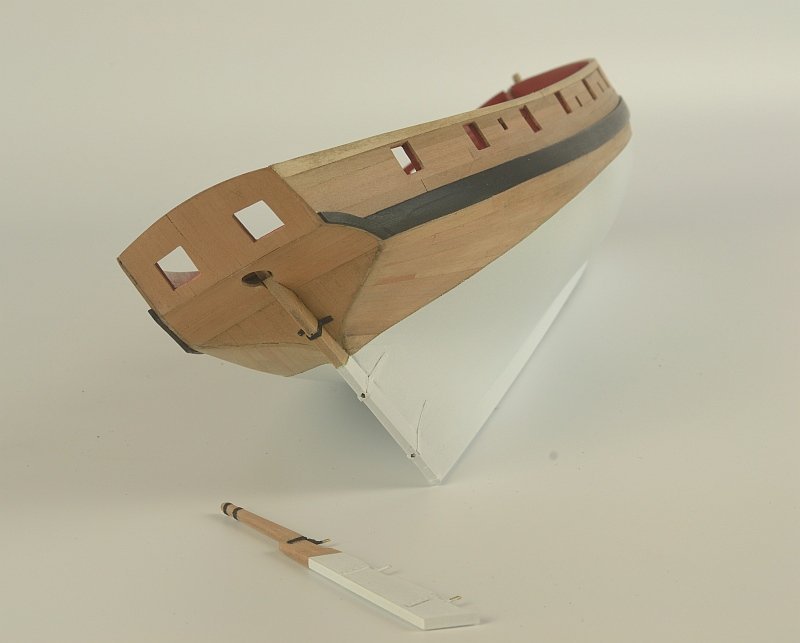
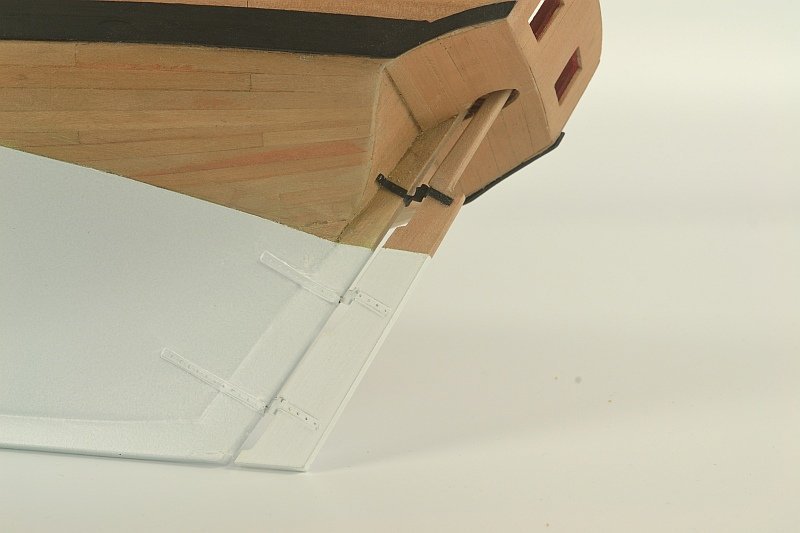
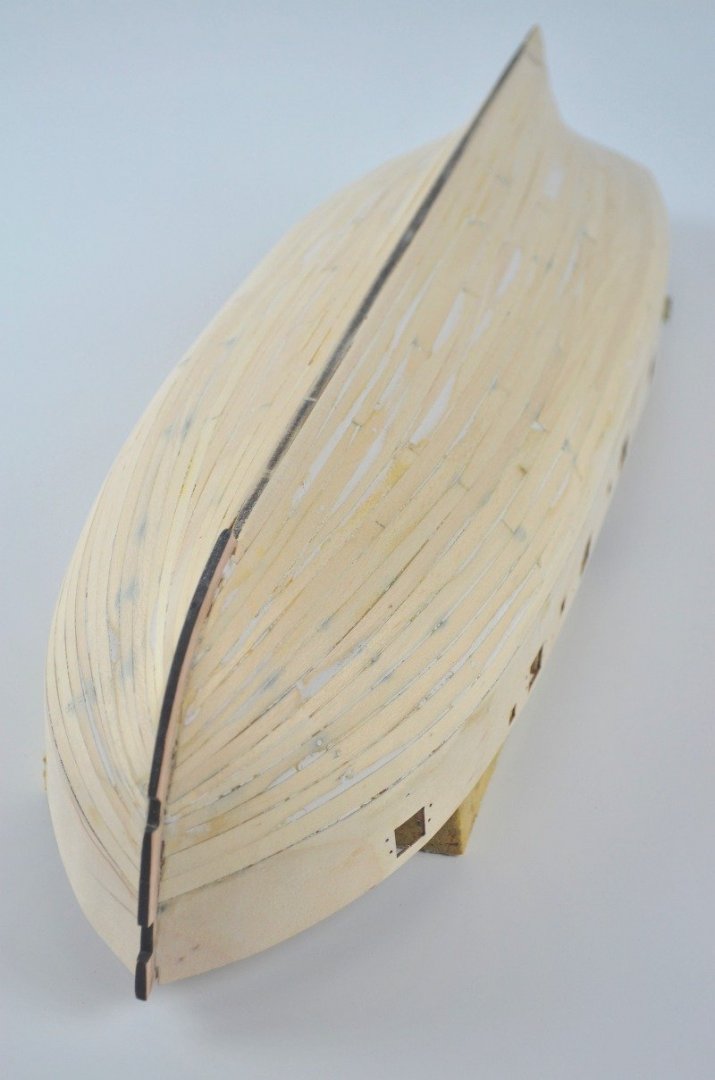
Hello - feel like a major milestone has been reached. Hull completed although had an issue with establishing the waterline. With the hull sitting on the stand found the bottom keel was not level - lower at the stern. Noticed on plans where showing the keel level the waterline goes downwards towards bow. Have decided to do the waterline parallel to the keel and the keel level as I will be mounting Flirt on small brass columns. Hopefully this has not been a mistake. Rudder ready to be fitted. Rudder fitted. Regards Doug
- 102 replies
-
- 7
-
-
- Flirt
- Vanguard Models
- (and 1 more)
-
BobG - hopefully this helps https://modelshipworld.com/topic/24308-looking-for-the-correct-sequence-and-terminology-for-deck-plank-butt-shift/ Regards Doug
- 102 replies
-
- 1
-

-
- Flirt
- Vanguard Models
- (and 1 more)
-
Hi - thank you for the comments. BobG - used 3 butt shift with the planks being 13.5cm in length. Find it easier to shape and glue down if I just have to concentrate on either the stern or bow. Don’t do any thinking / marking up - just get on with it. Some times one can over think the job or in my case it’s too hard to think it through. Find the first planking gives clues on how to / where to get it right. Once two thirds down will work up a couple of strips from keel and then muddle through in between. My get out clause is on all my builds so far have white hulls so can covering things up 😕 2 small stealers each side at stern and no drop planks at bow. The Stern Side Counters in the instructions are done at a later stage but it seemed as glbarlow did more sensible to add them while doing the Wales. Thanks Doug
- 102 replies
-
- 2
-
-
-
- Flirt
- Vanguard Models
- (and 1 more)
-
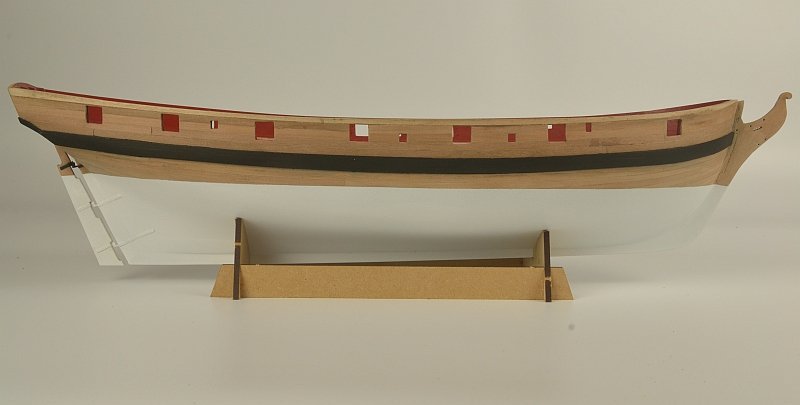
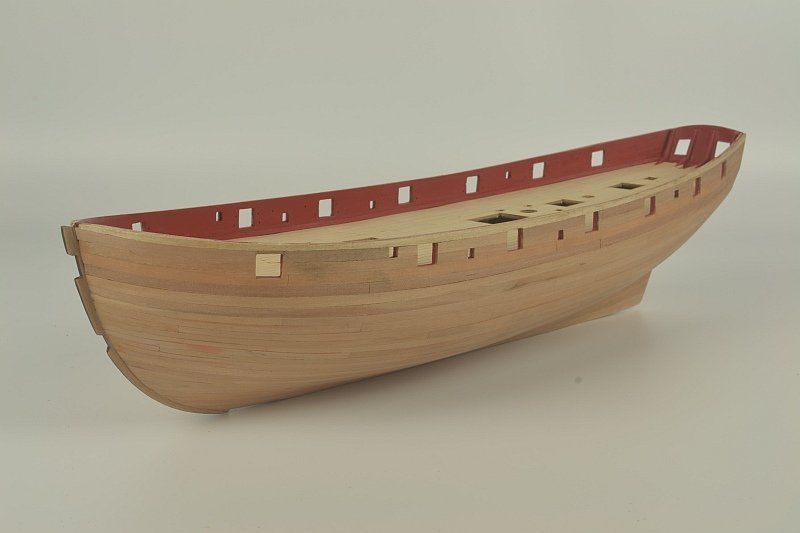
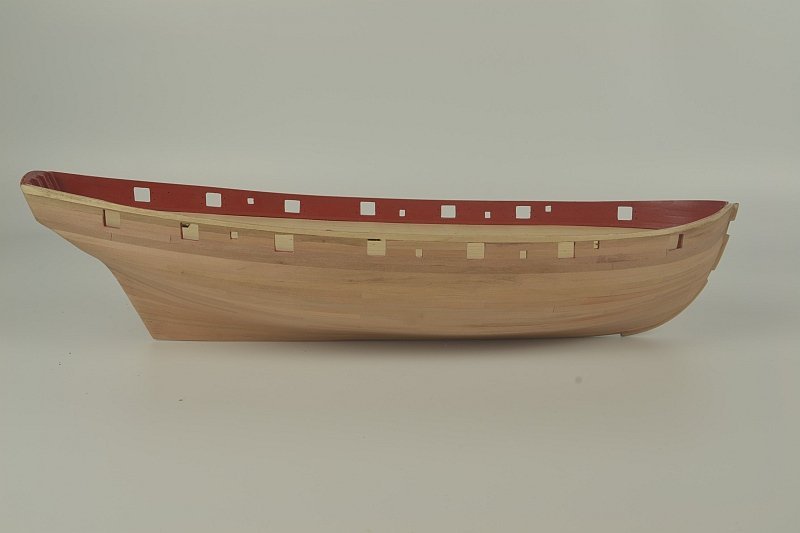
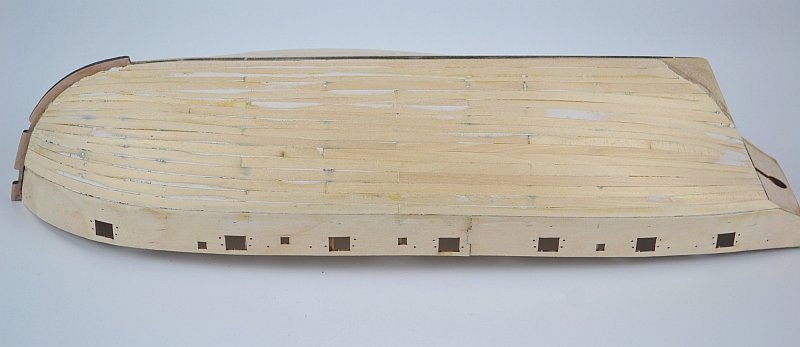
Hello - second hull planking completed with gun ports etc opened. For some strange reason did not have enough strips to do the job hence the lighter maple strip. Short by 4 strips - top row and a strip either side for the Wale. Used masking tape to position top of Wale. Wale completed but have followed glbarlow example in adding the Stern Side Counters while doing the Wales. Thank you for looking. Doug

- 102 replies
-
- 15
-
-
- Flirt
- Vanguard Models
- (and 1 more)
-
Thank you glbarlow and Blue Ensign. Doing my best - greatly helped by the excellent step by step instructions with lovely photos by James H and the kit quality by Chuck. Thanks for looking. Regards Doug
-
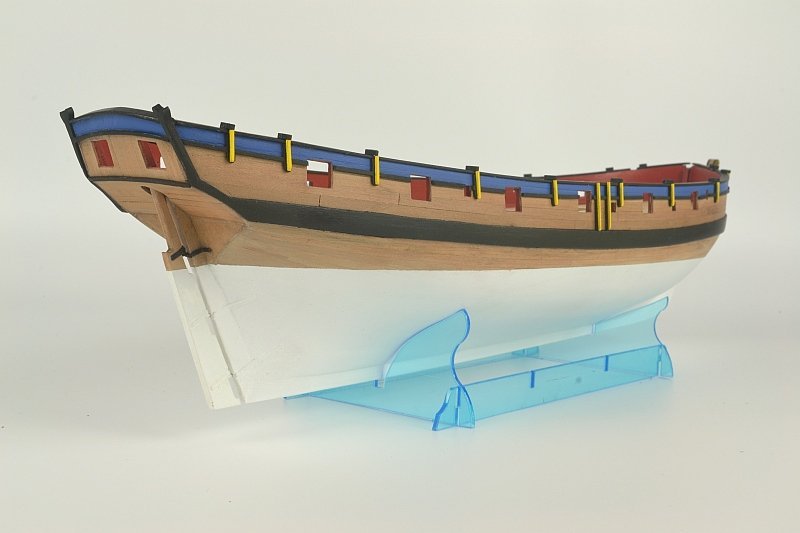
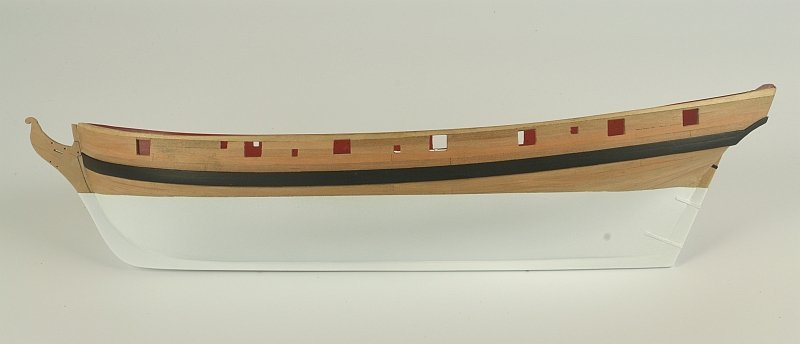
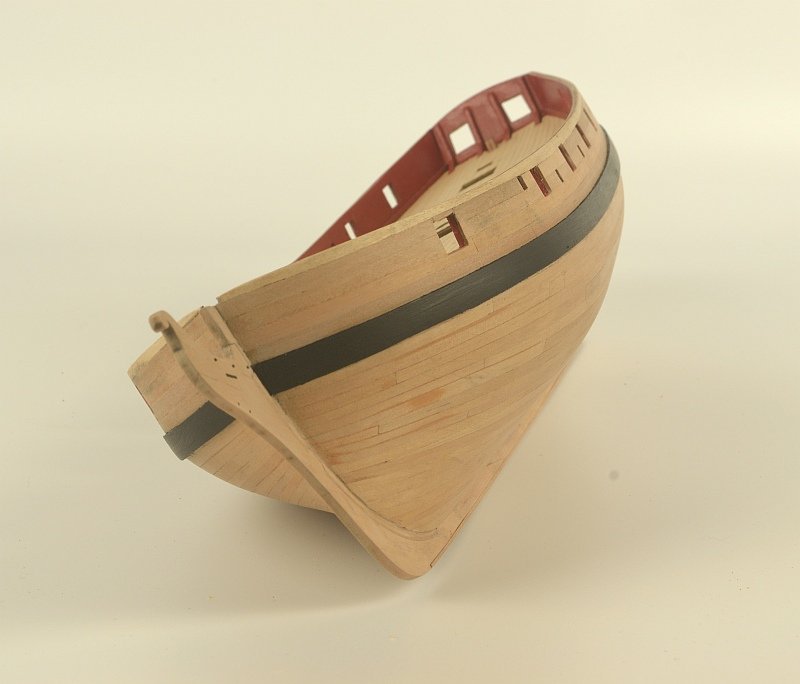
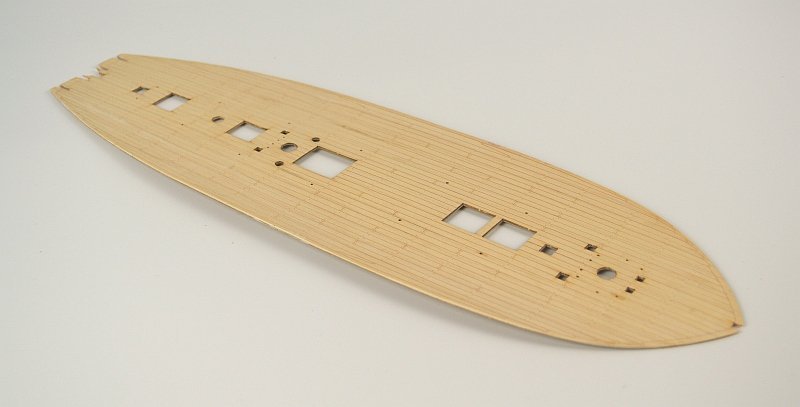
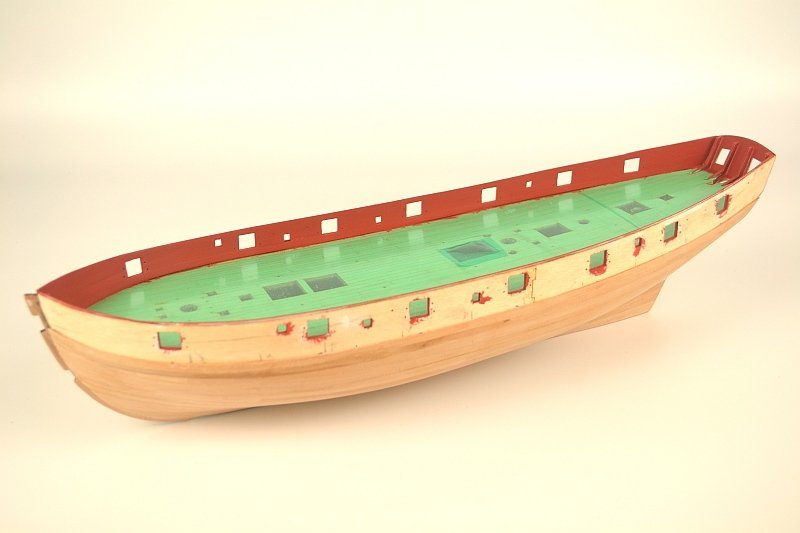
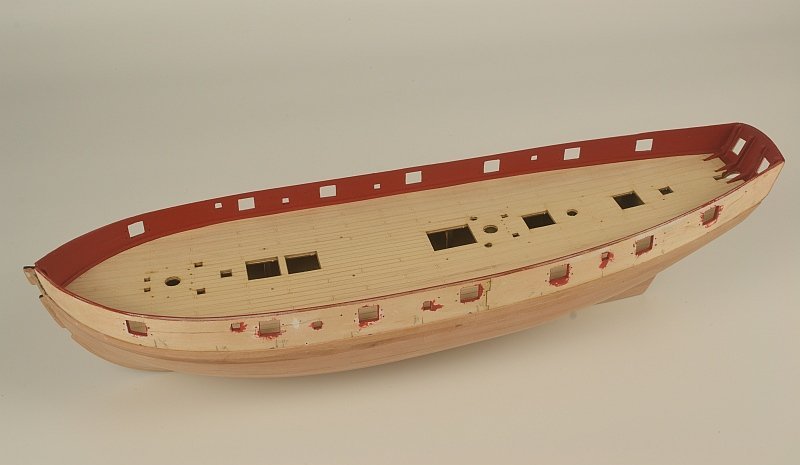
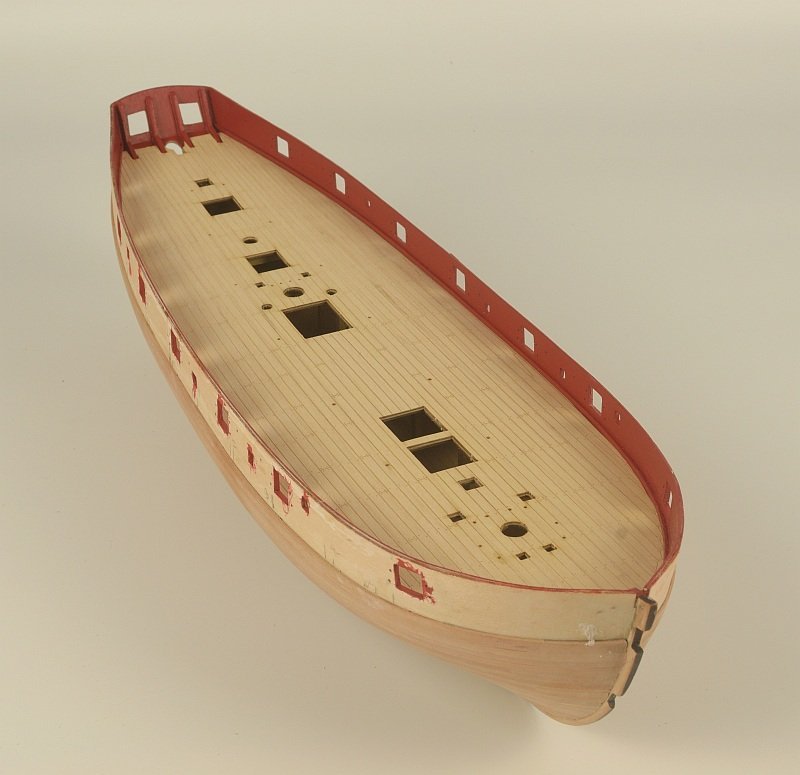
Hello - Further steps forward. Have mounted the deck veneer onto thin ply as I thought it would be easier to get flat off the model as the veneer had a few ripples / undulations. Deck glued in place and protected with a vinyl film. The inner Bulwarks lined and gun and oar ports opened up. Have mixed a colour slightly brighter than the standard red ochre / red oxide although it possibly doesn't show. Just need to do a 2 x1 mm strip along bottom edge. Bottom strip in place and protective deck cover off although will cover it again for the next stage which is the rest of the hull planking and wales. Thank you for looking and the previous encouraging comments and 'Likes' Regards Doug

- 102 replies
-
- 6
-
-
- Flirt
- Vanguard Models
- (and 1 more)
-
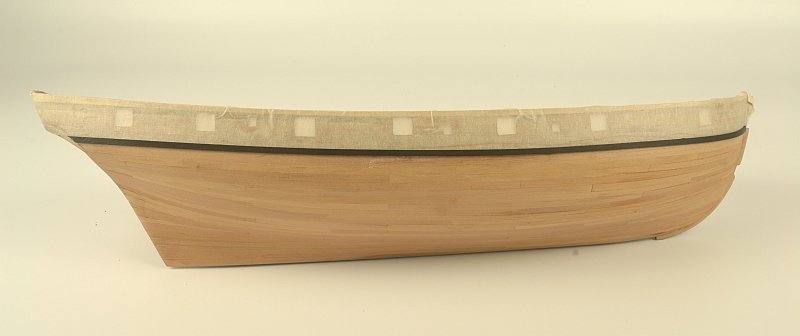
Hello - Hopefully you all are having a good Christmas. Second planking from the wale down done using super glue and planks cut to a lengthof 13.5 cm. Thank you for looking and past 'likes'. Regards Doug
- 102 replies
-
- 11
-
-
- Flirt
- Vanguard Models
- (and 1 more)
-
Hello - just a quick update on progress. Have finished stern counter. Decided to cut the pieces exact around window area so to minimise sanding as the area around on the inside had been painted in the red. The 'master plank' on both sides laid as instructed. Looks a bit wavy to me - maybe did not fit the Bulwark Patterns too well. I may be some time - the dreaded 2nd planking now has to be done.... Regards Doug
- 102 replies
-
- 8
-
-
- Flirt
- Vanguard Models
- (and 1 more)
-
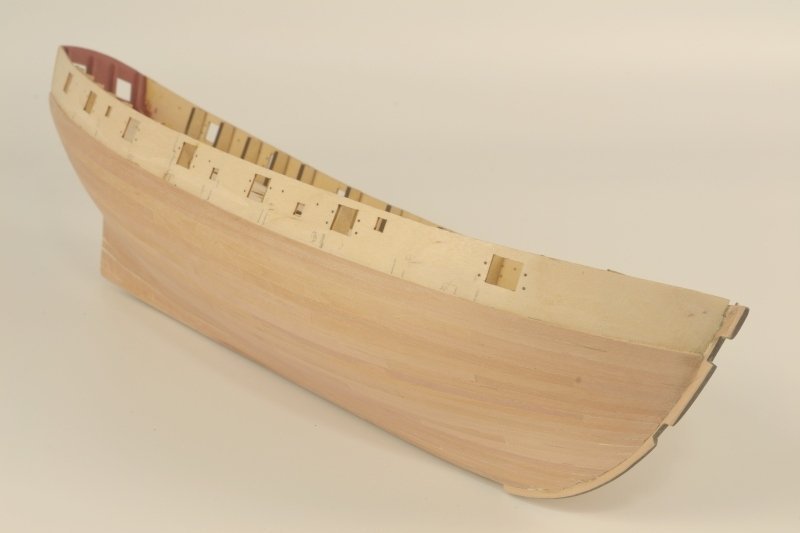
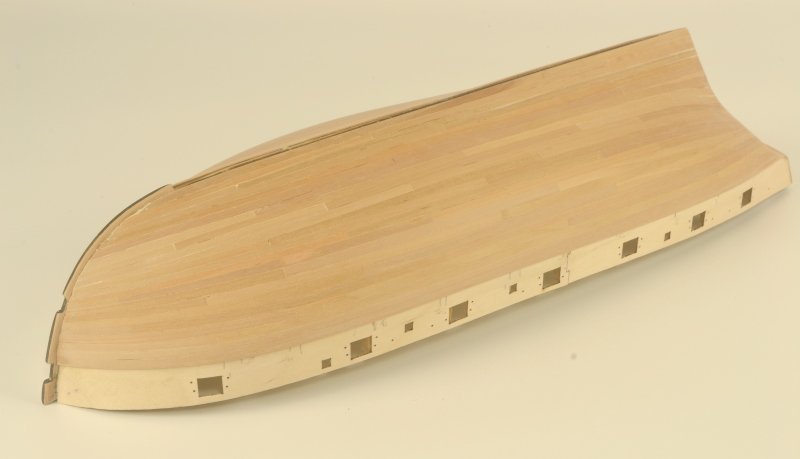
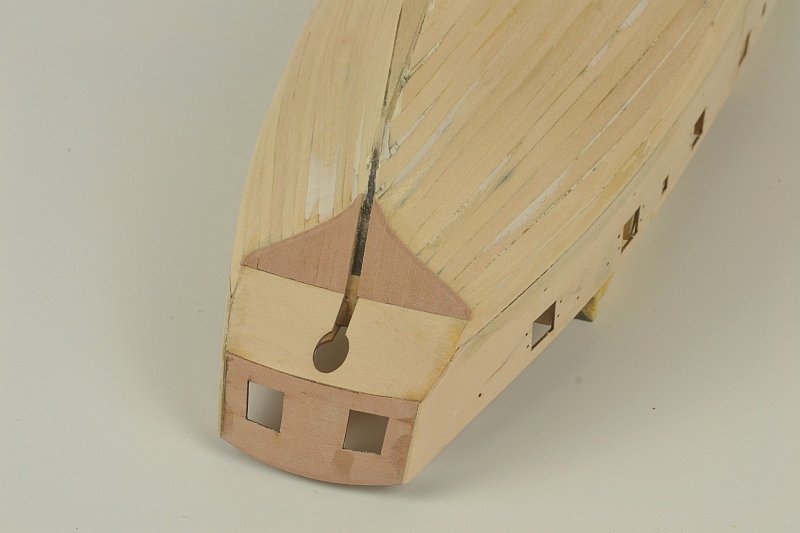
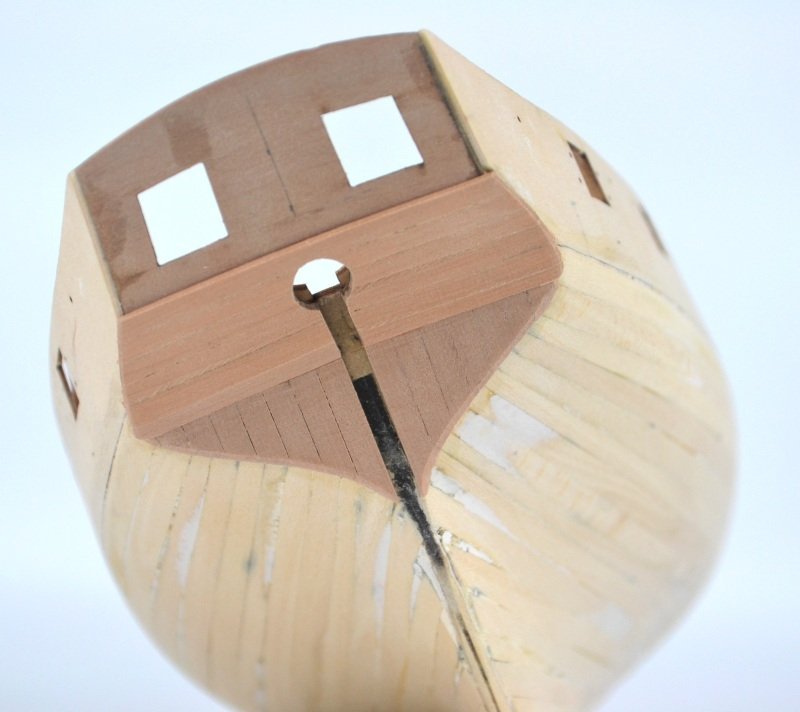
Hello - further progress. One step I'm glad to get done - the 1st planking. Although not great it is least a sound base for the 2nd planking - hopefully. The Stern area - started the second planking. Thank you for looking in and the past comments and 'Likes'. Regards Doug
- 102 replies
-
- 12
-
-
- Flirt
- Vanguard Models
- (and 1 more)