HOLIDAY DONATION DRIVE - SUPPORT MSW - DO YOUR PART TO KEEP THIS GREAT FORUM GOING! (89 donations so far out of 49,000 members - C'mon guys!)
×


Dfell
-
Posts
251 -
Joined
-
Last visited
Content Type
Profiles
Forums
Gallery
Events
Everything posted by Dfell
-
Hello glbarlow - thank you with help with the tint. Seeing the images on my iPhone the background is grey and when I upload the images to the site from my pc the background is blue. Am using a Nikon D3100 camera but it’s a bit too clever for me - am trying to sort the colour balance via it’s software. Hope you don’t mind am using your good build as a very helpful guide / inspiration along with the manual. Thanks for looking Doug
-
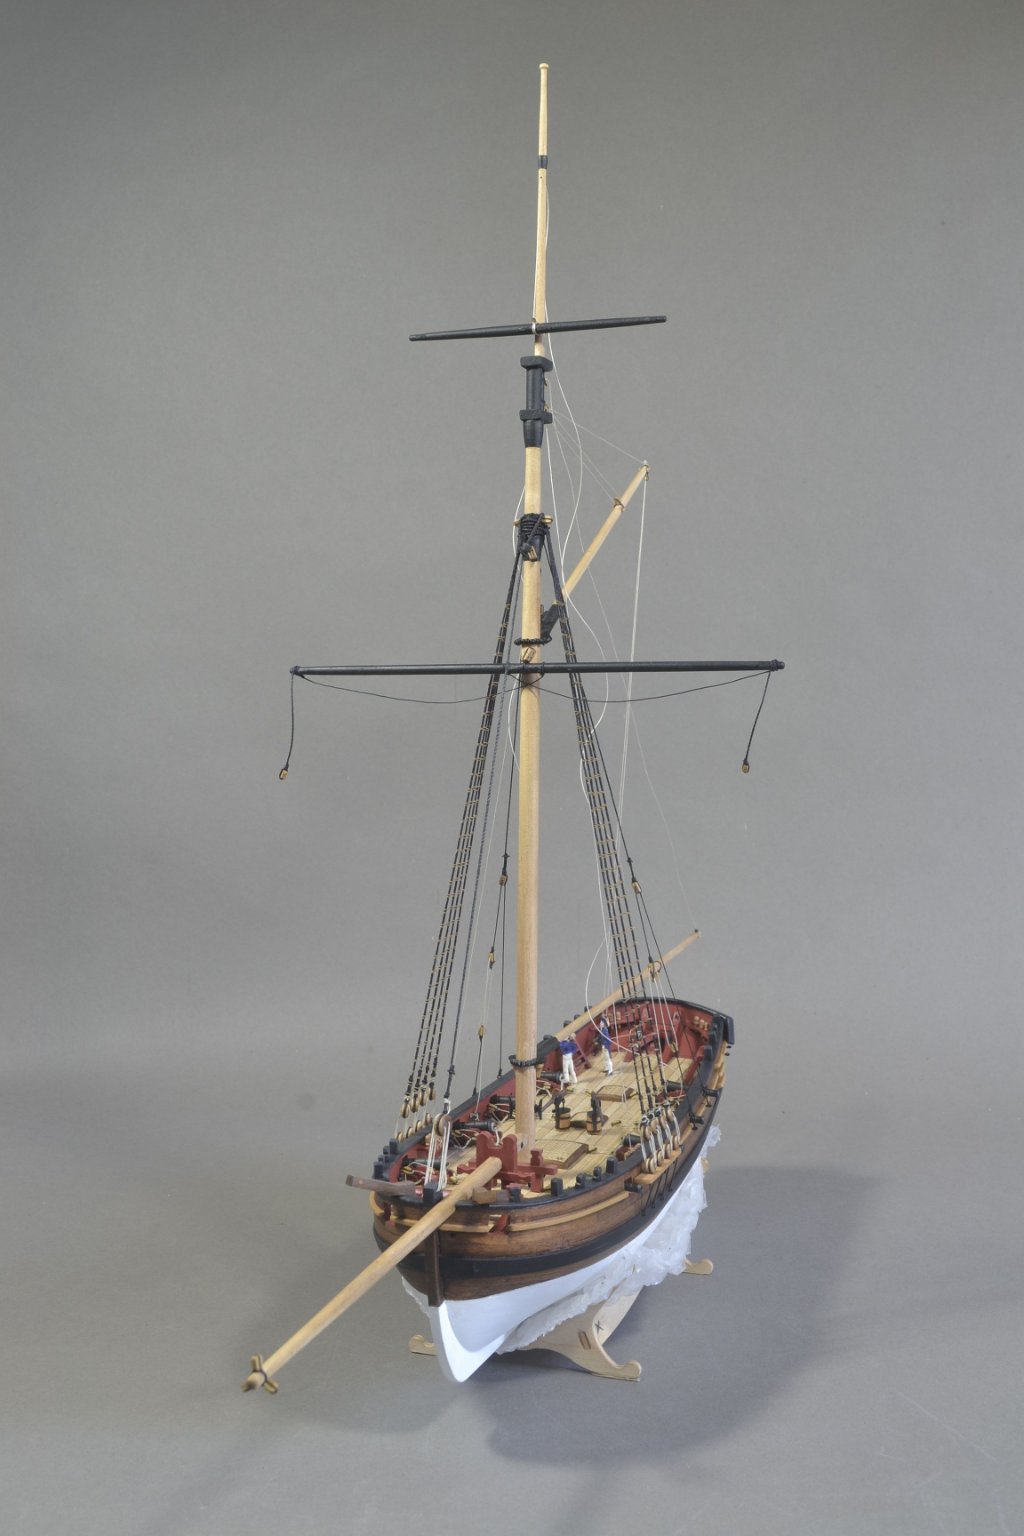
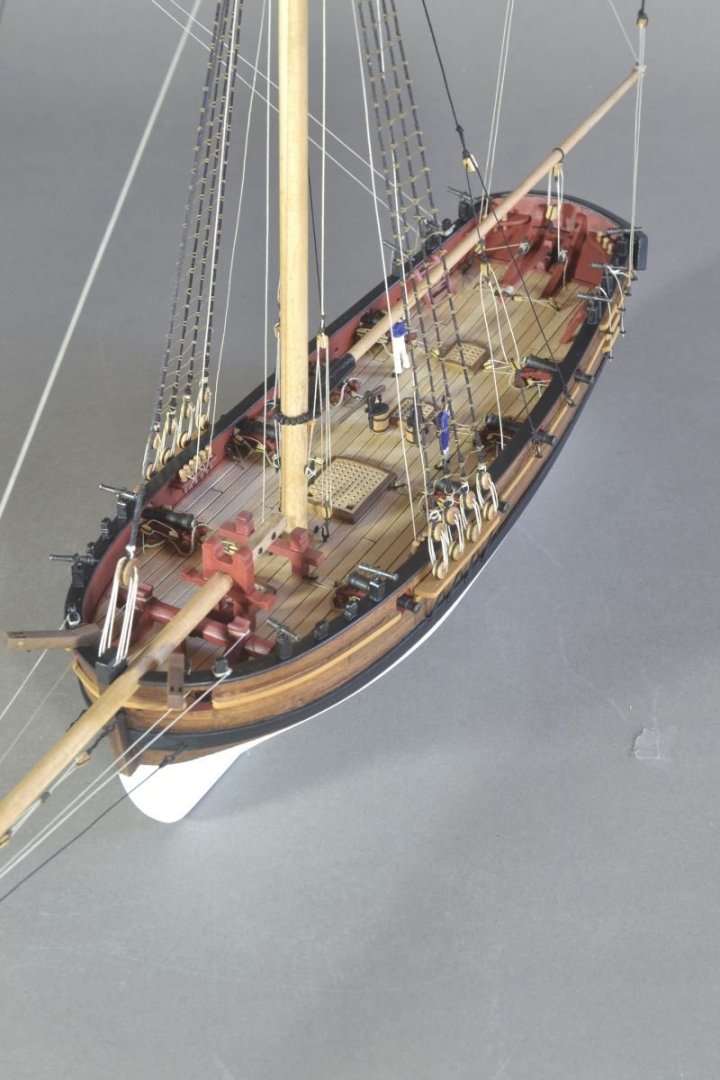
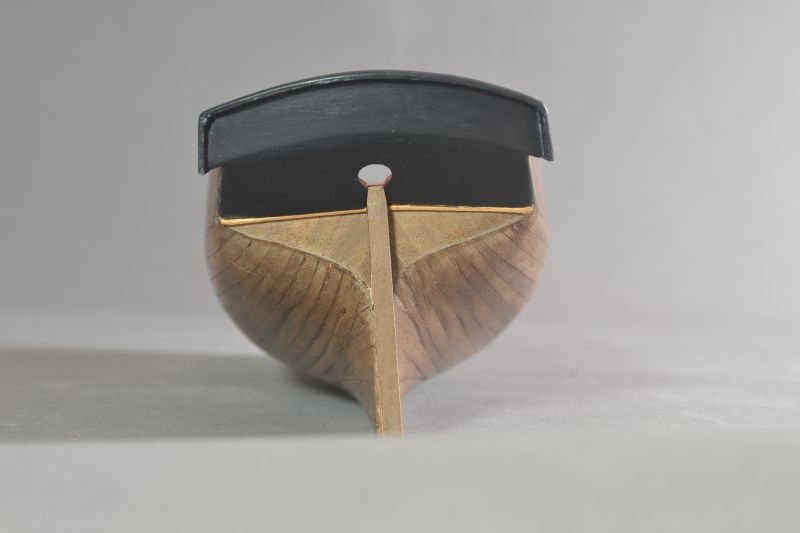
Hello - just a small update. Following the instructions as laid out beautifully by Chris Watton and James H. Deck supports in place The Stern Frame Patterns fitted and then a slightly worrying time getting the main Deck in place. It all clicked into place and no need of any weights to hold it down while glue dried. Stern Counter in place along with the Stern Board. Have thinned the mdf where the Stern Post fits. Just more sanding to make sure the run of the first hull planking will be smooth. Going to have to find a way to get the background without a blue tint - guess colour balance is wrong. Anyway thanks for looking. Regards Doug

- 102 replies
-
- 7
-

-
- Flirt
- Vanguard Models
- (and 1 more)
-
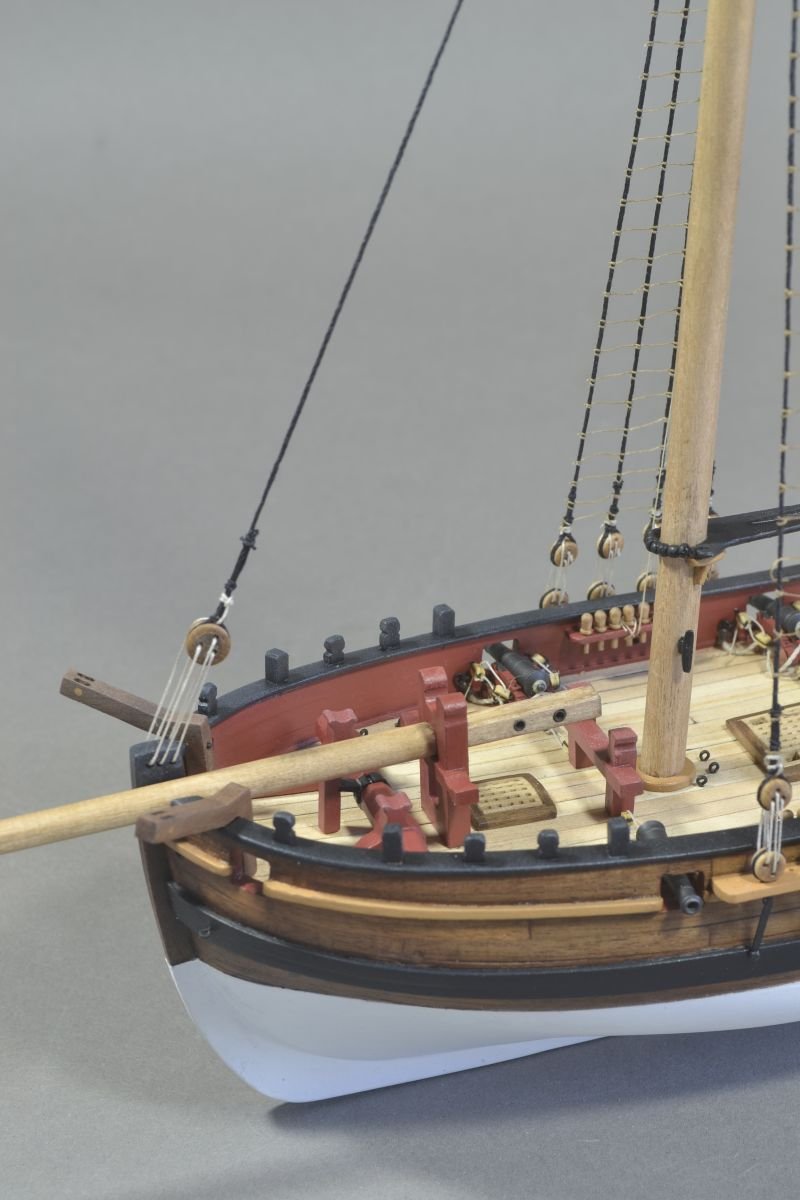
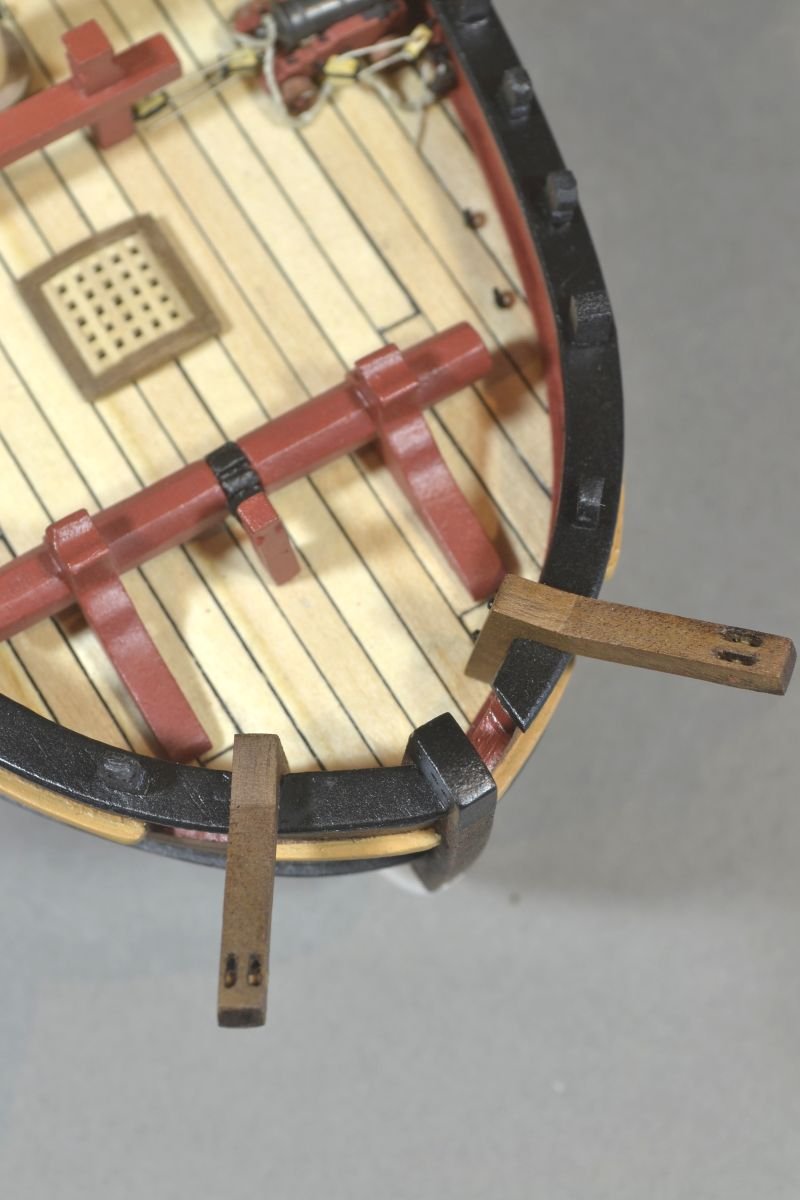
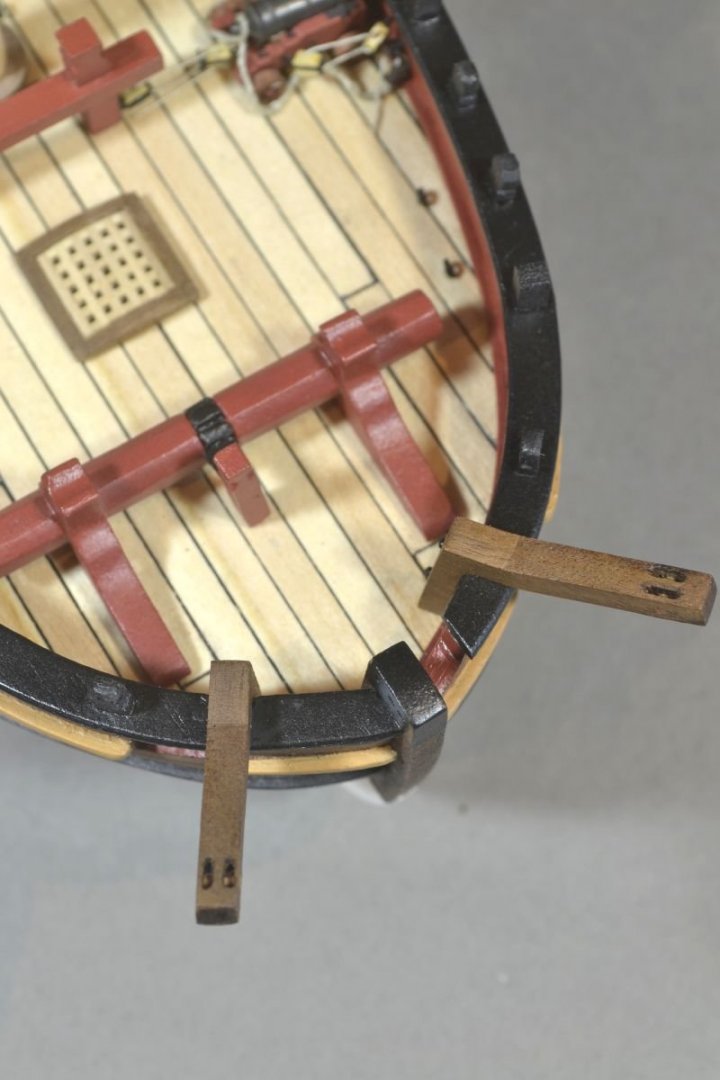
Hello – have decided to do HMS Flirt as my next build having seen the excellent reviews and build logs of various Vanguard Models ships on this site. Chris Watton has certainly done a beautiful job and was somewhat hesitant to make a start on this build as it will probably be downhill from here and not do Chris any justice even though the instruction book is a work of art on its own. Have followed James H and gone for a white background instead of my usual black but have not as yet got any clever photoshop programs to improve the backdrop. Anyway first stage done. For some reason which I don't know why I decided to fill in the vertical gap on bulkhead 10 using the part from the mdf sheet. Door fixed in place and a small eyelet and blobs of glue for door handle. Thanks for looking. Regards Doug
- 102 replies
-
- 8
-
-
- Flirt
- Vanguard Models
- (and 1 more)
-
Thank you VTHokiEE. Bought the case with the base from a UK company.
- 40 replies
-
- 1
-
-
- sherbourne
- caldercraft
- (and 1 more)
-
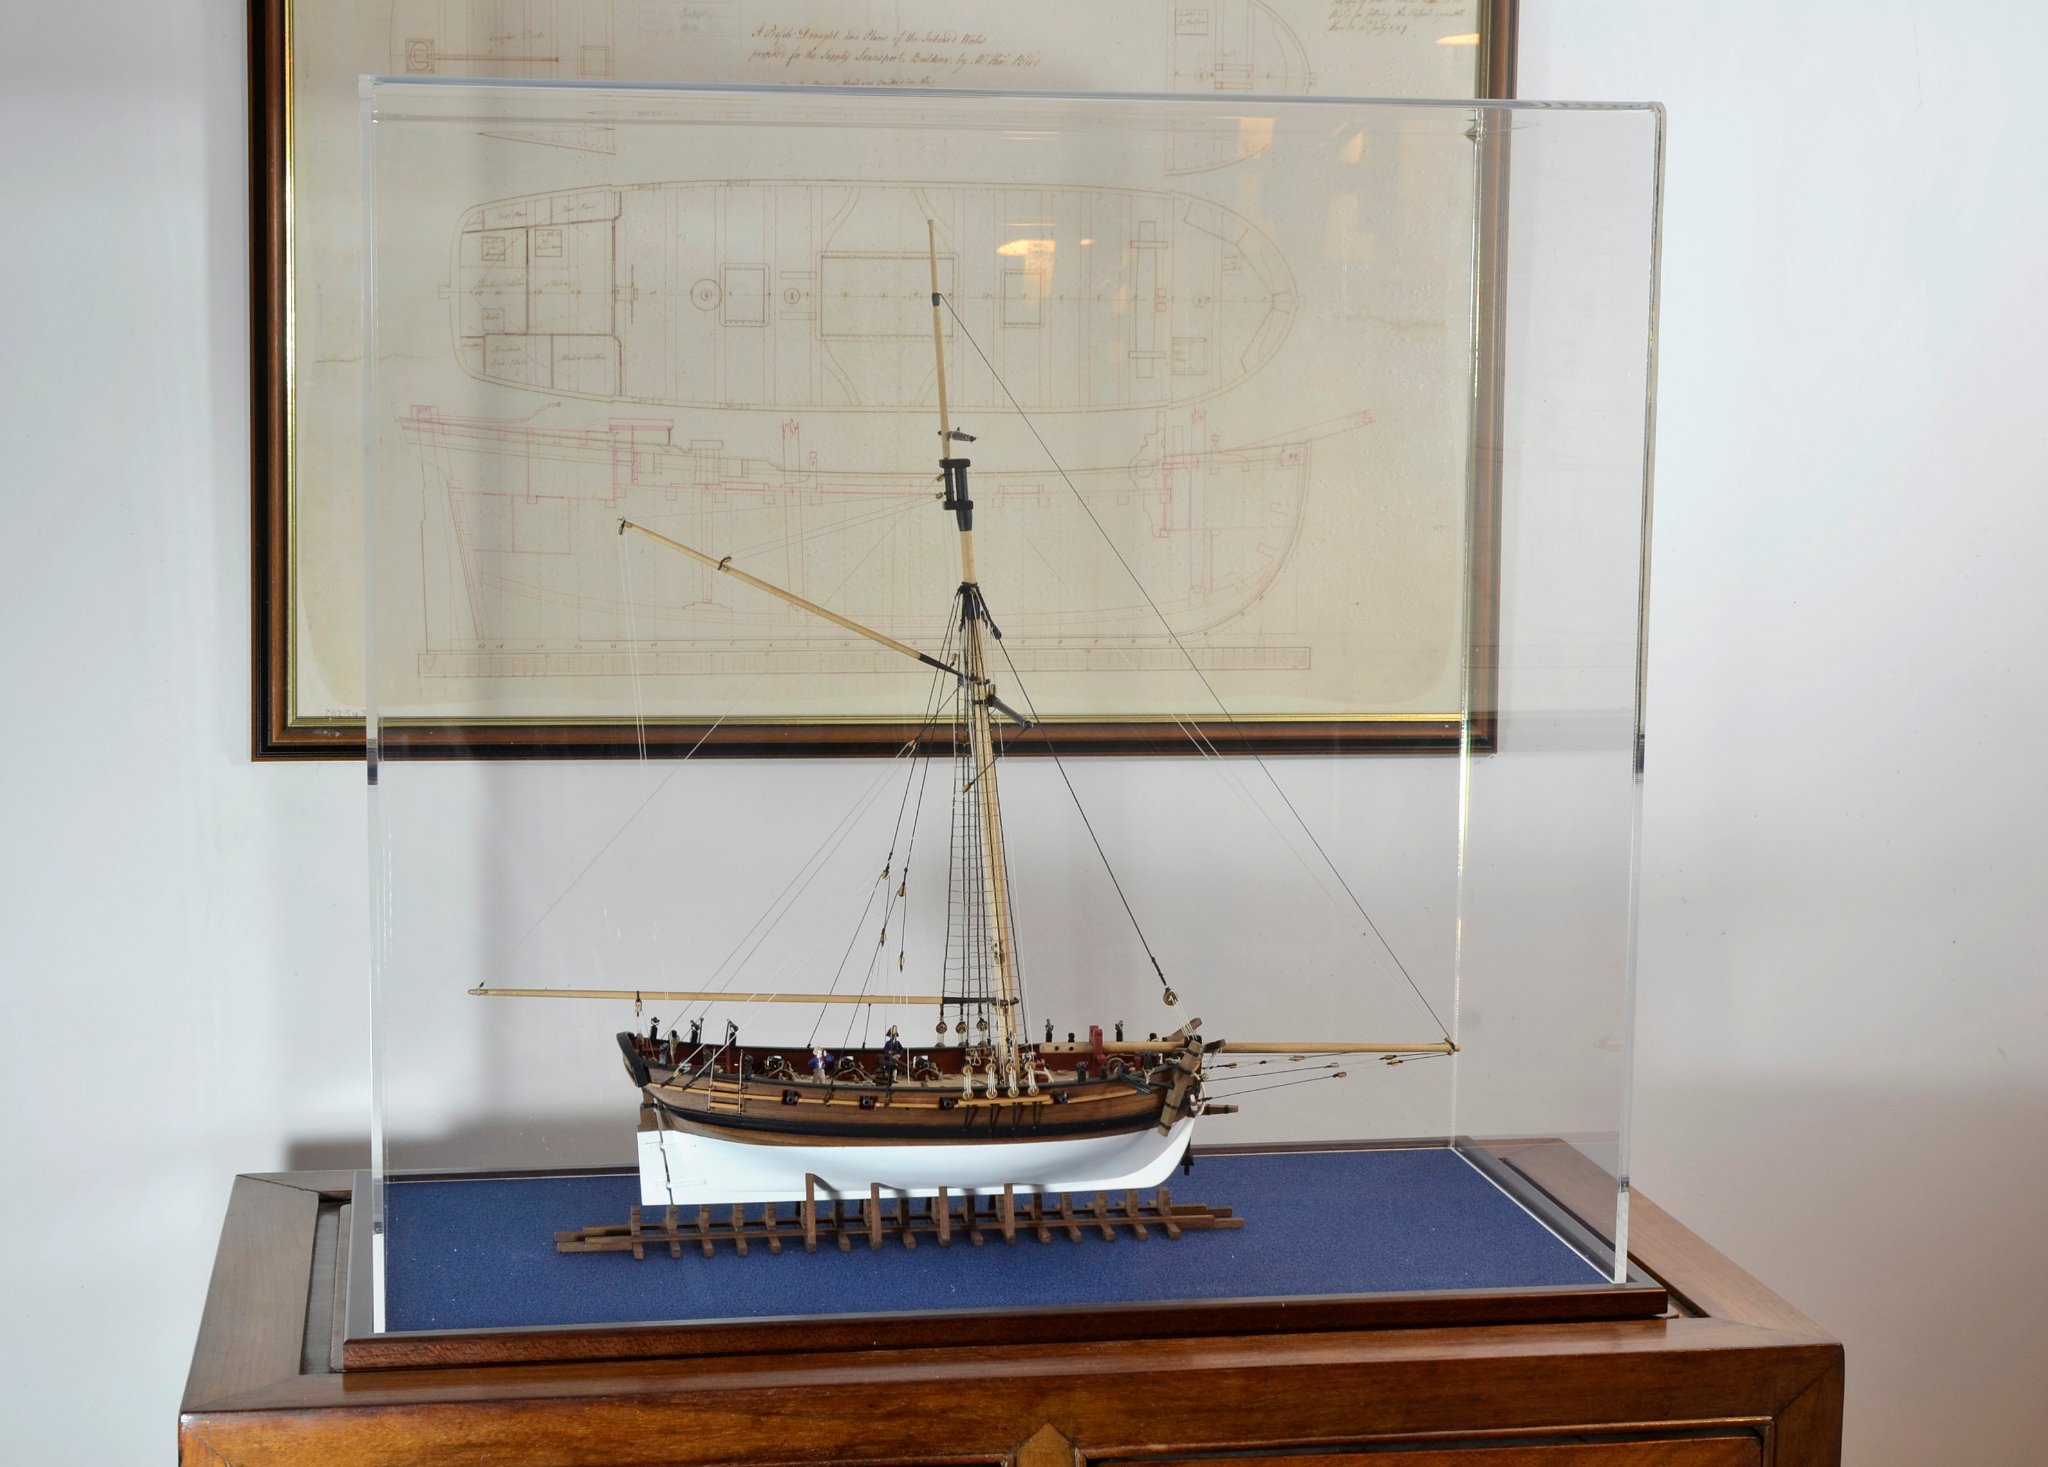
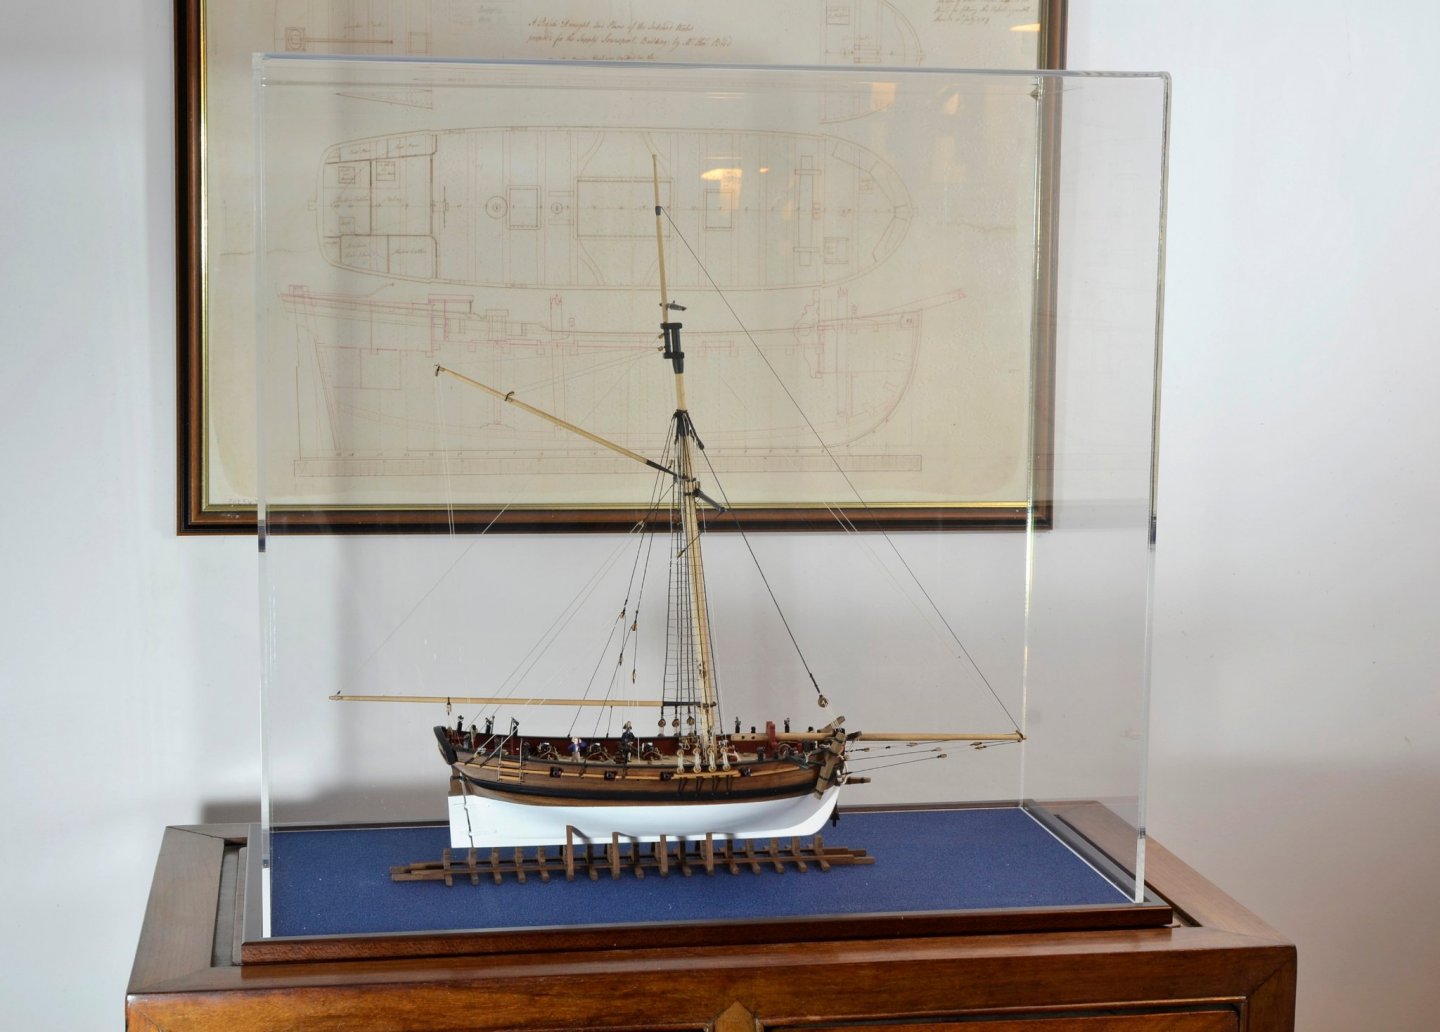
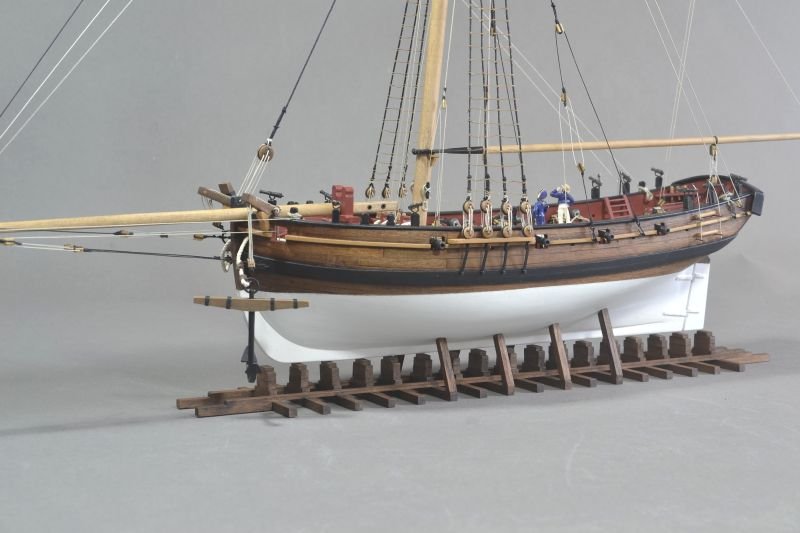
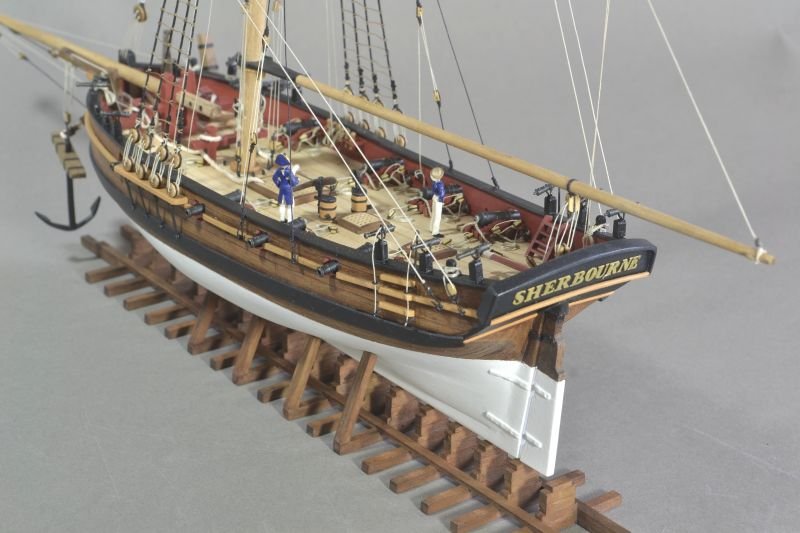
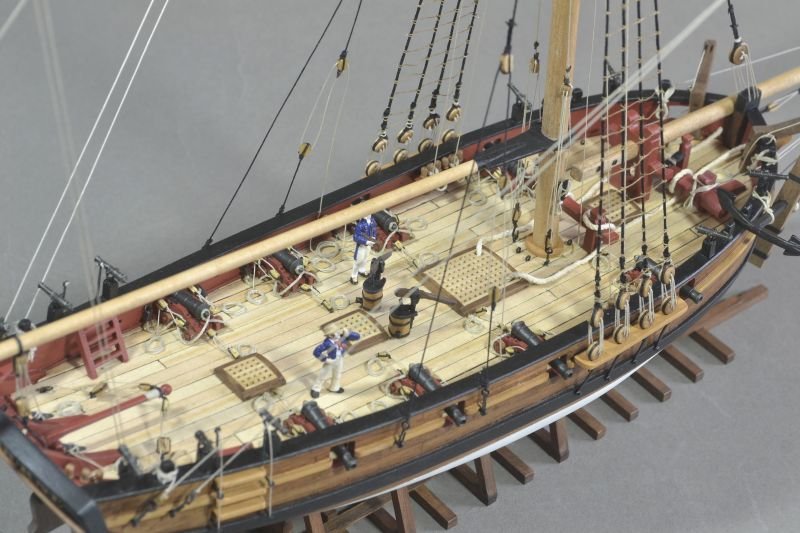
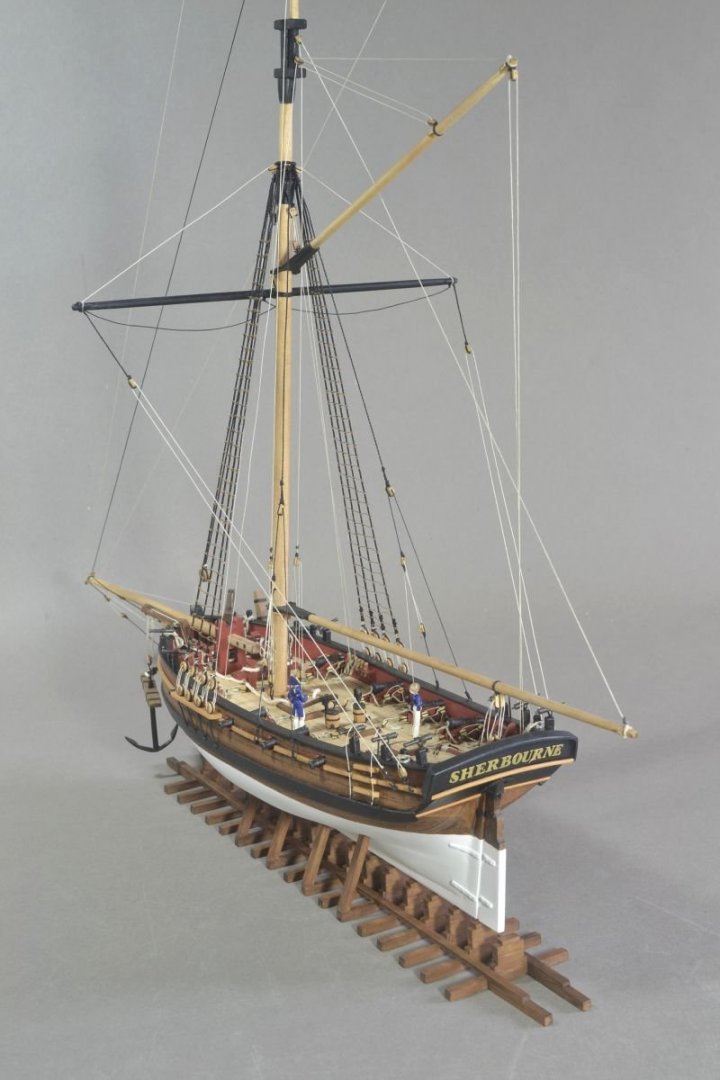
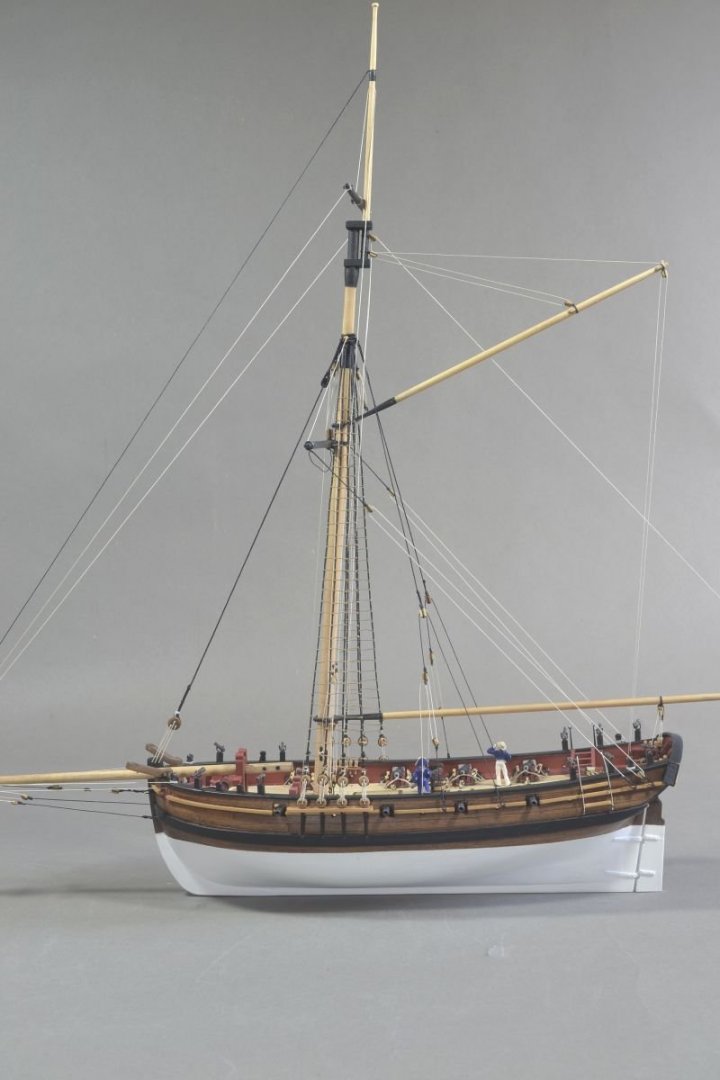
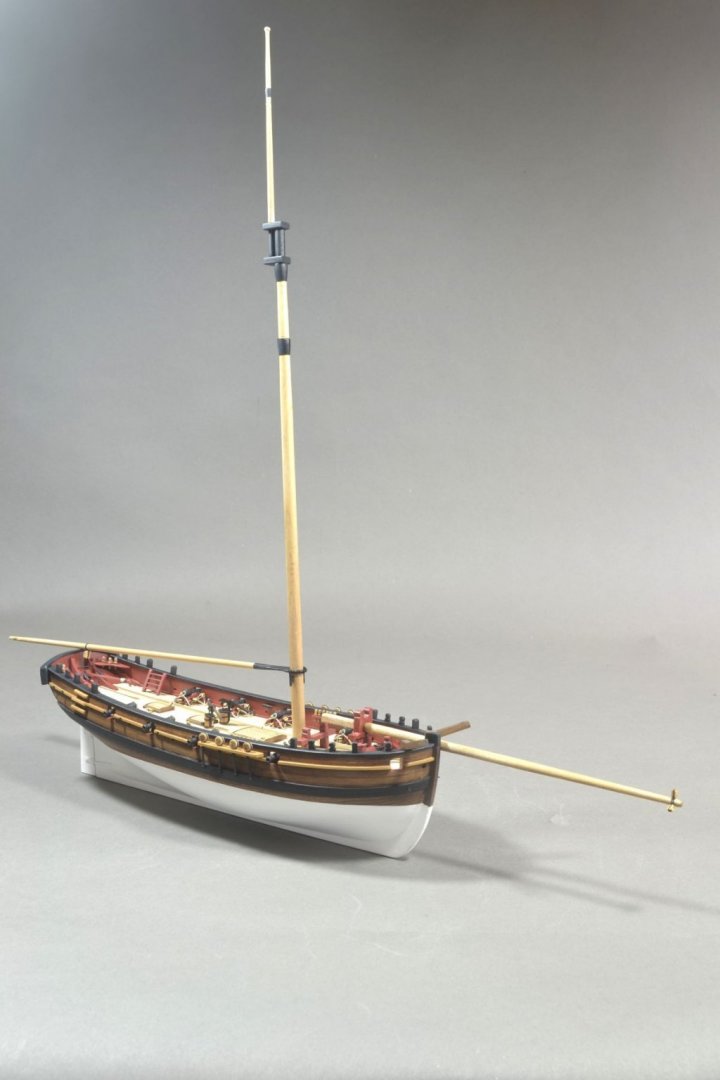
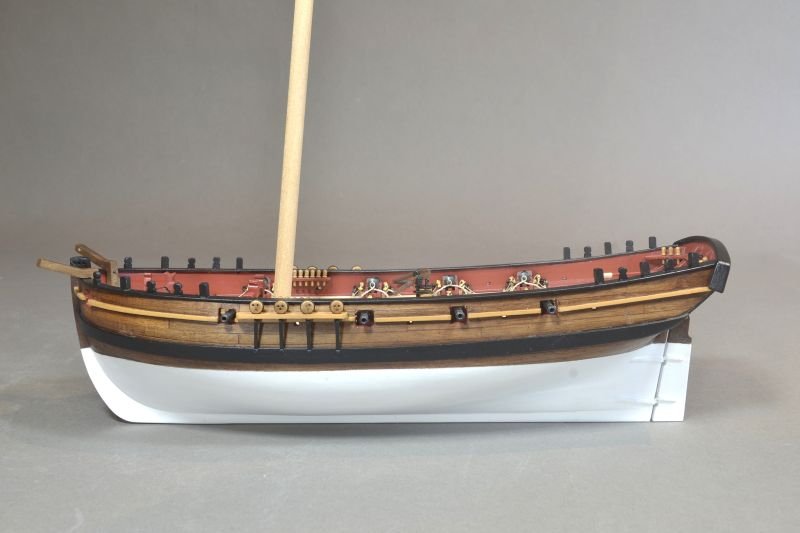
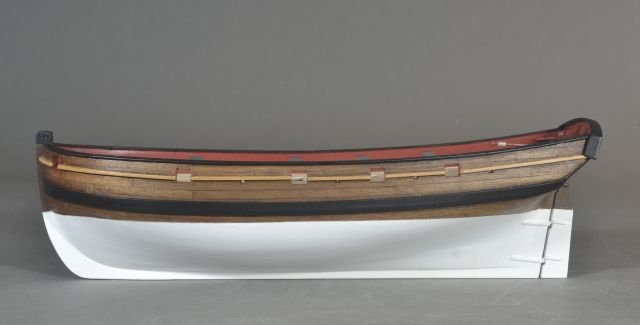
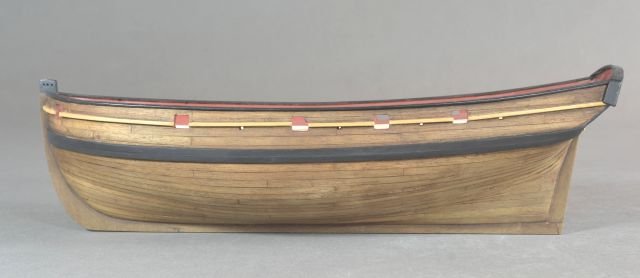
Hello - Okay all done and dusted. Finished. The Cutter Sherbourne now on display in its acrylic case. Thank you to all of you for looking in and your comments and the 'likes'. Not sure what the next build will be....... Regards Doug
- 40 replies
-
- 7
-
-
- sherbourne
- caldercraft
- (and 1 more)
-
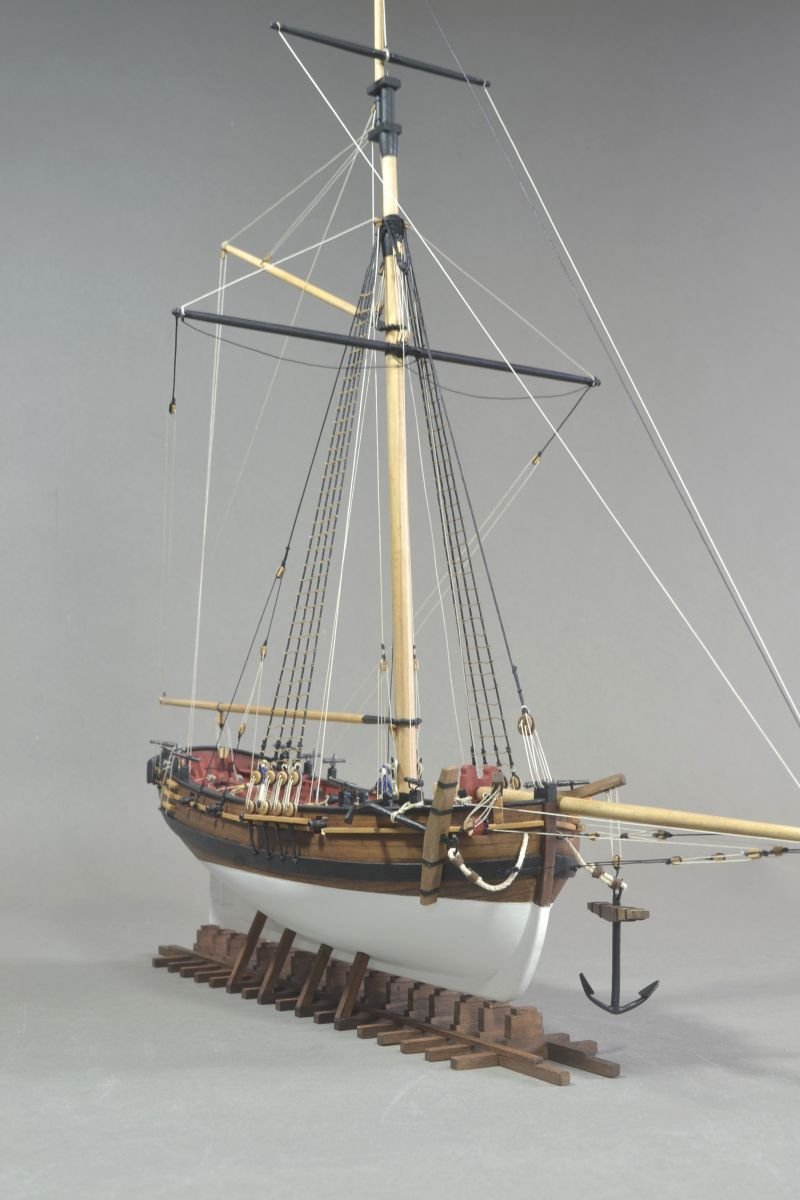
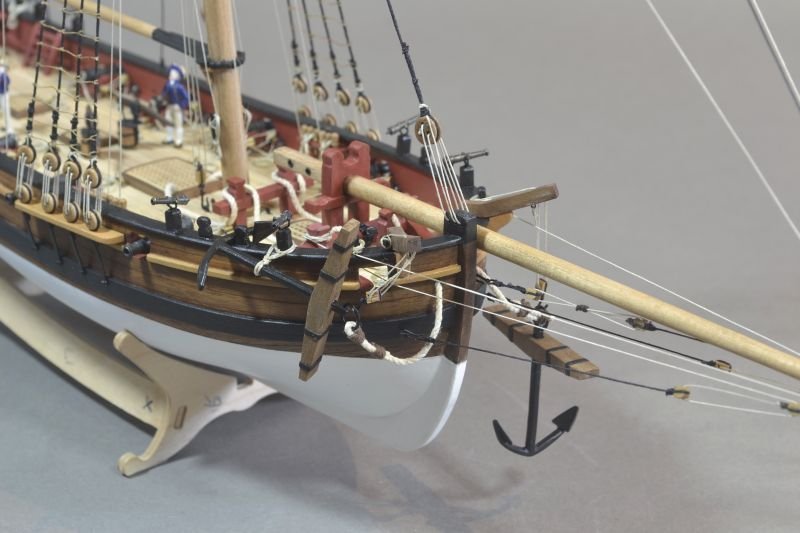
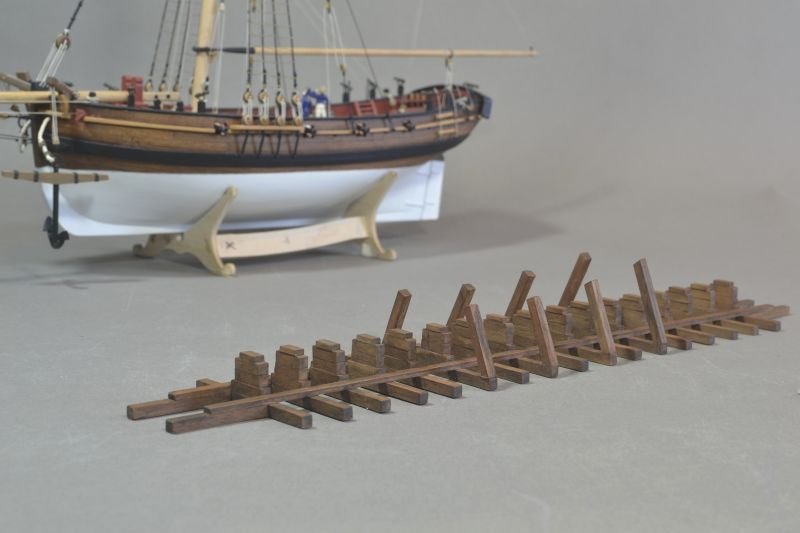
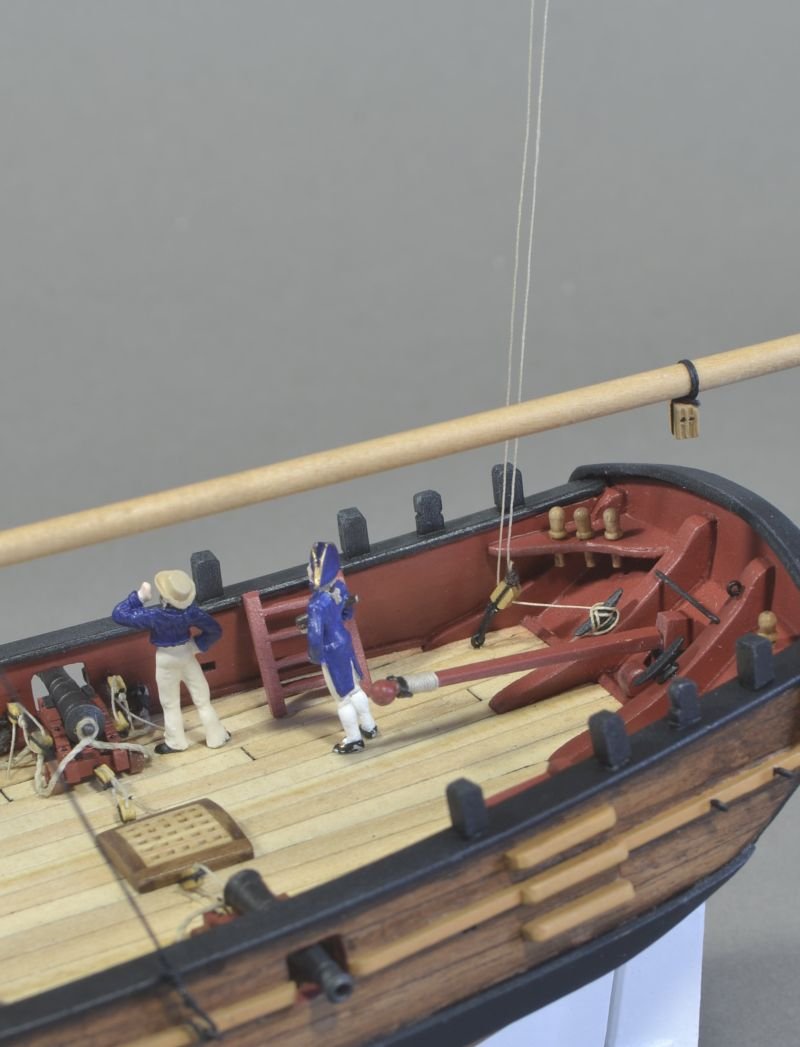
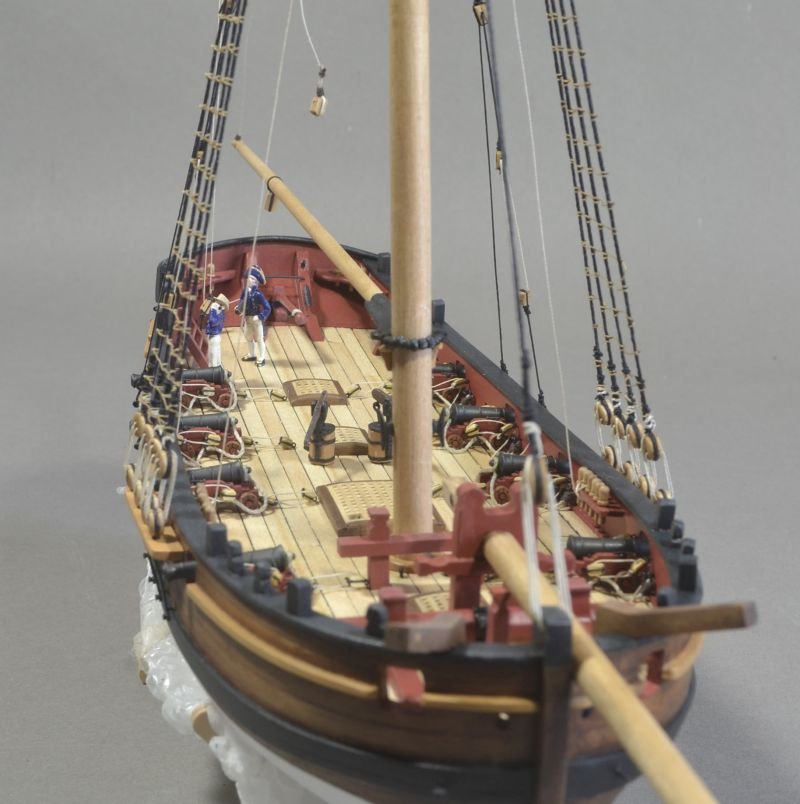
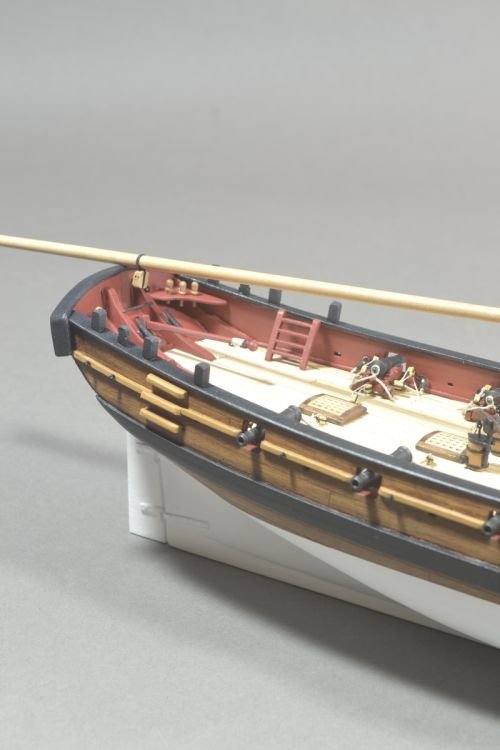
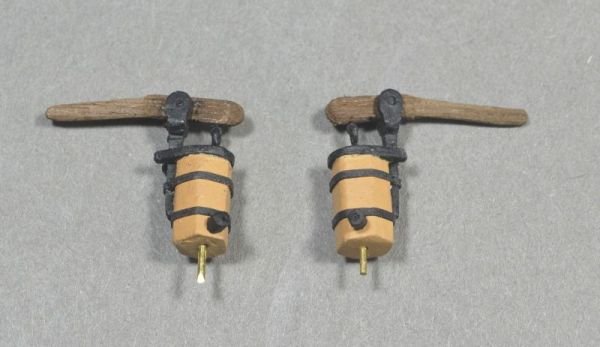
Hello - I finished about a week ago and now just waiting for the holiday period to end so as I can order the display case. The anchors all roped up - I know the anchors should be tied with a knot but always think the knot ends up looking rather large. Have done the stand / slipway - idea pinched from Dubz who I would like to thank although by the looks of things he has been banned. A great loss. All rope coils added. Well that's it, other to thank all the Sherbourne builds which were a great help and hopefully I haven't let the side down. Would like to also give credit to Blue Ensign who showed how to do swivel gun brackets from hooks on his Pegasus. Thank you for looking in and all the past comments and likes. Will update with a final photo once display case arrives. Hope next year is better for everyone. Regards Doug

- 40 replies
-
- 10
-
-
- sherbourne
- caldercraft
- (and 1 more)
-
Hello Gazzarian Thank you for the nice comment. I stained the walnut with a medium oak stain and a flat varnish. Regards Doug
- 40 replies
-
- 1
-
-
- sherbourne
- caldercraft
- (and 1 more)
-
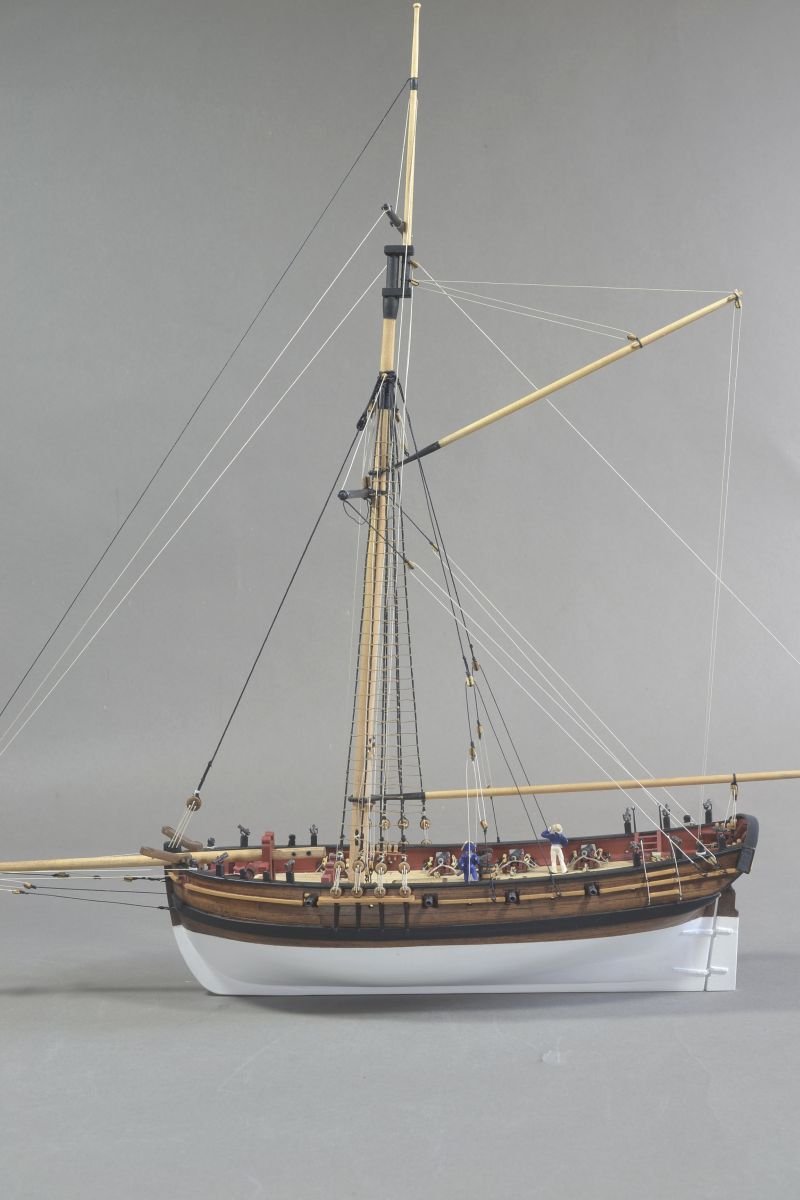
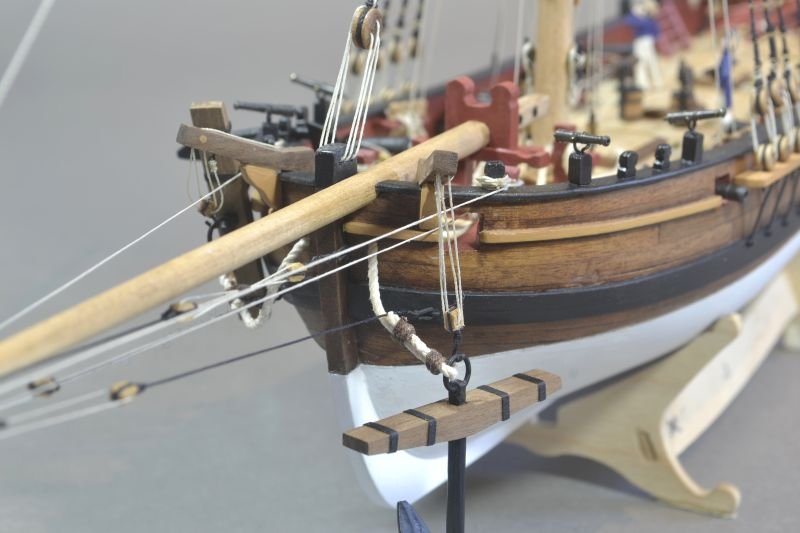
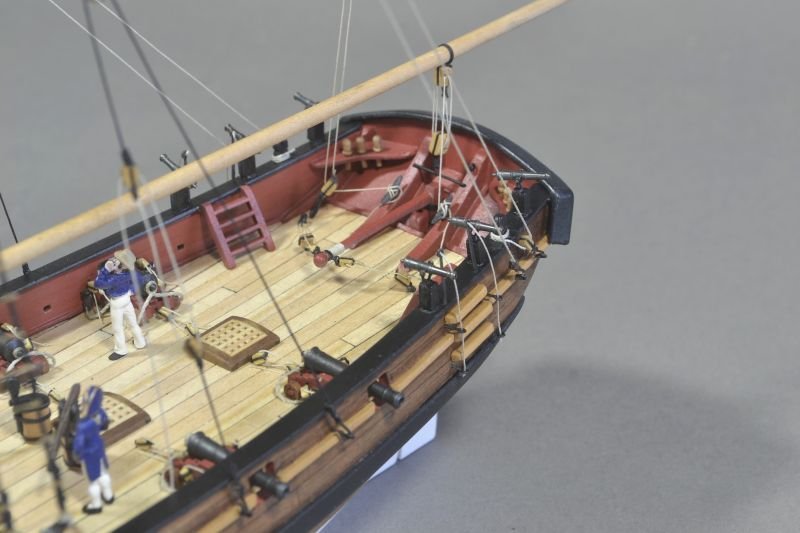
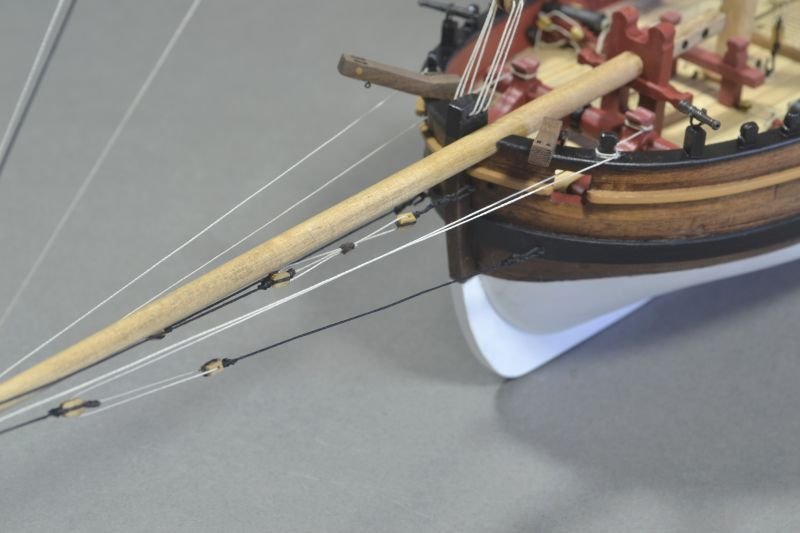
Hello - The finish line is in sight. Rigging done except for the anchors as awaiting to order suitable thread which seems to be out of stock. Have redone the front stay as felt the mouse / collar section needed to be lower down. Tiller rigged plus rope support for steps. Also swivel guns installed. The brackets are hooks straightened out then bent into required shape. A 2mm hole drilled into the gun posts and a brass tube inserted and then the brackets plus gun. Was not confident in fitting handles to swivel guns which I would like to have done. Was not sure I liked what was required for the royal stay and how it was tied off so did something similiar to what is on my HMS Supply build. So anchors and rope coils next and then how to mount and a case. Thank you for looking and the 'Likes'. Regards Doug
- 40 replies
-
- 11
-
-
- sherbourne
- caldercraft
- (and 1 more)
-
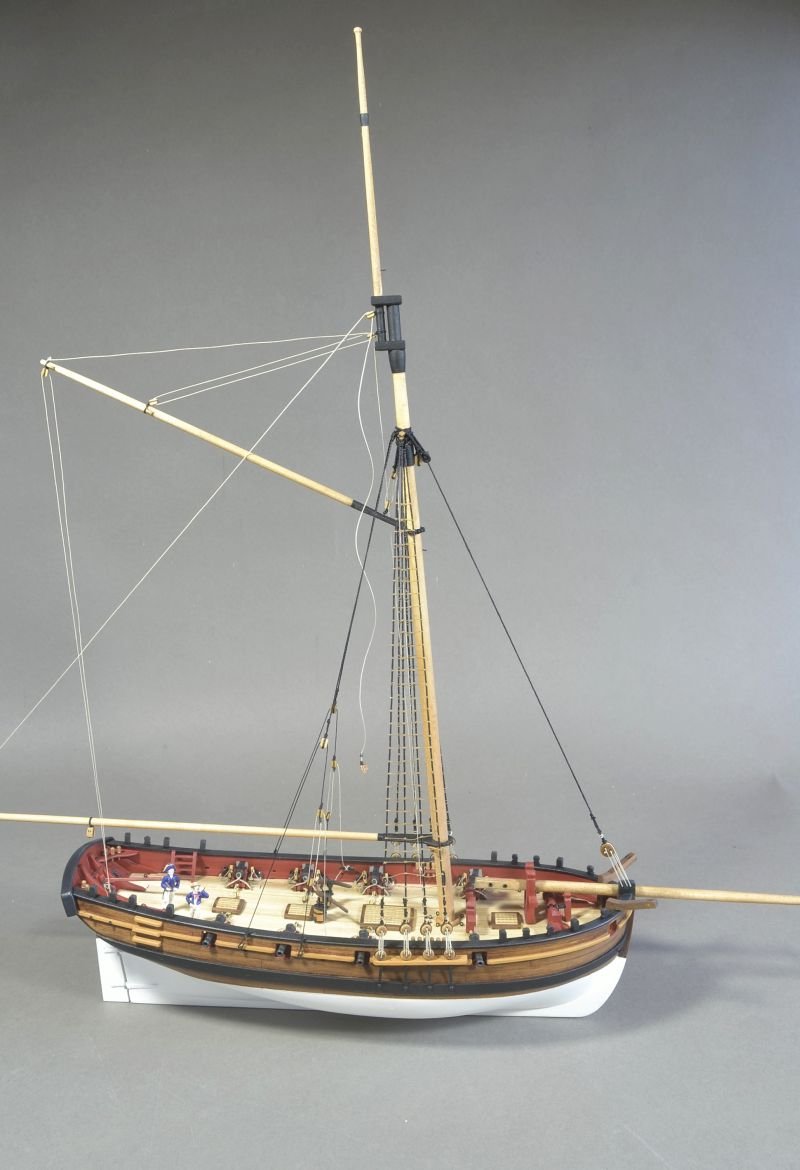
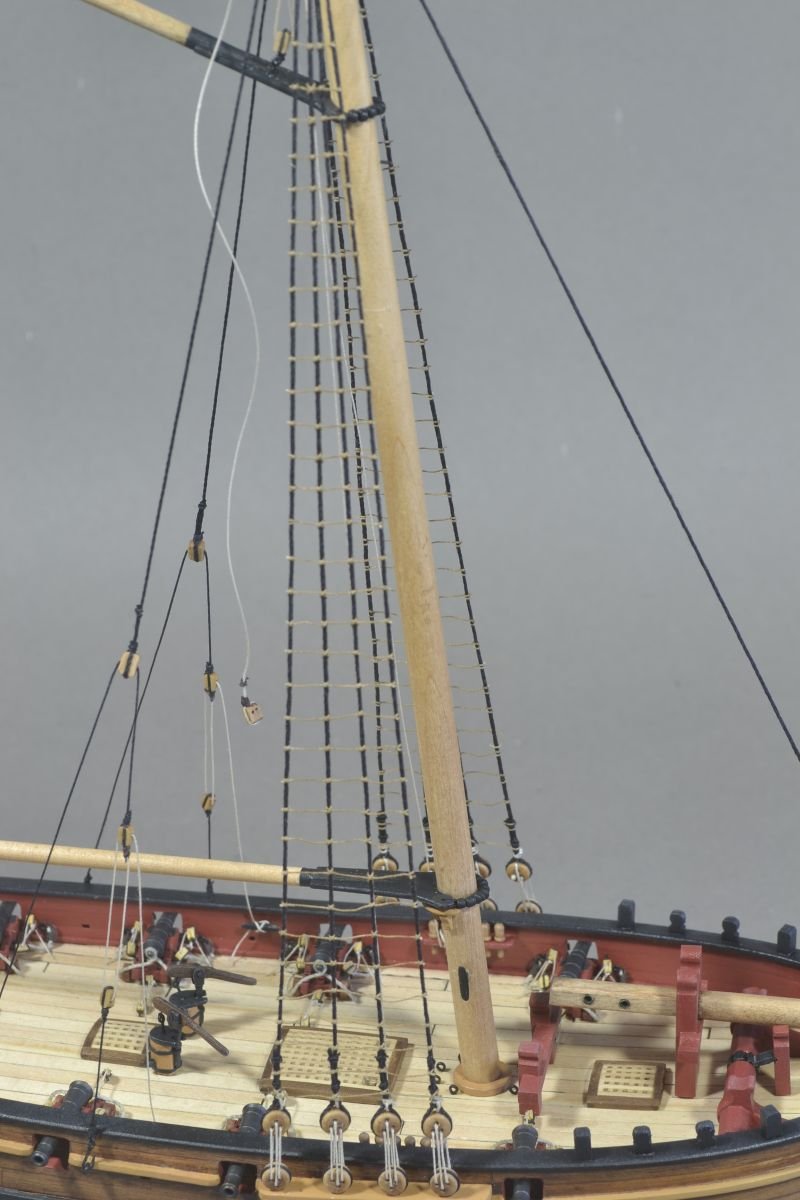
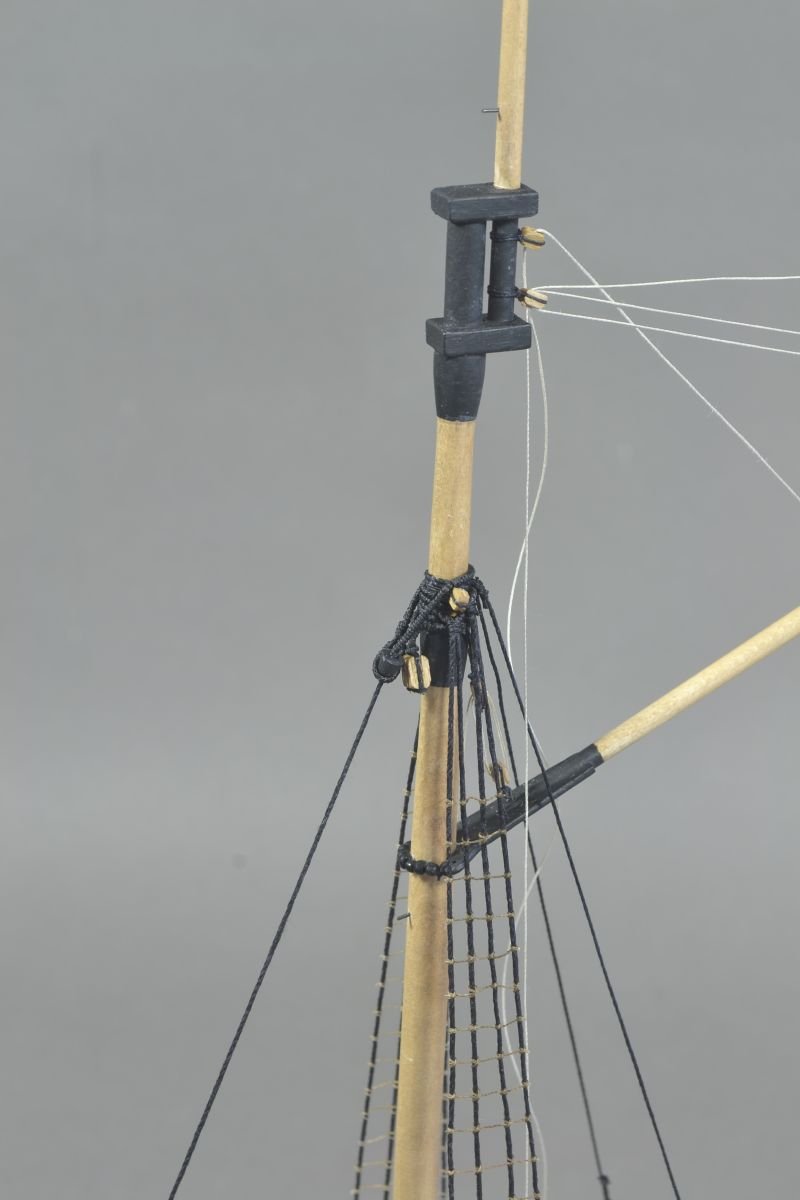
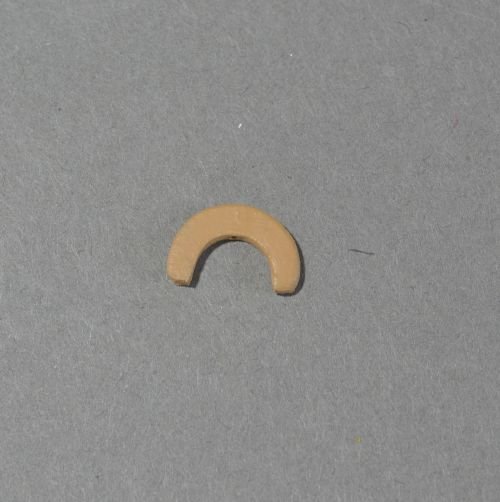
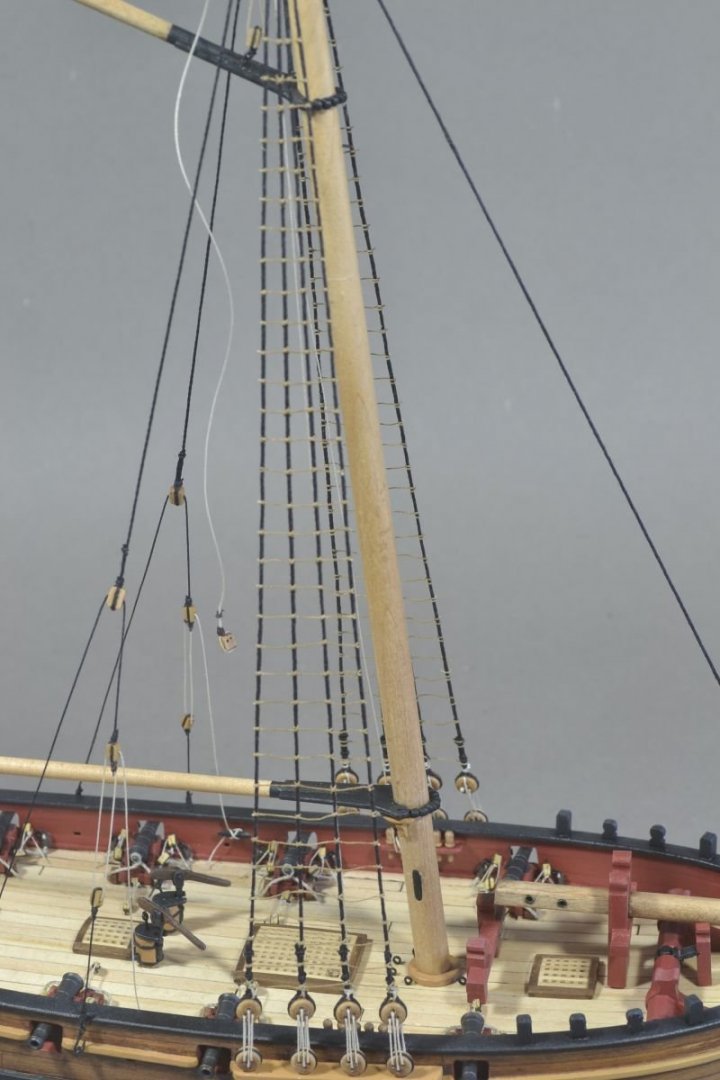
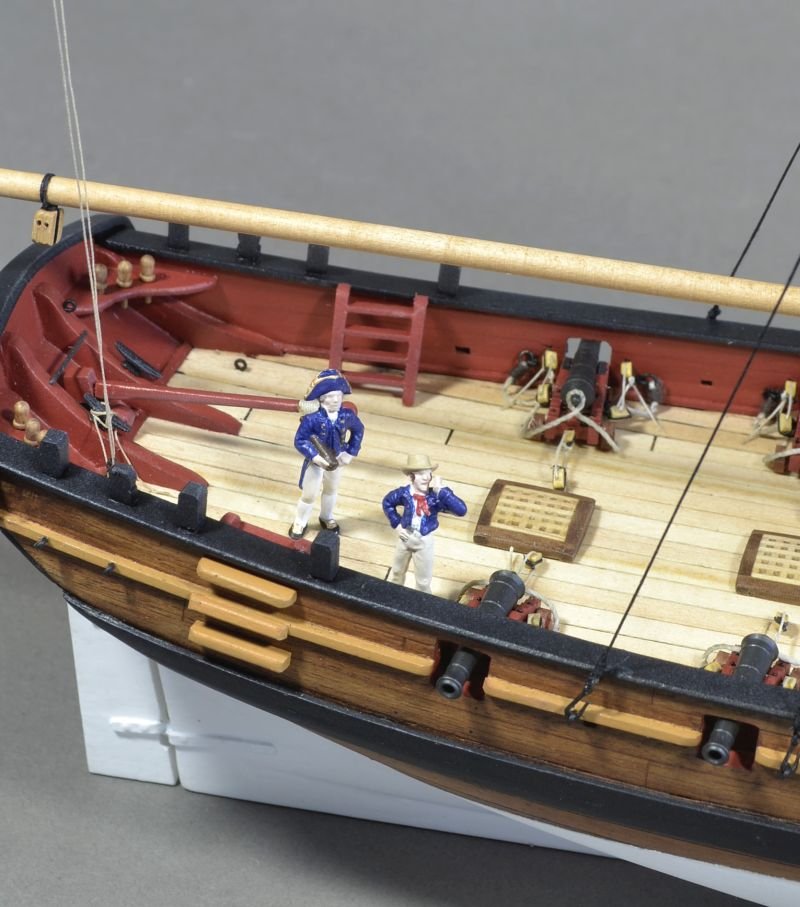
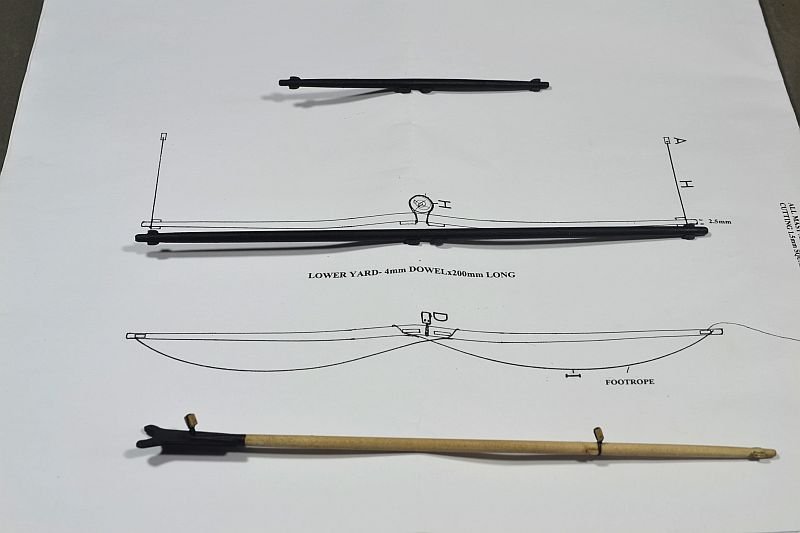
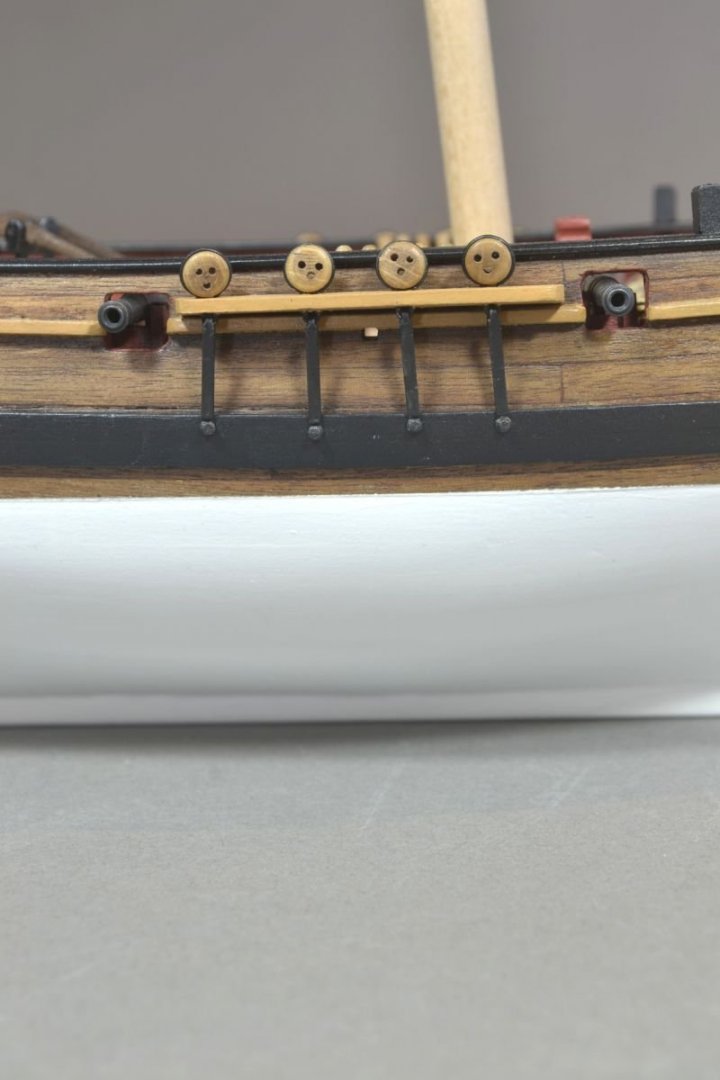
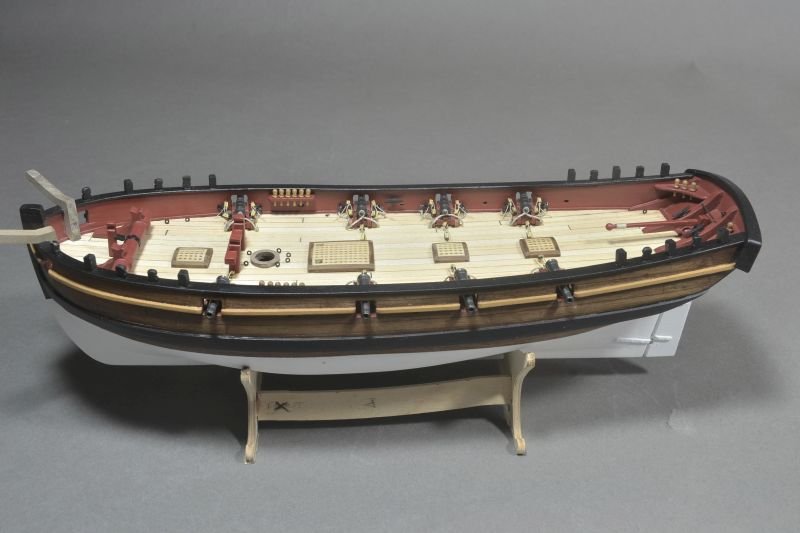
Hello - quite a few stages on. Shrouds, ratlines (least favourite job), stays and start of some running rigging. Happened across which I thought was an empty parts sheet when I noticed this part still attached. Cound not find any reference to it either on plans or Parts Listing but on searching other Sherbourne builds it is the rest for the Gaff boom - the stool. This has been glued in place plus some support brackets. Have now got some figures to help with getting a feel for the scale of things - pumps probably still too big....... Not sure who he is shouting at - maybe me - may have done something wrong with the build or too slow or both. Shrouds etc with attempt at serving. Mouse made using a lathe. Couldn't work out how the rigging should be on this - it's the line coming down from end of Driver Gaff. Anway this is what I did - hopefully it's good. Upper Yard and lower Yard now attached. Okay - last photos. Sorry too many photos Thanks for looking in and the 'Likes' - very much appreciated. Regards Doug


- 40 replies
-
- 6
-
-
- sherbourne
- caldercraft
- (and 1 more)
-
Hello - some more steps forward. Masts shaped and dry fitted along with the gaff boom. Bowspit also dry fitted plus some blocks. The Yards and Driver Gaff shaped and ready to be fitted. Some steps have been added. Some eyelets attached to tiller but not sure how I am going to rig it up as the steps are close by. Another view. Thank you very much JpR62 for your lovely comments - much appreciated. Also thank you for looking in and the 'likes'. Regards Doug
- 40 replies
-
- 7
-
-
- sherbourne
- caldercraft
- (and 1 more)
-
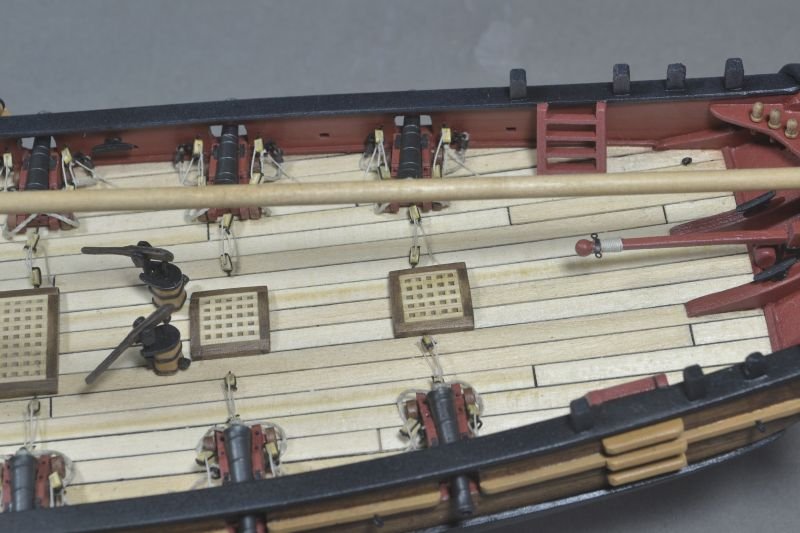
Hello - more bits and pieces done. The channels and deadeyes fixed into position - pinned and glued. The angle of the strops was done by tying thread to the mast at the correct height and aligning it with the deadeye. The catheads fixed into position with two grooves cut out and a dowel inserted through the side. The bolts are just brass wire inserted and a drop of black paint added. The pumps have been shortened - hopefully a more suitable size. May buy some of those sailor figures seen on some builds which probably helps with the scale of things. Side view Thank you for looking. Regards Doug

- 40 replies
-
- 9
-
-
- sherbourne
- caldercraft
- (and 1 more)
-
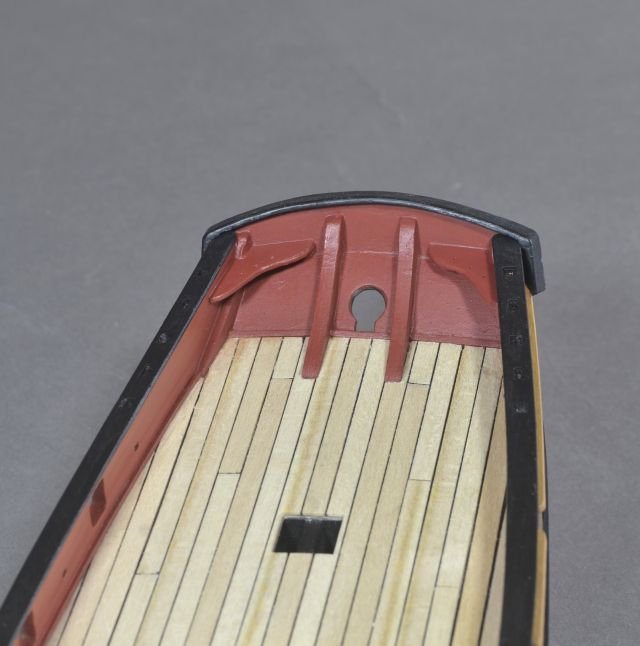
Hello - just a short update. Pumps now in place - look a large feature on the deck. Maybe made them too big. Fixed the what ever it is called skirt around rudder. Copied this from tkay 11. Made the round fitting from scrap ply and not brass. Thank you for looking in and the 'Likes' ccoyle (Chris) - Sorry not come across your build and cannot see it in the index. Maybe you could show me where to find it as would like to see your build. Regards Doug
- 40 replies
-
- 5
-
-
- sherbourne
- caldercraft
- (and 1 more)
-
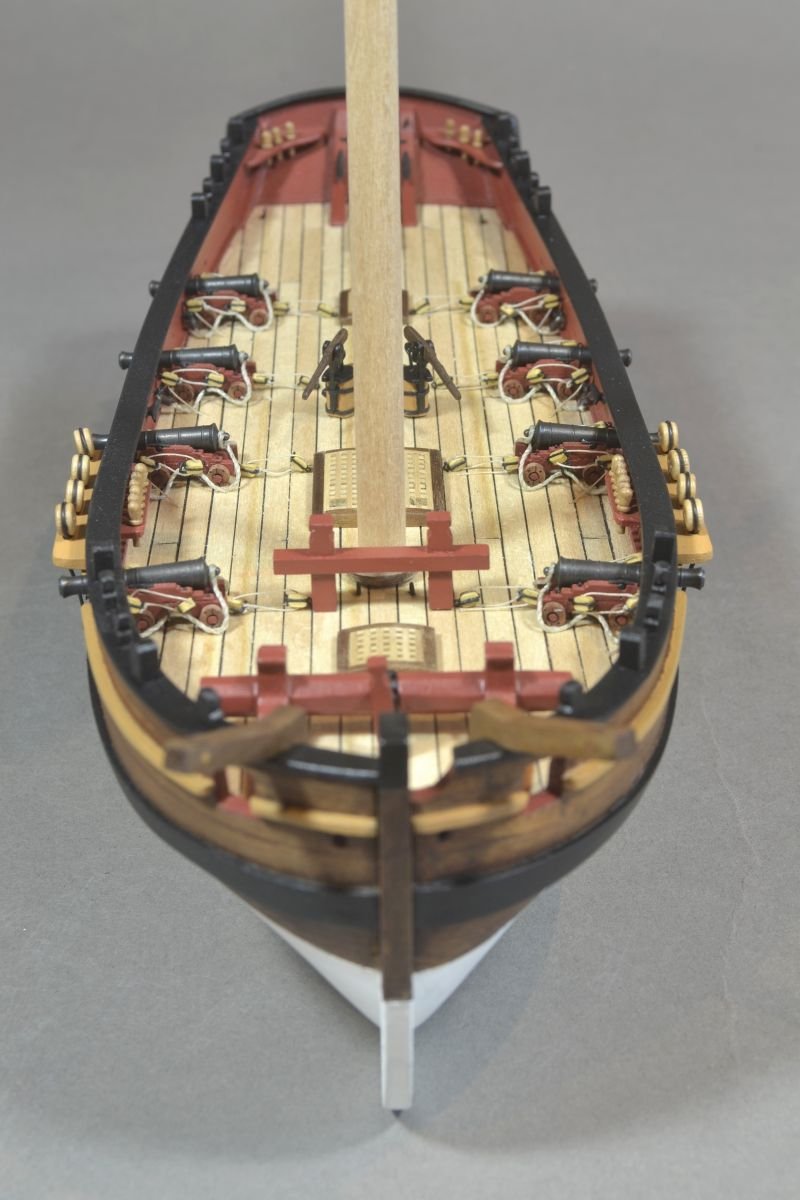
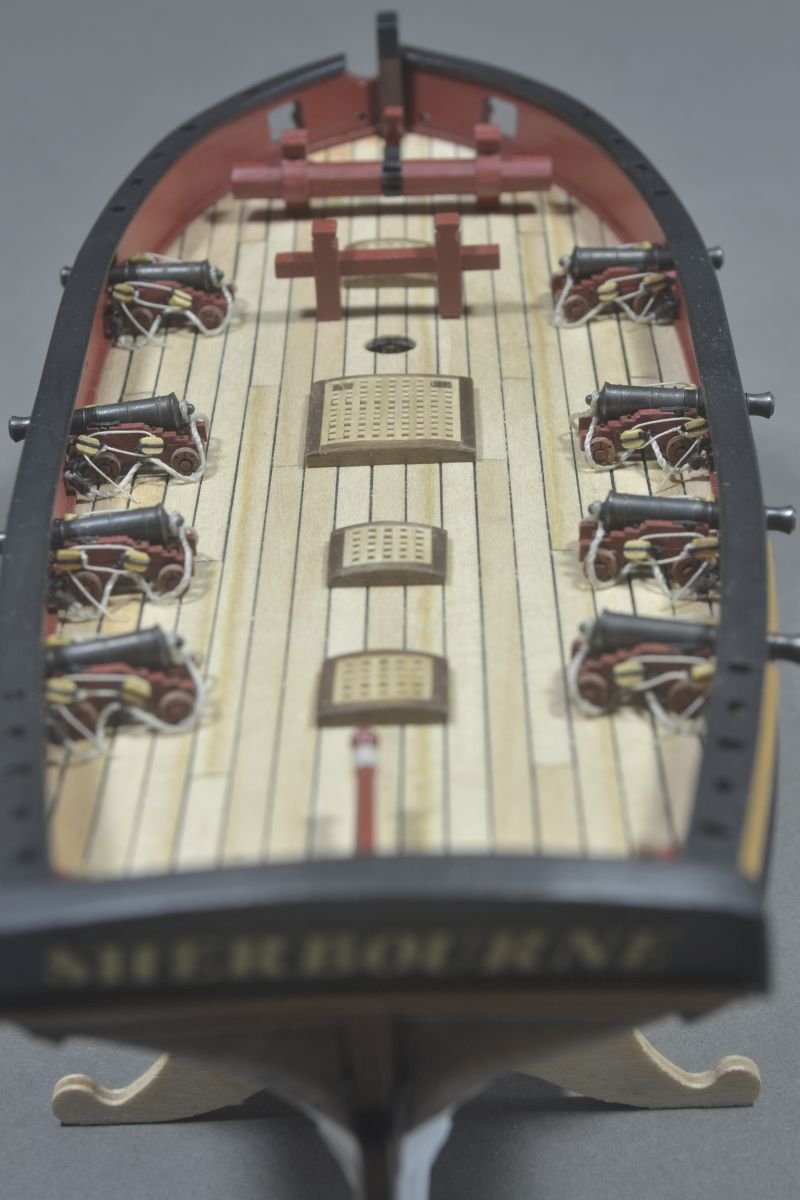
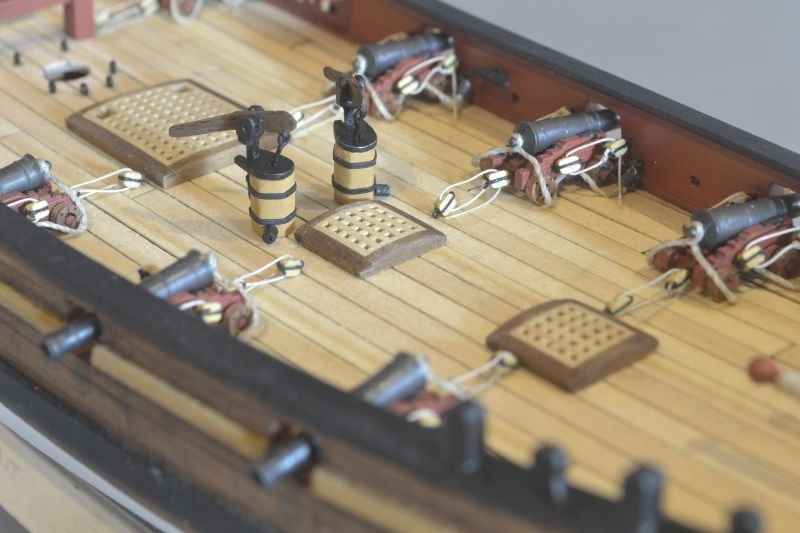
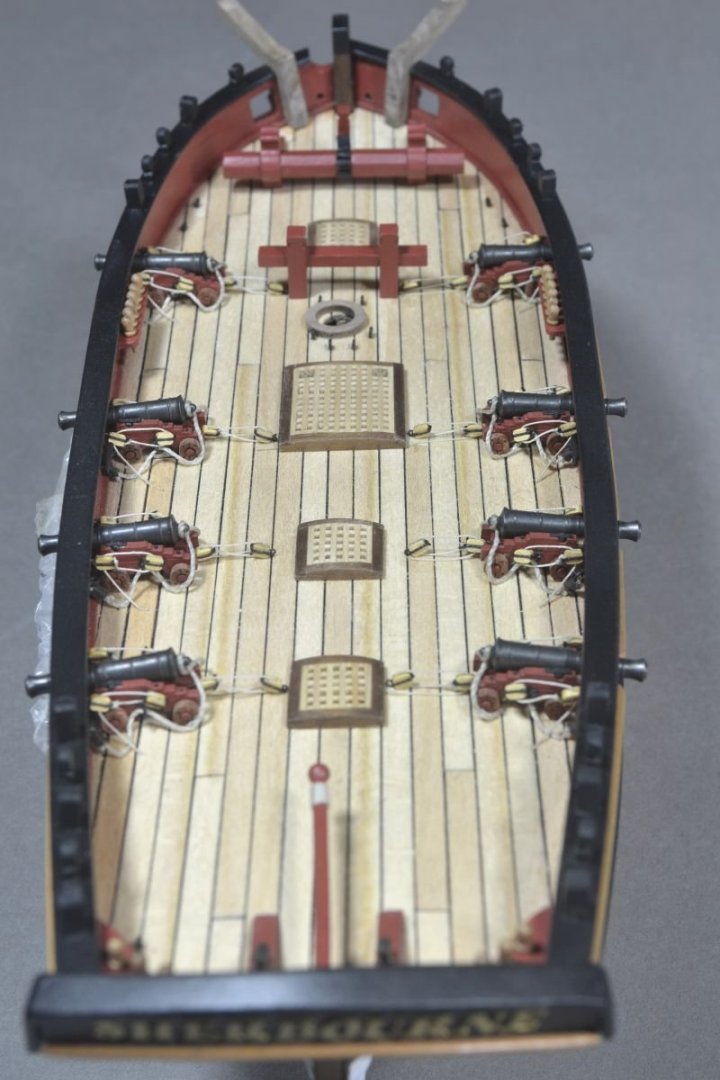
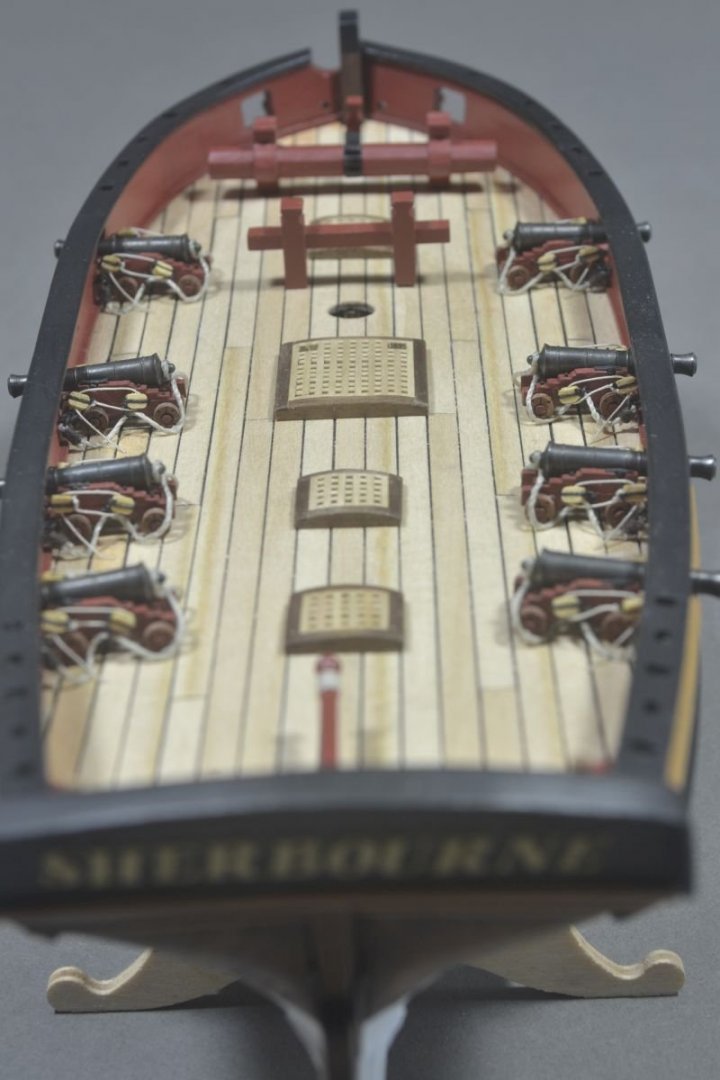
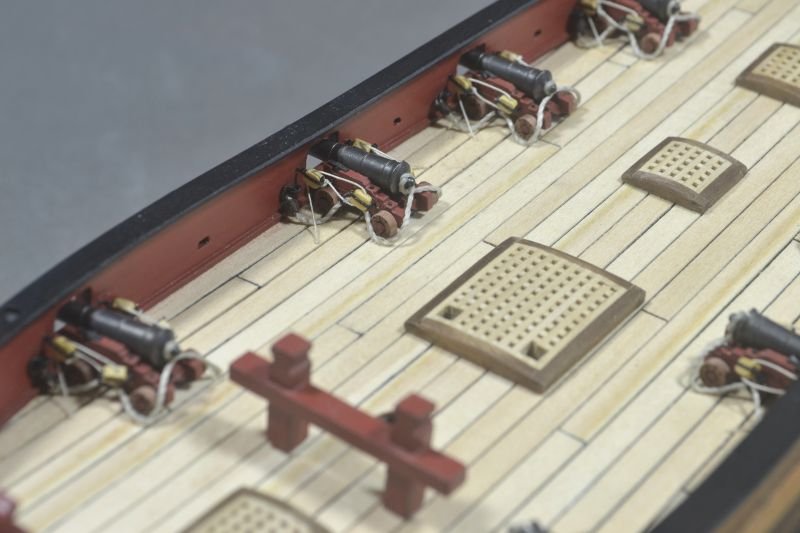
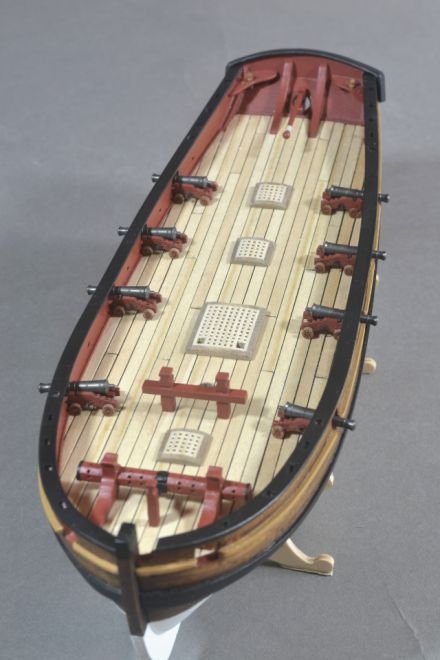
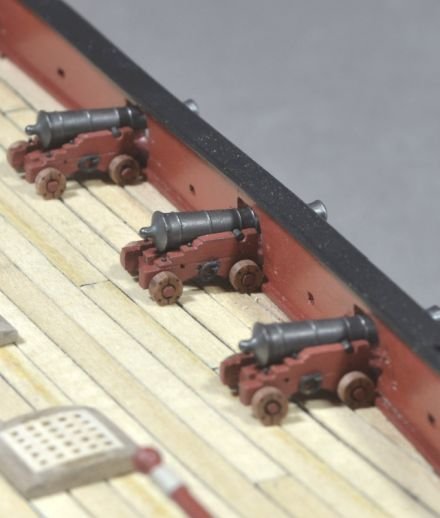
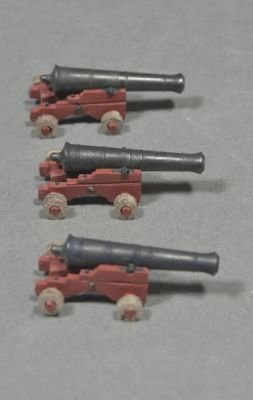
Hi - progress update. Guns fully rigged although I haven't seen anyone do the rear rigging so far so maybe I'm missing a trick here. Thank you for your kind comments Blue Ensign and Edwardkenway but I feel my rigging is a bit clumsy and not realistic - maybe make the rope hang more naturally or frapp them (hopefull right term). Blocks look too large. Other bits and pieces added -cleats, belaying racks (possible should be fitted slightly higher), timberheads and catheads (dry fitted). Pumps made - although it took a few attempts. Used kit parts but trimmed / thinned them down. Afraid they don't look too good close up. BenD - Please don't throw your Sherbourne in the bin as I am using yours as a good guide to help me with this build. Regards Doug
- 40 replies
-
- 6
-
-
- sherbourne
- caldercraft
- (and 1 more)
-
Hello Liam Have fun doing the rigging of the cannons - very fiddly 🙂 Used 0.75 thread for main restraining rope and 0.10 for the other bits. Nice to see another Sherbourne. Regards Doug
- 46 replies
-
- 1
-
-
- caldercraft
- sherbourne
- (and 1 more)
-
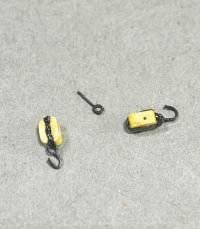
Hello - an update on the cannons. Now nearly completed rigged up - just the rear set up to do. First I had small hooks attached made from very small eyelets to the 2mm blocks but when put in place the blocks were just about touching so just fixed eyelet into carriage side and bulwark. Difficult not to make it all a bit out of scale and clumsy. Have filled the rather bad holes in winch. Thanks for looking in and the encouraging comments and likes. Regards Doug

- 40 replies
-
- 9
-
-
- sherbourne
- caldercraft
- (and 1 more)
-
Hello - a quick update as I am awaiting on some bits to rig the cannons. The cannon carriages are from Chris Watton - so thank you Edwardkenway for your help there. Like the detail to the wheels. Hatches made and placed in situ not glued as yet plus some other deck fittings. Some rather bad square holes put in the winch🙁 Thank you for looking in and the comments / likes. KevW good luck with your Sherbourne - look forward to seeing it. Regards Doug

- 40 replies
-
- 6
-
-
- sherbourne
- caldercraft
- (and 1 more)
-
Sorry - just realised it was Chuck Passaro I contacted and not Chris so I will try Chris Watton. Thank you for all for your help. Regards Doug
- 40 replies
-
- 1
-
-
- sherbourne
- caldercraft
- (and 1 more)
-
Hello Edwardkenway - yes I asked Chris but he said he doesn’t have anything that size (3 pounder) and didn’t think anywhere else would. I will look on his site again - maybe the smallest size carriage he does might be okay as the kit supplied carriages look a little bit small for the barrels and fiddly to fully rig. Thank you.
-
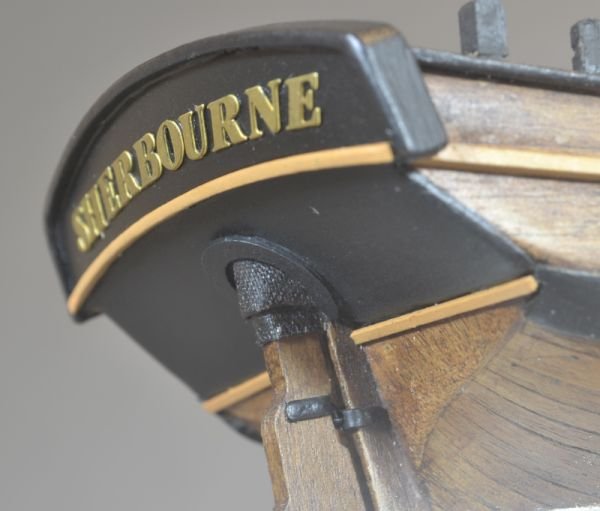
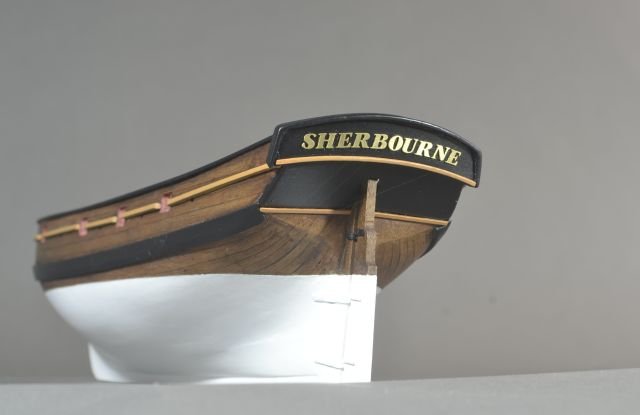
Okay - quite a few steps on. Hull painted white as you can see. Rudder pintells etc made from scrap brass with small drops of pva glue to simulate bolts or at least trying to. Name placed on stern - not painted just kept it brass. Was tricky to do as letters are in italics and being placed on a curve the left half of the word always looked more upright than the right half which looked like it was leaning more. Constantly was scrambling on the floor looking for lost letters - was wondering at times if I might have to shorten the name or come up with something different. Some cannons partly made up. Tried to find another supply in box wood as the wood for the carriages and wheels wasn't very good but with no success. So will continue with what I have. Bolts fitted to carriages as well as a groove scored and the straps are black tape. Barrels seemed to want to point downwards Tiller was remade as the supplied one didn't look right. Thank you Ryland Craze and Edwardkenway for your kind comments. Thank you for looking in. Regards Doug
- 40 replies
-
- 7
-
-
- sherbourne
- caldercraft
- (and 1 more)
-
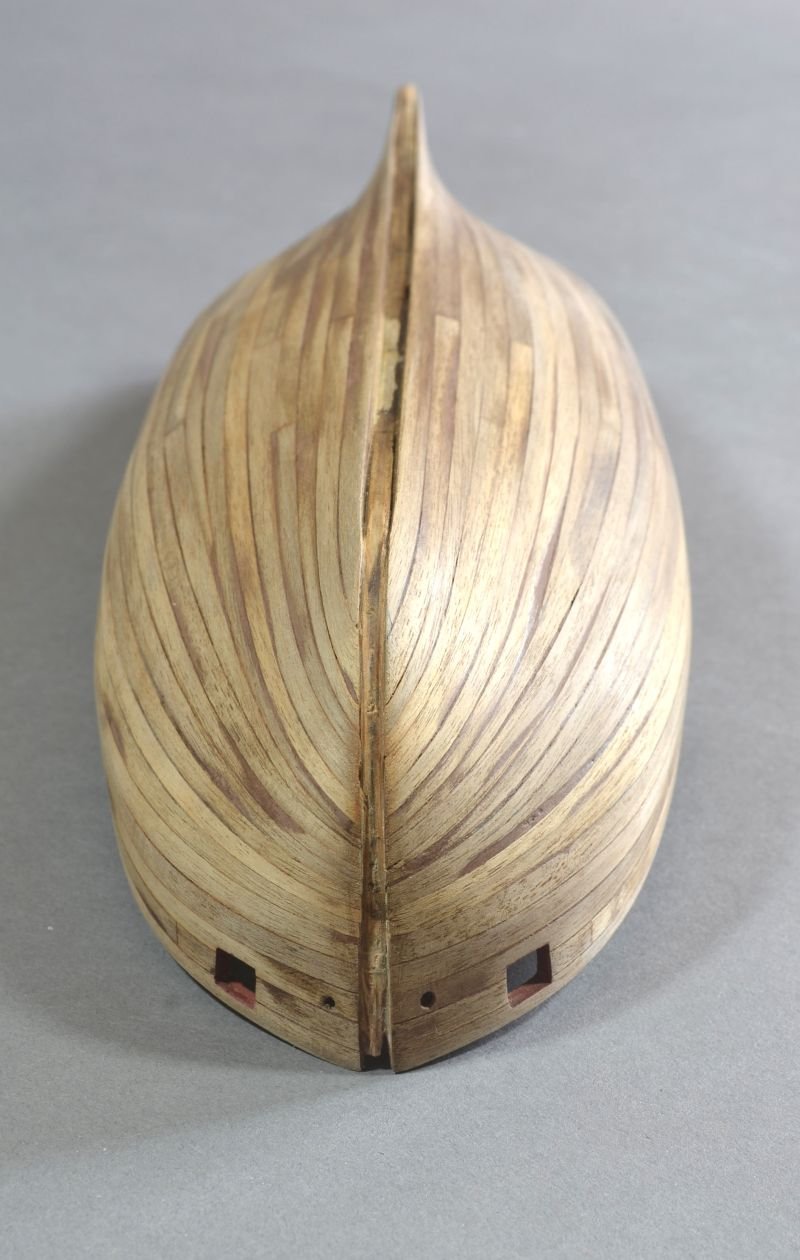
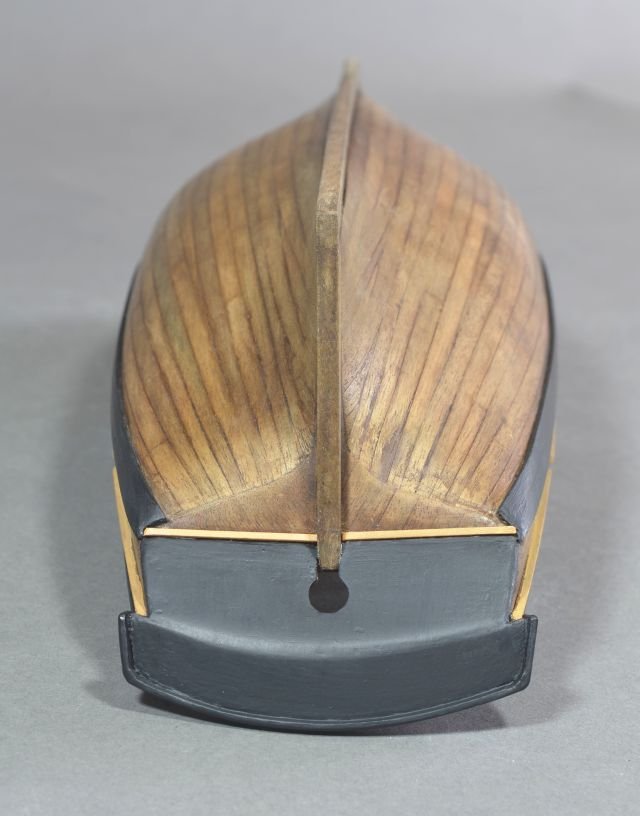
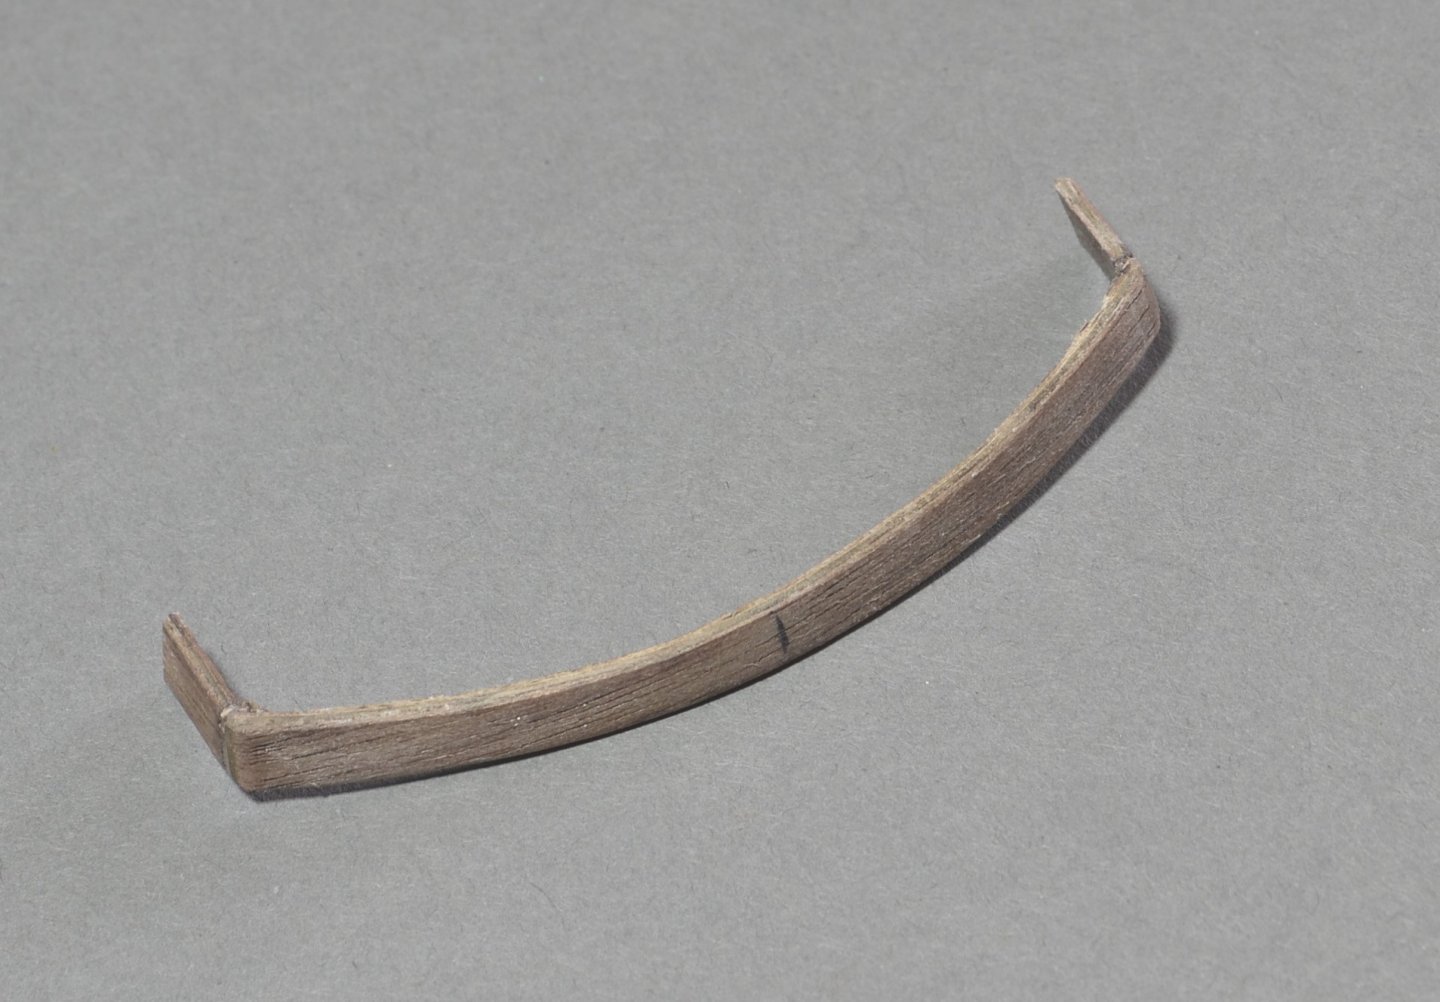
Hello - Hull nearly complete with the wale attached. The Wale was a little tricky but got there. For some reason the Keel was a fraction too short - probably due to my dodgy build work - so a bit was added. Capping rail in place plus trim. Borrowed from that great builder Dubz - a bit of support / belaying pin rack at the stern which I have since see another builder had the same idea on his Sherbourne. Just wish I could also borrow Dubz's skill........ The Bowsprit opening in place. Thanks for the 'Likes' on previous post and thank you for looking. Next is to paint lower hull section white. Regards Doug
- 40 replies
-
- 11
-
-
- sherbourne
- caldercraft
- (and 1 more)
-
Hello Duncbe - Gutermann black thread. I use this thread as it’s not fuzzy but the method is probably frowned upon as everyone uses pencil or something similar on the edges. Using the thread makes the caulking look a bit wide (not to scale) but I like it and have used it on all my builds. Thank you for the nice comment Regards Doug
- 40 replies
-
- 4
-
-
- sherbourne
- caldercraft
- (and 1 more)
-
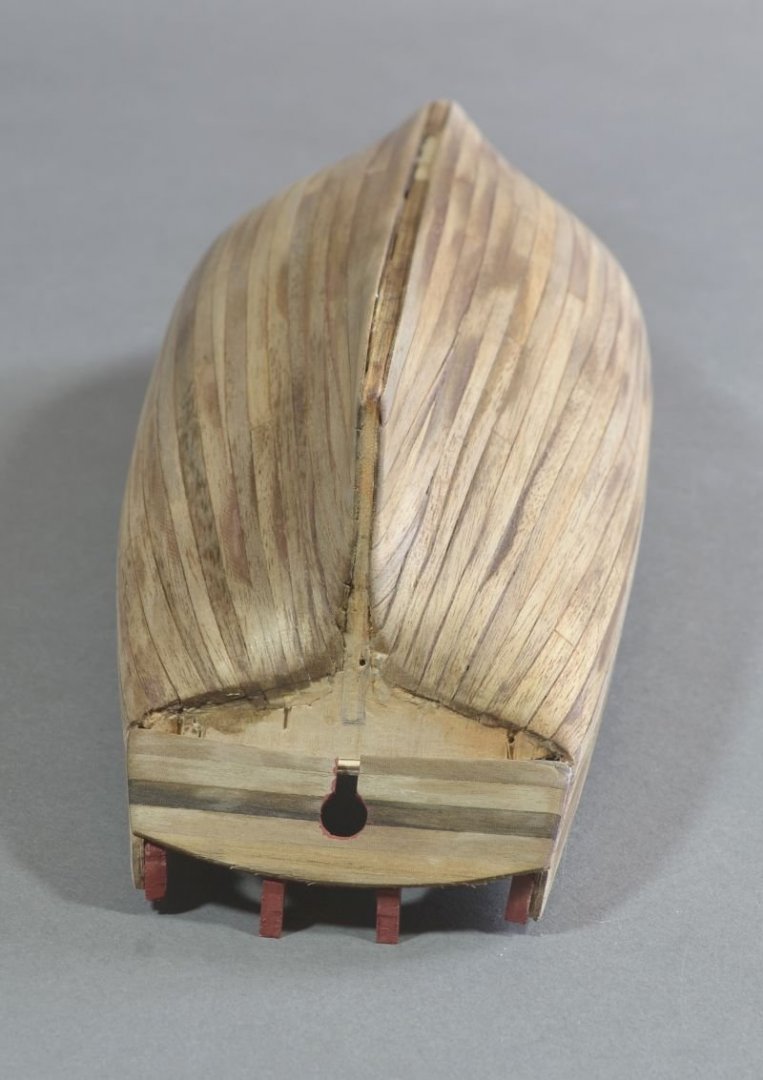
Hello - some further progress. The second hull planking complete. Not brilliant but am painting lower half white so hopefully things might improve. Made a top rail for the stern. It was done from scrap wood in three pieces - first made a template from card. Next will be the wale and keel sections added. Again thanks for looking and the 'Likes' Regards Doug


- 40 replies
-
- 12
-
-
- sherbourne
- caldercraft
- (and 1 more)
-
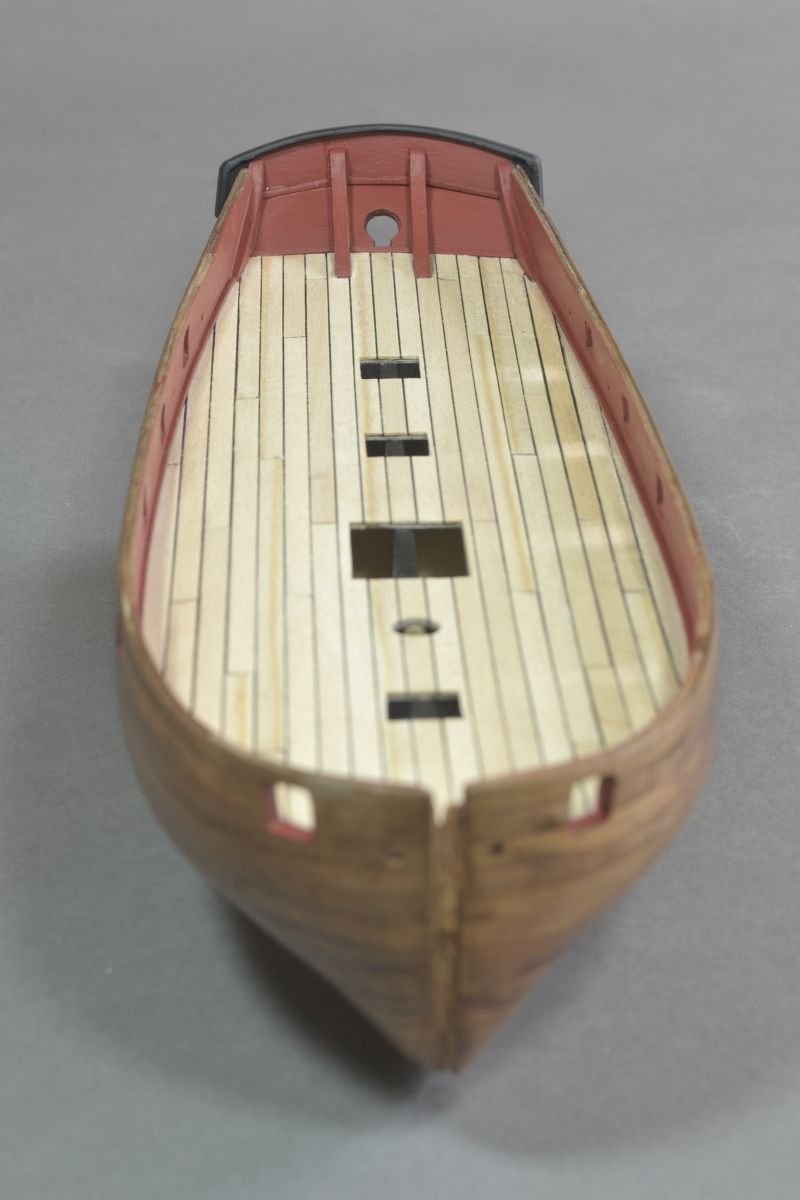
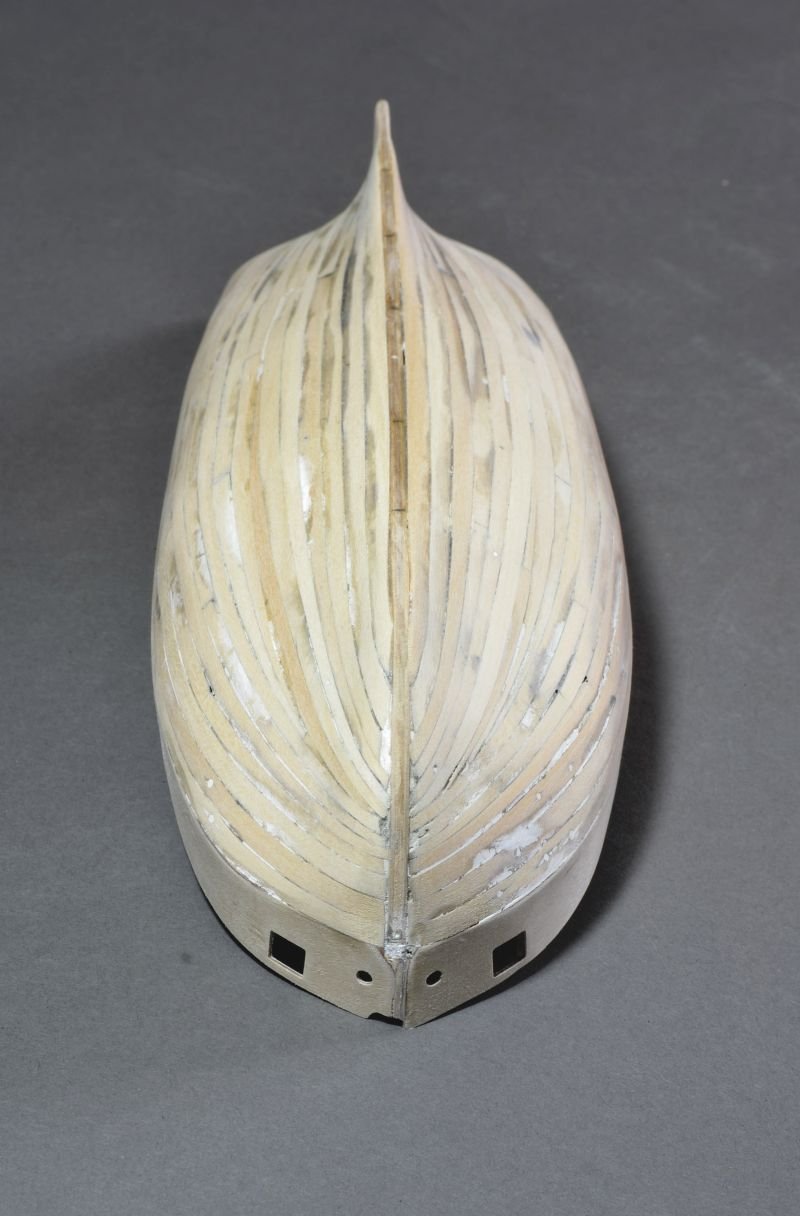
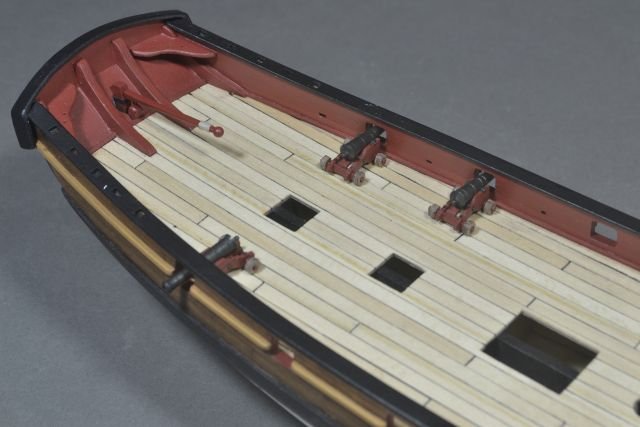
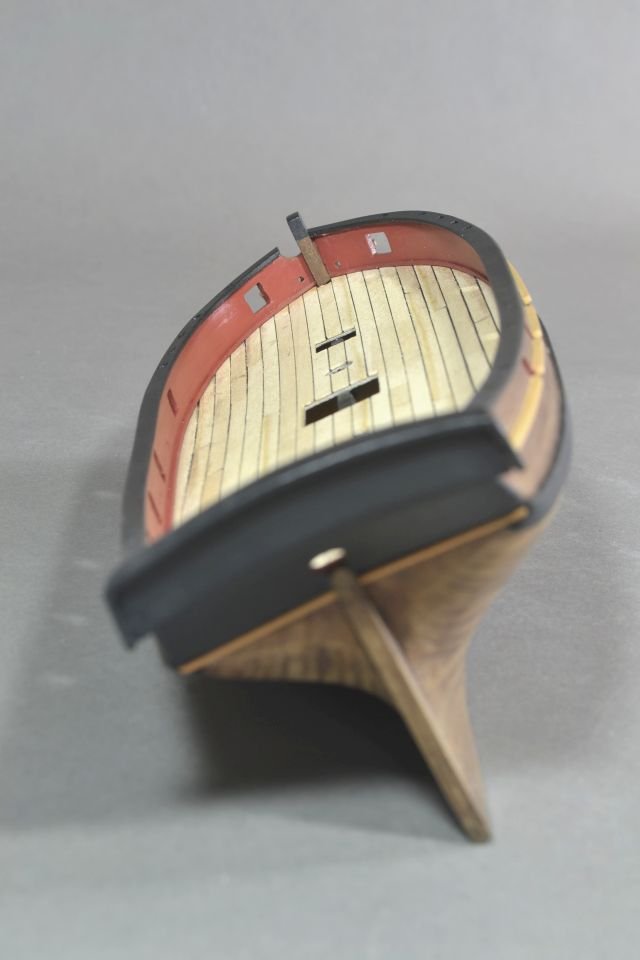
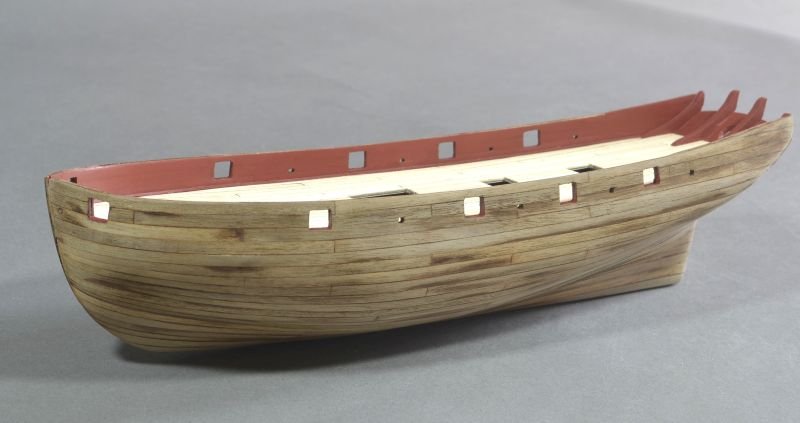
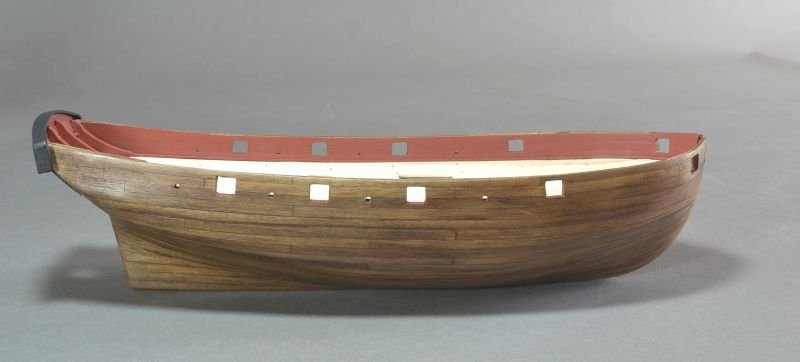
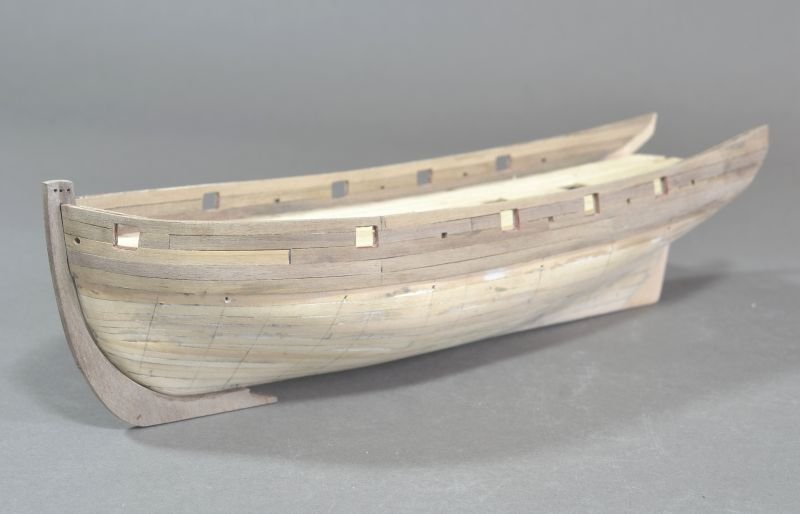
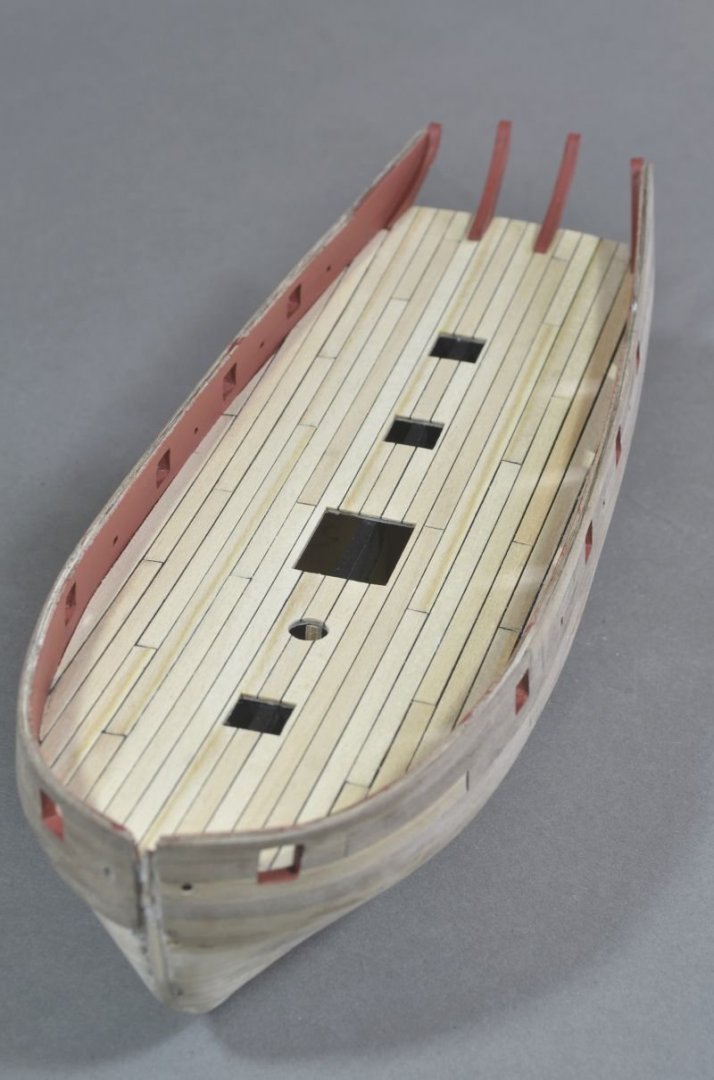
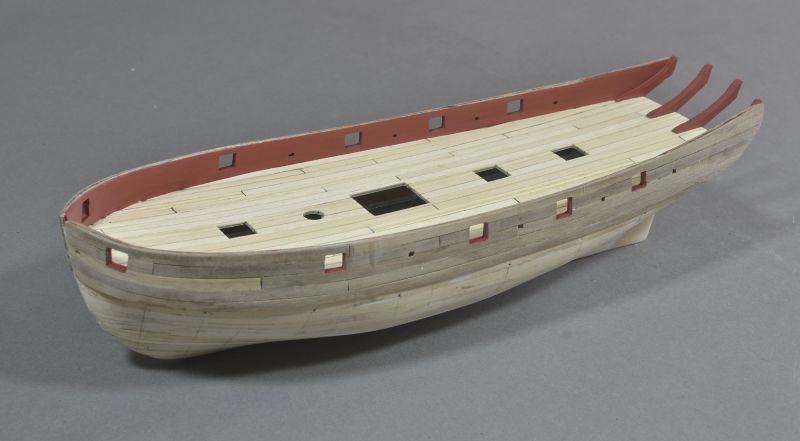
Hello - a small update. 2nd planking started. Have started where the wale will be so the corner at the stern will easier to deal with and then work up. This left slithers of planking to be added at the stern. Then the inner Bulwarks were done. Not good at filing the gun ports so prior to planking inside and out painted the edges of gun ports of the ply in red so as to keep a check on filing / sanding. I have found myself not following the order of building from the instructions so no doubt this is going to end in tears. Deck planking done. Thanks for looking and the 'Likes'. Regards Doug

- 40 replies
-
- 11
-
-

-
- sherbourne
- caldercraft
- (and 1 more)
-
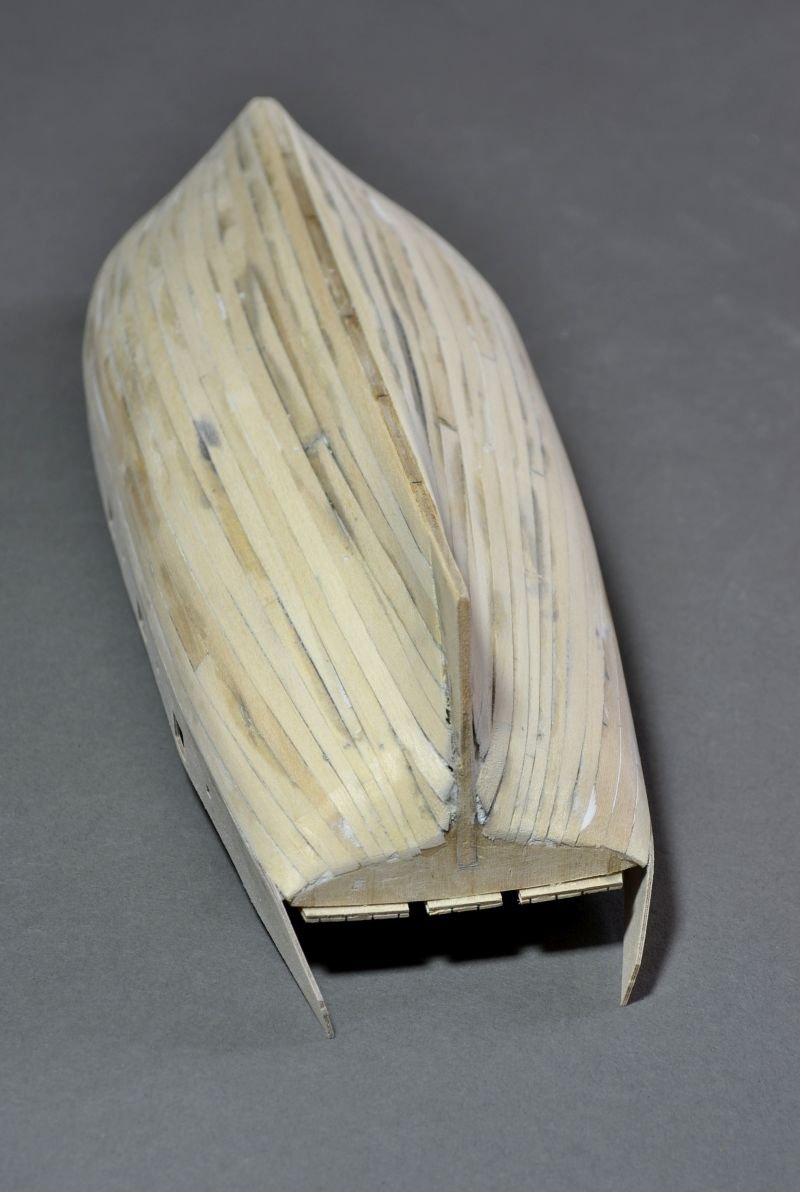
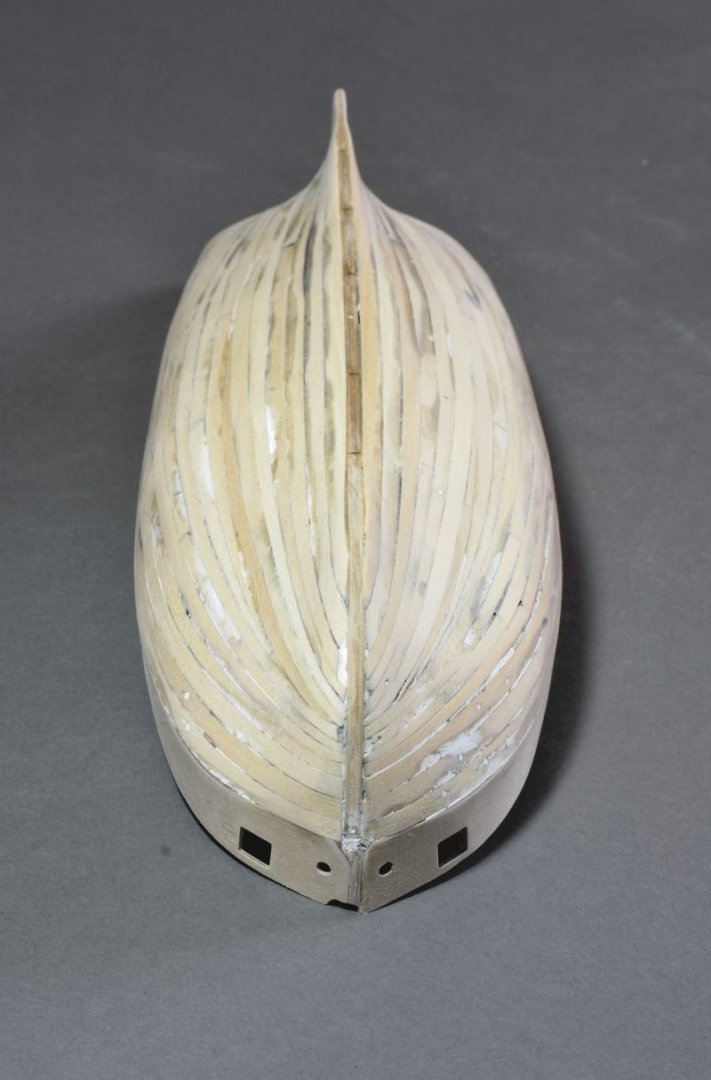
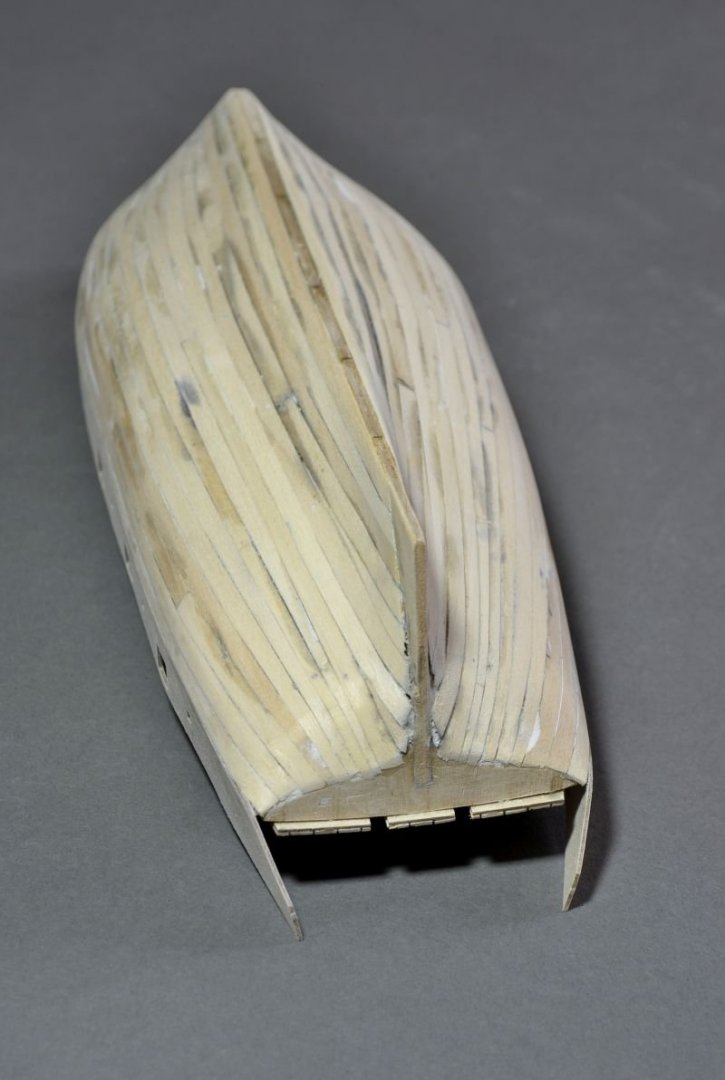
Hello - a bit further on. The gun port strips added. Next stage first planking. Not pretty but hopefully a good enough base for second planking. It's tempting to keep sanding but risky. Anyway thank you for looking in and the likes on the previous post. Regards Doug


- 40 replies
-
- 10
-
-
- sherbourne
- caldercraft
- (and 1 more)
-
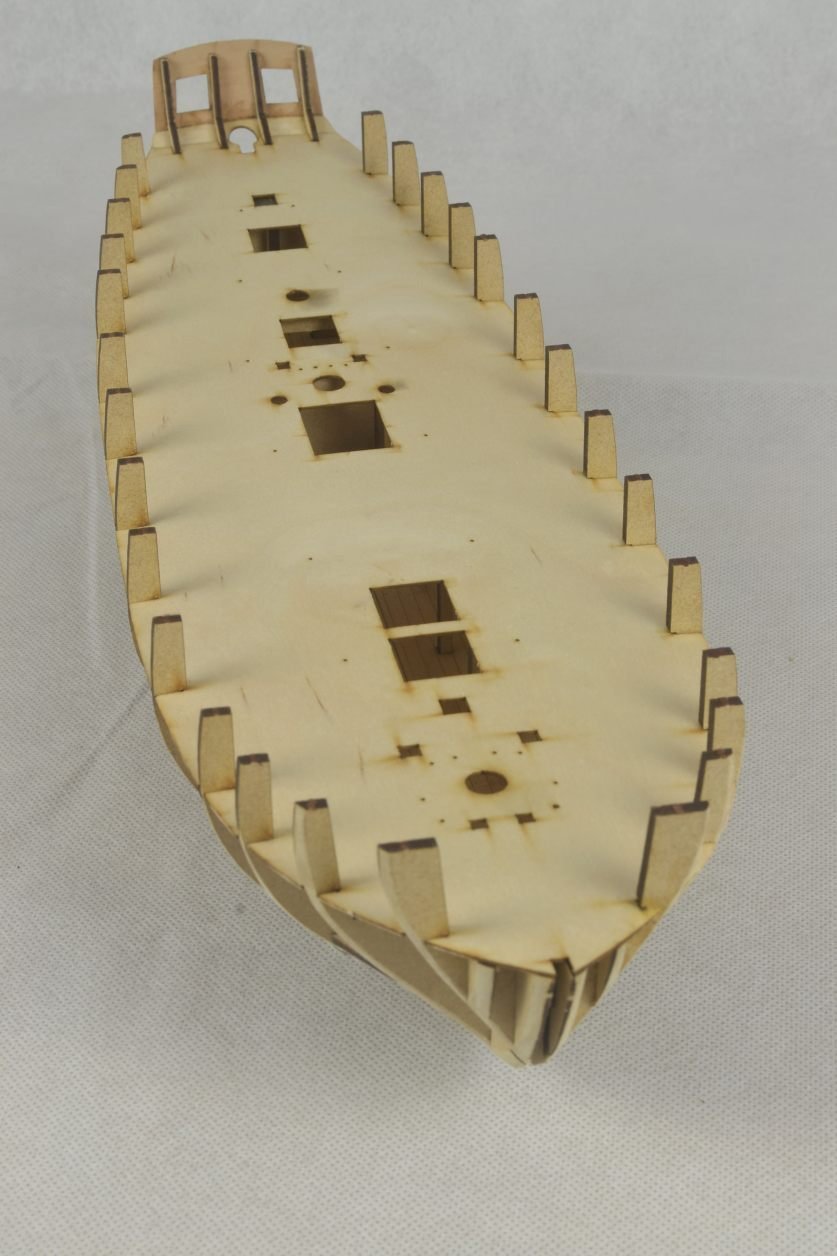
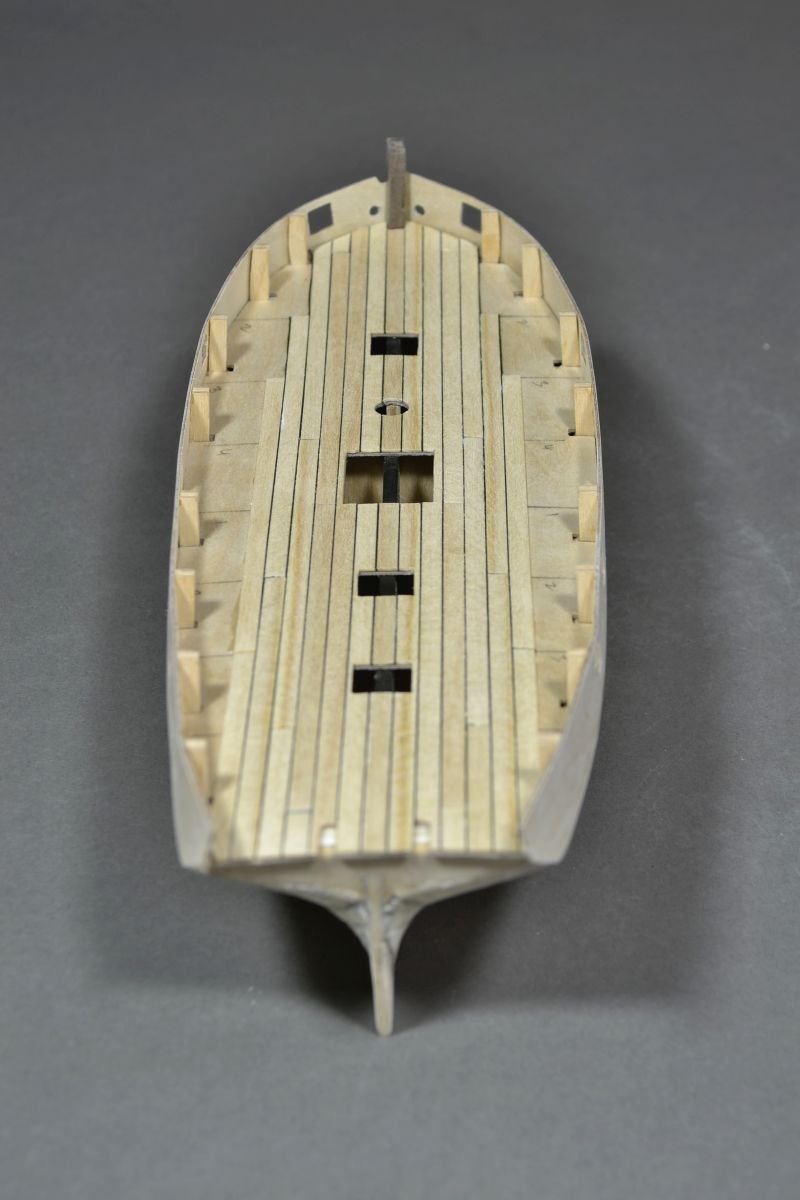
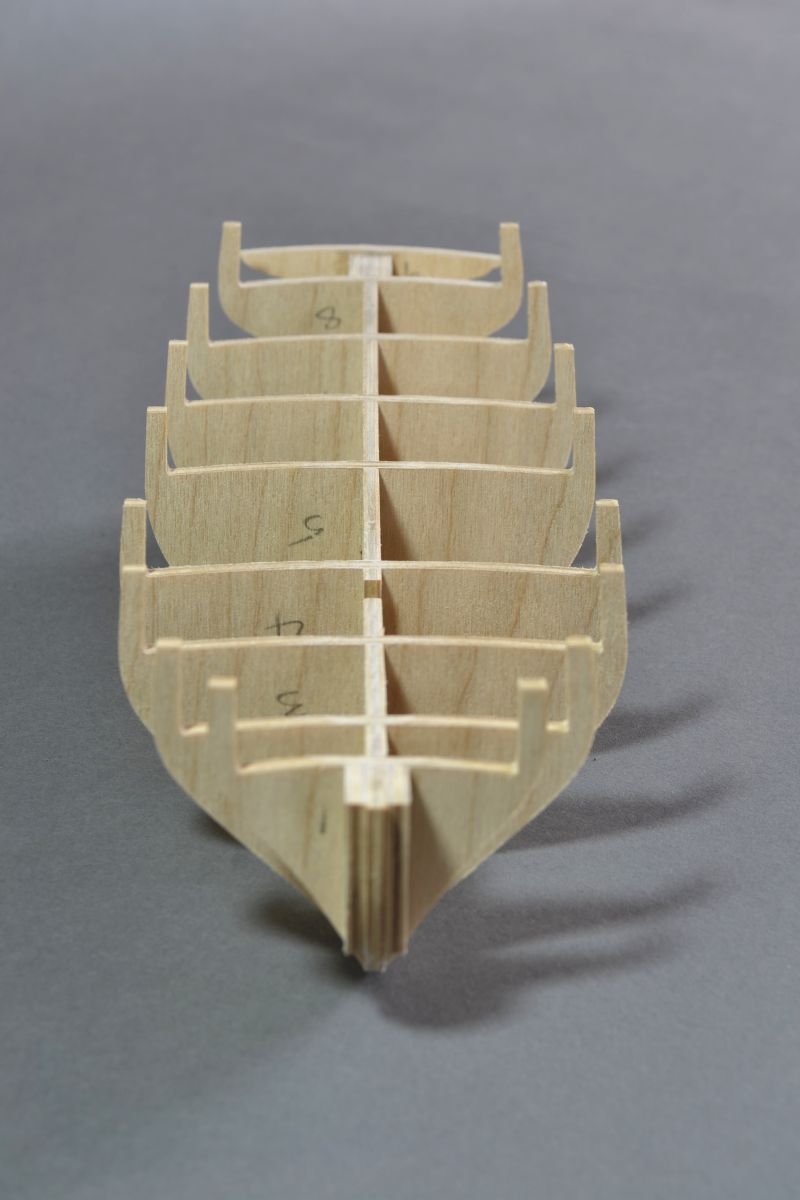
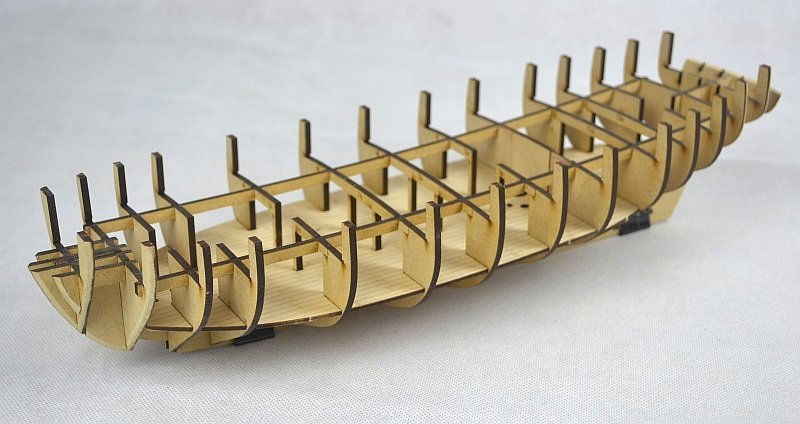
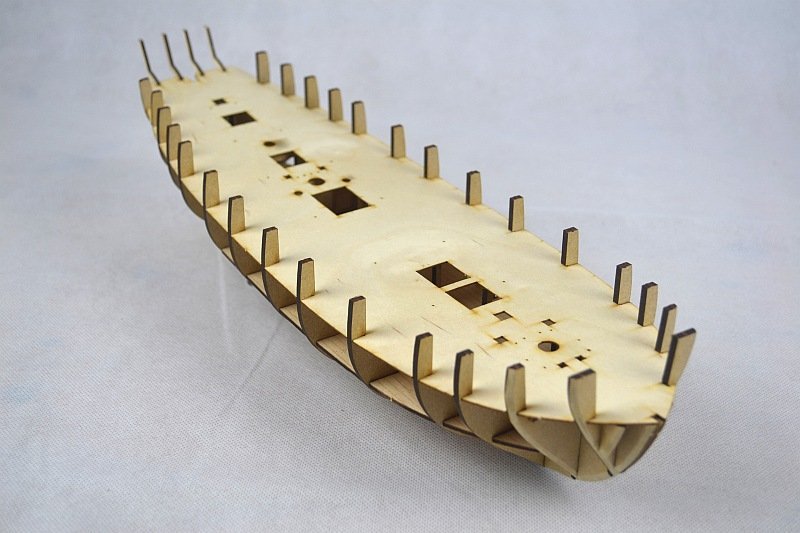
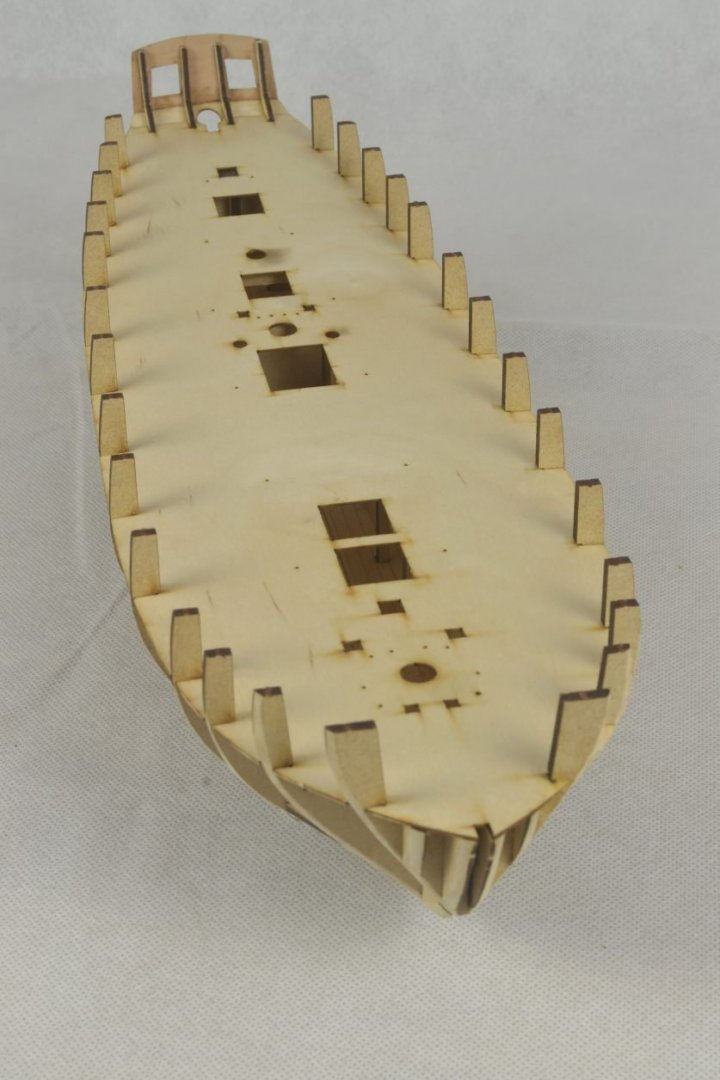
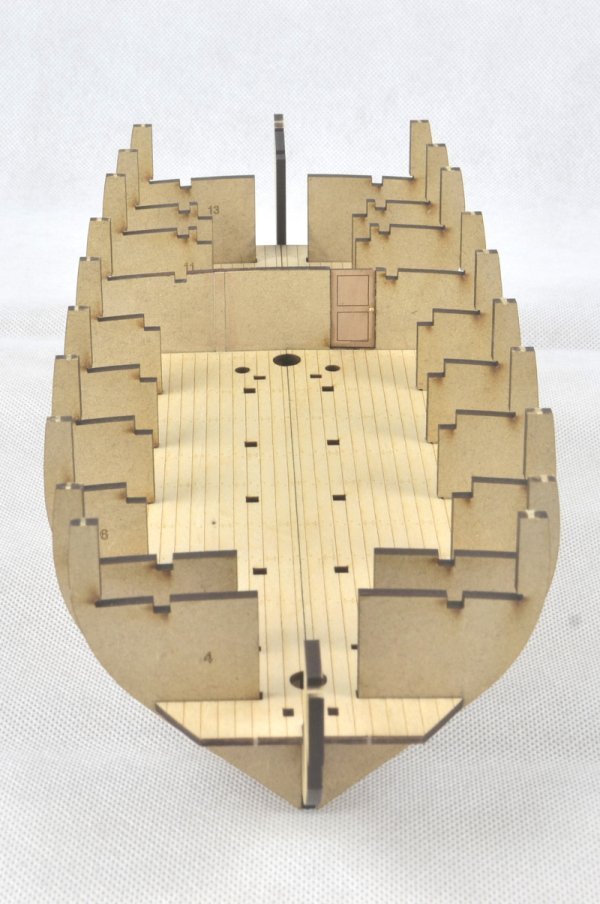
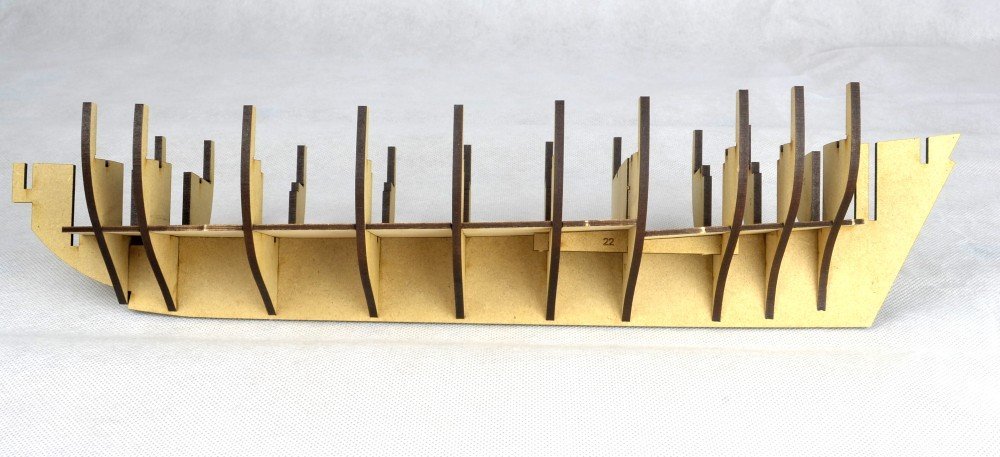
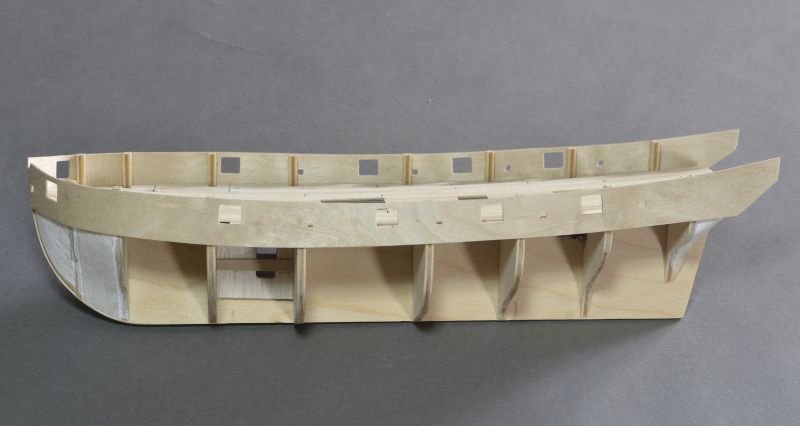
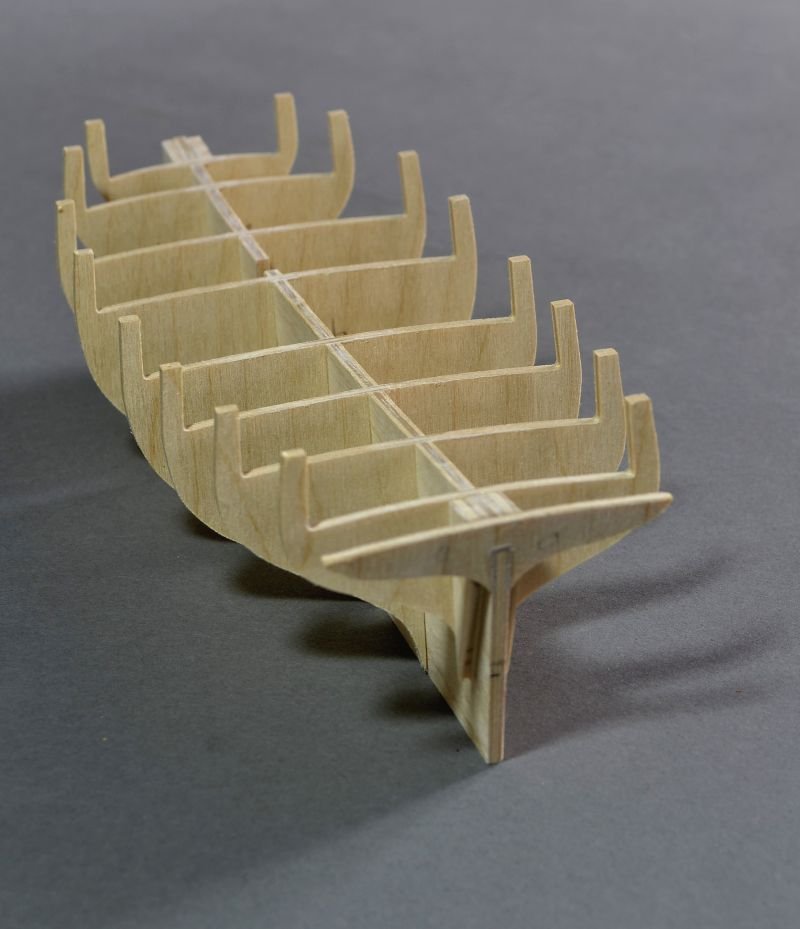
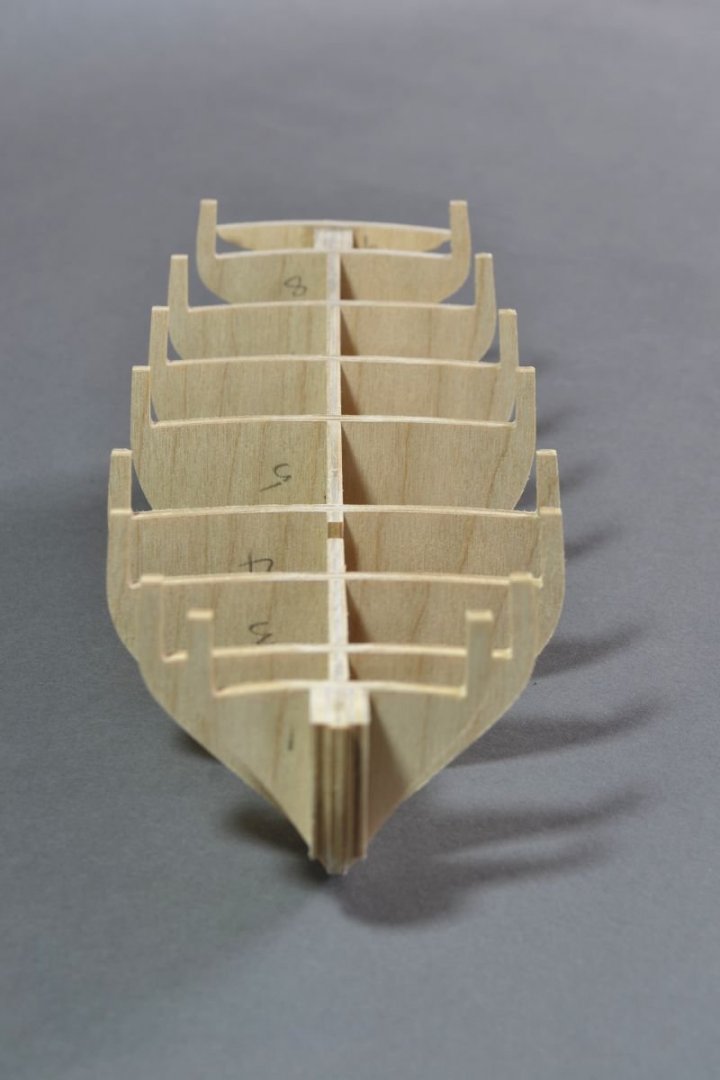
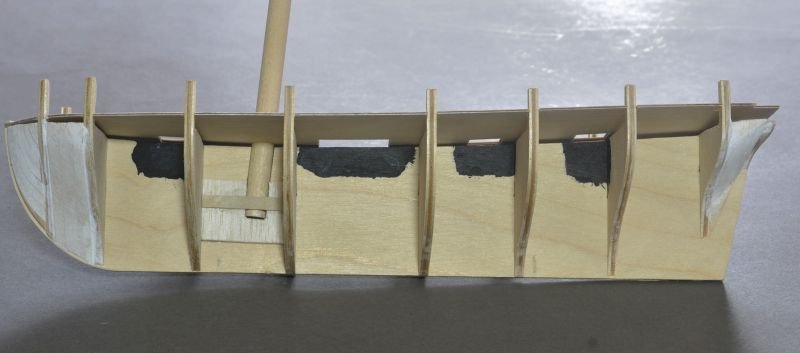
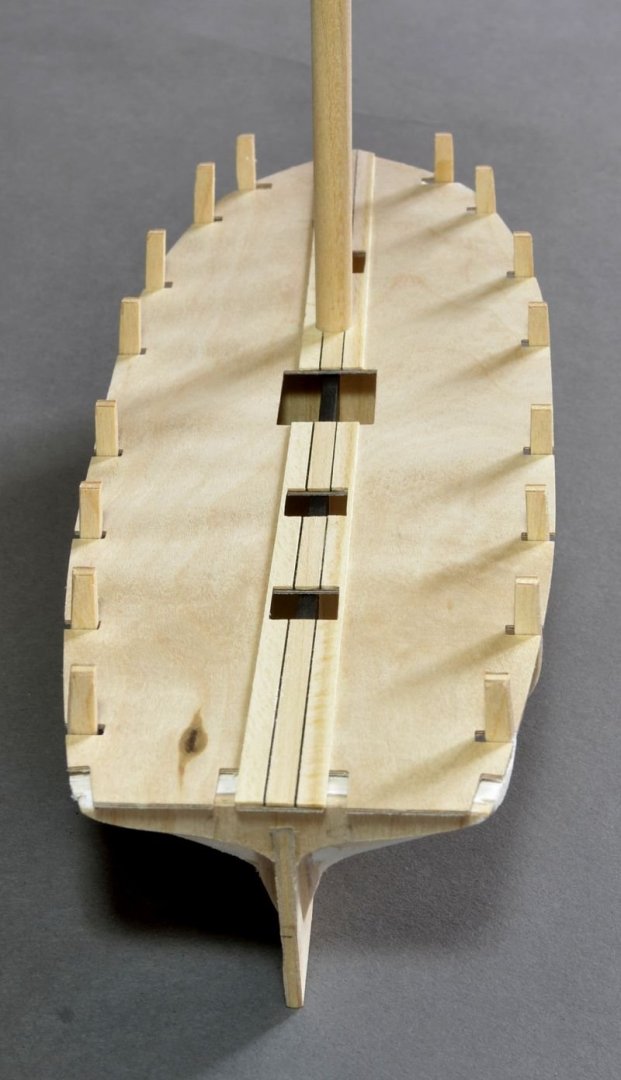
Hello - Thought I'd do a smaller kit so hopefully it will not take quite so long. The first steps done with the bulkheads. Next the balsa filler bits bow and stern plus a bit of support for the mast. The ply decking sheet dry fitted so as to lay the central planking with access to trim around hatches etc. It's good to see there are currently other Sherbourne builds going on at the moment so I'll be able to learn what to do. Thanks for looking in. Regards Doug
- 40 replies
-
- 9
-
-
- sherbourne
- caldercraft
- (and 1 more)