HOLIDAY DONATION DRIVE - SUPPORT MSW - DO YOUR PART TO KEEP THIS GREAT FORUM GOING! (Only 68 donations so far out of 49,000 members - Can we at least get 100? C'mon guys!)
×


rvchima
-
Posts
697 -
Joined
-
Last visited
Content Type
Profiles
Forums
Gallery
Events
Everything posted by rvchima
-
 Augie, You Syren is an inspiration. I can hardly wait to get back to work. Rod Sent from Wrangell-St. Elias National Park, Alaska. (I'll bet you would like the fishing here!)
- 1,668 replies
-
- 1
-

-
- syren
- model shipways
- (and 1 more)
-
1/2 hour until I leave for the airport for Anchorage and I'm in the basement tying foot ropes.
-
Bob, Good to hear from you. I was wondering what happened to your build. Frank Mastini's book "Ship Modeling Simplified" has several pages about sails, mostly discouraging you from building them. It does cover a lot of the extra rigging needed for sails. I am sure not the person to ask about sails but I used to make kites and am quite comfortable around a sewing machine. A 1/4" hem is easy but a 1/16" hem will be tough. That could be less than the distance between the needle and presser foot. You can try running a glue stick down the edge of the cloth and folding against a straight edge or over a stretched thread. A touch with a warm iron will set the glue, or a bit of rubbing alcohol will loosen it. Then stitch through the glued hem. I just posted a photo of my yards at http://modelshipworld.com/index.php?/topic/440-us-brig-syren-by-rvchima-model-shipways/page-6 The background is a photo backdrop cloth made of thin muslin. To me it looks perfect for sail material. Hopefully someone else will chime in with better suggestions. I am looking forward to seeing your ship under sail! Rod
-
By "worse" I mean "harder than." Sorry honey.
-
Dirk, You say that you know to put down the model and listen to your wife, but you are building two models at once. That is worse than having two wives! But they sure are beautiful. Rod
-
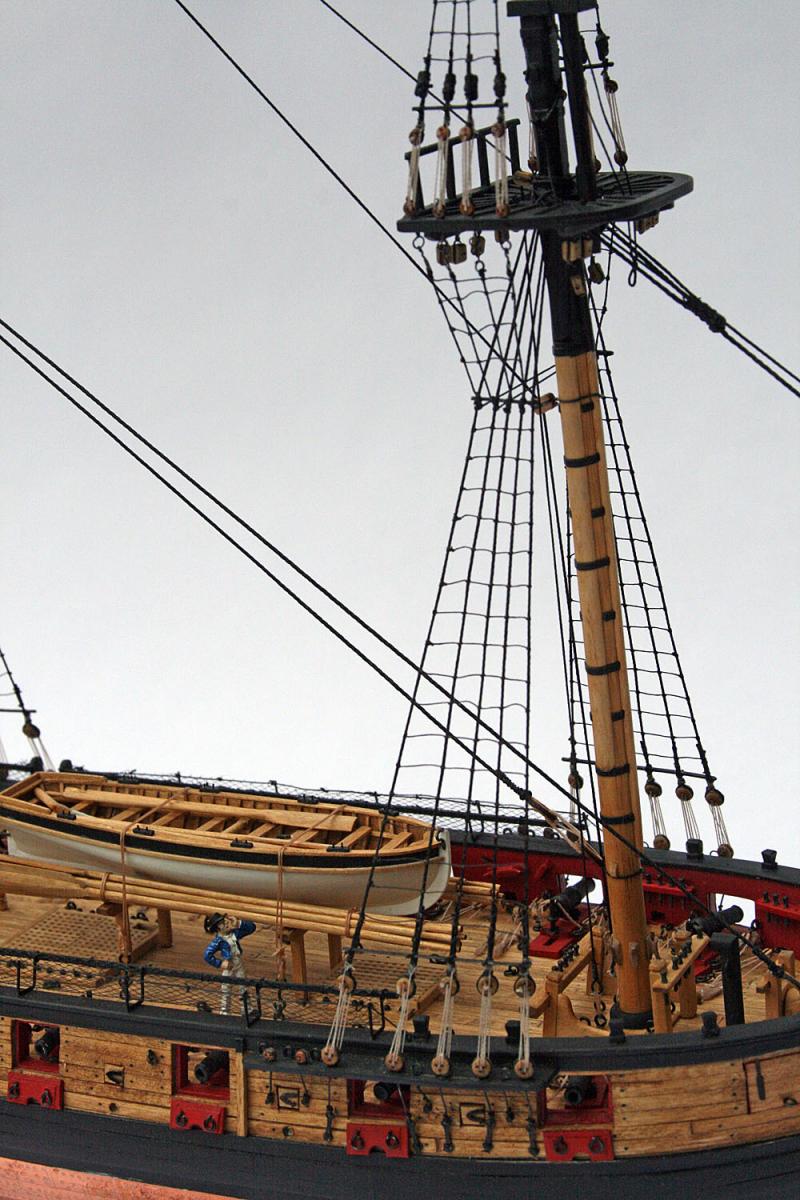
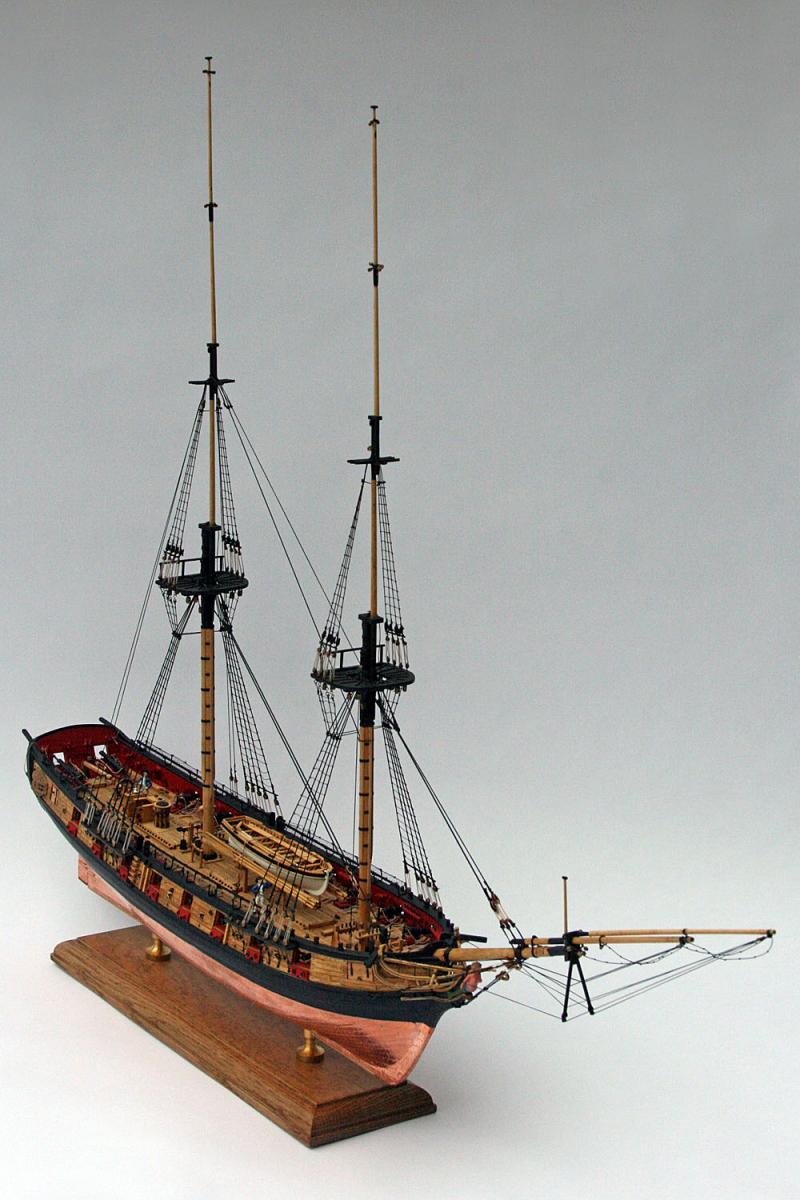
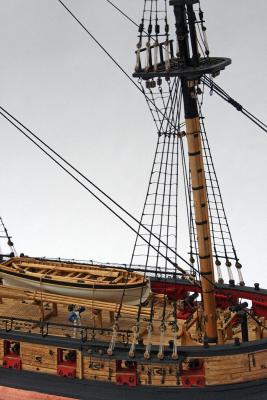
Yards In Progress 25 weeks, 437 man-hours The lower yards are complete, but I've only shaped the rest. After considering Augie's advice I decided not to paint the yards pink. Instead I decided to follow Chuck's scheme and paint them black. I kind of like the contrast between the black yards and the natural stuns'l booms. One piece of advice - if your wife calls from a business trip while you're tying blocks to a yard, put down the yard and listen to your wife. I tied a whole mess of blocks on the wrong side of the yard. Oops. (They're fixed now.) You won't hear from me for a while. Saturday we leave for a two-week land tour and cruise in Alaska. I'll post a photo of the cruise ship when I return.

-
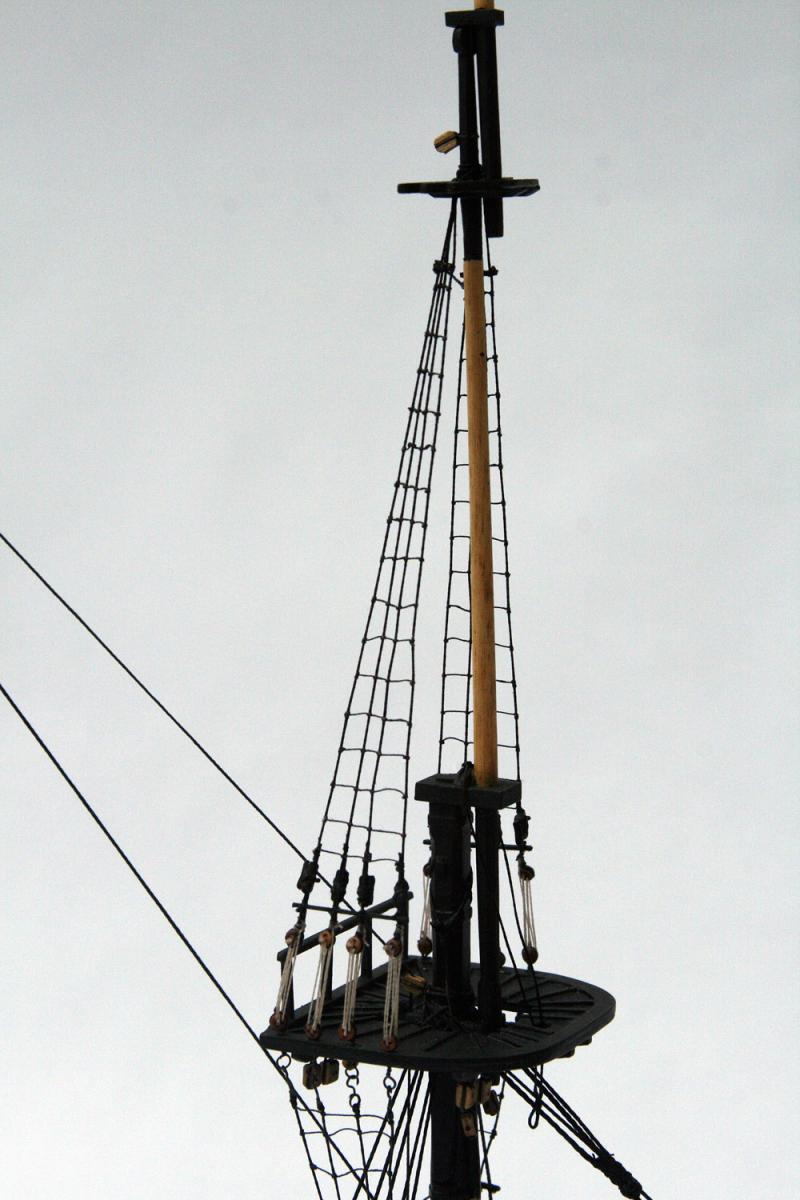
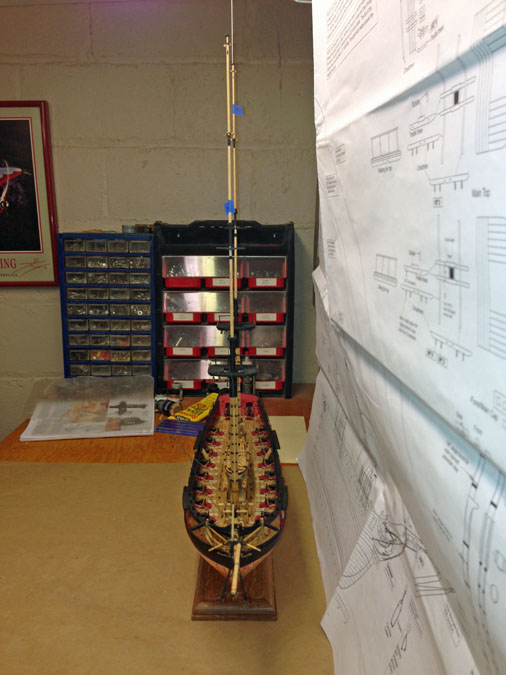
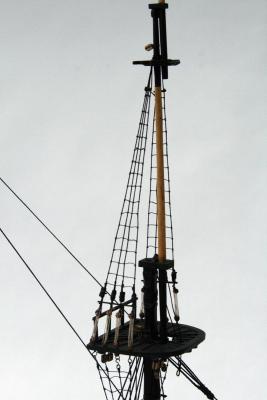
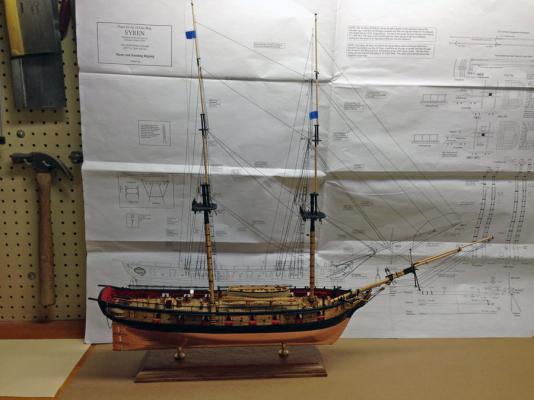
Standing Rigging Complete 24 weeks, 415 man-hours Amazing how complicated the foreward end of the ship is compared to the aft end.


- 127 replies
-
- 2
-
-
- model shipways
- syren
- (and 1 more)
-
Absolutely beautiful Augie! I am building yards now and can hardly wait to start rigging!
- 1,668 replies
-
- 1
-
-
- syren
- model shipways
- (and 1 more)
-
Augie, Thanks for the information about the staysail halliards. I can see now how the downhaul would be unhooked at the lower block, and the hallyards would be used to raise the staysails. Thanks also for the links to the Eye of the Wind website. The diagrams and photos of the sails really clarified things for me. I printed a photo of the Eye to hang in the workshop next to the Syren. I have just completed construction of the two lowest yards and am trying to decide whether to paint them or not. I was thinking that pink would look good with the red gun ports.
-
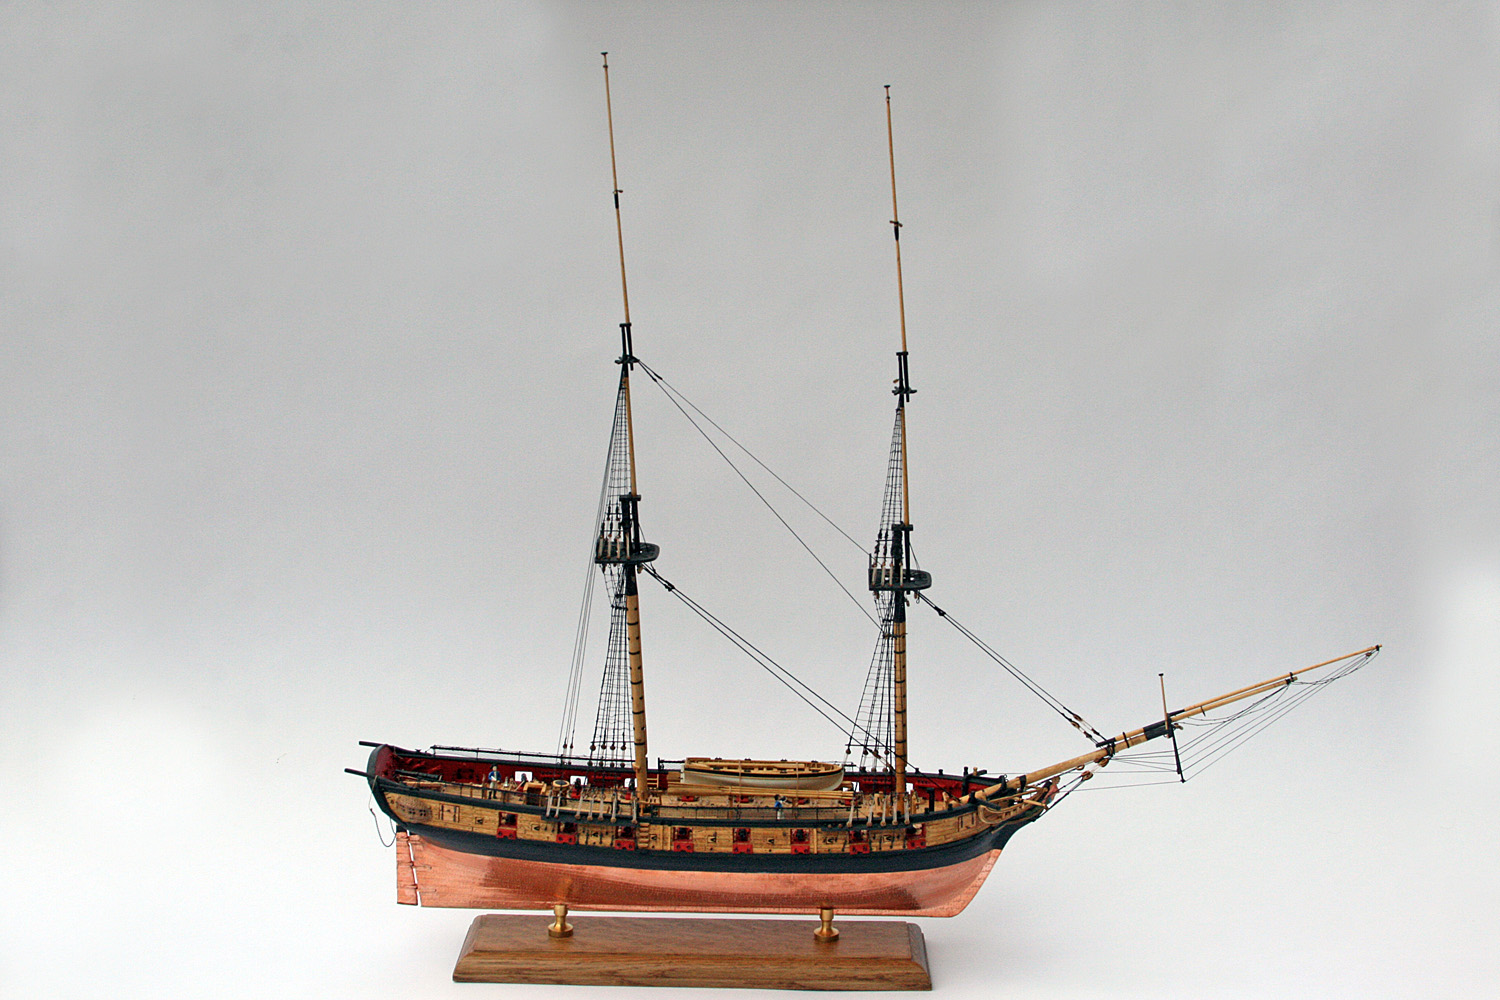
Does anyone have an image of a ship like the Syren under full sail? I am a total landlubber and don't quite know what the sails would look like on the Syren.
-
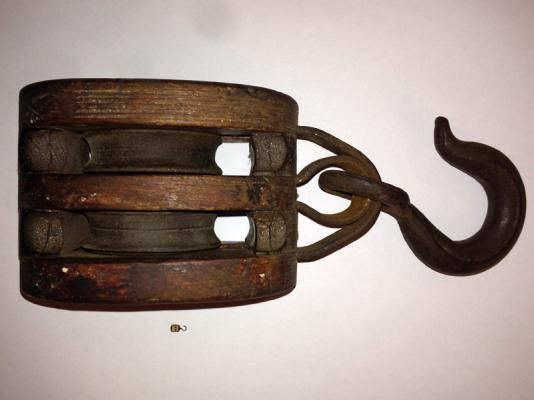
Trying for a more realistic look Ha ha, only joking. I went to an awesome antique show last weekend and had to buy this double block. Next to it is one from the kit for scale. When I finish the Syren I'll clean up the old block and hang it in a place of honor in my shop.
- 127 replies
-
- 5
-
-
- model shipways
- syren
- (and 1 more)
-
Trying for a more realistic look I've been experimenting with techniques to make the blocks look more realistic. Here's what I came up with.

- 127 replies
-
- 1
-
-
- model shipways
- syren
- (and 1 more)
-
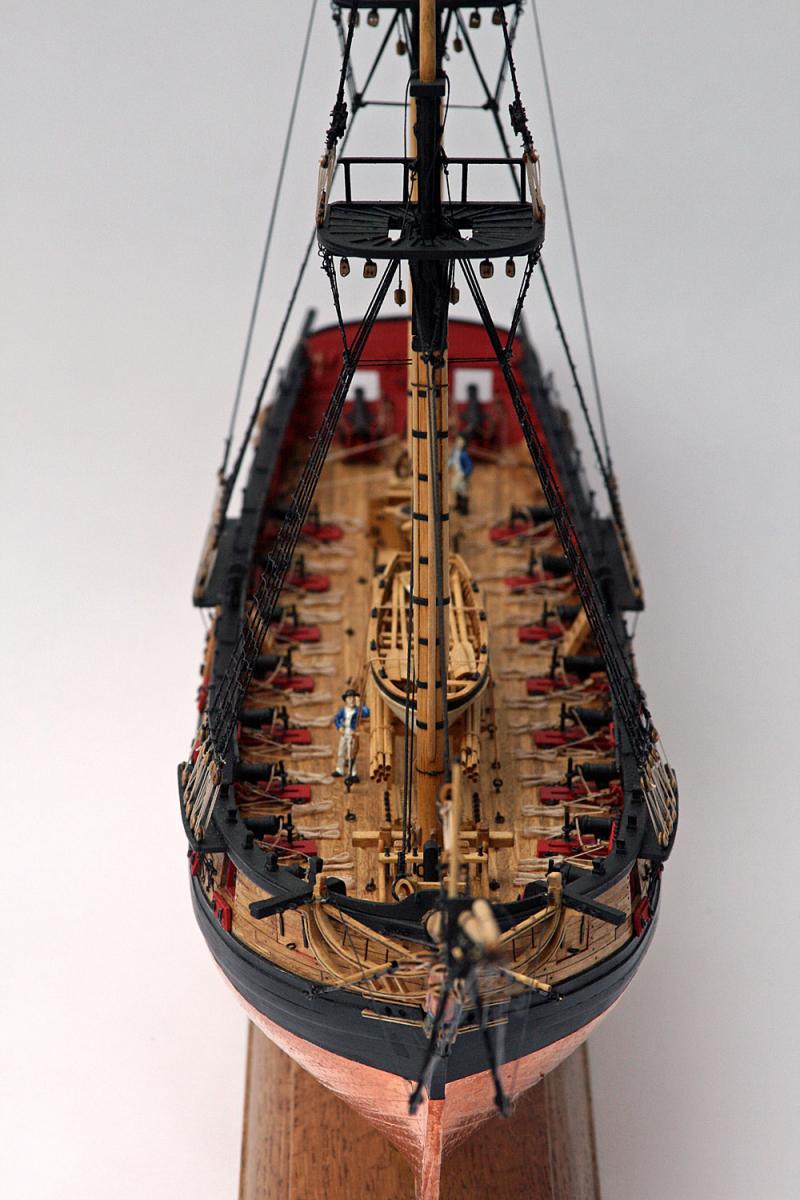
Hi Augie, I just finished all the staysail rigging, but I'm mystified about what it's all for. It seems that all ends of that rigging is belayed to something not useful. Would some of those lines be used for something when under sail?
-
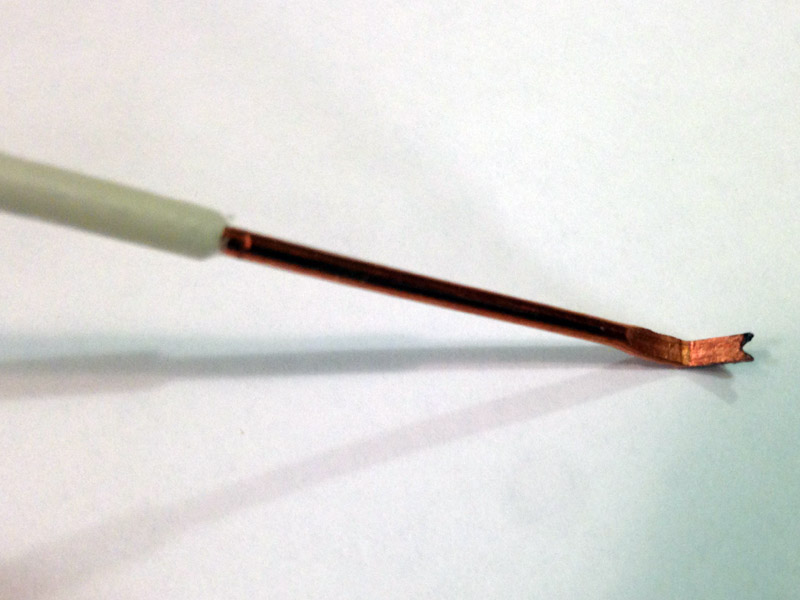
Belaying Tool I made this belaying tool from a piece of electrical wire. I stripped off about 2 inches of insulation and flattened the end with a hammer. I used a triangular file to cut a notch in the end and thinned the sides of the tool with my disk sander. After a little experimentation I put a 45 degree bend in the end to help with reaching under the belaying pin racks. Belaying is still a pain, but this tool sure helps.

-
Don't do this About 10 days ago I finished my standing rigging. I was excited that I could finally start cutting wood again for the boom and gaff, and reached across the bow to grab a dowel. My arm brushed the fore royal stay, and BANG, the fore topgallant mast snapped right off. I sure wish I had taken a photo because it looked SO pitiful hanging there tangled in rigging. But I took a deep breath, gently untangled the mast, put a drop of medium CA on the lower part, and pulled the topgallant back into place. The tension from all the lines was surprising, but it held the mast perfectly in place. I let the glue harden, then added two 1/16 by 1/32 braces fore and aft. I stained the braces to match, and all is well again.
-
Ratlines and Some Backstays Completed Last week my wife had business in Flint, MI, and I went along for the ride. While she was working I visited the Flint Institute of Art, which has an exhibit called Ship Shape, Models of Great Lakes Vessels. The exhibit has about 30 ship models, many freighters and side-wheelers. My favorite was a magnificent 5-masted ore carrier. As if 2 sets of rat-lines isn't hard enough. The exhibit runs through 6-16-13. If you're in the area it's worth a visit. Here's a link to their web site: http://www.flintarts.org/exhibitions/current/shipshape.html I also stopped in Rider's Hobbies in Flint. They had a nice selection of Model Shipways supplies, so I bought one of each size of rigging line. Good thing 'cause I just ran out of .018 black! After Flint we drove to Dearborn and spent a day in Greenfield Village and a day at The Henry Ford Museum. There were practically no nautical exhibits, but if you're into planes, trains, automobiles, or steam engines, WOW, what a great museum! That accounts for a week of no work on the Syren, but I have made some progress since my last post. My extra deadeyes arrived from MS, and I have finished the ratlines and some of the backstays. Here are some recent photos of the Syren. 20 weeks, 375 man-hours Lower shrouds and ratlines Upper shrouds and ratlines


- 127 replies
-
- 4
-
-
- model shipways
- syren
- (and 1 more)
-
Beautiful work Augie! Not only is your Syren much neater than mine, but so is your workbench.
-
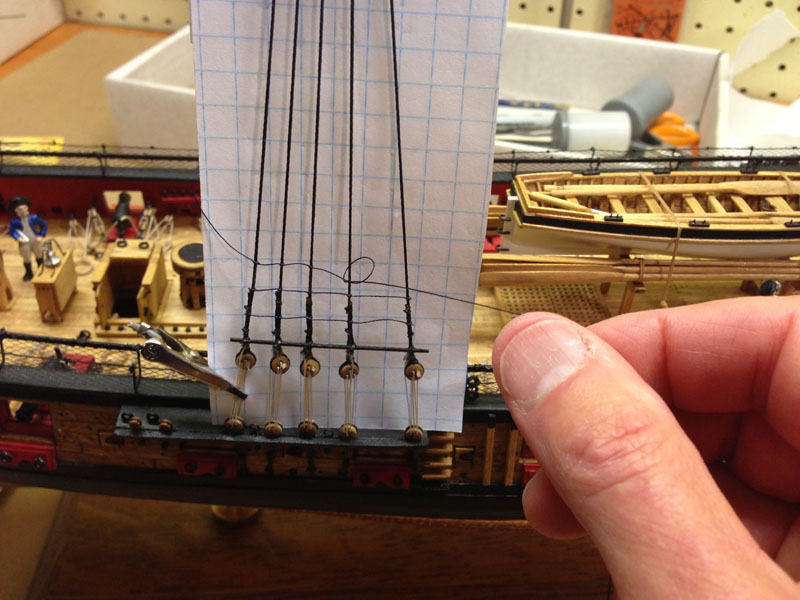
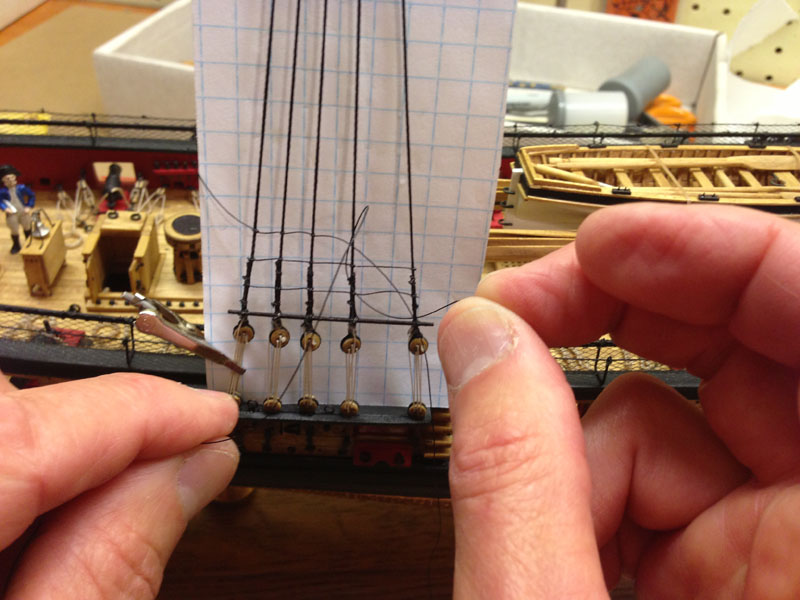
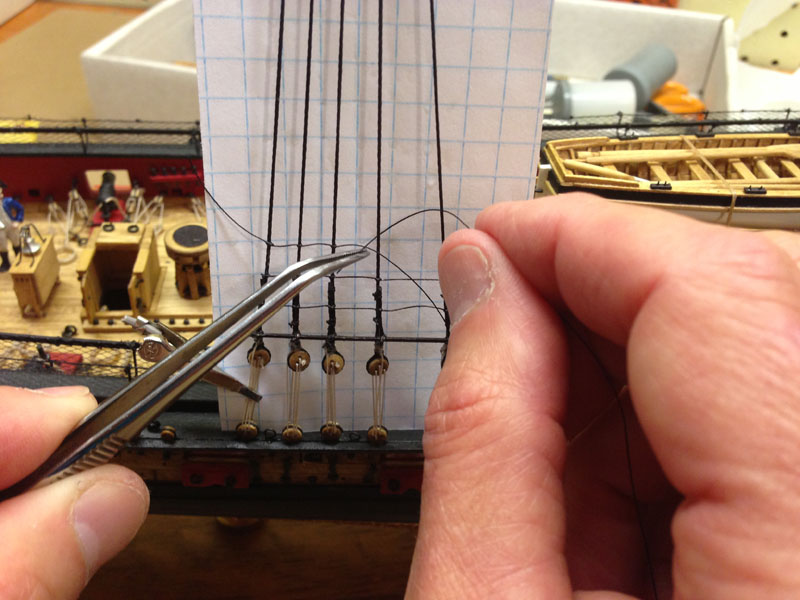
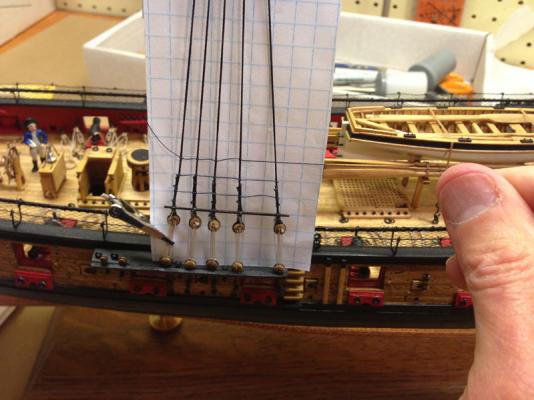
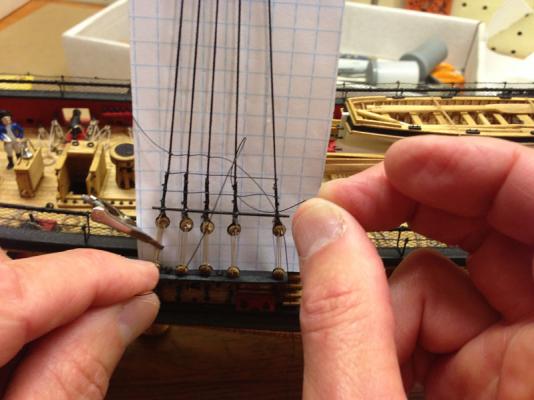
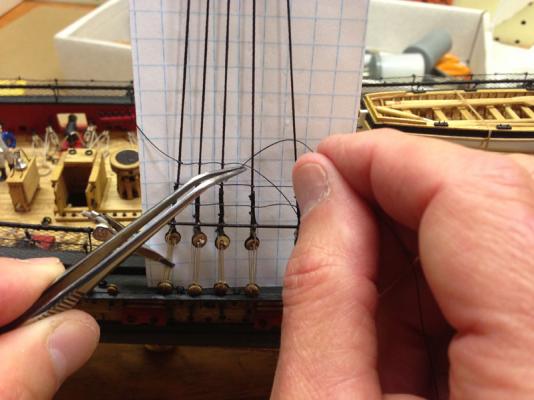
Standing Rigging In the last week I've added a lot of the standing rigging and started the rat lines. I discovered that I am short several 2.5 and 3.5 mm deadeyes, so I pestered Model Expo and they promised to send more. I the meantime my Syren is a little lopsided, with some shrouds missing on the port side. I experimented with the ratlines and found that clove hitches were a lot of work to tie. But Ship Modeling Simplified by Frank Mastini says that at small scale a simple overhand knot is simpler and neater than a clove hitch, so that's what I used. Here are step-by-step instructions for tying the ratlines. 1. Clip some 1/4" graph paper to the shrouds. Micro clips for igniting model rocket engines are great for holding graph paper, loose threads, and rigging deadeyes. Start with a clove hitch on the left-most shroud, since a clove hitch is self-tightening. Pull the line across the next shroud with your right hand. Then use your left hand to put some angled tweezers in the "hole" between the next 2 shrouds and the ratline you're working on. Grab the end of the line with the tweezers. 2. Use the tweezers to pull the line through the hole, then push it through the loop in the line in your right hand. Here I've already grabbed the end and dropped the tweezers. I wish this picture was a little clearer. 3. Ta-da! You have an overhand knot around the next shroud. 4. Tighten up the knot, then move on to the next shroud. When the line is done align everything with the graph paper, then put a drop of medium CA on each knot. Blot quickly with a paper towel, and make sure the graph paper is not stuck in back. In 15 seconds you can trim the ends of the lines. When all the lines are done, touch each knot with a black Sharpie marker to cover up shininess from the glue. After my deadeyes arrive I'll try to get some photos of my Syren with some standing rigging in place.

- 127 replies
-
- 2
-
-
- model shipways
- syren
- (and 1 more)
-
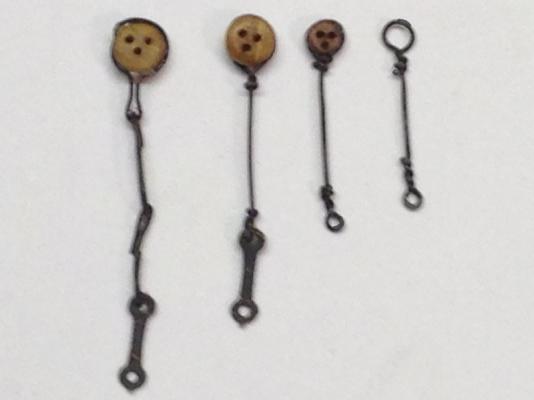
Chain plates, then a week off I haven't posted in a couple of weeks but I have a good excuse - I spent a week in Duck, NC for my son's wedding. Eric Chima and Jess Aylward were married in a beautiful ceremony on the beach, in 25 mph winds. We were all freezing cold, but the wedding went off perfectly and everyone had fun. During the week I visited the Wright Brother's memorial in Kitty Hawk, and my second son Keith and I took hang gliding lessons on the dunes. The winds were also high then, so we flew tethered to the instructors on a short leash. I'd love to go back for more. But back to the Syren. Before the wedding I started the chain plates as described in the instructions. I stropped all the deadeyes, made a zillion links, then assembled a few chains. Then I noticed that they were all different lengths, and all were longer than the in drawings. Oh s*&^. After a little thought, I decided to start over and cheat. I replaced the chains with a long, single wire twisted around a deadeye on one and with a loop on the other end for a nail. I used the photo-etched brass preventer links for some detail. I made a jig to get the correct length. The whole batch of deadeyes took a couple of hours and I am happy with the results. Left - chain plates like they're supposed to be made, but too long. Right - simplified chain plates.
-
Sweep ports Excellent question racouch444. I didn't know what sweep ports were either. I even built 16 long oars called sweeps (see page 73 of the instructions) and never made the connection until now. Sure would be cool if someone left the doors off temporarily, built the sweeps early, and poked them out the side to see what she looks like under oar. Concerning cannons, I remember reading that MS was supplying new cannons now, and might even be open to replacing them. Anyone know about that? I bought very expensive cannons from Bluejacket Shipcrafters. But then I've spent way more on tools, supplies, and paints than I spent on the model in the first place. Every new project deserves some new tools. Rod
-
Bob, Thanks for the information about the spell checker. I use Firefox and had somehow had no dictionary installed. It's fixed now so I have no excuses. Rod
-
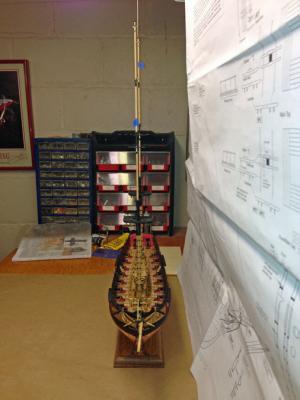
Masts Stepped I stepped the masts last night. Plans on the wall to align the side view, plumb bob hanging from the ceiling just behind the main mast to make sure it's vertical from the front. I used 5 minute epoxy for the job. I've done everything else with 15 second medium CA, so the epoxy gave me 20 times the working time I'm used to. Stayed up until 1 am making tiny wire links for the chain plate assemblies. Not the most fun part of the model. ;^(
- 127 replies
-
- 2
-
-
- model shipways
- syren
- (and 1 more)
-
Augie, I just downloaded and printed the photo of your yards. I'll be building a set before long, and your photo will be a better reference than all the plans in the box. Rod
-
Hi Bob, I just skimmed through your Bluenose build log and am totally amazed at all the minute details that you have built. I've never seen turnbuckles that small. Just magnificent! I'll be following along from now on. Rod
-
Question about this editor This is a nice editor for a blog, but does it have a spel checkr? I can't find one anywehre!