
MORE HANDBOOKS ARE ON THEIR WAY! We will let you know when they get here.
×


rvchima
-
Posts
692 -
Joined
-
Last visited
Reputation Activity
-

 rvchima got a reaction from clogger in HM Bark Endeavour by rvchima - FINISHED - Caldercraft - scale 1:64 - yet another
HM Bark Endeavour - Finished!
1 year, 4 months, 10 days, 664 hours
I put in a lot of hours since my last major post, and completed the model on Dec. 30. Here are some photos.
Anchors
Since July I've had the main anchors lashed to the channels. When I attached the second set of anchors I decided that the model would look better with the main anchors hanging. That's how they're displayed on my Syren. After a bit of deconstruction I hung them from the cathead. I like them much better this way.
Anchor buoy lashed to the first shroud
Fore and main masts
Main and mizzen masts
Rigging Problems
The kit has two plans for running rigging. Plan 7 is mostly lifts and the plan 8 is mostly braces. I started with plan 7 and rigged all the lifts, working fore-to-aft. All of those lines belayed to many of the pins, eyes, and cleats shown on the deck plan. I tried to follow AOTS for attachment points.
Then I opened plan 8 and started rigging the braces fore-to-aft. It turns out that plan 8 shows many lines belayed to the same points as plan 7, so I started using unused points nearby. By the time I got to the mizzen mast I had totally run out of deck eyes and mast cleats to belay to. There were line cleats attached to each of the mizzen shrouds, but they were totally unused on the plans. I ended up rigging some of the mizzen braces to those shrouds. They're probably incorrect but it was all I could do at that point. Please don't tell the admiral.
Bow with jack
Stern with Ensign
Flag Problems
I bought the jack, ensign, and commissioning pennant from Cornwall Model Boats. They are made by BECC in the UK and are perfectly sized and beautifully made, but he fabric material is very soft and hangs limply. I experimented with several products to make them hold a wavy shape - spray starch, white glue, and polyurethane spray. Nothing worked very well so I ended up washing everything out of the ensign and starting over. Luckily the paint is waterproof. I ended up putting a couple of coats of clear shellac on each flag, crumpling them up, and putting them aside to dry. Then I held them in front of my electric workshop heater and worked them into shape. Even the easy things are hard.
Case
I designed and built a case for an old Model Shipways Flying Fish a few years ago, and later scaled the design for my Syren. The Endeavour has nearly the same height and width as the Syren but is 2 inches shorter, so this rescale was easy. I have ordered five pieces of plexiglass cut to size for an Endeavour case and will start cutting wood today.
It looks like my wife and I will be moving to Asheville, North Carolina soon, so I need to get this ship in a case before the move. Pictures to follow.
-
 rvchima got a reaction from yvesvidal in Prinz Eugen by rvchima - FINISHED - Aeronaut - Scale 1:200 - WWII German Heavy Cruiser
Mast
The Germans expected their cruisers to be way out in the Atlantic raiding convoys, so they had very tall masts and lots of antennas for communication. Instead the ships spent a lot of time in Norway where the tall masts weren't as important.
The mast was fun to build. I started with a large diameter dowel, spun it in my drill press at top speed, and sanded the three sections to smaller and smaller diameters. Five minutes, tops. That's how I make masts and yards for sailing ships. The antennas are brass rod, soldered in a few places. There is a brass ladder up to the first platform. The other platforms should probably have ladders and rails too, but I think I'll just skip those details.
The rectangular block is the aircraft hanger. The plane will sit on top of it. The large block was pre-cut, but the grain goes side-to side. I just painted it and the grain is too obvious, so I filled it with wood filler and will have to repaint.
I probably should have sanded those X-pieces better before assembly.
-
rvchima got a reaction from yvesvidal in Prinz Eugen by rvchima - FINISHED - Aeronaut - Scale 1:200 - WWII German Heavy Cruiser
Painting Little Parts
I recently took a break from building and decided to paint a bunch of the plastic parts instead.
Here's a photo of my work bench and about 25 plastic parts. I started with a coat of Tamiya white primer from a rattle can, then used an Iwata air brush to spray the parts with AK International acrylic, color AK734, Dunkelgrau 51. I had one 17 ml bottle of paint and had trouble finding more anywhere online. Eventually I ordered 5 bottles from 3 different companies. Now it looks like I will enough left over to paint a (real) battleship.
Here are the painted parts. The kit came with 9 sets of stairs that look OK until you realize that the steps would be knee high at 1:200 scale. I had hoped that the Pontos detail kit might have some scale stairs. It has 4 sets, not nearly enough. I'm using the plastic ones.
Rails & Chains
As I've mentioned, the Aeronaut kit comes with 14 lengths of nicely made rails. There are 2 problems, 1. they're silver, and 2. they're as tall as person at 1:200 scale. The Pontos detail kit has lots railing stanchions that would be about chest high at scale, but the pieces are microscopic and I don't want to deal with hundreds of them.
So now my deck planks, my stairs, and my railings are way off scale, but no one will ever know except you and me.
The Aeronaut kit also comes with 2 sizes of brass chains for the anchors and anchor hold downs. The links are probably way off scale too but I just don't care anymore. I blackened the rails and chains using Novocan black patina for stained glass, another hobby of mine.
Hard to tell, but the top 2 rails are black and the bottom 2 are silver.
-
rvchima got a reaction from yvesvidal in Prinz Eugen by rvchima - FINISHED - Aeronaut - Scale 1:200 - WWII German Heavy Cruiser
Forward Superstructure & Bridge
The kit came with wooden blocks to carve for the forward superstructure, but the main block was crushed. I used a balsa block and attached the various bridge pieces. The drawings show railings, doors, portholes and windows, but there is nothing in the kit to use for those things. I used thin sheet brass for the railings, eyelets for the portholes, and cut card stock for the windows. I had some photo etched brass doors left over from my Arleigh Burke build and attached them. I really wanted to see something completed so I glued everything together. Big mistake. I should have filled the balsa grain and painted everything before assembly.
The kit comes with 14 very nice pieces of pre-made railings but I wasn't sure if there was enough for all the little fiddly pieces. More on that later. It also includes a bag of brass railing stanchions and I used those here. I have experimented with thread and several kinds of wire for the railings and am not totally satisfied with any of them.
I primed the tower with dark gray spray paint. Here you can also see sheet brass rails on the lower deck. The drawings show lots of louvered air vents all over the ship. I tried to make some using thin balsa strips glued to card stock. Not bad but could be better.
The plastic modeling industry has some beautiful battleship models with very complex add-on detail kits. I couldn't find anything for the Prinz Eugen at 1:200 scale, but Pontos Models from Korea has an accessory kit for the Bismarck at 1:200. It looked like a lot of the parts would fit my model so I took a chance and ordered the kit on eBay from https://www.bnamodelworld.com/ in Australia. Their price beat anything in the US and they shipped immediately. Then, because of the pandemic, the box sat in customs in Melbourne for almost a month. Very frustrating but I got it.
Pontos 1:200 Detail kit for the Bismark
The detail kit is nicely packaged - much nicer than the Aeronaut kit.
The kit has five sheets of photo etched parts. Four are brass and include pipes, funnel parts, holders for the ships boats, doors, windows, and louvers. One sheet is some silver metal and includes stanchions for the railings, oars for the ships boats, and antenna pieces.
The kit has a bag of parts for the funnel, another bag of parts for the paravanes, and three props. Two of the props turn one direction and one the other way.
I attached the props first.
-
 rvchima got a reaction from mtaylor in Prinz Eugen by rvchima - FINISHED - Aeronaut - Scale 1:200 - WWII German Heavy Cruiser
Mast
The Germans expected their cruisers to be way out in the Atlantic raiding convoys, so they had very tall masts and lots of antennas for communication. Instead the ships spent a lot of time in Norway where the tall masts weren't as important.
The mast was fun to build. I started with a large diameter dowel, spun it in my drill press at top speed, and sanded the three sections to smaller and smaller diameters. Five minutes, tops. That's how I make masts and yards for sailing ships. The antennas are brass rod, soldered in a few places. There is a brass ladder up to the first platform. The other platforms should probably have ladders and rails too, but I think I'll just skip those details.
The rectangular block is the aircraft hanger. The plane will sit on top of it. The large block was pre-cut, but the grain goes side-to side. I just painted it and the grain is too obvious, so I filled it with wood filler and will have to repaint.
I probably should have sanded those X-pieces better before assembly.
-
rvchima got a reaction from mtaylor in Prinz Eugen by rvchima - FINISHED - Aeronaut - Scale 1:200 - WWII German Heavy Cruiser
Painting Little Parts
I recently took a break from building and decided to paint a bunch of the plastic parts instead.
Here's a photo of my work bench and about 25 plastic parts. I started with a coat of Tamiya white primer from a rattle can, then used an Iwata air brush to spray the parts with AK International acrylic, color AK734, Dunkelgrau 51. I had one 17 ml bottle of paint and had trouble finding more anywhere online. Eventually I ordered 5 bottles from 3 different companies. Now it looks like I will enough left over to paint a (real) battleship.
Here are the painted parts. The kit came with 9 sets of stairs that look OK until you realize that the steps would be knee high at 1:200 scale. I had hoped that the Pontos detail kit might have some scale stairs. It has 4 sets, not nearly enough. I'm using the plastic ones.
Rails & Chains
As I've mentioned, the Aeronaut kit comes with 14 lengths of nicely made rails. There are 2 problems, 1. they're silver, and 2. they're as tall as person at 1:200 scale. The Pontos detail kit has lots railing stanchions that would be about chest high at scale, but the pieces are microscopic and I don't want to deal with hundreds of them.
So now my deck planks, my stairs, and my railings are way off scale, but no one will ever know except you and me.
The Aeronaut kit also comes with 2 sizes of brass chains for the anchors and anchor hold downs. The links are probably way off scale too but I just don't care anymore. I blackened the rails and chains using Novocan black patina for stained glass, another hobby of mine.
Hard to tell, but the top 2 rails are black and the bottom 2 are silver.
-
 rvchima got a reaction from lmagna in Prinz Eugen by rvchima - FINISHED - Aeronaut - Scale 1:200 - WWII German Heavy Cruiser
Forward Superstructure & Bridge
The kit came with wooden blocks to carve for the forward superstructure, but the main block was crushed. I used a balsa block and attached the various bridge pieces. The drawings show railings, doors, portholes and windows, but there is nothing in the kit to use for those things. I used thin sheet brass for the railings, eyelets for the portholes, and cut card stock for the windows. I had some photo etched brass doors left over from my Arleigh Burke build and attached them. I really wanted to see something completed so I glued everything together. Big mistake. I should have filled the balsa grain and painted everything before assembly.
The kit comes with 14 very nice pieces of pre-made railings but I wasn't sure if there was enough for all the little fiddly pieces. More on that later. It also includes a bag of brass railing stanchions and I used those here. I have experimented with thread and several kinds of wire for the railings and am not totally satisfied with any of them.
I primed the tower with dark gray spray paint. Here you can also see sheet brass rails on the lower deck. The drawings show lots of louvered air vents all over the ship. I tried to make some using thin balsa strips glued to card stock. Not bad but could be better.
The plastic modeling industry has some beautiful battleship models with very complex add-on detail kits. I couldn't find anything for the Prinz Eugen at 1:200 scale, but Pontos Models from Korea has an accessory kit for the Bismarck at 1:200. It looked like a lot of the parts would fit my model so I took a chance and ordered the kit on eBay from https://www.bnamodelworld.com/ in Australia. Their price beat anything in the US and they shipped immediately. Then, because of the pandemic, the box sat in customs in Melbourne for almost a month. Very frustrating but I got it.
Pontos 1:200 Detail kit for the Bismark
The detail kit is nicely packaged - much nicer than the Aeronaut kit.
The kit has five sheets of photo etched parts. Four are brass and include pipes, funnel parts, holders for the ships boats, doors, windows, and louvers. One sheet is some silver metal and includes stanchions for the railings, oars for the ships boats, and antenna pieces.
The kit has a bag of parts for the funnel, another bag of parts for the paravanes, and three props. Two of the props turn one direction and one the other way.
I attached the props first.
-
 rvchima got a reaction from GrandpaPhil in Prinz Eugen by rvchima - FINISHED - Aeronaut - Scale 1:200 - WWII German Heavy Cruiser
Mast
The Germans expected their cruisers to be way out in the Atlantic raiding convoys, so they had very tall masts and lots of antennas for communication. Instead the ships spent a lot of time in Norway where the tall masts weren't as important.
The mast was fun to build. I started with a large diameter dowel, spun it in my drill press at top speed, and sanded the three sections to smaller and smaller diameters. Five minutes, tops. That's how I make masts and yards for sailing ships. The antennas are brass rod, soldered in a few places. There is a brass ladder up to the first platform. The other platforms should probably have ladders and rails too, but I think I'll just skip those details.
The rectangular block is the aircraft hanger. The plane will sit on top of it. The large block was pre-cut, but the grain goes side-to side. I just painted it and the grain is too obvious, so I filled it with wood filler and will have to repaint.
I probably should have sanded those X-pieces better before assembly.
-
 rvchima got a reaction from mikegr in Prinz Eugen by rvchima - FINISHED - Aeronaut - Scale 1:200 - WWII German Heavy Cruiser
A Brief History of the Prinz Eugen
(gathered from several books - maybe I can post some references later)
The Prinz Eugen was laid down in April, 1936, launched in August, 1938, and commissioned in August, 1940.
He took part in the first raid of the battleship Bismarck in May, 1941 when the British battleship HMS Hood was sunk and the Prince of Wales was heavily damaged. (The German navy refers to ships in the male gender.)
He spent a lot of time in various ports with boiler and engine problems.
In early February of 1942 German battle cruisers Gneisenau, Scharnhorst, heavy cruiser Prinz Eugen, various destroyers, torpedo boats, and other ships made a dash from Brest, France through the English Channel to Kiel, Germany. A massive escort was provided by the Luftwaffe. On February 22 many of the ships departed for Norway.
On February 23 the British submarine HMS Trident torpedoed Prinz Eugen. The stern of the ship was almost severed but the ship limped into Lofjord, Trondheim the next day.
A repair ship made emergency repairs by welding a blunt stern with twin rudders operated by the crew turning a capstan on deck. (This would make a cool model!) Prinz Eugen returned to Kiel under his own power and was completely repaired by the end of October. After returning to service he served as a training ship in the Baltic, and provided artillery cover for retreating German troops.
On October 15, 1944 Prinz Eugen was returning to Gotenhafen, (Gdynia) Poland at full speed in the mist, and rammed the light cruiser Leipzig which as adrift making a routine engine coupling transfer. The ships were locked together for 14 hours. Prinz Eugen continued to Gotenhafen under his own power and had a new bow fitted in less than a month. Leipzig was towed.
Prinz Eugen continued to provide artillery support for ground troops, and ended up in Copenhagen at the end of the war. The ship was decommissioned and taken by the British to Wilhelmshaven, Germany for inspection by engineers from all of the Allied Powers.
The ship was desired by all, but the USA won her by drawing lots from a hat. In January, 1946 a crew of 40 US navy sailors and 574 German personnel sailed him to Boston and later to Philadelphia, where he was hit by a US Navy tug. The tug was severely damaged. In March he was sailed to California via the Panama canal. In May he was sailed to Pearl Harbor, Hawaii, and then to Bikini Atoll in the Pacific.
On July 1, 1946 Prinz Eugen and a fleet of other ships were bombed in an air burst test of a "Fat Man" atomic bomb like that used on Nagasaki, Japan. Prinz Eugen was 1200 yards from the center of the blast and received only superficial damage. On July 25 it was bombed again with an underwater detonation of a second atomic bomb. Prinz Eugen was 2000 yards from the center of the blast and again received minimal damage but high radioactive contamination. Occupation of the ship would be lethal, so it was towed to Kwajalein Lagoon nearby. A small leak went unrepaired because of the radiation. By late December the ship was listing, rolled over slowly, and sank on a reef with parts of the stern out of the water. It remains there still and is no longer radioactive. Search for "Wreck of the German cruiser Prinz Eugen" in Google maps and look at the satellite view.
In 1974 the German Navy League requested the removal of one propeller. It is now on display as part of the Laboe Naval Memorial in Kiel, Germany.
-
rvchima got a reaction from yvesvidal in Prinz Eugen by rvchima - FINISHED - Aeronaut - Scale 1:200 - WWII German Heavy Cruiser
A Brief History of the Prinz Eugen
(gathered from several books - maybe I can post some references later)
The Prinz Eugen was laid down in April, 1936, launched in August, 1938, and commissioned in August, 1940.
He took part in the first raid of the battleship Bismarck in May, 1941 when the British battleship HMS Hood was sunk and the Prince of Wales was heavily damaged. (The German navy refers to ships in the male gender.)
He spent a lot of time in various ports with boiler and engine problems.
In early February of 1942 German battle cruisers Gneisenau, Scharnhorst, heavy cruiser Prinz Eugen, various destroyers, torpedo boats, and other ships made a dash from Brest, France through the English Channel to Kiel, Germany. A massive escort was provided by the Luftwaffe. On February 22 many of the ships departed for Norway.
On February 23 the British submarine HMS Trident torpedoed Prinz Eugen. The stern of the ship was almost severed but the ship limped into Lofjord, Trondheim the next day.
A repair ship made emergency repairs by welding a blunt stern with twin rudders operated by the crew turning a capstan on deck. (This would make a cool model!) Prinz Eugen returned to Kiel under his own power and was completely repaired by the end of October. After returning to service he served as a training ship in the Baltic, and provided artillery cover for retreating German troops.
On October 15, 1944 Prinz Eugen was returning to Gotenhafen, (Gdynia) Poland at full speed in the mist, and rammed the light cruiser Leipzig which as adrift making a routine engine coupling transfer. The ships were locked together for 14 hours. Prinz Eugen continued to Gotenhafen under his own power and had a new bow fitted in less than a month. Leipzig was towed.
Prinz Eugen continued to provide artillery support for ground troops, and ended up in Copenhagen at the end of the war. The ship was decommissioned and taken by the British to Wilhelmshaven, Germany for inspection by engineers from all of the Allied Powers.
The ship was desired by all, but the USA won her by drawing lots from a hat. In January, 1946 a crew of 40 US navy sailors and 574 German personnel sailed him to Boston and later to Philadelphia, where he was hit by a US Navy tug. The tug was severely damaged. In March he was sailed to California via the Panama canal. In May he was sailed to Pearl Harbor, Hawaii, and then to Bikini Atoll in the Pacific.
On July 1, 1946 Prinz Eugen and a fleet of other ships were bombed in an air burst test of a "Fat Man" atomic bomb like that used on Nagasaki, Japan. Prinz Eugen was 1200 yards from the center of the blast and received only superficial damage. On July 25 it was bombed again with an underwater detonation of a second atomic bomb. Prinz Eugen was 2000 yards from the center of the blast and again received minimal damage but high radioactive contamination. Occupation of the ship would be lethal, so it was towed to Kwajalein Lagoon nearby. A small leak went unrepaired because of the radiation. By late December the ship was listing, rolled over slowly, and sank on a reef with parts of the stern out of the water. It remains there still and is no longer radioactive. Search for "Wreck of the German cruiser Prinz Eugen" in Google maps and look at the satellite view.
In 1974 the German Navy League requested the removal of one propeller. It is now on display as part of the Laboe Naval Memorial in Kiel, Germany.
-
 rvchima reacted to lmagna in Prinz Eugen by rvchima - FINISHED - Aeronaut - Scale 1:200 - WWII German Heavy Cruiser
The ship lost in Norway was the Blucher.
She was hit about 30 times by 11" and an additional 13 by 5.9" shore mounted guns from point blank range, and after losing two boilers and having a severe fire started by these hits she also received two torpedo hits, again in the engineering areas. All of this damage was inflicted on the same side of the ship. The fires advanced and at least one 4.1" magazine also blew up causing even more damage and additional listing. Finally with virtually no power and a considerable list the Blucher rolled over and sank with considerable loss of life. While the Blucher took hits in the stern causing her to have to use her engines to steer due to her rudder function being lost but I do not believe she lost her stern.
The other main ship involved was the Pocket Battleship Lutzow with 11" main guns, and while she also took considerable damage from the shore guns was able to escape. On the way back to Germany she was also attacked by a British Submarine and took a torpedo hit but was still able to make it home.
The ship used in the atom bomb tests was the Prinz Eugene not the Admiral Hipper. That ship was scuttled by her crew after taking damage from RAF bombers in 1945.
-
rvchima got a reaction from yvesvidal in Prinz Eugen by rvchima - FINISHED - Aeronaut - Scale 1:200 - WWII German Heavy Cruiser
Rough Superstructure
Superstructure parts for the kit are made from sheets of limewood either 10 mm or 12 mm thick, plenty high enough for a 1/200 scale sailor to walk under. The parts are stamped about 0.25 mm deep, but you have to cut them out with a scroll saw, and then sand, sand, sand.
The superstructure layers are sandwiched between sheets of 1 mm 3-ply that constitute the decks. In some places the deck is flush with the structure below, and in other places it overhangs, often to hold a gun. The ply pieces are warped so it's hard to hold the sandwich together to sand the flush edges. I started gluing each layer to it's upper deck after this photo was taken.
-
rvchima got a reaction from yvesvidal in Prinz Eugen by rvchima - FINISHED - Aeronaut - Scale 1:200 - WWII German Heavy Cruiser
Painting the Hull and Deck
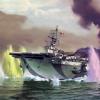
The Prinz Eugen was painted with 20 different paint schemes over its 6 year lifespan. This web site has drawings of all of them.
http://www.kbismarck.org/forum/viewtopic.php?t=470#p10532
I chose the dazzle camouflage scheme used in the Baltic in May of 1941. You can see it in the photo below.
I carefully chose all of my colors and went searching for paints online. Between the worldwide pandemic and the fact that there are few hobby shops left in the US, I had a terrible time finding what I wanted. After several disappointments with online shops I walked to my local hardware store and bought four rattle cans of Rustoleum - Colonial red, granite gray, black, and white.
h
I painted the red and then the gray. Here I'm masking off for the white parts of the camouflage. Painting the superstructure is going to be a b****.
I planked the deck using long strips of 4 mm lime (bass) wood left over from another model. That's still 5x too wide for scale but it looks much better than the stuff that came with the kit. I glued down long strips with CA, and then notched the strips every 30 mm with a chisel to show individual planks. I sealed the surface with Timbermate wood filler, sanded, wiped off a quick coat of dark stain, and airbrushed everything with 4 coats of orange shellac. Much of this was not exactly planned, but it came out pretty good in the end.
The ship had big swastikas painted on a red field on the deck for identification. I printed the swastikas on an ink jet printer, sprayed them with clear, and pasted them on.
-
rvchima got a reaction from mikegr in Prinz Eugen by rvchima - FINISHED - Aeronaut - Scale 1:200 - WWII German Heavy Cruiser
Portholes on a Battleship?
The plans for the Prinz Eugen show 209 portholes on each side of the hull. It seemed odd to me that there would be ANY portholes on the side of a battleship so I Googled "Portholes on WWII battleships?" Turns out that there are a lot of uninformed modelers out there with the same question as me. Here's a good discussion of the topic.
https://www.quora.com/Why-did-German-battleships-in-World-War-2-like-the-Scharnhorst-and-Prinz-Eugen-have-porthole-windows-all-over-their-hulls-like-passenger-ships
The short answer is that before the end of WWII most battleships had inadequate ventilation and no air conditioning, so they had plenty of portholes for crew comfort. The portholes were all above the heavy armor belting on the lower parts of the hull and had steel covers that could be closed over them during battle.
The kit came with 10 bags with about 50 tiny eyelets in each, which I assumed were for portholes. I taped a side view over the hull, marked the center of each porthole with a pin, and started drilling. After 30-40 holes I realized that this wouldn't be accurate enough, so for subsequent holes I clamped a metal straight edge along the pin pricks and used that to keep the holes even.
I thought I could just pop the eyelets in the holes and glue them with CA, but they never sat flush with the hull. I ended up crimping each one across the hull with a smooth pair of pliers. In retrospect I should have bought a specialty eyelet crimping tool, but it's too late now. After I finished the portholes on the hull I realized that there would be hundreds more on the superstructure and I was down to my last bag. I ordered 500 more from a doll supply company on eBay. I think that the kit has enough eyelets for an RC model where you probably would not want 418 holes in the side of the hull.
It seems that I didn't take any photos of the hull covered with brass eyelets, but this photo after painting gives you an idea what they look like. That leads me to painting the hull.
-
 rvchima got a reaction from Moab in Prinz Eugen by rvchima - FINISHED - Aeronaut - Scale 1:200 - WWII German Heavy Cruiser
Rough Superstructure
Superstructure parts for the kit are made from sheets of limewood either 10 mm or 12 mm thick, plenty high enough for a 1/200 scale sailor to walk under. The parts are stamped about 0.25 mm deep, but you have to cut them out with a scroll saw, and then sand, sand, sand.
The superstructure layers are sandwiched between sheets of 1 mm 3-ply that constitute the decks. In some places the deck is flush with the structure below, and in other places it overhangs, often to hold a gun. The ply pieces are warped so it's hard to hold the sandwich together to sand the flush edges. I started gluing each layer to it's upper deck after this photo was taken.
-
rvchima got a reaction from Moab in Prinz Eugen by rvchima - FINISHED - Aeronaut - Scale 1:200 - WWII German Heavy Cruiser
Painting the Hull and Deck
The Prinz Eugen was painted with 20 different paint schemes over its 6 year lifespan. This web site has drawings of all of them.
http://www.kbismarck.org/forum/viewtopic.php?t=470#p10532
I chose the dazzle camouflage scheme used in the Baltic in May of 1941. You can see it in the photo below.
I carefully chose all of my colors and went searching for paints online. Between the worldwide pandemic and the fact that there are few hobby shops left in the US, I had a terrible time finding what I wanted. After several disappointments with online shops I walked to my local hardware store and bought four rattle cans of Rustoleum - Colonial red, granite gray, black, and white.
h
I painted the red and then the gray. Here I'm masking off for the white parts of the camouflage. Painting the superstructure is going to be a b****.
I planked the deck using long strips of 4 mm lime (bass) wood left over from another model. That's still 5x too wide for scale but it looks much better than the stuff that came with the kit. I glued down long strips with CA, and then notched the strips every 30 mm with a chisel to show individual planks. I sealed the surface with Timbermate wood filler, sanded, wiped off a quick coat of dark stain, and airbrushed everything with 4 coats of orange shellac. Much of this was not exactly planned, but it came out pretty good in the end.
The ship had big swastikas painted on a red field on the deck for identification. I printed the swastikas on an ink jet printer, sprayed them with clear, and pasted them on.
-
rvchima got a reaction from yvesvidal in Prinz Eugen by rvchima - FINISHED - Aeronaut - Scale 1:200 - WWII German Heavy Cruiser
Portholes on a Battleship?
The plans for the Prinz Eugen show 209 portholes on each side of the hull. It seemed odd to me that there would be ANY portholes on the side of a battleship so I Googled "Portholes on WWII battleships?" Turns out that there are a lot of uninformed modelers out there with the same question as me. Here's a good discussion of the topic.
https://www.quora.com/Why-did-German-battleships-in-World-War-2-like-the-Scharnhorst-and-Prinz-Eugen-have-porthole-windows-all-over-their-hulls-like-passenger-ships
The short answer is that before the end of WWII most battleships had inadequate ventilation and no air conditioning, so they had plenty of portholes for crew comfort. The portholes were all above the heavy armor belting on the lower parts of the hull and had steel covers that could be closed over them during battle.
The kit came with 10 bags with about 50 tiny eyelets in each, which I assumed were for portholes. I taped a side view over the hull, marked the center of each porthole with a pin, and started drilling. After 30-40 holes I realized that this wouldn't be accurate enough, so for subsequent holes I clamped a metal straight edge along the pin pricks and used that to keep the holes even.
I thought I could just pop the eyelets in the holes and glue them with CA, but they never sat flush with the hull. I ended up crimping each one across the hull with a smooth pair of pliers. In retrospect I should have bought a specialty eyelet crimping tool, but it's too late now. After I finished the portholes on the hull I realized that there would be hundreds more on the superstructure and I was down to my last bag. I ordered 500 more from a doll supply company on eBay. I think that the kit has enough eyelets for an RC model where you probably would not want 418 holes in the side of the hull.
It seems that I didn't take any photos of the hull covered with brass eyelets, but this photo after painting gives you an idea what they look like. That leads me to painting the hull.
-
rvchima got a reaction from yvesvidal in Prinz Eugen by rvchima - FINISHED - Aeronaut - Scale 1:200 - WWII German Heavy Cruiser
Hull, Deck, Stand, and Propellers
I trimmed the excess plastic off the hull with a razor saw, and glued wood strips to the inside edges to support the deck. I decided not to use the bulkheads.
I shaped a piece of poplar and glued it inside the hull as an attachment point for a stand. The prop shafts were then glued in place.
The kit includes red plastic props for RC . Later I replaced them with scale brass props.
-
rvchima got a reaction from mtaylor in Prinz Eugen by rvchima - FINISHED - Aeronaut - Scale 1:200 - WWII German Heavy Cruiser
Thank you for your comments Lou. I obviously don't know the distinction between a battleship and a heavy cruiser, but I'd like to learn. Mostly I just enjoy making things, and a heavy cruiser looked like a challenge. Please continue to correct me when I get the history wrong.
Rod
-
rvchima got a reaction from GrandpaPhil in Prinz Eugen by rvchima - FINISHED - Aeronaut - Scale 1:200 - WWII German Heavy Cruiser
Rough Superstructure
Superstructure parts for the kit are made from sheets of limewood either 10 mm or 12 mm thick, plenty high enough for a 1/200 scale sailor to walk under. The parts are stamped about 0.25 mm deep, but you have to cut them out with a scroll saw, and then sand, sand, sand.
The superstructure layers are sandwiched between sheets of 1 mm 3-ply that constitute the decks. In some places the deck is flush with the structure below, and in other places it overhangs, often to hold a gun. The ply pieces are warped so it's hard to hold the sandwich together to sand the flush edges. I started gluing each layer to it's upper deck after this photo was taken.
-
rvchima got a reaction from GrandpaPhil in Prinz Eugen by rvchima - FINISHED - Aeronaut - Scale 1:200 - WWII German Heavy Cruiser
Painting the Hull and Deck
The Prinz Eugen was painted with 20 different paint schemes over its 6 year lifespan. This web site has drawings of all of them.
http://www.kbismarck.org/forum/viewtopic.php?t=470#p10532
I chose the dazzle camouflage scheme used in the Baltic in May of 1941. You can see it in the photo below.
I carefully chose all of my colors and went searching for paints online. Between the worldwide pandemic and the fact that there are few hobby shops left in the US, I had a terrible time finding what I wanted. After several disappointments with online shops I walked to my local hardware store and bought four rattle cans of Rustoleum - Colonial red, granite gray, black, and white.
h
I painted the red and then the gray. Here I'm masking off for the white parts of the camouflage. Painting the superstructure is going to be a b****.
I planked the deck using long strips of 4 mm lime (bass) wood left over from another model. That's still 5x too wide for scale but it looks much better than the stuff that came with the kit. I glued down long strips with CA, and then notched the strips every 30 mm with a chisel to show individual planks. I sealed the surface with Timbermate wood filler, sanded, wiped off a quick coat of dark stain, and airbrushed everything with 4 coats of orange shellac. Much of this was not exactly planned, but it came out pretty good in the end.
The ship had big swastikas painted on a red field on the deck for identification. I printed the swastikas on an ink jet printer, sprayed them with clear, and pasted them on.
-
rvchima got a reaction from GrandpaPhil in Prinz Eugen by rvchima - FINISHED - Aeronaut - Scale 1:200 - WWII German Heavy Cruiser
Portholes on a Battleship?
The plans for the Prinz Eugen show 209 portholes on each side of the hull. It seemed odd to me that there would be ANY portholes on the side of a battleship so I Googled "Portholes on WWII battleships?" Turns out that there are a lot of uninformed modelers out there with the same question as me. Here's a good discussion of the topic.
https://www.quora.com/Why-did-German-battleships-in-World-War-2-like-the-Scharnhorst-and-Prinz-Eugen-have-porthole-windows-all-over-their-hulls-like-passenger-ships
The short answer is that before the end of WWII most battleships had inadequate ventilation and no air conditioning, so they had plenty of portholes for crew comfort. The portholes were all above the heavy armor belting on the lower parts of the hull and had steel covers that could be closed over them during battle.
The kit came with 10 bags with about 50 tiny eyelets in each, which I assumed were for portholes. I taped a side view over the hull, marked the center of each porthole with a pin, and started drilling. After 30-40 holes I realized that this wouldn't be accurate enough, so for subsequent holes I clamped a metal straight edge along the pin pricks and used that to keep the holes even.
I thought I could just pop the eyelets in the holes and glue them with CA, but they never sat flush with the hull. I ended up crimping each one across the hull with a smooth pair of pliers. In retrospect I should have bought a specialty eyelet crimping tool, but it's too late now. After I finished the portholes on the hull I realized that there would be hundreds more on the superstructure and I was down to my last bag. I ordered 500 more from a doll supply company on eBay. I think that the kit has enough eyelets for an RC model where you probably would not want 418 holes in the side of the hull.
It seems that I didn't take any photos of the hull covered with brass eyelets, but this photo after painting gives you an idea what they look like. That leads me to painting the hull.
-
 rvchima got a reaction from gieb8688 in Prinz Eugen by rvchima - FINISHED - Aeronaut - Scale 1:200 - WWII German Heavy Cruiser
Rough Superstructure
Superstructure parts for the kit are made from sheets of limewood either 10 mm or 12 mm thick, plenty high enough for a 1/200 scale sailor to walk under. The parts are stamped about 0.25 mm deep, but you have to cut them out with a scroll saw, and then sand, sand, sand.
The superstructure layers are sandwiched between sheets of 1 mm 3-ply that constitute the decks. In some places the deck is flush with the structure below, and in other places it overhangs, often to hold a gun. The ply pieces are warped so it's hard to hold the sandwich together to sand the flush edges. I started gluing each layer to it's upper deck after this photo was taken.
-
rvchima got a reaction from gieb8688 in Prinz Eugen by rvchima - FINISHED - Aeronaut - Scale 1:200 - WWII German Heavy Cruiser
Painting the Hull and Deck
The Prinz Eugen was painted with 20 different paint schemes over its 6 year lifespan. This web site has drawings of all of them.
http://www.kbismarck.org/forum/viewtopic.php?t=470#p10532
I chose the dazzle camouflage scheme used in the Baltic in May of 1941. You can see it in the photo below.
I carefully chose all of my colors and went searching for paints online. Between the worldwide pandemic and the fact that there are few hobby shops left in the US, I had a terrible time finding what I wanted. After several disappointments with online shops I walked to my local hardware store and bought four rattle cans of Rustoleum - Colonial red, granite gray, black, and white.
h
I painted the red and then the gray. Here I'm masking off for the white parts of the camouflage. Painting the superstructure is going to be a b****.
I planked the deck using long strips of 4 mm lime (bass) wood left over from another model. That's still 5x too wide for scale but it looks much better than the stuff that came with the kit. I glued down long strips with CA, and then notched the strips every 30 mm with a chisel to show individual planks. I sealed the surface with Timbermate wood filler, sanded, wiped off a quick coat of dark stain, and airbrushed everything with 4 coats of orange shellac. Much of this was not exactly planned, but it came out pretty good in the end.
The ship had big swastikas painted on a red field on the deck for identification. I printed the swastikas on an ink jet printer, sprayed them with clear, and pasted them on.
-
rvchima got a reaction from gieb8688 in Prinz Eugen by rvchima - FINISHED - Aeronaut - Scale 1:200 - WWII German Heavy Cruiser
Portholes on a Battleship?
The plans for the Prinz Eugen show 209 portholes on each side of the hull. It seemed odd to me that there would be ANY portholes on the side of a battleship so I Googled "Portholes on WWII battleships?" Turns out that there are a lot of uninformed modelers out there with the same question as me. Here's a good discussion of the topic.
https://www.quora.com/Why-did-German-battleships-in-World-War-2-like-the-Scharnhorst-and-Prinz-Eugen-have-porthole-windows-all-over-their-hulls-like-passenger-ships
The short answer is that before the end of WWII most battleships had inadequate ventilation and no air conditioning, so they had plenty of portholes for crew comfort. The portholes were all above the heavy armor belting on the lower parts of the hull and had steel covers that could be closed over them during battle.
The kit came with 10 bags with about 50 tiny eyelets in each, which I assumed were for portholes. I taped a side view over the hull, marked the center of each porthole with a pin, and started drilling. After 30-40 holes I realized that this wouldn't be accurate enough, so for subsequent holes I clamped a metal straight edge along the pin pricks and used that to keep the holes even.
I thought I could just pop the eyelets in the holes and glue them with CA, but they never sat flush with the hull. I ended up crimping each one across the hull with a smooth pair of pliers. In retrospect I should have bought a specialty eyelet crimping tool, but it's too late now. After I finished the portholes on the hull I realized that there would be hundreds more on the superstructure and I was down to my last bag. I ordered 500 more from a doll supply company on eBay. I think that the kit has enough eyelets for an RC model where you probably would not want 418 holes in the side of the hull.
It seems that I didn't take any photos of the hull covered with brass eyelets, but this photo after painting gives you an idea what they look like. That leads me to painting the hull.