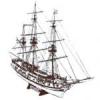
Dominik Posted February 15, 2013 #1 Posted February 15, 2013 (edited) Here it is again, my build log of the Mamoli Rattlesnake. Following the crash of the Model Ship World forum in early 2013, the following shows pictures only of the build as it progressed between June 2012 and February 2013. Text and descriptions are added only to pictures published after February 2013. Feel free, however, to ask any questions you might have when browsing through the documentation.This is my first build of a wooden ship (although I do have some experience from plastic models). Since I have time to work on this kit only in the evenings and occasionally on the weekends, I am sure it will take me a while to finish. But Rome wasn't built in one day either I chose the Rattlesnake cause it looks fairly "strong", elegant and even impressive, almost like a frigate, while not being too challenging for a first build. Some background information from http://www.mamolimodel.com/'>Mamoli:Scale: 1:64 Length: 697 mm Height: 463 mm The privateer ship Rattlesnake was built at Plymouth, Massachusetts, in 1779 or 1780, allegedly to designs by John Peck. At various times it carried from 14 to 20 guns and its complement consisted of 85 men. It was captured off the American coasts in 1781 by the British 44-gun ship Assurance. It was taken to England, where it was renamed Cormorant and its lines were drawn. With its reduced dead rise and its very sharp fore lines the Rattlesnake must have been very fast. It had a detached forecastle and quarterdeck, linked by removable gangways, unshipped during the battles. Edited February 15, 2013 by Dominik --- Current build: Rattlesnake 1781 (Mamoli)
Dominik Posted February 15, 2013 Author #2 Posted February 15, 2013 First steps with the frames. --- Current build: Rattlesnake 1781 (Mamoli)
Dominik Posted February 16, 2013 Author #3 Posted February 16, 2013 Planking. --- Current build: Rattlesnake 1781 (Mamoli)
Dominik Posted February 16, 2013 Author #4 Posted February 16, 2013 Planking finished. --- Current build: Rattlesnake 1781 (Mamoli)
Dominik Posted February 16, 2013 Author #5 Posted February 16, 2013 Some more details. --- Current build: Rattlesnake 1781 (Mamoli)
Dominik Posted February 16, 2013 Author #6 Posted February 16, 2013 More details. --- Current build: Rattlesnake 1781 (Mamoli)
Dominik Posted February 16, 2013 Author #7 Posted February 16, 2013 Preparing for the cannons. --- Current build: Rattlesnake 1781 (Mamoli)
Dominik Posted February 16, 2013 Author #8 Posted February 16, 2013 Grating and additional details on the cannons. And a chair for the cabin. --- Current build: Rattlesnake 1781 (Mamoli)
Dominik Posted February 16, 2013 Author #9 Posted February 16, 2013 The smoke generator and some progress on the planking. --- Current build: Rattlesnake 1781 (Mamoli)
Dominik Posted February 16, 2013 Author #10 Posted February 16, 2013 Custom made entrance to the cabin (the Mamoli metal plate was a bit too simple), the smoke generator and some other progress. --- Current build: Rattlesnake 1781 (Mamoli)
Dominik Posted February 16, 2013 Author #11 Posted February 16, 2013 The custom made entrance doors to the cabin. fish 1 --- Current build: Rattlesnake 1781 (Mamoli)
Dominik Posted February 16, 2013 Author #12 Posted February 16, 2013 The cabin with furniture and lamps and cables in the body of the ship. fish and CaptainSteve 2 --- Current build: Rattlesnake 1781 (Mamoli)
JPett Posted February 17, 2013 #13 Posted February 17, 2013 Ahoy, Dominik I know I said it once, but I will say it again I love the chairs I also really like the functioning doors on the poop bulkhead. Something I might attempt on my build. Thanks for sharing On with the Show.... J.Pett “If you're going through hell, keep going” (Winston Churchill) Current build: MS Rattlesnake (MS2028) http://modelshipworld.com/index.php?/topic/45-model-shipways-rattlesnake-ms2028-scale-164th/ Side Build: HMS Victory: Corel http://modelshipworld.com/index.php?/topic/3709-hms-victory-by-jpett-corel-198/?p=104762 On the back burner: 1949 Chris Craft Racer: Dumas http://modelshipworld.com/index.php?/topic/939-1949-chris-craft-racer-by-jpett-dumas-kit-no-1702/ Sometime, but not sure when: Frigate Berlin: Corel http://www.corel-srl.it/pdf/berlin.pdf
Dominik Posted February 17, 2013 Author #14 Posted February 17, 2013 Ahoy, Dominik I know I said it once, but I will say it again I love the chairs I also really like the functioning doors on the poop bulkhead. Something I might attempt on my build. Thanks for sharing Thanks for the compliments. Well, I sort of overdid it with the furniture. Although I am quite satisfied with the objects as such, the tiny cabin (still wonder how anybody could move in there) does not really allow for any of the interior design to be visible. Once the cannons are installed, you won't be able to see much. Nevertheless, the functioning doors, the windows I added at the rear end plus the lamps I installed in the cabin, will hopefully allow a small glance. /Dominik --- Current build: Rattlesnake 1781 (Mamoli)
Martin W Posted February 24, 2013 #15 Posted February 24, 2013 Dominik -- It's good to see that you've restored at least some of your log. I'll be checking in on your progress. Cheers, Martin Current Build: HMS FLY 1776 Previous Builds: Rattlesnake 1781 Prince de Neufchatel
Dominik Posted February 25, 2013 Author #16 Posted February 25, 2013 Here follows a short update on my build. Not much, since other things keep me busy as well. Have begun to close the first layer of planking, which was a bit tricky due to the cables that need to exit the body of the ship somewhere and, if possible, in a nice and organized way. The first two pictures show the solution I have chosen, with a small plastic plastic pipe through which all cables are channeled out from the ship. I wonder what happens if one of the cables breaks inside the ship... I have also finished the rudder and really like the result. As you can see on the pictures, I first made the mistake of choosing the wrong angle on a small piece that faces the keel. But corrected it before the assembling and gluing began. I have also begun with the floor planks on the "cabin roof" (in the lack of the special, nautical terminology). Should not take me too long to finish that. CaptainSteve 1 --- Current build: Rattlesnake 1781 (Mamoli)
JPett Posted February 25, 2013 #17 Posted February 25, 2013 Ahoy Domink, Are you going to have a switch for each light or just one for all the lights and another for the smoke. If I may make some suggestions If you go with just one switch for the lights, you could reduce the number of wires to four. Two for the smoke and two for the lights. You could still put individual rheostats for the intensity of each light on the ship to adjust the brightness of each light. I also am curious as to how you were planning to mount the finished ship. I ask because should you choose the pedestals you could use three. Two to mount the ship, one as a dummy using the hole for the bolt as a place to hide the wires. Nice work on the rudder too. I am sure what ever you choose you will do it well. On with the Show.... J.Pett “If you're going through hell, keep going” (Winston Churchill) Current build: MS Rattlesnake (MS2028) http://modelshipworld.com/index.php?/topic/45-model-shipways-rattlesnake-ms2028-scale-164th/ Side Build: HMS Victory: Corel http://modelshipworld.com/index.php?/topic/3709-hms-victory-by-jpett-corel-198/?p=104762 On the back burner: 1949 Chris Craft Racer: Dumas http://modelshipworld.com/index.php?/topic/939-1949-chris-craft-racer-by-jpett-dumas-kit-no-1702/ Sometime, but not sure when: Frigate Berlin: Corel http://www.corel-srl.it/pdf/berlin.pdf
src Posted February 26, 2013 #18 Posted February 26, 2013 (edited) Dominik, I too am curious how you will handle the wires as I will have the same issue on my build. Love all the details your adding. Even if you cant see it its nice to know they are in there. On your smoke generator, dont those RC generators create an oily residue? What will that do to your finish? Sam Edited February 26, 2013 by src Current Build Constructo Enterprise
Dominik Posted February 28, 2013 Author #19 Posted February 28, 2013 Thanks for your comments, guys. I have not yet decided how many switches to install, or indeed whether anything should be connected. However, I do not want to overdo it so I am currently thinking of connecting all lights and only have the smoke generator separate. In a model of this size, and considering that this is my first build, it should be enough to switch all lights on/off with one button. Although now that I think of it, it would be nice to just light up the cabin... Let's see, as the cables all come out from the body of the ship, I can still play with that later on. As to the mounting of the finished model, I will probably put it on some simple wooden construction (see, e.g., here http://www.shipmodel.com/files/rattlesnake-privateer-webrattlesnake28.jpg), instead of pedestals. Although there are some good pedestals out there with holes in them through which would hide the cables perfectly, I think the ship should rest on wood Call me old-fashioned if you want. As to the smoke generator, I have not really thought of how the smoke might affect the finish... I tested the generator once and the smoke did not seem to much or too sticky that it would actually pose a threat to either the wood or the finish. However, the generator is surrounded by a tiny iron ring which will protect the surrounding wood from the heat. And finally, I do not expect to use the generator all that often. It is more of treat that I will use every once in a while to impress visitors --- Current build: Rattlesnake 1781 (Mamoli)
JPett Posted March 1, 2013 #20 Posted March 1, 2013 (edited) Ahoy Dominik Great link. I found 2 more Ratts on that site with photos of some very impressive builds I like the mount too, might consider it for my build, Thanks No lights or smoke for me though, 30 years in the entertainment industry, I have seen enough of that Edited March 1, 2013 by JPett On with the Show.... J.Pett “If you're going through hell, keep going” (Winston Churchill) Current build: MS Rattlesnake (MS2028) http://modelshipworld.com/index.php?/topic/45-model-shipways-rattlesnake-ms2028-scale-164th/ Side Build: HMS Victory: Corel http://modelshipworld.com/index.php?/topic/3709-hms-victory-by-jpett-corel-198/?p=104762 On the back burner: 1949 Chris Craft Racer: Dumas http://modelshipworld.com/index.php?/topic/939-1949-chris-craft-racer-by-jpett-dumas-kit-no-1702/ Sometime, but not sure when: Frigate Berlin: Corel http://www.corel-srl.it/pdf/berlin.pdf
Martin W Posted March 1, 2013 #21 Posted March 1, 2013 Hi Dominik -- It's good to see how you're progressing. Like JPett, I also appreciate that link. The wooden mount shown in the picture is the one that comes in the Mamoli kit, I believe, since I have all those short pieces of wood. Your planking on the quarter deck is off to a good start. One challenge I faced on the quarter deck is that I'd already cut the hatches and installed the capstan, so getting that center plank exactly right proved a trickier than I'd expected. Yours looks pretty doggone good to my eye. Cheers, Martin Current Build: HMS FLY 1776 Previous Builds: Rattlesnake 1781 Prince de Neufchatel
Dominik Posted March 4, 2013 Author #22 Posted March 4, 2013 Here follow some pictures from the planking of the quarterdeck and the forecastle. For the planking I used the same pattern as for the main deck, see the earlier picture in post no 3 (page no 1 of this build log). It is slightly more sophisticated than the pattern suggested by the instructions from Mamoli but it felt like the right thing to do after studying online some additional plans of the Rattlesnake. The pictures also show the polished wood which will eventually also be treated with the varnish I used for the planks of the main deck. Did I mention that the ship now also has a "real" captain who relieved the "paper version" of his duties --- Current build: Rattlesnake 1781 (Mamoli)
Martin W Posted March 7, 2013 #23 Posted March 7, 2013 Dominik -- Your new captain shows how lonely the life of the leader can be! Cheers, Martin Current Build: HMS FLY 1776 Previous Builds: Rattlesnake 1781 Prince de Neufchatel
Dominik Posted March 7, 2013 Author #24 Posted March 7, 2013 Dominik -- Your new captain shows how lonely the life of the leader can be! Cheers, Martin Well, the captain has some buddies but they are still a bit "nude" Will have to get some colours over the weekend to make them look proper. --- Current build: Rattlesnake 1781 (Mamoli)
joshukr Posted March 11, 2013 #25 Posted March 11, 2013 nice job with the decking, it is looking great. -joshukr- Current Build: Willie L. Bennett Skip Jack - Model Shipways (1:32) - First Build

Recommended Posts
Create an account or sign in to comment
You need to be a member in order to leave a comment
Create an account
Sign up for a new account in our community. It's easy!
Register a new accountSign in
Already have an account? Sign in here.
Sign In Now