TomShipModel
-
Posts
285 -
Joined
-
Last visited
Content Type
Profiles
Forums
Gallery
Events
Everything posted by TomShipModel
-
Well done Ken. Since, this isn't built to any particular establishment, the owner/skipper used their own preference. Some blackening would have been likely. In the Royal Navy of that time, both gaff and boom would have been blackened. Maybe, blacken both spars at the jaws and at the end. Tom
- 238 replies
-
- 3
-

-
- sloop
- providence
- (and 1 more)
-
Very good demo. Thanks.
-
You are welcome Chuck. Glad to do it. It was fun.
- 421 replies
-
- 5
-
-
- medway longboat
- syren ship model
- (and 1 more)
-
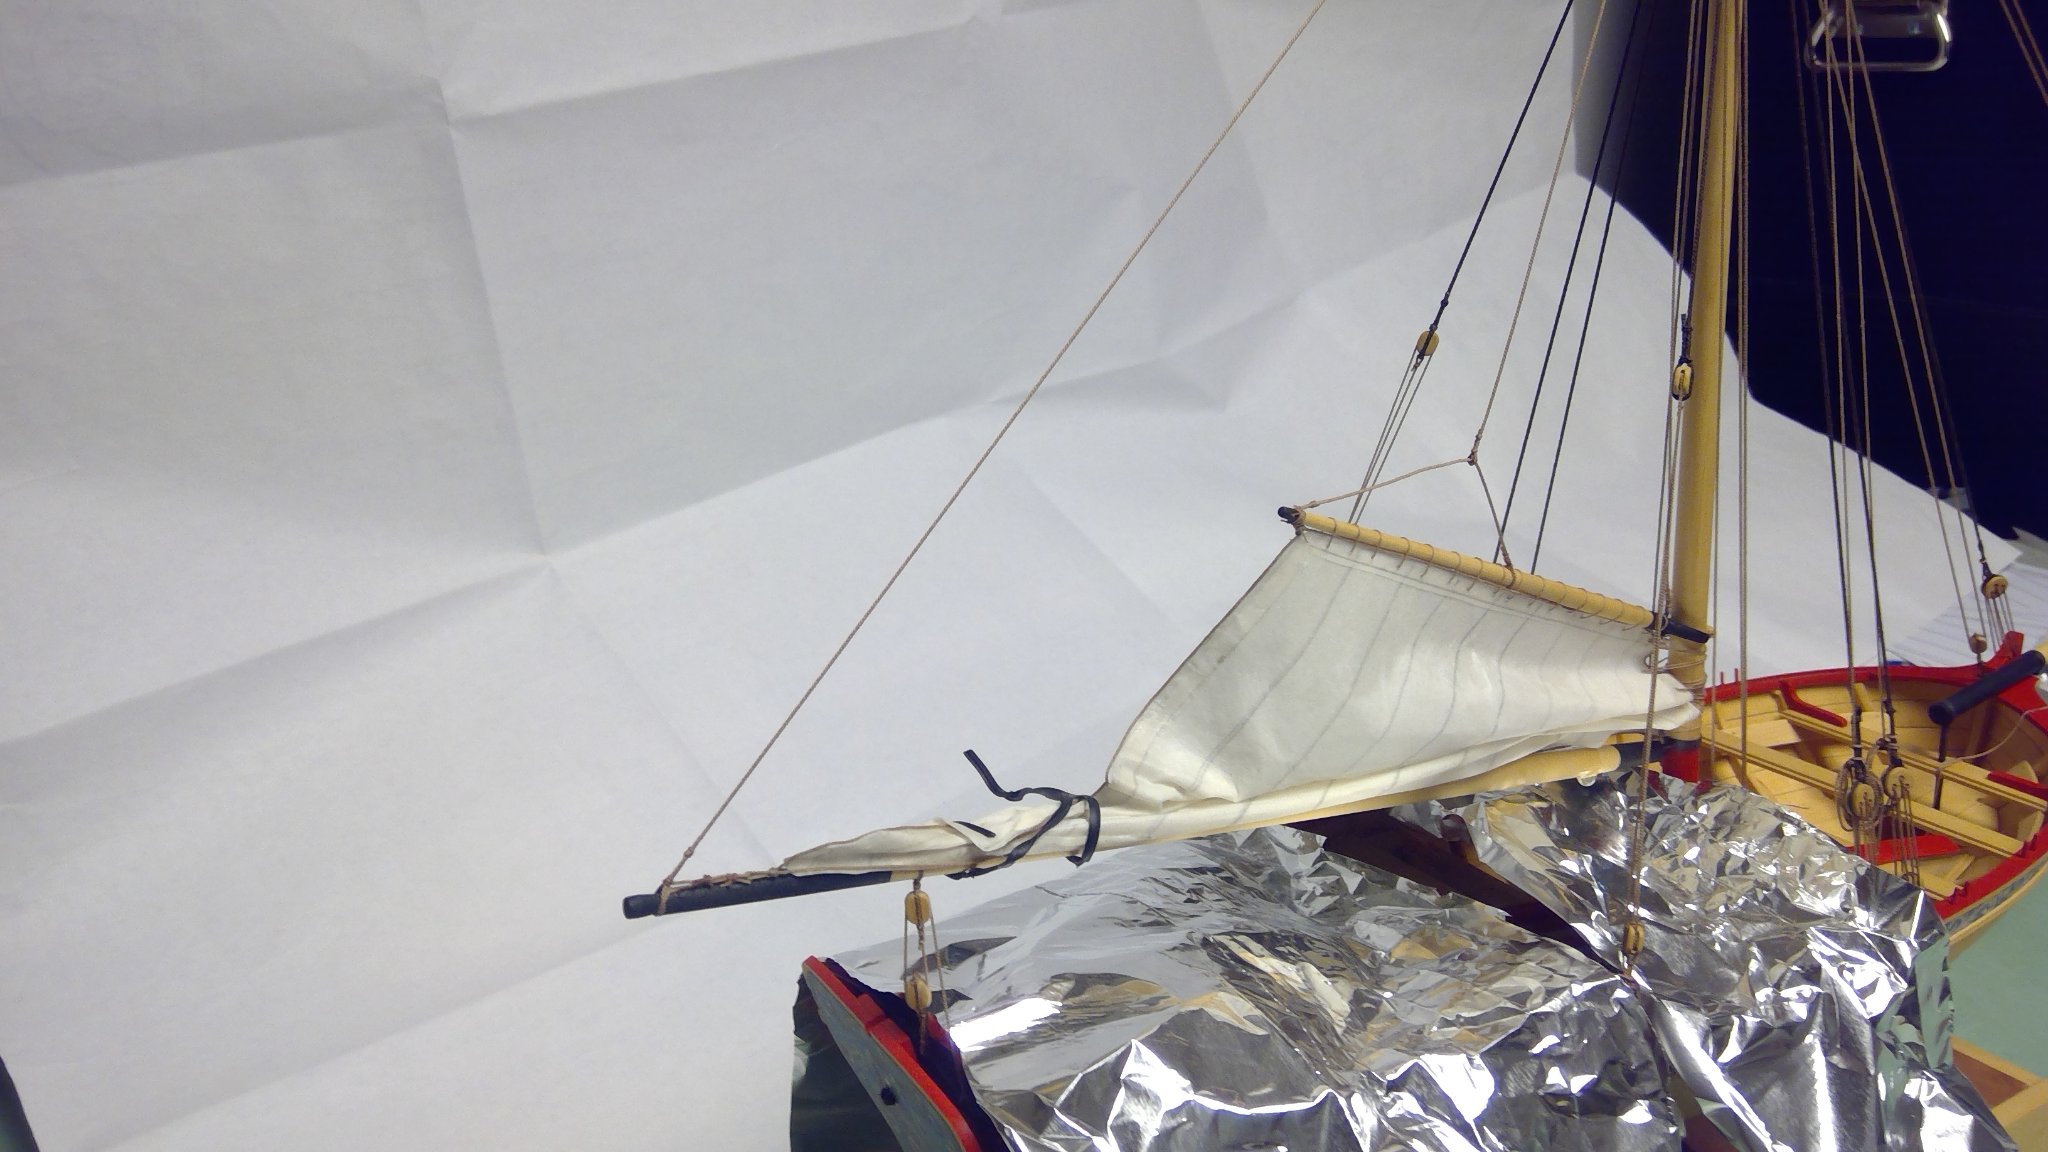
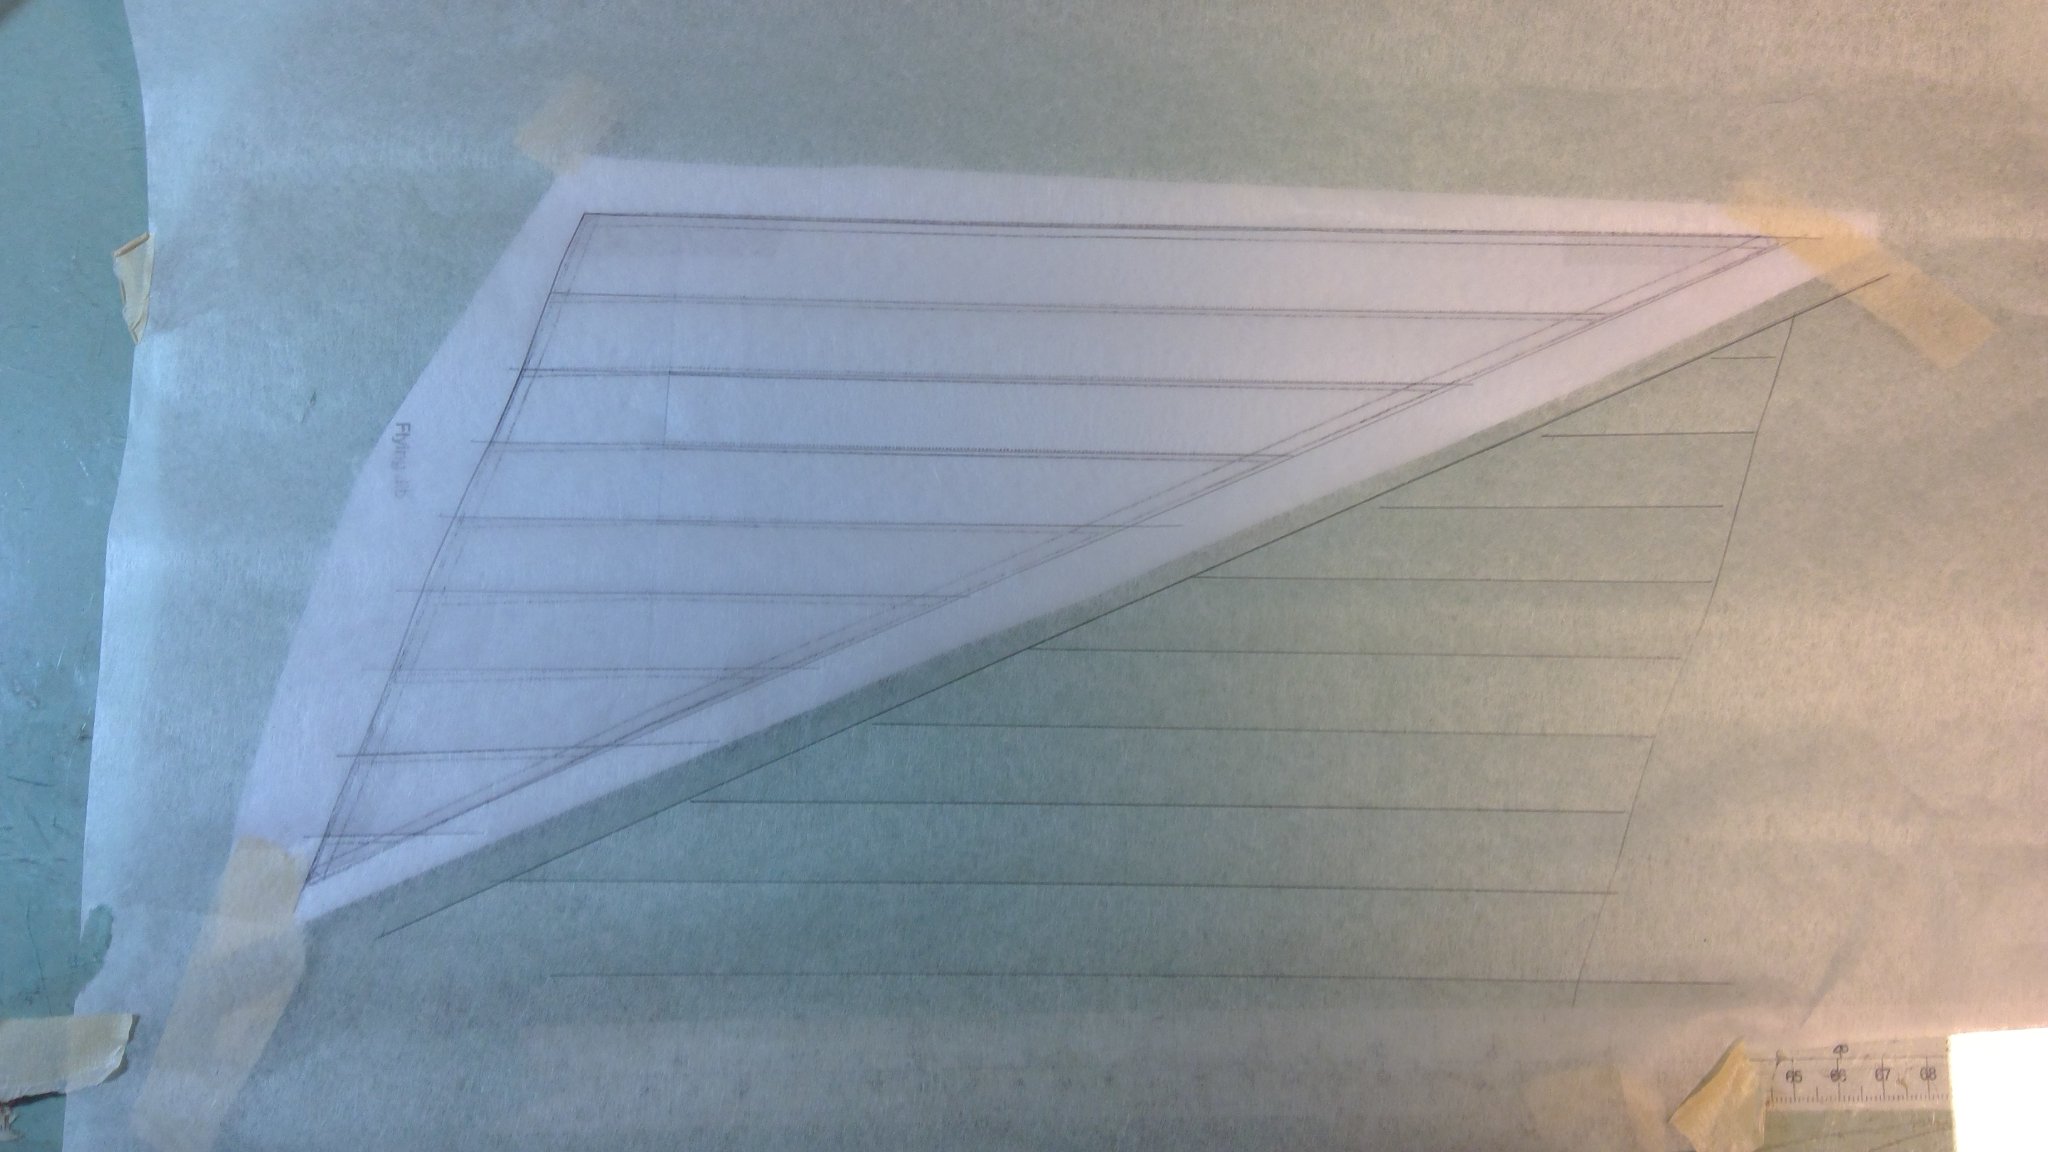
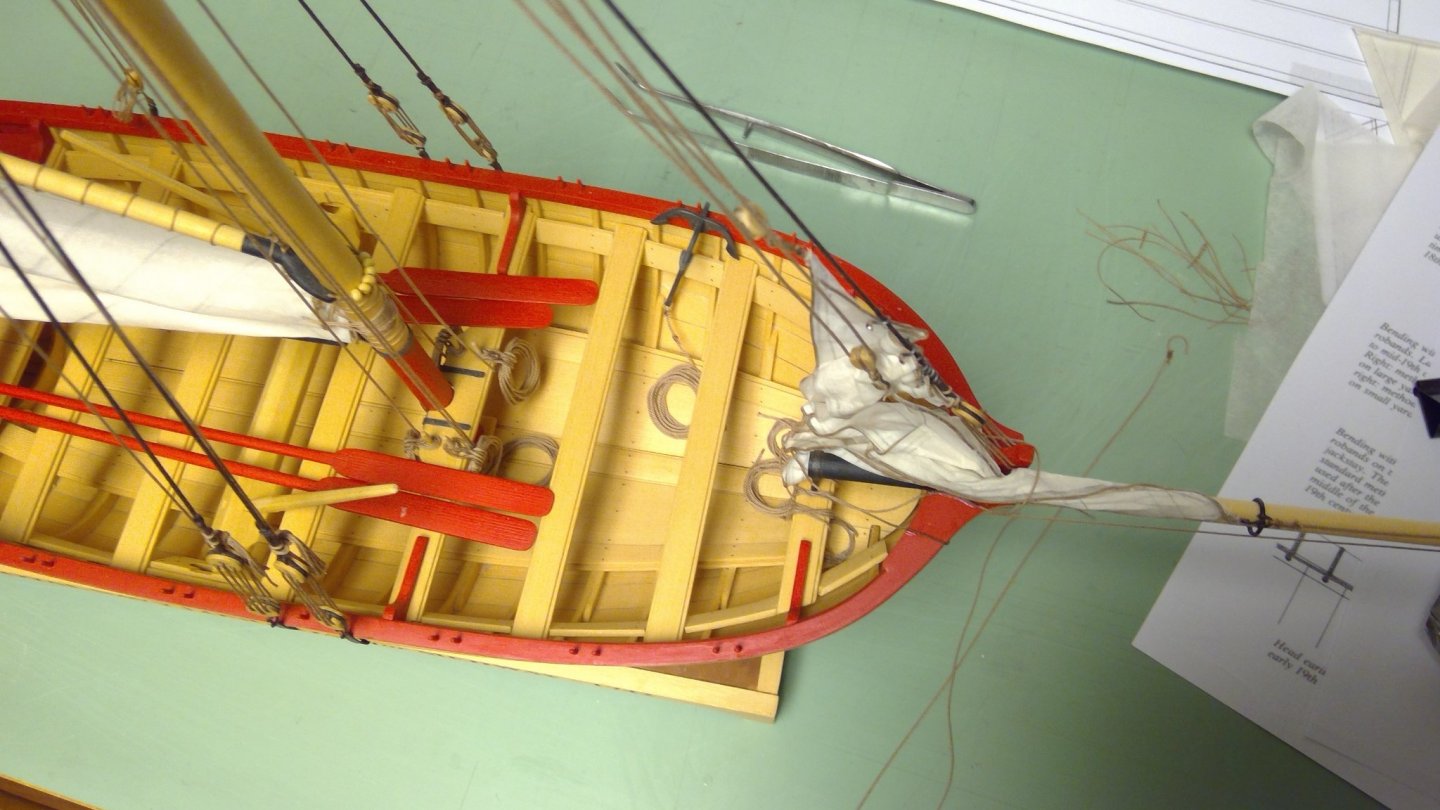
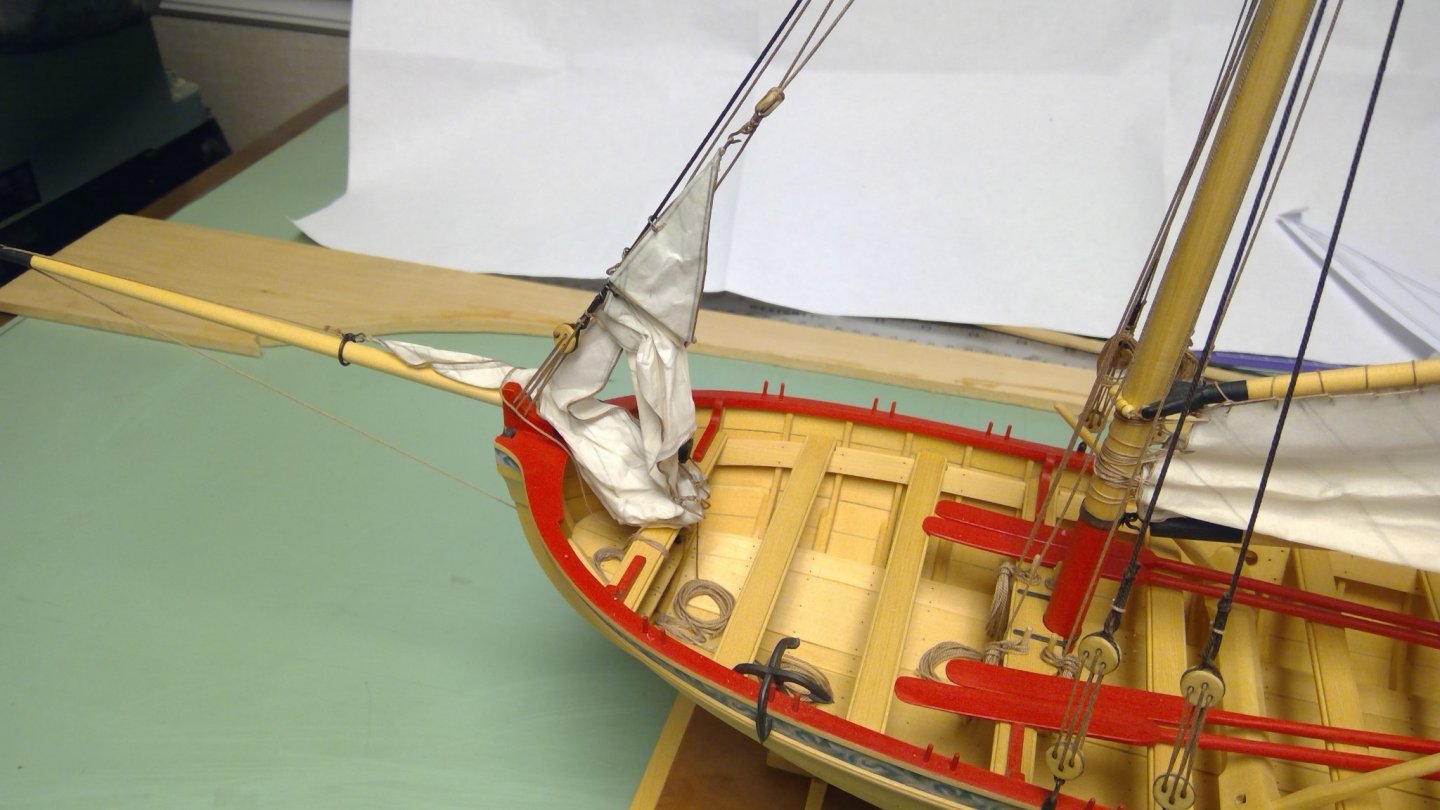
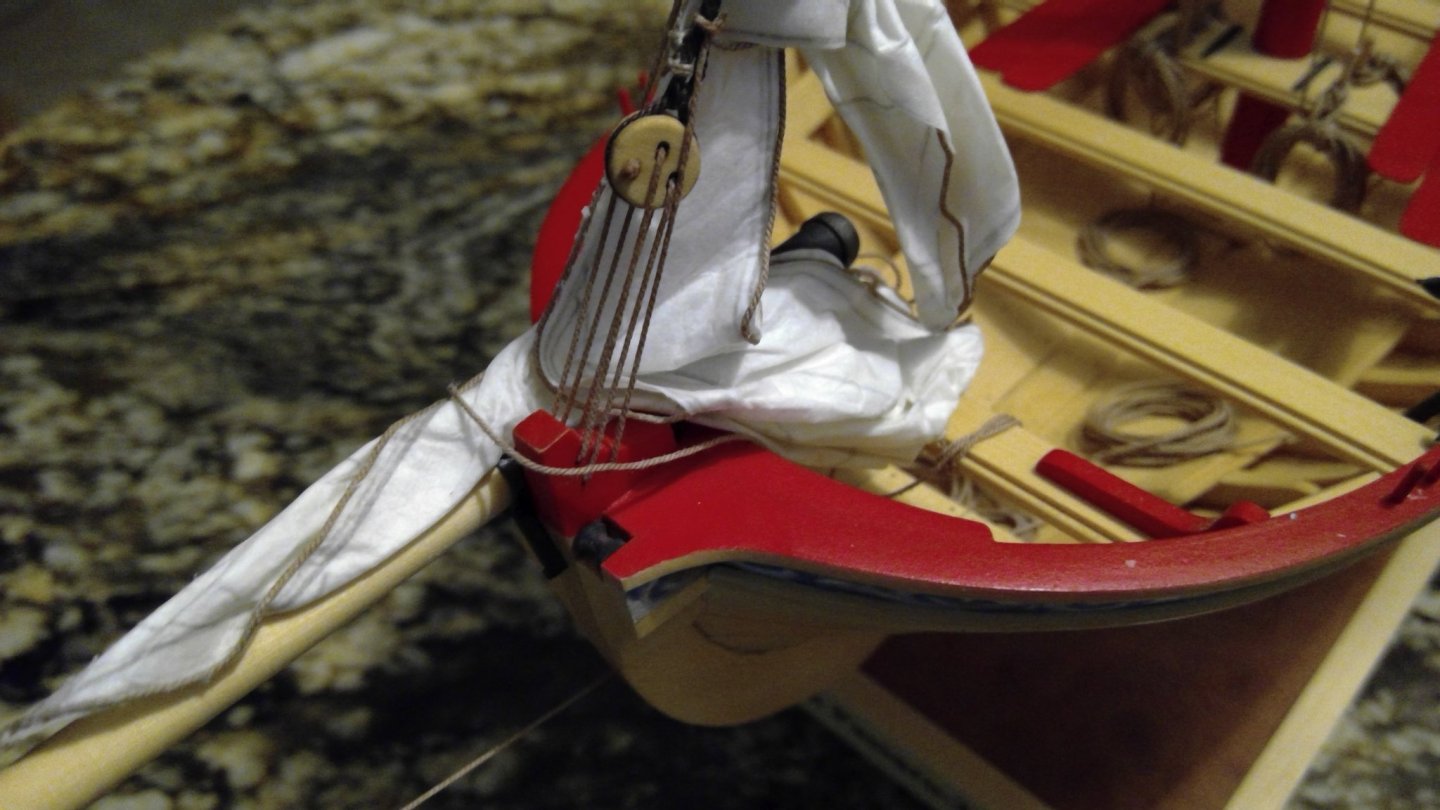
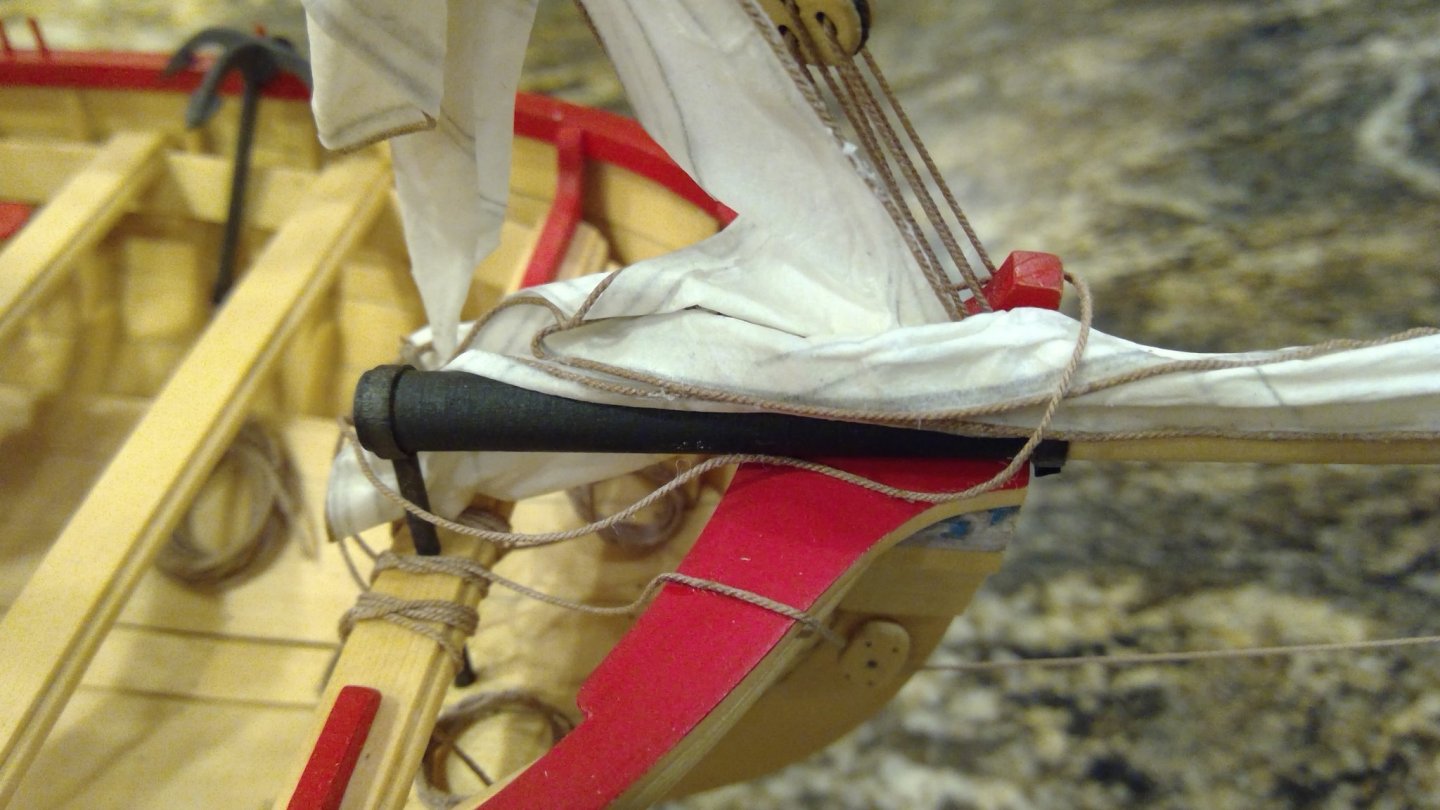
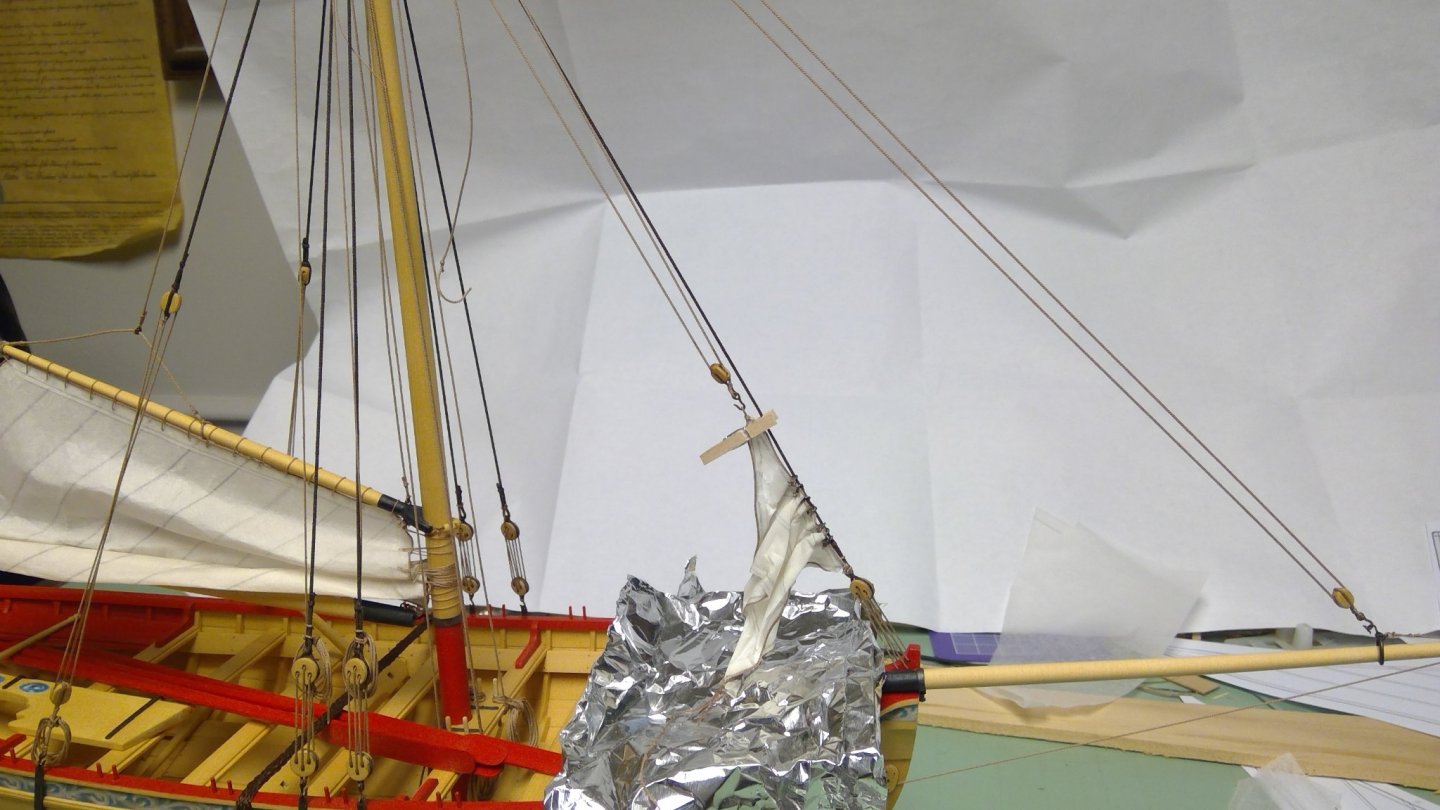
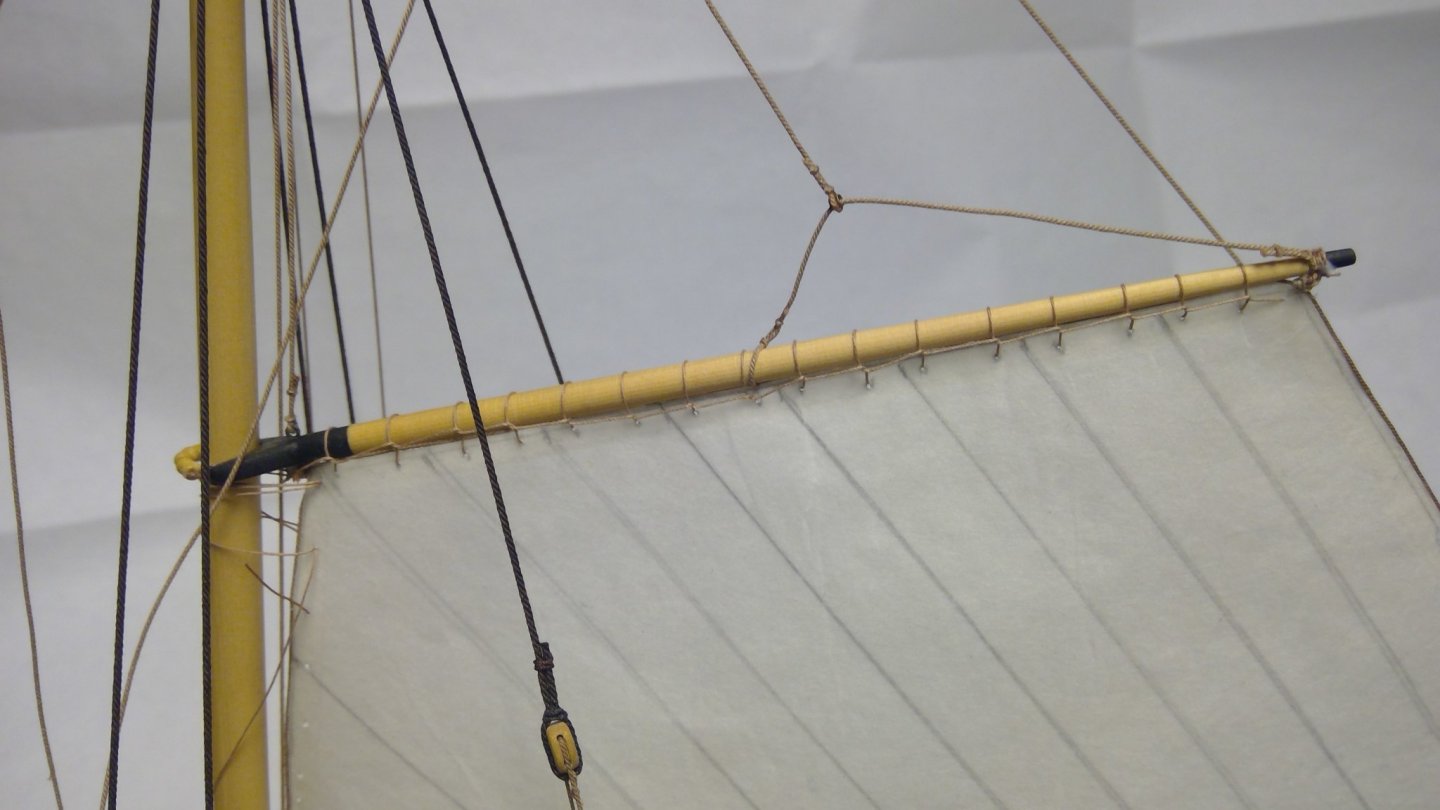
Moving on to the jib, we see that it is set flying (that is, it isn't tied to a yard or any standing rigging). The traveler on the bowsprit will be one connection point and the halyard block another. Differing from the fore sail, there are two sheet lines on the jib. The reason is because when changing tacks (moving the sail so that it draws on the opposite side of the boat) the stay prevents a single sheet from being shifted from one side to the other. Because this sail is a flying sail, it is best to start furling it off the model. Do that by moistening the sail with your wetted brush at the points where the sail is going to bend. This sail is set by first raising the halyard and then hauling in the outhaul that pulls the traveler out on the bowsprit. In the opposite direction, on a larger rig, there would be an inhaul to pull the traveler in. On a small boat, you cast off the outhaul and pull in the sail while letting off on the halyard. On a larger ship, there is a net to catch the lowered sail. Not so on the boat. Lowering the sail without pulling in the traveler would drop the sail in the water (a mini-disaster). So, lengthen the outhaul. I cheated and spliced in a segment of line and seized it to the traveler. You make the splice by open the end of the line to separate strands on both cut ends. Then apply white glue connect to two ends and twirl the line between your thumb and fore finger. The lowered sail rests on the bowsprit and the thwart. The last thing to do is to rig the sheet line. One side gets wrapped around a thwart. The second sheet wraps around the stem and is then belayed on the thwart on the opposite side. I wet down the line with dilute white glue, add a little weight with a doll house clothespin pin or two and let the line sag. I have photos of this below. Once the sail is dry, touch up the shape and hang. Finally, belay the lines to the thwarts and add rope coils. I make my coils by wrapping white glue soaked line around an adequately sized dowel on the pushing the formed coil off the dowel before the glue dries. With rigging line, I only use Cyano to point the line. Once the line goes through where I need to thread it, the cyano is cut off. All the line fixing is down with acrylic matt finish or dilute white glue. The furls sails are now done. I hope that you like the affect. Try doing it; it is really not that hard to do.

-
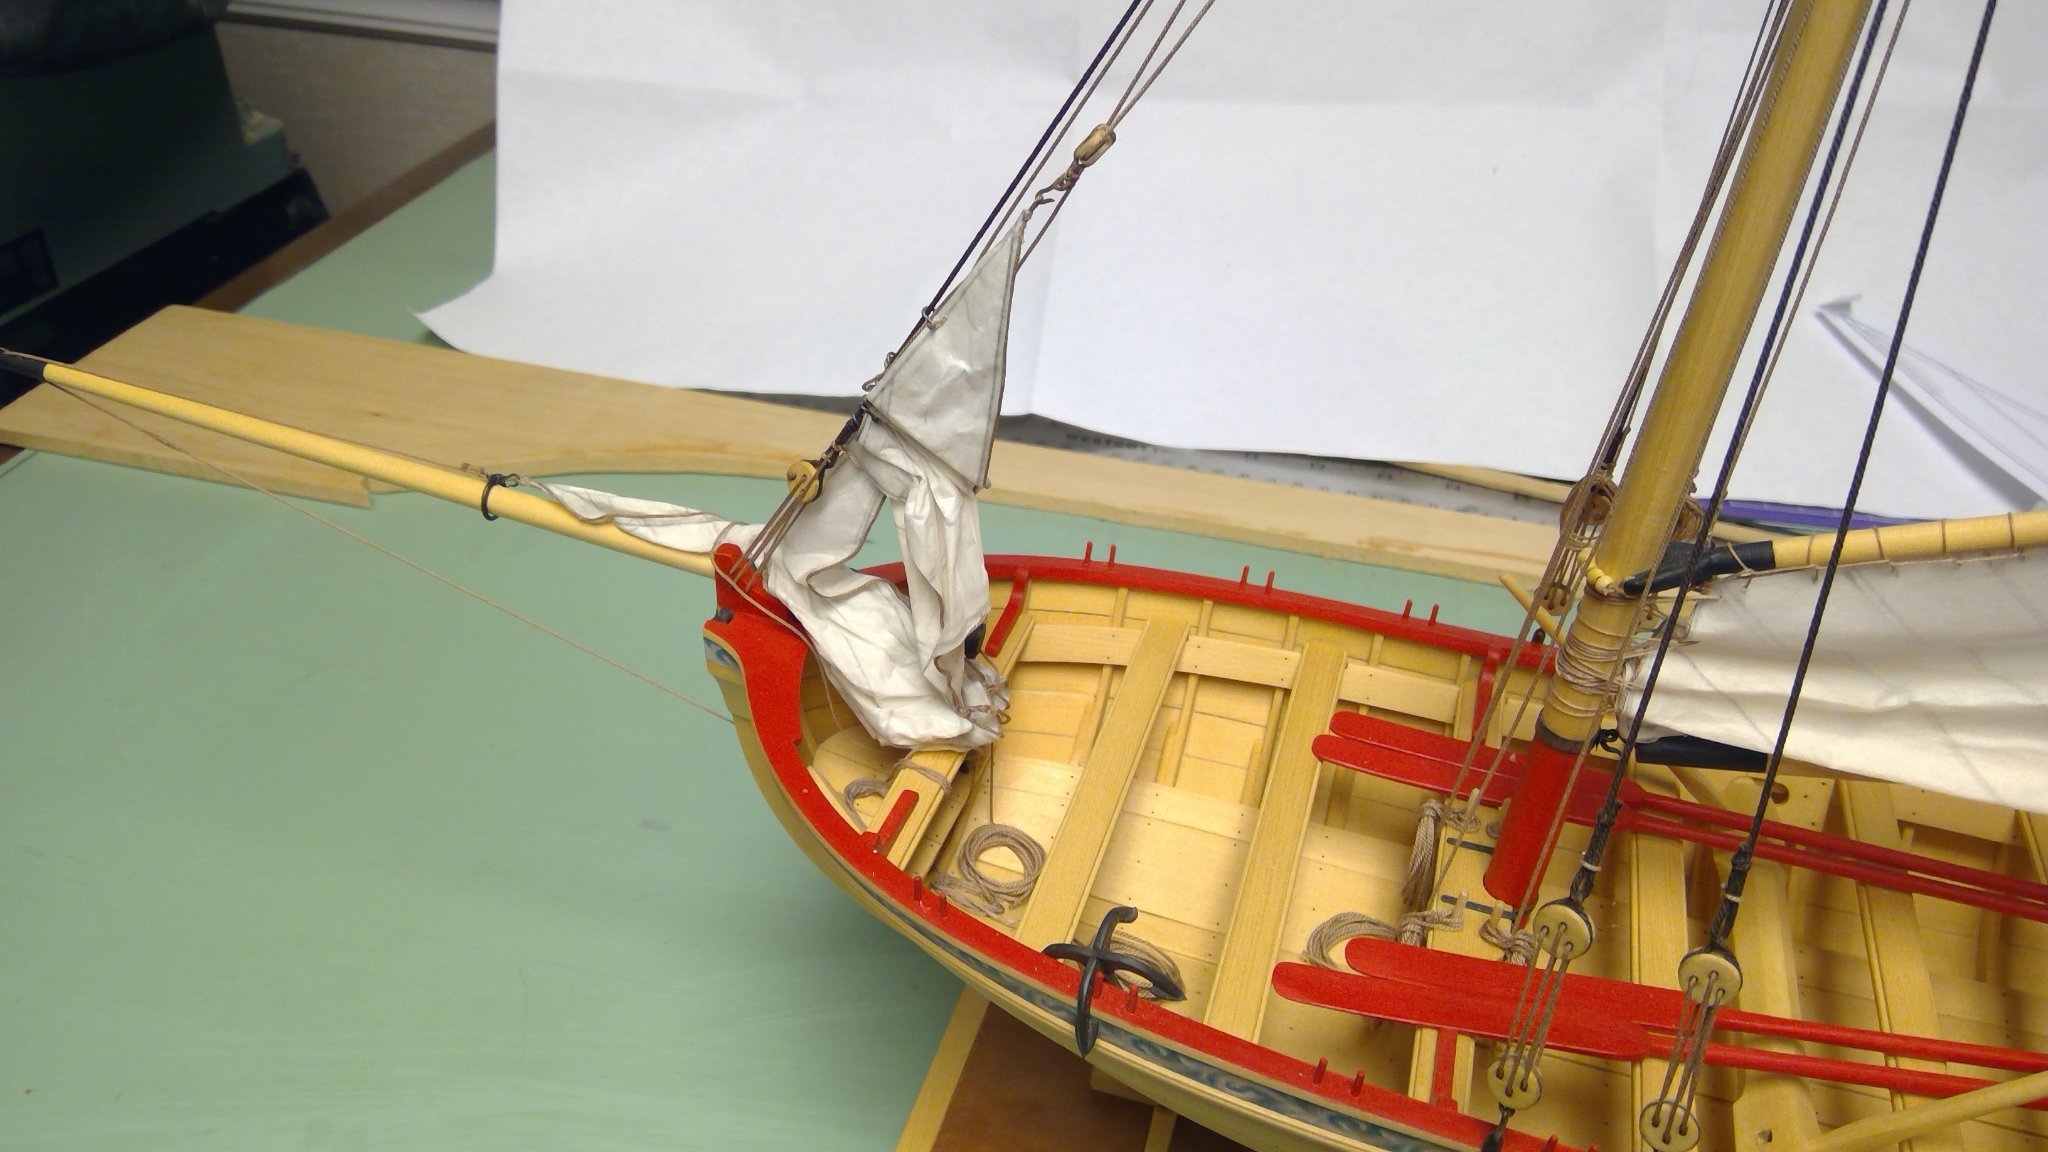
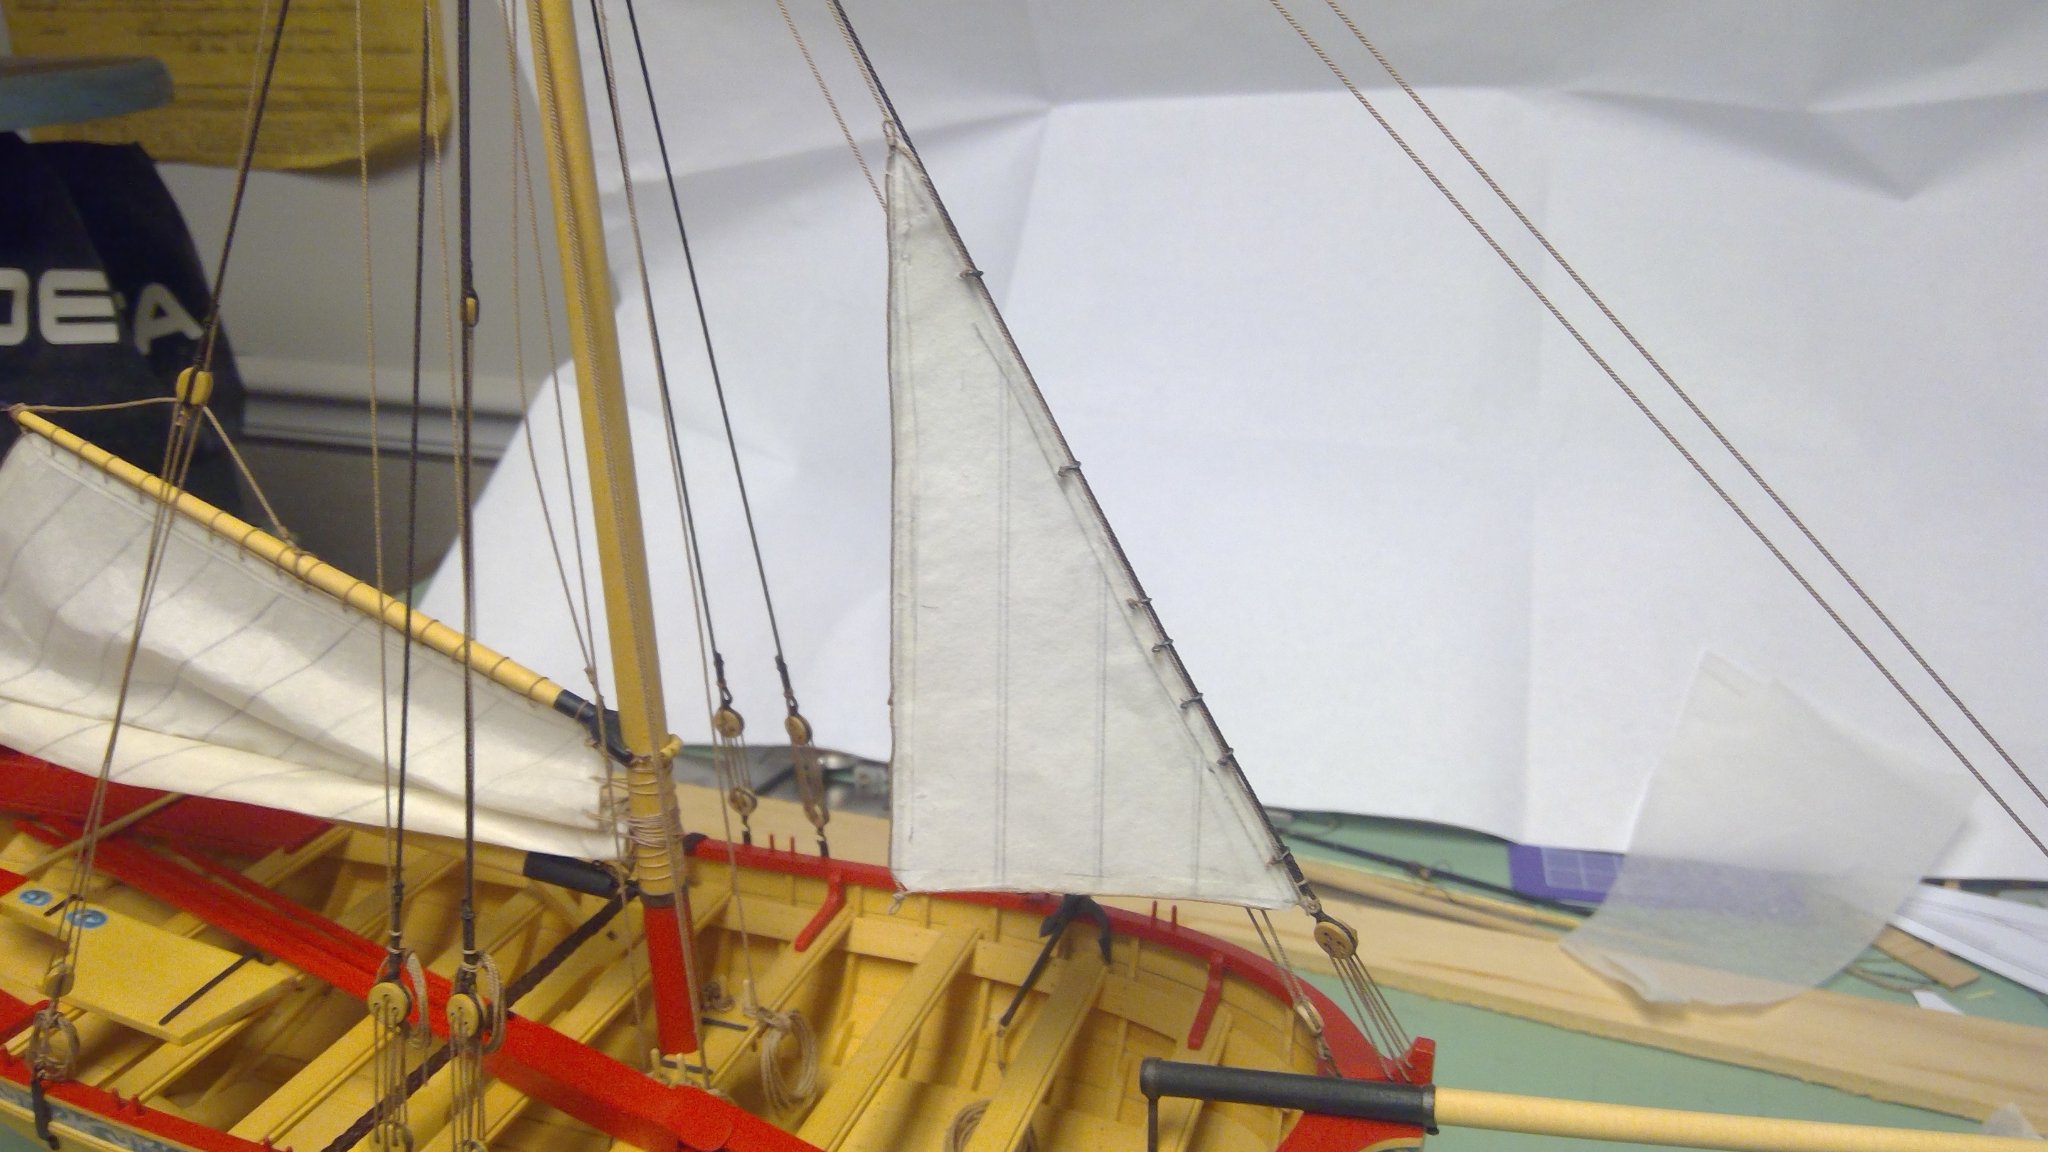
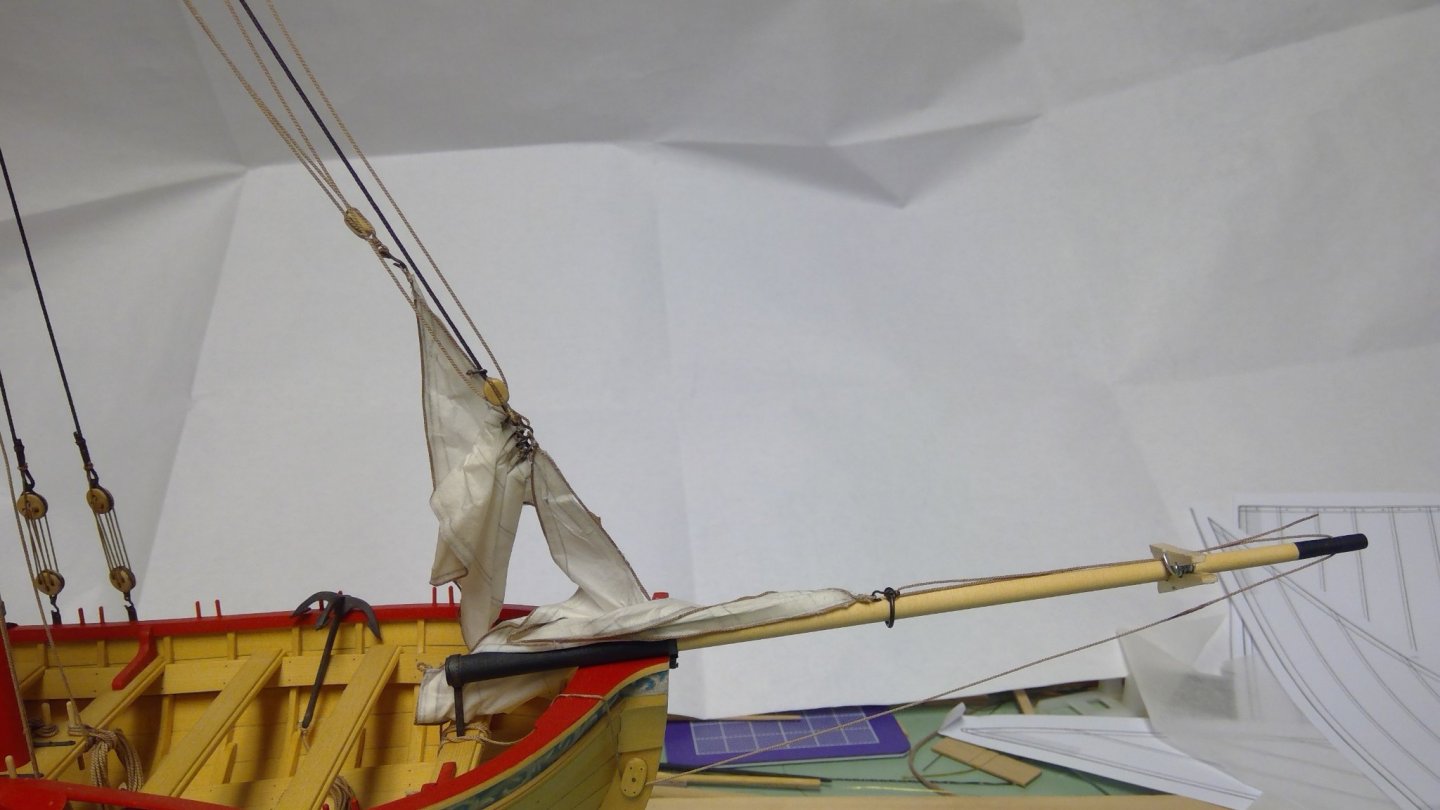
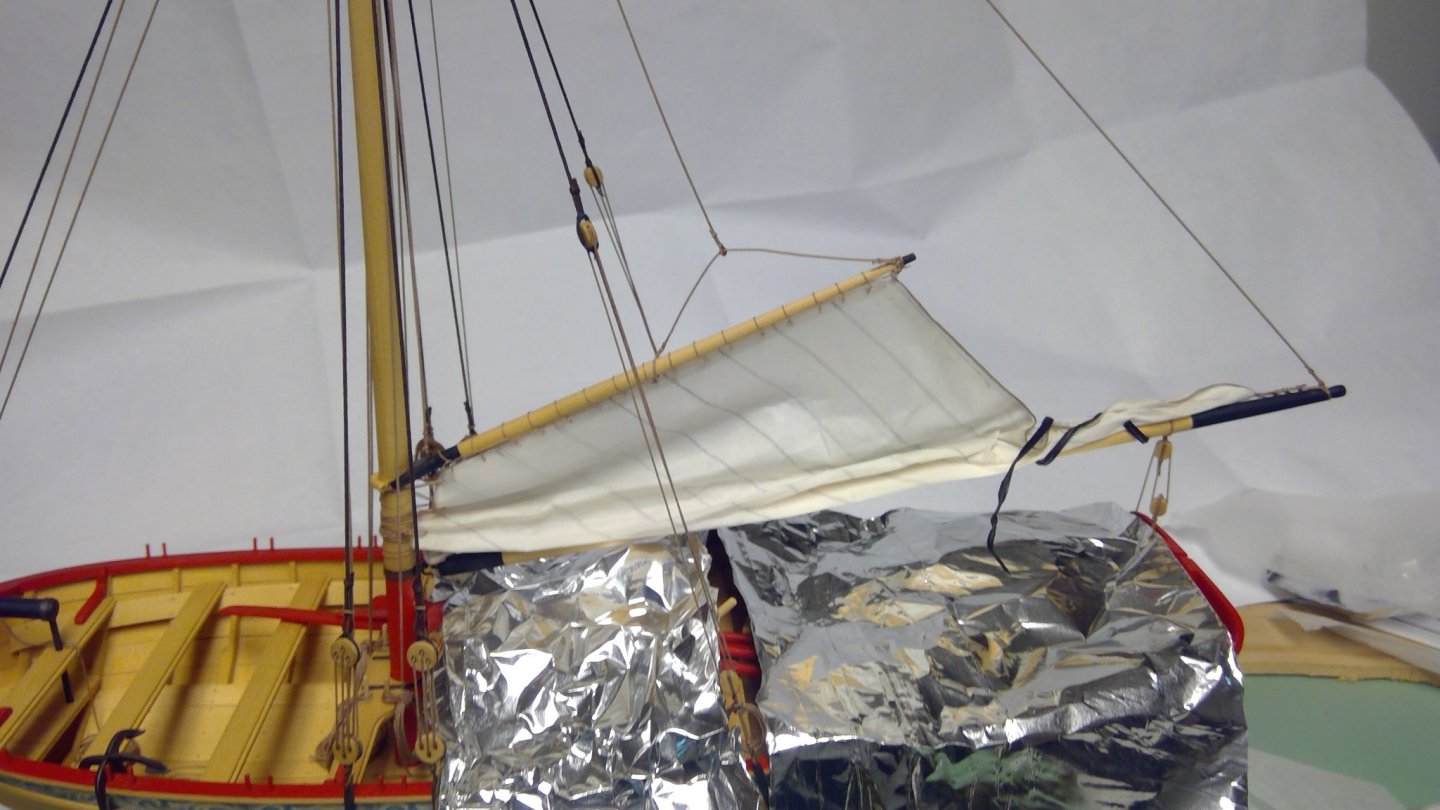
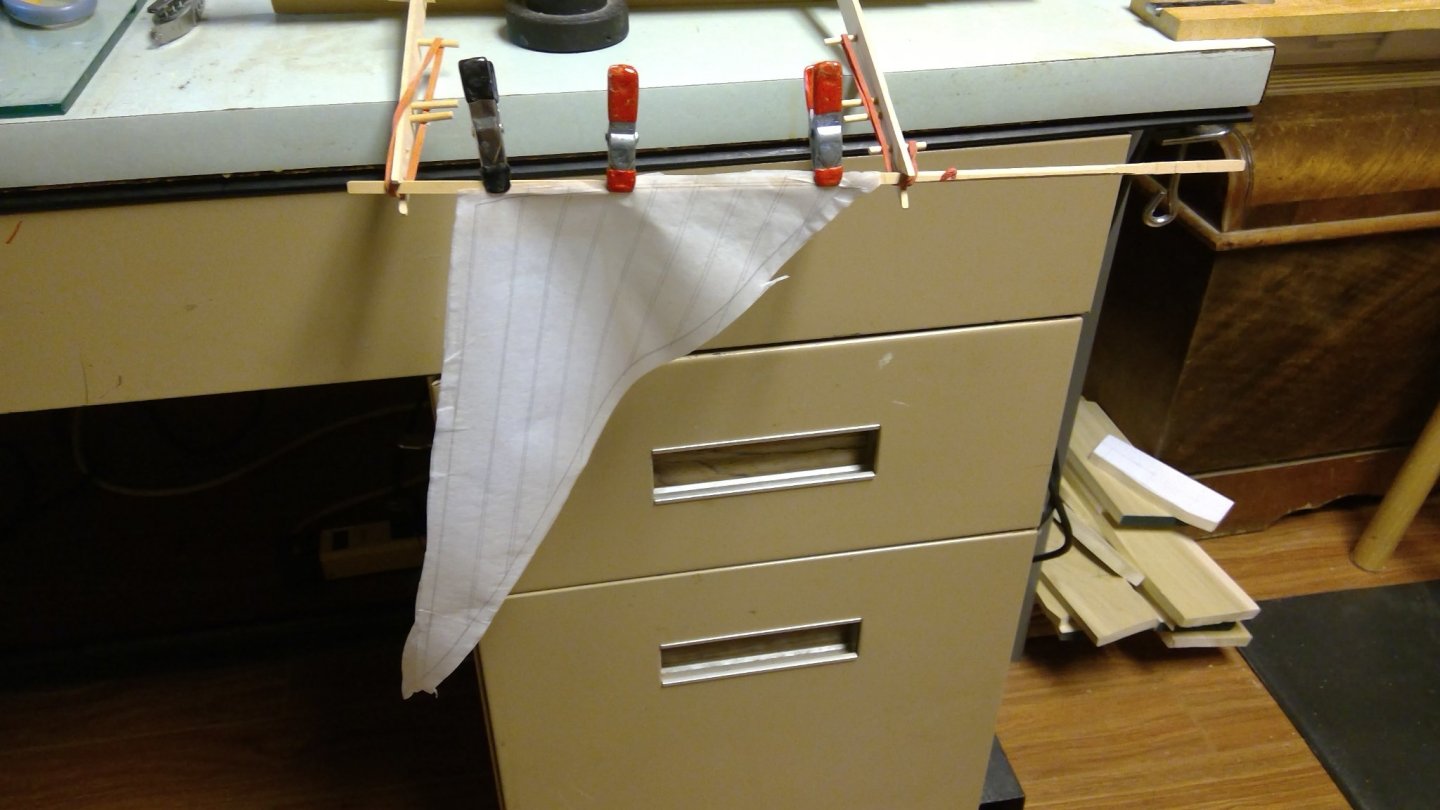
Now we move on to the head sails. As with the main sail, the head sails will be furled. So, the sail are will need to be reduced from the full set sail. The fore sail is attached to the stay. When furled, it will slide down the stay. The foot of the sail will be at the level of the top deadeye of the stay. The sail at half size looks a bit small, but remember that there needs to be a convincing look to the furled sail. Avoid the temptation to go too long up the stay. Since the top part of the sail, and the lower section will be a bit unfurled, the full with of the cloth (space between the seems) will be evident. So, draw these seam lines at the the full width. The others will show in the folds so spacing isn't much of a concern. The fore sail is attached to the stay in one of two ways. One way is to lace it with a continuous run line. Given that this rig is intended to be set up and broken down quickly, I would avoid the continuous lacing. Unlike the mainsail that would be stored laced to the gaff, the fore sail would not have been attached to the stay when the rig was struck. So, I attached it using 'hanks'. A hank looks exactly like a Greek Letter Omega. It is on top of the stay and the legs are lashed together through a grommet in the sail. Instead aof a continuous lashing through the grommet, sometimes a loop on each leg were connected by a wooden toggle. This made attaching these pretty quick. In the case of the model, I simply ran the line through the sail twice to make a loop, placed the hank on the stay capturing one leg in the loop, and then pulling the loop tight and tying it around the leg on the opposite side. As with the Main sail, drill, don't punch, the grommet holes. As with the mainsail, you need to have the number of attachment points that you would have with a set sail. From what I've been able to find, there was one hank for each cloth. For this sail, that means a total of seven hanks. The lower cringle is simply laced to the stay in the bite at the top of the deadeye. After the sail is attached to the stay, attach with a bite or seizing a sheet to the other end of the sail. There is only a single sheet for this sail. Not so for the jib, but we will cover that later. Finally, the sail halyard block is hooked at the top of the sail. Now furl your sail by wetting it and sliding it down the stay. You will do this to get it to hang convincingly. After it dries, you may want to do some touch up shaping. Do that with your wetted brush. Note the doll house cloths pin before I reattach the halyard to the mast.

-
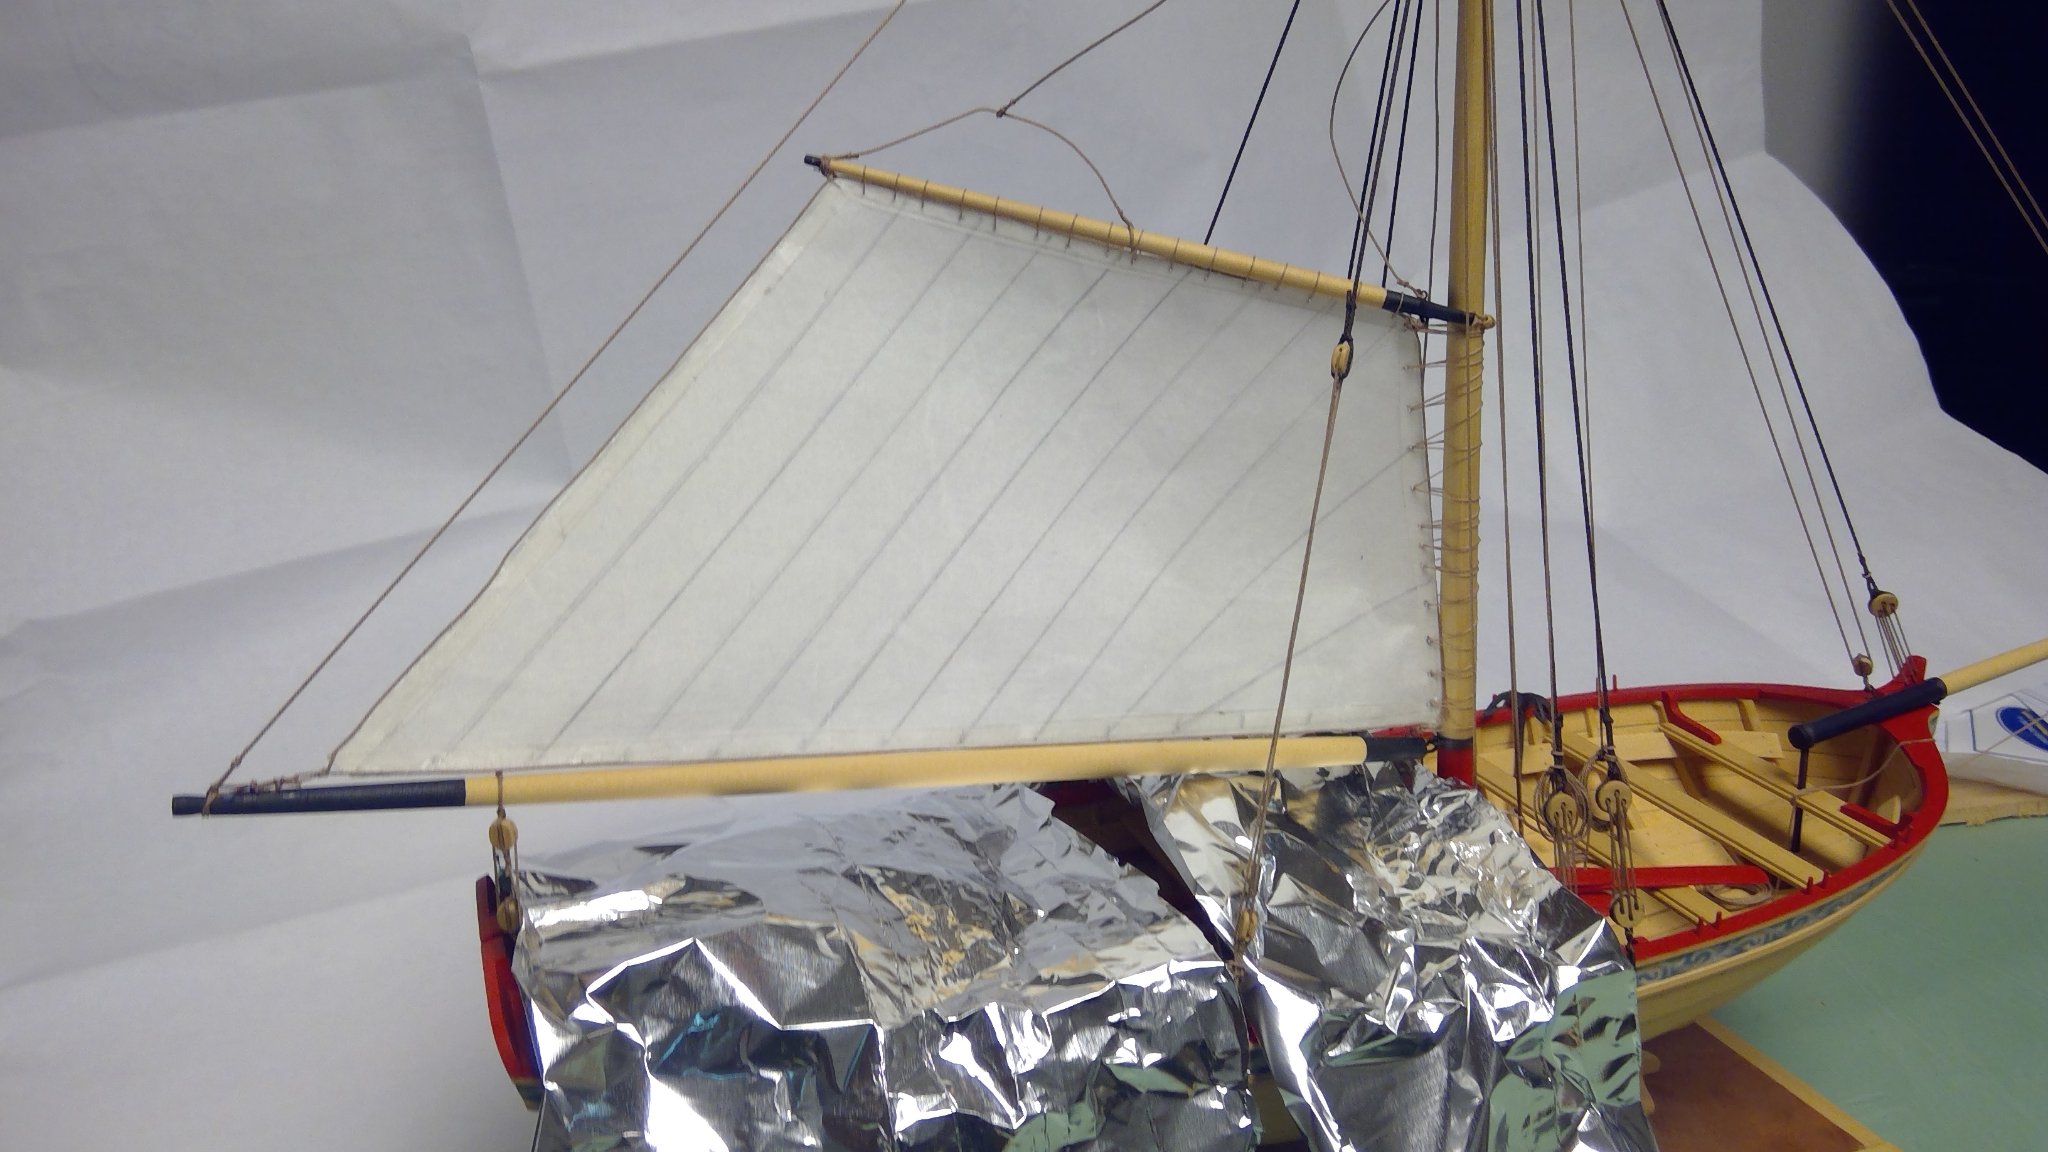
Now that the main sail is lashed to the gaff and to the mast it needs to be shaped as the gaff is lowered. I covered the boat with a bit of foil to preclude any water dripping into the boat. They key here is to be slow and deliberate. You are wetting the sail to shape it, but don't soak it. As the gaff is lowered, fold the sail gently wetting where you want it to fold. These are very loose folds (don't crease the sail). the lowered sail will fold over the boom. This is how it would be before any gaskets were tied on. No you need the sail to dry. Note that I uses the doll house clothes pins and a twist tie to hold it while it dries. After it stiffens up, continue shaping to get a realistic look. You should also wet the rigging lines that would be sagging in a catenary sag. Many times water and some clothes pin weight is enough to do this. Sometimes, brush on some dilute white glue. Chuck's rope takes well to this treatment.


-
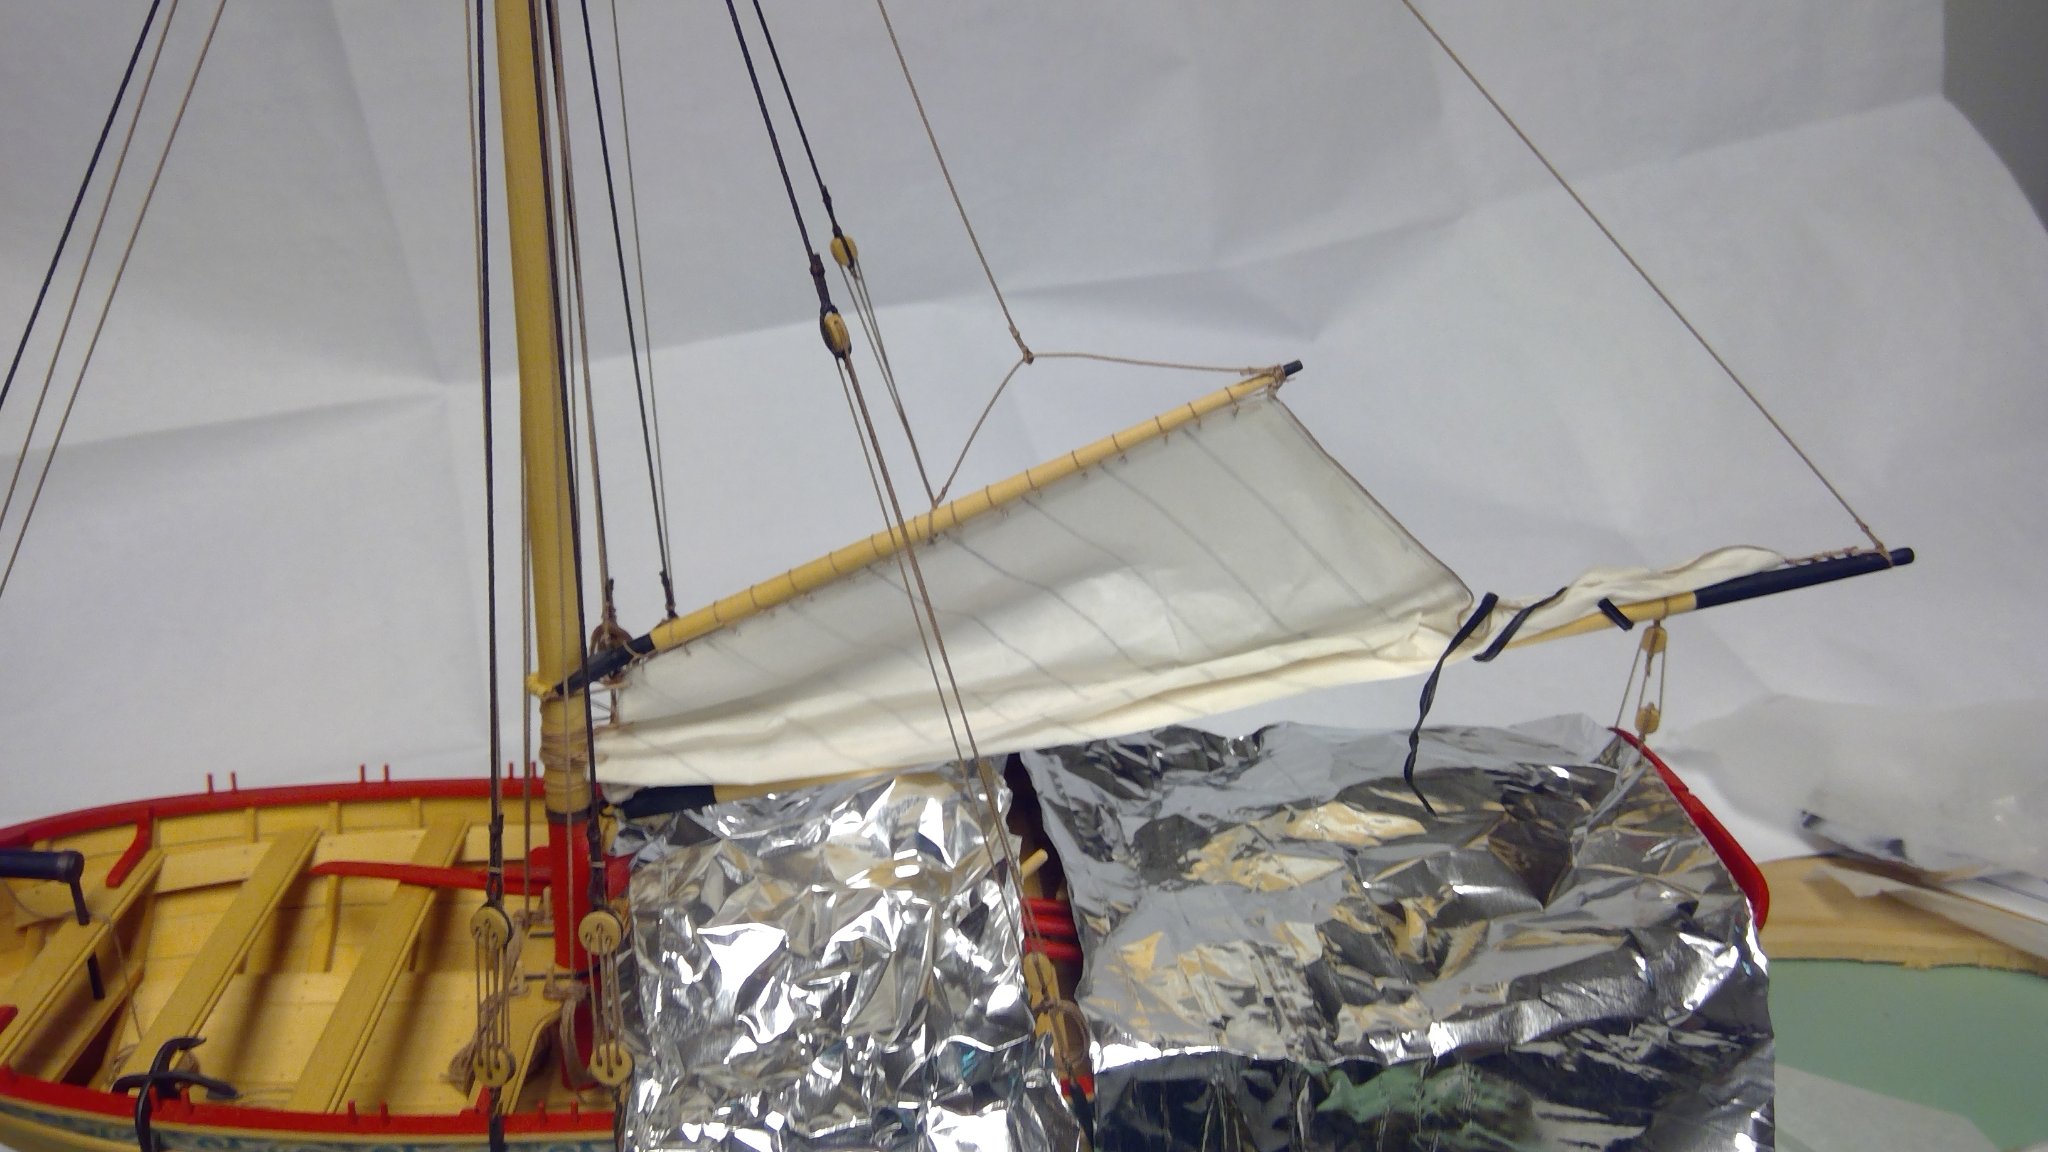
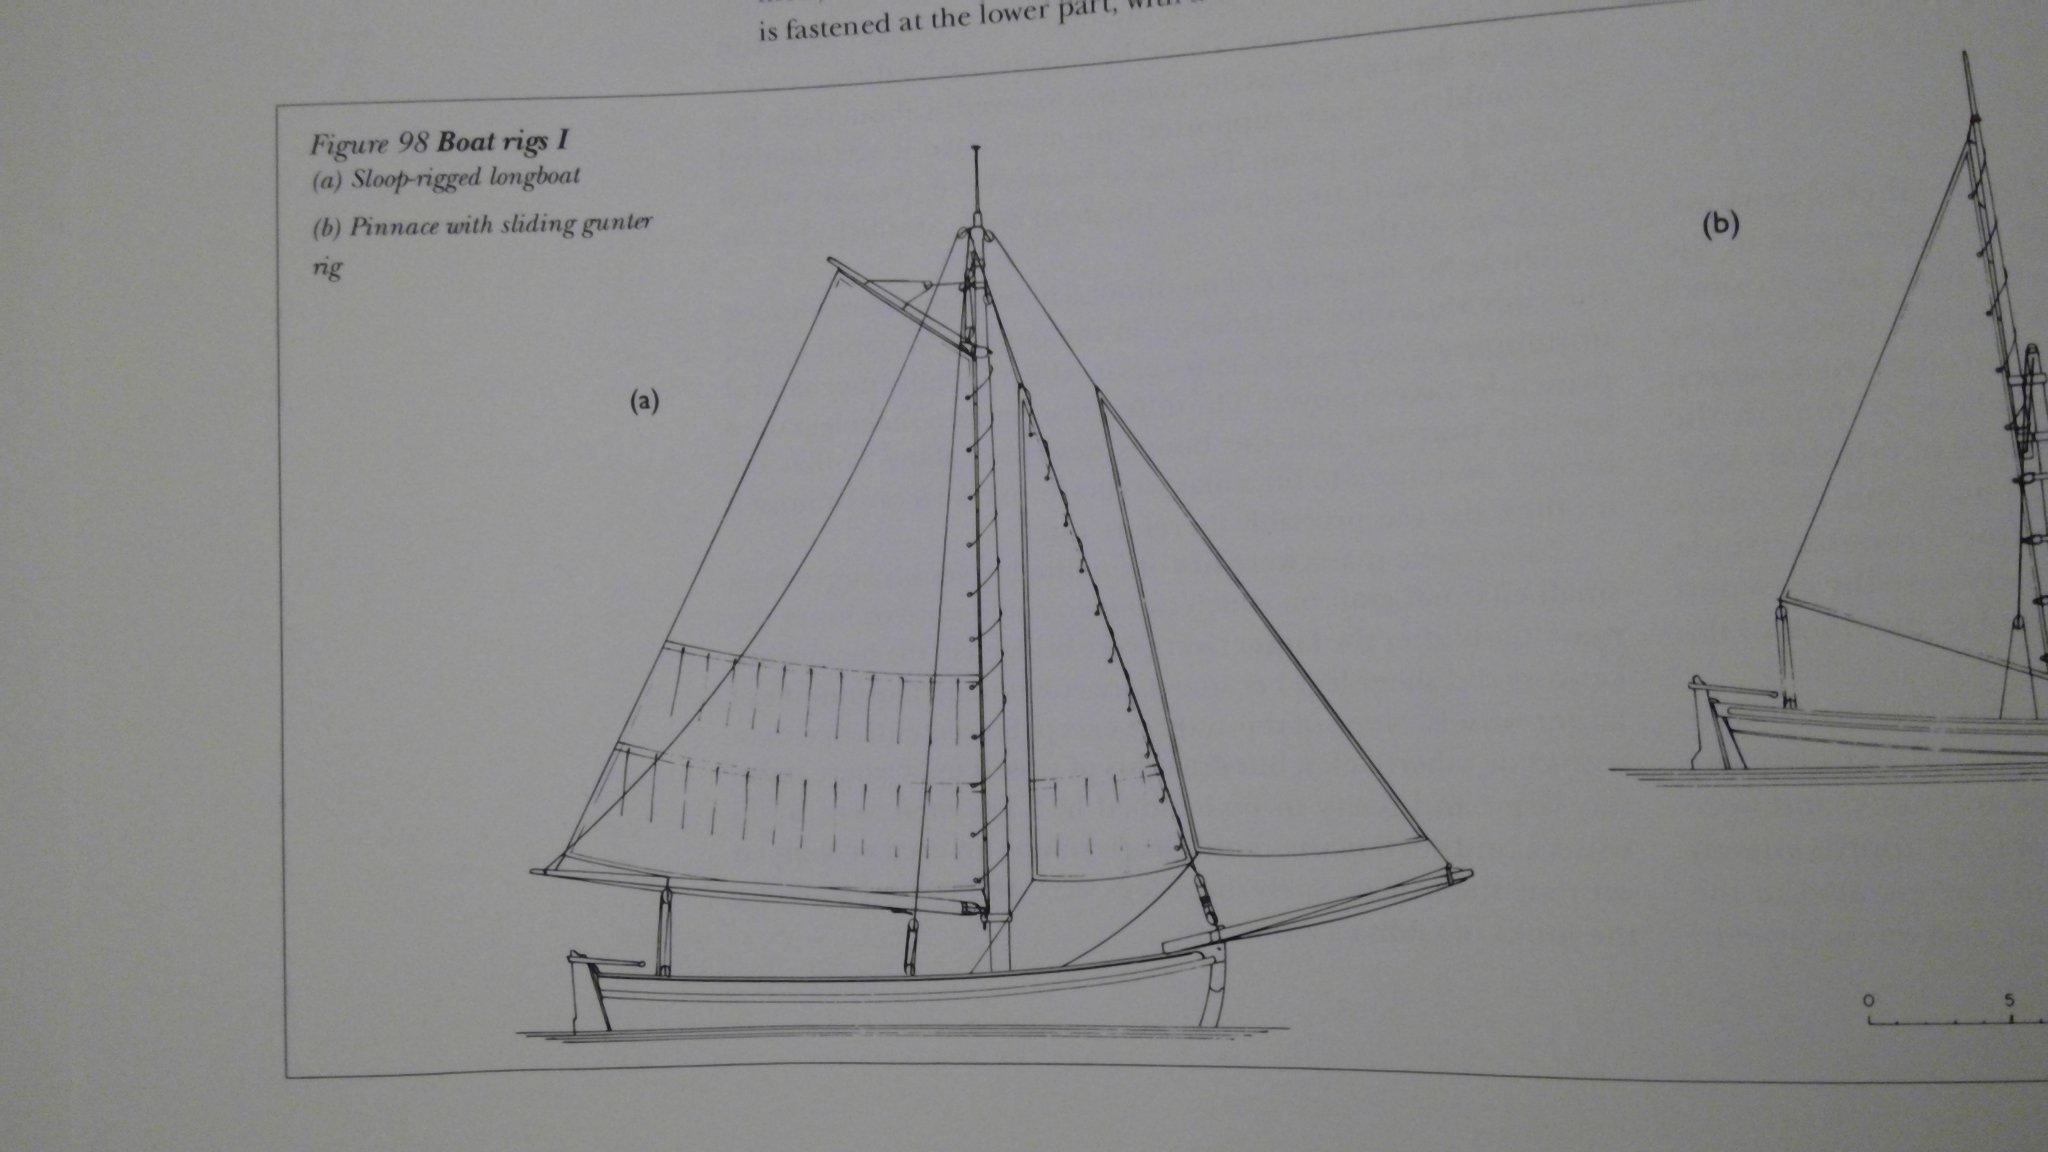
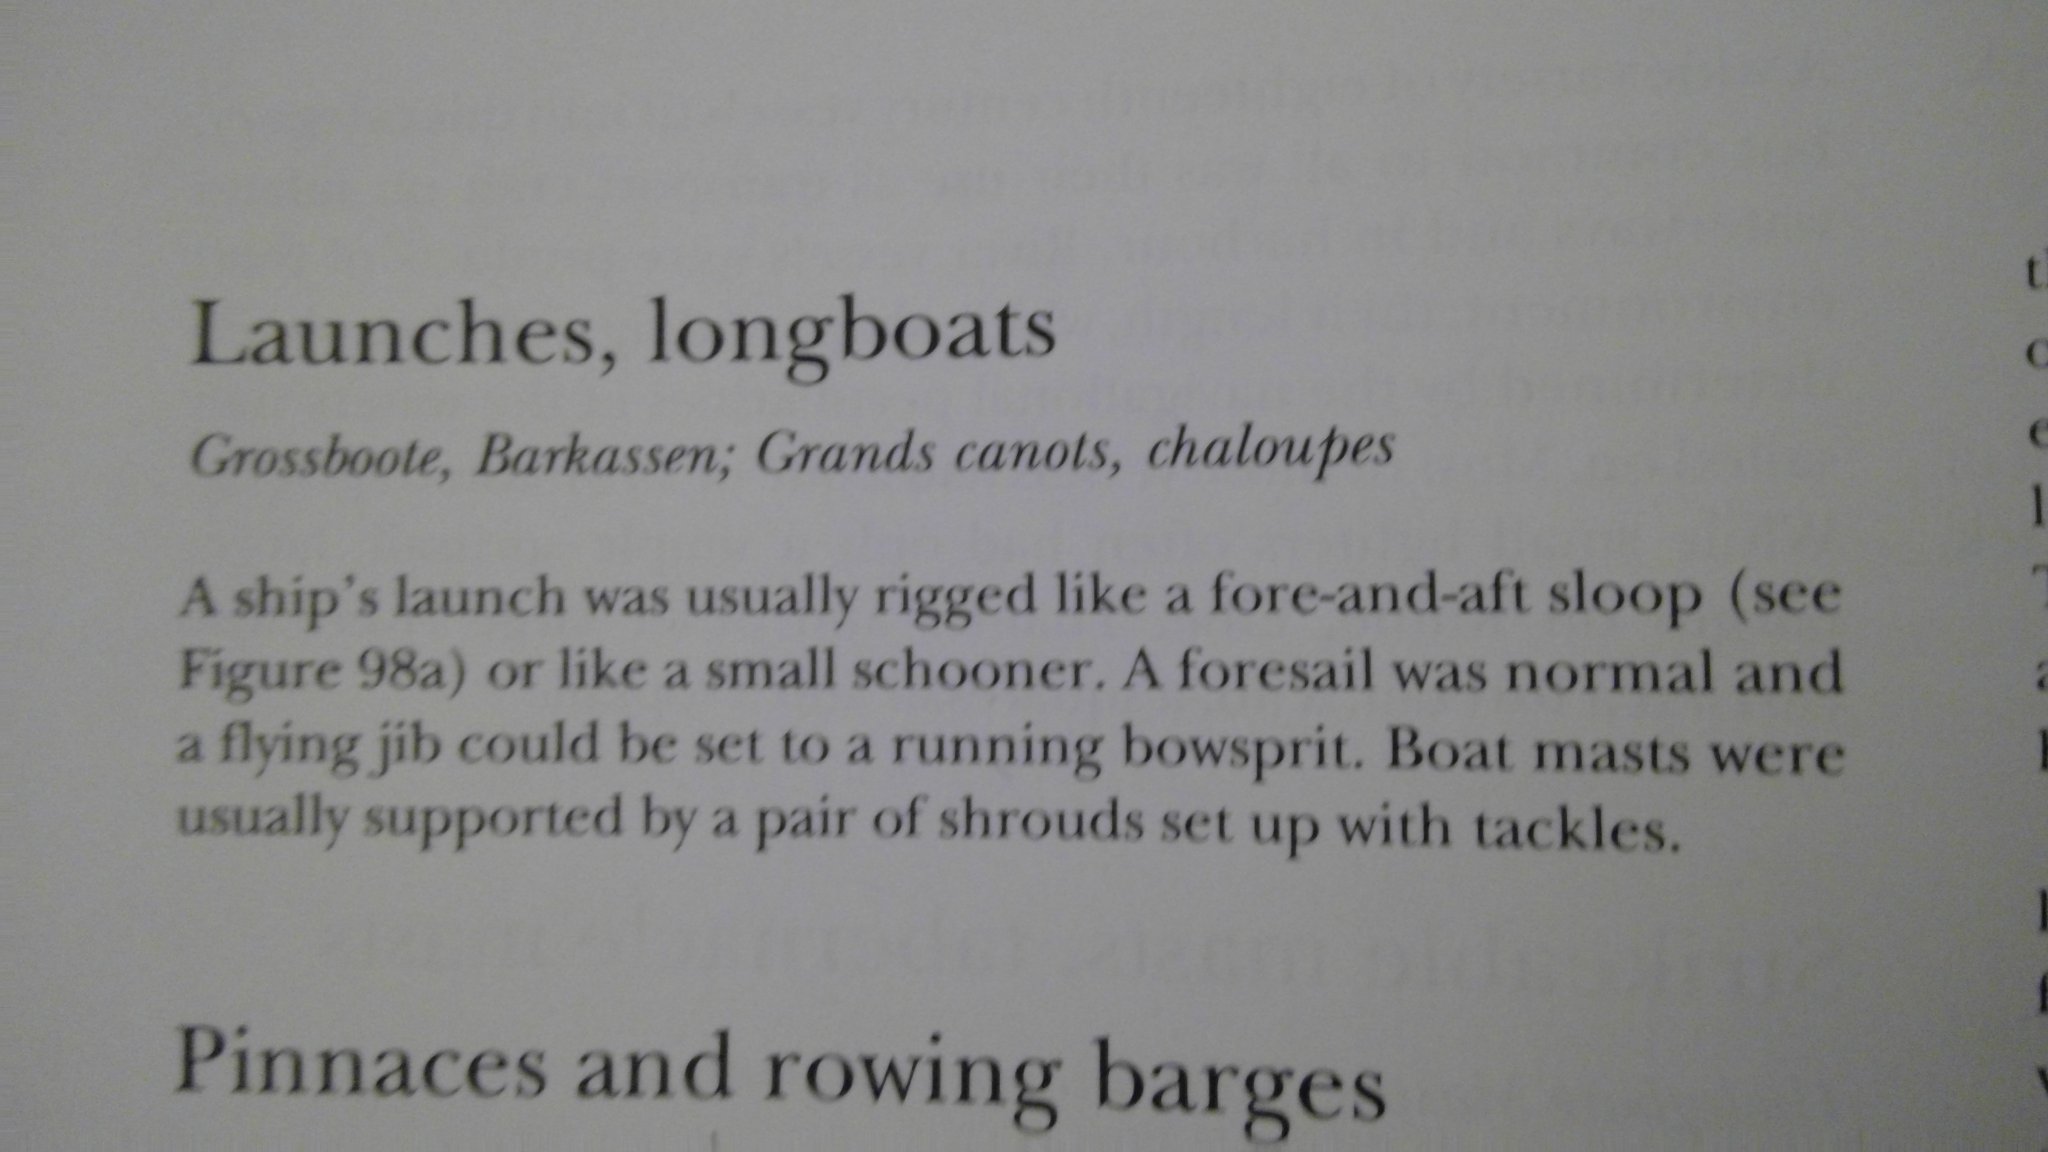
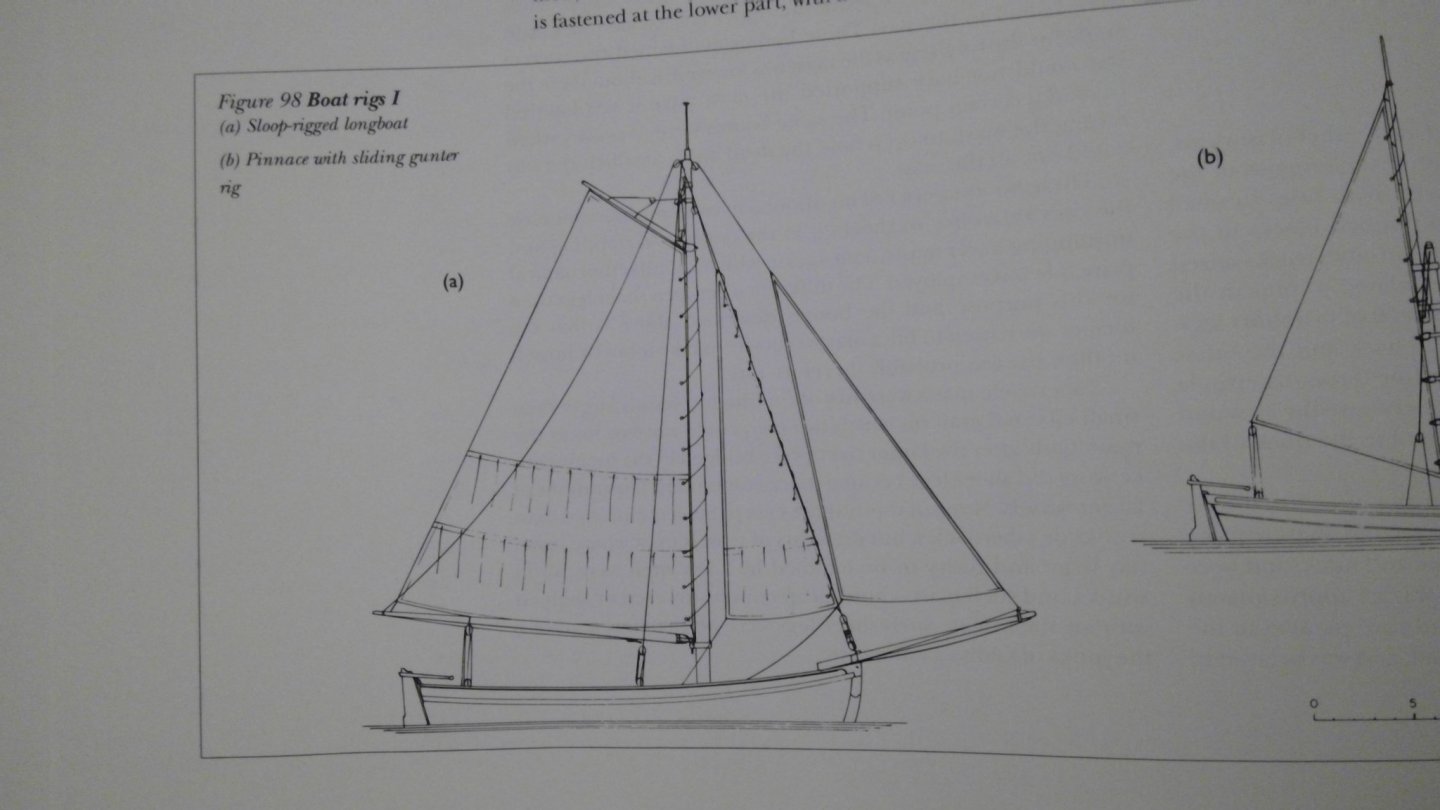
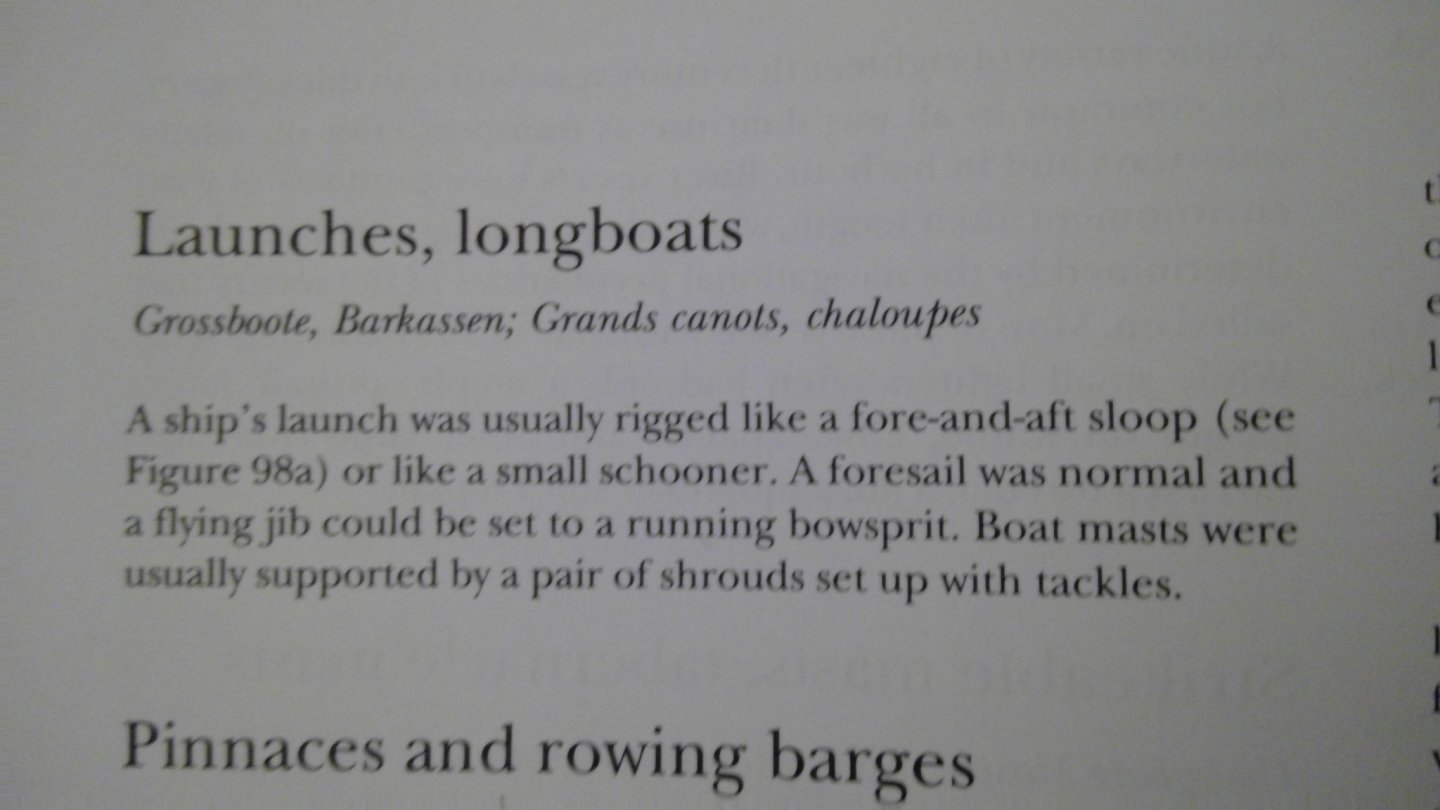
The rigging and sail plans that come with the Longboat are very good, but adding sails needed a bit more research. While there are many references available for ships, that isn't the case for boats. The most clear reference that I found was in "Eighteenth Century Rigs and Rigging" by Karl Heinz Marquardt. I took a photo of his drawing of a rigged long boat. The book states that the ship's launch (long boat) is rigged as a fore aft sloop with the normal fore sail and that a jib can be set on a running bowsprit (a traveler). Note that he shows the sails spiral laced. As I explained before, I do not believe this to be the only way and probable not the best way based on my prior post. There are several Youtube videos of how a gaff rigged sail is raised and lowered. Also, in the 1990s, I had the opportunity to sail on the replica of John Paul Jones', Providence, a boat that is also rigged as a Cutter with a gaff rigged main sail. You will also note that the fore sail attaches to the stay above the upper deadeye. This is a very important consideration. The sail is raised by hauling on the throat and peak halyards for the gaff simultaneously so that the gaff is kept roughly horizontal. When the throat halyard reaches its desired position, the peak halyard is pulled until the sail is spread. The boom lifts become slack as the weight of the boom is now carried by the sail. We will be showing the sail furled with the gaff slightly raised. The sheet in some cases, rigs through a sheave on the end of the boom and then forward to a single block. Alternatively, the sail is simply lashed to the boom. Since the model did not have a sheave in the boom, I simply lashed the sail to the boom. You might choose the alternative for your model and you would be historically accurate, An interesting story is that it didn't go well with raising sail on the Providence he first time. With the sail stowed, there are gaskets holding the gaff and boom together. Imagine four to seven people hauling on a line with the gaskets still attached? What happened was the boom jaw snapped. Fortunately, then had the wood to make a replacement.
-
I photographed my references for the attachment to the gaff and mast. I think that these are more clear than the earlier posts.
-
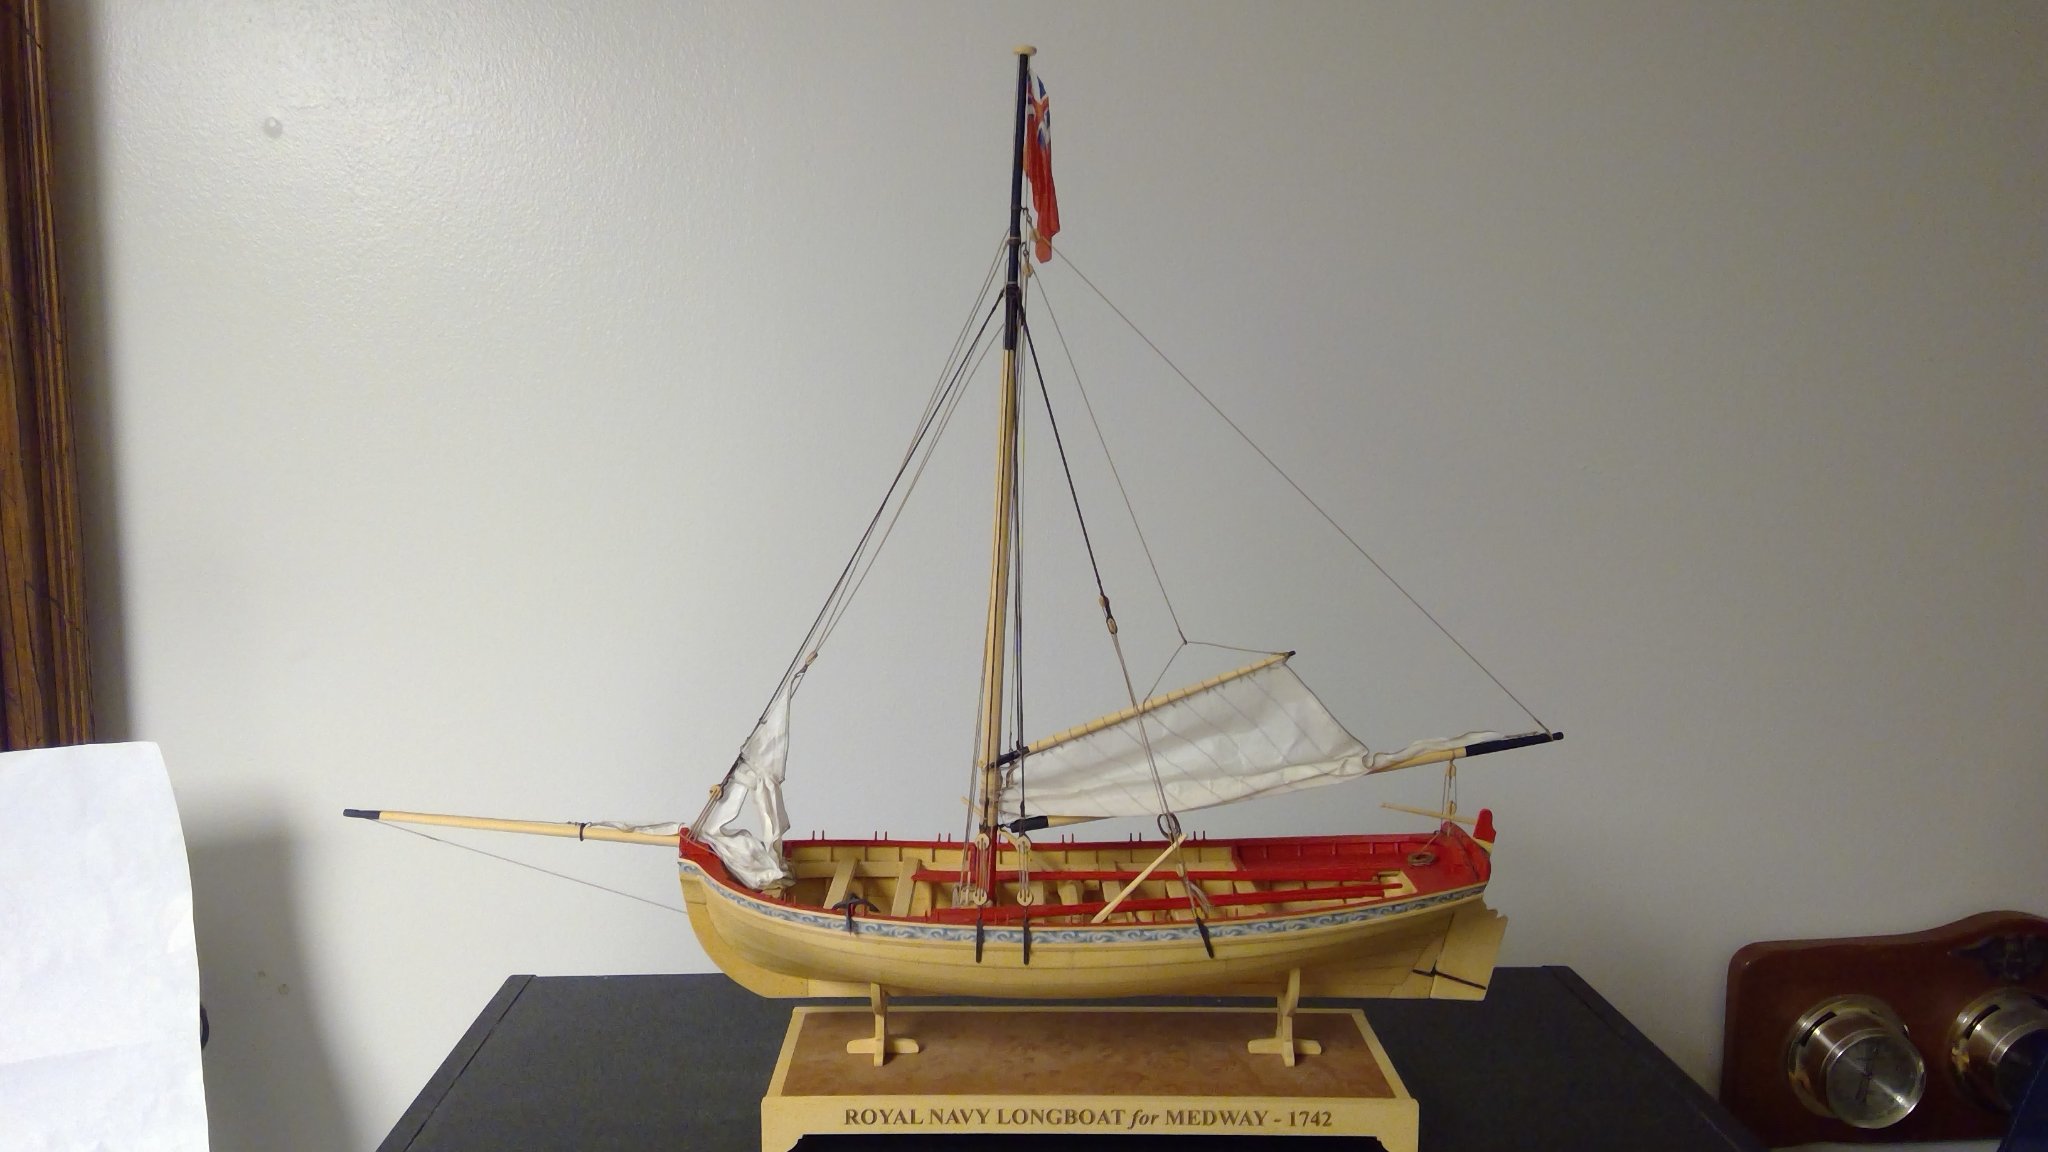
Actually, furled sails will be it for the Longboat. Set sails for an open boat doesn't look right without at least two crew. I did those carvings on Liverpool quite some time ago. Thanks for the kind words. More to follow on the sails for Medway.
-
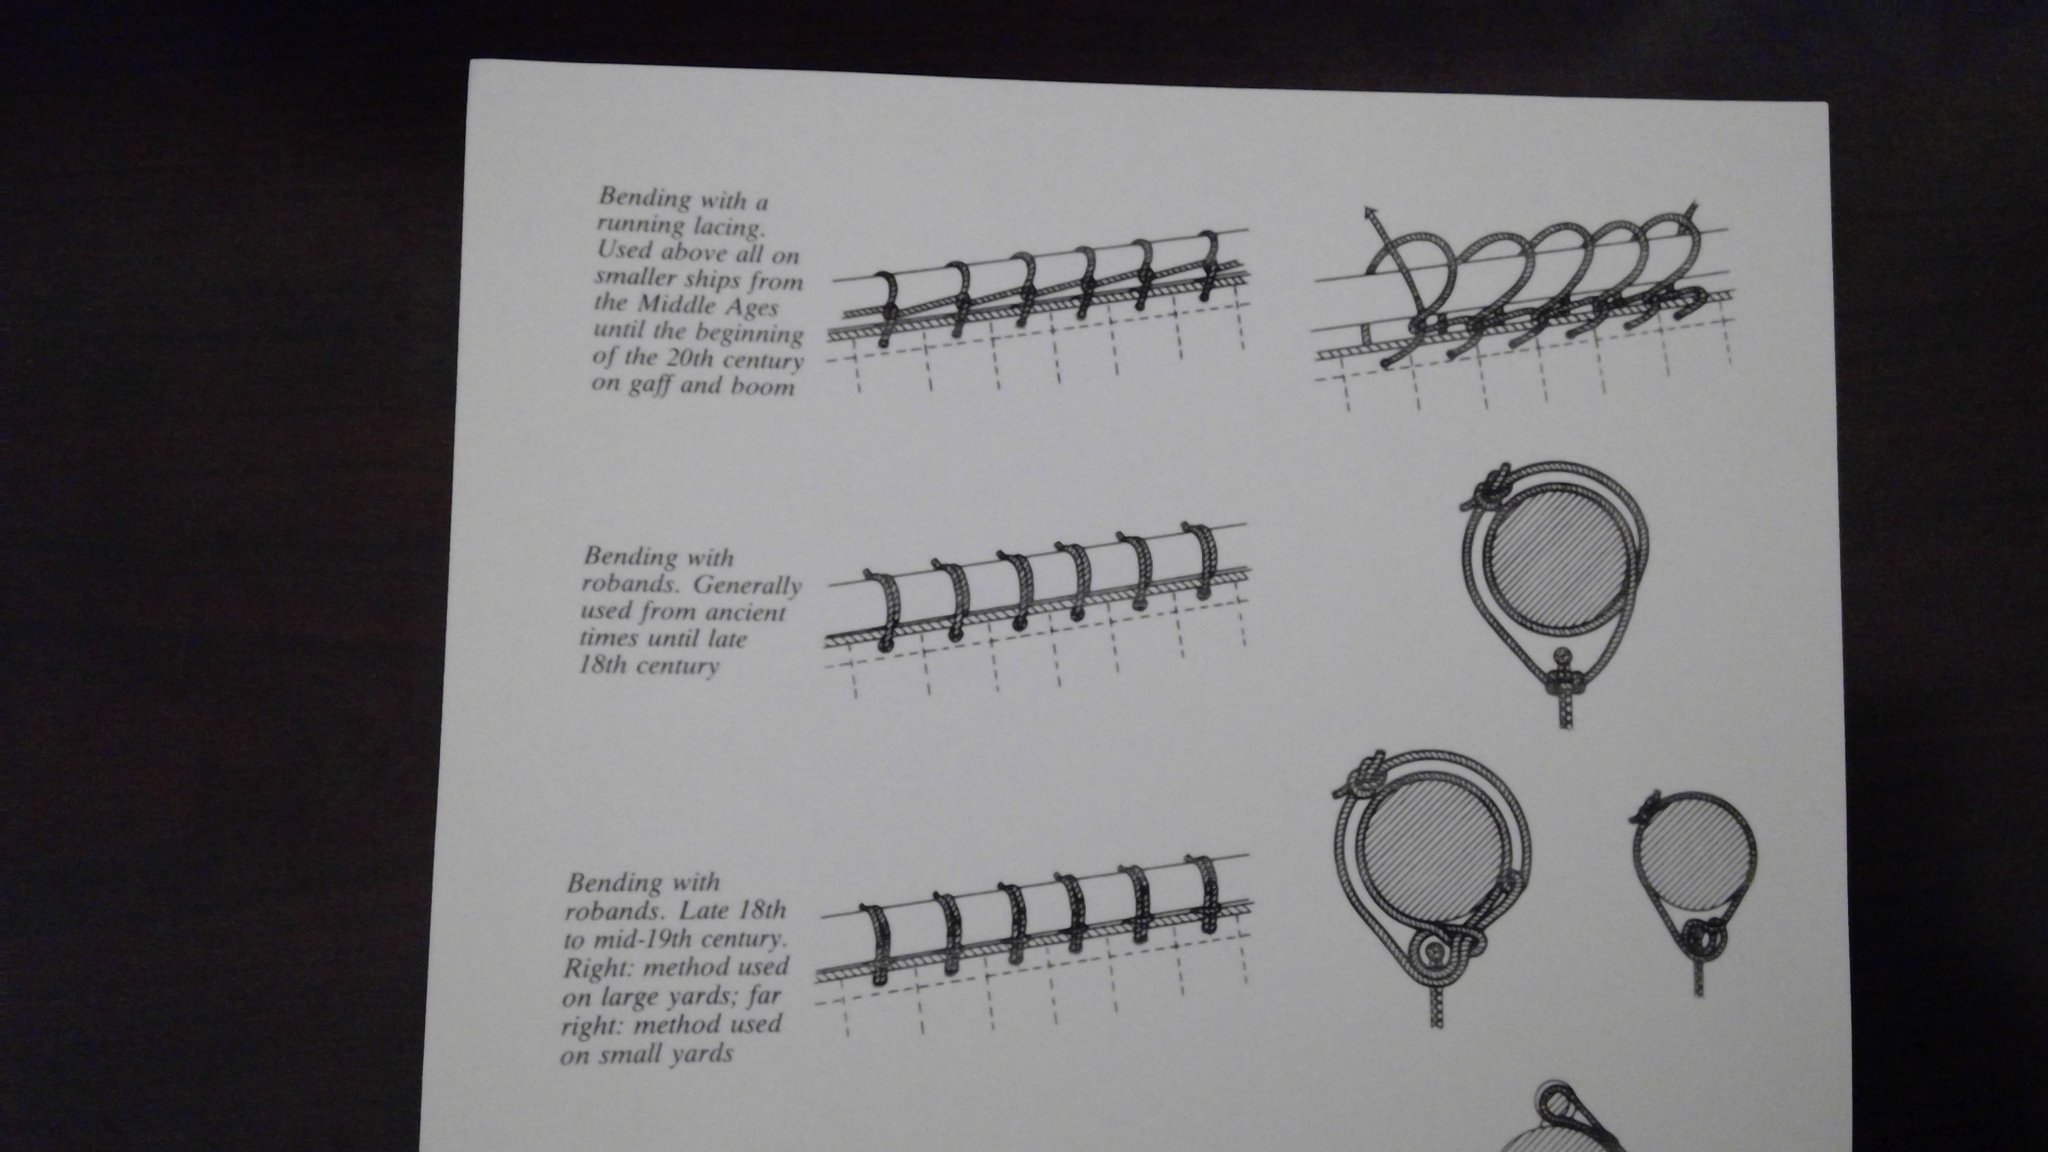
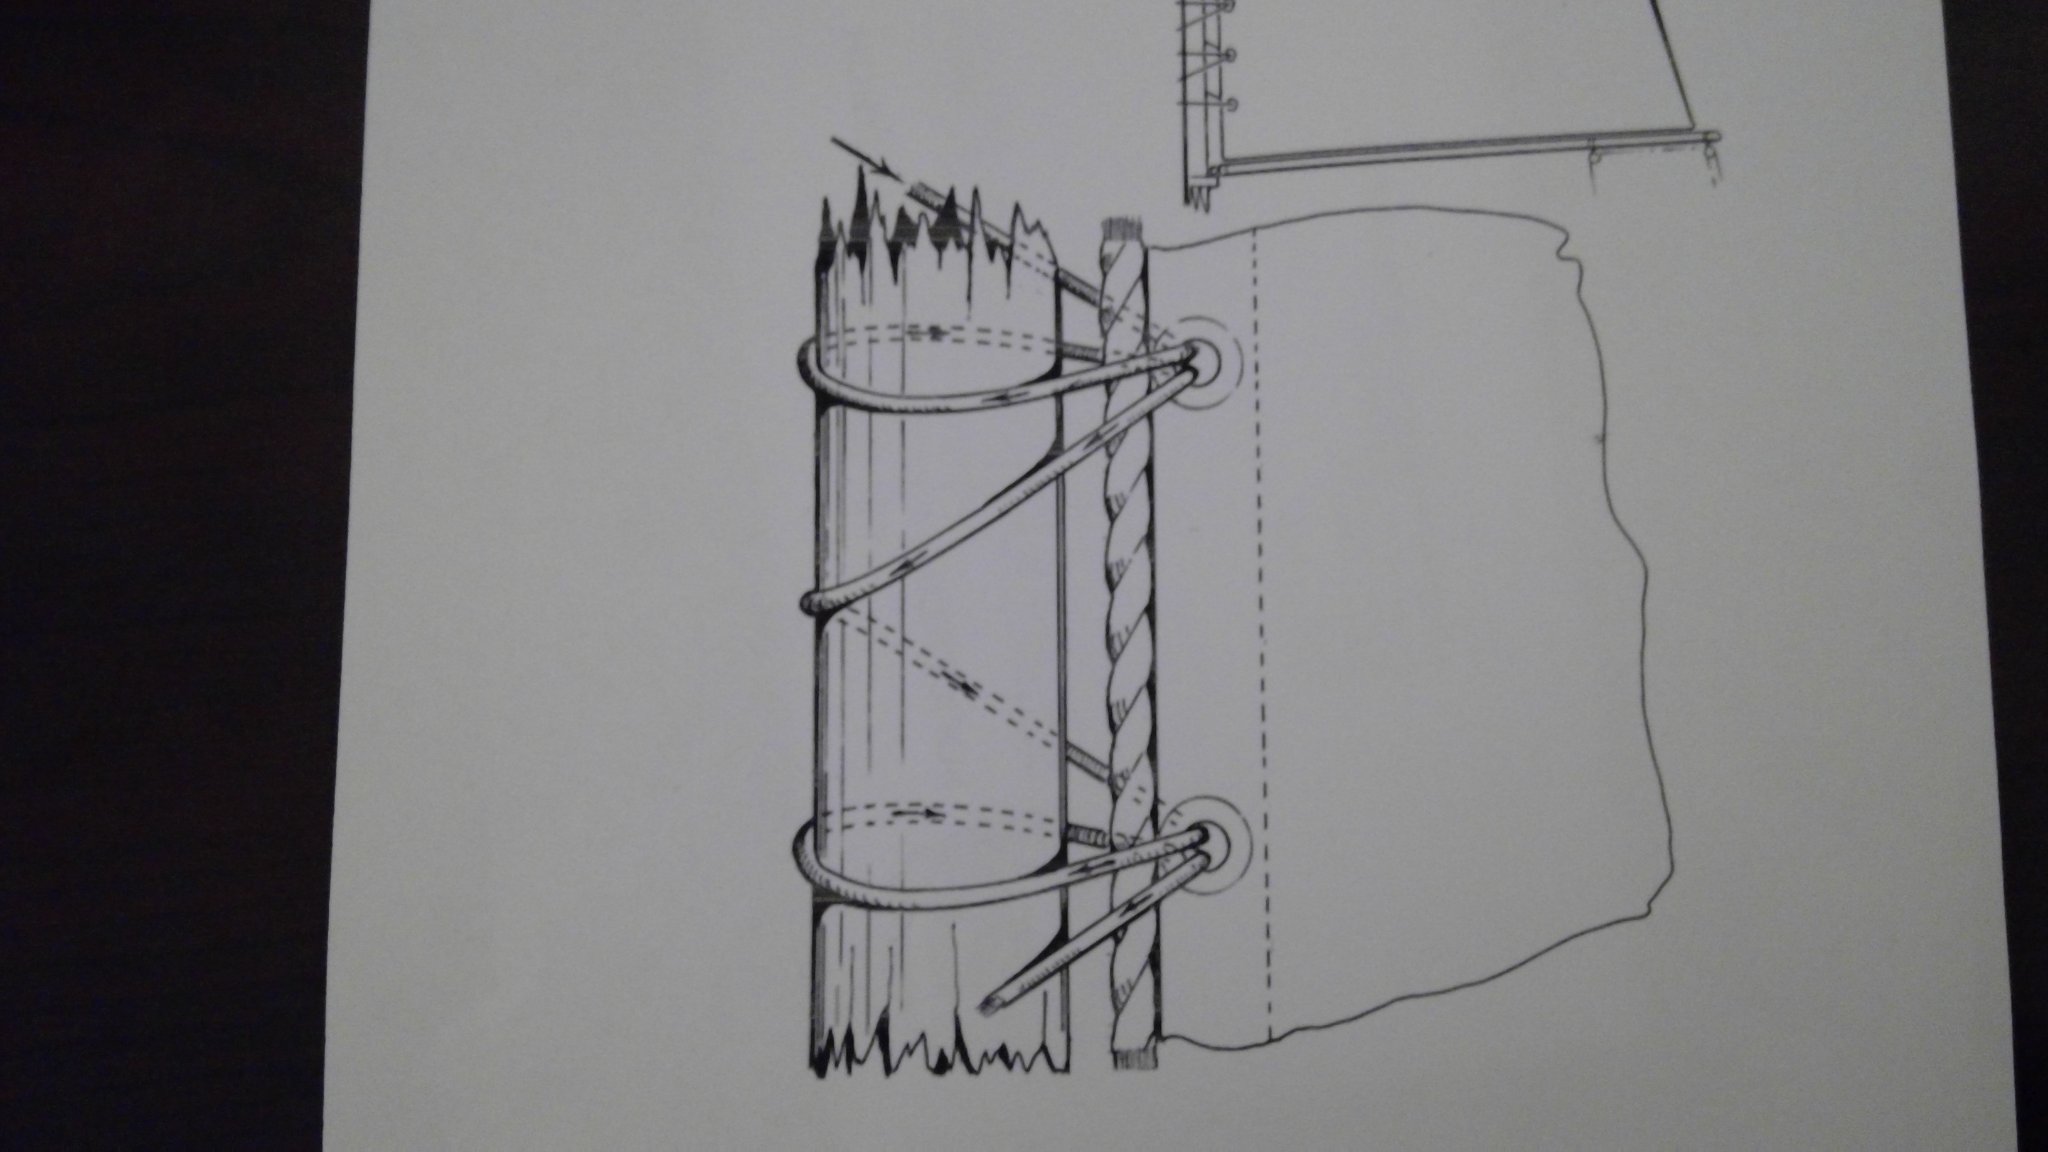
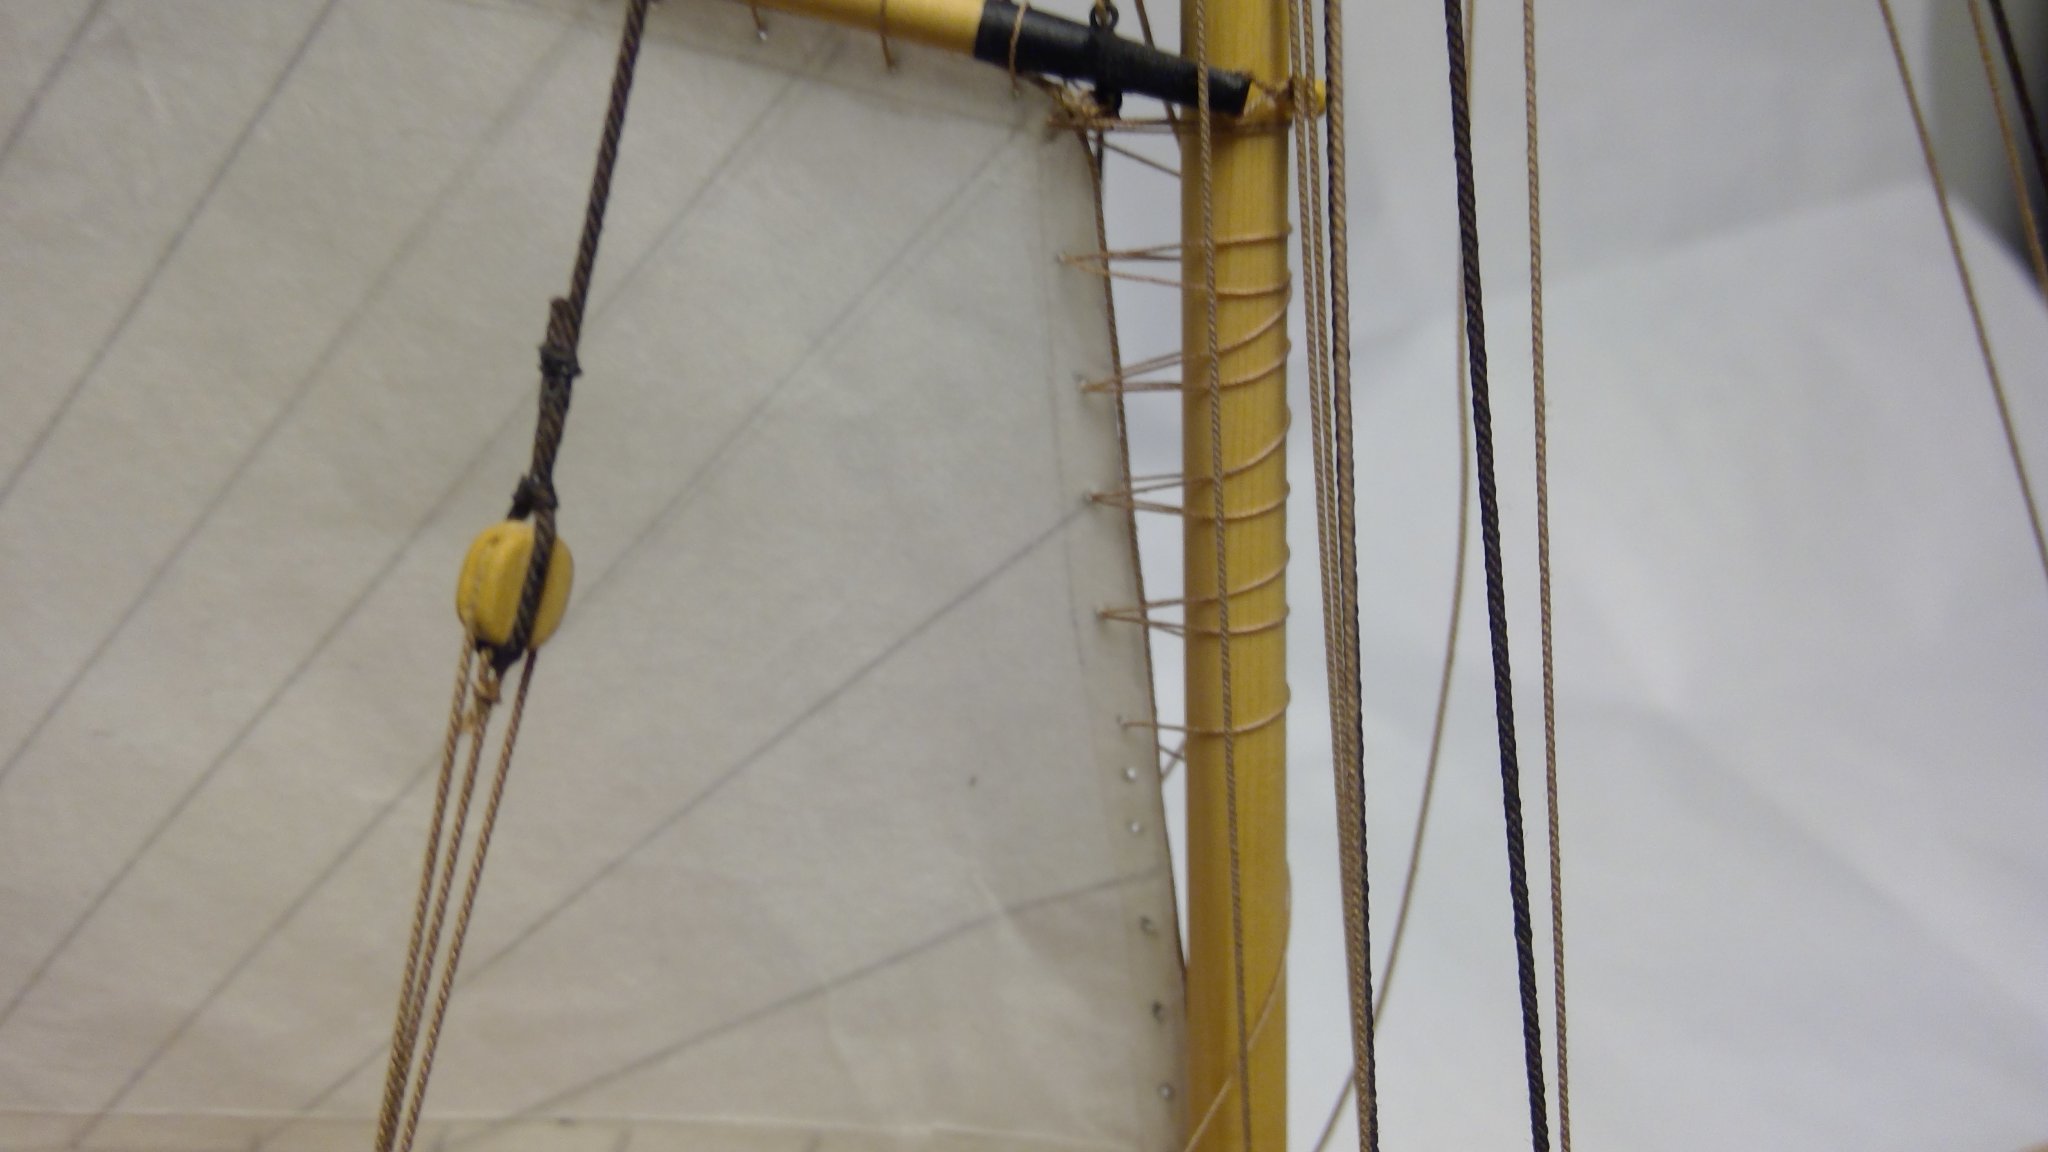
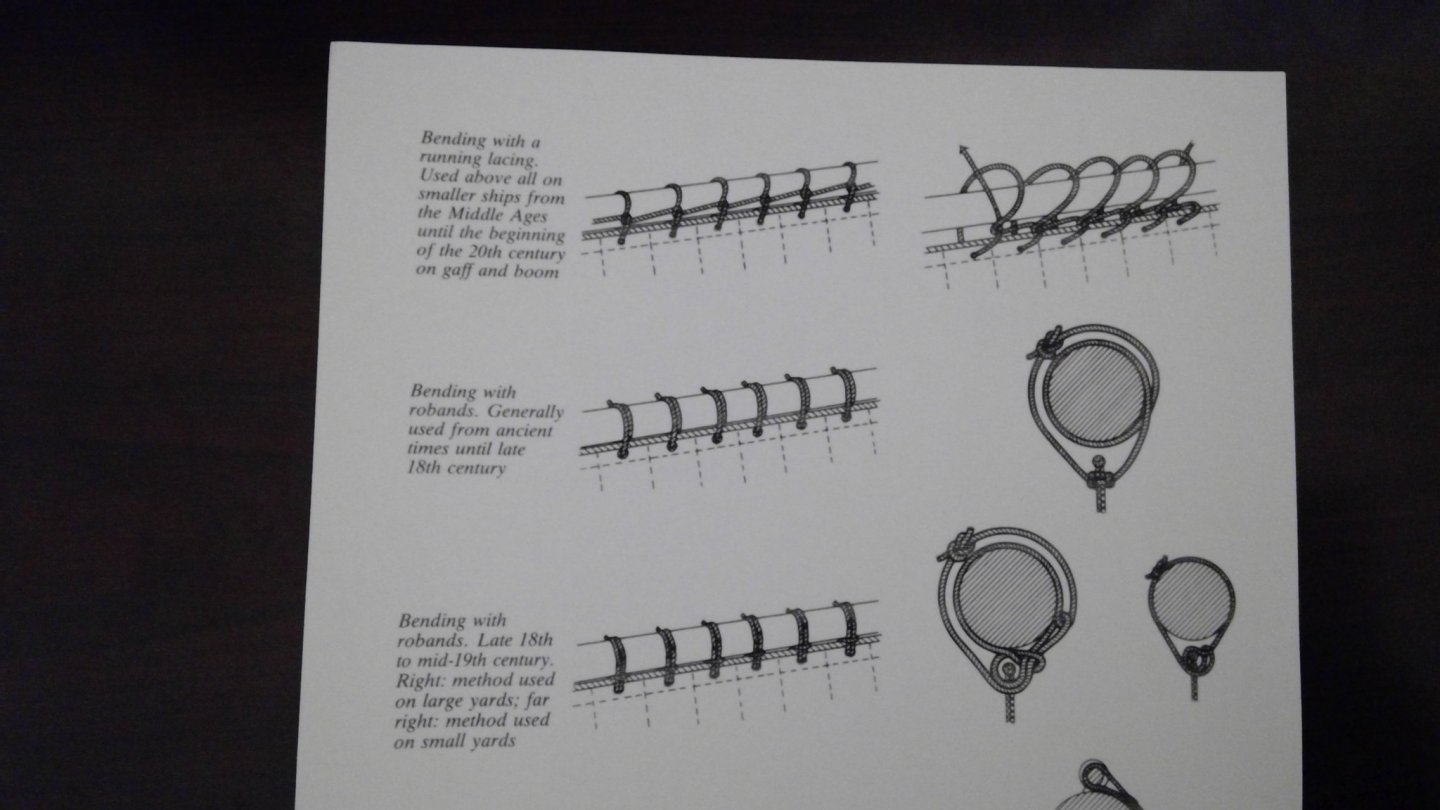
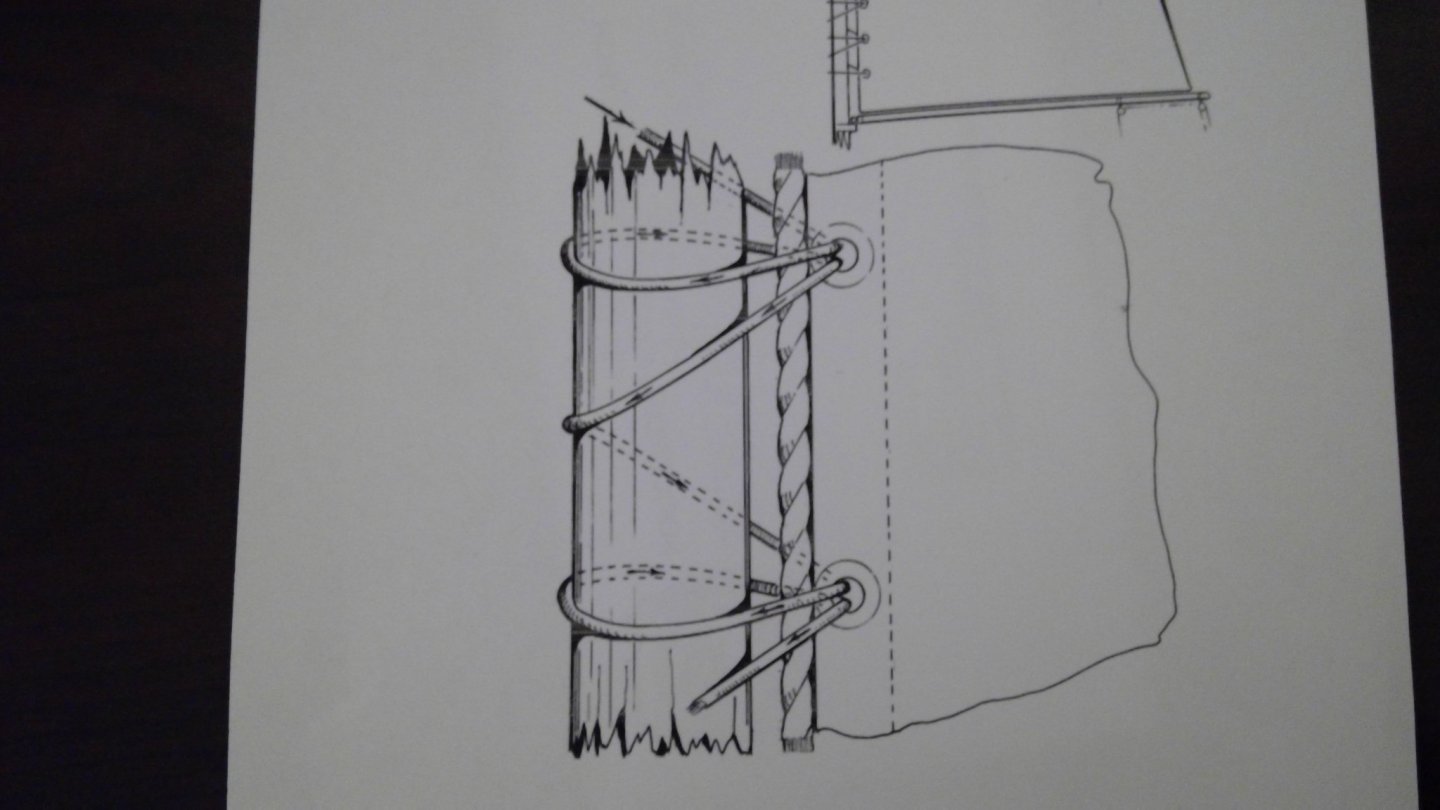
The first photograph shows the lashing to the gaff. Note the the lashings are vertical. The tendency to do spiral lashings is not correct. The second photo shows the lashing to the mast. Note that it is purposely loosely wrapped arround the mast and that the rope passes through each grommet twice.

-
I'm not sure that you will be able to download the pdf, so here is a photo of the lashing to the gaff.
-
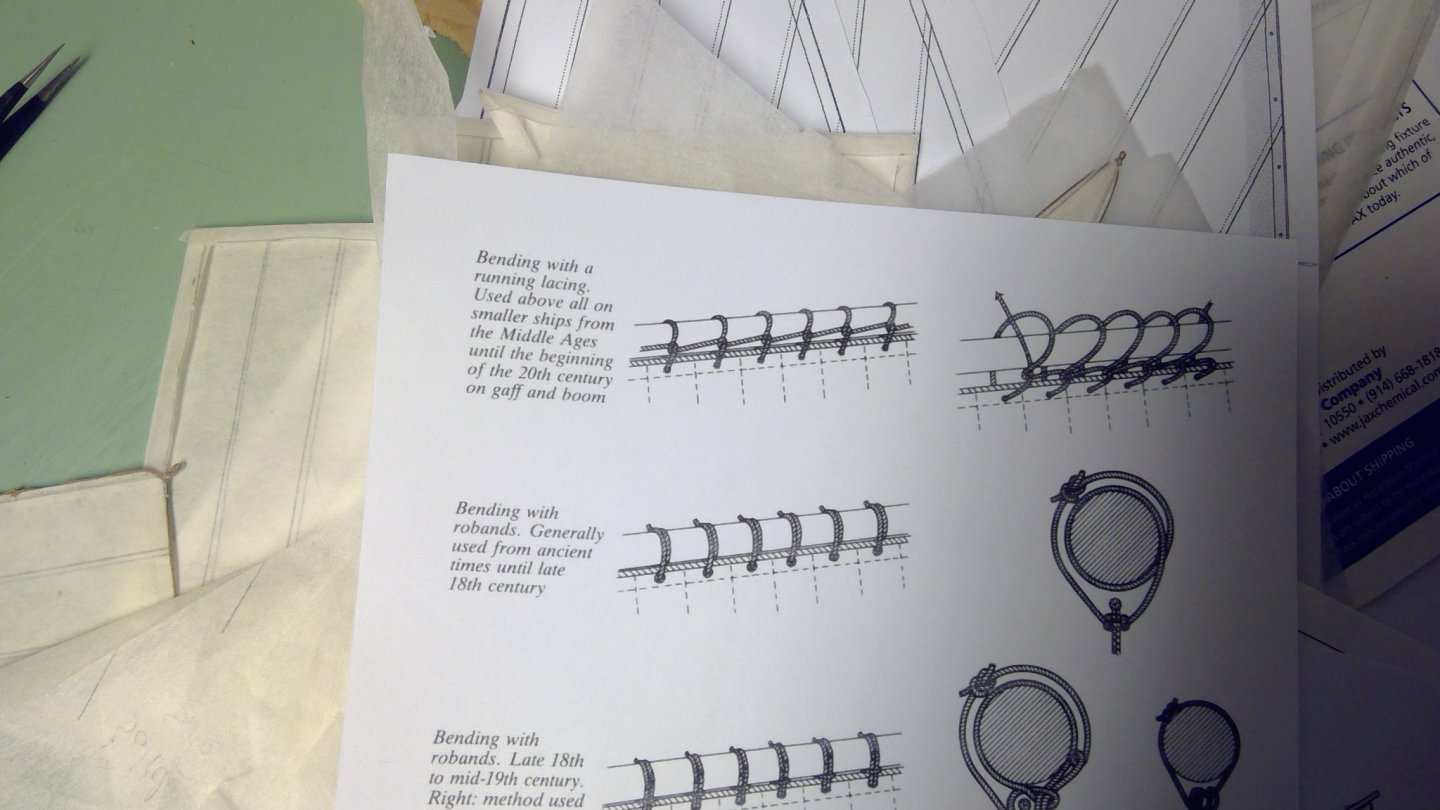
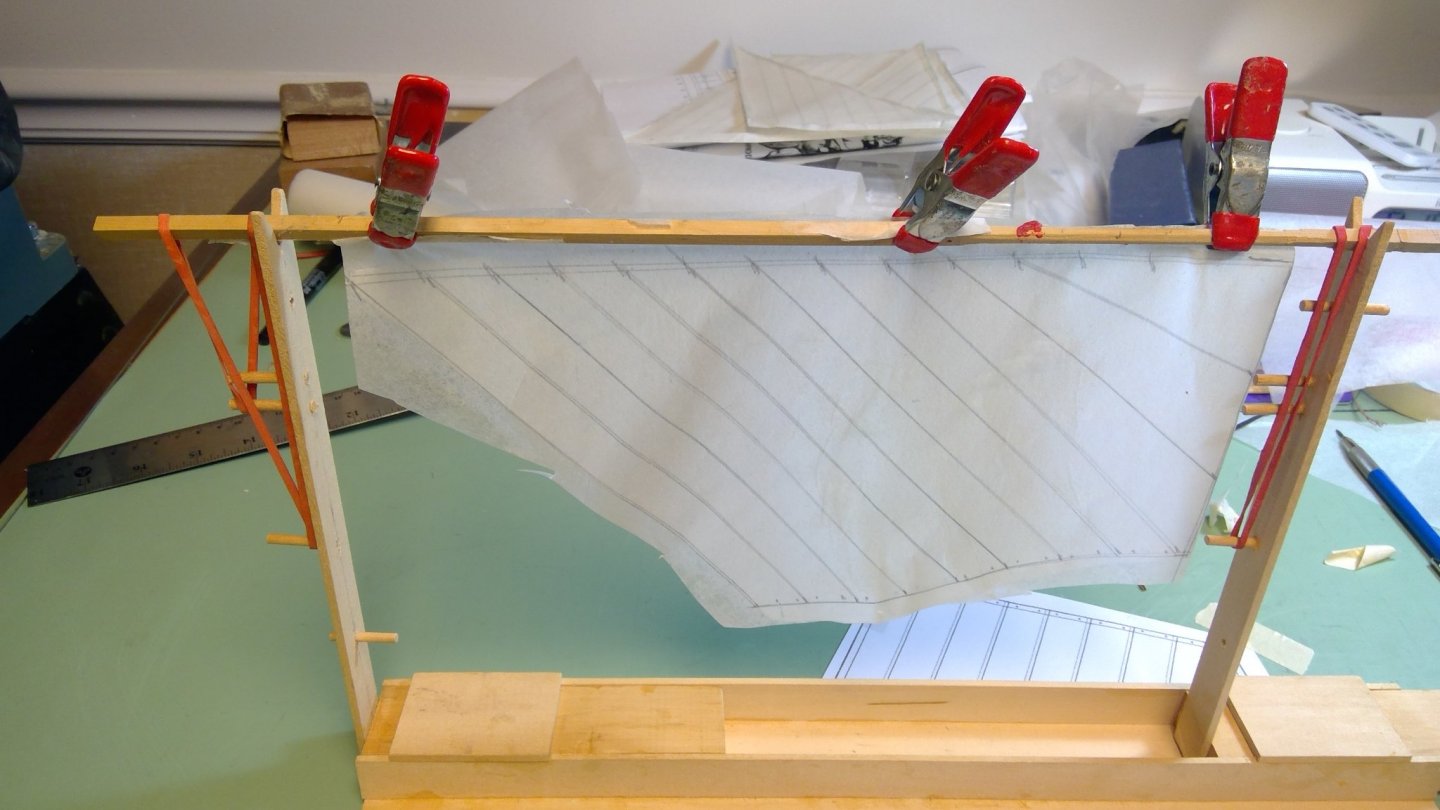
The next step is very important. Even though the sail is half the height of a full sail, the number of lashings securing it to the mast must remain the same. Since it will be partially furled, the upper 15% or so of the sail will be visible. So, at the head, make the first 4 or 5 lashing grommets the full distance apart. The remaining grommets will be spaced in the remaining height at the lower part of the sail. You do this so that the total number of lashing are wrapped around the mast. You will note that once dry, the sail is very stiff, and quite strong. I drill the grommet holes. Do not attempt to punch them out! Trust me on that. To lash or not to lash the sail to the gaff is a question based on the size of the craft. Continuous lashing of a sail would have been very tough in a standard size ship. For this model, almost 3 feet of line was required to lash the head of the sail. Just imagine how you would do that on a larger ship. However, for this boat, the rigging was to be installed or removed quickly. So, a lashed gaff would likely remain attached to the sail and mast when it was removed. The other alternative was robands. Robands would definitely been used in a larger craft. I have included two files showing methods of lashing the main sail. For this model, the top method is the one that should be used, or use robands. For the lashing to the mast, note that the rope passes through each grommet twice. Gaff Rig Sail Lashing.pdf
-
Once dry, trim the overlap so that it is slightly wider than the linings (leech linings) around the periphery of the sail. The amount of extra width is determined if the sail is going to be set or furled. For these very large sails, I would put a very light gage brass wire under the lining so that it could be used to shape the sail. This is especially important for flying sails or sails simply attached to a stay as the sail, even when shaped, will not stay where you want it (it will simply twist the stay and lay flat. If the sail is to be furled, no wire should be used. The overlap is creased and glued down around the sail using acrylic matt medium. Matt medium is used because the sail will nee to be wetted again when it is shaped. At this point, reinforcing cloths of a single ply of silk span are added to the leeches (corners) of the sail. Note that these reinforcements only go on one side of the sail. For a fore and aft sail, as these are, it is the starboard (right) side. The mainsail will have a reef band or two. Again, the reef band is only on one side of the sail (starboard). I made full size sails, just as an experiment, but we are doing furled sails here. One thing that must be considered is that unless you elect to have a very slight furl, the area of the sail must be reduced. If this is not done, the sail will be simply too bulky and the furl will not look realistic. Let's strat with the mainsail. On a gaff rigged cutter (this long boat is rigged as a cutter) the sail is lashed to the gaff, and to the mast. The lashing to the gaff is tight, but the lashing to the mast is purposely loose. That is so the gaff can be readily raised and lowered and so the lashing does not bind on the mast. You will not that in latter periods, the attachment to the mast was via hoops. You will also note that the gaff rig requires the gaff to be raised or lowered. Unlike larger drivers and spankers, the gaff sail is furled on the boom and not to the mast. But first, let's make the sail. First, we need to consider that the entire head of the sail is lashed to the gaff, and the entire foot of the sail is stretched across the length of the boom. So, the tabling cloths need to be full width at the head and the foot. That means that when you draw the table cloths you shorten the length of the sail about half and connect the locations of the seams at the head and foot. The second of the two photos shows the shortened sail. The third photo shows the sail drying. Once dry, the bolt rope and leach cringles need to be applied. The cringles are where the rigging is attached to the sail. The cringles are made by looping the bolt rope and putting a seizing to secure it. The bolt rope is fixed to the edge of the sail with a product called "No Sew". Basically, it is a glue. The fourth photo shows the completed sail. I didn't include the reef band or reef band because it would be completely hidden.


-
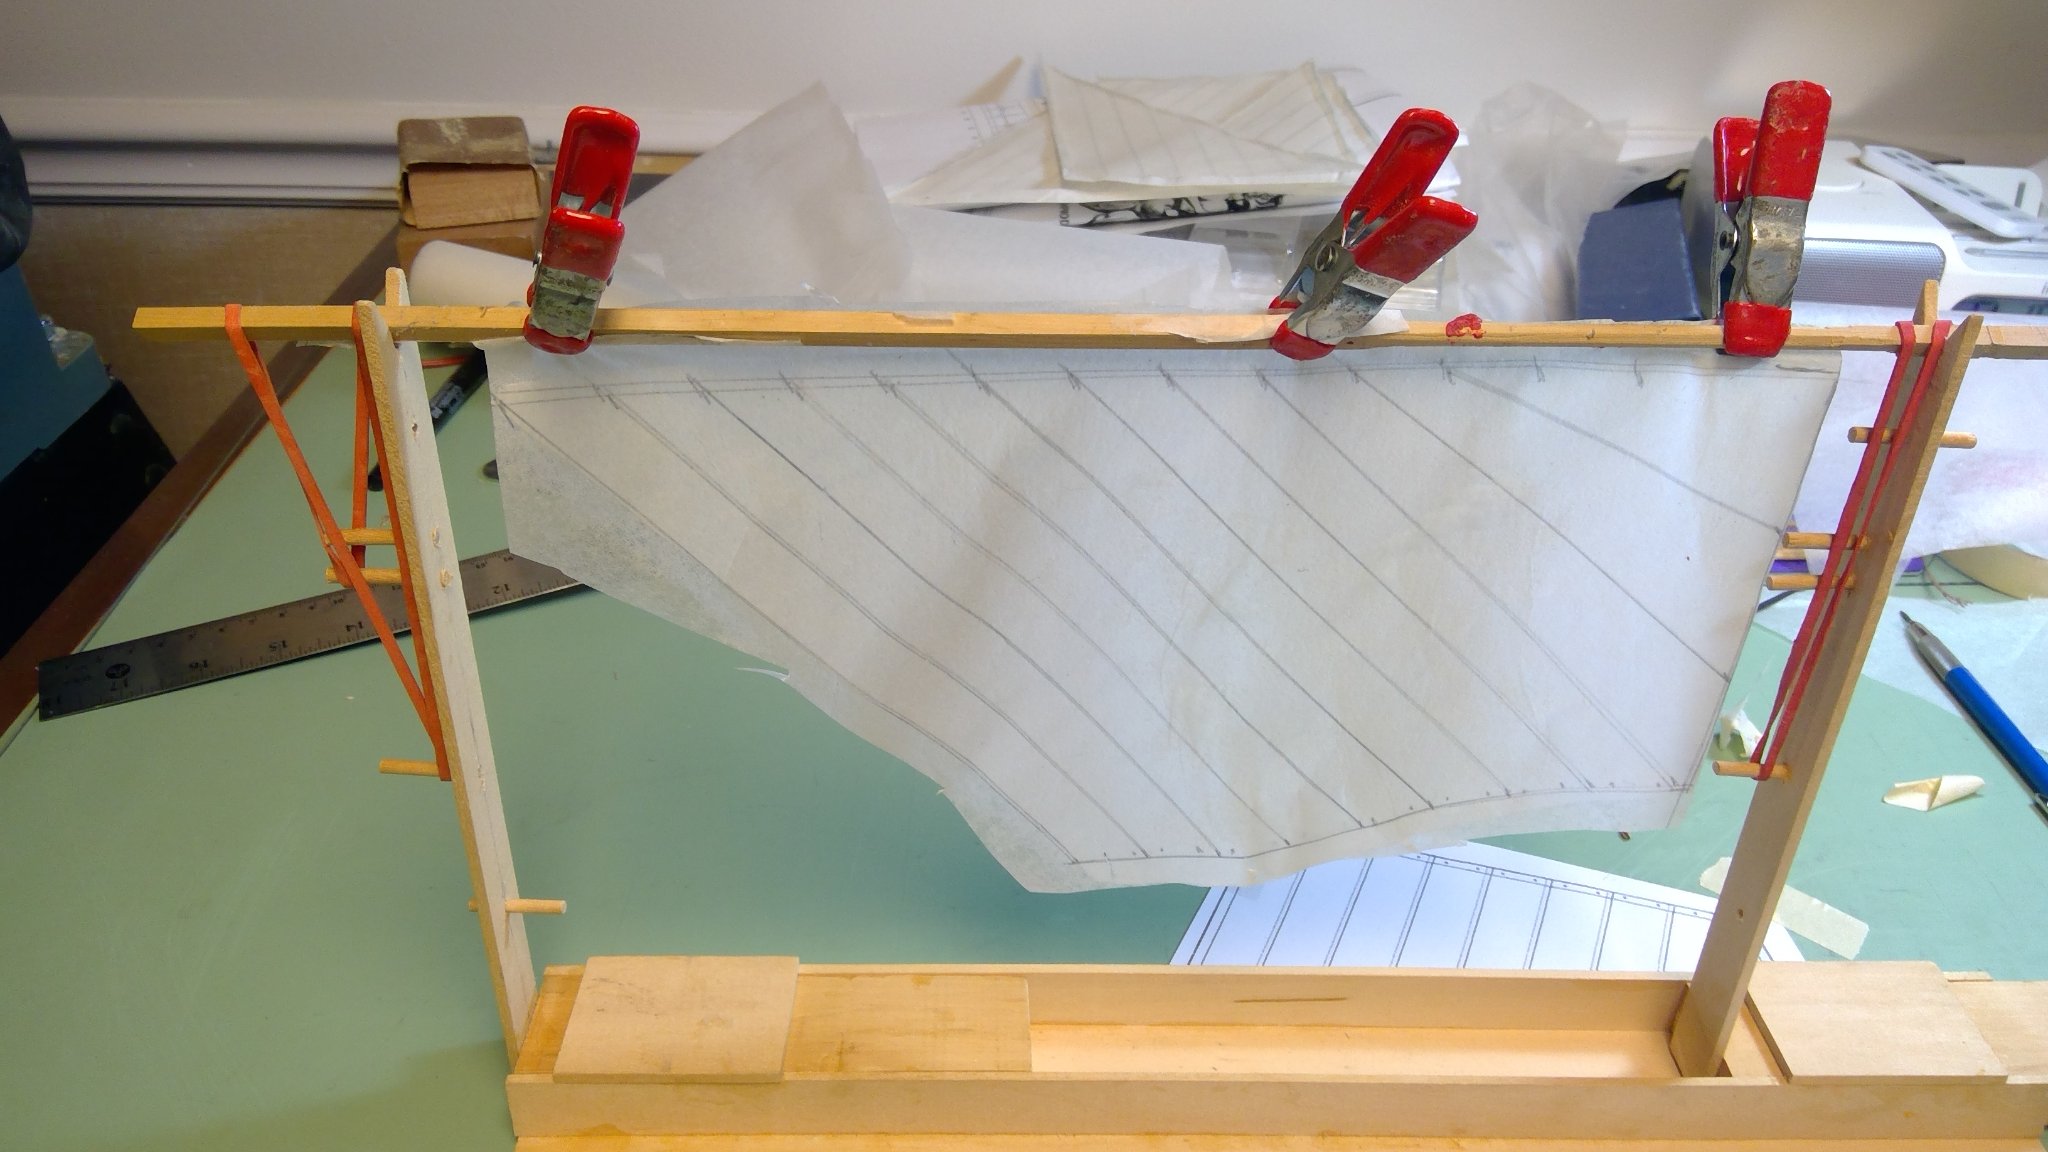
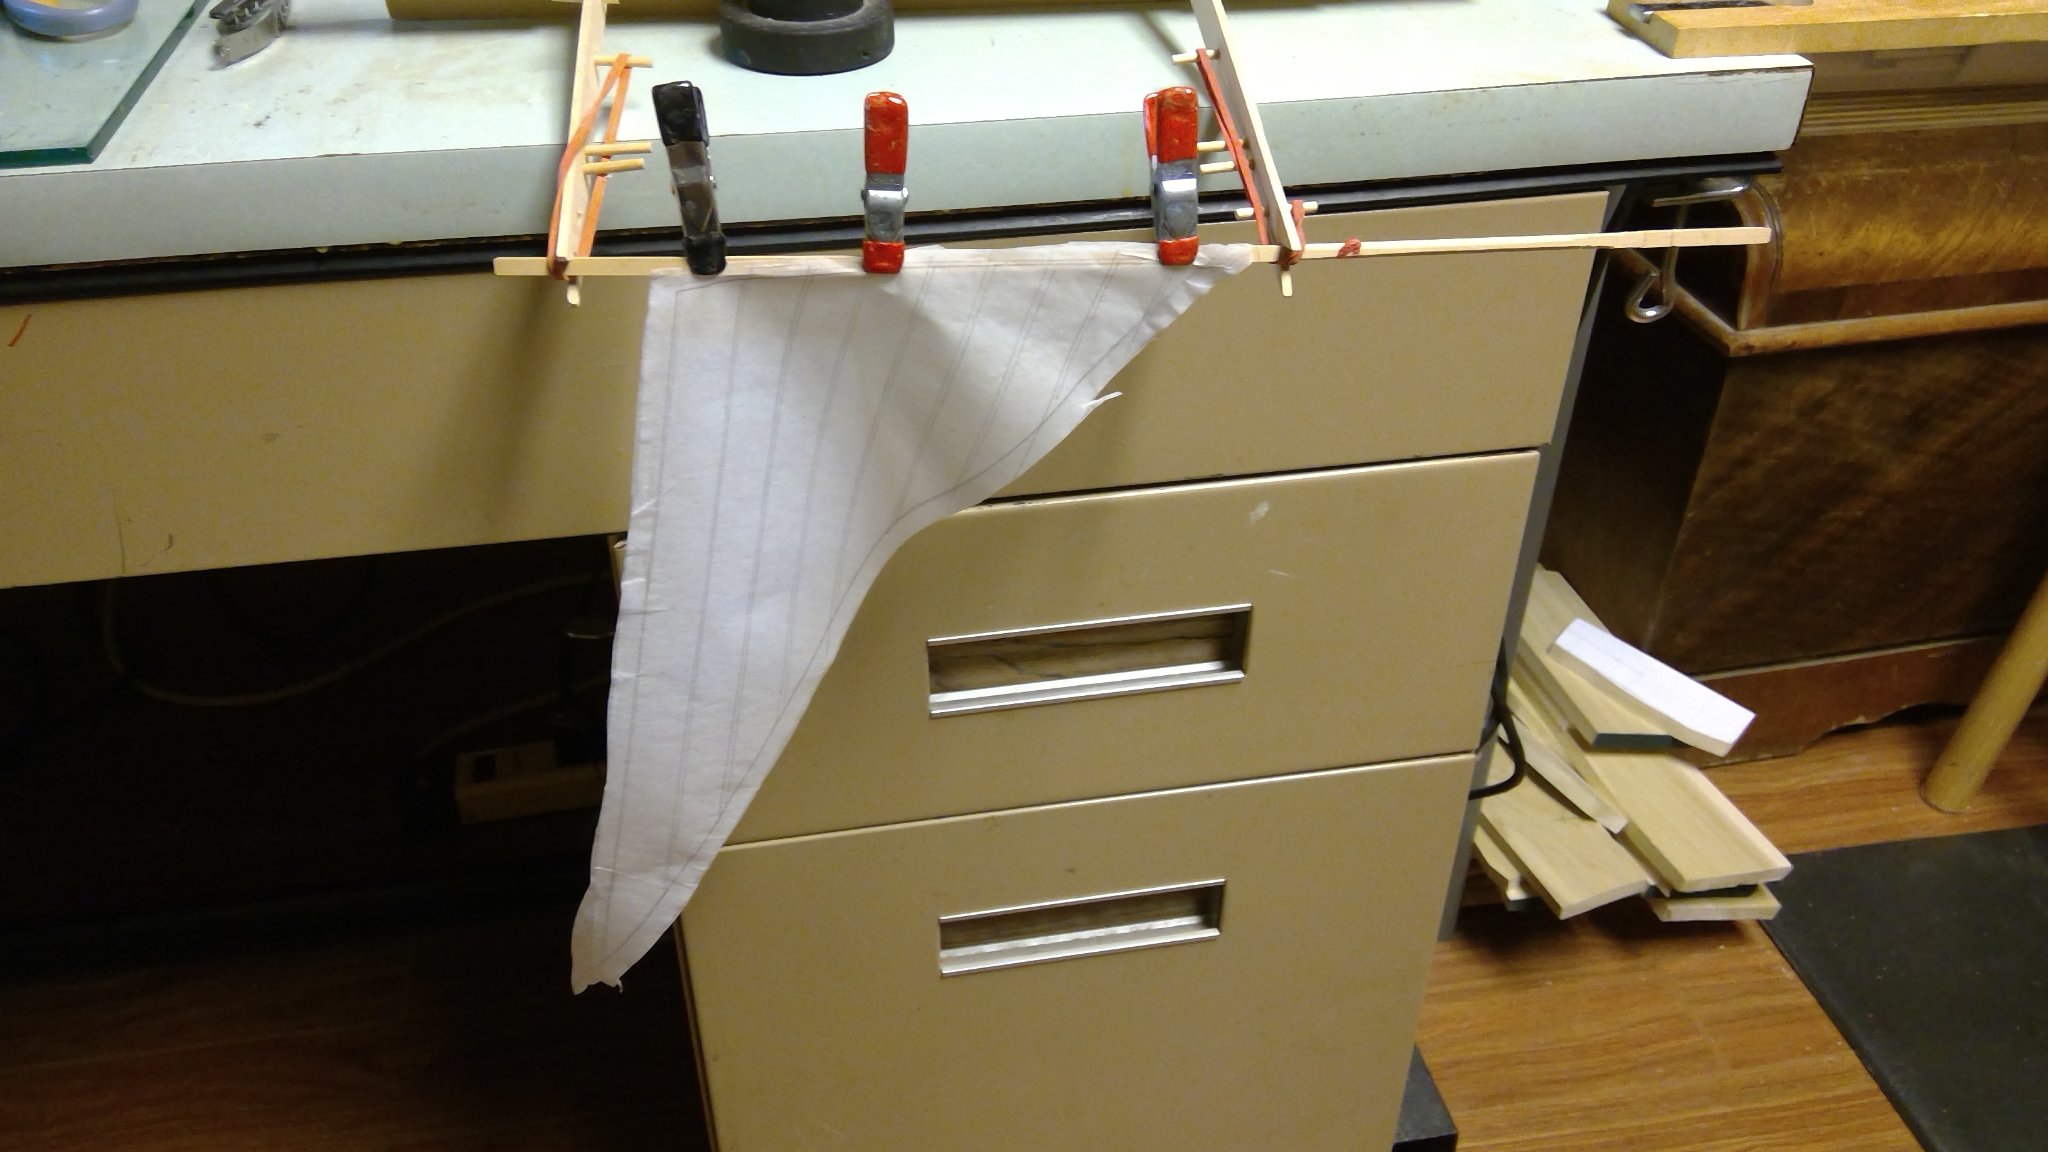
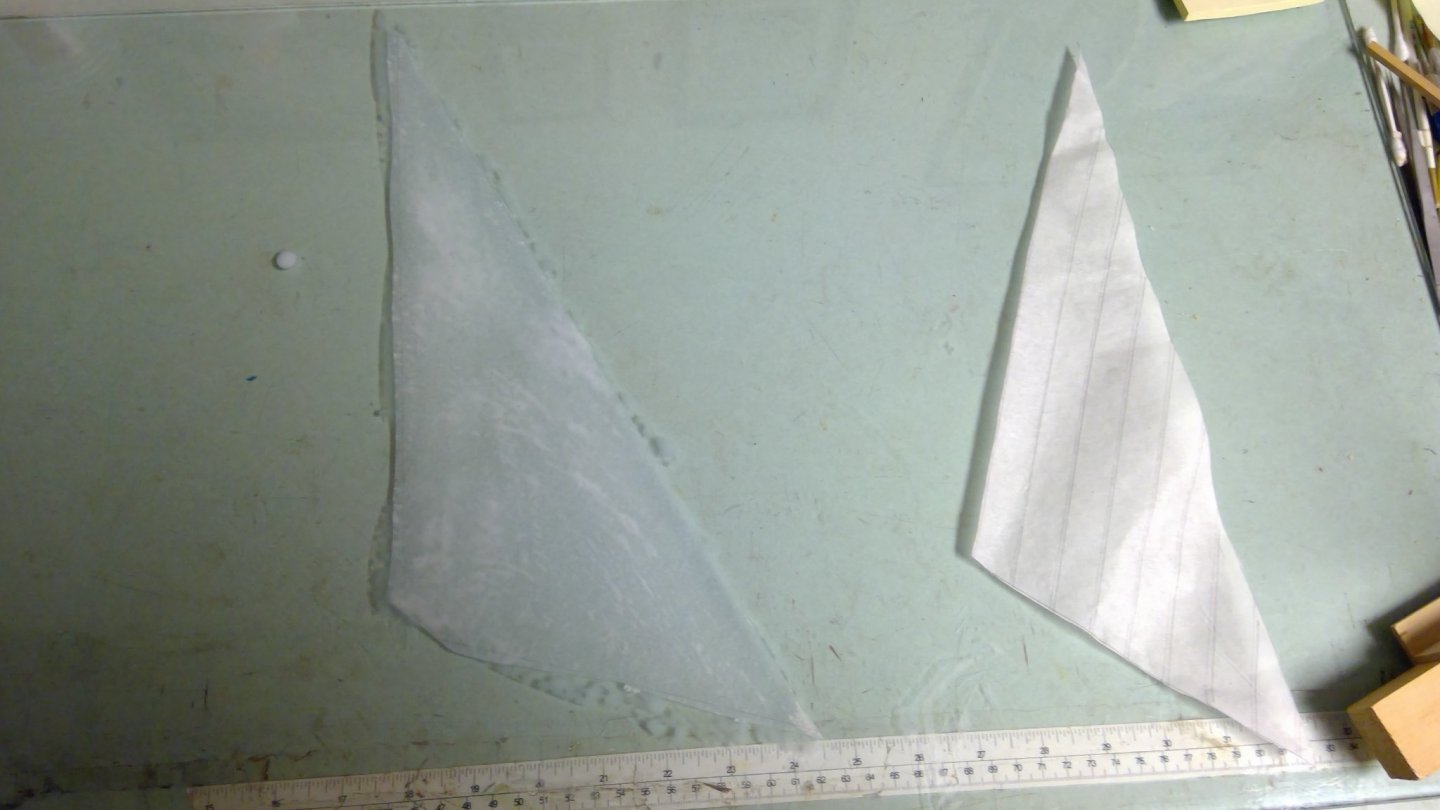
The first photo shows the template for the jib, and all four plies of silk span. The next photo shows the wetting down process. First, spread out the piece of silk span that has the on which you traced the dashed lines. Liberally wet the sail and with your fingers, smooth out any air pockets. Next, overlay the second piece of lined silk span and align the outside lines. Note that the wet silk span will stretch a bit. Smooth it down and brush on more mixture. Now, gently peal the wet silk span from the glass. Spread out a blank sheet and wet it down. Add the two center sheets on the wet out side sheet. The third phot shows the center sheets on the right, and the first outside sheet on the left. Finally, lay down the last sheet, spread out the last sheet, wet it, and smooth it out. Be certain that the outside sheets have an overlap all around the center lined sheets. Last, peal the silk span sail from the glass and hang it up to dry. I use doll house clothes pins with this jig that I assembled from scrap wood. Directions for the jig are in the Nautical Research Journal.

-
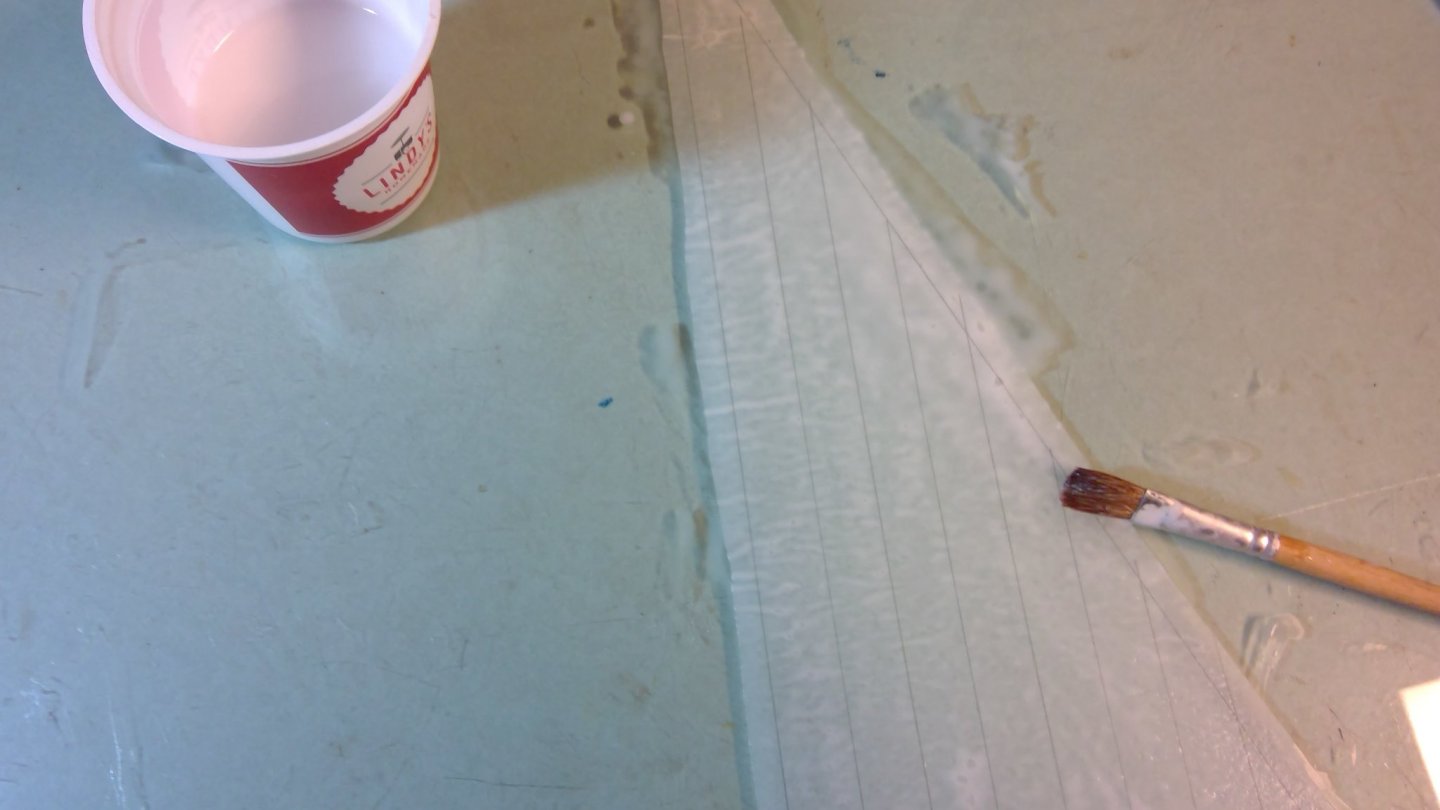
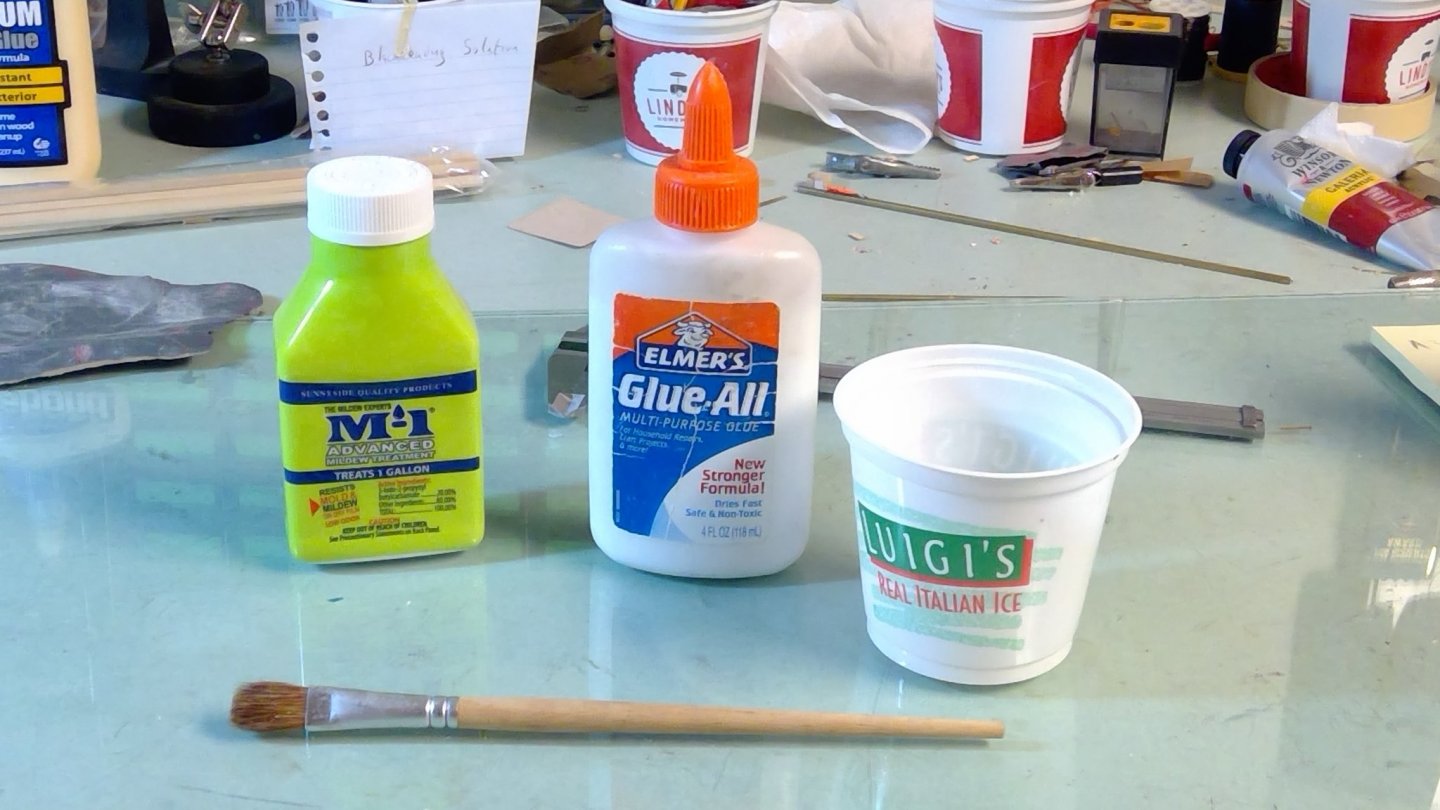
Cut out each of these on the at the borders of the sail. Note that when lined up and placed on top of each other the lines that you traced are offset. That is to suggest the overlapping seams. Now cut two more pieces of silk span. Since silk span has a weave, these two new pieces are rotated 90 degrees and are slightly larger all around. Next, put white glue in a cup and add water so that you have a mix of 8 to 10 parts water to one part glue. Ad one small drop of biocide. Remove the template. You are now ready to assemble the sail.
-
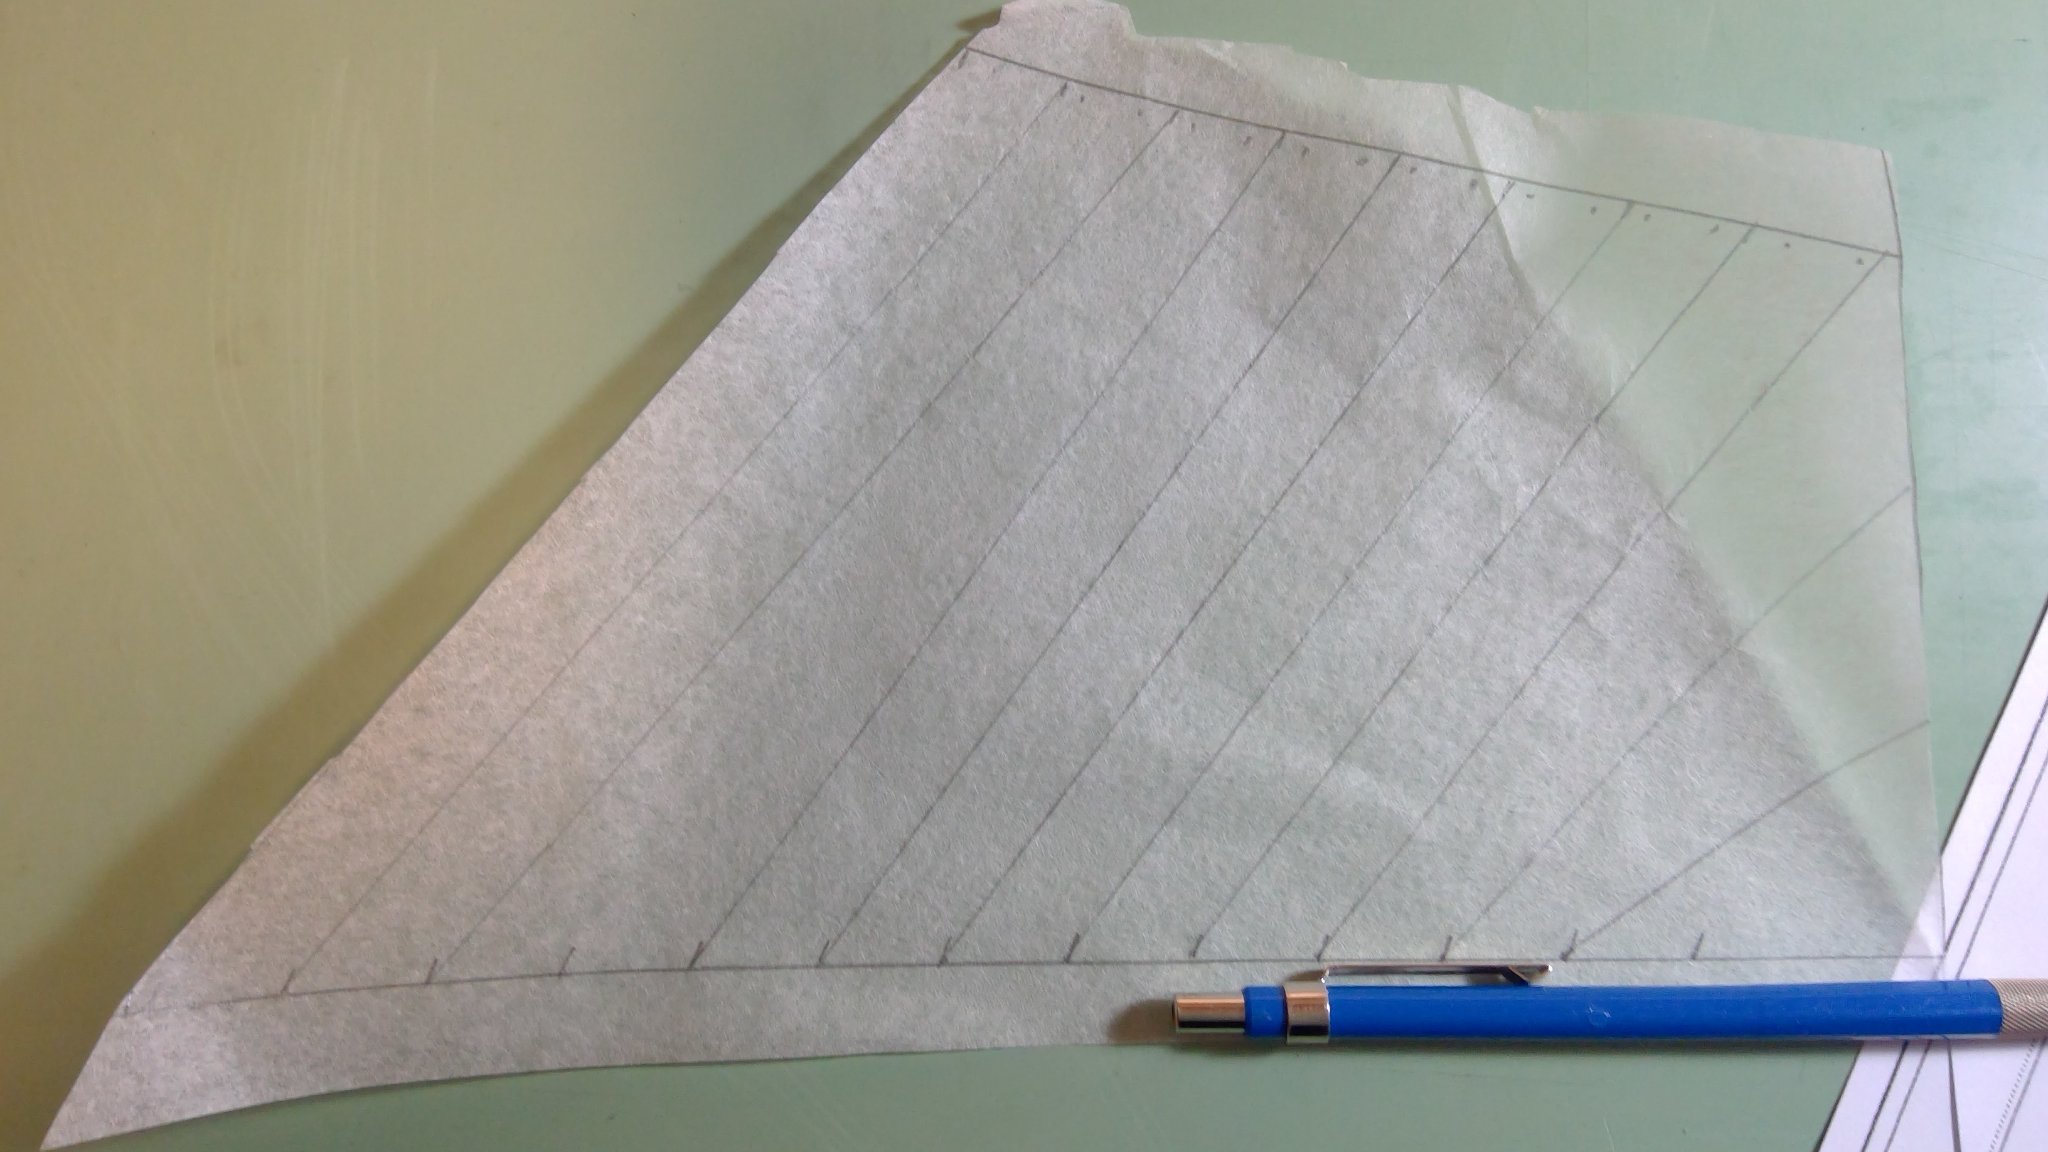
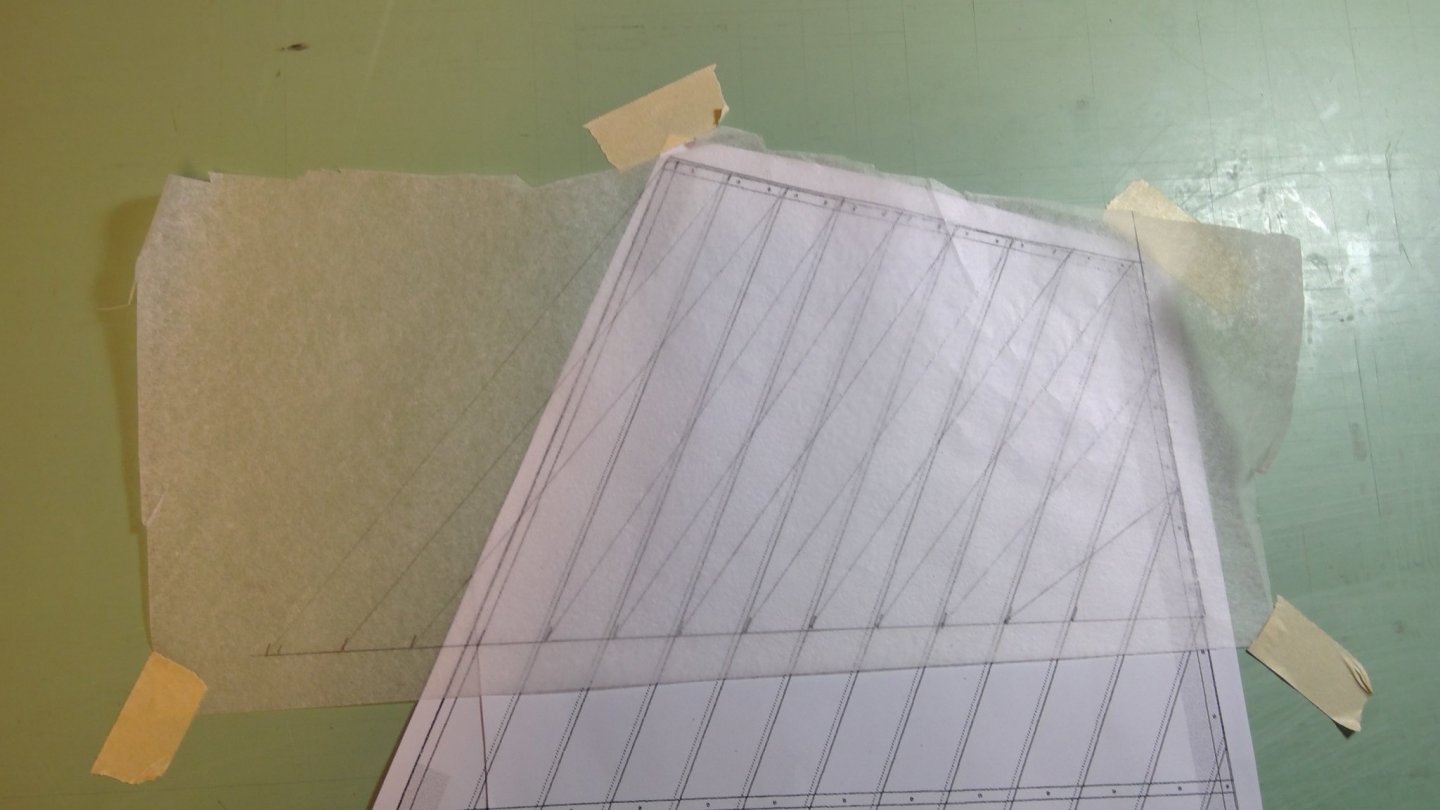
The sail is taped to the glass work surface. The lines for the tabling are traced onto a sheet of silk span that is overlaid over the sail template. Use a mechanical pencil or similar with a 4H lead or similar. You will note that there are two plies shown. On the one pictured on the bottom, I traced the solid seams. On the one on the top, I traced the hidden seams (those shown dashed).

-
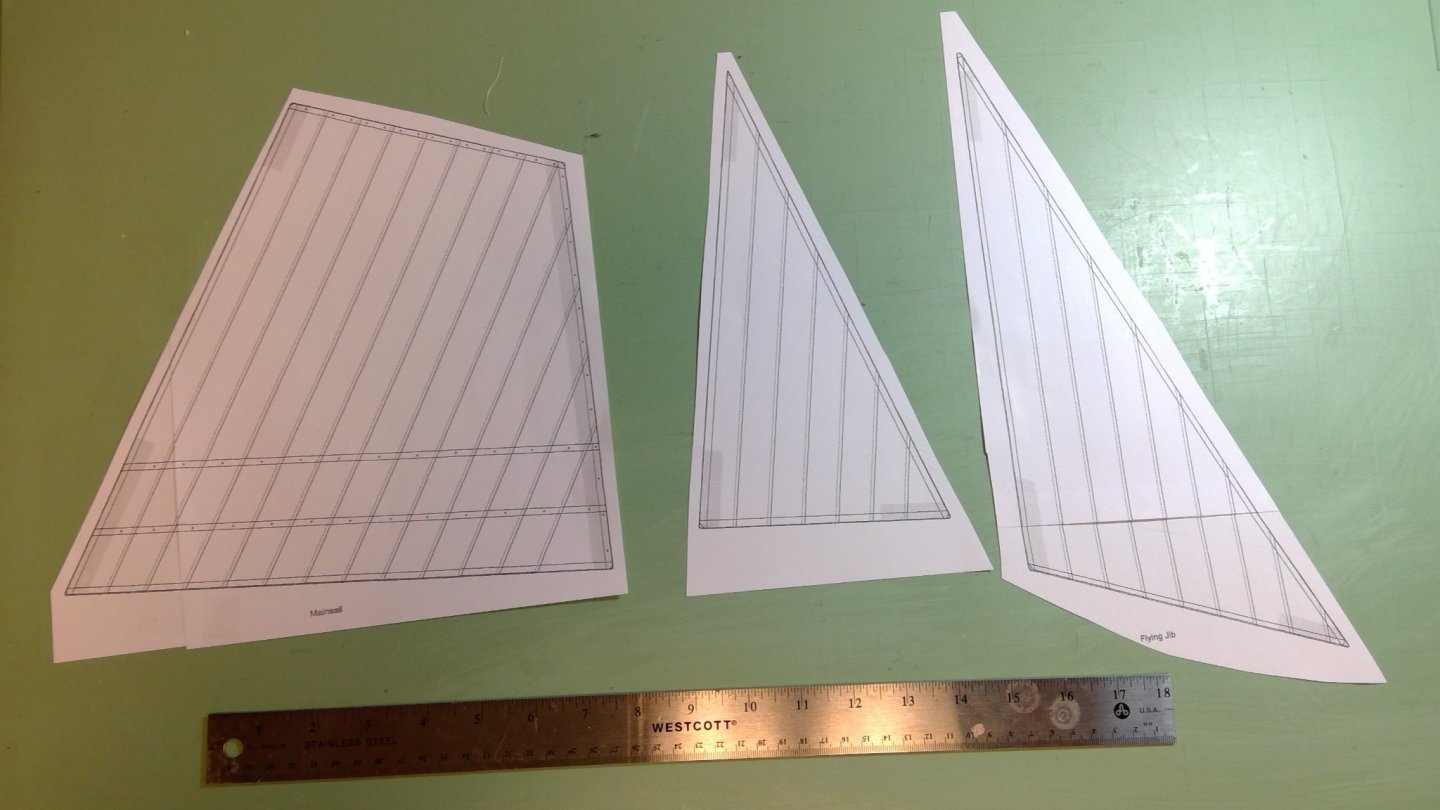
In this installment, I will describe how to make the sails themselves. For this particular model, the sail plan that is available as a download from Syren is the place to start. It is noted that this boat has the same sail plan and rig as a Gaff rig Cutter (same as Cheerful) except that the lines are smaller and there are certain accommodations so that the rig and sails can be set up, or broken down, readily. The first photograph is of all three sails (main, fore stay sail, and jib) cut from the downloaded plan. Some observations are; The main sail is gaff rigged. That means that it is attached to the gaff. It is also laced to the mast. More about that latter. The fore stay sail is attached to the stay (hence "stay sail"). The jib is completely set flying (flying jib) meaning that the uphaul raises the peak of the sail and the traveler spreads the sail along the bowsprit. I will show one sail being fabricated. The others are generally assembled the same way except that the sizes, shapes, and details of reinforcing or reef bands are different. I'll explain that as we move along.
-
Tom, I do have a presentation for sails on a frigate at 1:96. However, this particular presentation is for sails on a large scale long boat. I will consider posting the other one latter pending if I can directly upload it. Tom
-
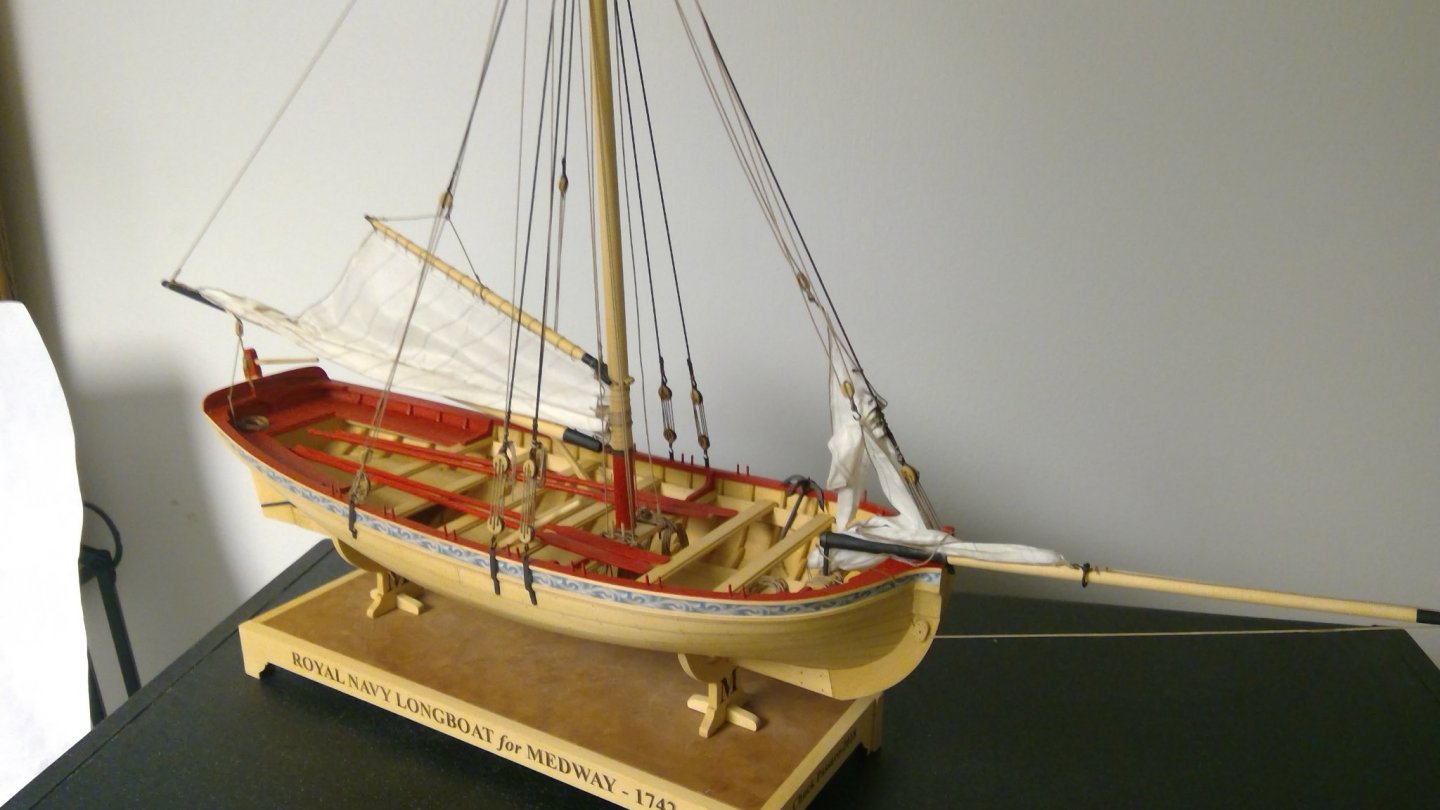
Sails were made, in this period, of strips of duck called 'cloths'. The cloths were 18 to 20" wide and had a 2" overlapping seam. In most of the smaller scales 1:48 and smaller, the overlap would be very difficult to see. However, in 1:24, you would see the overlap. That is one reason why I went to four plies of silk span for this model. The second was to add a bit more thickness for this very large scale. Again, at 1:48 and below, I'd stick with 3 plies. There is a sail plan for the Medway Longboat. Chuck has laid out the cloths very nicely, so you have a bit less work. However, there are a few decisions that you need to make. The biggest one, is to set the sails, or to furl them. I have seen many models with sails, and I have a few opinions. First, set sails, in my opinion, need to be shown drawing. Frankly, sails that just hang there don't do it for me. Next, when you do set sails, all of the sails need to be drawing with the wind in the same quarter. I'm sure that you've seen models with a limp flag or pennant, or one flying opposite to how the sails are drawing. This, again, in my opinion, spoils an excellent model. Additionally, too many sails hide quite a bit of detail. You want to make certain that the sails you set, and those that you furl, represent an actual configuration. Many models show ever sail set (think of the Revell Constitution). That happened once; when Constitution was becalmed and searching for any wind. The fact is that sails can blanket other sails making them inefficient. So, avoid the temptation of all sails set. Finally, avoiding the 'ghost ship'. A ship can have two or three figures on it, and it would still be a realistic presentation; i.e. the sails are in their proper configuration and the rest of the crew is below decks. However, we are putting sails on an open boat. Would an open boat with no crew have set sails? Also, if the sails are to be set, the boom would likely be swung out one side or the other. Given that this model is so light, that would complicate the stand to keep it from capsizing. I made aa main, fore and jib to be set, but I also made a set of sails to be furled. I went with the furled sails.
-
You will also need a flat surface to lay out the plies. I do this on a piece of plate glass. An old glass shelf will do the trick.
-
The next thing that we need, are materials. You will be making up your sails from several plies of silk span. You will be assembling the plies with a very thin mixture of white glue, clean water, and a small touch of Biocide. You can get the biocide from any paint or home improvement store. You need the biocide because white glue is an animal product. The biocide prevents it from mildew and spotting latter on.
-
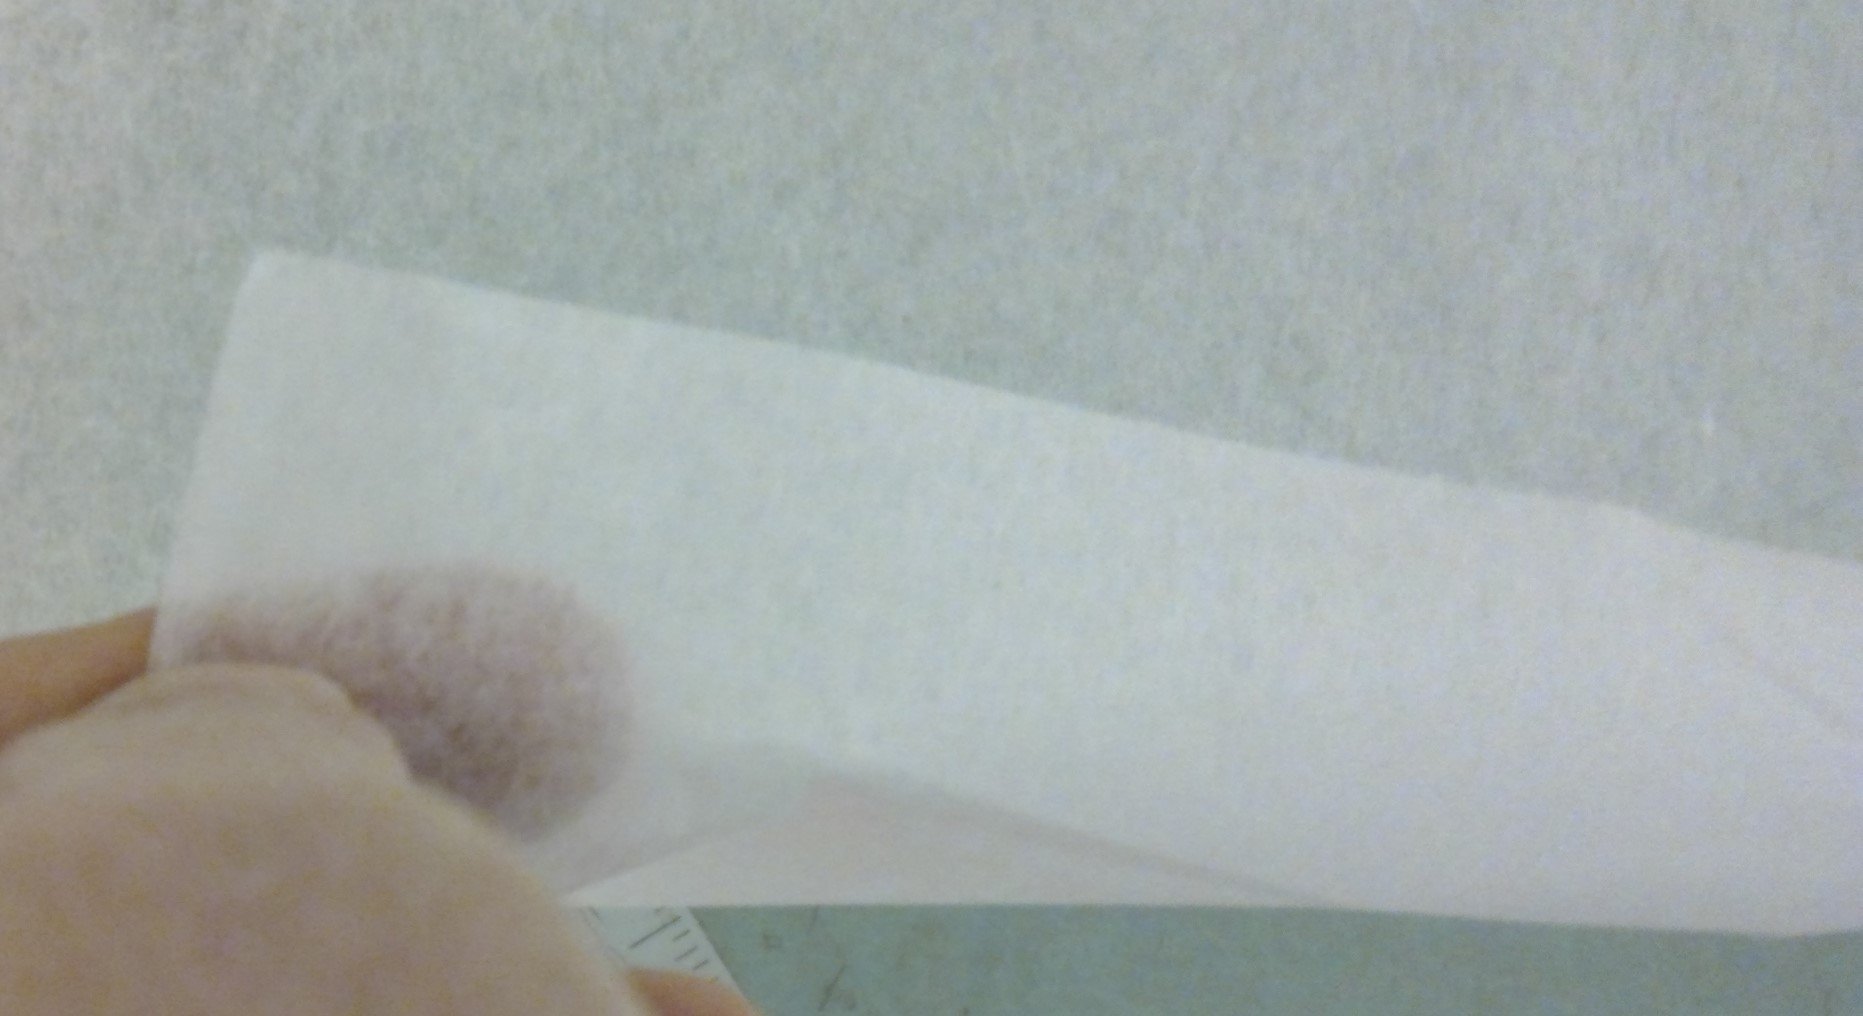
Why Silk Span? Cloth tends to look way over scale, especially if the sails are furled. Silk span looks like tissue paper, but it is actually silk. Lt is sufficiently pliable (can be draped or hung as actual sail cloth). This technique developed by the late John Wisner (NRG Shop Notes II, page 197, Nautical Research Journal 41:126) and in Justin Camerata's book on dioramas. It has been demonstrated by Nic Damuck of Bluejacket. The thinnest grade available (0-0). Other methods work fine, but they tend to be a little thick and if the sails are to be furled or draped, it is very tough do do with cloth and next to impossible with bond paper.

-
The Medway Longboat by Syren is a very popular model. As designed, it produces a beautiful model and in a larger scale that shows significant detail. I was asked to produce a set of sails for the Longboat. This topic will lead you through a process that I use for making sails. I will point out in the beginning, that this method has been used many times. It is also a shop note in the NRG Publication "Ship Modelers Shop Notes". It has also been demonstrated in several venues including Northeast Joint Clubs. I have added a few of my own tweaks to this process. My chosen material is silk span. Silkspan looks like tissue paper but it is a fabric and it does have a specific weave. It is marked by Bluejacket as Model Span. More to follow. Download the entire sail Tutorial here....Sails for a Cutter Rigged Long Boat.pdf Tom