
HOLIDAY DONATION DRIVE - SUPPORT MSW - DO YOUR PART TO KEEP THIS GREAT FORUM GOING! (Only 20 donations so far - C'mon guys!)
×


TomShipModel
-
Posts
289 -
Joined
-
Last visited
Content Type
Profiles
Forums
Gallery
Events
Everything posted by TomShipModel
-
You will also need a flat surface to lay out the plies. I do this on a piece of plate glass. An old glass shelf will do the trick.
-
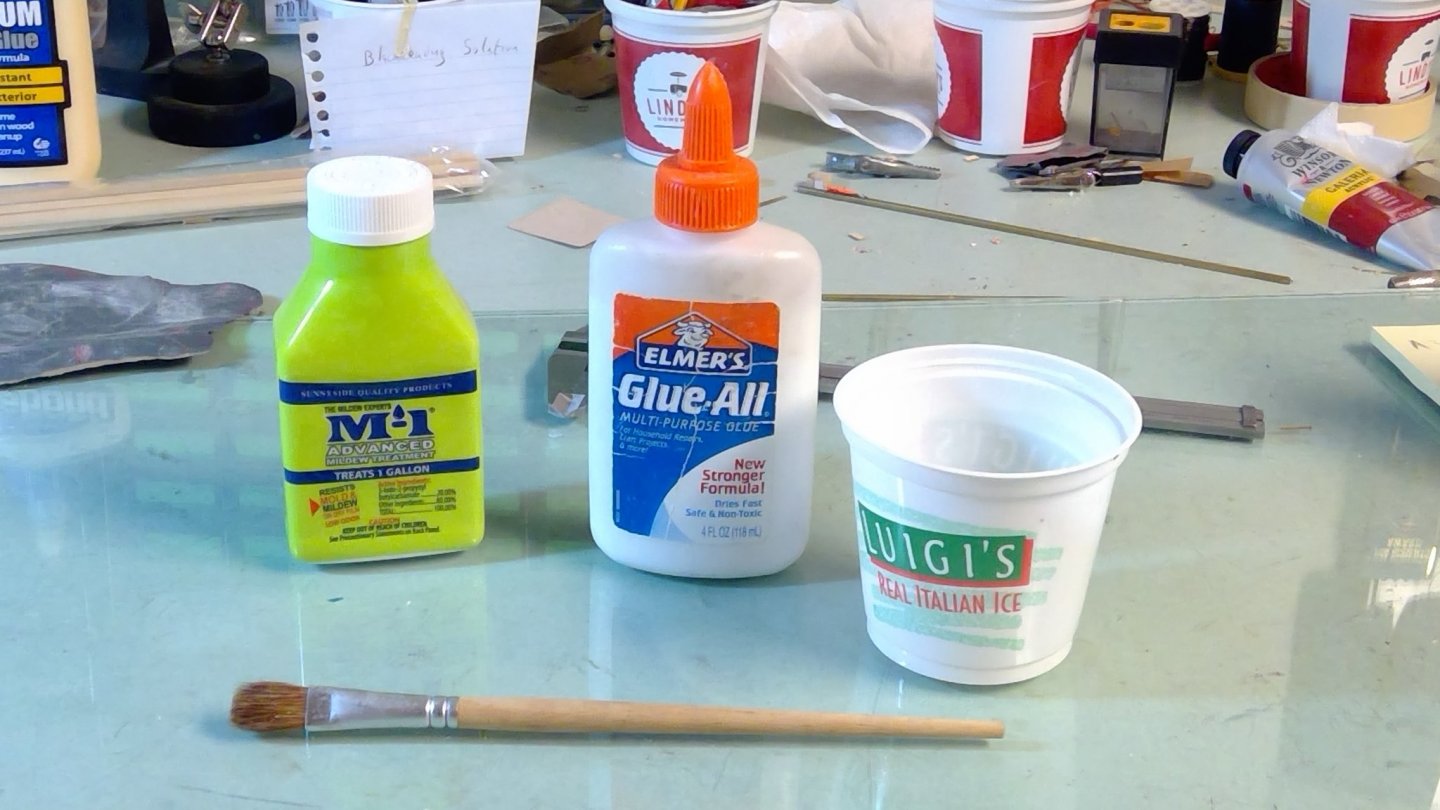
The next thing that we need, are materials. You will be making up your sails from several plies of silk span. You will be assembling the plies with a very thin mixture of white glue, clean water, and a small touch of Biocide. You can get the biocide from any paint or home improvement store. You need the biocide because white glue is an animal product. The biocide prevents it from mildew and spotting latter on.
-
Why Silk Span? Cloth tends to look way over scale, especially if the sails are furled. Silk span looks like tissue paper, but it is actually silk. Lt is sufficiently pliable (can be draped or hung as actual sail cloth). This technique developed by the late John Wisner (NRG Shop Notes II, page 197, Nautical Research Journal 41:126) and in Justin Camerata's book on dioramas. It has been demonstrated by Nic Damuck of Bluejacket. The thinnest grade available (0-0). Other methods work fine, but they tend to be a little thick and if the sails are to be furled or draped, it is very tough do do with cloth and next to impossible with bond paper.

-
The Medway Longboat by Syren is a very popular model. As designed, it produces a beautiful model and in a larger scale that shows significant detail. I was asked to produce a set of sails for the Longboat. This topic will lead you through a process that I use for making sails. I will point out in the beginning, that this method has been used many times. It is also a shop note in the NRG Publication "Ship Modelers Shop Notes". It has also been demonstrated in several venues including Northeast Joint Clubs. I have added a few of my own tweaks to this process. My chosen material is silk span. Silkspan looks like tissue paper but it is a fabric and it does have a specific weave. It is marked by Bluejacket as Model Span. More to follow. Download the entire sail Tutorial here....Sails for a Cutter Rigged Long Boat.pdf Tom
-
Hi everyone! Thank you, Chuck, for the kind words. I will be setting up a tutorial on the sails. It will take me a little while to set it up, but once I do I will run through it quickly. I typically use three plies of silk span for 1:48 and smaller if the sail is to be set. Sometimes I will reduce to two ply if the sail is to be furled, but not always. Because the Longboat is 1:24, I used four plies of silk span. More when I get my log started. Tom
- 421 replies
-
- 10
-

-
- medway longboat
- Syren Ship Model Company
- (and 1 more)
-
I am signed up. Can't wait to see it! Tom R
-
Tom, Very well done! The sails are very realistic and the coloring is very good. Tom R
-
I'm signed on as well. An interesting note is that I was in London in July 2005 with a short side trip to Portsmouth to do a deep tour of HMS Victory. Since it was the 200th Anniversary Year of the Battle of Trafalgar there were a few special events including a mock battle between the Red team and the Blue Team. My wife and I went to St Paul's in London. I made a point to visit Nelson's crypt and behold, it was closed for cleaning and refurbishing! On the 200 anniversary; can you imagine? There was a very nice display, but that was it. Five years latter, I was in London again to visit my daughter who was doing an internship. Again, I went to St. Paul's specifically to see Nelson's crypt. This time it was open, but the lights were turned down so low that it was extremely dark. In any case, I hope that this event gets rolling. Tom
-
Just added my membership number.
-
Ken, Congratulations on an excellent model. Great job! Wish to see it in person very soon.
- 238 replies
-
- 2
-
-
- sloop
- providence
- (and 1 more)
-
Your sails are excellent both in color and the way in which they are drawing. You may have mentioned it already, but how did you attach the bolt ropes? Are they sown on or are they glued with liquitex? Best, Tom
-
Well done Ken. Your workmanship is very clean. Your research to get it as close as you can to the prototype is sound. Great job.
- 238 replies
-
- 4
-
-
- sloop
- providence
- (and 1 more)
-
Yes, lighter rope would be appropriate as these ropes had no preservative on them at all. You started with the simply ones first. When you get to the Topsails with two reef points on every cloth and two or three reef bands; then the fun begins!
-
Yes, this is used to prep the canvas for painting. I do use it for setting knots as well. However, on caution is that for black and dark brown rigging it does give a bit of a white haze on the line. I typically use dilute white glue to set knots on dark colored line. As you had mentioned, for me, the only use for cyano on rigging is to point the line to run it through a block. Cyano just makes rigging too brittle and the stretching and slackening of line due to temperature and humidity changes could (an in my case does) break the line at the interface between the cyano hardened line on the rest of it.
-
That would be great. The person who put this silk span method into shop notes was the late John Wisner, a member of the Connecticut Club.
-
Your model is excellent. Since you are going to bend sails, a very good reference is "Seamanship in the Age of Sail" by John Harland. I am not a sailor, and this book will help you to enhance realism. For example, a ship like yours did have 37 total sails. However, they were never all set. The reason is that they would blanket each other and be counterproductive. So, stay sails would be set if a ship was sailing close to the wind. However, in that sitution some of the square sails would not be set and those that were would have their yards braced to the extreme. Also, studding sails were normally not set on both ends of the yard. They would be set on one side or the other and normally not bent at all. The only documented case of a ship having every sail set was when Constitution was becalmed when it was being chased by a British Squadron. The ship was being towed/kedged, in the hope of finding any wind. Once they did find some wind, only the sails that were favorable were left set. Finally, many of the running rigging lines would actually hang with a drape. For example, if the courses are furled, both the sheets and tacks would be hanging slack. I really appreciate your build and good fortune with your sails.
-
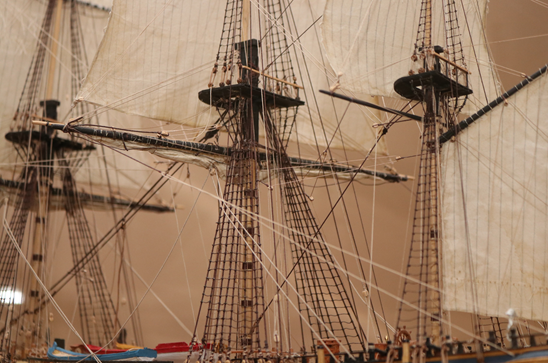
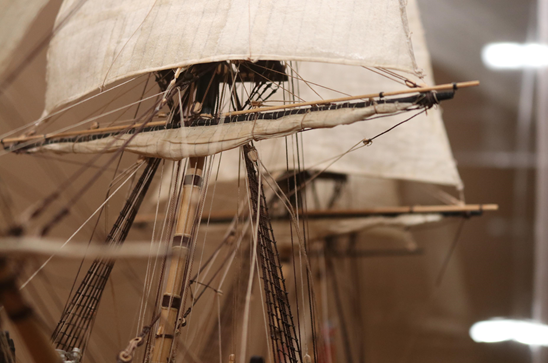
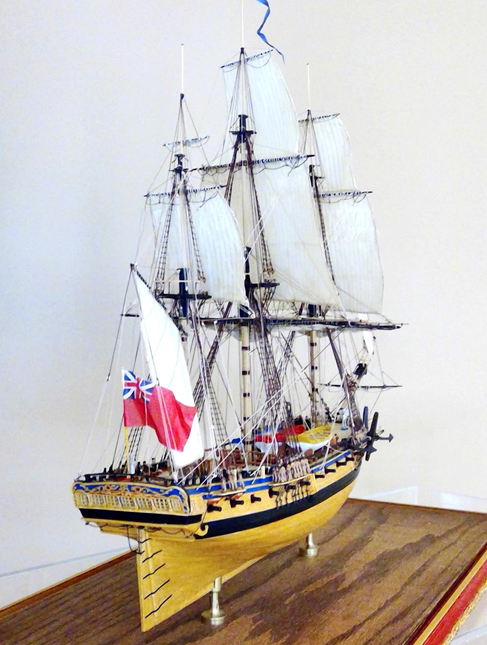
Good morning. I did silk span sails for my 1:96 HMS Liverpool. I used silk span as it can be draped, furled, and billowed very easily using dilute white glue with a touch of biocide in the mix to prevent mildew. I use three plies and laminate them together. The center plie has the tabling penciled on. Up to 1:48, this should work well. This method has been demonstrated many times and was put in NRG Ship Model Shop Notes 2. The results are very good. I modifi ed the method slightly to suit my model. I've presen ted this method several times at our local clubs. Here is a photo of the results.
- 385 replies
-
- 10
-
-
Stunning work! Photographing a model close up is very telling in that what the naked eye would hide can now be seen. There are no flaws on this model. Excellent workmanship and very realistic.
- 211 replies
-
- 4
-
-
- prince of wales
- tamiya
- (and 2 more)
-
Yes, that would be very interesting. I'm wondering if there are any period references out there. I'm going to take a look in "Seamanship in the Age of Sail" by John Harland.
- 263 replies
-
- 2
-
-
- Medway Longboat
- Syren Ship Model Company
- (and 1 more)
-
Very good question about serving. Actually, lines are wormed, parceled and then served in full size practice. In a small boat where the rigging is set up and taken down frequently I would imagine that the rigging lines are preset so that they can be raised quickly. So, as previously suggested, the eye splices at the mast head are pre made and served. I'm guessing that they would remain on the mast head even when it was taken down. The deadeyes would remain turned into the shrouds, and since the lower deadeyes are hooked into the chain plates the lanyards would be rigged loosely. In any case, a beautiful job Ryland. Tom
- 263 replies
-
- 2
-
-
- Medway Longboat
- Syren Ship Model Company
- (and 1 more)
-
I use a method that Chuck at Syren uses. I have done UK ensigns using this method in 1:96, but, it will work nicely in 1:350 . First, find the flag that you want on the internet. Copy the flag into your word processor program (I use Word) and resize it to what you need. You may need to do a few trial prints until you get the correct size. Once you do, print it out on an ink jet printer. Now, take tissue paper, or silk span, and tape it over the printed flag. Load the paper back into the printer and then print again on the silk span or tissue paper leaving a flap on the fly of the flag. You will be folding that flap over the flag halyard. Let it dry thoroughly. Now, Remove the tissue flag and fold the flap over the halyard (it's not on the model yet). Glue it down with white glue of clear mate medium like Liquidtex. Put the halyard on a fixture (like a third hand) so the the line is taught. Now, spray the flag with mate laquer (I use Krylon). While it is still wet, shape the flag as needed. A small dowel or paint brush handle works well. If you don't like how it flies, spray again. Here are the results on my 1:96 HMF Liverpool. Best regareds,
-Copy.thumb.jpg.2f94122895db24e35a0f4dc192e57543.jpg)
- 211 replies
-
- 7
-
-
- prince of wales
- tamiya
- (and 2 more)
-
This model is truly a work or art! Beautiful and very realistic.
- 211 replies
-
- 5
-
-
- prince of wales
- tamiya
- (and 2 more)


-Copy.jpg.5a8406403eabe812346887f2dc20b70f.jpg)