Cap'n Rat Fink
-
Posts
829 -
Joined
Content Type
Profiles
Forums
Gallery
Events
Everything posted by Cap'n Rat Fink
-
 HERE IS THE REST OF THE PHOTOS.... HAPPY MODELING EVERYONE!!!
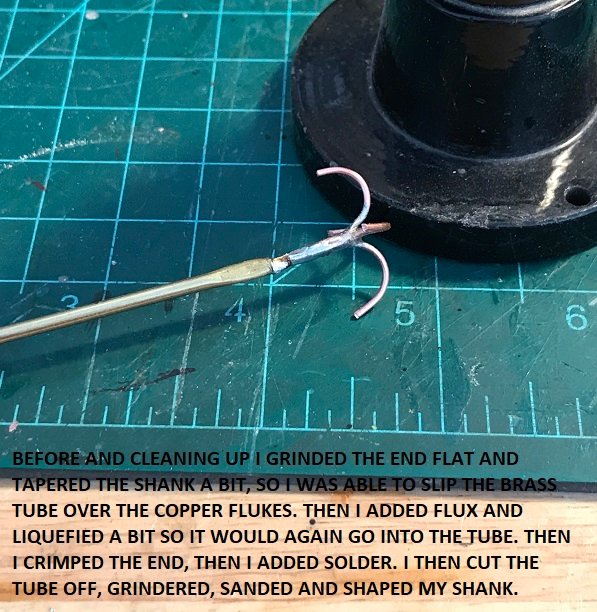

-
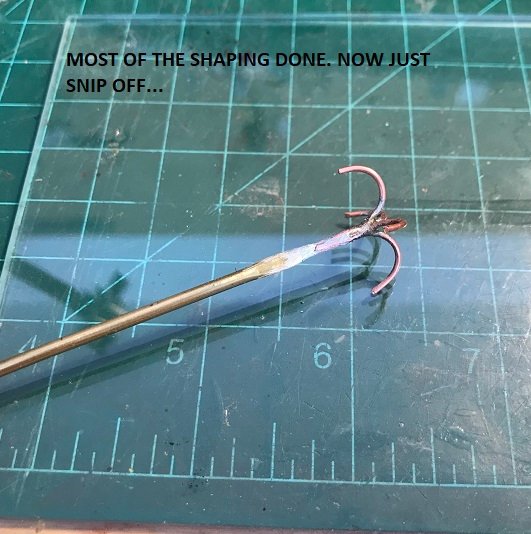
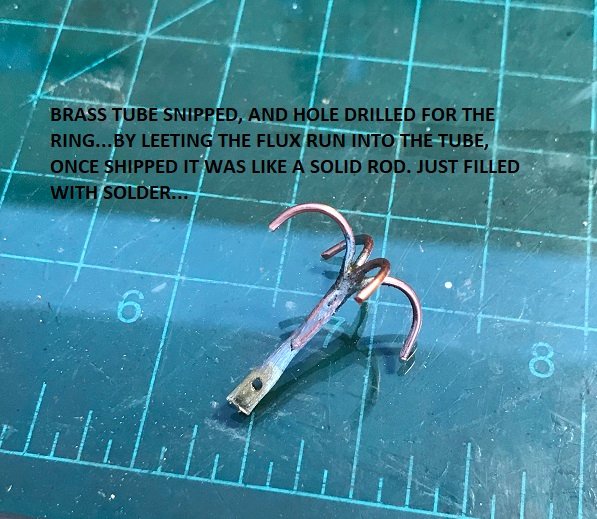
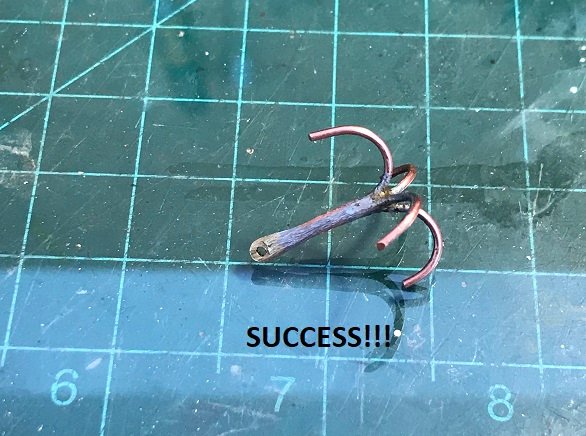
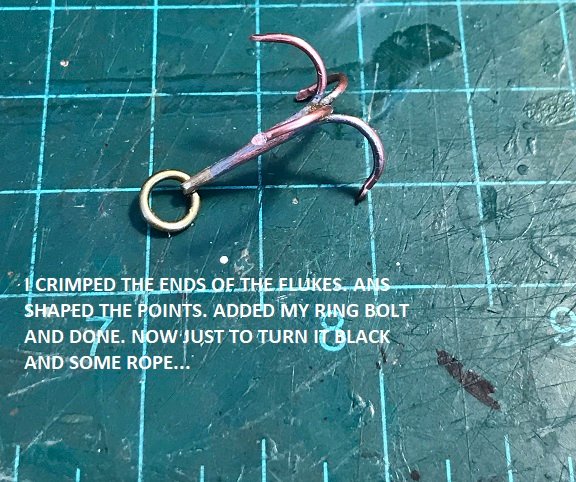
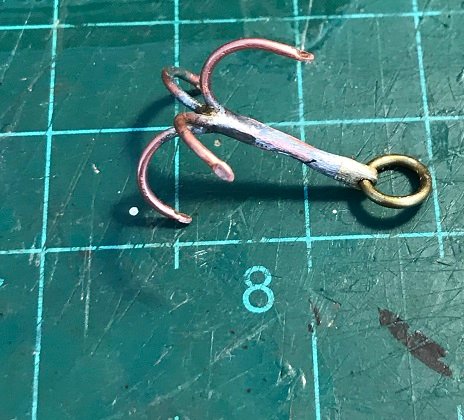
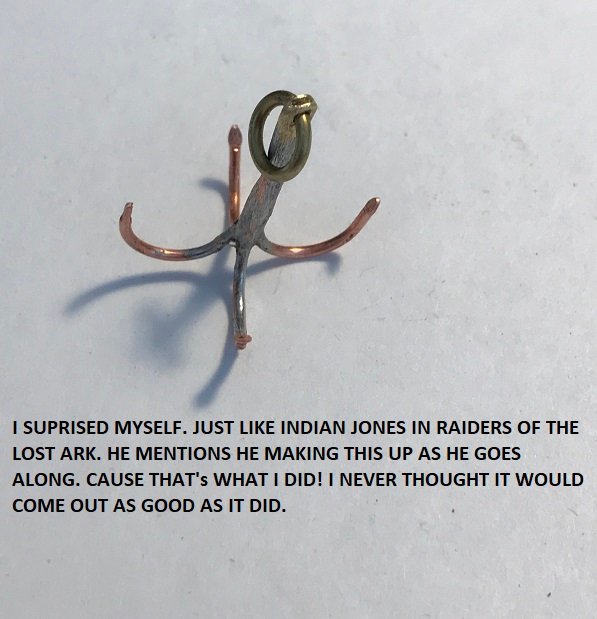
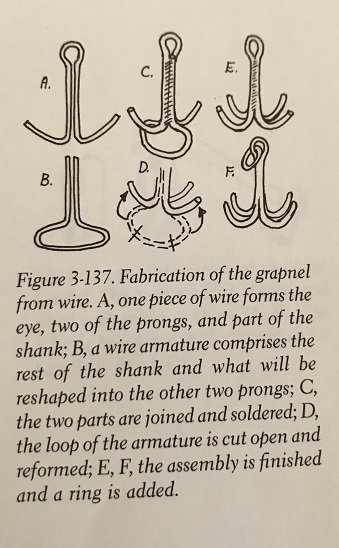
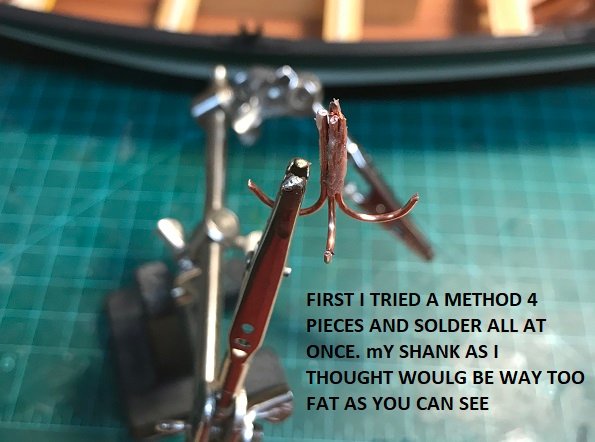
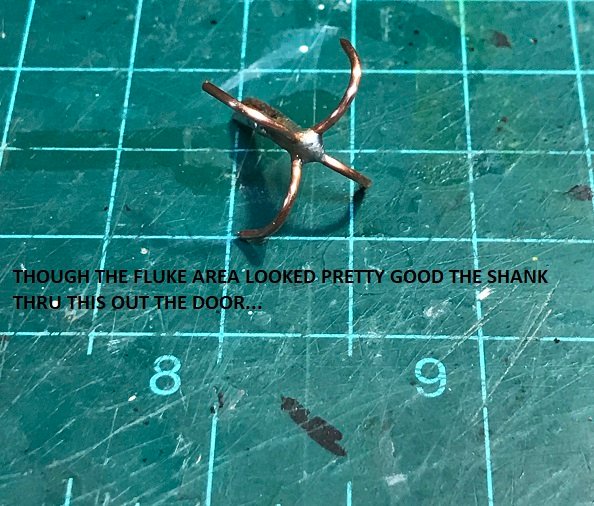
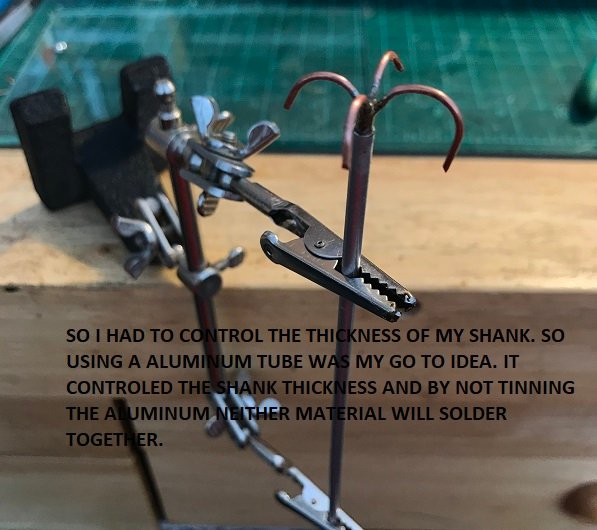
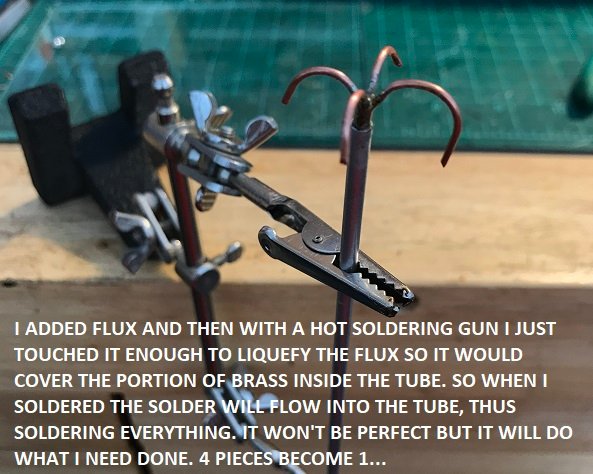
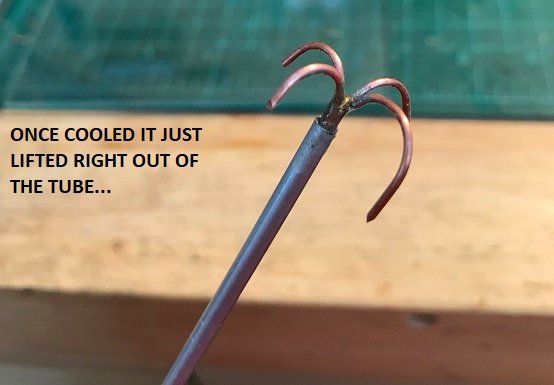
THANKS FOR ALL THE LIKES... WELL HERE WE GO AGAIN WITH MY ADVENTURES IN METAL WORKING. LOOKING HOW RONNBERG WENT ABOUT MAKING THE GRAPNEL ANCHOR. I SAID OH BOY, MINE WAS NOT GOING TO COME OUT THAT GOOD. SO I HAD FIGURE SOME OTHER WAY TO WORK WITH MY FEEBLE METAL TALENTS. SO HERE WE GO....I HOPE THE PICTURES EXPLAIN ENOUGH OF WHAT I WENT THROUGH. IF NOT PLEASE ASK AWAY. I REALLY LIKE SHARING WHAT I GO THROUGH IN HOPES IT WILL ASSIST OTHERS IN THEIR MODELING ADVENTURES.

-
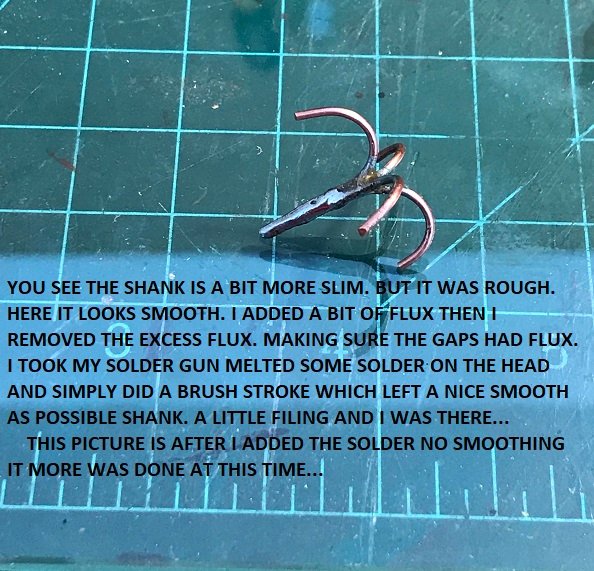
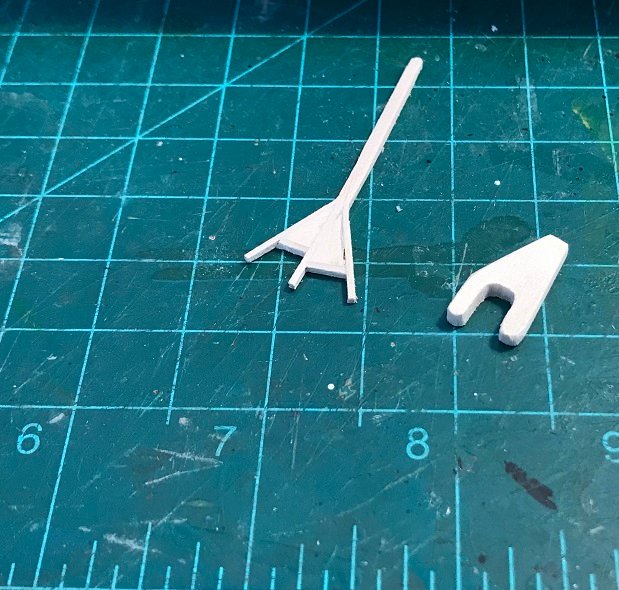
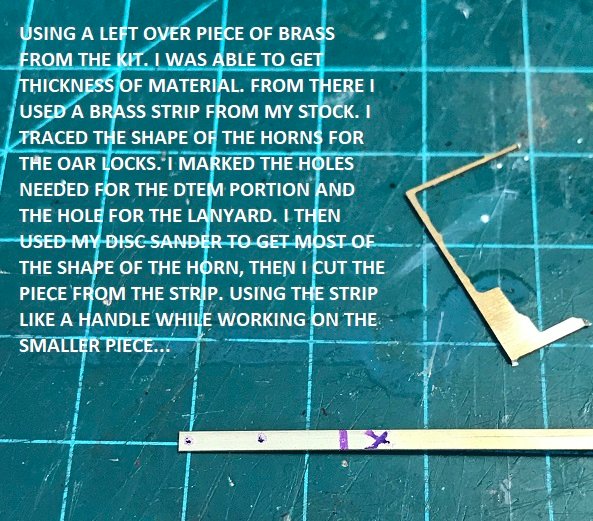
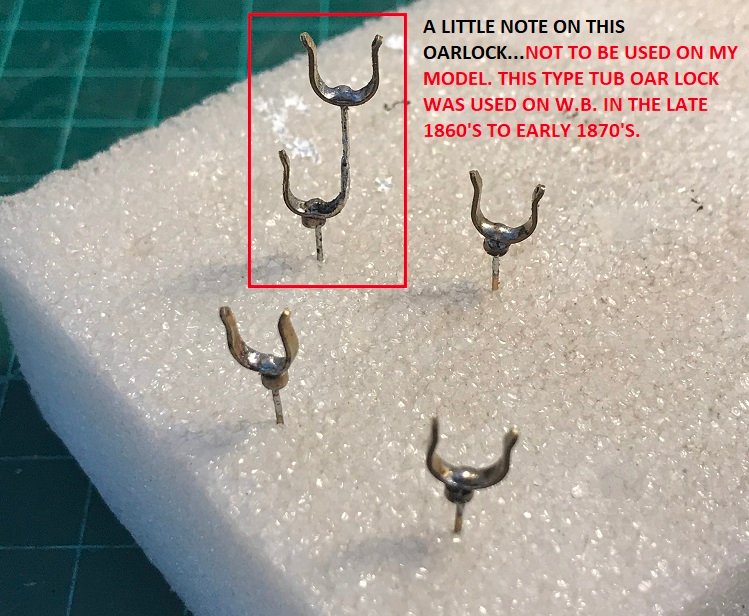
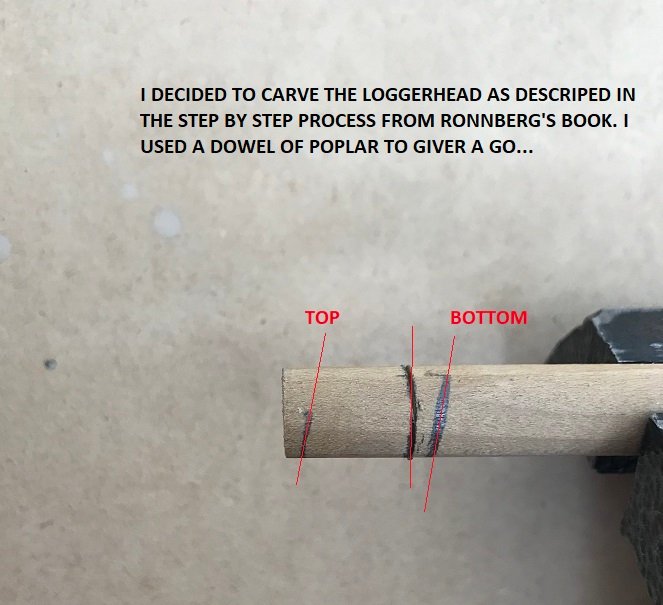
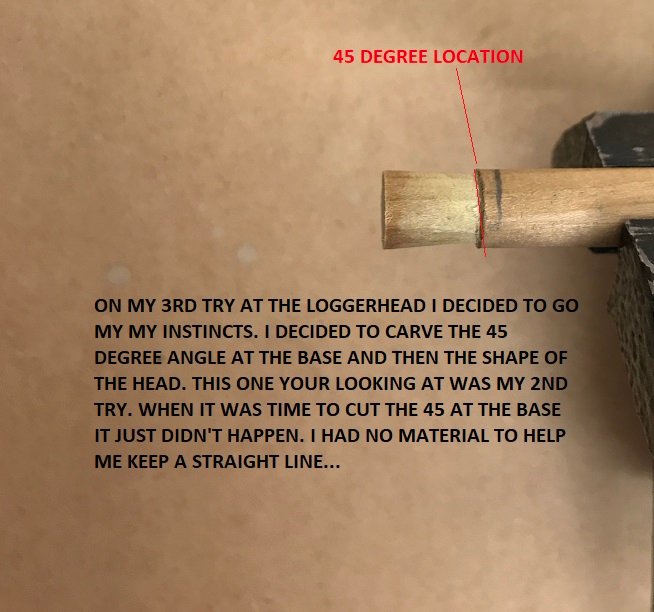
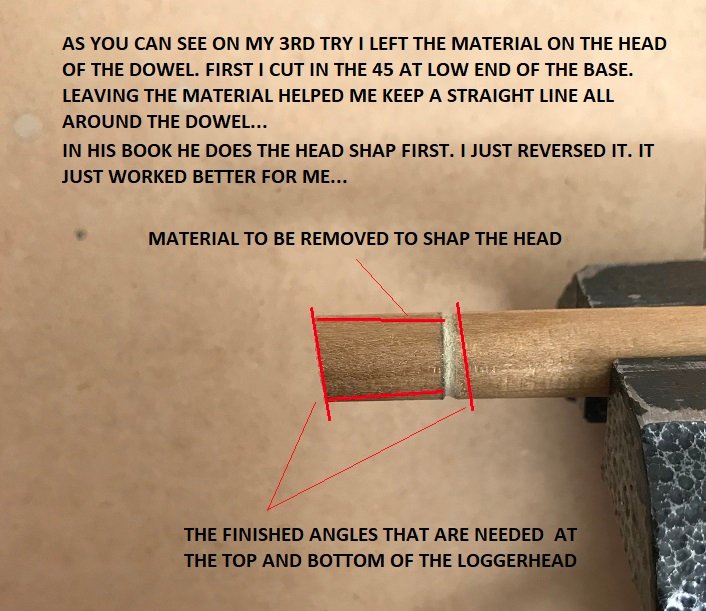
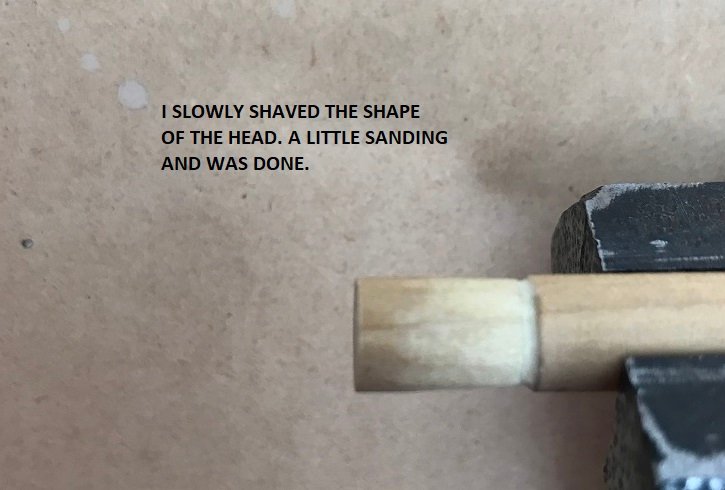
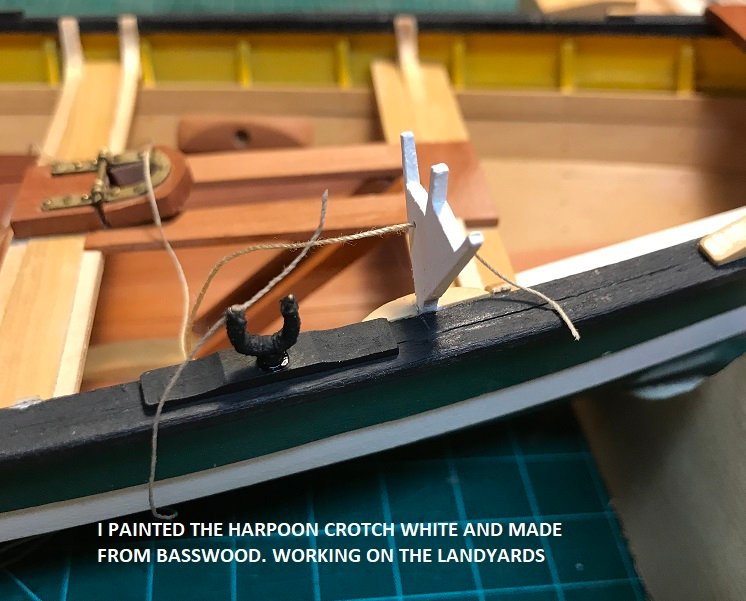
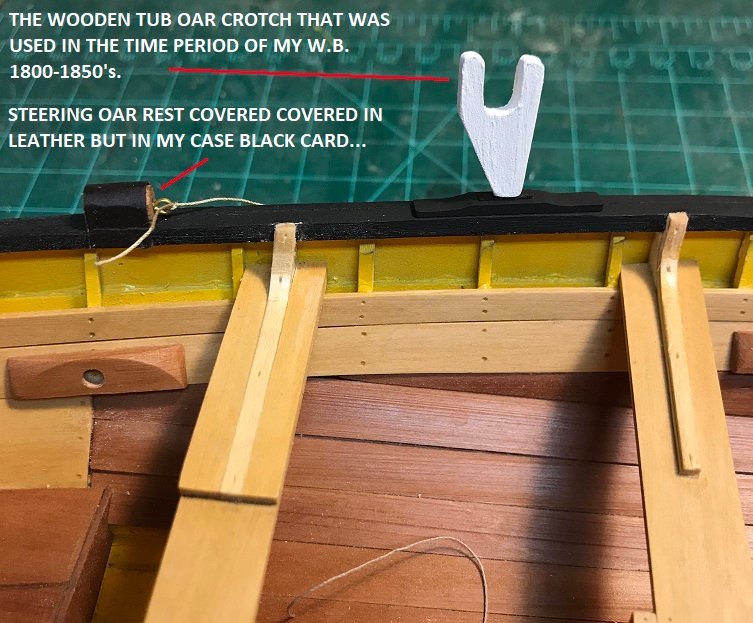
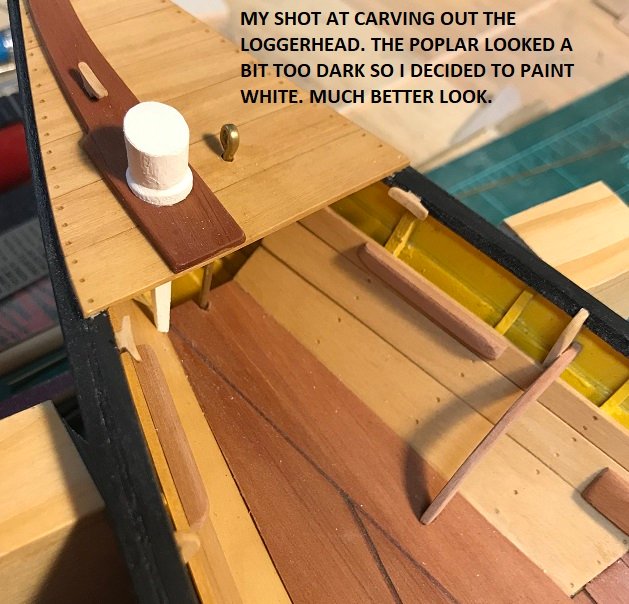
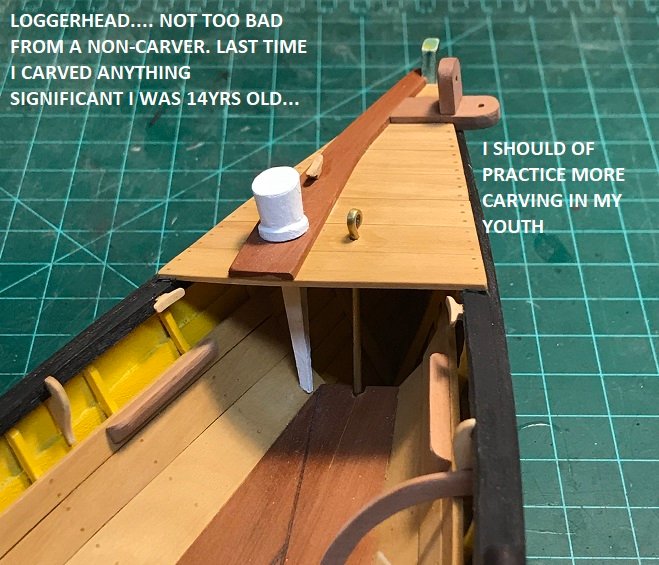
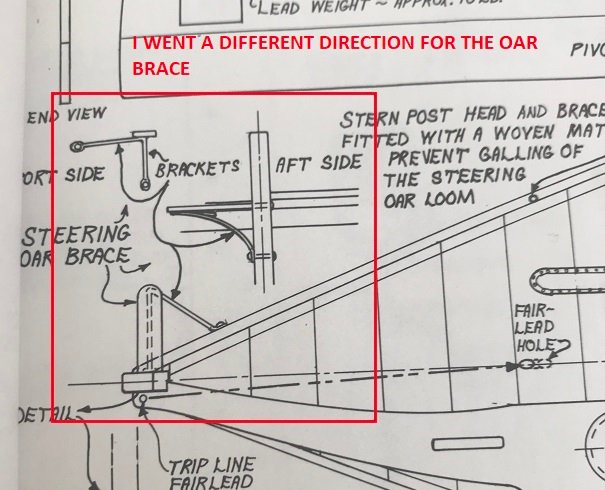
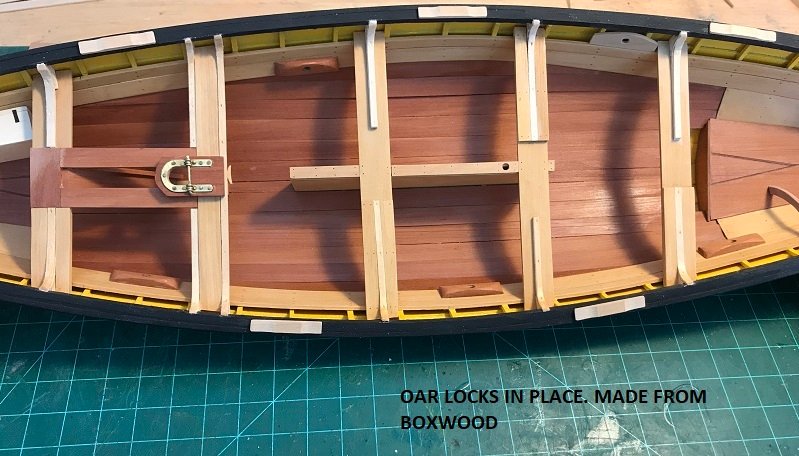
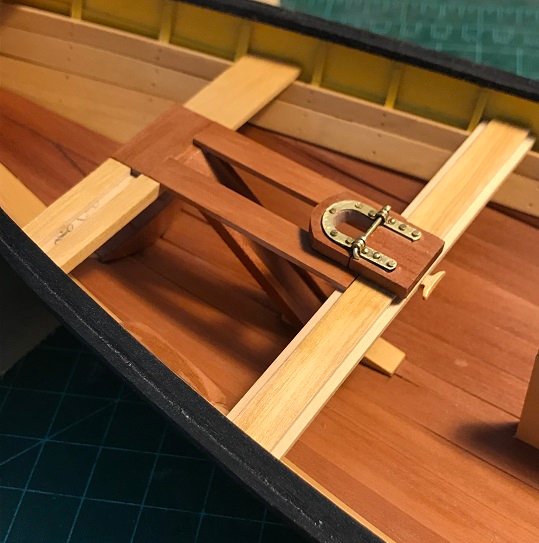
HI JOHN AND THANK YOU VERY MUCH! SO ONWARD WE GO WITH ADDED MORE OF LITTLE THINGS. I TRIED CARVING THE LOGGERHEAD INSTEAD OF JUST TURNING IT ON THE LATHE. NEXT TIME IT'S THE LATHE. I AM STICKING WITH WHAT I DO BEST...HAHA! THE HARPOON CROTCH AND THE TUB OAR CROTCH FROM BASSWOOD... TRYING TO BETTER MY METAL WORKING SKILLS WHICH I HAVE NON TO SPEAK OF. THE TUB OAR LOCK WAS A LITTLE CHALLENGE WITH SILVER SOLDERING. IT CAME OUT PRETTY GOOD. SOLDERING SMALL ITEMS IS A CHALLENGE FOR ME. LARGER ITEMS NO BIGGIE. RONNBERG HAS THIS IN HIS BOOK, BUT THESE WERE USED IN THE LATE 1860's THRU EARLY 1870's. WHY HE HAD THIS IN HIS BOOK AND ON THE PLANS??? ALL I CAN FIGURE IS THE BOAT DID NOT CHANGE MUCH IN EVERYTHING ELSE SO MAYBE THAT's WHY. I AM JUST GUESSING HERE. IF I WANTED TO USE IT I COULD??? HAPPY MODELING!!!

-
AND A LILLE MORE.... YOU ALL HAVE A NICE MODELING DAY!!!
-
THANKS JOHN, and THANK YOU ALL FOR THE LIKES!!! SO I CONTINUE ON WILL ALL THE LITTLE BIT TO ADD TO THE HULL OF THE BOAT....


-
Well done Mike. Your rope looks real good.
-
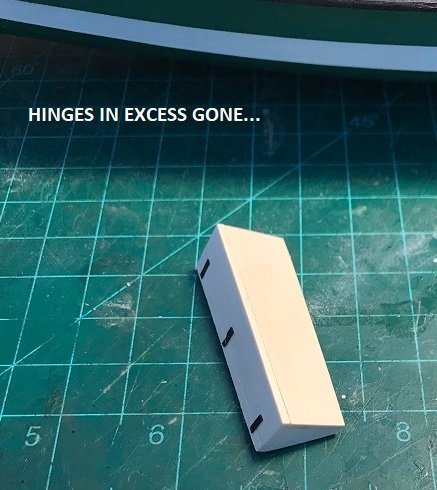
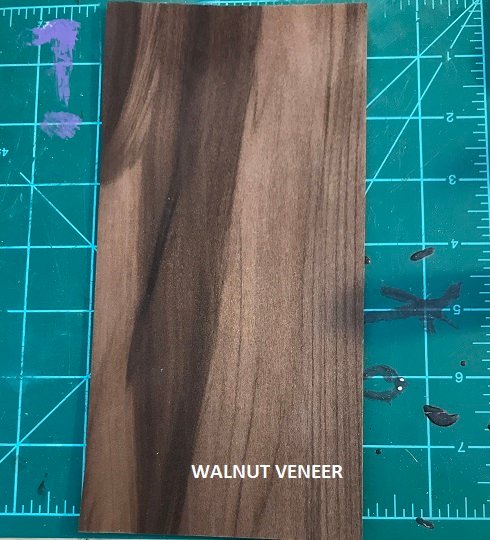
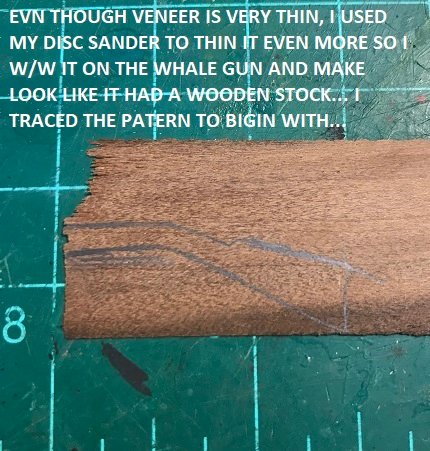
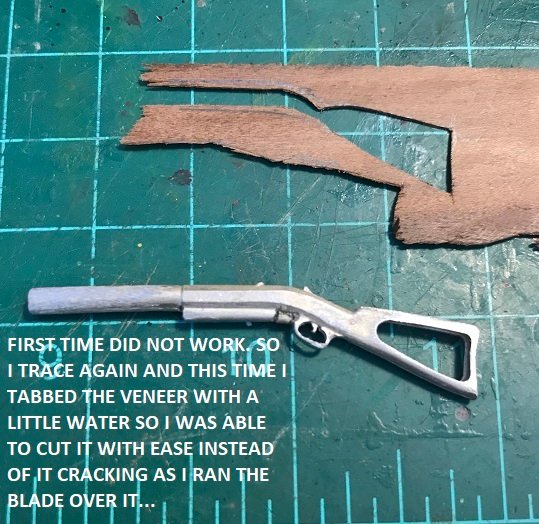
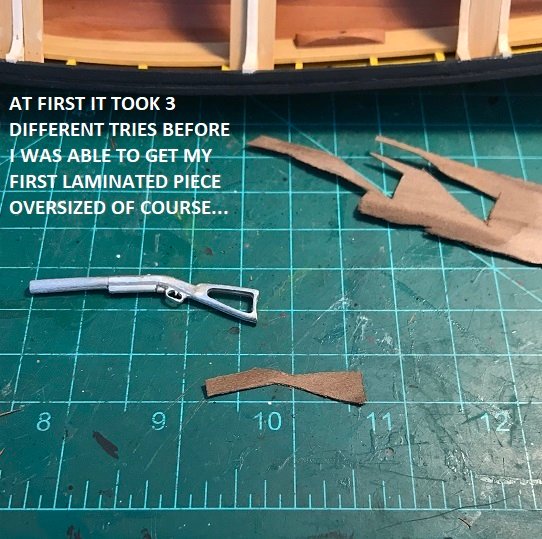
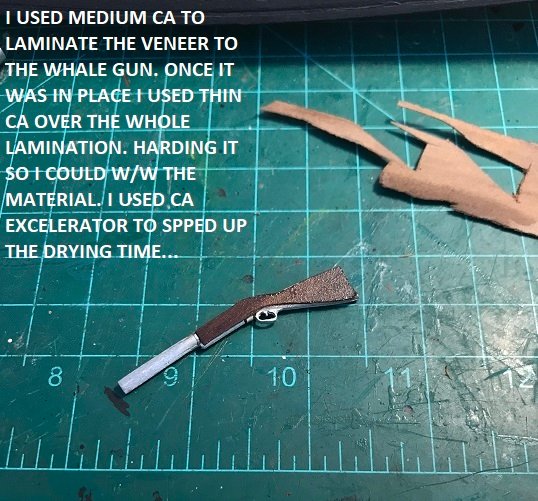
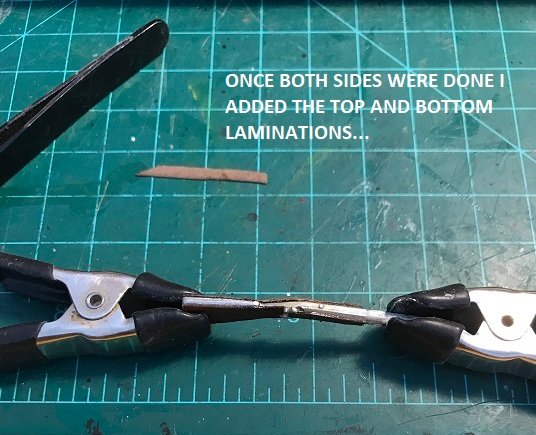
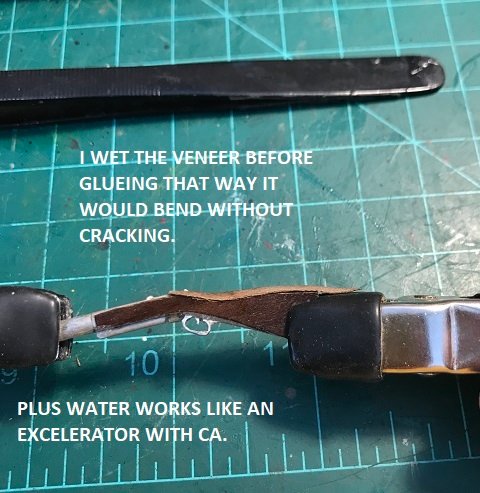
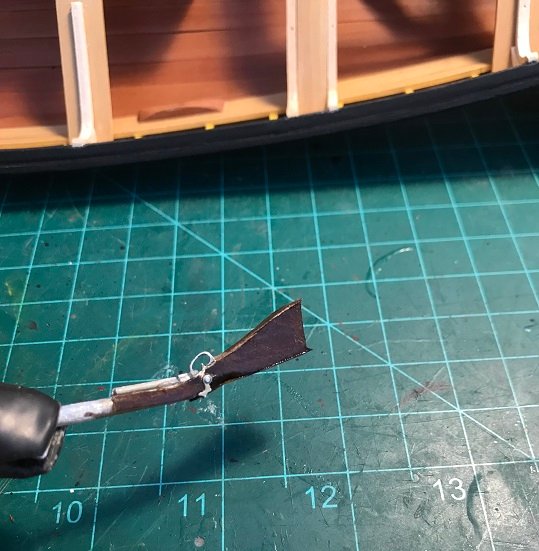
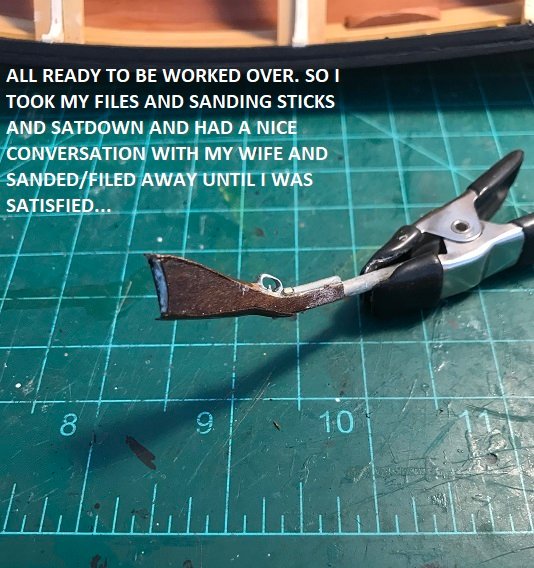
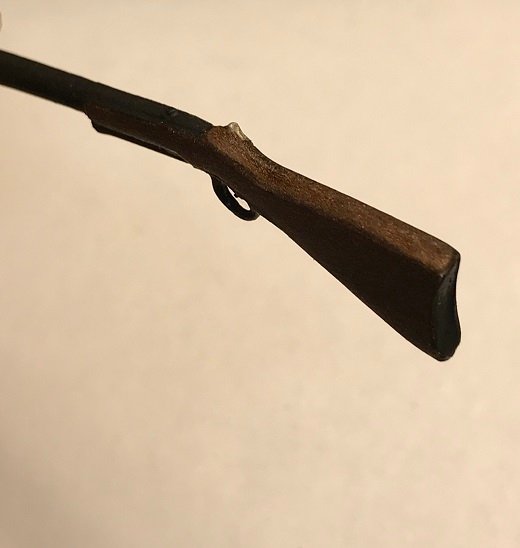
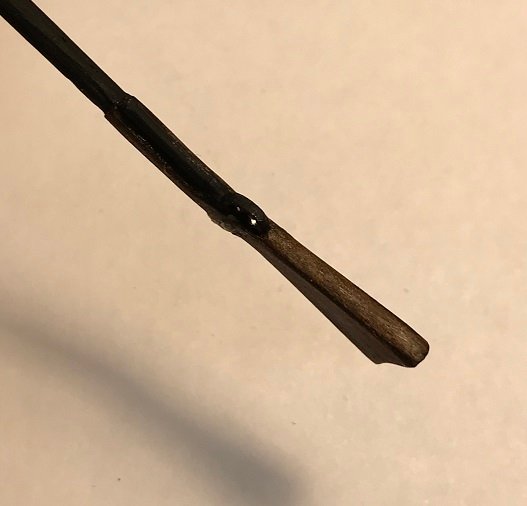
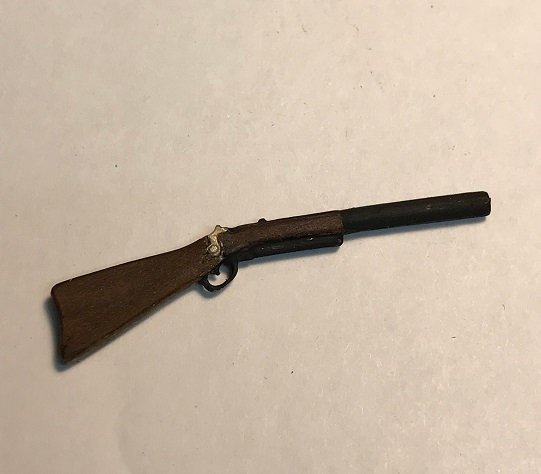
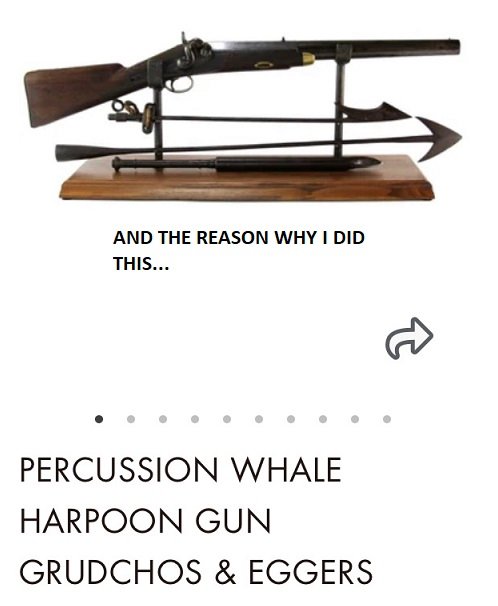
I DECIDED TO PULL AWAY FROM THE BOAT TODAY AND WORK THE WHALE HARPOON GUN. I HAD TO FILE THE KIT GUN A BIT TO LOOK LIKE I WANTED IT TOO. MY BUDDY WHO USE ALL THE MATERIAL EXCEPT FOR A FEW ITEMS AND WOOD LEFT THE GUN. SO I WORKED IT OVER TO MY LIKING...

-
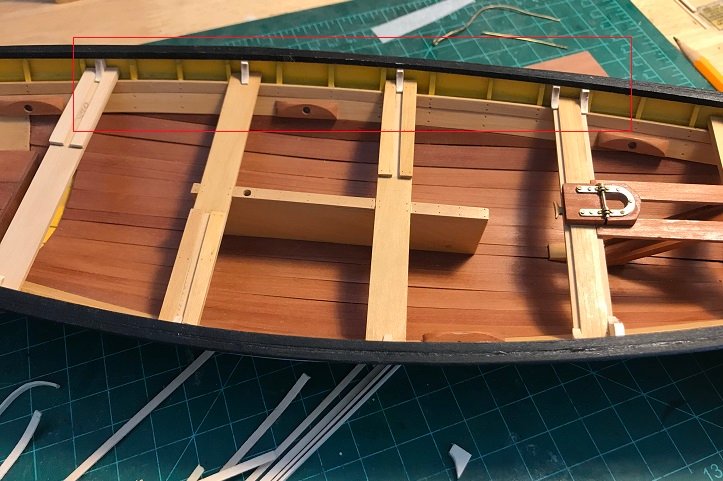
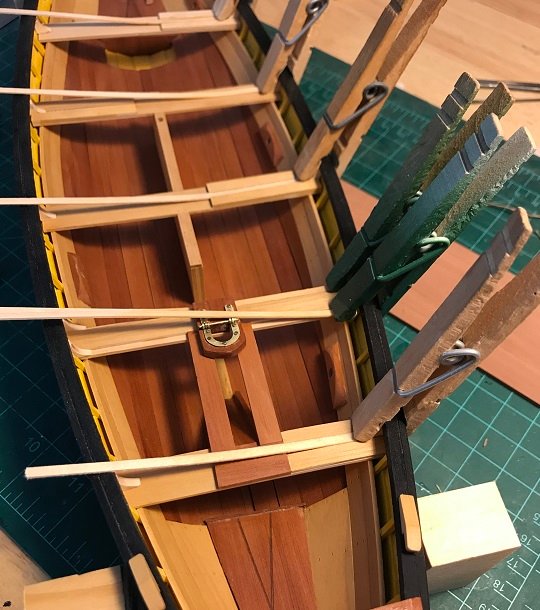
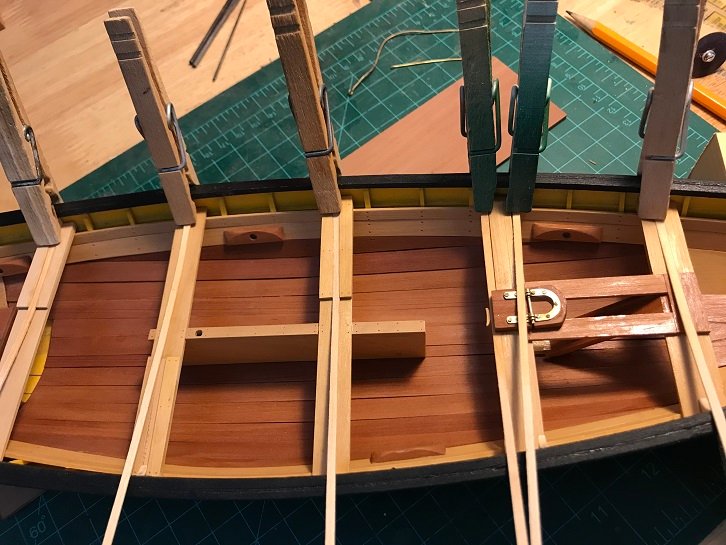
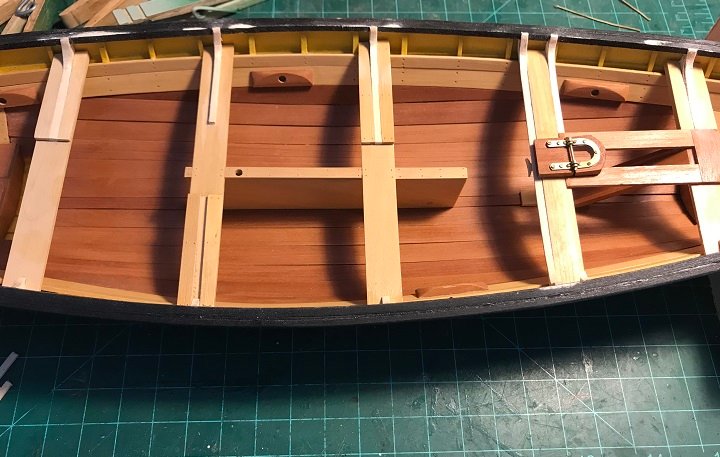
Thank you for the likes everyone! Now for the thwart knees and the pads. I decided to use basswod because the thwarts were boxwood. Since both are light colored I figured it would make for a nice contrast. I pre- bended one of the strips ahead of the knees. No reason. Once I figured the curve to the knee I made a little template so I would have the same curve for all 12 knees. Made all the knees a little proud so I could just do a little sanding in place, till they were flush with the wales. The one knee to the extreme left is completed. Even though I pre- bended the strips I Soaked the strips for about a minute and placed them on the knees and cloths pinned them for a few minutes so they would conform to the curve on the knee. I cut them to length and glued them in place afterwards. Per the practicum this was going to be done with 2 lamination's. The clothes worked very well, because the inside of the pin was of course wood and rounded which helped keeping the pin from leaving a mark on the soft basswood. working on the 2nd lamination. Both lamination's in place, glued, sanded, and ready for wipe-on poly. The two different tones of light colored wood came out real nice for my taste. And how I left it last night. Just a little finish and we be done. LATER YOU ALL!!!

-
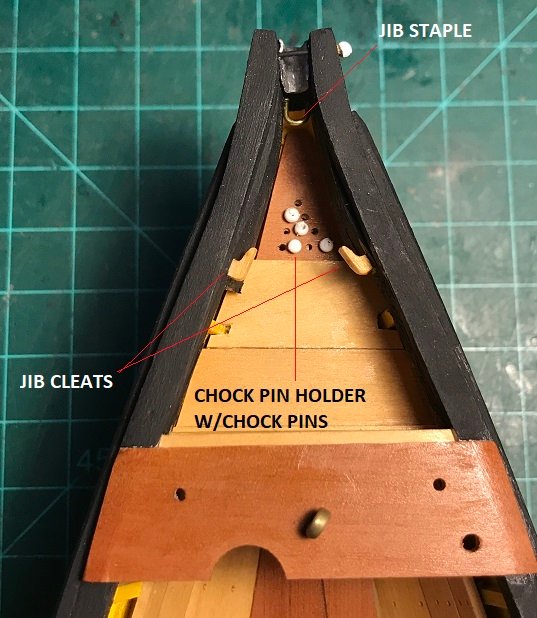
I can pretty call this area done, except for the drilling of the hole for the mast. The instruction say to do this ahead of time. For me I figured I can better locate where the mast hole should be placed. Like I mentioned earlier. I was going with not just the main sail, but also add the jib. It required me to add a few more bits at the bow. The jib cleats and jib staple. The staple was in some boats just for the simple reason that they would at times run the line to the jib thru a staple located just under the chock.
-
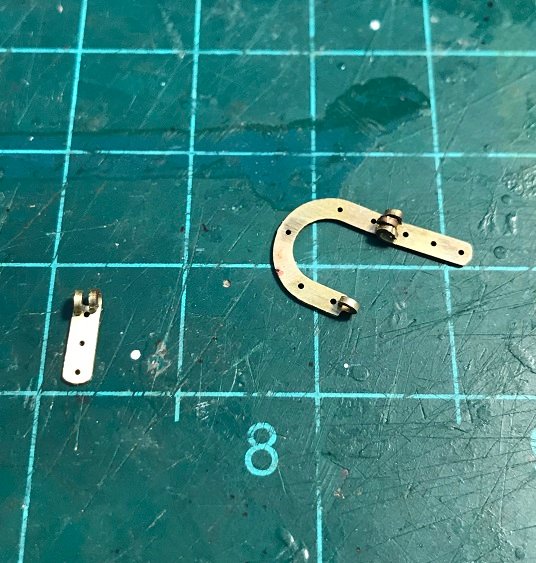
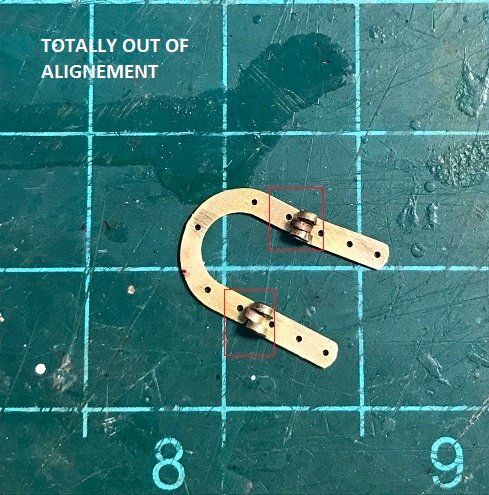
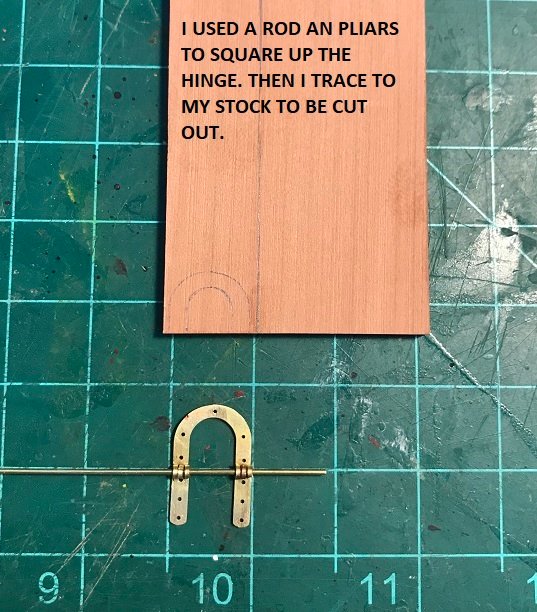
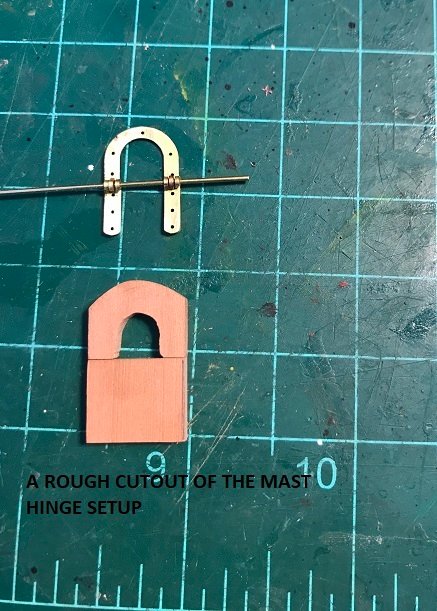
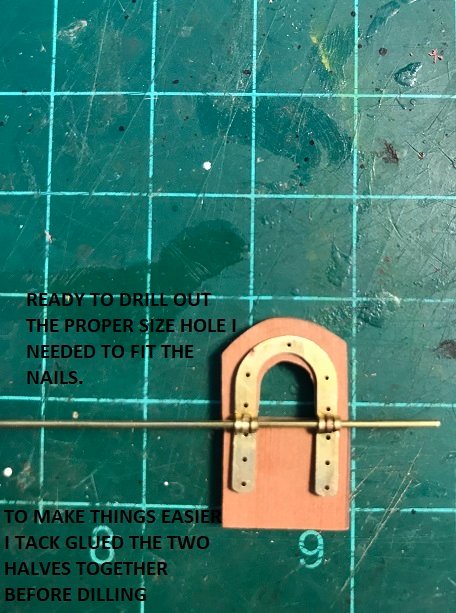
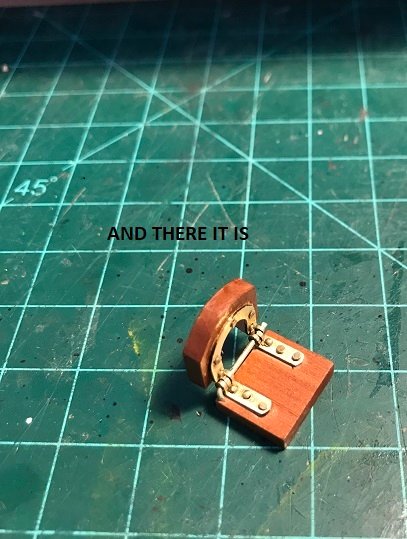
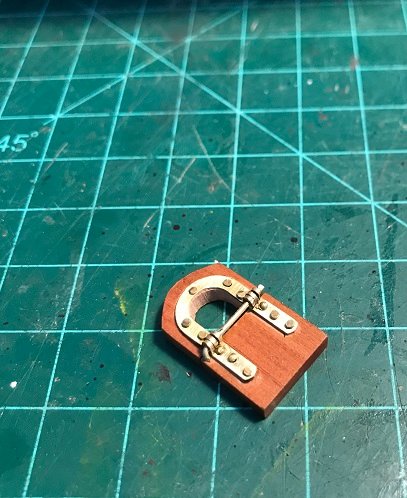
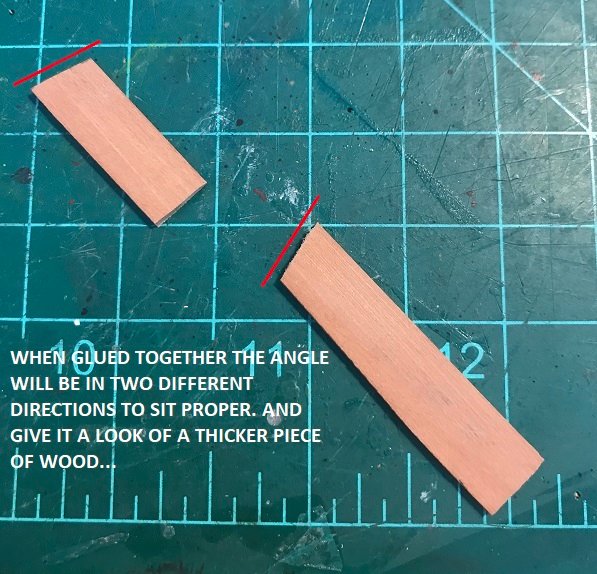
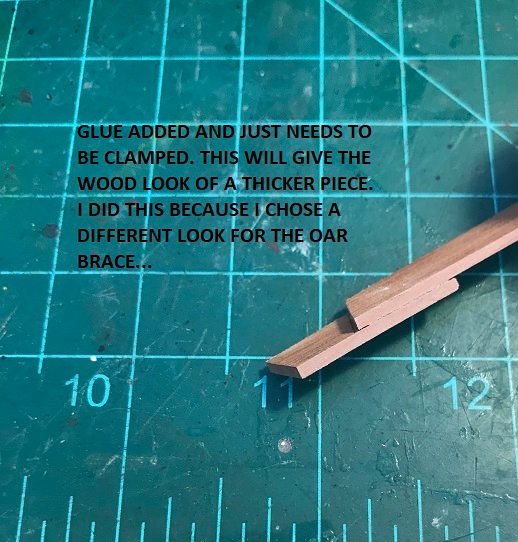
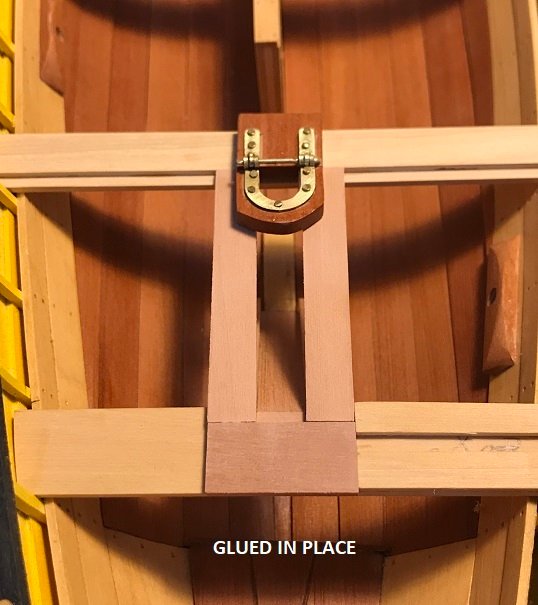
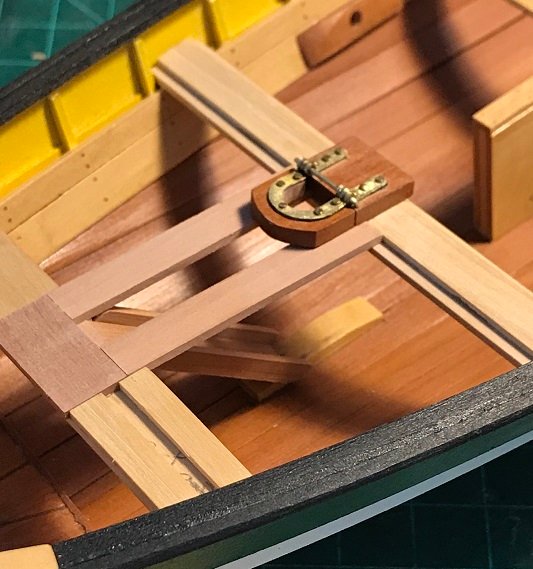
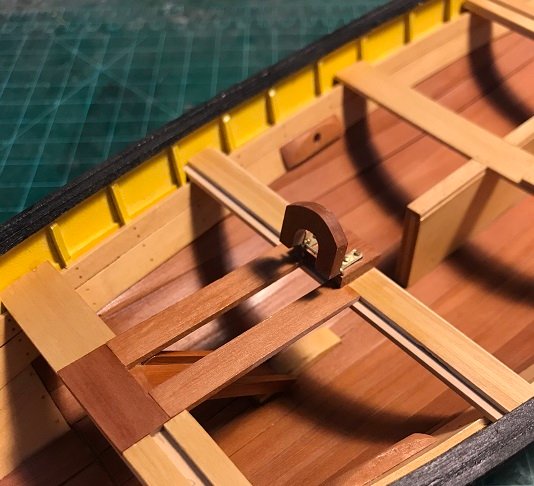
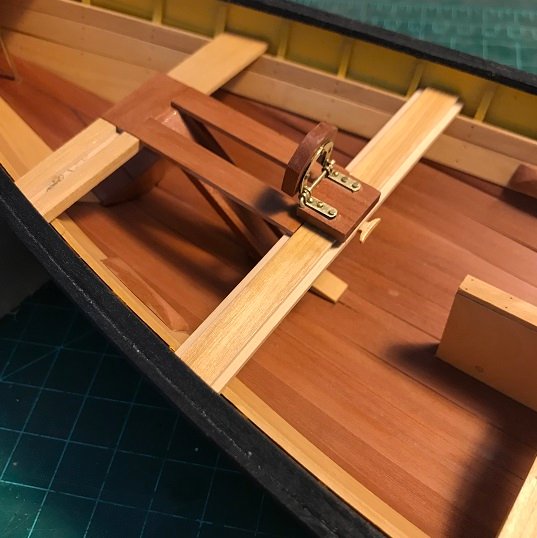
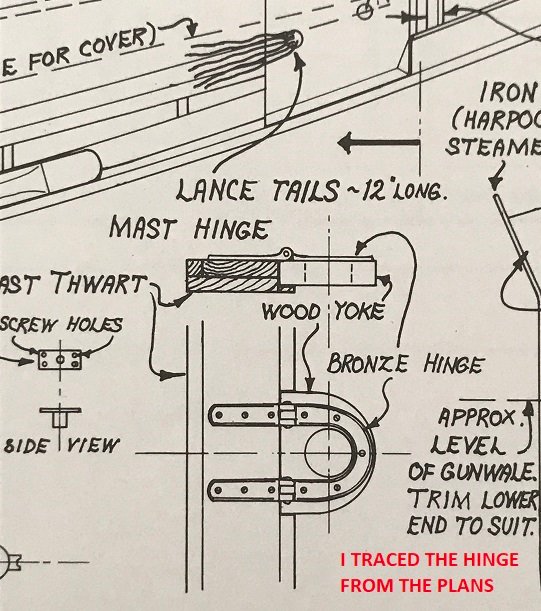
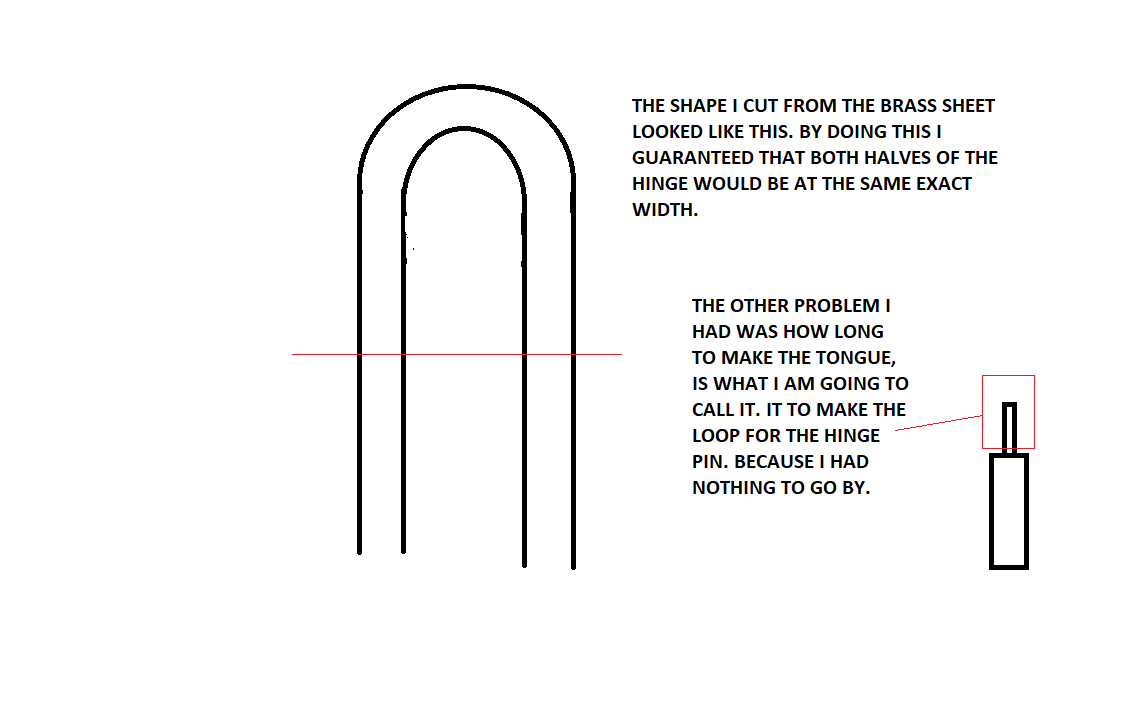
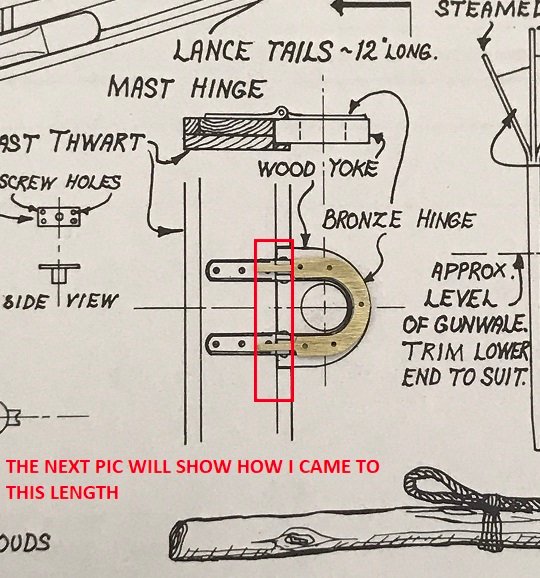
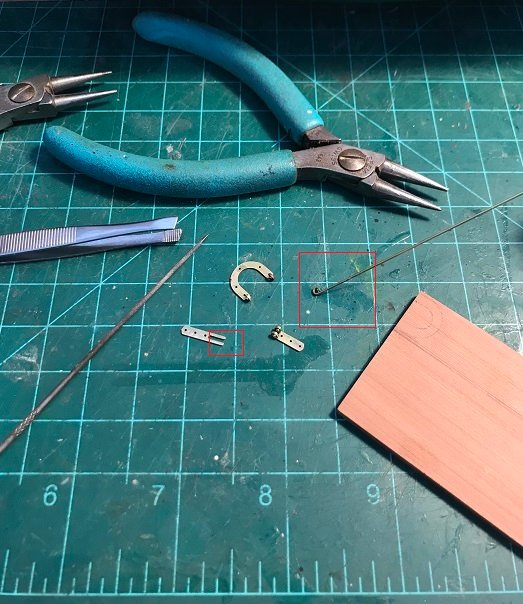
Now to finish off the Tabernacle and trough area. And adding extra little bits for the jib sail. Now I am not good at all with metal working. My parents couldn't afford much, so I could only go to wood shop in high school. No metal shop. Oh well. Working with metal never interested me anyway. So used my mini band-saw to cut out what I needed for making the mast hinge from a brass sheet. After that a little filing and sanding to take the rough away and there you go. I then traced it over the swiss pear I used for completed the hinge. I drilled the hole small at first and once i figure which nails to use I real drilled to a bigger set of holes, and at the same time pre-drilling the wood. I just then pressed the nail in place and I was done. If you notice the flat strip of brass at the upper right. What I did was fold it over and made sure the brass rod for the hinge pin fit properly. Then I took the roll out of it and took a measurement. Then I knew how long to make tongue for the 3 pieces used to make the hinge. Yes i could just made them longer, but it just seemed easier and worked out better for me.
-
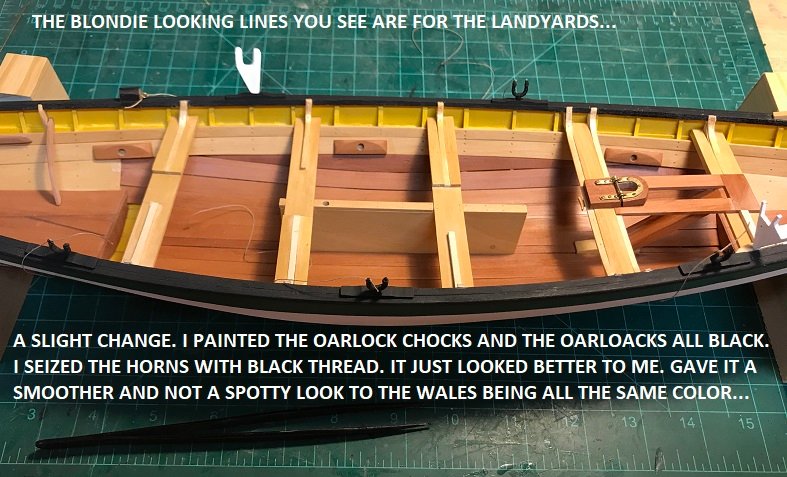
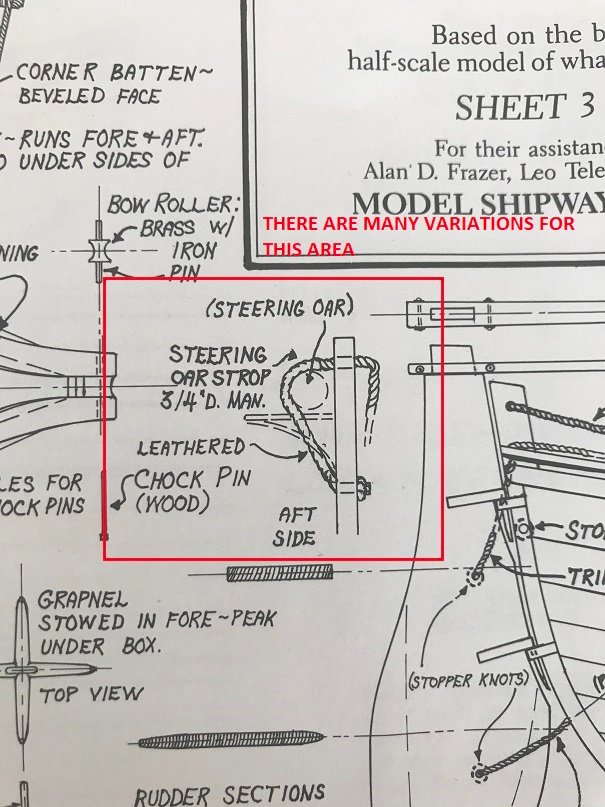
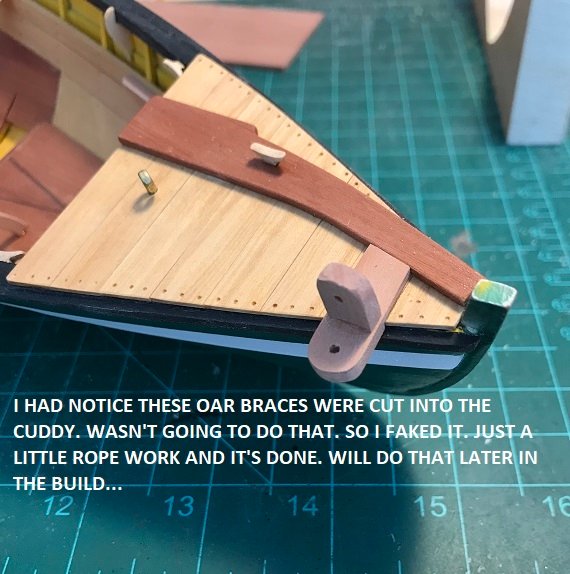
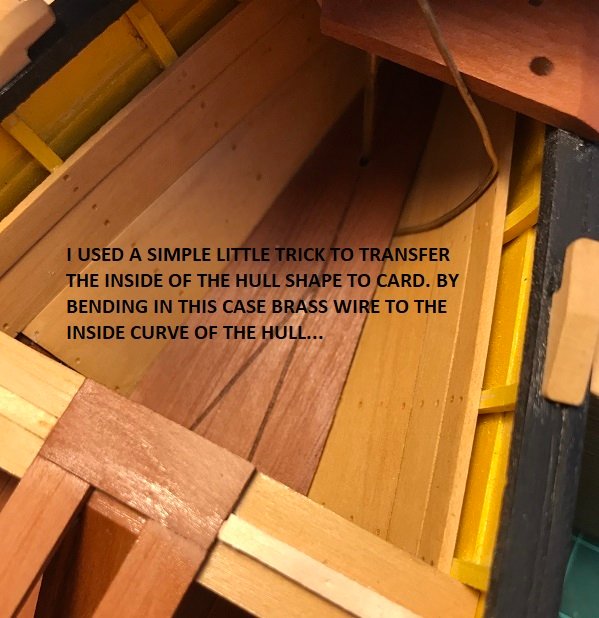
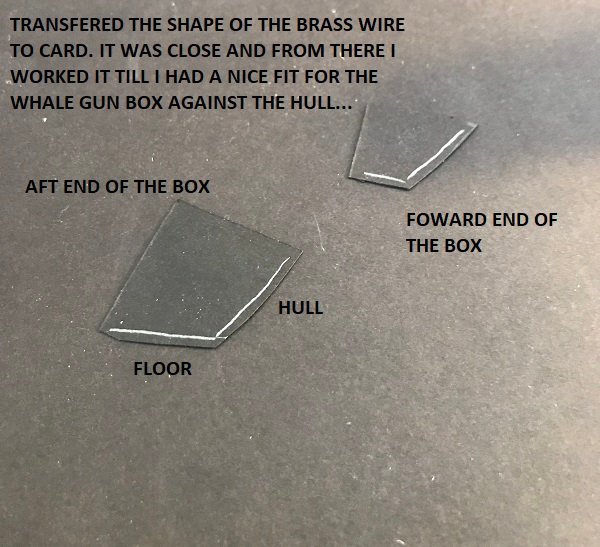
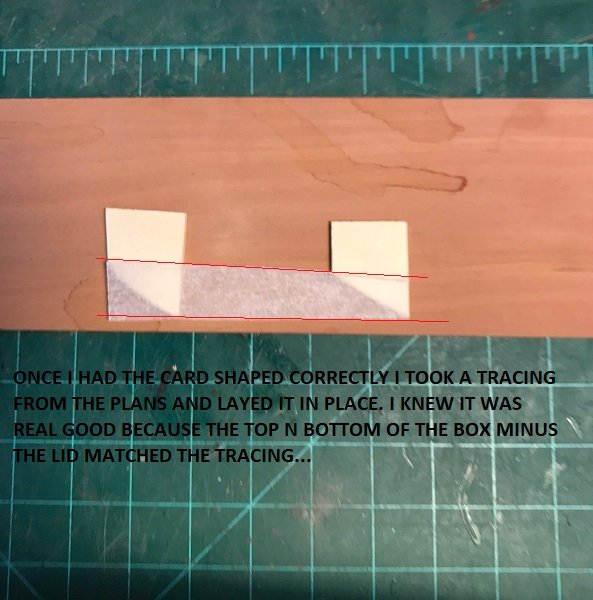
THE NEXT 2 PHOTOS OF THROUGH ALSO SHOW SOME OF THE gaping OF THE FLOORING. I DID THIS BY USING CARD IN BETWEEN EACH FLOOR. WHEN YOU READ ABOUT THESE BOATS, THEY WERE BUILT AND THEY WERE BUILT FAST. SO THEY WERE BUILT ROUGH. WITH GAPS HERE AND THERE. I JUST WANTED MY BOAT A LITTLE CLOSE TO THE REAL THING. NOW THE CHOCK LOCATED AT THE BOW IS WHERE THE WHALE LINE WOULD RUN WHEN A WHALE WAS SPEARED. THE CHOCK WAS PROTECTED BY A BRASS, LEAD, LIGNUM VITAE, WHALEBONE OR A ROLLER. THE KIT PROVIDER A ROLLER, BUT MY FRIEND USED IT WHEN I GAVE HIM THIS KIT. I USED A FISH WEIGHT OF COURSE MADE OF LEAD AND SHAPED IT TO FIT. IF YOU HAVE NOTICE THE HOLES DRILLED IN THE BOX ARE IN A TRIANGULAR SHAPE. THEY DRILLED IN THIS PATTERN OR A DIAMOND SHAPE. NOW THEY NOT FOR DRAINAGE BUT FOR THE CHOCK PINS. THE PINS WERE USED TO HELP KEEP THE WHALE LINE FROM JUMPING OUT OF THE CHOCK. THEY SAY IF THE CHOCK WASN'T PROTECTED IN THIS CASE WITH LEAD THE CHOCK AND STEM POST WOULD BARELY LAST ONE SEASON, IT WOULD WEAR DOWN VERY FAST. AND NOW ONWARD TO THE BUILDING OF THE TABERNACLE. THIS MODEL IS A LOT OF FUN, BECAUSE IT HAS A LOT OF LITTLE BITS TO DO HERE AND THERE WHICH I ENJOYING MAKING...
-
THANKS JOHN, COMING FROM YOU A MASTER BUILDER IT MEANS A LOT SIR!!! OK WERE DID WE LEAVE OFF AT. I WAS IN THE MIDDLE OF BUILDING THE TROUGH FOR THE BOAT. I BUILT THE WHOLE TROUGH AWAY FROM THE MODEL. IT MADE THE PROCESS EASIER, AND MADE IT SIMPLE TO LINES THINGS UP...
-
HERE ARE FEW PICS OF ME ADDING THE TROUGH. NOTHING IS GLUED EXCEPT THE LARGER TWART. I NEEDED THE TWART GLUED SO I CAN BETTER FIT THE TROUGH AND THE LAST TWART AT THE BOW.
-
NOW WHERE RONNBERG's BOOK IS SUPERB FOR BUILDING THE BOAT, I DO FAVOR ANSEL's BOOK THE WHALEBOAT IS GREAT FOR ADDING DETAILS TO THE BOAT. FOR THOSE OF YOU WHO KNOW ME KNOW HOW I AM. I TRY TO MAKE MY MODEL MY OWN, BY CHANGING THINGS UP. IN ANSEL's BOOK HE SHOWS THE N.B. BOAT WITH A MAST TROUGH AND A JIB SAIL. SO I WILL BE GOING IN THAT DIRECTION TO MAKE MY MODEL DIFFENT FROM OTHER MODELS OF THE BOAT. HERE ARE A FEW PICS OF WHY I WENT IN THIS DIRECTION.....
-
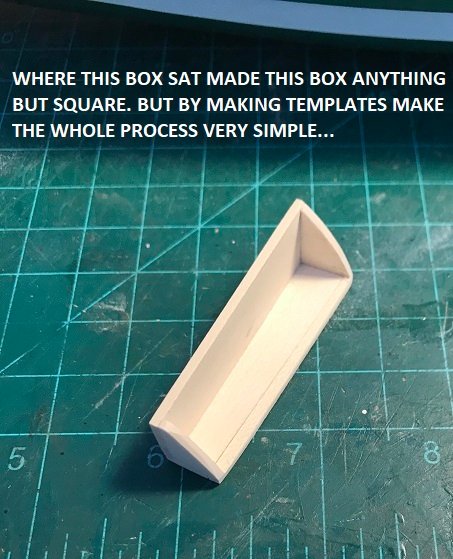
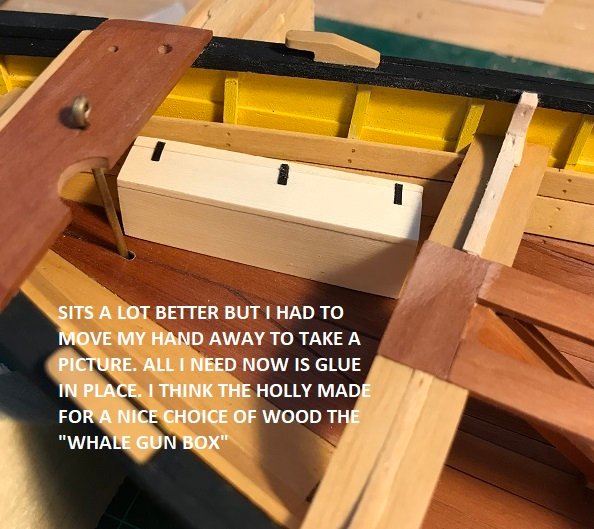
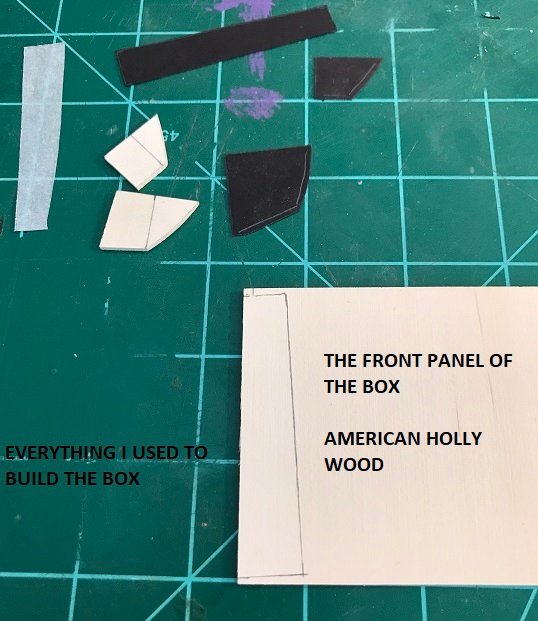
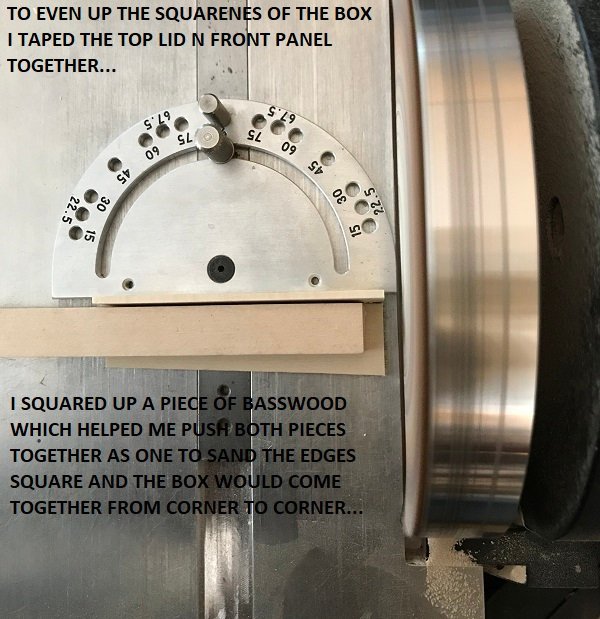
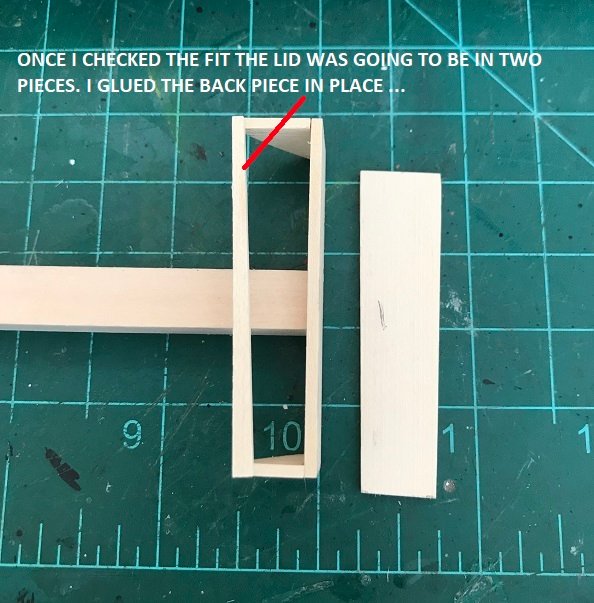
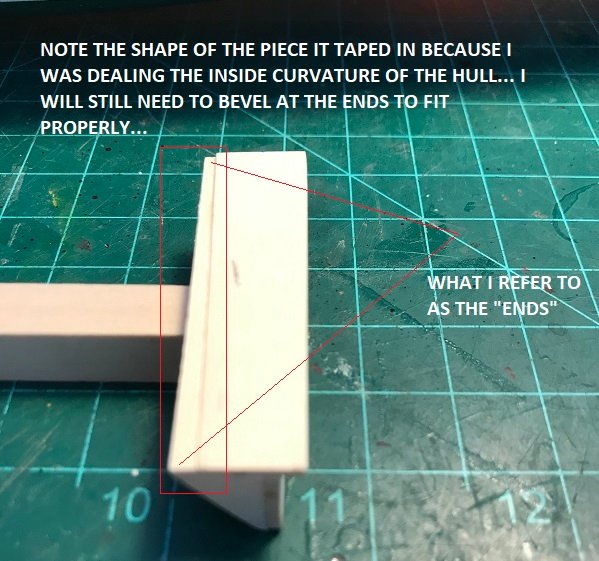
THANKS YOU JOHN , and VLADIMIR, HI EVERYONE, JUST GOT A LITTLE BUSY WITH THINGS AROUND THE HOUSE, BUT I AM BACK TO MODELING AGAIN. FINISHING UP THE STIFFNERS AND THE FOOT BRACE WHICH ARE NOW COMPLETED. THEN THE PREVENTER CLEATS WHICH I MADE FROM 1/8" SQUARE BOXWOOD WHERE NEXT. AS FOR THE THIGH BOARD IT WAS FAIRLY SIMPLE. I HAD TO DRILL HOLES FOR THE LIFTING STRAP, KICKING STRAP, AND THE CLUMSY CLEAT ALL LOCATED ON THE THIGH BOARD. ONCE DONE I DID NOT INSTALL THE BOARD BECAUSE I HAD TO WORK WITH THE TREADED "BOX". WHY DO I SAY THIS? WELL REMEMBER I STARTED THIS LOG A FEW YEARS BACK AND THEN I GOT BUSY. I LEFT FOR ALMOST 2 YRS. STUPID ME WHEN I READ THRU RONNBERG's BOOK I CAME TO THE BOX. I DIDN'T AGREE WITH THE RONNBERG's INSTRUCTIONS AS TO WHEN TO DO THE BOX. I MADE MY PLANS, BUT TOTALLY FORGOT. WHICH MADE BUILDING THE BOX A ROYAL PAIN THE BUTT!!! I WAS PLANNING ON MAKING TEMPLATES OF THE BOX BEFORE THE INWALES, BOX CHOCKS, GUNWALES, AND THE CHEEKS WHERE ALL INSTALLED. BY FORGETTING TO DO SO, EVERYTHING WAS IN THE WAY AND BUILDING THE BOX TURNED INTO A PAIN. IF I HAD REMEMBERED HOW I WAS GOING TO GO ABOUT BUILDING THE BOX IT WOULD OF BEEN A BREEZE TO DO. "STUPID ME". I PRIDE MYSELF THAT I TRY TO LOOK AHEAD AND PLAN THINGS WAY AHEAD OF TIME TO MAKE THINGS EASY ON ME. PRACTICUMS ARE GOOD BUT TO ME THEY ARE MORE LIKE THE "PIRATES CODE".....MORE LIKE GUIDELINES. LOL! SO HERE WE GO....
-
Thanks Guys for all the kind words. I was gone for a long while and never saw these remarks. Please except my apologies. Have Fun!
-
Another update on the little details this whale boat has a bunch of....
-
Your boat looks wonderful. Very nice modeling skills Sir!
-
Thanks for stopping by John, Well we are pretty safe for being pretty close. The wind shifts and all the smoke and ash head this way. But a break in the heatwave is helping out a great deal. Take care buddy.
-
HI EVERYONE, I HAVE FINALLY GOT TO MY LITTLE BOAT HERE. WELL AT 1/16 SCALE SHE IS KINDA BIG FOR A LITTLE BOAT. I started with the center board trunk cap. I made the lifting strap from brass which I'll show later because I forgot. What I did was indent the centerboard top edge then all i have to do is push the board up, a dab of glue to an eye bolt place on center board, let dry and it's done. Of course i will have the strap already fastened to the eye bolt when I do this. I also decided to glue the twart's as I went along. The instructions wanted the twarts glued in ahead of this step, but it made it easier to get my hands in there to do little stuff. So the 2 middle twarts had to be glued in place to the centerboard trunk as should in the instructions, not just to the port and starboard sides of the boat. The Peak Cleats looked to be a challenge. With different bevels in all directions. I first drew the lines for location of the bevels. The size of the cleats are 1"x1/4"x1/8". I worked on the side bevels first. Using my little hand plane to start the bevel. i could only do so much. Then i used the plane to do the face of the cleat. I only took enough off to get close to the bevel I wanted. The rest of the way was using the sanding stick to get the shape. Actually it wasn't as hard as I thought it would be. There was a total of 4 to do. Three went glued in place on the starboard side. One went to the port. What I am liking a lot about my boat is I made sure the floor board and little gaps. Not a clean fit, because reading about these boats they were made fast and not show room quality. I plan on displaying the boat with most of the gear out of the boat.
-
Hi John nice hearing from you. I do hope things are well with you, Hey how many times are you going to quarantine Tom Hanks out there. HAHA! Well i decided to make my base of course from melamine and framed in with poplar. The poplar framing will go on after I am done with the rigging. Turning the board here and there might indent the poplar. Even classified as hardwood it's pretty soft to me. I mounted the boat deciding on rigging her on the display board. I added the masts, bowsprit, and cleats, stop cleats here and there. I first glue the boat into place, which after I pinned with brass rod. underneath I used small one inch wood screws going into the keel for securing. After all I live in So. Calif......earthquake country. Haha! I have a little touch up painting and wipe on poly stuff left to do and I will start with the gammoning first. You will notice I never attached the rudder opting to display in a different way. All the cannons will not go on the boat, again deciding to display in a different. As for the pea shooters on the caprails they will be mounted when I think they will no longer interfer with the rigging. Oh also you will notice the red painted area incomplete. I plan on adding figures to add a little life to the model. I hope it works out right for what I have planned. So here is a few pics where I am at. I will also get back to working on my bedford whaleboat while rigging the Hannah. So away we go!!!
-
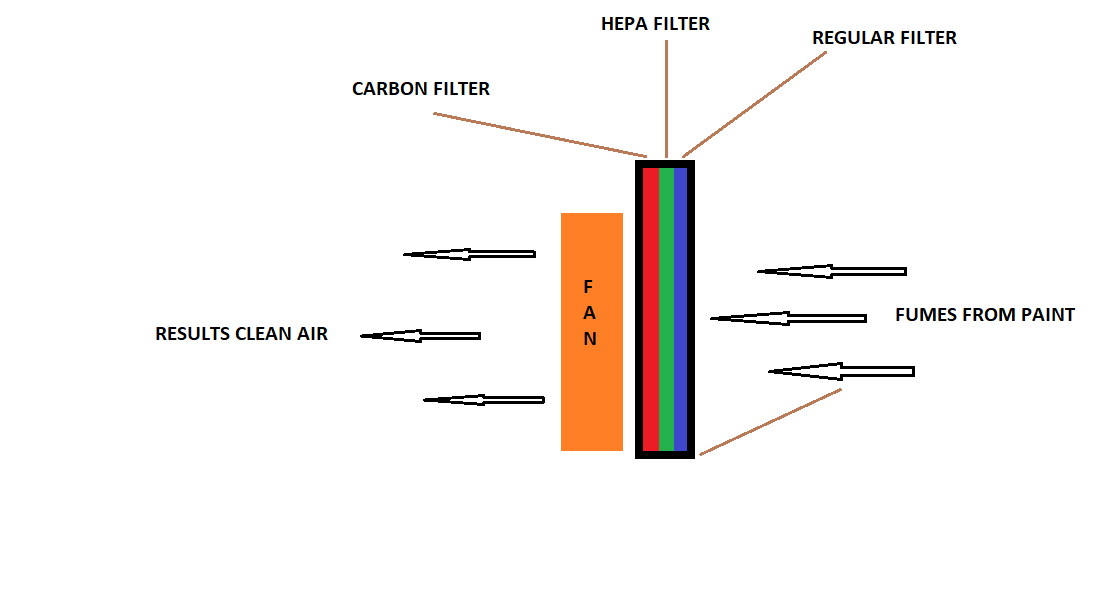
And to further answer the gentleman question of safety and how what type of filters I will using and making....
-
I WAS ASKED THIS QUESTION ON ANOTHER FORUM..... " What about making sure you don’t use paint with flammable fumes or fan could cause spark and fire! " MY ANSWER.... Kurt the best possible answer I can give you is there are bomb proof fans out there to buy. But very expensive. But I have seen at home paint booths for slightly larger items to spray and they use furnace fans for ventilation. My little fan has a sealed motor for one. But there are important things I can do. making sure there is proper ventilation. Doesn't do any good to have a bitchin fan or simple one if there is nowhere for the fumes to go. I also will have filters in front of the fan that will filter the fumes as they pass and clean air will exit on the other side. If I was going to use it in home I would vent it with a exhaust tube. But i built it for outside in the garage and making sure it vents towards an open window. Per my firefighting buddy oil paint have a rate before they are dangerous. But that rate can be reached if the are your in is not properly ventilated. Plus I did you know that enamel paint is also flammable when the paint is still wet. It's not just the fumes. So for me I have to work smart not stupid. I hope I answered this for you.
-
THE SIDES, TOP, AND THE BOTTOM TAPED AND YOU CAN SEE HOW IT COLLAPSES or GOES UP.... THE VELCRO WAS USED TO REMOVE OR ADD THE BACK PIECE. I USED 2 SIDED TAPE FOR THE VELCRO. YOU CAN SEE THE BACK ATTACHED AND OPENING TO GET READY TO PAINT. ALMOST READY TO PUT AWAY. UN-VELCRO THE BACK SIDE AND JUST ABOUT READY. READY TO BE PUT AWAY. REMEBER I HAD THE OPTION TO PLACE THE FAN INSIDE THE BOOTH. IF I HAD DONE THAT THEN THE WHOLE UNIT WOULD BE A 1 PIECE FOLDING PAINT BOOTH. MY CONFIGURATION IT'S 2 PIECE. I HAVE SEEN THIS DONE WITH MODELING PAINT BOOTHS BEFORE THROUGH THE YEARS. i FINALLY GOT AROUND TO MAKING ONE FOR MYSELF. i HOPE YOU ENJOYED MY LITTLE THREAD. JUST THOUGHT I WOULD SHARE TO YOU ALL. hAVE A GOOD DAY.