DONATION DRIVE - SUPPORT MSW - DO YOUR PART TO KEEP THIS GREAT FORUM GOING!
×


Cap'n Rat Fink
-
Posts
829 -
Joined
Content Type
Profiles
Forums
Gallery
Events
Everything posted by Cap'n Rat Fink
-
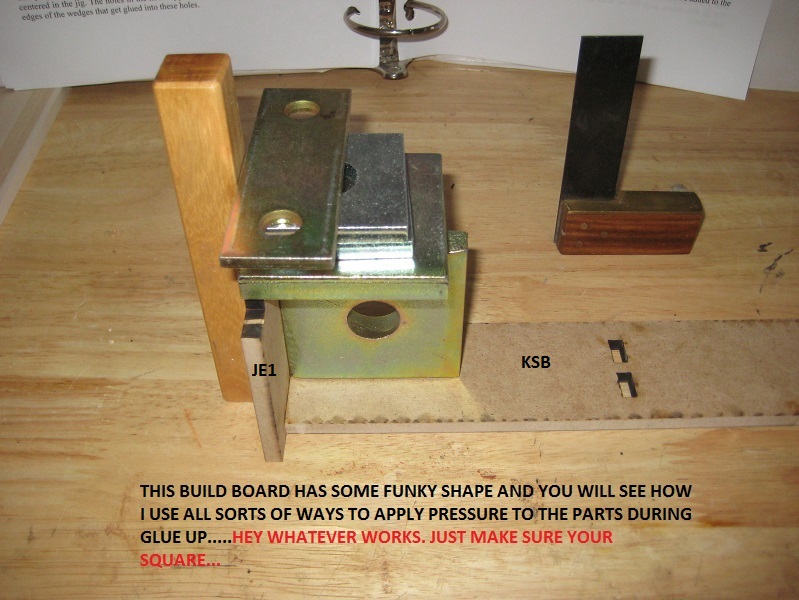
 Denis, Thanks. Mr Hunt says his frame drawings are about right on. Which I believe is true. But with first time doing this. I'm not cutting my throat. I left more material on the frames to cover my butt. Sure enough Mr. Hunt caught a mistake I was making. So I should recover because I left more material then I should of. He's watching me like a hawk....which is a good thing. Mark, You got it nice and slow. I posted these pics and things look rough. But once I get the tree nails, fore and aft finish sanding on the face of the frames, and glue them up it should look a lot better. I will retake pics of the views I posted so you can see the difference. David, Thanks for the kind remarks. I plan on buying the Hahn plans. I plan on taking it all the way to rigging her out. Dave, I have been watching your progress on the AVS. Very very nice. And your other builds are very nice too. Your a good modeler. Thank you all for the replies and likes....
 -
Thanks for all the likes and remarks guys... Well made some progress tonight. The frames at the bow are loosely placed(I know things are looking a little rough). Nothing is glued up as of yet. But I had to show you where I was at. Since I have never made cant frames before. I hope I am doing them right. If you see something wrong please let me know. Once they are tree nailed and I make sure they are sitting proper I will glue them into and take some new pictures. THANKS FOR LOOKING IN....
- 201 replies
-
- 12
-

-
Thanks Denis, An update to let you all know I am still with it and plugging along. Yes I am in no hurry. At first I decided to start with the mid ship frames. The easier ones which Mr. Hunt points out. Well I did. But in his practicum he has the frames numbered 1 to 36. I did 1,2 n 3. Then I said what the hell I have to do them. Weather now or later. I have changed course and have started with the bow cant frames. I will w/w them until I am done. I have never done cant frames before. Especially cant's that are made from 4 pieces to create 1 cant. Usually it's one piece of material and then you shape it. Once I complete them I will install the last 3 frames before the 1st cant at the bow. Once done I will use my scraper to do the inside fairing. I just figured it would be easier to get to the tight areas of the bow out of the way. Then I will do the same at the stern. Then finish off the midship frames. So hopefully I will have updated pictures in about a week. Well that's my plan anyway....AND I AM STICKING TO IT!!!
-
Hi Carl, Wish me luck. Like I said...Me no like puzzle and I sure don't want to get them pieces all mixed up. So I am pulling the frames off the billets one at a time. Hi Denis, I have been watching your build logs. Man you have not changed one damn bit. Still pumping out the models. I have too many interests going so I do the best I can. Thanks for stopping by brother man. Thank you all for the likes....
-
Thank you all guys for stopping by and the kind remarks and likes. Well I am done with Frame 1. So now that I have gone thru the procedure of building the frames. It's time to get into it and get thru this portion of the build. Then I can start getting things put together on the build board...
- 201 replies
-
- 12
-
-
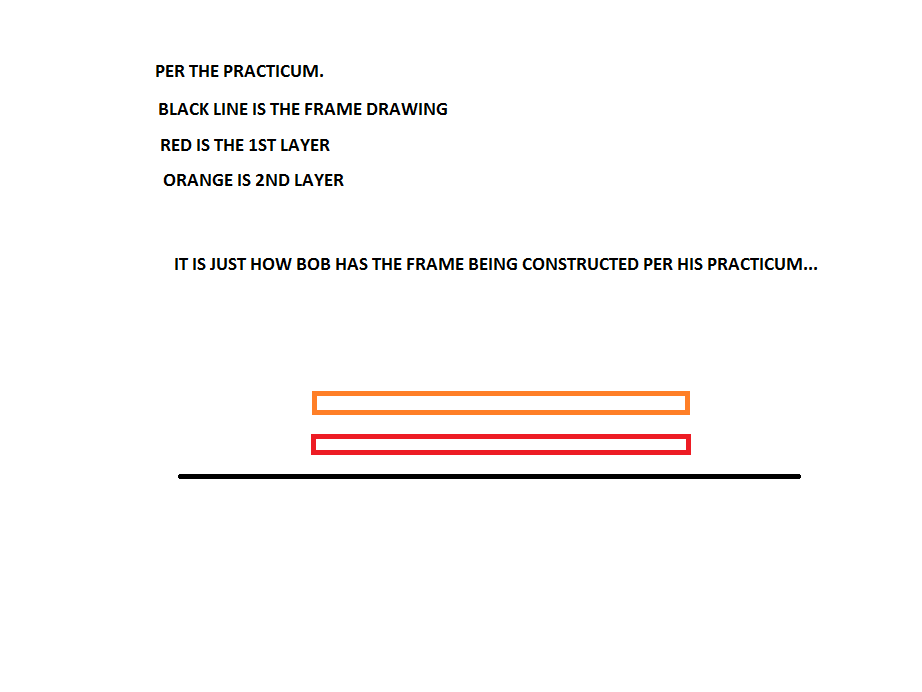
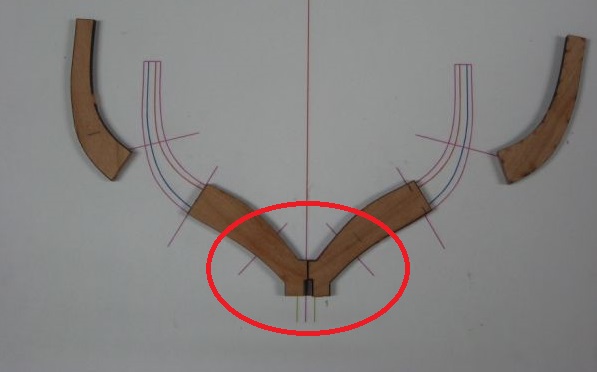
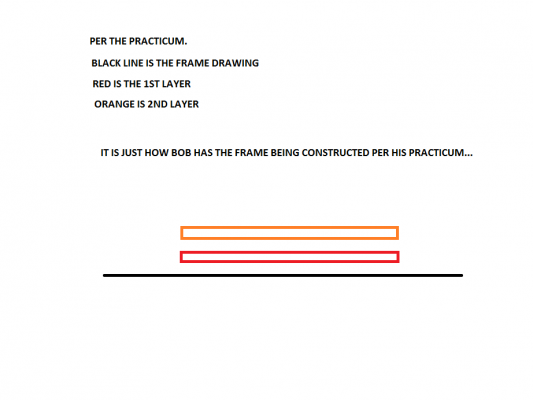
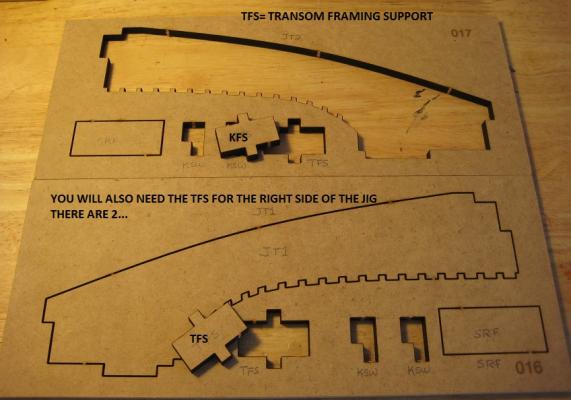
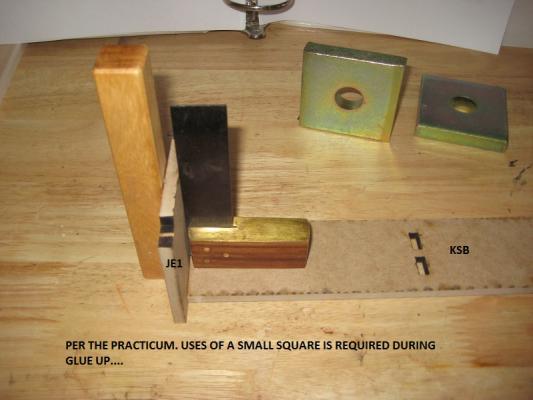
A question was ask by another builder. I thought I would clear things up... Why the frames were oversized. The taps at the bottom of the frame. With the tap in mind. Would it not be better to glue the 1st layer over the 2nd layer. On the picture you will see these little taps/notches at the bottom of the frame. Highlighted by the red circle. Well per Bob Hunt's practicum, He configured these taps as he calls them with his laser program. The taps are there to strengthen that area of the frame, during construction of the hull. Once the hull is completed, I remove it from the build board. During the final fairing process I just remove those taps. Hopefully showing the frame sitting in the rabbet nicely... My apologies for not clarifying this in my build log...
- 201 replies
-
- 10
-
-
Carl wish me luck. One thing I don't like. I have never like puzzle. So hopefully I won't mix up the pieces. So I work on frame 2 that is all I remove from the billet. Frame 2. My mama didn't raise no fool. Thanks all for the replies and likes....
-
Thank you everybody for stopping by and all the likes... Ok now that I have printed up chapter 4 and have read it over 3 different times. It's time to get started on these frames. So what frame to start with? Frame number 1....
- 201 replies
-
- 13
-
-
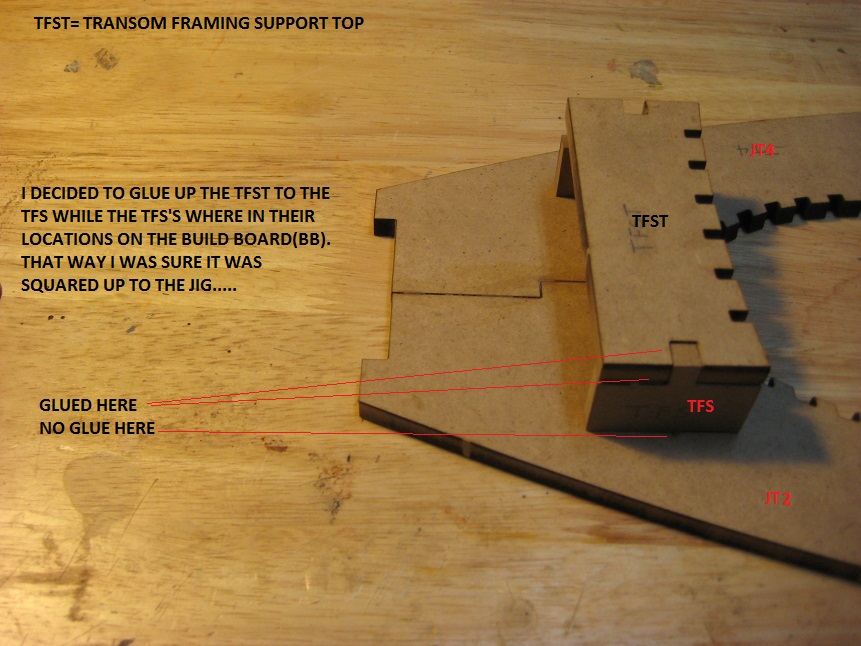
Mark, It is mdf 1/4inch. Yes both on the cnc n laser. When I got the kit in the mail it came in a little box. Surprised me at first. I thought the B.B. was coming in another shipment. Then I saw it was in multiple pieces. But it is sturdy and holds the Keel nice and snug. Hi John, Thanks for stopping by. It's going to be fun! Greg, Reading up on the chapter for the transom it will work pretty good. I'm a hoping. hey Denis, Glad to be back. But I have been w/w wood a lot. Building a few bee hive boxes, and scratch building Mid Century Modern furniture for my wife.(HAPPY WIFE....HAPPY LIFE). Thank you all for stopping by and all the likes...
-
I have switched my attention now to LK. Added the chainplate assembly.... Now onward to some of the bits and pieces on the deck...
-
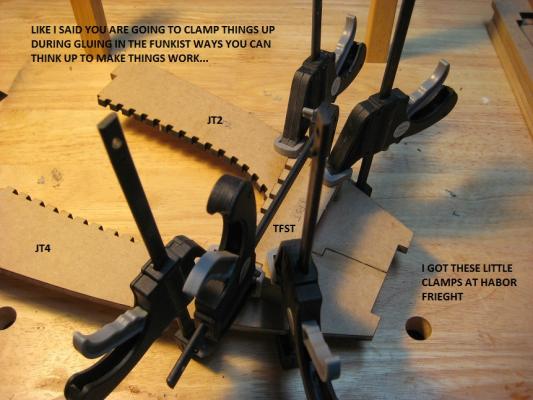
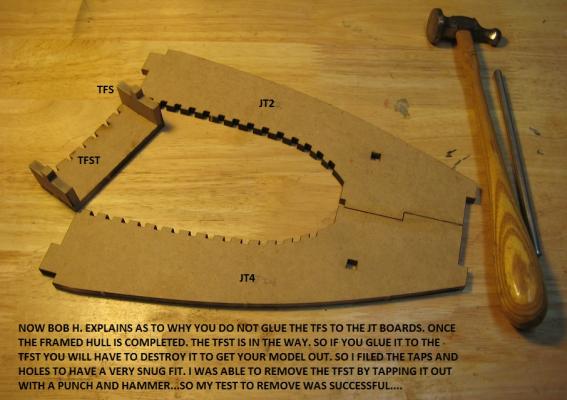
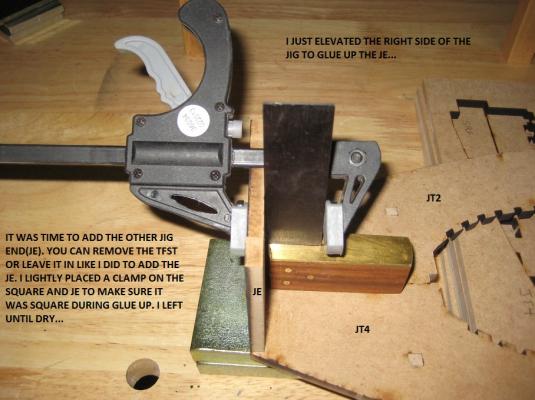
cog at times I think I do not explain things well. So I add my comments to the pic's so others can see what I am trying to say. thanks for your comment... Canute it is right side up. not ala Hahn. But I do plan on doing one of those. Bob hunt turned it right side up as to not waste so much material... Keith this is a cool little semi scratch kit. Having fun... and thank you all for the likes....
-
and a few more pictures..... The LLC Hannah is a very nice kit for the beginner POF modeler. I consider my skills to be able to handle a much more demanding POF model. But I needed something to get me going again since I have been away for so long. I am building the Echo Cross Section which I will complete soon. My only hold up is how I am going to display it. I plan on displaying it a different way. I am also building my own D. B. it will look a little different. I hope to update my build log on that one soon...


- 201 replies
-
- 15
-
-
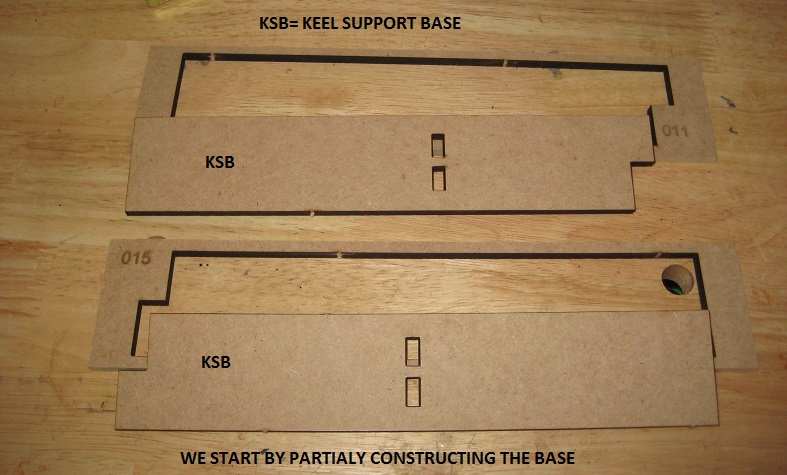
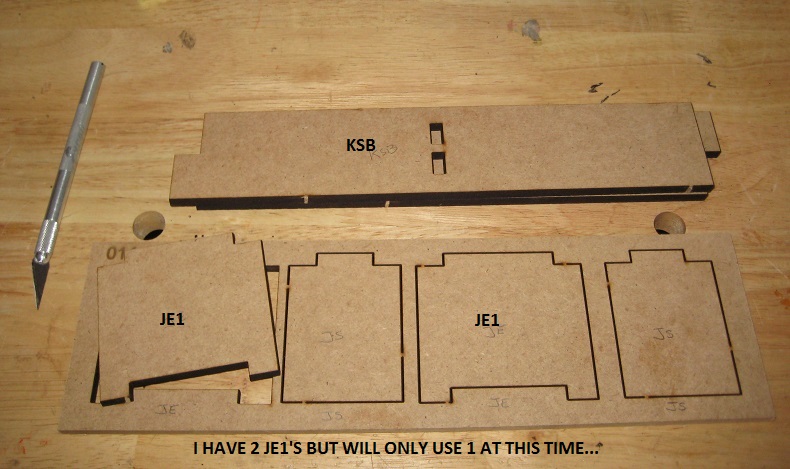
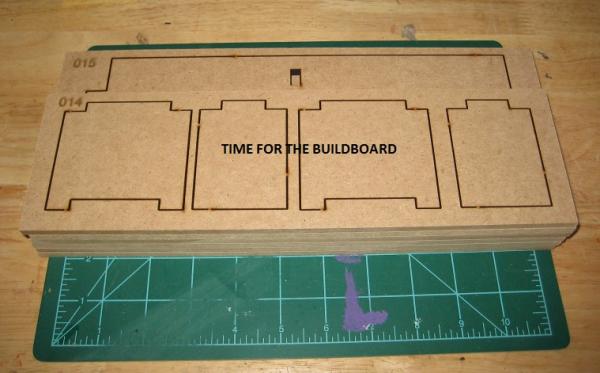
Thank you all for stopping by and the likes too... So here we go with the construction of the Build Board...


- 201 replies
-
- 12
-
-
Hello All, There where some questions brought up from the NRG/MSW of this build log. But all is clear now and I will be back with updates on my progress soon. My I say I am all for and support the NRG/MSW on monitoring and verifying that everything is on the up n up here at MSW. See you all real soon.
-
I placed weights on the keel so it won't warp on me till I attach it to the build board.
- 201 replies
-
- 16
-
-
Thanks guys for the reply's and likes. Well here you go. Keel assembly completed. Build board next.
- 201 replies
-
- 12
-
-
Hey Sjors, Anga, Hello my friends, nice to hear from you again. Been having a great time with life. I hope things are good with you as well. Been building bee hive boxes for my wife, and wood working mid century modern furniture again for the love of my life, and wood turning. And having fun with our children and grandkids. God has been good to us. Your Friend always, Mario
-
WELL IT'S 2016. I STARTED THIS REBUILD IN AUG. 2012..... Hello All, Well I have decided to bring this build back to life. Been very busy. But I have had time for my hobbies. I got a little off track with bee hive boxes. But went back to my wood working and model building again. If you read the first entry of this build I was going to rig this model, but decided to more of a Admiralty style display. So I had to make the display board and attach the model to it. Then go back to completing it. Thanks for looking in....
-
Ok where did I leave off last night. Well no modeling tonight. Off of work(sorry for that 4-letter word) tonight late. So by the time I get settled in it will be beddy by time. So here's the rest of the pictures. I wood like opinions on the train tackle blocks. My dilema is I used 2mm double blocks and 1.5mm single blocks. So are they out of scale. I could go to 1.5mm doubles n 1mm singles. drilling holes wood be a bit of a challenge. but going with smaller holes means smaller thread. So wood the blocks be at a better scale????? But now the thread wood be out of scale. HMMMM! Should I pick what might look best... I welcome all opinions with great interest...
-
well another update on my privateer........