Cap'n Rat Fink
-
Posts
829 -
Joined
Content Type
Profiles
Forums
Gallery
Events
Everything posted by Cap'n Rat Fink
-
 I USED DUCK TAPE TO HOLD IN PLACE UNTIL I WAS READY TO SWITCH TO VELCRO STRAPS ONCE STRAPPED IN THE BOOTH IS READY.
 -
prepping the fan.... NOW I HAD THE OPTION TO HAVE THE FAN ON INSIDE OF THE PAINT BOOTH, BUT I LOCATED ON THE OUTSIDE. THE METHOD TO MY MADNESS....I HAVE A BIGGER PAINT AREA! NOW DOING WILL CAUSE THE BOOTH JUST TO FALL OVER, SO I MADE SOME STABILIZER LEGS TO SUPPORT THE FAN N HOUSING FROM THE SCRAPS. IT WORKED JUST FINE.
-
NOW IT'S NOT PRETTY, BUT THEN AGAIN IT'S JUST A PAINT BOOTH. SO IT''S GONNA GET A LOT UGLIER AS I USE IT. YOU CAN USE WHITE DUCK TAPE FOR A BETTER LOOK BUT THOUGHT YOU ALL CAN SEE MY PROGRESS A BIT BETTER WITH THE STANDARD GREY TAPE. THESE 2 CUT WERE SO THE TOP WOULD FOLD ACCORDING TO PLAN. THE CUT AT THE 12 INCH MARK WAS MADE ON THE BACK SIDE OF THE TOP PIECE. THE UPPER LEFT PORTION OF THE PHOTO SHOWS THE CUTOFF. THIS WAS MARKED BY PLACING THE TOP PIECE UP AGAINST THE SIDE PIECE. THEN I LOWERED THE FLAP TILL IT CAME INTO ALIGNMENT WITH THE SIDE PIECE, AND THEN I MARKED AND CUT IT OUT. NOW THE BACK WAS A NORMAL SHEET OF 24X18. I SHOW MEASUREMENTS BECAUSE IT DEPENDS ON THE SIZE AND TYPE OF FAN A BUILDER WILL USE. MY FAN WAS A SIMPLE 10" FAN.
-
HI EVERYBODY, A MODERATOR CAN MOVE THIS TO THE APPROPRIATE AREA IF THIS IS NOT CORRECT. i THOUGHT PAINT AREA, BUT A PAINT BOOTH SEEMS TO ME TO JUST BE ANOTHER TOOL. i WAS IN NEED OF A PAINT BOOTH BUT DID NOT WANT TO CHEW UP SPACE IN THE SHOP. bUT THOUGHT IT WOULD BE NICE TO HAVE IT MOBIL ALSO. VERY EASY TO MAKE AND A MINIMAL LIST OF MATERIALS USED..... 24-Pack of 24"x18" Ultra-Smooth Opaque Corrugated Plastic 4MM White Sign Blanks VELCRO TWO SIDED TAPE DUCK TAPE NOT MUCH ELSE! I am a slow typist so bare with me as I add to this log. from this and this
-
HI EVERYBODY, A MODERATOR CAN MOVE THIS TO THE APPROPRIATE AREA IF THIS IS NOT CORRECT. i THOUGHT PAINT AREA, BUT A PAINT BOOTH SEEMS TO ME TO JUST BE ANOTHER TOOL. i WAS IN NEED OF A PAINT BOOTH BUT DID NOT WANT TO CHEW UP SPACE IN THE SHOP. bUT THOUGHT IT WOULD BE NICE TO HAVE IT MOBIL ALSO. VERY EASY TO MAKE AND A MINIMAL LIST OF MATERIALS USED..... 24-Pack of 24"x18" Ultra-Smooth Opaque Corrugated Plastic 4MM White Sign Blanks VELCRO TWO SIDED TAPE DUCK TAPE NOT MUCH ELSE! I am a slow typist so bare with me as I add to this log.
-
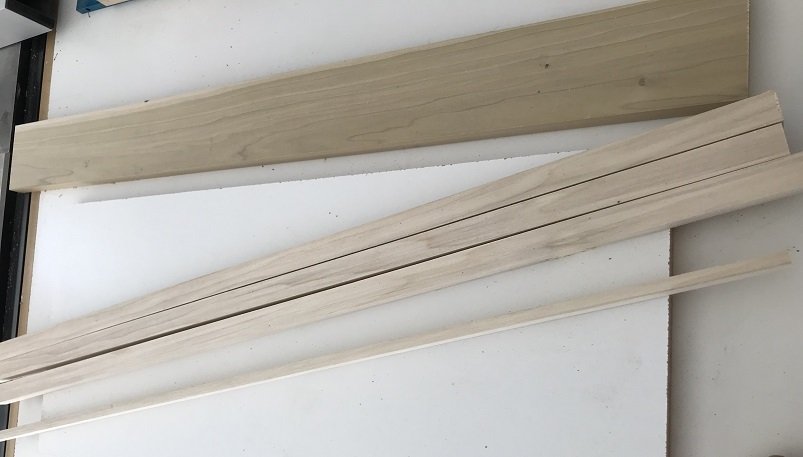
Well I am back at it with my woodworking, modeling, and home projects. But figures i live in southern California in the Mojave Desert. Right it's heatwave after heatwave. As I type 106 degrees today and tomorrow to be hotter. Oh Boy. I have a garage shop at this time. My own personnel shop, well looks to be next year not now. So i have my indoor rigging station setup inside our home ready to go for the spider monkeys to start running lines. The spars and mast are ready for rigging. The bowsprit is ready to be placed and glued in and as with the spars. But I decided it's best to start construction of the display case. It's easier to take the model and test fit without all the masts, spars, and bowsprit in the way. Once I have the way I want all the good stuff will be placed and glued into their locations. I can either set the hull permanently on the display base the rig or keep on the vise as the rigging goes along. I decided on melamine as the base with poplar for the framed edging around the melamine base. The 3 large strips will be for the framing of the melamine base. The one small strip you see will be milled down to be used to display the boat. I was going to use basswood, but since I had this strip left over I decided to put it to good use. The large poplar piece you see is the same of the piece I milled down for the base. Just thought i would show you it does take much to create the display base. NOW I NEED IS A COUPLE BUNCHES OF BANANAS TO KEEP THE SPIDER MONKEYS AND THE RIGGING SHOULD GO VERY WELL!!! NOW FOR A COLD BEER CAUSE IT'S DAMN HOT!!!
-
Chris, John, Mark, Thanks Guys. You know kinda get a little fed up with social distancing, masks, stay at home, and you want to chuck it all away. Until a couple of months ago It was a virus on the news. Now friends have died, nephews and nieces getting infected and hoping nothing gets worse. Then family dying of cancer to add to all of this within these past 2 months, you just gotta stop for a moment and take a deep breathe. I am a God fearing man so i do some praying and hope things will calm down and hope things get better for all of us. I will be back soon so no worries. My biggest and only worry is for my brother. This is his 2nd wife. He has lost them both to the BIG C. So just trying to be there for him. We are doing good and going to keep it that way. So keep it going guys. be back next week(building again).
-
Hi Guys, Thank you. Well we put to rest my brothers wife a couple of days ago. So going to visit with him for the rest of the week before he head back to Northern California. I also have my rigging are setup and then i will be getting back to my whaleboat. I am reading thru your build log mark trying to catch up, since i was away for a few years haha! Hey John you have a build going on? I hope you do.
-
Be back soon my friends. the virus and cancer has claimed a few fiends and family. The last memorial was yesterday. God Bless and be safe!
-
Hey Thanks John N Mark and for all the likes too! i have been making head way on both model. But summer has gotten so busy as of late,I have not been able to post pics. Plus our single parent daughter has to work and we are dealing with stay at home schooled grandkids. It is what it is. Will get back here asap. But I still find time to do modeling.
-
Hi John I thank you very much for your kind remarks. You take care Bro. Thanks again Dave and I hope your Hannah build is going good for you too. Too me I am almost done and i consider rigging a whole different project. I will probably leave the guns, boat off, because I know when i will most likely knock the off sticking my hands and rigging tools in an out of there.
-
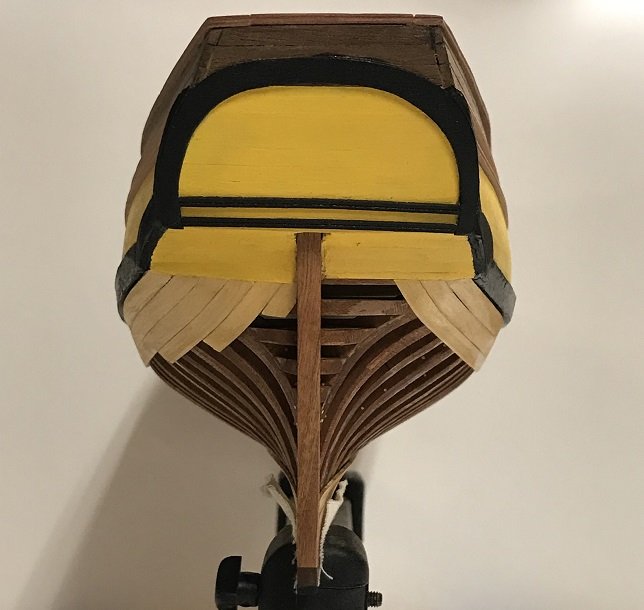
Thanks Dave and Mark for your opinions....your very right. Hello All, Been having internet problem for just about 2 weeks, the problem has been resolved so here we go. I worked on the mast and spars, plus the Hannah's little boat. The mast and spares were made from dowel and stain a light shade of walnut. The spares were shaped and painted black and goes for the crosstree area too. The crosstree area was built from basswood and painted. The ships boat was build upside down like so many other small boats builds in these boat forums that I have seen. So I didn't show this. I just had to pick a size and go from there. Bob Hunt does not do any of this(longboat) on the Hannah practicum. But mentioned that the boat was about 2.5 inches. Well mine was a little bigger and to me it matched or was close to the size seen on Hahn's model. I decided to use holly, boxwood, and ebony for the boat. Add as much detail as I was wanted. Ring bolts an rings, tholes were all brass. The craddles out of boxwood. Hanh placed his across the breadth of the ship and a tight fit for the cannon but it worked. It worked for me too, but I decided to go with the Halifax settting with a couple of adjustments to mine. Hey gotta make it my own as they say. Plus it looks pretty good to me. What say you all? It's not glued in place yet, because I will be rigging it to the craddles off the deck. Which will be easier, then I will glue it into place maybe before or after the rigging. The Hannah is mentioned to be a good starting POF model with minimul rigging. I have done more complicated rigging before, thats why I haven't decied as of yet. I have learned to make the rigging as easy as possible. If I do rigging! So internet don't fail me now...here we go.
-
Thanks John for your kind words! My internet is up again so before it goes down again....here we go. the photos are self explaining. but the last 3 are there to get some advise or help. remember i started this in 2016. the hannah has 10 swivel guns for some reason i only had 8. i don't even remember wher i got them from. so to order more and to match would be a guessing game. i have 2 others,,,,,But di ships have all the swivel guns the same or did they have a couple of different guns. i thinking they kept it the same. the last 2 pics is what i am having trouble with. the rigging. so here you go.
-
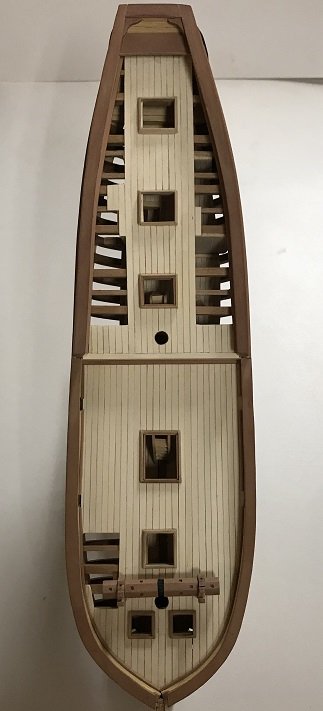
Dave, Ken thanks for your kind remarks, and all the likes! hello everyone, I have been a lot of internet problem with my provider. so have not been able to post. at this time the chain-plates and dead-eyes are completed. swivel gun posts and guns are completed. almost completed with the painting. i am adding eye-bolts everywhere. i am done with the grading. i only graded 2 locations. the reason being is i add a below deck detail and adding grading at each location would of made it difficult to see. the rudder being the only thing i have left to do other then the sticks. as for the masts, yards and bowsprit, i am considering rigging. but when you look at hanhs model and look at his plans both are rigged differently. i am a woodworker not a seaman. so i really need some step by step instruction of where all the lines are to be rigged, blocks to be placed, and eye-bolt locations. But still i do need step by step. i would love to rig it but worried to screw up. hanhs rigging sheet doesn't help too much for me. i even search places like ebay to see if someone was selling left over plans of a hannah kit that has the rigging instructions, but no luck as of yet. if i can't find them, then i am just about done with the hannah. i can add rigging block and eye-bolts that i can figure out to the model, but not everything. BUT THE BIG CONFUSION IS WHY HANH RIGGED THE MODEL DIFFERENT FROM THE PLANS. and another issue for me is i started this model in 2016 and here it is 2020. I am fighting burn out of this model. there is no way this should of taken this long, but there was so many times i could not get to it through the years.......I CAN'T BELIEVE I AM SAYING YEARS!!! so i have a few pictures to add here and more to come once i clean them up. just having a wonderful time with our www provider. i never should of retired. or i would fix the damn service myself.
-
i was really surprised how they came out. With all the steps to do i was certain i was going to srew up some where down the line. having never done this before.
-
THANK YOU JOHN AND FOR ALL THE LIKES TOO!!! The cannon carriages were a lot of work. so many steps and so many cuts to so to make it happen. Here's the results...
-
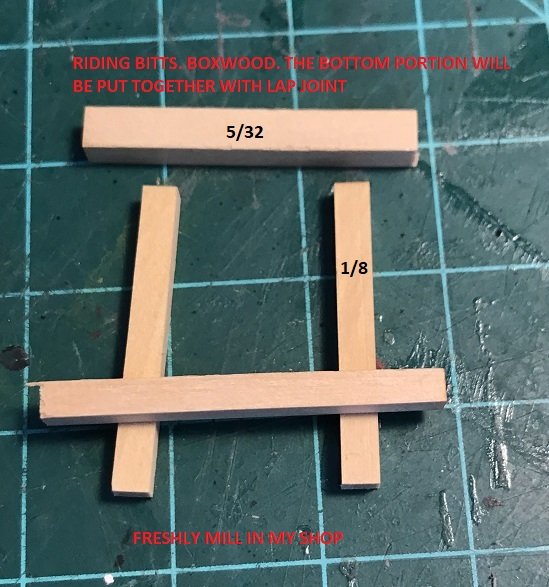
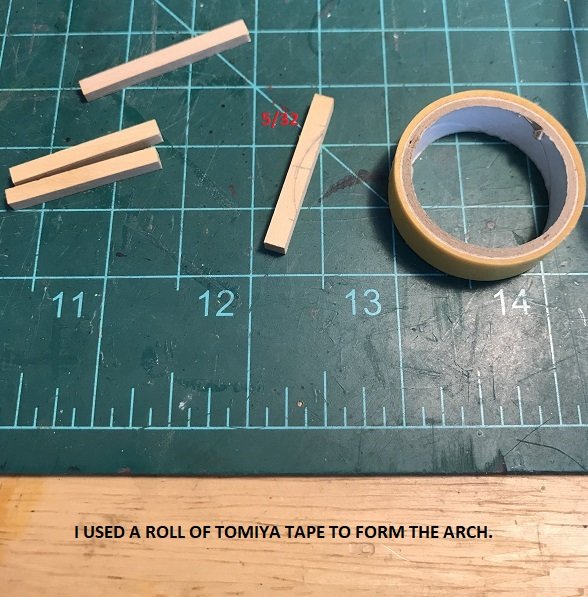
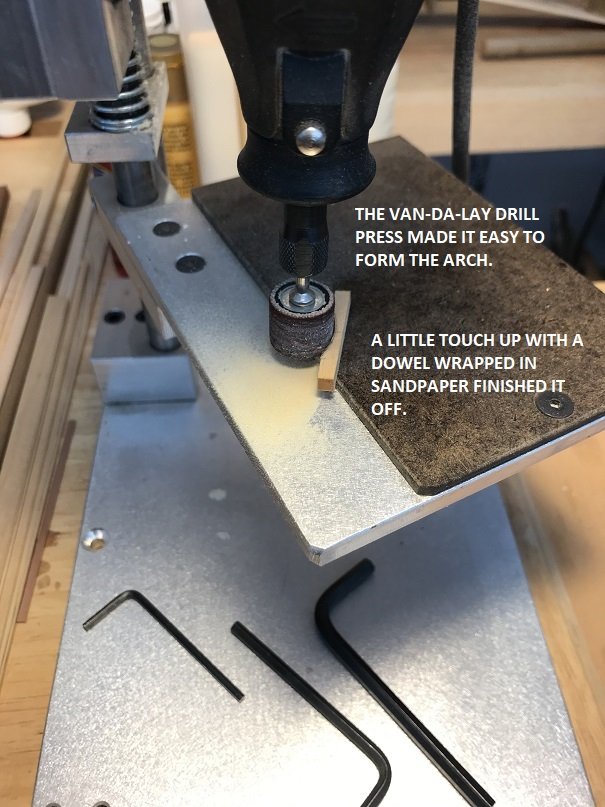
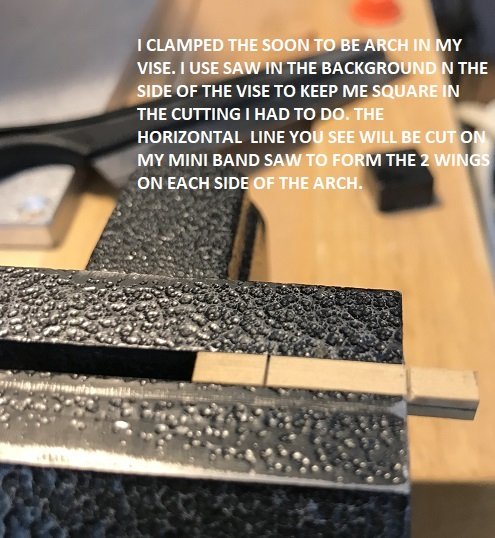
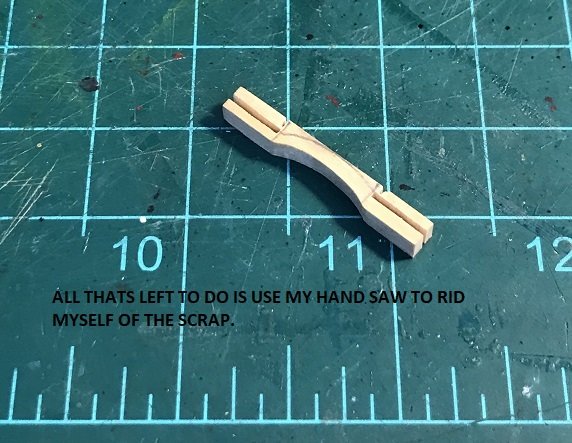
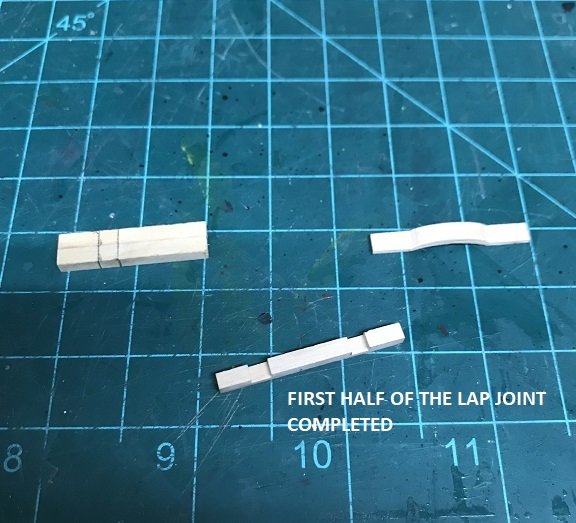
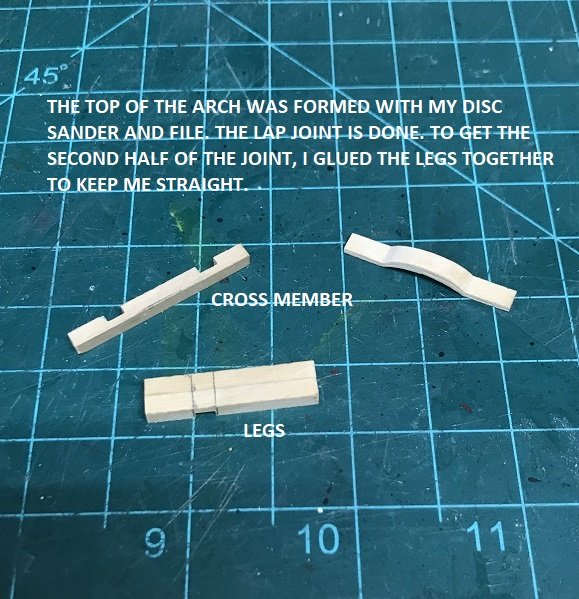
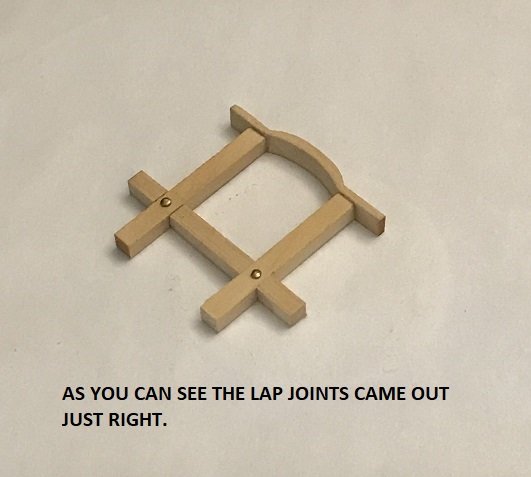
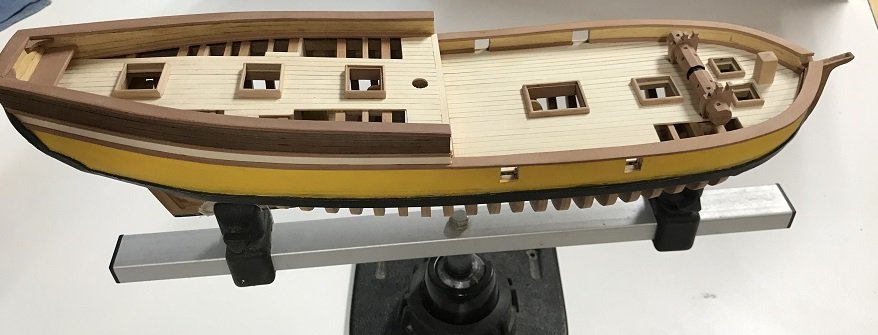
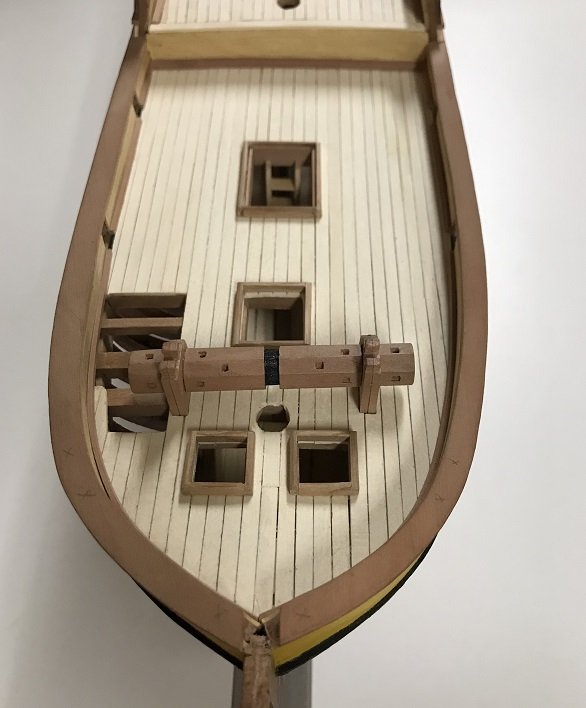
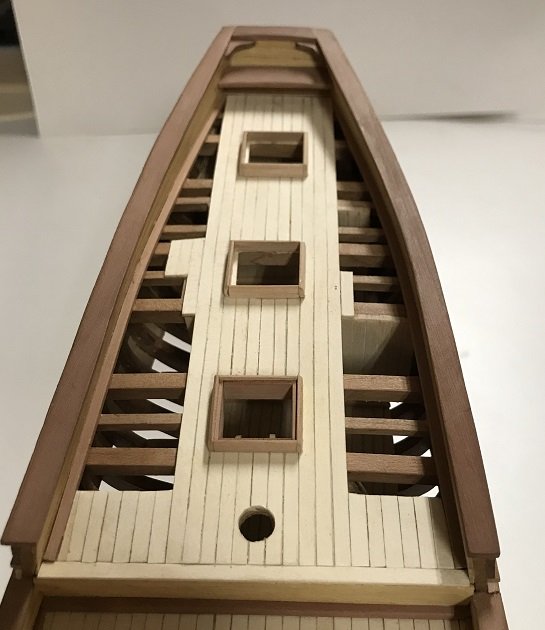
HELLO ALL, I AM IN THE MIDDLE OF DEALING WITH ALL THE FURNITURE AND BITS AND PIECES THAT HAVE TO DO WITH THE QUARTER AND POOP DECK. I'M WORKING ON THE BILGE PUMPS, COMPANIONWAY, DECK HOUSE, RIDING BIT, TIMBER HEADS, CATHEADS, CANNON CARRIAGES, AND NOW CONSIDERING ON HOW I WILL BE MOUNTING AND DISPLAYING THE MODEL. THE PICTURES SHOW HOW I HANDLE SOME OF THE ISSUES ON MAKING ALL THE ITEMS. BUT I DECIDED AT THE END OF THIS POSTING TO SHOW WHAT HAS BEEN COMPLETED. I GOT A LITTLE CARRIED AWAY WITH WORKING ON THE CANNON CARRIAGES, BECAUSE I HAVE NEVER SEEN REALLY GOOD PICTURES OR EXPLANATIONS ON HOW TO CREATE THEM. BOB HUNT DID A GREAT JOB IN EXPLAINING HOW, BUT HE USES PICTURES OF THE RATTLESNAKE CARRIAGES. SO I AM HOPING MINE CAME OUT LIKE THEY SHOULD. I AM STILL WORKING ON THEM, BUT DECIDED TO SHOW WHERE I AM AT WITH THEM. I DIDN'T SHOW ANYTHING ABOUT THE BILGE PUMPS OTHER THEN THEY ARE MADE FROM CHERRY WOOD AND EBONY HANDLES. I USED 3/16" SQUARE CHERRY AND TAPERED TO 1/8". THERE WASN'T MUCH TO THEM. ON THE TIMBERHEADS I DECIDED TO SHAPE THEM, DRILL A HOLE ADD A BRASS ROD AND PINNED THEM TO THE DECK. I HAD MARKED WHERE THE STANCHIONS WERE AT AND IT IS WERE THEY ARE PINNED AT. I JUST THOUGHT I WOULD A BETTER JOB AT SHAPING AWAY FROM THE MODEL. AS FOR THE DECKHOUSE AND COMPANIONWAY I USED A BRASS HANDLE AND BLACK CARD FOR THE HINGES. SO I HOPE I EXPLAINED THINGS WELL, BUT IF I DID NOT PLEASE GO AHEAD AND ASK ME TO CLEARIFY AS TO WHAT I WAS TRYING TO SAY.
-
THANK YOU JOHANN AND DAVE, AND ALL THE LIKES! WELL I AM STARTING TO DEAL WITH ALL FURNITURE AND BITS N PIECES AS I SAY ON BOTH MODELS. SO I WILL BE JUMPING BACK AND FORTH ON BOTH MODELS. BECAUSE THIS SMALL STUFF IS A BIT OF A CHALLENGE. THE DECK-HOUSE AND COMPANIONWAYS ALONE TOOK ABOUT AN HOUR EACH. THEY HAVE ALL THE TRIM TO DO. TAKES FOREVER.