HOLIDAY DONATION DRIVE - SUPPORT MSW - DO YOUR PART TO KEEP THIS GREAT FORUM GOING!
×


Mike Dowling
-
Posts
1,234 -
Joined
-
Last visited
Content Type
Profiles
Forums
Gallery
Events
Everything posted by Mike Dowling
-
You sir are a gent! Yes I reckon I could get away with it but..........! No there are no plank ends, something else I don't like about it and I have already tried scoring across the wood but it tears rather than leaving nice ends. The scale of this model is 1:48 so, because I am no good at maths either, how long should scale planks be? Any ideas? I would reckon about 5 inches or 12 cms ?
- 225 replies
-
- 1
-

-
- chaperon
- model shipways
- (and 1 more)
-
Thanks for that Carl, I had been thinking about how to make a template in case and I like your suggestion. This kit, apart from the laser marked planks has a lot of guidelines to show were other pieces go later. That is partly why I didn't dare sand the deck any harder in the first place.
- 225 replies
-
- 3
-
-
- chaperon
- model shipways
- (and 1 more)
-
Hey guys, here are some pictures warts and all. I would like honest opinions please as to what I should do.

- 225 replies
-
- 12
-
-
- chaperon
- model shipways
- (and 1 more)
-
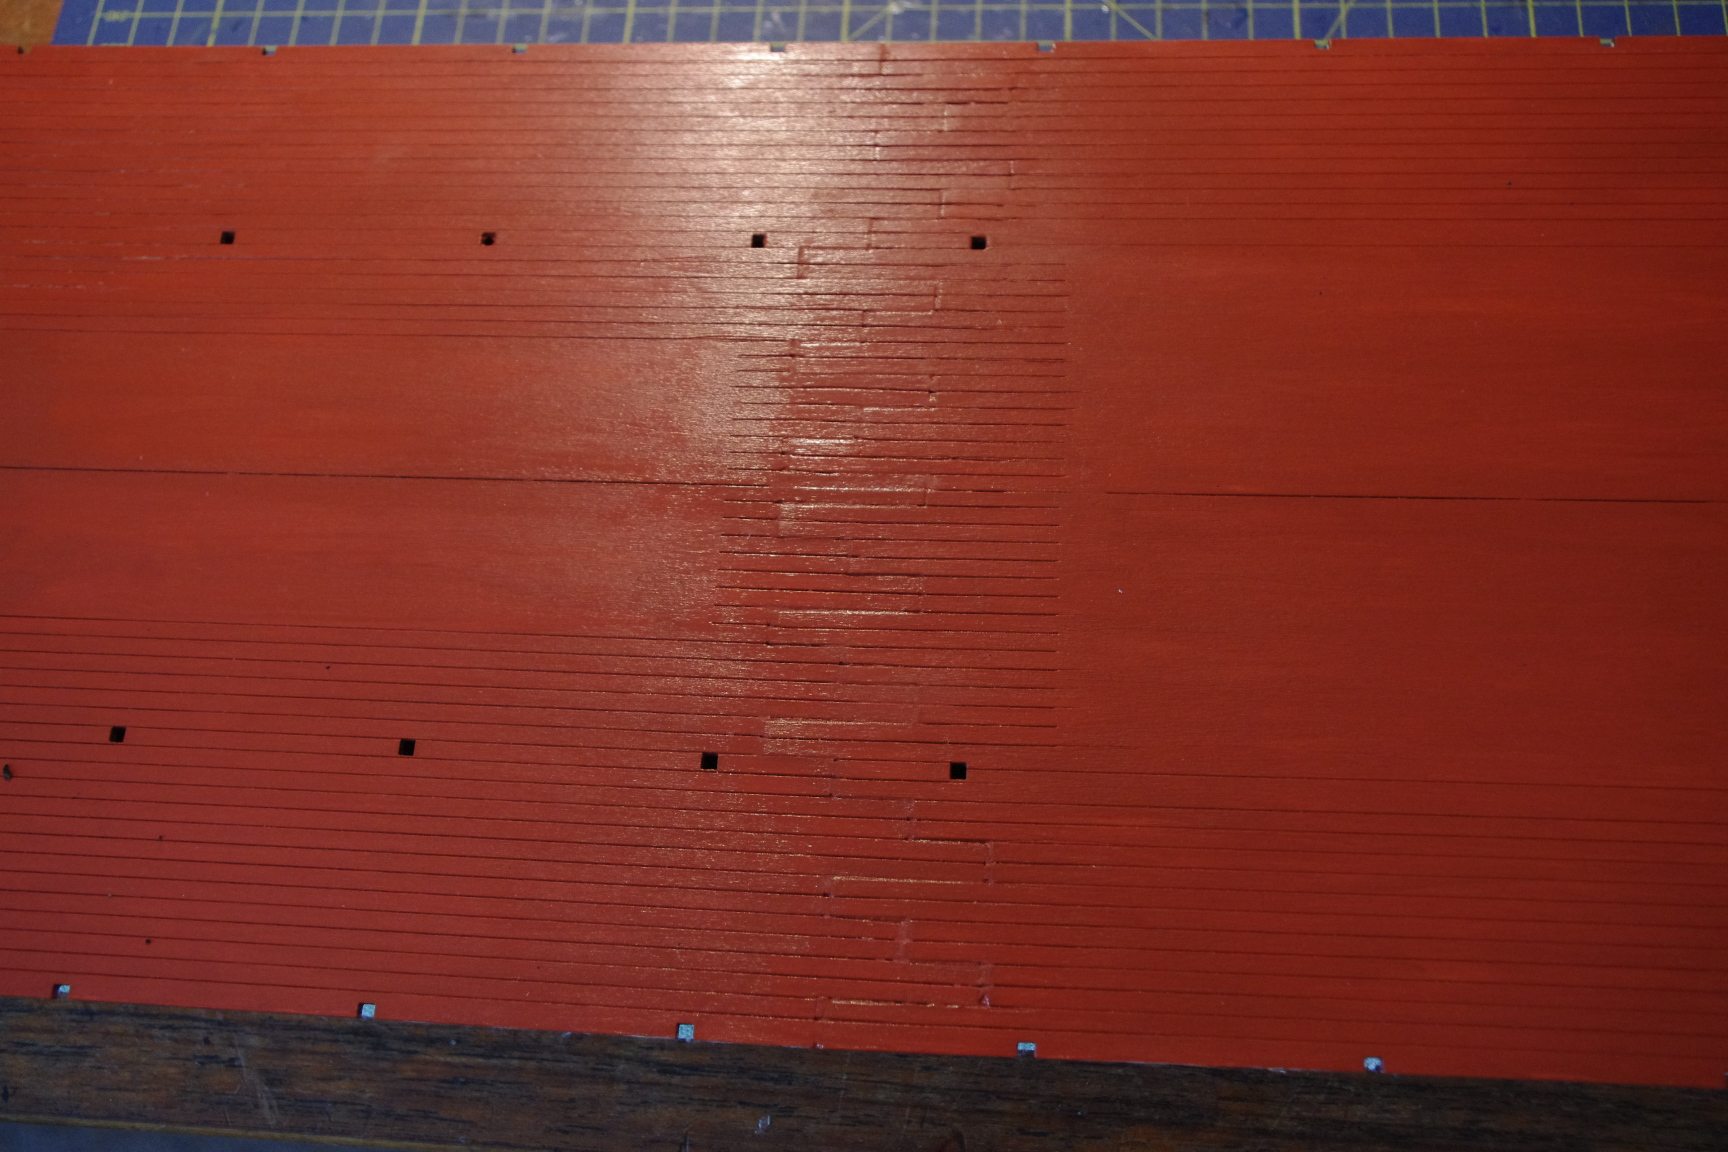
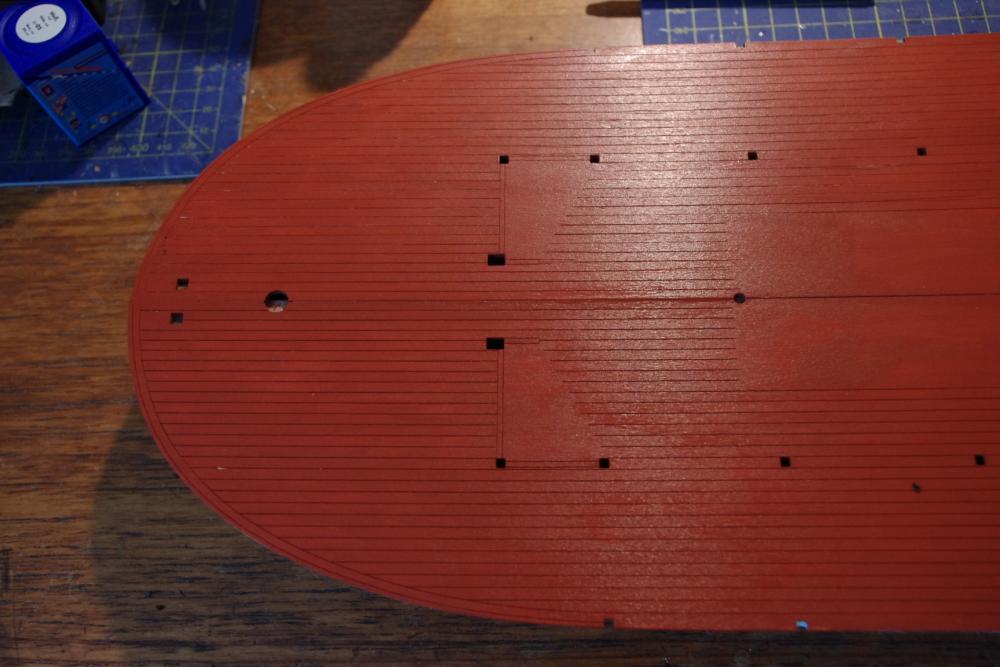
No Cathead (wish I knew your proper name, it seems a bit rude to keep calling you Cathead) you are absolutely right. There are loads of solutions to different problems and any/all suggestions are welcome. Having said that I have just had a bath (not that anyone wants to know that!) and come back to look at the painted surface and I have to say I am far from impressed. The problem with MSW and all the experts and advice is that all of a sudden you become like them !!!! I am not at all happy with what I see of my efforts thus far. Cathead you will be thrilled but I am now seriously considering this re-planking lark. Don't know what you think Karl because you managed with the kit as was ? But, experts, what is the best wood for such narrow planking ? We are looking at 1/8th because it is an American kit which is 3. something mm for the Europeans which I simply refuse to be !! I did get some Manzonia before for my Lady Smith and that fairly decent. Any good? I will not get the size right for the laser lines whatever I do which is a bit of a pain but allowing for glue and slightly rough edges this aint going to happen anyway! A lot of the walls and stuff are also planked in this kit much like others I have done so whatever I do has to be consistent. There was loads of planking to be done on the Robt. E. Lee I built which I do quite enjoy and the end result of that build looks one heck of a lot better than what I have in front of me now. So guys, should I stick with Manzonia which is a wee bit wide but a good thickness or use something else ? HELP!
- 225 replies
-
- 3
-
-
- chaperon
- model shipways
- (and 1 more)
-
I think you miss the point my friend. The planking lines are supposed to show although you have a very good point about some of the other 'joints'. Your suggestion might be brilliant for those. I think there are just too many square holes in this kit for your cunning plan to work but thanks for the suggestion. There is a lot to be said for scratchbuilding methinks but I am certainly not sure I could make as wonderful a model as your Bertrand!
- 225 replies
-
- 4
-
-
- chaperon
- model shipways
- (and 1 more)
-
So far I have sealed the deck with sanding sealer less the talc and it has had two coats of brushed acrylic and it still needs another one. So far, the planking lines still show through. If it looks dreadful I am quite prepared to order some wood and re-plank but there are a lot of precut holes to redo. I wouldn't mind if they were circular but loads are square !! To be honest by the time the superstructure is on top there is not a huge amount of deck actually showing but we shall see. I might be really brave, take some pics and see what others think!
- 225 replies
-
- 3
-
-
- chaperon
- model shipways
- (and 1 more)
-
Many thanks to Carl who has sorted my problem out.
- 225 replies
-
- 3
-
-
- chaperon
- model shipways
- (and 1 more)
-
All very interesting but what has this all got to do with cows? On a slightly different topic, I am not good with computers. A lovely lady called Anja who used to be a moderator for the forum used to help me with getting my 'current build' to show under my details and also list my previous builds and gallery. I think a couple of moderators may be watching this build of mine so please, can someone either tell me in very easy language how to do it or, make an offer to do it for me ?
- 225 replies
-
- 7
-
-
- chaperon
- model shipways
- (and 1 more)
-
As I said I have been very tempted to plank the deck. I will see how it turns out because I can always plank on top. My next build obviously just has to be a scale cow !! Now, how on earth do you paint that ?!!!!!
- 225 replies
-
- 2
-
-
- chaperon
- model shipways
- (and 1 more)
-
I love it Roger !! Having done a test, methinks the best option is the sanding sealer, to be done however without shaking the tin! Thing is, sanding sealer contains talc so, if I don't shake it I don't get the talc in my laser cut grooves !! I think it will work but having said that the water and sanding also works but the paint still soaks in a lot and I only bought 30mls not a bucket full ! I have also to say that I do think sanding sealer is wonderful! It smells awful but does a really good job and I did recommend it on another build to someone else with porous wood. Maybe I should listen to my own advice.
- 225 replies
-
- 4
-
-
- chaperon
- model shipways
- (and 1 more)
-
Thank you both for that. Normally I would indeed seal the wood with the sanding sealer but my concern is that it will fill the laser cut plank lines which are not very deep at all. I do like your idea of wetting the surface first Kurt so I am tempted to try a very small area with both methods to see which works best.
- 225 replies
-
- 3
-
-
- chaperon
- model shipways
- (and 1 more)
-
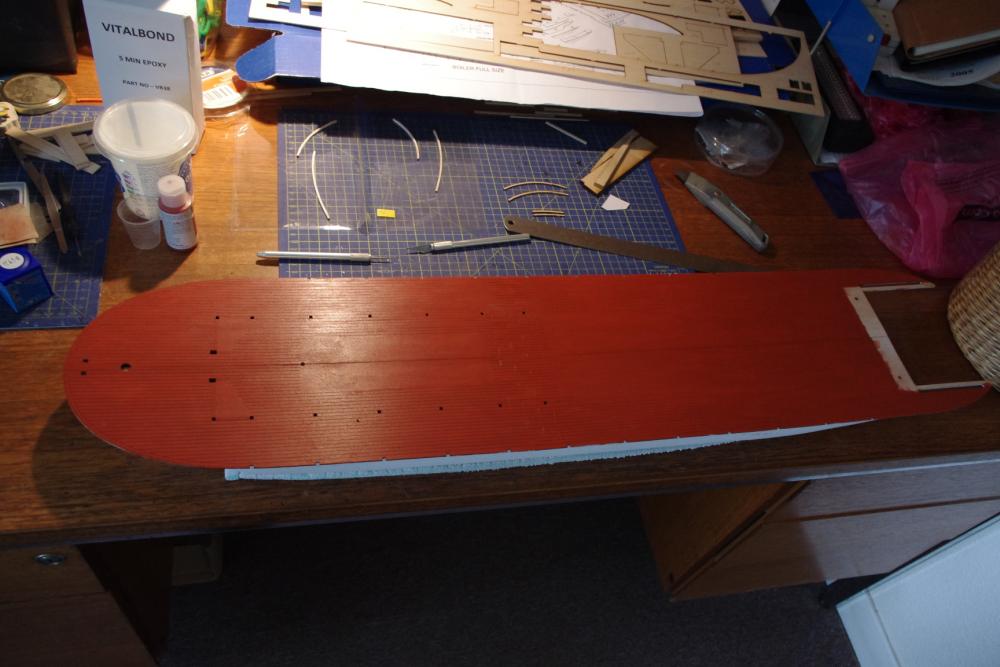
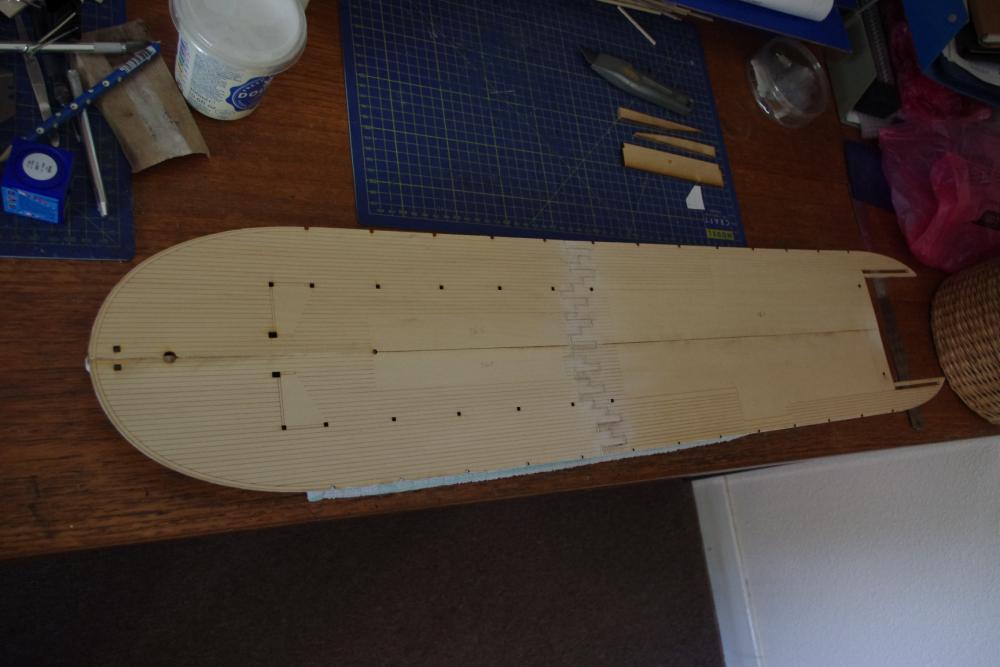
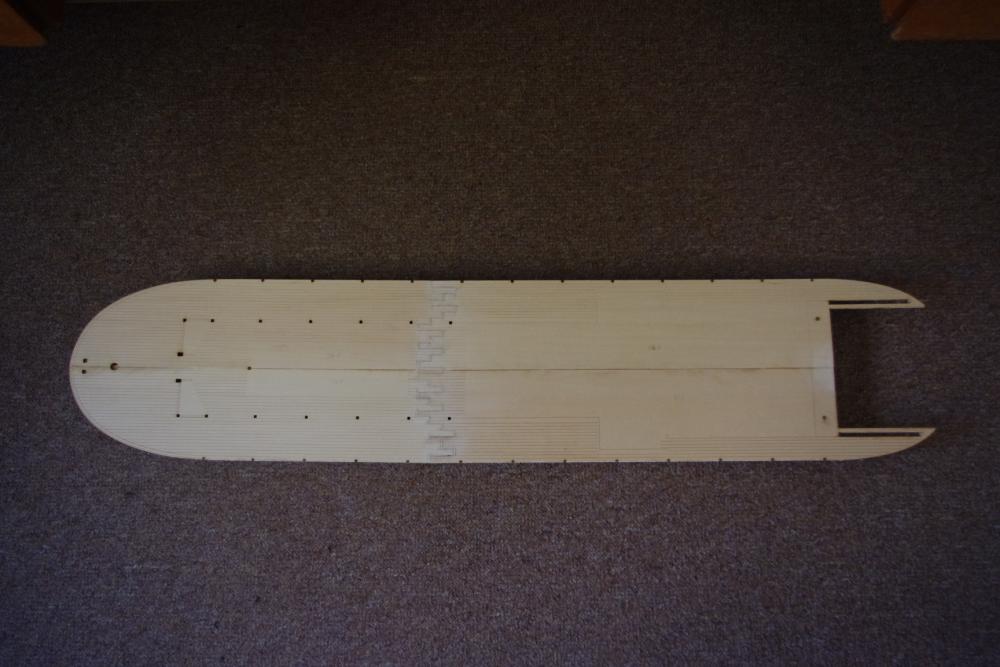
Time for a winge!! I reckon that Model Shipways get their basswood from the same place as Constructo !! Both are horrible, very prone to denting and as absorbent as blotting paper. It just loves to soak up anything like water including paint and then warp in a variety of directions. I suppose if one wants to be precision accurate then mechanical engineering with metal is the answer and this sort of thing is the punishment that those of us who work with wood must put up with. Right, enough of the rant. I have now put the first deck on the hull which proved to be a lot more difficult than I anticipated. To be honest apart from the above I am not sure why it was so awkward but I had the devils own job lining up the four parts required. Anyway, they are now on, very firmly glued (!!!) and the sort of 'dog tooth' joint between the sections filled and re-scored for the imitation planking. To be perfectly honest I would have preferred to plank the deck as I have with others but I am trying to follow the destructions! I don't have an airbrush so I am intending to hand paint the deck with iron oxide coloured paint as suggested but which I have to say is very orange. My main problem is that if I water down the paint it will make the basswood far too soggy and raise the grain far too much. If I use it too thick it will fill in the laser cut plank markings. I have tested on a piece of scrap and the coverage is good and I found if I sanded it afterwards very, very gently that the wood doesn't show too much through and if anything leaves a sort of weathered effect. Any hints or opinions as how to progress gratefully received. Anyway, a couple of photos of the deck.
- 225 replies
-
- 7
-
-
- chaperon
- model shipways
- (and 1 more)
-
It's a good thought but I'm afraid much too clever for me. I shall be glad just to get the whole thing looking like it is supposed to but many thanks for your interest.
- 225 replies
-
- 2
-
-
- chaperon
- model shipways
- (and 1 more)
-
I too have been caught out before by OcCre's paper decorations be it wallpaper or decals. They promise me they are changing them but we shall see. In the meantime I photocopy everything like that first - just in case but it looks like you made a good recovery job.
-
I am probably being thick but I am not sure what a steam plant is. I think it sounds too complicated for me anyway.
- 225 replies
-
- 1
-
-
- chaperon
- model shipways
- (and 1 more)
-
I could do that Carl ! Don't want to upset the expert though!!! You wait until I get onto the superstructure, silk finish sounds good to me !!
- 225 replies
-
- 2
-
-
- chaperon
- model shipways
- (and 1 more)
-
Thank you very much Roger, I really appreciate that.
- 225 replies
-
- 1
-
-
- chaperon
- model shipways
- (and 1 more)
-
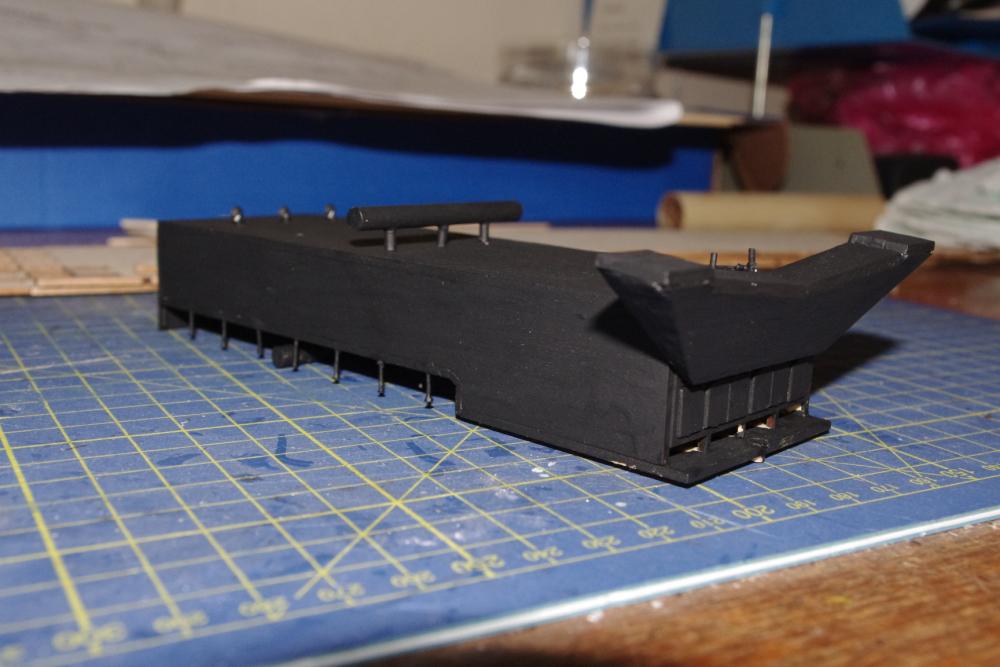
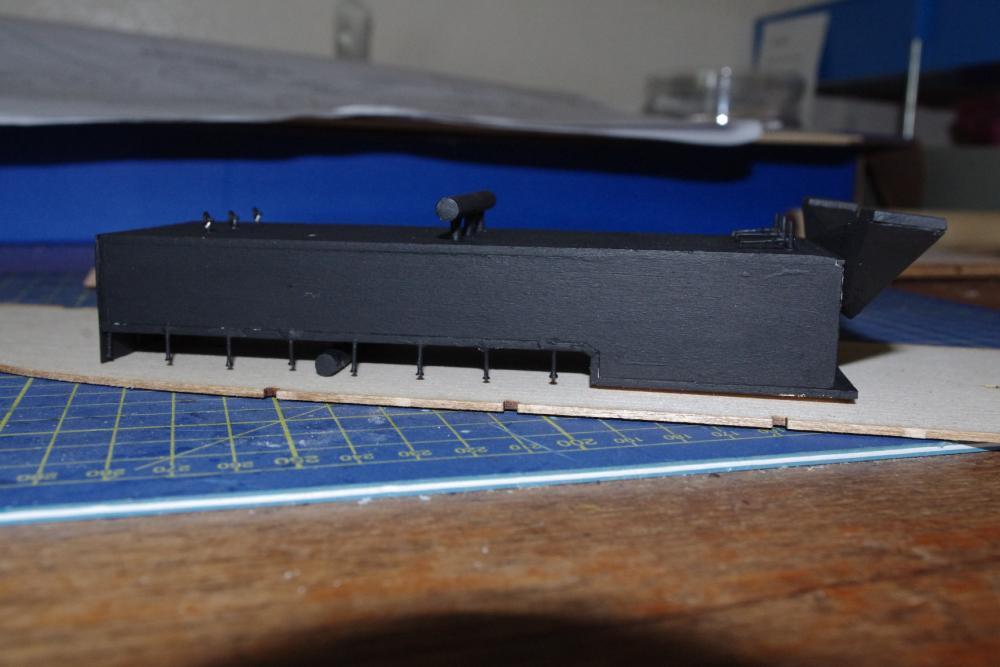
And here are a couple of shots of the boiler. A wee bit more paint and the steam lines to go on but otherwise done. Matt black really doesn't photograph well and I can't believe something so boring to look at could have taken so long to put together!
- 225 replies
-
- 8
-
-
- chaperon
- model shipways
- (and 1 more)
-
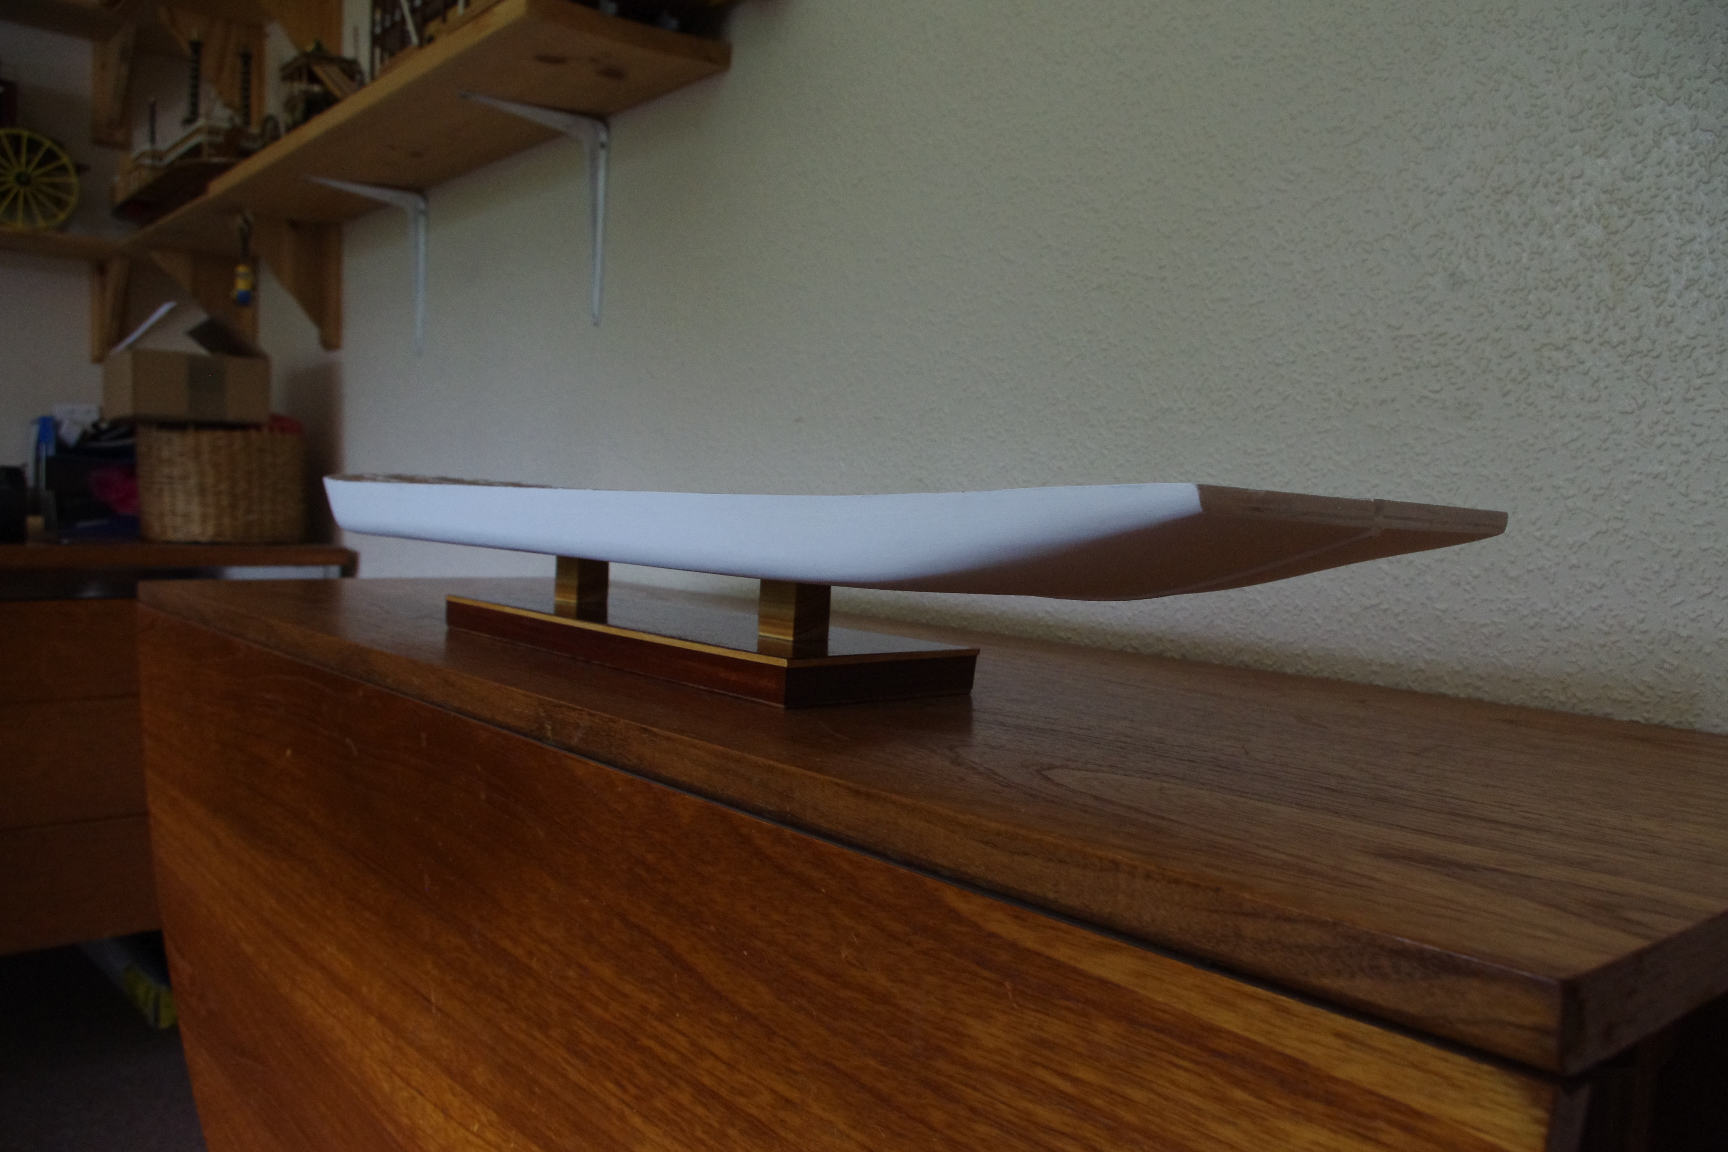
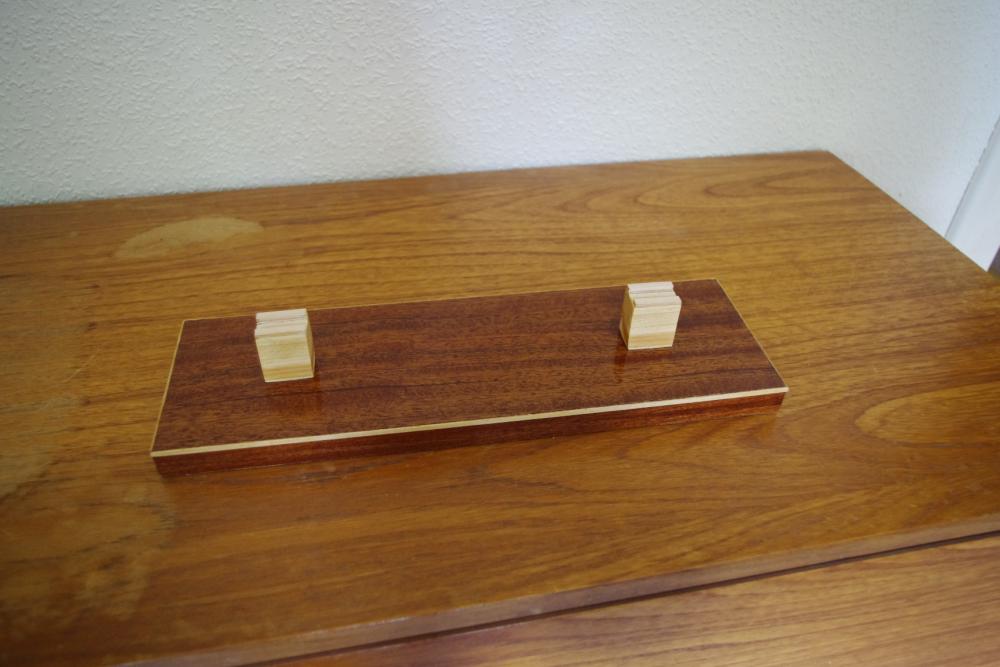
No sensible answer to that really Carl. I sort of gauged the size to that of my Robert E Lee Steamer and whilst I know this is a bit bigger I didn't want the stand to detract too much if that makes any sense ?! Just going back a bit to previous comments, if I paint the decks in iron oxide colour, should the paddle wheel be a brighter red or the same as the decks ?
- 225 replies
-
- 3
-
-
- chaperon
- model shipways
- (and 1 more)
-
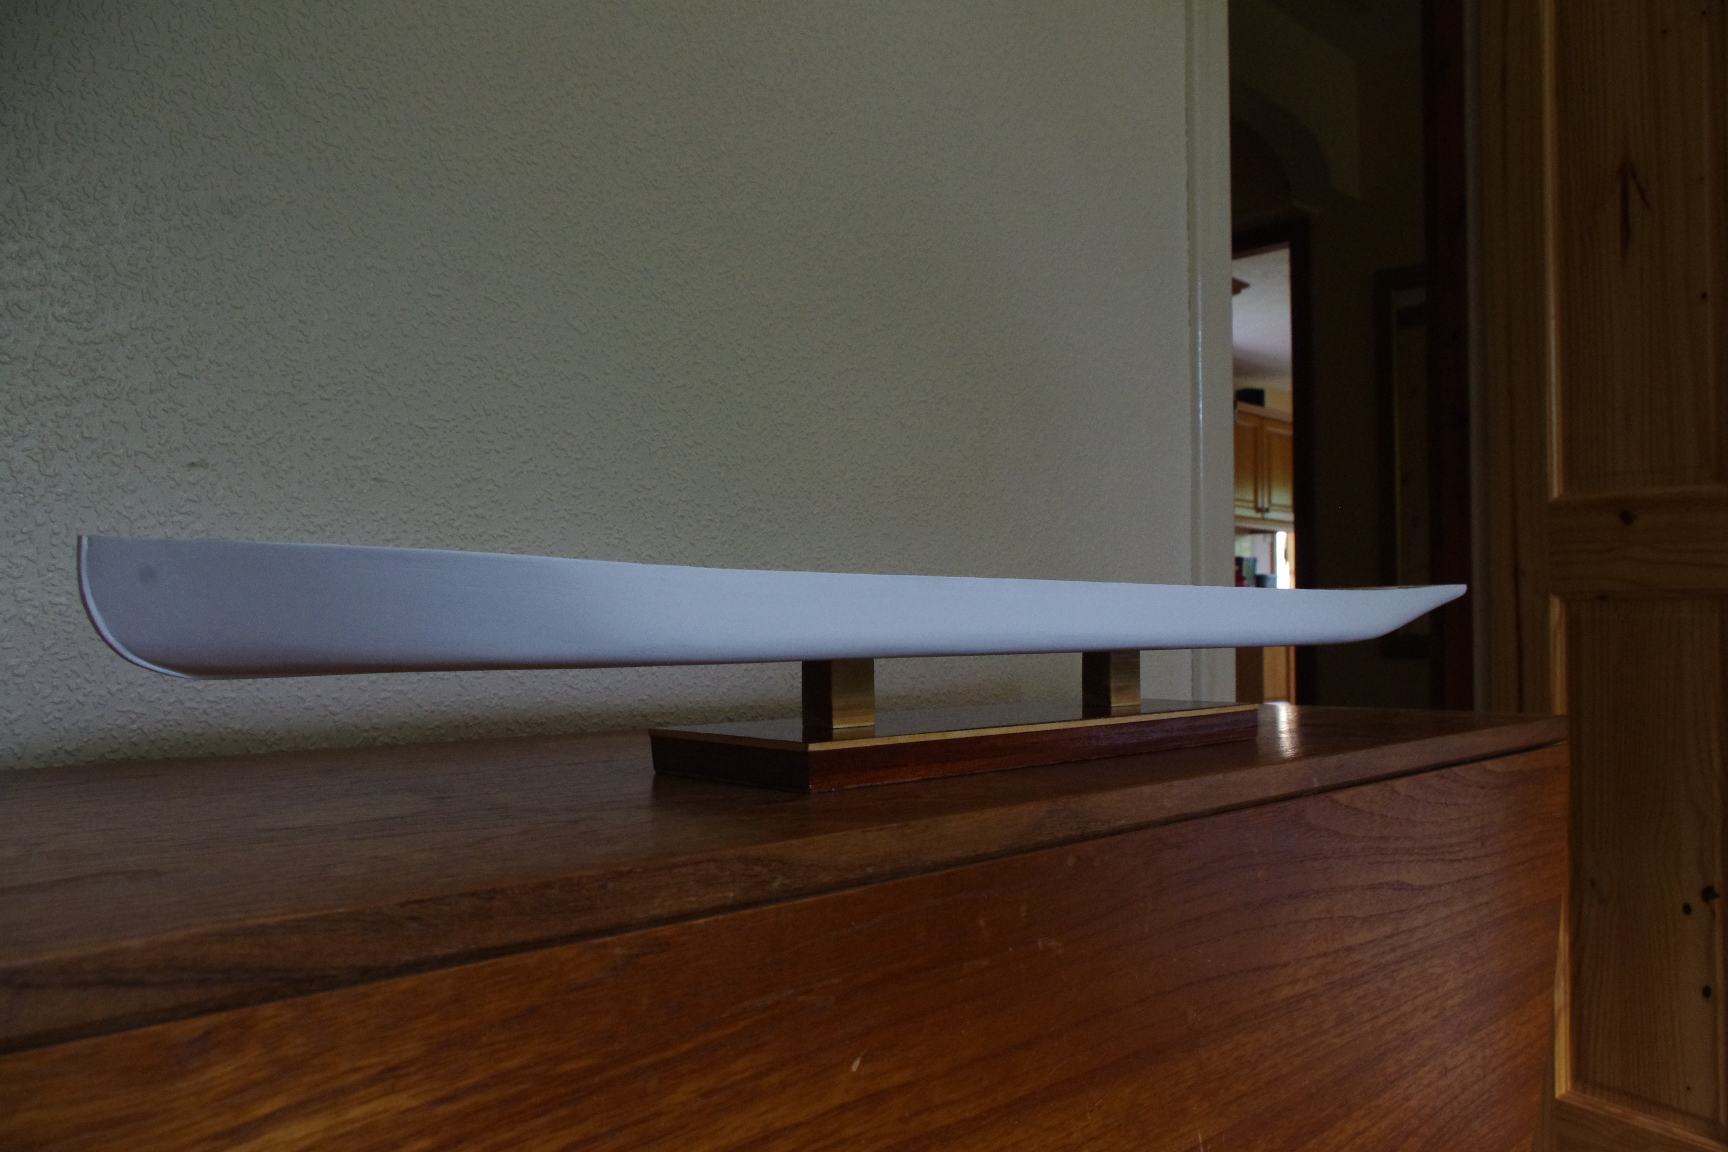
Well folks, I made myself a stand for the beast ! Having done all the filling and sanding I tried to hand paint the hull as I don't have an airbrush. After four, yes four coats of paint it still looked absolutely dreadful. So I purchased a matt white aerosol spray paint, sanded the whole thing down again and gave it three coats of spray. Strange really, gloss paint is easy to get a smooth finish but matt (thanks Kurt) is a nightmare. Never mind, it's done now and I must admit to being rather pleased with the result. I have been building the boiler whilst waiting for the paint to be delivered and I managed to find some iron oxide acrylic paint to do the decks with, coming soon!


- 225 replies
-
- 11
-
-
- chaperon
- model shipways
- (and 1 more)
-
You do for this boat !
-
Hey there my expert friends, Should I or did you use matt paint for the hull or go for a satin finish ? I assume gloss is quite out of the question ?
- 225 replies
-
- 2
-
-
- chaperon
- model shipways
- (and 1 more)
-
That alternate planking was quite good fun I remember and it look s like you have done a super job there. If I may make one small suggestion you might find it easier to put the wallpaper on the various room walls before you start putting them together. Not wishing to interfere just a suggestion.