

edbardet
-
Posts
133 -
Joined
-
Last visited
Content Type
Profiles
Forums
Gallery
Events
Posts posted by edbardet
-
-
The key to these saws is that they cut on the PULL stroke. That creates very little stress on the blade (they are exceptionally thin) and pulling keeps tension on the blade which helps for a straight cut. I have a mini one and love it. Only about 6 in long and double sided.
Treat them with great respect since they have what seem like very brittle teeth and will snap easily if the saw is torqued.
Secondly they are sharp and create very knife like cuts in flesh very easily.
Ed
-
Check the Amazing Photo string

Ed
-
Keep the roap and use it for shrouds! Thats how it got it's name "shroud-laid". Really shroud-laid is four strands, but if it looks square may be usefull.
Ed
-
A lot depends on what you model. I like 1:24 since I do cross sections and partial models and I am more interested in the construction rather than the 'accessories'.
Ed
-
Bava-
The reason people do not use Blender is that they probably first looked at it when the interface was horrendus (expletative deleted). That is why I did not go that route. HOWEVER Cinema 4D has priced me out with their upgrades and I looked at Blender again after the interface changed. I'm going to switch on my next project. I want to research it's plan (pattern) making capability and maybe try it instead or TurboCad, which is also getting expensive.
Ed
-
Just a note in passing. I normally use rubber cement for placing the patterns before I cut. I've never had a problem and it comes off easy.
When I used rubber cement (Elmer's) on the Spanish Cedar it actually penetrated and left a slight stain. I was able to lightly sand the wood and remove the stain, but still it was extra work.
Ed
-
I've done the following in three different houses and shops and since it is so versatile I thought I'd add the 'Proven' tag.
Flexible storage and display space has always been a problem for me. Hanging pictures, displaying antique tools or storing milled woods has created problems in the past. In the 70's I got this idea from a display in a retail store but was stopped (dead) by the cost of materials.
I'll describe what I did and then show pictures of my current incarnation.
This involves covering a wall, or section of wall with either cedar siding or wide strips of thin wood lain in an overlapping pattern. Whatever wood you use it is installed in the normal manner of siding installation in that it is only nailed across the top of each plank and the plank above it covers the nails in the lower one. Exactly like ship-lap planking. The top most plank gets a covering if you so choose. Do not nail any other place.
Now comes the sneaky part. When you are done it is not hard to slightly lift the overlap at the bottom. This is the secret to it's use.
The next step is to go into the back of your clothes closet or laundry room, in a dark corner, and sneak up on those hangers that hide there madly reproducing. Before they get a chance to hide, drag them into the light and to your shop. Before they get a chance to reproduce get your pliers and cut them up and bend them as the following picture shows.
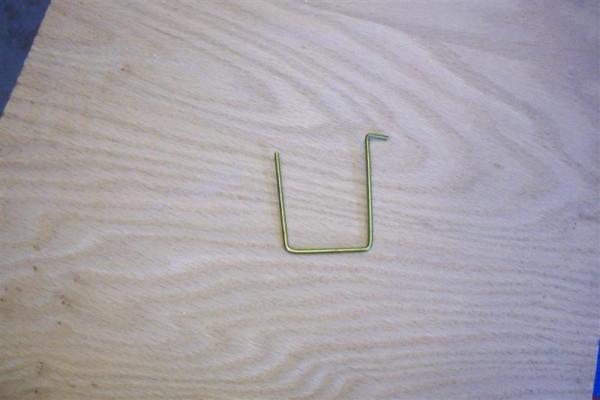
The critical measurement is the little leg at the tip which must be the length of the thickness of the paneling. The length and the bottom leg can be at your pleasure. Some of my small ones only have a little bit protruding for hanging pictures and the larger ones big enough to display an antique plane or auger bit.
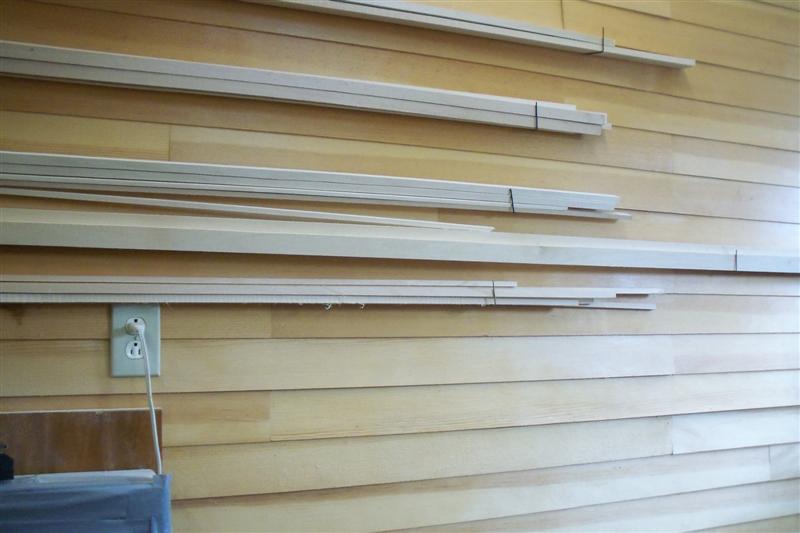
For this use I made them of a size to hold some of my longer milled strips of Basswood.

It really works.
For a display wall that I hung a bunch of antique hand tools, some of which were quite heavy, I made the hooks of bigger material. To make space for them I placed small washers under the nail head when I fastened the siding to the wall. This gave a larger gap.
If you are going to use an unfinished siding, no sweat in the shop, but it will fade and change color due to the light, so you may want to finish the wood before your done.
This should also work with hand cut shingles, or any strip wood, for a really unique look. The picture shows a wall made of 1/8" x 5" clear yellow pine. I found it in a veneer wholesaler's warehouse. It had been cut for doing some commercial laminating and they had a lot left over.
Have a ball!
Ed
-
I forgot all about pine tar. When I first went to Alaska in the early 60's my first cross country skis were government surplus 'white whales' and they had to be cleaned and the base coat for the wax was pine tar. That was a good smell.
Ed
-
While I was traveling several years ago I picked up a piece of what was called cigar cedar. I'm pretty sure it is Spanish Cedar, but that is besides the point.
This wood cuts and sands well and on top of that has a beautiful (IMHO) smell. Not as overpowering as the aromatic cedar that is used in closets and chests, but very pleasant. I'm going to use it on my Bomb Vessel cross-section as a contrasting wood and I hope the smell lingers

OK --for those of you who don't want the smell of a humidor --- forget it
 but it's as close to a pipe as I've gotten in 25 years. It does bring back pleasant memories.
Ed
-
Here is an idea for inexpensive spreader bars.
-
Rogue-
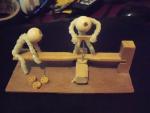
Excellent idea! I did that once before, since demolished due to space, and will probably do it again. The Book "Building the Wooden Fighting Ship" by James Dodds and James Moore is excellent. You might like this idea to show some tasks. These are 1:24 and real easy to make. Pipe cleaners and 1/2" faces from Hobby Lobby. It's been so long I can't remember where I got the dead eye illustration.
Ed

-
I gave up on purchasing figures a while back.The Adam ones would have done the trick but I'm really not a good painter. I wanted them to illustrate certain boat building tasks and also some crewmen working. So I just did the attached. Simplistic but portrays the information as to how things were done. In this case drilling holes in dead-eyes. These are 1/24 scale.
Ed

- Ray Durant, slagoon, riverboat and 3 others
-
 6
6
-
I am very interested in this kit. I have been trying to find plans to scratch build it and have had no luck. None of my inquiries to Korea have had any response, so the kit is probably my best bet.
Please keep up posting.
Ed

Question on Shipyard Fixtures circa 1774
in Nautical/Naval History
Posted
In the attached photos there is a furnace like device in the center of the shipyard (Deptford circa 1774)
Could they be steamers?
There are several in the yard and some quite close to the slips. This could indicate the need to get heated timbers to the ships rapidly.
I would like to know what they are.
There does not seem to be a way to insert long timbers, but all the covers could be raised and timber lowered into the center for soaking / steaming.
Was steaming done in the 1700's?
Could it be a 'stove' where tar pots were heated for calking. Does anyone have another opinion?
Thanx,
Ed