


jack.aubrey
-
Posts
1,268 -
Joined
-
Last visited
Content Type
Profiles
Forums
Gallery
Events
Posts posted by jack.aubrey
-
-
Thaks to everybody for your messages, I greatly appreciate your sentences, Jack.
A special mention to Yves for his fantastic message that changed my negative opinion on my birthday: not old but mature . . wonderful.
-
-
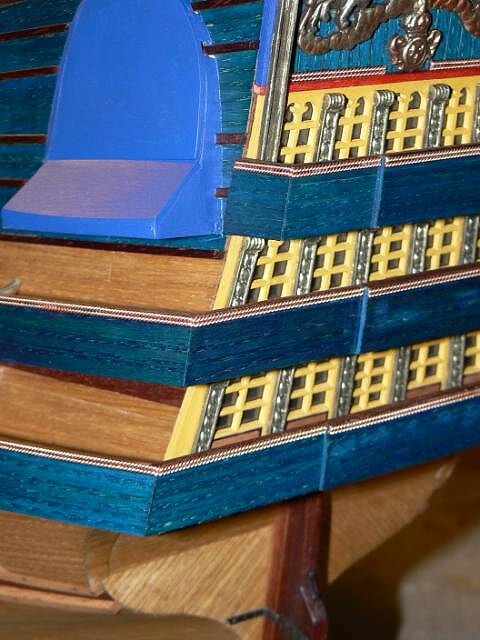
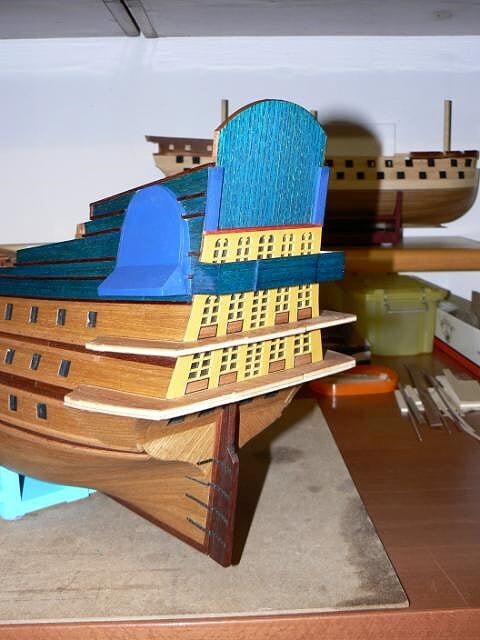
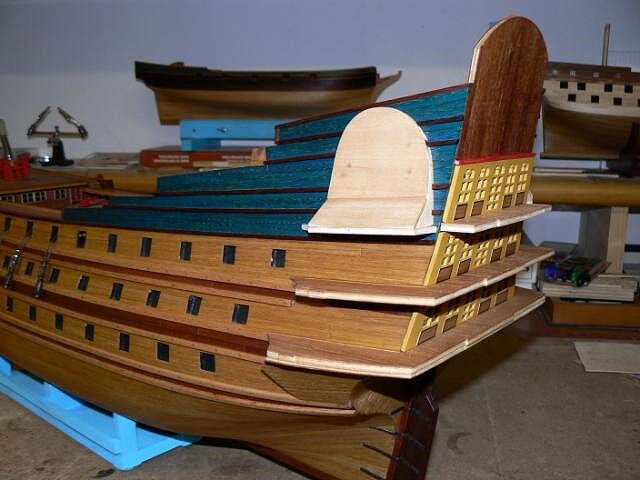
Wednesday, August 22, 2012 - Stern galleries
Finally today I have finished with the stern galleries and the goldening of all the decorations, apart the figurehead and two other human statues. I think I achieved a result that exceeds my expectations:
- The epoxy glue is very good for this type of bonding. . by the way I also glued with the same glue the guns under the decks, guns that detached after few hammer blows when they were stuck with the cyan; now I can do everything;
- But, more importantly, I think I've got a very good quality even though at the cost of a lot of time and patience;
- Negative point is that I spent a lot of time to finish in a precise way (and perfect for me) the wood of the galleries and then, with all these decorations, I realize that even if I finished less precisely would have been fine anyway: we see so little of the background veneer stained. .
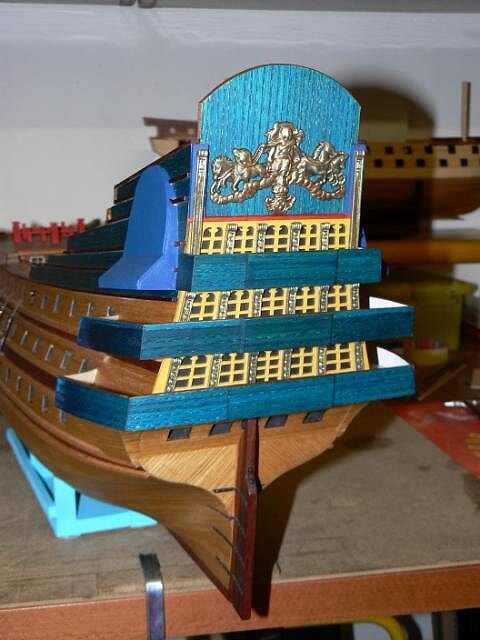
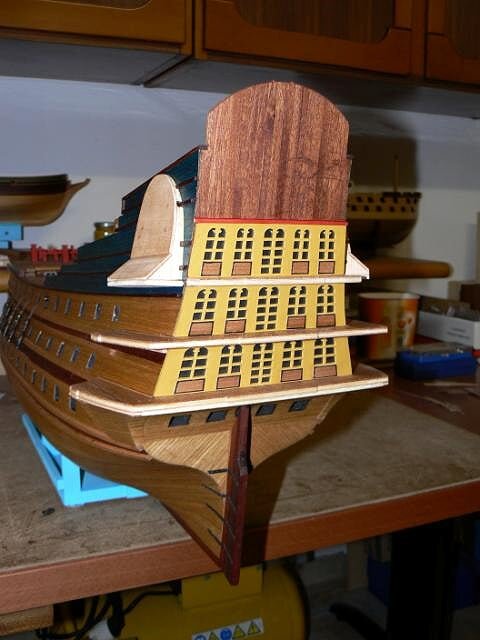
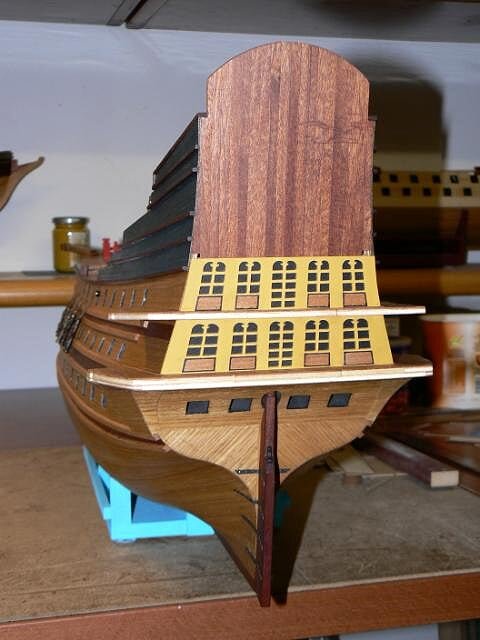
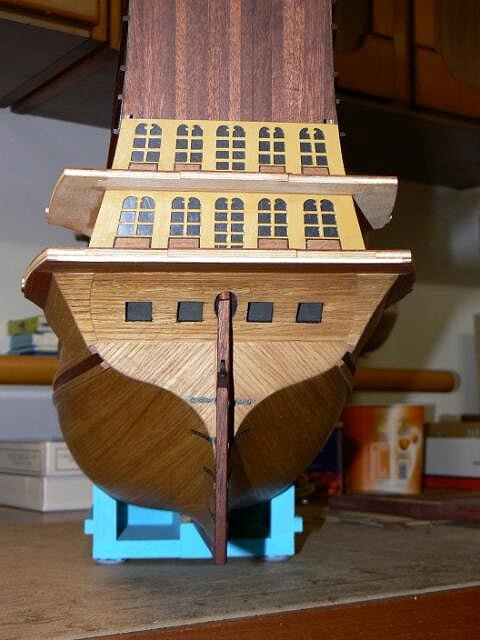
Let's start with a total of three images of the stern
. . from behind:
01 P1080343.jpg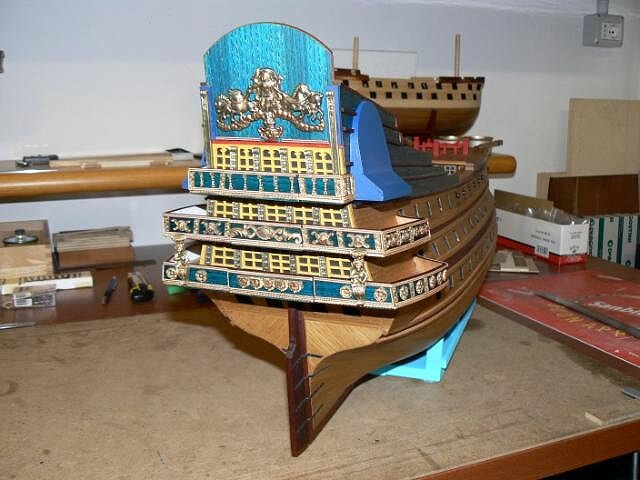
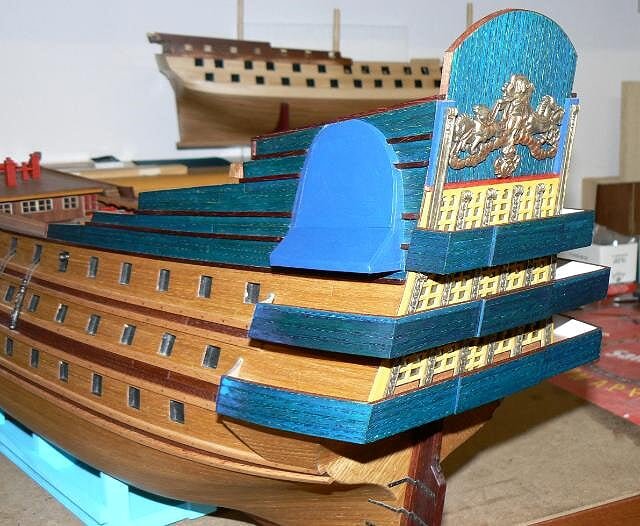
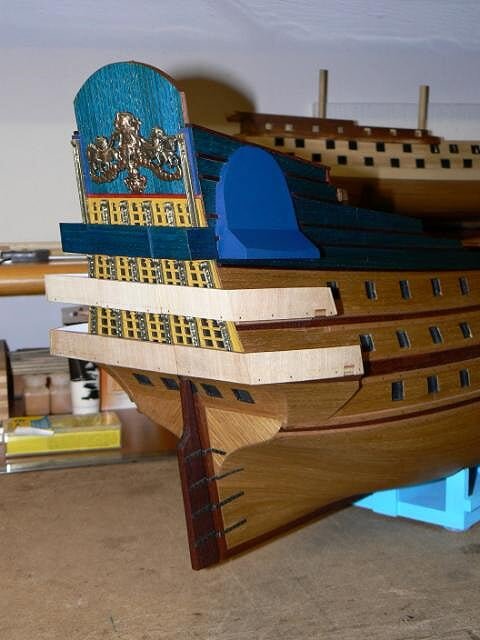
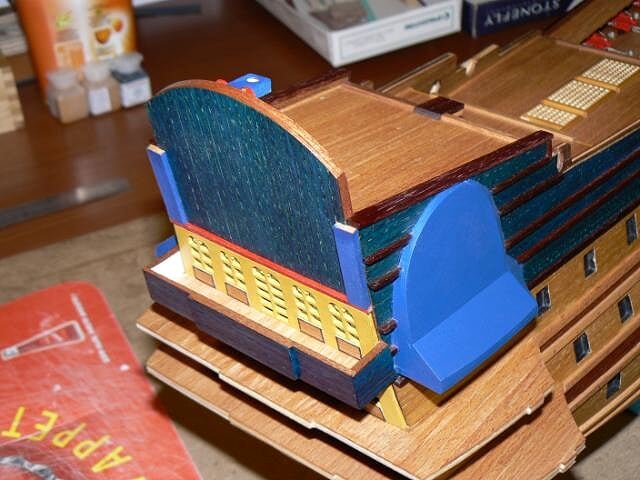
. . from the right:
02 P1080344.jpg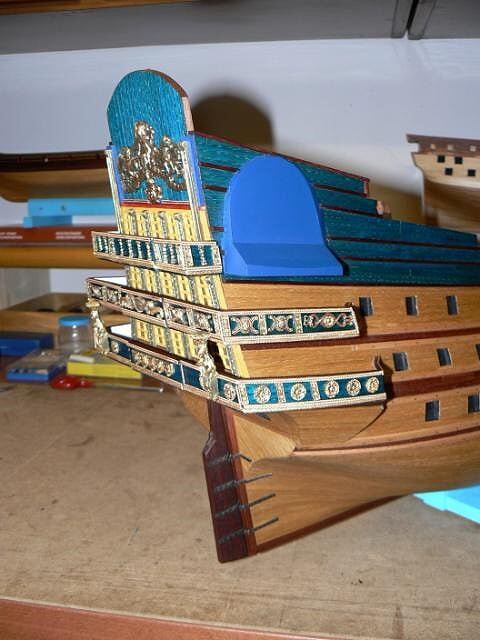
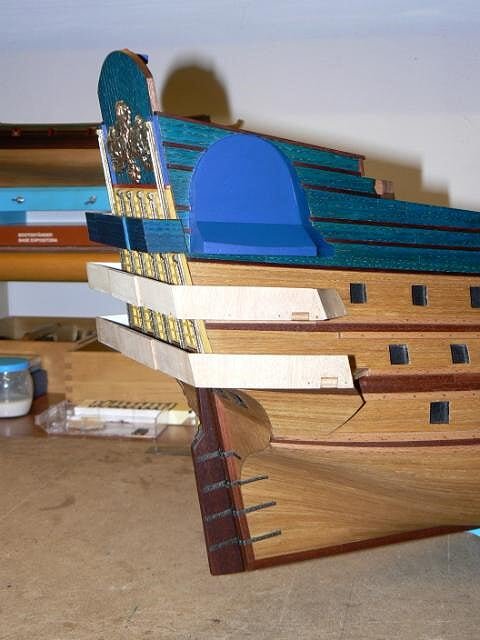
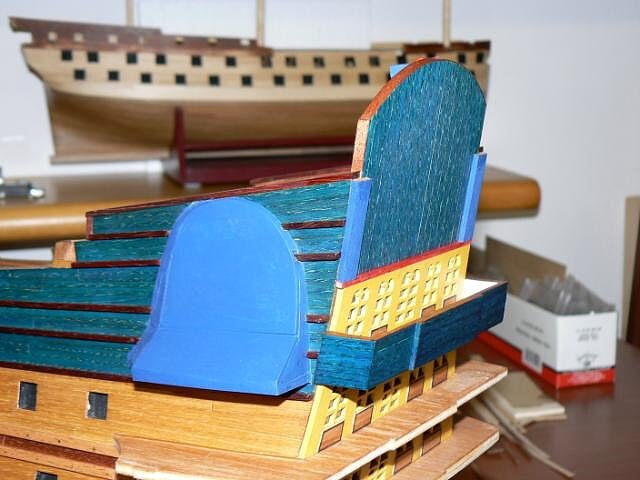
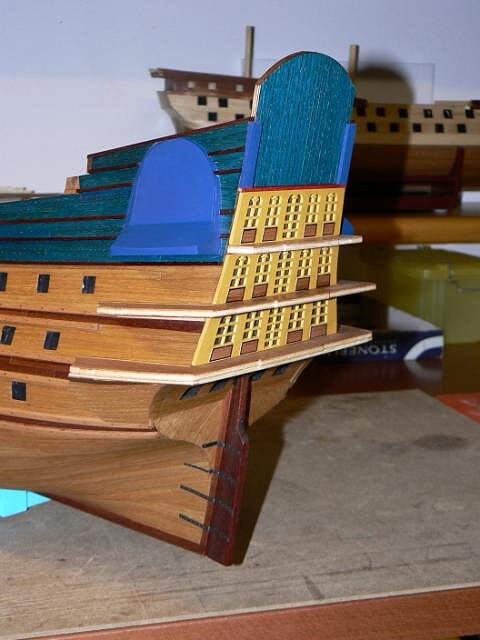
. . from left:
03 P1080345.jpg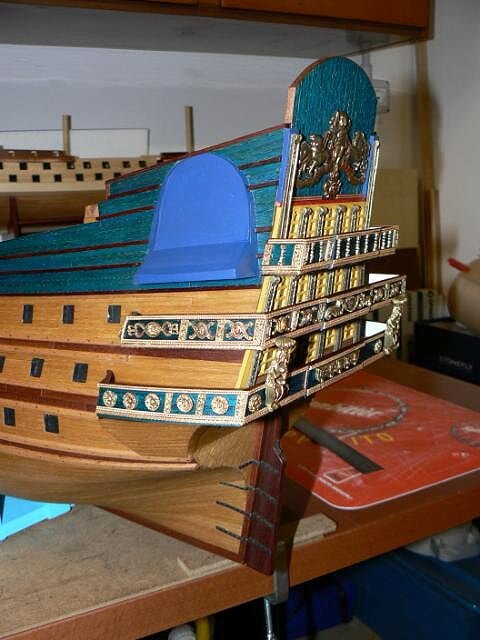
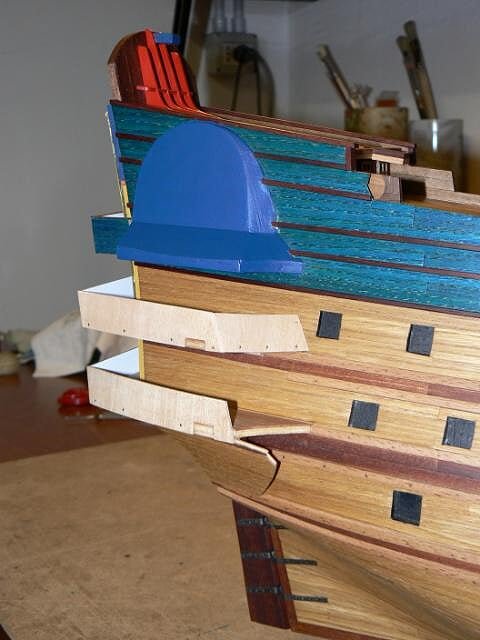
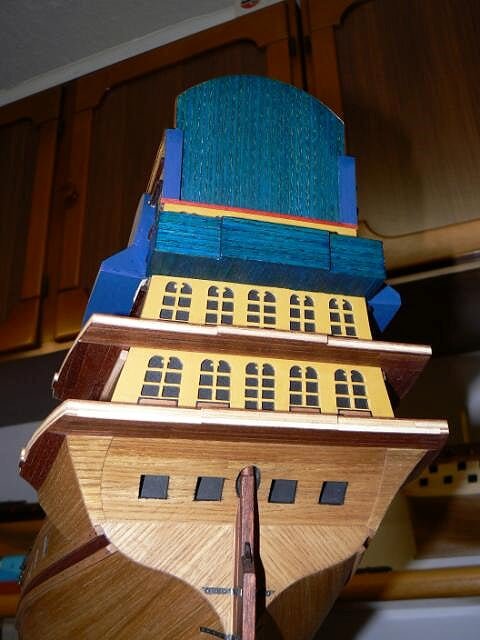
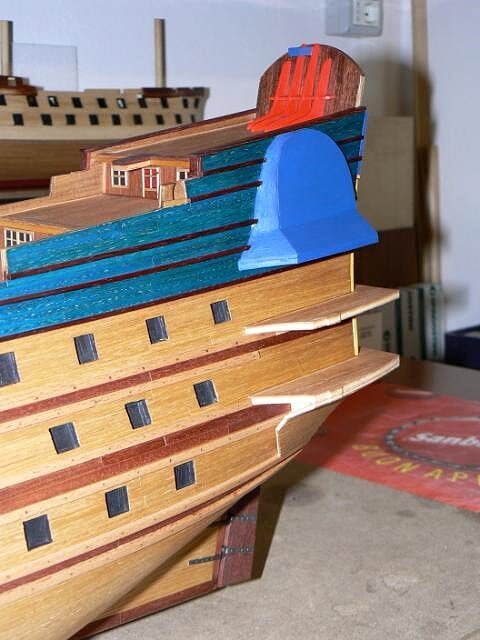
. . Finally an image closer:
04 P1080346.jpg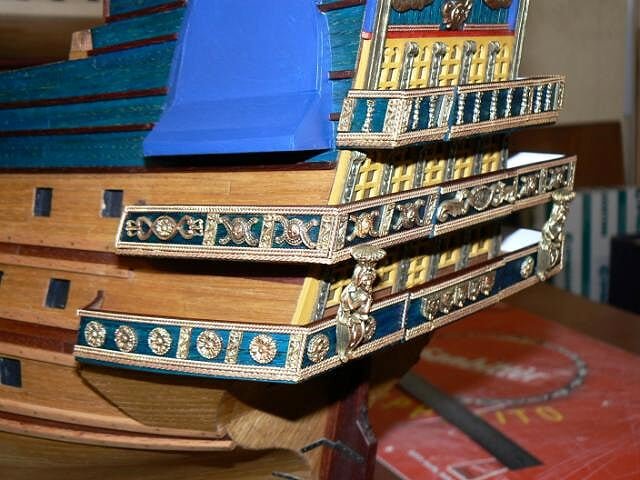
As I think I've already written, I used a two components epoxy glue that, after this very positive experience, I would totally recommend for this type of application.
Once dry it is very strong and, in contrast to the errors I've done at the beginning, you do not need a lot of it to assure a strong bond.
To overcome the long setting time and drying I soon learned the trick to put in a couple of points a drop of cyan in gel form. This glue, taking hold almost immediately, holds the piece in place, thus leaving the possibility to epoxy to dry. It's a trick that speeds up a lot of the work.
. . continues. . Best regards, Jack. -
. . . . Thanks to vulcanbomber and md1400cs for their comments, I've greatly appreciated . . . . .Friday, August 17, 2012
Another group of decorations for my Soleil ready for goldening. In the image these decorations are shown after the application (with the airbrush) of dark brown color, namely an intermediate stage of processing. Yesterday afternoon I finished them, more/less a couple of hours of work . .
01 P1080340.jpg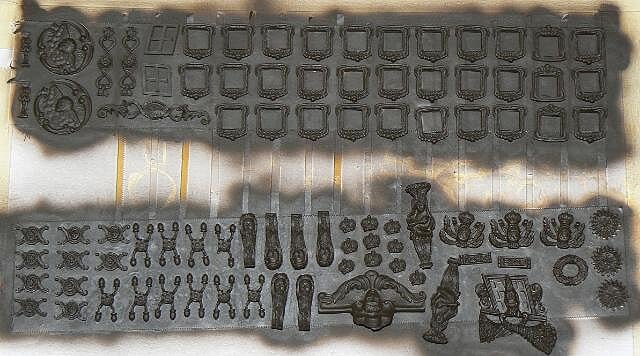
In the meantime I continued with the application of the decorations at the stern.
Compared to the first experience I did a little variation to the bonding process which is proving to be crucial to speed up this kind of work: having realized that it is not necessary to use over the entire surface to be bonded the epoxy glue, very long to dry, I left a couple of very small areas clear, where I placed a drop of cyan-acrilate in gel.
This "trick" makes the cyan able to fix almost instantly the piece in place and then you can wait quietly the drying of the epoxy without bothering to stop by one means the piece in place . . and of course I can continue in the meantime with something else. .
02 P1080341.jpg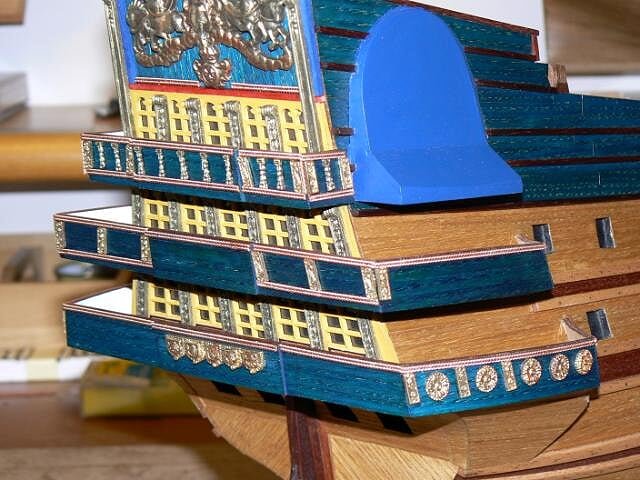
03 P1080342.jpg

-
Wednesday, August 15, 2012
These days I used, for the first time after 40 years, the airbrush I purchased a few weeks ago. Main objective was to apply a couple of coats of primer and a coat of paint in dark brown on the metal decorations. Even with all my inability to master the medium, after a little practice I was able to achieve the result that I had in mind. The day after I then ventured to golden them. What shown below is the final result. This is only a small part of the decorations to work on. I'll work on a little at a time, with patience in three or four steps.
01 P1080334.jpg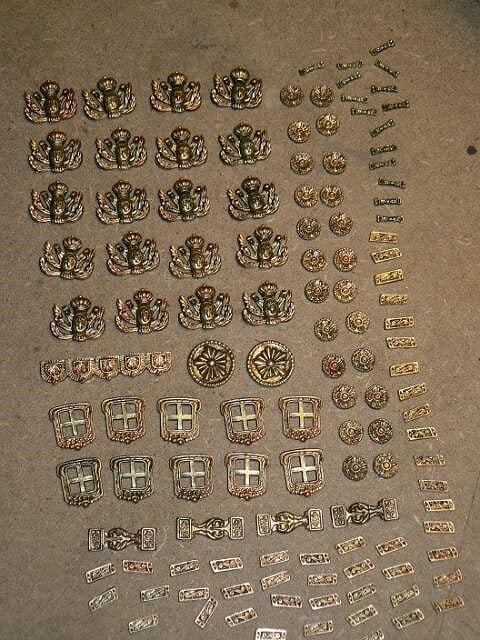
I propose here below two images of the famous garnishments, explained in my last message, mounted on the top of the galleries. I like very much. I changed a bit the copper colour with some gold applied with dry brush to maintanin an identical aspect with the other decorations.
02 P1080336.jpg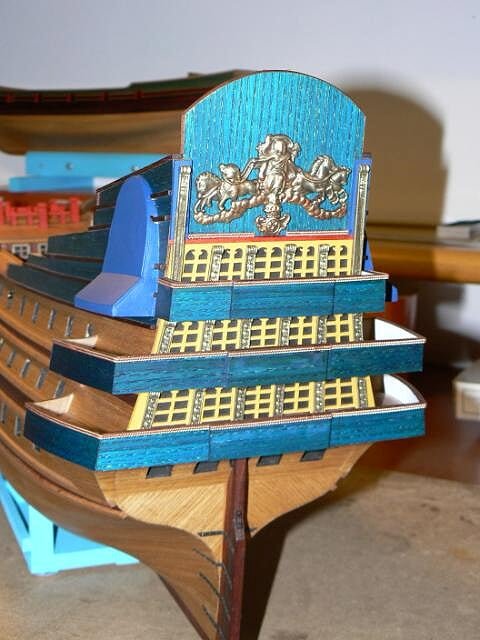
03 P1080337.jpg
Cheers, Jack.Aubrey. -
Friday, August 10, 2012 - embellishments
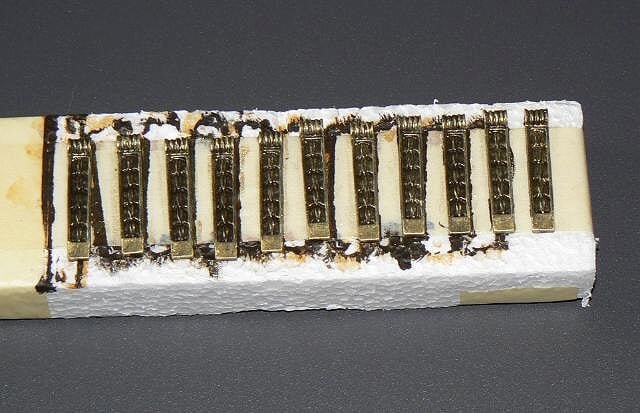
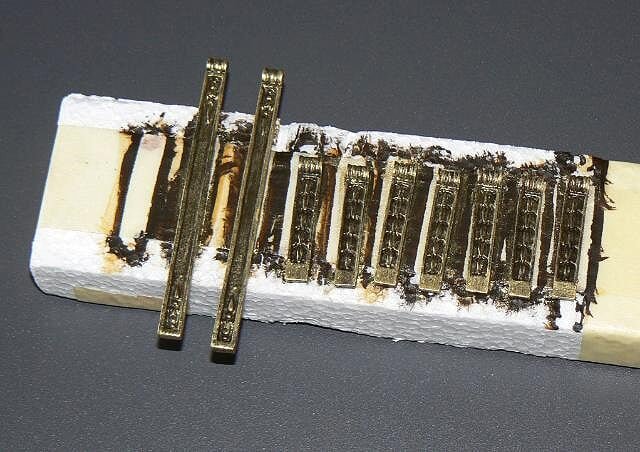
Today I spent most of the day to do tests for garnishing. The method described in the written instructions was not suitable so I tried alternatives. So I turned to think of other solutions and, after many trials that did not satisfy me, see photo number 02, I found "my" garnishments in the picture number 01.
Method of construction:
- Material used: copper wire diameter mm. 0.5, the color creates a diversion to gold decorations;
- Inserted the two ends of the wire in the minidrill spindle I held it stretched with a nail;
- I turned on the minidrill until the clutch permitted, then I turned off removing the piece;
- Unbelievable, the obtained garnish is always perfectly right;
- I cut the ends of the garnish;
- I glued two hanks each other with cyan gel, this bonding is only temporarily, until the piece is placed in its final position, where (I have already tried it on a piece) it is definitely fixed with epoxy glue.
I look forward tomorrow to verify that the bonding with the epoxy has the seal that I expect and if "OK", I'll proceed with the rest of the bonding, all pieces should be all ready.
PS: the image here below are not photographs but scans, I forgot the camera. .
01 Guarnitura-1.jpg02 Guarnitura-2.jpg
-
Thursday, August 9, 2012
In the meantime I progressed a bit with this complex poop and here I put some pictures of the stern with the galleries practically finished. Obviously the decorations are not yet included .. this will be the main job of the next .. weeks!
These photos were strongly affected by the use of the digital camera "flash", so the colors are a bit dissimilar from reality. . Jack.Aubrey.
01 P1080327.jpg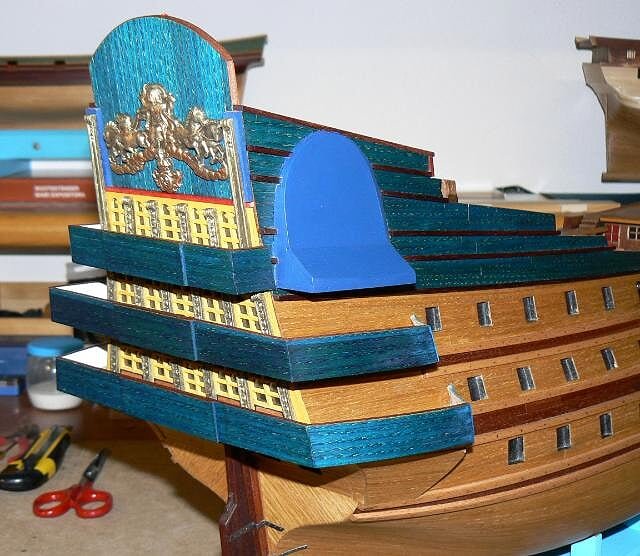
02 P1080328.jpg
03 P1080330.jpg
04 P1080331.jpg
05 P1080332.jpg
-
Monday August 6, 2013
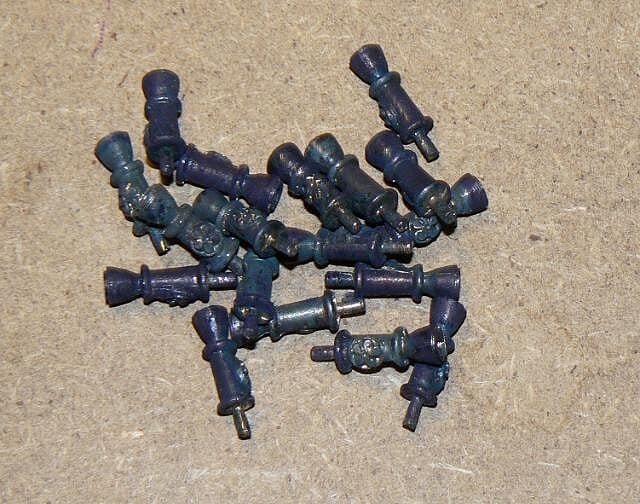
In the meantime I tested and finished the browning of all the gun half-barrels: there is the type I call "big", which should, I think, be mounted on the lower and intermediate decks and the "small" or "medium" type for the upper deck. The browning was done in four "steps", due to the number of guns, and the resulting colour slightly differs between each step. I think it's due to a progressive weakening of the burnishing liquid that I used more than once. Some have a blue tone that I like more than the classic gun metal tone . .
01 P1080316.jpg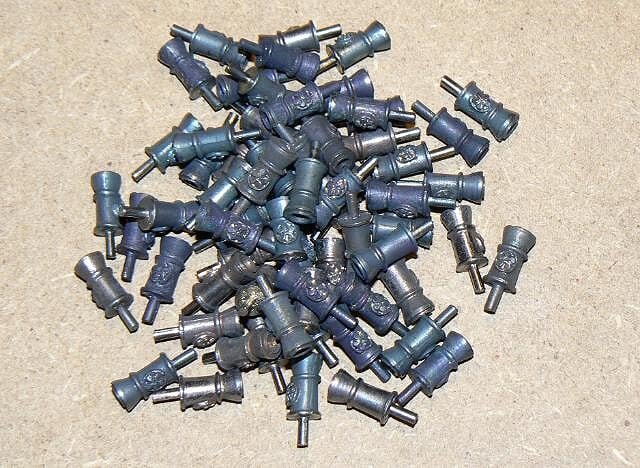
02 P1080317.jpg
See you soon, Jack.Aubrey. -
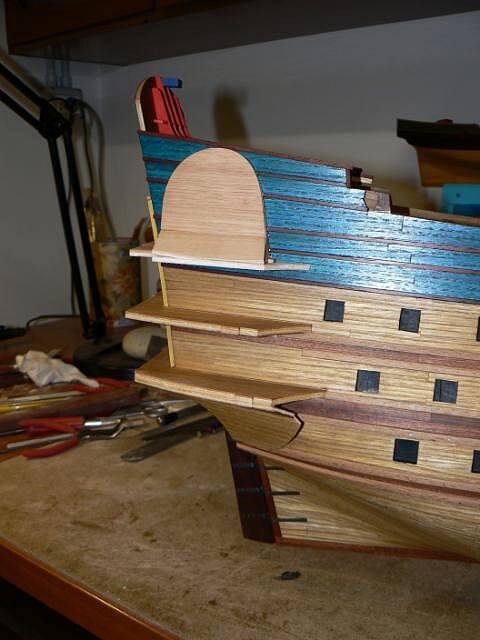
Sunday, August 5, 2012 - Stern
Here are some pictures of the stern as at yesterday afternoon. The images were taken today before starting further work.
01 P1080311.jpg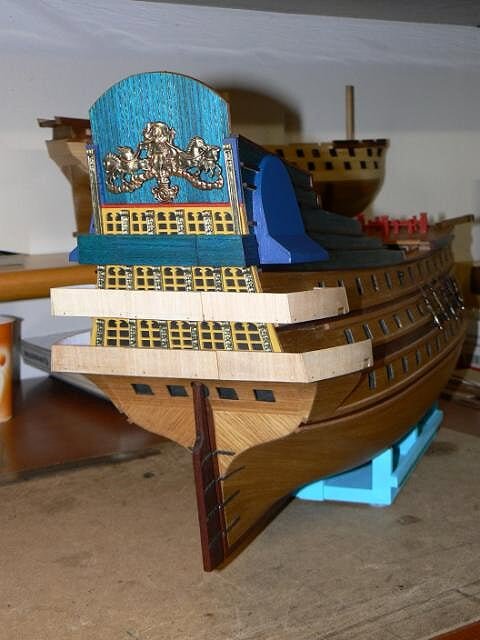
02 P1080312.jpg
03 P1080313.jpg
04 P1080314.jpg
05 P1080315.jpg
-
Saturday, July 28, 2012 - Decorations
Due to an early return from a short vacation near Pisa, I found myself in these days making tests for the treatment of the stern decorations of the ship.
I obviously choose those elements that must be applied before proceeding to complete the remaining galleries. In practice the main figure on the transom (fig. 01) and the "columns" to be applied at the sides of the stern windows (fig 02-03).
01 P1080308R.jpg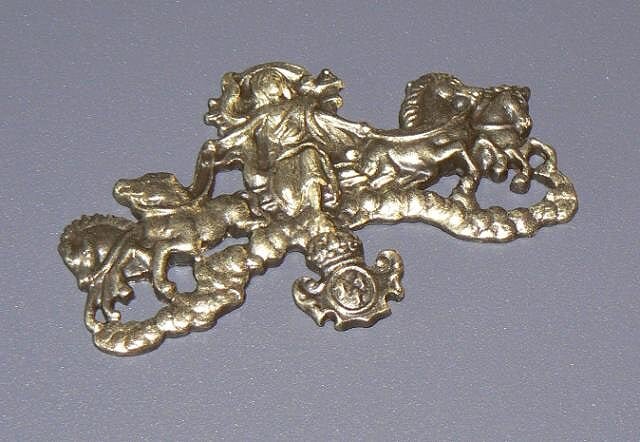
02 P1080309R.jpg
03 P1080310R.jpg
What you see above is the result, for the time being to be considered 95% definitive . . I will decide in the coming days.
For the moment, no aero-pen usage, only a simple brush. The procedure is briefly the following:
1) cleaning the pieces with brushing and subsequent degreasing with nitro;
2) two coats of primer (polyurethane water);
3) a coat of "dark brown" paint (always polyurethane water);
4) gilding with golden paint, always polyurethane applied using the "dry brush" technique.
I'm considering also a moderate usage (always using the dry brush technique) of a copper-colored paint. -
Tuesday, July 10, 2012 - again the stern
These are the last pictures of the work done these days, before closing the yard for a couple of weeks for summer holidays. I built the upper gallery, integrating it with the color scheme of that particular area of the hull.
I would say that there is not much to add since there are no real problems running this kind of work, only a lot of patience. .
01 P1080302.jpg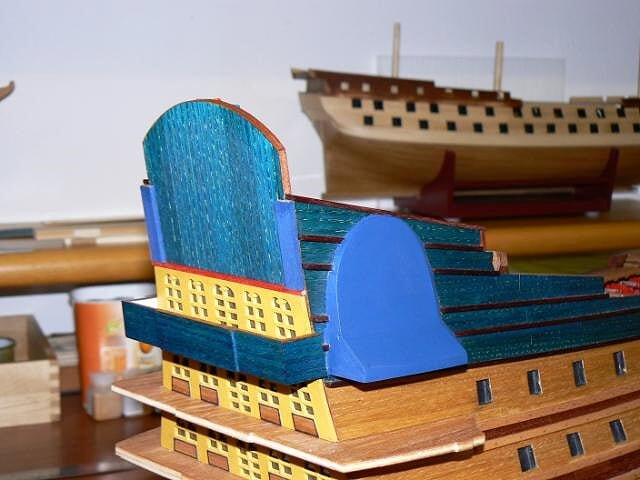
02 P1080303.jpg
03 P1080304.jpg
04 P1080305.jpg
05 P1080306.jpg
See you soon, Jack.Aubrey. -
Friday, July 6, 2012 - More on stern
This week I had not much time to devote to ship modeling, but even if at a slow pace I did something.
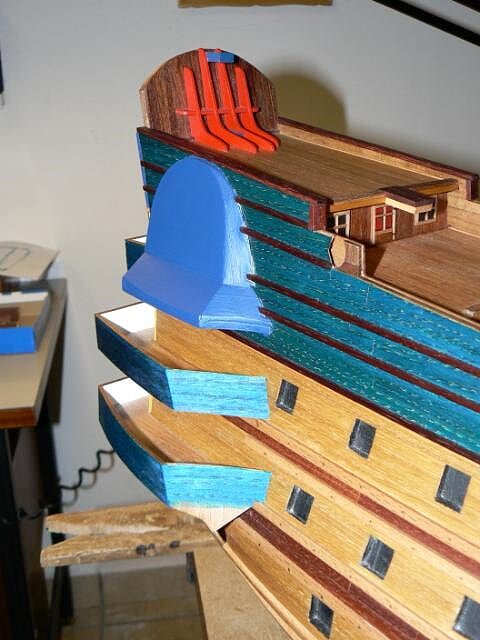
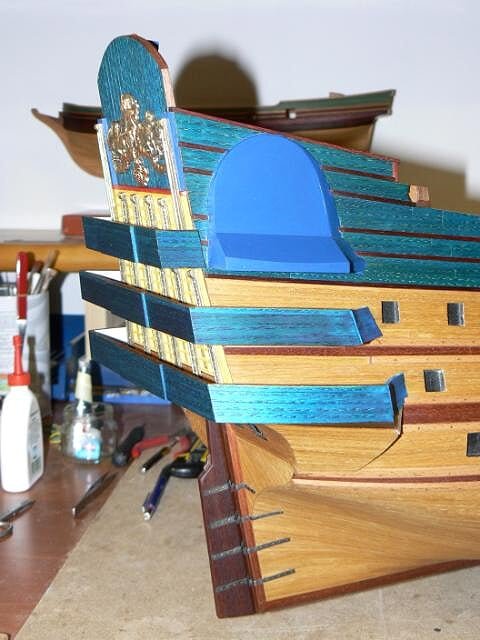
I finished, after some testing, the installation of the missing elements to complete the upper "bottiglie". The missing pieces were built from scratch, starting from a sweet wooden block that I had to shape with great patience to fit in position.
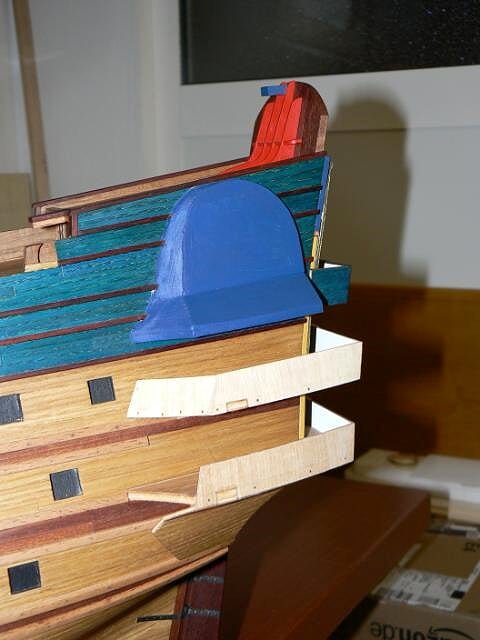
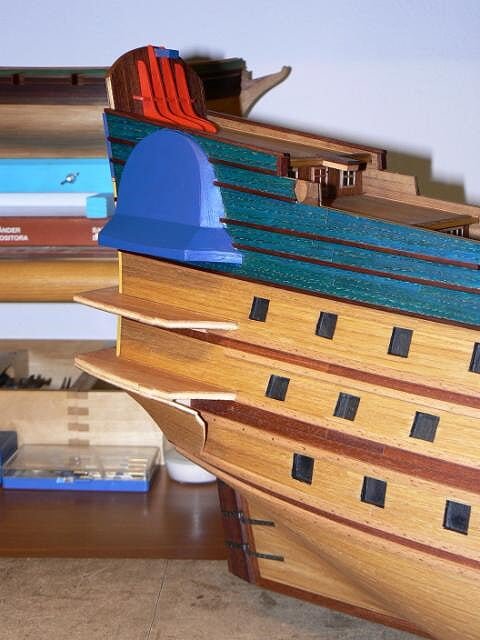
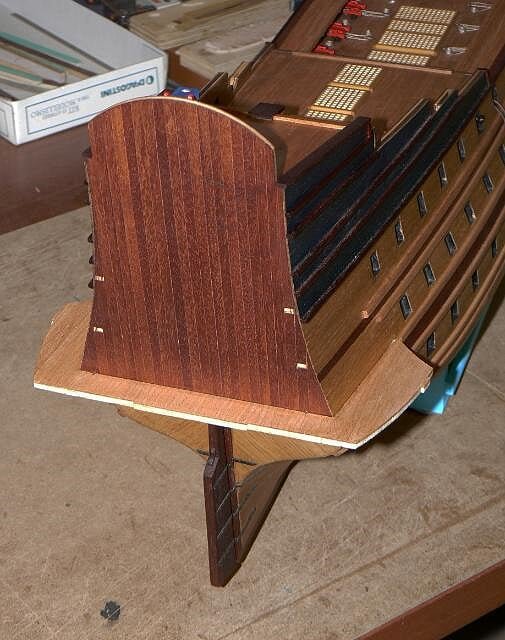
Time consuming work and with the constant risk of breaking the piece with a wrong movement. I originally planned to plank the "bottiglie" with strips of stained blue but I realized that it was not possible to be completely succesful. For this reason I painted them in blue. Now I have to refine the whole and apply the additional coats of paint. The blue color in the images is not as it appears in the reality: the usage of the flash for shooting photos is responsible of this change . . anyway I don't like too much but . .
Finally I covered the remaining mahogany transom with stained blue wood, to complement the color scheme of the sides.
As anticipated, nothing striking for a week's work. . however, the wheels are always in motion, and this is the important thing. Of course the heat of these days does not help, indeed. . . for good luck yesterday I washed the car. Usually, the effect is that immediately starts to rain. . let's hope. Update: this system seems to work ALWAYS, in fact some hours later it was raining a lot . .
Cheers, Jack.
01 P1080297.jpg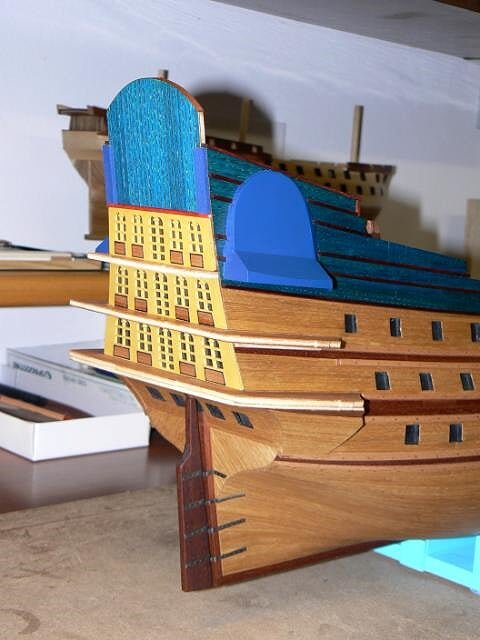
02 P1080298.jpg
03 P1080299.jpg
04 P1080300.jpg
05 P1080301.jpg
Extra image...
06 P1080296.jpg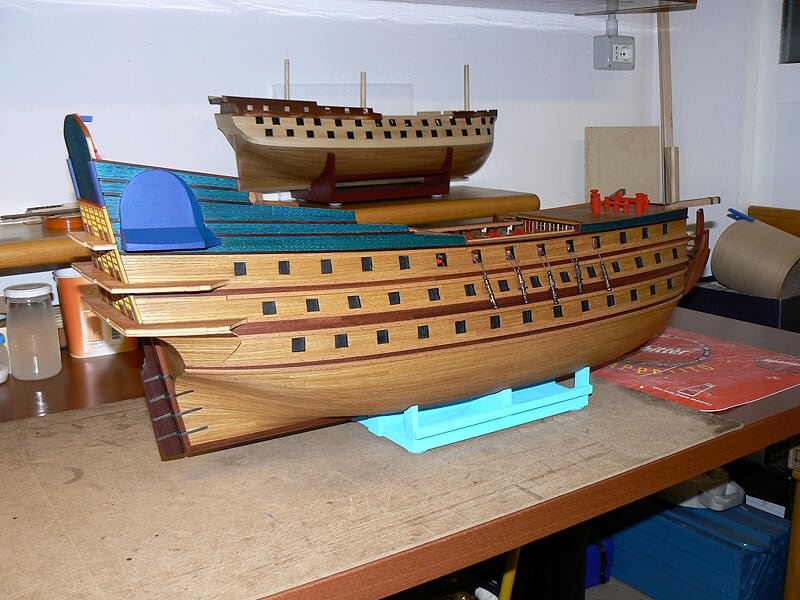
-
The issues come out on newsstands on a weekly basis, but the kind of subscription I made with the De Agostini involves shipments on a monthly basis by parcel post. The monthly pack always contains four issues.The next shipment will contain issues 22, 23, 24 and 25.As I wrote, I received issue 22 from a friend, which I will return him as soon as I'll receive the monthly parcel. I hope everything is clear, Jack.Aubrey
-
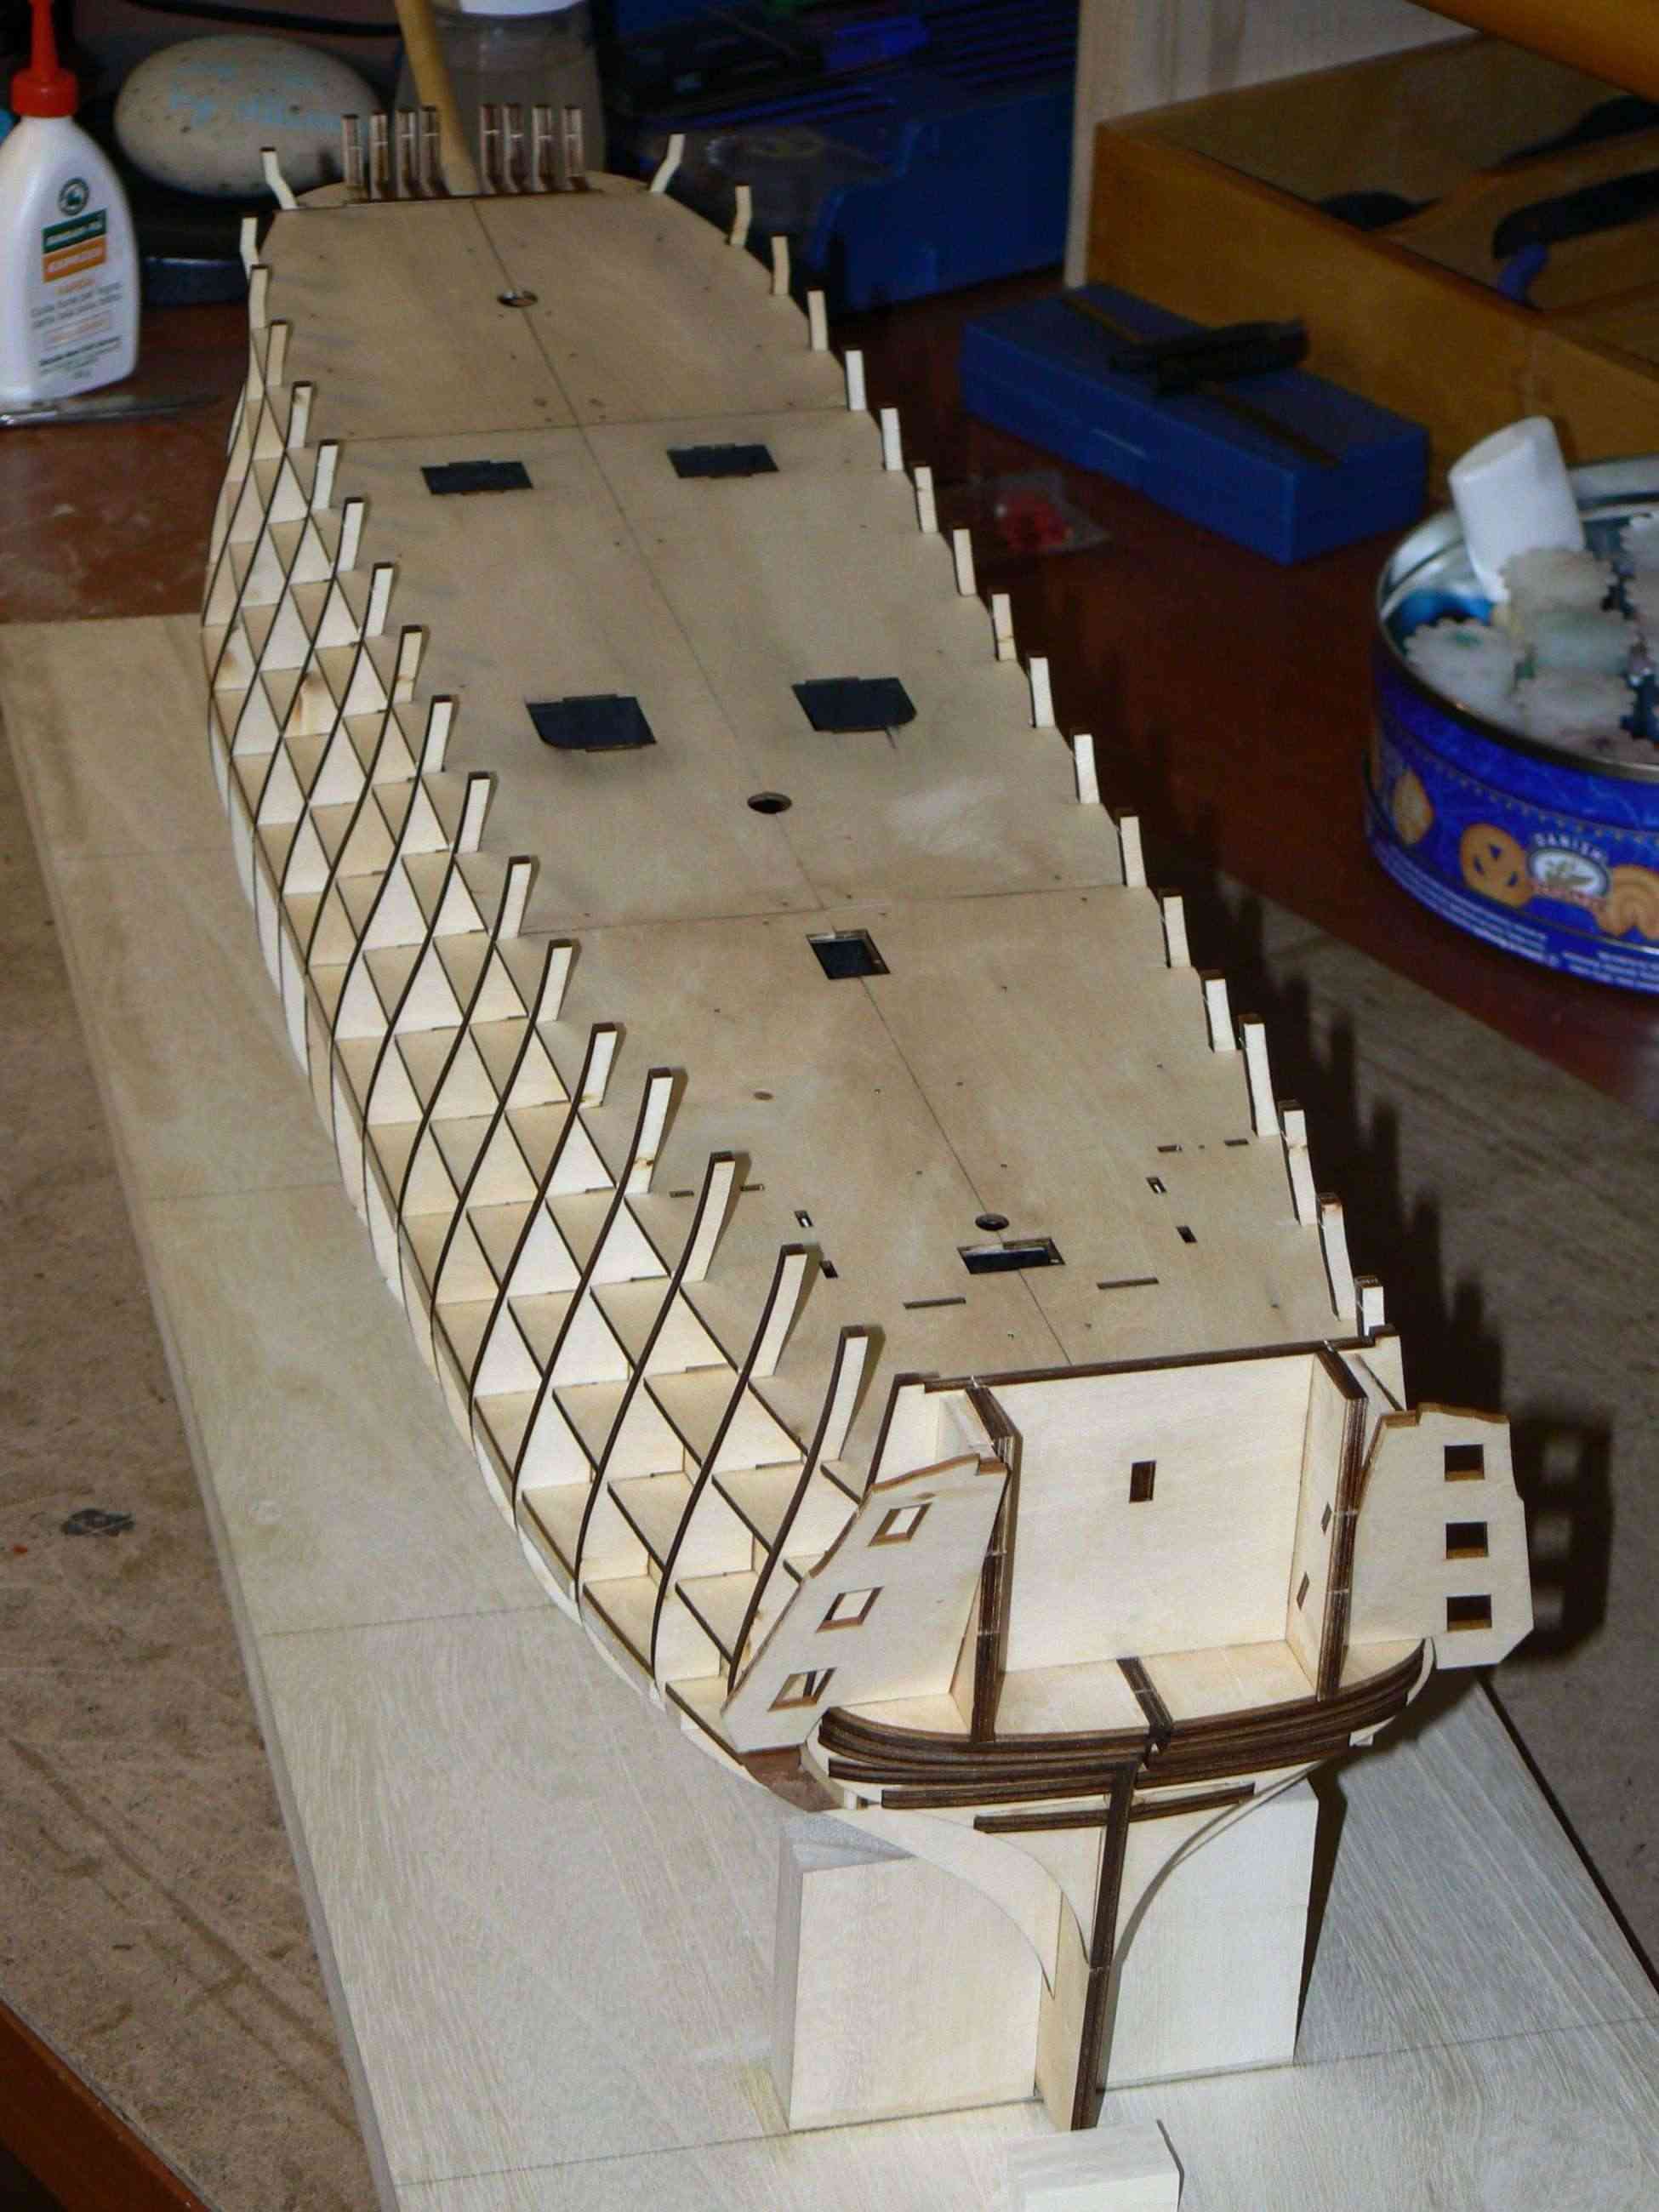
Sunday, June 30, 2013Today I finished the installation of the third segment of the deck.Nothing to positively or negatively report regarding this task.The only detail to be noted concerns the two openings on this deck segment where below are located the two "boxes" (shown in my previous message) now with the inside colored in black and with the bottom planked with strips 3 x 0.5 mm: the internal sides dimension of these two boxes are smaller than the sides dimension of the openings located on the above deck.So the deck does not completely fit with the two boxes. . a small defect that honestly I did not expect and that is not present, for example, in the middle deck segment.It will be necessary to remedy.Regards, Jack.Aubrey.01
 02
02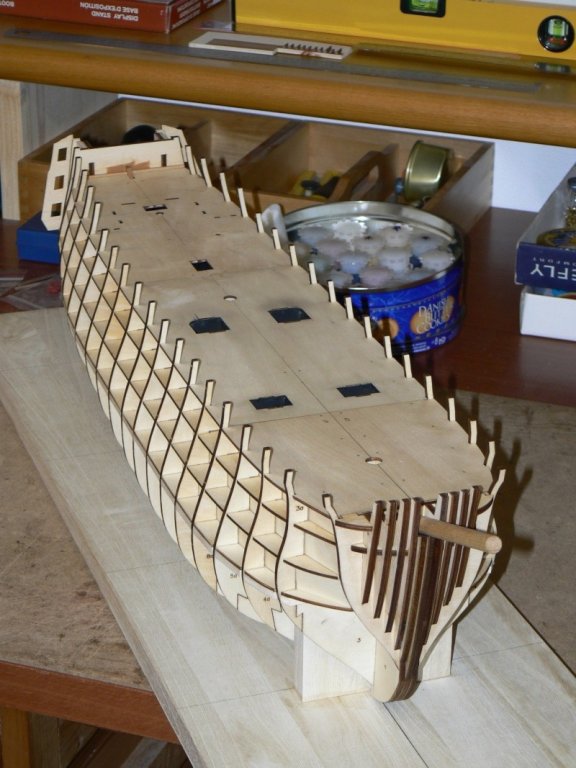 03
03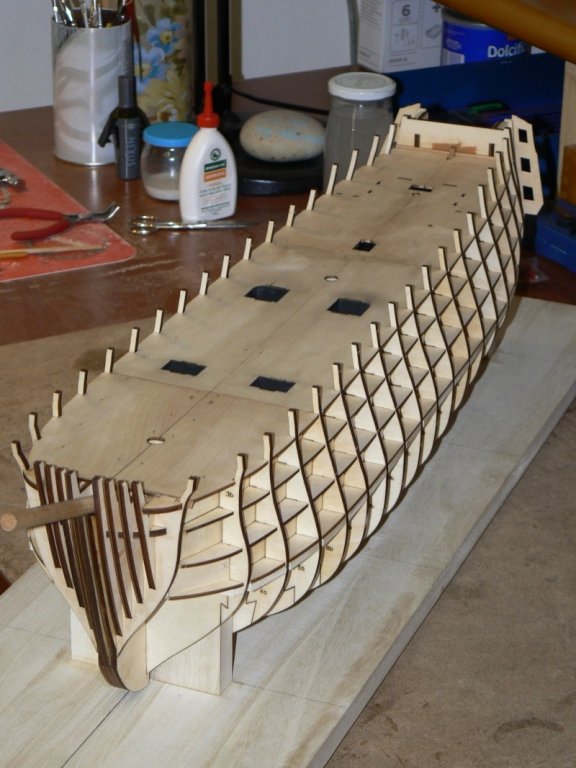 04
04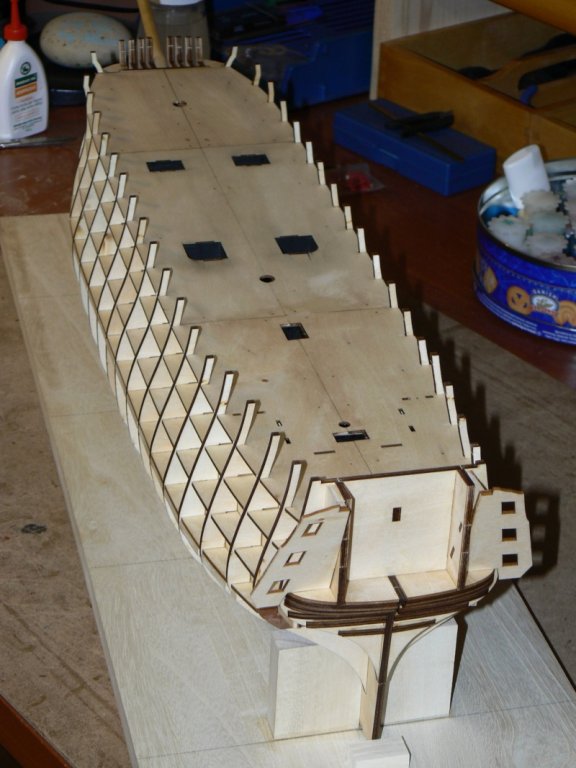 High Resolution Images:
-
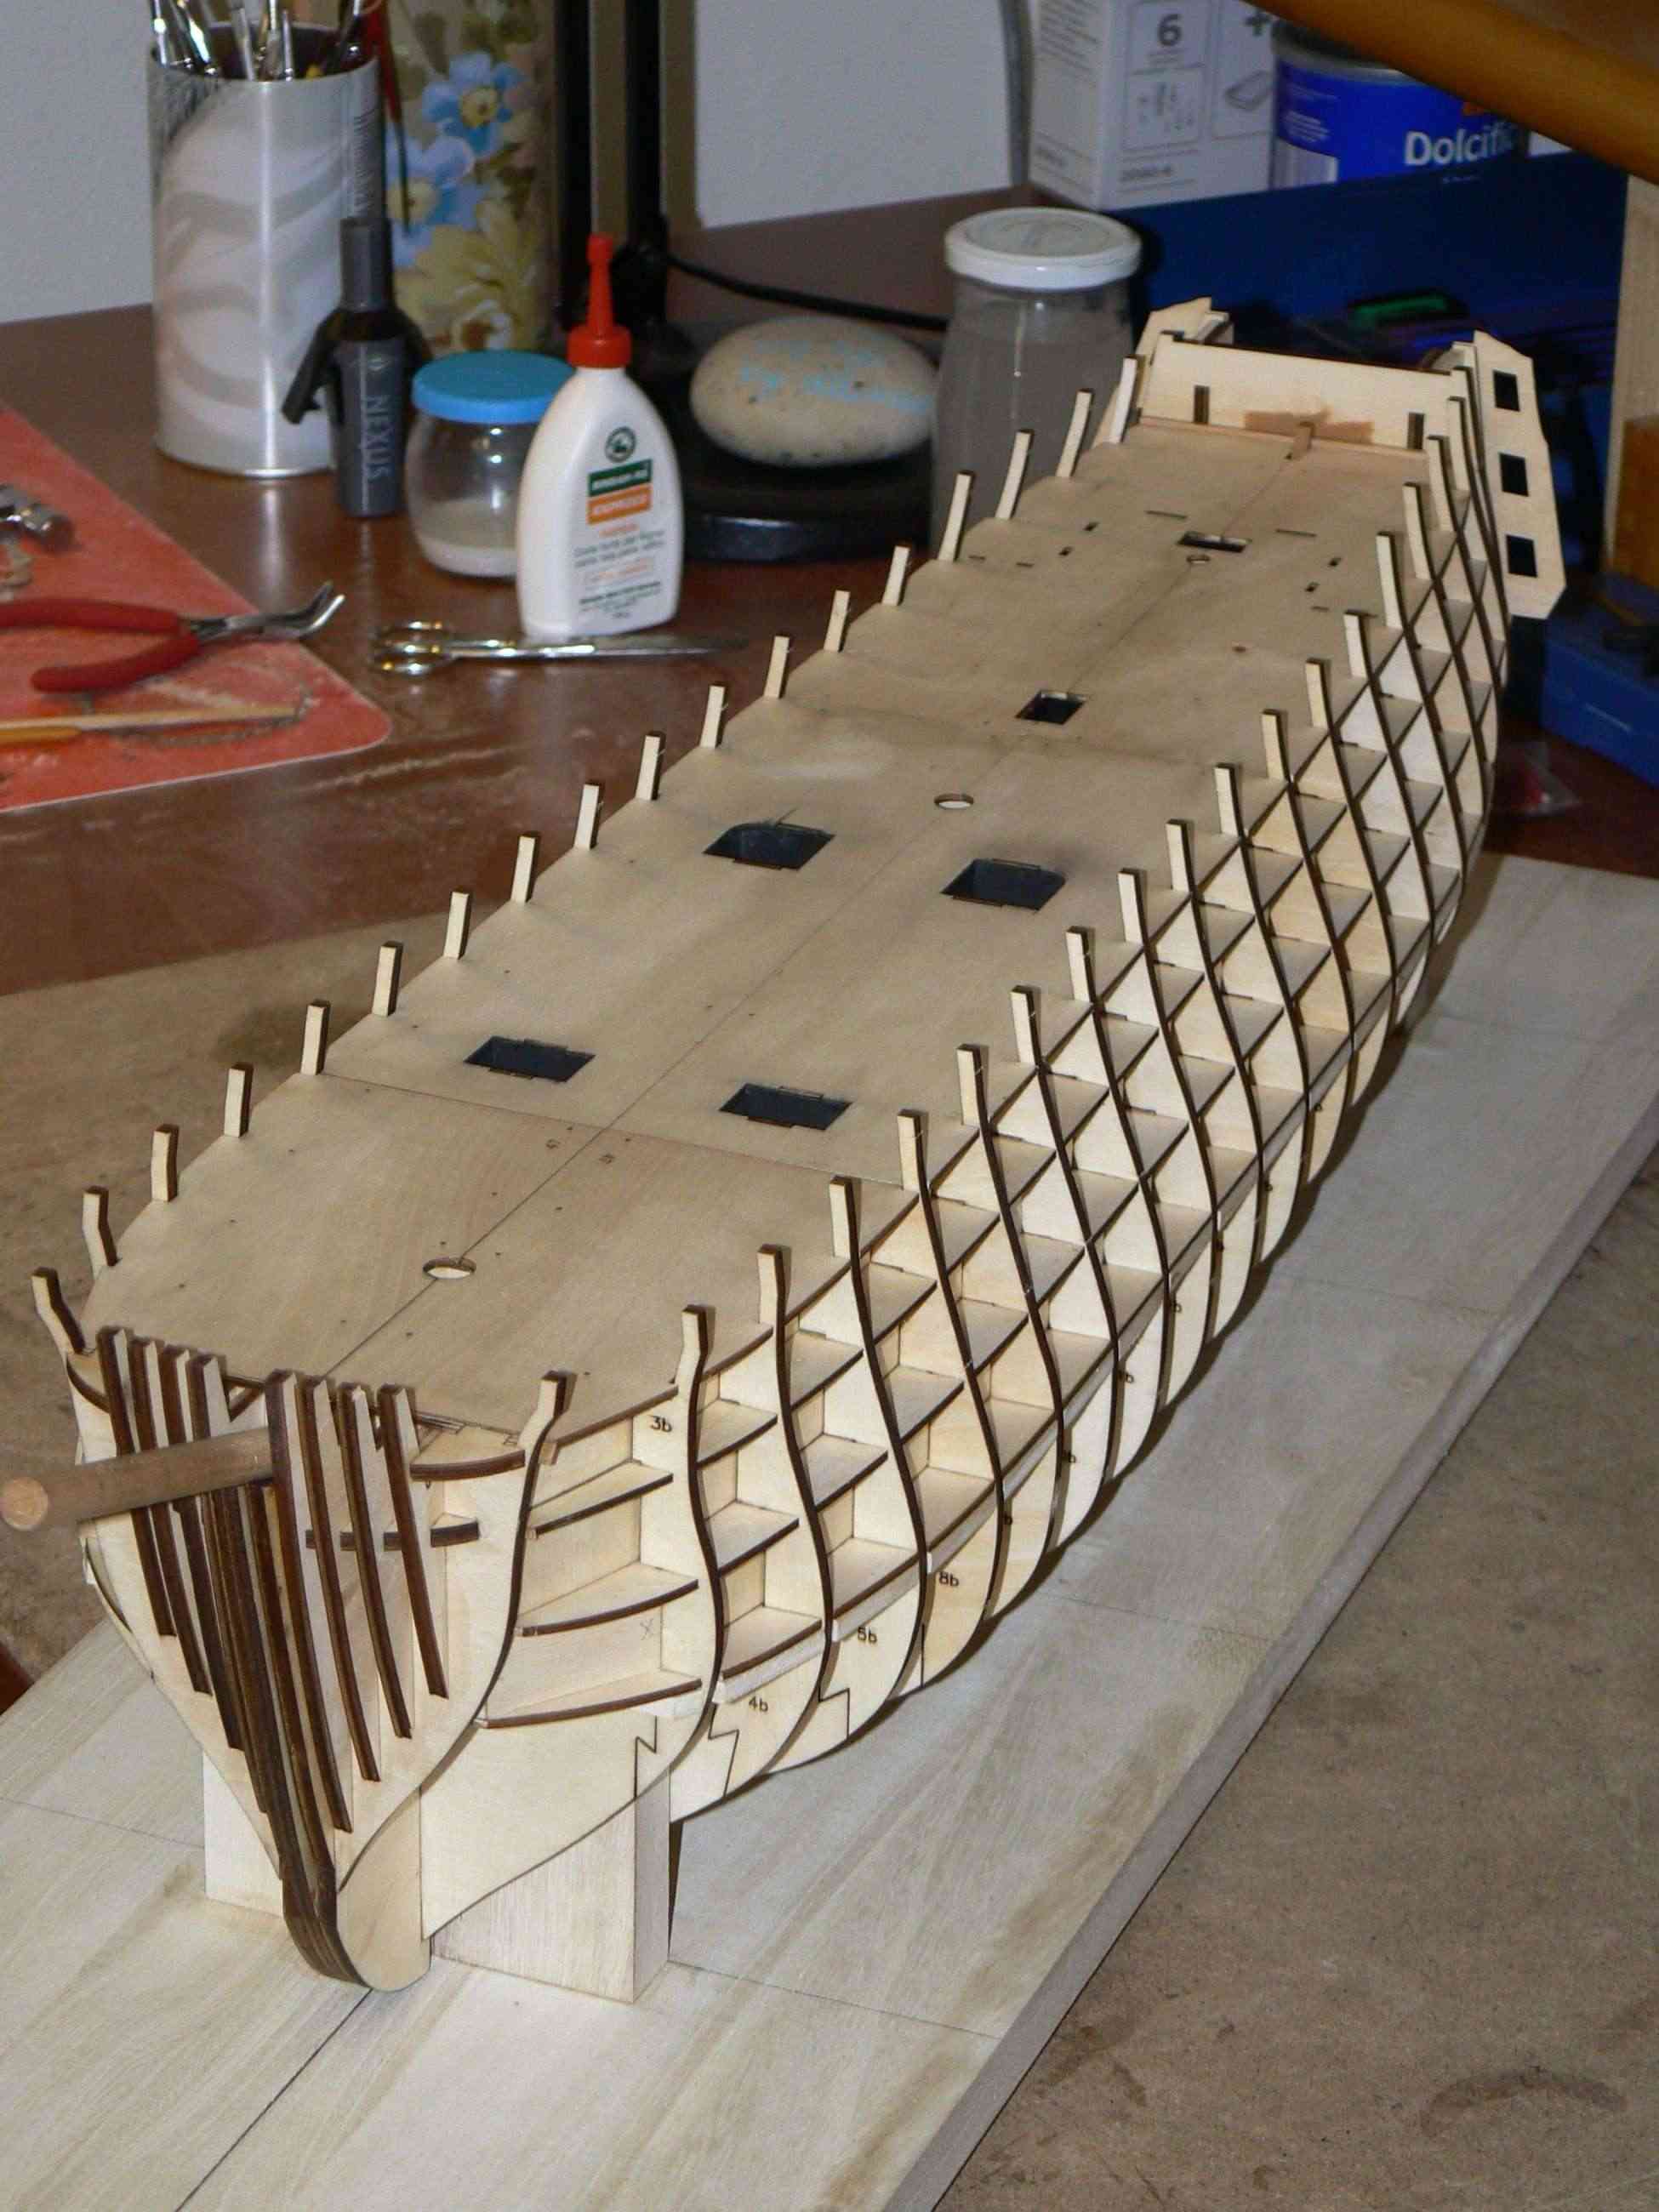
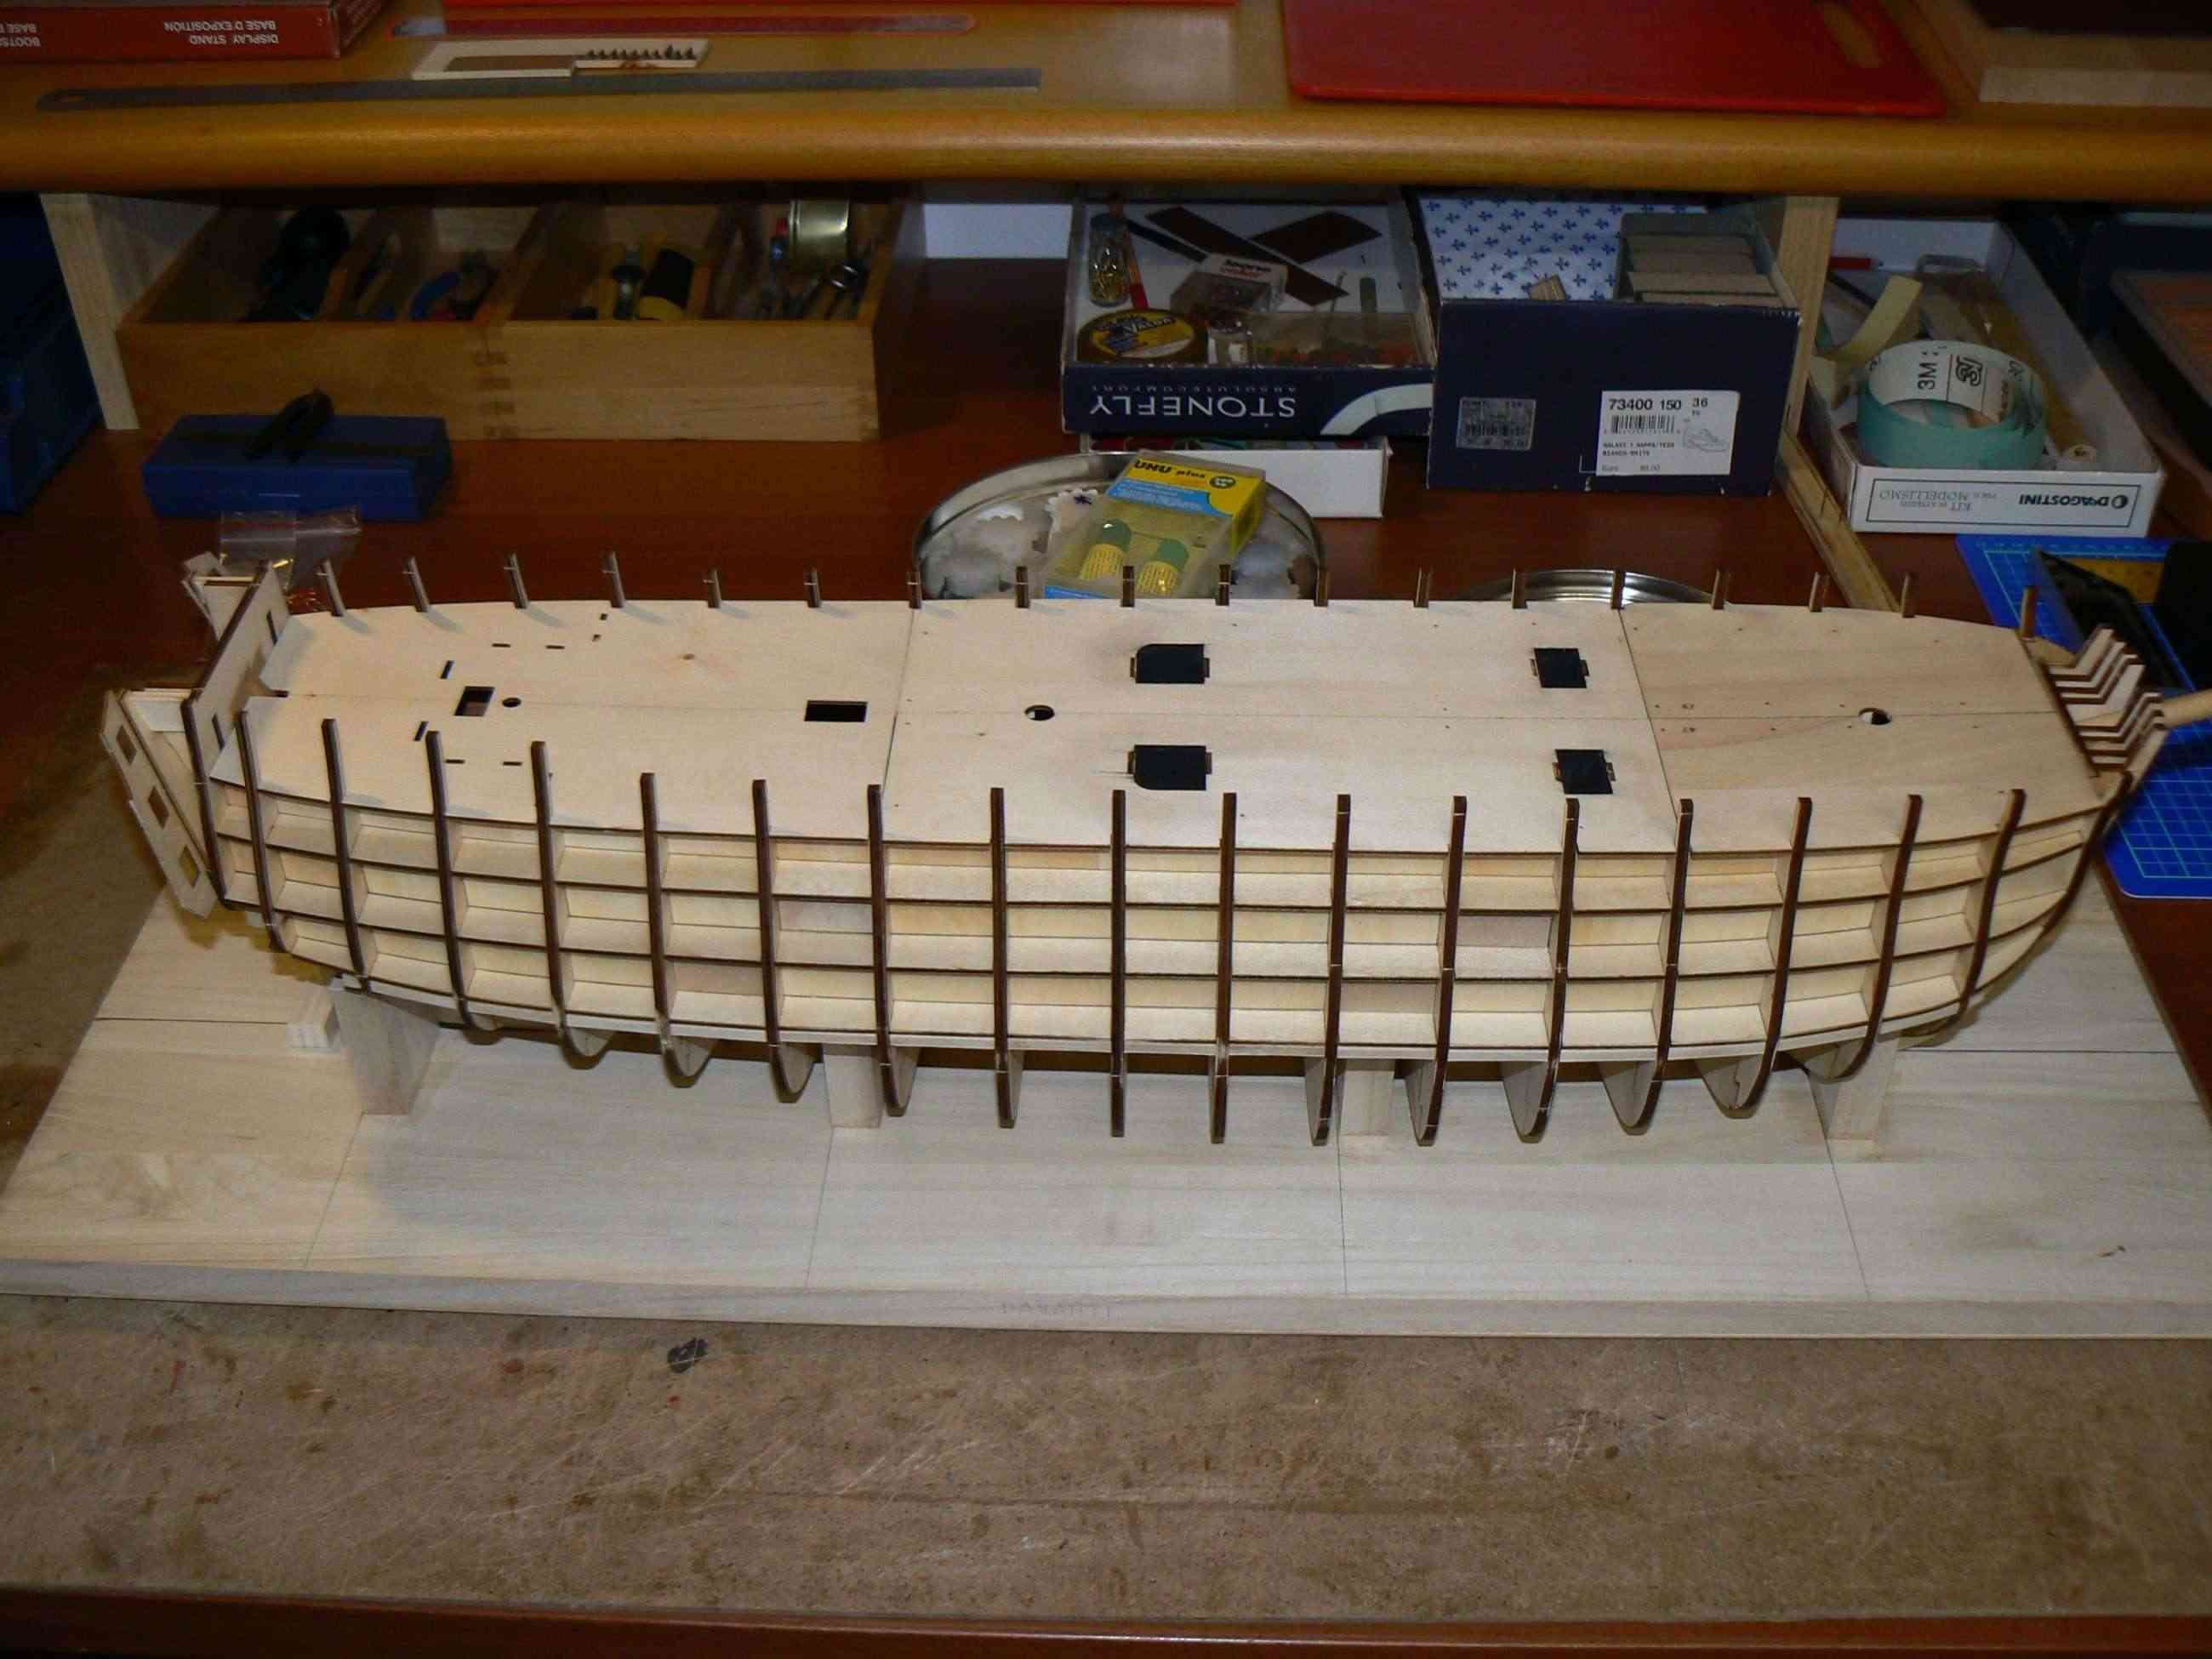
Friday 28, Saturday, June 29, 2013 - Issue 22Thanks to a friend I got the material of issue 22. While the work I'm doing on the Soleil Royal is very dispersive, during the frequent breaks due to waiting, I decided to start the installation of the last segment of the main deck.Let's start with the beams: in the first two pictures you can see these items installed, and like the previous ones below the already installed deck segments, they are reinforced with a strip of poplar plywood of 5mm.01
 02
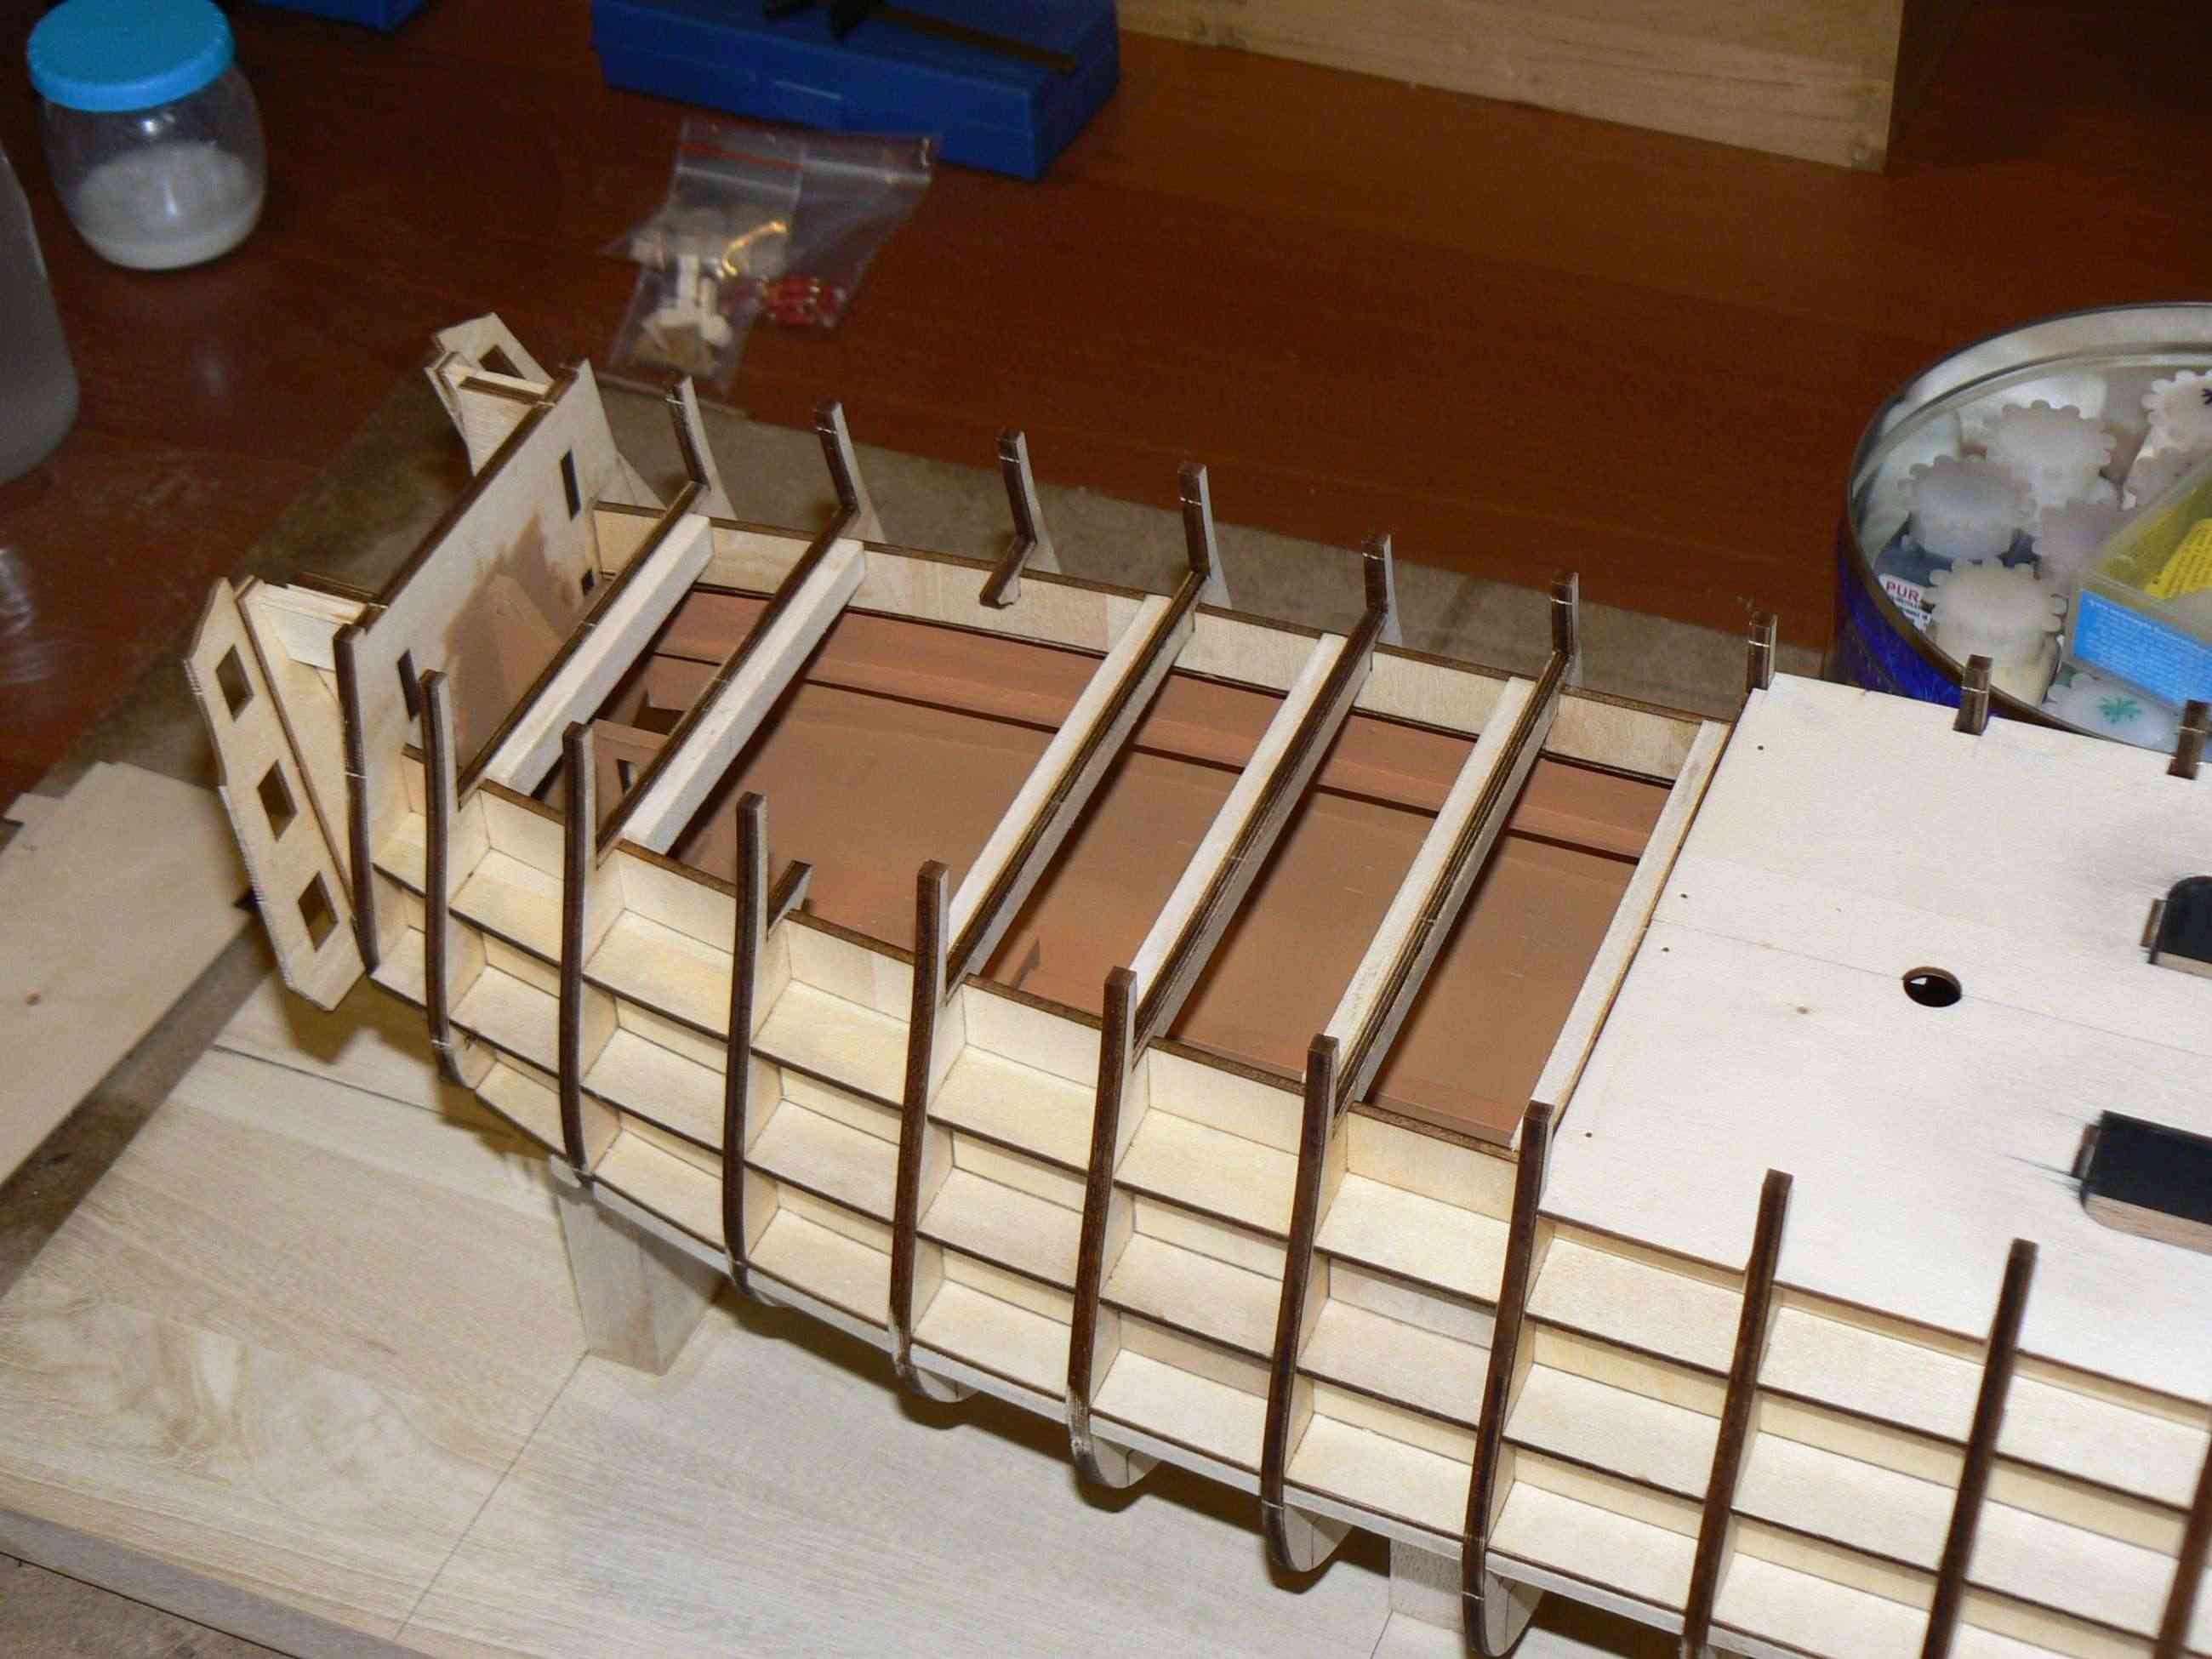
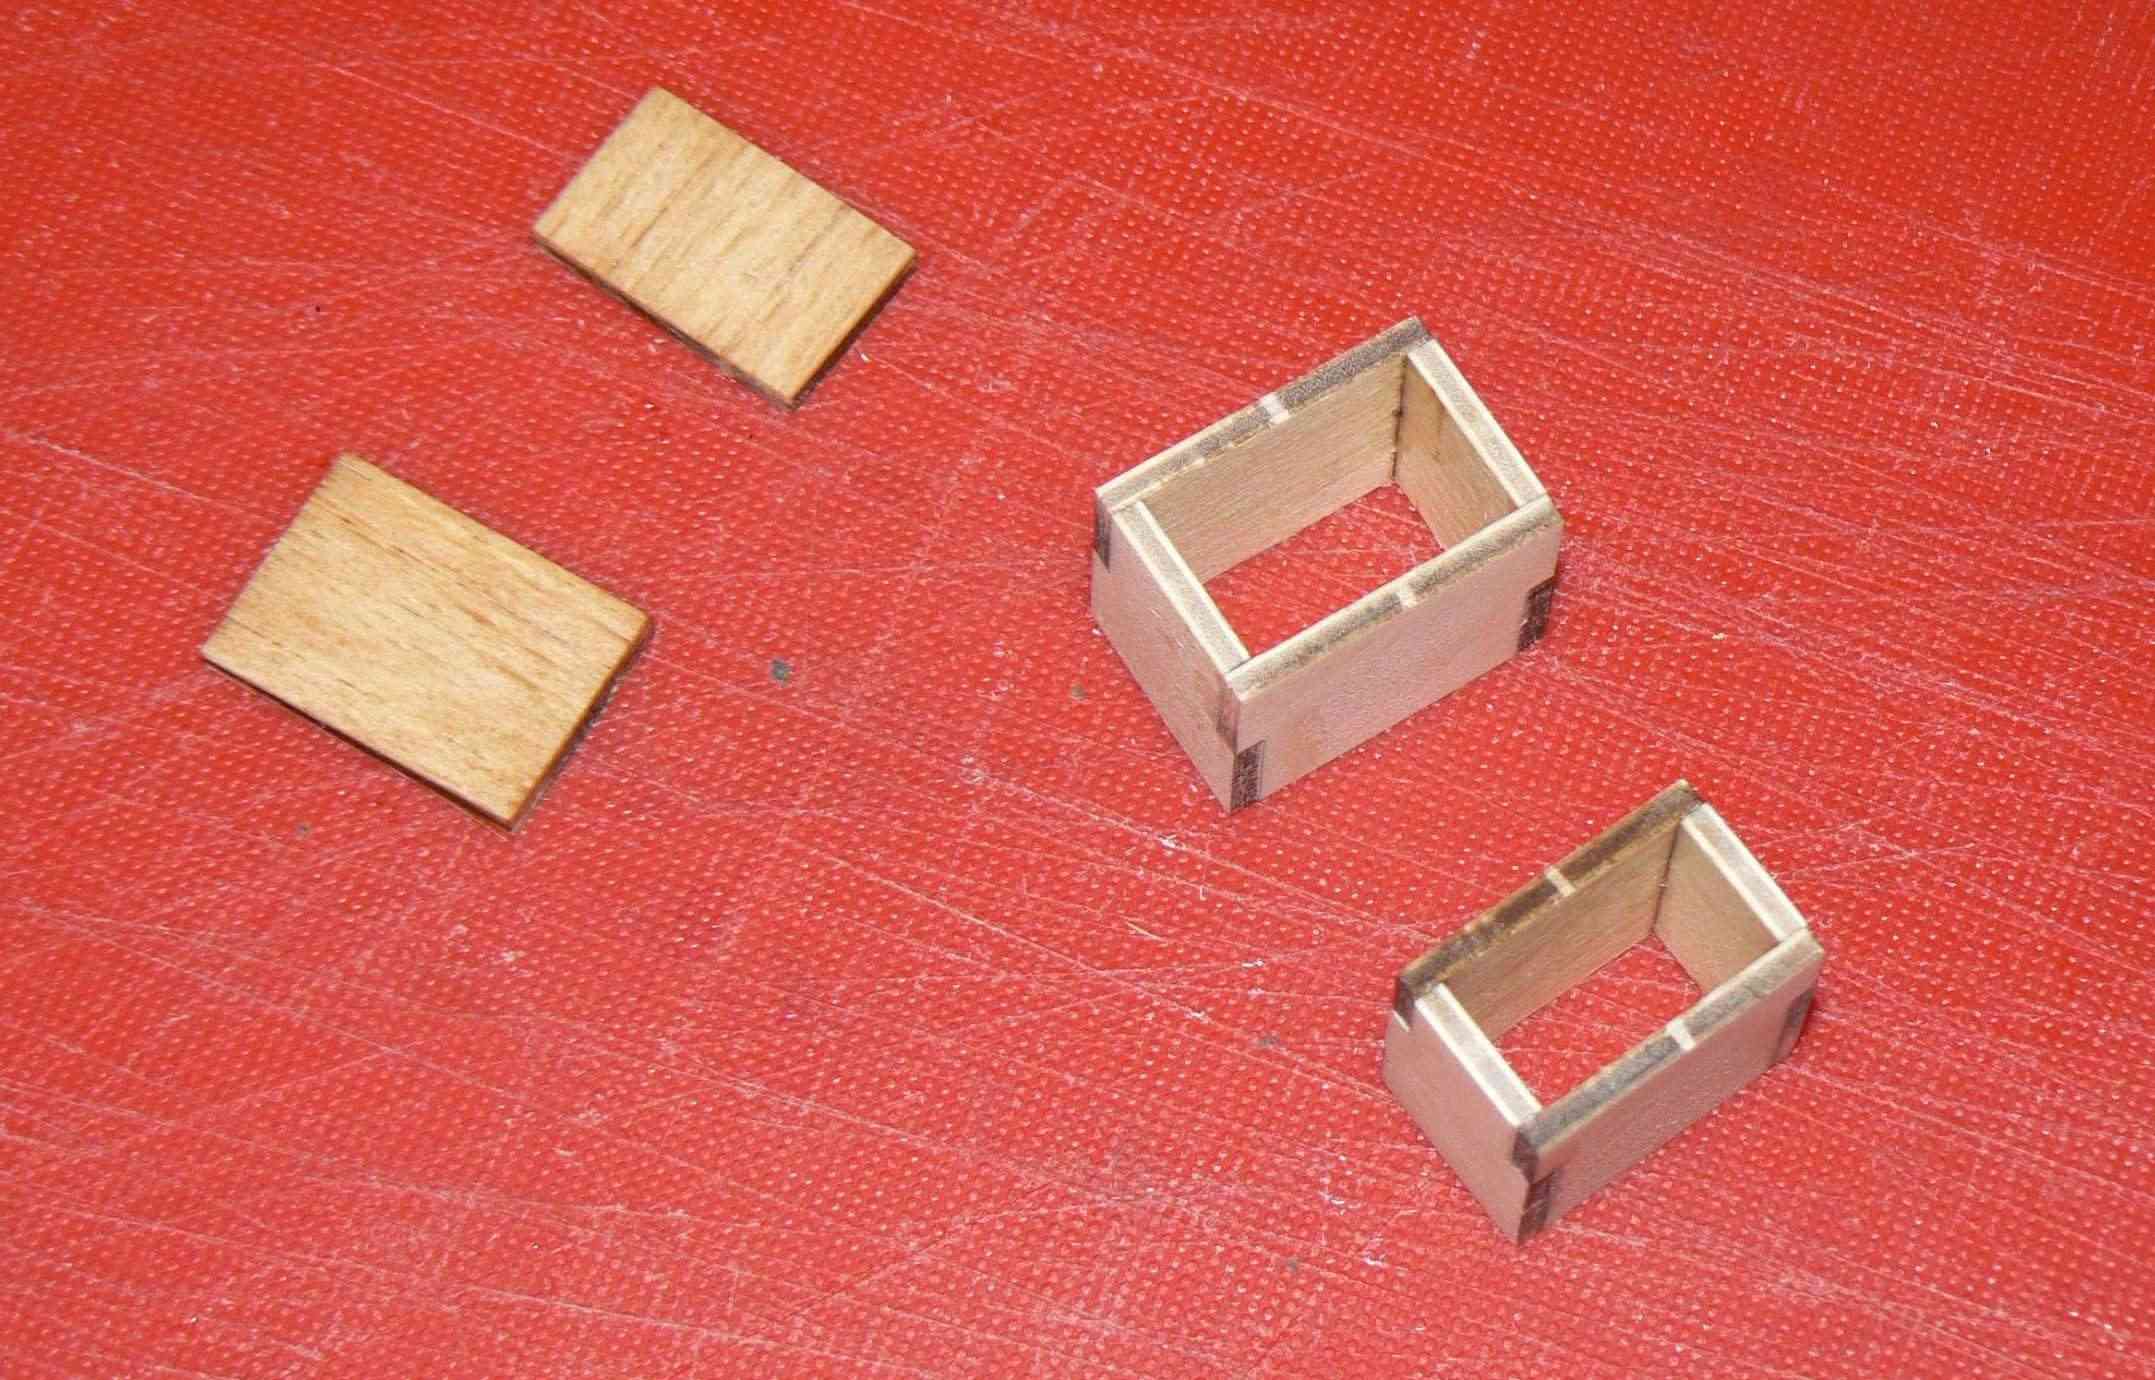
02 Later I started to mount the boxes that simulate the deck below. The floor is already planked, I have now to paint the inside of the two boxes to continue.03
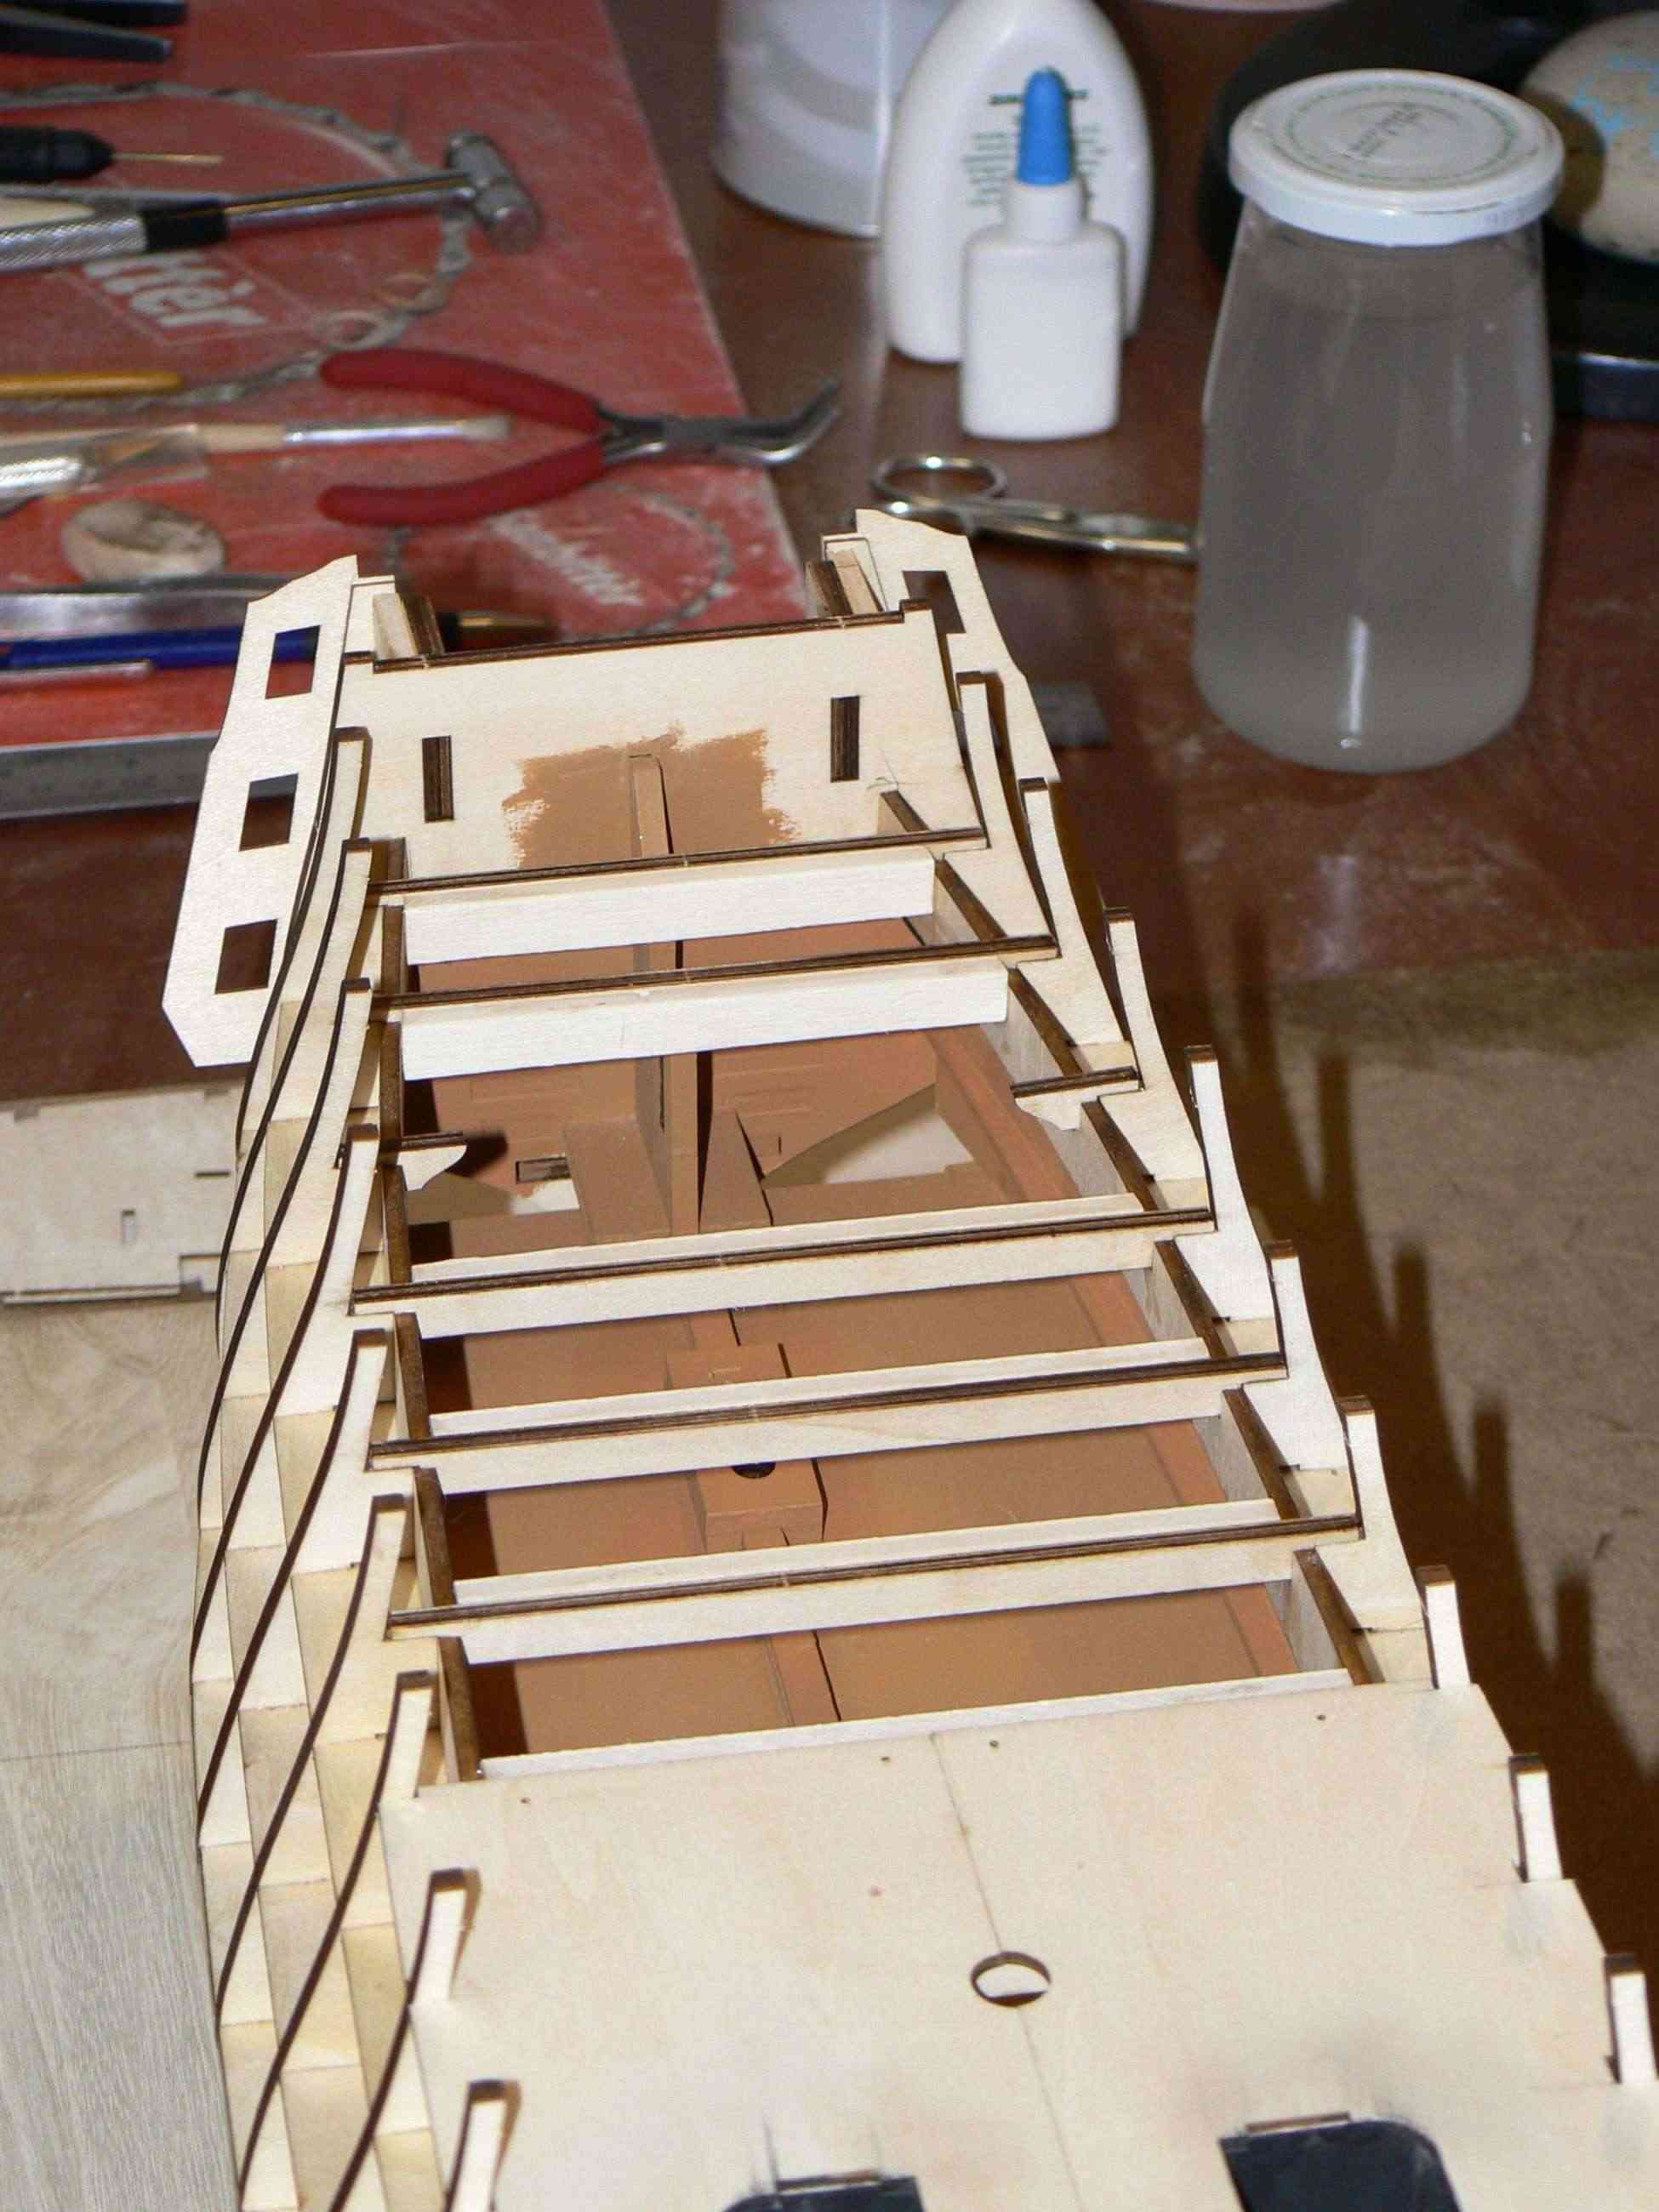
 In the next two images, the two elements of the last deck segment positioned although obviously not yet glued. They "entered at home" without almost having to work on. . incredible.04
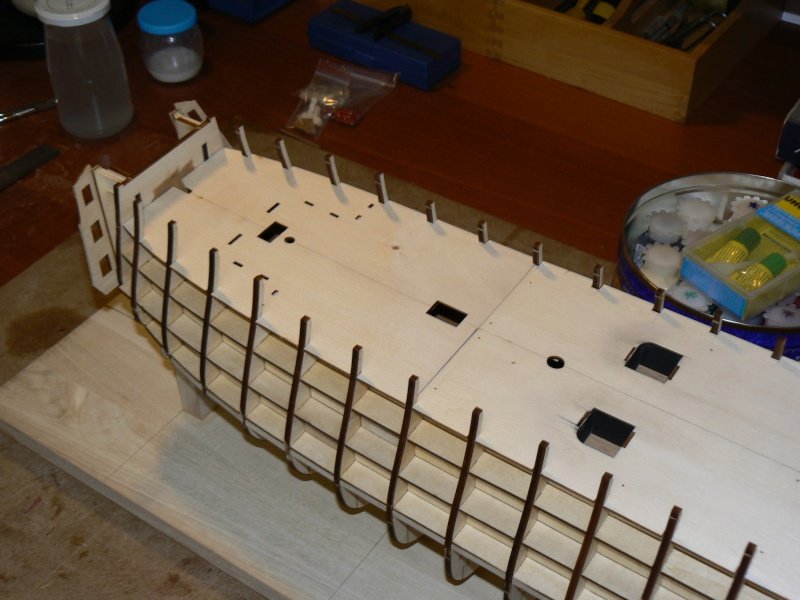 05
05 Cheers. Jack.AubreyHigh Resolution Images:
-
Sunday, July 1st, 2012
A day lost in search of an smart method to build the front side of the two upper "bottiglie". I beg your pardon but I don't think in english they are called "bottles", and unfortunately I don't know their right english terminology
P1080287.jpg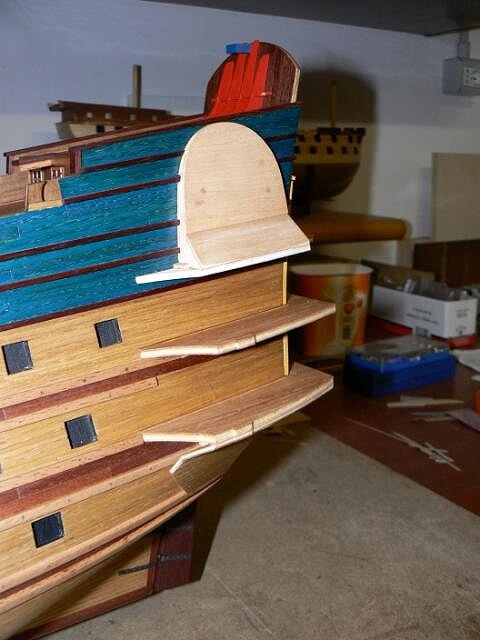
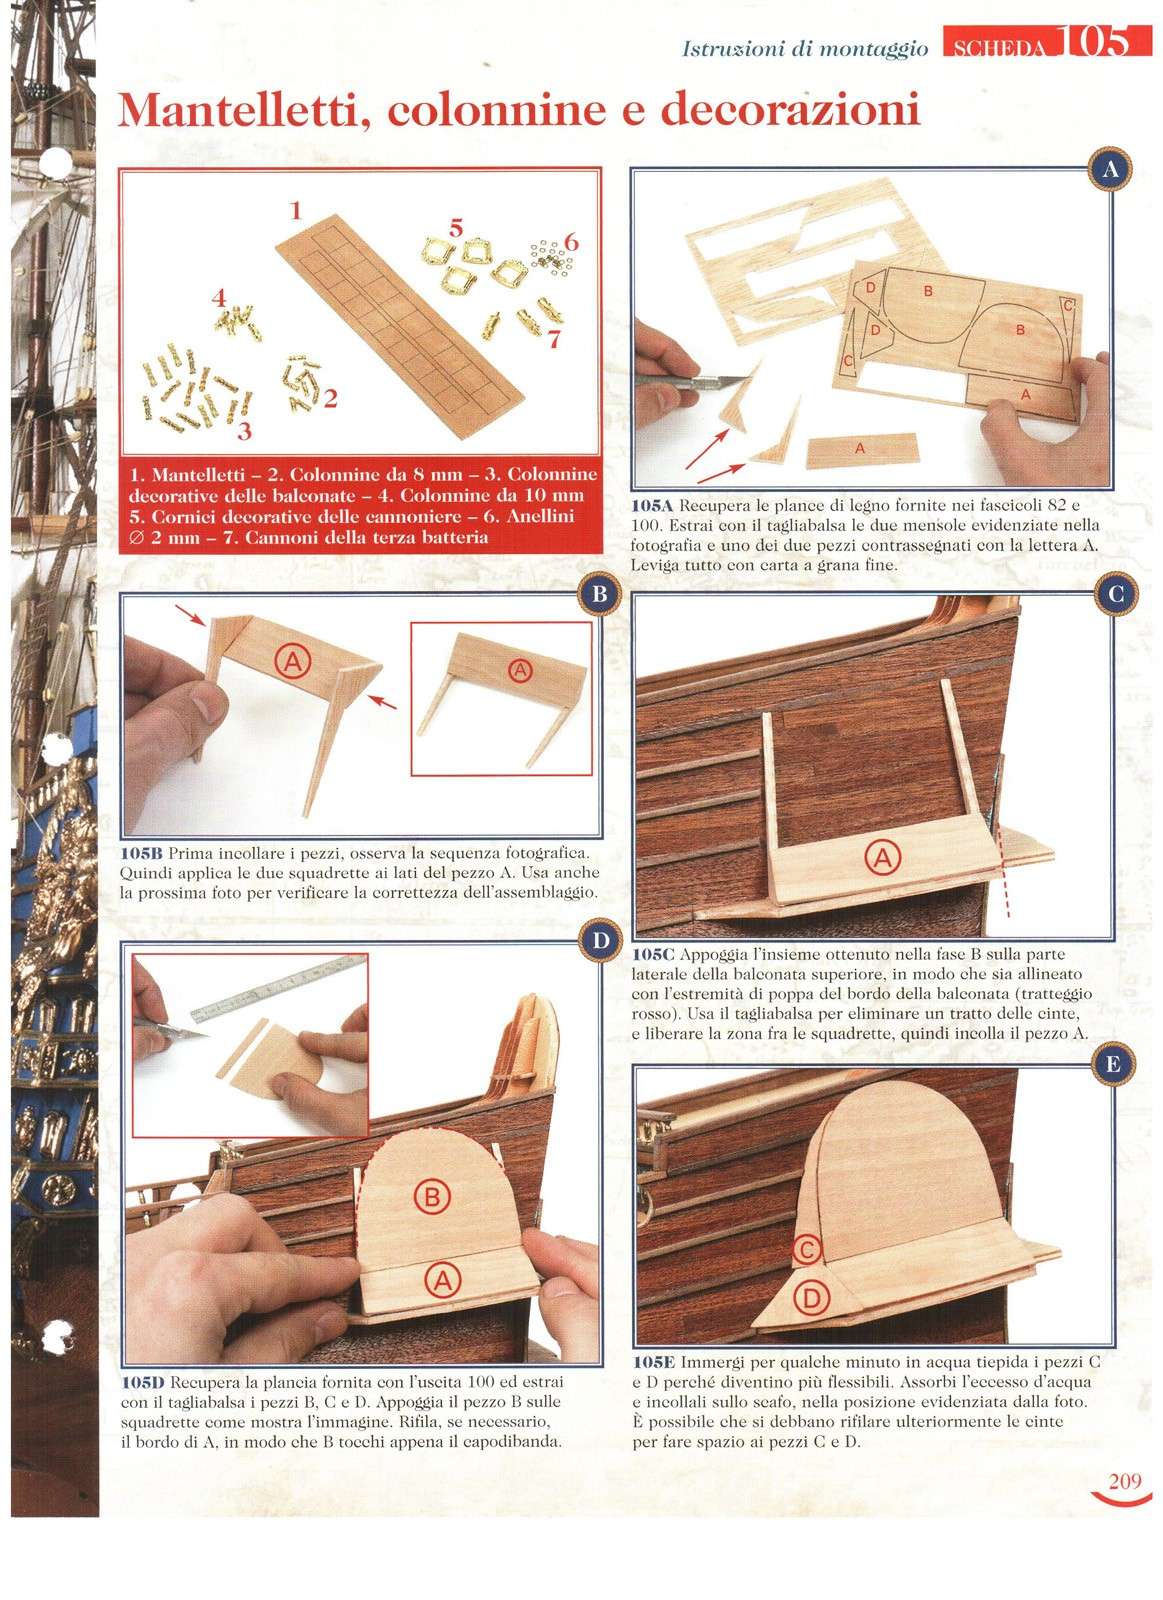
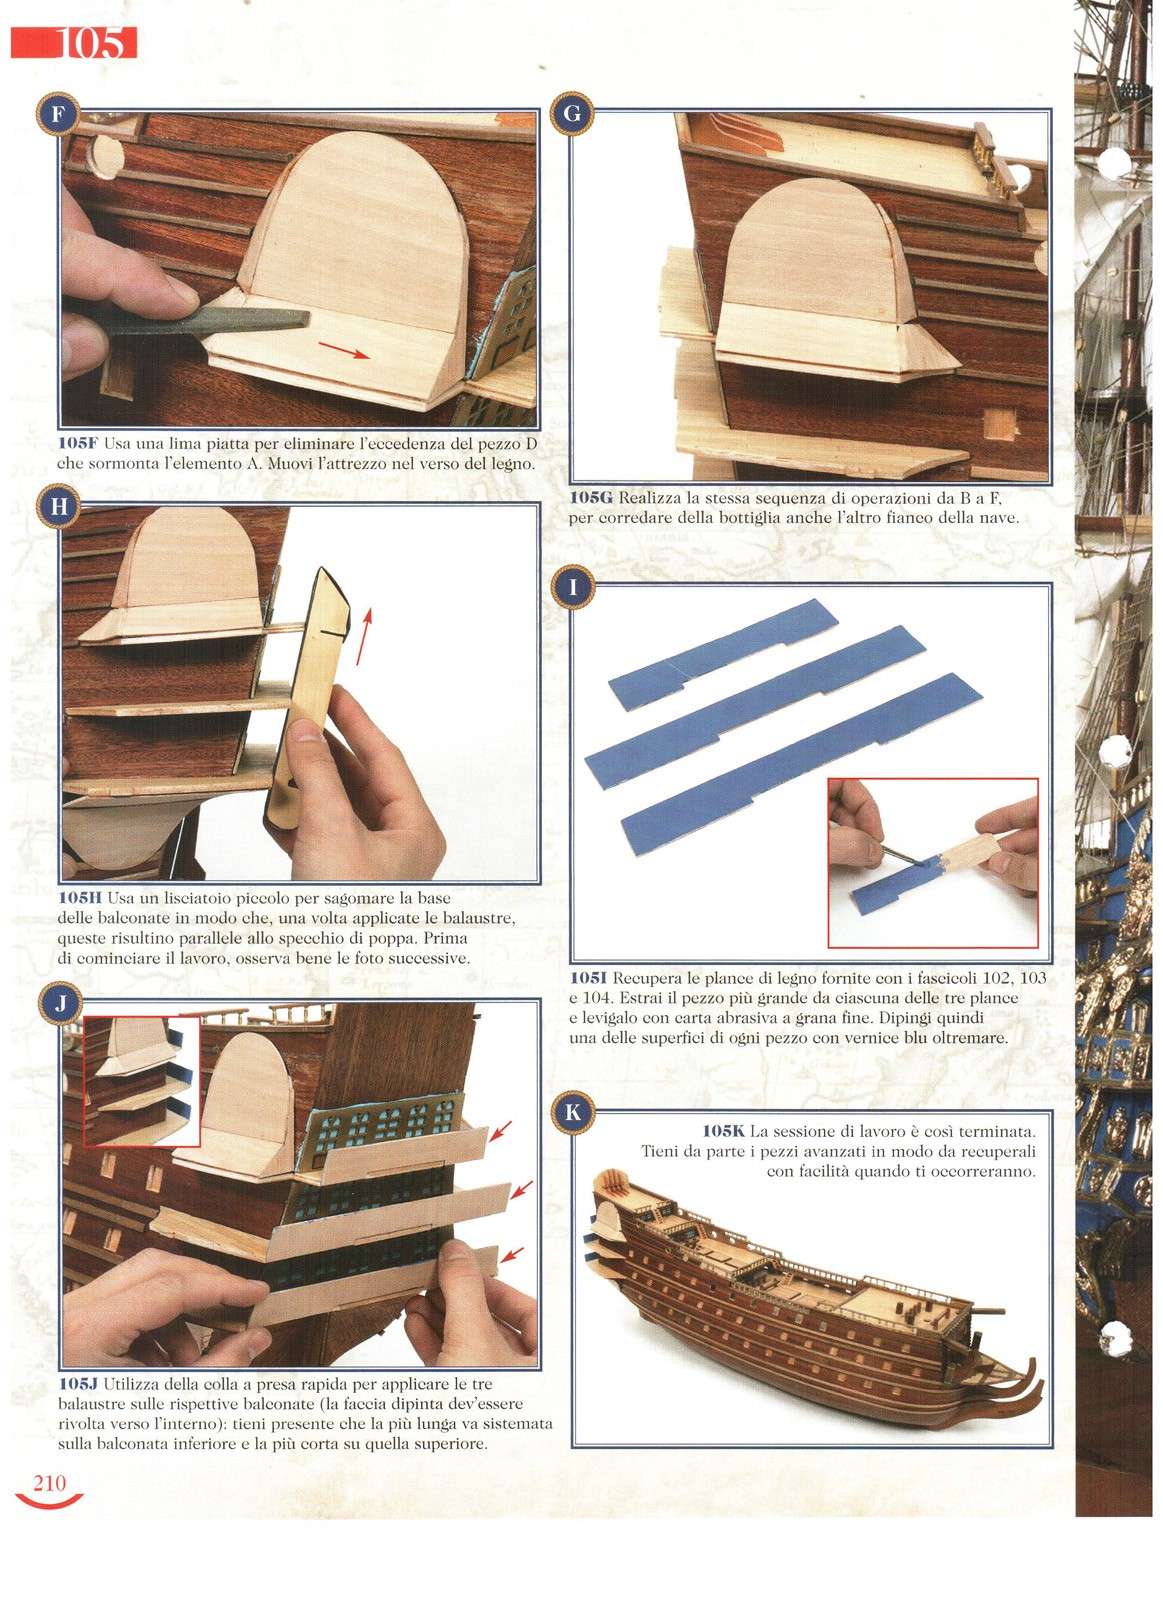
How someone can build it with the material supplied (two pieces of plywood) I just don't know (see steps E, F and G of the card n° 105 following the two links here below):
http://i46.servimg.com/u/f46/12/86/14/83/105-fr10.jpg
http://i46.servimg.com/u/f46/12/86/14/83/105-re10.jpg
After an afternoon of tests and thoughts I finally found a way that seems to work, although it is a rather complex solution. During the next session I think to build these two final items. Regarding photos, at the moment there is nothing interesting to show you.
Regards, Jack. -
Saturday, June 30, 2012Since it's approaching the day of my 63rd birthday, I decided to reward myself with a gift useful for any kind of modeling.
A couple of years ago I purchased an air compressor. It is shown in the picture presented here below.
It's a air compressor made in China that had a cost for me of € 80. It has a tank capacity of 24 liters and a good supply of accessories: to blow air (which I often use to wipe my models), to pump the tires, to paint, to spray oil, etc.. While I didn't made an excessive usage, it has often proved useful in various circumstances.
To use it for ship modeling, however, there is something missing, another important add-on, although new for me to discover and learn.
01 P1070156.jpg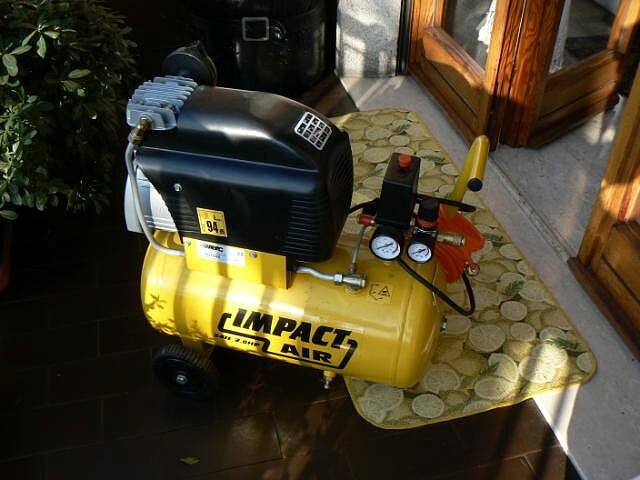
A good airbrush!
So this morning, with my dear friend Orestes, I went to buy an airbrush. It is a "cloned" airbrush of a famous brand. I paid a more than acceptable price: € 48.
02 P1080291.jpg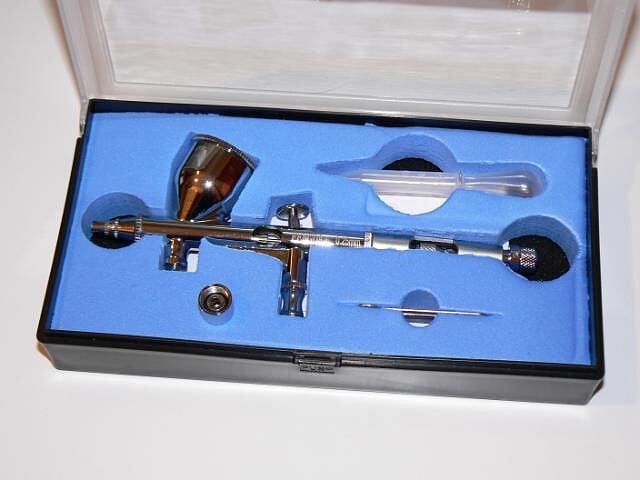
Gravity tank, possibility to regulate the amount of paint in output, possibility to adjust the air pressure in output. This latter aspect is interesting in that, while having the same feature on the air compressor, with this feature on the brush you get a greater flexibility and simplicity of use.
03 P1080294.jpg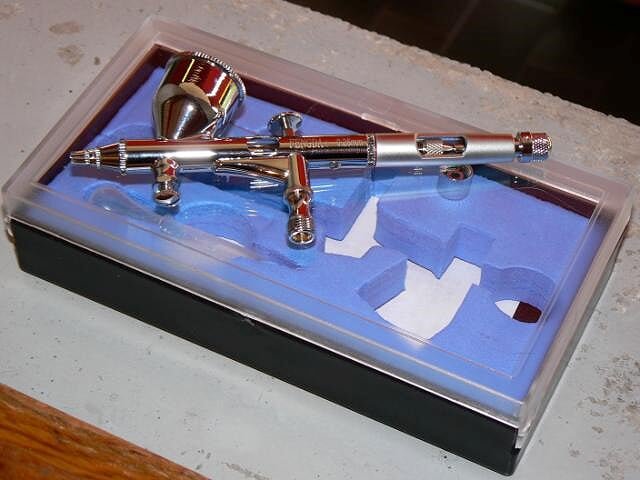
Finally, I also got a pipe to connect the airbrush to the compressor. Another € 7 for the pipe and € 4 for a couple of adapters to connect to the compressor, which is equipped with a fast connector, very practical in use. All these items are visible in the photo presented below.
04 P1080295.jpg
All that remains to do now is some testing with the new equipment. It should become useful in the near future. . for Soleil I think to the treatment of golden metal decorations.
Greetings, Jack.Aubrey. -
Jack,
Nice work on that stern. It is not obvious from the pictures, but I suppose you painted the backdrops in black, behind the windows. Did you use a transparent film to simulate the glass of the windows? Sometimes, it can provide some reflections that help make it more realistic.
Yves
Hi Yves,
I added to the back surface of each windows row a small frame on three sides. I left unchanged only the upper side. Once the row was glued to the stern, I inserted in the upper gap the transparent film plus a piece of black cardboard. The upper side is then covered by the next floor and so on. In this way I have simulated the glasses plus a black interior. The result is very good, although every solutions surely knows another better . . If you have suggestions, I will appreciate them, although I'll cannot use on this ship: remember that I'm describing facts happened about one year ago . .
Regards, Jack.Aubrey
-
Thursday, June 28, 2012 - Poop
Again, these days the weather was very hot . . anyway, I was able to continue without too much troubles with this complex poop. Given the type of work to be achieved, my job was characterized by relatively short sessions, followed by periods of waiting time.
In the pictures here below you can see the progresses made: they aren't "striking" but they fully satisfy me.
In the idle time between the different sessions I started to collect and catalog all the materials of all the issues till now distributed by De Agostini. This was necessary to retrieve in a more efficient way the available materials in the next future.
After a few days of this habit, now all the metal decorations, gun barrels, blocks, deadeyes, chains etc. are now well stored and easily retrievable.
I have now to decide a strategy of how to manage/treat the golden decorations. I cannot leave them as they are: too unrealistic. The instructions suggest to treat them with "judea bitumen" (is it the right term ?). I never used it but I don't like the effect achievable.
I have to think about this problem in search of a good idea, but in line of principle my way would be to treat them with a primer, then a coat of "Terra di Siena Bruciata" with a final "dry brushing" with gold and copper paint. I'm also considering to buy an airbrush, not only to treat these decorations but with in mind future uses and implementations.
See you next time, Jack.Aubrey.
01 P1080285.jpg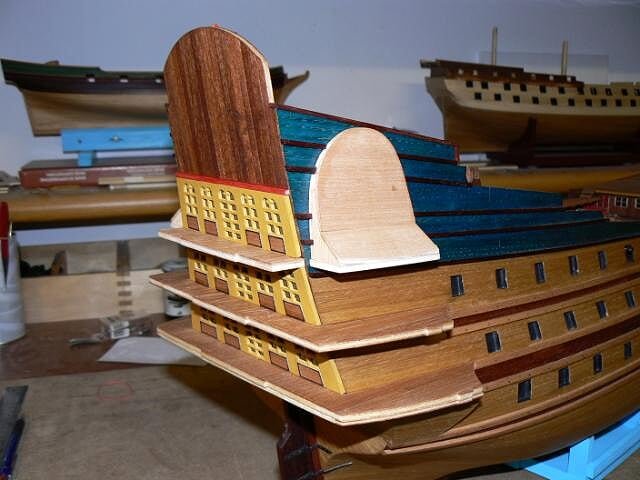
02 P1080286.jpg
03 P1080287.jpg
04 P1080288.jpg
05 P1080290.jpg
-
Saturday, 23 June, 2012 - Poop
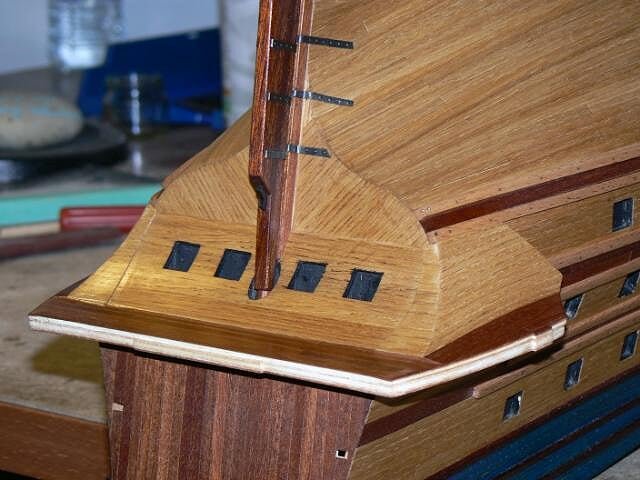
In recent days, the hot weather has "slightly affected" my productivity; however, between yesterday and today I was able to progress a little bit. Thanks to a very good suggestion of a friend, I decided the best way to simulate the gallery windows, so I began to implement the idea.
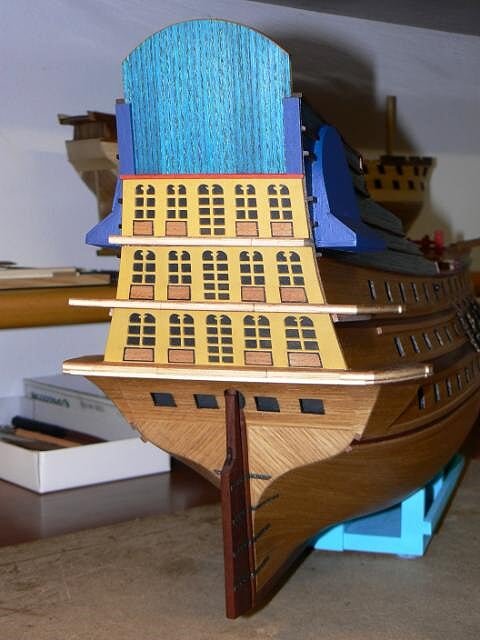
After having attached the first row of windows, I was able to apply the floor of the second gallery, and, above it, the second row of windows. I started to paint these panels in gold color but after two strokes I realized that I didn't like at all the effect achieved: too artificial and unlikely, so I decided to use a light yellow acrylic paint . .
01 P1080280.jpg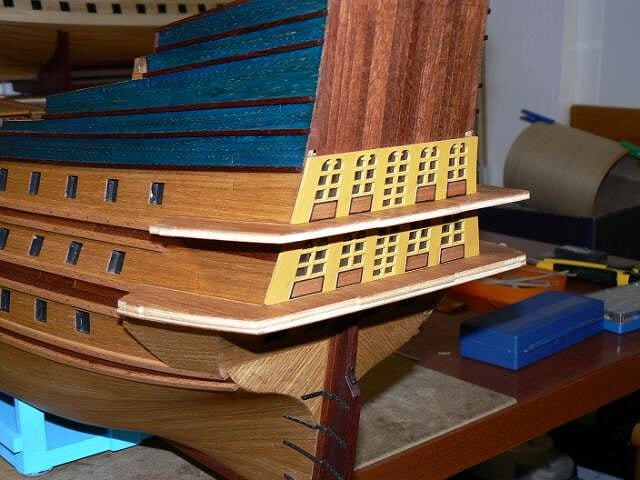
02 P1080281.jpg
03 P1080282.jpg

04 P1080283.jpg
Finally, I proceeded to plank with mahogany veneer the bottom of the overhang, in line with the wood used in the area of the two wales that are at the same level.
05 P1080284.jpg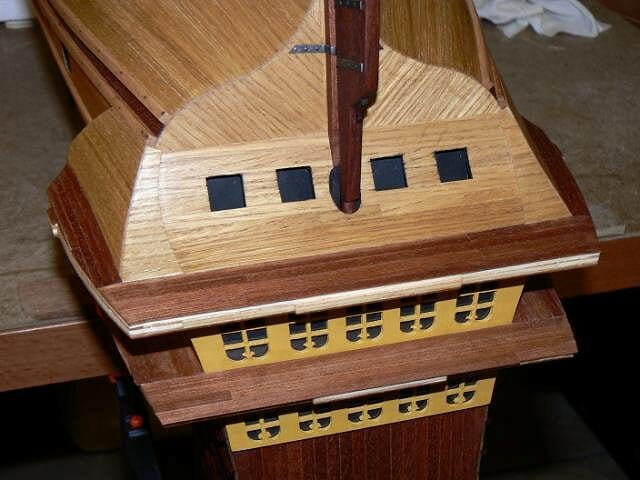
See you next time, cheers, Jack.Aubrey. -
Monday, 18 June, 2012 - Poop
Just a week ago I glued to the poop the floor of the lower gallery and its four vertical supports that serve as point of attachment for other elements.
During this week I worked on the model almost every day but for short periods only. The reason of this method is due to new pieces to be fixed on this gallery that needed to be appropriately adapted; but especially because of the long waiting times, once fixed a piece, to dry and "hold" the glue. Everything before managing the next piece. So I spent one day to fix a piece, another for the other side, etc. . I took the opportunity to fill the waiting time with sessions in the pool and gym.
However, yesterday I managed to finish this lower gallery to a point that allows me to proceed shortly with the gallery immediately above.
Because, as I may have mentioned earlier, I'm not going to color these pieces of blue paint but I want integrate them in the scheme of dark wood / light wood / wood stained, the result you see here below is completely different from that obtained by others: no filler, no painted plywood in view, but coverage of these pieces with the same chestnut / mahogany veneer used for the hull (photo 01 and 02), as well as the floor of the gallery was planked with beechwood (photo 03).
01 P1080270.jpg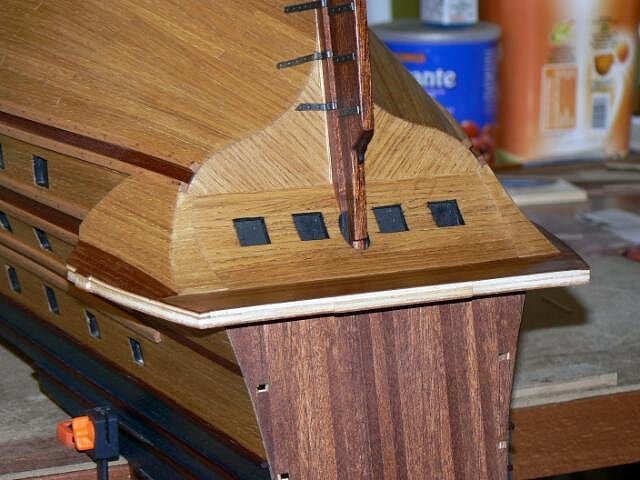
02 P1080272.jpg
03 P1080273.jpg

Finally, the gallery windows. For the time being I smoothed and finished them with sandpaper and small files and I applied three light coats of white acrylic paint, as a primer for a future gold paint.
I thought to apply in the back of these panels a sheet of acetate (the one that you usually use for transparencies, thickness approximately 0.15 mm.) to simulate the glass and framing the rear perimeter with small strips of 0.5 mm.
In this way, once pasted the panel, the acetate sheet is not in contact with the bottom and should give a more realistic glass effect. The problem is that, making some bonding tests of an acetate sheet on a piece of wood, I discovered that the cyan-acrylate practically does not paste at all . . I need an idea.
04 P1080275.jpg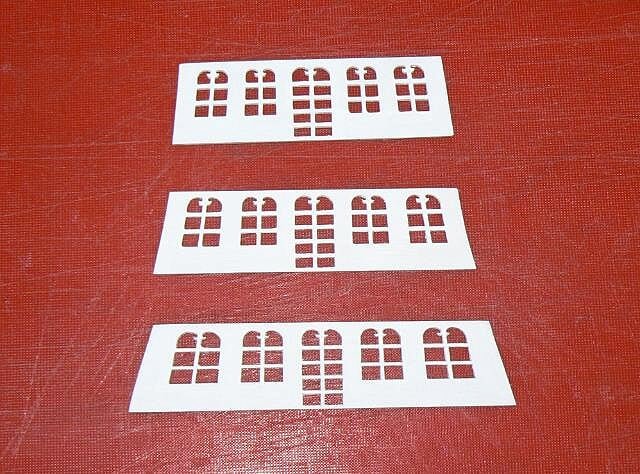
See you soon, Jack. -
Monday, June 11, 2012
In these past days I focused myself on the study, the material collection and the initial operations planning for the tasks related to the building of the complex poop of this ship, more in detail I studied how to prepare and mount the three galleries.
The material provided by De Agostini for these tasks is quite dissimilar in quality: some pieces are of good quality, while others are less if not worse. . it is a constant problem in these partworks: often between an issue and the next the quality of a similar piece is totally different. In this case there are only two possibilities: 1) to request De Agostini to re-ship the whole issue (losing roughly three weeks) or 2) rebuilding the wrong/bad piece with a better material. In my case, however, the quality is not as important because all the "bad" pieces will later be hidden.
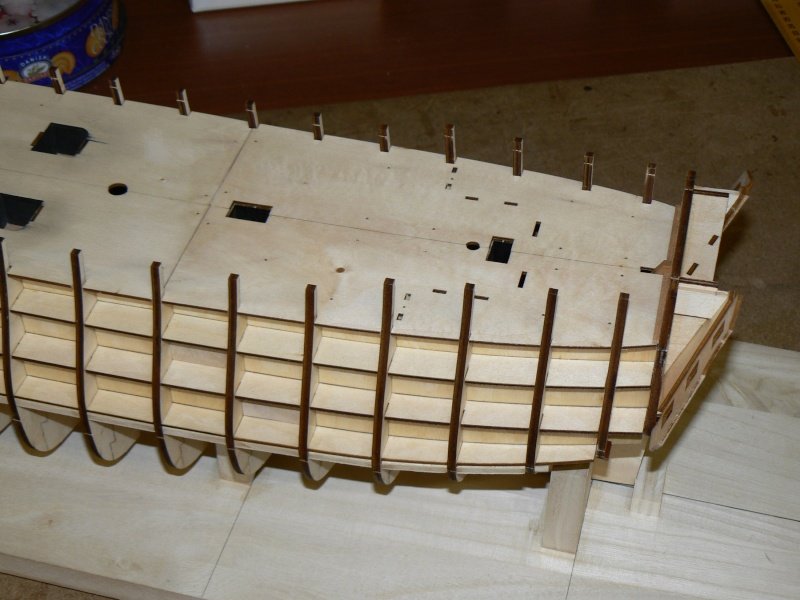
Once mounted the floor of the lower and middle galleries I had to adapt them to the shape of the hull so that they fit perfectly in their final position . . evaluate it, change eventually a bit and try again. . until the piece is OK.
Then I proceeded to plank the top of the floor with strips similar to those used for the decks, I remember that decks on this model are in beechwood.
To fix the floor I used the vinyl glue but, for safety, I also put in place four pins of metal.
01 P1080263R.jpg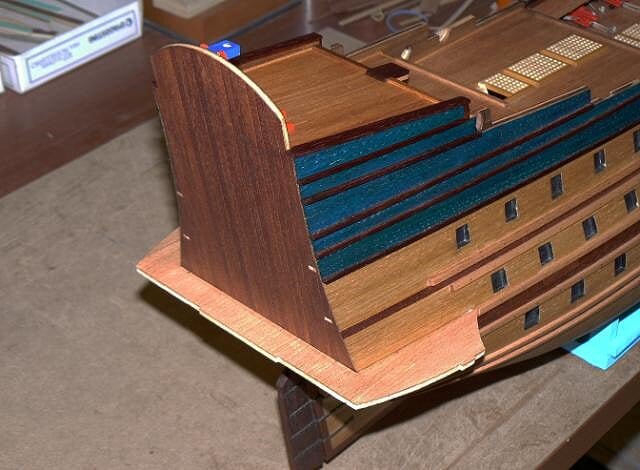
02 P1080265R.jpg
This gallery should be aligned with the fourth wale (from the bottom) and, thanks to the inexistent drawings and to the instructions where you were not told to take a particular care, I discovered that, to maintain the ideal sheer of the wale, the floor appears to be in a higher position of a few millimeters than it should be. . . The picture below shows this gap. Obviously at this point the remaining two galleries will also be located higher with possible implications not currently quantifiable. However I was expecting similar situations. In due time I will see how to manage the problem.
03 P1080266.jpg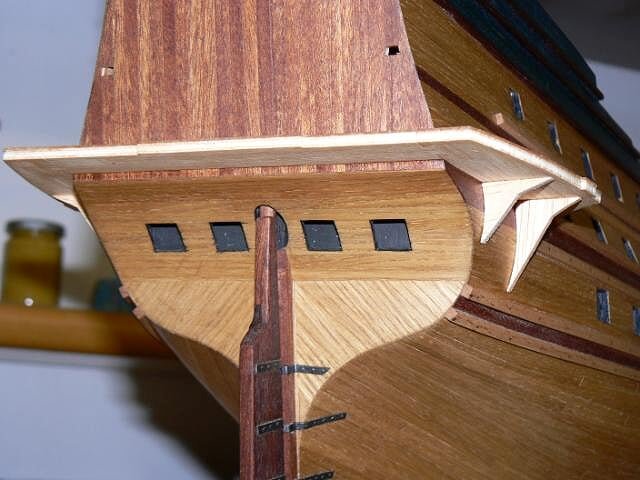
Finally, a personal interpretation of the positioning of the ladder to access the "higher" deck (I do not know how to call it exactly): in that position, I thought to locate a door. But now I can't put in front of the door a staircase. . (again, some drawings of the model would certainly have helped).
So I thought to correct the error by moving the ladder back and here explained the need of this small platform added now and protruding.
I imagine the reactions of the "purists", in this case being them totally right, but these situations are recurrent with these partworks . . linked with other amenities such as instructions sometimes lacking of clarity and the chronic absence of drawings.
About drawings: if I can imagine and understand why drawings are not published for these kind of kits, from another point of view it would be enough some sketches, of proper size, showing particulars or even prospective views similar to the one in the Soleil Royal model plans from Panart (Mantua) and more precisely the table No. 4. Such views cannot be used as plans themselves, then would meet the needs of the publisher, but they would be incredibly useful to the modelers . .
04 P1080267.jpg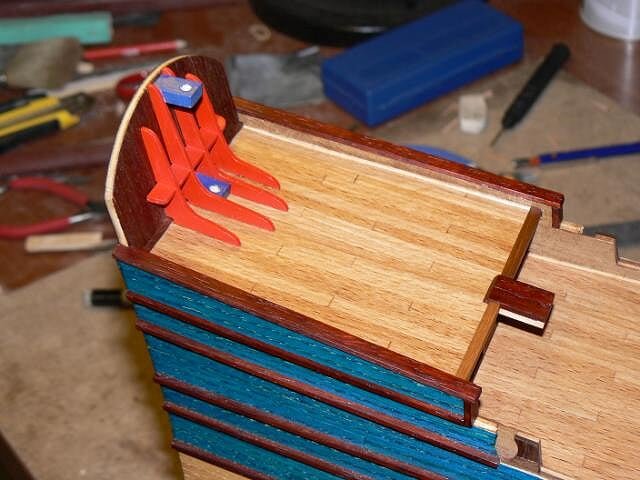
After these amazing discussion on materials and plans, I greet you and wish you a good day. Jack.Aubrey -
Wednesday, June 6, 2012These days I applied myself to build all the stairways and ladders available on the Soleil Royal. I experienced also a variation in the construction of the ladders that allowed me to build them, let's say, in "mass production". In addition I designed and implemented a totally personal way to build the four "low" ladders connecting the gangways to forecastle and quarterdeck. I really like this solution, more realistic. At the moment I do not have pictures, but you'll see them in due time.Now I am left with essentially three jobs before embarking on a major new enterprise: re-glue guns, fix some new elements around the mainmast, paste all the stairways and ladders that I painted for the occasion in blue.After this point, more or less a matter of few hours, I will devote myself to the building of the poop.It's a while I think what to do at this point and I came to conclusion that it is better for me to concentrate in the building of infrastructures and galleries of the poop, maybe finishing it completely, but surely coming to a point at least which I will no longer need to heavily manipulate the hull to perform the work. The objective is to leave the finish of the gunwale at that point, when you can work without tipping too the hull thus avoiding possible breakage.Today I have collected all the material for the components of the poop and I studied very carefully all the instructions for its construction. I must become confident with the whole process, because I have in mind a set of possible variations that intrigue me very much. Finally, to take help from other modelers, I downloaded all the images of the poop of the modelers who have already built it . . a small advantage to stay a little back and let others go ahead to open the track . . images that will be very useful to keep in mind the point of arrival!See you soon, Jack.
-
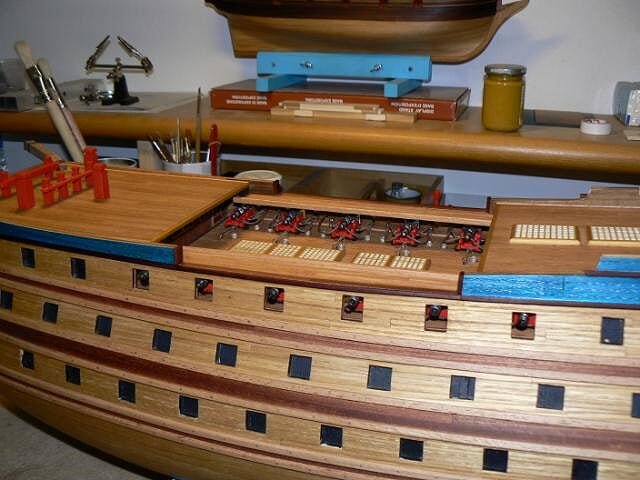
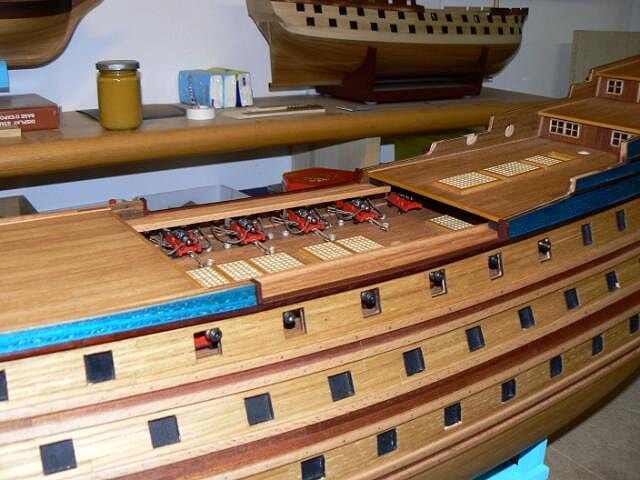
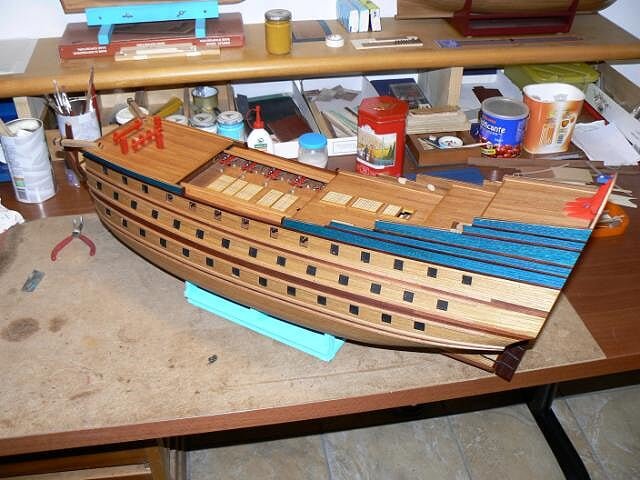
Sunday, June 3, 2012 - Gangways
As I wrote earlier I installed the gangways above the guns; they were ready some time ago. I set them in place with a particularly sophisticated bonding so that we can safely say that they are proof of "catastrophic events".
The guns you see in these images are placed as if they were fixed, in the reality they are only positioned due to the well-known incident, I put them in place for photographic needs only.
I'm considering putting some columns below the gangways, I'll see what to do later, probably after having repaired again the barrels of the guns.
I connected the two "mini" wales of the forecastle and stern area so that now they seem as one single piece. .
01 P1080250.jpg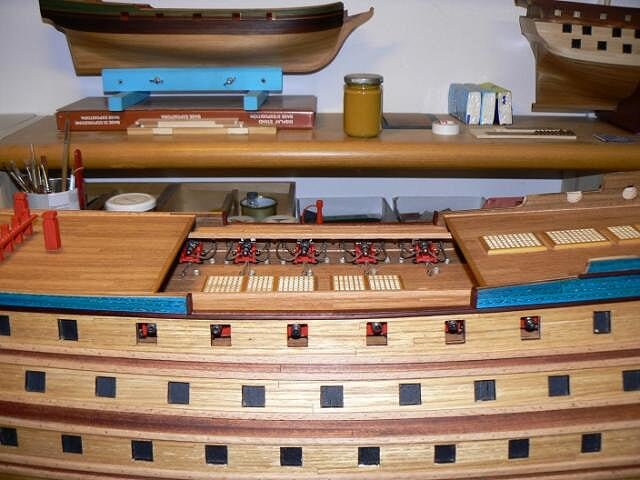
02 P1080251.jpg
03 P1080252.jpg
04 P1080253.jpg

05 P1080255.jpg
Finally, I apologize for the mess in this picture, but I shot the photos in the lab and unfortunately there is a bit of mess on the working table. . .
See you next time, Jack.Aubrey

 . . .
. . .
Twelve Apostles by jack.aubrey - De Agostini - Scale 1:100
in - Kit build logs for subjects built from 1801 - 1850
Posted