HOLIDAY DONATION DRIVE - SUPPORT MSW - DO YOUR PART TO KEEP THIS GREAT FORUM GOING! (Only 20 donations so far - C'mon guys!)
×


SawdustDave
-
Posts
1,770 -
Joined
-
Last visited
Content Type
Profiles
Forums
Gallery
Events
Everything posted by SawdustDave
-
 Actually, that is how I have made all of my previous launches Roger.... and you may be right, but I decided to give B&B a shot. Thanks Jon.... I picked up on that suggestion from your build log. Dave
- 742 replies
-
- 3
-

-
- constitution
- frigate
- (and 1 more)
-
Tom.... It could be that the very thought of intentionally breaking a kit part goes against a modelers instinct. We take such care to NOT break fragile components. Must admit I first gave a valiant try with rotary bits and got very unsatisfactory results. BTW - How cold are you these days? Thought about you many times over the last week. Cheers
- 742 replies
-
- 3
-
-
- constitution
- frigate
- (and 1 more)
-
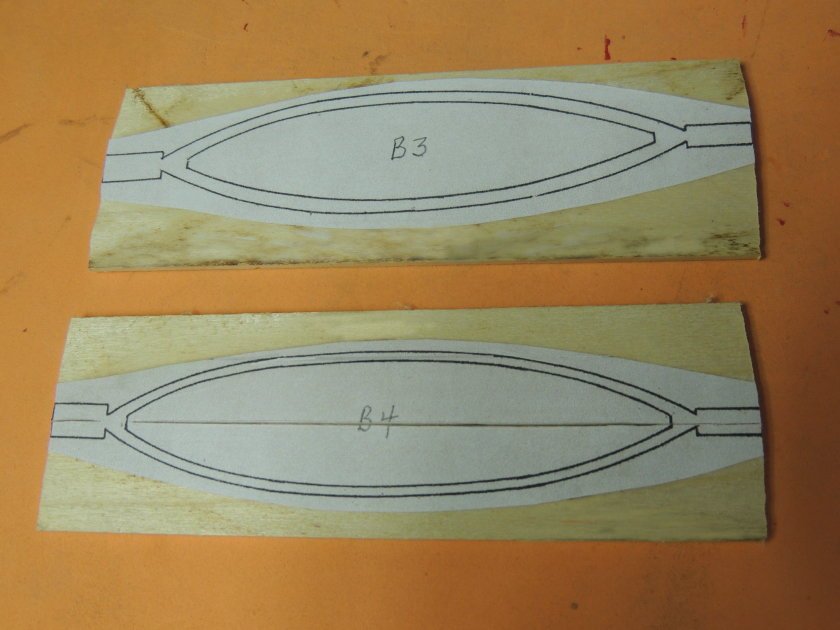
Cutting out the layered b&b launch parts.... Wishing I had not sold my little scroll saw.... now needed to cut out the interior sides of these layers with no opening to access them with my band saw blade. Solution..... See part marked B4 below....Scored each one deeply with an Xacto blade and broke them apart. Important to make the clean break occur down the center of the two tabs. By breaking them apart with the grain of the wood, they can easily be glued back together without any loss of width. aaa

- 742 replies
-
- 12
-
-
- constitution
- frigate
- (and 1 more)
-
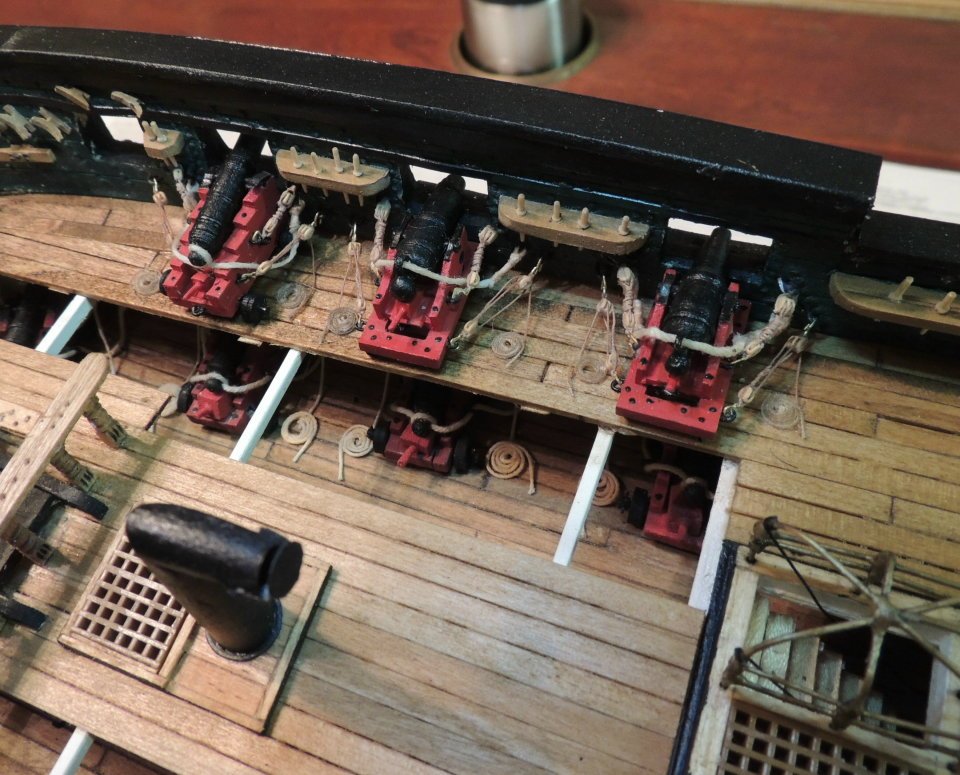
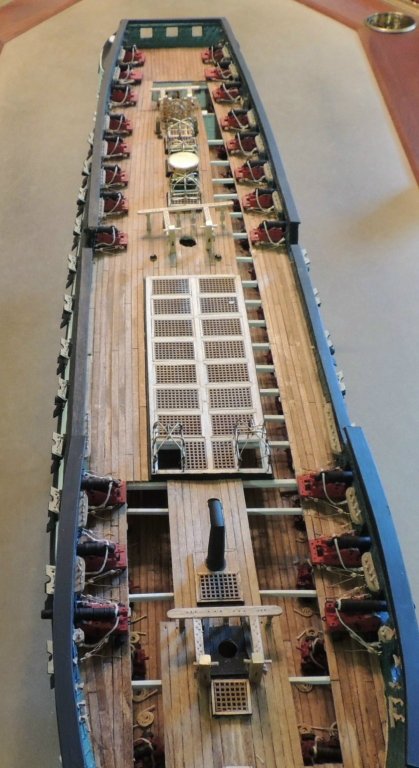
I guess this is just a celebration posting of the fact that the rigging of all the spar deck guns is now complete.... except for the train tackle, which I'll have to come back to because I ran out of blocks and have to wait for Chuck to ship. Excuse the lighting of the full deck photo..... Note the difference in the size of the rope used on the gun deck cannons seen through the cutaway vs the smaller rope used on the spar deck guns. Not much we can do about that now. Happy to finally break away from gun rigging and return to working on the Pinnace.

- 742 replies
-
- 13
-
-
- constitution
- frigate
- (and 1 more)
-
Cutty Sark by NenadM
SawdustDave replied to NenadM's topic in - Build logs for subjects built 1851 - 1900
Excellent details on such a tiny launch Nenad.- 4,152 replies
-
- 7
-
-
- cutty sark
- tehnodidakta
- (and 1 more)
-
I agree Jon. I have always considered the ship’s launches to be my personal favorite modeling tasks. Thank you for providing your amazing build log, which is my “go-to” reference.... along with the US Navy plan sheets I too am working with. Very excited to begin this stage. Dave
- 742 replies
-
- 3
-
-
- constitution
- frigate
- (and 1 more)
-
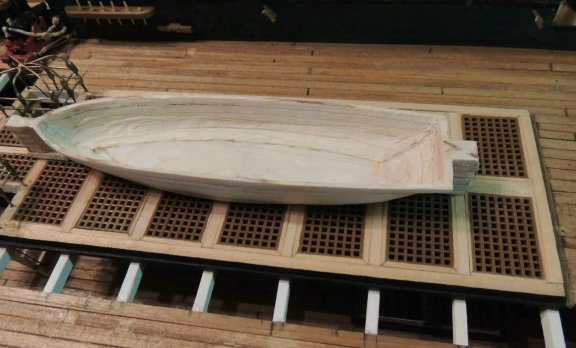
Ran out of the 3/32" tackle blocks and now waiting for Chuck's order to arrive. Meantime, after three days of making rope coils for the deck and gluing them in place last night I opened the shop with nothing to do in terms of gun rigging progress. PS - This was the first time I have made a jig for creating rope coils for the deck (have always used masking tape to create the coils).... The jig I made with clear plastic disks and with a nail through the center worked great. Meantime, I decided to begin building the Pinnace. This little "Model-within-a-model" project should keep me occupied for a while.... nor to mention the three other launches to be built. Dave
- 742 replies
-
- 7
-
-
- constitution
- frigate
- (and 1 more)
-
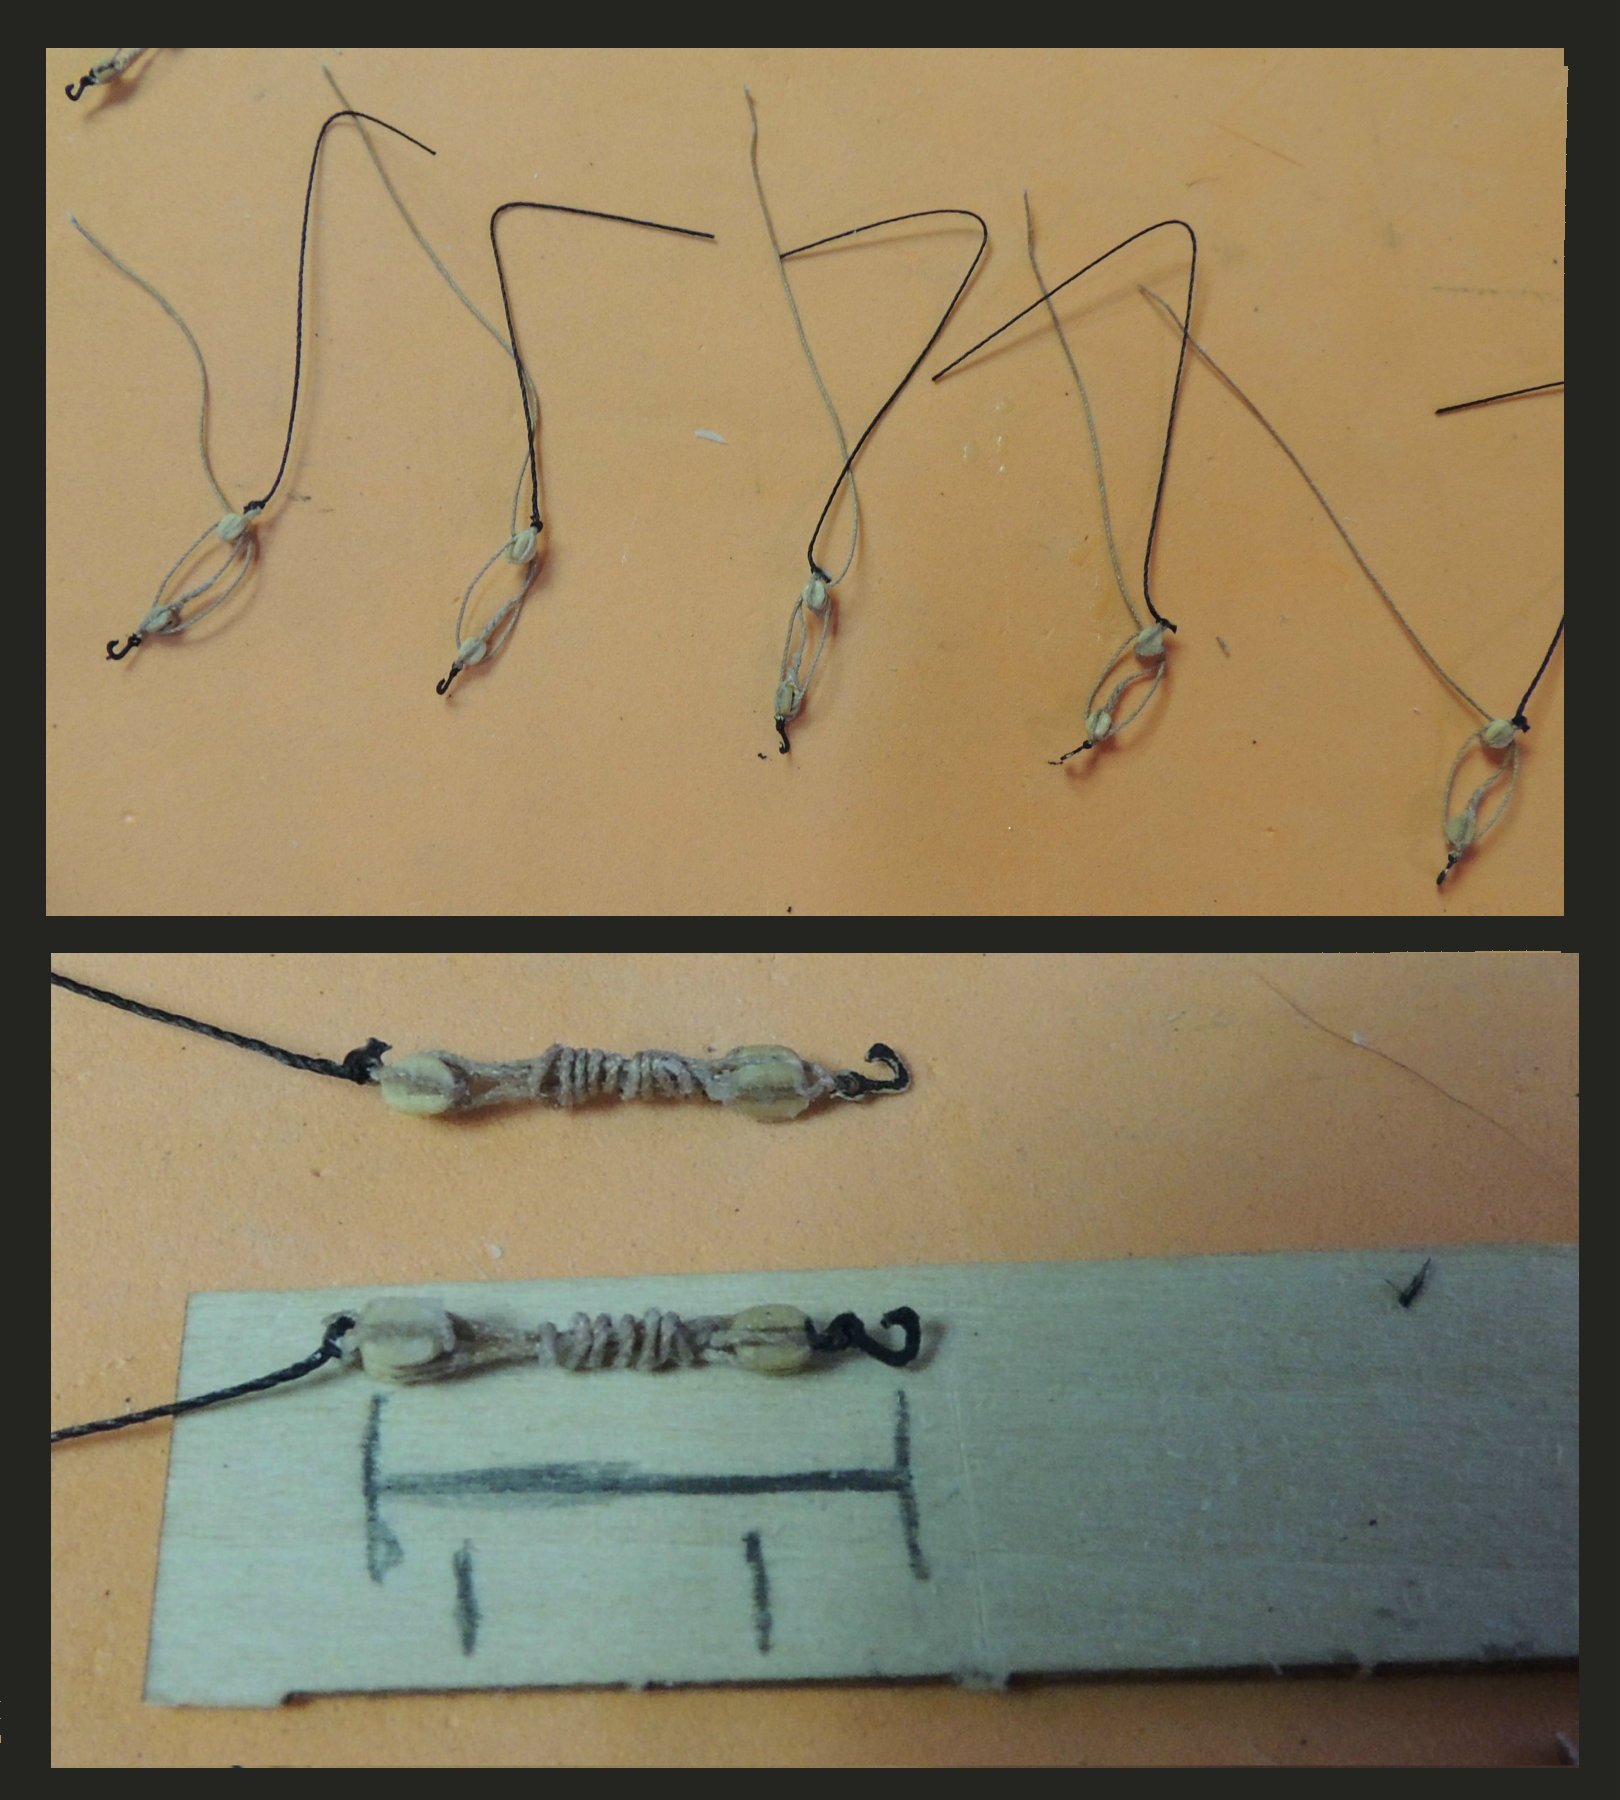
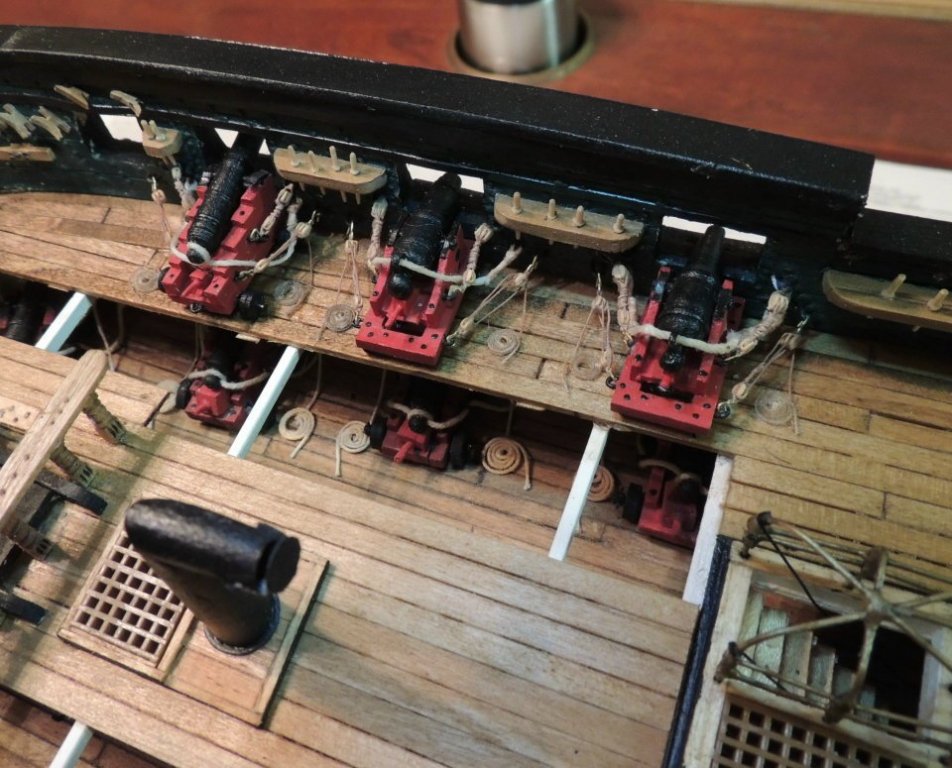
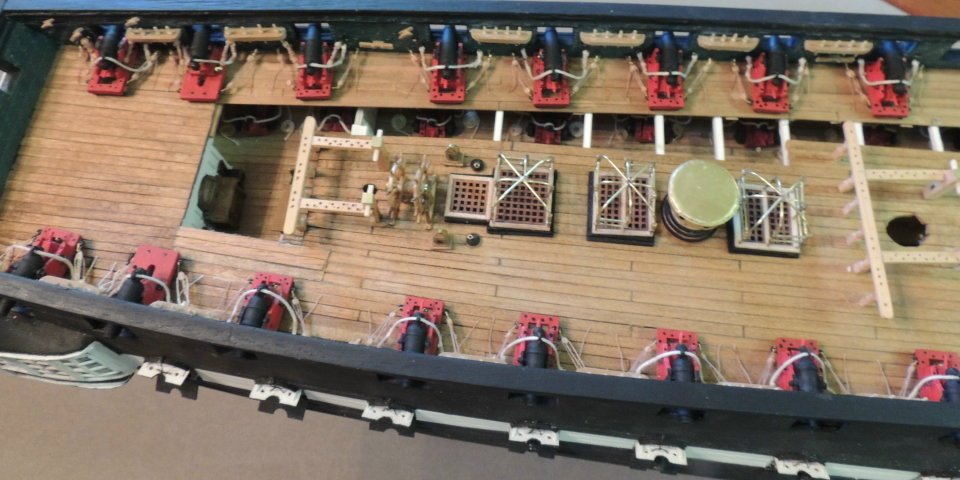
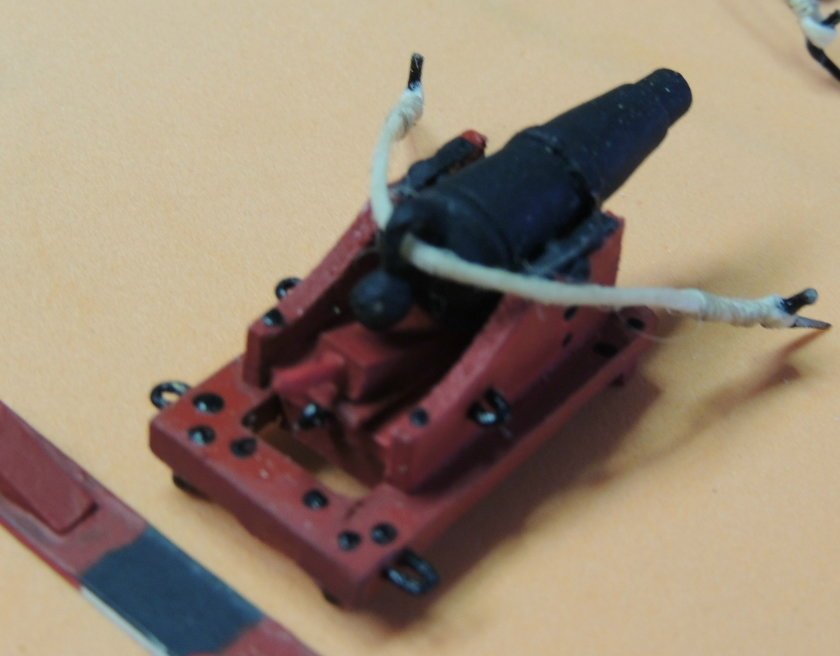
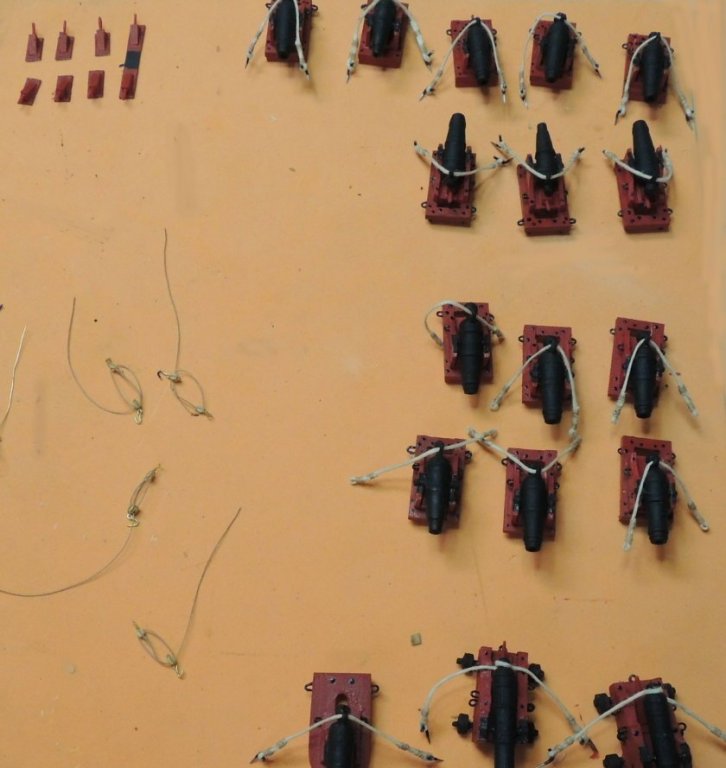
Spar Deck Guns Installed.... Although still much to do before moving on and celebrating, the guns are all installed with partial rigging. Now working on the short tackle rigging seen here.... Note, I had to find a way to attach the bulwark hooks since I had made a strategic mistake by adding the belaying rings as I was building the bulwarks. The biggest problem being that the pin rails are blocking any possible access to several rings. My solution - instead of using tiny hooks to attach the blocks, I went with a length of black beading lines which can be pulled through the rings, securing each with a touch of CA gel, and then snipped off. Seen here, the top photo shows the assembly, and the bottom photo shows the tackle sets after wrapping. Note the measurement jig used to control the exact length of each tackle set. And here is the installed tackle.... Obviously, I have not began fitting the rope coils, which will be the last task to polish off the guns. Also note that I have not begun working on the out haul tackle for the eight guns not affected by the cut away sections.

- 742 replies
-
- 19
-
-
- constitution
- frigate
- (and 1 more)
-
OK, so we all have our screw ups. I do like Ken’s view about “learning lessons”. And Jon’s reminder that most of our mistakes are between “you and God”.... but I must add “your MSW friends” to that short list. Oh! One other.... THE DREADED CLOSE-UP CAMERA! (Sees all - Tells all) Merry Christmas All
- 742 replies
-
- 5
-
-
- constitution
- frigate
- (and 1 more)
-
My bad on the quoin mistake.... not the only DOWNER for me today. Just did a re-count on all of my inventory of assembled guns and came up two short on the required cannonades. Back to the lathe one more time. Am I alone with these kind of screw-ups?
- 742 replies
-
- 5
-
-
- constitution
- frigate
- (and 1 more)
-
Driving me NUTS with stuff like this Jon. So I did fail to note the difference in the quoins between the long guns and the cannonades. Dag nab-bit!!! Too late now.... all done with quoins. They is what they is!
- 742 replies
-
- 3
-
-
- constitution
- frigate
- (and 1 more)
-
You are so right Geoff. As a scratch builder, I don’t think I could have tackled this without the experience gained with a dozen previous models over the last ten years. I’m just glad I saved this very special ship for my last major project as she deserves my best effort.
- 742 replies
-
- 6
-
-
- constitution
- frigate
- (and 1 more)
-
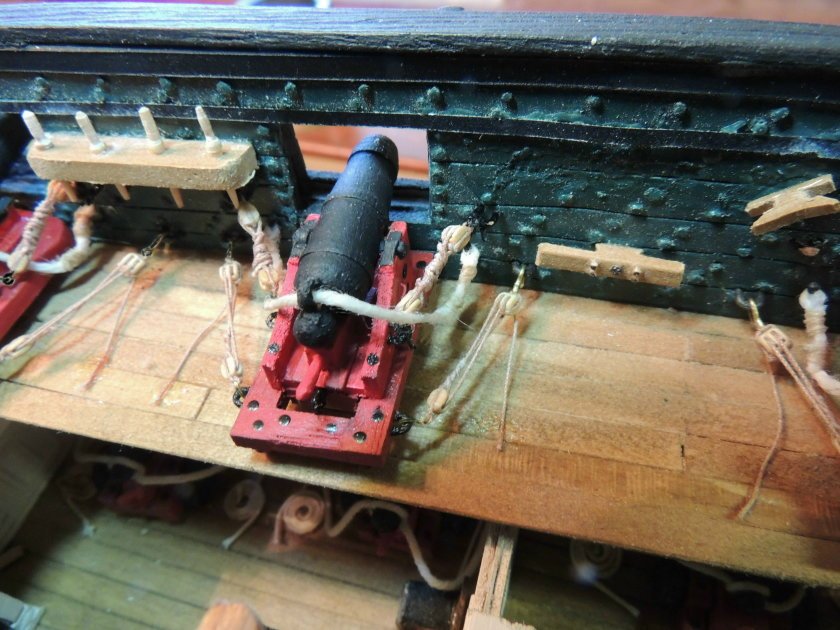
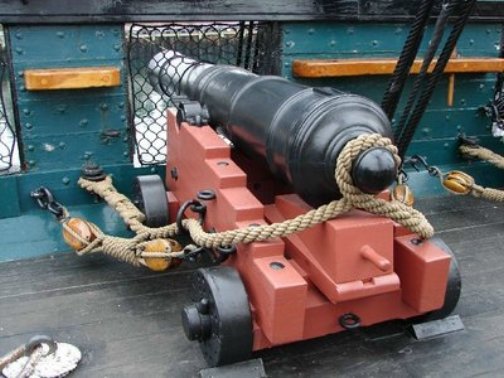
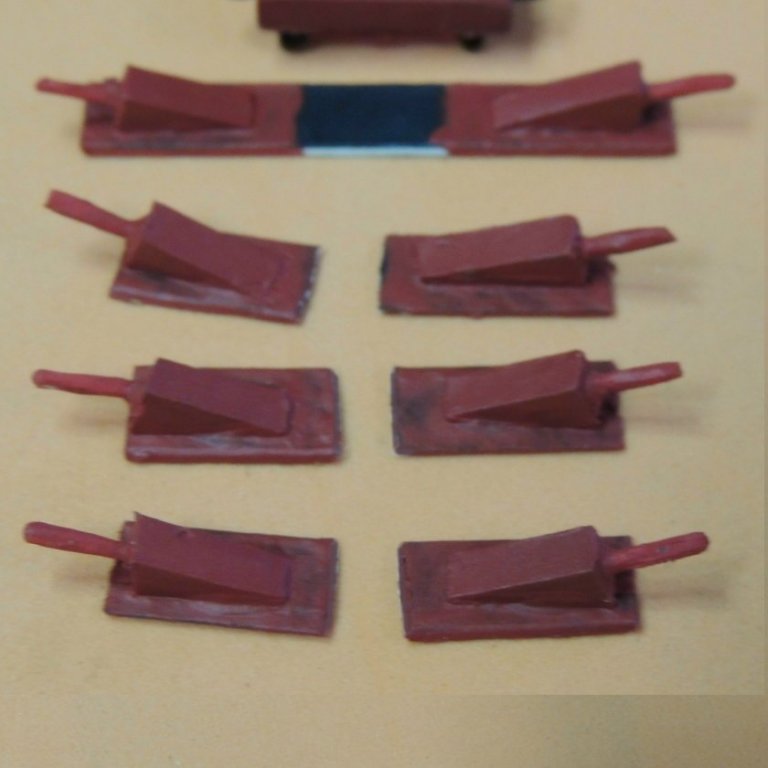
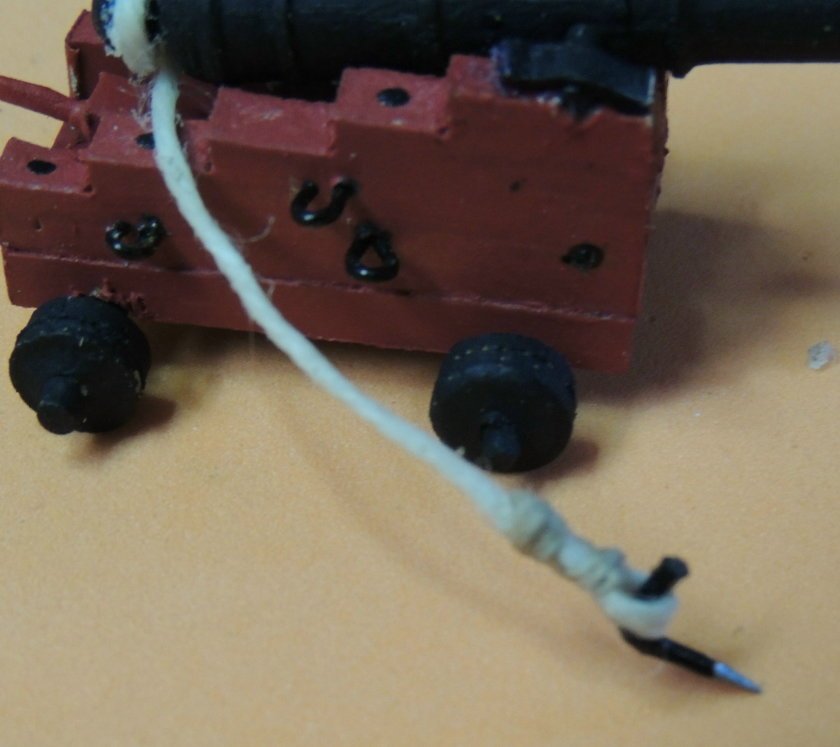
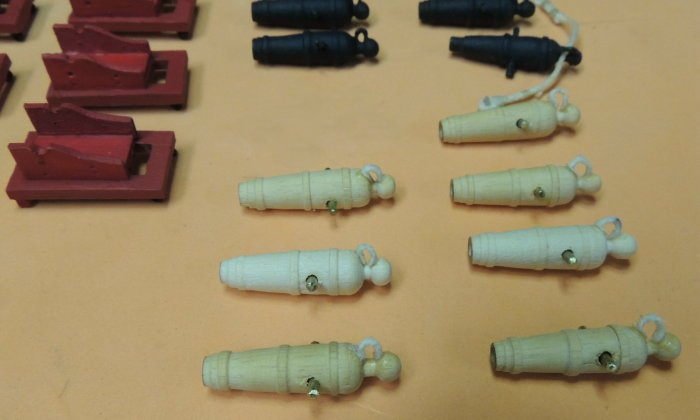
GUNS - UPDATE.... Thanks again for the visit Piet. I took a short break to post a few quick shots of the progress on the spar deck guns. For many years, having rigged dozens of deck guns, I found a small detail I have long overlooked with regard to the quoins. How many of us have simply stuck a shaped handle on a wedge and glued it directly onto the carriage beneath the gun? A closer look at the Connie's guns, I find that the quoin's have a rib on the bottom which rides in a groove which is cut into a separate base fixed to the carriage.... (seen below) So, I have attempted to emulate that little detail by placing the quoins onto strips of poster board. Unfortunately, the groove is visibly lost with two coats of paint. Another little note to pass on is a technique I am using to attach the breaching-tackle to the bulwarks.... Rather than fit the belaying peg to the ship and wrestling with getting the seized rope onto the fixed peg, I have glued the pegs into the rope ends.... note the very sharp tips that can be inserted into holes drilled into the bulwarks. Finally.... a shot of assembled guns in progress. Now working on the tedious rigging of the 3/32" blocks purchased from Syrenshipmodelcompany.com.... thanks Chuck.
- 742 replies
-
- 9
-
-
- constitution
- frigate
- (and 1 more)
-
Thanks for dropping in Frank. Long time no see Mate. Merry Christmas!
- 742 replies
-
- 4
-
-
- constitution
- frigate
- (and 1 more)
-
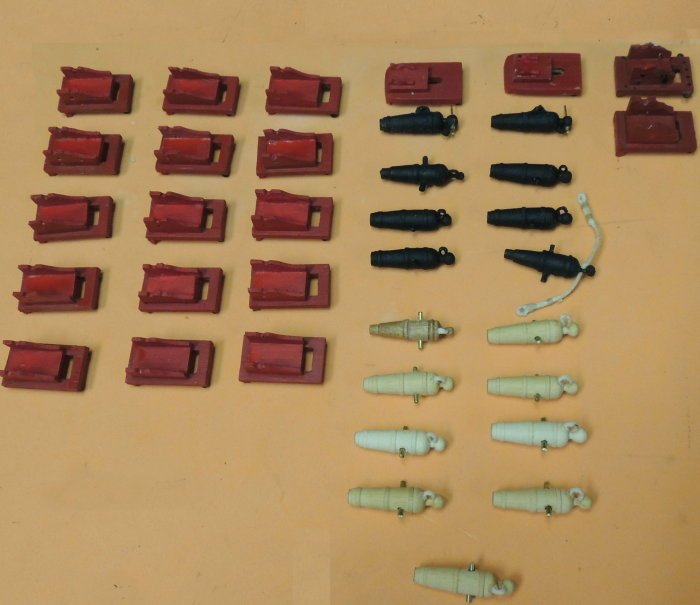
Guns Progress.... A couple of quick shots. Note the two carronades and slides at the top, along with the two long gun carriages. The other 15 carriages are for the cannonades.... (one missing from the photo is now in position on deck where I'm working on the first rigging). Also note I still have two long guns to turn to complete the full 20 gun spar deck armament A closer look at the unpainted cannonades.... Ready to begin detailing the carriages......
- 742 replies
-
- 12
-
-
- constitution
- frigate
- (and 1 more)
-
Geoff.... Just revisited your build.... and I am SOOO inspired! Maybe by this time next year I should be somewhere near where you are..... although not nearly as well done. Beautiful work sir! And thanks again for providing such a great source of reference. Dave
- 742 replies
-
- 5
-
-
- constitution
- frigate
- (and 1 more)
-
Spar deck armament note.... Slowly working on the guns and carriages and rigging for the 20 placements on the spar deck. Just curious, this morning I did a quick count of all the various parts required to scratch build a single cannonade..... came up with 56 parts each. To the casual observer, the 1,100 parts, and the precise assembly of each, that go into creating those deck guns are so far beyond comprehension. . Ever question why we do this stuff?! Merry Christmas Mates!
- 742 replies
-
- 6
-
-
- constitution
- frigate
- (and 1 more)
-
Thanks for joining the discussion Henry. Yes, by now I have managed to thoroughly research the entire topic after being pointed in the right direction. Very timely in my case as I was able to build two of my gun carriages for those two “true carronades”. My good friend, Tom, will pleased to know I will be building two guns with screw jacks. As for progress report.... All 20 spar deck carriages built, but not painted. I also decided NOT to cast the gun forms because I am not at all happy with the prototypes I created several months ago.... besides all that, my 2-part silicone mix has gone bad so I can’t make a new rubber mold. So we’re now in the process of turning all of the carronade barrels individually. As of this morning, eight down - ten to go. Cheers All
- 742 replies
-
- 6
-
-
- constitution
- frigate
- (and 1 more)
-
Think I'll have to steer away from the screw elevation Tom. Much too far along with the carriages at this point. Please don't dare me Mate. In my younger days, I’ve been known to jump off high buildings with an umbrella on a "dare"...... yahahahaha Dave
- 742 replies
-
- 4
-
-
- constitution
- frigate
- (and 1 more)
-
I must apologize Tom. As many times as I have visited your beautiful build, I never took note of the fact that you bashed the carronades into the 1812 version. I do admit, I do tend to focus more on graphics than text. Beautiful job, and I salute the fact that you took on the challenge. Way to go Mate.
- 742 replies
-
- 5
-
-
- constitution
- frigate
- (and 1 more)
-
I knew someone had an explanation for this question. Thank you Jon. With so much time invested in the carriages, at this point, looks like I am pretty much committed to the 1927 version. The 1812 version with the elevation screw mechanism changes everything. Cheers
- 742 replies
-
- 3
-
-
- constitution
- frigate
- (and 1 more)
-
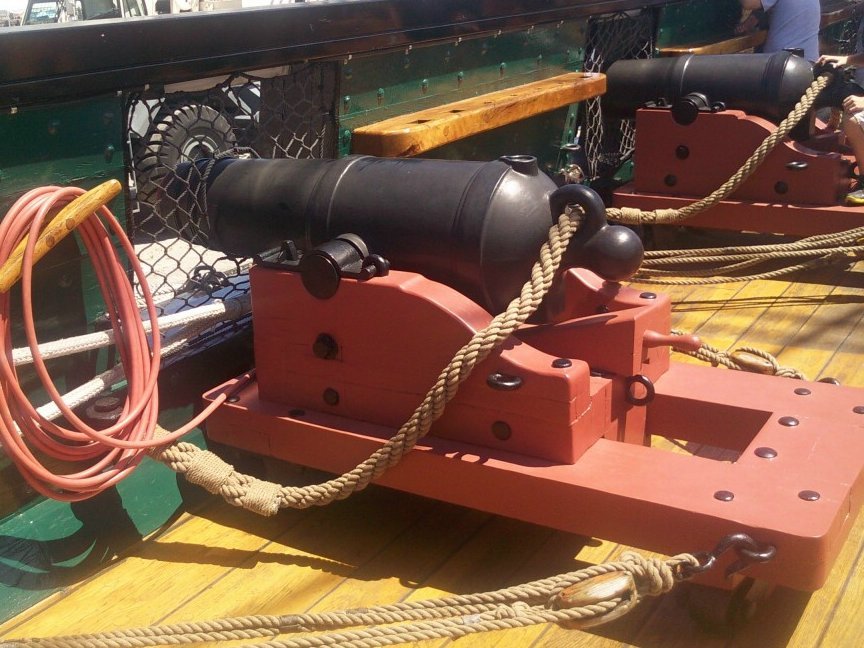
One of you historians help me understand this. Getting ready to begin creating the 32 pound carronades for the spar deck. In my research, I keep coming across photos of this gun with a screw mechanism. I have not seen this replicated on any model, and don't intend on doing that myself. Just curious...... Compared to this photo we all recognize....

- 742 replies
-
- 7
-
-
- constitution
- frigate
- (and 1 more)
-
Began with the slightly rectangular base.... added the corner "feet", then a slightly beveled second rectangle centered on the base piece. The cabinet is one single solid piece of shaped bass wood trimmed out with paper stock to form the panels. Then trimmed out the top with gold sheet stock. Those little tops are actually created from some gold “sticky sheets” I had laying around from another build. It has a great “ brassy” appearance, and is easy to cut with Xacto blade. Although it has a sticky back side, I did reinforce each of the four sides with a dab of CA gel. The ball was simply turned from brass rod.... drilled a hole in the bottom side to receive a wooden peg for mounting onto the tops. Really fun little build. Cheers.
- 742 replies
-
- 7
-
-
- constitution
- frigate
- (and 1 more)
-
Thanks Ken. I’m sitting here scratching my head over the ammo passing scuttles, which do not appear on the Virtual Tour images.... actually, it appears as if the fixture is covered by a rope coil. The ones on the gun deck appeared as painted black with a white ring in the center of the round ( three tiered) fixture.
- 742 replies
-
- 4
-
-
- constitution
- frigate
- (and 1 more)