patrickmil
-
Posts
1,209 -
Joined
-
Last visited
Content Type
Profiles
Forums
Gallery
Events
Everything posted by patrickmil
-
 Personally, I have only had to do this on small pieces but it is possible on large pieces. That said, the Googles has this to say: Hot water Submerge the resin in hot water (around 55°C) for about five minutes. The resin will become flexible and can be reshaped by hand while it's still hot. Once it cools, the resin will harden again. Hair dryer or heat gun Heat the resin until it becomes more pliable, then shape it into a mold or curved surface and tape it in place until it sets. You can also use heat to bend resin that has already cured, but it might try to revert to its original shape.
- 176 replies
-
- 2
-

-
- new orleans
- iron shipwrights
- (and 2 more)
-
I guess with that in mind, it all comes down to how accurate you want the part of the hull above the waterline to be in regards to distances between hatches, fittings, and vents and the flight deck. Shimming and milliput might be the way to go if you already have the interior of the hull fitted out.
- 176 replies
-
- 3
-
-
- new orleans
- iron shipwrights
- (and 2 more)
-
Warm/hot water and gently working it so the hull meets up with the deck would be your best bet, I would think.
- 176 replies
-
- 2
-
-
- new orleans
- iron shipwrights
- (and 2 more)
-
Ahhhhh, That's great to know. I've only seen a few of their offerings on FB and wasn't able to locate them online. Didn't think to check out evil-bay though. Thanks for the heads up!
- 97 replies
-
- 3
-
-
- Curtis Wilbur
- I Love Kit
- (and 2 more)
-
As mentioned, here is the pic of the whole 5" gun with my mod in place. I think the barrel looks waaaaaaay better than the plastic from the kit. Still unbelievable that upgrade sets going for $500+ don't have a turned barrel.
- 97 replies
-
- 8
-
-
- Curtis Wilbur
- I Love Kit
- (and 2 more)
-
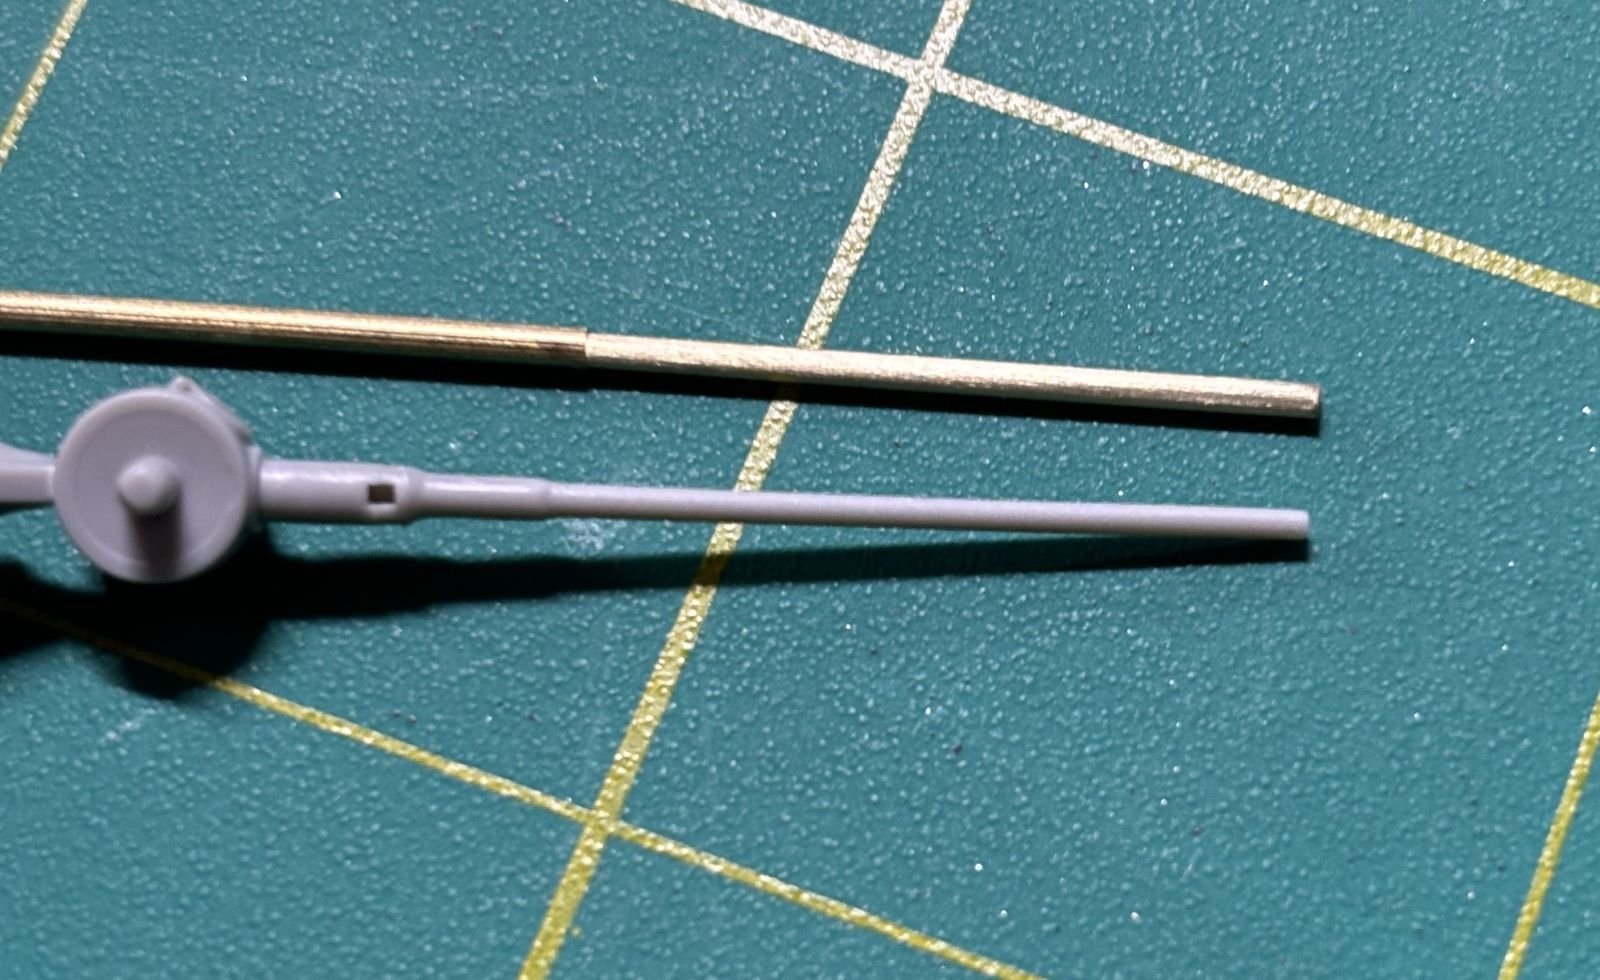
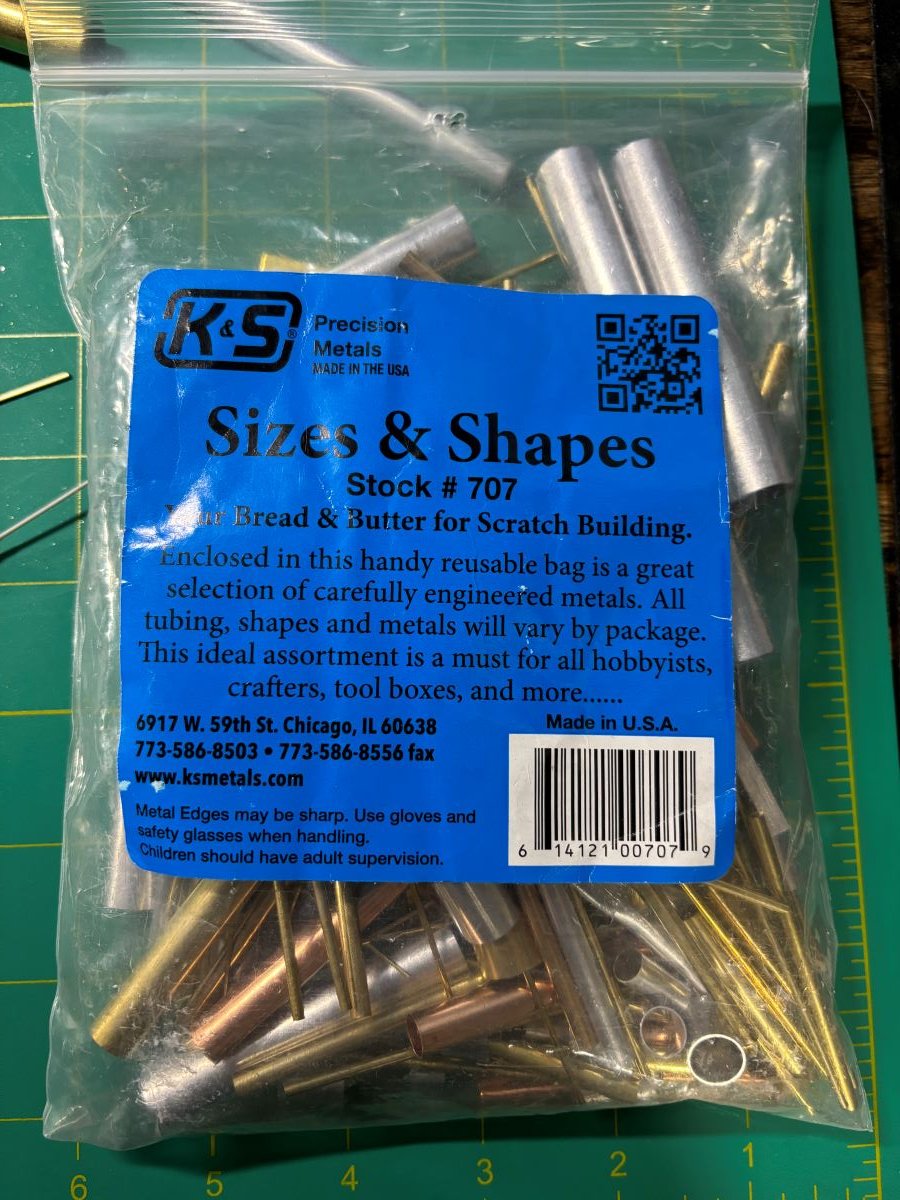
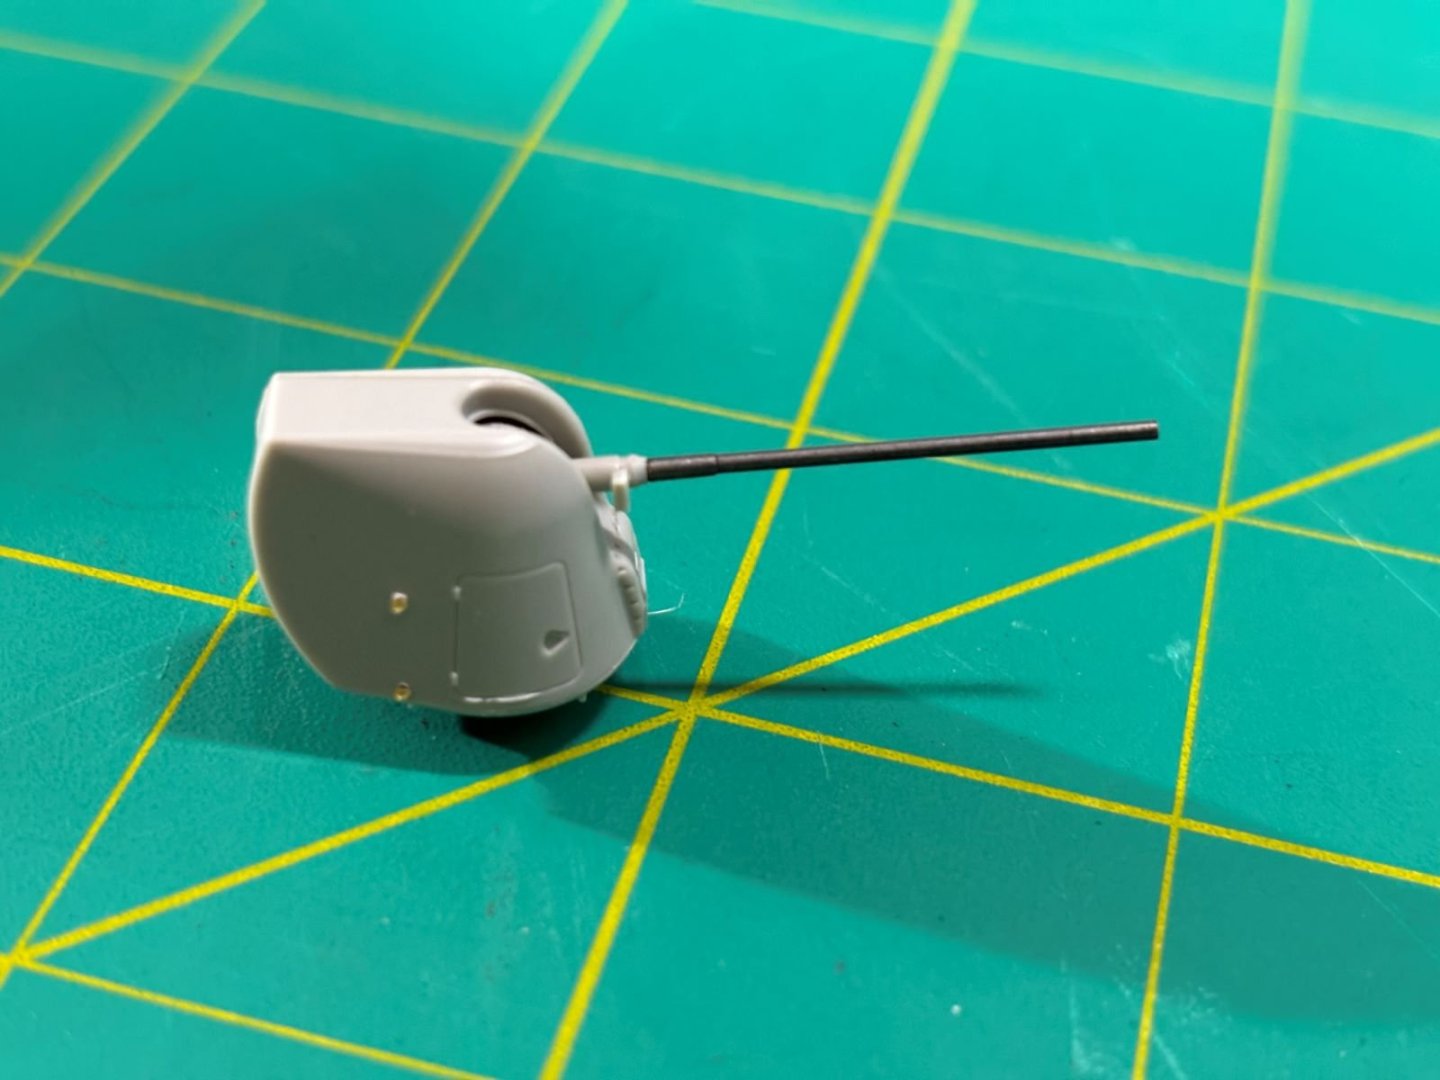
While this build log is still freshly in front of me, figured I'd add a mod I made. None of the really overly expensive upgrade kits offered for this kit include a turned brass barrel or other turned brass antenna pieces for that matter. The kit barrel is ok-ish. There is a seam and a slight step was on my example. I decided to make my own out of brass. After all, nothing looks like metal more than actual metal. The company Precision Metals has always hit it out of the park with their offering of odds and ends. I'll get more pics up when the blackening has completely dried and I have it mated to the rest of the 5" gun assembly.

- 97 replies
-
- 6
-
-
- Curtis Wilbur
- I Love Kit
- (and 2 more)
-
Looks like you're making a gem out of a tough kit. Great work so far!
- 176 replies
-
- 3
-
-
- new orleans
- iron shipwrights
- (and 2 more)
-
Hey fellas! I really appreciate those kind words. I wish I had some secret to divulge but the credit all goes to my photo etch bending tool from The Small Shop and then some very pointy tweezers to pick out each rung/step and bend them slightly down. Thanks all the same though, lol.
- 97 replies
-
- 5
-
-

-
- Curtis Wilbur
- I Love Kit
- (and 2 more)
-
Hi Pete! I appreciate your kind words. I'm excited to be so close to the finish line now. Just have to dig deep and avoid the temptation to start on something new before wrapping this one up.
- 97 replies
-
- 3
-
-
- Curtis Wilbur
- I Love Kit
- (and 2 more)
-
Been awhile since I've posted here. Since last time, a move from Columbus OH to Cincinnati OH has occurred. Luckily there were no casualties involved; at least on models I actually cared about. A lot has gone into USS Curtis Wilbur in the meantime. I'll let the pictures speak for themselves. One strong word of caution on this kit, do NOT follow the instructions sequence when planning for the ship's rigging. The kit railings for the flag halyards are poor and at the time ILK would have you attach them, it would result in a CA glue bond between paint layers. Needless to say, I figured this out the hard way when I attempted to secure the EZ Line from the kit railings to the yardarms. My solution was to drill mounting holes in the appropriate deck, bend some brass wire, and loft the rigging accordingly. And trust me, I know the solution in the pictures is not 100% accurate.


- 97 replies
-
- 12
-
-
- Curtis Wilbur
- I Love Kit
- (and 2 more)
-
The kit adds those mounts on Page 20, step 21. Just two little pieces of PE with three bends apiece.
- 97 replies
-
- 5
-
-
- Curtis Wilbur
- I Love Kit
- (and 2 more)
-
Hi Pete! I gotta admit, I follow you on LSP. Your builds are incredible! Just literally finished checking in on your Smurf jet. My best resource has been seaforces.org. https://www.seaforces.org/usnships/ddg/DDG-54-USS-Curtis-Wilbur.htm I have not seen anything definitive on one set way of rigging from one DDG to another, but in the kit there are rails that get mounted just in front of the flag bags (hopefully someone can correct me if this is the wrong term). The lines for the signal flags go from these rails, around the back of the tripod, to the lower yard. There are also two pair of three antenna lines that go from those mountings on the front of the bridge piece to the upper yard. There is one last line for the ensign (I think?) that gets tied off to a mounting spot on the rear of the mast and goes to the same railing as for the signal flags. I have quite a bit to update on the forum with my recent progress on CW. From what I've seen so far, I don't know if the huge aftermarket sets are worth the cost, but that's only my opinion. The kit is fairly well detailed but also kind of a work of fiction as there are some configurations that do not add up to what is present in online pictures. They are also releasing a Flight IIa kit soon, but I'd be willing to bet they use the same hull which would be off by about five scale feet in addition to other shape concerns. All that said, I've really enjoyed working on her and overall it's been a rewarding project so far. Thanks, Patrick
- 97 replies
-
- 4
-
-
-
- Curtis Wilbur
- I Love Kit
- (and 2 more)
-
Thankfully that hull plating is not present on the plastic kit hull. I wonder if it's just an artifact from their CAD modeling.
- 97 replies
-
- 2
-
-
- Curtis Wilbur
- I Love Kit
- (and 2 more)
-
I've been seeing a lot of pictures for this really big set and other smaller sets from HS Models. The detail looks exquisite but some of it also seems a bit egregious. This is only an assumption, but looking at the pictures, the dark blue details would be resin? And if that really is the case, some of the molded on detail on the bulkheads, such as little thin wires and other things, might be a touch too much to sand off and replace in resin. Looks like they would also have you remove the VLS systems fore and aft. At some point, they might just look at issuing an entire kit, LOL. The extra detail will be lovely, but some of this might be a little over the top, IMHO.
- 97 replies
-
- 3
-
-
- Curtis Wilbur
- I Love Kit
- (and 2 more)
-
Thank you! Apparently there are quite a few upgrades coming out for this kit now. When it's all said and done, I'm willing to bet the cost of all of the upgrades will far exceed the cost of the kit. That said, the upgrades appear to be very detailed.
- 97 replies
-
- 4
-
-
- Curtis Wilbur
- I Love Kit
- (and 2 more)
-
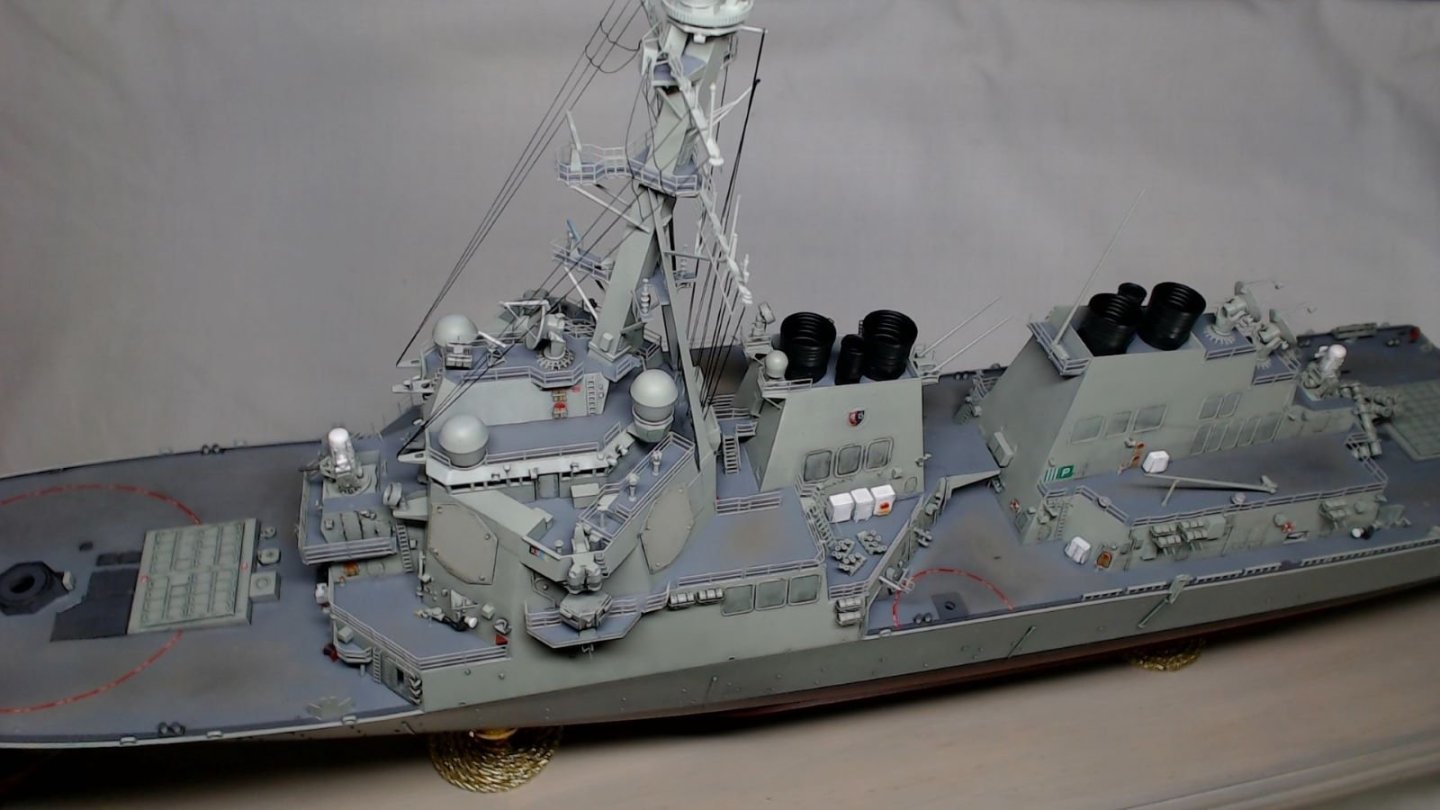
Hi all! Since it's only once every four years, figured I might as well post an update on February 29th. Nothing really needs discussed that the images can't show off themselves. Thanks for looking!


- 97 replies
-
- 12
-
-

-
- Curtis Wilbur
- I Love Kit
- (and 2 more)
-
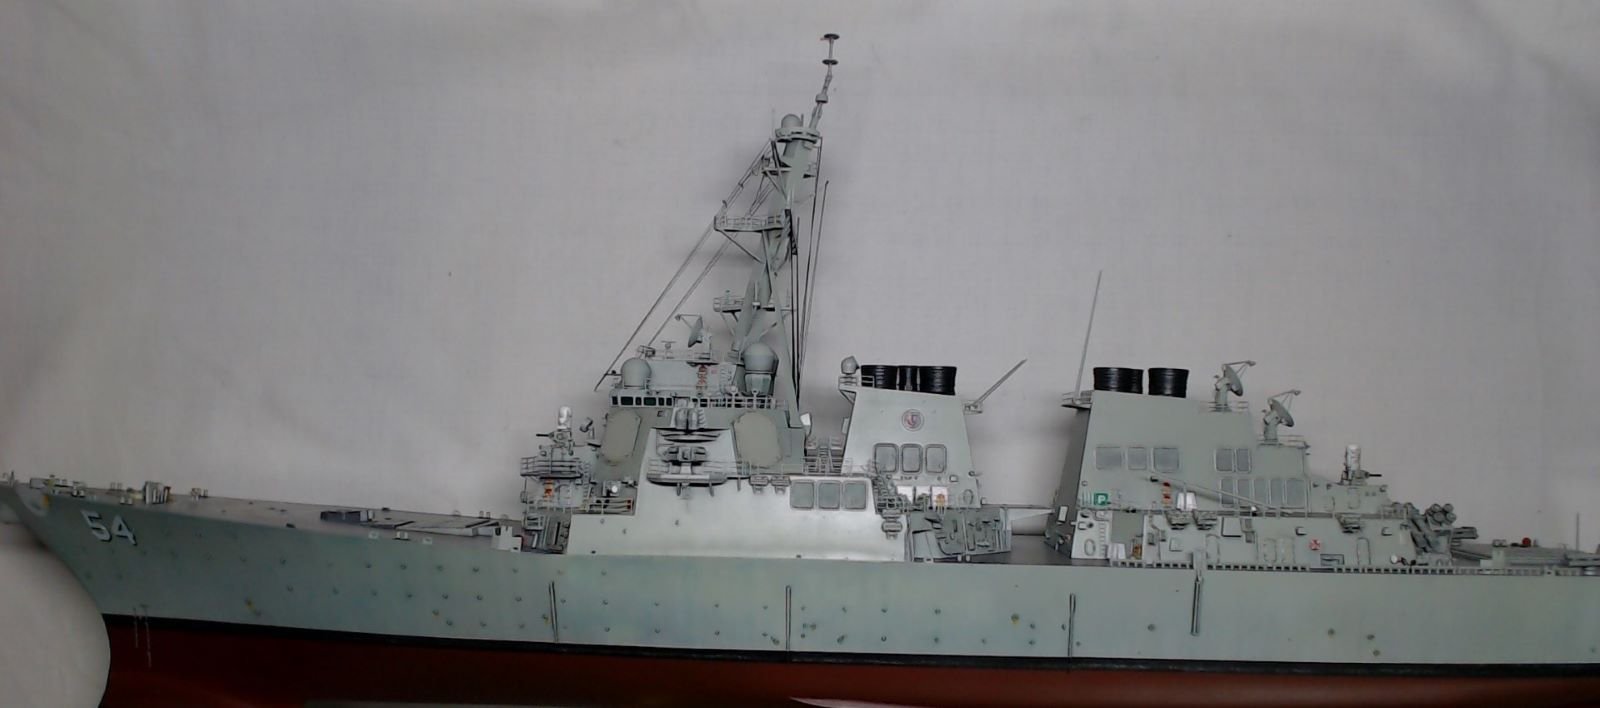
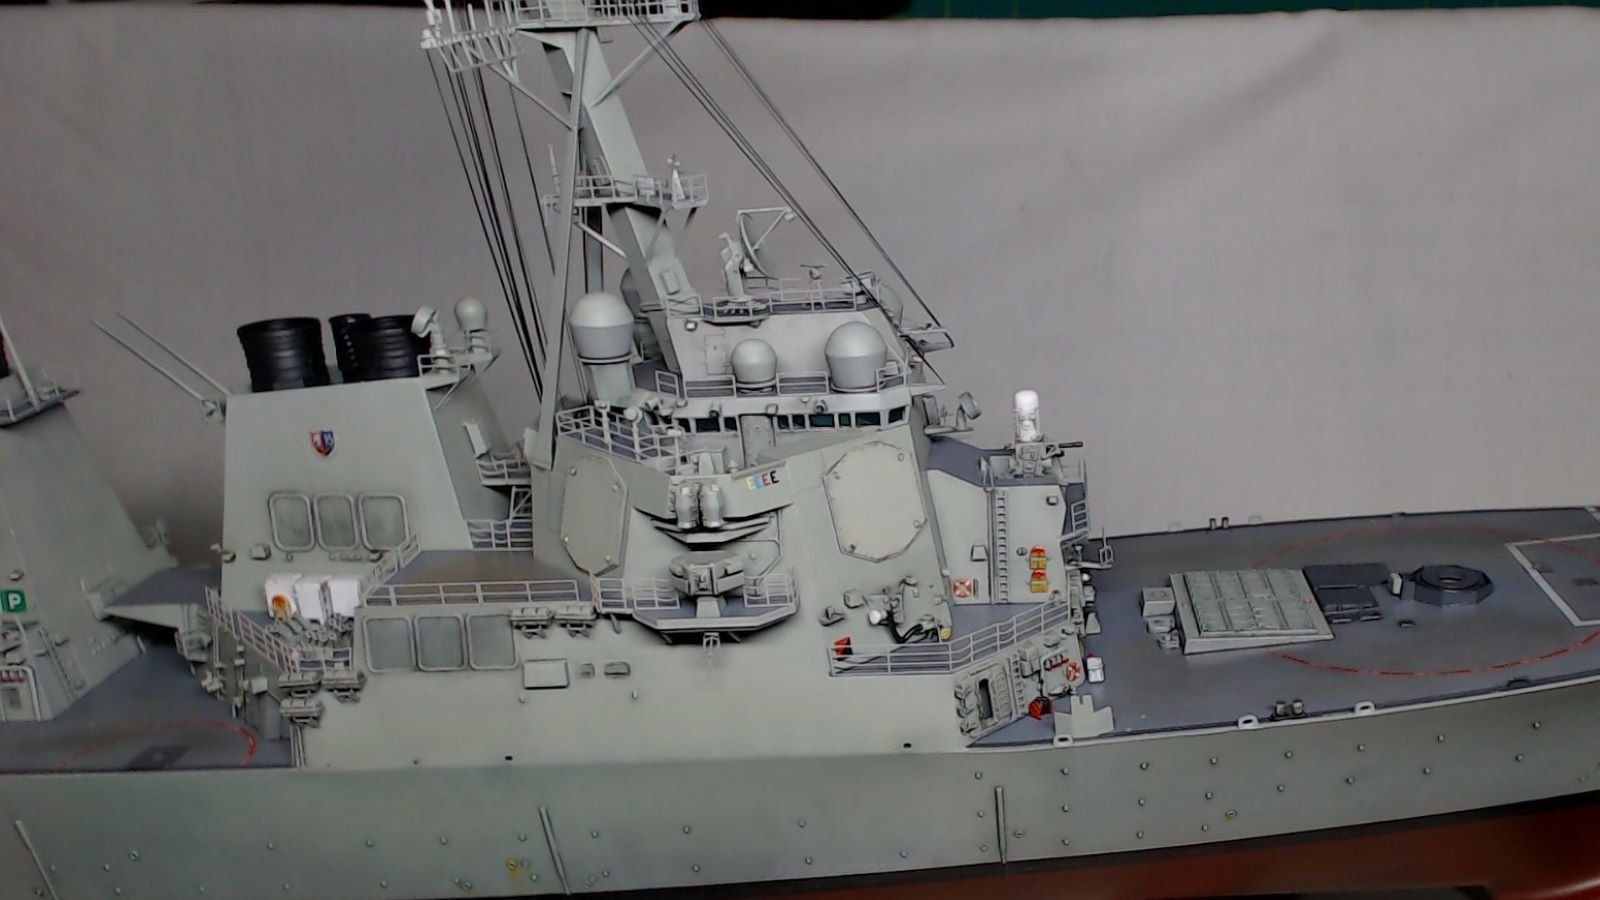
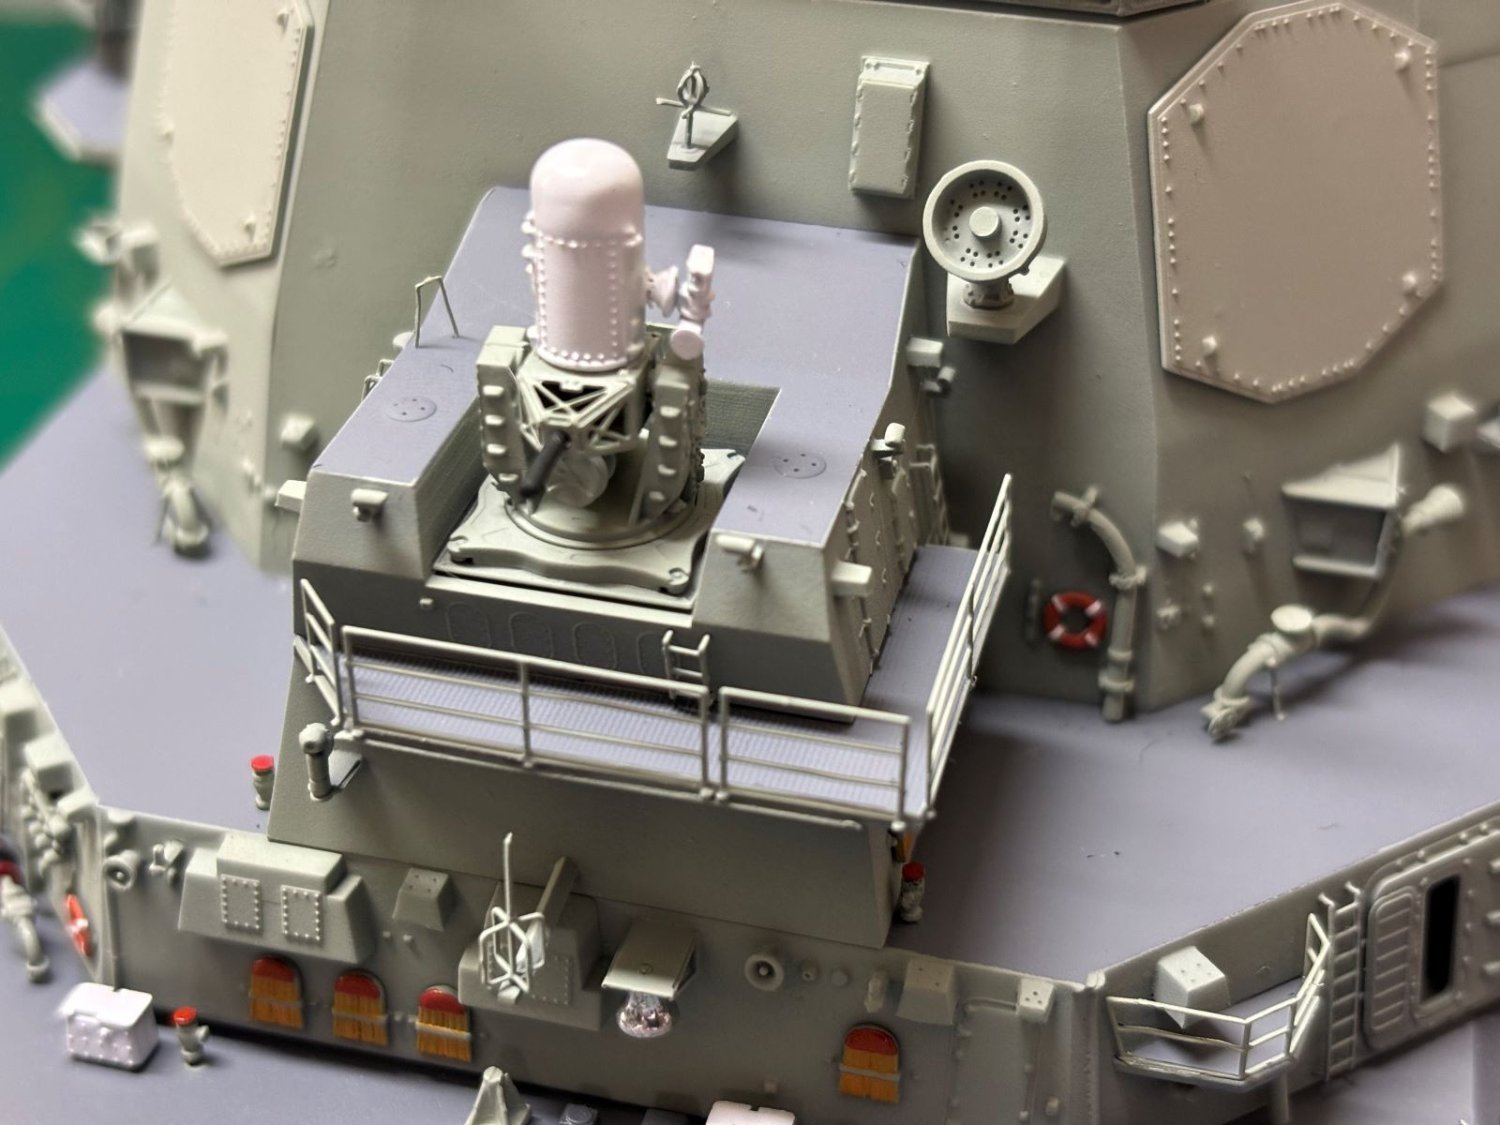
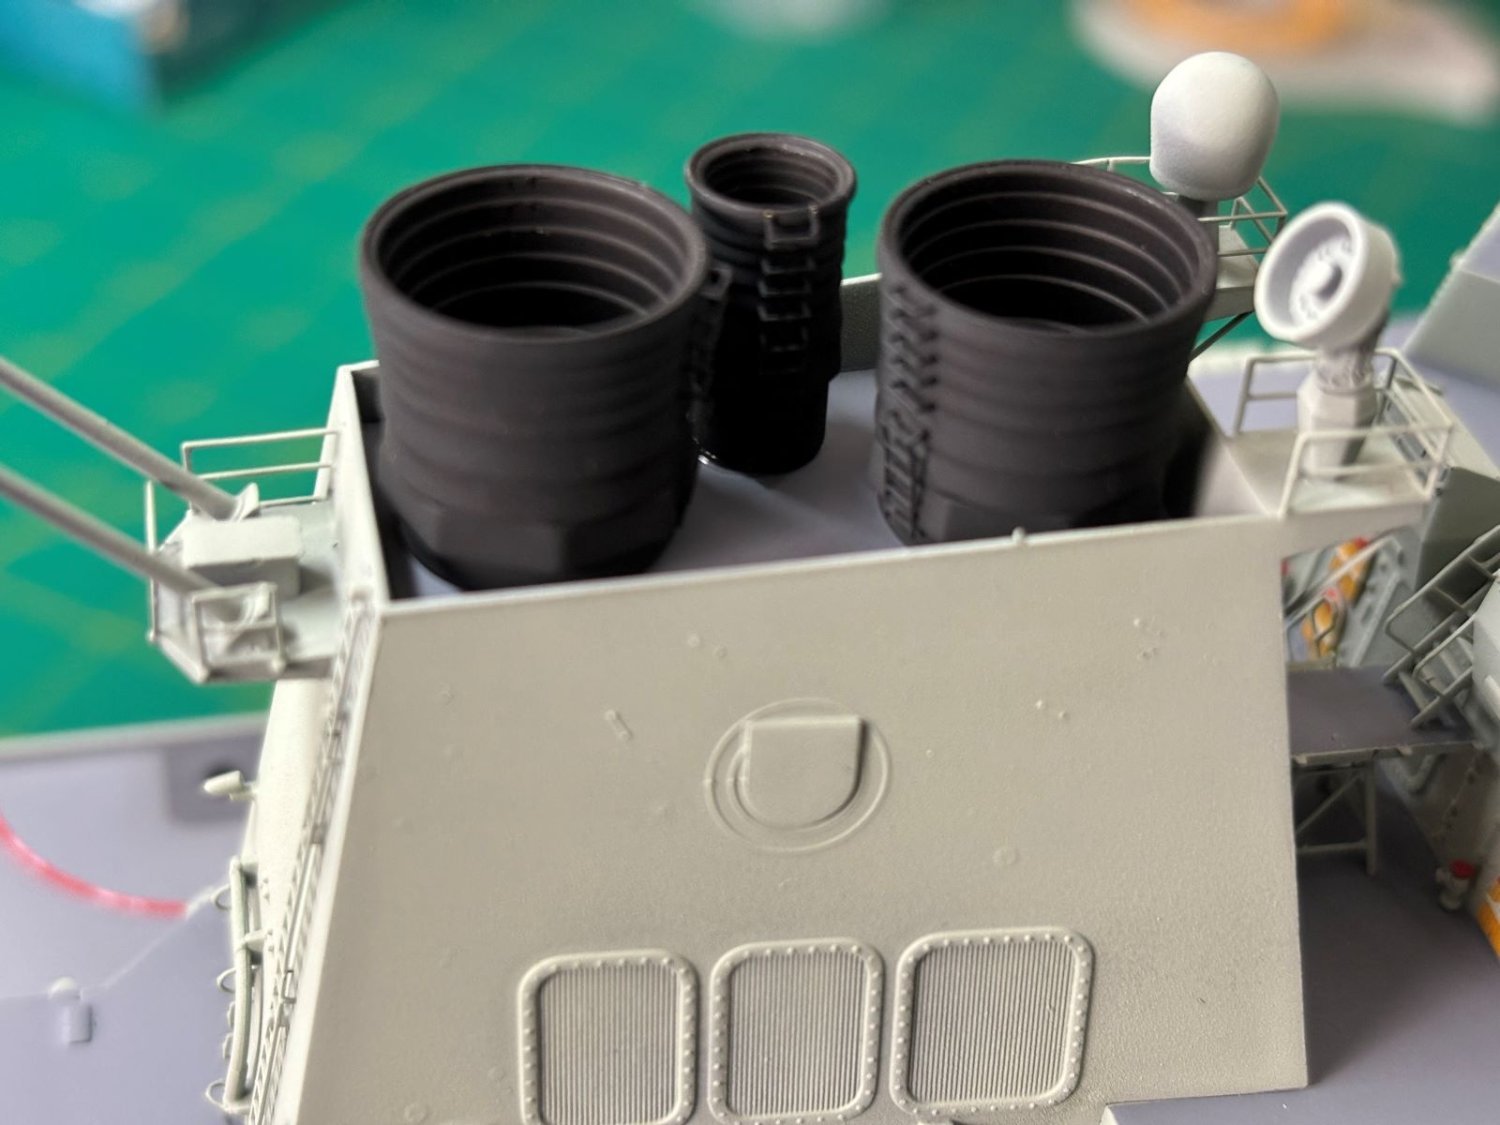
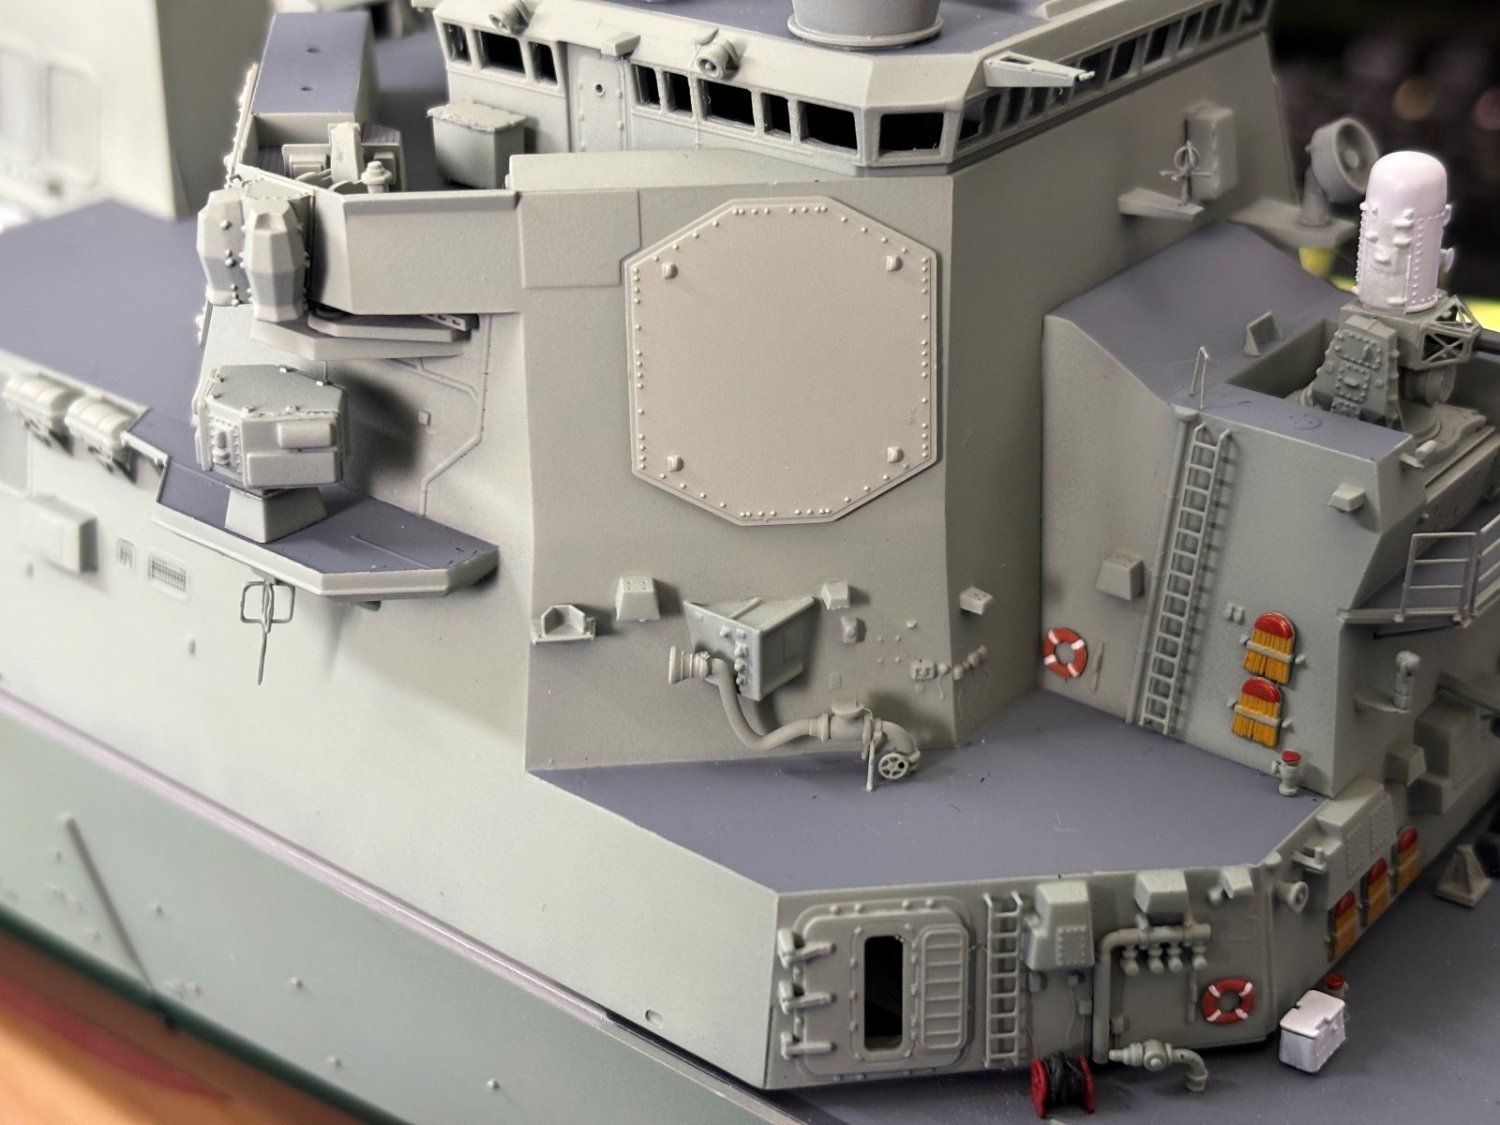
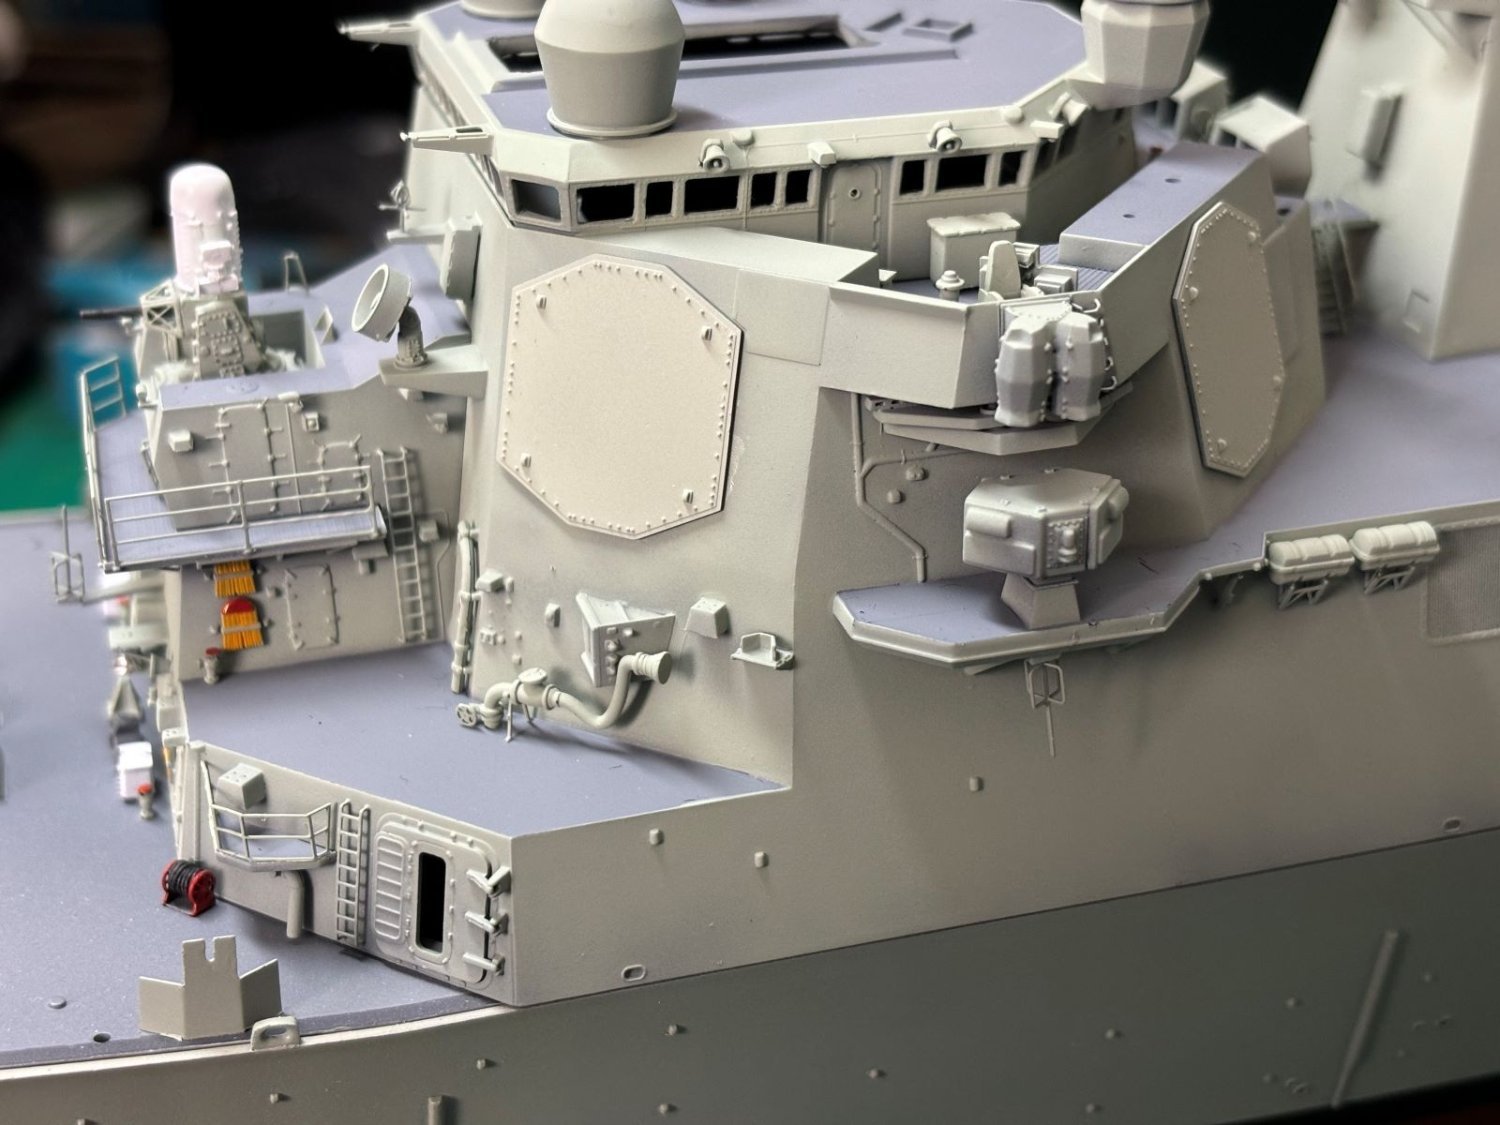
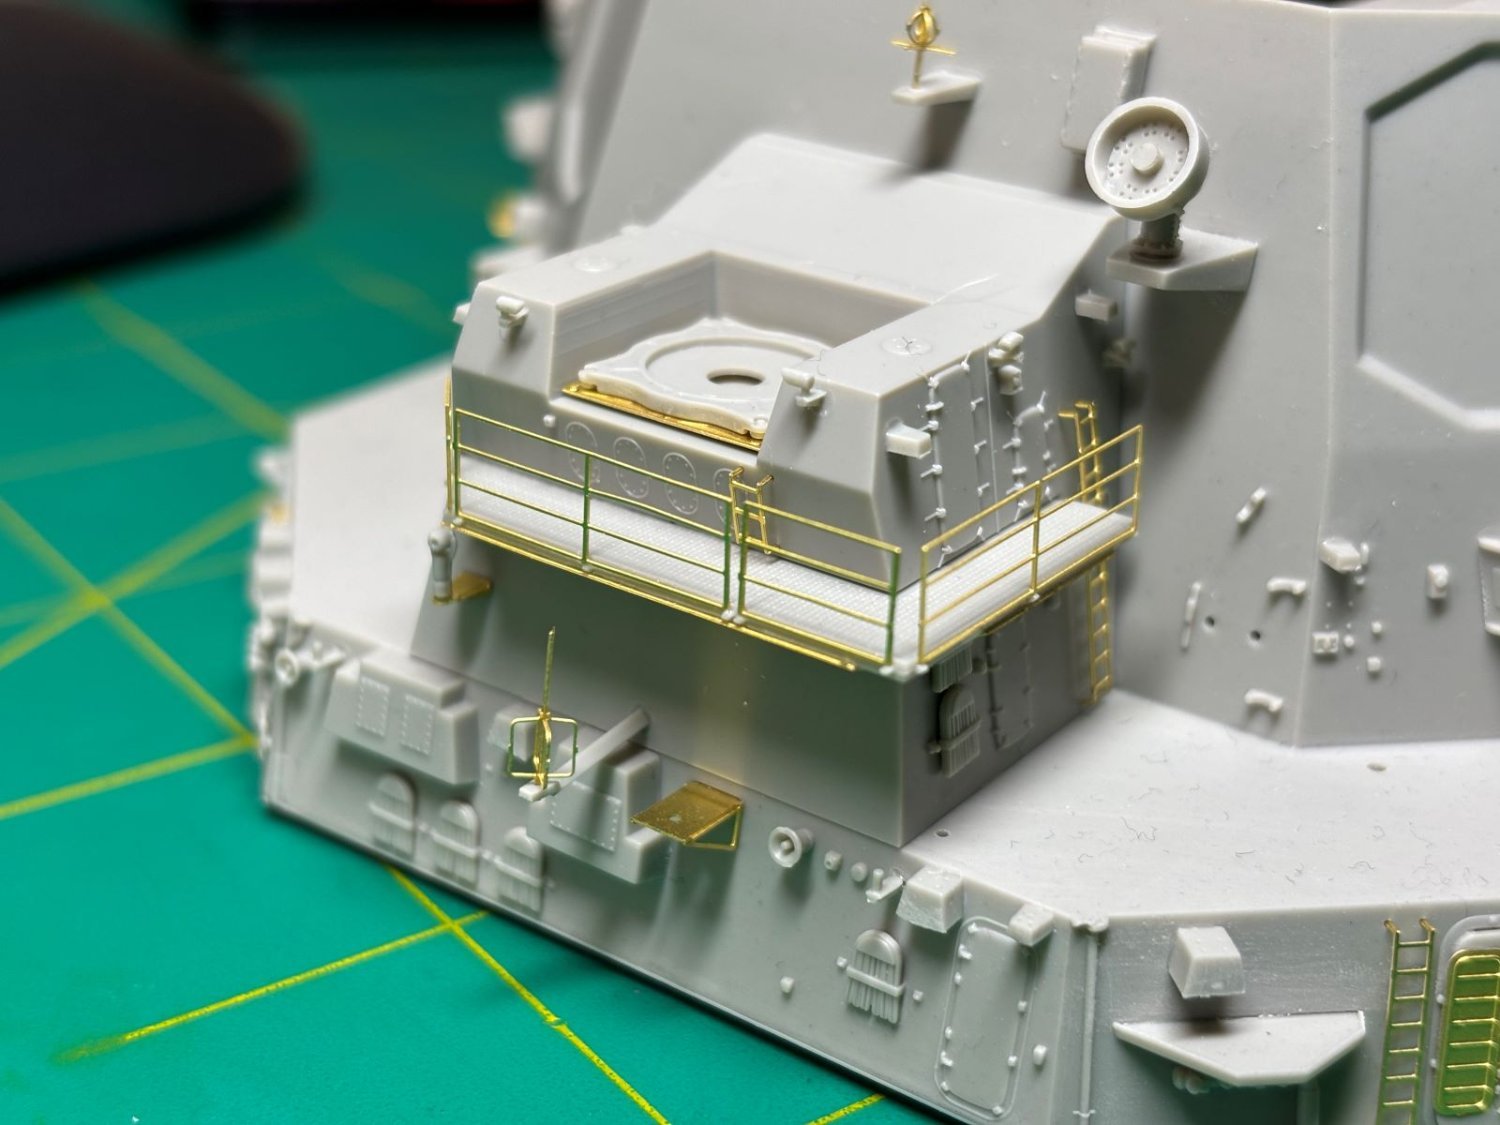
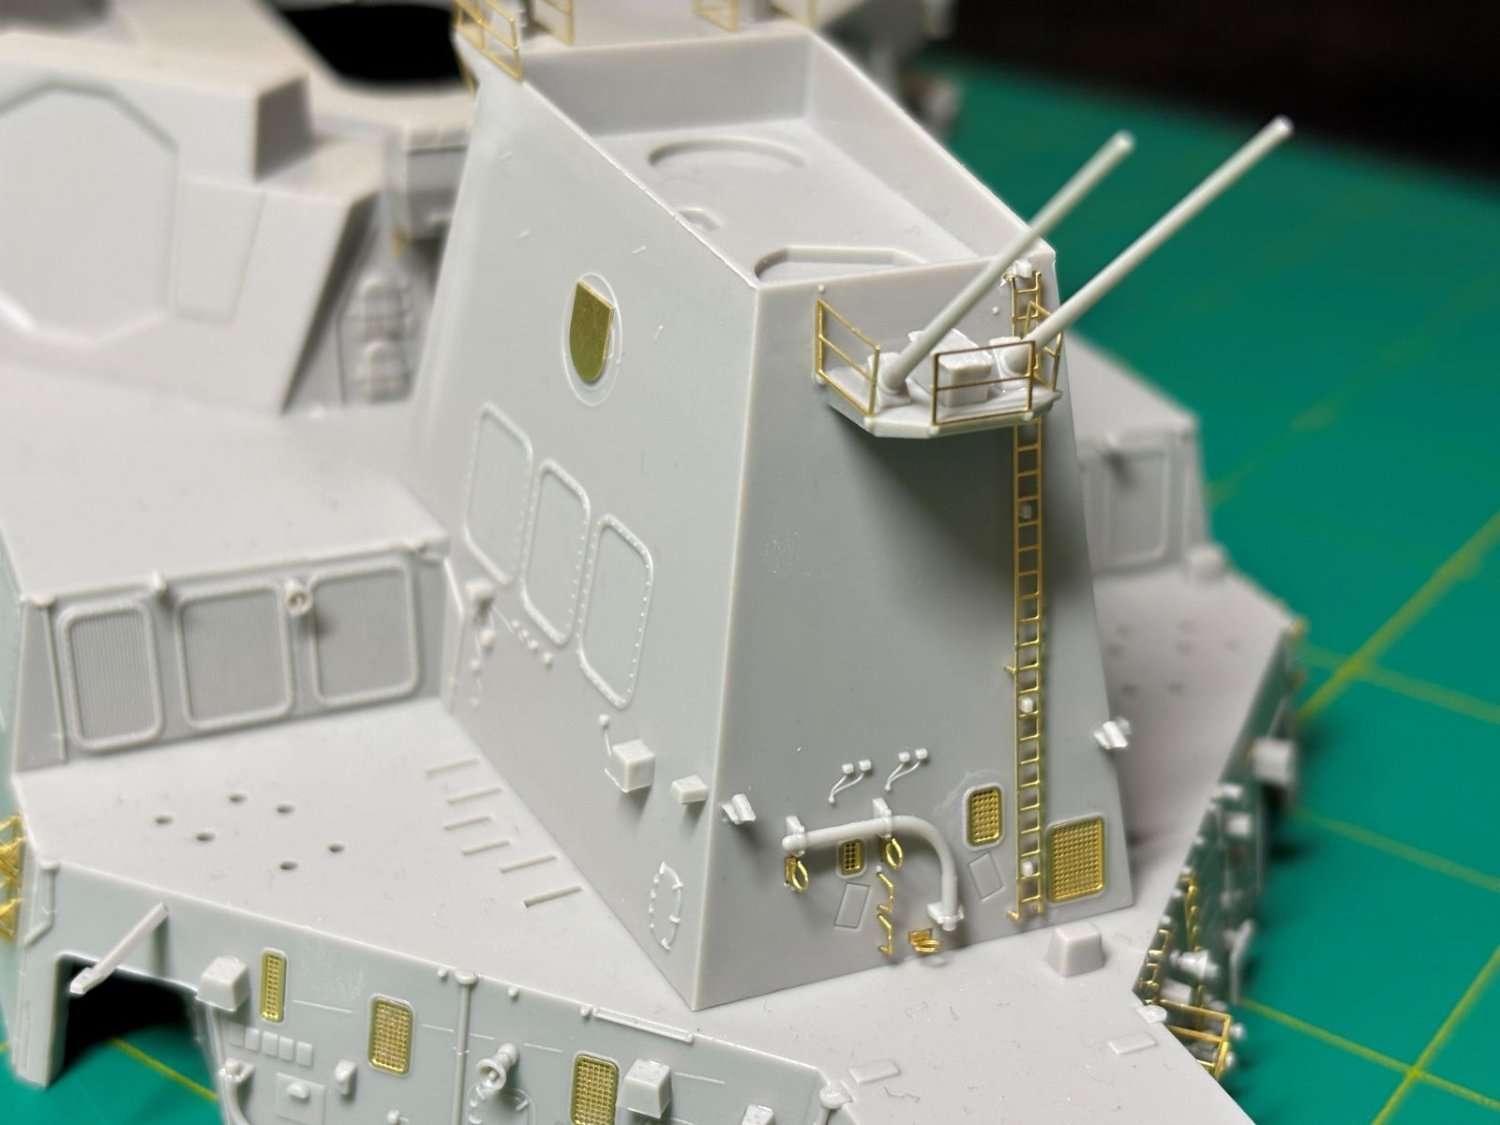
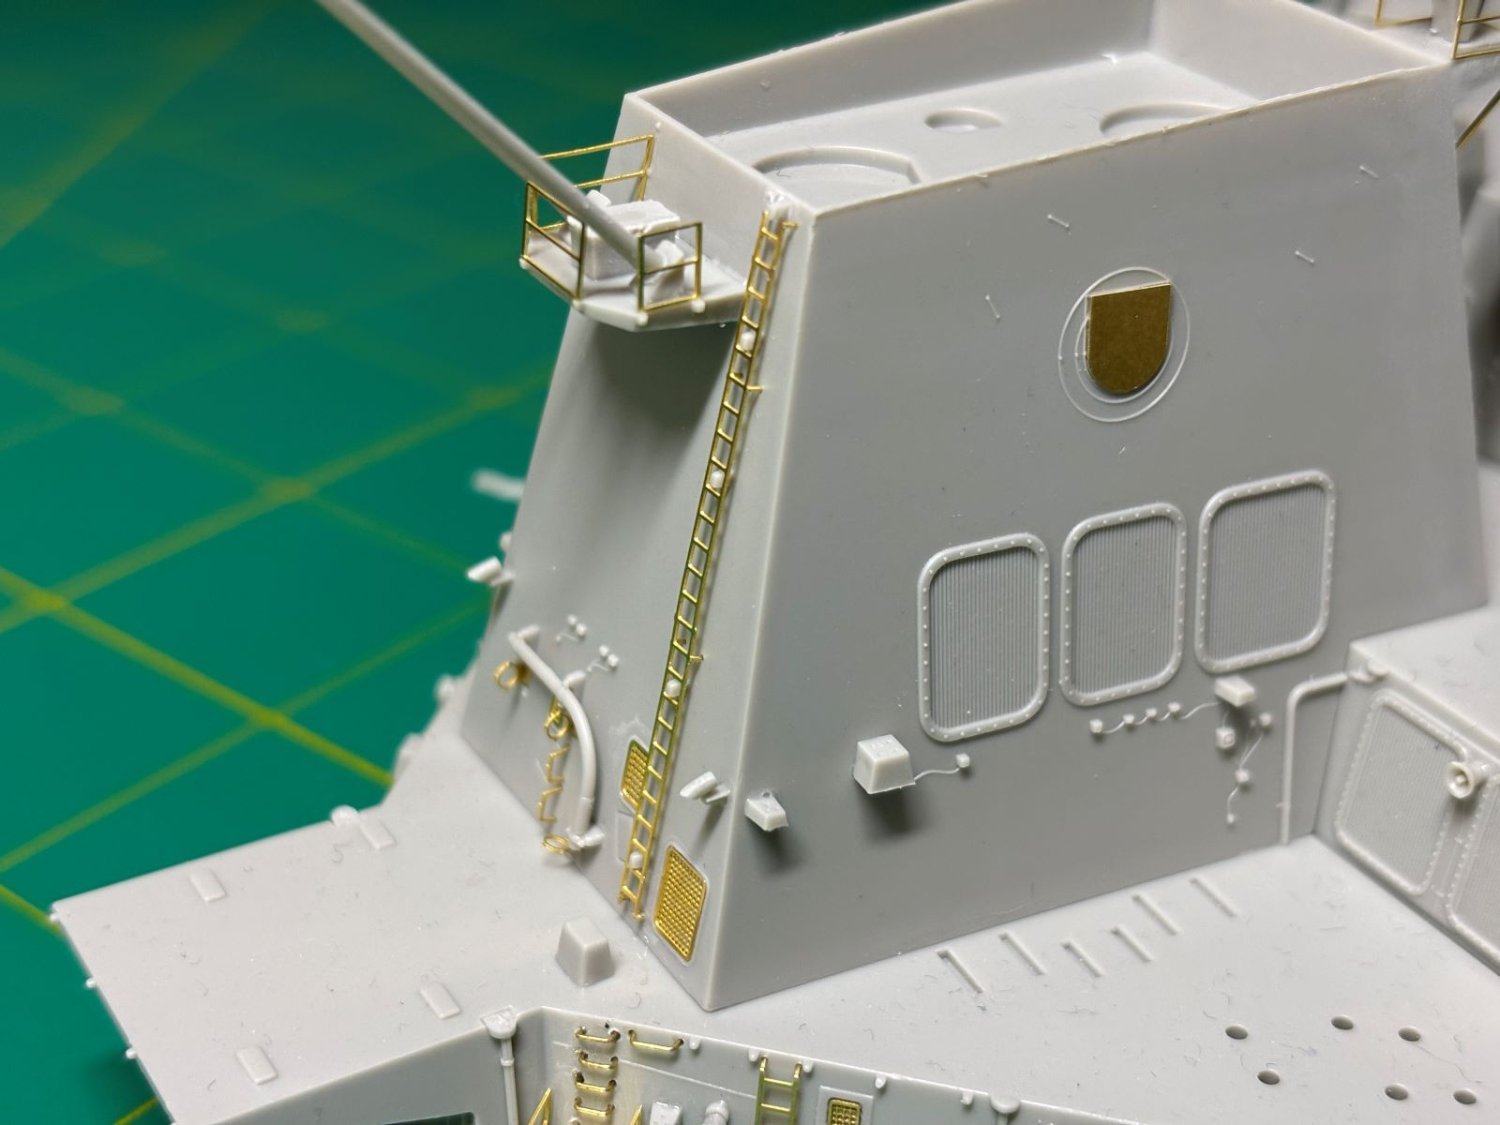
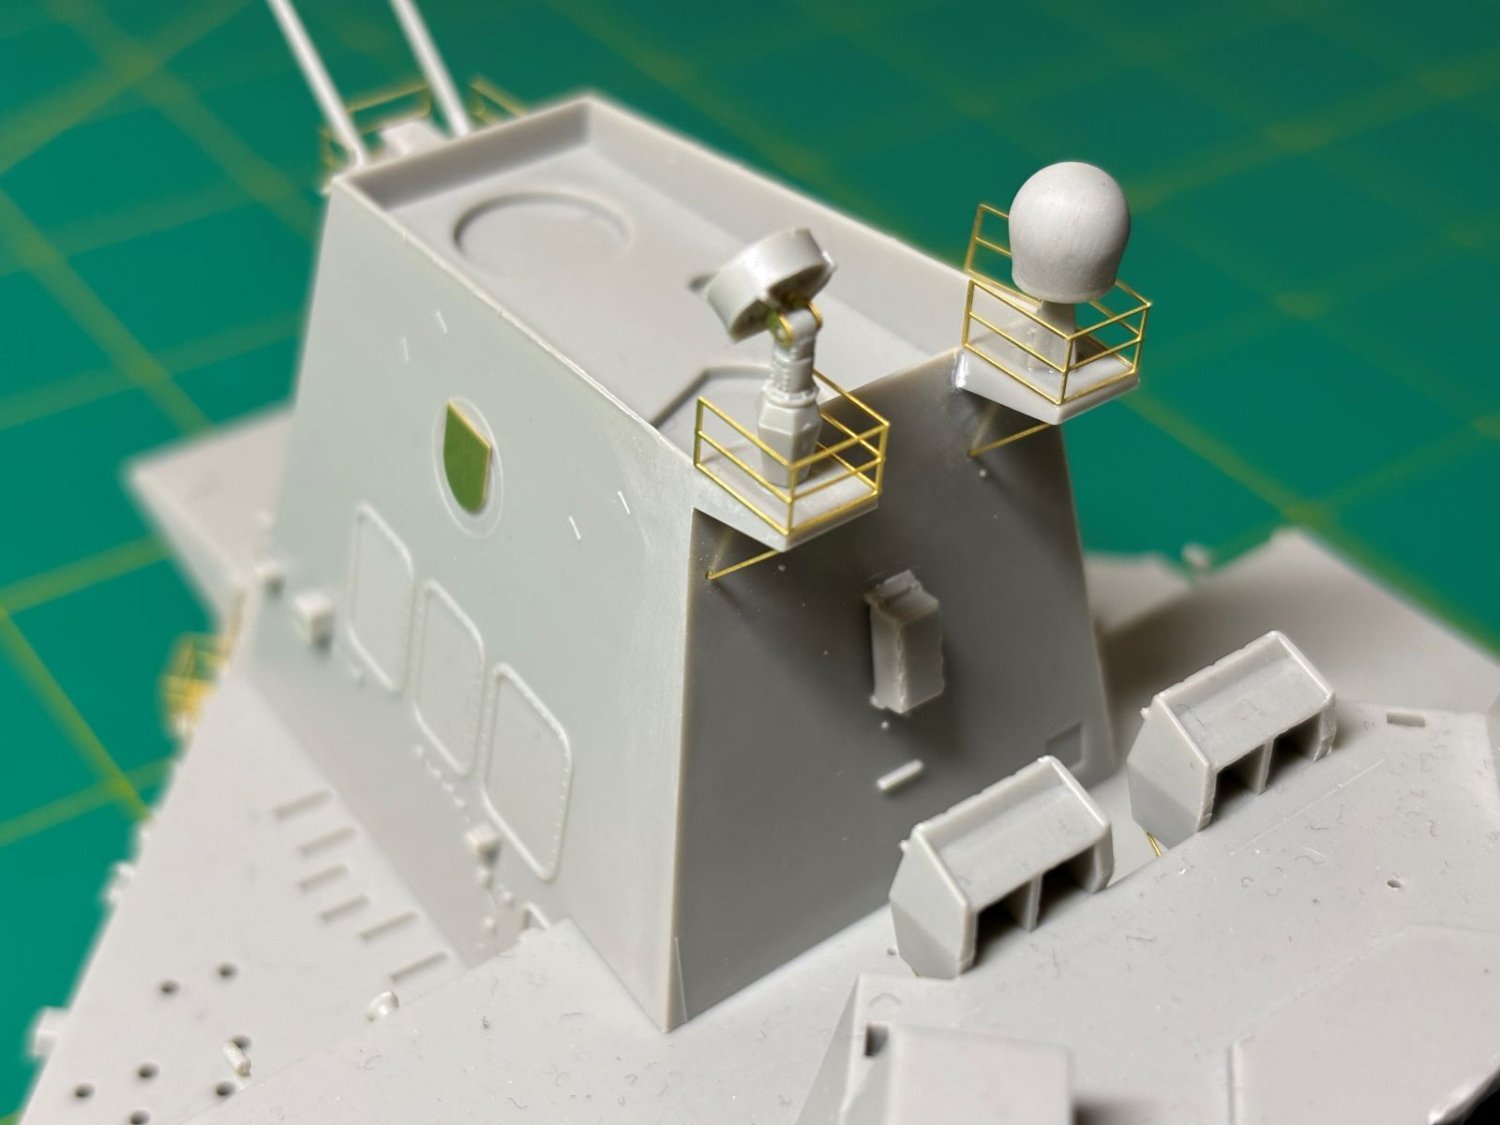
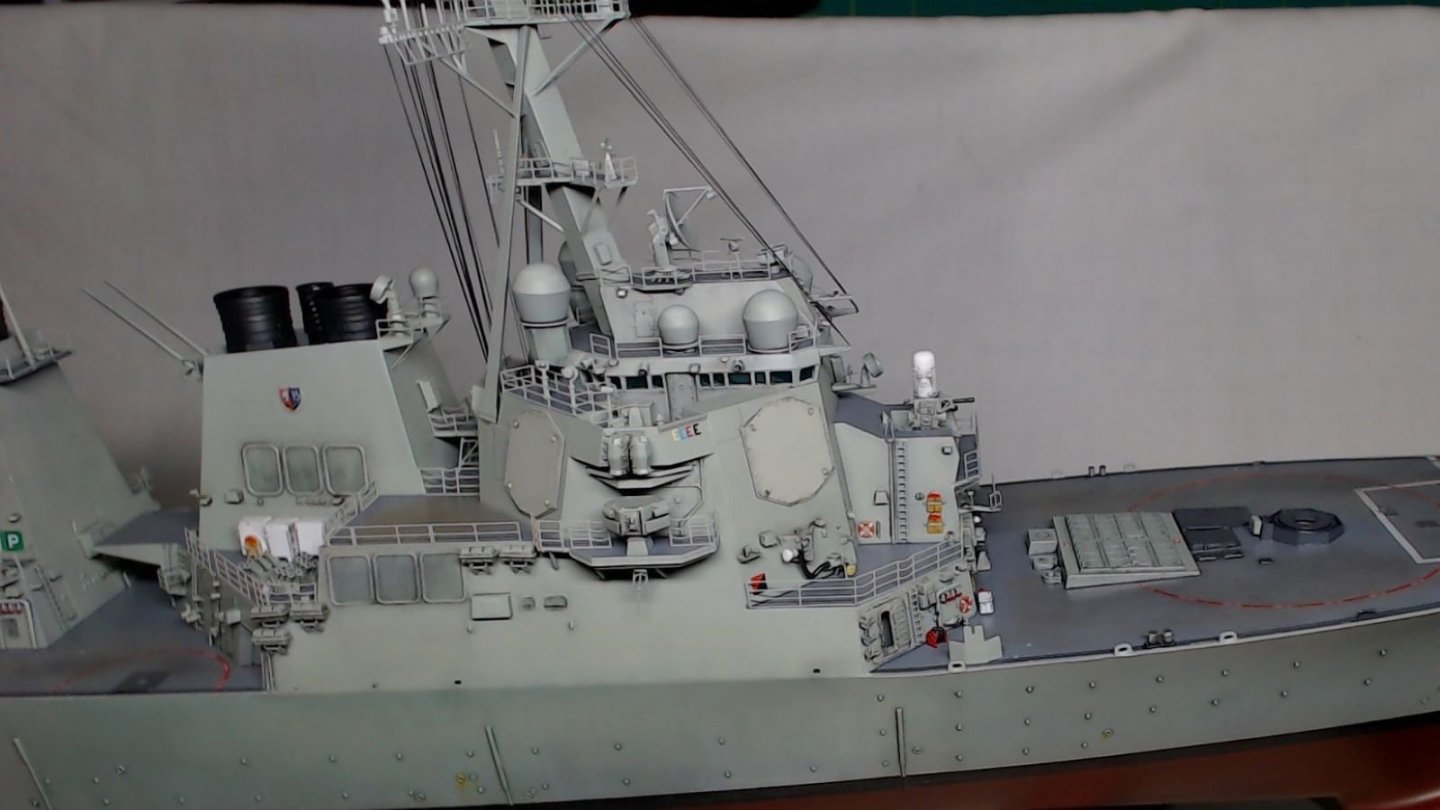
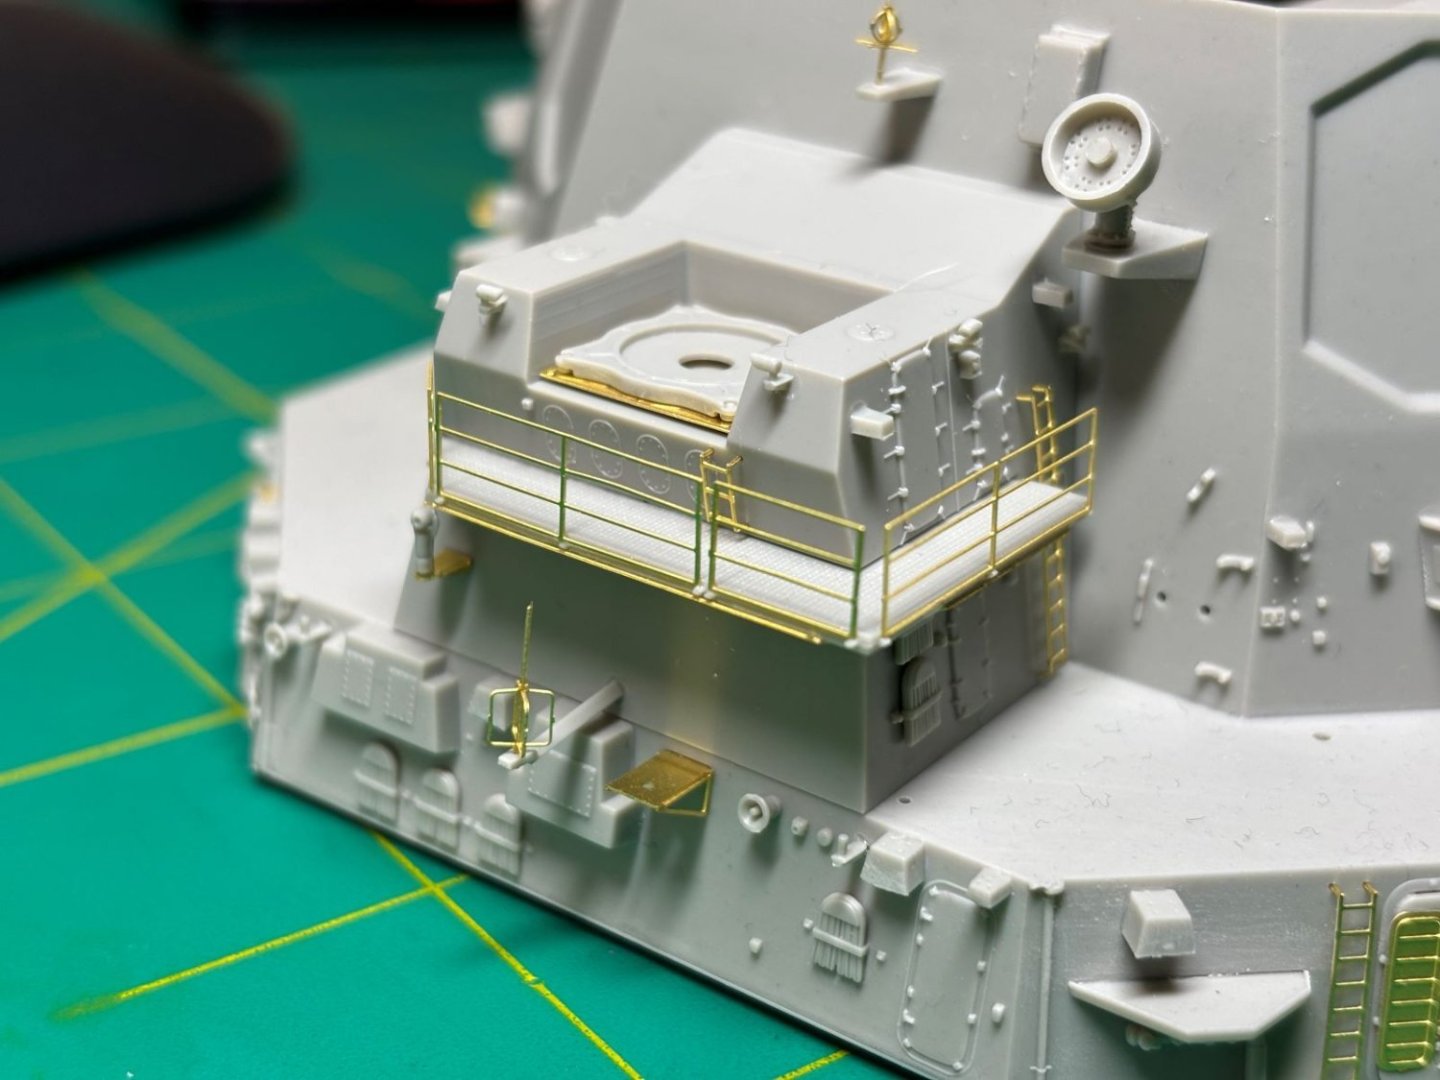
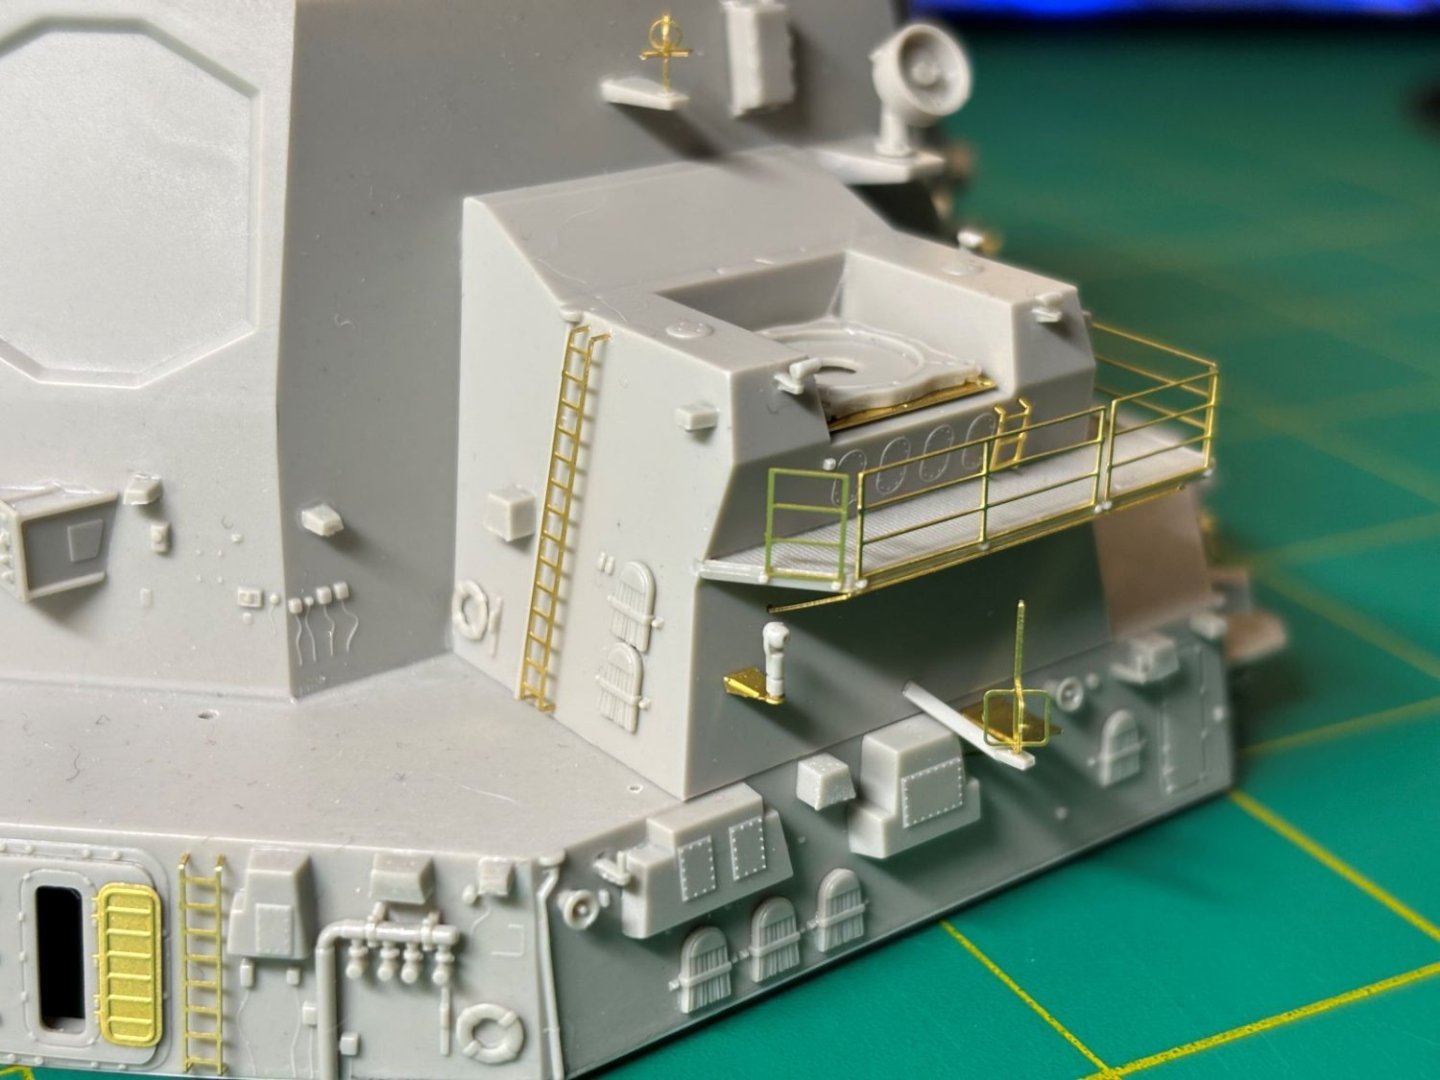
Hi all, Thanks for the looks and likes. It's been a bit since I've posted on this project. I've been pouring a lot of efforts into the main superstructure on this ship. Something I've learned since last time; this kit is actually geared more for a much more recent time period than I had originally thought. Comparisons between the kit and online pictures make this much more clear to me now. Here are some pictures of my progress. I'm still needing to paint and decal much of this before I permanently stick it down to the deck and hull. I hope you all enjoy and thanks for following!


- 97 replies
-
- 10
-
-
- Curtis Wilbur
- I Love Kit
- (and 2 more)
-
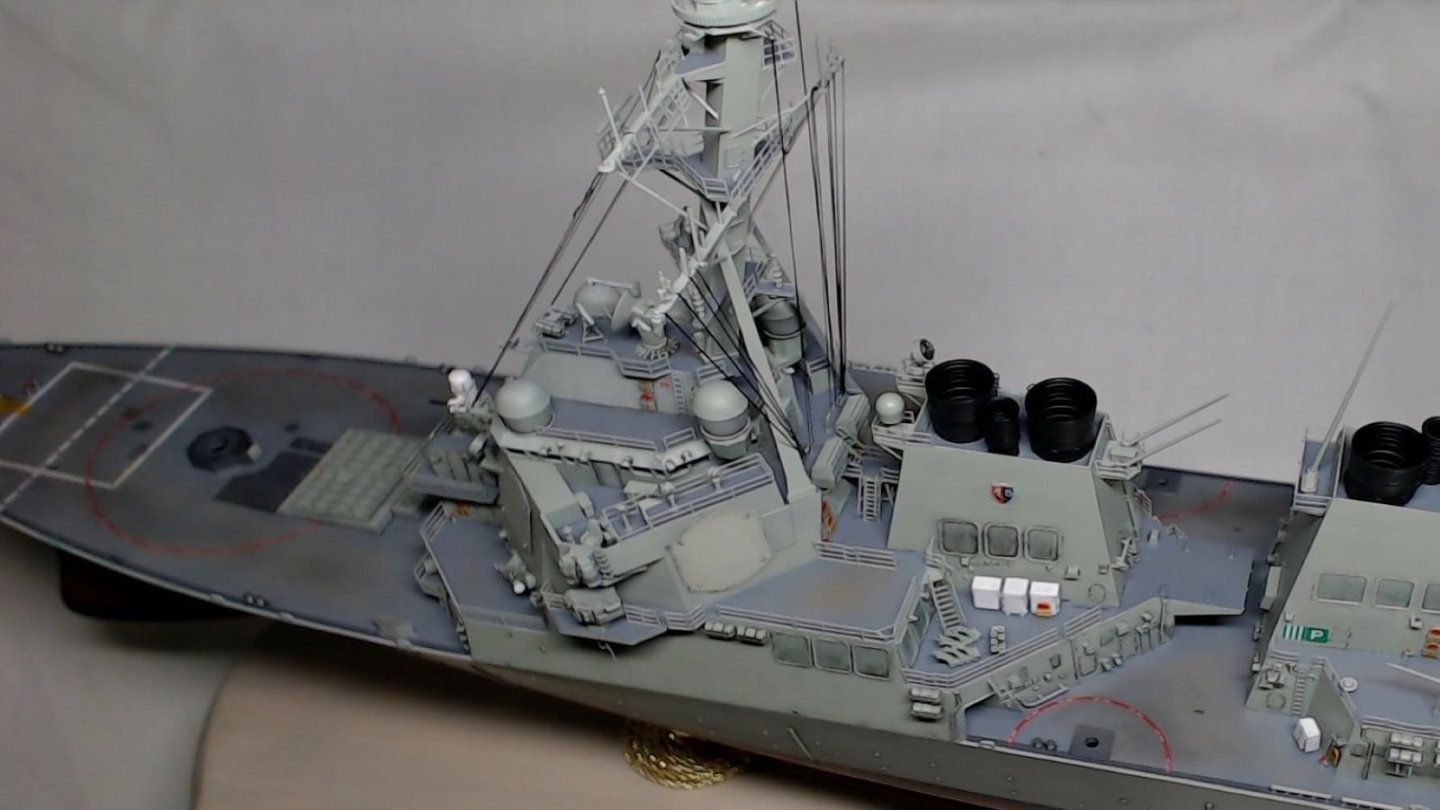
I strayed completely off the kit's recommendations. In fact, I feel like I've strayed off of what most recommendations were. For the vertical surfaces and most of the deck details, I have been using XF-12 (J.N. Grey) over a darker grey to help give some depth. For the decks, the non-skid is painted in XF-53 (Neutral Grey) and the slick-deck is painted in XF-24 (Dark Grey). Some of the details are in white and some are in red, as well. I went with these colors after looking for some time at online resources and these colors looked closest for me and how I wished to represent the subject.
- 97 replies
-
- 3
-
-
- Curtis Wilbur
- I Love Kit
- (and 2 more)
-
The hull is pretty thick, but cutting it for a waterline model is definitely doable with a Dremel or Proxxon, or a lot of manual elbow grease. Edit: to add to the above, this is one 1/200 scale ship where I think waterline would be cool since the hull isn't as large as a bathtub.
- 97 replies
-
- 5
-
-
- Curtis Wilbur
- I Love Kit
- (and 2 more)
-
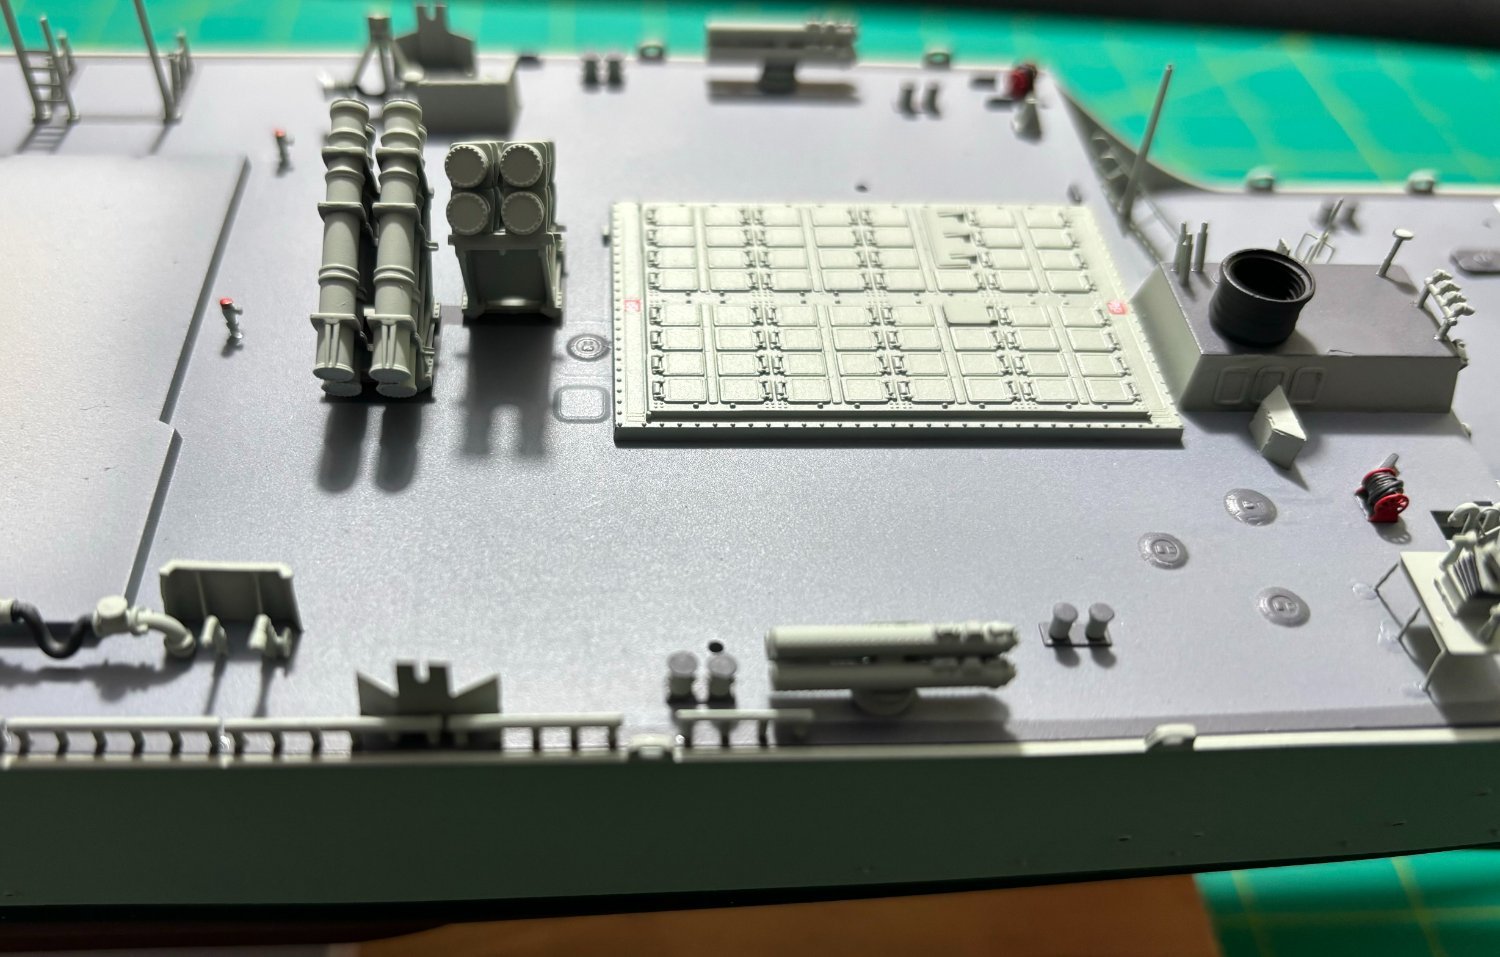
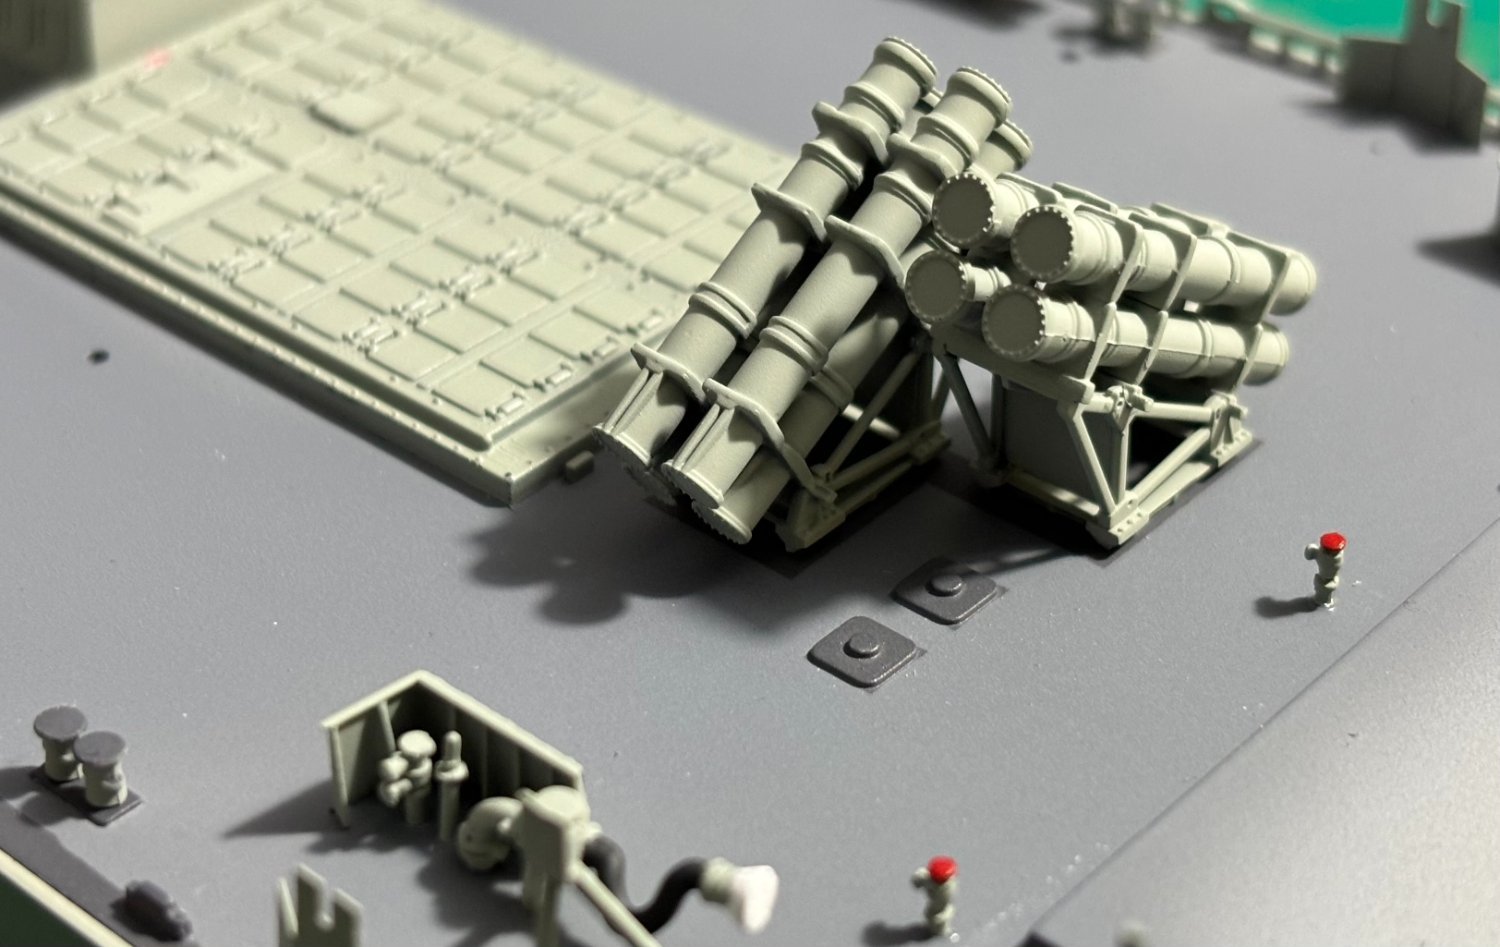
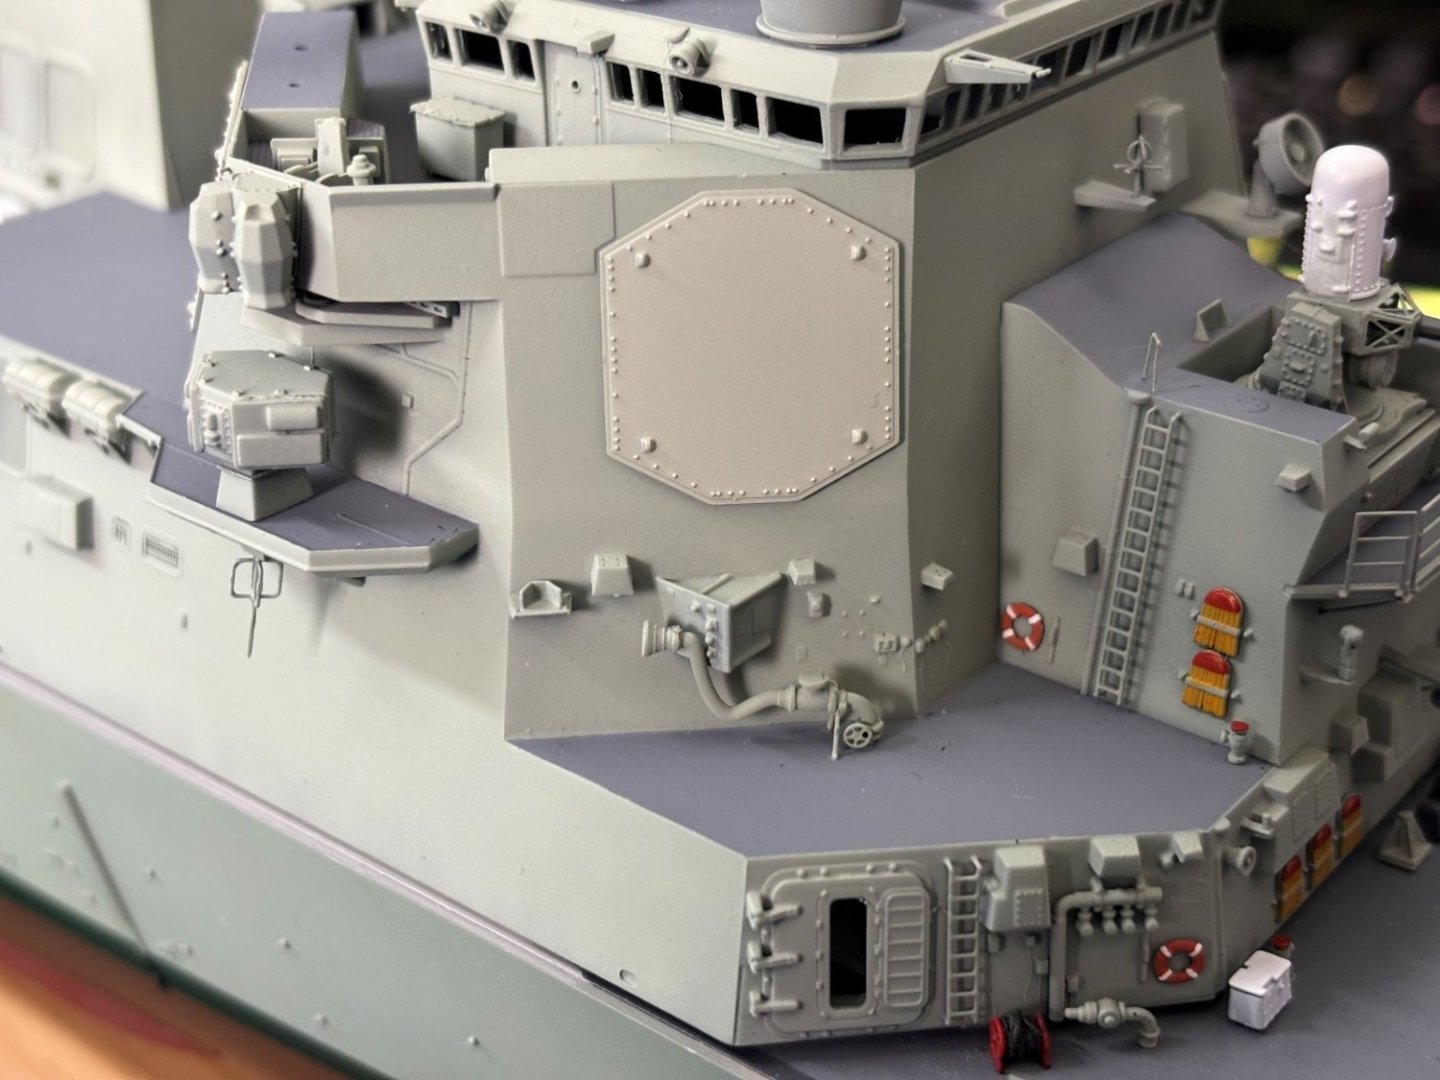
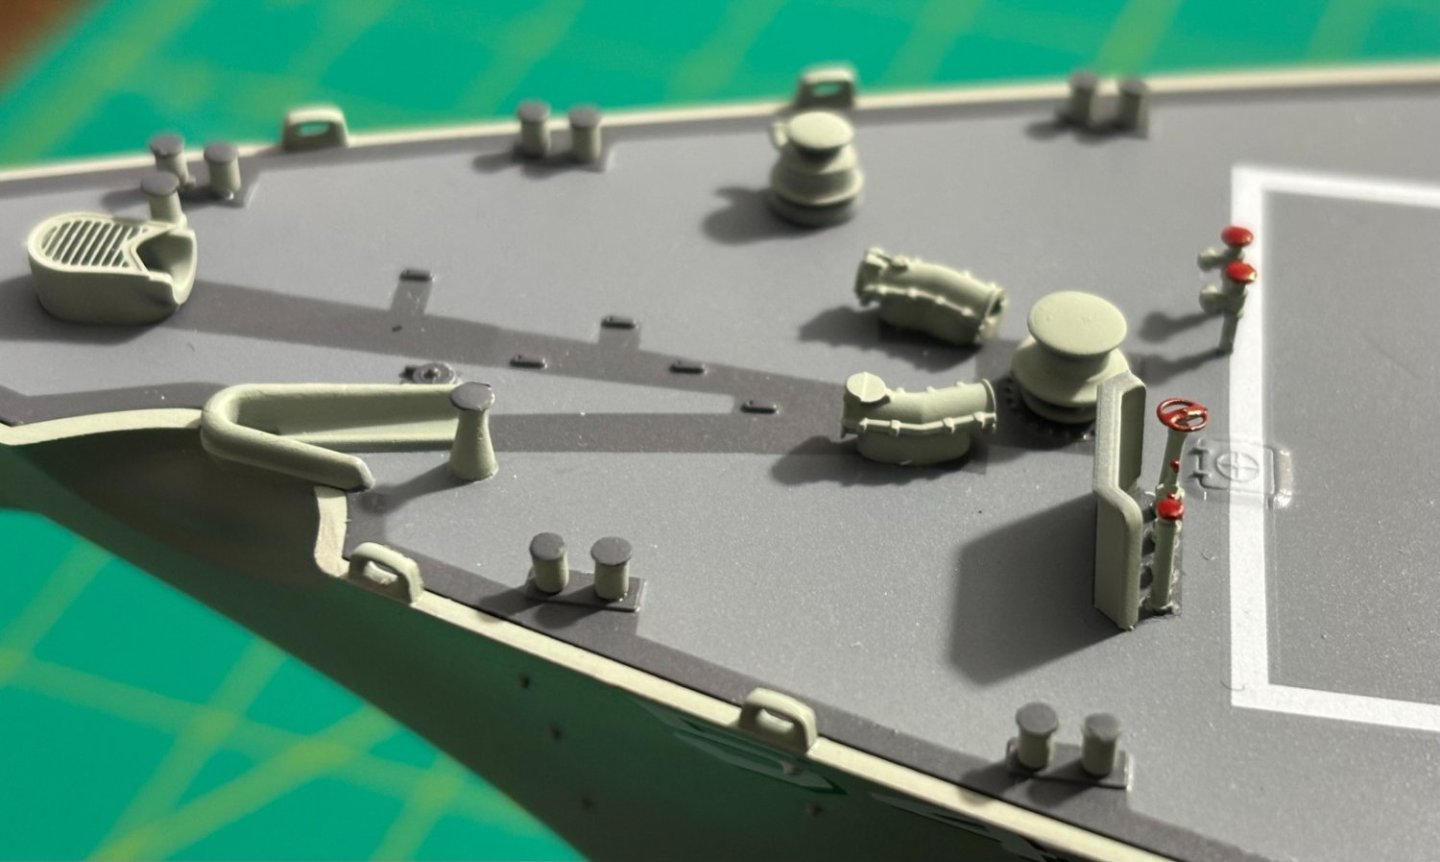
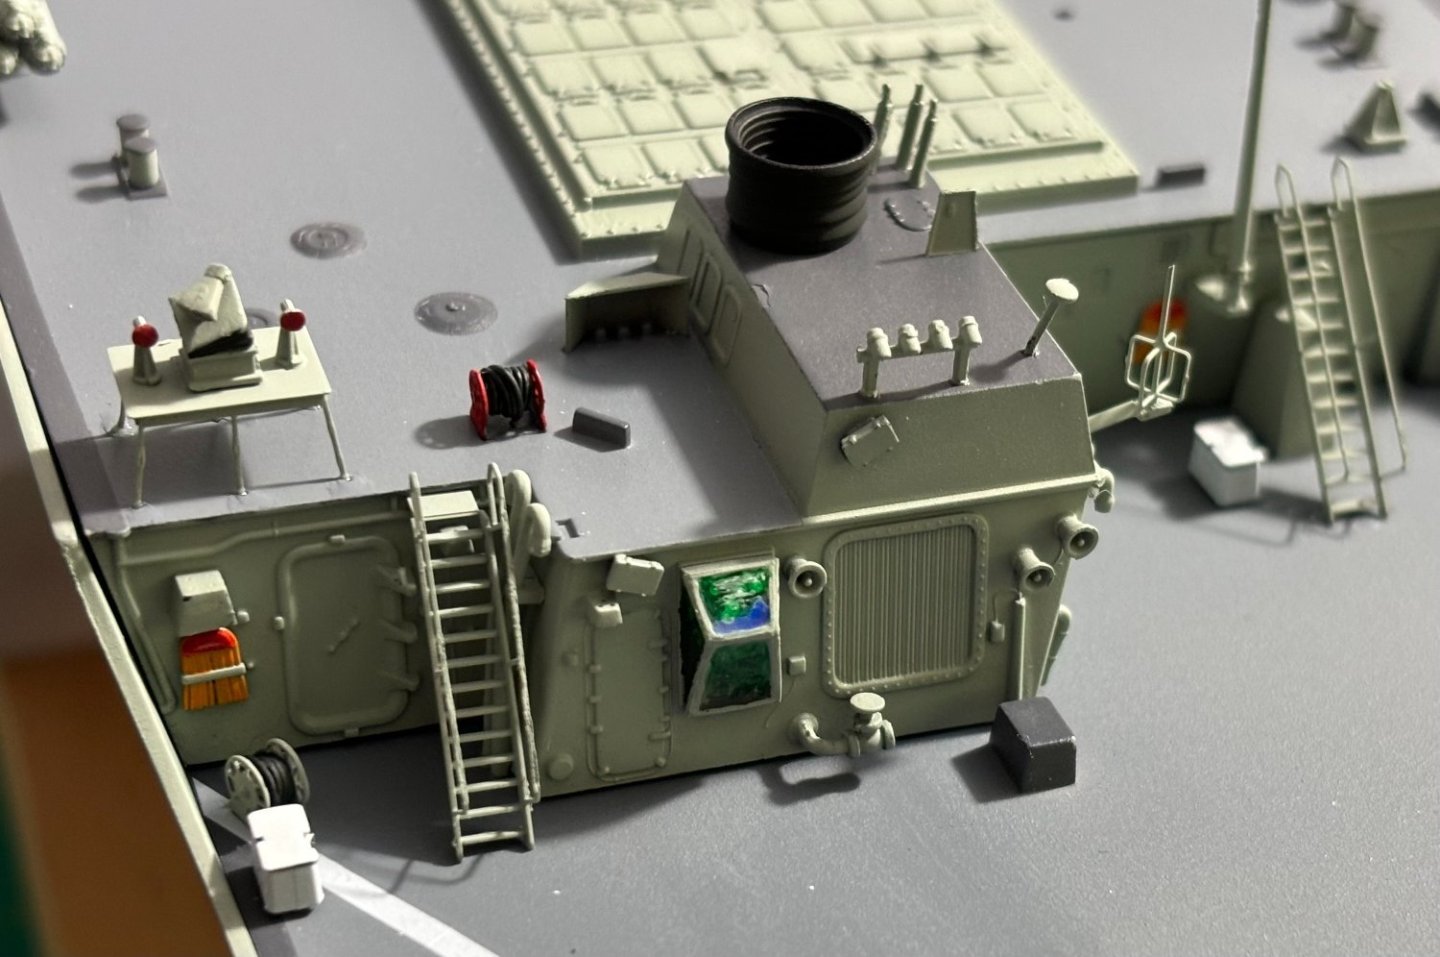
I appreciate all of the likes and comments; they really provide encouragement when this project throws its curve balls at me. I worked through steps 4-12 in the instructions. These steps have you have add many tiny little deck details. These comprise 200+ tiny little parts and I decided to conquer all of those steps in one large "MEGA-STEP" 🤪. I prepared them by separating them from their sprues, cleaning them up as best I could, and then sticking them in groups to paint stirring sticks with tape sticky-side up. Once primed and painted, I was able to detail paint anything needing it and then they all got stuck on the hull and deck. While it's very far from perfect, I'm happy with my results and it passes muster with a one foot viewing distance. Ugh! The macro lens is brutal. I couldn't see that seam line on the Harpoon launcher until the below picture. Thankfully, after worrying about it for several hours, I figured that it should not be easily visible if at all since that side will be facing the funnel structure in pretty close quarters. Thanks for looking in!


- 97 replies
-
- 10
-
-
- Curtis Wilbur
- I Love Kit
- (and 2 more)
-
Thank you very much! I'm going to start looking, but if I don't find one, I'm going to start one; Trumpeter Decals Survivors Club. I'll let ya know how that pans out. 🤣😆🤣😆
- 97 replies
-
- 3
-
-
- Curtis Wilbur
- I Love Kit
- (and 2 more)