HOLIDAY DONATION DRIVE - SUPPORT MSW - DO YOUR PART TO KEEP THIS GREAT FORUM GOING! (Only 20 donations so far - C'mon guys!)
×


maaaslo
-
Posts
372 -
Joined
-
Last visited
Content Type
Profiles
Forums
Gallery
Events
Everything posted by maaaslo
-
the hint that gave it up was the one about italian loving radio. Marconi was a great man. and had a beutyfull yacht... well, but it was a tough one i admit,,,
-
Elletra the name is
-
hi fellow modellers. i have some time ago purchased the dremmel tool from RotaCraft. very basic one, was cheap and came with all sorts of attachements. it did its job and then it was sitting in the cupboard waiting for its time. the time came when i have got my Victory from deagostini and have been fairing the hull. again, it did its job. after fairing i tried to create a tool to easen up the chamfering process for planks. i have made simple enclosure in form of table and have somehow managed to attach this dremmel inside with the sanding drum sticking out of the table just enough to use it as sander... and here comes the problem. the drum sander kit is not spinning as it should. it runs on eliptical curve rather than on circle. looks like the pin is bent, but i have tried a few of them and these are straight as one can be. would you think that this is a problem with the chuck on the dremmel? i know its a cheap one, i was thinking on replacing it anyways, what dremmel tool would you recommend? thank you Pavol
-
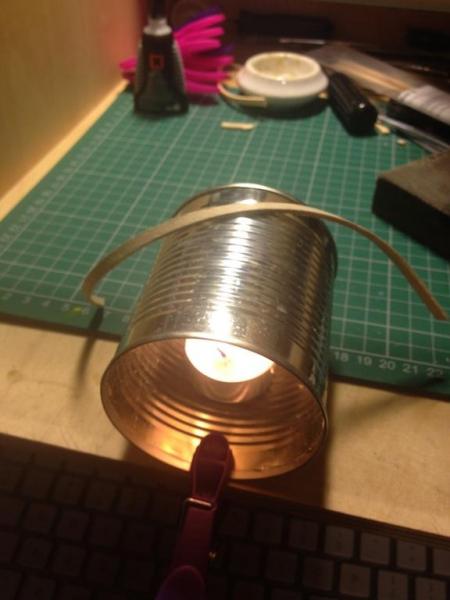
bending planks on an old tin can
maaaslo replied to maaaslo's topic in Modeling tools and Workshop Equipment
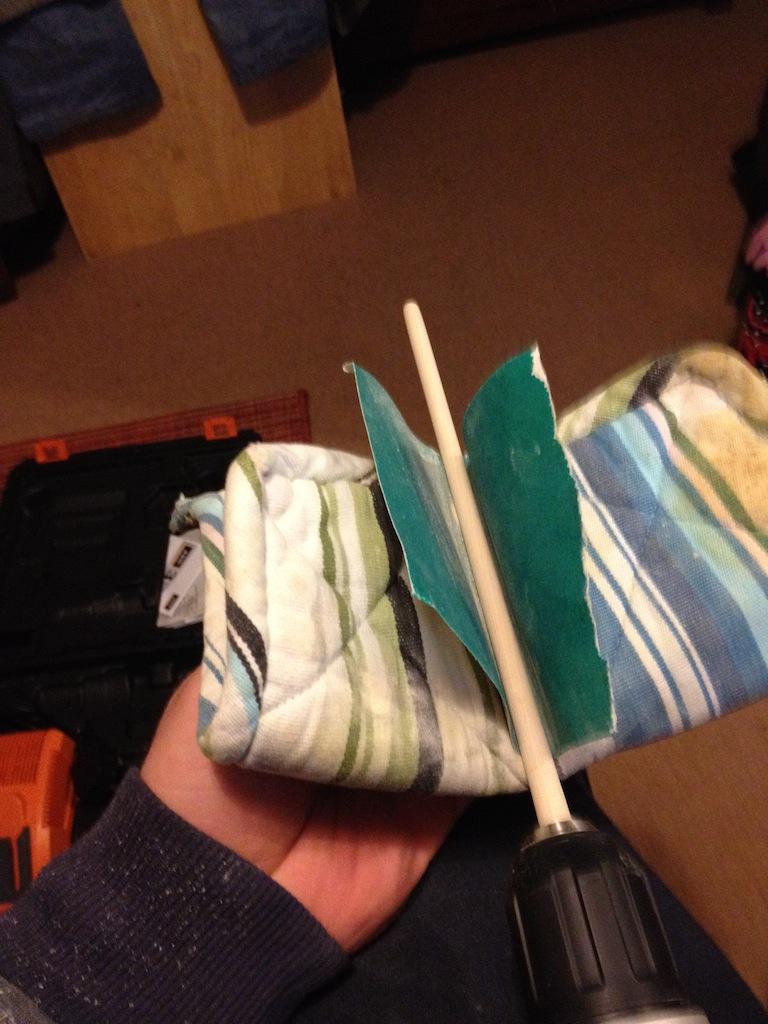
just be carefull guys, ive burned my fingertip quite badly that day. one would never beleive how hot it can get... and just to clear any confusion, it is not my idea, i just pulled it out as there is not enough talk about plank bending. somebody have mentioned it even here, i just cannot find it at the moment. he also used it combined with steam iron, i found it is not necessary as heat given by candle light is enough to soften up the wood. -
I think its going to have two huge cutouts... Looking amazing already.
-
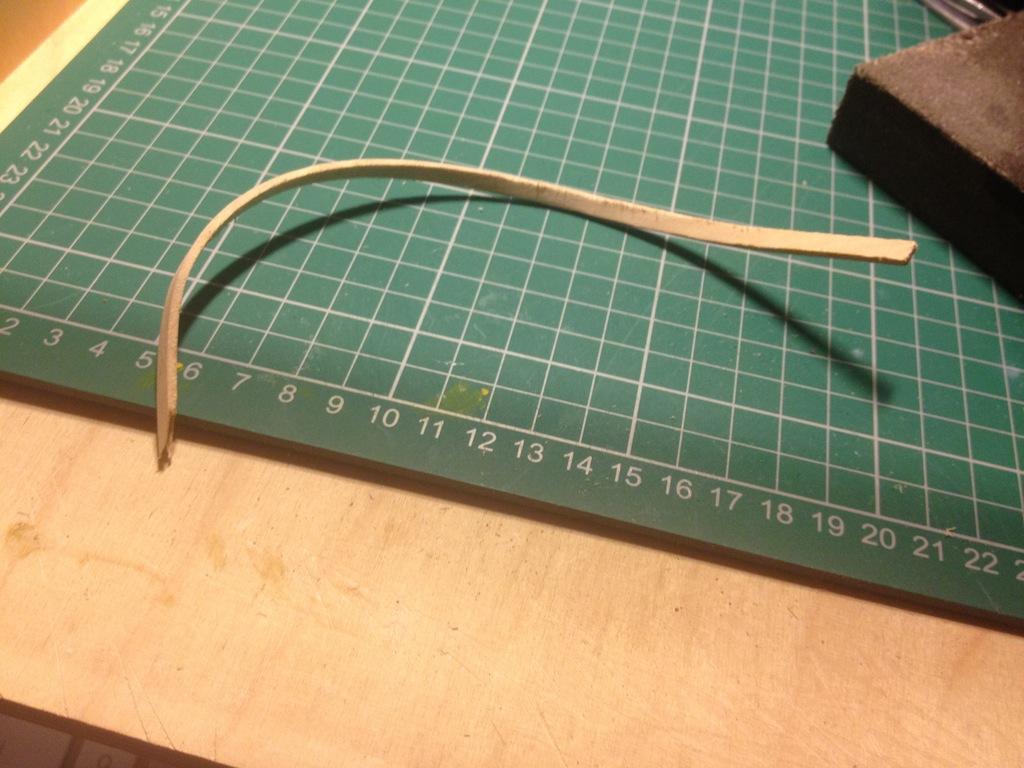
i was looking for a cheap solution for bending planks. electric plank bender is too expensive for me (on very tight budget at the moment). cutting the planks with the hand tool is without the chance for me, im too clumsy and have wasted too many already. so i resurected the old method of bending, by heat. all i needed was an empty tin, tea candle light and cloth peg. tin must be of small diameter, so it gets hot quickly, also allows you to do tighter curves. planks can be bent in many ways, lateraly too. basically, with a bit of patience, you can twist the plank without breaking it...

-
thank you Neal that was the picture i did need. ive trimmed it and now have started todo planking. when there is at least a few layers done, i will start the build log too... keep up good work./
-
hello fellow likely minded people... i have got a chance to get del prados bounty kit as a full set for almost peanuts. is it worth it? i could probably pay something about £85 for all the issues + it already has got the hull partly built, at least the frame has been put together. has anybody succesfully built this, is there a lot of problems? how about instructions? thank you guys for any help. pavol
-
hi, nice job, as for first. for second, id like to ask a question if you do not mind... i am currently in the process of planking the gallery support. in instruction there is step where you need to sand the planking so it go in the nice line with the frame... i do not understand this. how much am i supposed to sand off so it looks nice and neat? would you happened to have a close up picture of your gallery supports and showing sort of line i could follow?
-
BTW, great idea.
-
i havent tried file yet, mainly because i only tried to do rough sanding to measurements... but i will, thank you for idea.
-
does it have to be foot operated? if not then i would simply buy something like this : http://www.screwfix.com/p/varilight-push-dimmer-1g-1-2w-250w/34373;jsessionid=zBGnRpJdpgY1xkFTglZRPV8cSfMnw92g81XppGvwg4sls26TKNL0!-579098187
-
maybe if some sort of enclosure, with work top, so the whole thing could be sitting on its side... i have one dead hdd here, i could also try that... how bad does it heat up? what about amount of dust it create?
-
not bad a result for first paper model. good luck and steady hands. i have got Lexington from shipyard, almost half way through, just cannot force myself to finnish it... pavol
-
Ryland i am not taking it away from you, it works good for you, but those sanding sticks do cost a lot of money (at east over the time). i bought a whole roll of this sanding paper, i thing grade 120 for near to nothing. this way its going to last me a life time... it barelly was showing any use on it. also, if you push too hard on the stick, you bend the dowel you work on. if you hold it in the hand, you wil avoid any vibrations... and it really takes fraction of time, you can push as hard as you want and have the drill on full... Pavol
-
Stockholm tar partwork models are a great alternative for those who cannot afford to throw out the cost of a single kit out of window. but you overpay. it works the same way as if you bought it on credit card and repay over longer period of the time. price in Euro would be 7.99Eur x 120=958.8eur and in here, in UK, it costs £5.99 for one issue x120= roughly £720. a whole lot of money., now i am sensible man, i do not like to waste money if i do not have to. i have got my hands on the full collection for £281. having already about 50 issues from when i bought it before for aprox £130 it looks like i have paid over £400. but i still can sell those 50 issues i have duplicate and have some money back. doesnt work out such bad a deal ,does it? about the rib no.15, i only read it on this forum, prior to the crash. if somebody knows about the problem anything better, please could you clarify? i have spent past month looking through the forums all over the globe, to gather the best possible info. i have never seen the faulty rib mentioned anywhere. not even in that official build log. btw, that one is great... i surelly will follow as many of victory logs as possible, one never knows... Pavol
-
A small hand-held power sander
maaaslo replied to Modeler12's topic in Modeling tools and Workshop Equipment
it does give some vibrations, mine was worse than a plastic boyfriend, but after a while your hand adjusts. if any parts give up, at least you find the weak points prior to problems getting worse. i only had to reglue two ribs in the frame... -
i was thinking, do i have room for lathe, and more importantely, do i have money to waste? ( considering i love models it is not waste of course...) so i was thinking, many people use drills and atach parts of the real lathe onto the wooden jig frame. i do not have room for that. after i spoke to my friend, who owns joinery shop and he explained to me how they use the lathe on processing very thin materials, ive had an idea what to do. i raided my wifes kitchen drawer and aquired her thermo glove. ive cut a bit of coarse grade sanding paper. fitted the boxwood dowel into the acu drill and grabbed the whole thing in my hands. first i was surprised at just how effective this very primitive setup is. in matter of 1 minute ive had the bowsprit half done. it only needs a bit of fine sanding done and it would be ready to fit... arent the most primitive tools some of the best? there is litterally nothing that could go wrong with this... btw, i recommend using outside, or perhaps in dedicated workshop: very messy...

-
that is an awfull lot of sanding to be done by hand. i too am looking to get it done easier, as i havent got a belt sander i have used vibrating corner sander? to do the job, works lovely...
- 62 replies
-
- 1
-

-
- victory
- deagostini
- (and 1 more)
-
i have started to build HMS Victory by DeAgostini. before the forum crashed ive read somewhere that there was a problem with rib no.15. that it was out of shape and not fitting the frame correctly. is this true? as no.15 on my model does come out a bit and i am sure it is not because of my clumsiness... what do i need to do? conntact the manufacturer/packer for replacement? thank you pavol
-
i wouldnt buy it for that money. especially when hes trying to push you. perhaps he knows something you do not. i just got a very nice deal. Victory from DeAgostini, whole set for aprox 300eur. the scale is bigger, easier to create all details. if even that one is worth it i will leave to others, as it is my first ever model, so i do not know much about these...