maaaslo
-
Posts
372 -
Joined
-
Last visited
Content Type
Profiles
Forums
Gallery
Events
Everything posted by maaaslo
-
my apologies, i should really correct myself. these engraving tools are not being used for cutting out small circular parts, they rather use them to make rivets. small rivets with rounded head. you could use that to enhance your casemates and other parts of the ship. for cutting out small circular parts the use technique of placing just a tip of scalpel (x-acto blade) and going around the diameter of the part. like stabbing the paper. in the end you end up semi-circular cut-out of rather ruff edge, but since the parts are mainly small, you cannot see the difference. i just realised that my vocabulary is still not good enough, i sound like a foreigner... also, paper modellers do not use any kind of markers to touch up edges. rather try to use semi-dry paintbrush dipped in acrylic or other paint of your choice. just like dry brushing. marker tends to change the colour after some time. i had some level of success using just colour pencils. paper modeling is rather cheap, but to get to the result Doris or firdajan shows, it takes a loooong time... i have made a few hulls of hms Cleopatra from shipyard ( i think 4 in total) and three of them flew to the bin. the last one is done to such level i am happy with it. i had to put it aside as life got in a way, but am contemplating on the idea of resurrecting it. if you need more help or info, i am happy to help. firdajan might be willing too. on our papermodelers.sk forum, we have a thread where the basic tools and techniques are described. if there would be demand, i could try to translate.
- 193 replies
-
- 4
-

-
- cerberus
- paper shipwright
- (and 1 more)
-
Couple of points: did you check the dimensions of printout of the model against the file you printed from? Some printers do change dimensions just by a fraction, enough to ruin your work...(learned that a long time ago) you heard of tabs? Lot easier to glue larger portions to the deck than creating a thick base on the deck- risk of warping the deck as you are using moist glue (paper+moisture=disaster). you mentioned yamato, bismarck... as a second pper model, i would aim slightly lower... perhaps these would be a good way of learning the skills needed to build yamato... http://digitalnavy.com/downloads.html paper modelers do glue their parts on thicker card. This allows them to stiffen the parts, especially the structurally important parts like formers and decks. Use white glue, on the card(not on the part printout) and let it dry on flat surface under a lot of weight. small parts and fittings can be soaked in superglue. this way you can avoid paper from sepparating itself into layers. for cutting out small diameter circles, guys in our slovak forum came with ingenious trick- they use jewelers engraving tools to do so http://www.cooksongold.com/Jewellery-Tools/Swiss-Set-Of-23-Grain-Tools-Plus---Handle-prcode-999-2355 ideal to cut out those tiny rivet heads. also get a compass cutter - very handy when you need to cut a perfect circle.
- 193 replies
-
- 2
-
-
- cerberus
- paper shipwright
- (and 1 more)
-
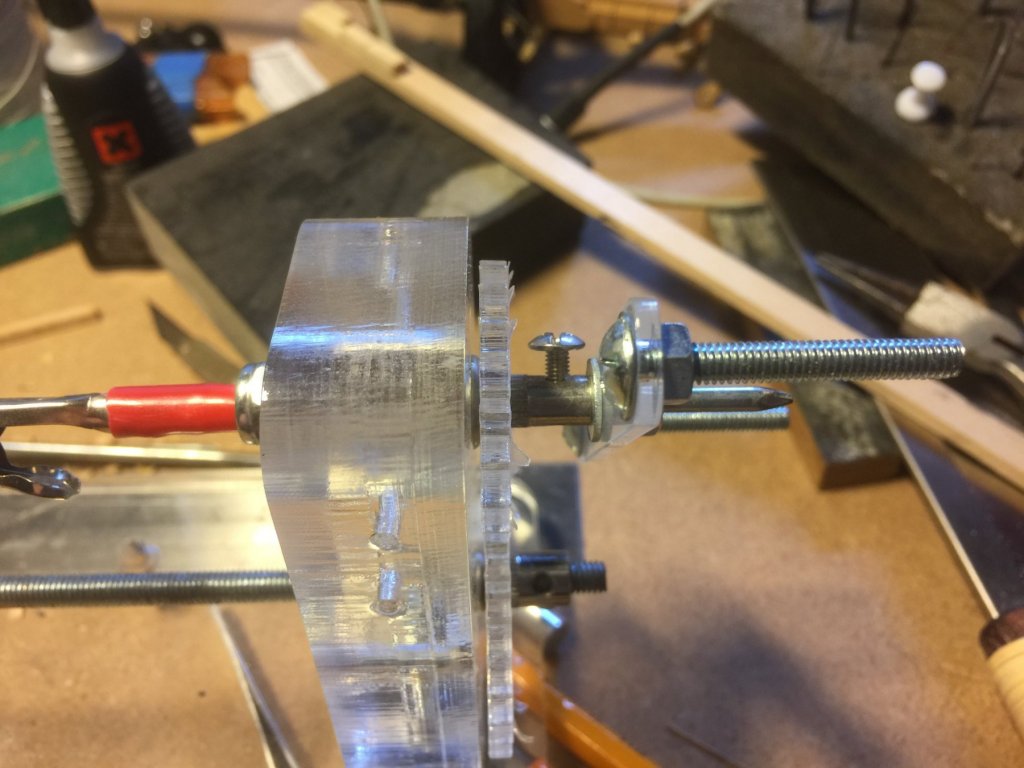
dear Alexey by no means i wanted replacement parts for free. oh no. i do not need them as i have altered the screw for a slightly larger one, like those used to fit computer hdds. now the attachment being used holds secure. regarding the motor, i have taken a short video. please apologise shaky hands. i had to work camera and controller unit at the same time. as you can see, no load. i use the same adapter you posted. machine did only work for less than one hour in total during its life. sound does not bother me, as i normally listen to quite a noisy music (industrial noise some call it). it runs relatively smooth, taking into consideration how much the screws are tensioned to hold it together. i would probably have used different pinions collars as i have mentioned in my earlier post as these are rather flimsy and do get thread destroyed quite soon. IMG_6443.MOV i would also have a suggestion for a tool to be offered. same as the tool for holding the deadeyes but with two pins forming letter V, for accurately setting the bottom two holes on deadeyes. i know you can use crocodile clip, but i would very much like to avoid marking seized deadeye with marks from the clip. p.s. i just realised how big the video is (213mb) im sorry for that.
-
I think i have the first version if this serving machine. I must say i dont like the gears and possibly will look into changing them. Due to the thickness of material used for the pinion of the gear, screw tends to slip and destroy the thread almost instantly. I think i will try to get something like meccano for replacement. Just need to measure the original and place the order. also i found that the control unit sometimes does not react/ is not accurate enough. Sometimes i have to turn it to full for it to start working. otherwise it has been a good adition to my workshop and does make my life a lot easier when it comes to serving. Hope that new version also brews coffee...
-
Identifying a line and type of knot used
maaaslo replied to maaaslo's topic in Masting, rigging and sails
I have tied the other block the same way ( thanks cthulu for the serving machine) and it looks fine. Thank you for your help. -
also, i would probably try to make it from bamboo... cheap and rather strong...
-
Identifying a line and type of knot used
maaaslo replied to maaaslo's topic in Masting, rigging and sails
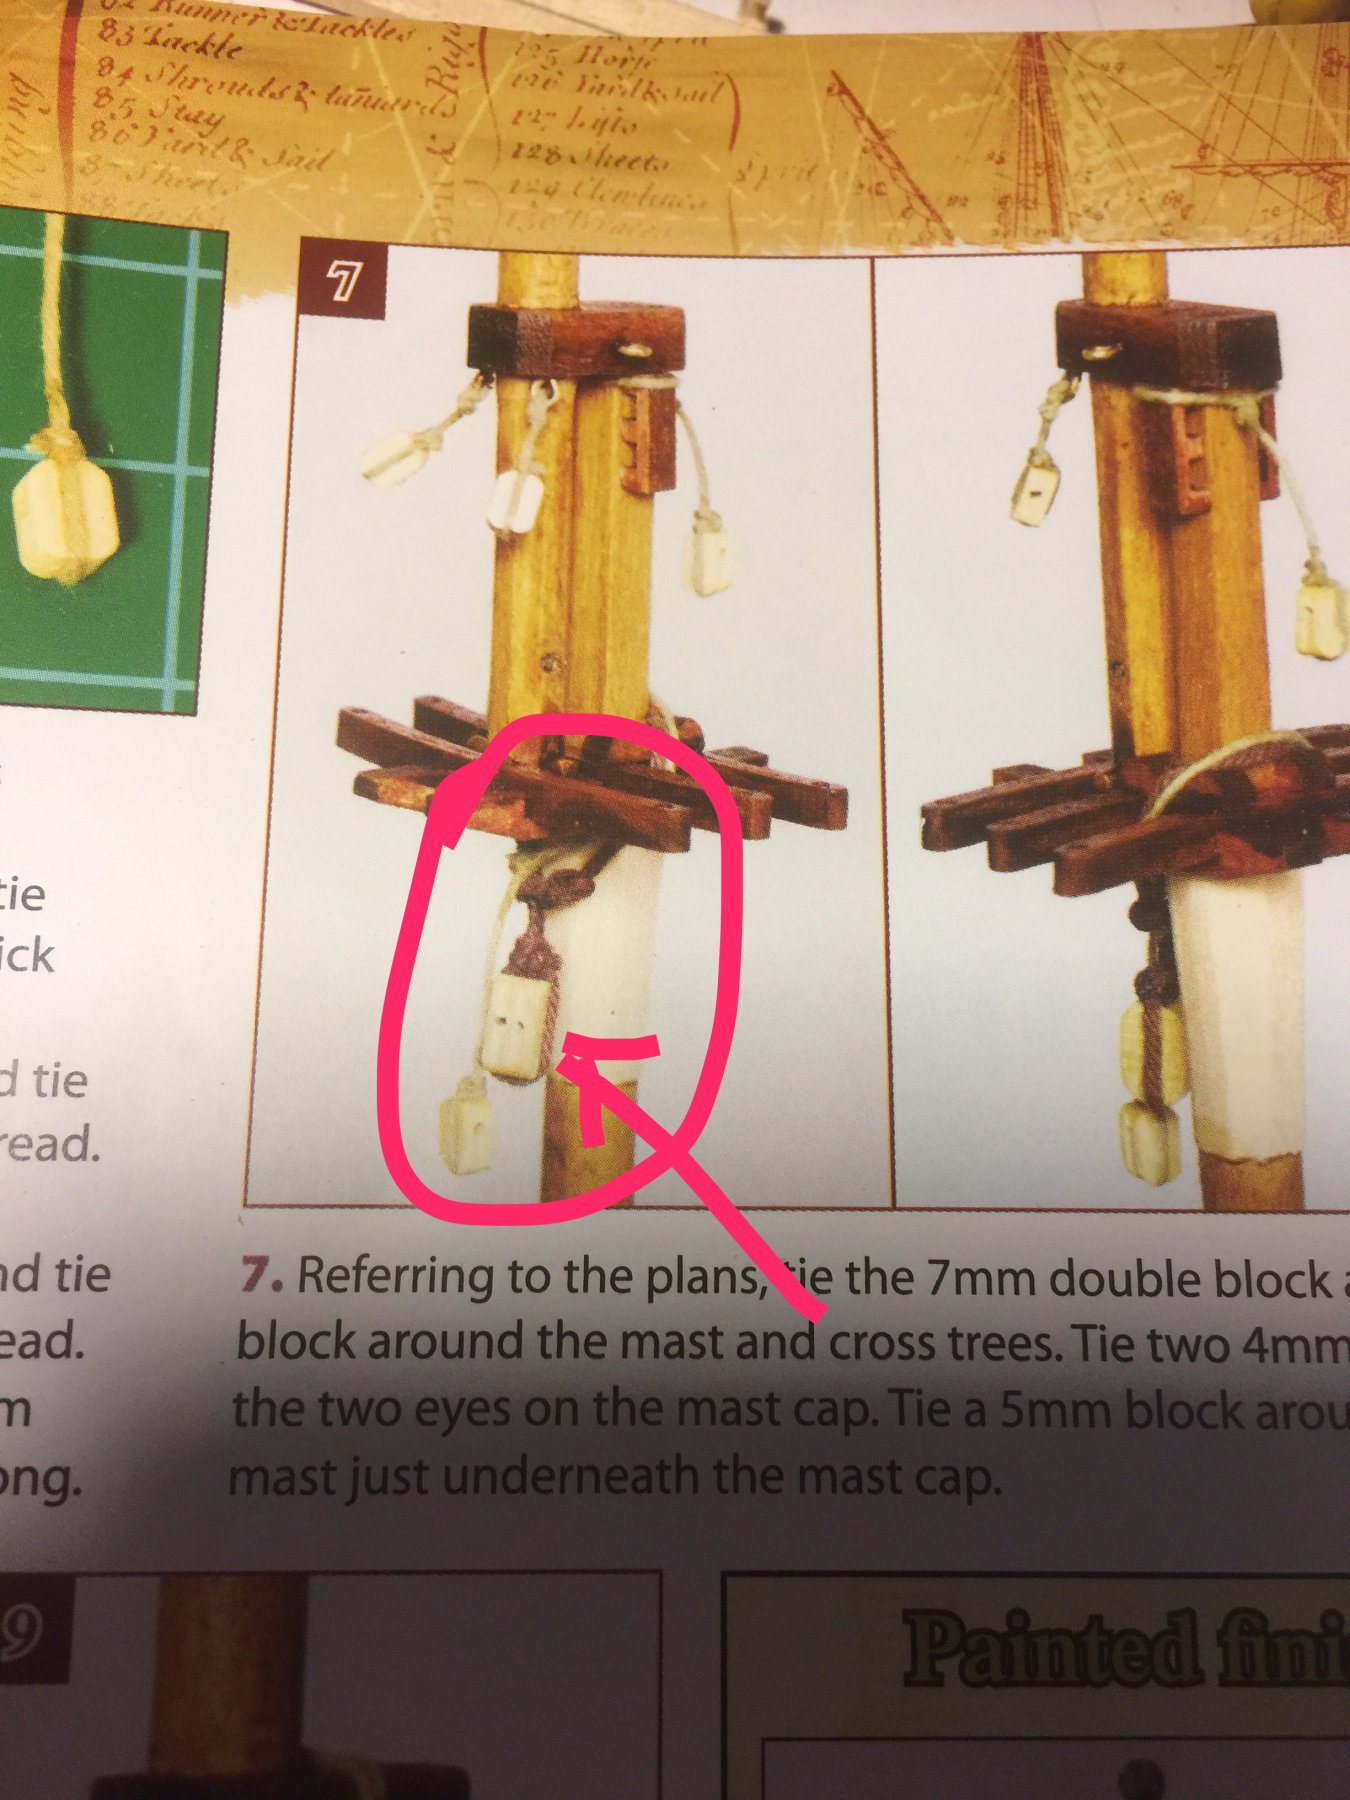
This does not look like the printed instruction at all... i mean, i know they have to simplify, but thats simplified too much. Do you think the other would be tied the same? also, big THANK YOU. It looks simple enough, so im gonna do it the original way. -
Hello friends, i have searched my books for a correct term, hope i found it... i am looking to find out how to tie one double block to a main topgallant crosstree on my Vic model. for those who would be also building victory from model space kit, its the 7mm double block from step 7 stage 64. i cannot seem to see how is this block tied to the mast... i assume that it would be same as the 5mm block that is also mentioned in there, which i also dont have a clue how to do. thank you in advance. pavol

-
I am guilty of doing exactly what most of you have warned begginers to not to - picking hard kits to built. Started a few Polish Shipyard paper sailing ships ( i was mesmerized and obviously wanted to try) failing misserably, but learned a great deal. With paper its easy, i build from copy (original kept for retirement) so printing replacement is easy. For the wooden kits i went for deagostini victory. Thats my current build. I have sodomised the hull, but have managed to rectify most of the offending bits up to one: the hull is twisted. Not badly but its there. That i cannot fix as i would have to start again and frankly, i cannot be bothered. This kit is for learning. I spen only about GBP200 to get it so it doesnt bother me. As a side build i picked 18century long boat... and that is a mistake. Even though its well documented kit, has been finished plenty times i cannot get further than starting to plank. Its too flimsy for me. So put that aside, the whole experience also depends on how big your fingers are
-
Hows this going on?
-
Nice job. one question: did you wax the lines prior to installing them on the ship?
- 144 replies
-
- 4
-
-
- surprise
- artesania latina
- (and 2 more)
-
And you are how old? Im 35 and have never finished a single ship. Shame on me... nice job.
- 701 replies
-
- 7
-
-
- phantom
- model shipways
- (and 1 more)
-
HMS Naiad 1797 by albert - FINISHED - 1/48
maaaslo replied to albert's topic in - Build logs for subjects built 1751 - 1800
As much as i am enjoying looking at the pictures and admiring what i see, i cannot stop wondering at the fact that Albert did not answer a single question any members would ask him. Its all thank you this, thank you that... i would love to ask too, but i noticed its kind of pointless. Curse the tower of Babylon and what it did cause to the mankind... -
Thank you Tim, much obliged.
-
i too am building a Scottish Maid. my one comes form an olderkit, not this newer version. also i bought it partly bulit, but since the original builder have abandoned it ( guess cos he made quite a bit of botcehd job)after building the hull, im currently doing second planking on bulwarks. could you do me a fafour? i need detailed pictures of transom area. i know the angle my transom has is completely off ( i couldnt do much, since this was one of the mistakes) but i like what modification you did to yours. id like to do those little "windows" you did and need to know how much aprox to cut off of the transom. thank you pavol
-
Perhaps, i can only speak from my own experience. When i was finishing my carpentry studies, the old master gave us a piece of linden plank a d told us to carve something. I failed so miserably...
-
Hi Magnificient and trully masterfully crafted plans are being drawn here. One thing i would like to ask. Since i only visit the forum occasionally, i do not recall seeing any previous versions of your plans, nor i recall actually stumbling upon any of the previous works you have mentioned in your first post. What exactly are you planing to do with the finished plans? Are you going to release the data in any form? If so, how would one be able to obtain the results and where?
-
Working with Hull Planks on Model Space HMS Victory Kit
maaaslo replied to CDW's topic in Wood ship model kits
I just started to do decking. According to the instructions, you only need light sanding after the decking is done. Well in my case its impossible to find two planks that would have same dimensions. Thickness ranges between 1.31-1.67mm and width between 4.82-5.14mm so far. Width does not bother me, but the thickness gives me headaches. I dont have thicknesser to hand and the supply of planks is rather limited. -
Working with Hull Planks on Model Space HMS Victory Kit
maaaslo replied to CDW's topic in Wood ship model kits
Do wood supplied is ok. Nothing extra. Just soak it in hot water for 10-15 mins then bend it and nail it to the model. Leave till next day and only then glue... Also, when sorting the bunch of planks, keep the soft ones for them sharp bends around the bow and the back... -
HMS VICTORY 1759 by isalbert
maaaslo replied to isalbert's topic in - Build logs for subjects built 1751 - 1800
While i certainly am admiring the quality of your workmanship (outstanding!!!), i think that the name of the thread is a bit misleading. The model you are so beutifully crafting is of the Victory after her great refit. The gallion figure is completly different to what it was in 1759. At the rear you have no balconies, as far as i know there were galleries there before refit. If you have a look and compare your masterpiece to the one off Doris, you will see a lot of differences. -
In case anyone needs or wants the kut, there are numerous auctions on ebay selling complete set for approx 350-400 gbp. Thats about a half of original cost... I managed to buy it there and paid about 320. With a bit of luck you can save a big buck...
-
thank you for the tip..
-
i am very tight on funds at the moment and also am in great need for table saw.i was thinking, in some diy stores you can get tile cutting saw. after i would change the blade, do you think this substitute would be good enough? i would fit piece of laminated board on the cutting table, so there are no obstacles and no grooves... also guide would probably need to be made. but all in all, is it a good idea, or bad one? thank you for your opinions...
-
it is always nice to see somebody with so much enthusiasm. ive lost mine long time ago ( i build only when i am in mood. last "mood " was two months ago...) id ike to point at something. you mentioned you want to use balsa for carving. i am not so sure if it is a good idea. balsa is not the best material for carving, due to its grain. i would probably grab rather something like... wood from linden tree, perhaps something soft, but carveable. balsa is i think just way too soft for carving.
-
Need help regarding specialized drill bits
maaaslo replied to md1400cs's topic in Modeling tools and Workshop Equipment
Would you consider burning the groove out? Just get the profile of that groove done out of some hard metal and then heat it over the flame. It should work. In joinery and carpentry this method is used sometimes...